

Everyone wants to work on raspberry pi 5 and importantly to know about the OS and how that OS installations work and here is the answer for your search in
Everyone wants to work on raspberry pi 5 and importantly to know about the OS and how that OS installations work and here is the answer for your search in this blog we cover all steps required at the time of installation.
So Now here We start with our blog so stay tuned for more details about the process
- Features of raspberry pi 5
- Prerequisite to start
- Flashing the SD card
- Installing OS imager
- Setting up OS in SD card
- Setup the hardware
- Get started with raspberry pi
Features of raspberry pi 5
- Processor: -Quad-core 64-bit Arm Cortex-A76 CPU
- RAM: – SRAM 4GB and 8GB
- Ethernet: -Gigabit Ethernet
- GPIO pins: – 40 GPIO header pin
- Ports: -2 USB 3.0 ports support 5Gbps operation
- Ports: – 2 USB 2.0 ports
- Wi-Fi: – Dual-band 802.11ac
- Bluetooth: – Bluetooth Low Energy (BLE) 5.0
- GPU: -VideoCore VII GPU
- Power: – 5V/5A DC power
Prerequisite to start
- Raspberry pi 5
- SD card
- SD card reader
- Power supply
- Keyboard
- Mouse
- Desktop
- HDMI cable
- HDMI to micro-HDMI adapter
- Active cooler
- Raspberry pi 5 case
Flashing the SD card
- Insert SD card into card reader and connect it to you PC or laptop
- Flash the SD card from Create and format hard disk partition or press Windows Key+X And select Disk Management.
- Select the Removable disk (SD card)
- Right click delete volume and Unallocated space

Disk will be formatted and will be ready for OS installation
Installing OS imager
1. Download the raspberry pi imager for windows from raspberry pi official web site


2. Install the imager

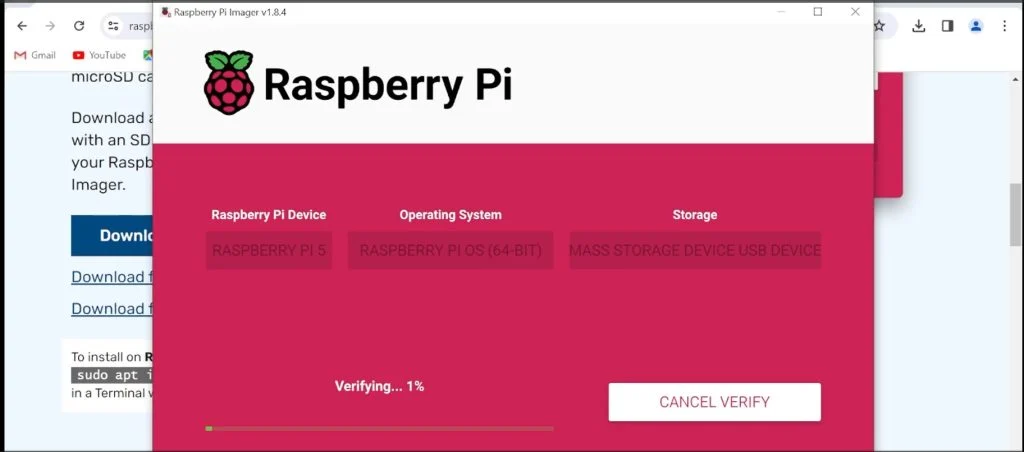
Setting up OS in SD card
1. Open Imager and Select the following setting

2. Choose device raspberry pi 5

3. Choose operating system Raspberry Pi OS

4. Select the storage

5. Setup the User and Password just save it properly and provide Wi- fi name and password

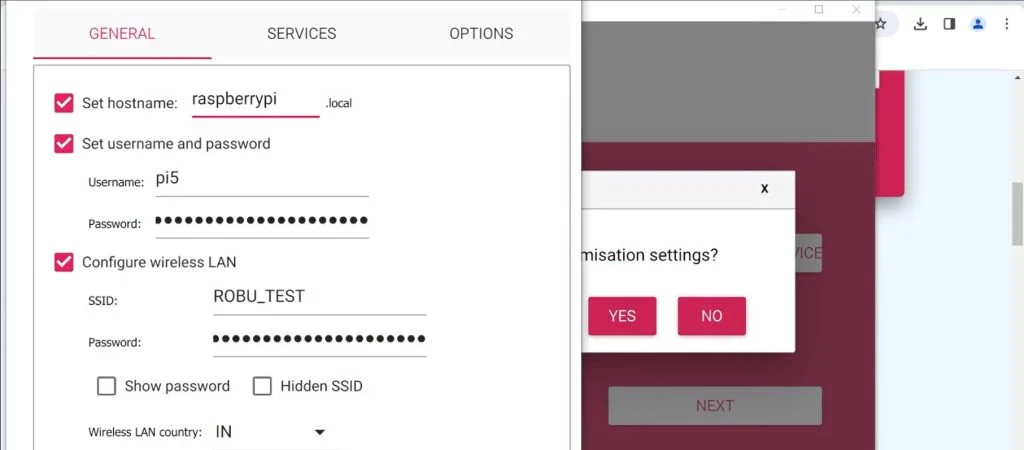
6. Click YES on confirmation message
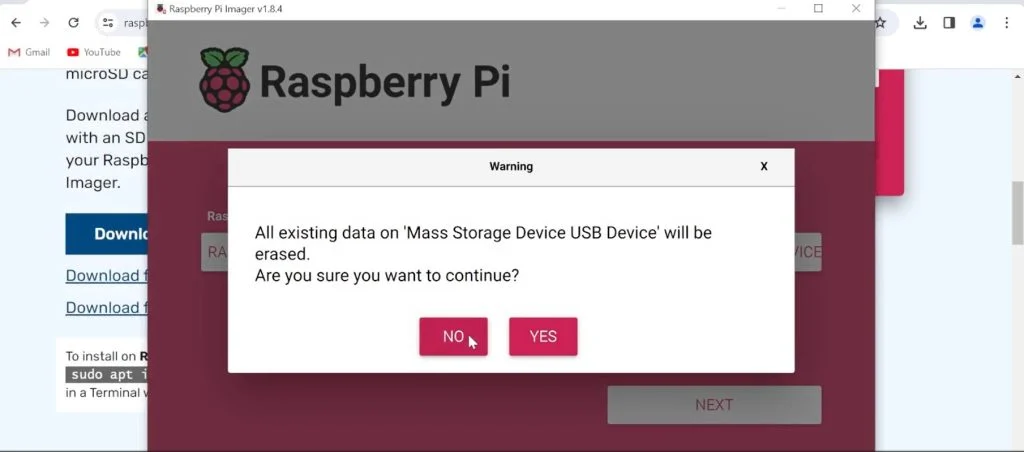
7 Start downloading OS
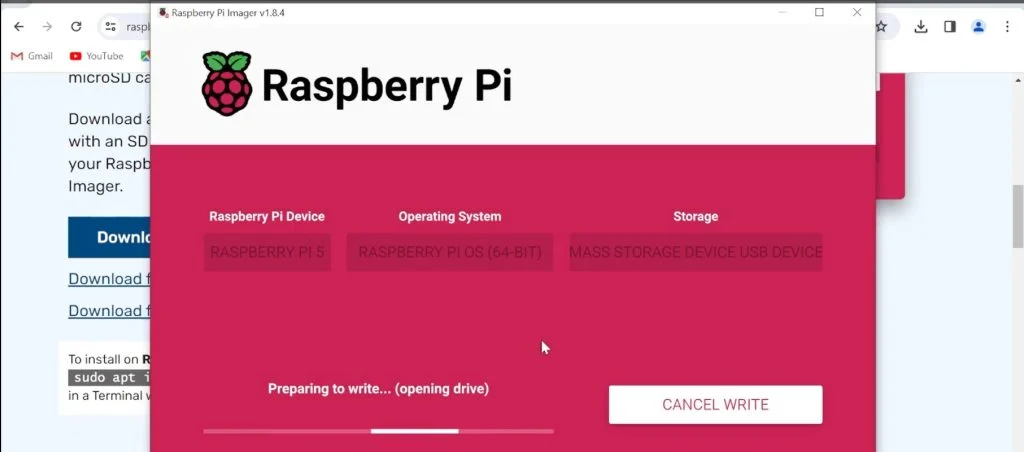
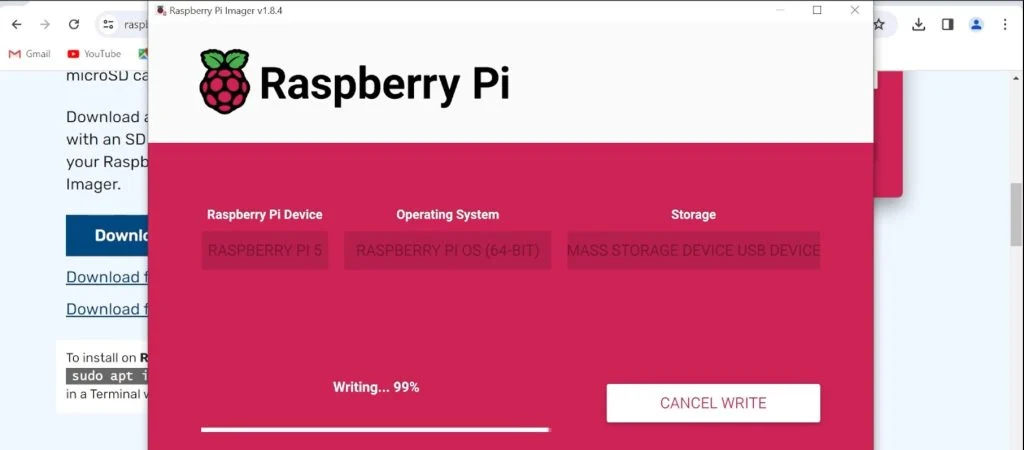
Once OS installation is completed remove SD card from card reader and insert it in raspberry pi 5
Setup the hardware
Connect keyboard, mouse, and desktop HDMI and supply to Raspberry pi 5

Connect the desktop to raspberry pi using micro-HDMI converter
Connect mouse, keyboard, power supply to raspberry pi 5
Turn ON raspberry pi 5
Connect it to Wi-Fi or Hotspot
Open the terminal
1 Sudo apt update
2 Sudo apt upgrade

Get started with raspberry pi
That’s how Raspberry pi 5 setup completed now we can operate it like pc, program it, or do any other function according to our need we can install various game code editor we can also use it for embedded project.
Watch detailed video on YouTube: – https://youtu.be/jqFQkm45vJI
Watch How to setup Raspberry pi on Laptop: – https://www.youtube.com/watch?v=d4EJaIPc4eE&t=12s
Place the raspberry pi in its case and connect Fan pins to pi board if you’re not using case use active cooler place it accordingly and connect it to pi.
Make sure all connections are proper


Trying out Super Ace was a fun mix of luck and strategy. The free spins and wilds really keep things exciting-perfect for casual players looking for a casual yet rewarding slot experience.
Logging in to bet10login needs to be easy, and this site delivers. No hassles, straight to the action. If you’re already a member, this is your direct line. Quick login via bet10login.
Quick look at h2bt – seems to be pointing towards some decent betting platforms. Worth a check if you’re exploring different options. Take a look at: h2bt
999rgame is the new thing. The gameplay looks alright, I have not tested it myself, but you can check it out: 999rgame
It’s fascinating how easily accessible online casinos like fairplay casino games have become – even with KYC processes! The speed of deposit (1-2 mins!) really taps into our instant gratification tendencies, doesn’t it? Understanding those behavioral triggers is key.
Looking new interface for 188Bet. They always are the best! Time to enjoy with taiapp188bet: taiapp188bet
Downloaded the mig8app the other day, and it’s surprisingly smooth. The interface is user-friendly, and the betting options are quite extensive. Check it out yourself: mig8app.
jiliok https://www.lajiliok.org
pin77 online https://www.pin77-online.com
bybet https://www.bybetts.net
luxebet https://www.laluxebet.com
bw77 https://www.wbw77.com
jililuck https://www.lijililuck.net
jilifish https://www.bejilifish.net
The Philippines’ Best GCash Online Casino for Peso Betting and Top Slots. visit: pesomaxfun
39jl Casino Online Philippines: Quick 39jl Login, Easy Register & App Download for the Best 39jl Slot Games. Experience the best 39jl slot games at 39jl casino online Philippines. Enjoy quick 39jl login, easy 39jl register, and seamless 39jl app download for top gaming! visit: 39jl
Phaaa Online Casino Philippines: Secure Phaaa Login & Register to Play Premium Phaaa Slot Games. Phaaa Download App for the Ultimate Mobile Casino Experience. Experience premium Phaaa slot games at Phaaa Online Casino Philippines. Secure Phaaa login & Phaaa register today! Phaaa download app for the best mobile gaming. visit: phaaa
Great breakdown on baccarat strategies-very insightful! It’s refreshing to see content that truly understands the player’s mindset. For those looking to explore more gaming options, check out JLJL PH for a top-tier online experience with live dealers and immersive slots.
[3868]Pinas777 Online Casino: Secure Login, Easy Register, Top Slots & App Download in the Philippines. Join Pinas777 Online Casino, the top choice for players in the Philippines. Experience easy pinas777 login, fast register, and premium pinas777 slot games. Get the pinas777 app download now for secure gaming and big wins! visit: pinas777
[6963]Jilliko Casino Philippines: Best Jilliko Slot Games, Easy Login, Register & Official App Download Experience the best Jilliko slot games at Jilliko Casino Philippines! Secure Jilliko login, easy Jilliko register & official Jilliko download. Join the top Jilliko casino and start winning big today! visit: jilliko
[9994]Playtime Casino Philippines: Easy Login & Register for Online Slots. Download the Playtime Casino App APK Today! Experience the best online slots at Playtime Casino Philippines! Secure your playtime login, finish your playtime register, and download the playtime casino app APK today for non-stop gaming action and big wins anytime, anywhere. visit: playtime
[8156]Dreamjili Casino Philippines: Easy Login, Register, and App Download for the Best Online Slots. Join Dreamjili Casino Philippines! Experience seamless dreamjili login, fast dreamjili register, and easy dreamjili app download. Play the best dreamjili slot games and win big today. The ultimate online casino destination for Filipino players! visit: dreamjili
That’s a bold prediction! Considering accessible entry points like the ₱50 minimum deposit at slot games online casino, more players might actually be taking those risks. Interesting analysis overall though!
Interesting read! RTP analysis is key to understanding slot volatility, and platforms like 369jl app casino are innovating with diverse game options. Seamless access via app/browser is a big plus for PH players!
amoxicillin clav
amoxicillin clav
fluconazole tablet
fluconazole tablet
lisinopril 5 mg tablet
lisinopril 5 mg tablet
Responsible gaming is key, folks! It’s easy to get carried away, especially with platforms like 49jili offering so much variety – slots, live casino, everything! Remember to set limits & play within your means. A solid platform is great, but self-control is vital.
cefixime trihydrate
cefixime trihydrate
ursodiol
ursodiol
That’s a great point about balancing accessibility with depth in game design! Seeing platforms like 365bet live link focus on smooth onboarding-like their quick registration-is encouraging. It really can make a difference!
azithromycin sale
azithromycin sale
doxiciclina
doxiciclina
finasteride medication
finasteride medication
levitra generico
levitra generico
mirtazapine 30mg tab
mirtazapine 30mg tab
tetracycline 500mg tablet
tetracycline 500mg tablet
Stackshine https://en.stackshine.io simplifies SaaS spend management with full software visibility, renewal tracking, and employee offboarding automation. Reduce costs, eliminate unused tools, and gain control over subscriptions with a smarter, centralized platform.
online antibiotics
online antibiotics
is zyloprim over the counter
is zyloprim over the counter
prevacid generic cost
prevacid generic cost
казино онлайн пин ап https://cafemcity.ru
зеркало пин ап https://mebdv.ru
скачать пин ап пин ап игровые автоматы
смотреть кино в хорошем качестве новинки кино 2026
гостиная дизайн интерьера https://center-bereg.ru/vybor-dizajnera-interera-v-spb-ot-poiska-speczialista-do-analiza-dokumentov.html
diflucan for yeast
diflucan for yeast
пин ап онлайн казино пин ап рабочее зеркало
повторные промокоды алиэкспресс купоны промокоды алиэкспресс
Volvo в Україні https://novosti.stck.me/post/1800412/Kupit-spetstekhniku-SDLG-v-Ukraine/ екскаватори, фронтальні навантажувачі та дорожні машини. Надійність, ефективність і сучасні рішення для будівництва. Продаж, підбір і обслуговування техніки для бізнесу.
Нужен займ? https://tvojbank.ru быстрые деньги без лишних документов. Высокий процент одобрения, моментальные выплаты и удобная заявка. Сравните предложения МФО и выберите выгодные условия для получения займа.
Cover art studio https://cover-art-design.ru
Find something new chillhop playlist with thousands of genre playlists spanning every style of music imaginable.
pin up игровые автоматы https://drrebenka.ru
sertraline generic
sertraline generic
Нужны деньги? интернет займы быстрый способ получить деньги. Минимальные требования, высокий процент одобрения и удобное оформление. Сравните предложения и выберите выгодный займ.
Доставка цветов https://kvarz-shop.ru авторские букеты и редкие композиции с быстрой доставкой. Премиальные цветы, индивидуальный подход и стильное оформление. Закажите уникальный букет для особого случая с гарантией свежести.
Нужны заклепки? заклепка вытяжная алюминиевая 4х10 прочный крепеж для соединения деталей. Алюминиевые, стальные и нержавеющие варианты. Надежность, долговечность и удобство монтажа для различных задач и конструкций.
zoloft generic tablet
zoloft generic tablet
Нужны заклепки? заклепка вытяжная прочный крепеж для соединения деталей. Алюминиевые, стальные и нержавеющие варианты. Надежность, долговечность и удобство монтажа для различных задач и конструкций.
More Details: https://simerdu.com/indian-nude-videos-cncmengs-porn-video/
Нужны заклепки? заклепка вытяжная нержавеющая прочный крепеж для соединения деталей. Алюминиевые, стальные и нержавеющие варианты. Надежность, долговечность и удобство монтажа для различных задач и конструкций.
Today’s Top Stories: https://olxbd.com/open-sex-video-100-percent-free-porn-video-clips-sex-video-pornography-grown-pornography-pipe/
rent nyc office office space manhattan
Check this site for the most comprehensive emoji meaning decoder with real usage examples and context.
Появились вредители? дератизация цены обработка помещений от вирусов, бактерий и насекомых. Современные методы, безопасные средства и опытные специалисты для надежной защиты.
Уничтожение вредителей https://dezinfekciya-mcd.ru/unichtozhenie/otlov-krotov/ уничтожение бактерий, вирусов и насекомых. Обработка квартир, домов и коммерческих помещений. Безопасные препараты, опытные специалисты и гарантия результата.
Free online games https://poki.com.az/ play without downloading or registering. A large collection of games across various genres: action, puzzles, racing, and strategy. Easily access from any device.
Arizona sports events https://oxu-az.com.az/ football, transfers, and live match results. Latest news, statistics, and reviews for fans and sports enthusiasts.
Free online games 1001-oyun.com.az the best browser games with no installation required. Huge selection of genres, easy search, and quick launch. Play anytime for free.
Roblox Download http://www.delta-roblox.com.az/ Download the game, learn about Roblox Studio features, and learn about security settings. Play, create your own worlds, and protect your account. A complete guide to installing, playing, and using the platform safely.
Выгодно купить кварцевый песок для пескоструйного аппарата – 100% очистка без забитых сопел! Забудьте о засорах: очищайте металл в разы быстрее. Ваш аппарат скажет спасибо, а результат поразит клиента. Купить кварцевый песок!
Every music fan shoegaze playlist should bookmark this playlist finder to discover new genres and hidden gems.
Нужен кондицинер установка кондиционера в москве стоимость профессиональный монтаж сплит-систем под ключ. Быстро, аккуратно и с гарантией. Подбор оборудования, установка и настройка с соблюдением всех норм и стандартов.
Обзор червячных хомутов https://teletype.in/@da_revanta/sMB0_AOMqxv как выбрать лучший вариант для надежного крепления. Сравнение материалов, размеров и производителей. Полезные советы по выбору, установке и применению для разных задач.
нужен бот? https://botman.pro создавайте ботов для продаж и поддержки клиентов. Интеграции, сценарии, автоответы и аналитика. Простое решение для бизнеса без навыков программирования.
[url=https://remont-membrannoj-krovli-1.ru]ремонт мембранной кровли[/url]
[url=https://shumoizolyaciya-avtomobilya-1.ru]шумоизоляция автомобиля[/url]
Latest scores https://rtahasports.com game highlights, and player news from the NFL, NBA, NHL, and MLB. Get up-to-date statistics, transfers, and analysis. Follow the games and learn everything about teams and players in real time.
Товар или услуга? https://burza.su публикуйте объявления и находите товары, услуги и вакансии. Удобный поиск, категории и быстрый доступ к актуальным предложениям.
Любишь музыку? https://radomir-art.ru музыка с душой, тексты и композиции. Слушайте онлайн, открывайте новые треки и погружайтесь в атмосферу искреннего творчества.
Любишь читать но нет времени? аудиокниги фентези огромный выбор жанров, удобный поиск и качественная озвучка. Наслаждайтесь любимыми произведениями в любое время.
Нужен займ? быстрый подбор микрозайма на карту оформление онлайн без справок и поручителей. Быстрое решение, удобная подача заявки и получение денег на карту. Подберите выгодное предложение и получите средства в короткие сроки.
Только свежие новостной портал свежие новости политики, экономики, общества и технологий. Актуальные события, аналитика, обзоры и мнения экспертов. Следите за главными новостями страны и мира онлайн в удобном формате каждый день.
Строительные технологии https://universalstroi.su выгодные инвестиции в доступное жилье. Стабильный доход, перспективные проекты и высокий спрос. Получайте прибыль от инновационных решений в строительстве.
Монтажные работы https://montazhstroy.su услуги по установке инженерных систем и конструкций. Быстро, качественно и с гарантией. Выполняем задачи любой сложности для частных и коммерческих объектов.
учет ответственного хранения https://otvetstvennoe-hranenie-sklad.ru
нужно ответственное хранение склад ответственного хранения
дизайн интерьера спб заказать интерьер квартиры
дизайн квартир москва https://dizayn-kvartir-msk.ru
Effektiver Guide akne behandlung leitfaden hilft bei der Bekampfung von Pickeln und Hautunreinheiten. Ursachen verstehen und Pflege optimieren. Mit dem Akne Behandlung Leitfaden finden Sie passende Losungen fur klare Haut.
[url=https://shumoizolyaciya-avtomobilya-moskva-1.ru]шумоизоляция автомобиля Москва[/url]
шумоизоляция автомобиля цена https://shumoizolyaciya-avtomobilya-cena-1.ru
Открываешь кейсы KC? изи дроп промокоды актуальные бонусы и скидки для пользователей. Получайте выгодные предложения, дополнительные возможности и экономьте при использовании сервиса. Все действующие промокоды в одном месте.
Мгновенные микрокредиты на https://credit-world.ru – это возможность получить деньги без лишних сложностей без длительного ожидания и отказов. У нас собрано более 50 МФО, где можно получить деньги практически каждому. Изучите доступные варианты, найти лучший вариант и отправить анкету сразу в несколько МФО, и узнать результат в кратчайшие сроки.
Office for rent https://rentofficetoday.com/en/ business premises in business centers and commercial buildings. Compare office for rent, private office space for rent, and offices to rent in prime locations. Find the best office rental solutions and rent office space that fits your business needs
противопожарные двери https://dveri-ot-zavoda.ru с доставкой и профессиональной консультацией, посмотрите актуальные решения для разных типов помещений.
Сломалась машина? мобильная техпомощь техпомощь на дорогах СПб и Ленобласти: эвакуация, подвоз топлива, запуск двигателя, вытаскивание авто — 24/7. Круглосуточная мобильная служба техпомощи в Санкт?Петербурге и Ленинградской области. Оказываем выездную помощь в любое время: эвакуируем авто, подвозим топливо, помогаем завести двигатель и вытаскиваем застрявшие машины.
Универсальный прецизионный преобразователь давления jumo delos s02 для контроля температуры, давления и других технологических параметров. Удобный интерфейс, точные измерения и возможность интеграции в системы мониторинга.
Нужен промокод? easydrop промокоды актуальные бонусы, скидки и акции для пользователей. Используйте рабочие коды, получайте дополнительные преимущества и экономьте при использовании сервиса. Все свежие предложения в одном месте.
Нужна брендированная продукция? изготовление ежедневников с логотипом ваш надежный партнер в сфере брендинга в Алматы. Мы специализируемся на производстве сувенирной продукции с нанесением логотипа и корпоративной полиграфии. В нашем каталоге вы найдете всё для продвижения бренда: бизнес-сувениры, промо-мерч, текстиль и полиграфическую продукцию. Мы принимаем заказы оптом от 50 единиц, что делает нас доступными как для крупного бизнеса, так и для небольших компаний.
fluconazole 150 mg tablet for yeast infection
fluconazole 150 mg tablet for yeast infection
Гранитные памятники https://allgranit.ru от производителя в Москве: надёжность и красота на века. Компания Allgranit предлагает гранитные памятники напрямую от производителя — без посредников, переплат и долгих ожиданий. Мы создаём мемориалы, которые сохраняют память о дорогих людях на долгие годы.
Нужен ремонт? профессиональный ремонт жилья под ключ, быстро и качественно. Дизайн, отделка, электрика и сантехника. Гарантия на работы и прозрачная смета. Выполняем проекты любой сложности.
https://getmod.ru/forum/topic/konditsioner-v-mashine-stal-huzhe-holodit/ 29ru.net
vibramycin eye ointment
vibramycin eye ointment
Проблемы с алкоголем? https://www.narkolog-na-dom-vizov.ru срочная помощь при алкогольной и наркотической интоксикации. Вывод из запоя, капельницы и поддержка 24/7. Анонимно, быстро и безопасно с выездом врача на дом.
Лучшее путешествие джип тур ялта ай петри горы, каньоны и побережье. Увлекательные маршруты, опытные гиды и яркие впечатления от путешествий по Крыму.
Do you trade cryptocurrencies? bitkelttrade.com ai trading automate your transactions and earn passive income. Smart algorithms analyze the market and help you make decisions. Increase your income and reduce risks with modern technology.
Предприятиям масло моторное бочка купить предлагает индустриальные масла и смазки оптом с доставкой по РФ.
macrobid medication for uti
macrobid medication for uti
Лучшее путешествие джиппинг ялта горы, каньоны и побережье. Увлекательные маршруты, опытные гиды и яркие впечатления от путешествий по Крыму.
Do you trade cryptocurrencies? bitkelttrade trading bot automate your transactions and earn passive income. Smart algorithms analyze the market and help you make decisions. Increase your income and reduce risks with modern technology.
Do you trade cryptocurrencies? bitkelttrade trading bot automate your transactions and earn passive income. Smart algorithms analyze the market and help you make decisions. Increase your income and reduce risks with modern technology.
http://www.vladimir.ru/forum/forum/thread/57940#comment-105384 Устранение утечек фреона
Купить 3D-принтеры https://reporter63.ru/content/view/786013/zagolovok-razvitie-3dpechati-kak-novaya-tehnologiya-menyaet-nash-mir в Минске — продажа оборудования для печати пластиком и фотополимером. Подбор, консультации и гарантия. Найдите идеальный 3D-принтер для ваших задач.
Продажа 3D-принтеров http://reporter63.ru/content/view/786012/zagolovok-3dprinter-revolyuciya-v-proizvodstve-i-tvorchestve Минск — FDM, SLA и другие технологии печати. Широкий ассортимент, выгодные цены и профессиональные консультации. Подберите устройство под свои задачи.
Все самое свежее здесь: https://parfumabc.ru/parfum/gilles-cantuel/
ГНБ бурение https://stroytex.su современный способ прокладки инженерных сетей без раскопок. Подходит для дорог, рек и плотной застройки. Точная технология, сокращение сроков и минимальные затраты.
lasix generic cost
lasix generic cost
Утилизация биоотходов https://stroi-musor.su вывоз и переработка пищевых и растительных отходов. Экологичные решения, соблюдение стандартов и надежный сервис для предприятий и частных клиентов.
где можно сделать флаг на заказ срочное изготовление флагов
Хочешь оригинальную подушку? https://dakimakura-print.ru комфорт и уют для сна. Длинная форма, мягкий наполнитель и стильные принты. Отлично подходит для отдыха и расслабления.
Нужен пластический хирург? сайт клиника пластической хирургии санкт петербург современные операции и эстетические процедуры. Опытные хирурги, безопасные методики и индивидуальный подход. Консультации, диагностика и качественный результат.
Нужна мебель? изготовление мебели на заказ эксклюзивные изделия из натурального дерева. Индивидуальный дизайн, качественные материалы и точное изготовление. Решения для дома и бизнеса.
Just found this during a meeting; NUSTAR Rewards looks legit for PH players with GCash support. Check out NUSTAR Rewards download apk to try their slots and fishing games now!
Нужна премиум мебель? производство премиальной мебели изготовление на заказ. Натуральные материалы, эксклюзивный дизайн и долговечность. Решения для дома и бизнеса с высоким уровнем качества.
ЖК Солянка Парк https://tzstroy.su современный жилой комплекс с комфортными квартирами и развитой инфраструктурой. Удобные планировки, благоустроенная территория и хорошая транспортная доступность для жизни.
Подробности по ссылке: https://home-parfum.ru/products/chanel-egoiste-platinum/
купить премиальную мебель https://mebel-dub-zakaz.ru
lasix water pill 40 mg
lasix water pill 40 mg
Авто портал https://tvregion.com.ua новости, обзоры и тест-драйвы автомобилей. Актуальная информация о новых моделях, технологиях и рынке. Узнавайте все о машинах и выбирайте авто с удобным сервисом.
Авто портал https://autoguide.kyiv.ua свежие новости, обзоры и тест-драйвы. Рейтинги автомобилей, советы по выбору и актуальные предложения. Все о мире авто в одном месте.
Авто журнал https://psncodegeneratormiu.org новости, обзоры и тест-драйвы автомобилей. Узнавайте о новых моделях, технологиях и рынке. Полезные советы, рейтинги и аналитика для автолюбителей.
Авто журнал https://nmiu.org.ua свежие автомобильные новости, тесты и обзоры. Рейтинги, сравнения и рекомендации по выбору авто. Все о мире автомобилей в одном месте.
Авто портал https://retell.info обзоры автомобилей, тест-драйвы и новости рынка. Сравнения моделей, рейтинги и советы по выбору авто для любых задач.
nexium 20 mg packets
nexium 20 mg packets
Авто журнал https://bestauto.kyiv.ua тест-драйвы, обзоры и новости автоиндустрии. Узнавайте о новинках, технологиях и трендах рынка. Удобный формат для чтения каждый день.
Онлайн авто журнал https://simpsonsua.com.ua новости, обзоры и тест-драйвы автомобилей. Актуальная информация о рынке и новых моделях для автолюбителей.
https://dubai-villas-sale.com villas for sale in dubai
Авто журнал онлайн https://translit.com.ua все о машинах: новости, тесты, обзоры и аналитика. Следите за новинками и выбирайте авто с удобным сервисом.
Автомобильный журнал https://mirauto.kyiv.ua новости, обзоры и тесты автомобилей. Советы по выбору, рейтинги и аналитика. Все о машинах и рынке авто.
Авто портал https://nerjalivingspace.com автомобильные новости, тест-драйвы и обзоры. Узнавайте о новинках, технологиях и тенденциях рынка. Удобный сервис для автолюбителей.
Последние изменения: https://listai.pro
Обязательно к прочтению: https://sn74.ru
clozaril
clozaril
Расширенный обзор: https://listai.pro
Строительный портал https://zip.org.ua все для ремонта и строительства в одном месте. Актуальные статьи, советы экспертов, обзоры материалов и технологий. Найдите подрядчиков, сравните цены и выберите лучшие решения для дома, квартиры или бизнеса быстро и удобно.
Женский портал https://muz-hoz.com.ua мода, красота, здоровье и психология. Советы, тренды и полезные статьи для современной женщины. Удобный онлайн формат для ежедневного чтения.
кайт египет кайт хургада
Эконом Хочешь 3д ограждение? 3д панели забор прочные и надежные решения для защиты территории. Современные металлические конструкции с антикоррозийным покрытием, простым монтажом и долговечностью. Подходят для частных домов, предприятий и общественных объектов.
Эконом Лучшие металлические 3д ограждение идеальное сочетание прочности, эстетики и доступной цены. Подходят для дачи, участка, склада и промышленной территории. Быстрая установка, устойчивость к погодным условиям и долгий срок службы.
Хочешь недорогой забор? купить 3д забор от производителя удобное решение для быстрого монтажа ограждения. Прочные сварные конструкции, устойчивость к нагрузкам и погоде, минимальный уход. Отличный вариант для частных и коммерческих территорий.
Высокопрочные ограждения ограждение 3д современный способ обеспечить безопасность участка. Долговечные материалы, надежная конструкция и эстетичный внешний вид. Подходят для установки на любых типах территорий и условий эксплуатации.
Лучшие ограждения сетчатое ограждение 3d практичное и долговечное решение. Усиленные ребра жесткости обеспечивают прочность, а современное покрытие защищает от ржавчины. Идеально для дома, дачи, предприятий и общественных территорий.
Купить панели для ограждения 3д панели забор долговечность, прочность и аккуратный внешний вид. Быстрый монтаж, устойчивость к погодным условиям и минимальное обслуживание. Отличный выбор для дачи, участка или коммерческой территории.
Нужна соляная пещера? открыть соляную пещеру проектирование, подбор материалов, монтаж и оформление. Создаем уникальные пространства для галотерапии с продуманным дизайном и эффективной системой микроклимата.
Common Projects https://sartale.com/collections/common-projects sneakers combine minimalism, premium materials, and impeccable quality. They feature a clean design, genuine leather, and everyday comfort. They’re the perfect choice for those who value style, comfort, and durability.
Копицентр «Копирыч» https://kopirych.by профессиональный партнер для тех, кому нужна качественная печать фото в городе минск и по всей Беларуси. Мы предлагаем полный комплекс полиграфические услуги для частных клиентов и компаний: от срочной подготовки документов до изготовления рекламной продукции и персональных сувениров.
Нужен грузовик? https://neotruck.ru компания «НЕО ТРАК» — это современный дилерский центр полного цикла, работающий на рынке коммерческого транспорта и спецтехники уже более 20 лет. Являясь официальным дилером ведущих производителей, таких как DONGFENG, JAC, FAW, DAEWOO TRUCKS, ISUZU, HYUNDAI и других, компания предлагает широкий выбор грузовых автомобилей различной тоннажности, спецтехники, от фургонов и бортовых платформ до эвакуаторов и крано-манипуляторных установок.
Лучшие профессии онлайн курсы для столяра создание мебели москва возможность получить практические знания и освоить востребованные специальности в короткие сроки. Обучение подходит для тех, кто хочет начать карьеру или сменить сферу деятельности. Все материалы доступны онлайн и сопровождаются поддержкой преподавателей.
Решил купить авто? привезти машину в россию подбор, проверка, доставка и оформление под ключ. Найдем надежный автомобиль по вашим параметрам и бюджету с гарантией прозрачности сделки.
Лучшие ограждения забор 3д практичное и долговечное решение. Усиленные ребра жесткости обеспечивают прочность, а современное покрытие защищает от ржавчины. Идеально для дома, дачи, предприятий и общественных территорий.
Полное руководство на https://npprteam.shop/articles/tiktok/pochemu-blokiruyut-akkaunty-tiktok-ads-2026-prichiny-predotvrashchenie/ предоставляет практические инструменты для диагностики и предотвращения проблем с аккаунтами TikTok Ads в актуальном контексте 2026 года. Материал основан на реальных примерах блокировок и включает пошаговые инструкции по проверке соответствия вашей рекламной стратегии требованиям платформы. Вы получите понимание того, как система TikTok анализирует объявления, какие сигналы тревоги вызывают автоматическую блокировку, и как восстановить доступ в случае проблем. Этот ресурс особенно полезен для тех, кто работает с высокорисковыми вертикалями или впервые запускает кампании на платформе и хочет избежать дорогостоящих ошибок. Используя информацию из статьи, вы сможете уверенно управлять своими рекламными аккаунтами и сосредоточиться на достижении целевых показателей без страха перед санкциями платформы.
Implementing how to implement Google Ads enhanced conversions without errors ensures your conversion data reaches Google with maximum accuracy and compliance. Enhanced conversions use first-party customer data to match conversions back to ads, addressing the growing challenge of privacy regulations and third-party cookie deprecation that marketers face in 2026. The setup process involves hashing sensitive customer information like email addresses and phone numbers before transmission, implementing server-side or hybrid tracking configurations, and validating data schemas to prevent mismatches that undermine campaign optimization. For performance marketers and e-commerce teams managing high-volume transactions, this technical foundation directly impacts ROAS calculations and bid strategy effectiveness.
военная ипотека Это позволяет быстрее стать владельцем нового жилья.
Нужна градирня? что такое градирня и для чего она нужна ключевой элемент системы охлаждения, позволяющий эффективно снижать температуру воды за счет теплообмена с воздухом. Применяется в промышленности, энергетике и на предприятиях. Обеспечивает стабильную и экономичную работу оборудования.
Нужна септик или погреб? https://septikidlyadoma.mystrikingly.com эффективное решение для автономной канализации. Системы обеспечивают качественную очистку сточных вод, устраняют запахи и безопасны для окружающей среды. Подходят для частных домов, коттеджей и загородных участков.
In comparisons of modern digital storefront systems focused on UX clarity, a strong example is Willow Vendor Pebble Studio which maintains everything feels tidy and the experience is quite user friendly, offering a clean and intuitive browsing flow throughout the site.
In evaluations of e-commerce platforms focused on structure and design, a strong example is Opal Grove Global Hall where simple interface and content feels neatly arranged throughout the pages, helping users access information quickly without clutter or confusion.
Проволока сварочная Заказать трубы ВГП в Акмолинской области|Приобрести водогазопроводные (ВГП) трубы по ГОСТ 3262-75. Быстрая отгрузка от завода-изготовителя. Идеальное решение для прокладки водопровода и газовых сетей. Осуществляем резку в размер и доставку на объект. Гарантируем выгодные цены при оптовых закупках и тендерах.Трубы электросварные цена Кызылорда|Широкий ассортимент электросварных труб: круглые, квадратные и прямоугольные профили. Реализуем со склада трубы электросварные различных диаметров. Отлично подходят для металлоконструкций, заборов и трубопроводов. Высокое качество сварного шва и сертификаты соответствия. Организуем логистику до вашего объекта в любой регион.Трубы стальные ППУ в Северо-Казахстанской области|Качественные трубы ППУ для тепловых сетей. Обеспечивают минимальные потери тепла, надежная защита от внешней коррозии. В наличии трубы с ОДК (системой оперативного дистанционного контроля). Долговечность и надежность вашей теплотрассы гарантированы. Доставим собственным транспортом прямо на ваш объект.Винтовые сваи в Области Улытау|Высокопрочные стальные винтовые сваи для фундаментов любой сложности. Собственное производство, соблюдение всех норм и ГОСТов. Быстрый монтаж без тяжелой техники, отличное решение для сложных грунтов и перепадов высот. Доставка свай по всему Казахстану без задержек. Скидки при заказе больших партий.Безраструбные чугунные трубы в Актау|Пожаробезопасные и абсолютно бесшумные чугунные трубы SML (безраструбные) для систем канализации и водоотведения. Европейский стандарт качества, высочайшая прочность, устойчивость к коррозии. Предлагаем также классические трубы чугунные ЧК со склада. Организуем оперативную доставку в любую точку РК. Гарантируем качество и полное соответствие нормам.Труба профильная стальная в Кызылординской области|Продажа стальных профильных труб (квадратных и прямоугольных) всех ходовых размеров и толщин стенок. Идеальный материал для сборки металлоконструкций, заборов, каркасов зданий. Возможна резка в нужный вам размер прямо на складе. Осуществляем доставку металлопроката на объекты по всей территории РК. Сотрудничаем с физическими и юридическими лицами.Лист горячекатаный Жамбылская область|Надежный стальной лист г/к из углеродистой и низколегированной стали марок ст3, 09Г2С. Толщина металла от 1.5 до 50 мм в наличии. Абсолютно незаменим в строительстве, тяжелом машиностроении и для сварных конструкций. Осуществляем резку листа по заданным параметрам. У нас низкие оптовые цены и индивидуальный подход к каждому заказу.Лист оцинкованный цена в Экибастузе|Высококачественный лист оцинкованный с максимальной степенью защиты от ржавчины и агрессивной среды. Гладкие листы поставляются в рулонах и пачках различных толщин. Широко применяется в фасадных работах и производстве воздуховодов. Возможна продольно-поперечная резка рулонов. Быстрая доставка металлопроката на ваш объект по всему Казахстану.Профлист цена Область Жетысу|Надежный профлист (профнастил) для устройства долговечной кровли, крепких заборов и облицовки фасадов. В ассортименте стеновой, кровельный и несущий профнастил. Осуществляем изготовление листов под ваши точные размеры без переплат за обрезки. Быстрая и аккуратная доставка на объект в любой город РК. Строительным компаниям предоставляются выгодные партнерские условия и скидки.Металлическая арматура Уральск|Стальная арматура А3 (рифленая) и А1 (гладкая) для надежного армирования фундаментов и монолитных железобетонных конструкций. Предлагаем мерную и немерную арматуру в прутках и бухтах. Удобная отгрузка по весу (тонны) или метражом в зависимости от ваших потребностей. Гарантируем полное соответствие ГОСТ. Предлагаем индивидуальные спецусловия и скидки для застройщиков с доставкой по РК.Купить двутавровую балку в Области Жетысу|Надежная балка двутавровая для монтажа несущих металлоконструкций, мостов и тяжелых перекрытий. Благодаря своему профилю обеспечивает максимальную прочность на изгиб. В наличии все ходовые номера двутавра по ГОСТ. Работаем по всему Казахстану без сбоев в логистике. Предоставляем отличные скидки при заказе оптом.Швеллер цена за метр Костанайская область|Горячекатаный и гнутый П-образный швеллер для эффективного усиления конструкций и каркасного строительства. Всегда в наличии ходовые размеры от 5П/У до 40П/У. Постоянное наличие больших объемов металла на наших крытых складах. Оказываем услуги профессиональной резки в размер. Оптовым клиентам и строительным трестам предоставляются весомые скидки.Уголок металлический в Талдыкоргане|Надежный стальной уголок по ГОСТ. Широко применяется в промышленности и бытовых целях. Оказываем качественные услуги точной гибки, резки в размер и горячего цинкования. Быстрая отгрузка и доставка по всем регионам Казахстана.Канат грузовой в Актау|Оцинкованные тросы и канаты без покрытия высокого качества. Обеспечивают максимальную безопасность грузоподъемных операций. Осуществляем нарезку троса любой длины и профессиональную опрессовку стропов. Оперативно доставляем заказы транспортными компаниями по всему РК.Купить проволоку в Жезказгане|Вязальная отожженная проволока, Вр-1 для армирования, качественная пружинная и сварочная проволока. Реализуем продукцию в бухтах, удобных мотках и на пластиковых катушках. Обеспечиваем строгий контроль диаметра сечения и механических свойств на производстве. Приглашаем к сотрудничеству строительные и производственные компании.Сетка кладочная цена в Рудном|Сварная арматурная сетка в картах, плетеная (рабица) и тканая сетка в рулонах. Идеально подходит для штукатурных работ, армирования бетонных стяжек и кладки. Продукция производится на современном оборудовании. Предлагаем низкие оптовые цены и оперативную логистику по РК.Сэндвич-панели в Талдыкоргане|Производим сэндвич-панели с базальтовой минватой и пенополистиролом. Обеспечивают отличную тепло- и звукоизоляцию, обладают высокой огнестойкостью. Предлагаем огромный выбор цветов полимерного покрытия по каталогу RAL. Предоставляем гарантию на материалы и выгодные расценки.Отводы купить Кызылорда|В ассортименте стальные отводы, переходы, тройники, эллиптические заглушки и фланцы. Рассчитаны на высокое давление, гидравлические удары и экстремальные температуры. Вся продукция сертифицирована, имеет паспорта качества. Оптовым покупателям и снабженцам — персональные скидки.Краны шаровые оптом Костанайская область|Промышленная и бытовая запорная арматура высшего качества. Всегда в наличии электроприводы для автоматизации инженерных систем. Сотрудничаем только с проверенными заводами, гарантируем долговечность. Гибкая система скидок для монтажных и эксплуатирующих компаний.Купить радиаторы отопления Алматы|Эффективные алюминиевые, биметаллические и стальные панельные радиаторы отопления. Идеально подходят для установки в системах центрального и автономного отопления. Всегда в наличии необходимые комплектующие для подключения (краны, заглушки, кронштейны). Доставка заказов по всему Казахстану.Провод СИП купить в Области Жетысу|Реализуем силовой кабель ВВГнг, АВВГ, гибкий КГ, самонесущий провод СИП. Гарантируем строгий ГОСТ и абсолютно честное сечение жил (медь, алюминий). Осуществляем отмотку кабеля любой длины со склада. Для электромонтажных организаций действуют отличные скидки.Цветной металлопрокат Петропавловск|Прокат из цветных металлов премиум-качества для различных нужд. Материалы отличаются высокой электропроводностью, долговечностью и коррозионной стойкостью. Оказываем услуги профессиональной резки цветного металла. Быстрая и бережная доставка по всему Казахстану.Крепеж и метизы Темиртау|Огромный выбор: анкерные болты, высокопрочные болты, гайки, шайбы, шпильки и такелаж. В наличии черные и оцинкованные изделия с надежной защитой от ржавчины. Готовы обеспечить любую стройку качественными метизами в полном объеме. Предоставляем отличные скидки для снабженцев и оптовиков.
в Павлодаре Водогазопроводные трубы Жезказган|Приобрести трубы ВГП по ГОСТ 3262-75. Отгрузка с металлургических комбинатов. Идеальное решение для прокладки водопровода и газовых сетей. Предлагаем услуги резки и оперативную доставку на стройплощадку. Гарантируем выгодные цены при оптовых закупках и тендерах.Трубы электросварные в Северо-Казахстанской области|Большой выбор электросварных труб: профильные и круглые профили. Продаем трубы электросварные различных диаметров. Применяются в строительстве и машиностроении. Высокое качество сварного шва и сертификаты соответствия. Организуем логистику до вашего объекта в любой регион.Трубы стальные ППУ Кызылорда|Качественные трубы ППУ для прокладки теплотрасс. Снижение теплотерь до минимума, устойчивость к влаге и коррозии. В наличии трубы с ОДК (системой оперативного дистанционного контроля). Долговечность и надежность вашей теплотрассы гарантированы. Быстрая отгрузка и доставка по регионам РК.Сваи винтовые стальные в Темиртау|Надежные стальные винтовые сваи для фундаментов любой сложности. Собственное производство, соблюдение всех норм и ГОСТов. Позволяют возвести фундамент за 1 день, отличное решение для сложных грунтов и перепадов высот. Доставка свай по всему Казахстану без задержек. Скидки при заказе больших партий.Безраструбные чугунные трубы в Астане|Современные и долговечные чугунные трубы SML (безраструбные) для систем канализации и водоотведения. Отличаются превосходной звукоизоляцией и стойкостью к агрессивным средам. В наличии полный комплект соединительных хомутов и фитингов. Осуществляем поставки на крупные строительные объекты. Гарантируем качество и полное соответствие нормам.Купить профильную трубу в Шымкенте|Реализуем профильные трубы (квадратных и прямоугольных) широкого сортамента. Идеальный материал для сборки металлоконструкций, заборов, каркасов зданий. Предоставляем услуги точной резки газом и отрезным станком. Работаем оптом и в розницу, делаем отличные скидки за крупный объем. Сотрудничаем с физическими и юридическими лицами.Лист г/к цена в Кызылорде|Горячекатаный листовой прокат из углеродистой и низколегированной стали марок ст3, 09Г2С. Толщина металла от 1.5 до 50 мм в наличии. Используется для изготовления деталей, обшивки и несущих элементов. Осуществляем резку листа по заданным параметрам. У нас низкие оптовые цены и индивидуальный подход к каждому заказу.Лист оцинкованный цена Усть-Каменогорск|Оцинкованные стальные листы с максимальной степенью защиты от ржавчины и агрессивной среды. Гладкие листы поставляются в рулонах и пачках различных толщин. Служит отличной основой для кровли, вентиляционных коробов, профилей и ограждений. Гарантируем строгое соответствие стандартам ГОСТ и высокое качество цинкового покрытия. При оптовых заказах предлагаем специальные сниженные цены.Профлист цена в Уральске|Качественный профилированный лист для устройства долговечной кровли, крепких заборов и облицовки фасадов. В ассортименте стеновой, кровельный и несущий профнастил. Осуществляем изготовление листов под ваши точные размеры без переплат за обрезки. Собственный автопарк для бережной транспортировки. Строительным компаниям предоставляются выгодные партнерские условия и скидки.Арматура строительная в Алматинской области|Стальная арматура А3 (рифленая) и А1 (гладкая) для надежного армирования фундаментов и монолитных железобетонных конструкций. Предлагаем мерную и немерную арматуру в прутках и бухтах. Оказываем услуги точной резки и гибки арматуры. Имеются сертификаты качества и паспорта на каждую партию металла. Предлагаем индивидуальные спецусловия и скидки для застройщиков с доставкой по РК.Купить двутавровую балку Алматинская область|Надежная балка двутавровая для монтажа несущих металлоконструкций, мостов и тяжелых перекрытий. Основа для самых сложных архитектурных и промышленных строений. Осуществляем нарезку в точный размер и помощь инженеров в подборе сечения. Гарантируем оперативную доставку длинномерами прямо на ваш объект. Предоставляем отличные скидки при заказе оптом.Прокат швеллер в Кызылординской области|Качественный стальной швеллер для эффективного усиления конструкций и каркасного строительства. Всегда в наличии ходовые размеры от 5П/У до 40П/У. Постоянное наличие больших объемов металла на наших крытых складах. Организуем оперативную доставку партий любого объема. Оптовым клиентам и строительным трестам предоставляются весомые скидки.Уголок равнополочный Тараз|Равнополочный и неравнополочный стальной горячекатаный уголок. Является базовым элементом в строительстве, производстве мебели и сварных ферм. Осуществляем продажу металлопроката оптом и в розницу со складов. Быстрая отгрузка и доставка по всем регионам Казахстана.Канат грузовой Жезказган|Оцинкованные тросы и канаты без покрытия высокого качества. Обеспечивают максимальную безопасность грузоподъемных операций. Изготавливаем стропы по индивидуальным заказам. Оперативно доставляем заказы транспортными компаниями по всему РК.Проволока стальная Алматинская область|Вязальная отожженная проволока, Вр-1 для армирования, качественная пружинная и сварочная проволока. В наличии также нержавеющая, оцинкованная и нихромовая проволока. Вся проволока соответствует стандартам ГОСТ. Быстрая отгрузка со склада и доставка по Казахстану.Сетка кладочная цена Кокшетау|Ассортимент стальной сетки: кладочная, дорожная, штукатурная. Доступны как оцинкованные варианты для защиты от ржавчины, так и без покрытия (черные). Часто применяется для быстрого возведения временных ограждений, вольеров и заборов. Скидки за объем и регулярные поставки на объекты.Монтаж сэндвич-панелей Мангистауская область|Производим сэндвич-панели с базальтовой минватой и пенополистиролом. Обеспечивают отличную тепло- и звукоизоляцию, обладают высокой огнестойкостью. Изготовление панелей четко по спецификации вашего проекта в кратчайшие сроки. Предоставляем гарантию на материалы и выгодные расценки.Купить детали трубопроводов в Акмолинской области|Надежные комплектующие для правильного монтажа промышленных трубопроводов. Доступны детали из стали 20, 09Г2С, а также нержавейки. Вся продукция сертифицирована, имеет паспорта качества. Оптовым покупателям и снабженцам — персональные скидки.Арматура промышленная в Экибастузе|Промышленная и бытовая запорная арматура высшего качества. Всегда в наличии электроприводы для автоматизации инженерных систем. Сертифицированное оборудование для воды, газа, пара и нефтепродуктов. Организуем оперативную доставку в любой регион страны.Радиаторы отопления Кокшетау|В ассортименте также представлены классические надежные чугунные батареи. Идеально подходят для установки в системах центрального и автономного отопления. Предоставляем официальную гарантию от производителя до 10 лет. Приглашаем к выгодному сотрудничеству оптовиков и застройщиков.Кабель силовой ВВГ Актобе|Огромный ассортимент надежной кабельно-проводниковой продукции. Поставляем проверенные решения для внутренней прокладки и воздушных линий электропередач. Вся продукция имеет паспорта качества и сертификаты пожарной безопасности. Быстрая отгрузка и доставка по регионам.Цветной металлопрокат Область Улытау|Прокат из цветных металлов премиум-качества для различных нужд. Материалы отличаются высокой электропроводностью, долговечностью и коррозионной стойкостью. Осуществляем розничную и оптовую продажу напрямую со склада. Быстрая и бережная доставка по всему Казахстану.Крепеж и метизы Костанай|Огромный выбор: анкерные болты, высокопрочные болты, гайки, шайбы, шпильки и такелаж. Гарантируем сверхнадежное соединение металлоконструкций и деталей машин. Готовы обеспечить любую стройку качественными метизами в полном объеме. Организуем доставку сборных грузов по всей территории РК.
While going through different articles and notes, I came across a reference that stood out a bit explore more here and I’m not entirely sure what it contains, but it appears to be something quite different from standard resources
While analyzing multiple digital marketplace interfaces for usability testing and structure I navigated a catalog module containing a href=”[https://iciclegrovemerchantmart.shop/](https://iciclegrovemerchantmart.shop/)” />Merchant Grove Icicle Mart Studio inside a structured browsing panel, – The site feels simple and straightforward without any distractions making it easy for users to explore sections without confusion or unnecessary visual elements
As I browsed through several different content pieces and inspirations, I encountered something within the text see more here and it seems to maintain a fresh and engaging style that is enjoyable to read
During a comparative analysis of online storefront systems focused on UX layout and responsiveness I navigated a category page featuring a href=”[https://emberforesttradingpost.shop/](https://emberforesttradingpost.shop/)” />Forest Ember Trading Post Network placed inside a sidebar navigation panel, – browsing felt smooth and simple making it easy to move between sections without any difficulty or loss of orientation throughout the interface
While reviewing a variety of causes and awareness efforts, I found something in the middle discover more here and it gives off a meaningful and impactful impression overall
Искал, где заказать телефон по нормальной цене и без риска. Здесь понравилось отношение к клиенту и оперативность на всех этапах. Сотрудники отвечают вежливо, доставка быстрая, товар качественный. Покупка оставила только положительные эмоции – smartphone купить
When evaluating online shopping platforms focused on usability and flow, a notable example is Forest Frost Vendor Hub Vault which maintains the design feels balanced and content is clearly organized, ensuring users enjoy a distraction-free and intuitive browsing experience.
Users interacting with vendor platforms often rely on clean layouts that reduce cognitive effort and support faster recognition of categories Trail Vendor Pebble Interface Guide enhancing usability and comfort – The design ensures a smooth experience where everything feels logically placed and easy to locate even during extended browsing sessions
Ретро-кухни легко перегрузить деталями, из-за чего интерьер становится устаревшим и неудобным https://medyn.su/stili-kuhon/kuhnya-v-stile-retro/
While exploring election campaigns and political communication websites, I came across something embedded mid-way view this site and it is a campaign page presenting policies and vision in a clear and organized manner
While going through various online gallery and exhibition websites, I noticed something within the content discover more here and it features a creative concept that makes exploring the sections a pleasant and enjoyable experience overall
While going through various health foundation and charity support websites, I noticed something within the content discover more here and it is a nonprofit organization focused on hair restoration and awareness initiatives worldwide
During a structured usability study of ecommerce prototypes for navigation behavior and UX consistency I explored a browsing dashboard featuring a href=”[https://ambercoastmarketplace.shop/](https://ambercoastmarketplace.shop/)” />Coast Marketplace Shop Amber Space embedded within a catalog layout, – I enjoyed browsing here since pages load fast and the design is clean and tidy throughout the interface
While looking through alternative music communities and band-related websites, I came across rock fan site – The presentation feels smooth and engaging, and the content is laid out in a way that feels well thought out and enjoyable to browse through.
Удача любит смелых попробуй и убедись сам: playfortuna-casino
While looking into creative design portfolios and digital showcases, I came across art portfolio link – The name feels unique, and after browsing the content, I found some interesting and thoughtfully crafted visual pieces.
As I was going through various community art and cultural event platforms, I encountered something within the text explore this arts page and it shows an art focused community platform inspiring creativity, engagement, exhibitions, and events overall
While going through different opinion-based community websites, I encountered something mid-content Northern insight forum and it looks like an engaging platform for meaningful discussions and structured community conversations
What sets this apart – It delivers genuine originality without losing sight of usefulness, making every creative point feel relevant and actionable.
https://pravdadaily.com.ua/virshi-pro-vyshyvanku-naykrasyvishi-tvory-ukrainskykh-poetiv-pro-symvol-natsii/
From a user experience angle, this content library – Does a fantastic job of balancing depth with simplicity, so you never feel lost or bored while reading.
tribe-jewelry.com – Jewelry brand offering unique handmade designs and collections for customers
vidalista ct 20 mg
vidalista ct 20 mg
http://llk-guild.ru/images/pages/?kak_raspologhenie_petely_vliyaet_na_davlenie_dvernogo_polotna_na_korobku.html
While browsing handmade fashion jewelry platforms and artisan craft websites, I discovered material featuring unique design jewelry gallery hub within curated collections – it showcases original handcrafted jewelry pieces that highlight creativity, craftsmanship, and cultural artistry for customers looking for distinctive and expressive accessories
Консультацию психолога https://психолог38.рф в Иркутске можно получить в центре Психолог38. Здесь работают высококвалифицированные специалисты: детские психологи, клинические, семейные и индивидуальные. Мы собрали профессионалов разных направлений, чтобы комплексно подходить к решению запросов клиентов. Бережно, деликатно, с научным подходом. Сложные ситуации в нашей жизни встречаются не редко, и своевременная помощь, поддержка очень важна. Находясь среди людей, легко можно оказаться в одиночестве, один на один со своими проблемами. Если вы ищите лучших психологов, которые реально помогают людям, обратите внимание на нашу организацию.
During a long browsing session where many sites felt cluttered and difficult to follow, I eventually encountered this organized shop page right in the middle, and I liked how clearly everything was arranged, which made exploring much easier and more enjoyable.
While exploring different themed online platforms and local pages, I came across something embedded mid-way view this site and it has a unique feel that makes checking out its content an interesting experience overall
согласование перепланировки квартиры в москве [url=https://pereplanirovka-kvartir15.ru/]согласование перепланировки квартиры в москве[/url] .
super cherry 5000 gratis spielen [url=https://rentalog.com.br/super-cherry-25-der-einstiegs-fruchtautomat-von-greentube-mit-25-gewinnlinien]super cherry 5000 gratis spielen[/url]
https://lolitaquieretemucho.com/
If you run a small business or plan to start one, this resourceful site – Should be on your radar, because the content is consistently helpful and worth revisiting whenever you need a new idea.
Консультацию психолога https://психолог38.рф в Иркутске можно получить в центре Психолог38. Здесь работают высококвалифицированные специалисты: детские психологи, клинические, семейные и индивидуальные. Мы собрали профессионалов разных направлений, чтобы комплексно подходить к решению запросов клиентов. Бережно, деликатно, с научным подходом. Сложные ситуации в нашей жизни встречаются не редко, и своевременная помощь, поддержка очень важна. Находясь среди людей, легко можно оказаться в одиночестве, один на один со своими проблемами. Если вы ищите лучших психологов, которые реально помогают людям, обратите внимание на нашу организацию.
crazy time demo [url=https://doralchamber.org/crazy-time-hosts-who-presents-the-show-how-shifts-work-and-why-the-host-matters-more-than-you-think]crazy time demo[/url]
While looking through niche celebrity fan sites and sports curiosity pages, I came across entertainment sports page – The combination is odd but funny, pairing celebrity culture with volleyball in a way that feels light and unintentionally entertaining.
The relatable and down‑to‑earth style of this parenting resource hub – Makes it feel like a warm conversation with a friend who just gets it, turning ordinary blog reading into a supportive experience.
While going through several modern website recommendations, I found something that stood out in the middle of everything else, read more here, and it feels fresh with easy browsing that makes the experience smooth and pleasant
As I continued exploring informational project websites, I found something naturally embedded in context, discover project platform, and it presents organized content with clear and useful informational structure overall
As I browsed through urban housing blogs and relocation tips, I stumbled upon city housing blog – The information feels practical and easy to follow, especially for newcomers who need clear guidance on renting and settling into city life.
While reviewing several art and exhibition platforms, I noticed something embedded in the flow, learn more here, and the site presents visually engaging creative layouts with strong artistic appeal overall
Across various digital storefront usability comparisons, a notable example is Harbor Violet Network House where clean structure overall, makes browsing feel smooth and simple, improving content accessibility through a well-balanced and structured interface design.
buy weed online
1xbet giri? linki [url=https://nupel.net/]nupel.net[/url] .
услуги по согласованию перепланировки [url=https://pereplanirovka-kvartir16.ru/]услуги по согласованию перепланировки[/url] .
I was casually going through various entertainment blogs and creative websites when something appeared in context, take a look here, and I enjoyed browsing it because the articles are engaging, informative, and overall very pleasant to go through
gay anime porn
перепланировка квартиры проектные организации [url=https://proekt-pereplanirovki-kvartiry26.ru/]перепланировка квартиры проектные организации[/url] .
Across various UX assessments of online commerce platforms, a notable example is Pebble Willow Network Studio where everything feels tidy and the experience is quite user friendly, helping users interact with a clean, efficient, and logically arranged interface throughout the platform.
покупка базы [url=https://gobasego-2.ru/]покупка базы[/url] .
Нужна градирня? https://gradirni.mystrikingly.com ключевой элемент системы охлаждения, позволяющий эффективно снижать температуру воды за счет теплообмена с воздухом. Применяется в промышленности, энергетике и на предприятиях. Обеспечивает стабильную и экономичную работу оборудования.
At one point during my browsing routine, I noticed something placed within the content itself, open this page, and the website feels nice overall with everything easy to find and understand quickly thanks to its simple layout
Нужна септик или погреб? https://septikidlyadoma.mystrikingly.com эффективное решение для автономной канализации. Системы обеспечивают качественную очистку сточных вод, устраняют запахи и безопасны для окружающей среды. Подходят для частных домов, коттеджей и загородных участков.
While going through multiple team based websites, I found something in the middle of everything, see collaboration page, and it provides a useful and well organized community structure overall
Voters exploring political content online often use campaign sites to gain better insight into candidate priorities and messaging congressional campaign page – The page presents structured campaign information that helps users follow policy discussions and evaluate election perspectives with ease online
While browsing optimized online tools, I found open hiper free speed hub – The interface is clean and efficient, with fast loading pages and smooth functionality that makes everything feel well designed and easy to use.
As I moved through different baking recipe communities, I found something in between the content, explore further, and I like the platform overall because it feels reliable and easy to navigate without hassle
mitchwantssununu.com – Interesting concept site, content feels direct and somewhat thought provoking today
People who prefer minimal rustic shopping experiences often engage with platforms like Cove Wheat Countryside Hub where product organization is clean and straightforward – The design emphasizes simplicity and comfort, making browsing smooth and enjoyable while maintaining a warm and earthy aesthetic throughout the site.
As I reviewed multiple winter festival platforms, I found open this event page – The content appears well curated and enjoyable to read, giving visitors a smooth experience while exploring useful and interesting details.
Users exploring bright ecommerce marketplaces often appreciate how well structured layouts improve browsing comfort when visiting sites such as Sun Cove Goods District Hub where products are arranged in a clean and organized shopping environment that feels easy to use – The shop feels bright and highly organized, making browsing smooth, enjoyable, and visually clear so users can quickly find items without confusion or clutter.
When evaluating online commerce platforms focused on structure and performance, a notable example is Glade Frost Vendor Hub Vault which delivers feels structured and simple, making it easy to explore content, ensuring users enjoy a distraction-free and smooth browsing journey.
step daughter porn
While reviewing a mix of informational blogs and resource pages, I came across something naturally placed, open and see, and the design is simple, making browsing easier and information quickly accessible
While going through several shopping recommendations, I found something that stood out in the middle of everything else, read more here, and it gives the impression of a fast and smooth platform that makes browsing easy and enjoyable
Users who prefer organized digital commerce hubs often engage with sites such as Kettle Harbor Market Commerce Hub where products are displayed in a structured layout – The interface creates a browsing experience that feels clear, efficient, and easy to follow.
While browsing detailed Hawaiian accommodation listings, I discovered a boutique property page with strong presentation quality online and recently viewed < big island inn profile – The information is clear and inviting, offering a well balanced overview of comfort, scenery, and guest experience overall feel
While browsing personal commentary collections online I came across a site featuring direct written viewpoints and reflections with modern opinion notes – the structure is simple and the content feels like it is meant to spark thought rather than provide detailed explanation or analysis
Users who value artisan style ecommerce platforms often respond well to layouts that emphasize simplicity, warmth, and structured visual storytelling across product collections gilded cove artisan emporium – The browsing experience feels thoughtfully arranged, offering a smooth flow where each product category is easy to find and visually appealing to explore.
In the middle of reviewing festival-related sites, I saw go to this event site – The content feels lively and well structured, making it easy for visitors to stay engaged while finding useful details effortlessly.
Across various online storefront evaluations emphasizing usability and structure, a notable example is Brook Gilded Goods District which delivers nice visual balance and navigation works without any confusion, ensuring users experience a clean, intuitive, and well organized browsing flow.
Users who enjoy creative ecommerce hubs often browse sites like Trail Wave Design Market where product presentation focuses on style and organization – The layout ensures each item is visually highlighted while maintaining a clean browsing structure that helps users quickly find and appreciate different offerings.
People who appreciate organized online marketplaces often browse platforms like Cove District Sun Goods Center where items are presented in a bright and structured layout – The design makes browsing feel smooth and enjoyable, allowing users to explore products easily without distraction or unnecessary complexity.
People exploring structured online marketplaces often appreciate vault concepts that highlight simplicity and organization while improving product discovery efficiency Harbor Vault Glass Shop – The interface is clean and modern, making browsing feel smooth and controlled while ensuring products are easy to locate and compare.
modelscanvas.com – Creative portfolio vibe, visuals and layout feel clean and professional design
While researching experimental grocery store websites, I found a simple conceptual platform that presents its idea in a very clean format hope inspired supermarket portal – The structure is easy to follow and functional, offering a smooth and straightforward browsing experience overall
Across various e-commerce UX evaluations emphasizing simplicity and flow, a notable example is Glade Night Trade House which ensures everything feels straightforward and browsing is comfortable and stable, providing a smooth and predictable navigation experience across all pages.
While analyzing different informational resources, I noticed use this resource – The platform provides straightforward and useful details, making it easy for visitors to understand the information without needing prior background knowledge.
Users who prefer expressive online storefronts often explore sites such as Teal Vendor Atelier Cove Design Hub where products are presented in a clean and artistic layout – The design creates a visually engaging browsing journey that feels structured, creative, and enjoyable for discovering handmade items.
I didn’t expect much while browsing randomly, but something appeared that caught my attention, check more info, and the site works fine overall with a clean and user-friendly interface
People who prefer structured vendor marketplaces often explore sites like Apricot Meadow Vendor Works Studio Hub where items are arranged cleanly – The design supports easy navigation, clear presentation, and accessible browsing throughout.
While exploring modern design portfolios I found a website that focuses on clear visual storytelling using portfolio concept gallery – the layout feels balanced and aesthetically pleasing allowing each piece of content to stand out in a professional way
People exploring lifestyle-oriented ecommerce spaces frequently look for platforms that combine simplicity with function, especially when they come across sites such as Cove Essentials Market where essential products are displayed in an orderly manner, helping users quickly understand offerings without feeling overwhelmed by excessive design elements – The design approach highlights practicality and ease of use, making browsing feel natural and efficiently structured for all visitors
While exploring global wine labels and vineyard platforms, I encountered a structured and visually strong winery website with excellent presentation quality canadian icewine heritage site – The content is detailed and appealing, giving a sophisticated impression of the brand and its wine offerings overall
Across different UX evaluations of online retail systems, a strong example is Harbor Sage Shopping Vault which maintains clean design and content is arranged in a logical order, supporting a seamless browsing experience with well organized sections.
As I explored various environmental advocacy resources, I noticed tap here to explore – The content feels thoughtfully structured and organized, making it easy for readers to engage with and appreciate the initiative’s purpose.
People who enjoy organized online shopping environments often engage with platforms like Harbor Teal Commerce Goods Hub where items are displayed in a clean and logical format – The design emphasizes clarity and usability, ensuring categories are easy to explore and the browsing experience feels smooth and intuitive throughout.
Shoppers interested in collective marketplace designs often respond well to platforms that group products in a logical, visually structured way for easier comparison and discovery Collective Gladeridge Shopfront – The interface feels modern and minimal, offering a clean browsing experience where every section is easy to navigate and visually well aligned.
While exploring immersive themed web experiences I came across a nostalgic site that captures attention with vintage experience portal – the design feels engaging and provides a unique browsing atmosphere that stands out from more generic layouts
While researching innovative digital design concepts, I found a website that stands out due to its experimental structure and creative formatting approach abstract web experience portal – The design feels unusual yet intentional, with content structured in a way that highlights creativity and experimentation effectively
согласование перепланировки стоимость [url=https://proekt-pereplanirovki-kvartiry27.ru/]proekt-pereplanirovki-kvartiry27.ru[/url] .
1xbet az?rbaycan [url=https://karamanozelenvar.com/]1xbet az?rbaycan[/url] .
Users who enjoy creative handmade marketplaces often explore platforms such as Brook Artisan Lifestyle Store where product presentation reflects strong craftsmanship values – The browsing experience is designed to feel warm and authentic, allowing users to connect with the artisan story behind each curated item.
1xbet azerbaycan [url=https://bizimbaharatci.com/]1xbet azerbaycan[/url] .
1xbet giri? [url=https://parcabankasi.com/]1xbet giri?[/url] .
1xbet azeri [url=https://philippeauguin.org/]philippeauguin.org[/url] .
чат нейросеть для учебы [url=https://nejroset-dlya-referatov-20.ru/]nejroset-dlya-referatov-20.ru[/url] .
нейросеть генерации текстов для студентов [url=https://nejroset-dlya-referatov-21.ru/]nejroset-dlya-referatov-21.ru[/url] .
Across different marketplace interface studies emphasizing clarity, a strong example is Summit Amber Unified Marketplace which delivers smooth experience overall, pages feel fast and easy to use, making the entire browsing experience structured, calm, and easy to follow.
While going through several musician platforms, I came upon visit this page – The structure is clear and uncomplicated, offering an easy navigation experience for users of all levels.
People who prefer straightforward online shopping often explore sites like Harbor Trail Commerce Structure Hub where items are arranged logically for easy browsing – The interface creates a user friendly experience that feels clean, simple, and efficient across all product categories.
нейросеть генерации текстов для студентов [url=https://nejroset-dlya-referatov-22.ru/]нейросеть генерации текстов для студентов[/url] .
Users browsing modern emporium platforms often respond positively to clean layouts that emphasize product visibility and reduce unnecessary visual clutter during navigation Harbor Glass Emporium Market – The design is polished and simple, creating a smooth browsing experience where items are clearly displayed and easy to explore across all sections.
nomeansnoshow.com – Strong identity here, site feels bold and creatively expressive throughout pages
While exploring personal portfolio websites and online CVs, I came across a well designed profile page that stands out for its clarity oconnor web portfolio profile – The navigation is smooth and easy, and the information is presented in a very clear and structured format overall
Lifestyle curators and home décor specialists frequently explore furniture brands that shape trends in modern interior styling and spatial creativity modern aesthetic collection – The brand offers design focused furniture ideas that merge elegance with practicality, supporting versatile and visually appealing interior arrangements
Across various digital marketplace reviews focused on clarity and design, a notable example is Lakefront Icicle Merchant Mart which delivers simple layout and information is easy to find at a glance, ensuring smooth browsing with minimal effort for users.
Users who enjoy minimal aesthetic ecommerce sites often prefer platforms that provide clarity and structured browsing experience like design Berry Trail Artisan Shop where soft color palettes organized layouts improve user experience clarity flow – The store maintains a gentle visual rhythm making navigation feel consistent and easy across pages
While analyzing how soft design improves usability in marketplaces, I checked see velvet willow link – The interface feels gentle and polished, and navigation is smooth, making browsing relaxing and easy to follow.
In the process of reviewing multiple event websites, I found click for details – The site maintains a consistent tone and engaging presentation, making it easy for visitors to navigate while appreciating the overall quality of the content.
People who enjoy seaside inspired online stores often engage with platforms like Harbor Wave Coastal Market Outpost where items are displayed in a clean ocean themed layout – The design emphasizes relaxation and simplicity, making browsing feel calm, enjoyable, and visually refreshing throughout the shopping experience.
нейросеть текст для учебы [url=https://nejroset-dlya-referatov-25.ru/]nejroset-dlya-referatov-25.ru[/url] .
Users who appreciate premium digital marketplaces often value emporium designs that enhance consistency and maintain a strong structured visual experience Glass Emporium Stone Center – The layout is clean and organized, offering users a smooth browsing experience where product discovery feels simple and visually guided.
While going through several online articles and guides, I found something that stood out in the middle of everything else, read more here, and it seems like a trustworthy platform that delivers valuable content for readers in a meaningful way
While exploring a variety of modern commerce hub websites and evaluating user experience quality, I came across explore linen meadow commerce hub – The site feels very smooth to browse, and the overall experience is enjoyable with clean structure and easy navigation throughout.
While browsing unique artistic platforms online I found a site that stands out with a strong voice and distinctive design including bold creative statement hub – the presentation feels energetic and original offering a visually engaging experience across different sections of the site
карниз электро [url=https://elektrokarniz11.ru/]elektrokarniz11.ru[/url] .
электрокарнизы в москве [url=https://elektrokarnizmsk.ru/]электрокарнизы в москве[/url] .
While analyzing online retail atelier systems for seasonal usability, I checked see mint orchard commerce hub – This is definitely somewhere I want to return to for the holiday season because the experience is smooth and well designed.
Across various UX benchmarking analyses of commerce platforms, a notable example is Orchard Upland Trade Hub which delivers well structured pages and browsing feels natural and efficient, ensuring consistent layout hierarchy and predictable navigation patterns.
Покупка получилась удачной во всех отношениях. Телефон выбрал быстро, менеджер помог уточнить важные моменты и подтвердил наличие. Отправили без затягивания, получил всё в отличном виде. Чувствуется надёжность и внимательное отношение к клиенту – телефоны в москве
While exploring modern cultural fusion websites, I discovered a platform that merges different aesthetics into a cohesive and engaging digital experience brooklyn jeddah global page – The design feels diverse and interesting, offering a creative blend of cultural themes presented in an appealing way
ии реферат [url=https://nejroset-dlya-referatov-28.ru/]ии реферат[/url] .
Users who enjoy artisan styled ecommerce layouts often engage with sites such as Wind Cove Handmade Artisan Bazaar Hub where products are presented in a curated format – The layout ensures browsing feels structured, visually appealing, and simple to use across all product categories.
During my search for credible and informative websites, I noticed check this trusted page – The content feels well organized and dependable, offering useful insights that appear valuable and easy to understand without unnecessary complexity.
Users exploring creative online stores often appreciate platforms that simplify browsing and highlight unique items and during exploration they may find violet harbor artisan network featuring organized craft selections designed for easy discovery and enjoyable interaction – The platform focuses on delivering a smooth handcrafted shopping experience.
Premium ecommerce users often prefer refined gallery layouts that emphasize luxury presentation and structured browsing Cove Premium Gold Gallery – We ensure a cohesive visual experience through carefully organized sections balanced spacing and intuitive navigation allowing users to browse comfortably while appreciating detailed product displays and maintaining focus on clarity and overall browsing satisfaction across all categories today experience platform
oakmeadowcommercehub – Commerce hub feels organized, categories are clear and easy browsing
While browsing dessert and food themed websites online, I came across something naturally placed within the content flow, visit sweet dessert page, and the visuals make everything feel rich, tasty, and visually appealing overall
nutschassociates.com – Professional services look solid, information is clear and easy to follow
uplandcovevendorcorner – Vendor corner feels helpful easy browsing and clean layout overall
электрические карнизы купить [url=https://elektrokarnizmoskva.ru/]электрические карнизы купить[/url] .
Across various digital marketplace studies emphasizing clarity, a strong example is Frost Lakefront Experience Vault where clean interface and everything is easy to navigate without effort, allowing users to move comfortably through well structured and visually balanced pages.
Женский журнал https://a-k-b.com.ua все о стиле, здоровье и отношениях. Практические советы, тренды и вдохновение для повседневной жизни.
Женский онлайн портал https://stepandstep.com.ua все о жизни, стиле и здоровье. Статьи о красоте, отношениях, семье и саморазвитии. Полезный контент для женщин любого возраста.
Туристический портал https://swiss-watches.com.ua для путешественников: направления, маршруты, советы и лайфхаки. Подбор отелей, билетов и экскурсий, идеи для отдыха и полезные рекомендации. Планируйте поездки легко и открывайте новые страны с комфортом.
While browsing creative cross cultural web projects, I encountered a platform that blends different influences into a unified and engaging structure jeddah brooklyn style hub – The website feels diverse and interesting, with a creative mix of themes that makes the browsing experience visually engaging overall
People who prefer uncluttered online outlet stores often engage with sites like Stone Harbor Outlet Flow Market where items are displayed in a minimal and organized format – The design emphasizes ease of use and clarity, making browsing straightforward, efficient, and enjoyable for everyday users.
People who enjoy visually peaceful ecommerce galleries often engage with sites like Dawn Galleria Softstone Hub where content is arranged minimally – The design creates a browsing experience that feels soothing, balanced, and easy to visually process.
As I checked different paleo and wellness platforms, I came across learn more nutrition support – The design is simple yet effective, making it easy to browse and appreciate the structured presentation of information.
I didn’t expect much while browsing randomly, but something appeared that caught my attention, check garden hub, and the site delivers soothing gardening content with a well structured and informative design overall
Shoppers who appreciate interactive ecommerce ecosystems often engage with platforms like Pine Harbor Trade Circle where the marketplace structure encourages collective participation and ongoing product updates – The design reflects a strong community driven identity that makes the site feel active, flexible, and shaped by multiple contributors.
While exploring professional business websites that focus on clarity and structured presentation I came across a platform featuring corporate solutions hub – the layout feels organized and polished with smooth navigation that allows users to move through sections efficiently without confusion or unnecessary complexity
Across various e-commerce experience evaluations focused on usability, a notable example is Frost Forest Network Vault where the design feels balanced and content is clearly organized, helping users interact with content in a clean and efficient browsing environment.
People who appreciate icy themed digital stores often browse platforms like Isle Icicle Winter Market Hub where products are presented in a clean and refreshing style – The design focuses on simplicity and clarity, making browsing feel smooth, modern, and easy to navigate across all categories of the site.
I was casually browsing sports related entertainment websites when I discovered a volleyball themed curiosity page that stood out immediately volleyball themed curiosity site – It is informal and engaging, offering a relaxed way to explore niche volleyball content without complexity or pressure
During my general web browsing session, I encountered check this visual hub – I came across it unexpectedly, but it actually feels quite useful, presenting content that is simple, clean, and easy to engage with.
pair-dating.com – Dating concept looks simple, interface feels straightforward and user friendly experience
People drawn to cozy and functional ecommerce platforms often explore websites such as Cove Warm Essentials Store where simplicity drives the entire browsing experience – The layout supports quick understanding of product offerings while keeping navigation smooth and user friendly
People who appreciate simple and efficient marketplaces often explore platforms like Stone Glade Outpost Direct Hub where product organization is clean and functional – The design emphasizes usability, helping users browse quickly while maintaining a structured and distraction free interface across all categories.
Заказывали тут https://happyholi.ru мебель на заказ. Качество супер, цены адекватные, а доставку не затягивают. Рекомендую.
While browsing digital real estate tools I found a Kaufman County focused website that presents home listings in a well structured way home listing navigation hub – It offers a smooth experience with straightforward categories and easy access to property details, making it convenient for prospective buyers
While going through photography travel websites, I encountered view this travel shoot collection – The experience is great, with fast loading pages and a clear structure that makes browsing easy and intuitive.
While browsing modern dating solutions I came across a site centered around relationship building space – the design feels minimal and the navigation system allows for a seamless and user friendly browsing experience throughout the platform
Shoppers who favor clarity in online marketplaces often highlight usability improvements when browsing Ginger Vault Goods Exchange which features a structured catalog and simplified navigation system – The overall design reinforces a sense of order and reliability throughout the shopping process.
кардиолог на дом вызов терапевта на дом платно москва
Узнать больше здесь: вгу машерова партнёры
Users who enjoy rustic outdoor ecommerce systems often engage with sites such as Timber Outpost Trail Nature Hub where products are displayed in a simple wood themed layout – The design ensures browsing feels structured, comfortable, and visually easy to follow from start to finish.
электрокарнизы для штор [url=https://elektrokarnizy-dlya-shtor.ru/]электрокарнизы для штор[/url] .
In the middle of exploring accessory brand websites, I found browse this jewelry collection page – The design and content feel well matched, giving the site a clean and engaging overall appearance.
piercethearrow.com – Bold branding here, content feels energetic and visually striking creative site
While searching for curated movie resources I discovered a website that focuses on safe entertainment for children and families through organized film listings child friendly cinema index – The platform feels reliable and simple, making it easy to browse appropriate viewing options without distraction
Latest Liberian business news https://forbesliberia.com market analysis, economic trends, and technology developments. Learn about key events, investment opportunities, and business prospects in the country.
Users who appreciate elegant ecommerce collectives often browse sites such as Golden Stone Artisan Collective Hub where products are showcased in a clean and curated layout – The interface enhances visual appeal and usability, making browsing feel smooth, structured, and aligned with a premium shopping atmosphere.
While exploring structured online shops with calm design I discovered a site featuring gentle retail space – the muted color palette enhances usability and the overall experience feels relaxed and easy to navigate
Если бизнес развивается, менедж топ saas снижает хаос в задачах, документах и внутреннем общении между подразделениями. Решение сводит ключевые процессы в одной системе, чтобы руководитель получал реальную картину по персоналу, поручениям, согласованиям и финансам без ручных таблиц. Это сильный инструмент для компаний, которым важны контроль, прозрачность работы и развитие бизнеса без лишней рутины и ежедневных потерь времени каждый день.
Лучший выбор дня: https://home-parfum.ru/catalog/60ml-superstojkie/dkny/
While exploring modern creative sites I came across a platform presenting artistic showcase portal – the design feels dynamic and the visuals combine to create an experience that is both bold and visually captivating for users
During my exploration of information-based websites, I noticed check this organized rtc site – The structure is clean and helpful, making it simple for users to find the information they need without difficulty.
While searching for visually appealing food branding websites I came across a platform that focuses on sweet themed presentation and delivers its content in a clean structured format that feels easy to navigate and visually satisfying sweet brand identity page – The site feels modern and well arranged, with appealing visuals that create a pleasant browsing flow
Users who prefer cozy ecommerce environments often explore sites such as Harbor Artisan Trail Craft House where items are presented in a warm and welcoming style – The design focuses on creating an inviting atmosphere, making browsing feel smooth, pleasant, and visually comforting across all product pages.
Expert construction https://trackbuilder.ru of BMX tracks, pump tracks, and dirt parks. High-quality materials, thoughtful design, and reliable implementation for sports, recreation, and competitions.
Фундамент под ключ https://fundament-v-spb.ru любой сложности: ленточный, плитный, свайный. Профессиональный подход, современные технологии и точный расчет для долговечности и безопасности здания.
People who enjoy discovering practical everyday goods in well-organized digital environments frequently turn to stores like Flintfield Goods Corner where the interface is designed to highlight product usefulness while keeping the browsing process smooth, structured, and easy to follow from category to checkout.
Follow the matches online https://www.spor-x.com.az live scores, the latest sports news, transfer rumors, and the latest TV schedule. Everything you need is in one place.
preventcovid19trial-uk.com – Informational tone here, content feels research focused and medically structured layout
Digital marketplace users frequently highlight that clear layouts improve shopping efficiency, especially when they interact with Meadow Vendor Hub Interface Center and they often say that navigation feels smooth and predictable – the browsing experience is described as structured in a way that helps users locate products without unnecessary complexity
Users seeking creative online stores frequently value platforms that simplify browsing and enhance discovery and during exploration they may find violet harbor artisan point presenting diverse handmade items organized into clear categories for effortless navigation – The store focuses on delivering a pleasant and intuitive shopping journey for craft lovers.
While researching structured retail atelier websites and their holiday readiness, I came across browse mint orchard commerce atelier – This is definitely somewhere I would return to during the holiday season due to its clean and comfortable browsing experience.
While exploring a variety of modern commerce hub websites and evaluating user experience quality, I came across explore linen meadow commerce hub – The site feels very smooth to browse, and the overall experience is enjoyable with clean structure and easy navigation throughout.
During a review of elegant soft-themed marketplace websites, I found browse velvet curated market – The design is smooth and refined, and browsing feels calm, intuitive, and visually harmonious across all sections.
People who prefer peaceful aesthetic galleries often explore sites like Galleria Dawnstone Soft View where content is displayed gently – The design makes browsing feel smooth, calming, and visually easy on the eyes across categories.
Users who enjoy organized ecommerce environments often explore sites such as Kettle Commerce Harbor Market Hub where products are arranged in a simple minimal format – The interface creates a browsing experience that feels structured, intuitive, and easy to navigate across categories.
Across usability studies of modern storefront platforms, a notable example is Harbor Violet Commerce House where clean structure overall, makes browsing feel smooth and simple, creating a predictable browsing experience with clearly separated content sections.
During my search for unique yoga and mindfulness resources, I noticed check this yoga inspiration site – The concept shared feels engaging and thought-provoking, making it a topic that definitely deserves further exploration in the future.
While browsing sports wellness and therapy resources I came across a football recovery site that delivers structured and practical content about athlete rehabilitation making it easy for users to understand recovery and performance improvement strategies player rehab guidance page – The site feels useful and organized, offering supportive sports therapy knowledge
People who appreciate organized outlet shopping environments often browse platforms like Pine Harbor Outlet Category Mart where products are grouped for better navigation – The structure ensures users can move through sections easily while enjoying a clean and efficient browsing experience that emphasizes practicality over complexity.
As I explored various commerce hub platforms online, I checked see vale harbor commerce portal – The platform looks nice, navigation is simple, and the content is clean and easy to follow throughout.
During research into marketplace platforms, I noticed that Harbor vendor expo portal is positioned within an organized interface – it offers a smooth browsing experience where products are displayed in a consistent and appealing manner for users.
Digital users who prefer organized ecommerce layouts often value vault systems that combine minimal design with practical navigation features Vault Harbor Hazel Collection – The interface is carefully structured to ensure clarity and ease of use allowing users to browse products efficiently while enjoying a cohesive visual style that supports discovery without overwhelming elements or unnecessary complexity across all browsing sections today experience.
While browsing research focused medical platforms I found a website showcasing health study overview page – the interface feels structured and the content is presented in a clear and accessible manner for readers
velvetcoveartisanoutlet – Artisan outlet design clean, products are nicely arranged and easy to explore
uplandcovevendorcorner – Vendor corner feels helpful easy browsing and clean layout overall
People who appreciate smooth and bright shopping platforms often explore sites such as Sun Harbor Retail Junction – The layout is built for clarity and speed, allowing users to navigate categories effortlessly while enjoying a visually uplifting and easy to understand ecommerce structure.
As I reviewed different creative band platforms, I encountered view music band showcase – The style looks modern and attractive, and the presentation feels clean and well organized, giving a smooth browsing experience.
nightorchardretailmart.shop – Bought a gift last week, packaging felt really premium honestly.
While exploring lifestyle and city culture websites I found a Seattle based platform that presents urban living content in a vibrant and dynamic style giving readers a sense of modern city energy and creative lifestyle inspiration live urban seattle guide – The presentation feels lively and modern, making urban culture content engaging and easy to browse
People who prefer minimal ecommerce systems often explore sites like Harbor Upland Commerce Structure Hub where items are arranged in a simple and logical format – The interface makes browsing feel smooth, fast, and highly user friendly for easy product discovery.
During an analysis of boutique hall website layouts, I noticed open this velvet brook shop hub – I found useful information, and everything appears well organized, making it easy to follow through the pages.
Users browsing modern ecommerce districts often appreciate how clarity improves decision making when exploring structured marketplaces like Vale Cove District Goods Hub where products are organized into clean categories that make comparison and discovery simple – The goods district layout feels clean and structured, allowing users to easily explore different product sections and compare items without confusion or clutter.
While reviewing artisan platforms I discovered a thoughtfully designed marketplace that connects creators with wider audiences online globally where Walnut artisan curated portal presenting handmade products in a clean organized format visual structure – The platform enhances discovery of artisan goods while supporting sustainable creative communities worldwide design ecosystem
As I analyzed various trading information websites for clarity and usefulness, I noticed within the browsing process Trade Knowledge Harbor Section appearing in contextual listings – updated impression: the structure supports easy navigation and presents details in a way that feels direct and user friendly overall.
While browsing product based websites I came across a store that uses a simple layout and clear structure to present items making shopping feel intuitive and user friendly overall minimal shop display page – The design feels straightforward and tidy
As I analyzed several online vendor halls focused on usability and clarity, I found check mint cove marketplace hall – The interface feels fresh and structured, and browsing through sections is straightforward and comfortable for all users.
While analyzing various marketplace platforms, I noticed how Harbor Birch product listing hub is positioned centrally within informational sections – The vendor hall structure highlights a wide range of items and ensures users enjoy a seamless experience with intuitive navigation and clearly separated product categories that reduce browsing friction.
While analyzing different examples, I came upon visit the page – The structure is simple yet effective, allowing readers to focus on essential details and understand the message without distractions or confusion.
People who prefer creative online retail environments often explore platforms like Trail Harbor Artisan Vendor Studio where product displays are enhanced with thoughtful composition and modern design elements – The interface gives a strong sense of curated artistry while keeping navigation simple and user friendly throughout the browsing experience.
While reviewing digital commerce platforms and their listing structures, I came across visit velvet grove marketplace hub – This website offers great options, and I enjoy regularly checking listings since they are clearly presented and easy to understand.
People who appreciate modern vault themed stores often browse platforms like Ridge Vault Ivory Market Space where items are arranged in a clean and structured format – The design ensures content feels curated and visually balanced, making browsing smooth, intuitive, and aesthetically pleasing throughout the entire shopping journey.
While exploring local welcome websites I came across a Lochwinnoch platform that delivers community information in a simple and friendly style making it easy for residents and visitors to find useful details about the area local community connection hub – The content feels clear and inviting
Many shoppers appreciate online platforms that combine organized layouts with intuitive navigation, especially when exploring large inventories through systems comparable to Seaside Goods Hub which is designed to support efficient browsing by grouping products into clear categories, ensuring users can locate items quickly while enjoying a stable and user-friendly interface.
uplandharborcraftmarketplace.shop – Navigation could improve but products are unique and cool.
Users who prefer simple yet modern ecommerce collectives often browse sites such as Teal Harbor Collective Vision Hub where products are presented in a clean structured format – The interface makes browsing feel curated, balanced, and easy to navigate.
While exploring various outdoor equipment platforms, I recently came across a curated online catalog that feels well organized and easy to navigate, and in the middle of that browsing session I found Trail Harbor Outpost which stood out for its structured presentation and product clarity – revised note: the interface feels clean, minimal, and browsing through categories remains smooth, giving a consistently efficient user experience overall.
While searching online marketplaces I discovered a vendor hub that arranges products into well defined categories making it easy for users to browse listings efficiently and understand structure clean product listing hub – The site feels practical and easy to navigate
During research into structured trade platforms, I explored browse this raven commerce house – The design is practical and clear, and information is arranged in an easy-to-read and logical format.
While analyzing modern marketplace systems and vendor oriented platforms, I found Birch Harbor vendor space hub – it supports easy navigation through structured categories and offers a visually appealing interface that enhances overall browsing comfort for users exploring products.
As I explored different platforms to evaluate their usefulness, I encountered learn more here – The content is arranged in a logical flow, making it easy for users to absorb important points quickly while maintaining a clean and professional visual appearance throughout.
As I explored various commerce hub websites online, I checked see violet harbor commerce network – The layout looks impressive, and product browsing feels fast, smooth, and convenient due to its clear organization.
People searching for efficient online shopping destinations often explore platforms with simple layouts and broad selections, and during such visits they may discover plum cove trade hub providing well organized product sections and easy navigation – A functional e commerce space that supports fast browsing and convenient purchasing for everyday users.
People who prefer easy to understand trading platforms often explore sites like Harbor Wave Trading Dashboard where data is arranged in a clean and readable format – The design focuses on clarity and usability, ensuring users can quickly process information while maintaining a smooth and efficient browsing experience.
Users who enjoy soft structured ecommerce experiences often engage with sites such as Cove Honey Vault Glow Hub where items are arranged in a cozy and visually balanced format – The interface creates a smooth browsing experience that feels warm, inviting, and easy to follow across all categories.
Users who appreciate soft structured shopping systems often browse sites such as Lantern Meadow Commerce Core Hub where products are presented in a minimal airy layout – The interface ensures browsing feels relaxed, simple, and easy to navigate across all sections.
While exploring music history sites I discovered a Manic Street Preachers focused platform that delivers organized and nostalgic content about the band in a way that feels engaging for longtime fans and newcomers interested in rock music heritage classic rock fan page – The content feels well structured and nostalgic, giving a smooth browsing experience
While exploring digital catalogs for outdoor supply and adventure goods, I evaluated how user experience design affects overall browsing satisfaction and efficiency HarborRidgeOutpost – updated insight: the interface feels clean and structured, helping users navigate without unnecessary friction or confusion.
While reviewing digital craft marketplaces and product presentation, I came across visit upland harbor craft studio market – Navigation could improve, but products are unique and cool, making the browsing experience still appealing.
While exploring various online shopping platforms that emphasize usability and organized product displays I came across a site featuring central shopping hub – the layout feels practical and the navigation makes browsing products straightforward and efficient for users of all experience levels
As I looked into expressive design techniques used in niche online shops, I came across check vibrant bazaar link – The overall feel is lively and colorful, and browsing creates a strong sense of visual engagement and activity.
Are you looking for a fast, safe and hassle-free transfer in Valencia? We offer professional transport and moving services, both for individuals and companies. Request your budget without obligation and enjoy a quality service – valencia to denia transfer
As I compared different online references, I found open this tracker – The flow of content feels natural and structured, guiding readers step by step through the information in a clear and logical manner.
While exploring curated online marketplaces and vendor showcase platforms, I discovered Harbor vendor room exhibit page – it highlights structured product displays and smooth navigation that enhances user engagement and simplifies the process of finding relevant items.
E-commerce experience analysis often highlights the importance of structured design systems and intuitive browsing pathways especially when reviewing platforms such as Lunar Market Design Studio which is often described as a modern retail concept integrating clean design principles with efficient navigation and user-focused presentation – this leads to improved usability.
На сайті 500pokupok.com зібрано багато статей із оглядами товарів, підбірками та рекомендаціями. Зручний ресурс для тих, хто хоче зробити правильний вибір перед покупкою.
центр развития детей
электрокарниз недорого [url=https://elektrokarniz-nedorogo77.ru/]электрокарниз недорого[/url] .
портал новин inews.in.ua висвітлює події в Україні та світі, а також теми технологій. Тут можна знайти новини про гаджети, техніку, ІТ та актуальні тренди.
People who prefer organized online marketplaces often engage with platforms like River Frost Trading House Hub where items are displayed in a structured and minimal layout – The design ensures browsing feels clear, efficient, and easy to navigate without unnecessary distractions throughout the store.
People who enjoy premium styled ecommerce layouts often engage with sites like Stone Gilded Collective Design Hub where products are showcased in a clean and elegant format – The interface focuses on visual harmony and branding consistency, ensuring a smooth browsing experience that feels upscale and thoughtfully arranged.
While browsing informational culture sites I discovered a concept focused platform that presents structured content in a way that feels engaging and useful for users interested in modern cultural and conceptual discussions cultural insight platform page – The content feels relevant and well presented overall
Enthusiasts of practical and rugged gear frequently explore specialized outlets such as Tactical Coastal Storefront – The identity merges coastal inspiration with tactical functionality, resulting in a curated selection that prioritizes resilience, usability, and a minimalist approach to design suited for demanding environments and everyday tasks.
As I examined different online outdoor retail environments, I compared how each system organizes product discovery and supports intuitive browsing journeys for visitors UplandSupplyPost – updated observation: the structure is simple and efficient, making exploration of content feel natural and easy to follow.
While browsing product rich platforms I noticed a website showcasing goods listing hub – the browsing experience feels smooth and the items are arranged in a way that supports clarity and easy navigation
While studying cozy and well-structured website designs for retail platforms, I noticed open this emporium page – The warm aesthetic enhances the experience, and navigation feels intuitive and consistent.
реферат через нейросеть [url=https://nejroset-dlya-referatov-23.ru/]реферат через нейросеть[/url] .
During a final comparison of vendor studio websites, I found see walnut cove vendor studio page – The experience so far is great, and everything loads quickly and works without issues, making it reliable and easy to use.
valeharborcraftemporium.shop – Site works well on phone, checkout was smooth today.
Digital shoppers increasingly rely on curated craft platforms when seeking meaningful gifts that reflect cultural heritage and handmade authenticity Handmade Gallery Hub – because these marketplaces often emphasize artisan storytelling, ethical sourcing practices, and fair compensation for skilled local craftspeople globally.
электрокарниз [url=https://karniz-motorizovannyj77.ru/]karniz-motorizovannyj77.ru[/url] .
While researching ways to better manage common sensitivities at home, I came across visit this helpful site – The explanations are written in a clear and simple manner, making it easy for anyone to understand the concepts without needing prior knowledge or feeling overwhelmed by technical language.
While analyzing modern marketplace systems and vendor oriented platforms, I found Birch Harbor vendor space hub – it supports easy navigation through structured categories and offers a visually appealing interface that enhances overall browsing comfort for users exploring products.
Users who prefer curated creative shops often explore sites such as Lemon Harbor Artisan Vision Outlet where items are arranged in a structured inviting format – The design ensures navigation feels clear, warm, and easy to follow throughout the artisan outlet experience.
People who appreciate modern gallery based marketplaces often explore platforms like Stone Ginger Elegant Gallery Hub where products are showcased with refined visual structure – The galleria format enhances browsing flow, making it easy for users to navigate while enjoying a stylish and immersive shopping experience.
электрические карнизы купить [url=https://elektrokarnizy-dlya-shtor150.ru/]электрические карнизы купить[/url] .
While browsing small curated online shops I came across a charming outpost themed store that highlights simple design principles and user friendly navigation including hazelstone goods outlet – everything feels intentionally basic yet effective giving users a relaxed and straightforward shopping journey from start to finish
Full turnkey accounting support https://financeprofessional.ee filing declarations, calculating salaries, and reporting to the tax office. The guys work with e-Residency, everything is done online, without visiting the office. The prices are reasonable, and the reports are always on time.
While comparing different online shops for camping gear and their user interface decisions, I found open this gear site – The simplicity in layout works really well, and browsing across pages feels smooth, allowing users to move naturally without confusion or delays.
электрокарнизы для штор цена [url=https://avtomaticheskie-karnizy.ru/]электрокарнизы для штор цена[/url] .
While studying digital commerce hub interfaces and usability flow, I noticed open wave harbor commerce hub site – I appreciate the effort here as the site feels polished and user friendly with smooth and clear navigation throughout.
карниз электроприводом штор купить [url=https://elektrokarnizy777.ru/]elektrokarnizy777.ru[/url] .
карнизы с электроприводом купить [url=https://elektrokarnizy33.ru/]elektrokarnizy33.ru[/url] .
While browsing upscale getaway platforms I came across a luxury lodge site that highlights premium countryside stays with a visually rich and inviting presentation making it appealing for users seeking relaxation and comfort premium lodge experience hub – The content feels polished and visually appealing
While browsing different outdoor retail concepts for usability testing and layout comparison, I noticed a structure that emphasizes clarity and simple navigation which helps users move through categories efficiently and without distraction CoveSupplyHub – revised observation: the outpost layout remains minimal, allowing quick browsing and making product discovery feel intuitive and efficient overall experience.
While browsing digital retail spaces with thematic design I discovered a platform showcasing mountain marketplace hub – the alpine style gives a fresh aesthetic and the browsing experience remains structured and easy to navigate
Shoppers navigating large digital catalogs often depend on well-structured vendor portals that categorize products efficiently for easier discovery while offering improved browsing structure and clarity Vendor Collection Portal – These platforms help reduce decision fatigue while ensuring users can explore multiple product categories with minimal effort
нейросеть студент бот [url=https://nejroset-dlya-referatov-26.ru/]нейросеть студент бот[/url] .
In the process of reviewing online content hubs, I discovered this platform here – The browsing experience feels refined, with a design that supports easy reading and smooth interaction.
As I reviewed examples of online artisan boutique systems, I checked see velvet brook handmade hub – I’d recommend this to anyone who enjoys handmade goods since the collection feels authentic and carefully selected.
While analyzing curated online marketplace structures and vendor directories, I came across a well organized page where informational sections highlight Canyon Harbor market structure view embedded within the main content, improving clarity – The trade hall provides a balanced browsing system with structured categories and intuitive navigation for easy product discovery.
жалюзи с приводом [url=https://elektricheskie-zhalyuzi5.ru/]жалюзи с приводом[/url] .
People who prefer simple and structured shopping environments often engage with sites like Harbor Hall Acorn Vendor Space where product listings are displayed in an orderly format – The design ensures a smooth browsing experience by emphasizing clarity, consistency, and easy navigation throughout all sections of the marketplace.
During a detailed review of online vendor atelier websites focused on usability and layout clarity, I noticed visit this wave harbor atelier hub – Browsing here is pleasant, as categories are clearly organized and easy to navigate without confusion or clutter.
https://tpc72.ru/
нейросеть для учебы онлайн [url=https://nejroset-dlya-referatov-29.ru/]нейросеть для учебы онлайн[/url] .
During an exploration of curated resource listings and niche digital hubs, I found a platform that appeared smooth and simple to use, particularly Crest goods browsing portal offering a straightforward structure for easy navigation – Came across this recently, seems quite helpful and easy to explore, with an interface that feels organized and suitable for repeated visits.
While comparing user-friendly interfaces designed for clarity and structure, I discovered explore this neat platform – The design is balanced and organized, and navigating through content is seamless.
Many people browsing online artisan hubs appreciate systems that organize handmade goods into clear categories while supporting ethical production values Handmade Bazaar Link – such environments improve visibility for small traders and help customers evaluate quality items with greater confidence and ease
While browsing cruise related content I discovered a website that focuses on cruise journeys and travel planning with a clean interface that helps users quickly understand available voyage options and destinations sea voyage directory – The site feels clear and well structured
Users who enjoy simple ecommerce experiences often prefer goods store layouts that reduce visual clutter and improve navigation efficiency Marble Harbor Essentials Goods Store – The interface focuses on clean structure and intuitive browsing allowing users to find products quickly while maintaining a consistent and easy to understand environment that enhances overall usability and satisfaction across the entire platform today system.
рулонные шторы виды механизмов [url=https://elektricheskie-rulonnye-shtory77.ru/]elektricheskie-rulonnye-shtory77.ru[/url] .
Users interested in minimal aesthetic shopping platforms often appreciate sites such as Petal Archive Studio where products are displayed in a studio-inspired archive system that supports smooth browsing and clear visual hierarchy – The overall experience blends petal-inspired softness with structured archival organization for easy exploration
During mobile browsing across commerce platforms and vendor hubs, I noticed a site with Jasper harbor trade commerce hall portal – The name is cool and modern, but it was surprisingly slow to load on my phone.
While reviewing experimental ecommerce food themed storefronts and organic product templates, testers noticed a central module containing wild orchard vendor workshop portal embedded within layout flow, and although the branding feels natural and farm inspired, the product pages lack any visible ingredient lists or nutritional breakdowns causing confusion during browsing sessions across multiple devices
While analyzing online vendor atelier platforms for design quality, I checked see wave harbor artisan hub – Browsing here is pleasant, and categories are clear and easy to navigate across all sections of the platform.
Users exploring structured ecommerce environments often appreciate how clean vendor hall layouts improve navigation efficiency when browsing platforms such as Chestnut Harbor Vendor Hall Hub where listings are clearly organized into sections that support quick scanning and easy discovery – The vendor hall design ensures a smooth and structured browsing experience that feels intuitive, reducing clutter while helping users find products quickly and comfortably across all categories.
While analyzing different mental health websites, I noticed use this resource – The tone is calm and welcoming, helping visitors feel comfortable while reading content that is clearly explained and easy to follow.
While browsing different online retail mart platforms and evaluating purchase experiences, I came across explore night orchard retail mart – I bought a gift last week, and the packaging honestly felt really premium and carefully handled.
During a review of efficient and clean digital storefronts, I found browse this outpost site – The layout is clear, and navigating through sections feels easy and functional for users.
As I explored various online listing directories and marketplace hubs, I came across something that seemed clean and user-friendly, particularly with Coast vendor browsing page – the structure feels smooth and easy to follow, making navigation simple and enjoyable to return to again later.
Shoppers searching for affordable handmade collections often value platforms that highlight seasonal discounts and organized craft categories for easier browsing experiences Creative Discount Workshop while ensuring consistent quality control – such marketplaces allow users to explore creative items while enjoying reduced pricing and smooth navigation across different sections.
Users who appreciate minimal secure vault systems often engage with sites such as Harbor Vault Elm Core where items are displayed neatly – The interface creates a browsing experience that feels consistent, stable, and visually well organized.
While studying online marketplace systems I came across a streamlined interface where the Sweet caramel vendor hall hub appears naturally within the page structure, improving usability – The hall environment feels lively today with diverse selections and a browsing experience that is simple, direct, and visually appealing for everyday users.
While exploring personal expression platforms I found a straightforward website that keeps things minimal and direct making it feel approachable and suitable for simple browsing experiences clean identity page – The layout feels simple and calm
Shoppers who value clarity in ecommerce design often prefer websites that structure content into logical categories and provide easy navigation systems that help them quickly identify relevant items without unnecessary complexity or visual distraction during browsing Crest District Opal Hub – The platform emphasizes organized layouts and user friendly navigation tools that ensure smooth browsing across categories while maintaining a clean and efficient shopping experience from beginning to end.
While studying digital vendor atelier websites for accuracy and trust signals, I noticed open trail harbor vendor hub – The platform seems credible, and the information provided feels consistent, structured, and reasonably accurate throughout.
While browsing through different online vendor platforms I came across a site where Amber Harbor vendor lounge entry page – The “amber harbor” theme sounds appealing, but the lounge section mostly shows blank pages, which makes the whole experience feel unfinished and a bit confusing overall.
While exploring online storefront collections and niche vendor hubs, I noticed a site with Cove goods room Juniper entry link – It has an artistic layout, but the purpose and product range aren’t very obvious, which makes the experience somewhat unclear.
Digital retail platforms are evolving toward more structured models that enhance trust and operational efficiency across global ecosystems Guild commerce listing portal guild inspired architectures help standardize processes and improve coordination between different market participants – Structured guild marketplaces are valued for their ability to maintain consistent quality standards
During a review of organized and visually appealing retail platforms, I found browse this goods outlet – The design is clean and refined, and the products are presented clearly for easy browsing.
While browsing through different curated resource hubs and niche recommendation threads, I came across something that felt simple and well organized, especially when seeing Copper vendor access link included – it appears like a solid platform where content is clearly presented and accessible in a very user-friendly way.
Для многих специалистов сегодня для сотрудников сферы здравоохранения повышение квалификации в строительстве предлагается в понятном дистанционном формате с поддержкой профильного института. Когда подходит срок подтверждения квалификации, закрыть вопрос с обязательной процедурой или понять требования к пакету документов, здесь можно все оформить без спешки и без сложностей. Обучение организовано так, чтобы действующим сотрудникам было реально совмещать обучение с работой, а вопросы решались с поддержкой кураторов.
People who enjoy friendly ecommerce environments often engage with sites like Market Ember Meadow Exchange where products are shown clearly – The design ensures browsing feels organized, simple, and visually inviting throughout all sections.
As I analyzed several creative artisan platforms and their product range, I found check oakcove artisan goods hub – The selection feels broad and well organized, and browsing is engaging enough to justify spending time exploring everything available.
Хочешь продать монеты? Читать профессиональная оценка, быстрый выкуп и надежные условия. Работаем с редкими, инвестиционными и антикварными монетами. Выплата сразу после согласования стоимости.
While reviewing a range of agency platforms, I found check this out – The overall appearance is polished and organized, helping users quickly recognize the professionalism behind the design.
During casual browsing of fabric inspired online stores I found embedded within the main content area a section featuring cotton meadow storefront portal and although the design looks smooth and pleasant, the repeated session timeouts make navigation frustrating and reduce confidence in the platform’s overall usability and consistency.
People interested in artisan online shopping often seek platforms that balance simplicity and sophistication when engaging with curated stores such as Chestnut Cove Makers Outlet – product presentation is carefully structured to ensure clarity, helping users quickly understand offerings – the overall design reinforces trust through consistency and warmth.
Modern digital commerce solutions are increasingly designed to support vendor collaboration and streamlined purchasing processes especially through systems such as Retail Vendor Network – these platforms provide structured tools that help maintain consistency in listings and improve overall customer satisfaction during browsing
During casual browsing of ecommerce platforms I found Harbor Moon shop vendor lounge portal – The theme is attractive and consistent, but I feel the site needs richer product visuals to improve trust and usability.
While reviewing creative online storefronts focused on handmade goods, I came across visit artisan display hub – The design feels curated and expressive, and browsing through products is both simple and enjoyable.
hsk 4 учебники (HSK 4 открывает новые горизонты в освоении китайского языка, предлагая более сложную лексику и грамматику, чем предыдущие уровни | HSK 5 продолжает усложнять задачу, требуя уверенного владения широким спектром тем и стилей речи, что приближает вас к уровню свободного общения | HSK 6 является вершиной китайского языкового мастерства, демонстрируя способность понимать и использовать практически любую информацию, выражать сложные идеи и мысли на высоком уровне | HSK course 4 представляет собой структурированный учебный план, разработанный для эффективной подготовки к экзамену HSK четвертого уровня | HSK 4 standard и HSK 4 standard course подчеркивают официальный и общепринятый формат подготовки к HSK 4, соответствующий требованиям экзамена | standard course hsk 4, hsk standard course 4 и hsk 4 учебник акцентируют внимание на учебниках, являющихся основным инструментом для изучения материала HSK 4, включая грамматику, лексику и примеры использования | учебник hsk 4, учебники hsk 4, hsk 4 учебники — синонимичные запросы, указывающие на поиск официальных и вспомогательных материалов для подготовки к HSK 4 | hsk 4 workbook предлагает практические упражнения для закрепления материала, а hsk 4 ответы и ответы hsk 4 — ключевые ресурсы для самопроверки и понимания правильных решений при выполнении заданий.)
While scanning through various niche directories and discovery pages, I noticed something that seemed well organized and minimal, especially when seeing Harbor copper browsing hub included – I like the simple layout, because it makes things easier to understand and navigate almost immediately.
coworking services https://coworking-space-dubai.com
While exploring curated ecommerce directories I noticed a highly organized interface that improves usability where Vendor hall caramel structure portal Vendor hall caramel structure portal integrated mid-content supports browsing – The platform delivers consistent navigation and structured categories allowing users to browse products smoothly without unnecessary complexity in daily use.
As I reviewed structured artisan marketplace platforms, I noticed check upland cove creative hub – The design is clean and simple, and I had no trouble finding what I needed quickly while browsing.
While reviewing staging ecommerce vendor systems and UI marketplace templates, analysts noticed a content block featuring ridge vendor amber parlor showcase console node integrated into layout flow, and despite the warm amber ridge concept suggesting a polished marketplace, the vendor parlor section feels like a placeholder element which weakens perceived completeness during usability testing sessions and design evaluations
As I explored multiple digital outdoor marketplaces, I focused on usability and layout clarity, and during that process I encountered CoveVale Practical Supply – updated observation: the design is minimal and structured, supporting easy browsing and quick access to essential product information in a way that feels efficient and user centered.
Женский журнал stepandstep всё о красоте, моде, здоровье и отношениях. Практичные советы, тренды, лайфхаки и вдохновляющие истории для женщин, которые стремятся к лучшему каждый день
During casual inspection of vendor platforms I found a mid page listing containing creek harbor online trade hub and even though the branding feels calm and refreshing, the broken search feature limits functionality and makes it difficult to efficiently explore available categories or listings.
Many online shoppers looking for artisan goods tend to prefer structured platforms that highlight craftsmanship, easy navigation, and reliable performance during browsing sessions Craft Night Market Portal offering organized collections and intuitive search features across multiple handmade categories for better experience – Users often find such marketplaces efficient due to clear categorization and smooth performance even during peak browsing traffic
pebblecreekcraftexchange.shop – Will order again next month, hope they restock soon.
While reviewing comfortable browsing experiences in outdoor-themed stores, I came across visit this green outlet – The layout feels natural and calm, and navigating through pages is smooth and predictable.
People who value efficient ecommerce platforms often prefer websites like Quick Lane Harbor Store where product discovery is streamlined through clear category organization – The design focuses on speed and simplicity, ensuring users can browse comfortably and find what they need without unnecessary effort or confusion.
During exploration of bargain ecommerce hubs I discovered Nightfall trade house promo listing – I entered for the discounts, but the checkout stage made me uncomfortable enough to stop before finishing the purchase.
While going through different curated resource directories and marketplace hubs, I found something that seemed straightforward and accessible, especially when seeing Coral tradehouse meadow portal included – Pretty decent site overall, navigation works smoothly without confusion, making it easy to explore content without difficulty.
As part of reviewing goods district website layouts, I noticed check this gilded marketplace district – The structure is clean and logical, and browsing feels smooth, enjoyable, and easy to understand across all pages.
During usability analysis of ecommerce sandbox environments and UI prototype systems, testers identified mid page modules containing marble harbor vendor gallery trade showcase access node within layout structure, and despite the premium marble theme, the images are low resolution which reduces clarity and engagement during testing and evaluation processes
https://tpc72.ru/
During review of digital marketplace structures I observed a platform that offers a clean and intuitive browsing experience focused on usability Chestnut Harbor digital trade hub and it organizes products into clear sections that help users explore listings comfortably while maintaining a stable and visually appealing interface overall today.
пресс подборщик Почвофреза кирпич-имитация — специализированное оборудование, используемое для обработки почвы с формированием рельефа, похожего на кирпичную кладку, для ландшафтного дизайна
While comparing different online marketplace sites I noticed in the middle of a content section a listing containing creek harbor trade house entry portal and the layout looks extremely similar to another tradehall version which makes it confusing to distinguish between the two platforms during normal browsing and evaluation.
While reviewing different soft aesthetic themed online storefronts for usability and visual comfort, I noticed a particularly calming structure during browsing where Velvet Brook Outpost appears integrated within the layout and the overall presentation – revised note browsing feels calm minimal and pleasantly structured making exploration easy and visually relaxing for users across pages
E-commerce platforms that emphasize structured browsing and logical category grouping tend to create better user experiences and improved engagement over time Night Market Hall Portal – The layout feels organized and accessible, allowing visitors to smoothly navigate between different vendor sections while maintaining a consistent browsing rhythm throughout the site
As part of reviewing visually appealing boutique sites, I noticed check boutique collection – The layout is modern and consistent, and browsing feels natural and easy to follow.
While reviewing modern retail district style websites for performance quality, I explored browse this oak cove retail zone – The interface runs smoothly, and navigation feels clean and responsive without any delays or confusing elements.
As I explored several craft exchange platforms for product availability and usability, I found check pebble creek artisan exchange – I will order again next month and hope they restock soon because the selection looked really good.
During browsing of online marketplace sites I found Oak Cove market commerce portal – The interface is simple and visually clean, but not having a search bar makes navigation frustrating when dealing with many listings.
While scanning through niche marketplace listings and resource hubs, I noticed something that stood out for its usability, especially where Coral meadow trade link appeared – Pretty decent site overall, with navigation that works smoothly and doesn’t cause confusion, making everything easy to access.
During UX evaluation of sandbox ecommerce systems and vendor marketplace prototypes, testers found embedded navigation containing plum harbor vendor room access console node inside structured layout, and although the plum harbor aesthetic feels bright and fruity, the vendor room has zero vendors listed which weakens user engagement during usability testing sessions
телевик в смартфоне, что это такое как работает оптический зум и какие преимущества дает телевик
People who enjoy browsing handcrafted goods online often stumble upon curated spaces that highlight makers, including handmade goods explorer site offering an inviting selection of artisan products and an easy navigation structure that enhances the overall shopping and discovery experience. – A user-friendly artisan platform dedicated to creativity and engaging product presentation.
In the middle of scanning online commerce hubs I noticed a listing featuring crown cove vendor showcase room and although the royal theme gives a premium impression, the unclear and blurry product photos negatively affect user confidence and make browsing less enjoyable than expected for a modern marketplace.
Many people reviewing the platform appreciate how intuitive the navigation feels, especially when switching between vendor categories and exploring different management sections available Vendor Room Portal Guide Interface Overview it creates a smoother workflow for users who need quick access to tools and organized information without unnecessary complexity slowing them down during usage.
While reviewing digital artisan outlet marketplaces, I came across visit vale cove handmade outlet hub – The browsing experience is useful and efficient, and I found several interesting options quickly while exploring different sections.
During a review of gentle-themed artisan retail platforms, I found browse rose trail goods mart – The design feels soft and inviting, and products are arranged neatly for an easy and visually pleasing browsing experience.
While checking out different marketplace sites and online vendor hubs, I found a platform featuring Harbor market Juniper hall access page – The site looks like it has potential, so I may revisit it in a few weeks to see progress.
While going through multiple niche resource collections and discovery platforms, I found something that seemed reliable and well optimized, especially where Flora harbor access hub appeared – Everything loads fine without issues, and the visit was smooth and pleasant, making it easy to explore content comfortably.
Across prototype ecommerce environments and UI vendor frameworks, developers identified embedded navigation content containing quartz vendor meadow hall showcase entry node within page structure, and although the quartz theme feels polished and natural like mineral clarity, the market hall is fully empty today which negatively impacts usability during system analysis and testing cycles
Many investors and casual users searching for multi-purpose trading platforms often prioritize systems that combine accessibility with diverse listings and reliable service structures especially when exploring new online marketplaces and ecosystems solarbrook commerce hub which integrates various commercial options into a single interface making it easier for users to discover relevant trading opportunities and manage selections efficiently. – An integrated commerce solution designed for smooth discovery and organized digital trade experiences.
While exploring different artisan emporium platforms and evaluating shipping quality and product reliability, I came across explore solar orchard artisan emporium – It’s great for gift shopping, and everything arrived in one piece without any damage or issues at all.
While scanning online trade platforms I discovered a central section featuring harbor crown vendor hall directory and although the layout is neat and professional, it does not provide actual vendor information and instead shows placeholder content which limits its real world usability significantly.
While analyzing online commerce hubs for simplicity and structure, I checked see canyon upland commerce site – The platform appears decent, and the information is presented in a clear, useful, and easy-to-understand way.
ferncovevault – Vault style neat, content feels organized and carefully structured overall
The interface is appreciated for its consistency, particularly when navigating through Cloud Cove Goods Access Grid which keeps everything structured – items are displayed in an orderly format that makes scanning and selection simple and effective
While looking through vendor comparison lists I found a surprising entry Kettlecrest vendor house entry and the pricing strategy appears unusually aggressive, which makes me unsure whether it is sustainable or reliable.
While going through different curated directories and online marketplace listings, I found something that seemed organized and intuitive, especially when seeing Hazel vendor harbor link included – Clean design and strong structure make browsing feel comfortable and simple, which helps everything load and flow in an easy-to-follow way.
People who regularly shop online tend to favor platforms that reduce complexity, and while searching they may come across sunbrook trade center which groups items logically and helps users complete purchases with minimal effort and confusion. – A centralized trading platform focused on smooth user experience and efficient product browsing.
During frontend inspection of ecommerce sandbox platforms and vendor directory UI systems, developers identified a central module featuring orchard quartz vendor hall staging entry portal integrated into structured layout, and despite the unique quartz orchard identity suggesting premium design, the vendor hall redirects unexpectedly to the homepage which reduces usability during testing sessions and evaluation stages
During research into structured craft marketplace websites, I explored explore upland harbor craft collection market – Navigation could improve, but products are unique and cool, giving the platform creative value.
Digital consumers interested in curated marketplaces often prefer environments that feel both artistic and efficient, and while browsing they may discover creative commerce atelier point featuring selected goods and – it focuses on delivering a harmonious blend of functionality and aesthetic appeal.
During a casual review of online market-style websites I came across Kettle Harbor Bazaar Hub – The design is visually pleasant, but I ran into multiple footer links that don’t load properly, which makes the overall structure feel incomplete and a bit rushed in development.
ролет штора [url=https://rulonnye-zhalyuzi-avtomaticheskie.ru/]ролет штора[/url] .
While going through multiple niche resource collections and online listing pages, I found something that seemed well organized and accessible, especially where Honey vendor marketplace link appeared – First impression is nice overall, and everything looks relevant and easy to read, which supports a comfortable browsing flow.
рулонные шторы виды механизмов [url=https://elektricheskie-rulonnye-shtory90.ru/]elektricheskie-rulonnye-shtory90.ru[/url] .
роликовые шторы [url=https://elektricheskie-rulonnye-shtory.ru/]роликовые шторы[/url] .
Across prototype UI testing and ecommerce marketplace environments, developers observed content modules featuring harbor quick market house vendor showcase hub link within layout flow, and while the naming implies a fast and responsive marketplace, the actual loading speed is slow which reduces user satisfaction during testing sessions
People working with global commerce tools appreciate platforms that combine variety and organization to create a smooth browsing experience for users MarketBridge Control Hub – It provides structured navigation that helps users quickly find relevant trade options without confusion
Читать больше на сайте: https://www.kinofilms.ua/forum/t/5225407/
During reviews of minimalist digital storefront concepts and conceptual UX layouts, one may notice embedded references to Harbor Vendor Market Frame which feels visually complete yet practically sparse in content distribution across categories – It mirrors typical dropshipping site structures built from common drag-and-drop builders.
As I compared different artisan exchange websites for usability and design, I came across explore violet harbor craft hub exchange – There is nice variety available, and I enjoy exploring sections without getting lost thanks to intuitive navigation.
Users who frequently shop online tend to appreciate platforms that provide structured categories and curated selections that simplify the process of finding suitable and relevant products quickly suncove goods atelier center – This marketplace delivers a smooth and engaging browsing journey where curated items are presented in a clean and accessible format for all users.
During a comparison of vendor-based eCommerce studios focused on usability, I came across discover this lavender shop – The layout feels refined and balanced, and browsing products is straightforward with a visually appealing structure.
Новое в категории: https://www.freeboard.com.ua/forum/viewtopic.php?id=145713
While comparing craft emporium systems for mobile usability and checkout flow, I discovered browse vale harbor craft exchange emporium – The site works well on phone, and checkout was smooth today with no friction during payment.
During a casual browsing session through niche listing pages and discovery threads, I noticed something that stood out for its clarity and organization, particularly Meadow honey trade portal – I really enjoyed looking around here, as the layout is neat and user friendly, which made everything easy to understand quickly.
While going through online vendor directories and commerce platforms, I noticed a listing with a visually appealing name but limited substance, especially Aurora commerce harbor hall vendor hub – The branding is strong, but the content feels a bit underdeveloped.
During frontend evaluations of ecommerce marketplace systems and UI vendor prototypes, developers observed navigation elements containing ridge quick vendor house market access entry portal embedded in page flow, and although “quick ridge” is intended as a performance upgrade, the real-world experience still feels moderately slow which impacts usability during testing sessions
Modern digital trade environments benefit from indexed systems that categorize vendors and improve accessibility for users seeking services vendor marketplace index – This marketplace index enhances discoverability by organizing vendors into structured listings that simplify browsing and comparison tasks
While researching artisan bazaar platforms with a focus on performance and structure, I explored browse this orchard mint artisan site – The experience feels consistent and positive, and navigation is smooth with a reliable and well-balanced interface.
Across multiple UI kit implementations and ecommerce sandbox tests, platforms like daisy trade pavilion often showcase visually appealing layouts that conceal underlying backend weaknesses, especially in email subscription systems that frequently fail without proper error handling or feedback messages – The pavilion design feels complete but signup requests often return server errors
Users who enjoy streamlined digital storefronts typically seek platforms that simplify browsing while offering reliable speed and structured navigation menus teal cove product gateway featuring optimized loading times and well defined categories that make it easier to explore items efficiently without overwhelming page layouts or confusing interfaces.
While researching user-friendly vendor house platforms and their layout patterns, I explored browse this vendor lemon shop – The presentation is minimal and clear, making navigation easy and ensuring a comfortable browsing experience throughout.
Across sandbox UI evaluations and ecommerce vendor prototype systems, analysts encountered structured sections featuring harbor rain hall vendor market showcase hub node within page layout, and while the rain concept creates a calming visual mood, the hall contains broken image placeholders throughout which reduces engagement during browsing analysis and usability testing cycles
mintmeadowgoodsroom – Feels well organized, I didn’t face any issues navigating around.
During general browsing of commerce hubs and vendor platforms, I found a no-frills trade site containing Harbor Bay marketplace commerce hall link – I like its simplicity and the fact that it avoids annoying signup popups.
velvetbrookartisanboutique.shop – I’d recommend this to anyone who loves handmade goods.
Shoppers looking for simplified digital catalogs usually prefer systems that group content logically and allow quick access to relevant product areas without unnecessary complexity slowing down their browsing experience cotton grove catalog hub – This browsing layout emphasizes clarity and ease of navigation, making it straightforward for users to locate items and review listings efficiently in a clean environment
In usability testing sessions focused on ecommerce prototypes users frequently encounter the daisy harbor room interface where harbor vendor showcase link looks like a proper navigation element but actually triggers an automatic redirect loop back to the homepage instead of displaying any vendor information – this creates a broken navigation experience for end users
As part of studying structured online commerce hubs, I explored check this ridge commerce hub – The interface is minimal and organized, and users can understand everything quickly while navigating the site.
Across sandbox marketplace testing and UI prototype evaluations, testers noticed navigation elements containing rain harbor vendor hall console access hub within page structure, and although the rain harbor naming convention remains uniform, the vendor hall feels like a repeated template which negatively impacts engagement during interaction testing and system analysis
During a general exploration of curated online marketplaces and discovery pages, I found something that seemed well organized and easy to follow, particularly references including Harbor pine access portal – The overall experience is good, and everything seems clear and straightforward here, which makes navigation feel simple and efficient.
During a general review of commerce hubs and vendor trade hall listings, I noticed something that felt playful in presentation but minimal in actual offerings, particularly Harbor commerce acorn trade hall hub – The branding is cheerful and unique, though the inventory currently seems quite restricted.
1x giri? [url=https://1xbet-67.com/]1xbet-67.com[/url] .
In staging reviews of demo ecommerce systems, testers identified meadow vendor access hub within central navigation but despite the soft meadow aesthetic SSL certificate warning messages continue appearing during interactions affecting trust during checkout sessions online tests in QA cycles
генерация [url=https://nejroset-dlya-referatov-24.ru/]генерация[/url] .
Digital marketplace users benefit from calm and structured layouts that separate vendor categories clearly, allowing efficient browsing and better comparison of available services across different sections lounge vendor index portal – Vendor lounge feels calm with well structured product categories available, ensuring a smooth experience where users can quickly understand offerings and navigate listings without unnecessary complexity
During a review of modern craft boutique websites and design structure, I found browse velvet grove artisan goods boutique – A minor typo appears in the description, but overall I’m satisfied with the browsing experience and layout.
While reviewing experimental marketplace UI systems and vendor directory platforms, developers observed embedded content featuring meadow solar vendor market room console link inside structured layout, and although solar meadow implies renewable energy alignment, there are no eco certification visuals which reduces sustainability confidence during usability testing sessions
People who enjoy well structured artisan stores often explore sites like Dock Oak Craft Artisan Outlet where items are shown in a clean layout – The interface creates a browsing experience that feels organized, easy, and visually comfortable.
электрокарниз недорого [url=https://prokarniz17.ru/]prokarniz17.ru[/url] .
As I explored different online directories and curated discovery platforms, I noticed something that stood out for its structure and responsiveness, particularly with Isle icicle marketplace entry – The platform is nice, and I appreciate how quickly pages load, which makes browsing feel quick and simple.
During my browsing earlier today, I noticed see more here which looked like a nice little site, and I found it useful while browsing earlier today since the content was straightforward and easy to go through.
While browsing through different online marketplace-style platforms and vendor directories, I came across something that felt visually calm and inspired by nature, especially where Alpine Cove market hall hub – The whole branding gives off a cozy mountain shop vibe, making it feel warm and inviting like a small alpine village store experience.
Доставка свежих цветов в день заказа. Флористы собирают букеты из проверенных поставок, бережно упаковывают и передают курьеру. Работаем ежедневно, гарантируем сохранность и точное время вручения. Анонимная отправка и фотоотчёт включены https://buketico.ru/
In sandbox testing of ecommerce UI frameworks, users reported seeing dawn ridge commerce panel within content layers, and despite its placement looking intentional, after the dash – ridge inspired visuals are appealing but footer links are completely dead making site navigation feel unfinished and poorly connected overall
While browsing through different online platforms earlier today for comparison, I came across something in the middle like visit this neat site which I browsed earlier today, and everything looked neat and quite easy to navigate without confusion or unnecessary complexity.
Users exploring minimalist vendor platforms often prefer interfaces that emphasize clarity and reduce unnecessary visual distractions fern lounge trade index – This index format organizes vendor data in a structured way that supports easy browsing and quick understanding
Для современных компаний вашему бизнесу менедж топ способна помочь выстроить понятную и эффективную работу команды без хаоса в процессах. В одном удобном окне просто ставить задачи, отслеживать дедлайны, видеть движение средств, контролировать команду и понимать что происходит в компании. Инструмент подойдет для компаний любого масштаба, где ценят контроль и дисциплину. Компания растет быстрее, когда процессы работают четко.
During usability testing of ecommerce marketplace systems and UI sandbox environments, testers found a navigation module containing solar orchard house market vendor access portal link embedded mid layout, and although the solar orchard theme feels optimistic and growth oriented like a renewable commerce ecosystem, the checkout page lacks recognizable security badges which creates hesitation during interaction testing and evaluation processes
Users who enjoy artisan ecommerce aesthetics often engage with sites such as Fern Ridge Handmade Goods Market Hub where products are arranged in a clean structured layout – The design ensures browsing feels easy, clear, and visually appealing across all sections of the marketplace.
wheatmeadowmarketroom.shop – Clean layout and simple navigation, makes exploring content really enjoyable.
As I reviewed examples of online vendor collective systems, I checked see oak meadow vendor marketplace – The product photos are clean, and the descriptions are helpful, making it easier to understand each listing quickly.
During a casual browsing session across online resource hubs and marketplace listings, I came across something that felt polished and accessible, particularly references like Harbor ivory vendor access – The platform appears professional, and I might recommend this to others as well because navigation feels simple and intuitive.
During review of prototype marketplace systems and UI kits testers identify navigation elements placed within content streams drift orchard market node which behaves inconsistently across sessions giving the impression of a full catalog while only revealing a very small selection of available items – The aesthetic is peaceful but functionality feels heavily limited in practice
While going through multiple vendor commerce platforms and marketplace hubs, I noticed almost identical naming patterns across different listings, especially Alpine harbor commerce trade vendor hall link – It created a strong sense of déjà vu while navigating.
While reviewing different digital trade gallery systems and online vendor showcase platforms for design ideas and performance evaluation purposes across sample layouts Dune Meadow trade gallery entry navigation stayed fluid and pages responded quickly without delay making the experience easy to follow – Clean and organized browsing with consistent responsiveness and simple structure across all pages
As I was reviewing various online marketplace gallery concepts and vendor hub designs for inspiration and structural understanding Pearl Cove market browsing hub I found the experience steady and predictable which helped maintain smooth exploration across all sections. – The platform performed well overall and content displayed without delays
Users exploring vendor directories often mention how organized categories help them navigate large inventories efficiently, and many highlight that the platform feels structured and intuitive when they encounter the section featuring Floraridge Vendor Room Hub – Vendor room has organized layout and easy product discovery in this updated interface experience that supports smoother browsing overall and improves clarity across multiple product sections
During UX assessment of simulated ecommerce platforms, reviewers highlighted strong visual appeal driven by sun inspired branding, yet noted structural emptiness in sections like a href=”[https://sunharborvendorroom.shop/](https://sunharborvendorroom.shop/)” />sun harbor bright vendor access panel where Sun harbor design remains attractive but the vendor room lacks any descriptive information or product listings, reducing clarity and user understanding
While exploring fast loading websites and clean UI examples, I came across visit hiper free platform – The interface feels really clean overall, everything loads quickly and the system works smoothly, making the browsing experience simple and efficient.
Users who appreciate clean market dashboards often browse sites such as River Harbor Asset Insights Hub where information is structured efficiently – The design makes trading data easy to follow, practical, and straightforward.
While searching for simple and clear websites, I came across explore this resource and appreciated how everything is organized here, allowing me to understand the information quickly without unnecessary confusion.
As I continued exploring various online directories and marketplace-style pages, I came across something that felt well organized and easy to use, particularly with Ridge ivory trade link – The browsing experience feels smooth overall, and nothing is complicated or hard to understand, making navigation feel effortless and natural.
During QA testing of sandbox marketplace designs and UI templates, reviewers spotted a central content block featuring marketroom willow portal link integrated into page flow – the design suggests a nature themed storefront but lacks willow imagery entirely leaving the interface feeling unfinished and visually inconsistent across product display regions
Online shoppers tend to favor platforms that reduce friction and improve accessibility when browsing product listings Canyon Harbor quick access page the layout here ensures a streamlined experience that allows users to find items quickly and efficiently without distractions
While scanning through online marketplace lounge directories and vendor systems, I came across a strong amber color theme, especially Amber commerce ridge vendor lounge portal – It looks visually warm and modern, but the contrast issues affect readability quite noticeably.
During casual research into marketplace listing designs and experimental vendor portals for inspiration and interface comparison across multiple references Dune Meadow vendor parlor index the layout remained structured and content sections were clearly separated improving readability – Simple navigation flow with fast loading pages and stable interface behavior throughout browsing session
solarorchardartisanemporium.shop – Great for gift shopping, everything arrived in one piece.
In the middle of checking various platforms, I discovered visit this platform and noticed the simple layout, which made browsing feel really smooth and ensured everything was easy to access and understand without complications.
While reviewing experimental ecommerce interfaces with ocean inspired color schemes, testers highlighted a strong teal visual identity that improves aesthetic consistency, but noted organizational weaknesses in key areas such as a href=”https://tealcovemarkethall.shop/
” />teal cove vendor hall marketplace panel where the teal cove design looks polished and calming, yet the market hall requires additional category structure to support efficient navigation during usability testing workflows
Users who appreciate cozy ecommerce design often browse platforms such as Flint Brook Artisan Studio House Hub where products are displayed in a clean warm layout – The design ensures browsing feels calm, visually appealing, and well structured throughout the entire shopping experience.
The platform provides a smooth browsing experience where everything is well arranged and easy to access for users Silk Meadow market hub I liked how clearly structured the entire site felt during use
Users who enjoy simple ecommerce navigation often engage with sites such as Cove Goods Bright District Sun Hub where products are displayed in a clear and organized structure – The browsing experience feels smooth, intuitive, and easy to manage across all categories of the shop.
After exploring several online resources, I discovered look into this which provided a smooth experience overall, since pages loaded quickly and everything functioned properly without interruptions.
Digital shoppers commonly report that vendor hubs with clear categorization significantly improve browsing flow, especially when exploring Forest Vendor Center which is considered helpful for simplifying product searches and improving visibility – users often note a more seamless browsing experience overall.
While looking into unique Hawaiian boutique accommodations with strong design aesthetics, I came across a highly polished listing online today < hawaii garden inn detail – It presents information clearly and smoothly, giving a pleasant impression of comfort, nature, and well organized hospitality features
calmcovevendorparlor.shop – Really nice platform, easy browsing and smooth user experience today
While scanning through online resource hubs and discovery threads, I noticed something that stood out for its usability and structure, especially where Jewel brook vendor access page appeared – This seems useful overall, and I found the content quite straightforward today, making navigation feel simple and stress-free.
During experimental UI evaluation sessions, testers spotted a navigation snippet containing dune drift market hall gateway placed within mid page content but suffers from sandy tone readability issues reducing clarity significantly in structured layouts – Dune aesthetic feels unified yet text contrast issues impact usability across devices
When evaluating vendor platforms, smooth navigation and logical layouts are essential for user satisfaction Canyon Harbor trade access link this one delivers a consistent and organized browsing process that enhances usability and overall experience
Online car games masin oyunlari com az racing, driving simulators, and 20+ games in one place. Get behind the wheel, navigate the tracks, and get the adrenaline rush without downloading.
While reviewing curated trade gallery platforms and marketplace catalog systems for usability testing and structural insights across sample interfaces, I discovered Plum Cove goodsroom browsing portal embedded mid-content – The content remains clear and readable, and I could navigate easily through sections without distractions or unnecessary complexity affecting the experience.
During a casual exploration of commerce hubs and vendor marketplace listings, I found a platform that appears quite new and not fully populated yet, particularly Cove Aurora goods room link – The site looks fresh, but each category only shows around three products, which feels a little strange.
sageharborgoodsgallery.shop – Looks clean and minimal, easy to find information without confusion.
People who enjoy structured emporium browsing often explore sites like Grove Timber Emporium Flow Hub where items are arranged in a rich layout – The interface ensures browsing feels smooth, organized, and easy to understand throughout the store.
People who enjoy artistic online marketplaces often engage with platforms like Cove Teal Vendor Artisan Studio Market where items are displayed in a creative and organized format – The design emphasizes artistic expression and structure, making browsing feel smooth, inspiring, and visually balanced across all product categories.
velvetgrovecraftboutique.shop – Little typo in description but overall I’m satisfied.
1xbet resmi sitesi [url=https://1xbet-68.com/]1xbet-68.com[/url] .
While reviewing UI sandbox ecommerce systems with consistent teal coastal styling, testers observed a well structured harbor themed interface, but the vendor hall lacks meaningful data when inspecting a href=”https://tealharborvendorhall.shop/
” />teal harbor vendor hub showcase node where the design appears clean and cohesive, yet the vendor hall continues to display Lorem ipsum placeholder text which limits usability during evaluation and interaction testing processes
During my search across multiple online options, I found <a href="[https://woodharborvendorroom.shop/](https://woodharborvendorroom.shop/)" / check it here which seemed like a helpful platform overall, and I might visit again sometime soon since everything was fairly well organized.
1xbet giri? adresi [url=https://1xbet-69.com/]1xbet giri? adresi[/url] .
1xbet g?ncel [url=https://1xbet-70.com/]1xbet g?ncel[/url] .
While analyzing vendor listing systems online, I visited vendor listing network and noticed how neatly everything is categorized for quick access and discovery – The browsing experience feels structured, calm, and easy to understand at a glance
1xbet yeni giri? [url=https://1xbet-71.com/]1xbet yeni giri?[/url] .
Users looking for vendor platforms often prefer a really nice platform like this with easy browsing and smooth user experience today Calm Cove shop access point everything feels clear and comfortable to explore
cenforce 200 ebay
cenforce 200 ebay
During UX research on experimental ecommerce layouts and hybrid themed marketplaces, designers observed embedded routing components featuring meadow dune storefront entry node placed mid page, where the mixed environment concept creates confusion in visual storytelling – Meadow name contradicts dunes, leading to a weakened brand narrative that feels inconsistent and poorly structured across multiple sections of the interface during testing phases
Users engaging with digital storefront systems often appreciate clarity in design, especially when they encounter Meadow Room Browse Station Online and they mention that the layout helps them quickly understand product placement – the structure is frequently described as efficient for comparing items without feeling overwhelmed by unnecessary details
While going through various online directories and curated resource hubs, I found something that seemed organized and user-friendly, especially when seeing Jewel vendor cove link included – Pretty clean interface overall, with everything arranged in a logical way that makes navigation feel natural and straightforward.
Many shoppers value vendor platforms where search tools work quickly and the interface remains clean and minimal Solar Meadow marketplace link the browsing experience here feels responsive and helps users find content without waiting or frustration
While exploring online grocery innovation projects, I came across a concept store website with a very simple but effective layout structure hope digital supermarket view – The presentation is clean and minimal, making navigation intuitive and the overall idea easy to grasp quickly
While exploring different aesthetic-focused online marketplace designs for usability research, I came across a section featuring Honey Meadow market gallery portal embedded within a clean structured interface that emphasizes spacing and visual balance – The overall browsing experience feels warm, inviting, and smoothly organized, making navigation feel effortless and visually comfortable throughout
Exploring digital vendor sites is more efficient when the interface is clean and the layout is simple like here Silver Cove vendor center the browsing experience felt smooth and content was easy to access without confusion or clutter
During a relaxed session exploring marketplace listing frameworks and vendor gallery designs for UX inspiration and comparison across sample platforms I encountered Teal Harbor commerce gallery view – The interface feels organized and responsive, allowing users to browse comfortably through sections while content remains readable and transitions stay smooth and visually consistent throughout navigation
During a casual exploration of online vendor marketplaces and commerce hubs, I noticed a platform with a strong autumn design identity, particularly Meadow autumn market hall link – The seasonal theme is really appealing, and it would be great if they added genuine customer reviews soon.
People who enjoy structured online marketplaces often engage with sites like Harbor Teal Commerce Connect Hub where items are arranged in a logical and efficient layout – The interface creates a browsing experience that feels simple, organized, and easy to explore across all product categories.
Users browsing vendor platforms often prefer well organized content and simple layout that makes it easy to explore everything quickly River Harbor shop access point this one delivers a clear and efficient browsing experience overall
Users who appreciate elegant digital vault marketplaces often browse sites such as Golden Cove Vault Archive Hub where products are displayed in a clean refined layout – The interface creates a browsing experience that feels organized, consistent, and visually appealing throughout the platform.
After comparing several online resources that felt similar, I encountered check this page which included interesting content, and I spent some time checking different sections today while going through the material.
Across prototype UI environments for outdoor themed marketplaces, developers identified a rustic timber trail layout that feels immersive and natural, but functional structure collapses in key areas such as a href=”[https://timbertrailmarkethall.shop/](https://timbertrailmarkethall.shop/)” />timber trail marketplace hall entry node where the design remains visually consistent and earthy, yet the navigation system is entirely broken which disrupts user interaction flow during system analysis and testing phases
While researching different online marketplace concepts and experimental vendor directories, I encountered a page that immediately stood out explore Moon Cove listings – The browsing experience felt smooth and exploratory, allowing me to move between sections at my own pace while noticing small design details that made navigation intuitive and engaging.
Across prototype storefront testing and UI review sessions, analysts found embedded cart elements containing echo brook vendor hall console in checkout structure, but quantity updates fail to apply after user changes – Echo brook is catchy and modern, but cart page does not correctly reflect updated product amounts in testing environments
Что такое дискретная видеокарта в ПК и что означает дискретная видеокарта
While going through different curated marketplace directories and resource pages, I came across something that felt clean and structured, especially where Mint orchard vendor hub appeared – I like the overall feel here, since it’s simple and easy going, allowing users to move through content without difficulty.
When exploring digital marketplaces, clean design and intuitive navigation often define a good user experience Icicle Brook goods portal this platform offers a pleasant browsing flow that helps users find what they need quickly and without hassle
violetharborretaillane.shop – They responded to my email within an hour, nice.
While browsing premium beverage brands and winery portfolios, I found a well designed wine website that presents information in a clean and elegant format icewine luxury brand page – The brand feels well established, with detailed wine descriptions that are both appealing and easy to explore
In the process of exploring modern marketplace aesthetics and digital catalog platforms, I came across a page containing Honey Meadow trade lounge view embedded within a clean and visually balanced structure that reduces clutter – The experience feels warm, stable, and very easy to navigate even during longer browsing sessions
During a casual session reviewing online vendor gallery systems and commerce platform designs for inspiration and usability insights across sample sites, I found Pebble Pine digital trade hub placed within structured content – The browsing experience was enjoyable and I could explore listings without confusion as everything remained simple, responsive, and clearly presented throughout.
Digital marketplaces benefit from fast performance, and this site ensures pages load quickly and remain organized Silver Harbor item portal I enjoyed how smooth and responsive the entire browsing experience felt overall
bayharbortradehouse – Almost identical to another bay domain, bit confusing tbh.
In the course of reviewing browsing-focused platforms, I discovered shopper browsing gateway which features a clear interface that helps users move between sections effortlessly – The overall experience feels smooth, consistent, and pleasantly intuitive
The platform offers a smooth experience and clean layout making browsing very convenient overall today Plum Harbor market hub I found everything easy to access
Users who enjoy straightforward ecommerce experiences often engage with sites such as Trail Harbor Smart Commerce Hub where products are displayed in a simple and organized layout – The design ensures smooth navigation that feels user friendly, clear, and easy to understand while browsing different sections.
During my search for well-designed websites, I stumbled uponclick this design example which felt refreshing, as the design feels modern and neat, definitely stands out nicely with its clean structure and balanced layout throughout the pages.
People who appreciate organized ecommerce hubs often browse sites like Orchard Granite Vault Network Hub where items are presented in a clean structured format – The design ensures browsing feels stable, safe, and visually easy to follow throughout the platform.
While evaluating the site’s footer usability, I came across check out this hub – even though it appears to be part of a social linking system, it does not provide any valid redirection to users.
During usability analysis of ecommerce support pages and helpdesk interfaces, testers found a mid-layout module containing echo harbor customer help center link embedded within contact flows, but outgoing emails from support fail to deliver properly – Echo harbor feels familiar and simple, yet the customer service email keeps bouncing back across all test domains
Exploring vendor directories highlights how structured layouts and helpful sections improve overall browsing efficiency and satisfaction Violet Harbor vendor explorer this platform keeps everything organized and ensures users can move through content without confusion or delay
As I continued exploring various online listing directories and discovery threads, I came across something that felt clean and structured, particularly with Cove marketplace moon page – The experience is solid, and I didn’t encounter anything confusing at all, making navigation feel natural and effortless.
During my review of multiple marketplace-style listings, I found V “navigation entry marker” shown in an unusual broken format, and Cicicleislemarketparlor.shop appeared mid-content, while the design feels modern enough and navigation was quite simple to follow throughout the browsing session.
https://www.google.com.au/url?q=https://g-r-s.fr/pag/code_promo.html
During research into modern vendor listing systems and curated marketplace examples I encountered Birch Harbor digital market hub naturally integrated into the content flow – everything loaded efficiently and the browsing experience remained smooth, giving a sense of well structured and responsive design throughout.
While browsing unconventional web design showcases, I discovered a platform that focuses heavily on experimental structure and creative layout design digital experiment design hub – The site feels unique and creatively structured, with content arranged in a way that highlights artistic experimentation and visual flow
pineharbortradeparlor.shop – Nice interface design makes navigation simple fast and quite pleasant
Good usability depends on design, and this platform ensures modern interface makes browsing feel very easy today overall Linen Cove vendor explorer I found everything simple and accessible
During a casual exploration of online marketplace hubs and vendor listings, I found a platform that seems visually fine but lacking in ongoing content, particularly Cove Autumn vendor room link – The blog section is empty, which raises questions about whether the site is still maintained.
mintorchardretailatelier.shop – Definitely coming back here for the holiday season.
While exploring different online vendor platforms, I immediately noticed how the modern feel of this site combined with simple navigation creates a smooth and intuitive browsing experience overall Sky Harbor vendor lounge hub everything feels clean, organized, and easy to move through
Users who enjoy soft themed ecommerce sites often engage with sites such as Wave Harbor Coastal Breeze Outpost where products are shown in a light and structured format – The design makes browsing feel smooth, relaxing, and visually soothing across all categories of the store.
After checking out several alternatives that lacked clarity, I encountered <check it here which offered a much better experience, with clearly presented information and smooth navigation.
People who prefer minimal digital marketplaces often engage with sites like Orchard Lantern Trade Path Lane Hub where items are displayed in a structured format – The design ensures navigation feels intuitive, fluid, and easy to navigate throughout the platform.
During a detailed comparison of several web pages, I encountered explore this store – the structure and design immediately reminded me of a nearly identical platform, giving off a strong déjà vu impression that makes the experience feel duplicated.
Across staging ecommerce evaluations and prototype UI testing sessions, analysts identified a content module containing harbor elm goods display entry inside layout flow, but despite the natural themed branding, images repeatedly fail to load leaving empty product slots – Elm trees are strong, but the goods room experiences broken image links that reduce visual completeness
Many online users value platforms that present information clearly while maintaining attractive visuals for engagement Forest Meadow product hub the design here supports quick discovery of relevant details and keeps navigation simple and efficient across different sections
During my review of marketplace websites, this platform stood out because its clean layout makes exploring products easy and visually pleasant overall Autumn Cove browsing portal I found everything clear and comfortable to use
As I continued exploring various online resource hubs and marketplace listings, I came across something that felt organized and easy to use, particularly with Harbor moss vendor entry – The site seems decent, and I’ll probably check it again soon since navigation is intuitive and clean.
sageharborgoodsgallery.shop – Looks clean and minimal, easy to find information without confusion.
While reviewing digital commerce platforms and curated marketplace systems for UI evaluation and structural comparison across sample interfaces, I came across Plum Cove trade goodsroom view integrated within content – The interface is simple and effective, and I found the content easy to read while navigating comfortably through different sections without any confusion or slowdown.
zencovegoodsgallery.shop – Simple interface clear structure makes finding information very quick indeed
coralharbortradegallery.shop – Great browsing experience overall everything feels organized and easy today
While researching modern web portfolios and personal introduction pages, I discovered a clean and structured profile that feels highly professional jackonson portfolio showcase site – The page offers smooth navigation and clear information presentation that makes browsing easy and efficient overall
Online football matches futbol oyunlari com az play football for free and without registration. Choose teams, participate in matches, and enjoy dynamic gameplay right in your browser without downloading.
car games online https://araba-oyunlari.com.az racing, drifting, parking, and driving. Over 20 games are available for free — play now and hone your skills.
People who enjoy handcrafted ecommerce systems often engage with sites like Cove Wind Artisan Style Market Hub where items are displayed in a clean structured format – The interface creates a smooth browsing experience that feels curated, easy to use, and visually appealing across all categories.
While checking different vendor platforms and marketplace listings, I found a berry-styled site with Cove house berry market portal – The aesthetic is clean and fresh, but the missing contact page makes it feel slightly unfinished.
After comparing different resources online, I came across visit here which provided a structured experience, helping users find things much faster and navigate through content easily.
People who prefer simple ecommerce navigation often engage with sites like Meadow Juniper Goods Core Hub where items are displayed in a structured layout – The design ensures browsing feels smooth, organized, and easy to explore across categories.
Many online marketplaces can feel cluttered, but this platform keeps everything nicely structured so browsing feels smooth and comfortable Sky Harbor product hub I liked how easy it was to find content and move through pages effortlessly
1xbet g?ncel [url=https://1xbet-giris-69.com/]1xbet g?ncel[/url] .
1xbet turkey [url=https://1xbet-giris-67.com/]1xbet-giris-67.com[/url] .
1xbet ?ye ol [url=https://1xbet-giris-68.com/]1xbet-giris-68.com[/url] .
Exploring digital marketplaces shows how simple design and fast performance improve user satisfaction significantly Sea Cove vendor center the experience feels pleasant and efficient, allowing users to access content quickly without unnecessary complexity or delays during browsing
Exploring digital vendor sites becomes more enjoyable when nice visuals and structured layout make browsing feel smooth and pleasant Berry Cove vendor center the interface felt clear and visually appealing throughout
After exploring several websites with varying design quality, I discovered check this resource and noticed everything looks well structured, helping users move around without issues and making navigation feel simple and easy throughout the browsing experience.
During a relaxed session exploring marketplace design structures and online trade gallery systems for usability testing and structural insights, I came across Sun Cove commerce display board within structured content – The interface felt visually pleasant and fast, and I enjoyed browsing because everything was well organized and easy to navigate without issues.
People who prefer uncluttered online outlet stores often engage with sites like Stone Harbor Outlet Flow Market where items are displayed in a minimal and organized format – The design emphasizes ease of use and clarity, making browsing straightforward, efficient, and enjoyable for everyday users.
While exploring culturally inspired and creatively themed websites, I came across a visually distinctive platform that blends different influences in an engaging way jeddah brooklyn cultural mix page – The site feels diverse and interesting, combining themes in a way that makes browsing engaging and thoughtfully presented overall
During evaluation of curated vendor platforms and digital marketplace systems, I noticed a page featuring Upland Cove commerce gallery space integrated into a minimal interface that supports readability – The experience feels steady, structured, and very easy to navigate without unnecessary complexity or visual overload
Портал по инженерии https://build-industry.su и перепланировке: проекты, согласование, нормы и практические решения. Полезные статьи, сервисы и экспертиза для безопасного изменения планировок и внедрения инженерных систем
Дома и коттеджи https://orionstroy.su под ключ в Москве: от проекта до готового жилья. Профессиональный подход, контроль качества и комфортные условия сотрудничества
After navigating through several platforms that felt unfinished, I discovered visit here and appreciated its polished presentation, which made it stand out as a more thoughtfully developed site.
Users who prefer organic styled ecommerce platforms often explore sites such as Forest Artisan Cove Green Outlet Hub where products are arranged in a minimal natural structure – The design ensures browsing feels soothing, clear, and visually balanced across all product categories.
While scanning through different trade platforms and vendor listings, I noticed a basic-looking site featuring Berry harbor commerce vendor room link – It served as my last stop today, and I’d say it’s decent but not particularly memorable.
This type of marketplace performs better when a simple interface works well, navigation is quick and intuitive today for all users Oak Cove browsing hub the experience felt smooth
During a content review session, I noticed see this trade page – even though the branding implies activity, the site feels deserted, as if it were once active but is now largely neglected.
A clean interface improves usability, and this platform makes it easy to go through different sections quickly and smoothly Snow Cove marketplace link I found everything clearly organized and easy to access
rainharborvendorparlor.shop – Good organization easy navigation helps users find things efficiently today
Online platforms that focus on organized content presentation often deliver better usability for browsing sessions Elmwood gallery content portal this one allows users to navigate sections smoothly while maintaining clarity and structure at all times
реферат через нейросеть [url=https://nejroset-dlya-referatov-27.ru/]реферат через нейросеть[/url] .
1xbet spor bahislerinin adresi [url=https://1xbet-giris-70.com/]1xbet spor bahislerinin adresi[/url] .
During exploration of online commerce lounge designs and vendor directory systems for usability comparison and inspiration across multiple references I encountered Upland Cove vendor lounge flow portal inside structured content and found the interface visually balanced with a clean layout that improves readability and navigation – Everything feels modern and nicely arranged, making browsing comfortable and straightforward
sageharborgoodsgallery.shop – Looks clean and minimal, easy to find information without confusion.
Users who appreciate minimal icy ecommerce design often browse platforms such as Icicle Isle Snow Market Hub where items are displayed in a refreshing and clean layout – The design ensures easy navigation and a calming browsing experience that feels structured, modern, and visually appealing across all sections.
viagra spanish translation
viagra spanish translation
Чаты строителей https://stroitelirussia.ru в России— официальный сайт для общения и обмена опытом. Объединяем строителей со всех регионов России, обсуждения, вакансии, советы и полезные контакты
Ремонт и отделка квартир https://kaluga-remont.su а также строительство коттеджей под ключ. Комплексные услуги, опытная команда и контроль на каждом этапе работ
While analyzing various websites that felt overly complex, I found go through this site which stood out for its clean interface, helping me navigate smoothly and access useful details without confusion.
Users who prefer lightweight ecommerce layouts often explore sites such as Acorn Harbor Outpost Clear Market Hub where products are grouped in a minimal and accessible structure – The interface ensures browsing feels calm, user friendly, and easy to navigate across all categories.
While browsing international themed websites with cultural depth, I came across a platform that creatively blends multiple influences in one space cultural fusion concept page – The site feels engaging and diverse, offering a mix of themes that creates an interesting and visually appealing experience overall
While analyzing modern digital storefront concepts for inspiration, I found a section containing harbor vendor showcase hub integrated within a structured layout that emphasizes readability and spacing – The experience feels calm and organized, allowing users to explore content comfortably without distraction or visual overload across multiple sections
Users often appreciate platforms that combine well structured pages with clean design for a more comfortable and efficient experience Acorn Harbor catalog entry I found navigation easy and everything clearly labeled
While exploring different online vendor platforms, I noticed how a smooth layout combined with responsive pages creates a very pleasant browsing experience that feels easy and efficient overall Snow Harbor trade hall hub everything loads well and navigation feels natural throughout
Exploring structured vendor environments reveals how effective navigation can enhance overall user satisfaction >Aurora Harbor product hub the layout supports effortless browsing and allows users to move through categories smoothly with minimal effort required during interaction
While reviewing various marketplace index systems and experimental vendor directories, I found Moon Harbor marketplace index page – The site maintained a consistent layout across pages, making it easy to browse information step by step without feeling overwhelmed or rushed.
Users generally expect online shopping sites to offer clear navigation and structured product presentation for ease overall experience Valecove Goods Room web portal – Site structure supports smooth navigation, enabling users to explore categories without unnecessary complexity or confusion throughout browsing sessions based on interface review findings user insights
Users who enjoy minimal ecommerce design often explore sites such as Gladestone Rustic Outpost Market where items are arranged with a focus on simplicity and function – The layout ensures easy navigation and reduces clutter, creating a browsing experience that feels calm, structured, and highly user friendly across all categories.
1xbet com giri? [url=https://1xbet-giris-71.com/]1xbet com giri?[/url] .
When usability is strong, nice design overall means pages load fast and feel very smooth Ivory Harbor listing portal navigation felt natural
продвижение сайтов франция [url=https://loveshtory.com/svoimi-rukami/stati/provedenie-tehnicheskogo-audita-sajta-kljuchevye-shagi-i-rekomendacii/]продвижение сайтов франция[/url]
People who appreciate organized online trade systems often browse sites like Harbor Jasper Trade Center Hub where items are presented in a simple structured layout – The design ensures browsing feels smooth, logical, and easy to understand throughout the marketplace.
In the process of reviewing multiple online resources, I encountered check this out here which provided a smooth browsing experience, with a layout that felt organized and easy to move through without confusion or unnecessary effort.
Some websites feel slow, but this one keeps a simple design and fast loading for a reliable interface Glass Harbor quick browse page navigation felt easy and consistent throughout
I discovered a niche sports entertainment page while browsing online communities that focuses on volleyball discussions and fandom content fun volleyball discussion corner – It encourages relaxed engagement with humorous undertones and simple presentation that makes the experience enjoyable and approachable
Всё об отделке фасадов https://fasad-otkos.ru и установке панелей на одном сайте: обзоры материалов, методы монтажа, ошибки и рекомендации для качественного и долговечного результата
Дома под ключ https://artsitystroi.ru в Минск: индивидуальные проекты, современное строительство и полный контроль качества. Создаем надежные и удобные дома для жизни
Many shoppers prefer vendor platforms where pages are responsive and layouts are easy to understand and navigate Raven Grove marketplace link the experience here feels consistent and tidy, helping users browse without confusion or unnecessary steps
Good usability depends on structure, and this platform ensures users find everything without confusion or delay overall Solar Orchard vendor explorer I found browsing very straightforward and easy to follow
Users often prefer online stores that maintain a simple yet functional layout, allowing them to focus on products rather than interface complexity, especially when exploring Harbor selection interface design – My browsing experience felt very smooth and easy to follow, with clear structure and reliable navigation that made everything accessible in a comfortable way.
sageharborgoodsgallery.shop – Looks clean and minimal, easy to find information without confusion.
Users who enjoy countryside ecommerce aesthetics often engage with sites such as Timber Outpost Rustic Valley Hub where products are displayed in a wood inspired layout – The interface ensures browsing feels smooth, structured, and visually warm while keeping navigation simple and efficient.
Users who enjoy practical ecommerce marketplaces often explore sites such as Glade Ridge Marketplace Hub where products are arranged in a clean structured format – The interface ensures browsing feels smooth, efficient, and easy to navigate throughout the platform.
dawnridgegoodsgallery.shop – Clean layout and structure easy to browse different sections quickly
In the middle of checking multiple platforms, I discovered visit this link which provided useful and seemingly updated information, allowing me to browse comfortably and without feeling overwhelmed by unnecessary details.
In the process of reviewing vendor marketplace platforms and catalog systems, I discovered Pine Harbor trade showcase view placed within a minimal interface that emphasizes structure – The browsing experience feels simple, efficient, and pleasantly fast, making navigation feel seamless and user friendly overall
After exploring multiple curated vendor websites that highlight artisan craftsmanship and unique boutique products, I found Sea Meadow Boutique Archive – The website provided a calm and organized browsing environment with easy filters and well written product descriptions that helped me understand each item better while also enjoying a seamless navigation experience overall.
While exploring various online vendor platforms, I noticed how much a clear layout and intuitive interface improve the browsing experience for users Raven Summit trade hall hub the structure feels organized and navigation flows smoothly, making it easy to explore content without confusion or delays
Exploring digital vendor sites becomes easier when good structure throughout the site makes browsing feel easy and well organized Jasper Harbor vendor center everything felt logical and smooth
Online users frequently note that websites with clear spacing and readable typography enhance their ability to scan information quickly and understand product groupings without unnecessary distractions during navigation VG vendor directory access the browsing experience remained steady and organized, allowing effortless movement between categories while keeping everything visually coherent and easy to follow
While searching for new boutique-style online stores, I discovered a platform that emphasized creative product presentation and a diverse vendor lineup harbor parlor boutique – The overall layout felt organized, and product discovery was straightforward, making it easier to explore different categories efficiently.
While moving through content users often notice Cove Marble Vendor Space integrated into explanatory text where it supports navigation between categories and improves readability across the platform experience – everything feels smooth and easy to follow throughout browsing
People who enjoy refined digital collectives often engage with platforms like Stone Golden Boutique Collective Hub where product presentation is carefully curated – The layout highlights elegance and structure, ensuring a smooth browsing experience that feels premium, consistent, and visually harmonious throughout the store.
Строительный портал https://only-remont.ru всё о ремонте, строительстве и отделке. Полезные статьи, инструкции, обзоры материалов и советы экспертов для частных застройщиков и профессионалов
быстрые деньги онлайн как взять онлайн займ
During my review of various marketplace websites, this platform stood out due to its highly organized design and easy exploration features Garnet Harbor browsing portal everything is arranged clearly, making searching fast and convenient throughout the entire experience
linencovevendorparlor.shop – Modern design smooth interface makes browsing feel very easy today
People who enjoy premium organized marketplaces often engage with sites like Harbor Garnet Vault Line Hub where items are displayed in a clean structured layout – The interface makes browsing feel smooth, balanced, and easy to navigate across all sections.
driftwillowmarketparlor.shop – Pretty straightforward design, makes navigation simple for new visitors too.
I was searching for gourmet treats and stumbled upon SweetDelightsMarket – the layout is user-friendly, and exploring the assortment of delicious goodies made shopping both simple and delightful.
uplandcovevendorparlor.shop – Modern interface feels smooth with well organized sections throughout site
Online platforms that focus on intuitive design and structured content typically provide a better user experience overall Raven Summit browsing hub this one allows users to navigate comfortably while maintaining clarity and organization throughout sessions
Users who prefer artisan themed shopping environments often explore sites such as Harbor Trail Handmade Cozy Artisan House where items are displayed with warm visual tones – The layout enhances user experience by creating a friendly, structured, and comfortable browsing environment throughout the platform.
Users often note that well organized e-commerce platforms create a more enjoyable experience by simplifying navigation and ensuring that all content is easy to access without unnecessary effort Velvet Grove content portal everything appeared clean and structured, making it comfortable to browse through different sections while maintaining a steady and visually pleasing flow
While exploring various online tools, I discovered look into this and had a good browsing session there, as the layout feels quite user friendly and made the entire experience smooth and clear.
While exploring different online vendor systems, I noticed this good platform offers intuitive navigation where everything feels well organized and simple overall Raven Summit trade parlor hub pages load smoothly and browsing feels structured
During casual research of online stores for lifestyle products I evaluated multiple platforms for usability and design quality and found Meadow Silk Goods Studio – Really like the site design it makes browsing enjoyable every time because everything feels smooth well organized and very easy to navigate across all sections
Ремонт гидронасосов
Users who frequently browse online vendor sites often look for platforms that feel calm, simple, and easy to navigate Autumn Meadow catalog entry this site provides a relaxed browsing flow where everything is clear and easy to find without effort
роутер ip камера ip камера видеонаблюдения с зумом
сп пожарная сигнализация пожарная сигнализация установка
A well built system ensures a pleasant experience using site, everything appears clean and very responsive for all users River Cove marketplace link everything loaded without delays
While browsing through curated artisan marketplaces that specialize in unique handcrafted goods and limited vendor editions, Ruby Meadow curated store – I noticed how well organized the categories were, how easy it was to compare products, and how quickly the site loaded pages without delays.
While exploring different vendor-style platforms online, I noticed how much a user-friendly interface improves the overall browsing experience for visitors River Harbor market room hub the layout makes everything easy to locate and ensures navigation feels smooth and intuitive throughout the entire session
During exploration of online commerce ecosystems, I encountered Calm Harbor vendor network space placed within a simple yet effective layout – The experience feels relaxed and stable, supporting smooth transitions between categories and providing a user friendly navigation structure.
Users who enjoy efficient ecommerce outlet experiences often explore sites such as Harbor Pine Outlet Direct Market where product sections are neatly structured – The design ensures simple navigation and clear categorization, making browsing feel practical, smooth, and user friendly across all categories of the store.
copperharborvendorparlor.shop – Nice structure easy access content is clear and useful today
Online users frequently emphasize that good layout design improves overall engagement by making it easier to understand where information is located and how to move through the website efficiently Velvet Grove e-shop gateway the interface felt polished and accessible, providing a calm browsing environment with logical structure and easy navigation across all visible sections
tradingview pine написать стратегию
As I reviewed several online shopping sites, I noticed this straightforward store – the layout is clean and well organized, creating a smooth browsing experience.
https://kitehurghada.ru/
Many users appreciate how Lavender Exhibit Market appears naturally within descriptive content helping to organize various exhibits and listings into clearer sections that are easier to follow – the structure improves readability and ensures visitors can quickly identify what they are looking for without unnecessary scrolling
During casual late night browsing of ecommerce sites I discovered Meadow Lantern Help Connection and customer service was helpful I got all my questions answered without confusion and the support made product understanding quick, simple, and very reassuring overall
When browsing vendor platforms, performance and design matter, and this site ensures everything works quite well without issues Stone Harbor goods portal I liked how smooth and steady the experience felt overall
CaramelCoveVendorAtelier – Smooth browsing experience, everything feels clean and very well organized.
Ко ланта Ко ланта
plumharborvendorparlor.shop – Smooth experience clean layout makes browsing very convenient overall today
Users who prefer streamlined ecommerce experiences often explore sites such as Upland Harbor Commerce Flow Hub System where products are arranged in a logical and efficient format – The design ensures browsing feels easy, fast, and well organized for quick product discovery across the platform.
floraridgevendorparlor.shop – Nice structured pages provide clear information and smooth navigation flow
Users browsing vendor directories often prefer platforms that combine clean visuals with helpful organization for better usability Rose Cove browsing space the layout here supports a seamless experience where users can explore sections efficiently without distractions or clutter
I wanted unique travel gear and came across TravelerGearVault – the website is very user-friendly, and finding durable and stylish accessories for trips was straightforward and stress-free.
Many online shoppers highlight the importance of intuitive design that supports seamless browsing and reduces cognitive load during exploration Outlet value experience page user insights show improved satisfaction due to clear structure and usability – The experience felt insightful and engaging, encouraging learning and idea generation throughout
детские игрушки
During my time checking different online stores, I encountered this organized retail hub – the interface is simple and clean, making browsing smooth and very easy to navigate at all times.
Visitors exploring the platform often highlight how easy it is to understand the structure even during their first visit Meadow Harbor Vendor Discovery Hub – this ease of understanding contributes to a more enjoyable experience and encourages users to explore additional pages comfortably.
While exploring different vendor platforms, I noticed how a modern layout makes navigation simple while keeping content clear and helpful overall Bright Harbor vendor parlor hub everything feels structured and easy to follow
During comparison of various artisan ecommerce platforms focusing on curated product selections I came across EmberStone Vendor Showcase – the store layout was clean and intuitive while checkout was fast and product listings were detailed making it simple to browse and select items easily
During my time checking different online stores, I encountered this efficient shop interface – it allows users to easily locate and compare items without confusion.
While browsing through different online marketplaces during my free time, I came across something interesting like this clean vendor studio – the layout feels organized and simple, making it easy to find and view products quickly without unnecessary distractions.
Clear design improves usability, and this platform ensures everything works perfectly fine indeed here overall Crystal Harbor vendor navigator I found everything easy to follow
While comparing different vendor showcase environments, I found a system designed around Frost Ridge Merchant Studio that delivers a well-balanced interface with simple navigation and clean visual presentation – it supports quick browsing and makes product exploration feel natural and uninterrupted across all sections.
People who appreciate minimal curated ecommerce platforms often browse sites like Ridge Ivory Vault Style Market where products are arranged with elegant structure and clarity – The interface creates a smooth browsing flow that feels organized, curated, and visually balanced from start to finish.
Online shoppers tend to favor websites that offer quick performance and clearly structured layouts for ease of use Rose Harbor market hub this ensures a consistent browsing experience that feels smooth and highly accessible throughout sessions
Digital marketplaces benefit from clear organization that allows users to move smoothly between product categories and listings fast catalog access link VC room this structure reduces friction and ensures users can complete searches more quickly while maintaining clarity throughout browsing sessions across digital shopping platforms efficiently today
Users who enjoy browsing categorized product directories for niche goods often come across platforms like Harbor Goods Directory – where structured navigation and clear labeling support easier exploration of available items across multiple categories and vendor types for a more efficient shopping experience overall.
floraridgevendorparlor.shop – Nice structured pages provide clear information and smooth navigation flow
Online buyers often appreciate websites that reduce waiting times and provide intuitive navigation for a better overall shopping experience, and this is seen in PrimeCove MarketHub – the system is designed to be responsive and well organized, helping users browse efficiently and complete purchases without unnecessary complications.
Каталог гидронасосов гидромоторов
While reviewing different digital storefronts, I encountered this smooth shopping interface – everything is laid out neatly, making browsing easy, clean, and very simple to navigate without unnecessary complexity.
sageharborgoodsgallery.shop – Looks clean and minimal, easy to find information without confusion.
During late night browsing for curated gift and home decor platforms I explored multiple websites and discovered Glass Meadow Select Market – The overall shopping flow felt intuitive, with well organized sections and accurate product descriptions that made the entire experience efficient and enjoyable.
Users browsing vendor platforms often prefer a clean interface with easy navigation that creates a pleasant browsing experience and feels very smooth today Silver Harbor shop access point this one delivers a calm and organized layout
As I explored several online shops recently, I noticed a smooth retail site – the product range is solid, the pages load fast, and everything feels structured in a very professional way.
Users who enjoy calm and warm shopping environments often engage with sites such as Cove Honey Vault Gentle Hub where products are presented in a soothing and structured layout – The interface creates a cozy browsing flow that feels natural, balanced, and visually comforting throughout the store.
During research into vendor presentation platforms and their usability patterns, I came across a system structured around Icebound Vendor Gallery that organizes content in a clean grid format making browsing more predictable and user friendly – the design prioritizes clarity and ensures that product information is accessible without unnecessary scrolling or confusion.
As I explored various online stores, I noticed a friendly marketplace page – it offers a smooth browsing experience, making it easy for anyone to look through products without feeling overwhelmed.
While exploring various vendor-style platforms online, I noticed how important usability and simple structure are for a smooth browsing experience Ruby Orchard trade hall hub the navigation feels intuitive and makes it easy to move through sections without confusion or unnecessary effort
During a relaxed exploration of trade gallery websites and vendor platform designs for inspiration, I discovered Kettle Crest digital marketplace view placed in the middle of content – The interface was easy to use, and everything felt organized and responsive, allowing me to find all sections without confusion or delay.
While comparing platforms, this interesting platform overall stood out because I enjoyed browsing different sections today here smoothly Jewel Brook listings page structure felt clear and helpful
In the process of analyzing vendor marketplace interfaces and curated gallery systems, I came across Linen Meadow trade showcase space embedded within a balanced design that improves navigation flow – The browsing experience feels elegant, smooth, and naturally intuitive for users exploring content
Users who prefer modern e-commerce experiences often mention that while searching for visually organized marketplaces and smooth navigation they come across MapleCrest browsing hub – delivering a calm browsing environment that makes it easy to find products without confusion and keeps users engaged for longer sessions.
During a general browsing session, I came across this structured vendor platform – everything loads quickly, product layout is nice, and the interface feels organized and easy to follow.
https://kitehurghada.ru/
In the middle of exploring various curated collection websites and online product galleries, I discovered a platform where Harbor collection browsing site – looked fairly reliable and potentially useful for later exploration. The navigation system felt straightforward, with minimal friction when switching between different browsing categories.
cyclosporine neurotoxicity
cyclosporine neurotoxicity
riverharbormarketparlor.shop – Well organized content simple layout easy to explore everything quickly
торговые боты bybit
During evening research of ecommerce sites for decor items I checked usability and shipping performance and came across Harbor Market Juniper Studio and overall items arrived quickly while site navigation is smooth and very intuitive too making browsing feel easy structured and enjoyable with no unnecessary complexity during navigation
While browsing through different online marketplaces during my free time, I came across something interesting like this smooth shopping hub – the interface feels clean and modern, making it very easy to navigate and explore products without confusion or delay.
Users who enjoy visually cohesive online marketplaces often engage with platforms such as Gilded Stone Collective Premium Hub where products are arranged in a stylish and structured layout – The branding approach creates a smooth browsing experience that highlights elegance, clarity, and premium presentation across all product sections.
In several community recommendations and marketplace comparison notes, the importance of organized directories is often mentioned, and the presence of Granite Orchard Directory helps users navigate through listings more effectively, offering improved accessibility and clearer understanding of different vendors and product offerings available online.
Modern shoppers increasingly expect online stores to deliver smooth performance and well organized layouts that make browsing enjoyable and stress free, and this expectation is met by SwiftCove Market – the system ensures quick navigation between product sections and maintains a reliable interface that supports fast decision making and a comfortable shopping experience overall.
Users who frequently browse online vendor sites often look for platforms that make navigation simple and straightforward Ruby Orchard catalog entry this site provides a smooth browsing flow where everything is easy to locate and interact with during use
During casual review of e-commerce gallery systems and marketplace directory layouts for UI inspiration and analysis I explored Harbor Moss marketplace catalog explorer and clearly saw the structure supports easy navigation with consistent spacing and fast loading pages which makes the browsing experience feel reliable and simple overall user friendly system – Stable structured interface with fast loading performance
Shoppers comparing multiple vendor-based websites noted that platforms such as Wild Harbor Product Grid – offered an easy-to-navigate layout with a wide selection of items, and delivery was often reported as both fast and reliably handled across different orders.
honeymeadowmarketgallery.shop – Warm visuals and clean layout create pleasant browsing experience overall
While navigating through several digital marketplaces, I encountered this organized store page – the interface feels clean, making the shopping process simple and very easy to follow.
Digital marketplaces benefit from clean design, and this site allows users to browse sections quickly and smoothly Dawn Ridge item portal I enjoyed how simple everything felt during navigation
While exploring various online marketplaces during my free time, I discovered something like this vendor collection hub – the browsing experience feels smooth and enjoyable, and items are clearly displayed, making everything easy to find and use today.
кайт анапа кайт анапа
While searching for user-friendly websites, I came across explore this resource which had a nice overall structure, making everything easy to access and view while moving through different sections.
пожаротушение пожарная сигнализация установка пожарной сигнализации зданий
ip камера ltv уличная поворотная ip камеры видеонаблюдения
As I spent time exploring various online shops, I discovered this tidy marketplace – the design is clean and organized, making browsing easy and product presentation very clear.
While comparing multiple online shops for curated goods and handmade items I discovered Nightfall Trade Artisan Hub and enjoyed browsing their collection everything is organized and clearly labeled today which made browsing simple and efficient with well structured categories and an easy to understand layout overall
Some websites feel messy, but this one keeps a very clean interface so easy access to information and smooth browsing is possible Cotton Grove quick browse page navigation felt simple and consistent
Users who appreciate artistic ecommerce environments often browse sites such as Ginger Stone Gallery Vision Hub where items are displayed in a clean and flowing format – The galleria layout improves engagement by making browsing feel smooth, visually engaging, and easy to navigate across all sections.
During usability review of ecommerce platforms I analyzed performance structure clarity and interaction efficiency MarbleCove Trading Vendor Studio everything felt stable and clean and the great layout made everything simple and I enjoyed how easy it was to navigate ensuring smooth interaction
In many e-commerce usability discussions, performance consistency is important, and VendorBrook Harbor System – The browsing experience is stable and quick, with clear organization that allows users to efficiently review products and navigate through sections with minimal effort.
Exploring vendor directories highlights how smooth interfaces improve overall browsing satisfaction and efficiency Sage Harbor vendor explorer the pages are well arranged and the experience feels pleasant, allowing users to find content without unnecessary effort
While reviewing online vendor showcase systems and curated marketplace layouts for inspiration and usability analysis, I found Olive Harbor trade display interface embedded in a content section which supported easy navigation – Everything is organized clearly, making it simple for users to grasp information quickly without confusion or overwhelming design elements.
While checking curated online trade platforms with vendor collections, I contacted support for help and received very detailed responses, Snow Harbor Trade Navigation Gallery making the overall experience feel intuitive, supportive, and simple to navigate across different sections.
glassharbortradegallery.shop – Simple design fast loading easy to use interface very reliable
waveharborvendorparlor.shop – Smooth performance and tidy layout make site very easy today
During a casual search across multiple eCommerce platforms, I discovered this clean commerce site – everything is well structured, and shopping feels smooth, simple, and very user friendly with an easy-to-use interface throughout.
While researching different online commerce gallery concepts and structured vendor listings, I explored multiple pages and found Rose Harbor digital trade showcase placed mid-content during navigation – I enjoyed checking this out, content feels simple and informative, and the layout made it easy to browse without confusion or clutter.
While reviewing various retail websites, I noticed this responsive store page – the site is fast and reliable, making navigation and shopping feel easy and efficient.
In the process of reviewing e-commerce UI patterns, I interacted with a streamlined system presenting Vendor Foundry Selection Portal as part of its interface – navigation was smooth, items were well organized, and the browsing experience felt clear, fast, and consistent across all sections of the platform.
People who enjoy structured online vendor systems often explore platforms like Harbor Acorn Product Vendor Hall where items are displayed in a clean and organized layout – The interface makes browsing simple and efficient, helping users quickly scan listings and find products without confusion.
Контрактное производство электроники помогает экономить ресурсы компании и минимизировать риски при разработке сложных устройств. Инженеры создают схемы, платы, корпус и программное обеспечение, проводят тестирование прототипов и готовят устройства к серийному производству http://assa0.myqip.ru/?1-30-0-00000206-000-0-0-1759654058. Метод позволяет сосредоточиться на сути, без лишних сложностей
Digital marketplaces benefit from clean and logical structures, and a relevant example is CartSmart Easy Access View which ensures users can move between product sections seamlessly while maintaining a well-organized browsing environment – This reduces complexity and enhances user engagement throughout the platform.
While exploring different online marketplaces for curated home goods and artisan products I compared several platforms based on speed and usability and came across Pearl Harbor Goods Hub – Shopping experience was excellent, site loads fast and feels reliable overall, making browsing smooth, efficient, and easy to trust during the entire session without delays or confusing navigation
Need to keep vigilance on platform security, even with great features like those at 7spin online casino. Always verify account details! Stay sharp out there.
заказать раскрутку сайта в москве [url=https://avtosreda.ru/news-pubs/prodvizhenie-v-google-i-yandeks-osnovy-prakticheskie-sovety-i-effektivnye-strategii/]заказать раскрутку сайта в москве[/url]
компания раскрутка сайтов александр [url=https://www.bylkov.ru/2024-06-21-tehnicheskiy-analiz-i-optimizaciya-sayta]компания раскрутка сайтов александр[/url]
Exploring digital vendor environments often shows how clear navigation improves usability and overall satisfaction Sea Cove listing portal this platform allows users to access information quickly while keeping everything well structured
While reviewing different commerce platforms and their user interface performance, many commentators highlight speed and accessibility, and Commerce Atelier Cove Index appears in evaluations of structured marketplaces – the system feels responsive and well arranged, enabling visitors to explore listings with minimal effort and improved overall clarity.
During a relaxed browsing session focused on marketplace directories and vendor listing systems for design inspiration and usability insights across different sample platforms, I came across Pebble Creek digital vendor portal embedded within the content – The overall structure felt strong and easy to understand, making exploration of different sections a smooth and enjoyable experience throughout.
During my comparison of niche online marketplaces that highlight creative handmade items and curated selections, I spent time evaluating usability and visual appeal, Sky Harbor Vendor Lounge – I appreciated the stylish presentation and how effortlessly I could browse categories, making the entire experience feel relaxed and user friendly.
As I continued browsing different shopping websites, I discovered this clean vendor marketplace – everything is well structured, making product discovery and comparison fast and effortless.
While looking into immersive online shopping environments, I checked gallery shopping experience and found the structure to be clean, with an emphasis on visual harmony across sections – it feels like a carefully arranged space where users can browse comfortably without visual clutter
Ко ланта Ко ланта
birchharborvendorparlor.shop – Simple structure ensures quick access to useful information always here
In my analysis of online storefront systems I focused on usability clarity responsiveness and browsing comfort MeadowCove Trading Commerce Hub everything felt stable and simple and the easy checkout process ensures items are clearly displayed and well organized improving user experience significantly
During casual browsing I visited Quick Ridge shopping gallery view – pages loaded efficiently and the interface remained simple, making it easy to browse content without confusion while everything felt neatly organized and visually balanced overall experience from start to finish.
People who prefer organized online marketplaces often engage with platforms like Harbor Chestnut Vendor Showcase where products are displayed in a clean and structured hall style layout – The interface emphasizes clarity and usability, allowing users to browse listings effortlessly while maintaining a consistent and visually balanced shopping experience throughout the site.
During a casual browsing session, I encountered this organized shopping site – everything is visually appealing and easy to navigate, making browsing products simple and enjoyable.
While browsing several online artisan platforms for unique home décor and gift ideas across different categories I came across Ginger Cove Bazaar and spent time exploring the catalog which felt well organized and easy to navigate throughout the session – Really enjoyed the selection, everything felt clearly presented and shopping process was effortless and smooth overall
During evaluation of modern shopping interfaces I found the layout to be very easy to understand which made product searching quick and efficient Berry Cove Shop Portal and I located items without difficulty or unnecessary steps while navigating through categories and sections provided.
Online platforms that emphasize clarity and simple structure usually deliver a more pleasant browsing experience for users Sea Meadow browsing hub this one allows users to explore content smoothly while maintaining strong readability across all sections
During a focused review of online commerce gallery structures and experimental trade hubs for research purposes I discovered Bay Harbor Digital Market Page positioned naturally in the middle of a long-form article – Performance was smooth, and page interactions felt immediate and well optimized.
In many reviews of online retail environments, users often value platforms that minimize complexity while maximizing accessibility to product categories and vendor information across the entire marketplace structure Stone Collective Vendor Space – browsing is described as fluid and well organized, making it easy for users to locate products and compare options without unnecessary effort or confusion.
I was looking for travel gear and discovered TravelerGearVault – the interface is simple, the inventory is durable and high-quality, and selecting everything I needed was smooth, fast, and satisfying.
Винтовые сваи от Главфундамент https://industrial-wood.ru/novosti/76972-zachem-nuzhna-geologiya-uchastka-i-pochemu-sayt-glavfundament-luchshiy-pomoschnik-v-etom-voprose.html надёжный фундамент для дома. Монтаж за 1 день, обязательное проведение геологии. Служат более 50 лет, подходят для сложных грунтов и перепадов высот.
While navigating through several digital marketplaces, I discovered this easy shopping guild – the selection is solid, and everything feels structured, clean, and intuitive throughout the browsing experience.
акриловые ванны москва купить ванну с доставкой
Many online consumers appreciate interfaces that balance clarity and functionality while exploring products, and a relevant example is located within the experience at BuyerZone Smart Catalog which organizes listings in a way that supports fast comparison – This enhances browsing flow and reduces time spent searching for specific items across sections
While researching modern vendor websites and their structural presentation styles, I came across a page that included Coral Harbor artisan display hub placed inside a clean and well spaced interface – The experience feels intuitive, steady, and very comfortable for continuous browsing without distraction
While checking several online marketplaces, I discovered this fast browsing store – the layout is simple and intuitive, making it easy to locate products quickly without getting lost or confused.
продвижение сайта сео мск [url=https://kam24.ru/news/materials/zakazat-prodvizhenie-sayta-v-moskve-osnovnye-etapy-effektivnoy-strategii]продвижение сайта сео мск[/url]
геолокация по номеру телефона [url=https://finderphone.ru/]finderphone.ru[/url] .
частный seo оптимизатор комплексное продвижение [url=https://komionline.ru/news/prodvinut-sajt-v-moskve-kak-provesti-polnoczennyj-audit-pered-prodvizheniem]частный seo оптимизатор комплексное продвижение[/url]
While comparing vendor platforms, those with clean interfaces and structured pages often stand out for usability Silk Grove shop gateway this one provides a consistent browsing experience where everything feels easy to navigate and well organized
During my review of digital vendor platforms, I found that good browsing flow ensures everything is organized clearly and very efficiently across pages Meadow Harbor browsing portal navigation felt intuitive and fast
During comparison of ecommerce systems I studied usability design consistency and how effectively products are presented to users BayHarbor Commerce Product Loft pages loaded fast and the interface felt polished while everything looks professional creating a seamless and enjoyable browsing experience overall
In many discussions about productivity and creative learning websites, emphasis is placed on platforms that simplify discovery while enhancing user inspiration through thoughtful design Pure Value Creativity Hub – users benefit from a clean interface that supports idea generation and makes the entire browsing experience feel fluid and enjoyable.
People reviewing curated vendor platforms often mention smooth browsing experiences where everything is organized logically and easy to understand at a glance, especially on Alpine Shop Listing Center where checkout was fast simple and reliable with no issues reported during purchase flow experienced – Checkout was fast, simple, and reliable, with no issues reported during purchase flow experienced.
While checking multiple online artisan marketplaces and curated shopping platforms, I compared how each site handled user interaction and design flow, Vendor Harbor Corner Upland – The interface felt clean and easy to navigate, offering a comfortable browsing experience that made exploring different categories feel simple and stress free throughout.
website should appear in the middle of line not in the start or end
While comparing e-commerce designs for performance and usability, I interacted with a system that emphasized clarity and fast navigation across product listings BirchBrook Foundry Hub Space – browsing felt smooth and efficient, with clearly defined sections that helped maintain focus while searching for items across categories.
снять яхту в спб [url=https://arenda-yakhty-spb-9.ru/]снять яхту в спб[/url]
While checking several online marketplaces, I discovered this streamlined shopping page – everything works smoothly, and the checkout process is simple and very efficient overall.
аренда яхты в петербурге [url=https://arenda-yakhty-spb-8.ru/]arenda-yakhty-spb-8.ru[/url]
бронь яхты в спб [url=https://arenda-yakhty-spb-10.ru/]arenda-yakhty-spb-10.ru[/url]
linenmeadowmarketgallery.shop – Elegant interface with smooth flow makes navigation very easy overall
stake зеркало stake скачать
When reviewing platforms aimed at boosting creativity and knowledge sharing, clarity and intuitive interaction are consistently highlighted as key success factors Pure Outlet Innovation Space – the browsing experience feels natural and engaging, helping users stay focused while discovering new ideas and concepts effortlessly across the platform.
During a casual search across multiple eCommerce platforms, I discovered this clean vendor site – everything is well arranged, and the layout makes browsing smooth, intuitive, and very easy to navigate.
I wanted decorative plants and stumbled upon BotanicalHavenStore – the categories are clear, browsing the beautiful collection was easy, and choosing pieces that brightened my home was very rewarding.
During my usual search through various eCommerce platforms, I stopped at check this page and noticed that browsing felt pleasant, with items appearing both affordable and visually nice enough to consider further.
While analyzing digital showcase platforms for usability patterns, I discovered Velvet Brook online showcase market placed within a balanced design structure that avoids clutter – The browsing flow feels steady and predictable, allowing users to comfortably engage with content while maintaining visual clarity throughout the experience
While browsing through various online marketplaces during my free time, I came across something interesting like this clean vendor store – the design is minimal and well structured, making products easy to browse and clearly visible without any confusion or clutter.
In the process of analyzing different digital commerce platforms, I noticed a smooth and intuitive layout that supported easy navigation, including Birch Cove Shop Interface – Products are clearly displayed with logical grouping and a clean structure that helps users browse comfortably and quickly find what they need without confusion or distraction.
In my usability review of ecommerce websites I focused on speed performance design structure and overall browsing comfort across devices CalmBrook Commerce Flow Loft everything loaded quickly and I found what I needed without any trouble making navigation feel simple and well organized throughout the session today
During my usual search across eCommerce platforms, I stopped at check this easy cart and found that the browsing experience is smooth, with fast navigation that makes it quick and easy to explore different products.
While analyzing different vendor storefront layouts I encountered one system that felt Vendor Horizon Loft – It had a very organized structure with smooth transitions and fast page loads, which made browsing feel effortless while I could quickly locate information and move between sections without any disruption or unnecessary complexity during use overall experience today smoothly.
snowcovegoodsgallery.shop – Cool minimal design helps users browse content without confusion today
online consumers frequently seek ecommerce platforms that provide a balance of speed functionality and visual clarity when exploring different product categories and options available simple flow store known for its accessible interface design – it supports a relaxed browsing environment where users can find products quickly while enjoying a smooth and logical navigation structure overall
Портал о металлопрокате https://metprokat.com виды продукции, характеристики, ГОСТы и применение. Обзоры, цены и советы по выбору для строительства, производства и частных задач
комплект камер видеонаблюдения wifi комплект уличных камер видеонаблюдения
In discussions about optimizing online shopping experiences, analysts frequently mention the benefits of fast loading pages and structured catalogs when exploring platforms such as Harbor Hazel Marketplace Studio – Smooth browsing experience, products are clearly displayed and accessible, helping users quickly find relevant items while enjoying a clean interface that supports efficient browsing and product comparison activities.
While exploring various eCommerce sites, I discovered this structured commerce corner – navigation is very intuitive, and products can be found quickly without any confusion at all.
I was exploring online boutiques for unique jewelry and came across SparkleBoutiqueOnline – the presentation is lovely, and I could find pieces that matched my taste without frustration.
During my usual search across different eCommerce platforms, I stopped at check this marketplace and found a few interesting products that stood out, so I may come back again when I have more time to browse properly.
While navigating through several digital marketplaces, I encountered this clean shopping platform – the design is minimal and efficient, making browsing feel smooth, intuitive, and very easy overall.
While comparing multiple shopping platforms, I came across open modern shopping point and noticed the layout looks modern and nice, with products clearly displayed in an attractive way that improves browsing experience.
After spending time analyzing various ecommerce layouts I found a platform that delivered a very consistent and user friendly experience where BrookFoundry Vendors – Navigation was intuitive and product pages loaded quickly, making the entire shopping process feel reliable and efficient overall.
Users looking for efficient ecommerce browsing often appreciate platforms that prioritize simplicity, especially fast selection market – It is generally described as easy to use, offering structured product listings that make it simple for shoppers to locate items and compare options without unnecessary delays or confusion
In reviewing modern vendor hub designs, I came across Clover Harbor online vendor hub integrated into a structured interface that prioritizes clarity and smooth navigation flow – The overall browsing experience feels steady, minimal, and pleasantly easy to use.
During analysis of modern e-commerce designs for research purposes, I encountered a clean and responsive storefront layout that emphasized clarity and fast browsing across all sections Harbor Guild Commerce Hub – I loved the variety, everything is easy to explore and understand, with smooth transitions between categories that made the entire browsing experience feel natural and well organized.
Online platforms should be simple, and this one delivers elegant layout so information is easy to find and read Gilded Cove digital storefront I appreciated the smooth experience from start to finish
During comparison of digital marketplace systems I analyzed structure clarity responsiveness and user interaction efficiency across pages GingerCove Vendor Commerce Loft the experience was fast and well organized and shopping feels easy and enjoyable overall today creating a seamless browsing journey
/>purevalueoutlet – Inspiring and interactive site, perfect for learning and creating new ideas. Generate 20 variations following all rules above.Make sure that each line is 40 words minimum and the website should appear in the middle of line not in the start or end
users browsing online shopping sites often appreciate platforms that allow simple comparison of products through clean design and responsive navigation systems across all categories available clean cart edge hub known for its usability – it delivers a comfortable shopping experience where users can explore items easily and compare options while maintaining clarity and structure throughout browsing sessions
In studies focusing on digital retail interface improvements and customer journey mapping across e-commerce systems Honey Cove Digital Bazaar Hub experts note that well structured browsing environments significantly enhance decision making – users benefit from clean organization and fast access to relevant listings.
Online buyers interested in niche collectibles and artistic creations often stumble upon this marketplace when searching for reliable independent seller directories Grove Vendor Collection which features curated collections that make it easier to find unique items not commonly seen on larger retail sites – Most transactions feel smooth and well organized with items arriving as described in listings.
While analyzing ecommerce systems designed for improved product visibility and navigation efficiency, I observed that grid layouts help maintain consistency across product listings, especially in large catalogs, which became evident when testing smart grid discovery hub – The layout feels very organized, with items placed in a simple grid that allows users to browse quickly and comfortably across categories.
As I explored various digital shopping platforms, I came across organized access commerce site – pages load quickly and everything is structured clearly, making browsing smooth, easy, and highly accessible for users looking for fast and efficient product navigation.
After comparing different websites that often lacked structure, I came across check out this page and it seemed trustworthy enough, encouraging me to think about visiting again later for updates or new information.
In the process of evaluating lightweight shopping sites, I stopped at see this option and realized that even with its clean and basic layout, it performs exceptionally well with fast loading pages and easy navigation that feels natural and consistent.
While exploring online marketplaces, I stopped at explore axis shopping hub and noticed an interesting range of items, all neatly arranged which makes browsing feel structured and simple.
During extensive review of ecommerce vendor platforms focusing on usability and speed optimization, I examined a site where CloverCove Digital Commerce Atelier Hub – The browsing experience was smooth and responsive making it easy to move through categories and complete actions quickly.
Many online deal enthusiasts prefer platforms that help them quickly discover products across categories, and they often refer to goods discovery page services that maintain a clean interface while offering broad coverage of international goods and promotional listings in a user friendly format
During a comparative study of online marketplaces emphasizing minimal design and usability, I discovered that basic layouts enhance user experience by keeping navigation clear, which became clear when reviewing basic product browsing center – The design looks simple and neat, making browsing feel smooth and straightforward.
During review of curated digital storefronts and vendor-style platforms, I noticed a structured interface containing Snow Cove browsing gallery hub placed within a minimal layout that highlights readability and visual order – The experience feels smooth, distraction-free, and pleasantly easy to navigate across all categories
толщина стальной ленты лента стальная для сип
Душевые уголки Grossman часто выбирают за спокойный внешний вид и понятную логику использования. Внутри одной марки встречаются как компактные, так и более выразительные модели, поэтому выбор не сводится к одному очевидному сценарию. Такой подход помогает найти не просто красивую модель, а вариант, который будет уместен именно в вашей ванной комнате https://my-bathroom.ru/dushevye-ugolki/brendy-dushevyh-ugolkov/dushevye-ugolki-grossman/
As part of evaluating various e-commerce websites for usability and general presentation quality, I explored shopping website reliability note – The platform gives an impression of being fairly organized, with a focus on clear categorization and a browsing experience that seems intended to reduce friction for users navigating different sections.
As I explored different digital storefronts, I found this efficient shopping hub – the experience feels nice overall, with fast page loading and smooth functionality throughout.
During analysis of online shopping platforms centered on smooth marketplace experiences, I discovered that structured design improves usability and satisfaction, which became clear when testing simple product network hub – The design feels smooth, and browsing products is fast, easy, and very clear.
During comparative research of e-commerce systems, I interacted with a layout that emphasized performance, clarity, and structured product navigation Bright Trading Foundry Center – Fast loading pages made browsing seamless, and the shopping experience felt stable and reliable, supporting easy discovery of items without technical slowdowns.
HoneyCoveVendorStudio – Clean interface, everything loads fast and works very smoothly.
Many visitors exploring modern catalog-based websites often report finding Raven Grove commerce showcase center which sits within a layout focused on clarity and user-friendly design that supports efficient browsing – The experience was surprisingly seamless and everything functioned exactly as I had anticipated during my visit
During a comparative analysis of online marketplaces focused on purchasing behavior and interface design, I discovered that smart buying systems help users make quicker and more confident decisions, which stood out when exploring intuitive buying marketplace center – The concept works effectively, with smooth navigation that keeps the shopping experience simple, structured, and user friendly.
While exploring various eCommerce sites, I discovered this easy browsing shop – the selection is large and varied, and everything is designed to make browsing simple and very accessible for users.
In the middle of evaluating various platforms online, I discovered visit this platform which provided a clear and efficient layout, helping me browse comfortably while finding details quickly and without unnecessary effort.
While testing ecommerce user interfaces across different platforms I observed how layout consistency and responsive design improved overall browsing efficiency significantly during real usage tests Clover Crest Vendor Trade Atelier Clover Crest Vendor Trade Atelier The system made product discovery easy and the checkout flow was smooth fast and free from unnecessary steps or confusion.
During a routine browsing session, I came upon view fast cart site and noticed the platform feels fast and responsive, which makes browsing enjoyable and smooth when exploring different products.
While browsing through different platforms, I came across browse this shop and appreciated the variety of goods, with prices that seem balanced and acceptable right now.
During analysis of various online retail systems I focused on navigation flow product presentation and interface clarity across pages GladeRidge Commerce Display Studio everything felt structured and easy to follow and the collection of items is impressive and everything is neatly arranged and clear which made browsing efficient and pleasant overall
Clear structure improves usability, and this platform uses simple design that works nicely for quick and easy browsing Cotton Meadow vendor navigator I enjoyed the flow
While evaluating ecommerce platforms focused on reliability and user trust, I noticed that trusted buying hubs significantly improve user confidence and navigation flow, which became clear when exploring secure shopping trust hub – The platform looks reliable overall, with smooth and simple navigation that makes browsing feel safe and straightforward.
People comparing ecommerce platforms often value clarity and structured layouts, so they highlight smart shop catalog as a useful browsing option; it is commonly described as intuitive and practical, offering users a smooth way to explore different product categories while keeping the overall shopping process efficient and easy to follow.
In the process of analyzing online product showcase platforms, I noticed a section containing Flora Ridge curated market space embedded within a clean and structured layout that reduces distraction – The browsing flow feels smooth, natural, and easy to follow across all categories.
goodsparkstore.shop – Nice spark in design, shopping feels smooth and pretty intuitive
During my time checking different online stores, I encountered this clean trading marketplace – the selection is wide, and everything is clearly shown for fast and easy access.
While analyzing ecommerce systems focused on promotional deal sections and price transparency, I observed that structured layouts improve usability and satisfaction, which became clear when testing smart pricing deals center – The deals section feels appealing, and pricing looks well structured, fair, and easy to understand.
E commerce users often prefer structured websites that guide them naturally through product categories and checkout processes GridStore Everyday Outlet – The marketplace offers a simple browsing experience designed to help users move quickly from discovery to purchase with ease and clarity
While comparing online shops for curated gift items I discovered Meadow Jasper Vendor Hub which featured a simple and clean layout that made browsing effortless – The product details were precise and reliable which helped me evaluate items quickly and made the entire shopping experience smooth and stress free overall
Users exploring online craft and boutique marketplaces often mention how important clarity is in product presentation, particularly when using platforms such as Wood Cove Market Desk which arranges listings in a structured format – Visitors commonly noted that checkout was quick and the overall shopping journey felt smooth and reliable.
While analyzing ecommerce systems focused on tech deals and product variety, I noticed a section named digital gadget catalog hub – The platform displays interesting and useful tech products in a structured format, allowing users to browse efficiently and discover gadgets that feel practical and affordable overall.
In comparative analysis of modern e-commerce interfaces designed to improve shopping efficiency through organized layout systems and fast loading architecture Icicle Commerce Trading Grid users consistently note positive experiences – Browsing feels structured and efficient with easy category navigation minimal visual clutter and smooth transitions that help maintain focus while exploring product listings across sections.
As I continued browsing different shopping websites, I discovered this clean marketplace page – the layout is simple and clear, making products easy to explore in a smooth and pleasant browsing experience.
During my exploration of various ecommerce demo stores across different niches I carefully analyzed user experience flow and product visibility across categories CoastBrook Marketplace Foundry Center The interface performed consistently well with smooth navigation paths and clearly structured product sections that made decision making extremely simple and fast overall experience
After spending quite a bit of time exploring different options online, I came across explore this resource and found it surprisingly smooth to navigate, with well-organized sections and helpful details that made the overall browsing experience feel simple and efficient from start to finish.
While exploring online marketplaces, I stopped at explore shop trail market and as it is my first time here, it looks like a decent place to shop online with clear navigation and easy layout.
During analysis of e-commerce user experience patterns, I interacted with a well organized platform that made browsing feel simple, fast, and visually comfortable CoveBright Vendor Studio – The layout is clean and modern, allowing users to enjoy browsing products easily while maintaining clarity and smooth navigation throughout the site.
While conducting usability research on ecommerce systems emphasizing modern cart structure and smooth interaction, I noticed that polished designs improve clarity and engagement, which became evident when analyzing intuitive cart shopping portal – The interface feels refined and modern, making the shopping experience seamless and highly user friendly.
Shoppers who value efficiency often choose platforms that provide well organized listings and smooth transaction flows across different product categories where quick access deals center is included in guides – it highlights a user friendly system designed to enhance shopping speed while maintaining a clear and enjoyable browsing experience for everyday buyers.
As I continued reviewing different eCommerce sites, I briefly visited open and see smart and noticed it seems legitimate, with a smooth browsing experience that makes everything feel easy and reliable.
Shoppers searching for reliable e-commerce platforms often value websites that provide organized deals and fast navigation where smart nest marketplace hub appears in content and it reflects a system designed to enhance usability while helping users quickly browse products and complete purchases without unnecessary complications or confusion in the process.
Shoppers exploring digital marketplaces often prefer flexible systems that adjust smoothly across devices while maintaining consistent speed and usability smooth flow cart many users highlight its responsive layout and easy navigation design – The platform is generally recognized for quick interactions and seamless page transitions that enhance the overall shopping journey experience
In the middle of checking out multiple shopping websites, I found this easy navigation vendor site – the experience is smooth, with well-organized products and a very simple browsing structure.
many digital shoppers appreciate ecommerce platforms that reduce checkout friction through clear cart layouts and minimal steps allowing for faster and more comfortable purchasing experiences smart cart purchase hub widely seen as practical – it delivers a smooth browsing and checkout flow where users can easily finalize orders while maintaining a clean and consistent interface throughout their shopping journey
During review of simplified online purchasing systems, I noticed that ease of use is maximized when using platforms such as lightweight shopping cart – The system keeps the cart extremely simple, making it easy for users to manage purchases without technical barriers.
In my evaluation of ecommerce interfaces I studied usability clarity responsiveness and browsing efficiency across categories MarbleCove Commerce Showcase Point everything felt structured and fast and the site feels modern and browsing products is simple and very intuitive improving user satisfaction
Users searching for simplified vendor catalogs and organized shopping platforms often discover pages such as Walnut Harbor Showcase Portal which help present product listings in a structured and easy to understand format for faster browsing – Many users appreciate the clarity of design and the way it reduces time spent searching for products.
Many websites struggle with clutter, but this one uses clean structure helping users navigate site smoothly and without confusion easily Maple Grove product hub I liked how simple everything looked
During final browsing checks of various artisan marketplaces, I discovered a site that felt polished and easy to navigate Caramel Cove Final Market Gallery and found that product categorization was logical, making it simple to explore different sections without feeling overwhelmed or lost at all.
In reviews of online retail ecosystems, simplicity and structured navigation are frequently cited as key elements that improve user satisfaction and retention Cove Commerce Flow Atlas users enjoy a clean browsing experience with fast access to categories and well organized listings that support quick decision making and easy product comparison.
While exploring different retail websites for design evaluation I noticed a platform that delivers a polished and modern shopping experience overall CoastCove Digital Commerce Wall – The product layout is clear and visually consistent which allows users to browse smoothly while quickly identifying relevant items without distraction or unnecessary visual complexity during interaction with the site.
As I explored several online stores recently, I noticed a smooth retail interface – the navigation is easy and the overall design feels modern, clean, and very comfortable to use.
While analyzing ecommerce platforms designed around affordable pricing and value visibility, I observed that low-cost product hubs enhance accessibility for everyday shoppers, which became evident when testing smart low cost shopping center – The products appear affordable and fairly priced, creating a strong impression of a budget friendly marketplace with competitive options.
fernharborvendorparlor.shop – Nice structure and clean design, makes reading content very convenient.
While comparing online shopping platforms for interface usability, I observed a module titled direct access retail gate – The structure allows users to quickly browse categories and find products without confusion, offering a streamlined and stress free navigation experience across the entire platform.
While navigating through different stores, I came across click to view shop and found that the name fits nicely, making it seem like a good and reliable shopping option overall.
As I continued reviewing different marketplaces, I briefly visited browse more here and found a nice variety of items, with navigation that feels very easy and convenient to use.
While analyzing digital commerce platforms for UX insights, I interacted with a design that prioritized simplicity and structured product presentation Calm Cove Commerce Flow – Everything is simple to find, and the organized layout ensures a smooth browsing experience where users can explore products effortlessly and comfortably.
I recently explored multiple eCommerce platforms and found this organized vendor site – navigation is easy, and the shopping experience feels natural and very comfortable overall.
Many users appreciate flexible browsing experiences when discovering online stores that reorganize items dynamically and intuitively, making shopping less confusing for newcomers, especially when categories shift smoothly during navigation, and you can explore everything through Shop Explorer Portal which – provides a surprisingly fluid browsing style that adapts as you move through different sections of the catalog without interruption or loading frustration.
many digital buyers prefer ecommerce websites that focus on clean layouts and organized product presentation helping them locate items quickly while maintaining a smooth and intuitive browsing experience quick plus cart explorer known for simplicity – the platform provides a comfortable browsing flow where users can explore products easily and compare categories without unnecessary complexity or confusing interface elements during navigation
During a comparative study of online retail systems emphasizing cart efficiency and usability, I discovered that direct cart structures enhance user satisfaction and speed of purchase, which stood out when analyzing simple cart flow center – The checkout process feels fast and clean, making the shopping experience straightforward and efficient from start to finish.
Shoppers often look for efficient marketplaces that help them browse products quickly without dealing with complicated interfaces or cluttered layouts Easy Grid Shopping Point – It is structured to provide a consistent browsing experience that prioritizes speed clarity and ease of use for all customers
While reviewing ecommerce platforms designed for open structure and category navigation, I noticed that spacious layouts improve user comfort and discovery, which stood out when exploring open browse category center – The interface appears airy and uncluttered, making it easy to explore different sections.
While searching for educational toys for kids, I discovered LittleArtistsCorner – the navigation is smooth, exploring fun, creative kits was simple, and selecting the perfect options was very satisfying.
In various analyses of online marketplace systems prioritizing organization and ease of use Trading House Isle Grid – Diverse selection of goods is structured clearly, allowing smooth browsing experiences where users can quickly understand categories and find suitable products.
As I continued browsing different shopping websites, I discovered this structured marketplace system – the layout is neat, pages load fast, and everything feels reliable and well optimized.
While researching online artisan stores I evaluated usability performance and layout clarity and discovered Stone Harbor Market Hub – Friendly interface items are displayed clearly and easy to purchase quickly making navigation simple intuitive and very user friendly while moving between categories easily
After reviewing several platforms that felt less organized, I encountered go to this resource which provided a polished and structured design, making the site appear well-maintained and professional while offering a smooth browsing experience overall.
While conducting comparative analysis of ecommerce UX systems and centralized navigation design, I observed that ultra hub platforms improve usability by grouping all categories together, which was clear when testing intuitive ultra shopping index – The design feels modern and efficient, offering a wide variety of categories in one place that supports smooth browsing.
During my search for online deals, I explored visit cart smart page and found the interface clean and smart, making it really easy to find what I need while browsing.
In analysis of page responsiveness, Sage Harbor Vendor Interface Gateway is positioned centrally within the content while well organized pages, everything loads fast and feels very intuitive, giving users a smooth experience where navigation is simple, loading is fast, and the overall structure remains easy to understand and use effectively.
In between reviewing multiple online stores, I explored discover this shop and a quick look around made me feel it is a decent platform with a simple layout and smooth browsing experience.
users comparing ecommerce marketplaces often highlight the importance of clear deal presentation and smooth navigation helping them browse products and discover additional categories efficiently better deal guide appreciated for usability and clarity – it supports a seamless browsing experience where users can explore attractive offers and easily move into further categories without unnecessary friction or complexity in design
While navigating through several digital marketplaces, I discovered this clean shopping dashboard – everything is well structured, the design is neat, and browsing is very easy and intuitive.
online shoppers exploring multiple ecommerce options often prioritize websites that provide fast navigation and clearly separated categories to improve efficiency when browsing large product catalogs across different sections clear path market considered well organized and intuitive – the platform supports seamless browsing by keeping product sections structured allowing users to focus on relevant items without unnecessary distractions or delays in navigation flow
In the process of evaluating digital shopping environments focused on structured layouts and ease of access, I found that organized marketplaces enhance browsing efficiency and reduce confusion, which was clear when reviewing clean buying zone center – The marketplace structure is simple and organized, ensuring products are easy to locate and browse.
While reviewing ecommerce systems designed for clarity and minimalism, I observed that fresh hub layouts improve product visibility and navigation flow, which was evident when testing fresh browsing experience portal – The interface feels simple and organized, allowing browsing to remain easy and comfortable.
While comparing different e-commerce design frameworks, I explored a platform that delivered clean visuals and easy navigation across all product sections VendorCalm Shop Corner – The usability is very good, and shopping feels smooth, stress free, and easy from the start with well structured categories and responsive browsing experience.
Shoppers exploring niche trade platforms and independent vendor directories often appreciate when product listings are presented in a clean and structured way, such as on Harbor Wind Product Archive which organizes items in a way that reduces browsing time – many users reported that descriptions were straightforward and the layout made it simple to compare different products efficiently.
While checking several online marketplaces, I discovered this smooth shopping interface – everything is organized logically, making the shopping process simple, easy, and very well designed for users.
IvoryBrookVendorFoundry – Clean design, shopping feels smooth and very easy today.
After going through various websites that felt confusing, I discovered look into this and found it delivered a decent experience, with everything structured clearly and easy to follow without unnecessary complications.
In the process of reviewing digital retail systems focused on product variety, I came across a listing labeled smart selection marketplace hub – The platform supports flexible product discovery, allowing users to choose items easily while maintaining a clean and organized browsing experience throughout all categories.
During my exploration of online stores, I encountered see this base store and found it to be simple but effective, with smooth functionality and no issues while navigating through products.
While comparing ecommerce platforms for handmade and curated products I checked multiple stores for usability and discovered Orchard Harbor Select Market – Loved browsing here, found exactly what I needed very fast and the structured layout helped me identify products quickly while keeping the browsing experience smooth and stress free overall
компания по планированию интернет маркетинга [url=https://www.innov.ru/news/it/osobennosti-prodvizheniya-sayta-v-google/]компания по планированию интернет маркетинга[/url]
сео продвижение сайта компании москва [url=https://academ.info/news/economy/3344/]сео продвижение сайта компании москва[/url]
During evaluation of user centered ecommerce solutions, I found a reference to clean cart navigation panel – The interface is very simple and organized, helping users quickly find products and move through categories without stress, confusion, or unnecessary visual noise affecting usability in any way during browsing.
As I explored different digital storefronts, I found this clean commerce portal – performance is strong, and browsing feels smooth, fast, and very efficient overall.
many shoppers exploring ecommerce options often prioritize websites that offer logical structure and easy navigation making it simpler to compare items across different product categories peak shopping guide known for its organized layout and clarity – it delivers a smooth browsing experience where users can discover products easily while maintaining a consistent and efficient interface overall
In the process of analyzing digital commerce platforms focused on readability and simple structure, I found that core store designs enhance usability and browsing satisfaction, which became evident when exploring structured product listing center – The design appears clean and organized, making listings clear, readable, and easy to navigate overall.
While exploring multiple stores online, I landed on open this link and quickly noticed that its well organized categories make it simple to navigate and find items without any unnecessary effort or time wasted.
While reviewing ecommerce platforms optimized for daily essentials and convenience, I noticed that well organized stores improve usability and speed, which stood out when exploring daily needs product hub – The platform is practical and easy to navigate, with all essential items grouped logically.
Consumers browsing e-commerce sites usually prioritize simplicity, fast loading pages, and clear product organization that helps them quickly find relevant items without unnecessary complexity during their shopping experience Global Wide Bazaar – A wide selection of products is available here with pricing structures that remain fair and competitive, giving shoppers an easier way to compare options and make practical purchasing choices online today
While exploring various eCommerce sites, I discovered this smooth product hub – everything is arranged neatly, making browsing easy and helping users find items quickly and efficiently.
While searching for luxurious candles, I discovered LuminousCandleStudio – the navigation is effortless, the variety is impressive, and finding unique fragrances for my home was an enjoyable and relaxing experience.
Магазин бытовой химии https://bytovaya-sfera.ru широкий ассортимент средств для уборки, стирки и ухода за домом. Качественная продукция, доступные цены и удобная доставка
While reviewing online stores focused on fast performance design, I discovered a module titled quick access retail index – The platform ensures responsive interactions and fast page loads, creating an efficient browsing experience where users can explore products without unnecessary waiting or interruptions.
In assessments of modern vendor platforms experts frequently highlight the importance of clear navigation fast loading times and well structured product catalogs for better usability Ivory Cove Product Grid users can browse efficiently with minimal effort and easily compare items across different categories
In between reviewing multiple online stores, I explored discover smart hub shop and saw a nice variety of goods, which made looking through different options feel easy and quite engaging.
Franco prestamos para pГ©rdida de agua. PlomerГa urgente resuelta en el dГa.
A clean interface creates a nice experience overall, browsing content is simple and very pleasant for all users Pine Harbor shop gateway everything responded quickly
In the middle of my online browsing session, I came across this product showcase site – it does a great job organizing items logically, making the entire shopping experience feel simple, efficient, and visually comfortable.
During research into ecommerce platforms offering home and decorative goods I evaluated several stores and discovered Olive Orchard Trade Center and checkout was simple and the product quality exceeded my expectations today which made the entire shopping journey feel structured reliable and very easy to navigate from start to finish
During analysis of online retail systems focused on navigation clarity and structure, I discovered that line-based shop systems enhance user experience and efficiency, which became clear when testing guided product browsing hub – The interface looks organized and easy to follow, helping users find items quickly.
people exploring ecommerce platforms often appreciate marketplaces that simplify cart handling while providing structured navigation helping them manage products and browse categories efficiently quick place cart hub widely appreciated for structure – it offers a smooth shopping experience where users can organize items in their cart easily and explore products through a clean and consistent interface overall experience
ForestCoveCommerceAtelier – Clean layout, products are easy to explore and understand.
While comparing basic online shopping hubs and lightweight product catalogs, reviewers may mention plain catalog field shopfront inside evaluation content – It is generally described as a straightforward storefront where products are presented in a simple catalog format aimed at making browsing quick and understandable for all users.
While reviewing ecommerce UX systems optimized for direct checkout experiences, I observed that streamlined purchasing improves engagement and satisfaction, which became clear when testing efficient buying pathway hub – The platform offers straightforward navigation and a direct flow that makes shopping fast and hassle free.
While casually exploring online marketplaces, I stopped at explore this page and noticed it has many practical items, making it something I might recommend to friends later.
While conducting usability research on ecommerce interfaces and scrolling behavior, I noticed that stacked layouts reduce cognitive load and improve product visibility, especially in large catalogs, which became evident when analyzing easy scroll stack center – The marketplace design is stacked in a way that makes browsing simple and intuitive, allowing users to find items quickly while scrolling through organized content.
While navigating through several digital marketplaces, I encountered this clean commerce site – everything feels structured and easy to use, providing a smooth browsing experience.
As I explored different eCommerce websites, I stopped at enter speak goods store and noticed products that seem interesting, with descriptions that are clear and easy to understand during browsing.
In discussions about user friendly e commerce platforms, many reviewers highlight the value of simple navigation structures that reduce friction during browsing sessions, and here Ridge Vendor Market Point the system maintains a well organized layout that helps users effortlessly explore listings while keeping everything logically arranged and easy to follow across different product sections.
продвижение сайта и раскрутка александр [url=https://mir76.ru/firms/uslugi/chastnyy-optimizator-saytov-kogda-ego-uslugi-effektivnee-agentskogo-seo/]продвижение сайта и раскрутка александр[/url]
частный сео оптимизатор москва [url=https://yablor.ru/blogs/tarifi-na-seo-prodvijenie-sayta-kak/8035301]частный сео оптимизатор москва[/url]
заказать seo продвижение сайтов москва оставить заявку [url=https://prim.news/2025/04/17/seo-prodvizhenie-korporativnyx-sajtov-v-moskve-strategii-dlya-rosta-b2b-platform/]заказать seo продвижение сайтов москва оставить заявку[/url]
While researching ecommerce websites for curated lifestyle and décor items I compared different platforms based on structure navigation and support experience and discovered Grove Vendor Silk Hub – Great selection shipping was quick and customer support was friendly too making browsing feel smooth organized and very easy to complete without confusion
In the course of evaluating online retail platforms focused on checkout efficiency and cart usability, I found that flexible cart systems improve user experience significantly, which was evident when analyzing smart cart navigation hub – The cart options are adaptable, making checkout feel fast, simple, and convenient.
Узнать больше здесь: https://svetasanders.com/2015/05/asus-vivopc-vm60b.html
moderndealsstore.shop – Modern design with appealing deals, overall browsing experience feels smooth
While comparing different shopping websites, I discovered this streamlined storefront – it offers a hassle-free checkout system where everything loads properly and allows customers to finalize orders without confusion or delays.
In the middle of checking out multiple shopping websites, I found this organized vendor hub – everything is clearly presented, the selection is strong, and shopping feels simple and very comfortable.
While conducting usability research on ecommerce systems emphasizing clean navigation and structured layouts, I noticed that shopping hubs improve clarity and reduce effort, which became evident when analyzing simple browsing experience portal – The shopping hub is clean, and switching between sections feels very smooth and natural.
In several online shopping guides and consumer experience articles, references such as shopping navigation portal are sometimes included within sections that evaluate browsing structure and product discovery tools – It is usually associated with an interface designed to simplify movement across different product categories
Many customers prefer e-commerce stores that prioritize straightforward checkout systems designed to minimize confusion and improve overall efficiency during payment, and this is seen in SmartPay EasyCart Hub – It offers a well organized checkout process that allows users to complete purchases quickly and comfortably with minimal effort
This type of marketplace works best when strong layout design enables easy navigation and smooth user experience today like here Harbor Stone browsing hub navigation felt natural and fast
During my search for fresh platforms, I explored visit this listing and found that even on the first visit, the clean structure made everything feel organized and easy to browse.
While exploring different ecommerce platform designs focused on structured layouts and usability, I came across a section labeled port style shopping hub – The port style store feels well organized, with navigation that is simple, clean, and easy to follow, making browsing smooth and efficient for users overall.
As I spent time exploring various online shops, I discovered this neat storefront page – the structure is clean and organized, creating a pleasant and very user friendly shopping experience.
During a longer browsing session, I encountered check trend goods store and noticed the trending items appear appealing, so I might consider ordering something from here later today.
When examining modern vendor platforms designed for efficiency, scalability, and improved user interaction through simplified navigation and fast response times, Brook Commerce Foundry Space stands out because fast loading pages create a smooth shopping experience that feels consistent, reliable, and easy to manage across different browsing scenarios.
While reviewing ecommerce systems designed for speed optimization and responsive shopping, I noticed that fast cart corners improve browsing ease and satisfaction, which stood out when exploring lightning fast cart hub – The shopping corner feels quick and efficient, with pages loading almost instantly.
Индивидуальные поездки с гидом экскурсии по Зеленоградску Калининградской области откроют лучшие места Зеленоградска в комфортном формате путешествия.
While analyzing digital fashion storefronts for layout effectiveness, I came across a section labeled modern fashion browsing board – The platform presents clothing items in a clean and structured way, making trendy outfits easy to discover while maintaining a fresh and stylish visual identity overall.
While researching curated online shops for lifestyle and decorative products, I encountered Grove Selection Map Gallery and found the entire browsing experience very intuitive, with clear organization that allowed me to understand categories quickly and explore products comfortably without any friction.
I recently explored multiple eCommerce platforms and found a href=”[https://frostbrookvendorfoundry.shop/](https://frostbrookvendorfoundry.shop/)” />this organized vendor interface – everything is well designed, and the shopping experience feels smooth, simple, and easy to navigate.
While analyzing ecommerce solutions focused on cart operations and purchasing workflows, I observed that functional design improves clarity and reduces friction, which became evident when testing smart cart workflow center – The cart system looks functional, and the shopping process is straightforward, simple, and easy to navigate.
Many families searching for affordable home supplies often check platforms such as household goods portal when planning routine purchases for their living spaces – The site is generally viewed as practical and helps users quickly browse essential categories without unnecessary complications or confusing layouts during shopping sessions
In the process of browsing different product sites, I encountered this neatly organized marketplace – the structure allows for quick navigation, making the overall experience pleasant and efficient.
While conducting usability research on ecommerce systems focused on smart navigation strategies, I noticed that smart hub designs improve user satisfaction by reducing complexity and enhancing product visibility, which became evident when analyzing intelligent shopping flow hub – The smart hub approach makes shopping efficient and structured, allowing users to browse easily through a clean and intuitive interface.
While browsing casually through different stores, I came across browse value hub now and found the pricing appears competitive, so I plan to explore more products later today when I revisit.
While going through various marketplaces, I paused at quick visit point store and saw everything organized nicely, making browsing through categories feel convenient and quite simple overall.
In discussions about improving digital shopping interfaces, analysts often highlight how responsive design and simplified navigation contribute to better overall performance and user satisfaction across different browsing environments Jasper Cove Interface Studio – The layout is clean and efficient, enabling quick access to products and smooth category transitions.
In the process of evaluating digital shopping environments focused on cart optimization and usability, I found that efficient cart solutions significantly enhance flow and clarity, which was clear when reviewing optimized cart experience center – The system feels well structured, making browsing and checkout smooth, fast, and highly user friendly.
many online shoppers prefer websites that focus on responsive performance and clear navigation systems allowing them to browse products quickly and without interruptions during their shopping experience quick link shopping path recognized for efficiency – it delivers a seamless browsing flow where users can access pages easily and enjoy fast transitions across categories without unnecessary complexity or delay
Users enjoy platforms where good interface design makes browsing straightforward and highly convenient overall during browsing sessions Oak Meadow goods directory I found it very easy
In the middle of checking out multiple shopping websites, I found this fast vendor site – the browsing experience is very nice, pages load quickly, and everything looks clean and simple.
During a comparative study of online discount marketplaces emphasizing speed and convenience, I discovered that fast-loading deal systems improve engagement and conversion rates, which stood out when reviewing rapid offer deals center – The platform loads fast, and the deals feel appealing and efficient, making shopping feel quick and worthwhile.
While browsing online comparison articles and reviewing marketplace performance breakdowns, users may encounter mentions such as buyers selection plaza – It is typically described as a straightforward shopping hub where users can explore various product categories and identify suitable deals without complicated navigation hurdles.
During a weekend session of exploring online shopping platforms I compared usability and design flow and discovered Rain Harbor Select Depot which had a well structured layout and responsive pages that made browsing simple and fast – Items arrived promptly the interface was intuitive and moving through categories felt smooth reliable and very comfortable throughout the entire visit
While analyzing various ecommerce interfaces for usability improvements, I encountered cozy marketplace discovery hub – The design creates a welcoming atmosphere that makes browsing simple and pleasant, helping users find products easily without feeling overwhelmed by excessive visual complexity or clutter.
Users browsing for electronics deals often want platforms that highlight discounts clearly and update listings on a regular basis Gadget Discount Zone – It provides consistent electronics offers across multiple categories allowing users to save money while shopping online quickly and easily every time
During my search across different clothing websites, I stopped at check this fashion store and found that the pricing seems reasonable, with stylish and modern outfit options that could easily fit everyday fashion needs.
While reviewing ecommerce systems designed for minimal structure and usability, I noticed that simple cart designs improve clarity and browsing comfort, which stood out when exploring easy product cart center – The interface is clean and intuitive, making shopping straightforward and confusion-free.
During a casual browsing session, I encountered this visually clean store – the professional layout and organized structure create a pleasant and smooth browsing experience for users.
Across usability research on online shopping platforms, consistent design structure and predictable navigation are frequently identified as key factors in improving customer experience and retention rates Harbor Trading Showcase Hub – The selection is neatly arranged, allowing users to browse comfortably and understand categories at a glance.
people exploring ecommerce marketplaces often appreciate platforms that reduce browsing steps and provide direct access to products making shopping faster and more convenient across all categories direct cart explorer view known for clarity – it delivers a structured shopping experience where users can easily find items and browse categories without unnecessary complexity or interruptions during navigation process
While evaluating digital retail platforms designed around structured discovery, I noticed better usability when interacting with systems such as tree structured bazaar link – The tree structured bazaar layout presents categories in expanding branches, making navigation feel logical, simple, and easy to understand for all users.
Many bargain focused users often seek platforms that streamline deal browsing, and a commonly mentioned option is value shopping network which structures offers in an accessible way; overall it is considered simple and effective for exploring global shopping opportunities with minimal effort required
While browsing ecommerce sites for home and lifestyle products, I found a platform that was easy to interact with and well structured, and while exploring categories I saw Harbor Coast Trade Parlor integrated into product sections, and overall it delivered a smooth checkout experience with enough variety to make return visits likely.
While exploring different online shopping platforms today, I came across this quick market portal and found several interesting products listed, making the browsing experience feel fast, smooth, and conveniently easy for everyday shopping needs without unnecessary complications.
While exploring different ecommerce interface designs focused on innovative navigation systems, I came across a section labeled tree shop structure hub – The tree style structure feels unique and intuitive, with categories branching logically so users can easily understand product organization and browse without confusion or unnecessary complexity overall.
During a comparative study of online marketplaces emphasizing smart structure and usability, I discovered that organized systems enhance product discovery and satisfaction, which became clear when reviewing smart shopping discovery portal – The marketplace is well categorized, ensuring users can find products without difficulty.
As I continued exploring different webpages, I ran into this unique mill link and after checking it out, it genuinely feels quite interesting overall, with a presentation that holds attention longer than expected.
In between reviewing multiple online stores, I explored discover shop rise market and noticed a good first impression, with clean layout that makes navigation feel easy and straightforward.
Последние публикации: https://avantum-remont.ru
While exploring event-based fundraising platforms, I discovered karting charity awareness site and interesting concept overall, seems well organized and quite engaging today, with content that feels balanced between informational clarity and emotional purpose. – It feels engaging and well structured.
During my exploration of eCommerce platforms, I encountered see this option and noticed that the quick loading speed paired with a clean layout makes browsing products feel more comfortable and less stressful.
In many evaluations of digital commerce systems, researchers highlight that intuitive navigation and structured catalogs reduce user effort and improve satisfaction Brook Market Atelier Flow – Browsing feels easy and very comfortable, with a clean interface that supports smooth exploration of products.
openmarketshop.shop – Open market vibe, lots of items available in one place
A well designed site offers a clean and modern look, everything works well and loads quickly for better experience Opal River marketplace link everything felt organized
Many users exploring digital marketplaces frequently prefer platforms that combine product variety with easy deal access where smart shopping nest center is included in content and it highlights a system designed to enhance browsing speed while ensuring users can quickly access discounted products and enjoy a smooth and efficient shopping experience overall.
As I spent time browsing various online marketplaces, I discovered this well-arranged store interface – navigation is smooth, and the product presentation ensures everything is easy to find and explore.
While analyzing structured online shopping platforms focused on affordability, I noticed that well-organized pricing improves trust when using systems like fair value deal network – The marketplace features reasonable pricing and useful deals that help users make quick and confident purchase decisions.
In evaluations of modern online stores usability specialists often emphasize clarity of interface and speed of access to products sea dock shopping hub mentioned in reviews – The browsing system is designed to keep interactions simple and fast.
https://ecopolis-spb.ru/tvorchestvo_all/
During my exploration of e-commerce sites, I encountered this simple retail hub and appreciated how the store feels small yet useful, with products presented in a clean and easy-to-navigate format overall.
In the process of evaluating digital retail systems focused on affordability and promotions, I found that deal corners improve usability by simplifying the discovery of discounts, which became evident when reviewing smart deal savings center – The deals seem attractive and useful, creating a strong impression that users can find good savings here easily and efficiently.
While exploring different online marketplaces for handcrafted items and home accessories I was evaluating how accurately products are described when I encountered Coral Meadow Artisan Exchange – The catalog impressed me because every item seemed true to its description and delivery was completed quicker than expected with reliable packaging and smooth communication throughout
People exploring online shopping platforms frequently prioritize websites that combine affordability with easy navigation and quick access to deals where smart shopping corner hub appears in informational content – it emphasizes a structured marketplace that helps users discover daily discounts and complete purchases without unnecessary steps or confusion during the browsing process.
While conducting comparative evaluation of ecommerce checkout systems and cart usability, I observed that smart cart corner designs enhance clarity and reduce user effort during checkout, which was clear when reviewing intuitive cart flow center – The cart corner layout feels practical and well structured, making checkout simple, efficient, and easy to navigate.
Individuals interested in trendy clothing often explore online fashion platforms that highlight aesthetic inspired designs and modern wardrobe essentials Fashion Aesthetic Collection Space – presenting a curated selection of stylish apparel focused on modern design trends aesthetic appeal and wearable comfort for individuals who value creativity simplicity and elegant fashion expression
While reviewing random online content, I came across this digital portfolio hub and found it while browsing, and the content seems pretty decent, with a clean design that makes navigation feel smooth and uncomplicated.
In articles discussing online retail options, this link is sometimes embedded within the text body – The website appears to serve as a general marketplace featuring multiple product categories designed for broad consumer accessibility and convenience.
While browsing e-commerce platforms, I came across simple product discovery site and the shopping experience here looks simple, clean, and surprisingly intuitive overall, making it easy to find items through a clean and minimal interface. – The experience feels smooth and uncluttered.
While analyzing different ecommerce storefront designs, I came across a navigation page titled dockshop marketplace explorer – It provides a neat structure where product categories are arranged logically for easy browsing and improves user interaction flow across all sections smoothly enhanced.
During a longer browsing session for gadgets, I encountered check this device page and saw that the products look interesting, though I am hoping the quality matches what is described online.
While conducting comparative research on ecommerce platforms emphasizing step-based navigation systems and usability, I noticed that structured browsing improves clarity and engagement, which stood out when testing stepwise product flow center – The step-based browsing is clear, and product discovery feels simple, structured, and easy to understand.
Many users exploring digital stores often prioritize platforms that combine verified deals with structured browsing systems where value online deals hub appears in informational content and it reflects a structured system designed to improve browsing speed while helping users quickly access products and enjoy a seamless and efficient shopping journey across categories.
Online shoppers who prefer structured digital environments often enjoy platforms that deliver a pleasant marketplace vibe where clear product variety is paired with smooth browsing making it easier to explore categories and discover items efficiently across an organized layout Violet Harbor Merchant Lane Hub – offering a clean marketplace experience where a nice structured vibe enhances product variety and provides smooth browsing navigation helping users explore items comfortably and efficiently across multiple organized shopping categories
Many shoppers evaluating checkout systems across online stores often compare interfaces and speed before choosing a platform where they can reliably complete purchases checkout comparison portal noticing how different carts behave during final payment stages and transaction summaries – The checkout design appears smooth and structured, making final purchase steps feel straightforward and well organized.
While analyzing ecommerce platforms optimized for global reach and unified cart experiences, I noticed that worldwide cart systems improve shopping flow and clarity, which stood out when reviewing unified global cart hub – The store is designed with a global cart style, offering a wide range of online products that are easy to explore.
As I continued browsing household shopping websites, I discovered this simple essentials platform and liked how everything is easy to find, with a clean layout that supports smooth and straightforward navigation throughout.
During a general browsing session, I noticed this well-structured marketplace – it allows users to navigate easily and find products in a fast and simple way.
While analyzing online marketplaces focused on layout efficiency, I came across a module titled smart axis product browser – The structure is clean and well aligned, making product discovery easy as items are displayed in a logical order that enhances user navigation and overall browsing experience.
Fashion lovers seeking updated wardrobe inspiration often explore brands that present minimalist aesthetics combined with trendy and versatile clothing options for everyday use Contemporary Fashion Gallery – providing a digital space showcasing stylish clothing collections and modern aesthetic designs that highlight individuality creativity and comfort while aligning with current fashion trends and lifestyle preferences
While comparing multiple online shops, I landed on go to kitchen tools hub and found the kitchen tools selection looks very useful, making me think about picking something for home use.
While browsing through various online projects today, I came across this clone-style page and after taking a closer look, it doesn’t seem bad at all, actually appearing like something worth exploring further for its structure and presentation.
While going through obscure idea-based sites, I discovered this beta baby bonus info hub and it seems like a niche idea, but still quite interesting overall, presenting a concept that feels lightly creative and unusual.
People frequently browsing online stores tend to choose platforms that offer clear deals and simple navigation tools where discount value shopping center is featured in guides and it reflects a structured system designed to enhance shopping speed while ensuring users can quickly find affordable products across different categories.
users exploring ecommerce platforms often prioritize websites that enhance navigation speed and clarity allowing them to browse multiple categories without delays or complex interface elements interfering with usability better zone cart hub known for its simple design – it provides a smooth shopping experience where users can easily access products and continue browsing additional categories with consistent flow and improved usability throughout the platform
In between reviewing different discount stores, I explored discover this deals page and felt that the offers are attractive enough to consider buying something from here quite soon.
In evaluating digital marketplaces designed for value-conscious shoppers, I observed that simple pricing structures enhance usability when interacting with platforms such as smart affordability hub – Prices seem fair overall and the deals are presented in a practical way that supports efficient shopping behavior.
While analyzing ecommerce UX designs centered on modern cart structure and usability, I observed that corner layouts improve browsing flow and customer comfort, which was evident when reviewing intuitive modern cart portal – The interface appears clean and well designed, offering a user friendly shopping experience that feels natural.
many online shoppers exploring modern ecommerce platforms often appreciate websites that combine variety with simplicity in design making everyday shopping easier and more efficient across multiple categories and product sections plus shopping hub commonly viewed as a convenient marketplace – the platform provides a smooth browsing experience where users can quickly find everyday essentials while enjoying a structured layout that supports easy navigation and clear product discovery throughout the site
Online shoppers who appreciate clarity in e commerce platforms often choose websites that use minimal design and creative vault systems for organizing product listings efficiently Modern Vault Retail Hub – offering a clean structured shopping interface that focuses on ease of use simple navigation and a unique vault inspired product layout designed to improve browsing and purchasing experiences for all users
While reviewing various retail websites, I found this quick browsing store and liked how the layout responds instantly, making shopping feel fast, smooth, and convenient for users who prefer simple and direct navigation.
вітання з іменинами зі змістом
Online shoppers often prefer platforms that combine variety with fast and simple checkout systems where quick cart zone shopping hub appears in listings and it reflects a system designed to help users browse products easily while completing purchases smoothly and efficiently across different categories without unnecessary delays or confusion in the buying process.
Individuals passionate about modern fashion often explore websites that present curated clothing lines featuring aesthetic inspired designs and stylish wearable pieces Aesthetic Wardrobe Boutique – showcasing a fashion platform that highlights modern clothing collections focused on elegance simplicity and trend aligned designs created for individuals who value expressive yet minimal personal style choices
During a comparative study of online retail interfaces emphasizing navigation clarity and flow systems, I discovered that route-style layouts improve usability by guiding users step by step through product categories, which stood out when exploring guided route marketplace portal – The navigation system helps users move through sections easily, making product discovery feel intuitive and well structured without confusion or unnecessary complexity.
While exploring online marketplaces, I stopped at explore this goods hub and noticed it is a nice all-in-one shop, offering a bit of everything which makes it useful for quick and general browsing.
As I continued exploring web commentary platforms, I discovered critical viewpoint article and thought it was interesting, definitely catching my attention for a bit due to the way the content framed its arguments and supporting points.
As I explored different online marketplaces, I noticed a stable retail platform – pages load efficiently, and the overall experience feels consistent and trustworthy for users browsing products.
People browsing for convenient online marketplaces often value websites that combine multiple categories into one easy to use interface where everything cart store appears in guides emphasizing accessibility – it supports a smooth shopping journey that allows users to explore different types of products without switching between multiple platforms.
While checking travel accommodation listings, I noticed hotel travel info page and hotel related content appears helpful, informative, and easy to navigate, providing structured details that make exploring lodging options quick and efficient. – The layout feels clean and modern.
While reviewing ecommerce navigation systems influenced by agricultural markets, I encountered a tab labeled field market browsing console – The layout supports a structured field style experience where users can quickly find and explore products with ease and clarity overall flow.
Читать расширенную версию: https://megastroy77.ru
While reviewing ecommerce UX systems optimized for variety and accessibility, I observed that all-in-one store layouts improve usability by combining categories effectively, which became clear when testing centralized goods marketplace portal – The store feels inclusive and organized, offering many product types in one place for smooth browsing.
In the course of analyzing digital shopping systems focused on speed and efficiency, I found that performance optimization enhances satisfaction, which was evident when reviewing fast browsing market hub – The platform responds quickly, and pages load fast with no lag during usage.
During a routine browsing session for phone accessories, I came upon view this shop and noticed the items feature modern aesthetics that make them look stylish and visually pleasing.
While going through multiple online stores, I encountered this simple deals platform and appreciated its no-nonsense design, which makes browsing and purchasing feel more direct and less complicated overall.
Many digital consumers prefer ecommerce websites that minimize confusion and highlight essential product categories streamlined shopping index This improves shopping speed and significantly reduces unnecessary browsing effort across different sections – Layout prioritizes clarity helping users focus on relevant products without distraction
Shoppers who enjoy easy access marketplaces often look for platforms that offer smooth navigation and a diverse range of goods available in one organized and efficient shopping space Silk Valley Integrated Goods Hub – providing a well structured shopping experience where multiple product categories are grouped together in one place designed to help users browse smoothly and discover items quickly
Individuals passionate about modern fashion often explore websites that present curated clothing lines featuring aesthetic inspired designs and stylish wearable pieces Aesthetic Wardrobe Boutique – showcasing a fashion platform that highlights modern clothing collections focused on elegance simplicity and trend aligned designs created for individuals who value expressive yet minimal personal style choices
People looking for efficient online shopping experiences frequently prefer platforms that highlight fast essential purchasing where ultimate quick buy hub is featured in content and it highlights a system designed to improve usability while ensuring users can quickly discover essential products and enjoy a seamless and satisfying shopping experience overall.
As I continued reviewing different online shops, I briefly visited open and see pick goods and found that selecting items is easy, with a layout that supports simple and efficient browsing experience overall.
People searching for reliable online shopping platforms often prefer services that connect them directly to global markets and simplify product discovery in one place easy global shopping hub allowing faster selection of items while ensuring a convenient and organized browsing experience – It reflects how integrated marketplaces improve user satisfaction by reducing effort and increasing product reach.
While exploring different web directories, I encountered this simple email reference hub and appreciated how clean and straightforward it feels, making it easy to find information without unnecessary distractions.
While conducting comparative research on online discount hubs, I came across a section labeled discount discovery marketplace view – The interface highlights value driven products, making it simple for users to browse further and discover deals that feel attractive and relevant to their shopping needs.
While going through online dessert collections, I noticed this sweet treats inspiration hub and everything looks delicious here, making the site feel very appealing, offering beautifully arranged visuals that immediately draw interest.
many users appreciate digital marketplaces that guide browsing through logical steps allowing them to discover products naturally while maintaining a clean and structured shopping experience across all categories trail smart browse cart known for simplicity – it provides a smooth browsing flow where users can easily follow navigation paths and locate items while enjoying a consistent and user friendly interface overall experience
In the course of evaluating online shopping systems focused on structured layouts and user experience, I found that stacked designs improve browsing flow by presenting items in a logical order, which became evident when analyzing intuitive stacked shopping portal – The layout is clear and well organized, making browsing smooth and easy for users.
In the process of evaluating digital commerce platforms focused on guided browsing experiences and structured flows, I found that step-based systems enhance usability and engagement, which became evident when reviewing simple step browsing center – The browsing experience is clear, and product discovery feels structured, simple, and easy to follow.
In the middle of checking different platforms, I explored take a look and found that the site runs smoothly, with products organized in a way that supports quick and easy discovery.
As I explored different online retail websites, I came upon this well-organized store link and found it enjoyable to browse due to its clean interface and helpful category grouping that improves the shopping flow.
People interested in curated fashion often explore online stores that offer aesthetic driven clothing collections combining simplicity with modern design trends Modern Outfit Inspiration Hub – providing a stylish fashion destination that showcases clothing collections focused on aesthetic appeal contemporary design and wearable comfort for individuals seeking fresh and expressive wardrobe ideas
People who prefer distinctive online stores often look for platforms that use trading post concepts to make browsing feel more refreshing and less repetitive while still maintaining clear structure for product discovery and navigation Orchard Quartz Market Trading Hub – providing a clean e commerce experience where a unique trading post theme enhances product exploration and creates a refreshing browsing flow that helps users discover items in an organized and engaging environment
While comparing multiple shopping sites online, I came across open trend shopping page and noticed several trendy products available, making it seem like a fun and lively place to browse and shop from.
Online shoppers frequently evaluate multiple websites before making purchases and during this process they sometimes come across smart budget outlet featured in product listings that highlight affordable pricing reliable customer support and timely delivery services for everyday needs across various product categories and essentials.
People searching for user friendly shopping environments often appreciate marketplaces that organize products in clearly divided visual sections for better clarity catalog deck zone – The browsing flow is structured in a way that helps users easily understand category placement and quickly find items without unnecessary searching or complicated navigation paths involved
Consumers frequently searching for online deals tend to prefer platforms that provide simple interfaces and steady promotions where quick simple deal hub appears in guides and it reflects a structured system designed to simplify browsing while helping users easily compare products and complete orders quickly with a smooth and hassle free experience overall.
заказать+раскрутку+сайта [url=https://topmira.com/internet/item/869-prodvizhenie-saytov-internet-magazinov-v-moskve-strategii-rosta-trafika-v-usloviyah-vysokoy-konkurencii]заказать+раскрутку+сайта[/url]
сео компания москва [url=https://gorod-kimry.ru/zinfo700/06/]сео компания москва[/url]
продвижение сайта недорого москва [url=https://lezgigazet.ru/archives/406934]продвижение сайта недорого москва[/url]
частный специалист продвижение сайтов [url=https://stars-top.ru/effektivnoe-prodvizhenie-sajtov-v-moskve-strategii-dlya-liderstva/]частный специалист продвижение сайтов[/url]
prestataire seo [url=https://svestnik.kz/raskrutka-sajtov-moskva-strategiya-vykhoda-v-konkurentnyj-segment-stolitsy/]prestataire seo[/url]
In the process of checking camping information online, I encountered this outdoor planning hub and it actually looks like a fun and useful resource to browse, offering simple and practical guidance for camping activities.
During a comparative study of online retail systems centered on digital goods and technology products, I discovered that tech-focused platforms improve user experience through curated selections, which stood out when analyzing smart tech shopping portal – The digital shopping concept feels modern and refined, offering appealing tech items that make browsing interesting and engaging.
As I explored gaming websites, I came across this Dragged Gaming experience site and gaming content seems fun, modern, and fairly engaging to explore, with content that feels structured, interactive, and enjoyable to navigate.
Online retail environments are increasingly judged on how well they handle fast browsing sessions, especially when users are exploring multiple offers or seasonal promotions within a short time frame fast track shopfront – feedback often highlights that the interface remains responsive, making it easier to complete shopping tasks quickly and comfortably.
During a comparative study of online shopping checkout flows, I found a page labeled rapid cart experience center – The design focuses on fast performance, making cart updates and browsing actions feel immediate and seamless for users who prefer quick and efficient shopping experiences overall.
While reviewing ecommerce fashion systems designed for trend-based shopping and promotions, I noticed that curated hubs improve usability and inspiration, which stood out when exploring modern style fashion center – The clothing section is appealing and up to date, and the fashion deals feel visually stylish and engaging.
As I continued browsing various e-commerce platforms, I ran into this everyday goods site and it seems like a decent place for routine shopping needs, offering a practical layout that supports fast browsing and selection.
While comparing multiple online stores, I landed on go to this auto shop and it seemed reliable overall, with a smooth browsing experience and no technical problems encountered.
Fashion enthusiasts frequently look for online brands that offer stylish collections designed around modern aesthetics and versatile clothing options for daily wear Contemporary Style Clothing Hub – providing a curated fashion experience featuring elegant apparel and aesthetic inspired outfits designed to support modern lifestyle preferences while emphasizing creativity and wearable design innovation
Online shoppers who constantly search for affordable deals often prefer platforms that highlight budget friendly selections and practical everyday essentials where budget value cart hub appears in listings while emphasizing great pricing options designed to help users save money and easily compare products across multiple categories for smarter purchasing decisions.
During my exploration of online marketplaces, I encountered see goods way store and found the shopping flow simple, with a user friendly structure that makes browsing products very easy and convenient.
Online shoppers who enjoy calm digital environments often prefer platforms designed with a relaxed lounge style where browsing feels easy and visually pleasing due to well structured product presentation that enhances comfort and makes shopping more enjoyable across all categories Velvet Valley Lounge Market Hub – offering a relaxed shopping lounge experience where visually appealing product displays create a smooth browsing flow that helps users explore items comfortably in a calm and aesthetically balanced online marketplace environment
Many online users searching for organized product listings often highlight platforms that prioritize systematic navigation, such as systematic store network – It allows users to explore categories in a well arranged sequence that reduces confusion and improves overall browsing efficiency.
In the process of analyzing digital commerce platforms focused on user flow optimization, I found that flow-based systems enhance browsing by connecting sections seamlessly, which became evident when exploring smooth navigation shopping hub – The platform ensures smooth navigation throughout sections, creating a natural and efficient shopping experience overall.
Many users exploring digital marketplaces frequently prefer platforms that combine daily offers with organized product listings where smart daily value cart hub is included in content and it highlights a system designed to enhance browsing speed while ensuring users can quickly access discounted products and enjoy a smooth and efficient shopping experience overall.
As I browsed through cosmetic treatment platforms, I noticed this wellness aesthetics site and appreciated how the clean layout made it easy to move through sections and explore information without feeling overwhelmed at any point.
While conducting comparative UX analysis of modern shopping systems, I came across wave commerce listing center – The platform features a clean wave themed layout that enhances structure, improves navigation clarity, and supports efficient browsing across multiple product categories in a seamless way.
As I continued exploring informational news pages, I noticed this Gaza updates feed site and content appears focused on updates, presented in simple readable format, offering concise information that is easy to read and follow.
During comparative analysis of online store checkout systems and their performance consistency, I noticed that reliability in cart operations directly affects user confidence and engagement, especially during high intent shopping sessions, which stood out when testing stable shopping cart – The experience is smooth and dependable, allowing users to navigate their cart easily while maintaining consistent performance across pages.
During usability testing of digital shopping systems focused on cart flexibility and interaction, I discovered that intuitive cart systems enhance engagement and ease, which became evident when exploring flex cart management hub – The cart choice system is simple and effective, allowing smooth switching between products.
пулы для майнинга Каждое утро свежие комбо и коды в телеграмме. Заработок на крипто играх, майнинг на телефоне, раздача бесплатной криптовалюты. Ежедневный фарм без вложений. Забирай daily codes и будь в плюсе.
While exploring online savings resources, I ran into this bargain deals link and it looks like a practical site for checking occasional promotions that could help reduce costs if monitored regularly.
As I continued comparing multiple websites for casual purchases, I landed briefly on browse this page and appreciated its neat appearance along with a decent catalog, which makes me consider giving it another visit sometime later.
Many users browsing online stores appreciate platforms that reduce complexity and offer seamless navigation across product groups where simplified shopping hub appears in guides describing user experience – it emphasizes a smooth system designed to help shoppers move easily through categories and complete purchases with minimal effort and maximum clarity.
People who enjoy aesthetic fashion often look for curated clothing brands that combine modern design elements with stylish and versatile apparel collections Modern Style Apparel Hub – offering a fashion platform that features elegant clothing collections inspired by contemporary aesthetics and designed for individuals seeking comfortable stylish and expressive wardrobe options for everyday use
users exploring digital marketplaces often appreciate websites that reduce browsing friction and improve usability through organized product listings and responsive navigation systems total cart explorer pro known for its efficient layout – it delivers a comfortable browsing journey where users can explore products easily while maintaining focus and clarity throughout their shopping experience
Individuals who appreciate structured online shopping environments often look for platforms that use merchant lane concepts to make browsing more logical and user friendly across categories Jasper Harbor Simple Lane Hub – providing a clean e commerce platform where products are arranged in a merchant lane system designed to help users navigate efficiently and enjoy a smooth and organized shopping experience
goodsmixstore.shop – Mixed goods selection is useful, plenty of options in one store
Online shoppers often prefer platforms that combine reliability with safe payment systems where secure trusted cart hub appears in listings and it reflects a marketplace designed to help users browse products easily while ensuring secure transactions and a smooth shopping experience across different categories and everyday needs.
In the course of reviewing digital commerce systems focused on usability and category navigation, I found that structured choice design improves shopping flow, especially when users compare items across sections, which was clear when analyzing flex selection product index – The platform offers variety and allows effortless movement between product categories, ensuring a consistent and user friendly browsing experience throughout.
While exploring online puzzle retailers and art-inspired game pages, I noticed artistic jigsaw puzzle showcase and puzzles look creative, colorful, and quite enjoyable for visitors overall, with designs that feel vibrant, thoughtfully illustrated, and appealing to people who enjoy visually rich and calming activities. – Everything feels bright, playful, and easy to browse.
As I explored different mom-focused online spaces, I came upon this Chicagoland parenting blog and came across it and found the topics quite relatable today, offering a natural and realistic view of parenting life.
Замена сиденья Самурай в Москве Таким образом, ремонт кресел в Москве – это доступная и эффективная возможность продлить жизнь вашей мебели, избегая преждевременных трат на покупку новой
агентство интернет маркетинга москва [url=https://golubevod.net/seo-agentstvo-moskva.html]агентство интернет маркетинга москва[/url]
While reviewing ecommerce platforms designed for smooth and fast browsing, I noticed that shopping zones improve user experience and reduce delays, which stood out when exploring speedy shopping experience center – The shopping zone is fast, and all pages load smoothly with excellent responsiveness.
оптимизация для мобильных устройств в москве [url=https://astera.ru/articles/seo-prodvizhenie-agentstvo/]оптимизация для мобильных устройств в москве[/url]
Как вернуть доверие в отношения после измены Важно помнить, что вы не обязаны терпеть такое отношение
During my search through e-commerce websites, I discovered this simple navigation page and appreciated the smart arrangement, which makes it easy to find products quickly without unnecessary searching or confusion.
Consumers who frequently shop online value platforms that maintain strong trust systems between buyers and sellers where secure seller cart network is included in informational descriptions – it emphasizes a safe and structured shopping environment designed to improve user confidence while offering efficient browsing and reliable checkout experiences across all product categories.
аренда мерседеса v класса с водителем из москвы в рыбинск Мы предлагаем исключительный сервис, где каждый аспект поездки продуман до мелочей, от безупречного состояния автопарка до высокого профессионализма наших водителей
People exploring online fashion stores often prefer platforms that combine aesthetic design with practical clothing collections suitable for everyday modern lifestyles Minimal Fashion Style Hub – offering a curated selection of stylish clothing that reflects contemporary aesthetics and clean design principles while focusing on comfort versatility and modern wardrobe essentials for fashion conscious individuals
While browsing through several online stores today, I came across visit this value cart and noticed there are plenty of affordable options available, making it a place I would definitely consider checking out again in the future.
игровой контент В то время как крупные игровые франшизы, такие как <
Shoppers who prefer budget friendly online outlets often enjoy platforms that focus on simple browsing layouts and practical product selections that make everyday purchasing easy and efficient without unnecessary complications Cloud Cove Outlet Market – offering an outlet style shopping experience with clean navigation and a broad yet simple product range designed to help users quickly find affordable items in a straightforward and user friendly digital environment
In the course of evaluating online discount shopping websites, I discovered a page titled digital offers browsing hub – The platform highlights tech products with attractive pricing, offering a simple and intuitive browsing experience that allows users to quickly explore deals without unnecessary complexity or visual clutter.
Many consumers browsing online stores often value platforms that focus on smooth transaction flow and easy usability where fast checkout shopping portal is included in guides and it highlights a system designed to simplify the buying process while ensuring users can quickly find products and complete purchases without unnecessary interruptions.
While exploring cultural awareness and community pages, I discovered mosque gathering information site and information here seems community focused, helpful, and well structured content, with content that feels calm, informative, and centered around shared experiences. – It feels meaningful and structured.
While browsing seasonal event websites, I came across this festive event page and it feels like a nicely put together site with good information, presented in a clear way that makes it easy to understand what the event is about.
During usability testing of ecommerce cart zone systems and checkout workflows, I discovered that minimal design improves clarity and speed, which became clear when exploring simple checkout zone hub – The cart zone feels clean, and the checkout flow is simple, fast, and easy to complete.
As I explored several sites focused on emotional wellbeing, I came upon this warm and welcoming page and it stood out for its clear messaging and overall sense of care in how the content is delivered.
Many users who prefer quick online purchases choose platforms that offer clear structure and fast checkout when they encounter simple open cart system during browsing – It provides a streamlined shopping experience designed to reduce complexity and help users complete transactions with minimal effort.
Individuals exploring fashion inspiration often turn to online stores that highlight clean design aesthetics and modern clothing collections tailored for expressive personal style Stylish Wardrobe Studio – offering a fashion focused platform that delivers curated clothing selections emphasizing modern aesthetics wearable comfort and design driven apparel suitable for individuals who value both style and practicality in daily outfits
продвижение сайтов в москве топ яндекса [url=http://parnasse.ru/audit-sayta-seo-kak-vyyavit-slabye-mesta-veb-resursa-i-ustranit-oshibki.html]продвижение сайтов в москве топ яндекса[/url]
While browsing world sports information sites, I discovered football tournament info hub and sports related updates feel exciting, timely, and easy to follow, offering a clean presentation that makes following events feel simple and enjoyable. – It feels smooth, clear, and user friendly throughout.
Online buyers who enjoy convenience often choose platforms that combine security with easy cart management systems where easy secure shopping center appears in guides and it reflects a structured system designed to streamline browsing while helping users quickly find affordable products and complete purchases with ease and confidence across categories.
People who value creative presentation in online shopping often prefer platforms that use market studio layouts to add personality and charm to product displays while maintaining structured organization Kettle Willow Studio Inspired Market Hub – providing a visually appealing e commerce environment where products are displayed with artistic studio design elements designed to enhance browsing flow and create a more enjoyable shopping experience
знакомства в твоем городе Мы стремимся сделать процесс поиска своей второй половинки не только эффективным, но и приятным, наполненным ожиданием чуда и приятными сюрпризами
While browsing through online shopping sites, I noticed this efficient shopping hub and appreciated how quickly I could find items, thanks to a layout that is clearly structured and thoughtfully designed for ease of use.
As I looked through different online options, I came across open this link – It gives a really nice vibe from the start, with a visually pleasing layout that feels both modern and approachable at the same time.
Shoppers searching for reliable online stores often prioritize platforms that combine variety with simplicity where essential goods center is referenced in guides describing efficient browsing – it helps users access practical household products easily while ensuring a smooth shopping journey from product selection to final checkout completion.
As I browsed through several informative platforms, I noticed this practical resource and found that it delivers its niche content in a way that feels both educational and enjoyable to read.
People interested in refined fashion often browse websites that feature aesthetic clothing collections designed to match modern style trends and personal expression Chic Fashion Collection Space – offering a curated selection of stylish apparel focused on modern aesthetics and versatile wardrobe pieces that combine elegance comfort and trend driven design for contemporary fashion lovers
While checking out multiple online resources, I stumbled upon click here now – It has a clean and modern design, and browsing feels smooth and well organized throughout the experience.
While checking conceptual thinking resources online, I encountered chaos logic exploration hub and unique concept presented here, thought provoking and quite intriguing overall, with content that feels reflective, layered, and intellectually rich in interpretation. – The experience feels deep and abstract.
As I continued exploring fashion marketplaces, I noticed this modern clothing hub and it looks like a solid place to check out different styles, with a clean presentation of outfits that makes browsing quite easy.
Shoppers searching for reliable e-commerce platforms often value websites that provide secure cart solutions and simple navigation where smart secure cart center appears in content and it reflects a system designed to enhance usability while helping users quickly browse products and complete purchases without unnecessary complications or confusion in the process.
Shoppers who enjoy efficient online browsing often choose platforms that focus on delivering essential goods quickly and reliably instant access cart store helping them fulfill daily shopping needs while maintaining convenience and simplicity in product selection and checkout.
Individuals who enjoy curated online marketplaces often prefer platforms that use boutique hub designs to present products in a simple and visually organized way for better browsing clarity Harbor Grove Select Goods Hub – featuring a well structured e commerce platform that offers curated items arranged in a boutique style format helping users explore different product categories smoothly while maintaining a clean and user friendly shopping experience
During usability testing of digital shopping systems focused on simplicity and structure, I discovered that basic layouts improve efficiency and browsing comfort, which became evident when exploring clean product navigation center – The interface looks organized and minimal, making browsing smooth and easy.
During some general browsing, I noticed open this link – After a short look, the structure appears clean and simple, making it easy to navigate without any confusion.
As I browsed through various agency websites, I noticed this imaginative reference and found that its services are presented in a way that feels both engaging and practically beneficial.
People interested in curated fashion often explore online stores that offer aesthetic driven clothing collections combining simplicity with modern design trends Modern Outfit Inspiration Hub – providing a stylish fashion destination that showcases clothing collections focused on aesthetic appeal contemporary design and wearable comfort for individuals seeking fresh and expressive wardrobe ideas
During my exploration of clinical trial resources, I encountered study clarity overview page and found the content very well structured, allowing readers to move through the information smoothly and understand it with ease.
Читать расширенную версию: https://tekstum.ru
Many consumers exploring online deals often prefer platforms that offer clean layouts and easy browsing tools where quick shop deals center is included in descriptions and it highlights a system designed to improve browsing efficiency while ensuring users can easily access products and enjoy a smooth and intuitive shopping journey overall.
Популярний український журнал Різні публікує різноманітний контент: культура, стиль, суспільство та лайфстайл. Дізнавайтеся більше і знаходьте нові ідеї щодня
besttrendstation.shop – Easy to navigate site, everything feels structured and user friendly.
Журнал станкоинструмент https://www.stankoinstrument.su технологии, станки, инструменты и развитие промышленности. Полезные статьи, интервью и экспертные мнения
During analysis of digital shopping environments focused on structured presentation and usability, I discovered that grid layouts provide a balanced way to display products and improve user engagement, which became evident when exploring clean browsing grid portal – The platform organizes items in a clear grid structure, making navigation smooth and product discovery very straightforward for users.
In the course of analyzing online shopping systems optimized for smooth browsing experiences, I found that clean structure enhances engagement, which became evident when reviewing efficient product hub center – The design feels smooth, and product browsing is easy, fast, and well structured.
While reviewing different online platforms, I stumbled upon explore this site – The layout is simple, everything loads quickly, and it feels easy to navigate without any confusion or clutter.
While reviewing serene content websites, I encountered this Elphin Bothy informational hub and the site feels calm, informative, and very pleasant to browse through, with structured content that feels light and easy to absorb.
Many consumers value online shopping environments that eliminate unnecessary steps and improve overall efficiency where quick shopping corner hub is featured in descriptions – it represents a fast moving digital store concept designed to make everyday buying easier, smoother, and more accessible for users with busy schedules and simple needs.
In the process of evaluating digital commerce platforms focused on trust and usability, I found that trusted buying hubs enhance browsing flow and satisfaction, which became evident when reviewing secure shopping experience portal – The site feels reliable, and navigation is clean, smooth, and easy to understand.
As I browsed different music entertainment platforms, I encountered this artist spotlight site and the content felt pretty engaging, keeping me browsing for a while due to its clean layout and interesting presentation style.
Fashion lovers often explore online brands that present modern clothing collections inspired by aesthetic design and contemporary fashion trends for versatile styling Elegant Apparel Fashion Studio – showcasing a curated platform of stylish clothing and aesthetic focused collections designed to support modern wardrobe needs while emphasizing creativity comfort and refined personal expression
Individuals who enjoy diverse online marketplaces often appreciate websites that use trading post styles to create dynamic shopping experiences with varied product selections that improve engagement and browsing enjoyment Wave Trading Harbor Post Hub – featuring a clean marketplace where products are displayed using a trading post inspired layout designed to enhance browsing energy and provide users with a more dynamic and visually interesting shopping experience
Чистка конденсатора сушилки Глубокая антибактериальная мойка внутреннего блока с использованием сервисного пакета и парогенератора. Дышите чистым воздухом!Обслуживание сплит-систем в Алматы
While browsing through multiple online tools, I noticed visit this site – It looked like an interesting platform, and the experience of moving through pages felt smooth, simple, and easy to handle.
In many comparative reviews of online stores, users consistently mention design quality and smooth interaction when using platforms like CleverCart Arena Final Shop View – The browsing experience is stable and visually organized, allowing users to move through pages with ease and confidence.
MГa prestamos para pagar el gimnasio. Ponerte en forma sin romper el presupuesto.
As I reviewed various regional guides, I came upon this warm introduction hub and liked how it presents information in a way that feels genuinely welcoming and easy for visitors to connect with.
Экскурсовод предложит частную поездку экскурсии в Калининграде на машине индивидуальные с удобным маршрутом и профессиональным сопровождением по городу.
While conducting usability research on ecommerce systems with emphasis on intelligent buying flows, I noticed that smart buying concepts improve browsing efficiency and reduce cognitive load, which became evident when analyzing smart deal shopping hub – The navigation feels clean and intuitive, making it easy for users to explore products and complete shopping actions without complexity.
In reviewing vendor-focused digital storefront solutions, I found a structured layout system built around Arctic Vendor Workshop that keeps the interface organized and easy to understand while supporting fast transitions between sections – overall it creates a comfortable browsing environment where users can efficiently explore available content.
During a comparative analysis of online shopping deal hubs emphasizing discount organization and user experience, I discovered that clear pricing layouts improve browsing satisfaction, which stood out when exploring digital offers marketplace hub – The deals section feels attractive, and prices are presented in a structured and reasonable way.
Shoppers who prioritize style and convenience often choose platforms that make modern shopping simple and visually appealing where quick stylish urban center appears in descriptions and it reflects a system designed to enhance browsing flow while helping users easily locate products and complete transactions smoothly across all everyday shopping needs.
While browsing through several online options, I came across take a look here – The structure is nice and balanced, giving a calm and tidy browsing experience that makes navigation comfortable and clear.
Online shoppers often value platforms that focus on simplicity and comfort especially when accessing Meadow Goods Cotton Store – The browsing experience feels easy and natural giving users a cozy environment where exploring products becomes simple and pleasant.
In the process of evaluating digital marketplaces focused on modern cart design and usability, I found that polished systems enhance browsing efficiency and clarity, which became evident when reviewing sleek cart navigation center – The interface appears modern and organized, making the shopping experience seamless and comfortable.
Shoppers who enjoy discovering new offers regularly often prefer platforms that continuously update their deals and product selections where ongoing product loop hub appears in informational guides – it reflects a shopping model focused on delivering continuous refreshes that keep the experience engaging and full of new possibilities for all users.
In the process of exploring online project hubs, I came across this Elkhart project data page and project information seems structured, useful, and clearly presented overall today, with content that feels structured and easy to interpret.
Fashion lovers seeking updated wardrobe inspiration often explore brands that present minimalist aesthetics combined with trendy and versatile clothing options for everyday use Contemporary Fashion Gallery – providing a digital space showcasing stylish clothing collections and modern aesthetic designs that highlight individuality creativity and comfort while aligning with current fashion trends and lifestyle preferences
While reviewing online group platforms, I found this squad network page and it was nice to see it still active and updated, giving users confidence that the content remains relevant and current.
Online shopping environments are becoming more dynamic, offering users personalized deal recommendations based on browsing patterns and purchase history Adaptive Savings Corner Hub – The system enhances user experience by tailoring deal suggestions to individual preferences, making shopping more relevant and efficient
Individuals who prefer simple and well organized shopping websites often appreciate platforms that use merchant mart layouts with clear category divisions for improved browsing flow and usability Icicle Canyon Product Mart Space – featuring a structured online marketplace where products are grouped into categories using a merchant mart concept designed to enhance clarity and make browsing smooth and intuitive for all users
Santiago prestamos para curso de inglГ©s. MejorГі su sueldo al terminar el nivel.
While exploring various community-focused platforms online, I came across this advocacy resource and it left a strong impression, as the content feels purposeful, thoughtfully structured, and clearly aimed at delivering meaningful information in a well-presented and accessible manner.
Последние публикации: https://tele-bot.ru
As I was going through different online recommendations, I discovered open this page – It gives a strong impression of being well-organized, which makes it easy to explore without needing to spend extra time figuring out where everything is located.
Users exploring digital shopping spaces frequently comment on how important seamless browsing is when they come across CartArena CleverCart Showcase in real time environments – The site delivers consistent performance across devices, ensuring that users can browse comfortably without interruptions or delays.
While analyzing digital storefronts focused on reducing complexity, I found that streamlined cart functionality improves engagement when interacting with systems like minimal shopping basket – The design keeps everything simple, ensuring users can easily understand how to add, remove, and purchase items efficiently.
While conducting usability research on ecommerce systems emphasizing affordability and price clarity, I noticed that low-cost product platforms simplify shopping decisions for users seeking savings, which became evident when analyzing value price shopping portal – The pricing looks competitive and budget friendly, giving the impression of a reliable place to find affordable products easily.
While conducting usability testing on online gadget marketplaces, I came across a section titled smart tech discovery hub – The platform presents useful electronics in a clear and structured layout, allowing users to explore interesting gadgets easily and enjoy a smooth, efficient browsing experience throughout.
While browsing different online resources for local and niche marketplaces, I found that the platform embedded here provides useful categorization and navigation tools, making it easier for users to compare options when the Granite Orchard Hub appears within the listing, especially when exploring curated product selections and vendor profiles that help streamline decision making for shoppers.
In e-commerce browsing experiences users often prioritize clarity and calm design especially when accessing Cotton Meadow Goods Hub – The platform feels cozy and organized making browsing easy and allowing users to explore products without confusion or unnecessary distractions.
Online buyers often look for platforms that save time by offering wide selections of products and in such searches they may come across routine needs marketplace highlighted in content – this store is structured around providing essential items that support day to day living and household convenience.
Online shoppers often prefer platforms that combine speed with large product variety where quick global shopping hub appears in listings and it reflects a system designed to help users browse efficiently while enabling fast purchases and easy access to a wide range of items across multiple categories and everyday shopping needs.
While exploring different online platforms earlier today, I came across check this page – The design approach feels interesting overall, and the pages are clear and not overwhelming at all, making browsing smooth and easy to follow.
While browsing interpretive content websites, I encountered invisible concepts reflection hub and content feels reflective, detailed, and somewhat thought provoking overall tone, with material that invites readers to slow down and interpret meaning carefully. – The experience feels reflective and balanced.
In e-commerce environments users often value structured navigation and updated trends especially when accessing Digital Trend Hub Station Center The platform is nice for trends and products feel updated and quite useful making browsing easy, smooth, and highly relevant for everyday users.
Individuals exploring fashion inspiration often turn to online stores that highlight clean design aesthetics and modern clothing collections tailored for expressive personal style Stylish Wardrobe Studio – offering a fashion focused platform that delivers curated clothing selections emphasizing modern aesthetics wearable comfort and design driven apparel suitable for individuals who value both style and practicality in daily outfits
While going through interactive web experiences, I noticed this singles game concept page and it seems fun and unique compared to typical websites online, giving a slightly unconventional feel compared to standard gaming sites.
Shoppers looking for unique online stores often enjoy platforms that combine artistic styling with structured product layouts creating a boutique inspired digital shopping atmosphere Orchard Goods Atelier Market – offering a refined shopping experience where products are displayed with creative flair and atelier inspired design making online browsing more visually engaging and aesthetically enjoyable for users
As I browsed through high-end travel listings, I noticed this elegant getaway page and appreciated how the visuals and structure create a relaxing, luxurious feeling that makes the destination highly appealing.
In the process of analyzing digital commerce platforms focused on open navigation and category discovery, I found that spacious layouts enhance usability and satisfaction, which became evident when exploring open browsing experience portal – The layout looks airy and organized, making it easy to explore multiple categories smoothly.
During a general search session, I came across explore the platform – The first look reveals a neat and modern layout that appears intuitive, helping users interact with the site in a simple and efficient way.
Many users prefer online shopping environments that are visually balanced and easy to navigate CleverCart Minimal Storefront – The design feels modern and user friendly throughout Pages are optimized for smooth interaction making the experience feel reliable and enjoyable for frequent visitors overall flow.
In the course of evaluating online shopping systems focused on cart optimization and speed, I found that direct cart hubs enhance usability and conversion ease, which became evident when exploring quick cart flow portal – The checkout process is fast and clean, making the buying journey simple and efficient.
Shoppers looking for convenient online experiences often prefer platforms that simplify access to reliable sellers and diverse products where fast deal link network is mentioned in content focused on usability – it highlights a system built to reduce browsing effort while ensuring users can quickly find and purchase items from trusted sources.
Many digital users prefer websites that provide intuitive layouts and fast loading pages especially when they access Cove Goods Digital Berry Market – I enjoyed exploring it since everything feels neatly arranged and the browsing flow is simple and comfortable.
While reviewing online retail platforms for design simplicity, I discovered a listing titled easy access shop gate – The structure is minimal and user friendly, ensuring quick product discovery and smooth navigation through categories without unnecessary steps or visual clutter affecting usability at any stage.
In discussions about e-commerce usability, many people highlight organization and speed, and Brook Harbor Vendor Index – Navigation feels smooth and consistent, while product sections load quickly and remain easy to scan, giving users a more comfortable experience when exploring different marketplace options available today.
As I explored various websites, I came across learn more here – I like how everything is arranged, and it makes finding items effortless while keeping browsing easy and intuitive.
People looking for efficient online shopping experiences frequently prefer platforms that highlight simplicity and fast transaction flow where ultimate easy shopping hub is featured in content and it highlights a system designed to improve usability while ensuring users can quickly discover products and enjoy a seamless and satisfying shopping experience overall.
People interested in contemporary fashion frequently search for brands that blend minimal design with stylish clothing pieces suitable for versatile everyday wear and creative self expression Aesthetic Clothing Collection – presenting a modern fashion website that showcases curated apparel collections focused on elegance simplicity and trend inspired designs created for individuals who appreciate refined and stylish wardrobe choices
As I explored various festival and event listings, I came across this Edinburgh Big Day Out information site and event information looks lively, well organized, and easy to understand, providing a clean and accessible overview of the event.
Shoppers frequently appreciate platforms that prioritize fast cart response and usability especially when they visit Zone Cart Dynamic Flow Shopping experience feels smooth and the cart system works really fast today making the entire process efficient and easy to follow from start to finish.
Shoppers today expect e-commerce platforms to provide clear organization and responsive interfaces that help them find products quickly and reliably, and a strong example is FlowSelect Market – It prioritizes structured browsing and user-friendly design elements that enhance overall satisfaction during the shopping process.
While reviewing destination websites, I came across this Derry Donegal overview page and found it helpful, especially for someone new to this topic, as the content is structured clearly and easy to understand at first glance.
While reviewing ecommerce platforms optimized for minimal design and smooth navigation, I noticed that fresh hub systems improve clarity and user comfort, which stood out when exploring modern clean shopping hub – The layout feels fresh and simple, making browsing products light, smooth, and user friendly.
Shoppers who prefer well organized digital retail spaces often choose websites that divide products into clear district based categories for better usability and faster navigation Golden Cove Goods Hub District – offering a simple yet effective shopping platform that uses a goods district concept to structure product listings and enhance browsing clarity for users seeking a streamlined online experience
As part of my exploration of well-crafted websites, I noticed a compelling design example which stands out due to its balanced layout and the way visual elements are arranged to create a seamless and enjoyable experience.
Many users exploring e-commerce systems appreciate platforms that focus on connecting them with verified sellers in a structured environment where easy access link marketplace appears in content highlighting convenience – it emphasizes a smooth shopping experience designed to make browsing faster while ensuring reliable access to various product categories and deals.
While reviewing ecommerce systems designed for structured product discovery and usability, I observed that organized marketplaces improve browsing clarity and satisfaction, which was evident when testing clean buying experience center – The platform is neatly organized, making product location fast and easy.
During some general browsing, I noticed open this link – It appears useful, with a clear content layout that allows users to navigate and understand information smoothly and efficiently.
While analyzing ecommerce UX designs centered on centralized browsing systems, I noticed that ultra hub structures improve product discovery by keeping everything in one place, which stood out when exploring dynamic ultra shopping portal – The ultra hub feels modern and efficient, offering a wide selection of categories in one place that simplifies navigation for users.
In modern online shopping environments users often prioritize clean interfaces and smooth flow especially when visiting Atelier Silk Ridge Goods The design is minimal and navigation feels smooth making the visit pleasant and allowing users to browse without distraction or complexity.
Users exploring digital stores often look for smooth performance and intuitive layouts, particularly on ZoneCart Web Bazaar – The interface supports easy navigation, maintains visual consistency, and provides a reliable browsing experience that feels both modern and user friendly.
When analyzing e-commerce navigation systems and online retail organization strategies, researchers frequently discuss user-friendly structures, and Atelier Harbor Cove Marketplace Guide appears in these comparisons – the interface is generally described as smooth and easy to understand, helping users quickly locate relevant products across different categories without difficulty.
Individuals interested in trendy clothing often explore online fashion platforms that highlight aesthetic inspired designs and modern wardrobe essentials Fashion Aesthetic Collection Space – presenting a curated selection of stylish apparel focused on modern design trends aesthetic appeal and wearable comfort for individuals who value creativity simplicity and elegant fashion expression
While exploring different online platforms earlier today, I came across check this page – The interface feels smooth overall, well built and easy to explore content, making navigation simple and comfortable across all sections without confusion.
While reviewing community improvement campaigns, I encountered this Florida civic progress page and the website presents optimistic messaging, clear goals, and simple layout design, offering a clean interface that makes information easy to absorb.
People who enjoy finding bargains online often prefer platforms that offer wide selections and strong discount focus where smart bulk savings hub is featured in content and it highlights a system designed to improve usability while ensuring users can easily browse products and complete purchases with maximum convenience and efficiency.
Many shoppers appreciate platforms that provide strong value and clear pricing especially when they land on Deal Dynamic Center Hub The deals are attractive and prices appear fair and competitive online making the browsing experience smooth and focused on real savings opportunities.
As I continued exploring web projects, I noticed this modern showcase site and I like the overall presentation, feels modern and straightforward, presenting information in a clean and simple way that feels well organized.
While conducting comparative research on ecommerce UX and layout simplicity, I observed that core store designs improve user satisfaction by enhancing readability, which was clear when testing minimal product listing hub – The layout feels straightforward and uncluttered, making listings easy to read and navigate.
веб сайт продвижение александр [url=https://zhizn-zvezd.ru/internet-prodvizhenie-v-moskve/]веб сайт продвижение александр[/url]
While analyzing several informational websites, I came upon this well-structured example and it impressed me with how clearly it communicates its message, making it accessible and easy to follow for a wide audience.
Online users searching for fast shopping solutions often gravitate toward platforms that reduce friction in purchasing and improve speed where seamless buy hub appears in content describing efficient systems – it emphasizes a user friendly environment where transactions are processed quickly and buyers can enjoy a smooth experience from start to finish without complications.
Нужен займ? взять займ 1000 рублей мгновенное решение, перевод средств и минимум требований. Идеально для срочных финансовых ситуаций и быстрых расходов
Shoppers who enjoy well structured online environments often prefer commerce hub websites that provide wide product variety and smooth navigation making browsing more efficient and user friendly Velvet Ridge Product Commerce Hub – offering a structured shopping experience where diverse products are arranged in a central hub design that enhances navigation and helps users explore items smoothly across multiple categories
While analyzing ecommerce UX systems focused on daily necessities and usability, I observed that practical stores enhance browsing flow and reduce confusion, which became clear when testing essential goods shopping hub – The marketplace is well categorized, making everyday products easy to access and purchase.
In the course of evaluating online retail platforms for usability and flexibility, I discovered a section called choice based product portal – The interface is clean and user friendly, allowing customers to browse freely and select products in a way that feels natural and adaptable to their needs.
Many users browsing online stores prefer websites with simple design and efficient usability especially when accessing Raven Guild Retail Flow Grove The layout feels interesting and user friendly making browsing easy and allowing users to explore content without unnecessary distraction.
Fashion enthusiasts looking for stylish clothing often prefer brands that offer curated aesthetic collections reflecting modern trends and versatile design approaches Contemporary Wardrobe Fashion Hub – offering a curated fashion platform featuring modern clothing collections and aesthetic inspired designs that emphasize elegance versatility and comfort for individuals seeking refined and expressive personal style choices
While browsing through various online tools, I noticed visit this site – After trying it out, I found the navigation to be well-optimized and easy to use, with no issues while moving through different sections.
Many e-commerce usability reports highlight how structured vendor listings contribute to faster decision making and improved satisfaction during product comparison and browsing activities online Stone Collective Commerce Hub – users appreciate the organized presentation, which allows them to quickly scan options and identify relevant items without unnecessary scrolling or confusion.
Many users appreciate deal websites that focus on smooth interaction and minimal clutter, particularly when exploring CleverDeal Zone Hub – The interface is clean and responsive, allowing users to browse different categories easily while maintaining a consistent and user friendly experience overall.
As I was checking different platforms online, I discovered open this page – It offers fast loading pages, and the overall experience feels responsive and user friendly, keeping navigation smooth and simple.
While browsing humor encyclopedia-style pages and odd reference sites, I encountered humor encyclopedia entry page and the presentation feels straightforward and lightly humorous, making it easy to read and casually enjoyable without any complexity. – Feels like a soft comedic reference idea.
Нужен эвакуатор? эвакуатор солнечногорск автомобиля в солнечногорске быстрая помощь на дороге 24/7. Перевозка автомобилей любой сложности, доступные цены и оперативный выезд по городу и области
Online shoppers who prefer efficient experiences tend to choose platforms that combine variety with fast browsing systems where fast open shopping center appears in content and it reflects a system designed to enhance browsing efficiency while helping users quickly access deals and complete purchases smoothly across different product categories and needs.
Сломалась машина? эвакуатор химки по химкам круглосуточная работа, быстрый приезд и аккуратная транспортировка авто. Помощь при ДТП, поломках и срочных ситуациях
Individuals searching for reliable online shopping destinations often encounter platforms where shopping experience portal integrated browsing elements simplify their decision making process allowing smoother transitions between categories and product types especially when exploring multiple options in one session online quickly – The interface supports efficient browsing without unnecessary complexity.
Online buyers often choose marketplaces that focus on convenience and clarity while offering diverse product selections, and a relevant example is Prime Dock Market – The platform enhances shopping efficiency by providing organized categories and easy navigation so users can complete purchases without unnecessary delays or complications.
In the process of evaluating digital marketplaces focused on organized layouts and usability, I found that line-based shop designs enhance browsing flow and accessibility, which became evident when reviewing clear layout shopping hub – The structure appears neat and logical, allowing users to find products quickly and easily.
While going through specialized content websites, I noticed this southwest coast reference page and it seems like a niche site but still quite informative overall, providing focused insights that still feel easy to grasp.
During my review of fine jewelry platforms, I encountered this luxury collection site and found it visually impressive, as the layout feels polished and carefully arranged to highlight products in a very classy and professional manner.
Shoppers interested in modern technology accessories often browse websites that highlight deals and updated product listings where t budget gadget marketplace hub provides access to affordable devices and useful add ons while helping customers make quick and informed purchasing decisions across different tech categories.
In the process of evaluating digital commerce platforms focused on direct buying efficiency, I found that streamlined checkout systems enhance satisfaction and usability, which became evident when reviewing efficient order flow hub – The platform is simple and direct, making navigation clear and the buying process smooth.
While reviewing online stores focused on fast performance design, I discovered a module titled quick access retail index – The platform ensures responsive interactions and fast page loads, creating an efficient browsing experience where users can explore products without unnecessary waiting or interruptions.
People exploring online fashion stores often prefer platforms that combine aesthetic design with practical clothing collections suitable for everyday modern lifestyles Minimal Fashion Style Hub – offering a curated selection of stylish clothing that reflects contemporary aesthetics and clean design principles while focusing on comfort versatility and modern wardrobe essentials for fashion conscious individuals
Individuals interested in aesthetically pleasing e commerce platforms often enjoy websites that present products in a clean organized and atelier inspired format for better browsing flow Dawn Ridge Creative Studio – featuring a refined online marketplace with elegant product presentation and structured layouts designed to enhance usability while maintaining a visually appealing and thoughtfully curated shopping experience for all users
Many online users prefer websites that offer clean structure and responsive performance for easier navigation especially when accessing Drift Orchard Shop Center Pages load fast and information is presented in an organized layout that makes browsing simple efficient and enjoyable for users who want quick access to clearly displayed content.
раскрутка сайта в интернете цены александр [url=https://progorod59.ru/longrid/view/v-permi-ozidaetsa-rezkoe-poteplenie-meteorolog-rasskazala-o-pogode-v-prikame-v-etom-mesace]раскрутка сайта в интернете цены александр[/url]
While exploring various online tools, I noticed visit this site – It has a clean design style, and nothing feels cluttered while going through sections, making the browsing experience easy and efficient.
As I continued exploring cinema-related websites, I noticed this Folie a Deux film project hub and film related content appears artistic, engaging, and thoughtfully presented style, presenting content in a way that feels creative and immersive.
Many reviewers of educational and creative platforms emphasize how important smooth performance and structured layouts are for maintaining user engagement and motivation over time Pure Value Idea Portal – the platform offers a stable and inspiring environment where users can comfortably explore, learn, and develop new ideas through a clean and interactive design.
E-commerce browsing becomes more enjoyable when websites prioritize clarity and structure, especially when users interact with Arena Goods Experience Hub because it reduces confusion and allows for smoother transitions between product categories and sections.
While checking out different online tools, I noticed visit this site – The platform feels straightforward, and navigating through it was simple and easy without any confusing structure or messy layout.
While conducting comparative research on ecommerce UX and checkout systems, I observed that flexible cart options improve browsing continuity and purchase flow, which was clear when testing smart purchase cart portal – The cart feels versatile, and the checkout process is simple, fast, and user friendly.
Many online shoppers exploring different categories often appreciate streamlined browsing when they encounter dynamic corner shop portal which helps them navigate products easily and continue exploring various items while enjoying a clean and intuitive interface that improves overall shopping experience significantly across devices and platforms
Many users exploring digital marketplaces frequently prefer platforms that combine convenience with organized product listings where easy deal nest hub is included in content and it highlights a system designed to enhance browsing speed while ensuring users can quickly access discounted products and enjoy a smooth and efficient shopping experience overall.
Нужна эвакуация машины? цена эвакуатора быстрое реагирование, аккуратная погрузка и безопасная доставка автомобиля в нужное место
Быстая эвакуация машины эвакуатор москва 24 часа быстро и удобно. Круглосуточный сервис, опытные специалисты и надежная транспортировка автомобиля
Shoppers looking for quick product discovery often choose platforms that allow instant browsing and minimal effort in finding desired items instant product access hub improving efficiency and reducing time spent searching through large catalogs of goods – It highlights the importance of accessibility in modern e-commerce environments.
As I evaluated different small business resources, I encountered this useful strategy resource and it stood out for its clear and practical advice that seems easy to understand and apply in real-world scenarios.
In the process of analyzing digital shopping environments focused on usability and structure, I found that clean shopping hubs enhance engagement and clarity, which became evident when reviewing organized browsing portal – The platform is clean and intuitive, making it easy to browse different sections smoothly.
ботинки с металлическим подноском купить Наша коллекция защитной обуви предлагает широкий ассортимент моделей, от классических кожаных ботинок до специализированных вариантов с усиленной защитой носка и антискользящей подошвой, идеально подходящих для тяжелых работ или работы в сложных погодных условиях.
Портал для туристов https://aliana.com.ua для путешественников: направления, маршруты, советы и лайфхаки. Подбор отелей, билетов и экскурсий, идеи для отдыха и полезные рекомендации. Планируйте поездки легко и открывайте новые страны с комфортом.
During a comparative study of online retail systems emphasizing scrolling efficiency and structured layouts, I discovered that stacked marketplace designs help users view products in a continuous flow, which stood out when exploring layered product stack portal – The interface is designed in a stacked format that makes browsing smooth and allows users to easily discover items while scrolling through clearly organized sections.
Fashion oriented users often seek brands that highlight stylish and minimalist clothing collections designed with modern aesthetic influences for everyday outfits Stylish Aesthetic Apparel Hub – offering a curated fashion platform featuring elegant clothing collections and contemporary designs that focus on comfort style and versatility for individuals who appreciate modern wardrobe aesthetics
техосмотр Мы предлагаем прозрачное ценообразование, чтобы вы знали точную стоимость техосмотра автомобиля в СПб заранее, делая процесс максимально комфортным
Many shoppers prefer platforms that focus on clean design and usability especially when they visit Goods Frost District Seaside Hub The layout is neat and well structured making browsing easy comfortable and visually clear for users across all sections.
покупка базы [url=https://gobasego-2.ru/]покупка базы[/url] .
People who appreciate functional online shopping often use merchant style platforms that make it easy to browse products and complete purchases without unnecessary complexity or delays Everyday Harbor Market Hub – offering a streamlined digital marketplace experience designed for practical browsing organized product categories and efficient shopping that helps users quickly find and purchase what they need for daily life
During some light online research, I ran into view this link – It has a well structured design, and navigation feels natural and very straightforward, making everything easy to find and explore.
While browsing curated wardrobe platforms, I discovered handpicked preloved wardrobe and the items feel thoughtfully selected, offering a sense of personality and sustainability that appeals to modern fashion enthusiasts. – It feels warm, intentional, and visually balanced overall today now experience here.
трансы саратова Эти города, словно магниты, притягивают к себе людей с разнообразными жизненными путями и желаниями, формируя уникальные сообщества и создавая неповторимые истории.
When analyzing interactive platforms built for learning and innovation, experts often highlight the importance of seamless navigation and well organized content presentation systems Value Outlet Idea Network – the site provides a comfortable browsing experience where users can easily explore ideas and engage with content that stimulates creative thinking.
In competitive online retail spaces, users often choose platforms that offer intuitive navigation systems and fast loading pages for a better shopping experience Goods Express Station – Streamlined design helps shoppers quickly move through categories and access relevant items while maintaining clarity and reducing unnecessary effort during browsing sessions overall.
People exploring online shopping options often appreciate platforms that keep navigation simple and product access direct, especially when considering services that bring organized listings and helpful browsing tools together for a smoother customer experience overall Online Deck Market which presents products in a well-organized manner while helping users find relevant items without unnecessary effort – The service design aims to reduce complexity while improving how users interact with online catalogs
During some general browsing, I noticed open this link – The interface is clean and the structure is simple, allowing quick understanding of everything without needing to dig through complicated sections.
Online users who want better organization in shopping platforms often rely on Choice explorer station which simplifies navigation across different product groups and enhances clarity while browsing allowing users to make informed decisions quickly without feeling overwhelmed by excessive information – system supports user friendly exploration.
Many users exploring digital stores often prioritize platforms that offer daily deal updates and structured browsing where value open deals hub appears in informational content and it reflects a structured system designed to improve browsing speed while helping users quickly access discounted products and enjoy a seamless shopping journey across categories.
People searching for reliable e-commerce solutions usually prefer platforms that ensure safe transactions and helpful support where trusted order service hub is included in content emphasizing security and it reflects a marketplace built to maintain customer satisfaction while offering consistent assistance and secure purchasing options across all categories of products.
While going through emotional support resources, I noticed this stay strong inspiration site and really like the message behind this, feels genuine and supportive, with content that feels warm, sincere, and thoughtfully composed.
Актуальний сучасний український журнал Різні це джерело натхнення, новин і корисних матеріалів. Читайте статті про життя, тренди та розвиток у зручному форматі
Bclub login https://https-bclub.tk
заказать кухню по индивидуальным размерам [url=https://zakazat-kuhnyu-17.ru]https://zakazat-kuhnyu-17.ru[/url]
заказать индивидуальную кухню [url=https://zakazat-kuhnyu-18.ru]https://zakazat-kuhnyu-18.ru[/url]
заказать кухню под заказ [url=https://zakazat-kuhnyu-19.ru]заказать кухню под заказ[/url]
заказать кухню с замером [url=https://zakazat-kuhnyu-20.ru]https://zakazat-kuhnyu-20.ru[/url]
During a comparative study of ecommerce platforms with cart-based workflows and checkout systems, I discovered that usability improves when cart design is simple and functional, which stood out when exploring structured cart solution hub – The open cart system looks functional, and shopping steps are simple, clear, and easy to understand.
Individuals passionate about modern fashion often explore websites that present curated clothing lines featuring aesthetic inspired designs and stylish wearable pieces Aesthetic Wardrobe Boutique – showcasing a fashion platform that highlights modern clothing collections focused on elegance simplicity and trend aligned designs created for individuals who value expressive yet minimal personal style choices
While exploring ecommerce systems designed for clarity and usability, I came across a module titled smart organized port hub – The platform provides a clean navigation experience, making it easy for users to explore products while maintaining a structured and efficient browsing environment overall.
Users exploring e-commerce platforms frequently prefer clean layouts and simple navigation especially when visiting Birch Harbor Market Access I like how organized it is making exploring very convenient and allowing users to find what they need quickly and without unnecessary effort.
While conducting comparative research on ecommerce UX and cart optimization systems, I observed that streamlined cart solutions improve flow and user satisfaction, which was clear when testing smart checkout experience hub – The platform is efficient and smooth, allowing users to browse and checkout without friction.
During a quick search session, I noticed this useful link – It shows a pleasant layout with simple flow, making everything easy to understand at first glance and easy to navigate.
As I explored different nature getaway pages, I came across this Fisherman’s Retreat escape listing and the location feels peaceful, scenic, and ideal for relaxing stays experience, presenting an environment that looks soothing and comfortable.
People who enjoy curated e commerce platforms often appreciate websites that combine boutique hall aesthetics with simple layouts to make product browsing more intuitive and enjoyable Ridge Glade Product Boutique Hall – providing a refined online shopping experience with carefully curated product displays and a clean layout designed to enhance usability and create a smooth browsing experience for all users
In competitive e-commerce environments, usability and visual balance play a major role in user satisfaction, especially when accessing CleverZone Product Space where categories are arranged clearly, allowing visitors to move smoothly through listings without feeling overwhelmed or distracted by unnecessary design complexity.
Нужны срочно деньги? https://buhgalter-uslugi-moskva.ru подайте заявку онлайн и получите деньги в кратчайшие сроки с прозрачными условиями и удобным погашением
In evaluations of modern e-commerce systems, clarity and responsiveness are often cited as essential features that enhance browsing efficiency when using platforms such as Hazel Harbor Commerce Studio Link – Smooth browsing experience, products are clearly displayed and accessible, ensuring users can navigate categories effortlessly while enjoying a structured and intuitive product discovery process overall.
Если вам нужна профессиональная верификация GMB в условиях российских ограничений — обратитесь к специалисту напрямую.
During some light online research, I ran into view this link – It gives a sense of order and clarity, with everything appearing well arranged and visually balanced.
As I continued exploring online project platforms, I noticed this Simpson Stride campaign page and this looks meaningful and worth spending some time exploring, offering information that feels carefully presented and moderately engaging to read through.
While conducting usability research on ecommerce systems focused on smart navigation strategies, I noticed that smart hub designs improve user satisfaction by reducing complexity and enhancing product visibility, which became evident when analyzing intelligent shopping flow hub – The smart hub approach makes shopping efficient and structured, allowing users to browse easily through a clean and intuitive interface.
In the process of exploring e-commerce platforms, I came across this fast shopping portal and found a few interesting products, with the browsing experience feeling efficient, smooth, and quite convenient overall.
In the course of evaluating online retail platforms focused on simplicity and usability, I found that clean cart designs improve engagement and shopping efficiency, which was evident when analyzing simple shopping flow hub – The interface is easy to understand and ensures a smooth shopping experience without any confusion.
Users browsing modern e-commerce platforms often value simplicity and responsiveness especially on Commerce Hub Marble Cove The design is very simple but it works really well for quick browsing making navigation smooth and efficient while keeping everything accessible and easy to understand.
Verified marketplace читать далее provides access to a wide catalog of digital profiles for advertising and media buying. Aged profiles with natural activity patterns consistently outperform fresh registrations in ad delivery quality and checkpoint avoidance rates. Access the full catalog today and discover why top-performing affiliates and agencies choose this platform for their account needs.
Established supplier npprteam.shop яндекс maintains the largest selection of quality accounts with transparent specs and competitive pricing for bulk buyers. A loyalty program with cashback on every order makes repeated purchases more cost-effective for teams with regular sourcing requirements. From first purchase to ongoing scaling, the platform supports every stage of a media buyer’s operational journey.
Leading store яндекс директ для арбитража gives media buyers access to aged, warmed, and verified profiles sorted by geo, trust level, and ad readiness. The knowledge base includes working guides for account warming, ad launch protocols, and reinstatement check procedures for reference. Professional media buying starts with professional tools — source from a marketplace built by advertisers, for advertisers.
Shoppers who enjoy easy navigation in online stores often prefer platforms that use merchant lane layouts to divide products into clear sections for faster discovery and better usability Maple Coast Easy Lane Market – offering a clean e commerce environment where products are organized using a merchant lane system designed to improve browsing flow and help users quickly locate items across multiple categories
Online shopping experiences improve significantly when platforms prioritize usability and clear structure, allowing users to find products faster and with less effort, and this is the goal of ValuePath Market – It ensures a smooth flow from browsing to checkout while maintaining a focus on affordability and practical product selection for everyday needs
In online shopping environments users often value consistency and simplicity that helps reduce effort during product discovery, especially when accessing Trendy Cart Center – The layout feels visually balanced and easy to follow, making browsing enjoyable while ensuring users can quickly locate items without confusion or delay.
While analyzing several modern e-commerce platforms focused on usability testing and customer journey optimization across different devices and regions, reviewers consistently highlight intuitive design patterns Honey Cove Atelier Shopfront that improve browsing clarity and reduce friction during product exploration across categories while maintaining a smooth and structured interface for users navigating multiple sections – users report a highly consistent and enjoyable browsing experience with clear layout organization.
In the course of evaluating online retail platforms focused on smart categorization and user experience, I found that structured marketplaces enhance navigation and reduce effort, which was evident when analyzing organized marketplace experience center – The setup is intelligent and clean, ensuring products are easy to find and browse.
During evaluation of online shopping platforms focused on user comfort, I found a section titled nest inspired shopping portal – The interface is designed with a cozy aesthetic that enhances browsing ease and helps users navigate product categories smoothly while maintaining a relaxed and enjoyable experience overall.
Users exploring online marketplaces frequently prefer websites with clear layouts and easy navigation especially when they land on Collective HarborStone Vendor Group The browsing experience felt smooth and nothing was confusing while navigating which made the platform simple and comfortable to use.
Modern platform protonnail caters to solo buyers and agencies who need reliable accounts at scale with volume pricing and priority restocking. The team provides onboarding guidance for new buyers and ongoing operational support for teams managing high-volume campaign portfolios. Access the full catalog today and discover why top-performing affiliates and agencies choose this platform for their account needs.
Growth-focused store bulk buy reddit accounts is built specifically for performance marketers who value transparency, speed, and predictable account quality. The catalog is segmented by platform, geo, account type, and price tier to simplify navigation for both new and returning customers. Every order comes with clear documentation, replacement guarantees, and access to a growing knowledge base of operational resources.
Expert-level shop discord account kaufen combines automated delivery with manual verification to ensure every account meets strict quality benchmarks. Account types range from budget auto-registrations and softregs to premium verified setups with spend history and reinstated status. Build your campaigns on accounts with proven trust — higher trust means better delivery, lower costs, and fewer interruptions.
While passing time online and opening various sites, I reached visit this webpage and after checking it out today, I found the structure neat with straightforward navigation throughout the pages.
Individuals who enjoy visually active online stores often look for platforms that use trading post layouts to create dynamic browsing experiences with varied product selections that improve engagement and shopping enjoyment Wave Harbor Product Trading Hub – featuring a structured e commerce platform where trading post design enhances product variety and creates a dynamic browsing flow that supports smooth navigation across multiple shopping categories
Professional service buy verified facebook business managers specializes in accounts optimized for paid campaigns with proper warming history and platform trust markers. Product cards display exact specifications including account age, verification level, included assets, geo origin, and current stock availability. Stop wasting budget on unreliable accounts Ч switch to a verified source and see the difference in campaign performance.
Many online users exploring trend-focused websites appreciate structured layouts and intuitive interfaces that reduce effort during browsing, particularly when they visit Trend Corner Explorer – The platform offers a seamless design flow that keeps browsing simple and enjoyable while making it easy to find new and relevant trends without confusion.
While reviewing digital vendor collectives and online storefront aggregators, I found information leading toward Elm Harbor product listings gateway which organizes vendor profiles and product listings in a way that supports easy navigation and comparison across multiple categories – it seemed like a decent resource for browsing diverse sellers
While reviewing ecommerce systems designed for affordability and discount discovery, I observed that savings focused layouts improve user experience by highlighting value offers clearly, which was evident when testing best value shopping corner – The deals look appealing and trustworthy, making it feel like a good place to find savings across different categories.
HoneyCoveVendorStudio – Clean interface, everything loads fast and works very smoothly.
While analyzing ecommerce websites with structured category navigation, I observed a listing titled branch organized shopping portal – The design presents products in a clear tree format that helps users understand relationships between categories and browse items easily with a logical and intuitive structure overall.
While reviewing several outlet directories and shopping hub listings online, I found a platform that appeared quite organized and visually balanced Hollow Creek product gateway which supports smooth browsing through categories and helps users quickly locate sections – The experience feels minimal yet functional for everyday browsing needs
Online users often value websites that provide clear structure and neat presentation especially when they land on Forest Cove Goods Flow Atelier The layout is tidy and professional creating a clean impression that helps users browse comfortably and find products without unnecessary effort.
While exploring international charity racing events, I discovered support racing initiative hub and interesting concept overall, seems well organized and quite engaging today, offering a blend of sport and humanitarian purpose that feels thoughtfully arranged and easy to understand for visitors. – It feels meaningful and clearly structured.
While comparing different online deal directories for everyday shopping, I found a platform reference deal browsing gateway which helps users explore categorized offers more easily – this shopnetmarket.shop interface makes deal discovery feel clean, structured, and simple for users who prefer organized navigation and faster decision making while shopping online across multiple categories.
Shoppers today rely heavily on digital marketplaces that integrate fast checkout systems with wide product selection and transparent pricing models EdgeFinder Shopping Hub – It provides a streamlined experience focused on speed, accuracy, and reliability in every transaction processed through the platform.
As I was browsing various online resources out of curiosity, I landed on explore here and checked it out today, finding the structure neat and the navigation quite easy to follow throughout the pages.
In the process of evaluating digital marketplaces focused on global cart systems and product accessibility, I found that unified cart models enhance usability and browsing efficiency, which became evident when reviewing global online cart portal – The design follows a global cart concept, making a wide range of online products easy to browse and compare.
Individuals who appreciate soothing online stores often look for platforms that use lakefront lounge aesthetics to make browsing feel calm and visually pleasing while maintaining structured product navigation Lakefront Velvet Shopping Lounge Hub – featuring a clean marketplace where products are displayed with calming lakefront design elements that improve browsing flow and create a peaceful and enjoyable shopping experience for users
Подробности на странице: https://franshiza-remontoff.ru
Все подробности: https://alexstroy.su
Shoppers frequently prefer e-commerce platforms that combine efficiency with visual clarity and structured navigation, particularly on TrendMart Goods Hub – The interface ensures a smooth browsing experience that allows users to move through sections easily while maintaining a clean and organized layout overall.
While searching through online vendor showcase networks and marketplace listings, I came across a mention of Elm Harbor trade collective portal which seems designed to present multiple vendor categories and product highlights in a structured format for easier user navigation – it gave a clean impression for browsing different shops
During my search for efficient online shopping systems, I came across budget shop corner hub that organizes affordable products into clear sections – Hyper Cart Corner delivers a really easy shopping experience with affordable products and fast delivery, ensuring smoother browsing and improved usability for users seeking quick access to deals.
Магазин бытовой химии https://bytovaya-sfera.ru большой выбор средств для уборки, стирки и ухода за домом. Качественная продукция, доступные цены и быстрая доставка
Срочный онлайн займ https://buhgalter-uslugi-moskva.ru быстрое решение финансовых вопросов. Оформление за несколько минут, высокий шанс одобрения и перевод денег на карту без лишних документов
In studies of online retail environments focusing on interface clarity and structured browsing systems designed to enhance user satisfaction and engagement during product searches Trading Icicle Market Flow feedback suggests strong usability performance – Overall experience feels smooth and well organized with intuitive navigation paths quick loading pages and a consistent layout that helps users compare products efficiently across sections.
Online consumers frequently enjoy platforms that act as neon styled shopping centers offering helpful product ranges and intuitive navigation for effortless browsing Neon Shopping Cart Flow Hub making exploration easier – The website is often noted for its vibrant design and structured interface that supports quick and simple product selection
People exploring online stores frequently prefer platforms that act as premium goods corners with solid product collections and clean layout designs for better usability Premium Goods Style Corner Explorer making browsing easier – The website is often recognized for its modern interface and efficient product discovery features
While exploring various online stores and catalog-style pages today, I noticed a layout that felt easy to navigate and quite minimal in design Hollow Creek Outlet homepage which helped maintain a smooth browsing flow across categories and sections without confusion or clutter – Overall impression is that the page is user friendly and straightforward for casual visitors
While analyzing platforms focused on shopping efficiency, I discovered smart shopping indexer that improves deal organization – this shopnetmarket.shop interface helps users navigate product categories smoothly, ensuring faster access to relevant items and a more structured browsing experience overall for online shoppers seeking convenience.
Online users often rely on rapid goods zones that feature fast shopping zone with simple layout and useful product range, ensuring quick access to products and a seamless browsing experience RapidCart Goods Zone Flow Portal – Supports structured navigation and optimized checkout performance
While conducting usability evaluations of ecommerce platforms focused on modern interface design, I noticed that corner cart layouts improve clarity and navigation flow, which stood out when exploring modern cart flow center – The interface looks clean and structured, offering a user friendly shopping experience that is smooth and intuitive.
Users often prefer clean and organized e-commerce interfaces for better shopping flow Fashion Cart Nexus – A refined shopping environment improves usability by presenting items clearly allowing users to compare options and make decisions efficiently without feeling overwhelmed by excess content
Винтовые сваи в Нижнем Новгороде, геология участка и испытания, подробнее:
https://wyksa.ru/2026/04/22/ecifika-gruntov-nizhegorodskoi-oblasti-pochemu-bez-geologii-ne-oboitis.html
While exploring curated online retail directories and artisan platforms, I found a listing pointing to Meadow Guild vendor showcase index which groups product pages into structured sections, and after browsing briefly I felt the content is readable and navigation is intuitive – overall it seemed efficient and user friendly
Shoppers looking for value often turn to online hubs that specialize in gathering limited time deals and promotional offers efficiently Flash deal directory allowing them to act quickly before offers expire and take advantage of significant savings opportunities across multiple categories – The platform is designed to highlight urgent discounts so users never miss out on short term price reductions
As I was browsing a mix of online platforms, I came upon discover more here and noticed the content seemed quite informative, making it something I would like to revisit again later for further exploration.
Many shoppers appreciate websites that maintain fast loading speeds and clear category organization, particularly when they browse Crystal Buy Shop Zone – The platform feels easy to use and trustworthy, helping users navigate smoothly while discovering products efficiently across all sections.
In discussions about optimizing online shopping platforms, usability specialists often highlight streamlined navigation and well structured layouts as essential features Cove Icicle Commerce Hub the overall experience remains smooth and accessible, with clearly arranged products and fast navigation that helps users browse efficiently and complete their shopping tasks with ease.
Many users prefer marketplaces that highlight curated items and ensure fast browsing so they can shop more effectively and comfortably Neon Pick Ultra Hub Center improving usability – It is frequently described as modern and user friendly with organized product listings
In today’s competitive online retail environment, having a place to quickly locate deals can be valuable, and this reference contributes to that concept promo finder directory – it allows users to view a collection of offers presented in a simple layout that prioritizes convenience and clarity.
Online users often appreciate platforms that provide clean structure and logical navigation especially when accessing Cove Forest Atelier Market The interface is simple and intuitive making everything easy to find while ensuring a smooth browsing experience across all categories and product listings.
Online users often rely on rapid style corner platforms featuring stylish items available here with quick browsing and smooth interface, ensuring smooth navigation and improved shopping satisfaction across devices ClearView Style Corner Access Center – Built for clarity, speed, and structured fashion exploration
In the process of evaluating digital marketplaces focused on variety and usability, I found that all-in-one store layouts enhance browsing efficiency and clarity, which became evident when reviewing unified shopping experience hub – The platform offers numerous product options, making it easy to explore everything in one location.
While scanning through various online marketplace listings and outlet-style directories, I noticed a website that offered a very organized structure, clear navigation paths, and a minimal design that enhances browsing clarity especially for casual visitors browsing experience overall Hollow Ridge outlet listing which feels simple and logically structured for easy navigation – The browsing experience feels smooth and accessible, with clear separation between categories and a layout that avoids unnecessary complexity making it suitable for general users.
Modern retail systems are increasingly focused on delivering wide product assortments that allow users to compare options easily and make informed purchasing decisions EveryRange Commerce Hub – This structure ensures customers can access multiple categories efficiently while benefiting from a smooth, organized, and user friendly online shopping environment designed for clarity and ease of use.
Digital buyers often prefer clean and responsive storefront designs that allow effortless movement between sections while discovering items in a guided flow where CartStyle Nexus – this navigation approach enhances clarity and makes product exploration more comfortable by reducing unnecessary complexity and supporting faster decision making across the platform
Users exploring online marketplaces tend to appreciate platforms that maintain order and clarity while offering a pleasant and efficient browsing journey overall Product Discovery Zone – It is generally noted for helping users find items quickly through a well structured layout that reduces browsing effort and improves convenience
During exploration of independent e-commerce hubs and marketplace aggregation sites I came across a catalog entry featuring Ivory Cove commerce showcase portal which was placed within a grouped vendor index and after browsing it briefly I noticed the content was easy to read – overall it felt like a useful platform and I liked going through its structured categories
Across multiple user experience reports on online retail platforms and marketplace design Isle Commerce Foundry Link – Diverse product catalog is arranged clearly, allowing users to navigate efficiently and discover items quickly across well structured categories.
While passing time online and opening random pages, I reached visit this webpage and found it to be a solid platform, with content that felt relevant and clearly structured throughout.
In modern e-commerce experiences users expect fast loading pages and easy navigation especially when they access Arena Digital Quick Buy – The platform provides a clean layout and responsive design making it simple to browse products and enjoy a seamless shopping journey.
People often appreciate platforms that combine neon themed bazaar visuals with simple interface design for a more enjoyable shopping experience Neon Trend Bright Bazaar Hub making browsing smoother – The site is known for its vibrant design and clear product structure
Online users often appreciate e-commerce platforms that prioritize structure and clarity especially when accessing Harbor Gallery Jasper Trade The site feels polished and well designed making browsing comfortable easy and visually balanced while helping users quickly find what they need.
In reviewing online shopping interfaces focused on simplicity, I discovered simple deals hub which structures product listings clearly – Simple shopping experience with clear layout and easy product access improves navigation flow by presenting items in an organized manner that helps users compare options quickly without being overwhelmed by unnecessary details.
During analysis of online retail systems focused on layout consistency and usability, I discovered that stacked product arrangements improve browsing efficiency, which became clear when testing smart stack product center – The layout is well structured and easy to follow, making browsing feel organized and simple overall.
Many digital shoppers rely on rapid trend hubs that deliver trend hub offering fresh items and easy navigation for users, helping them access updated products more efficiently while maintaining a smooth and intuitive browsing interface QuickBrowse Trend Hub Selection Portal – The interface ensures fast page response and structured category arrangement for better usability
Портал об автомобилях https://autort.ru новости автопрома, обзоры моделей, тест-драйвы и советы по выбору. Актуальная информация для водителей и автолюбителей
Мировые новости https://vse-novosti.net актуальные события со всего мира: политика, экономика, технологии и общество. Оперативные обновления и проверенная информация каждый день
Женский журнал https://justwoman.club онлайн: мода, красота, здоровье и отношения. Актуальные статьи, советы экспертов и идеи для вдохновения каждый день
Актуальные новости мира https://tovarpost.ru оперативная информация, аналитика и обзоры. Узнавайте о главных событиях и трендах международной повестки
Users appreciate online shopping environments that minimize effort while maximizing product visibility and clarity CartMarket Express Hub supports structured browsing while offering smooth transitions between categories and helping users find items quickly overall experience for better UX.
While exploring online shopping platforms and analyzing their usability structure, I came across a website that featured a simple and well organized layout which allowed users to navigate through categories smoothly without unnecessary complexity or visual clutter Honey Fern shopping entry acting as a central access point for browsing content – The interface feels clean and efficient, making it easy for users to find what they need quickly.
Consumers prefer platforms that ensure trust and simplicity while offering structured product listings and a checkout process designed for maximum convenience Trusted Goods Terminal – The site is commonly described as organized and efficient with a focus on helping users complete purchases quickly and confidently through a smooth interface
While exploring niche marketplace directories and digital commerce hubs I came across a catalog entry featuring Ivory Ridge vendor discovery page which appeared within a grouped listing system and after briefly reviewing it I noticed the structure was logical – overall the browsing experience felt simple, organized, and easy to navigate without distractions
As I checked out a few different platforms online, I discovered open this station link – It presents information in a structured way, making the entire browsing experience feel easy and user friendly.
During a short online search session, I found visit this link and noticed some interesting bits along with useful information that made the browsing experience worth a quick look today.
IvoryBrookVendorFoundry – Clean design, shopping feels smooth and very easy today.
Users often prefer shopping websites that offer organized layouts and quick access to items especially when they land on Digital Arena Cart View – The browsing experience is smooth and products are shown clearly allowing users to explore categories without confusion or delays.
Many shoppers prefer platforms that highlight modern trends in a central hub with fresh daily product updates and easy navigation options Neon Trend Glow Center Hub making selection easier – It is commonly appreciated for its structured layout and fast browsing capabilities
In the course of evaluating online shopping systems focused on digital innovation and technology, I found that modern platforms enhance usability by organizing tech items effectively, which became evident when analyzing smart digital marketplace hub – The site feels modern and well structured, with appealing tech items that encourage exploration.
Online shoppers often value websites that maintain speed and usability especially when they land on Vendor Ridge Atelier Flora Hub The browsing flow is smooth and pages load quickly without delay creating a pleasant and efficient user experience overall.
Online users frequently engage with rapid trend outlets providing outlet deals on trending products with simple and clean structure, ensuring smooth browsing and efficient product discovery process StyleFlow Rapid Outlet Access Center – Focuses on intuitive navigation and clean interface design
Shoppers appreciate digital platforms that remove unnecessary steps and provide clear pathways to desired products quickly Direct Purchase Zone this marketplace focuses on usability improvements – ensuring that users can move through categories efficiently while experiencing stable performance and reduced loading times
Online retail continues to expand as customers seek more efficient, flexible, and personalized shopping environments with better product discovery tools constantly improving experience Global Wave Outlet represents a model of adaptive e-commerce design focused on user engagement – Wave market brings fresh goods and organized layouts that simplify browsing and enhance shopping efficiency for all users
Modern online buyers appreciate structured shopping systems that make category browsing simple and product discovery more intuitive across platforms SmartZone Cart Navigator – this design approach improves user experience by streamlining navigation and presenting products in a clear and organized manner throughout browsing sessions.
Shoppers today often rely on e commerce platforms that combine usability and product variety to make online shopping more efficient and enjoyable Quick Goods Explorer Hub helping them browse categories smoothly while discovering relevant items without unnecessary effort – It is recognized for its simple structure and effective navigation system
During my research into online commerce directories and small vendor ecosystems I encountered Ember Brook shop collective index which presents a range of vendor profiles and categorized product listings in a simplified layout – I found it useful for quickly reviewing different marketplace participants
While scanning digital storefront designs, I found a website that offered a clean and minimal browsing experience, helping users move through sections efficiently with integrated elements like a href=”[https://indigoharborstore.shop/](https://indigoharborstore.shop/)” />Indigo Harbor marketplace link placed within the page structure – The overall feel is intuitive and user-friendly, with a strong emphasis on easy navigation and content clarity.
Медицинский портал https://vet-com.ru о здоровье: симптомы, методы лечения и профилактика. Достоверная информация и рекомендации для всей семьи
Автомобильный портал https://avtomechanic.ru ремонт, обслуживание и диагностика. Практические советы, лайфхаки и полезная информация для водителей
Всё об автомобилях https://web-mechanic.ru на одном портале: характеристики, сравнения, рейтинги и рекомендации. Узнайте больше о новых и популярных авто
Женский портал https://cosmoreviews.club мода, красота, здоровье и отношения. Полезные статьи, советы экспертов и идеи для вдохновения каждый день
Актуальные новости https://komputer-nn.ru технологий: ИИ, программное обеспечение, смартфоны, планшеты и гаджеты. Свежие обзоры, аналитика и главные события IT-сферы
In many e commerce performance reports speed and clarity are identified as critical factors influencing user engagement and conversion rates across platforms Ivory Cove Shopping Network users report a very intuitive browsing flow with organized sections and fast loading pages overall
While exploring different online resources, I landed on take a look and gave it a quick look, finding the platform clean and user friendly with a straightforward layout and simple structure.
During usability testing of digital shopping platforms focused on navigation efficiency, I discovered that flow-based systems improve browsing speed and clarity, which became evident when exploring efficient flow shopping hub – The platform offers smooth navigation between sections, making the experience simple, continuous, and easy to understand.
Many shoppers prefer websites that act as an exciting trend zone with fresh items and a simple browsing layout for easy discovery Neon Trend Bright Zone Hub improving usability – The platform is known for its vibrant interface and clear navigation system
кухни на заказ спб недорого с ценами [url=https://kuhni-spb-58.ru]https://kuhni-spb-58.ru[/url]
In digital shopping environments users often expect intuitive navigation and clean layouts especially when accessing Center Smart Cart Market – The platform provides a well structured experience that makes it easy to move through cart options without confusion or unnecessary effort.
кухни от производителя спб недорого и качественно [url=https://kuhni-spb-57.ru]https://kuhni-spb-57.ru[/url]
Many online shoppers prefer websites that focus on simplicity and clear content delivery especially when they browse Hazel Commerce Atelier Cove The content is presented nicely and feels comfortable to read making browsing easy and enjoyable across different categories and listings.
изготовление кухни на заказ в спб [url=https://kuhni-spb-59.ru]https://kuhni-spb-59.ru[/url]
Digital shoppers prefer platforms that consistently provide updated collections and easy navigation across multiple product categories for seamless user experience Trend Update Portal Hub Central – ensuring a reliable browsing experience where new items are easy to discover and explore without confusion or unnecessary complexity added
During comparison of ecommerce marketplace platforms, I found a site that emphasized clarity, variety, and simple navigation across multiple product categories BuyZone shopping market access embedded within the content flow – The platform offers a good mix of products and ensures users can browse comfortably without unnecessary distractions or complex design elements.
As I continued reviewing several websites, I found check this resource – The design remains simple and efficient, with pages loading fast and maintaining a clean look.
Style saver markets attract users who want to maintain a fashionable lifestyle while also taking advantage of discounts and promotional offers available online Style Saver Market It delivers a mix of trendy products and ongoing savings enabling users to shop smartly while enjoying a wide range of stylish and affordable options regularly
Shoppers often prefer online stores that provide clear categories and fast navigation tools Infinity Buy Express allowing them to move quickly through products and make decisions easily – The site is valued for its organized structure and efficient shopping experience
Всё для сада https://ogorodik66.ru и огорода на одном сайте: парники, теплицы, выращивание и уход. Практичные рекомендации и полезные материалы для дачников
While reviewing online marketplace ecosystems and artisan listing hubs I came across HoneyCove commerce discovery page which organized seller data into neat and readable sections – overall the interface felt simple and the content was easy to follow during a short browsing session
шкаф шкаф купе на заказ
заказ шкафа по размерам шкафы на заказ москва
мебель на заказ москва мебель на заказ
Хочешь обучаться? складчина сервис для поиска выгодных предложений на обучение. Получайте знания легально и экономьте на образовании
During a recent exploration of modern UI showcases and online shop structures I came across a page that stood out visually Harbor Ink store Harbor Ink store It presents a clean interface with smooth navigation flow that helps users quickly understand categories and browse through sections without feeling overwhelmed or lost at any point
In discussions about improving online shopping experiences, clear navigation and organized layouts are often seen as essential elements for success, and here Ivory Vendor Ridge Hub the platform provides a straightforward browsing environment that makes it easy for users to move through categories without confusion or unnecessary effort.
Many shoppers prefer websites that offer next cart station functionality with smooth checkout and structured shopping flow for easier browsing Next Cart Flow Quick Hub enhancing usability – The platform is known for its efficient interface and fast checkout experience
Many shoppers prefer platforms that keep interfaces clean and distraction free especially when they visit Icicle Foundry Trading Hub Brook The simplicity stands out clearly and nothing feels cluttered making browsing easy enjoyable and efficient from start to finish.
Online buyers prefer systems that provide smooth transitions from browsing to checkout, especially when design and structure support a seamless shopping journey Royal Cart Flow Interface Hub – ensuring clear product organization, fast cart handling, and a polished user experience that simplifies the entire purchasing process online
Users exploring e-commerce stores frequently value intuitive design and clean cart layouts especially when accessing Zone Cart Digital Hub – The simple interface enhances shopping flow making it easier for users to navigate products and complete their browsing experience smoothly and efficiently.
People who enjoy streamlined online buying usually search for websites that reduce effort and save time when selecting basic products for home use and routine shopping everyday essentials store – Many users find this kind of platform helpful because it presents essential items in a clear structure that supports faster decision making and easier navigation overall
Users looking for dependable e-commerce platforms may appreciate browsing options that feature CartGoods Online Center within a structured interface, where products are neatly categorized, deals are easier to compare, and the overall shopping process becomes more efficient, making it suitable for those who value clarity and convenience while shopping online regularly.
Many users prefer online stores that make navigation intuitive so they can focus on products rather than struggling with complicated menus CartFlow Essentials Hub improving the ease of browsing and selection – It is generally viewed as a user friendly platform with clear categories and smooth navigation features
заказать кухню [url=https://kuhni-spb-61.ru]заказать кухню[/url]
где заказать кухню в спб [url=https://kuhni-spb-60.ru]где заказать кухню в спб[/url]
Shoppers who enjoy exploring curated online deals often prefer websites that showcase style focused discounts in a clean and accessible environment Discount Style Storefront It presents an organized shopping experience where promotional offers are highlighted clearly helping visitors save time while discovering attractive items across multiple categories and seasonal collections
While exploring various independent marketplace directories and vendor networks for informational purposes I came across Honey Cove creative vendor space which appeared within a grouped listing section and after browsing for a short time I found the structure fairly intuitive – overall it felt like a solid platform and gave a generally positive impression of usability and layout simplicity
кайт сафари
While evaluating ecommerce UX designs centered on cart usability and checkout optimization, I noticed that smart cart corners improve conversion efficiency by simplifying purchase flow, which stood out when exploring smart order cart portal – The design feels practical and user friendly, with a checkout flow that is smooth, simple, and easy to complete.
While browsing through different online options, I came across view this bold page – The straightforward layout makes it easy to find what you need with minimal effort.
While comparing ecommerce boutique platforms I came across a site that showcased products in an organized and visually appealing grid style layout Iron Hollow apparel gallery making it easier for visitors to scan items quickly and navigate through categories without confusion or unnecessary scrolling effort during browsing
In various reports on digital retail systems emphasizing customer satisfaction, usability, and streamlined browsing experiences across structured marketplace environments, Jasper Vendor Speed Hub is highlighted since fast loading pages ensure shopping feels smooth, responsive, and very reliable even when users switch between multiple product categories quickly.
Online users enjoy platforms that present deals in a visually appealing and organized format, improving clarity and reducing browsing complexity significantly Royal Deal Clean Navigation Hub – delivering structured categories, fast access to offers, and a streamlined interface designed for effortless shopping and improved user satisfaction throughout the experience
Many shoppers prefer online platforms that reduce complexity and improve clarity especially when they browse Orchard Drift Commerce Hub Pages load fast and content is arranged in an easy to understand format making navigation simple efficient and comfortable for users exploring different products and sections of the site.
Online consumers frequently prefer websites that deliver next generation buy hub services with smart deals and wide product variety for efficient shopping Next Gen Buy Ultra Hub Point enhancing experience – The website is often recognized for its smooth navigation and well structured categories
Users increasingly expect straightforward online platforms that minimize complexity and provide clear navigation paths Simple Order Access – The design philosophy centers on simplicity, helping users complete their orders with minimal effort and maximum clarity across all device types overall platform
Users exploring modern trend-based platforms often value clean structure and easy navigation that improves browsing efficiency especially when they visit Digital Trend Corner Hub – The trend section is well structured making browsing feel smooth and intuitive while helping users discover content without confusion or delay.
Shoppers frequently choose websites that reduce complexity and focus on delivering easy access to promotional discounts across many categories DealStream Finder making it simpler to compare prices and save more effectively – The platform is appreciated for its structured layout and fast browsing experience
Online shoppers who value clarity and convenience usually prefer digital spaces that organize promotions in a structured and visually appealing way for faster decision making Trendy Bargain Spot – The platform experience here focuses on presenting deals in a more dynamic format where users can explore offers comfortably while enjoying a smooth and distraction free shopping journey across various product sections
During my search through independent digital shop directories and curated vendor ecosystems I discovered Ember Cove commerce showcase portal which seems to bring together multiple product listings and seller profiles into one accessible space and from what I observed the pages load quickly while maintaining readability across sections – the browsing experience felt fairly clean and responsive
In the process of evaluating ecommerce navigation design, I observed a section called clean structured goods hub – The platform displays products in a logical sequence, ensuring smooth browsing and allowing users to find items easily without clutter or confusing layout elements.
https://capital360.com.ua/
I spent some time checking out various websites and eventually saw explore these items – The shop gives off a clean and organized feel, and the prices look fair, which adds to the overall impression of a reliable browsing experience.
While reviewing different websites during a short search, I stopped at learn more here and noticed it appeared to be a helpful resource, with a simple layout that made browsing easy and smooth.
While comparing online marketplace platforms I found a website that used a structured and minimal design approach Iron Leaf shop hub positioned within the main content area and allowing users to browse through sections without confusion – The interface feels practical and well organized with clear navigation paths and easy access to information
Users appreciate marketplaces that simplify browsing by organizing quality items into clear categories, reducing time spent searching and improving overall shopping satisfaction Smart Royal Goods Discovery Hub – offering streamlined navigation, well structured product sections, and a smooth interface designed to enhance convenience and clarity during online shopping sessions
In discussions about improving e commerce design systems, analysts frequently point out the importance of fast navigation and simple interfaces that allow users to move between product categories effortlessly while maintaining engagement and satisfaction Jasper Commerce Cove Hub – Overall usability is strong, with well structured pages and easy browsing that helps visitors find items quickly and without unnecessary complexity.
Many digital shoppers prefer websites that provide stability and clear interface design especially when accessing FernCove Atelier Market The platform appears well maintained and trustworthy offering a browsing experience that feels consistent easy to follow and suitable for users who value reliability during online shopping sessions.
Online shoppers benefit greatly from platforms that prioritize speed and simplicity when managing product browsing and checkout processes Modern Shopping Gate delivering a seamless experience that keeps interactions quick and easy across all sections of the website – The design focuses on improving usability and reducing unnecessary steps during shopping sessions
People looking for convenience in online shopping often prefer platforms that consolidate multiple product categories into a single browsing space Unified Shopping Goods Corner making it easier to explore items efficiently – The site is frequently praised for its organized layout and user friendly browsing experience
In modern online shopping environments users often expect organized layouts and simple navigation especially when they access DealZone Easy Access Hub – The structure is intuitive and supports smooth deal browsing allowing users to quickly find offers and move through categories without confusion.
Digital shoppers often search for dependable e-commerce systems that deliver consistent quality, secure transactions, and well organized product listings for everyday convenience Secure Cart Reliability Portal – It emphasizes dependable ordering processes and quality control standards that help users feel confident while purchasing items through online retail environments.
ToLife designs https://tolifedehumidifier.com and manufactures compact dehumidifiers for residential use. The product line is based on semiconductor condensation technology and includes models with automatic shut-off, sleep mode, removable water tanks, and ambient lighting. Specifications and documentation are available on the official website.
смотри тут https://forum-info.ru есть разборы таких случаев, люди пишут реальные отзывы и делятся опытом, особенно полезно почитать тем, кто уже столкнулся с подобной ситуацией
Consumers interested in fashion and home essentials frequently appreciate digital stores that simplify product discovery through organized sections and appealing layouts Modern Style Arena – The platform is portrayed as a modern shopping destination where stylish goods are grouped thoughtfully allowing visitors to browse categories easily while enjoying a smooth and visually pleasing interface
While scanning curated online shop ecosystems and commerce listing hubs I found FloraBrook vendor discovery index which grouped marketplace entries into a clean and readable structure – overall I gathered useful insights while casually browsing through its sections
шкафы на заказ москва шкафы купе на заказ
During a comparative study of online retail interfaces emphasizing navigation clarity and flow systems, I discovered that route-style layouts improve usability by guiding users step by step through product categories, which stood out when exploring guided route marketplace portal – The navigation system helps users move through sections easily, making product discovery feel intuitive and well structured without confusion or unnecessary complexity.
https://pravdadaily.com.ua/imena-na-bukvu-a-povnyy-spysok-populiarnykh-ukrainskykh-ta-inozemnykh-imen/
I came across several stores before landing on click here to see – The shop has a smooth and simple browsing flow, and the items seem curated in a way that makes exploration feel natural and easy.
Users appreciate stations that maintain updated product listings with simple navigation, ensuring easy access to goods without unnecessary complexity or delays Royal Smart Goods Update Station – designed to deliver fast browsing, organized categories, and a streamlined shopping experience that improves user engagement and satisfaction overall
In discussions about improving e-commerce platforms, I came across shop management toolkit which is aimed at optimizing store functionality – it provides structured tools for managing products, improving interface control, and ensuring that online business operations remain efficient, scalable, and user-friendly for both administrators and customers interacting with the system.
рулонные шторы с электроприводом цена [url=https://rulonnye-shtory-s-elektroprivodom17.ru]рулонные шторы с электроприводом цена[/url]
When analyzing e-commerce platforms designed for improved customer journeys, specialists often focus on visual hierarchy and structured browsing systems that guide users effectively Jasper Trading Visual Point – The selection is neatly arranged, with strong clarity that supports easy browsing.
In e-commerce browsing experiences users often prioritize simplicity and structured design especially when accessing Vendor Corner Cove Fern The site feels easy to navigate and I did not have trouble finding anything important while moving through product pages and vendor sections.
While analyzing online marketplace designs for usability and performance, I came across a site that offered both speed and visual clarity in one package Iron Petal collection hub placed within the content section – The browsing experience feels refined and fast, with a layout that enhances user interaction significantly.
Many shoppers prefer digital platforms that offer steady improvements and clearly arranged product listings to simplify the overall browsing experience significantly Smart Station Market View enabling easy exploration – It is often highlighted for its organized interface and continuous updates that help users find relevant products with minimal effort
Modern e commerce visitors often expect fast and reliable browsing experiences that allow them to move between categories seamlessly while maintaining clear visibility of product details and pricing information Fashion Goods Control Hub – This control hub for fashion goods focuses on structured navigation and rapid loading pages to ensure a smooth and controlled browsing experience for users
Are you looking for a fast, safe and hassle-free transfer in Valencia? We offer professional transport and moving services, both for individuals and companies. Request your budget without obligation and enjoy a quality service – airport transfer valencia
Users exploring online marketplaces frequently value fast navigation and structured content especially when visiting Corner Digital Goods Hub – Listings are clearly presented making browsing simple and efficient while helping users quickly find relevant products without unnecessary effort.
During a casual scan of online commerce directories and artisan listing portals I found Flora Brook vendor insight hub which displayed cleanly organized marketplace data with readable formatting – I discovered useful insights while casually navigating through different sections
While reviewing different websites during a short search, I stopped at learn more here and noticed it was a nice site overall, offering clearly structured information and pages that load smoothly without interruptions.
Many online buyers prefer platforms with intuitive layouts and well structured product categories that simplify browsing significantly Premium Goods Station Intuitive Browse Hub – The website is optimized for speed and usability ensuring smooth shopping experiences across all devices today consistently
Хочешь отдохнуть? пожарить шашлык в воронеже уютный отдых за городом. Комфортные дома, природа, удобства и выгодные цены для выходных и праздников
мебель из массива дерева
I was exploring trending online shops and eventually saw open this shop link – The store gives a promising vibe, with a range of items that seem diverse and prices that feel reasonable overall.
центр развития детей
Many shoppers enjoy platforms that feature stylish items in a structured layout, making it easier to find trending products and explore categories efficiently Elegant Royal Trend Discovery Hub – providing smooth navigation, fast access to trending sections, and a user friendly interface that enhances digital shopping convenience and clarity overall
Shoppers who actively look for price reductions and seasonal promotions appreciate platforms that streamline access to relevant offers across various categories Price Drop Network – The system tracks and displays reduced pricing opportunities in real time, ensuring users can take advantage of savings quickly and efficiently without missing important deals.
рулонные жалюзи москва [url=https://avtomaticheskie-rulonnye-shtory50.ru]рулонные жалюзи москва[/url]
рулонные шторы на заказ цена [url=https://rulonnye-shtory-s-elektroprivodom11.ru]https://rulonnye-shtory-s-elektroprivodom11.ru[/url]
Shoppers commonly look for websites that highlight trending items in a modern visual style while keeping navigation simple and responsive Trend Vision Explorer making browsing enjoyable – It is often noted for its attractive design and structured layout that helps users explore products efficiently
Users exploring e-commerce trading hubs frequently prefer clean layouts and proper spacing especially when they land on Brook Forest Trading Foundry Hub The design feels comfortable and balanced making navigation easy and enjoyable while browsing through different categories and listings.
Across usability testing of e-commerce platforms, clarity and consistency in layout are often identified as key factors in creating a positive user experience Atelier Jewel Market Desk – The platform provides a smooth overall experience, making browsing feel natural, comfortable, and easy to understand.
Digital marketplaces are shifting toward simpler user interfaces that improve accessibility and ensure smoother navigation for all types of online shoppers globally SimpleWay Deals Zone – This platform supports easy shopping by organizing products clearly and providing a direct path from browsing to purchase with minimal effort required
While exploring multiple digital outlet stores for interface design insights, I discovered a website that presented its content in a clean and structured manner with easy navigation flow IronPetal deals outlet hub placed centrally within the layout – The browsing experience feels stable and user friendly, with clear category separation and smooth transitions between sections that improve overall usability.
Modern users frequently look for discovery focused platforms that make it easier to explore trending products Style Discovery Spot this spot is designed for discovery with smooth navigation and structured layout helping users find stylish goods effortlessly across categories online
As I navigated across several online pages, I encountered see daisystone details and had a quick look where everything appeared neat and easy today, making the browsing experience calm and easy to follow.
While analyzing online retail systems focused on savings, I noticed a section named discount explorer product hub – The design is clean and intuitive, presenting attractive offers that make users want to continue browsing and discover more cost effective options across different product categories.
In online retail environments users often expect clear structure and fast navigation especially when visiting Pick Market Flow Hub – The interface is clean and efficient allowing users to select items easily while maintaining a smooth and enjoyable shopping flow across all sections.
рулонные жалюзи москва [url=https://rulonnye-elektroshtory.ru]рулонные жалюзи москва[/url]
I was casually looking through shopping sites when I found check this platform – The layout appears clean and efficient, making it simple to explore categories quickly and find interesting products.
Online buyers often prefer platforms with curated selections since they provide a more focused and enjoyable browsing experience with less unnecessary distraction Premium Pick Market Organized Flow Hub – The website structure is optimized for clarity and speed making shopping efficient and user friendly
I had some free time and decided to browse around, eventually finding quick shop link which seemed pleasantly straightforward – It offers a relaxed and enjoyable browsing experience that feels very natural and easygoing.
Many users appreciate shopping hubs that combine royal elegance with modern updates, ensuring a simple browsing journey with clearly arranged categories Royal Trend Flow Experience Center – providing intuitive navigation, clean layout design, and seamless browsing that enhances daily product discovery and overall user satisfaction significantly
While going through a variety of online stores, I encountered check hollow items and it felt clean and simple – The browsing experience felt smooth, and products are nicely arranged, making everything easy and pleasant to browse.
Нужна стальная лента? гост 3560 73 лента стальная упаковочная широкий ассортимент, разные толщины и марки стали. Выгодные цены, быстрая отгрузка и поставки для производства и строительства
While researching modern online marketplaces and shopping interfaces, I discovered smart tree shopping guide that helps users browse products through clear categories – Shop tree market feels organized with useful categories for shoppers and improves overall shopping flow by offering a clean structure that reduces confusion and supports faster decision-making processes.
People browsing digital marketplaces often appreciate platforms that update their trending items quickly for a more efficient shopping journey Fast Trend Style Explorer making browsing enjoyable – The site is widely recognized for its clean design and real time updates
Users exploring online marketplace platforms often appreciate structured layouts and clear presentation that improve usability especially when they visit Granite Orchard Market Guild Hub The overall presentation feels solid and thoughtfully built giving users a smooth browsing experience that is easy to follow and visually well organized across all sections.
Users frequently value e-commerce sites that present products in a way that feels engaging and encourages them to come back later, particularly on copperpetal goods center – browsing felt enjoyable since items looked interesting and gave a strong impression of being worth checking again.
While checking different online resources, I landed on visit info portal and noticed the interface was clean and structured; I noted briefly – it provided an easy browsing flow with content that felt organized and readable.
Users who prefer streamlined shopping often seek platforms that unify product discovery and checkout into a single easy to navigate interface Style Checkout Hub – The hub integrates organized listings with a fast checkout flow helping users complete purchases efficiently without unnecessary navigation steps
During a casual search session, I discovered see this option and found the content to have a fresh tone, making it easy to read and understand quickly.
ironwavecollective.shop – Collective platform looks solid, easy access and well structured pages
Many users prefer e-commerce websites that focus on usability and fast navigation performance especially when they land on Smart Trend Corner Zone – The trend section is structured clearly making browsing smooth and efficient while helping users quickly discover relevant items without confusion.
I came across several online shops before landing on click to explore here – The site feels well-organized, and everything loads quickly, making the browsing process feel efficient and enjoyable overall.
Many users rely on premium pick zones featuring a nice variety of picks and fast loading product pages for efficient and enjoyable online shopping Premium Pick Zone Speed Flow Hub – The platform emphasizes smooth browsing and quick access to products across all categories
Online shoppers enjoy platforms where premium trends are displayed in a refined and minimal layout, helping them browse efficiently and find items quickly Smart Premium Royal Trend Station Portal – focused on smooth navigation, clean design, and organized product sections that improve usability and overall shopping convenience for users everywhere
People interested in curated online marketplaces often enjoy platforms that feel like quiet artistic spaces, where browsing is guided by simplicity, nature themes, and carefully arranged product selections hollow valley echo shop – It represents a rustic-inspired digital environment that emphasizes calm discovery, artisan craftsmanship, and a soothing overall browsing atmosphere for visitors.
When searching for digital storefronts that combine usability with aesthetic appeal, shoppers frequently appreciate platforms that balance simplicity with a wide range of lifestyle products Stylish Living Store – it presents a curated selection of home items designed to support comfortable modern living while maintaining an organized browsing experience for all users
Online buyers searching for premium items frequently appreciate platforms that curate luxury goods with clarity and elegant design presentation Luxury Shopping Discovery Hub improving flow – The website is often praised for its polished interface and smooth browsing experience
Online shoppers often value platforms where products are presented in a way that encourages curiosity and repeated exploration over time, as seen on petal copper retail hub – browsing felt enjoyable because the items looked interesting and made the site feel worth revisiting for further exploration.
During a relaxed browsing session, I found see shop page and it immediately felt simple and neat – The browsing experience felt smooth, and products look nicely arranged in a way that makes everything easy to understand at a glance.
People exploring new shopping platforms usually prefer when everything is arranged neatly so they can focus on discovering items without distraction or confusion urban flash corner browse guide the interface feels clean and modern which supports easy movement between sections and creates a comfortable browsing environment throughout the site
While testing various ecommerce checkout systems focused on performance and usability, I came across a section labeled quick cart shopping hub – The cart experience feels extremely fast and smooth, with responsive page loading that allows users to browse and add products without delays or interruptions during navigation.
Digital marketplaces are designed to reduce friction in the buying process, helping users quickly locate and purchase products that meet their needs Instant Shopper Hub – It provides immediate access to curated deals and shopping options that prioritize convenience and rapid decision-making for users
While reviewing digital gallery directories and curated e-commerce platforms I found a listing featuring Moon Cove gallery collection index which was embedded in a grouped index system and after exploring it briefly I noticed the navigation was smooth – overall it felt engaging and I would likely return again for future updates
Shoppers looking for affordable yet stylish options often appreciate platforms that balance design with accessibility in their layouts Budget Style Zone – This space focuses on delivering value oriented products within a user friendly environment that makes shopping both practical and enjoyable
For casual online shoppers seeking variety, GoldenBay retail showcase platform delivers a structured browsing experience with clearly arranged sections, allowing users to move through categories easily while enjoying an overall seamless and comfortable interface.
I was looking through several shopping sites when I found check this platform – The store gives a trustworthy impression, and the product descriptions appear clear and helpful for browsing decisions.
As I was searching for something interesting online, I ended up discovering simple online shop and it felt quite different in a good way – It provides a smooth and enjoyable browsing flow that feels very easy to follow along with.
Many users appreciate premium trend centers that act as a great place for discovering updated trends and modern product ideas in a structured way Premium Trend Easy Center Flow – The interface is designed for simplicity and helps users find trending products without difficulty
Digital users often rely on smart shopping platforms that highlight practical goods in a structured format, making it easier to browse and find essential items quickly Smart Savvy Product Flow Station Hub – offering fast loading pages, intuitive navigation design, and clear category organization that improves usability and enhances overall shopping efficiency
Shoppers exploring digital stores frequently enjoy platforms that offer a sense of discovery while browsing through different product categories and options, particularly on copper petal selection site – items felt interesting and made the experience worthwhile, encouraging another visit to see what new products might appear in the future.
Shoppers who prioritize convenience often choose digital stores that present products in an organized way with clear navigation and fast processing speeds Smart Goods Portal – This platform enhances shopping efficiency by combining intuitive design with quick access to product categories and streamlined checkout functionality
Many digital shoppers enjoy websites that use natural imagery as inspiration for design, creating a relaxing environment for discovering curated items across multiple categories and sections meadow echo goods portal – It suggests a marketplace built around freshness and openness, ideal for wellness, eco-friendly, and artisan products displayed in a simple and inviting layout.
Online consumers often choose websites that focus on modern design to ensure smooth navigation and faster access to product categories Modern Product Navigator making shopping efficient – The platform is frequently praised for its intuitive interface and organized shopping structure
While exploring different online stores, I came across see horizon items and it felt very clear and balanced – The layout is clean and the design is simple, making it easy to explore everything without effort or confusion.
People browsing online shopping spaces often comment on how important visual balance and category grouping are when trying to explore products efficiently and comfortably city flash corner store the experience feels straightforward and modern which supports smooth navigation and gives a sense of order throughout the site interface
While exploring different online resources, I landed on take a look and thought it was a solid site, with information presented clearly and a layout that made browsing smooth and efficient.
People who enjoy minimalistic shopping environments tend to favor platforms that present curated items without clutter and with easy navigation options Minimal Picks Zone – The interface focuses on simplicity while showcasing stylish goods in a way that supports quick browsing and comfortable user interaction
как отмыть стеклянные крышки от жира и как отмыть под стеклянной крышей проверенные способы и советы
As I navigated across several websites, I encountered see this option and experienced a well-organized layout that made browsing feel smooth and uninterrupted.
While checking various online stores for interesting items, I found visit this platform – Browsing here feels comfortable, the navigation is easy to follow, and pages load quickly, making the whole experience feel efficient and user-friendly.
While looking through online retail options, I encountered a well designed shopping space especially when accessing coastal collection marketplace which presents products in an orderly and accessible manner – The browsing experience feels stable and enjoyable with clear structure supporting easy exploration of available items
Digital shoppers frequently enjoy websites where product listings create curiosity and encourage deeper exploration of available categories and items, particularly on copperpetal browse hub – the experience felt positive since the items looked interesting and gave a reason to return and check updates or new selections again later.
Many users appreciate shopping arenas that streamline cart management, making it easier to complete purchases without unnecessary steps or delays Smart Cart Optimization Flow Arena Portal – offering clean layout design, efficient cart handling, and improved navigation flow that enhances usability and user satisfaction overall
Online consumers frequently prefer premium trend marts that offer useful items with a simple user experience for better convenience and faster shopping decisions Premium Trend Express Mart Hub – The interface is designed for smooth browsing and quick access to product categories improving overall usability
During a detailed usability study of ecommerce checkout interfaces, I observed that clarity and responsiveness in cart systems are key factors in user satisfaction, especially when dealing with fast decision making, which was clear when reviewing trusted checkout corner – The system feels reliable and consistent, providing a smooth cart experience that helps users complete purchases without confusion or delays.
While analyzing e-commerce systems that emphasize affordability and structure, I found smart bargain hub that organizes discounted products into clean categories – Value market hub focuses on affordable items and easy navigation, helping users explore deals efficiently while reducing unnecessary effort and making shopping more accessible and user-friendly overall.
Many digital buyers value e commerce systems that simplify cart management so they can track and complete purchases without unnecessary complications or delays Modern Basket Control Hub improving overall shopping flow – It is often recognized for its efficient cart design and user friendly structure that enhances the buying experience
As I checked out different websites out of curiosity, I encountered see this shop and it gave a balanced and tidy impression – The items seem thoughtfully chosen, creating a distinctive browsing experience that feels enjoyable and easygoing.
Many shoppers prefer platforms that combine creativity with floral-inspired aesthetics, offering a relaxing and visually appealing browsing experience for decorative and gift items petal bazaar floral view – It suggests a gentle marketplace filled with vibrant yet delicate design elements that enhance the discovery of artisan and nature-themed products.
While scanning small business listing platforms and independent marketplace hubs I encountered FloraBrook vendor resource portal which presented organized storefront listings with straightforward navigation design – I found useful insights while casually exploring its different vendor categories
Shoppers who prefer simplified digital browsing can benefit from Smart Basket Online which provides clearly arranged categories and faster product access – this makes it easier for users to compare items, evaluate choices, and complete purchases with greater confidence while enjoying a smooth and responsive online retail environment.
While casually browsing online shops, I discovered check items here and it felt clean and structured – The collection here seems fresh and thoughtfully curated for shoppers, giving a relaxed and easy browsing experience without unnecessary complexity.
Shoppers who like discovering new styles often choose platforms that organize trending products into clear sections for faster browsing and comparison Fresh Trend Zone – This zone focuses on delivering up to date product trends within an interface that supports smooth navigation and effortless exploration
Shoppers often prefer platforms that feel easy to use and visually engaging when browsing new collections and seasonal offers you can explore modern fashion portal which presents products in a structured way with clear visuals and helpful browsing features that enhance the overall user journey – The site leaves a positive impression with its neat presentation and intuitive design flow.
While checking out various online stores, I came across explore this discount site – The variety really stood out, and it appears to be worth a visit if you’re looking for bargains.
Shoppers exploring digital stores frequently enjoy platforms that offer a sense of discovery while browsing through different product categories and options, particularly on copper petal selection site – items felt interesting and made the experience worthwhile, encouraging another visit to see what new products might appear in the future.
Users frequently rely on shopping bazaars that highlight smart product selections, ensuring easy discovery of everyday items through simple navigation systems Smart Choice Product Flow Bazaar Center – focused on clean layout design, fast access to categories, and optimized browsing experience that enhances usability and clarity
While researching marketplaces focused on improved user experience, I discovered a structured shopping portal instant shop browser that organizes product data in a simple and accessible format for users – Quick online market delivers smoother browsing performance and helps shoppers quickly identify relevant items without spending excessive time navigating complex menus or layouts.
Many shoppers prefer digital platforms that highlight fresh trends in an organized way allowing them to browse products without confusion Modern Trend Select Hub making discovery simple – The website is often described as efficient and visually appealing with structured navigation
Online shoppers increasingly expect websites to provide consistent performance across devices including mobile tablets and desktop computers ensuring accessibility at all times crest store shopping gateway which helps reduce friction during browsing and supports smoother transitions between product pages categories and checkout processes for improved usability – Such gateways are often designed to streamline the user journey so that customers can focus more on products rather than navigating complex menus
While looking into various online platforms for informational content I discovered a page that could be useful for users seeking simple navigation and organized layout Quartz Orchard official page link which offers different pathways and structured sections that make it easier for visitors to find relevant content and explore at their own pace – The interface seems clean and relatively intuitive which may appeal to general audiences.
Users exploring e-commerce platforms often choose premium trend zones because they offer stylish trending products with clear and easy layouts for efficiency Premium Trend Flow Access Zone Hub – The platform ensures structured navigation and responsive performance for better usability
Online browsing becomes more enjoyable when platforms incorporate natural aesthetics and sustainable themes that highlight handcrafted and eco-friendly product categories pine echo nature collective – The concept represents a forest-rooted digital space where products are presented with pinewood-inspired simplicity and environmentally conscious design principles.
Many users browsing online stores prefer environments that highlight current styles while maintaining a clutter free design for smoother navigation across product categories Trend Style Corner Spot – The experience centers around displaying trendy goods in an organized layout that supports quick browsing and comfortable user interaction
As I explored multiple online platforms, I came across view items now and it gave a soft impression – I found some appealing items here and the browsing experience was quite pleasant, smooth, and easy to follow.
As I was exploring several online pages out of curiosity, I landed on explore here and noticed it seemed quite helpful, which made me decide to bookmark it for future reference when needed again.
рулонные шторы производство [url=https://elektricheskie-rulonnye-shtory15.ru]https://elektricheskie-rulonnye-shtory15.ru[/url]
While casually exploring digital storefronts I came across urban goods outlet which had a straightforward design and made browsing products quite smooth and easy – overall the shop felt decent and included some interesting items that stood out from typical listings.
While checking various online shops for new items, I found visit this stylish page – The store gives off a decent impression, with trendy products that seem reasonably priced and appealing for everyday shopping exploration.
Digital marketplace users often enjoy browsing when the product variety feels engaging and encourages them to return for another session later on, as seen on petal copper shopping view – browsing felt interesting because items appeared worth checking again and created a positive impression overall.
While looking through different sites today, I encountered see collection and it gave a smooth and simple browsing experience – I noticed several interesting items that made the visit feel enjoyable and worth exploring more.
Modern buyers increasingly prefer curated deal websites that reduce search effort, which is why Smart Deal House Express Hub – stands out with simplified categories, fast browsing options, and clearly structured promotional content for better shopping efficiency online every day.
While conducting usability analysis of ecommerce browsing systems and category organization models, I noticed that choice hubs improve clarity and reduce friction, especially when users explore different product sections, which stood out when reviewing flex shopping category index – The interface provides diverse options and enables easy switching between categories, making navigation simple, efficient, and user friendly throughout the platform.
Consumers interested in modern ecommerce experiences value websites that offer fast navigation, clear categories, and visually balanced product arrangements Universal Market Picks – This platform emphasizes simplicity and organization, ensuring users can explore various items easily while maintaining a pleasant and distraction free interface
While reviewing different websites during a short search, I stopped at learn more here and found it to be a pretty decent platform, where I enjoyed scrolling through different sections that were simple and pleasant to browse.
Many digital shoppers enjoy platforms that serve as a hub for trending products and ideas helping them stay updated with modern shopping preferences Trend Smart Center Hub improving experience – The site is known for its intuitive interface and well arranged product listings
Online visitors often favor platforms that combine modern aesthetics with practical navigation when exploring stylish products and trends Aesthetic Trend Hub – The platform blends visual design with functionality to create a comfortable browsing experience
Many shoppers appreciate digital platforms that maintain a clean and frosty aesthetic, making it easier to explore curated lifestyle collections without distraction or clutter frost bay curated goods hub – The idea suggests a calm northern brand that focuses on minimalist design and carefully selected lifestyle products presented in a visually soothing format.
During my online browsing time, I stumbled upon browse spruce items and it felt easy to use – The goods variety is nice and everything looks well presented and organized in a smooth and simple layout.
I was going through various online shops when I noticed explore this link – The interface feels very smooth and well-structured, making it easy to find products without confusion or frustration.
Users frequently value e-commerce sites that present products in a way that feels engaging and encourages them to come back later, particularly on copperpetal goods center – browsing felt enjoyable since items looked interesting and gave a strong impression of being worth checking again.
Online shoppers frequently value prime value corners that offer good value deals with practical and affordable choices for faster purchasing decisions Prime Value Vision Corner Hub – The website ensures quick access and structured browsing for improved satisfaction
E-commerce continues to advance with platforms like Ultimate Flex Shopping Zone offering highly adaptable product discovery tools – These systems prioritize user satisfaction through improved navigation, personalized recommendations, and flexible browsing structures that make it easier for customers to find exactly what they need in a simplified digital space.
Digital shoppers today increasingly value clean interfaces and efficient checkout systems while exploring different online stores for better deals and product selection, Golden Drift marketplace entry which helps them save time and improve decision making during their purchasing journey across multiple categories. This kind of design approach is often praised for reducing friction and making online buying feel more intuitive and organized
Online buyers often prefer a clean layout that removes distractions and keeps focus on products rather than unnecessary visual elements or clutter product discovery page – The design approach emphasizes simplicity and usability, ensuring customers can browse comfortably without feeling lost or overwhelmed during navigation.
покупка базы данных [url=https://gobasego-3.ru/]gobasego-3.ru[/url] .
Digital consumers value platforms that help reduce browsing time through smart organization, and Smart Pick Corner Selection Portal – delivers structured categories, intuitive navigation flow, and carefully arranged items that enhance product discovery and overall shopping satisfaction for users everywhere.
While reviewing independent retail platforms and online vendor listings I found FS community marketplace which presents categorized shop data, and after spending a few moments on it I noticed quick loading and simple readability – overall it felt efficient for general browsing purposes
Online consumers frequently look for platforms that provide regularly updated trending products so they can stay current with modern shopping choices Trend Flow Station Hub making discovery easier – The website is often noted for its simple interface and fast updating system that enhances user experience
E-commerce users frequently seek websites that showcase clothing deals while keeping the overall interface lightweight and easy to navigate on mobile devices Trend Cart Access this platform highlights curated fashion offers and ensures a smooth checkout process that supports quick decision making for busy online shoppers
While browsing online content for a while, I stumbled upon browse shop here and it felt simple yet appealing – The products look stylish and updated, and the browsing experience was smooth and pleasantly quick.
Consumers who regularly browse online stores often appreciate platforms that maintain consistent performance and quick access to products across sections Reliable Fast Goods Hub – This hub ensures stable performance and efficient browsing for users
As I explored different online platforms, I came upon discover more here and found the site to look clean and reliable, with a simple structure that made it easy to browse through the content.
Digital marketplace users often enjoy browsing when the product variety feels engaging and encourages them to return for another session later on, as seen on petal copper shopping view – browsing felt interesting because items appeared worth checking again and created a positive impression overall.
While checking different shopping websites, I found visit this store page – The platform feels quite interesting, and the product images are clear and appealing, making browsing feel more engaging and visually informative.
за что отвечают ГБ в видеокарте и какую роль играют гигабайты в работе видеокарты
Нужна стальная лента? лента стальная упаковочная широкий ассортимент, разные толщины и марки стали. Выгодные цены, быстрая отгрузка и поставки для производства и строительства
Many online consumers appreciate platforms that combine seasonal themes with mountain-inspired aesthetics, offering a smooth and immersive experience when browsing lifestyle and decorative goods frost crest peak goods hub – This reflects a winter alpine marketplace identity focused on rustic craftsmanship and cool decorative products arranged in a clean, structured layout.
I was navigating through different websites when I found shop collection now and it looked minimal and clean – I really liked the overall feel, and browsing was quick and easy today, giving a smooth experience.
Перед покупкой душевого уголка стоит оценить не только размеры ниши, но и удобство в ежедневном использовании. Кроме габаритов стоит учитывать профиль, ролики или петли, а также то, насколько легко будет ухаживать за стеклом и стыками. Именно поэтому хороший выбор здесь строится на планировке и удобстве, а не только на эффектной фотографии из каталога https://my-bathroom.ru/dushevye-ugolki/kak-vybrat-dushevoj-ugolok-dlya-vannoj-sovety-po-razmeru-steklu-i-poddonu/
Users who regularly browse e-commerce platforms tend to appreciate layouts that are intuitive and visually easy to understand explore urban pick zone shop – this type of organization helps reduce decision fatigue and supports faster shopping decisions without requiring too much mental effort from users online today
Many digital users enjoy quality buy worlds featuring a wide range of quality products making shopping simple and reliable for daily convenience Quality Buy World Flow Smart Hub – The platform is appreciated for its clean structure and speed
While reviewing online shopping environments focused on value pricing, I found a section titled digital offer marketplace view – The design showcases tech and online products in a visually simple way, making browsing efficient and helping users easily discover appealing deals and discounted items.
Shoppers who enjoy discovering modern items often rely on curated platforms like Smart Trend Arena Flow Hub – offering clean navigation tools, categorized product listings, and smooth browsing experience that improves convenience and helps users explore trends with ease today.
Online marketplaces are most appreciated when they reduce friction in browsing and help users quickly reach the products they are interested in exploring further, GoldenDune shop portal – The experience feels organized and accessible, making it easier for visitors to move through pages while maintaining a steady and comfortable browsing rhythm
While reviewing different websites during a short search, I stopped at learn more here and found it to be a nice site overall, offering useful content that seemed worth checking out later again for reference.
Many digital users enjoy platforms that focus on bright and energetic shopping experiences where neon styled products and offers are highlighted clearly for easy browsing Bright Neon Shopping Hub improving user experience – It is commonly recognized for its vibrant interface and smooth navigation that enhances product discovery in an engaging way
Many internet users searching for convenience often visit modern shopping assistant page – The cart choice store concept works like a helpful assistant, guiding users toward relevant items and improving their ability to make quicker and more informed shopping decisions online
Digital shoppers frequently enjoy websites where product listings create curiosity and encourage deeper exploration of available categories and items, particularly on copperpetal browse hub – the experience felt positive since the items looked interesting and gave a reason to return and check updates or new selections again later.
While checking different online marketplaces, I found visit this deal platform – My first impression is quite positive, with clear category organization and an intuitive browsing experience that makes navigation feel natural.
Online shoppers often value websites that reduce complexity and present products in a logical structure for faster navigation and better decision making Clean Speed Goods Zone – This version offers a clutter free environment where items are easy to find and browse efficiently
As I explored multiple creative platforms, I came across view items now and it gave a soft handmade feel – Crafts look unique and interesting, and it is definitely worth spending time exploring the details one by one.
Many households depend on online platforms that make repeat shopping faster and more predictable, and this is reflected in Everyday Quick Cart which positions itself as a practical solution while the service description focuses on helping users streamline routine purchases and enjoy a smooth digital shopping experience
Digital users often prefer platforms that emphasize creativity and thematic depth, making browsing more engaging when exploring curated lifestyle and modern decorative products frostdune goods center – The concept represents a visually distinctive marketplace that blends frost and desert imagery into a unified and adventurous shopping environment.
People interested in curated fashion collections often enjoy platforms that present clothing ideas in a clean and modern browsing interface style collection explorer – the experience feels visually appealing and easy to navigate, helping users stay engaged while exploring different style inspirations
cherry 5000 [url=https://cdrreportwriters.com/super-cherry-faq-die-10-haufigsten-fragen-schweizer-spieler-beantwortet/]cherry 5000[/url]
рулонные шторы на створку [url=https://avtomaticheskie-rulonnye-shtory5.ru]https://avtomaticheskie-rulonnye-shtory5.ru[/url]
While going through a few online stores, I encountered explore craft selection and it looked well organized and inviting – The items feel authentic and thoughtfully arranged, making it enjoyable to browse without any distractions.
сервис анализа креативов [url=https://reklamnyj-kreativ18.ru]сервис анализа креативов[/url]
crazy time stats [url=https://lu14.santacruz.gob.ar/crazy-time-bonus-games-explained-how-coin-flip-cash-hunt-pachinko-and-crazy-time-round-actually-pay/]crazy time stats[/url]
анализ баннеров [url=https://reklamnyj-kreativ19.ru]https://reklamnyj-kreativ19.ru[/url]
Online shoppers frequently value quality cart arenas that deliver smooth cart experience with well organized categories and checkout flow for faster purchases Quality Cart Arena Vision Cart Hub – The interface supports quick access and structured browsing flow
Digital users often rely on stores that simplify navigation and product discovery, and Smart Trend Store Discovery Hub – features organized listings, clean interface layout, and fast access to trending items that improve usability and make browsing more efficient and enjoyable overall.
I randomly stumbled upon a store earlier today and spent a few minutes checking it out, which turned into more time than expected have a look here – There’s something distinct about their offerings, and it feels like each product was chosen with purpose.
Online buyers often value websites that create a neon inspired corner filled with engaging products and deals for a more enjoyable shopping experience Neon Cart Fun Corner Hub making browsing easier – It is commonly described as vibrant and well organized with clear product categories
While exploring multiple websites during free time, I discovered browse stone collective and found the navigation smooth with clearly presented content, which made the browsing experience feel pleasant and well structured.
Users frequently value e-commerce sites that present products in a way that feels engaging and encourages them to come back later, particularly on copperpetal goods center – browsing felt enjoyable since items looked interesting and gave a strong impression of being worth checking again.
E-commerce users benefit from platforms that reduce friction in the shopping journey and provide clear pathways from browsing to payment stages Smart Checkout Lane – it focuses on improving usability and speed so customers can enjoy a more direct and efficient purchasing experience overall
I was browsing online earlier and came across something that felt worth mentioning after spending some time exploring it visit this prism ridge essentials shop – It’s a nice shop overall, and the products look interesting, making it feel worth checking out again later when I have more time.
I had been browsing multiple websites when I noticed visit this page – Everything appears arranged properly, making shopping online easier and more enjoyable with a smooth and structured user experience.
Consumers who regularly browse online stores often appreciate platforms that maintain consistent performance and easy access to curated selections Reliable Picks Hub – This hub ensures stable browsing and quick access to featured items
Curious users exploring small creative businesses online often find engaging product selections while scrolling through pages that include the GF Collective Shop section tucked into artisan directories – it delivers a vibrant yet simple shopping journey centered on handcrafted ideas and community-driven design
During a routine browsing session, I checked out check it out and noticed the content was interesting overall, making it easy to follow and understand due to its clean and simple structure.
While scrolling through different pages I came across a store that felt elegant and soft with a visually relaxing and organized layout silver petal selection – Beautiful collection here worth exploring for daily home inspiration today, offering inspiration for warm and inviting home spaces.
While going through a variety of online stores, I encountered check petal goods and it felt simple and organized – The store design feels modern and quite comfortable to navigate, making browsing easy and visually enjoyable.
Читайте найсвіжіші новини https://vikka.net ексклюзивні відео, аналітику та цікаві історії. Оперативна інформація щодня!
While scrolling through different pages I came across a store that felt balanced and calm with a structured layout and organized product display twilight oak selection – Store has calm aesthetic with easy browsing and clean layout, making discovery of items easy and natural.
Many online users enjoy platforms that feel like discovering a secret frozen enclave, offering curated goods that combine cozy living themes with premium and fantasy-inspired design frost enclave lifestyle hub – It reflects a hidden winter sanctuary identity where items are presented in a calm and immersive digital environment designed for relaxed and meaningful browsing experiences.
Fashion enthusiasts who frequently shop online often prefer platforms that present items clearly and reduce unnecessary distractions while browsing urban style arena link – the overall interface supports smooth navigation and helps users stay focused on discovering outfits that match their personal taste and preferences
Many users prefer online platforms that highlight fashion items in a simple and elegant layout, and Stylish Trend Buy Corner Center – offers organized product listings, intuitive browsing tools, and a clean interface that helps users quickly explore fashionable items with ease and clarity.
Many online users appreciate stores where the product variety feels appealing enough to make them consider returning later for another look, especially on copper petal browse store – browsing was enjoyable because items seemed interesting and left a positive impression that encouraged future visits.
Shoppers today often rely on quality cart stations that deliver efficient shopping station services with easy cart management and quick purchases for better convenience and usability Quality Cart Station Select Flow Hub – The platform is designed for clarity and structured browsing that enhances user experience
I had been browsing multiple websites when I came across see this collection – The items look stylish, and it feels like a pleasant place to discover new things online at your own pace.
I randomly stumbled upon a store earlier today and spent a few minutes checking it out, which turned into more time than expected have a look here – There’s something distinct about their offerings, and it feels like each product was chosen with purpose.
While analyzing different online store building frameworks, I discovered online cart zone engine which offers powerful tools for e-commerce development – it emphasizes scalability, improved backend handling, and flexible features that support businesses in building and maintaining smooth and efficient digital shopping environments.
While browsing late at night I came across a store that felt surprisingly calming and nicely structured overall radiant shore collection and it gave a soft and balanced impression that made browsing feel effortless, – The design feels intentional and user friendly, helping visitors explore categories easily while maintaining a pleasant and visually consistent experience throughout.
Online shoppers who value speed and simplicity often look for platforms that allow quick product selection without unnecessary delays or complicated steps during checkout Swift Pick Market Hub – This marketplace focuses on delivering fast browsing and a smooth checkout flow that helps users complete purchases efficiently and without confusion
While exploring different online stores, I found browse shop here and it gave a calm and organized feel – The clean layout and simple navigation made it easy to browse and enjoy the visit without any complications.
Міський портал Ваш провідник у житті Кривого Рогу: афіша, новини, довідник та корисні сервіси для мешканців та туристів
While exploring different handmade stores, I found see this shop and it gave a polished impression – Items here seem creative and browsing experience felt smooth overall, making browsing feel clean, simple, and pleasant.
Online shoppers increasingly rely on curated platforms that simplify discount discovery and improve browsing efficiency across categories Quick Deals Corner Hub this shopping model showcases how modern digital marketplaces prioritize limited time offers and smarter purchasing behavior for users who want consistent value while exploring digital retail environments today
While scrolling through different pages I came across a store that felt clean and simple with a smooth interface and logical category layout silver petal selection – The emporium feels well organized with many appealing items available now, making it easy to explore everything available.
Digital visitors seeking creative and practical products often look for marketplaces that highlight both quality items and smooth usability across all pages Artisan Deal Space – It provides a balanced marketplace experience featuring diverse listings and a user friendly structure that supports easy exploration and quick product discovery
Users frequently value e-commerce sites that present products in a way that feels engaging and encourages them to come back later, particularly on copperpetal goods center – browsing felt enjoyable since items looked interesting and gave a strong impression of being worth checking again.
Online users often enjoy e-commerce platforms that feel inspired by natural contrasts, especially when browsing curated lifestyle products that merge floral softness with winter frost design elements frost garden craft collective – The idea reflects a floral-winter hybrid marketplace where artisanal goods and seasonal décor items are arranged in a soft, visually appealing structure that enhances browsing comfort and creativity.
Online users browsing trend based fashion websites often prefer simple navigation and clearly structured product listings for better user experience flow today Trend hub navigation link – interface layout is clean and organized, allowing users to find products quickly and move between sections effortlessly without any confusion or delay at all
During casual browsing I came across a site that felt soft and simple with an easy navigation system and gentle visual presentation twilight oak discover hub – Store has calm aesthetic with easy browsing and clean layout, making exploration feel relaxed and stress free.
I came across several online shops before landing on click to explore – The product selection seems good, and they appear to refresh their inventory frequently with new items worth checking out.
People often choose quality trend centers because they deliver trend focused browsing with updated products and clean browsing design for better clarity Quality Trend Center Smart Hub Explorer – The platform ensures intuitive navigation and organized categories
I stumbled upon this shop while browsing and it felt organized in a way that made it easy to move through categories radiant essentials hub online – It was easy to browse overall and the items seem quite useful for practical daily life and general utility purposes.
I came across a site that felt easy on the eyes and simple to navigate, which made it stand out from others I visited today check out this shop – The structure is tidy and everything is arranged in a clear and pleasant way.
смотреть сериал сезон сверхъестественное онлайн бесплатно в хорошем
While reviewing a few different pages, I encountered check it out and noticed the clean formatting, which helps keep the content readable while ensuring the structure remains easy to follow for anyone visiting.
Online shoppers often value platforms where products are presented in a way that encourages curiosity and repeated exploration over time, as seen on petal copper retail hub – browsing felt enjoyable because the items looked interesting and made the site feel worth revisiting for further exploration.
While browsing through various websites, I stumbled upon browse cloudberry goods and it felt clean and structured – The selection of products is nice and browsing here was simple and enjoyable, making everything easy to go through.
As I explored multiple online platforms, I came across view items now and it gave off a soft and organized vibe – The products seem thoughtfully selected, making the browsing experience feel calm and well balanced.
While casually browsing different websites I came across something that felt modern and tidy with a structured layout and smooth design silver petal browse collection – The store layout is simple and makes browsing very smooth experience, helping users move through pages effortlessly.
Users exploring handcrafted and rustic-themed online marketplaces often appreciate forest-inspired branding that evokes cold woodland groves while browsing curated collections of artisan crafts, wooden décor, and handmade lifestyle products across structured categories frost grove craft hub – The concept reflects a chilly forest grove atmosphere where rustic handmade goods and artisan creations are presented in a natural, grounded marketplace style emphasizing craftsmanship and earthy aesthetics.
I was casually exploring online stores when I noticed take a look here – The website appears modern, and I really enjoyed scrolling through various product sections today since the layout made everything simple to explore.
Users describe the platform as highly responsive where every click leads to fast page updates and smooth transitions between categories quick fashion hub creating a convenient environment for browsing products without waiting times or delays that could interrupt the shopping experience or reduce usability.
People browsing agricultural e commerce platforms typically look for stores that offer both convenience and a broad selection of harvest related items Harvest Lane Trading Post – It provides a reliable online marketplace experience with well categorized products and a simple interface that improves usability for all types of shoppers
I came across something during browsing that felt visually clean and easy to follow which made it stand out immediately radiant field view – Clean layout and simple navigation make this site pleasant today and create a relaxed browsing experience without confusion.
Shoppers today often rely on quality trend stations that act as reliable trend stations showcasing modern items and frequent product updates for stress free browsing experiences Quality Trend Station Select Flow Hub – The platform is designed for structured browsing and easy product discovery
I don’t often share things I find online, but this one seemed interesting enough to mention here take a peek here – There are a few items that stood out, and it’s worth revisiting in the future.
breastfeeding medication domperidone
breastfeeding medication domperidone
In the middle of exploring shopping options, I found browse this platform – It looks neat and offers a simple browsing experience that feels natural.
Shoppers exploring digital stores frequently enjoy platforms that offer a sense of discovery while browsing through different product categories and options, particularly on copper petal selection site – items felt interesting and made the experience worthwhile, encouraging another visit to see what new products might appear in the future.
I was casually browsing online when I found shop link here and it stood out for its clarity – Everything looks well structured and easy to browse through quickly, giving a smooth and relaxed browsing experience.
During my search for shopping platforms, I stumbled upon check this out now – The experience is quite nice, with clear product displays and helpful descriptions that make browsing simple and efficient.
Users exploring themed online marketplaces often appreciate coastal winter branding that blends icy harbor imagery with calm seasonal aesthetics while browsing curated lifestyle and decorative product collections across structured digital categories frost harbor goods hub – The concept represents a serene coastal marketplace inspired by frozen harbors and still waters, offering curated goods that reflect a peaceful winter aesthetic designed for relaxed and visually immersive browsing experiences.
Online visitors who enjoy shopping for clothes usually prefer platforms that present items clearly and support fast browsing experiences trend station product view and this store appears to offer interesting fashion choices that look suitable for users seeking updated wardrobe selections
While exploring online I stumbled upon a store that felt clean and modern with a structured layout and smooth browsing flow silver sprout view hub – Nice selection of products here with a fresh and modern look, giving a seamless and pleasant experience.
While scrolling through different online shops I found a site that gave off a distinct vibe compared to most typical stores radiant grove market – It has an interesting selection and definitely feels different from usual online stores, which makes browsing it a bit more engaging.
Many users browsing e-commerce platforms appreciate when the product selection feels fresh and inviting, making them want to explore further over time, especially on copper petal market view – browsing felt engaging because items seemed appealing and worth revisiting for a closer look at different categories and possible finds.
While navigating through different sources on the web, I landed on check this page and it looked decent enough, leaving me with the possibility of coming back again to review it in more detail.
Many users prefer quality trend zones featuring a nice zone for exploring trending products with simple navigation systems that support safe and efficient shopping Quality Trend Zone Easy Access Hub – The platform supports structured navigation and quick browsing experience
While browsing through a mix of online craft and shopping sites just to explore new layouts, I came across something interesting in the middle like check this cozy craft spot – It gives off a warm and welcoming feel, with a simple layout that makes browsing comfortable and pleasant overall.
кабель цена за метр https://kabel-cena-za-metr-1.ru
[url=https://svetotekhnika-1.ru]светотехника[/url]
I wasn’t expecting to find anything notable, but I did come across something that felt calm and well put together visit this soothing shop – The items appear to be of solid quality, and the overall atmosphere is very relaxing.
I randomly clicked through a few pages and landed on explore this site which seemed well structured – I enjoyed browsing because everything looks organized and visually appealing in a simple and effective layout.
In the middle of comparing different platforms, I came across check this value page – After a quick look, it seems clean and straightforward, making browsing easy enough overall.
As I browsed through several websites earlier, I came across open essentials shop and it stood out clearly – Essentials here seem practical and nicely displayed across the site, giving a natural and relaxed browsing flow.
I was looking through different shopping platforms when I found check this platform – This shop appears legit, with a clean interface and an impressive variety of products that makes browsing smooth.
Shoppers exploring online stores often value platforms that combine speed, clarity, and modern visual presentation for a better overall experience CartVision Shopping Hub – The system ensures intuitive navigation and responsive design elements that help users browse seamlessly while maintaining a visually appealing interface that enhances engagement and satisfaction throughout the shopping journey
Users browsing online stores often enjoy platforms that combine harvest warmth with winter coolness, especially when exploring curated handmade crafts and seasonal décor items frost harvest lifestyle portal – It suggests a balanced seasonal marketplace where rustic goods are displayed in a structured environment inspired by natural transitions between autumn and winter.
Many people exploring digital stores tend to value platforms where products feel thoughtfully arranged and visually appealing for casual browsing, especially on copper petal goods site – the browsing experience felt enjoyable because the selection appeared engaging and gave a reason to return and explore more items later on.
While scrolling through various sites I discovered a shop that felt organized and easy to navigate with a calm layout radiant maple goods hub – I found some unique items while exploring this site earlier today, and it gave me a reason to take a closer look at what they offer.
While browsing online I found a store that felt artistic and grounded with a clean layout and stone inspired visual theme that made everything feel calm and structured stone light emporium hub – Stone inspired designs give this shop a unique aesthetic appeal, creating a natural and elegant browsing atmosphere overall.
I had been looking through several platforms when I noticed open goods corner – Everything appears properly organized, and browsing feels smooth and convenient overall.
Many digital users choose rapid buy markets that serve as fast shopping markets with easy access to everyday useful products offering a streamlined experience for quick decision making and simple browsing Rapid Buy Market Smart Flow Hub – The website provides intuitive navigation and responsive design that enhances user experience and overall shopping speed
Shoppers who frequently explore online fashion catalogs often look for websites that make product discovery simple and engaging urban station fashion mall and this platform gives a positive impression by showcasing trendy clothing options that seem relevant for modern style preferences
I was just casually exploring the internet when I came across something that seemed easy to browse and worth mentioning visit this neat store – The items are arranged well, and the overall layout makes everything simple to find.
During a casual browsing session where I was exploring several shopping platforms, I came across visit urban buy arena – The design feels simple and clean, and moving through pages is smooth and natural throughout the experience.
During my search across various e-commerce websites, I stumbled upon explore this organized shop – Everything feels well structured, and it makes finding items quick and easy without wasting time navigating through messy layouts.
While browsing through several online stores earlier today, I came across cloud meadow collective hub and it immediately felt peaceful and well arranged – I enjoyed the calm layout, and browsing felt relaxed and quite smooth throughout the entire experience.
People browsing online systems frequently appreciate platforms that maintain clarity in structure and provide quick access to different sections without unnecessary delays TrendFlow Vivid Portal – It offers a clean and responsive interface where every page loads quickly and content is arranged in a structured way that improves usability and makes navigation smooth and efficient for all types of users
Many visitors exploring online marketplaces often mention that browsing feels pleasantly engaging when product selections are varied and visually appealing, especially on platforms like copper petal hub – the overall experience felt enjoyable since items looked intriguing and encouraged further exploration during the session with a sense of curiosity about what else might be available.
Many digital consumers prefer marketplaces that feel elegant and cozy, especially when browsing curated artisan goods and winter lifestyle product collections across structured layouts frostlane goods emporium portal – This reflects a boutique-inspired identity where items are arranged in a warm, inviting digital environment focused on curated seasonal charm.
While exploring different online shops, I came across see goods here and it felt refreshingly simple and well organized – The modern design makes browsing smooth and comfortable, allowing for an easy and pleasant experience throughout.
While exploring various websites I came across a shop that felt simple and easy to understand at first glance radiant pine market – The entire layout appears well organized, and browsing is straightforward without confusion, making it easy to find what you need quickly.
In the middle of checking different shopping platforms, I came across open this oak collective – The experience is smooth and responsive, with fast page loads and fresh content that is easy to navigate.
While browsing through several platforms earlier today, I came across visit this platform and genuinely appreciated how simple everything looked, with a clear structure that made it easy to understand the content without confusion or unnecessary effort.
While scrolling through various online shops I discovered a website that felt clean and user friendly with well organized sections and smooth layout sun haven goods hub – Essentials here feel practical, useful, and nicely presented for shoppers, giving a comfortable and easy browsing experience.
Online consumers frequently choose rapid cart centers that feature quick cart systems designed for smooth and efficient checkout processes improving clarity and speed during online purchasing Rapid Cart Center Express Hub Access – The interface ensures fast transitions between cart and payment stages with minimal complexity
Shoppers interested in low cost online purchases usually seek websites that make it easy to find essential items at reduced prices without complicated filtering systems cheap deals warehouse and this store gives the impression of being suitable for practical buyers who prioritize savings and straightforward product access during their shopping experience.
лучшие сериалы сверхъестественное смотреть
скачать youtube видео [url=https://skachat-video-s-youtube-12.ru]скачать youtube видео[/url]
Sometimes you find something that feels well built and easy to trust, and this was one of those cases for me today browse this store – The design looks complete and consistent, making it feel reliable overall.
I had been jumping between various websites when I stumbled upon browse this buy station – The structure feels organized, and I could find things without much effort while moving through pages.
I was casually searching for deals online when I noticed take a peek here – It’s a decent store overall, and browsing feels smooth while categories are easy to navigate and well structured.
Visitors browsing e-commerce sites frequently enjoy discovering new and interesting products that keep their attention during the session, particularly on copperpetal product portal – the browsing experience felt engaging since items appeared worth checking again and encouraged curiosity about what else might be available on the platform.
Users browsing digital platforms typically value systems that combine speed, simplicity, and structured layout for better interaction and comfort StationFlow Vivid Portal – It provides a well organized browsing experience with easy navigation and fast loading pages that ensure users can move through content effortlessly while maintaining a clean and intuitive interface design throughout
As I explored multiple online platforms, I came across view items now and it gave a soft warm impression – The aesthetic is soft and pleasant, and the items look carefully chosen, making browsing feel comfortable and simple.
Users browsing e-commerce sites often enjoy platforms that feel like serene winter meadows, especially when exploring curated eco-friendly products and artisan décor collections frost meadow craft collective hub – The idea suggests a soft, nature-driven marketplace where sustainable items are displayed in a balanced and visually calming structure.
While casually browsing I came across a site that felt fast and lightweight, which made the whole experience feel effortless radiant shore store hub – It delivers a pretty smooth experience overall, and pages load quite fast here, making navigation simple and consistent.
While browsing for new online stores, I discovered browse orchid shop – The vibe is calm and pleasant, and sections are easy to navigate without confusion.
видеонаблюдение для дома комплект купить готовый комплект видеонаблюдения
Online buyers often look for clean interfaces with easy product discovery tools UX Shopping Arena – A user friendly design approach enhances engagement by making navigation straightforward and ensuring that product categories are easy to explore without unnecessary complications or confusion
While evaluating e-commerce browsing solutions, I found product listing compass which guides users through categorized deals – this shopnetmarket.shop platform focuses on enhancing navigation structure, allowing shoppers to easily locate relevant products and compare offers in a more organized and time-saving manner across different online shopping sections.
bluefocus.click – Blue focus provides clear direction and strong digital strategy guidance
стоматология москва стоматология клиника
Many shoppers enjoy rapid cart hubs offering central hub functionality for fast cart handling and convenient online shopping ensuring hassle free user experiences Rapid Cart Hub Easy Flow Portal – The platform is designed for simplicity and fast checkout performance
While casually exploring online shops, I discovered see this urban cart page – The experience is pretty decent, and the design looks modern while being easy to navigate throughout.
Users exploring budget marketplaces often highlight how important it is for pages to load quickly and remain easy to navigate Goods bazaar express hub – the platform delivers consistent performance and smooth browsing making it convenient for everyday shopping needs experience.
While casually browsing different websites I came across something that felt cheerful and clean with a structured layout and soft visual style sun meadow browse collection – Store feels bright, welcoming, and easy to browse through categories, helping users explore without difficulty.
While exploring different websites today, I found something that stood out because of how well structured it felt, so I thought I’d share it here check this category shop – It’s a pretty cool place, and the way items are sorted makes everything easy to browse without confusion.
During a casual online search across different shops, I discovered explore oak collection and it stood out with its organized presentation – The items seem like a pretty decent selection, with good quality feel and clear, attractive display throughout the browsing experience.
Digital shoppers often highlight that engaging product selections make browsing more enjoyable and increase the likelihood of returning to a site, as seen on petal copper goods hub – the experience felt worthwhile since items looked appealing and made the platform feel like a place worth revisiting.
While comparing multiple e-commerce platforms I observed usability differences and found BestTrendStation browse page – Great browsing flow, content is clear and visually quite appealing, ensuring a smooth and structured navigation experience that makes it easy to move between categories efficiently
I spent some time checking out various online shops and eventually found browse this petal market which looked neat and structured – The marketplace appears friendly and easy to navigate through different sections, making everything simple and pleasant to explore.
светильник потолочный дизайнерский светильники в стиле лофт
During a casual browsing session I found a site that felt visually striking in a subtle way with a clean and modern layout shadow glow shop – The shop has a cool aesthetic and offers interesting product choices that make it more engaging to explore than expected.
In the middle of comparing different platforms, I came across check goods peak – Everything is simple to navigate, and I found it easy and pleasant to look around today.
Shoppers often value e-commerce platforms that feel elegant and decorative, especially when browsing curated aesthetic gifts, floral décor, and lifestyle product collections frostpetal curated gifts portal – The idea suggests a refined emporium where goods are displayed in a soft, visually pleasing structure combining floral beauty with winter-inspired tones.
In the middle of reviewing different websites, I encountered see more details and during a brief look, I could see that the content was informative and the layout was thoughtfully designed for easy browsing.
Modern e-commerce visitors often expect seamless navigation systems that reduce effort while improving product visibility and accessibility across multiple categories where Modern Basket Point – this structured approach ensures a consistent browsing experience and allows users to find items efficiently without feeling overwhelmed by design complexity
Online shoppers often rely on curated platforms to avoid spending too much time searching manually, and one such example appears here bargain finder tool – it is generally regarded as a straightforward way to view multiple promotional opportunities while keeping the browsing experience simple and user-focused.
yacht charter Montenegro https://rent-a-yacht-montenegro.com
Visitors browsing e-commerce sites frequently enjoy discovering new and interesting products that keep their attention during the session, particularly on copperpetal product portal – the browsing experience felt engaging since items appeared worth checking again and encouraged curiosity about what else might be available on the platform.
mesalamine meds
mesalamine meds
While scrolling through multiple online stores for comparison, I noticed explore urban zone cart – I liked how fast everything loaded, making the browsing experience noticeably more enjoyable and fluid overall.
нарколог на дом воронеж цены [url=https://narkolog-na-dom-voronezh-11.ru]https://narkolog-na-dom-voronezh-11.ru[/url]
вызов наркологической помощи [url=https://narkolog-na-dom-voronezh-10.ru]https://narkolog-na-dom-voronezh-10.ru[/url]
вызвать нарколога на дом воронеж [url=https://narkolog-na-dom-voronezh-12.ru]вызвать нарколога на дом воронеж[/url]
Online users often select rapid cart solutions that provide helpful solutions for cart management and streamlined buying experience overall, ensuring smooth browsing and efficient checkout completion without confusion Rapid Cart Solutions Navigator Flow Portal – The website is optimized for clarity, speed, and structured transitions between steps
Users exploring fashion or general product websites often prefer platforms that emphasize strong imagery because it helps them evaluate items faster and with better clarity during browsing sessions vibrant cart browsing link and the visual structure of the site appears smooth and engaging, giving shoppers a comfortable experience while moving through different sections without visual confusion or clutter.
I found something during my browsing session that felt honest and well organized, so I thought I’d share it here for others to see check this trustworthy shop – It appears to be a reliable place, and the content feels genuine and carefully structured in a natural way.
While exploring different shopping websites I focused on usability flow and clarity and found Best Choice Online product hub – Helpful site overall, makes finding items quick and convenient today, with a straightforward layout that helps users navigate comfortably without confusion or unnecessary steps slowing down the experience
During my usual browsing session I came across a site that felt bright and structured with a clean layout and intuitive navigation system sun petal market hub – Market has good variety and items seem fairly well priced, giving a calm and easy browsing experience.
While exploring different online stores, I found see this shop and it gave a polished impression – Simple and neat design made browsing feel quick and comfortable, making the whole experience relaxed and enjoyable.
While browsing through several online stores today just to compare layouts and usability, I noticed something in the middle like check this petal store – The design feels very clean overall, making it easy to quickly find what you need without confusion or clutter.
While exploring online stores I found something that felt visually light and thoughtfully designed with a smooth browsing flow silk dune browse hub – I enjoyed browsing here, as the items appear stylish and reasonably presented, offering a comfortable and easy experience.
Shoppers often value e-commerce platforms that feel minimal and elegant, especially when browsing curated floral gift collections and winter-inspired decorative lifestyle products frostpetal retail collection hub – The idea suggests a soft retail environment where goods are displayed in a visually balanced structure inspired by floral-winter aesthetics and simplicity.
While exploring different online stores, I found open petal shop and it gave a soothing impression – The overall theme feels clean, soft, and visually welcoming, making browsing feel simple and pleasant throughout.
Digital consumers often seek faster navigation tools within online stores where efficiency matters StyleCart Navigator Hub enables quick transitions between categories while maintaining clean design flow and supporting easier decision making for users exploring various product collections daily usage.
During analysis of modern online marketplaces, I found easy cart explorer that improves product discovery through clean organization – Simple shopping experience with clear layout and easy product access helps users navigate smoothly and locate items faster while maintaining a minimal and intuitive browsing environment for everyday shopping tasks.
While exploring multiple online options, I discovered see this flash corner hub – The site feels light and responsive, making it a nice place to explore with a clean experience.
Many shoppers appreciate rapid goods centers offering fast access to goods with well organized categories and listings supporting faster browsing and checkout experience Rapid Goods Center Clean Flow Portal – The interface provides minimal design and efficient navigation tools
UI/UX professionals frequently test platforms that combine structured layouts with fast rendering speeds for better usability evaluation processes SkyHigh Interface Lab – A refined digital workspace that delivers smooth transitions and elegant design structure, helping users analyze interface behavior while experiencing a visually consistent and performance optimized environment throughout usage sessions
I don’t usually share links, but this one felt worth mentioning because it was easy to browse and visually well structured see this prism store – It has a clean design, and the simple navigation makes the overall experience enjoyable and comfortable to use.
Shoppers often value platforms that provide consistent scrolling behavior across all pages, ensuring a reliable and predictable browsing experience when exploring different items vivid cart smooth access and the design helps maintain focus on products by reducing interruptions and making navigation feel effortless and well structured across the site.
I came across this shop during browsing and it felt simple and clean with a well structured interface and easy navigation flow sun petal essentials hub – Simple store design makes shopping here quick and enjoyable experience, making the experience smooth and clear.
выезд нарколога [url=https://narkolog-na-dom-voronezh-13.ru]выезд нарколога[/url]
As I explored multiple online platforms, I came across view items now and it gave a gentle impression – Products appear well organized and easy to find on this site, making scrolling easy and comfortable overall.
While exploring different online shopping platforms today just to compare usability and layouts, I came across something in the middle like check this pine collective – The browsing experience feels nice overall, with everything structured clearly and easy to follow without confusion or clutter.
During a casual browsing session I found a store that felt like a traditional marketplace but with a modern and simplified design approach silver bay goods market – The marketplace feel is nice and the variety of products available here is decent, giving a balanced and easy shopping experience.
Many digital consumers prefer marketplaces that feel rustic and nature-rooted, especially when browsing curated handmade crafts and eco-friendly lifestyle products frostpine forest goods portal – This reflects a woodland collective identity where products are arranged in a calm, visually natural structure emphasizing pine aesthetics and traditional craftsmanship.
Shoppers enjoy digital marketplaces that combine intuitive navigation with well structured product displays for faster decision making and browsing comfort CartNavigator Flow Zone – the browsing experience is enhanced through logical category grouping and smooth movement between sections for improved shopping efficiency and satisfaction.
Many online shoppers today seek reliable systems that allow them to browse products without unnecessary complexity or delays Smart Checkout Portal the service emphasizes speed and simplicity in every interaction – users benefit from a streamlined experience that prioritizes quick loading pages and straightforward ordering flow from start to finish
In the middle of checking different shopping platforms, I came across open flash hub – Everything feels clean and well structured, and the content is easy to follow along without unnecessary complexity.
Digital professionals exploring performance oriented platforms often value systems that maintain fast loading times and easy navigation under all conditions PowerLink Interface since efficiency improves output – The platform provides structured navigation and stable functionality that ensures users can access tools and content quickly without facing delays or operational issues
Online shoppers frequently use rapid goods corner platforms providing convenient corner for quick shopping and simple product discovery today, ensuring smooth browsing and efficient access to a wide range of products BrowseSmart Rapid Corner Flow Hub – Enhances user experience with clean design and quick navigation tools
As I moved through a few online pages earlier, I discovered visit market page and it felt simple yet engaging – The products seem interesting and different, and browsing here was actually quite fun and easy to enjoy.
During my usual browsing session, I stumbled upon something that felt nice to explore and worth mentioning here take a look here – I enjoyed going through it, and it appears to be a reliable shop with a calm and well organized layout.
People exploring e-commerce platforms often value structured category systems that simplify browsing and allow them to find products quickly without unnecessary searching or repeated navigation steps vivid zone catalog hub and the website feels well arranged overall, offering a browsing experience that is straightforward and practical for users who prefer efficient shopping journeys online.
While casually exploring online shops, I discovered see this ridge hub – The design feels modern and well structured, with a responsive layout that makes browsing quite smooth.
After analyzing how the content is structured, I found that see this website fits into a well-organized design – discovered it today, and the site feels informative, engaging, and easy to browse.
During my online browsing time, I stumbled upon browse goods items and it felt easy to use – The interface is nice and clean, making browsing smooth and straightforward overall, with no distractions or clutter.
I was browsing late in the evening when I found a site that felt calm and simple with a clean layout and soft visual style sun spire collection hub – Collective offers interesting products and overall pleasant browsing experience today, offering a relaxed and enjoyable browsing flow.
During my quick scan of the website and structure, I came across learn more now and appreciated the layout – checked this out quickly, and it looks like a neat and useful site overall.
While exploring online stores I found something that felt clean and practical with a smooth and simple navigation structure silver crest browse hub – The products look reliable and descriptions seem clear and helpful overall, making the browsing experience efficient and easy.
Affordable fashion hubs are ideal for users seeking stylish clothing options that do not compromise on quality while remaining accessible within a reasonable budget range Affordable Fashion Hub This hub focuses on delivering cost friendly fashion choices across various categories making it easier for shoppers to stay stylish without exceeding their financial limits
Online users often appreciate e-commerce platforms that feel inspired by quiet ocean shores in winter, making browsing more engaging when exploring curated coastal décor and lifestyle product collections frost shore aesthetic hub – The idea reflects a minimalist seaside marketplace where goods are displayed in a visually calm structure influenced by cold ocean tones and clean design aesthetics.
During a review of multiple ecommerce marketplace websites, I found a platform that emphasized clarity and organized product listings in a very user friendly layout BuyZone shopping portal view embedded within the page structure – The site offers diverse product options and maintains an easy browsing flow that helps users quickly find what they need without confusion or unnecessary design complexity.
In between checking multiple platforms, I encountered browse urban flash market – The layout is good and simple, and everything is easy to see clearly throughout the browsing experience.
наркологическая помощь на дому [url=https://narkolog-na-dom-voronezh-14.ru]наркологическая помощь на дому[/url]
As I explored multiple sections and usability features, I found that view more info integrates into a tidy structure – the website feels clean, modern, and easy to browse around today.
Digital visitors often expect websites to be both visually appealing and easy to use, with clear organization that supports fast access to content MediaSummit Clean Interface – The SummitMedia platform provides a smooth and clean browsing experience where users can explore content comfortably without confusion or unnecessary complexity.
Users comparing digital websites often look for clean layouts, modern aesthetics, and how well the interface supports seamless navigation and fast content access UltraWave Navigation Portal – UltraWave delivers a clean modern design where browsing feels smooth and easy, allowing users to navigate content comfortably without confusion.
I was looking through various online stores when I noticed check shore collective – The first impression is strong, and the content is simple and clearly presented in a user-friendly way.
I found something during my browsing session that felt worth sharing due to its interesting and somewhat diverse collection check this market site – It’s an interesting collection, and I might revisit later to explore more items in more detail.
As I continued browsing through different areas of the site and examining its design, I realized that explore this page contributes to a seamless experience – everything feels smooth, and the structure is clear and easy to understand.
новая стоматология центр стоматологии
People who shop online regularly often enjoy platforms that offer occasional standout items, making the browsing experience more memorable and worth revisiting later for further exploration vivid shopping center link and the website maintains a balance of variety and interest that encourages users to come back for more browsing and discovery.
While browsing through various websites, I stumbled upon browse copper lane items and it felt balanced and neat – There is a good variety available and everything looks arranged in a clear way, creating a natural and easy browsing flow.
While scrolling through different pages I came across a store that felt easy to use and visually modern with a clean layout silver dune selection – This site feels modern and easy to navigate for new users, providing a smooth introduction to its content and structure.
Online shoppers looking for diverse catalog experiences often prefer platforms that keep navigation simple and visually clean, and they may explore the Golden Horizon Market and discover a wide assortment of items presented in a modern layout that emphasizes usability, clarity, and smooth browsing for everyday visitors across multiple categories and product types.
Best price fashion hubs are widely used by consumers who prioritize affordability and style while shopping for clothing and accessories online Best Price Fashion Hub This hub emphasizes competitive pricing on fashion items while maintaining a stylish catalog helping users find the best deals without compromising on modern trends
I was browsing randomly when I found a site that felt minimal and efficient with a clean layout and intuitive navigation structure sun woven online hub – Market feels creative with well curated items and smooth navigation, making browsing fast and user friendly.
Shoppers who prioritize organization often prefer online platforms that gather household essentials in one place, making it easier to manage routine purchases household needs depot – This setup is useful because it streamlines browsing and helps users quickly access important daily products without navigating through cluttered menus or unrelated items
People exploring idea-driven platforms often enjoy structured environments that encourage experimentation, creativity, and continuous learning through organized digital resources frostspire concept creation hub – It suggests a dynamic space where users can build, refine, and expand ideas in an interactive and supportive setting.
I spent some time checking out various online stores and eventually found browse this collection which had a simple and tidy presentation – Everything looks well arranged and easy to explore, resulting in a great browsing experience that feels effortless and pleasant throughout.
During my exploration of different web stores I recently came across Urban Pick Corner landing page – The overall browsing journey was simple and clear, with pages loading properly and a structure that supported easy understanding of where each section leads and how to navigate effectively smoothly
Many digital audiences appreciate platforms that enhance focus through clean layouts and simple organization that improves readability and navigation UltraFocus Experience Link – UltraFocus delivers a clear and simple layout where everything is well organized, ensuring users can stay focused and enjoy smooth browsing.
While exploring different online stores I came across a marketplace that felt clean and utility focused with a balanced layout and intuitive category browsing system urban bay collection – Goods selection looks practical and well suited for everyday needs, making product discovery simple and efficient.
After spending time navigating through the platform, I observed that access this link aligns with a clear presentation – the design feels modern, and the layout provides a smooth and visually organized experience.
While reviewing various shopping websites, I discovered explore this bazaar site – The experience of visiting was enjoyable, with smooth performance and easy-to-read information.
организация свадьбы ключ заказ свадьбы москва
I was just casually exploring the internet when I found something that felt new, fresh, and worth sharing here with others visit this petal store – It feels quite fresh overall, and I really like the way the products are shown in such a clean and attractive layout.
Users browsing online marketplaces often come across interesting selections that stand out during their session, making them consider revisiting the platform later for more browsing and discovery vivid trend shopping entry and the experience feels pleasant and engaging enough to encourage return visits for exploring additional items and updated collections over time.
While going through sections and testing navigation, I found that visit this link enhances the experience – this page feels smooth, and browsing around was actually pretty enjoyable overall.
During casual browsing I came across a site that felt minimal and efficient with a clear structure that made navigation very easy silver fern view hub – I like how everything is categorized, which makes browsing really simple and ensures a smooth experience across all pages.
Daily shoppers often look for platforms that update offers regularly while maintaining an easy to use structure that keeps browsing simple and efficient for repeat visits Daily Bargain Space – Here the concept emphasizes a regularly refreshed space where users can find updated bargains in a calm and organized layout designed to make everyday shopping more convenient and enjoyable
E-commerce platforms today are expected to deliver fast performance along with a clean and responsive user interface Digital Market Access – This solution prioritizes efficiency and accessibility, ensuring a smooth journey from browsing products to final purchase confirmation without interruptions overall
Digital users often enjoy e-commerce experiences that highlight innovation and utility design, especially when browsing curated essential tools and lifestyle products glow forge essentials flow portal – This reflects a warm industrial identity where products are arranged in a structured, glowing aesthetic focused on usability and modern appeal.
In conversations about organized learning resources online, users occasionally highlight that growth pathway hub is part of reference collections focused on clarity, simplicity, and improved navigation across informational content. – Many say it supports a distraction-free browsing experience.
During my recent web exploration of shopping platforms, I checked how quickly pages load and how navigation behaves, and UPZ online marketplace – The site feels well structured, allowing users to browse comfortably while maintaining a simple and clear interface across all sections.
While exploring online stores I found something that felt cozy and modern with a smooth layout and easy navigation between sections swift maple browse hub – Corner shop has cozy feel with surprisingly diverse product range, helping users move through pages without effort.
Users exploring modern websites usually prefer platforms that present information clearly while maintaining a professional and structured design approach ProLaunch Flow Portal – ProLaunch appears professional with structured content designed for quick reading, allowing users to navigate easily and understand information without difficulty.
Users exploring minimalist online stores often appreciate layouts that emphasize clarity and reduce unnecessary visual complexity Soft Meadow Marketplace allowing them to focus more on products that suit their needs while browsing comfortably and efficiently across a clean and simple interface experience flow
Online users generally expect platforms to be intuitive, well-structured, and capable of guiding them efficiently through various informational layers quickly BrandVision user guide – BrandVision user guide style layout assists visitors in understanding site structure, making navigation more predictable and user-friendly overall easy access navigation.
While reviewing the interface quickly and looking at different sections, I came across go to this site which fits into a clean design – the content is simple, useful, and easy to understand.
In the middle of checking different shopping platforms, I came across open ember vault – It looks like a solid site overall, and browsing around is straightforward and easy to manage.
As I browsed through different technology information websites, I encountered tech update space – a platform that delivers consistent and helpful tech insights, making it easier to understand ongoing digital changes and advancements.
While browsing through various online idea platforms and creative inspiration spaces, I came across idea discovery hub – a site I enjoy visiting because it consistently offers fresh, interesting content that keeps my curiosity engaged and encourages new ways of thinking.
During my usual browsing session, I came across something that felt simple and easy to navigate, so I decided to share it here take a look here – The browsing is good, and the layout feels smooth and intuitive, which makes everything easy to follow.
I found a website while exploring online that felt neat and modern with a clear structure that guided browsing effortlessly silver field item hub – Clean design and good layout make this store enjoyable today, making it simple to explore products without confusion.
During a casual online search across different websites, I discovered explore ridge shop and it stood out with its clear design – The layout and presentation made it easy to quickly locate what I needed, creating a smooth and efficient browsing experience overall.
While exploring different ecommerce pages I found a platform that feels clean and structured with a simple layout that makes browsing feel effortless and intuitive crest goods explorer designed for clarity and ease – The overall experience is smooth, minimal, and user friendly for all visitors
Shoppers who prefer refined browsing experiences often appreciate platforms that maintain organization while showcasing stylish items in a clean interface Elite Style Goods Arena – This final variation highlights a refined shopping arena where curated stylish goods are presented in structured categories helping users enjoy smooth navigation and efficient product discovery
Modern e-commerce users expect platforms that allow fast checkout processes and easy navigation without unnecessary complications or delays Fast Checkout Route helping streamline final purchase steps while maintaining a smooth and efficient interface design – This system reduces friction and supports quicker transaction completion for better convenience
Users exploring digital content platforms usually expect fast loading, smooth transitions, and dynamic interfaces that improve browsing efficiency and comfort WaveSharp Flow Node – The SharpWave platform feels dynamic and responsive, ensuring navigation works fast and smoothly while allowing users to move through content effortlessly.
While exploring online shopping environments for analysis I discovered Urban Style Bazaar digital access hub – The interface was smooth and intuitive, allowing quick transitions between pages while the overall structure ensured clarity and ease of use without overwhelming elements or confusing navigation paths anywhere
As I examined the structure and how the information is displayed, I noticed that this page here contributes to a straightforward experience – everything appears clean, and understanding the content is easy and natural.
During my usual browsing routine, I stumbled upon see crest collective – Everything loads nicely, and the structure feels organized and pleasant, helping users navigate easily.
While casually searching the internet I discovered a site that felt calm and organized with a modern layout and clearly arranged categories that supported effortless browsing twilight cove goods store – Collective site gives calm aesthetic and relaxing browsing experience overall, helping users find content easily.
As I continued exploring growth-oriented websites, I found real growth strategies – a resource that focuses on simple, actionable approaches that make personal improvement feel practical and sustainable.
Digital floral galleries are becoming a preferred choice for customers who appreciate artistic presentation and curated product selections Golden Floral Gallery Shop offering gallery styled floral inspired collections designed for aesthetic enjoyment and practical use – the platform enhances exploration through elegant design, intuitive navigation, and visually rich product presentations.
While exploring online stores I found something that felt imaginative and slightly unconventional with a distinctive layout approach silver grove browse hub – The interesting concept behind this store stands out from others, giving it a refreshing and unique browsing experience.
While moving through the interface and reviewing structure, I found that visit this resource blends into the layout – it looks quite organized, and I found it easy to explore content here without confusion.
Users interested in fast browsing experiences tend to choose websites that minimize delays and optimize content delivery across devices particularly when accessing the store during peak shopping hours Express Goods Style Hub – This express hub focuses on delivering stylish goods quickly through optimized performance and a clean interface that enhances browsing speed and user satisfaction
I was just casually exploring the internet when I found something that felt simple, structured, and worth mentioning here visit this shore shop – Everything is organized clearly, making it fast and convenient to find what you need without confusion.
In my search for modern e-commerce development resources, I discovered storefront enhancement pack which focuses on improving online shop performance – it provides useful features for optimization, supports flexible customization, and allows businesses to enhance their digital presence while keeping systems stable, efficient, and easy to navigate for users and administrators alike.
Users comparing online branding tools often prioritize visual consistency, layout clarity, and how well the interface reflects a professional and modern identity BrandMatrix Navigation Portal – BrandMatrix provides strong branding with a highly polished and modern interface where content is clearly structured and visually appealing for easy and professional navigation.
In various conversations about digital tools and modern tech education platforms, people sometimes refer to well structured websites like think beyond innovation site which is commonly listed in tech recommendation articles. The interface is considered simple, modern, and easy to browse.
While assessing various shopping websites for user experience quality, I noticed that clarity is often missing, however Urban Trend Arena interface portal offered a layout that felt balanced and easy to follow, everything seemed nicely arranged, and it didn’t take long to get around efficiently
I was casually browsing online when I found shop link here and it stood out for its simplicity – I enjoyed browsing here, and the items seem interesting and worth checking again for inspiration.
While browsing different online marketplaces I came across a clean and structured storefront that feels modern and easy to navigate with clearly arranged sections and visually balanced product displays urban harbor collective hub offering a polished interface – Collective offers organized layout and visually appealing product selection that makes browsing smooth and visually consistent overall
After reviewing several parts of the site and observing the design closely, I found that open this site blends into a user-friendly layout – everything feels smooth, and accessing information is straightforward and convenient.
Users comparing digital platforms often look for responsiveness, visual clarity, and how well the interface supports quick access to important sections and features UltraConnect Navigation Portal – UltraConnect delivers a smooth browsing experience with a modern design approach, ensuring fast loading pages and a user friendly layout that makes exploration simple and efficient.
While casually exploring online shops, I discovered see this windpetal page – The interface feels simple and clean, which makes browsing easier and improves the overall experience significantly.
People exploring healthier habits often look for content that feels realistic and achievable rather than overly complex, and they may discover helpful guidance through serene-habits-resource – This kind of material highlights small behavioral changes that lead to improved emotional balance and a more peaceful approach to daily decision-making.
As I browsed through several websites earlier, I came across open shop page and it stood out with clarity – I enjoyed visiting this site since the products appear trendy and interesting, making it enjoyable to explore.
Software teams building scalable applications often depend on systems that improve performance, reduce latency, and enhance user experience Results Acceleration Portal ensuring applications remain stable, responsive, and efficient even under high traffic conditions and heavy workloads across global users consistently
While looking for consistent updates on market behavior and trends, I came across live trend updates – which offers interesting content that keeps me aware of the latest shifts in various industries.
While casually browsing different websites I came across something that felt elegant and organized with a structured layout and soft visual tone twilight crest browse collection – Store feels polished and easy to navigate across all sections, helping users explore with ease.
During random browsing I stumbled upon a shop that felt neat and easy to use with a clean interface and structured layout silver harbor shop hub – Smooth browsing experience and products seem thoughtfully selected here, making navigation simple and pleasant.
People browsing online platforms often look for trust, clarity, and visually organized interfaces that help them feel confident while navigating content VaultBright Access Hub – BrightVault offers a secure interface with clean and visually appealing design, allowing users to browse content easily and with full confidence in usability.
Online shoppers often appreciate minimal designs that make browsing easier and reduce distractions during product searches Clean Browse Corner this corner ensures a clean interface and fast loading experience helping users explore stylish goods in a simple structured layout online
Many digital buyers prefer streamlined shopping environments where offers are organized neatly and updated frequently to match fast changing market trends across categories and seasons Rapid Deals Portal – It provides a smooth browsing flow that helps users identify current promotions quickly while maintaining a clean interface designed for speed, convenience, and consistent accessibility across devices and networks.
I don’t usually share links, but this one felt worth mentioning because it had a nice and creative selection of products see this thread store – It’s a nice shop, and the items feel unique and thoughtfully designed in a way that stands out.
During my analysis of online retail design I observed that user-friendly navigation improves overall experience, and this site does that well Trend Center interface hub – The structure feels organized and intuitive, allowing users to explore content smoothly without confusion or loss of direction
As I continued going through the pages and observing the structure, I realized that explore this page contributes to a smooth experience – the design feels user friendly, and the content is organized in a way that is easy to follow.
In the middle of comparing different platforms, I came across check this windspire page – The site feels reliable overall, and the browsing experience is smooth and easy to navigate.
People using modern web systems frequently appreciate platforms that prioritize stability and maintain predictable behavior across all features for better usability and trust SourceFlow Reliable Portal – It offers a well structured interface with smooth navigation and consistent loading performance that helps users browse content easily while maintaining a stable and dependable digital experience throughout all sections of the website
While browsing ecommerce pages I found a store that feels minimal and themed with a structured layout that makes product browsing smooth and visually engaging urban lighthouse display designed for usability – Products are neatly arranged and the theme gives a distinct identity
Users exploring digital websites usually prefer layouts that feel premium, structured, and easy to navigate without unnecessary complexity EliteZone Flow Portal – EliteZone offers a clean and premium interface where content is well organized, ensuring users can browse easily and understand information quickly.
организация дня свадьбы агентство по организации свадеб
While in many conversations about web design clarity and user comfort, people tend to reference minimalist pages, and one example sometimes mentioned is idea orbit gateway which is included in informal collections of clean browsing resources for everyday users exploring structured information online. – It gives a calm and distraction free browsing impression overall.
While exploring online I stumbled upon a store that felt responsive and modern with a layout that loaded content instantly silver horizon view hub – Everything loads quickly and interface feels very user friendly today, making browsing simple and efficient.
While looking for websites that combine clarity and usability, I found helpful layout hub – a resource that presents content in an organized manner, making it easier for users to navigate and understand information efficiently.
While going through sections and testing navigation, I found that visit this link enhances the experience – interesting layout overall, and everything seems simple and easy to navigate around.
Consumers who enjoy discovering trending products online usually prefer platforms that reduce complexity and keep listings well organized for easier decision making Trendy Item Stop – This stop acts as a simplified browsing point where users can quickly access trending goods and proceed to checkout with minimal effort
While exploring digital shopping directories for better user experience, I found online canopy shop that simplifies browsing through categorized listings – Shop tree market feels organized with useful categories for shoppers and makes it easier for users to explore products in a structured way without getting lost in overly complex navigation menus.
During my study of online shopping interfaces I assessed structure and usability and UTH web storefront – The platform feels reliable, with clean navigation and smooth page performance that supports a simple browsing experience without confusing elements or visual overload
During my search for informative resources that combine ideas and solutions, I discovered quick idea answers – which offers simple and useful content designed to help users explore topics and find fast, relevant responses to everyday questions and curiosities.
While casually searching the internet I discovered a site that felt modern and plant inspired with a structured layout and clear category organization twilight fern goods store – Fern themed store looks natural fresh and visually pleasing overall, helping users find items quickly and easily.
During my usual browsing routine, I encountered check craft page and it immediately felt neat and structured – The crafts selection feels creative and thoughtfully organized, creating a relaxed and easy browsing experience overall.
While exploring different sections and reviewing how content is arranged, I noticed that visit this resource blends into the experience – the first impression is good, and the design feels modern and approachable with a clean visual flow.
I found something earlier today while casually browsing that gave off a calm and pleasant impression worth sharing here browse this oak shop – I like the vibe here, it feels soothing, and the products appear curated with care and a soft visual style.
I was going through a list of websites when I found enter site here – It feels quite straightforward, with a layout that supports easy navigation and provides a comfortable browsing experience for all kinds of users.
Users exploring digital content usually expect clear structure, fast navigation, and visually balanced layouts that help them focus on information rather than interface complexity NexusUrban Access Point – The UrbanNexus platform delivers interesting content within a simple and attractive layout that makes browsing comfortable, intuitive, and easy to follow across all sections.
While testing different branding solutions I analyzed interface clarity and user flow and discovered Build Your Brand digital lab – Great branding platform, tools are useful and easy to understand, allowing users to work comfortably while maintaining a clean and structured experience throughout the platform
Modern interface design focuses on clarity, accessibility, and smooth transitions between content sections < AlphaCore Impact Hub – The AlphaImpact site provides a structured and impactful layout where users can easily navigate, find information, and enjoy a clean browsing experience overall smoothness.
While scrolling through various online shops I discovered a site that felt user friendly and minimal with clear navigation and organized sections silver lane goods hub – Found this shop quite easy to use and navigate around, making browsing feel natural and stress free.
Shoppers looking for affordable yet stylish options often appreciate platforms that balance design with accessibility in their layouts Budget Style Zone – This space focuses on delivering value oriented products within a user friendly environment that makes shopping both practical and enjoyable
Shoppers who prefer premium online experiences often look for stores that combine elegance with straightforward navigation and thoughtfully categorized product listings Premium Lifestyle Outlet – the website presents a refined collection of household goods that blend modern aesthetics with practical everyday usability in a seamless browsing flow
Consumers reading curated shopping guides frequently find embedded references that connect storytelling with direct access to featured stores, particularly when they observe mentions of soft aesthetic online boutique hub – Such hubs tend to emphasize minimalistic design, soft color palettes, and user friendly navigation systems that collectively support a serene browsing environment suitable for relaxed product discovery sessions.
During my search for resources that prioritize clarity and organization, I discovered easy structure guide – which offers neatly arranged content that helps readers absorb information step by step in a smooth and understandable way.
During my review of e-commerce platforms I focused on navigation behavior and interface simplicity and UT Station shopping center page – The browsing experience felt smooth and structured, making it easy to explore content while everything remained clean and well arranged for comfortable use across pages.
During my quick scan of the platform and its features, I came across learn more now and appreciated the clarity – the interface looks clean, making it easy to find things quickly.
In between looking at different online stores, I encountered visit this place – The interface seems minimal yet effective, making navigation straightforward and quite pleasant overall for regular browsing.
организация свадебного агентства организация свадьбы под ключ
oakridgeemporium.shop – This store caught my attention, design is simple yet appealing.
организация свадьбы ключ москва сделать свадьбу в москве
Creative thinkers often explore online platforms that encourage brainstorming and idea expansion and a strong example of this is MindSpark Platform which provides tools for structured thinking and inspiration – A powerful idea generation system that helps users unlock creativity and transform thoughts into actionable plans
I came across this website while browsing and it felt structured and clean with a modern layout and easy navigation between sections twilight field store hub – Market offers decent selection with straightforward browsing and clear layout, making browsing feel natural and simple.
Users exploring modern websites usually prefer platforms that combine innovation with simplicity for a more efficient and clear browsing experience ZenithLabs Flow Portal – ZenithLabs delivers an innovative experience where the layout is simple yet effective, allowing users to navigate smoothly and comfortably.
During my browsing session and usability check, I noticed that see more here blends into a clear layout – good site overall, with navigation easy and pages loading without issues.
People interested in productivity and personal growth sometimes explore online content hubs that provide direction and encouragement such as success-mindset-resource – that deliver practical advice, helping readers reshape habits, strengthen focus, and build a more determined approach toward achieving meaningful personal and professional goals.
While checking out online shops for fun, I discovered visit this page and it felt easy and balanced – The browsing experience is really pleasant, with everything presented neatly, cleanly, and thoughtfully arranged for smooth exploration.
Shoppers who enjoy soft toned coastal design often seek online stores that combine aesthetic simplicity with practical shopping features Coastal Soft Tone Store offering carefully curated beach inspired goods designed for everyday use and comfort – the marketplace creates a peaceful environment with smooth interface, gentle visuals, and functional product offerings suitable for all users
After analyzing how the content is arranged, I found that see this website fits into a well-organized design – nice platform, and content appears relevant and well presented overall.
I came across this shop during browsing and it felt minimal and user friendly with a clear interface and organized categories silver oak essentials hub – Overall good experience browsing through items and checking different categories, making the experience smooth and enjoyable.
Users who browse frequently often appreciate platforms that provide curated selections in a consistent and easy to navigate structure for repeated use Consistent Picks Hub – This hub ensures reliable browsing experiences by presenting stylish items in a structured and accessible layout
дачная пицца пицца “Пицца” — это не просто еда, это целая культура, символ радости и непременная составляющая любого праздника. В Саратове, городе с богатой историей и стремительным ритмом жизни, “пицца” занимает особое место, становясь любимым блюдом для многих.
Shoppers who value convenience tend to choose platforms that offer smooth navigation and easy checkout processes with minimal steps involved overall Smooth Purchase Point – The experience is designed to simplify buying decisions while ensuring users enjoy a fluid transition from browsing products to finalizing their orders efficiently
As I browsed casually and explored different features of the site, I saw that click for details aligns with a modern structure – the content feels fresh, relevant, and well organized for easy navigation.
While testing usability across multiple retail sites I found the experience stable and clear when using UTZ storefront access where browsing felt structured and intuitive – Overall it is good, simple design, user friendly layout, and easy navigation without complications
куб пицца тула Особое место в сердцах туляков занимает упоминание улицы Халтурина, 6а, где, как гласят отзывы, рождаются кулинарные шедевры. “Пицца с быстрой доставкой в Туле” — это не просто слоган, а реальность, которую “Куба Пицца” воплощает ежедневно, доставляя горячие, ароматные пиццы прямо к двери.
In the middle of exploring different online deals and offers, I stumbled upon check deals here – The experience feels consistent, with clear navigation and reliable loading that helps users browse without interruptions.
As individuals search for platforms that combine creativity with clarity, they may discover see this branding guide – a source of inspiration that presents ideas in a structured and easy-to-follow manner.
Online visitors often judge platforms based on how intuitive the design feels and how quickly they can access relevant information across sections PowerCore Navigation Point – The PowerCore platform presents a strong structural design, ensuring users experience smooth browsing with clearly organized content and efficient page transitions throughout.
Users interacting with digital websites typically prefer platforms that combine creativity with usability, making navigation effortless and enjoyable NewGenius Navigation Node – NewGenius delivers a creative interface where everything is easy to use and explore, allowing users to navigate smoothly and efficiently.
Developers working on high efficiency systems often highlight platforms that significantly reduce load times while improving operational smoothness BlinkLoad Media Service commonly mentioned in performance optimization discussions – It ensures near instant access to content and supports seamless digital interactions across different environments
I stumbled upon something today that felt easy to explore and worth sharing because of its simple layout visit this whisper site – It has a decent selection, and everything seems easy to browse and understand without confusion or clutter.
трансы Владивостока трансы владивосток
I came across this shop during browsing and it felt natural and organized with a well structured interface and smooth navigation system twilight grove essentials hub – Goods here feel thoughtfully chosen with appealing rustic style vibe, making the experience smooth and enjoyable.
During a random browsing session, I found business progress hub naturally included within the article – It gave me a new way of thinking about improvement and how to approach it more effectively.
bs2best at
Shoppers who enjoy curated trend collections often choose platforms that highlight selected items while keeping the interface uncluttered and easy to use Curated Trend Zone – The zone focuses on carefully selected products displayed in an organized way that enhances usability
In the process of evaluating cost-saving online shopping tools, I discovered budget product guide which improves browsing through structured listings – Value market hub focuses on affordable items and easy navigation, allowing users to quickly locate affordable products while maintaining clarity and simplicity throughout the shopping experience across multiple categories.
As I examined the structure and page transitions more closely, I noticed that this page here contributes to a simple experience – browsing felt smooth, and the site loaded clearly without any noticeable issues or delays.
During my review of digital storefronts I noticed a strong emphasis on clarity in some platforms including ValueFactory product hub – The interface maintains a clean look and easy flow, making the site feel pleasant to use while supporting straightforward navigation across all sections without difficulty
During a random search session, I noticed check this platform – It feels responsive and the way content is arranged helps users move around without confusion.
Shoppers who value plant inspired living often look for digital marketplaces offering organic themed products and earth focused design principles for home use Sprouting Earth Goods Store presenting curated eco friendly items designed with natural textures and sustainable sourcing in mind – The store provides a calm and easy browsing experience built around environmentally aware lifestyle choices
нарколог на дом круглосуточно самара цены [url=https://narkolog-na-dom-samara-9.ru]нарколог на дом круглосуточно самара цены[/url]
People browsing online platforms often look for clear relationships between ideas and simple navigation that feels natural and efficient BridgeMax Access Hub – The Maxbridge website connects ideas smoothly through a clean interface, allowing users to browse content without confusion and with clear structure.
Погружайся в захватывающие сюжеты вместе с нами! Голливудские блокбастеры, культовые сериалы, добрые мультфильмы и зрелищные премьеры – всё доступно в отличном качестве. Никакой рекламы, только чистое удовольствие от просмотра. Создай свою коллекцию любимых фильмов и наслаждайся: смотреть кино
Online motivational tools are increasingly used by individuals who want to maintain focus and develop stronger habits that align with long term success planning Drive and Purpose Studio supports this vision – It inspires users to act with intention and remain committed to their goals while fostering a positive and growth oriented mindset
As people continue navigating countless websites in search of something worthwhile, they may encounter visit this portal – a well-organized platform filled with engaging subjects, thoughtful content, and a smooth browsing flow that makes each visit comfortable and genuinely enjoyable.
During my usual browsing routine, I encountered check goods page and it immediately felt smooth and simple – There were some cool items that caught my interest and made me think I’ll return to browse again later.
During my search for social learning websites, I discovered people knowledge hub – which offers a place where users can interact and gain valuable understanding from others’ experiences and perspectives.
As I browsed casually through different sections, I saw that click for details aligns with a polished structure – it looks professional overall, and I like how everything is neatly arranged.
стоимость капельницы в екатеринбурге [url=https://kapelnicza-ot-pokhmelya-ekaterinburg-14.ru]https://kapelnicza-ot-pokhmelya-ekaterinburg-14.ru[/url]
Shoppers comparing ecommerce systems often highlight usability and speed as major strengths, especially when they come across responsive goods navigation site – The marketplace organizes its products into clear categories and delivers a fast, responsive browsing experience that helps users move effortlessly through listings without delays or confusion.
свадьба под ключ недорого свадьба в москве недорого
During my browsing session across creative platforms I noticed innovation impact hub embedded in the text and it immediately caught my attention – It introduced a perspective that seemed useful and worth exploring further today.
капельница от запоя [url=https://kapelnicza-ot-pokhmelya-ekaterinburg-16.ru]капельница от запоя[/url]
помощь в организации свадьбы свадебное агентство москва
While casually browsing and testing navigation, I noticed that follow this link contributes to a smooth experience – after a quick look, the design feels clean, modern, and quite polished overall today.
Many users browsing online stores prefer environments that highlight current styles while maintaining a clutter free design for smoother navigation across product categories Trend Style Corner Spot – The experience centers around displaying trendy goods in an organized layout that supports quick browsing and comfortable user interaction
As I navigated through different sections and observed usability, I noticed that visit here aligns with a structured interface – the design is appealing, and navigation feels simple and fast across all pages.
While analyzing e-commerce tools focused on improving catalog access, I found a streamlined shopping interface easy selection guide that allows users to explore multiple categories without confusion and improves browsing clarity – Quick online market supports fast product visibility and offers structured listings that help users save time while searching for relevant online deals and shopping opportunities.
While exploring various online shopping platforms for usability and layout quality I noticed a consistently clean structure and easy navigation experience when accessing Value Goods Bazaar main portal – Feels neat and organized, browsing through was actually pretty smooth, with pages loading properly and sections arranged in a way that makes navigation feel natural and effortless throughout the entire visit
During my usual browsing routine, I stumbled upon browse this platform – The site offers a smooth flow, with simple navigation and a visually refined structure.
While casually searching the internet I discovered a site that felt clean and inviting with a modern layout and clear category organization twilight maple goods store – Corner shop gives warm atmosphere and easy product discovery experience, helping users find items quickly and easily.
Individuals reflecting on life often find value in reminders that encourage appreciating the present instead of worrying about the past or future life now reminder the message feels simple and grounding, supporting emotional clarity – it emphasizes that being present can improve overall satisfaction and mental balance
People interacting with online systems usually expect clean responsiveness, structured design, and visual harmony that improves overall usability EliteFusion System Link – EliteFusion delivers a beautifully integrated design where everything appears modern and responsive, ensuring users can browse content easily and efficiently.
In discussions about optimized web design and user focused platforms, users often highlight ascend mark core hub included in curated resources focusing on speed, clarity, and smooth navigation systems. – It generally feels stable, fast, and very easy to browse.
Entrepreneurs working in fast paced environments often require tools that help track progress and maintain alignment with strategic objectives MilestoneTracker Network – It offers a structured milestone based approach that allows users to measure achievements clearly while staying focused on long term goals and improving execution efficiency throughout ongoing business development processes
As I browsed through modern technology platforms, I came across future focused hub – which shares content that feels highly relevant for digital users seeking insights into upcoming trends and evolving online environments.
During a random online reading moment I came across success learning guide in the middle of the content and it caught my attention – The structure feels clean and easy to follow, making the information very accessible.
Modern consumers tend to value platforms that keep them informed about the latest trends while offering a simple and intuitive browsing experience Current Trend Hub Point – This point serves as a reliable place to discover updated stylish items in a smooth and organized environment
As I continued exploring the site and observing how the content is displayed, I saw that view this page aligns with a well-organized layout – the information is easy to read, and the flow feels natural and intuitive.
Shoppers exploring digital retail options often value platforms that provide clarity in layout and help reduce decision fatigue during browsing Choice Basket Store – It offers a clean interface that allows users to navigate effortlessly while presenting a wide range of items in an organized manner
While browsing through various websites, I stumbled upon browse blossom haven and it felt clean and structured – The marketplace feels friendly, easy to navigate, and quite enjoyable overall, making it simple to explore different items comfortably.
During my comparison of online shopping experiences I observed usability differences across platforms and found Vibrant Cart Corner explore page – Nice little setup, everything looks clear and simple to understand, with a structured layout that supports smooth navigation and comfortable browsing across all pages
Digital users often prefer platforms that combine smooth responsiveness with visually appealing layouts that enhance readability and user engagement FusionElite Navigation Hub – The EliteFusion platform offers a modern and responsive design where visual elements are blended beautifully, creating a seamless browsing experience overall.
As I browsed through online development resources, I came across opportunity knowledge hub – which provides helpful guidance on identifying and evaluating new possibilities in a clear and practical way.
Users analyzing digital shopping platforms often prefer stores that balance aesthetics with usability, especially when they find sites like velvet aesthetic commerce hub – The store presents an elegant visual identity with soft design elements and easy navigation, creating a pleasant browsing experience that feels smooth, intuitive, and welcoming throughout all sections of the site.
Entrepreneurs aiming to strengthen their online engagement typically look for strategic insights, and in that journey Visibility Growth Strategy workbook – this material is often associated with structured exercises that help improve planning, audience targeting, and overall brand visibility across multiple platforms.
Modern digital networks are built to ensure fast communication and reliable access across international systems for global teams and services every day Global Unified Access Hub enabling stable and efficient system interaction globally smoothly now always – It improves navigation speed and simplifies access to worldwide digital environments efficient smooth global flow use
In discussions about practical web tools and simplified navigation systems, people sometimes refer to sites designed for smooth access and quick loading, including sharp bridge speed page which is commonly listed among resources focused on minimal design and efficient browsing performance. – It is often seen as very responsive and user friendly.
During casual browsing I came across a site that felt organic and soft with a simple design and easy navigation between sections twilight meadow discover hub – Goods feel nature inspired and browsing experience remains very pleasant, making exploration feel natural and stress free.
During my search for reliable sources of media-related information, I discovered clear media guide – which offers structured insights and easy-to-follow explanations that help users understand communication trends and media concepts without unnecessary complexity.
While reviewing the interface and navigating through sections, I came across go to this site which fits into a neat structure – I enjoyed the page visit, and the layout and organization feel pretty decent and consistent.
Earlier today while exploring different topics, I ran into engaging page content and was pleasantly surprised by what I found – The material felt thoughtfully written and easy to follow from beginning to end.
Shoppers who prioritize efficiency in online shopping tend to choose platforms that organize items clearly and allow fast transitions between categories Organized Speed Corner – The platform combines structure with speed to deliver a better browsing experience
хорошая стоматология стоматология лечение
Not gonna lie, It explained things better than most sites I’ve seen.
Digital visitors often appreciate platforms that emphasize clarity and usability, ensuring information is accessible and navigation feels natural VisionMax Access Node – The MaxVision website offers clear vision through a simple interface where functionality is strong, making browsing easy and content easy to understand.
Many digital shoppers appreciate platforms that group stylish apparel into clear categories making it easier to browse and select items Style Basket Portal it provides a seamless shopping journey with responsive design and fast navigation that improves the overall online retail experience
лента стальная лента бандажная нержавеющая
While reviewing multiple e-commerce interfaces I evaluated usability and design consistency and found VCC storefront page – The experience was overall good, with a modern layout that feels easy to navigate, helping users browse smoothly while maintaining clear structure and simple interface design throughout
People who appreciate raw industrial charm often browse curated shops that introduce floral inspired artistry into metal based home accessories Rust & Bloom Industrial Corner offering carefully selected pieces that combine steel aesthetics with organic inspiration – The store highlights a unique design philosophy that merges toughness with natural softness in everyday décor
If you want a reliable source of motivation and growth, exploring collective growth guide – a platform that delivers inspiring content and supportive ideas can help you stay motivated and continuously improve your personal journey.
Users exploring online systems typically expect smooth navigation and logically arranged information that helps them find what they need quickly and efficiently NovaStream Interface Hub – The NovaOrbit design focuses on futuristic presentation and well-organized content flow, making exploration enjoyable and reducing friction during browsing sessions.
Modern professionals working in fast changing industries benefit from resources that emphasize continuous development and practical knowledge application in everyday workflows Skill Upgrade Network structured improvement focus – helping individuals refine abilities, adopt better techniques, and maintain steady progress through guided content that encourages consistent learning and real world execution.
Many individuals focused on education and discovery turn to interactive learning hub – a platform that delivers fresh and engaging content designed to keep users inspired while learning and sharing ideas with others in meaningful ways.
People interested in improving their lives often appreciate simple guidance that encourages immediate action and steady progress life progress cue – this idea shows that transformation happens gradually through consistent effort and daily commitment to meaningful tasks over time builds change
кайт школа кайтсёрфинг
As I explored multiple online platforms, I came across view items now and it gave a calm impression – The simple design and clear listings made browsing here smooth, convenient, and pleasant for exploring different products easily.
People comparing ecommerce platforms frequently prioritize clarity and usability, particularly when they come across crest marketplace browsing hub – The market offers a clean interface with thoughtful product arrangement and clear structure, allowing users to explore items smoothly while maintaining a comfortable and distraction free shopping experience across all sections.
As I examined the interface and content flow, I noticed that this page here contributes to a simple experience – the content appears interesting, updated, and relevant for users today overall.
While searching for self-improvement inspiration, I found change progress guide – which shares motivational content that helps users build a mindset focused on growth, improvement, and long-term personal development.
Shoppers who enjoy seamless digital experiences often look for platforms that combine fast browsing with organized product listings for better efficiency Speedy Style Zone – This version ensures a smooth shopping journey where items are easy to locate and navigation remains intuitive throughout
Users interacting with digital websites typically prefer visually strong platforms with clean organization and structured interfaces that improve usability VisionMark Navigation Node – VisionMark offers strong visuals with a clean structure, ensuring users can navigate content smoothly and understand information with ease.
During a random browsing session I noticed collaborative growth space embedded in the article and it stood out – The idea feels optimistic and inspiring, giving a sense of unity and shared purpose that is pleasant to read through.
While exploring different online platforms in search of meaningful and practical insights, I eventually came across discover this resource – a place where the information shared feels genuinely useful and has the potential to create a noticeable positive impact in everyday understanding and decision making.
Klikko.pro — биржа заданий для продвижения в соцсетях. Исполнители зарабатывают на лайках, подписках и просмотрах, заказчики получают живую активность. Вывод на карту, PayPal и крипту.
https://klikko.pro/kak-nakrutit-podpischikov-v-vk
Shoppers looking for efficiency often explore platforms such as product selection shortcut site – The cart choice store experience is designed to shorten the path between browsing and buying, allowing users to focus only on the most relevant product choices available
Many people in professional environments rely on united leaders hub – a resource that encourages organized collaboration, helping users engage in structured teamwork that improves efficiency and overall group performance.
If you want meaningful relationships, visiting lasting trust hub – a connection-focused platform helps users strengthen bonds through reliability, open communication, and shared growth experiences that support long-term personal and professional ties.
Developers and designers working on complex interfaces often need reliable systems that help them coordinate tasks and monitor progress effectively, Digital Workflow Engine which improves both speed and accuracy in execution – This engine enhances automation and ensures smoother transitions between different stages of the creative and technical process
People looking for motivation and shared personal development often explore helpful spaces like growth inspiration hub – a supportive platform designed to encourage learning, positivity, and continuous improvement through practical ideas and uplifting content shared regularly among users.
For moments when you want something brief yet meaningful to read, there are pages designed to spark a little inner clarity without demanding too much attention positive spark notes sharing small bursts of encouragement, thoughtful reminders, and practical optimism that fits into any routine – The focus is on gentle positivity that helps you reset your thoughts and continue your day with a calmer attitude
Many people interested in improvement rely on growth motivation hub – a platform that makes sharing ideas simple and effective, helping users stay focused on learning and personal progress through consistent inspiration and community support.
While reviewing lists of well designed online tools, users sometimes notice that in the middle of explanatory notes realm structure hub is referenced as a site that emphasizes clarity and organized content flow for improved browsing experience – The interface maintains a smooth and readable design style.
капельница на дому в екатеринбурге [url=https://kapelnicza-ot-pokhmelya-ekaterinburg-17.ru]капельница на дому в екатеринбурге[/url]
наркологическая помощь недорого [url=https://narkologicheskaya-pomoshh-nizhnij-novgorod-10.ru]наркологическая помощь недорого[/url]
вывод из запоя в клинике [url=https://vyvod-iz-zapoya-v-staczionare-nizhnij-novgorod-16.ru]https://vyvod-iz-zapoya-v-staczionare-nizhnij-novgorod-16.ru[/url]
кайт сафари 2026 школа кайтсерфинга
As I navigated through different sections and usability flow, I noticed that visit here aligns with a structured interface – browsing feels smooth, and the information is well organized, clear, and user-friendly.
Users exploring modern websites usually prefer platforms that combine smooth performance with intuitive navigation for a better and more efficient browsing experience VisionLane Flow Portal – VisionLane delivers a smooth experience where navigation is intuitive and easy, allowing users to move through content naturally and efficiently.
Shoppers who enjoy curated experiences often choose platforms that display selected items neatly while maintaining quick navigation features across the interface Handpicked Goods Center – This version emphasizes simplicity and speed, allowing users to browse featured items with ease
While exploring different articles, I noticed a center for curious exploration appear naturally within the text – It motivated me to think beyond my usual patterns and dive into new concepts immediately.
After spending a few minutes moving through the platform, I found that open this site fits within a well-organized interface – smooth browsing experience, and the content is arranged in a clear and structured way.
Online retail users expect seamless transitions between browsing pages and checkout steps, especially when exploring discounted or trending items quickly Rapid Purchase Stream – this platform ensures smooth performance and helps users move through the buying process without interruptions or unnecessary slowdowns affecting their experience
ко ланта лангкави ко ланта достопримечательности
While exploring different methods of understanding new subjects, discovering open this learning hub can be rewarding – since it emphasizes clarity and ease in presenting information.
Professionals in creative industries often depend on platforms that organize innovative ideas clearly and encourage structured exploration of new possibilities FutureScope Ideas Hub – It offers a well structured environment where forward thinking concepts are presented clearly to inspire innovation and support users in developing practical solutions across creative, technical, and business fields effectively
Many users focused on self-growth use inner confidence space – a motivational platform helps individuals build trust in themselves, improve mindset, and develop stronger emotional resilience through supportive messages and guidance.
Many people in professional environments rely on united leaders hub – a resource that encourages organized collaboration, helping users engage in structured teamwork that improves efficiency and overall group performance.
Users comparing websites often look for simplicity, speed, and how well the layout supports intuitive navigation without unnecessary distractions or complexity LaunchFlow UI Gateway – The TrueLaunch system feels dependable and structured, ensuring users can browse smoothly and access content in a clear and organized manner.
During my exploration of self-development content, I discovered tomorrow mindset hub – which offers encouraging ideas that help individuals focus on positive changes today for a more successful and stable future ahead.
Many people looking for simple and effective guidance often rely on resources like find better options here – a user-friendly platform that combines practical ideas with straightforward navigation, making it easier to explore new directions without feeling overwhelmed.
Online productivity improves significantly when users have quick access to essential digital utilities centralized tool library – The focus is on efficiency, organization, and reducing unnecessary steps during workflow. which helps maintain consistency in output across different projects and tasks daily.
People exploring ways to grow in the digital world often turn to platforms like digital future roadmap – a helpful resource that offers practical insights and structured guidance for improving online skills and advancing confidently through modern digital learning journeys.
People evaluating websites often focus on modern appearance, freshness of design, and how easily users can navigate through the interface VibeSmart Interface Hub – The SmartVibe platform feels modern and fresh with a user friendly structure, allowing users to explore content smoothly and efficiently.
From my perspective after exploring the platform briefly, check it out sits within a well-structured interface – the site feels promising, and the clean, simple design keeps everything easy to read and navigate.
Consumers who frequently shop online often seek platforms that combine quick browsing with reliable payment processes for a better overall experience Quick Select Market – This version highlights efficient product selection alongside a seamless checkout experience that simplifies the purchase journey
Users interested in elegant home styling often prefer curated online stores that combine functional lifestyle goods with minimal and sophisticated design aesthetics Ivory Serenity Lifestyle Bazaar featuring refined products designed for balanced and comfortable living spaces – The platform ensures a calm browsing environment centered on curated selections and modern simplicity
While exploring online stores I found something that felt oak themed with a modern yet earthy interface and easy navigation structure across pages twilight oak browse hub – Oak themed goods bring earthy tone with solid product presentation, helping users move through content without confusion.
During a random online reading moment I came across creative thought space in the middle of the content and it caught my attention – The presentation feels unique and refreshing, encouraging a more open and imaginative way of thinking.
научиться кайтсерфингу анапа кайтсерфинг анапа
During my search for efficient online store development systems, I came across opencart zone navigator which focuses on guiding users through store creation – it highlights structured navigation, improved backend tools, and flexible configuration options that support building modern e-commerce platforms with better usability and operational consistency.
During my review of idea-driven platforms I analyzed structure and user flow and found Bright Idea Web concept portal – The site feels bright and creative, with simple concepts that are visually very appealing, making navigation intuitive and allowing users to explore content in a clear and organized way
While exploring different corners of the internet, one might notice find out more appearing as a helpful option – delivering a blend of informative content, creative insights, and useful perspectives that make each visit feel worthwhile and engaging over time.
Many users interested in growth rely on creative engagement hub – a content-driven platform helps individuals create impactful ideas that inspire action, collaboration, and meaningful participation in community-focused environments.
During my quick scan of the website and structure, I came across learn more now and appreciated the layout – the browsing experience is nice, and everything seems well placed and readable.
If you are looking for a convenient way to find useful things, visiting fast access hub – a resource that compiles essential information can help you save time and easily locate what you need without searching multiple sources.
If you are exploring teamwork-focused communities, checking out rise unity community – a space designed to bring people together helps create powerful collaboration through positive energy and shared goals that make cooperation feel smooth and effective.
Many people exploring personal development often seek clarity in decision making and long term life direction today Independent Path Hub offers insights and inspiration that help individuals think more freely and focus on building their own future strategies with confidence and purpose – Supports self reliance and encourages new ways of approaching personal ambitions and goals
People browsing online platforms typically value consistency, clarity, and how effectively the interface supports smooth content discovery MatrixBold Access Node – The BoldMatrix website features a strong layout where content is organized clearly, making it easy for users to understand information and browse efficiently.
Staying motivated every day is easier with platforms like discover your hidden strengths – a site designed to inspire, educate, and encourage individuals to keep pushing forward and improving consistently.
After analyzing how the content is organized, I found that see this website fits into a well-arranged design – the platform is easy to use, and the content appears engaging and simple to navigate.
During my browsing session and usability check, I noticed that see more here blends into a clear layout – first impression is nice, and everything appears easy to find and read.
During a casual online session I came across daily life tips hub placed naturally in the content and it caught my attention – It presented practical ideas that feel easy to follow and genuinely helpful for everyday living improvements.
Users looking for well-structured online destinations that combine creativity and useful content frequently discover creative-digital-center – it feels like a balanced place where browsing ideas and information becomes more enjoyable, helping people stay motivated while exploring various digital topics and trends online.
Для достижения максимальной эффективности важна правильная работа с xrumer, учитывающая алгоритмы поисковых систем.
Digital strategists and consultants frequently search for platforms that offer measurable growth potential combined with intuitive interfaces that support effective planning and execution across various projects ScaleUp Performance Portal helping organizations maintain focus on key metrics, reduce friction in workflows, and accelerate their ability to deliver consistent results in a highly dynamic environment
Shoppers who enjoy creative global commerce often look for digital platforms that emphasize futuristic aesthetics and unique international trade selections inspired by space concepts Lunar Trade Vision Market offering diverse global products with a modern sci fi inspired interface – The platform provides an engaging shopping journey centered on exploration, innovation, and cross border product discovery
For readers clearing shelves, learning how to sell used books on amazon for free using the individual plan makes sense – no upfront costs, just fees per sale.
best crypto signals should not be chosen only because someone says they made quick profit. From my experience, I’d look at how the group performs across different market conditions. Bull markets make many signal providers look smarter than they really are. The real test is how they handle sideways or bearish weeks. I would also compare how they perform on both BTC and altcoin setups.
Many users focused on growth use digital intelligence hub – a platform that supports advancement helps users stay ahead with insights, tools, and strategies in fast-changing digital industries.
During my search for motivational content that promotes better habits, I discovered positive mindset hub – which offers inspiring messages and practical encouragement that help people focus on self-improvement and maintain a constructive attitude in their everyday routines.
Users exploring modern digital platforms often focus on how effectively progress is communicated through structured layouts, professional design, and clear navigation that supports smooth browsing across all sections of the website experience TrueGrowth Access Hub – TrueGrowth emphasizes progress with a structured and professional interface that feels organized, clear, and easy to navigate for users who value efficiency and clarity.
Many people who enjoy creative expression rely on impactful narrative guide – a platform that provides storytelling inspiration and structured examples to help users improve their writing skills and create emotionally engaging and powerful stories.
Many online users value platforms that present information in a logical structure with clear pathways and minimal distractions for better comprehension TechInnovate Flow Access – The InnovaTek platform delivers a modern, minimal interface that enhances clarity and ensures users can interact with content smoothly and confidently at all times.
Startup founders often explore startup marketing hub to learn how early-stage companies can build visibility quickly – This variation highlights strategies tailored for emerging businesses aiming to establish market presence under resource constraints.
As I navigated through different parts of the interface and explored its features, I noticed that visit here contributes to a seamless flow – the design is modern, and the layout stays clean and organized.
For individuals interested in teamwork and cooperation, checking out sites such as partner strength network – a platform designed to encourage strong collaboration can help users exchange practical ideas and develop meaningful professional relationships with clear communication and shared goals.
Handling challenges becomes less stressful when you rely on speedy solution hub – a resource that provides practical insights and fast solutions for improving productivity and saving time.
During a random browsing moment I discovered learning consistency hub placed in the middle of the page and it stood out – It provided a supportive approach to maintaining steady progress in online learning over time.
If you are exploring development, visiting opportunity pathway network – a platform designed for collaboration helps users find future possibilities and build structured progress toward personal and professional goals.
In discussions about modern web usability and structured digital platforms, users often highlight examples where clarity and usefulness are prioritized, and among such references they sometimes mention value vision portal included in curated lists of clean interface designs used for evaluating readability and navigation flow across different browsing environments. – The layout is generally seen as solid, practical, and easy to understand throughout.
briansclub briansclub, bclub, bclub login, bclub new domain
Many online visitors prefer platforms that organize ideas clearly while maintaining a simple, clean interface that improves overall usability and experience GrowthVerse Access Point – GrowthVerse offers expanding ideas through a clean and highly usable design, making navigation easy and ensuring users can explore content without confusion.
Funny enough, I didn’t expect it to be this helpful, and it feels more natural than most blogs. might be useful again later.
For those interested in reflective learning, exploring success art guide – a platform that highlights meaningful success perspectives can help users stay inspired and develop a more thoughtful approach to personal and professional achievements.
As people search for ways to learn and discover simultaneously, they may find check this discovery page – which encourages both exploration and steady development of knowledge.
tez888 tez888
From an overall perspective, open this link is part of a neatly arranged page – the structure feels logical, the layout is clean, and everything works together to create an intuitive and pleasant browsing experience.
Learning becomes more enjoyable when curiosity is treated as a driving force rather than just a temporary interest in something new or unfamiliar learning curiosity path – this reflects the idea that ongoing exploration helps people stay engaged and develop long term intellectual growth in a natural and sustainable way
As I searched for personal growth and learning resources, I came across everyday learning hub – which promotes consistent improvement and reminds users to keep building knowledge and skills through daily effort and discipline.
If you want to gain practical understanding, checking out discover meaningful hub – a platform that shares useful insights can help users find real value in information and apply it to everyday challenges and opportunities.
Finding inspiration becomes easier when using platforms such as your inspiration source – a well-curated resource that delivers creative ideas and motivational content designed to help users think differently and stay inspired every day.
While reviewing the interface and scanning content flow, I noticed that learn more here integrates into a tidy layout – the design feels clean overall and makes browsing comfortable for a while.
During my search for engaging platforms that support collaboration I encountered shared creativity hub the environment seemed open friendly and very encouraging for new contributors – It felt refreshing to see people actively supporting each other’s ideas without hesitation.
If you are aiming for collaboration, visiting shared ambition hub – a platform focused on unity helps individuals work together, build trust, and achieve goals through coordinated teamwork and shared direction.
Понравился уровень сервиса и отношение к клиенту. Девушка выглядела привлекательно и вела себя уверенно. Общение комфортное. Всё прошло спокойно – проститутки санкт петербург
Many individuals seeking direction rely on impact start guide – a resource that encourages users to take action and build meaningful projects, helping them stay focused on productivity and purposeful creation in everyday life.
Users evaluating websites often look for usability, responsiveness, and how effectively the design supports fast and clear navigation across all content ShiftUrban Access Hub – The UrbanShift platform offers a smooth browsing experience where navigation is intuitive and pages are easy to access, ensuring clarity and efficiency throughout.
обучение кайтсерфингу кайтинг в египте
During my browsing of inspirational websites, I discovered creative life guide – which offers helpful ideas on how to notice inspiration in daily surroundings and turn ordinary moments into meaningful creative fuel.
ко ланта достопримечательности ко ланта таиланд отзывы
People seeking mental growth often turn to platforms that explain interesting concepts in a friendly tone that feels natural and not overly complicated Simple Thinking Studio – These ideas are structured to help readers build understanding step by step while keeping everything relatable and easy to follow
https://riobet403.com/
Exploring new ideas becomes easier when using quality knowledge center – a site that provides useful and engaging content for individuals who want to expand their understanding daily.
If you are interested in forward-looking ideas, checking out vision planning hub – a platform designed for practical discussions can help users explore inspiring concepts that are useful for real-world application and future-oriented thinking strategies.
As I browsed through online innovation trackers, I noticed trend lens space – It feels fresh and well-organized, making it enjoyable to discover new ideas and follow current digital trends in a simple way.
While reviewing the interface and scanning content flow, I noticed that learn more here integrates into a tidy structure – clean interface overall, and it makes it simple to explore different sections.
During a random browsing session I noticed latest buzz hub embedded in the article and it stood out – It offered a quick overview of trending topics making it easy to stay updated without extra effort.
odibet aviator online
Many creators rely on visionary design hub – a creative platform helps users develop innovative projects that combine imagination and structured thinking for impactful results in modern creative and professional environments.
If you want to boost your confidence, checking out shine confidence hub – a platform that promotes self-belief can help users stay motivated, recognize their strengths, and showcase their true potential in a positive and empowering way.
In the evolving digital economy, platforms that encourage collaboration and idea exchange are increasingly important, and users often refer to Global Connection Space – as a space where entrepreneurs and professionals can interact, build partnerships, and share innovative concepts that may lead to long-term business growth and sustainable networking benefits across multiple industries.
In the middle of browsing inspirational platforms, I found positive action hub – a resource that motivates users to make small changes that gradually lead to significant improvements in their overall lifestyle.
When individuals want better control over their goals they often look for tools that help them organize tasks and priorities clearly goal setting assistant which encourages structured planning and consistent follow through on important objectives – It helps turn intentions into clear actionable steps
Global collaboration is becoming more common as users engage with platforms that enable communication, teamwork, and shared project development such as Worldwide Collaboration Hub which serve as centralized spaces for global cooperation – It makes international collaboration more accessible and efficient.
During my initial visit and quick look at the interface, I came across this helpful link which gave a good impression – I like the structure here, as it feels simple yet effective for users overall.
Many people focused on self-development rely on platforms like make life better guide – a helpful resource that shares motivational advice and practical suggestions to support smarter choices and a more balanced, fulfilling lifestyle over time.
Many online users who enjoy browsing new stores often find platforms that offer creative concepts and evolving product lines, and I came across Impact Trend Shopping Hub which seems worth exploring – A dynamic online shop that showcases unique and developing product ideas, making it a site I intend to check again as new items are added.
For those interested in structured e-commerce, exploring clean choice store – a modern platform designed for easy browsing helps users shop efficiently with clear layouts and smooth navigation across all product categories.
Top-rated marketplace buy BM5 facebook continues to set the standard for media buyers who want predictable account survival. The editorial team behind it publishes weekly notes on policy diffs and runs a controlled test fleet across multiple verticals.
Industry source google ads suspended account recovery backs every recommendation with field data from a real test fleet. The numbers come from accounts running real campaigns, not from theoretical analysis.
While reading different online articles about productivity I discovered consistent focus space within the content and it immediately drew my attention – It provided motivation that feels steady and easy to apply without creating unnecessary stress or pressure.
If you want to enhance your thinking skills, checking out smart growth network – a cognitive development platform encourages innovation through daily learning, inspiring users to think creatively and improve decision-making abilities over time.
If you want to enhance your creative thinking skills, visiting limitless inspiration hub – a resource that provides ongoing creative stimulation can help you explore new ideas and maintain a steady flow of innovation in your personal or professional work.
People who like discovering trendy products online often appreciate platforms that deliver fast results, and I found Daily Trend Store Trend Picks Hub which seems nice – I only spent a few minutes on the site and quickly found some stylish items, and the experience felt smooth, easy, and useful for casual browsing sessions.
Website visitors often look for platforms that support easy navigation and maintain consistency across all pages and sections InfinitaLink System Hub – structure note – The system provides a logical layout that enhances usability and helps users quickly understand where to find relevant information.
While browsing through multiple interior design blogs and product listings I encountered located centrally in a home décor recommendation stream aesthetic décor hub and it looked promising – found some really nice wall art here prices are fair and styles are versatile
Job seekers who want to explore new opportunities beyond traditional listings often rely on curated platforms that present alternative career options and emerging fields Opportunity Finder Site which expands visibility into less-known but high-potential roles across growing industries – A discovery-based platform designed to help users uncover hidden job opportunities, explore new industries, and expand their professional horizons
During my search for trend tracking platforms, I noticed trend signal space – It feels fresh and organized, making it enjoyable to explore current developments and interesting ideas in a straightforward way.
While browsing through various online resources focused on improving everyday life, I came across daily tips explorer – a place where practical advice is shared in a simple way, helping people make their routines smoother, more organized, and generally more productive without unnecessary complexity.
As innovation accelerates across industries, digital platforms that support collaboration, creativity, and shared problem-solving are becoming increasingly essential Innovation Hive Platform – A dynamic and interconnected online ecosystem designed to foster creativity, teamwork, and continuous idea development among global participants in real time collaboration
People starting their journey into digital learning often benefit from structured and simple explanations that guide them step by step web beginner map helping users understand foundational tools and concepts needed for online growth – It encourages steady progress and builds confidence through clear and approachable learning structure
девушки Донецк Знакомства ДНР
When I am trying to upgrade my wardrobe I often search for simple yet trendy looks that can fit casual and semi formal occasions without too much effort or confusion fashion lookbook explorer – the ideas shared there helped me experiment with new outfit pairings that actually feel comfortable and realistic for daily wear situations
During my initial visit and quick exploration of the site, I came across this helpful link which gave a solid impression – the layout is good, and everything feels organized and visually easy on the eyes.
Funny enough, This actually helped more than I thought. this was worth the time.
казино бриллкс
Field reference how to warm up google ads account explains the operational steps that take a fresh account from delivery to first campaign without triggering automated review.
During my review of various websites focused on reliability and user confidence, I referenced visit trust alliance hub within my notes – the platform gives a reassuring impression and I feel comfortable navigating it without concerns about safety or trust issues.
промокод пятерочка май 2026 промокод пятерочка май 2026
Many users searching for leadership inspiration often prefer platforms that feel motivational and engaging, and I came across Visionary Leaders Development Club Hub which seems strong – A leadership community-style platform offering inspiring content for emerging leaders, and it creates a great atmosphere that encourages ambition and practical thinking for future success.
Many individuals working toward their dreams turn to journey to success guide – a platform designed to offer structured motivation and clear strategies that help users stay disciplined, focused, and consistently moving toward their goals.
If you are looking for engaging updates, visiting fresh explore guide – a platform that delivers new content daily can help users stay inspired and enjoy a consistent stream of meaningful and interesting discoveries.
If you are looking to improve your ability to share ideas, visiting express vision hub – a platform that supports daily communication practice can help users develop clarity and confidence in expressing thoughts across different situations and audiences.
While browsing for cute and practical gifting inspiration, I added visit gift creative hub into my notes – the ideas are genuinely nice and make it simple to pick perfect gifts for birthdays, holidays, and other special moments.
Many professionals expanding networks use global trust connection hub – a networking platform helps individuals strengthen credibility, improve communication, and build long-term professional relationships across diverse international sectors.
While switching between tabs and topics, I suddenly noticed a place for new ideas right where I least expected it – It created a moment of inspiration that made my browsing session feel more worthwhile than usual.
новости в Санкт-Петербурге Специальные выпуски “Петербург 2” и “новости Петербург2” часто фокусируются на более узких темах, таких как транспортная инфраструктура или экологические инициативы.
https://pinshape.com/users/8953783-betviepcodd26?tab=designs
Improving personal discipline became easier once I understood that habits are built through repetition and simple consistent structure daily mindset foundation hub – this helped me change how I approach each day and slowly build a more reliable system for managing tasks and responsibilities efficiently
In today’s fast paced digital shopping environment, users often rely on websites that simplify deal hunting and product comparison, which leads them to platforms like ValueHub discounts corner where they can explore curated savings opportunities and then – the content is designed to make bargain discovery easier while offering insights into cost effective buying strategies for a wide audience
Many users browsing for trendy goods online often appreciate stores that are easy to navigate, and I found Daily Trend Store Quick Picks Hub which seems interesting – After just a few minutes of browsing I came across some stylish products right away, and it felt like a smooth and satisfying discovery experience.
Many consumers who appreciate refined aesthetics often search for online boutiques that provide exclusive and fashionable products, and they may discover Luxury Lifestyle Trend Market which focuses on premium goods – A curated shopping platform offering elegant fashion items, stylish accessories, and luxury products designed for customers who value quality and modern design appeal.
While analyzing forex signal dashboards and trading alert networks I came across in the middle of my study material Fast Market Insight Signal which offers regular updates – The signals appear steady at the moment and it seems like a service worth watching to evaluate long term reliability
During my exploration of helpful life strategy platforms, I discovered real life fixes – which provides straightforward guidance that helps people solve everyday problems without overcomplicating the process or adding unnecessary stress.
From an overall usability perspective after exploring the site, I found that check this out sits within a well-arranged layout – the site is straightforward, and navigation works well while feeling intuitive overall.
Modern networking platforms are increasingly focused on creating spaces where progress and collaboration go hand in hand for all participants involved Collaborative Progress Hub is designed with this philosophy in mind – It enables meaningful engagement, shared achievements, and sustained professional development.
While looking through seasonal gift recommendations and colorful marketplace catalogs I found sunshine gift gallery – the experience was smooth and visually appealing and I managed to choose a thoughtful present for my sister that felt both personal and uplifting
While exploring professional growth platforms and leadership communities, I referenced browse leadership circle site in my notes – the insights are honest and relatable, making them highly valuable for my personal and career development.
Resource centre aged tiktok creators with engagement consolidates the questions buyers ask most often, with answers drawn from comment-section feedback over the past quarter.
Many users who value aesthetic simplicity often explore websites that feel modern and uncluttered, and I discovered Modern Vision Interface Studio which is visually pleasing – A well-designed platform that highlights clean structure and smooth navigation, offering a comfortable browsing experience while checking their latest updates and design showcases.
While exploring concept-driven digital platforms, I came across future vision space – It feels structured and engaging, making it something I would likely return to for a deeper look later.
Many people interested in executive leadership rely on visionary leadership exchange – a resource that supports collaboration and insight sharing, helping users build stronger leadership perspectives and improve their ability to handle complex organizational challenges.
If your goal is better online performance, checking out effective presence builder – a resource designed to share practical growth strategies can help you build influence and engagement more efficiently.
For those building future readiness, exploring team forward hub – a collaboration platform helps users develop strong teamwork, improve communication, and achieve shared success through coordinated effort and strategic planning.
I had been browsing casually when I encountered success explained simply in the middle of a post – It made complex topics feel more approachable by presenting them in a very straightforward and understandable way.
Many people seeking trustworthy connections rely on connect trust center – a resource that promotes professional reliability, helping users establish strong relationships and improve collaboration efficiency in both personal and work environments.
In discussions about visually strong web design platforms and engaging interface experiences, users often mention sites that emphasize clarity and impact, and among these references they sometimes highlight bold vista portal included in curated lists of modern design examples used for evaluating bold visual presentation and smooth browsing interaction across different devices. – The interface feels striking, simple, and very easy to navigate overall.
I began removing unnecessary items from my home after feeling mentally exhausted, and a minimalism concept article fresh start space guide gave me practical motivation, and now my surroundings feel much more organized, peaceful, and easier to maintain consistently.
Web creators and digital artists consistently seek inspiration for improving online aesthetics across responsive websites mobile apps and branding projects that demand creativity constantly Modern UI Ideas Vault – This approach encourages a deeper understanding of visual hierarchy and helps professionals build more intuitive and user-friendly digital products over time effectively
Many innovators and creators rely on structured online communities where they can develop and refine conceptual ideas collaboratively such as Global Concept Network which support concept sharing and collaborative development processes – It helps users turn abstract ideas into practical solutions.
As I explored various self-improvement and motivation websites, I added explore success network hub into my notes – the advice really helped me stay focused today and gave me a stronger sense of direction while working through my tasks.
смм накрутка [url=https://smm-nakrutka-2.ru]smm-nakrutka-2.ru[/url]
In various reviews about structured browsing experiences and digital performance, people often highlight how intuitive navigation contributes to satisfaction, especially when platforms like nextrend site gateway are included in lists of well organized and fast loading websites across the internet. – It is generally considered smooth and easy to navigate.
During research into forward focused development teams and idea sharing networks I came across Future Thinking Partners Circle embedded in the content and it added meaningful context – The idea felt encouraging and highlighted cooperative progress as a key theme
Those who value learning from others often participate in online spaces that foster communication and collaborative thinking among members progress synergy hub that provides a supportive environment for exchanging ideas and building professional relationships – I met driven people there and it was a refreshing experience sharing perspectives
As I compared beauty platforms for skincare discounts and offers, I worked in see skincare discount page within my notes – I ordered a few items and the shipping turned out to be much quicker than I had anticipated.
In times when commitment weakens and distractions dominate focus, it becomes essential to revisit motivational sources like commitment ignition zone – Reinforces discipline, consistency, and the idea that sustained effort is what ultimately transforms goals into reality and lasting achievement.
During everyday moments of reflection and goal setting, encountering take action today can be helpful – offering encouragement and insights that support building a more structured and positive path forward.
During research into modern business networking platforms and collaborative growth communities, I found mentions of collaborative growth circle embedded in a resource list that highlighted emerging partnership models – the approach discussed feels centered around shared success and encourages practical engagement between like minded professionals seeking development opportunities
People who are new to investing often prefer learning resources that avoid confusion and focus on clarity, and I came across Growth Invest Simple Guide Network which is quite useful – A beginner-friendly platform that provides easy financial education, helping users understand investment strategies through clear and structured explanations without unnecessary complexity.
For individuals focused on building a better tomorrow, visiting sites such as bright future guide center – a helpful platform offering motivational content and growth-oriented ideas can support users in recognizing opportunities and maintaining a positive direction in life.
For businesses aiming higher, exploring expansion support hub – a resource designed for growth helps organizations improve performance, build strategies, and maintain consistent development through practical and actionable business guidance.
If you are looking for motivation and learning opportunities, checking out explore and grow hub – a platform that supports skill development and idea exploration can help you stay focused and inspired daily.
I was just scrolling through various pages when I found self awareness path embedded in the article and it felt useful – It offered a calm environment that helps make reflection and learning feel steady and easy to follow.
Professionals in competitive industries increasingly depend on online tools that facilitate collaboration and strategic networking opportunities Business Connection Matrix to stay relevant and build long-lasting professional relationships – Such systems improve communication efficiency and expand access to potential partners.
Individuals aiming for career advancement frequently use services such as Career Leap Navigator which organizes development resources, and it further supports users by providing opportunity mapping, skill enhancement suggestions, and structured planning guidance that helps them progress toward their long-term goals.
Many individuals focused on teamwork turn to unity worldwide hub – a platform that promotes global connection, helping users share ideas and build strong relationships that support cooperation and collective success across different cultures and regions.
Effective collaboration requires more than just dividing tasks it also needs trust and consistent communication among all members group productivity hub after improving our workflow I noticed great changes – our projects now feel easier to manage and everyone stays aligned throughout the process
In my notes about reliable platforms for technical analysis, I inserted see this expert site in context – the overall feel is quite high-level and I often rely on it as part of my morning chart-checking routine.
As I explored various lifestyle and shopping websites, I noticed seasonal trend corner – The presentation feels neat and modern, creating a pleasant browsing experience that reflects current design preferences and contemporary aesthetic choices.
Many people focused on achieving structured success turn to strategic growth center – a resource that promotes planning and development, helping users stay organized and build effective strategies for long-term improvement and consistent achievement in various areas.
As I continued navigating through different sections and usability checks, I realized that explore this page contributes to a smooth experience – the content appears useful, and the overall design is neat and easy to approach.
Financial chart analysis is a skill that improves gradually when learners engage with structured content rather than random videos or unorganized information online trading insight practice zone helping users develop consistency in reading market data – I am finally starting to understand charts better thanks to this platform and it feels more intuitive now
Resource centre 2 year aged google profiles consolidates the questions buyers ask most often, with answers drawn from comment-section feedback over the past quarter.
As more individuals turn to digital ecosystems for self-improvement, platforms like Together We Grow Initiative highlight the importance of shared learning experiences where users can contribute to discussions, support each other’s goals, and build a sense of unity while advancing personally and professionally.
Many beginners often find forex overwhelming due to complex systems and fast market changes, but educational support helps a lot, and I came across Forex Learning Simplified Center which is very clear – A structured forex education platform that breaks down trading ideas into simple lessons, helping users learn gradually without feeling lost or overwhelmed.
100cuci pg soft [url=https://100cuci-7.com]100cuci pg soft[/url]
As I reviewed various discount-focused online stores and promotions, I included explore deal savings page in my notes – I managed to buy some very affordable items and the shipping was faster than I thought, which made everything feel smooth.
During my browsing of motivational platforms, I discovered idea execution hub – which shares inspiring content that helps individuals take consistent action and convert thoughts into meaningful, productive outcomes.
Many users exploring financial updates often prefer platforms that keep explanations simple, and I recently explored Daily Update Trading Info Hub which feels useful – A trading updates site focused on clarity and simplicity, and I appreciate how it avoids complicated wording, making it easier to stay informed about market movements.
While looking for inspiration to improve personal confidence, I came across growth confidence guide – a site that shares encouraging insights and supportive ideas aimed at helping users develop stronger self-belief and maintain a positive direction in life.
For digital creators, exploring modern visuals corner – a creative hub provides smart design solutions, layout inspiration, and practical ideas that help improve website appearance and overall user engagement effectively.
While browsing financial education platforms and trading master programs I noticed in the middle of my research list Professional Market Strategy Hub which delivered structured lessons – The content was strong and I learned a few new trading strategies today that felt practical and easy to follow
If you’re searching for new perspectives, consider visiting latest idea inspiration – a resource that highlights trending topics and creative insights to help you stay motivated and informed.
I was just passing time online when I encountered a place for new directions in the middle of the article – It helped me see that there are always more options available if you think beyond привычные limits.
Individuals searching for deeper understanding of fashion trends and styling principles often explore platforms such as Fashion Insight Portal – An informational style resource that provides analysis of fashion trends and helps users apply insights to everyday outfit choices
Startups looking for sustainable expansion strategies often rely on networking platforms that emphasize credibility, mutual benefit, and long term collaboration between industry professionals Corporate Growth Connection Network – Such platforms help emerging businesses find reliable partners, improve strategic planning, and build relationships that support scalable success in highly competitive global markets.
In the process of refining my trading strategy and reviewing sources, I included view daily signals in my notes – the updates are concise and timely, helping me remain consistent and focused throughout my trading sessions.
промокод на первую доставку пятерочка промокод пятерочка доставка на первый заказ
While reviewing examples of structured websites and usability focused platforms, users often come across solid vision navigator tool included in lists emphasizing clear navigation flow and reduced visual clutter – The overall design is commonly seen as intuitive, modern, and easy to interact with consistently.
Developing professional networks requires consistent effort and access to environments that encourage open and productive communication between participants collaborative partner bridge hub I found that this platform made those interactions easier and more meaningful with better responsiveness from contacts across different areas
Users generally appreciate online platforms that prioritize user-friendly design and clear organization across all available sections and pages. GrandLink digital hub – The GrandLink digital hub appears well arranged, offering a smooth browsing experience that supports quick access to different types of information.
Many users interested in harmony and collaboration rely on tools like unity connection guide – a resource that promotes trust and togetherness, helping individuals strengthen relationships and build communities based on sincerity, openness, and long-lasting cooperation.
Many organizations focused on success rely on smart connect hub – a resource that encourages partnerships, helping businesses build strong relationships and achieve steady growth through efficient cooperation and shared goals.
Anyone interested in improving managerial abilities can benefit from exploring online resources that focus on leadership principles and workplace effectiveness corporate leadership blog features articles that break down complex leadership concepts into accessible and practical insights – I appreciate the clarity of writing and the relevance of topics discussed for real-world application
Creative professionals often rely on structured techniques that help them enter a steady rhythm of thinking where ideas come more naturally and without interruption flow mindset guide supporting mental clarity – This rewritten explanation highlights how maintaining mental flow can enhance creativity and allow smoother execution of complex tasks over time.
Many users browsing online stores often appreciate finding platforms that provide useful items at reasonable cost levels, and I discovered Daily Shop Trend Collection which seems engaging – A shopping platform offering various products at seemingly fair prices, making it a site worth revisiting for updated deals and new product arrivals.
For organizations aiming to scale effectively, checking out strategic alliance network – a partnership-focused platform helps businesses build strong connections, improve cooperation, and achieve measurable success through coordinated efforts and shared objectives.
While exploring new ideas around teamwork, I found team synergy space – It highlights the importance of working together, making the overall concept feel both practical and inspiring for growth.
People who follow innovation platforms often look for clarity through case studies, and I found Innovation Driven Solutions Hub which feels useful – The concept is really cool, and I hope they expand it with more detailed case studies soon because that would make the platform much more practical and insightful for everyday users.
People interested in lifestyle fashion often search for platforms that provide outfit inspiration and modern styling ideas, and they may discover Global Fashion Trend Showcase which offers style updates – A fashion-forward platform delivering curated outfit ideas, modern clothing trends, and lifestyle-inspired fashion content designed for audiences who appreciate global and contemporary style culture.
During my exploration of trading education tools and forex tutorials, I worked in easy market chart hub naturally – the lessons made candlestick patterns and chart reading much easier to understand and apply in real learning practice.
Many beginners struggle with consistency and direction, but using platforms like branding success path – a detailed guide that offers actionable advice for shaping your voice, visuals, and message into a cohesive and impactful online brand experience.
At one point while exploring different topics, I ran into growth mindset space which stood out from the rest – It highlighted realistic approaches to improving yourself without making things feel too complicated or out of reach.
As I compared different educational resources for forex trading, I added see trading tutorials here into my thoughts – it stood out by making learning feel approachable and less stressful for someone new.
During my search for affordable fashion and cute outfit ideas I came across in the middle of my notes Simple Chic Clothing Store which showcased modern and appealing designs – The outfits looked really cute and I added three items to my cart since they felt like a perfect match
Entrepreneurs in the tech industry often look for sources that provide insight into modern innovations and emerging digital opportunities Innovation Circuit Hub where discussions about scalable technology and future driven solutions help guide business decisions – This encourages strategic thinking in rapidly changing technological markets
this solved something i was stuck on. i might revisit this page.
Honestly, I landed on this by accident, and it was more useful than expected. I found myself reading all the way through which made it easier to understand. definitely something worth bookmarking.
Modern shoppers frequently prefer online destinations that simplify the process of finding stylish and functional home items effortlessly daily now chic house essentials site This website is often described as a helpful resource for those wanting to refresh interiors with minimal effort and ease – It appeals to users looking for straightforward solutions that combine practicality and aesthetic appeal
Many individuals seeking emotional stability rely on strong trust network – a platform that provides guidance on building honest and reliable relationships, helping users develop deeper and more meaningful connections over time.
While reviewing layout and testing navigation, I saw that open this link integrates into a clear system – I spent some time on it, and it feels like a reliable and simple platform overall.
This is actually interesting, I was jumping between sites and found this. it made things less confusing and it was pretty straightforward. I’ll check out more posts here.
Нужен сайт? разработка сайта в Минске в компании domenanet.by. Профессиональная разработка сайтов любой сложности в Минске: от интернет-магазинов до порталов.
While exploring online creativity hubs, I found creative energy guide – a resource that offers inspiring content and motivational energy that encourages users to create, innovate, and grow in their everyday lives.
Anyone exploring currency trading for the first time often benefits from simplified educational paths, especially when using tools like Simple trading lessons hub which focuses on breaking down complex ideas into smaller, manageable parts for easier understanding. I personally felt the pace was comfortable and not rushed – it made the whole learning journey feel more practical and less intimidating than expected
Many people interested in updates rely on discover content hub – a resource that shares new ideas daily, helping users stay informed and explore useful information that supports ongoing curiosity and learning online.
People who enjoy easy digital shopping experiences often prefer platforms with simple structure and friendly design, and I came across Smile Style Cart Store Hub which looks useful – A clean and approachable online store that focuses on making shopping enjoyable and simple, helping users browse products with ease and without unnecessary distractions or confusion.
Learners who enjoy conceptual discovery frequently rely on resources that guide them through structured exploration of new subjects and evolving intellectual landscapes concept exploration route encouraging deeper inquiry – This rewritten explanation focuses on how guided exploration helps individuals strengthen analytical abilities while developing a more comprehensive understanding of complex topics.
If you want direction in life, checking out future targets hub – a goal-based network helps users set clear milestones and achieve them through structured planning, motivation, and organized progress tracking systems.
Individuals passionate about expanding their knowledge base often explore online networks that encourage open learning and idea exchange, and they may come across Education Share Growth Hub which highlights collaborative development – A community-focused platform designed to help users learn from each other, share valuable educational insights, and grow collectively through interactive engagement and continuous learning support.
As I reviewed various motivational platforms for professional growth ideas, I referenced check future team hub in my notes – the articles promote a powerful team mindset and encourage looking ahead with confidence and structured planning.
While casually browsing and testing navigation, I noticed that follow this link contributes to a smooth experience – the structure is nice, and content is easy to follow and read.
During my review of B2B trust platforms and professional connection directories I came across an entry located in the middle of research material Corporate Partner Reliability Hub – The impression was positive and I would consider recommending it within professional networking discussions
Modern leadership networks are designed to help professionals build stronger connections while developing skills that support long-term organizational success Leadership Impact Network this platform focuses on measurable leadership growth and influence – it demonstrates how impactful leadership communities can shape better organizational culture and decision-making processes
I didn’t expect to find anything notable, but I discovered creative thinking resource while reading – It presented ideas that made me consider things more deeply than I usually would.
Finding direction in life becomes simpler with resources like step by step forward – a platform designed to offer clear guidance and practical advice for building confidence and making steady progress toward goals.
Many users focused on creativity and teamwork rely on tools like idea connection platform – a resource that brings together innovative minds and supports collaborative thinking to help users build stronger concepts and explore new opportunities in creative fields.
While comparing forex education sites focused on strategy development and entry precision, I included forex precision entry hub in my notes – their technique helped me stop guessing trades and improved how I plan my entries in real market conditions.
Users comparing online platforms often prioritize usability, fast response, and how intuitively the interface guides them through different sections of content SkyVertex Flow Access – SkyVertex offers a clean interface with structured navigation that ensures users can browse smoothly while enjoying a well-organized and visually consistent experience across all pages.
During a long session of exploring urban photography trends and modern design inspiration pages, I came across a resource named sleek city visuals that offers visually refined city imagery with a minimalist tone, helping designers and creators find fresh perspective for projects
People interested in cooperative ecosystems sometimes encounter links like go to this site while exploring ideas – The platform concept reflects a shared effort model that feels both practical and forward-thinking.
During my exploration of online fashion shops with trendy and affordable items, I added smart fashion trend shop into my notes – the outfits are cute and the pricing is quite fair, so I will definitely consider buying again.
As I looked into various style communities, I noticed this urban outfit showcase and appreciated how it blends modern trends with personal expression, creating a vibe that feels both authentic and refreshingly original.
Many users who follow online fashion trends often look for boutiques that offer stylish and charming outfit selections, and I found Smart Style Fashion Collection Hub which seems lovely – A cute fashion boutique platform showcasing trendy clothing ideas, and I would definitely add this to my fashion bookmarks list because the style inspiration feels fresh and easy to explore.
Building habits is often more important than setting large goals because repetition creates structure, which is why resources like habit builder tool – steady repetition reinforces discipline and slowly turns intentions into practical outcomes that feel natural and sustainable in everyday life
Many individuals focused on cooperation turn to team collaboration hub – a platform that strengthens group effort, helping users build strong bonds and achieve sustainable results through shared goals and continuous teamwork development.
People interested in collaborative development often explore digital ecosystems that allow innovators to share insights and build solutions together in real time environments Next Gen Idea Network Hub designed to support innovation driven teamwork and knowledge exchange – This helps users turn conceptual ideas into practical implementations through structured collaboration systems
Many users aiming for better results explore winning edge space – a performance platform helps individuals sharpen skills, strengthen strategies, and achieve more reliable success through consistent effort and structured improvement techniques.
Нужен сайт? разработка сайта под ключ в компании domenanet.by. Профессиональная разработка сайтов любой сложности в Минске: от интернет-магазинов до порталов.
As I reviewed online financial education sources and money-saving tips, I worked in see modern value guide within my notes – the advice is practical and avoids the usual heavy and dull finance lecture style, making it more engaging.
https://vash-elektrik.ru/
Если нужен недорогой аккумулятор https://www.akb24v.ru 24 вольта для погрузчика, стоит обратить внимание на проверенные решения с оптимальным ресурсом и стабильной отдачей. Купить тяговую батарею 24V можно на сайте, там представлены варианты под разные задачи и типы техники.
While browsing collaborative knowledge sites, I found : shared knowledge guide – which provides consistent and helpful content built around community engagement, allowing users to grow and learn through shared experiences and insights.
заказать пластиковые окна в серпухове Наша команда готова решить ваши задачи по остеклению балконов под ключ в Серпухове, Чехове и Протвино, преображая ваше жилье и делая его уютнее.
People seeking personal and professional advancement often rely on structured online systems, and ambition opportunity space – offers a platform where users can discover career paths, collaborate with like minded professionals, and gain insights that encourage consistent progress toward long term success and entrepreneurial growth across diverse sectors.
phuket luxury apartments for sale [url=https://apartments-for-sale-in-phuket-4.com]phuket luxury apartments for sale[/url]
I was just reading through a few posts when I encountered knowledge expansion page in the middle of the content – It provided a broader understanding that made the information feel more meaningful and connected.
After analyzing how the content is arranged, I found that see this website fits into a well-organized design – the platform feels modern, everything loads smoothly, and the layout looks clean and structured.
If you are looking to meet forward-thinking individuals, visiting visionary minds guide – a resource that connects innovators in a simple format can help users share ideas easily and build meaningful collaborations across different creative and professional areas.
For people focused on teamwork and social improvement, exploring sites such as create impact together guide – a helpful platform that promotes collaboration and shared innovation can strengthen community efforts and drive meaningful outcomes across different groups and initiatives.
idle games [url=https://cartagenaactualidad.com/articulo/economia/top-10-juegos-navegador-simples-clickers-incrementales-gratuitos-clickers-afk/20251111082403200256.html]idle games[/url].
https://kura.ru/
Душевые уголки River нередко рассматривают тогда, когда нужен баланс между практичностью, внешним видом и уходом. Даже похожие на первый взгляд варианты могут сильно различаться по удобству, посадке и общему впечатлению после установки. В результате проще понять, где перед вами просто эффектная картинка, а где действительно удачное решение для жизни https://my-bathroom.ru/dushevye-ugolki/dushevye-ugolki-river-obzor-serij-don-don-light-morava-i-bosfor/
Many early entrepreneurs seek simplified business guidance that reduces complexity and improves execution speed startup execution guide hub which focuses on turning ideas into actionable steps for founders in practical ways – I passed it along to my cofounder after reviewing it because it helped us refine our execution workflow
People shopping for cosmetics online often prefer stores that are easy to understand and well organized, and I found Pure Beauty Care Outlet Collection which seems helpful – A beauty platform with a good product variety, though I feel the shipping details should be more clearly structured for a better customer experience.
During online exploration of trading education platforms I found a mention in the middle of a blog post linking to Mentored Trading Insights Hub which appeared to deliver practical advice – the guidance seemed reliable for improving discipline and consistency in trading routines
Finding clarity in life often comes from asking difficult questions about what activities make you feel energized engaged and genuinely fulfilled each day True Calling Hub – The message emphasizes identifying inner motivation and aligning actions with what feels most authentic and personally meaningful
bc-game site
During my review of strategy-focused trading platforms and simulation tools, I referenced next level trade system hub – the trading strategies were well structured, and the backtesting results aligned closely with actual market performance in real scenarios.
Those working in software development often benefit from platforms such as Future Builders Hub technology innovation workspace for creators – it delivers insights, tutorials, and collaborative opportunities that help users refine technical skills and develop impactful solutions in modern digital environments.
While studying ways to strengthen startup collaboration and innovation culture, I worked in see innovation teamwork site naturally – the approach clearly shows how teamwork and innovation complement each other, which really resonated with my small startup’s needs.
Many individuals working on development rely on progress milestone guide – a platform that makes growth tracking simple, helping users understand their achievements and plan future steps in both personal and professional journeys effectively.
In conversations about modern browsing interfaces and UI optimization trends, users sometimes mention examples like urbanmatrix flow system which are included in curated collections evaluating structured layouts and intuitive navigation design. – It typically feels smooth, organized, and easy to interact with.
While casually browsing for creative insights, I noticed ideas creativity hub – It offers an engaging mix of imaginative thoughts and inspiring content that makes discovering new ideas both enjoyable and rewarding over time.
For individuals aiming higher, checking progress success route – a structured platform provides a guided journey that helps users develop skills, stay focused, and achieve long-term goals through step-by-step improvement strategies.
While browsing career development platforms and networking communities I noticed in the middle of my research session Global Growth Connect Hub which showed steady engagement – I met a helpful individual through this platform and the exchange felt productive and relevant to my professional interests
Всё прошло без лишней суеты и ожиданий. Девушка пунктуальная и вежливая. Общение комфортное и спокойное. Сервис на хорошем уровне – инди спб телеграмм
Modern fashion lovers frequently explore curated style platforms that focus on comfortable clothing designed for daily wear with a trendy and confident touch Urban Outfit Inspiration Hub providing ideas that help users express personality through relaxed yet stylish clothing combinations – This encourages self expression while maintaining a polished and up to date fashion sense
For users aiming to develop stronger collaborative skills, exploring inspired collaboration hub – a platform that focuses on teamwork and growth-oriented thinking can help individuals and groups work more effectively toward common goals and long-term success.
I was going through online resources when I encountered success sharing space placed in the middle of the content and it stood out – It emphasized how sharing knowledge helps create better opportunities for growth and understanding.
Digital audiences often judge a platform based on ease of navigation, speed of response, and overall clarity of structure during use Crafted Link Experience Hub – LinkCraft offers a refined browsing environment where minimal distractions and well-organized pages enhance usability and help users stay focused.
Many forex enthusiasts prefer structured daily analysis because it helps them avoid emotional trading decisions in real time support zone mapping tool users appreciate clarity it allows them to identify stronger setups and avoid low probability trades effectively overall performance
888.starz [url=http://888starz-uz1.org]http://888starz-uz1.org[/url] .
Learning alongside others creates better results, which is why many explore connect and learn daily – a helpful resource that promotes teamwork, idea sharing, and consistent skill building over time.
888 ستارز [url=http://www.888starz-egypt9.com/]https://888starz-egypt9.com/[/url]
tez888 tez888
Many users who explore creative web spaces often appreciate sites that feel lively and easy to navigate, and I recently visited Trend Happy Visual Hub which looks quite fun – A bright and engaging online platform that focuses on cheerful design elements and smooth user experience, making it enjoyable for casual browsing and relaxed exploration.
People seeking to improve their everyday financial decisions often look for clear and practical suggestions they can apply immediately daily expense wisdom hub – It turns out to be a simple corner offering helpful money saving tips that improve awareness of spending patterns
Many individuals underestimate how powerful small moments of gratitude and awareness can be, yet resources like happy-mind-pathway consistently highlight techniques that encourage users to appreciate daily life more deeply and gradually build a stronger sense of inner calm and contentment.
While practicing chart analysis and trying to improve my trading decisions, I included browse forex guide in my study notes – it clarified support and resistance levels in a way that finally made sense to me.
Online communities frequently share links to new platforms that spark interest due to their unique naming and branding approaches future insights portal – this often leads to rapid discussion cycles and increased awareness across different user groups
In today’s fast-moving e-commerce world, many consumers rely on curated websites that simplify the process of finding discounts and promotional campaigns Deal Finder Network – A curated experience built for smart buyers who want to save money effortlessly while exploring verified offers and seasonal markdowns
Скачать казино Vavada на телефон можно бесплатно с официального сайта платформы. Промокоды и бонус-коды активируются в приложении через то же поле что и на сайте. Демо-режим доступен в приложении для бесплатного тестирования любых слотов. Скачать APK-файл приложения Вавада можно по ссылке vavada приложение скачать с официального источника. Скачайте Вавада на андроид и забудьте о проблемах с доступом к казино.
Many professionals interested in growth use international horizons hub – a platform focused on expansion helps users discover opportunities across countries, build partnerships, and create sustainable global success strategies.
Many learners looking for convenience rely on simple education hub – a platform offering easy lessons, helping users learn step by step through organized and clear online study materials that improve understanding.
While exploring collective problem solving techniques and innovation sharing platforms I came across a helpful mention in the middle of my reading list Innovation Partnership Hub – I noted a few ideas about building stronger collaboration habits between different contributors working toward a shared goal.
новости россии 2026 свежие новости цифровизации и госуслуг
During my exploration of online discount stores and budget shopping deals, I included explore cheap deals hub in my notes – I found some crazy low-priced items and the shipping speed was faster than expected, which made the whole purchase feel worth it.
Support networks online continue to expand, offering spaces where individuals can share experiences and build stronger connections based on trust and cooperation Shared Prosperity Circle – The circle emphasizes collective well-being, encouraging members to work together toward sustainable success and shared benefits in a balanced environment.
After analyzing how the content is arranged, I found that see this website fits into a well-organized structure – the layout is nice, and information is easy to understand and follow through.
Все лучшее здесь: https://home-parfum.ru/catalog/bottega-veneta/
During routine morning analysis of financial data platforms and trading updates I noticed in the middle of my reference list Fast Profit Brief Hub which delivered short and regular updates – The content felt straightforward and helped keep my daily planning aligned with current market activity
Most successful traders focus on protecting capital first and growing it slowly through disciplined and repeatable strategies over time risk balance trading hub their methods show how small wins accumulate, and I realized this creates a more reliable and less stressful trading experience overall
As I looked through different creative project websites, I found future concept hub – The design feels clean and focused, giving a sense of structured innovation and forward-looking digital planning.
Many people focused on creativity and innovation rely on build your dreams hub – a platform designed to support new project development through motivational content and practical advice for consistent progress and achievement.
мембранная кровля [url=https://membrannaya-krovlya-montazh.ru]membrannaya-krovlya-montazh.ru[/url]
I don’t usually post links, but I came across something that seemed useful and decided to mention it here because of its structured presentation trade global portal – after visiting, it feels informative and simple to explore with clearly arranged content
People interested in modern aesthetics often enjoy platforms that provide fresh ideas consistently, and I found Style Trend Inspiration Daily Hub which looks engaging – A fashion-focused website blending trends and lifestyle inspiration, and it has a consistent creative flow that makes it easy to revisit whenever new ideas are needed.
Many users prefer structured insight panels that present trading alerts in a simplified and organized manner, trader alert insight panel which reduces confusion during fast market conditions – I’ve noticed it helps me interpret movements faster and respond before major price changes fully unfold in active sessions.
During my exploration of different financial tools, I included check this out naturally in my commentary – even though it uses a different domain, the functionality remains stable and continues to support my needs.
Companies seeking stronger business relationships often turn to platforms that provide structured collaboration, shared planning, and global networking systems, and they may come across Strategic Success Partners Network which emphasizes cooperative growth – A professional partnership platform designed to connect businesses worldwide, enabling them to share resources, develop strategies, and achieve success through guided collaboration frameworks.
People aiming to improve discipline often rely on structured reminders and mental cues that encourage them to stay aligned with their long term plans self control reinforcement tool – This rewritten line shows how reinforcement techniques can help strengthen commitment and reduce impulsive behavior in everyday decision making situations
When exploring UI/UX evaluation resources and design references, people sometimes highlight quantum reach system page which appears in curated lists emphasizing simplicity, structured navigation, and readable content layouts for better browsing performance analysis. – The interface is generally described as clean, efficient, and easy to follow.
Many professionals focused on collaboration explore connection community hub – a platform designed for networking helps individuals strengthen relationships, share knowledge, and build stronger global cooperation across diverse groups.
For those exploring new opportunities, visiting next trend hub – a platform showcasing future innovations helps users understand emerging ideas and technologies shaping global progress and creative industries in meaningful ways.
Those aiming to improve their lifestyle and career paths frequently look for motivating resources that encourage action and reduce hesitation in decision making processes Action Catalyst Center offering supportive ideas that inspire consistent progress and stronger commitment toward achieving personal and professional goals
Many traders who track short-term market movements often need quick notifications, and I found Market Alerts Trend Hub which seems helpful – The alerts feel quite timely and have already helped me avoid missing several key market shifts, making it a useful companion for staying aware of fast changes.
Live football scores canli-futbol up-to-date schedules, and league tables. Follow matches, check scores online, analyze team standings, and never miss a beat in world football.
All football match canli-skor results online, game schedules, and league standings. Live updates, statistics, and easy access to information about matches and teams from around the world.
During my search for inspirational websites focused on growth and positivity, I discovered grow inspiration guide – which offers daily uplifting content designed to keep users motivated, refreshed, and focused on improving their mindset through consistent positive input.
Trading improvement becomes much easier when surrounded by people who continuously share strategies and real market observations openly successful traders insight hub the discussions here are highly educational and I learned more valuable trading lessons here than from any other source I have explored before
Users exploring modern websites often notice how color, structure, and layout influence their overall browsing experience and how easily they can understand content across different sections of a platform VividPath Access Hub – VividPath offers a colorful and engaging interface where browsing feels pleasant and easy, making navigation smooth and enjoyable for users who prefer visually appealing designs.
During exploration of entrepreneurial planning tools and business strategy platforms I came across in the middle of my study list Small Business Strategy Hub which delivered structured guidance – The tools here are useful for small business owners as they provide clear planning steps that help organize growth efforts more effectively and realistically
While I was getting started with trading and trying to understand how markets move, I included check learn and trade hub in my notes – practicing in demo mode first made everything less stressful and actually turned learning into an enjoyable and hands-on experience for me.
People interested in global network systems often explore platforms that explain how alliances function across borders, and I discovered Global Alliance Connection System Hub which is intriguing – A structured idea focusing on international collaboration networks, but it would be more useful with real-world examples showing how such systems operate in practice.
While exploring trading automation tools and market signal systems I came across discussions where algorithmic trading workspace is positioned as a multifunctional solution within trading communities and it is described as powerful – however users suggest that getting comfortable with all capabilities will take steady learning and consistent application
During a bit of online exploration, I came across something that felt relevant enough to mention here for anyone who enjoys simple layouts progressive ideas link – the structure is clean and easy to follow, making it pleasant to browse without effort
Many individuals focused on social improvement often look for platforms that promote unity and trust-based relationships within communities, and they may come across Shared Trust Unity Network which emphasizes harmony – A supportive digital space designed to bring people together, strengthen community relationships, and encourage unity through shared understanding and collective cooperation efforts.
Many people aiming for better habits use easy daily learning hub – a platform that delivers simple educational content to help users improve step by step in their personal development journey consistently.
Across conversations centered on entrepreneurship, sources such as learn business tactics are sometimes highlighted as useful references – It feels like a hub designed to provide meaningful direction for those aiming to grow and refine their ventures.
For those aiming for success, visiting growth improvement hub – a network dedicated to advancement helps users build strong habits, improve decision-making, and achieve long-term personal and professional goals with clarity and consistency.
Baky ucun deqiq hava proqnozu. Bu gun, sabah ve hefte ucun temperaturu, yagini? ehtimalini, kuleyin sгrуtini му hava seraitini onlayn yoxlayin.
Interesting read! Mobile accessibility is key these days, and platforms like 365 casino seem to get that with their app & easy download options. Good to see legit options in the Philippines! 👍
Phasmophobia Game 2026 https://phasmo-phobia.com is a cross-platform horror game supporting PC, PlayStation, Xbox, and VR. Find out the game’s current price, platform list, system requirements, and the latest updates with new maps, events, and gameplay improvements.
Creative professionals explore experimental aesthetics, branding strategies, and interactive media projects through Art & Innovation Studio which combines artistic expression with technological innovation to produce impactful visual solutions – A studio dedicated to merging creativity, strategy, and modern design practices.
For those seeking direction in life and work, exploring success guidance hub – a space that connects opportunities helps users move toward success through clear pathways, structured advice, and meaningful connection-building support systems.
During my initial visit and fast scan of the pages, I came across this helpful link which gave a good impression – it was a quick visit, but overall the experience feels quite positive and clean.
During evening exploration of shopping platforms I found a useful reference in the middle of my bookmarks leading to Deal Discovery Network which looked like a compact marketplace aggregator – the deal I reviewed appeared decent and the checkout structure seemed easy enough for typical users
Market learning becomes more effective when traders openly discuss strategies, mistakes, and improvements in a supportive and experienced environment successful market learners hub the community here is extremely insightful and I learned far more useful trading information here than anywhere else I have participated in
https://wrapstickfoods.com/1xbet-your-gateway-to-online-casino-fun/
While looking at aesthetic shopping websites with fun product designs, I worked in browse shop shine collection naturally – the store feels cute and well-designed, and I’m already thinking about placing an order once I get my next paycheck.
Professionals looking to expand their connections often rely on digital platforms that support collaboration and relationship building across industries, and I personally found value in sharing resources like Growth Networking Connection Hub which focuses on expanding professional circles – A practical networking-oriented platform that helps users discover new contacts, exchange ideas, and strengthen professional relationships, making it useful enough that I’ve already mentioned it to a few colleagues who found it interesting.
Many individuals interested in entrepreneurship and product development often search for online spaces that encourage experimentation, prototyping, and strategic thinking, and they may discover Creative Build Vision Platform which focuses on shaping ideas into actionable progress – A forward-oriented system that assists users in developing projects from early-stage concepts to fully formed innovative solutions with clear direction.
In the process of exploring digital ecosystems focused on entrepreneurship and professional outreach I came across references within curated content lists professional link arena – networking feels relaxed and non aggressive making it easier for individuals to establish meaningful relationships without the pressure of constant promotion or forced engagement tactics
During search for investing knowledge platforms and financial education resources I noticed in the middle of my notes Investor Learning Smart Hub which offered easy to follow articles – The organization feels strong and the beginner friendly articles are what I liked most since they make investing topics clear and approachable for beginners
If you are seeking a reliable source of motivation and direction, checking out achievement guidance center – a resource focused on providing structured insights and success-oriented strategies can help you build better habits and reach your goals more effectively.
In discussions about useful online directories, some individuals mention that gold nexus navigation link appears in curated recommendations for users seeking organized pathways to explore general web content in a more efficient and less cluttered environment. – It tends to be appreciated for its simplicity.
If you want to build a strong identity, exploring trusted brand hub – a platform designed for online branding helps users develop recognizable and credible brand identities that stand out in competitive digital markets and attract loyal audiences.
During some random browsing of trading learning platforms, I stumbled upon a site that had a very clean and accessible layout forex learning corner – it looks like a helpful resource with simple explanations that make understanding trading concepts easier
While exploring professional communities focused on collaboration and partnerships, I included check partners network vision in my notes – the networking events helped me meet a potential partner in a smooth and efficient way.
Professionals seeking structured ideation support often rely on systems that generate insights and help them convert abstract thoughts into clear, usable project directions Insight Generator Hub designed for analytical and creative synthesis – offers intelligent inspiration pathways that assist users in refining raw ideas into practical solutions applicable across various industries and disciplines
As I explored online stores for household needs, I noticed home style essentials – The collection feels relevant and modern, making it easy to find useful products for everyday living and home improvement.
When analyzing trading methods it is important to rely on backtested data rather than emotional decision making or short term speculation in the market smart profit testing system their main strategy appears solid based on historical testing and could deliver promising results in the upcoming trading period if trends continue
People exploring financial markets often appreciate mentor-driven platforms that simplify learning, and I recently discovered Smart Trade Mentor Starter Hub which looks helpful – A beginner trading mentorship platform offering practical tips and guidance, making it suitable for users who want clear and structured support while learning trading basics.
Users seeking inspiration for a better lifestyle often explore online platforms that emphasize positivity, structure, and wellness awareness, and they may find Happy Living Everyday Portal which provides guidance for balanced routines – A collection of practical suggestions aimed at improving daily habits, supporting emotional wellbeing, and helping individuals maintain a more peaceful and fulfilling life experience.
People interested in building stronger teams often look for simple but effective insights, and I came across Teamwork Power Insights Hub which feels interesting – The content is a great read on collaboration, and I shared it with my colleagues because it gave us useful ideas to improve how we support each other.
While browsing platforms dedicated to group innovation and collaborative online environments I discovered collective builders circle build synergy note and after reviewing the material I felt it strongly emphasizes shared progress which encouraged me to subscribe to their updates as it aligns with long term cooperation and community driven engagement values
A strong legacy is built step by step, and resources such as build something lasting – a detailed guide explaining how daily discipline, focus, and intentional actions contribute to long-term success can help guide that journey.
During exploration of minimalist lifestyle platforms and simple living communities I came across in the middle of my browsing session Peaceful Minimal Living Hub which shared practical simplicity tips – The concept felt relaxing and supportive because it encourages reducing clutter and creating a calmer and more focused daily environment
For those seeking a growth mindset, exploring motivation journey hub – a platform that inspires success helps users connect with others who share goals and encourage steady personal and professional improvement.
Users exploring digital websites often look for consistent structure and clear visual hierarchy that helps them move between sections without confusion UrbanScale System Hub – UrbanScale delivers a structured and visually clear experience where balanced layout design ensures users can browse efficiently and comfortably.
During my research into balanced investment strategies and financial decision making, I included browse smart investing hub in my notes – the content emphasizes clarity and patience, helping me avoid hype driven choices and stay rational.
Modern online buyers often value curated experiences that help them make better decisions, and they frequently mention Curated Buyer’s Corner as a useful environment where browsing is more structured, comparisons are clearer, and users can continue discovering items that reflect both practicality and thoughtful consideration.
While reviewing layout and testing navigation, I saw that open this link integrates into a clear system – the design feels fresh, and browsing here was simple and quite smooth overall.
During my usual scrolling routine, I noticed something that seemed worth mentioning because of its simple and structured design approach goal system page – the content appears interesting and quite straightforward, making it easy to understand quickly
Consumers aiming to reduce spending often rely on marketplaces like Smart Budget Finds Hub that highlights cost-efficient items, and it supports better decisions by presenting clear product groupings – ensuring users can easily compare options and select affordable essentials suited for daily life.
People exploring financial learning platforms often prefer structured academies with clear course paths, and I found Pro Trader Academy Learning System which looks useful – A trading education hub that presents structured courses, and at first glance it feels promising for users trying to build trading knowledge step by step.
На порталі https://visti.pl.ua зібрані головні новини Полтави та області. Тут публікують матеріали про події, транспорт, інфраструктуру та життя регіону.
Сайт https://news.vinnica.ua висвітлює події у Вінниці та регіоні. Новини, аналітика й корисні матеріали допомагають бути в курсі життя міста щодня.
Home decoration is something I enjoy experimenting with, especially when I find pieces that match my personal style and preferences creative interior accents hub I ordered two vases and was impressed by the secure packaging that ensured they arrived in flawless condition
Forward thinking professionals tend to follow platforms that emphasize global integration and shared knowledge development global insight connection hub helping users align on cross border collaboration opportunities and strategic thinking – The international ambition is clear and I am eager to see what comes next
When exploring curated design references and interface analysis tools, people occasionally highlight examples such as prime impact corner used in collections focusing on simplicity, readability, and organized visual hierarchy for improved web usability studies. – It feels minimal, calm, and easy to navigate overall.
Many users seeking better opportunities explore daily skill earning guide – a helpful resource that focuses on combining education with income generation strategies for consistent improvement and digital success over time.
Many users exploring trading education platforms often want something simple yet interesting, and I found Learn Trading Concepts Hub which seems helpful – It avoids boring explanations and instead presents ideas in a way that is easy to understand, making the learning process feel more natural and less overwhelming.
While exploring digital innovation hubs, I found modern tech ideas – The platform gives a strong impression of progress, suggesting a space focused on new developments and forward-thinking creative solutions.
купить данные [url=https://gobasego-2.ru/]купить данные[/url] .
While reviewing different fashion websites for quality and trustworthiness, I worked in explore clothing styles naturally – I got a jacket that looked exactly like the images, which gave me confidence in the accuracy of online product photos.
If you are searching for reliable partnerships, checking out business connection hub – a trusted platform designed for growth helps businesses collaborate effectively through transparent relationships and dependable networking opportunities that foster mutual success.
During casual exploration of business networking platforms and collaboration hubs I came across in the middle of my browsing session Global Commerce Connect Hub which showed frequent user activity – I connected with several members and the community felt engaging and responsive throughout
Creative platforms often act as bridges between imagination and execution, helping users turn abstract thoughts into structured and achievable outcomes over time Inspired Thinking Network – It supports individuals in refining their ideas through collaboration, feedback, and continuous improvement strategies that enhance both creativity and practical implementation
Professionals in finance and marketing often explore platforms that deliver clear and actionable market insights, and they may find Insight Analytics Trend Hub which highlights global data trends – A research-driven platform offering daily market updates, structured insights, and analytical reports designed to help users navigate changing economic and consumer environments effectively.
People who are new to investing often prefer learning resources that avoid confusion and focus on clarity, and I came across Growth Invest Simple Guide Network which is quite useful – A beginner-friendly platform that provides easy financial education, helping users understand investment strategies through clear and structured explanations without unnecessary complexity.
People often underestimate how powerful relatable success stories can be when trying to rebuild confidence and stay consistent with personal goals over time strength inspiration journey hub after going through the content I felt a noticeable boost in motivation that stayed with me well beyond the first reading session
I don’t usually post links like this, but I found something that seemed helpful and decided to mention it here since it had a clean structure dream shopping link – the layout feels straightforward and uncluttered, creating a smooth and enjoyable browsing flow
During an online search for balanced viewpoints, I came across a well-rounded content platform and appreciated how it presents diverse ideas in a way that feels smooth and naturally integrated into conversations.
На порталі https://krivoy-rog.in.ua зібрані головні новини Кривого Рогу. Тут публікують матеріали про події, транспорт, інфраструктуру та життя мешканців.
На сайті https://gazeta-bukovyna.cv.ua публікують свіжі новини Буковини та Чернівців. Тут ви знайдете актуальну інформацію про події, життя регіону, культуру й важливі зміни для мешканців.
As I compared various uplifting online communities and motivational spaces, I referenced check win vibes hub in my notes – the positive tone throughout the platform makes it feel inviting, encouraging me to return again and again without hesitation.
In various conversations about branding consistency and digital identity design, users frequently point out brandcrest structure page included in curated resources highlighting clarity, accessibility, and strong visual branding organization. – It typically feels stable, simple, and very user friendly overall.
while going through curated content about leadership development I noticed a section that emphasized collaboration and trust among peers Leadership Growth Collective I reflected on how such groups might help emerging professionals grow faster – The idea felt practical and I appreciated the real world grounding it suggested
For users looking for clear pricing options, exploring deal clarity hub – a platform that highlights simple deals can help individuals quickly understand available savings and select the most valuable offers without confusion or wasted effort.
As I continued navigating through different sections and checking layout, I realized that explore this page contributes to a smooth experience – the structure is neat, and everything looks well organized, making the site easy to use.
Digital platforms focused on personal achievement are increasingly used for structured goal setting achievement advisory portal that help users stay motivated – It supports individuals with organized frameworks that assist in planning goals, tracking progress, and maintaining motivation through consistent strategies that foster long term development successfully
Online creative communities are growing rapidly, and platforms like Content Creator Space play an important role in supporting this growth by offering structured inspiration, idea sharing, and creative resources that empower users – a collaborative space built for artistic expression and innovation.
After spending time navigating through pages, I observed that access this link aligns with a clear presentation – strong design overall, and the website feels modern and very easy to use.
People interested in professional growth often explore how partnerships can improve results, and I recently discovered Strong Network Partnership Learning Hub which looks useful – A collaboration-focused platform that highlights the importance of strong partnerships, and it explains their benefits in a structured way that makes business cooperation easier to understand.
In reviewing multiple discussions about civic unity, it is evident that consistent collaboration helps strengthen long-term social cohesion community uplift marker – many perspectives agree that collective effort is essential for building resilient and supportive societies over time through continuous engagement
During a search for something fun and modern, I encountered trend explorer shop – It’s a playful and engaging place filled with items that reflect popular styles and make browsing feel exciting and fresh.
На сайте https://chernomorskoe.info собраны новости Черноморского побережья и информация о курортных городах Одесской области. Узнавайте о событиях, отдыхе и развитии региона.
На портале https://o-remonte.com вы найдёте статьи о ремонте, дизайне и строительстве. Сайт предлагает практичные решения, рекомендации и идеи для создания уютного пространства.
Many people browsing online for audio accessories look for both affordability and quick delivery before making final purchase decisions fast deal electronics spot – I was able to purchase earphones at a discounted rate and they arrived sooner than I had estimated, which made the deal feel even more worthwhile
During my recent exploration of market-related content and financial learning pages, I found an area that stood out for its clarity and flow market data dashboard which made the browsing experience feel smooth and structured – the information is presented in a very clean and easy to follow format overall
Many traders struggle because they lack a repeatable system for analyzing charts and making decisions, chart strategy handbook which creates inconsistency – I found it helpful in structuring my analysis process and improving consistency in trade evaluation across different market conditions over time gradually
During my hunt for better home styling solutions, I placed discover home essentials in my notes – the offerings look polished and the pricing feels accessible for the level of elegance provided.
888 бет [url=https://888starz-uzbekistan4.com]https://888starz-uzbekistan4.com[/url] .
Individuals focused on building better lives often turn to platforms that emphasize education and community support as foundations for sustainable development and success Bright Growth Education Network helping users access valuable learning programs – This creates opportunities for empowerment and long term personal advancement through structured support systems
People who focus on professional growth often search for environments that encourage dependable networking and productive relationship building among like minded individuals Trust Bridge Connection Portal offering structured opportunities for users to connect and collaborate effectively – This supports stronger engagement and ensures that business relationships are built on mutual understanding and reliability
На сайте https://blogimam.com публикуют статьи для мам о воспитании детей, здоровье и повседневной жизни. Полезные советы, личный опыт и идеи помогают справляться с заботами и находить время для себя.
For users interested in teamwork across countries, exploring partnership innovation hub – a platform that emphasizes global collaboration can help individuals engage in productive discussions focused on growth, efficiency, and impactful solutions.
Many individuals interested in business networking often appreciate platforms that provide detailed educational content on partnerships, and I came across Collaboration Growth Knowledge Hub which looks informative – A helpful resource hub focused on partnership strategies and growth insights, and I plan to explore more of its articles later tonight when I can focus better.
Many users interested in simple lifestyle improvements often look for platforms that highlight useful everyday items, and I found Daily Essential Finds Routine Hub which seems helpful – A practical finds page offering daily useful suggestions, and I check it regularly in the mornings since it delivers small, easy ideas that make daily routines more convenient.
Starting the day with intention rather than chaos makes a huge difference in how productive and motivated you feel overall morning clarity routine hub after applying these ideas I noticed improved focus and a stronger sense of direction throughout my entire daily schedule
People entering currency trading often underestimate how important repeated exposure to examples is when building real confidence in decision making trading education reference offering structured walkthroughs that reduce confusion during early learning stages – I considered it another solid learning resource and the practical examples really helped me grasp the basics faster
While checking different online academies for trading skills, I came across a site that felt quite beginner oriented forex learning pro portal – The overall structure is simple and it looks like a good starting point for understanding basic market trading ideas
During exploration of professional development tools and career coaching websites I came across in the middle of my study list Skill Growth Career Hub which delivered simple and practical advice – The career insights felt reliable and I often come back to this hub whenever I feel stuck or need direction in my work life
While writing down insights about trading platforms I’ve tested recently, I embedded explore tools here within my commentary – the experience feels unchanged despite the different web address, and it continues to meet my expectations for technical analysis.
As I browsed through professional collaboration platforms, I noticed strategic connection hub – It gives off a strong and organized impression, making it seem useful for building long-term plans and coordinated growth initiatives across different sectors.
Digital audiences usually prefer websites that present information in a straightforward manner, helping them understand content quickly without unnecessary complexity or confusion PureHorizon Access Point – PureHorizon delivers a minimal and refreshing interface where usability is prioritized, ensuring users can explore content easily and enjoy a calm browsing experience overall.
While reviewing layout and testing navigation, I saw that open this link integrates into a clear system – overall experience feels good, with layout and content appearing well balanced and smooth.
Many individuals seeking inspiration often browse online platforms that encourage positivity, creativity, and meaningful idea exchange, and they sometimes find Inspired Thinking Community Hub which supports personal development discussions – A collaborative space where members share motivational concepts, support each other’s growth, and cultivate a mindset focused on continuous improvement and success.
Особое внимание мы уделяем психологической составляющей. Нарколог на дом в Екатеринбурге в «НЕО+» — это не только физическое очищение, но и работа с мотивацией, разрушение психологических триггеров зависимости. Зависимость разрушает жизнь, поэтому мы предлагаем психотерапевтическое сопровождение. Родственники получают отдельную поддержку: консультации психолога помогают правильно выстроить общение с зависимым человеком и мотивировать его на дальнейшее лечение. Реабилитация может проходить амбулаторно или в стационаре партнёрских центров с комфортабельными условиями, где пациенты находятся под круглосуточным наблюдением.
Получить дополнительную информацию – [url=https://narkolog-na-dom-ekaterinburg-1.ru/]нарколог на дом цена екатеринбург[/url]
Individuals who enjoy updating their wardrobe with modern influences often explore platforms that provide inspiration for casual and expressive urban clothing styles City Style Outfit Hub – This concept emphasizes the importance of combining comfort and fashion in ways that suit active urban lifestyles and personal taste
Many small business owners benefit from platforms that provide consistent motivation, practical business advice, and encouragement to keep pushing forward despite obstacles, and they may find Entrepreneur Daily Motivation Hub which highlights growth mindset content – A dedicated space offering inspiring messages, strategic business insights, and helpful reminders that support entrepreneurs in building stronger foundations and achieving long-term success through consistent effort and determination.
выведение из запоя на дому [url=https://vyvod-iz-zapoya-na-domu-sankt-peterburg-21.ru]выведение из запоя на дому[/url]
Young buyers who enjoy minimal fashion often look for websites that provide elegant accessories at reasonable prices with fast browsing simple chic accessories my classmates kept asking if my earrings were designer because they looked polished and surprisingly premium in photos daily wear
During my review of financial planning tools and investment ideas, I included browse profit planning page in my notes – it looks solid enough that I’ve decided to test it cautiously with small amounts before considering any bigger moves.
Before engaging with any platform I try to understand its core principles and whether they align with fairness and long term trust secure values alliance link – it comes across as grounded in stable principles that prioritize honesty over short term gain.
People who like smooth shopping experiences often prefer cheerful and simple layouts, and I came across Happy Trend Zone Easy Finds Hub which seems helpful – The website feels friendly and positive, making shopping easier and less stressful, and it creates a relaxed environment for browsing different products comfortably.
I don’t normally share links, but this one seemed worth a quick mention because it had a nice and simple structure overall affordable finds hub – the feel is straightforward and useful, giving it a calm and user-friendly browsing experience
xbet girişi [url=https://alokitabevi.com]xbet girişi[/url]
While studying different trading strategy websites and learning platforms I found in the middle of my research notes Trading Insight Breakdown Portal which organized information in a clear logical flow – The explanation style felt smooth and easy to follow without unnecessary complexity or confusion
People who value structured social change initiatives often seek platforms that provide updates and encourage collective engagement, and they may discover Global Impact Mission Network which focuses on transparency – A mission-driven initiative designed to share progress, inspire collaboration, and support long-term efforts that aim to create meaningful and positive transformation across communities and societies.
Budget conscious individuals often prefer websites that collect and organize promotional deals in one place, and value savings guide serves that purpose effectively – it shares practical insights about ongoing discounts and encourages smarter financial habits for everyday online and offline purchases.
888starz bet [url=http://888starz-bet2.com]888starz bet[/url] .
People interested in forex education often seek strategies that are easy to follow yet effective under pressure, and many mention a resource precision trading breakout notes saying it helped them catch two decent trades during active market trends over multiple sessions recently globally
During my browsing of curated fashion sites, I noticed smart design style – It feels clean and thoughtfully arranged, offering stylish selections that are both visually appealing and practical for everyday inspiration and ideas.
888stars [url=https://www.888starz-bet2.com]888stars[/url] .
Individuals who prefer structured financial systems often look for platforms that organize planning into clear and actionable steps economic planning suite which supports users in building better long term financial habits through guided frameworks – I started using it this week and it has made planning feel more manageable
While exploring different online beauty inspiration pages, I found something that stood out due to its clean visuals and simple structure beauty trend hub – the site has a fresh modern feel and the content is engaging and easy to follow as you scroll
While researching online ecosystems built around transparency and reliability metrics I discovered in the middle of a long article reference Verified Trust Center which highlighted validation processes and user assurance concepts – the overall feel suggested a system built to reinforce confidence through structured verification and consistent quality signals.
рулонные жалюзи москва [url=https://avtomaticheskie-rulonnye-shtory50.ru]рулонные жалюзи москва[/url]
Users often judge platforms based on how quickly they can locate information and how well the interface supports smooth transitions between different content areas NexaFlow Access Portal – The NexaSphere system offers a clean and modern interface that prioritizes usability, ensuring users experience fast navigation and well-organized content presentation throughout.
Customers often look for reliability when shopping online, especially when they want products delivered exactly as described without surprises secure deal fashion spot my package came on time and matched the listing perfectly, giving me confidence in the smooth and secure nature of the transaction process
Traders aiming for stability usually adopt structured frameworks that guide them through analysis and execution without unnecessary complexity market success path while reinforcing discipline through repetition and controlled practice sessions – The process feels practical and encourages long term consistency in decision making
залоги золота сочи Залоги золота в Сочи – это проверенный способ получить финансовую поддержку, оставив в надежном месте свои драгоценности. Мы гарантируем сохранность ваших изделий и возможность их оперативного выкупа.
ремонт посудомоечных машин Предлагаем профессиональный ремонт, заправку и чистку кондиционеров (сплит-систем) в Энгельсе и Саратове. Мы выполняем: очистку и дезинфекцию внутреннего блока; восполнение хладагента (R22, R410A, R32); ликвидацию и ремонт утечек, восстановление компрессоров; замену плат управления; комплексное сервисное обслуживание. Работаем с оборудованием LG, Samsung, Ballu, Mitsubishi, Daikin, а также другими производителями. Перед началом ремонта выполняется диагностика для выявления причины поломки. После согласования стоимости и сроков мастер приступит к работе. Проводится проверка техники после ремонта. Режим работы: Понедельник – Суббота, с 09:00 до 19:00. Вы можете вызвать мастера на дом или привезти технику в нашу мастерскую.
While checking out various online resources, I came across something that seemed useful and decided to highlight it here briefly everyday shopping spot – the design feels simple and efficient, allowing users to browse through products smoothly without confusion
Отдельно выделяют ситуации, когда проблема выходит за рамки одного эпизода. Если запои повторяются, усиливаются последствия алкоголизма, нарушается обычный режим жизни, а состояние после употребления становится тяжелее, домашний выезд часто становится первым этапом более последовательной помощи. При выраженном ухудшении самочувствия, признаках отравлении алкоголем или высокой нагрузке на системы организма может потребоваться наблюдение не только дома, но и в стационаре.
Подробнее можно узнать тут – [url=https://narkolog-na-dom-ekaterinburg.ru/]нарколог на дом цена в екатеринбурге[/url]
During my search for motivational platforms that encourage progress, I discovered inspired progress space – It has a refreshing concept where motivation and growth blend naturally, making it feel supportive for anyone looking to improve themselves steadily over time.
Many individuals aiming for better habits find that joining supportive groups significantly increases their likelihood of success over time consistency achievement hub members emphasize that regular engagement and shared progress tracking make it easier to sustain meaningful behavioral change
Вывод из запоя на дому — это медицинская помощь, направленная на стабилизацию состояния пациента без госпитализации. Такой формат позволяет начать лечение сразу после обращения и снизить нагрузку на организм, связанную с транспортировкой. В наркологической клинике «Частный медик 24» помощь оказывается с выездом врача, который проводит диагностику и подбирает терапию в зависимости от текущего состояния.
Получить больше информации – [url=https://vyvod-iz-zapoya-na-domu-sankt-peterburg-12.ru/]анонимный вывод из запоя на дому санкт-петербург[/url]
I spent some time comparing different networking websites before opening exclusive partner hub – The website felt clean and structured, and the updated content made browsing simple for visitors without clutter or unnecessary complexity affecting the experience online.
I happened to run into a page during my browsing session that felt quite accessible, so I thought I would share it here for anyone interested everyday savings hub – the structure is clear and makes it easy to go through the content step by step without difficulty
Эта услуга позволяет людям, которые не могут или не хотят покидать свой дом, получить профессиональную помощь и избавиться от зависимости без госпитализации. К тому же, вывод из запоя на дому позволяет избежать стресса, связанного с нахождением в медицинских учреждениях, при этом можно заказать вызов специалистов с учетом их опыта и лет работы, а также данных больного.
Получить дополнительную информацию – [url=https://vyvod-iz-zapoya-na-domu-ekaterinburg-18.ru/]анонимный вывод из запоя на дому в екатеринбурге[/url]
While analyzing forex trading signals and market tracking platforms I came across in the middle of my notes Steady Market Signal Tracker which delivers structured alerts – The signals appear consistent for now making it another platform worth watching to evaluate ongoing stability
During my search for business networking platforms, I discovered exclusive partner hub – The website felt great overall, and the content appeared engaging and professionally arranged, making browsing simple and clear for visitors without clutter or confusion online.
As I browsed through personal development websites, I noticed success progress space – The platform feels positive and well-oriented, emphasizing real growth, consistent improvement, and a mindset built around achieving long-term goals.
Процедура начинается с осмотра пациента. Врач оценивает основные показатели, включая давление и пульс, а также выраженность симптомов. После этого формируется состав капельницы и определяется тактика лечения, что позволяет эффективно провести вывод из запоя.
Получить больше информации – [url=https://kapelnicza-ot-pokhmelya-voronezh-7.ru/]капельница от похмелья на дом[/url]
During my search for motivational content, I came across modern inspiration hub – The platform felt really inspiring overall, and the content was helpful, clear, and motivating, making browsing easy without clutter or confusion online.
Домашняя детоксикация подходит для ранних стадий интоксикации, когда состояние пациента стабильно, а сопутствующие заболевания отсутствуют. Однако при длительном употреблении алкоголя физиологические изменения требуют более глубокого вмешательства. Стационар обеспечивает изоляцию от триггеров, исключает риск самостоятельного повторного употребления и позволяет врачам динамически корректировать терапию на основе лабораторных показателей и реакции организма. В 2026 году стандарты наркологической помощи делают акцент на превентивной безопасности: раннее выявление признаков делирия, судорожной готовности или кардиологических осложнений позволяет предотвратить критические состояния до их развития. Клиника «Стармед» выстроила работу так, чтобы каждый этап госпитализации логически вытекал из предыдущего, формируя непрерывную цепочку от острой стабилизации до планирования долгосрочной ремиссии.
Изучить вопрос глубже – [url=https://vyvod-iz-zapoya-v-staczionare-nizhnij-novgorod-6.ru/]стационар вывод из запоя[/url]
I was casually searching for practical home decor ideas and useful accessories when I found modern decor portal – The simple structure and clean presentation made the browsing experience more enjoyable without constant interruptions from unnecessary advertisements or confusing page arrangements online.
While checking out various content aggregation websites I came across a platform that feels refreshing and easy to navigate for general users Daily Discovery Board – The structure is well balanced and helps users quickly find relevant sections which improves browsing comfort and reduces unnecessary complexity during use
Earlier today while browsing through different lifestyle-related pages, I came across something that felt relevant enough to share here for others interested in modern living topics modern lifestyle hub – the overall experience is quite comfortable and the interface is simple and easy to navigate
https://thinklearnedu.com/1xbet-free-promo-code-azerbaijan-2026-1xtower-bonus-eu130/
While checking learning and curiosity based websites I found a platform that inspires users to stay curious and keep learning in a simple and engaging way Curious Growth Path Hub – the experience feels educational and motivating helping users stay curious, explore knowledge and build strong habits for lifelong learning and self improvement online
While exploring online retail platforms I came across a website that provides an easy shopping experience with smooth navigation, organized product listings and a clean interface that makes browsing convenient for everyday users Daily Smart Shopping Hub – the platform feels structured and user friendly, helping users quickly find products, compare options and complete purchases without confusion or delays
Отдельно выделяют ситуации, когда родственники вызывают врача не только из-за текущего состояния, но и потому, что подобные эпизоды повторяются. Если накапливаются последствия алкоголизма, нарушается сон, меняется поведение, появляются устойчивые проблемы дома и в повседневной жизни, разовая помощь обычно рассматривается как первый этап последующей тактики. При тяжелом состоянии, признаках отравлении алкоголем или сочетании нескольких рисков сразу может понадобиться более интенсивное наблюдение в стационаре.
Получить дополнительные сведения – [url=https://narkolog-na-dom-ekaterinburg-3.ru/]нарколог на дом анонимно екатеринбург[/url]
Sexwife
After reviewing multiple trading education sites, I landed on smart trader hub – The platform felt helpful and well organized, and the layout was simple and easy to understand, making learning accessible without unnecessary distractions or complex design elements online.
During study of communication skills and relationship dynamics I came across in the middle of my notes Strong Emotional Bond Guide which focused on practical improvement techniques – The content felt balanced and easy to apply in everyday social interactions
Stopped thinkingDigital shopping platforms have transformed how users explore wardrobe ideas and seasonal collections Chic wardrobe marketplace – the platform feels elegant, responsive, and thoughtfully organized for everyday fashion browsing – helping users find suitable outfits faster without spending too much time searching.
People who like structured creativity often prefer platforms that guide idea development without limiting imagination, especially when they visit concept creativity hub – the platform feels smooth and well designed, offering users a balanced environment where ideas can grow naturally while maintaining clarity and inspiration overall.
Dude, the sheer variety here is wild, especially the local payment options. If you’re just dipping your toes in, check out 444k স্লট ডাউনলোড first; it seems pretty straightforward to start with.
Для эффективной организации лечения и минимизации организационных рисков пациентам и их родственникам рекомендуется ориентироваться на следующие ключевые параметры:
Ознакомиться с деталями – [url=https://vyvod-iz-zapoya-v-staczionare-nizhnij-novgorod-10.ru/]наркология вывод из запоя в стационаре[/url]
1xbet güncel giriş [url=https://annelersatiyor.com]1xbet güncel giriş[/url]
Many people value shopping experiences that feel uplifting and enjoyable, where browsing products becomes a pleasant activity rather than a rushed or complicated task during their online sessions joyfulgoodsplace – This highlights a cheerful environment that encourages exploration and helps users feel satisfied while discovering items in a well structured and enjoyable digital marketplace setting online.
Fashion enthusiasts looking for global inspiration often benefit from platforms that simplify visual comparison and reduce browsing fatigue modern fashion index – structured indexing of style categories helps users identify relevant trends faster while avoiding unnecessary distractions and improving overall shopping clarity when exploring diverse collections online
As I reviewed different online collaboration spaces and professional discussion forums, I worked in growth success network hub naturally – I met driven individuals, and the group discussions provided meaningful value through shared knowledge and experience.
After checking multiple websites offering trading knowledge and tutorials, I landed on daily skill guide – The content felt practical and well presented, and the browsing experience stayed smooth without cluttered layouts or unnecessary interruptions affecting usability online.
While exploring digital shopping hubs I discovered a platform that emphasizes simplicity and global product accessibility for users Trade Flow Hub – the site provides an organized structure that makes browsing easy and efficient allowing users to quickly locate products and enjoy a smooth marketplace experience without unnecessary complexity today online
People searching for efficient online shopping platforms often appreciate well-organized product displays, and dream browse hub – offers a clean and simple shopping experience where users can discover items comfortably while enjoying a clear and intuitive browsing environment overall.
In conversations about personal growth, there’s always a moment where resources such as learn more here come into play and inspire reflection – Developing trust naturally requires patience, something many individuals are only now beginning to truly appreciate.
During casual browsing of online trading hubs, I found one that stood out for its simplicity and readability successful forex club – it appears to be a helpful resource with clear information that is easy to understand for beginners and experienced users alike
Online customers who prefer fast and organized browsing often choose platforms that minimize confusion and present all products in a logical and accessible order Easy Select Market since it supports smooth navigation and better shopping clarity – The system is designed for simplicity, ensuring users can quickly locate items without unnecessary steps or distractions
During my browsing of personal development platforms I found a website that encourages users to expand their horizon by learning and discovering new opportunities Expand Vision Horizon Hub – the platform feels inspiring and organized, helping users build knowledge, develop abilities and explore meaningful opportunities through an easy and structured online learning experience
While exploring online motivation resources I discovered a platform that shares uplifting content designed to support users in maintaining a positive and balanced mindset daily Inspire Life Network – the experience is helpful and easy to explore providing simple and positive ideas that encourage users to stay motivated and emotionally uplifted in everyday life online
888stars [url=www.888starz-uz3.org]888stars[/url] .
Капельница от похмелья в Воронеже с индивидуальной инфузионной терапией и врачебным контролем в наркологической клинике «Похмельная служба»
Получить дополнительные сведения – [url=https://kapelnicza-ot-pokhmelya-voronezh-8.ru/]капельница от похмелья на дому в воронеже[/url]
При выводе из запоя на дому с быстрым облегчением используются различные медикаменты, направленные на быстрое восстановление водно-солевого баланса, улучшение функции печени и почек, а также снижение симптомов алкогольного абстинентного синдрома. Важно, что состав препаратов подбирается в зависимости от состояния пациента, и все препараты вводятся под контролем квалифицированного медицинского специалиста.
Исследовать вопрос подробнее – [url=https://vyvod-iz-zapoya-na-domu-ekaterinburg-19.ru/]вывод из запоя на дому анонимно в екатеринбурге[/url]
Процедура начинается с осмотра пациента. Врач измеряет давление, пульс, оценивает общее состояние и выраженность симптомов. На основании этих данных формируется состав капельницы и план лечения. Такой подход позволяет учитывать индивидуальные особенности пациента и эффективно провести вывод из запоя.
Изучить вопрос глубже – [url=https://kapelnicza-ot-pokhmelya-voronezh-4.ru/]капельница от похмелья вызов на дом[/url]
Такие условия позволяют начать лечение без задержек и обеспечить более мягкое восстановление. При этом помощь может предоставляться анонимно.
Получить дополнительную информацию – [url=https://vyvod-iz-zapoya-na-domu-sankt-peterburg-11.ru/]нарколог на дом вывод из запоя в санкт-петербурге[/url]
I had been searching for value focused shopping websites before discovering smart value guide – The website felt clean and efficient, and products were arranged in a visually appealing and organized way, making browsing easy without clutter or confusing navigation elements online.
People who enjoy cheerful ecommerce platforms often search for websites that simplify product browsing, especially when they explore simple joy shopping hub – the platform feels clean and structured, allowing users to discover items easily while maintaining a smooth and enjoyable shopping experience throughout their entire visit.
рулонные шторы на пластиковые окна купить [url=https://avtomaticheskie-rulonnye-shtory50.ru]https://avtomaticheskie-rulonnye-shtory50.ru[/url]
During exploration of trading analysis platforms and market discussion hubs I noticed in the middle of my reference material Expert Trading Review Zone which focused on clear and professional market breakdowns – The analysis this week felt credible and well structured giving confidence in the insights being shared
I had been browsing online for local shopping experiences when I noticed simple trend guide – The platform felt clean and easy to navigate, and the modern design helped create a smooth browsing experience without unnecessary interruptions or confusing elements online.
shopandsmilealways – Great website today, products appear organized, easy and visually pleasant
Many users looking for practical daily recommendations often prefer websites that highlight simple and useful discoveries, and I found Daily Finds Essentials Guide Hub which seems useful – A daily essentials page offering convenient little finds, and I often browse it each morning since it provides quick inspiration for useful everyday products in a very easy way.
In today’s browsing session I examined several trend aggregation websites and noticed one platform that stood out for its simplicity and clarity Daily Trend Compass functioning as a Daily Trend Compass module – the structure guides attention toward relevant trending topics making exploration feel natural and efficient while reducing effort needed to locate meaningful updates or insights online
Many users exploring motivational content online value platforms that promote fresh starts and constructive thinking, and uplift journey portal – provides supportive messages that help individuals feel more empowered to embrace change and work toward meaningful personal progress.
While exploring creative inspiration platforms I discovered a website that encourages users to build something new through fresh ideas and meaningful project motivation New Build Idea Hub – the platform feels highly creative and motivating helping users start fresh projects, develop ideas and take action toward meaningful creation in a simple and inspiring online space
While browsing digital lifestyle marketplaces aimed at enhancing everyday happiness and home comfort, users sometimes find stores that feel welcoming and simple SunnyLifestyleOutlet – It is commonly viewed as a bright and approachable platform where users can enjoy easy browsing while discovering lifestyle products in a clear and organized format.
During my routine review of financial platforms and market analysis websites, I referenced global trading insight page – the consistent daily updates kept me ahead of trends, and the chart performance is fast and responsive, making analysis much easier overall.
I was going through a mix of different pages online and found one that caught my attention in a subtle way, so I thought I would share it here fashion discovery link – the structure is simple and well-organized, allowing users to browse smoothly without feeling overwhelmed
While exploring online retail platforms I discovered a website that showcases unique products clearly while providing a smooth and enjoyable shopping experience for users Unique Trend Explorer Hub – the experience feels structured and easy to use helping users browse items smoothly while enjoying a clean online shopping journey today
К показаниям относятся: запой длительностью более 72 часов, выраженная абстиненция с тахикардией, артериальной гипертензией, профузным потоотделением, наличие в анамнезе алкогольных делириев или судорожных эпизодов, сопутствующие хронические заболевания печени, сердца, поджелудочной железы. При тяжелых формах интоксикации, когда в организме накапливаются токсичные продукты распада веществ, резкое прекращение употребления без медицинской поддержки может спровоцировать отек мозга, острую сердечную недостаточность или желудочно-кишечное кровотечение. Стационар позволяет провести полноценную диагностику, включая ЭКГ, экспресс-анализы крови и мониторинг сатурации, что формирует точную картину состояния и исключает шаблонные назначения. В случаях сочетанной зависимости, когда в анамнезе присутствует наркомании, протоколы детоксикации адаптируются под специфику психоактивных соединений и включают усиленный нейрологический контроль.
Подробнее тут – https://vyvod-iz-zapoya-v-staczionare-sankt-peterburg-16.ru
People planning to redesign rooms often rely on digital inspiration platforms that organize modern home concepts into clear categories for easier browsing and idea discovery and they might find Home Design Discovery Tool while searching online – it is usually presented as providing intuitive navigation and visually clean presentation of ideas that support effortless exploration of interior styles.
While comparing trading education sites, I eventually opened daily market hub – The website felt informative and smooth, and everything was updated and easy to navigate, allowing quick browsing through sections without confusion or complex layout design online.
During a casual browsing session focused on fashion inspiration, I found my fashion style hub – It has a very personal and appealing vibe, making it enjoyable to explore different style ideas and creative outfit inspirations.
People who enjoy learning new things often look for platforms that spark curiosity and inspire exploration, and while browsing they discover curiosity discovery hub space – the platform feels natural, engaging, and inspiring, helping users explore ideas freely while maintaining a smooth and motivating experience throughout their learning journey overall.
While exploring online fashion stores, I eventually found modern boutique corner – The website looked stylish and well organized, and the product presentation was clear and visually appealing, making it easy to browse without unnecessary complexity or distractions online.
People looking for inspiration to grow and improve often value platforms that support motivation, and self development portal – offers uplifting content that helps users build confidence, stay focused, and move toward meaningful personal improvement goals overall.
Вывод из запоя на дому с детоксикацией в Екатеринбурге представляет собой сложную медицинскую процедуру, направленную на очищение организма от токсинов и восстановление нормального состояния пациента. Важной частью этого процесса является контроль врача, который следит за состоянием пациента, регулирует дозировку препаратов и корректирует лечение по мере необходимости. Процедура обычно включает в себя использование инфузионных растворов, витаминов и медикаментов, направленных на стабилизацию физического состояния пациента и облегчение симптомов абстиненции.
Подробнее тут – [url=https://vyvod-iz-zapoya-na-domu-ekaterinburg-20.ru/]нарколог на дом вывод из запоя[/url]
During my recent search for affordable shopping websites and discount directories I came across a platform that stood out for its simplicity and clear presentation of information Daily Value Finder – the deals section is neatly arranged making it simple for users to locate offers quickly and compare options without unnecessary confusion or clutter while browsing
While checking idea exchange platforms I came across a website that allows users to connect with ideas where everything feels clear and easy to follow Ideas Connect Space Hub – the platform feels intuitive and well structured helping users explore, share and understand concepts in a clean and accessible environment designed for smooth idea collaboration online today
Shoppers increasingly prefer online marketplaces that offer personalized recommendations and fast access to relevant products across different sections Personal Trend Market providing a seamless interface that adapts to user behavior and enhances browsing efficiency – It supports intelligent navigation and helps users discover products aligned with their interests
While analyzing online shopping site designs and user engagement factors I noticed in the middle of my research Simple Grid Commerce Site which used a very clean layout approach – The interface felt easy to scan and made browsing feel straightforward and visually comfortable
Many users exploring online marketplaces prefer stores that make navigation feel smooth and visually appealing, and smart retail space – improves product exploration by arranging categories logically, helping visitors find relevant items quickly and enjoy a more efficient shopping experience overall.
Design lovers and homeowners frequently visit sites like Elegant Living Hub to gain inspiration for elegant room arrangements, modern textures, and functional design layouts – The content emphasizes sophistication, simplicity, and harmony in creating comfortable and visually appealing home interiors spaces
Такой подход позволяет начать лечение без задержек и снизить риски, связанные с транспортировкой пациента. При этом помощь может предоставляться анонимно, что важно для многих пациентов.
Ознакомиться с деталями – http://vyvod-iz-zapoya-na-domu-sankt-peterburg-9.ru/
During research into online trading mentorship programs and educational hubs I came across Personalized Market Mentor Link a resource that presents tailored trading guidance in a structured and easy to follow format – The overall experience felt engaging and supportive for steady skill building
Well, This solved something I was stuck on, and it didn’t feel like copy paste content. I’ll keep this bookmarked.
During my search for online retail platforms I came across a website that offers a good selection of products with fast loading and organized navigation features Shop Fast Today Hub – the platform feels reliable and well structured allowing users to find products easily while enjoying a smooth and efficient online shopping experience today online
While checking out online stores focused on simplicity and minimal design, I noticed one that felt especially easy to navigate simple life essentials – the minimal layout really stands out and I like how effortless it is to move through the content
well, this broke things down in a better way.
People who enjoy practical and simple guides often search for websites that reduce complexity, especially when they visit simple understanding hub – the website feels structured and clear, allowing users to absorb knowledge easily while maintaining a calm and efficient browsing experience overall in all sections.
After reviewing multiple cosmetic outlets, I found trusted glow outlet – The platform featured a beautiful design, and browsing products felt smooth and enjoyable every visit, making shopping easy without confusion or unnecessary distractions online.
I was exploring several online shopping recommendations from forums before running into great price destination – The browsing experience remained smooth and organized from beginning to end, and I appreciated not having to deal with constant interruptions, flashing ads, or confusing navigation menus while searching for useful products online.
электропривод рулонных штор [url=https://avtomaticheskie-rulonnye-shtory50.ru]электропривод рулонных штор[/url]
During my browsing of home decor platforms I found a website that provides trending home ideas focused on modern aesthetics and visually pleasing interior arrangements Modern Space Ideas Hub – the experience feels creative and balanced, helping users explore home styling inspiration, decor trends and practical design improvements
While reviewing multiple online discount resources I came across valuable details at Offer Savings Dashboard that compiles various promotional offers in one easy to access space helping users evaluate deals efficiently – the design appears organized and supports smooth navigation for everyday online shoppers
Users who spend time reading motivational blogs and wellness-focused content often encounter hidden recommendations for uplifting websites, and within those pathways they sometimes reach HappyLifeRipple – A gentle digital space centered on emotional wellbeing, gratitude practices, and cultivating a consistently positive mindset.
People who enjoy keeping up with modern aesthetics often seek platforms that combine simplicity with trend focused content allowing them to explore new ideas without unnecessary distractions or clutter in the interface moderntrendspot – the website provides a clean layout that helps users quickly identify emerging styles while maintaining smooth navigation and a visually pleasant browsing environment for everyday fashion inspiration
While browsing for something different and memorable, I recently came across creative surprises hub – This place feels like a hidden gem online, offering a wide range of imaginative gift ideas that make choosing presents feel exciting and genuinely enjoyable for any occasion you have in mind.
Consumers exploring online offers often benefit from well structured platforms that present information clearly and help them compare products without confusion Discount Range Vault resulting in improved clarity and more effective decision making – The layout ensures users can browse efficiently and identify useful deals with ease
During my search for online retail websites I came across a platform that provides a secure and professionally designed shopping experience with simple navigation features Confidence Shop Hub – the platform feels trustworthy and clean making it easy for users to browse products safely while enjoying a smooth and reliable online shopping experience today online
Users benefit most from platforms that present relevant information quickly while maintaining an enjoyable browsing experience fresh content navigator – A navigation system designed to surface fresh content consistently helping users stay updated while exploring new topics through a streamlined and intuitive browsing structure.
People interested in economic updates often look for platforms that break down global movements into simple insights, and I found Global Market Insight Research Hub which seems helpful – The platform shares insightful market data that helps users understand larger financial shifts in a clear and accessible way without unnecessary complexity.
I don’t usually post links like this, but I found something that seemed helpful and decided to mention it here since it had a clean structure trending items page – the layout feels straightforward and allows users to move through sections quickly and comfortably
People who enjoy emotional reflection often prefer platforms that present ideas in a gentle and organized format, especially when they discover calm memory space hub – the website feels peaceful and easy to navigate, helping users explore meaningful moments while maintaining a smooth and relaxing experience overall.
Users interested in hassle-free shopping often rely on platforms that keep navigation simple and effective, and easy purchase zone – provides a clear browsing system where products are easy to find and the overall experience feels smooth and user-friendly overall.
While comparing different trading mentors, I eventually opened exclusive trading hub – The information felt useful overall, and the website structure was clean and professionally maintained, making learning easy without clutter or confusing navigation online.
I had been exploring different websites with curated resources and useful information before discovering simple discovery source – The layout remained clean and easy to follow, making the browsing experience enjoyable without overwhelming banners or unnecessary visual interruptions online.
https://capital360.com.ua/
While checking modern style stores I found a website that delivers a stylish shopping experience with trendy products presented in an attractive and organized format Style Shop Trend Hub – the experience feels clean and user friendly, guiding users to explore fashion items, discover styles and enjoy a smooth shopping interface online
Users exploring curated shopping outlets online often seek platforms that present items in a neat structured format allowing easier comparison and browsing Chic Select Outlet where design simplicity meets functionality – users experience smooth navigation while exploring products arranged in a visually appealing and easy to understand way
During my browsing of knowledge sharing platforms I found a website that supports interactive learning and easy communication between users Edu Flow Connect – the platform offers a clean design and smooth navigation making it easy for users to learn share ideas and stay engaged in a productive and well structured online learning experience today
Some users prefer more refined tools that highlight higher-quality promotions and curated selections rather than overwhelming lists of generic discounts, a platform occasionally mentioned is Premium Deal Explorer – it is often characterized as a browsing-friendly service offering a cleaner presentation of selected deals and easier navigation for users.
Many online users interested in trending fashion concepts appreciate platforms that make inspiration simple to navigate, and modern style hub – presents visually balanced content that supports easier discovery of stylish ideas while maintaining an attractive and organized browsing environment overall.
https://onetakephotos.com/2026/05/08/melbet-loyalty-promo-code-2026-max888/
In my exploration of lifestyle improvement platforms I discovered a website that focuses on sharing modern and visually engaging ideas for better everyday living Daily Lifestyle Inspiration – the content feels helpful and inspiring offering users simple yet creative lifestyle ideas that support modern living and make daily routines more enjoyable and well balanced online
During a late night search for online stores I stumbled upon Pure Shine Picks and it offered a pleasant surprise with its clean interface and well categorized listings that made browsing different products quite easy – the experience felt smooth and suitable for casual browsing sessions.
People who enjoy inspirational and exploration driven content often look for platforms that evoke a sense of travel and discovery, and while browsing they discover global journey inspiration hub – the platform feels immersive, uplifting, and motivational, encouraging users to explore new ideas and take action toward meaningful experiences in both digital and real world contexts overall.
While exploring different productivity and collaboration platforms online today, I came across something that felt worth mentioning here due to its clean structure and easy navigation overall team collaboration ideas hub – the site looks interesting with a clean layout and simple usability that makes browsing feel smooth and straightforward
As I searched across multiple sites for new and exciting trends, I noticed trend exploration hub – The title feels interesting and unique, leaving you wondering what kind of creative or popular ideas might be featured inside.
https://ecopolis-spb.ru/tvorchestvo_all/
While exploring online stores for easy shopping experiences, I eventually found easy retail corner – The platform appeared user friendly and straightforward, and browsing felt smooth because everything was clearly categorized without unnecessary distractions or clutter online.
Modern digital shoppers value platforms that reduce decision fatigue and provide straightforward paths to finding essential products quickly and efficiently Streamlined Cart Hub – This experience is described as an organized shopping space that prioritizes simplicity, allowing users to move through categories smoothly and complete transactions with ease and confidence in their choices
Earlier today I was checking different gift stores before opening daily gift selection – The collection felt interesting and well organized, and finding unique products was effortless and convenient, making the experience smooth for users without confusion or overwhelming design elements online.
While browsing value focused shopping sites I came across a platform that offers a good outlet experience with fast navigation and simple reliable browsing options Pure Value Market Hub – the platform feels smooth and structured, helping users find discounted products, explore deals and shop easily through a well designed online experience
While checking online shopping directories I found a platform that presents fashion trends in a visually appealing and easy to navigate format Modern Trend Market – the browsing experience is seamless and organized allowing users to quickly access the latest products while enjoying a stylish and user friendly interface throughout their visit today
https://pravdadaily.com.ua/z-dnem-anhela-liudmyly-istoriia-sviatoi-ta-tradytsii-sviatkuvannia/
Аккумуляторная техника на 14 вольт Аккумуляторная техника на 14 вольт
готовые рулонные шторы купить в москве [url=https://rulonnye-elektroshtory.ru]готовые рулонные шторы купить в москве[/url]
Юрист по медицинским спорам в Алматы Специализированная правовая помощь в Алматы по вопросам разрешения судебных разбирательств
Many users prefer ecommerce platforms that offer a balance between visual appeal and practical usability, ensuring a smooth and enjoyable shopping experience from beginning to end catalog browsing hub – the interface feels intuitive, clean, and responsive, helping users explore product catalogs efficiently and find relevant items with ease and comfort.
While browsing different innovation platforms, I eventually noticed simple idea hub – It is an inspiring platform where ideas are shared clearly and effectively, helping users grow smoothly without distractions or confusing design elements online.
In my browsing of growth oriented platforms I came across a website that supports users in maintaining positivity and continuous forward progress in life Grow Forward Center – the platform encourages users to stay motivated and focused on self improvement while offering simple guidance that promotes positive thinking and consistent daily growth online
Fashion lovers who enjoy exploring outfit ideas online often prefer platforms that keep content organized and visually appealing so they can browse trends comfortably and efficiently StyleNest Online offering a smooth and enjoyable browsing experience – The fashion environment feels well structured, modern, and engaging for daily inspiration.
Many individuals exploring new ideas often value platforms that promote curiosity and active engagement, and learning curiosity portal – creates an inspiring environment where users can discover information while staying motivated to explore continuously overall.
Individuals who enjoy reading about social responsibility and positive action often search for inspiring platforms, and they discover change makers corner which focuses on encouraging users to take initiative, think creatively, and engage in practical steps that support improvement in both personal behavior and wider community well being over time.
Turning vision into reality requires patience discipline and the willingness to keep moving forward even when progress feels slow or uncertain at times Vision To Reality Space Turning vision into reality requires patience discipline and the willingness to keep moving forward even when progress feels slow or uncertain at times is offered as guidance for staying consistent with goals – highlights how persistence bridges the gap between ideas and actual achievement
While browsing different financial planning websites, I eventually noticed trusted income guide – The platform felt informative and well structured, and the browsing experience was simple because everything was clearly organized without unnecessary clutter or confusing page elements online.
In my browsing of positivity and lifestyle platforms I found a website that promotes happiness and simple enjoyment in everyday life through inspiring content Joy Everyday Lifestyle Hub – the platform feels encouraging and clear, helping users develop positive habits, enjoy small moments and live a more fulfilling daily life through simple online guidance
I was just casually browsing through financial websites and came across one that felt quite accessible, so I decided to share it here forex strategy page – the content is organized in a straightforward manner, making it easy to absorb information quickly and comfortably
I spent some time comparing different signal platforms before opening exclusive analytics hub – The website provided useful content, and everything loaded quickly without unnecessary clutter, making browsing smooth and distraction free while exploring different sections online.
While reviewing community based platforms I noticed a lively space at networking discovery zone – it encourages users to stay active and engaged making the process of connecting discovering and growing feel smooth intuitive and naturally integrated into daily interaction habits
After spending time reviewing several online inspiration platforms, I eventually visited comfort destination site and appreciated how easy it is to navigate, with useful content that helps visitors stay engaged while exploring different sections in a clean and structured way.
While exploring motivational content platforms I discovered a website that provides daily inspiration designed to uplift users and encourage positive thinking through simple and engaging material Inspiration Daily Hub – the content feels uplifting, easy to read and engaging making it simple for users to stay motivated every day through short inspiring ideas and positive messages shared consistently online
Users frequently appreciate online shopping environments that offer both variety and stability while keeping navigation intuitive and product discovery enjoyable shopconnectzone – the site provides a seamless experience with dependable listings that help customers browse and choose products without unnecessary difficulty
Digital audiences typically prefer platforms that combine attractive design with functional navigation systems that support efficient browsing and content discovery MediaSummit Flow Portal – The SummitMedia interface feels modern and clean, offering a user-friendly environment where browsing is simple, enjoyable, and structured in a way that supports clarity.
People exploring personal development often look for structured guidance that helps them stay consistent and focused on long term aspirations while learning strategies Dream Path Motivator that reinforce discipline and clarity, making the journey toward success feel more achievable and organized through steady motivational reinforcement and practical mindset shifts – The message highlights persistence, belief, and structured goal achievement thinking for everyday growth.
Individuals interested in productivity often explore platforms that inspire action and help them move beyond procrastination habits Progress Ignition Hub because it reinforces the idea that every journey begins with a single step – The platform encourages structured thinking, goal setting, and consistent effort toward personal achievement
People who like managing and browsing favorites often look for platforms that simplify the selection process, especially when they explore saved items shopping hub – the site feels structured and intuitive, allowing users to find and choose products easily while maintaining a stress free and efficient browsing experience overall across all categories.
While reviewing inspirational platforms online, I came across Grow Strong Confidence which featured well organized motivational content and smooth navigation between sections – I really like how the information feels fresh, positive, and genuinely uplifting without feeling repetitive or overwhelming during browsing
While exploring online fashion platforms I discovered a website that presents fresh fashion updates and stylish trends through a user friendly design Fresh Fashion Style Hub – the platform feels smooth and modern, helping users explore new outfits, view fashion updates and enjoy easy navigation through a clean and structured browsing experience
While comparing websites offering fashion products and affordable accessories, I landed on daily outfit corner – The navigation process stayed simple from beginning to end, and the website maintained a clean structure without confusing layouts or endless popups interrupting the browsing experience online.
While exploring various planning and growth pages online, I came across something that felt quite useful and decided to share it here future insights link – the initial impression seems positive, with information that is clear, direct, and easy to follow
During my search for curated online stores, I discovered Dream Product Discovery Hub which offers a modern interface and neatly organized categories that improve usability – the site has interesting products and browsing felt smooth and surprisingly enjoyable today for a comfortable shopping experience
In my search for active digital communities I came across a useful network at discovery connect hub – the platform feels engaging and user friendly making it easy to connect with others discover new ideas and grow through regular communication and shared interests
Many digital shoppers appreciate websites that simplify fashion browsing while offering a wide range of outfit ideas and seasonal styles, and a frequently cited example is Fashion Lane Portal which is commonly presented as an online destination featuring stylish apparel selections and organized fashion categories designed for easy user navigation.
Ecommerce platforms that emphasize speed often deliver better user satisfaction by allowing shoppers to find items quickly and proceed without interruptions instant style hub – the site appears modern, fast, and easy to navigate, helping users explore products efficiently while keeping the experience smooth and simple.
Modern students often rely on digital platforms that offer structured learning materials and simplified explanations to improve comprehension and academic performance EduDaily Resource providing consistent educational support – This ensures learners can stay on track while gradually building stronger subject knowledge over time.
While exploring online knowledge hubs and informational collections, users sometimes find subtle links that point toward helpful discovery tools, and in the middle of this journey they reach EffortlessFindSpace – A clean and minimal platform focused on delivering easy navigation and smooth content discovery experiences.
Продажа медицинской техники https://techmed.kz и оборудования в Алматы от компании Adamant Group — это сертифицированные УЗИ-сканеры, физиотерапевтические, лабораторные и хирургические аппараты от надёжных производителей. Работаем с 2004 года, предлагаем сервис, установку и гарантию на всё оборудование. Медицинские аппараты с доставкой по Казахстану — оперативно отгружаем в любую точку страны, помогаем с подбором под задачи вашей клиники.
While exploring online shopping platforms I came across a website that emphasizes bright visuals and simple structure for a better browsing experience Everyday Shine Store – the layout is clean and attractive helping users navigate easily while enjoying a smooth and visually appealing online shopping journey today for everyday needs
рулонные шторы это [url=https://rulonnye-elektroshtory.ru]https://rulonnye-elektroshtory.ru[/url]
People who enjoy elegant shopping environments often search for platforms that simplify browsing while maintaining a refined look, especially when they visit classy product showcase hub – the site feels visually balanced and structured, making it easy for users to explore items comfortably while enjoying a smooth and aesthetically pleasing interface overall.
During my search for inspirational platforms I found a website that motivates users to stop delaying, start new goals, and take meaningful action toward self improvement and productivity Begin Today Inspiration Hub – the experience feels encouraging and clear, guiding users to start projects, build momentum and develop stronger habits for long term success
There are many educational websites online, yet exploration learning hub stands out because it presents several interesting ideas in an engaging way, making it a platform worth returning to again when looking for inspiration and useful information.
Consumers exploring stylish outfit ideas online frequently value stores that organize fashion collections clearly, and style discovery boutique – improves product browsing through logical category placement and modern design elements that make shopping feel more intuitive overall.
People looking for reliable online shopping often value platforms that provide a structured layout and secure process, making it easier to browse products and complete purchases with confidence safejourneyshop – This delivers a professional and transparent shopping environment where users can enjoy smooth navigation and a trustworthy experience throughout their entire online journey
Many users researching websites prefer systems that emphasize clarity, minimal clutter, and well-structured navigation elements for improved experience overall usability BrandVision clarity tool – the clarity-focused tools within BrandVision help streamline information discovery, ensuring users spend less time searching and more time understanding content.
During my search for useful financial guidance and investment tips, I discovered smart wealth guide – The website appeared reliable and well maintained, and navigating through sections felt smooth because everything was structured clearly without overwhelming distractions online.
While browsing online lifestyle collections, I discovered Unique Living Experience Hub which offers a modern interface and structured navigation that enhances usability – overall it feels like a nice website and browsing categories is smooth, visually appealing, and comfortable across all sections
Нужен керамзит? https://l-keramzit.ru/catalog/ качественный керамзит различных фракций для утепления, дренажа и производства легкого бетона. Доступны оптовые поставки, удобная упаковка и доставка на объект.
While checking various innovation and teamwork pages, I came across one that felt very accessible and well structured overall teamwork concept hub – the site looks interesting with a clean layout and simple usability that makes navigation very easy
During casual browsing of curated stores, I came across The Best Corner Hub Online which provides a clean and organized layout that feels intuitive – nice collection available and I liked how simple navigation makes browsing stress free
While exploring self improvement websites I found a platform that highlights motivational journey content designed to inspire users to take action and grow Meaningful Journey Hub – the experience encourages users to start today by offering simple inspiration and practical motivation that supports personal development and a positive mindset in everyday life online
After checking several online shopping deals sites, I discovered daily savings hub – The platform felt smooth and modern, and the updated content made browsing simple because categories were clearly structured without clutter or unnecessary visual noise online.
While comparing online stores with large inventories and mobile optimization, I added global market choice hub into my notes – the selection of products is broad and the navigation on mobile devices feels very smooth and user friendly overall.
Great content. Find out more at this link: this website
People who actively hunt for discounts and promotions often depend on specialized platforms that highlight trending offers and simplify the browsing experience across digital marketplaces Deal Hunter Central – Designed to help users quickly identify active discounts and valuable offers while improving efficiency in online shopping research and purchase planning
обратная сторона земли во все тяжкие смотреть
Погружайся в захватывающие сюжеты вместе с нами! Голливудские блокбастеры, культовые сериалы, добрые мультфильмы и зрелищные премьеры – всё доступно в отличном качестве. Никакой рекламы, только чистое удовольствие от просмотра. Создай свою коллекцию любимых фильмов и наслаждайся – фильмы
місце в серці морган
https://auliajavaland.com/wp-content/pgs/?1xbet_promo_code_vip-bonus.html
Self development websites frequently use embedded references to enhance readability and engagement, and one such example is inner direction system placed naturally within informational content – This helps create a smoother reading experience that encourages users to reflect on their life choices more thoughtfully.
During my search for personal growth sites I came across a platform that encourages users to grow confidence and develop a strong mindset through structured support Growth Path Confidence Hub – the experience feels encouraging and smooth, helping users strengthen mindset, build habits and follow simple growth focused ideas through a clean online environment
During my recent browsing of online stores I found a platform that focuses on creating a cheerful and user friendly shopping environment where everything feels easy and pleasant Happy Cart Smile Hub – the shopping experience feels bright and positive with smooth navigation and a friendly layout that makes browsing products enjoyable and stress free for all users online today
воллі заздрість турецький серіал
People who enjoy inspirational reading often prefer websites that deliver meaningful content in a clean way, especially when they explore daily inspiration corner hub – the site feels structured and motivating, helping users absorb positive messages while maintaining clarity and focus throughout their browsing experience without distraction.
After reviewing different online fashion stores, I discovered simple apparel directory – The website maintained a clean aesthetic and the fashion items were displayed clearly, making browsing more pleasant without excessive distractions or slow loading pages online.
Many individuals exploring personal development content appreciate motivational platforms that inspire confidence and initiative, and life change guide – offers supportive ideas that encourage users to embrace opportunities and move forward with stronger focus and determination in their everyday decisions.
Users interacting with digital platforms often prefer designs that combine fast performance with clear structure, making navigation smooth and intuitive ConnectUltra Navigation Node – The UltraConnect website presents a fast and modern interface where usability is prioritized, allowing users to browse comfortably and efficiently across all sections.
People exploring different shopping ecosystems appreciate platforms that orbit around user needs and present relevant products based on browsing behavior BuyOrbit Platform – A user centric shopping platform that aligns product suggestions with browsing patterns, creating a personalized and adaptive online purchasing experience.
olke xeberleri Azerbaycan xeberleri
A number of websites become difficult to use due to poor structure, though organized web portal offers a much more comfortable experience with its clean layout and simple navigation, allowing visitors to easily explore different categories without confusion.
While exploring group communication platforms, I found Grow Social Together Hub which offers a modern interface and organized sections that enhance usability – the community vibe feels strong and engaging content keeps me coming back as discussions are always interesting
While browsing ecommerce trend platforms I discovered a website that presents the latest stylish products in a clean and structured format Style Find Hub – the experience is fast and easy to use making it simple for users to browse trending items while enjoying a modern and user friendly shopping interface today across categories
Online shoppers who prefer assistance while browsing often search for platforms that make product selection easier and more intuitive, and a commonly cited example is Helpful Cart Explorer – designed to support users throughout their shopping journey by offering clear product insights and helpful recommendations that enhance overall decision making.
During my search for updated shopping websites, I found Trend Today Market Hub which offers a visually clean design and well categorized items that are easy to browse – I discovered interesting products and the layout feels modern, smooth, and simple to interact with overall
I had been browsing for personal growth platforms when I noticed simple start guide – The website felt inspiring today, and the layout stayed clean and enjoyable, allowing easy browsing across devices without distractions or overwhelming design elements online.
Душевой уголок Ravak Chrome привлекает тем, как в нём сочетаются размеры, внешний вид и практическая логика. Даже выразительная по виду модель может оказаться спорной, если не совпадают размеры, способ монтажа и сценарий использования. Такой разбор помогает увидеть сильные стороны модели заранее и не промахнуться с ожиданиями после установки https://my-bathroom.ru/dushevye-ugolki/dushevoj-ugolok-ravak-chrome-obzor-serii/
Shoppers exploring contemporary fashion platforms often prioritize clean interfaces that showcase trending items in an attractive and structured format PulseTrend Shop supporting easy navigation and quick decision-making – This demonstrates how modern e-commerce design focuses on combining usability with visually driven product presentation.
Readers who enjoy lifestyle blogs often search for content that encourages balance and creativity, and while exploring creative living ideas hub – the website feels fresh, structured, and inspiring, providing thoughtful suggestions that help users improve habits, discover new perspectives, and maintain a more fulfilling and meaningful everyday lifestyle approach.
как отмыть силиконовый ремешок как отмыть ремешок часов и как отмыть ремешок руководство по чистке силиконового ремешка
During my browsing of inspiration platforms I came across a website that promotes change and supports personal development through motivational and simple content Inspire Change Vision Hub – the experience feels smooth and uplifting, helping users build habits, improve mindset and follow structured transformation steps through a clean online environment
People who are focused on improving life direction often search for platforms that simplify decision making, especially when they visit clarity path guide – the website feels supportive and well structured, offering users practical insights that help them understand their priorities and move forward with confidence in everyday choices.
Luxury fashion shoppers frequently explore curated portals that showcase designer wear collections and premium apparel selections Designer Wear Portal allowing users to browse exclusive items and understand current designer fashion directions across markets – The portal emphasizes exclusivity while maintaining an easy browsing experience for fashion enthusiasts.
I spent the evening exploring fashion marketplaces before discovering trendy clothing hub – The platform felt well designed and organized, and browsing products was smooth because there were no unnecessary popups or cluttered layouts interfering with usability online.
While checking online discovery platforms I came across a website that offers structured and useful ideas designed to help users explore opportunities effectively Opportunity Knowledge Hub – the content is clear and practical allowing users to understand options easily and apply insights in a smooth and well organized digital environment today online
Nice. For further reading: click here
888старз вход [url=https://888starz-bet1.com]https://888starz-bet1.com[/url] .
88 stars [url=https://www.888starz-egypt8.com]https://888starz-egypt8.com/[/url]
People exploring online product assortments often appreciate systems that categorize items neatly allowing faster decisions and better understanding of available options while browsing different sections and deals Deal Explorer Vault interface presents organized listings designed for quick scanning and efficient product comparison – The approach prioritizes usability and straightforward browsing for better user satisfaction
Many online visitors prefer websites that feel clean and modern while still offering engaging content and easy-to-navigate structures that improve usability UrbanNexus UI Gateway – UrbanNexus combines interesting content with a simple yet visually appealing design, creating a browsing experience that feels smooth, organized, and enjoyable for users.
While exploring various online personal development and creativity platforms I discovered a website that encourages structured thinking and growth oriented learning for everyday users Mind Growth Studio – the platform promotes creative thinking and helps users develop ideas, create meaningful outcomes and grow effectively through simple and engaging content designed for continuous self improvement today online
While exploring online idea collections, I found Possibility Idea Space Hub which offers structured sections and easy navigation that makes browsing simple – there are lots of inspiring ideas here and it opens new possibilities daily in a natural and motivating way
During my search for innovation content, I came across modern ideas guide – The ideas are inspiring and useful, allowing users to browse easily while finding creative and meaningful concepts online.
Anyone interested in informative and easy to browse online platforms may appreciate organized idea website because the material appears thoughtfully structured, making the experience more enjoyable and helpful for visitors exploring creative and practical information online.
People searching for consistent updates on low cost products frequently appreciate resources that consolidate information like everyday bargains page this one, which gathers deals, comparisons, and helpful insights in a single location making it easier to save money on routine shopping tasks daily.
I had been browsing for new season fashion platforms when I noticed smart season wardrobe – The collection looked stylish, and the website felt modern and visually appealing, allowing smooth browsing without clutter or unnecessary navigation issues online.
While reviewing online tools for better selection, I came across Options Smart Finder Portal which had organized content sections and smooth navigation flow, making browsing efficient – the information felt clear and genuinely practical for users trying to compare options easily
While checking online gifting platforms I came across a website that showcases nice gift ideas and makes browsing simple, convenient and enjoyable for users looking for inspiration Everyday Gift Picks Hub – the platform feels smooth and user friendly, helping users discover creative and meaningful gift ideas in an organized and easy online environment today
People browsing for bargains frequently prefer websites that present deals in a well organized layout allowing them to quickly identify relevant offers and compare value across different categories Bargain Radar Network – Offers are displayed in a streamlined format that supports efficient browsing and ensures users can easily locate attractive deals without feeling overwhelmed by excessive information.
I spent the evening exploring trading education websites before discovering daily trading academy – The platform felt informative and easy to navigate, and the content was shared in a structured way that made understanding trading strategies simple without overwhelming details or confusion online.
Users who like interactive learning often look for platforms that make education more engaging, especially when they come across learning inspiration hub – the site feels modern and structured, allowing users to explore educational content easily while staying motivated and curious throughout their learning and discovery journey.
While exploring online self development sites I discovered a platform that shares inspiring messages encouraging action, creativity and strong personal improvement Great Motivation Start Hub – the experience feels empowering helping users take action, develop creativity and focus on personal growth through simple and effective motivational ideas for everyday life online
When people are trying to evaluate different services online and need clearer direction, they often look for structured tools, and in that context smart comparison hub helps users simplify research by offering clearer perspectives, making everyday decisions more structured and less confusing overall for better outcomes.
капельница от похмелья клиника [url=https://kapelnicza-ot-pokhmelya-voronezh-14.ru]капельница от похмелья клиника[/url]
сколько стоит капельница на дому цена [url=https://kapelnicza-ot-pokhmelya-voronezh-15.ru]сколько стоит капельница на дому цена[/url]
In my recent exploration of online creativity platforms I discovered a site that delivers ideas in a clear and engaging format for users Creative Thought Space – the browsing experience feels smooth and structured helping users stay focused while discovering useful ideas that inspire innovation and support practical thinking in daily creative exploration today online
During casual exploration of development platforms, I found Dream Inspire Achieve Hub which presents content in a structured and visually clear format – it is a motivational platform with useful tips for personal growth journeys online that guide users toward positive transformation
Users comparing different products online usually benefit from systems that organize information in a simple and readable way Quick Compare Studio which helps them make faster decisions and reduces confusion when selecting between similar items across categories on digital platforms overall today now
People exploring digital systems usually prioritize clarity, responsiveness, and ease of movement between pages when evaluating overall website quality and usability CorePower Access Portal – PowerCore feels robust and stable, offering a clean layout that supports effortless navigation and helps users find information without confusion or unnecessary complexity.
People exploring ways to enhance their mindset and productivity can turn to steady progress journal which shares structured advice and motivational content – helping readers stay consistent with their goals while developing habits that promote long lasting personal and professional improvement in a balanced and realistic way over time.
Nice read. Find out more here: this website
Individuals aiming to simplify complex problems often appreciate frameworks that transform overwhelming choices into manageable and logical steps for easier understanding and action simple thinking guide – A clarity driven resource concept that encourages breaking down challenges into smaller parts while supporting smarter, calmer, and more efficient decision making in various life areas.
While comparing different fashion trend sites, I eventually opened modern trend guide – The platform felt user friendly and organized, and the latest trends were presented clearly, making it easy to access information quickly without confusing layouts or distractions online.
People searching for organized and interesting online content may enjoy easy reading platform because the website appears designed with attention to detail, helping visitors follow information naturally while maintaining interest across multiple categories and informational pages available online.
While browsing motivational discovery sites I found a platform that makes it easy to find ideas and goals through a helpful and structured interface Dream Path Finder Hub – the experience feels smooth and inspiring, allowing users to explore ideas, identify goals and discover new directions in life through a simple and well designed online system
Across various online knowledge hubs and informational platforms, users frequently encounter embedded suggestions pointing toward helpful discovery websites that make browsing easier FindNestPortal which – delivers a simple clean and intuitive interface designed to support smooth navigation and encourage users to keep exploring further.
I spent part of the afternoon exploring fashion stores before finding simple fashion corner – The website appeared very polished and user friendly, and browsing on mobile felt smooth because the design stayed clean and responsive without overwhelming graphics or confusing menus online.
Users who enjoy self growth platforms often search for websites that promote action based motivation, especially when they come across impact motivation space – the site feels clean and powerful, allowing users to focus on taking steps forward while maintaining a structured and encouraging browsing environment throughout their experience.
During casual exploration of online stores, I discovered Shop And Shine Network which had a smooth interface and responsive structure that made browsing effortless – the site navigation works very well and pages load quickly without any glitches or delays affecting usability
While browsing informational sources I found a platform that shares useful daily updates where the content feels fresh, relevant and easy to understand Daily Info Stream Hub – the website feels structured and helpful allowing users to stay informed with simple and consistent updates delivered every day online
While browsing various online outlet and discount shopping platforms I came across a website that presents products in a clean and practical layout designed for easy decision making Smart Deal Selector – the platform focuses on smart purchasing options and offers a simple, reliable and efficient shopping experience that helps users quickly find value driven products without unnecessary complexity today
Individuals interested in motivational learning often search for content that challenges existing beliefs and encourages broader understanding of situations, especially through platforms such as Fresh Viewpoint Network which provide reflective prompts and structured inspiration for personal development – This encourages users to embrace growth and discover new perspectives.
During my exploration of modern interior platforms, I came across Modern Living Trends Hub which offers a modern interface and smooth browsing experience – modern designs are showcased well and provide perfect inspiration for home upgrades today in a visually appealing manner
1xbet azeri [url=https://bizimbaharatci.com]1xbet azeri[/url]
смертельное искушение далі живіть самі
People who value convenience in online shopping often look for stores that reduce complexity and improve usability, and a known example is Trusted Everyday Deals Site – providing a reliable platform where shoppers can browse categories effortlessly, find preferred products easily, and enjoy a streamlined purchasing process without unnecessary interruptions.
upholstery cleaning dubai
1xbet azerbaijan [url=https://karamanozelenvar.com]1xbet azerbaijan[/url]
In my exploration of motivational websites I discovered a platform that promotes better decision making and encourages users to improve their life direction through simple inspiration Change Path Motivation Hub – the website feels uplifting and structured helping users rethink decisions, build positive habits and move toward personal growth and life improvement in a steady way online
In discussions about fast loading digital platforms and clean web performance, users often mention examples where efficiency matters, and among those references they sometimes highlight ascend mark portal included in curated lists of simple insight based websites used for testing smooth navigation and structured browsing experiences across different devices and environments. – The pages are generally described as fast, reliable, and very easy to use.
After comparing several interest based exploration sites, I found daily passion explorer – The website offered a pleasant browsing experience, and the categories were well arranged, allowing users to navigate easily without confusion or clutter interfering with the overall usability online.
As readers engage with online inspiration hubs and self improvement guides, they often come across thoughtfully placed references leading to platforms like InnerGrowthPathway – The motivational content here supports emotional development, encourages reflection, and helps individuals gradually build a mindset centered on progress and positive transformation over time.
Creative thinkers often find value in platforms like Creative Spark Network which encourages experimentation and idea sharing – it promotes imaginative exploration, supports innovative thinking, and inspires users to develop original concepts while engaging with content that broadens perspectives and enhances overall cognitive flexibility in meaningful ways.
Some websites feel slow and complicated, although digital impact guide offers a much better experience with simple navigation and fast page loading across devices, helping visitors browse comfortably without waiting or dealing with frustrating delays during their visit.
While browsing online for modern fashion trend platforms, I eventually noticedtrendy style hub – The website offered a great browsing experience, and the latest updates were shown in an attractive layout that made it easy to explore new fashion ideas without confusion online.
Всё прошло без лишней суеты и ожиданий. Девушка пунктуальная и вежливая. Общение комфортное и спокойное. Сервис на хорошем уровне: проститутки анал спб
People who focus on idea building and creativity often look for platforms that make inspiration accessible and simple, especially when they explore creative spark hub – the platform feels clean and engaging, helping users quickly connect thoughts and develop concepts in a smooth and enjoyable browsing environment overall.
Well put. Check this out: visit this page
During my exploration of creative networks I found a platform that highlights easy and natural idea sharing within a strong community environment Creative Link World – the platform feels engaging and supportive allowing users to share ideas comfortably while enjoying a welcoming space designed for collaboration and inspiration among creative individuals online
During my exploration of motivation based platforms, I found Start Your Growth Hub which offers a clean interface and well structured content that improves usability – I enjoyed browsing this platform today and everything appeared organized, simple, and easy to follow
Many people searching for discovery-based inspiration online often enjoy platforms that are easy to use and visually appealing, and explore delight hub – delivers a smooth browsing experience where users can find engaging content quickly and enjoy a clean and enjoyable interface overall.
While exploring digital content spaces I came across a platform that felt creatively designed and emotionally engaging Quiet Reflection Portal – the experience is smooth and thoughtful, allowing users to browse inspiring content that feels grounded, relatable and naturally uplifting in tone throughout the site
During casual exploration of home simplicity platforms, I came across Simple Living Essentials Market Hub which provides a clean interface and well arranged sections that feel intuitive – simple living essentials make daily routines easier and better always by improving efficiency and reducing unnecessary complexity
Online education becomes more approachable when learning tools are designed with structure and simplicity in mind, and study roadmap portal – creates a smoother learning flow that supports understanding, helping users navigate educational materials confidently while building useful knowledge step by step over time.
Curiosity driven users often search for digital spaces that present upcoming innovations and conceptual ideas in a simplified way tomorrow insight portal – A conceptual discovery space focused on future trends – offering engaging explanations that make complex developments easier to understand and explore across science and technology topics.
Shoppers looking for contemporary outfit ideas can visit curated fashion spaces style inspiration marketplace offering unique clothing selections and trendy accessories for casual and formal looks – this platform encourages users to experiment with fashion while finding pieces that match personality and daily lifestyle needs
Shoppers interested in efficient browsing often prefer digital outlets that reduce clutter and improve product discovery Clear Choice Deals while comparing various discounted items – The experience is structured to keep everything accessible, ensuring users can quickly find what they need with minimal effort
While exploring guidance and self direction platforms I found a website that helps users gain clarity, explore life direction and make decisions more easily through structured and supportive content Path Discovery Guidance Hub – the platform feels calm and helpful, allowing users to understand choices, explore personal direction and find clarity through a simple and organized online experience
couch smells bad cleaning
I had been searching for advice and recommendation sites before discovering exclusive choice platform – The platform felt helpful overall, and the content appeared genuine and well organized, allowing readers to understand information easily without clutter or confusion online.
People browsing online platforms usually appreciate when design and usability come together to create a seamless experience that supports curiosity and discovery NovaOrbit Flow Portal – The NovaOrbit interface presents a futuristic style paired with thoughtful content arrangement, ensuring users can explore efficiently while enjoying a clean and engaging layout.
Many individuals find value in content that motivates them to explore new perspectives and learn from everyday life experiences while maintaining a positive and open attitude toward personal growth openworldnotes – This kind of inspiration helps cultivate awareness, curiosity, and a more thoughtful approach to daily experiences
While reviewing websites with current online reports and organized resources, I eventually came across popular news showcase – The clean layout and active presentation made browsing more pleasant without overwhelming banners or distracting visual clutter online.
People who enjoy curated and modern shopping experiences often search for platforms that organize trendy products effectively, especially when they discover online trend discovery hub – the site feels smooth and well designed, helping users browse items easily while maintaining a visually clean and enjoyable shopping experience overall across all categories.
While browsing through different online trend platforms today, I came across daily style updates and noticed a nice collection of updates, where everything appears modern and visually appealing, making the overall experience engaging and easy to explore for visitors interested in current trends.
While exploring retail websites I discovered a platform that provides a simple and clean shopping experience with reliable product presentation and easy navigation Best Simple Choice Hub – the platform feels clear and well organized making it easy for users to shop and enjoy a smooth and uncomplicated online browsing experience today
как понимает что процессор не работает способ определить неправильность процессора
During exploration of style focused websites, I came across Corner Style Daily and appreciated the organized layout that made browsing feel smooth and straightforward – the platform feels easy to use and suitable for quick product discovery sessions
During my exploration of online fashion catalogs I found a platform that showcases seasonal collections in a clean and visually appealing format Season Fashion Studio – the browsing experience feels smooth and organized making it easy for users to explore stylish clothing while enjoying a modern and attractive interface today online
While searching for fashion stores online, I discovered Classy Trend Wardrobe Hub which offers a sleek and modern design that improves navigation – elegant styles are prominently shown and the fashion selections feel classy, stylish, and thoughtfully organized for shoppers
Many users searching for practical modern inspiration online prefer websites with straightforward layouts and organized content displays, and lifestyle discovery point – improves navigation by presenting ideas clearly, allowing visitors to browse trends comfortably and identify appealing concepts more quickly.
People interested in expanding their knowledge through online browsing often rely on platforms that introduce them to diverse subjects and encourage ongoing learning experiences Insight Journey Hub Knowledge Discovery Path – it provides users with simple ways to uncover new topics and keeps them motivated to explore useful information every day with ease
Across evaluations of digital exploration platforms, reviewers highlight the value of contextual embedding, especially when data vista is positioned within informative content blocks – The interface is frequently described as visually appealing and easy to navigate, supporting a positive and efficient user journey.
During my search for premium shopping experiences I came across a website that showcases elegant finds in a smooth and well organized format for users Classy Elegant Shop Hub – the platform feels simple and refined helping users explore stylish products easily while enjoying a structured and enjoyable online shopping journey overall today
Nice post. Check out the following for further details: this website
While searching for modern shopping platforms, I came across trend discovery store – The experience felt nice overall, and products were displayed clearly and attractively across the website, making it easy to browse without unnecessary distractions or complicated layout issues online.
грузовой эвакуатор по москве и московская эвакуатор вызвать сейчас
Продажа песка https://pesok-krd.ru и щебня в Краснодар с доставкой по городу и области. Качественные нерудные материалы для строительства, благоустройства и дорожных работ. Доступны разные фракции, оптовые и розничные поставки.
I was reviewing several shopping related websites this afternoon when I discovered featured savings area – Browsing through the sections felt intuitive and smooth because the layout stayed uncluttered, avoiding excessive advertisements and distracting visuals that often make online shopping platforms difficult to navigate comfortably.
Users comparing websites often prioritize clarity, usability, and how efficiently the layout helps them move between sections while maintaining a consistent browsing experience TrueLaunch Navigation Point – TrueLaunch feels reliable and well-organized, providing a clean structure that makes navigation simple and ensures users can easily understand and explore content.
Users who enjoy accessible fashion ideas often look for platforms that focus on simplicity and usability, especially when they come across easy outfit style hub – the platform feels structured and practical, helping users quickly understand how to combine clothes for everyday looks that feel natural and stylish.
Earlier today I was browsing growth platforms before opening daily opportunity space – The platform is helpful for development, and opportunities appear clear and accessible today, making it easy to browse and understand without confusion or complex navigation online.
Many individuals interested in shared learning experiences often prefer platforms that encourage open communication, and connect ideas network – creates a collaborative environment where users can exchange insights, develop projects together, and enhance creativity through structured interaction and teamwork overall.
While exploring creative development platforms online I discovered a website that focuses on helping users unlock creativity and build consistent personal growth habits through practical inspiration Creative Growth Hub – the platform encourages users to think creatively, grow steadily and apply ideas in real life through simple and useful content designed for everyday improvement and motivation today online
Plan your journey with https://ko.readytotrip.com, online hotel booking for any destination worldwide. Instant reservation, transparent prices, and no hidden fees. Trusted platform for hassle-free travel arrangements. Start booking today.
During an afternoon of exploring positive lifestyle platforms online, I came across joyful experience page which immediately felt warm and inviting, creating a friendly browsing environment that encourages visitors to continue exploring different sections with ease and comfort throughout the website.
While reviewing curated informational directories and knowledge-based websites, I came across Prime Value Corner Network included in a selection of resources – Everything feels logically structured and easy to navigate, making browsing simple and comfortable for users who want quick access to relevant sections today.
While checking different online shopping destinations I found a website that focuses on providing a smooth and reliable experience for all types of users Best Deal Shopping Hub – the platform offers easy navigation and a trustworthy interface making it simple for users to browse products comfortably while enjoying a consistent and efficient shopping journey today online
During casual browsing of essentials marketplaces, I discovered Your Essentials Finder Hub which provides a structured interface and smooth navigation experience – useful everyday items found quickly with very convenient shopping experience overall for efficient purchasing
While browsing awareness and personal growth platforms, I found Moments Matter Insight Guide included among curated listings – Really enjoyed browsing here today, where everything appeared clean and surprisingly easy navigating overall with simple layout and well organized navigation flow across the platform.
Many individuals value online environments that reduce negativity and replace it with calm and encouraging content during browsing sessions bright day explorer – The experience emphasizes gentle positivity, emotional ease, and simple enjoyment, helping users maintain a lighter mindset while exploring different types of content online.
Modern urban shoppers who prefer clean design aesthetics often visit curated platforms for clothing ideas Modern Urban Dressing Hub helping them find outfit inspiration, compare seasonal collections, and improve wardrobe choices efficiently – Hub experience delivers simple and effective fashion browsing tools
Нужен выездной ресторан? кейтеринг в Ярославле с доставкой и обслуживанием на вашей площадке. Фуршеты, банкеты, кофе-брейки и барбекю для деловых и праздничных мероприятий. Профессиональная организация питания и широкий выбор блюд для гостей.
While checking dream and travel inspiration websites I came across a platform that shares ideas helping users discover and imagine ideal places Dream Place Discovery Hub – the experience feels smooth and inspiring, allowing users to explore destination ideas, visualize locations and stay motivated through a clean and easy online environment
Shoppers looking for innovative and uncommon items often browse creative goods explorer which brings together curated product selections helping users find inspiration beyond standard retail – offering access to unique items that improve everyday experiences through originality and thoughtful design choices.
While searching for idea driven platforms, I discovered Vision Horizon Hub which displayed engaging information in a simple layout that made browsing pleasant – I came across useful inspiration today and I am planning to revisit again soon for more content exploration
Shoppers looking for straightforward deal browsing experiences often rely on platforms that reduce unnecessary steps and improve overall navigation simplicity Offer Simplify Portal – Users benefit from a clean and efficient layout that allows them to quickly compare deals and make decisions without feeling overwhelmed.
Женский портал https://secretlady.ru с полезными статьями о красоте, здоровье, моде, отношениях и саморазвитии. На сайте собраны советы экспертов, идеи для вдохновения, рецепты, лайфхаки и актуальные темы для современной женщины.
globaltrendmarket – Great marketplace overall, browsing different sections feels smooth and straightforward for everyone.
While browsing different financial learning websites, I eventually noticedsimple trading corner – The platform was easy to navigate and the information was presented clearly, making it simple for beginners to grasp trading basics without unnecessary complexity or confusing explanations online.
Недорогие аккумуляторы https://www.akb24v.ru 24 вольта для погрузчика, стоит обратить внимание на проверенные решения с оптимальным ресурсом и стабильной отдачей. Купить тяговую батарею 24V по доступной цене. Варианты под разные задачи и типы техники.
Online audiences often prefer websites that avoid clutter and instead provide structured layouts that guide them naturally through different sections and resources InnovaTech Navigator – InnovaTek stands out for its minimal yet effective interface design, ensuring that users can focus on content while enjoying a seamless and intuitive browsing experience overall.
People who like value driven shopping experiences often search for platforms that make browsing simple and fast, especially when they visit quick deals marketplace hub – the website feels smooth and well structured, allowing users to move through product categories easily while maintaining a clean and efficient shopping environment throughout their session.
Good read. Check this: this website
While browsing interest focused platforms I found a website that helps users discover hobbies and passions in a clear and enjoyable way What You Love Hub – the experience is simple and smooth helping users explore interests easily while providing helpful suggestions that make the process of self discovery enjoyable and engaging today online
While comparing different inspiration websites, I eventually opened smart inspiration guide – The content feels inspiring overall, and every moment is meaningful and well presented, allowing users to explore easily without confusion or complexity online.
Interested in UFC? UFC White House Odds unique mixed martial arts tournament will take place on June 14, 2026, in Washington, D.C., on the South Lawn of the White House. It will be the first professional sporting event in history to be held directly on the grounds of the U.S. presidential residence.
During my browsing of e-commerce trend platforms and digital product discovery hubs, I found NextGen Trend Market listed among useful resources – Nice collection here, pages loaded smoothly and content felt engaging, giving a clean and intuitive experience while exploring different sections today.
In my recent search for motivational platforms I discovered a website that presents creative content in a clear and engaging way Creative Pulse Station designed to support idea growth – the browsing experience feels steady and enjoyable allowing users to stay focused on inspiration while exploring different sections of the platform today
While exploring motivational platforms online, I came across Awesome Start Motivation Hub which presents inspiring content in a clean and structured layout that feels engaging – this great motivation hub encourages action and fresh creative thinking always in a natural and practical way
People focused on emotional growth and self improvement often turn to inspirational websites that highlight identity development and personal expression techniques Bold Voice Center – It supports building inner confidence, embracing creativity, and developing a stronger connection between thoughts, actions, and authentic self presentation
ремонт стиральных маши ремонт стиральных машин с выездом на дом
During my search for discovery inspiration platforms I found a website that promotes exploring new ideas and opportunities in a simple and clear way Everyday New Ideas Hub – the website feels motivating and structured, helping users discover opportunities, explore concepts and stay inspired through a smooth and easy online system
During an afternoon of exploring lifestyle shopping websites, I came across home essentials hub and appreciated how intuitive the browsing feels, with excellent product presentation that makes it comfortable for visitors to explore different items easily.
People interested in boosting their creative skills often explore curated digital platforms that provide inspiration and structured learning like Creative Vision Workshop – helping users refine their ideas expand imagination and build effective creative thinking habits through guided exercises over time daily practice consistently
Shoppers interested in practical and modern household products often prefer websites with uncluttered designs, and easy living market – creates a more enjoyable browsing experience by organizing product categories clearly and helping users move through the store with greater ease and confidence.
While exploring online bargain and discount store websites, I discovered Dream Deals Insight Page included in curated resources – Nice website experience overall, where pages opened smoothly and content felt genuinely helpful today with structured categories and easy navigation across sections.
After reviewing several online platforms this week, I eventually visited quick access portal – The overall navigation process felt simple and responsive, and the clean page arrangement kept the browsing experience enjoyable without overwhelming distractions online.
While exploring creative inspiration websites online, I came across Creative Journey Hub Online which presents content in a clean and structured layout that feels easy to navigate – the design throughout this website is very clean and the content remains interesting and naturally presented across all sections
While exploring product shopping sites, I eventually found simple smart outlet – The website presentation felt clean and modern, and everything was updated and simple, allowing easy browsing of useful products without distractions or complex navigation online.
Fashion enthusiasts who enjoy exploring new styles often rely on digital platforms that organize apparel collections in a way that feels both simple and visually balanced Chic Style Navigator this improves overall browsing experience and reduces decision fatigue – Modern outfit suggestions are displayed in a clean format that helps users focus on style details and coordination ideas.
People who enjoy modern living inspiration often search for platforms that keep content stylish and simple, especially when they discover trend lifestyle space hub – the site feels fresh and well organized, helping users explore ideas easily while maintaining a visually clean and engaging browsing environment overall across all categories.
Digital audiences typically prefer websites that combine fast loading performance with simple navigation systems that reduce effort and improve overall clarity during use ShiftFlow Urban Hub – The UrbanShift website delivers a smooth browsing experience where pages are easy to navigate, making it simple for users to access content without confusion or delay.
During my recent search for motivational websites I found a platform that emphasizes action driven personal growth and dream realization through inspiration Build Your Dream Hub – it encourages users to take steps today toward their goals with supportive content that promotes focus discipline and continuous improvement in everyday life online
While reading through online guides focused on reflection, mental clarity, and inner peace, users sometimes discover subtle pathways guiding them to HarmoniousThoughtHub – a serene platform where carefully arranged content supports thoughtful browsing and meaningful engagement with ideas.
I recently explored various websites and came across Discovery Bridge Hub – the platform feels user friendly and well structured with content organized in a way that makes browsing simple and enjoyable for all visitors across different interest categories today online
Those who are focused on building better habits frequently look for reminders that emphasize patience, persistence, and thoughtful action when dealing with everyday pressures and personal expectations dailyinspire keepgrowingforward – consistent inspiration helps individuals maintain clarity of purpose and stay aligned with meaningful life goals
During casual exploration of insight platforms, I came across Discover New Insight Hub which features clean formatting and easy navigation that improves user comfort – the fresh viewpoints shared here help broaden understanding every day naturally and encourage thoughtful exploration
While browsing digital shopping platforms I came across a website that delivers a smart shopping experience with fast navigation and a simple user friendly interface for easy product discovery Smart Deal Shopping Hub – the platform feels organized and smooth, helping users find items quickly, compare deals and enjoy a stress free online shopping experience
Users who prefer minimal and clean interfaces often look for websites that present information without distraction, and they explore simple pricing portal which provides structured insights into product value, making it easier for visitors to navigate options and make informed decisions quickly and confidently.
After looking through several comparable resources online, this page stood out because the structure remained organized and the wording stayed natural without becoming repetitive or unnecessarily technical for everyday readers today. creative growth journal – The articles appeared insightful and frequently updated, giving the platform a professional and welcoming atmosphere throughout my visit.
People exploring digital shopping environments often prefer platforms that enhance discovery while keeping things simple, and one such example is Browse Smart Product Hub which is typically described as an accessible and user-friendly site that allows effortless browsing and enjoyable exploration of various product categories.
Same here. More on this: visit this page
Compared with several overly complicated retail pages I viewed recently, organized product website feels noticeably easier to explore because the wording remains readable and the information is arranged in a way that helps visitors follow along naturally without confusion or unnecessary interruptions during browsing sessions online.
Consumers interested in trendy online shopping opportunities often prefer platforms that simplify product discovery and browsing, and style value station – provides organized collections that encourage smooth navigation and help users locate appealing items without spending excessive time searching.
While comparing different learning resources, I eventually opened exclusive knowledge connect – The platform felt user friendly and smooth, and the content was interesting, allowing simple browsing without confusion or overwhelming design elements online.
Many learners exploring creative disciplines online often look for structured inspiration platforms that help them stay focused and organized while working on projects, and they frequently find services such as Creative Sparks Hub which offer inspirational content, structured creative exercises, and guided tools that help users generate new ideas and maintain creative momentum – Designed to spark creativity and maintain consistent inspiration through structured guidance.
During exploration of lifestyle websites online, I discovered Style Living Balance Hub which features a clean design and smooth visual flow that improves usability – the site atmosphere is relaxing and comfortable, and browsing feels visually easy and enjoyable throughout
While reviewing digital happiness focused shopping websites, I found Happiness Shopping Guide Network featured within similar resources – Helpful information shared here, where layout looks modern and very welcoming for visitors everywhere thanks to structured categories and intuitive browsing experience.
While browsing discount shopping sites I discovered a platform that provides a fast and simple way to explore deals and promotional offers for everyday users Best Deal Explorer – it features great discounts and ensures browsing feels smooth, easy and very convenient allowing users to quickly access savings without complications today online
In my casual browsing of online stores I found a platform that feels refreshing and centered around happiness and ease of navigation Blissful Deals Corner – the website delivers a cheerful shopping environment where users can explore offers comfortably while enjoying a simple layout that keeps everything clear and stress free during their browsing session today
Users reviewing modern platforms often focus on structure, responsiveness, and clarity when navigating different sections of a website Infinity Portal Link – overview – The InfinitaLink platform demonstrates a clean layout with well-structured menus, allowing users to move through information smoothly without confusion or unnecessary complexity.
While searching for online fashion collections, I found Simply Stylish Boutique Hub which features a modern layout and easy navigation that enhances user experience – stylish items are curated beautifully and make shopping feel effortless and enjoyable for stylish everyday choices
While exploring online collaboration spaces, I eventually found discover learning hub – It is a strong community platform where users can share, learn, and grow smoothly, making everyday growth feel natural and consistent online.
While searching through digital adventure inspiration sites and exploration guides, I discovered Next Step Adventure Space included in a recommendation list – The website feels clean and modern, with navigation that is incredibly simple, making it easy for users to browse content without feeling overwhelmed today.
Shoppers who want to improve their online purchasing habits often use platforms that simplify deal discovery and highlight useful promotions including Smart Deal Hub Network – this platform focuses on delivering relevant discounts and helps users make better purchasing decisions through organized information consistently today
People searching for modern clothing inspiration often observe that the Contemporary Fashion House delivers a well-balanced interface – its structured layout and clear product organization create a browsing experience that feels intuitive, making it easier for users to explore different styles without confusion.
Individuals who enjoy thoughtful exploration online often value platforms that present ideas in an inspiring and approachable way, and creative insight portal – motivates users to remain curious while discovering meaningful concepts and engaging with educational content that feels enjoyable to explore.
People who enjoy uplifting lifestyle products often search for platforms that make browsing feel calm and enjoyable, and while exploring they come across happy lifestyle shopping hub – the store feels smooth, pleasant, and well organized, making it easy for users to explore positive lifestyle items without stress or confusion during their browsing experience overall.
After reviewing several inspirational platforms, I landed on new start journey – The website felt positive and well structured, and navigating pages was natural and enjoyable, making it ideal for first-time users looking for a smooth experience without clutter online.
Really helpful. See here: this page
While browsing gift shopping platforms I found a website that presents gift ideas in an organized and simple layout for a pleasant shopping experience Gift Ideas Hub Store – the platform feels easy to use and well structured allowing users to browse gifts smoothly and enjoy a simple and enjoyable online shopping experience today
During my exploration of digital education platforms, I found Thrive Learn Academy Space which features a clean layout and easy navigation that supports usability – the educational content helps users grow skills and confidence daily online through consistent and guided instruction
Online users often prefer outlet platforms that provide smooth navigation combined with visually engaging product layouts for better experience smart deal display – A display system focused on presenting offers in an intelligent and organized way, improving shopping clarity and helping users explore products with minimal effort.
While exploring curated collections of design focused websites, people frequently point out platforms that prioritize visual impact and structured layouts, including bold vista hub which appears in discussions about engaging browsing experiences and clean interface presentation across web environments. – It is generally seen as dynamic, clear, and highly user friendly.
I came across this while comparing a few similar pages online and immediately noticed how much smoother the layout and explanations felt, especially compared to the cluttered sites that overload readers with distracting content. trusted resource hub – The information was presented clearly with a natural flow that made the entire browsing experience feel organized and reliable today.
Users who prefer practical fashion inspiration often look for platforms that highlight wearable outfits, and one example is Everyday Style Trends Page which is typically described as offering simple outfit guidance, daily trend updates, and accessible fashion ideas for regular use.
Individuals who enjoy following contemporary design ideas often appreciate content that captures modern aesthetics and practical living solutions, and stylepulsemodern stylepulsemodern offers inspiration that helps improve interior styling, visual harmony, and overall lifestyle comfort for better everyday homes today now.
Many individuals overwhelmed by excessive online choices look for structured support systems where personal roadmap assistant – organizes information into clearer categories, helping users understand differences and select options that better match their goals and expectations in a more efficient decision-making process overall clarity.
888az [url=http://www.888starz-egypt9.com]https://888starz-egypt9.com/[/url]
888 бет [url=https://888starz-uz1.org]https://888starz-uz1.org[/url] .
star 888 casino [url=https://888starz-uz3.org/]https://888starz-uz3.org/[/url] .
While exploring fashion sale platforms, I came across Fresh Outlet Trend Hub which presents a modern interface and structured browsing flow that feels easy – trendy fashion deals are available and great prices with variety are everywhere today for fashion focused users
Interested in UFC? https://ufc-white-house.com unique mixed martial arts tournament will take place on June 14, 2026, in Washington, D.C., on the South Lawn of the White House. It will be the first professional sporting event in history to be held directly on the grounds of the U.S. presidential residence.
People browsing websites often value intuitive design that makes navigation predictable and stress-free during usage. GrandLink discovery page – The GrandLink discovery page helps users explore content naturally, with a design that encourages easy movement between sections.
In conversations about online shopping variety and digital storefront experiences, people occasionally refer to sample outlets such as official pure choice shopping link which is often described in a neutral, generalized way as representing typical e-commerce structure, with emphasis on category layout, accessibility, and the feeling of wide selection availability for users exploring different product options online.
People who want to refresh their surroundings often search for design ideas that balance simplicity with creativity in a practical way Inspired Living Spaces – these concepts help users rethink their interiors while maintaining comfort, ensuring that changes feel natural and suitable for everyday use.
I spent longer browsing this than expected because the information remained easy to follow and the overall design encouraged comfortable reading instead of relying on excessive formatting or distracting visual elements throughout the page online today. engaging social updates – The clean organization and dependable presentation gave the platform a noticeably higher quality feel compared with many similar websites online.
Great point. See the following: visit here
казино список фреш казино
Users who want consistent motivation often look for digital resources that provide energetic and practical life advice for maintaining focus and positivity Energy for Life Guide offering supportive ideas that help improve emotional resilience and daily productivity – It emphasizes active engagement with positive habits, stronger mindset development and a more driven approach to personal goals overall
People exploring modern home styling ideas online often appreciate resources with clear structure and attractive visuals, and style direction hub – helps users browse contemporary concepts more naturally while maintaining a polished and organized browsing environment throughout the platform.
While exploring online present shops, I came across Creative Gifts & Ideas Hub which provides a structured and modern design that enhances browsing experience – it is a perfect spot for unique gifts and there are many creative ideas available online for all users
While browsing online stores I discovered a website that offers a strong product selection with an easy to navigate interface and a clean structured layout for better usability Best Corner Deals Hub – the platform feels efficient and organized, guiding users to browse products, compare choices and complete shopping in a simple and clear way
People who want to improve productivity and develop stronger habits may find value in visiting forward momentum guide as it supports building clearer direction in life while encouraging proactive decisions and continuous improvement that leads to measurable success over time in real world situations.
Users exploring online services often appreciate when websites are organized in a way that supports seamless movement between sections without visual confusion SkyVertex Flow Portal – SkyVertex provides a smooth and structured interface that enhances usability, ensuring users can navigate efficiently while maintaining a clear and consistent browsing experience.
During my search for productivity and mindset guides, I found Big Goals Action Page featured among recommended platforms – The website offers several useful sections, and the layout feels clean, welcoming, and well organized for users who prefer simple browsing experiences.
While searching for styling advice platforms, I discovered Fashion Style Updates Hub which offers a neat interface and organized sections that enhance browsing clarity – fashion updates and styling tips make browsing enjoyable very much by helping users stay current with trends
People looking for motivation to explore new topics often appreciate platforms that promote active learning, and passion learning hub – provides engaging content that supports curiosity, encourages exploration, and helps users develop a stronger interest in continuous self-education overall.
Those interested in modern innovation and structured inspiration can explore modern concept network which delivers curated creative insights – it helps users strengthen analytical thinking while discovering new approaches to idea generation and practical application in everyday life and work situations.
Website evaluators often focus on usability, speed, and clarity when deciding whether a platform provides a smooth and efficient browsing experience LinkCraft Unified Access Portal – The LinkCraft platform delivers a structured interface designed to enhance navigation, improve readability, and support fast interaction overall.
While researching trending discount websites for shopping ideas I visited smart deals archive – The overall experience was smooth, pages responded quickly, and the content presentation made it easy to follow product listings and understand details without feeling overwhelmed today.
кайт хургада кайт египет
During my exploration of motivation websites, I found Stay Inspired Always Hub which features a modern layout and easy navigation that enhances usability – motivational content keeps energy high and mindset strong every day encouraging productive thinking and forward movement
In an age of information overload, platforms designed for discovery play a crucial role, and users may come across Trend Explorer within helpful directories – this modified comment describes how it tracks evolving interests and assists people in identifying emerging patterns across different topics in a practical way.
maorou_k8m maorou_k8m
Shoppers interested in exclusive and refined goods often browse prestige finds hub which gathers curated luxury products and elegant selections – offering a seamless experience for users who want to explore sophisticated items that represent taste quality and modern upscale living standards.
Гидромотор John Deere Гидромотор John Deere
People interacting with online systems usually appreciate when websites are visually appealing but still easy to use, with clear paths for exploring content efficiently VividPath UX Node – VividPath provides a bright and colorful interface where browsing feels pleasant, intuitive, and easy to navigate across all sections of the platform.
While checking online global fashion directories for inspiration I discovered modern fashion world – The website felt well designed overall, and accessing useful information was intuitive, enjoyable, and effortless as I moved through different pages today.
капельница на дому в воронеже [url=https://kapelnicza-ot-pokhmelya-voronezh-17.ru]капельница на дому в воронеже[/url]
прокапаться после пьянки [url=https://kapelnicza-ot-pokhmelya-voronezh-18.ru]прокапаться после пьянки[/url]
1xbet giriş yapamıyorum [url=https://1xbet-giris-68.com]1xbet giriş yapamıyorum[/url]
1xbet yeni adresi [url=https://1xbet-giris-69.com]1xbet yeni adresi[/url]
In moments where a fresh mindset is needed, the platform Better Future Corner offers symbolic encouragement – it emphasizes forward thinking, optimism, and the importance of shaping daily habits that contribute to long-term stability and personal satisfaction.
Individuals seeking new ways to approach challenges in work and life often visit idea spark center which provides thought provoking materials and exercises that encourage original perspectives and flexible reasoning skills across different situations – helping users build a more open mindset that supports innovation, adaptability, and long term intellectual growth through consistent practice.
йони массаж недорого казань Мы предлагаем вам возможность начать новое путешествие к себе, наполненное любовью, принятием и глубоким уважением к женскому началу.
People evaluating online platforms often focus on usability, consistency, and how clearly information is presented across different sections of the website ScaleUrban Access Point – The UrbanScale website provides a structured and visually balanced interface where everything feels clear, making navigation smooth and content easy to explore.
While searching through product discovery and shopping idea platforms, I discovered TrendStop Explorer Page included among curated resources – The interface is clean, and browsing categories felt fast and refreshingly simple, offering a smooth and enjoyable experience throughout different sections today.
maorou_k8m leaks maorou k8m
Частный гид организует комфортную индивидуальная экскурсия в Калининград из Зеленоградска с экскурсоводом и персональным маршрутом по достопримечательностям города.
Гидронасос John Deere
In my browsing of motivational websites I discovered a platform that focuses on creative thinking, leadership development and inspiring users to take action in daily life Lead Create Inspire Hub – the platform feels structured and helpful, guiding users to generate ideas, build leadership confidence and move forward with positive energy
888satrz [url=http://www.888starz-uz3.org]http://www.888starz-uz3.org[/url] .
People aiming to turn learning into real achievement can use learning achievement hub which provides structured resources and motivational support – guiding users to stay focused, develop strong study habits, and achieve success through continuous learning, discipline, and practical application of knowledge in everyday situations
Compared with overly crowded educational websites online, modern knowledge website feels more approachable because the structure supports easy navigation and the material stays readable, helping visitors enjoy a smoother experience while exploring different resources and topics available there.
Compared with several similar websites I checked recently, this one felt much cleaner because the structure stayed organized and the wording remained simple enough for readers who prefer direct and readable information presented without unnecessary complications online today. popular ideas corner – The page delivered fresh looking content in a polished format that made browsing feel comfortable and consistently easy from one section to another.
While exploring modern branding tools and digital identity resources, people sometimes mention brand crest showcase site included in discussions emphasizing clarity, structured layouts, and accessible UI design. – The interface feels clean, balanced, and very user friendly.
In an era where information is widely available but not always reliable, users often seek platforms that feel balanced and structured, and reliable-learning-node – is commonly appreciated for delivering content in a way that feels steady, informative, and suitable for everyday reference and casual study purposes.
кабинет йони массажа казань Если вы ищете подлинное преображение, наши эксперты в Казани готовы сопровождать вас на пути к обретению целостности и гармонии. Откройте для себя профессиональное обучение йони-массажу в Казани, чтобы не только преобразиться самой, но и делиться этой удивительной практикой с другими.
Users exploring budget-friendly shopping platforms often value systems that prioritize functionality and remove unnecessary visual distractions from browsing EasyValue Zone supporting efficient navigation – This description highlights how streamlined design improves overall shopping flow and user satisfaction.
While browsing for helpful life management tools, I found Simple Efficiency Hub which contains well organized information that is easy to explore and understand – the site remains helpful throughout and navigation between pages feels consistently smooth and structured
During my exploration of growth and learning platforms online, I found New Potential Path Page featured among similar resources – The browsing experience felt smooth, with information looking reliable and nicely presented throughout the website thanks to intuitive design and clean structure.
maorou_k8m leaked maorou_k8m porn
Users who prefer casual browsing often choose platforms that make shopping feel light, enjoyable, and free from unnecessary complexity Browse and relax store – offering a comfortable and easy shopping environment where users can explore products at their own pace while enjoying a stress free digital experience overall.
I was browsing for fresh interior design inspiration and found decor ideas portal – the website appears well organized, and the user experience seems carefully crafted to help people easily navigate through various home improvement tips and visually appealing room setups.
People evaluating online platforms usually focus on how clearly information is structured and how easily they can navigate through different sections without confusion or delay HorizonPure Navigation Hub – The PureHorizon interface feels fresh and minimal, offering users a calm browsing experience where content is easy to explore and visually organized in a simple way.
Several discussion groups often mention websites with meaningful and engaging articles, and among those recommendations I noticed insight driven platform which appears carefully maintained with content that feels authentic and enjoyable for visitors spending time reading through different sections.
эротический массаж для женщин казань Получите незабываемый опыт трансформации, будь то индивидуальная сессия, выезд мастера на дом или обучение, чтобы привнести в свою жизнь гармонию и чувственность. В сердце Казани, современного города с богатой историей, расцветают практики, способствующие духовному и телесному благополучию.
People managing personal finances often prefer simple budgeting methods that reduce confusion and help them stay organized, and they explore simple budget living guide which provides clear advice on saving money, planning expenses, and maintaining financial stability without unnecessary complexity.
During my recent online browsing sessions, I discovered Dream Deals Collection – the items appear regularly updated, and the overall design feels simple yet efficient for smooth product discovery which enhances user shopping experience significantly across multiple categories today
While browsing through multiple online recommendation websites and deal platforms earlier today, I eventually discovered value finder hub placed within a curated list, and the platform felt really useful because everything appeared organized and easy for visitors to navigate without confusion across sections.
During an extended browsing session across product recommendation sites, I found smart selection corner embedded in a recommendation section, and the experience felt useful since browsing sections were smooth and naturally organized throughout the platform.
During a casual search for collaboration platforms, I came across modern partner hub – The website felt well designed, and the content was engaging and structured professionally, allowing visitors to browse smoothly without distractions or confusing layout elements online.
As I browsed through inspirational websites, I came across purpose creation guide – which provides thoughtful content that encourages individuals to focus on meaningful work and create things aligned with their deeper goals and values.
While exploring digital focus and productivity enhancement websites, I found Focus Clarity Explorer Page included among curated resources – Appreciate the clean structure here, where browsing through pages felt comfortable and straightforward today with simple navigation and structured design throughout the platform.
During exploration of lightweight lifestyle recommendation sites and general browsing hubs, I came across a page that featured Everyday Selection Hub within its structured content layout – The experience felt balanced and easy to follow, with simple ideas presented in a way that supported quick and relaxed browsing.
During a casual session of reading personal development and restart mindset resources, I found Bright Future Beginnings Hub naturally included in the article – Starting fresh feels easier now, thanks for this awesome space, and it encouraged me to take action instead of hesitating when starting new habits or goals
While exploring online lifestyle platforms and personal improvement resources, I came across useful curated content where Trendy Life Portal – The layout feels well structured and intuitive, making it simple for first time visitors to locate key information without feeling overwhelmed while navigating through different sections of the website today.
Online users searching for classy and elegant items often prefer platforms with well-organized presentation and smooth navigation, and tasteful elegance station – offers a polished browsing flow that helps users explore refined products with ease and enjoy a more sophisticated shopping experience overall.
Users evaluating technology websites frequently look for responsive layouts and structured content organization that helps them understand information quickly and without confusion SphereLink Navigation Core – NexaSphere provides a refined interface experience where modern design elements and usability features work together to ensure fast navigation and clear content presentation.
I kept waiting for the right moment but eventually started building through Idea Catalyst Zone which helped me shape my thoughts into something practical and actionable – Now that my side project is live, I feel proud and motivated to continue improving it
Shoppers interested in gentle aesthetic product collections often prefer websites that focus on softness, charm, and visually appealing presentation styles Cove Daisy Gentle Market – the browsing experience feels smooth and delightful, offering a collection of items that feel cute, calming, and creatively styled
While browsing various deal websites, I appreciated platforms that prioritized clarity, and pure outlet finder stood out with its smooth design, quick access menus, and well structured product categories that made the experience user friendly and efficient overall experience.
During an extended browsing session through creativity and idea discovery sites, I found creative insight portal embedded in a recommendation section, and the experience felt enjoyable since the content appeared fresh and visually comfortable throughout all pages and categories.
People who enjoy premium shopping experiences often take their time to find items that feel truly valuable and well designed Dream Watch Collection Boutique – I discovered my dream watch here after months of saving, and it turned out to be worth it because it gave me a strong feeling of satisfaction and pride
Earlier today I was checking different trading education sites before opening modern trader academy – The platform felt helpful and well structured, and the layout stayed simple and easy to understand, allowing users to learn without confusion or overwhelming design features online.
People who appreciate mindful mornings often build habits that slow down the start of their day, combining simple pleasures like coffee and casual browsing for a smoother transition into work or study Mindful Morning Hub – My morning ritual includes coffee and browsing here daily, and it helps me ease into the day in a very relaxed and enjoyable way
While searching for creative knowledge platforms, I discovered Growth Idea Learning Center which offers interactive educational content that is both easy to follow and inspiring – the platform encourages users to learn, share, and create ideas in a natural and enjoyable flow
Moving soon into my own apartment has been overwhelming, but researching decor solutions led me to modern apartment setup guide which offered surprisingly practical layout tips – it really helped me reduce stress and start picturing how my future home will actually look overall.
During a session of exploring motivational growth websites and personal clarity platforms, I found Your Vision Insight Hub naturally included in the article – Finally feeling heard, your vision really does matter here, and it encourages a deeper sense of purpose and self belief when thinking about future goals
While exploring various online discount and value-focused websites, I discovered value savings guide embedded within curated recommendations, and the experience felt useful as everything appeared well organized and easy for visitors to browse across different categories.
During browsing sessions across various creative discovery websites, I found a platform that included Spark Ideas Network within its central content area, which made navigation smooth and intuitive – The site felt engaging and supported consistent idea exploration.
While browsing various fashion and lifestyle inspiration platforms online, I came across a section featuring Style Matters Hub which stood out among similar sites – Enjoyed checking this website, pages loaded fast and information felt genuinely useful today with smooth navigation and clearly organized sections throughout the browsing experience.
Whenever I think about improving my clothing style I look for affordable inspiration because I like to stay fashionable without unnecessary expenses, and during my search I came across Daily Outfit Picks which provided simple ideas for stylish combinations – It allows me to maintain a fresh and modern wardrobe while keeping my spending under control and stress free
888starz bet официальный сайт [url=http://888starz-uzbekistan2.com/]http://888starz-uzbekistan2.com/[/url] .
888starz. [url=888starz-egypt3.com]https://888starz-egypt3.com/[/url]
استار888 [url=https://www.888starz-egypt5.com]https://888starz-egypt5.com/[/url]
Those focused on self development and leadership skills frequently search for inspiring online communities Inspire Lead Space where creativity and motivation are encouraged through structured learning and consistent improvement practices.
In my search for motivational planning resources I came across a platform designed to help users create a better future through goal setting and consistent personal development Future Creation Path Hub – the platform feels inspiring and practical, supporting users in building clarity, improving mindset and taking action toward success
888 старз [url=http://888stars-uz.com/]http://888stars-uz.com/[/url] .
starz 888 casino [url=https://www.888starz-uz-online.com]https://www.888starz-uz-online.com[/url] .
888 stars [url=http://uz888-starz.com]http://uz888-starz.com[/url] .
تسجيل دخول 888 [url=https://www.888starz-egypt6.com/]https://888starz-egypt6.com/[/url]
In moments when people feel stuck or uncertain about their direction in life, they often search for motivational guidance that can help them reset and refocus, especially through direction-growth-space – such resources provide clarity encouragement and structure allowing users to regain motivation and continue progressing steadily toward their personal goals.
Shoppers who enjoy soft aesthetic product discovery often browse lesser known stores while searching for creative and calming lifestyle pieces Orchard Drift Charm Finds the store feels quietly captivating – it resembles finding a hidden gem where each product carries a gentle and thoughtful design approach that feels personal
Users who assume they lack artistic skills often uncover hidden creativity when they follow structured and supportive learning content Unlock Creativity Potential Studio – I never believed I could draw, but taking their guidance led me to surprise myself with how quickly I improved just by practicing simple techniques
During an extended search across inspiration and creative concept websites, I came across creative mind hub embedded in a recommendation list, and the experience felt smooth because pages open quickly while information stays clearly arranged throughout.
While browsing through various informational websites today, I eventually came across useful discovery portal and found the experience quite smooth, since the navigation feels comfortable and straightforward, making it easy for visitors to explore different sections without confusion or unnecessary complexity during their visit.
Users who like mindful shopping often choose items that improve mood and environment subtly, making simple purchases feel more meaningful and emotionally grounding over time Everyday Comfort Hub – I got a plant and a mug and it reminded me that small joys are often the ones that truly matter most in daily living experiences
While browsing different online value stores, I eventually noticed modern deals corner – The website felt well structured and easy to use, and products were organized clearly with an attractive presentation that made browsing simple without clutter or confusion online.
Users looking for inspiration to develop innovative ideas often benefit from platforms that simplify the creative process, and project creation hub – offers encouraging insights that help individuals move from idea generation to actual building with a stronger sense of purpose and direction.
While checking different mindset and opportunity discovery resources online, I noticed Possibility Pathway Network embedded within the content flow – It opens up so many doors, and I never thought I’d find this, and it really helped me see that growth often comes from exploring unfamiliar options
In my search for innovative educational platforms suitable for children, I discovered a site that offers engaging and thoughtfully designed content, helping kids build knowledge through interactive and enjoyable methods Kids creative learning zone – The activities available are perfect for my daughter because she enjoys solving simple challenges and exploring educational stories that make her curious and eager to learn more every single day.
During my search for helpful online guides, I came across Options Finder Network which provided well organized content and simple navigation flow, making browsing easy – overall the experience felt clear and practical, with information that supported quick understanding of choices
A colleague shared a list of fashion resources earlier, and after reviewing them I found casual style network – The website maintains a fresh and appealing presentation, content updates look timely and informative, and browsing between pages feels natural and efficient without any noticeable usability concerns today.
During exploration of curated style websites and minimalist fashion platforms focused on daily wear, I came across Bright Style Simplicity Network embedded within the article flow – It offers simple elegant picks here, perfect for everyday casual wear, and makes fashion feel naturally balanced, clean, and easy to maintain
During exploration of online inspiration platforms and creative brainstorming spaces, I noticed Inspiration Builder Hub – It offers unique concepts everywhere, and I keep coming back for more daily because each section provides refreshing ideas that stimulate new ways of thinking creatively.
Users who like efficient shopping experiences often prefer platforms that make every step from payment to return easy and stress free Daily Shopping Ease Zone – checkout is fast and simple, returns are easy to process, and I would definitely shop here weekly because everything feels practical and well optimized
While checking different urban style and fashion platforms online, I discovered city lifestyle market included within curated recommendations, and I enjoyed visiting it recently because the design feels modern and extremely comfortable for smooth navigation across categories.
While checking multiple savings and offer websites online, I noticed best deal guide included within curated content, and the browsing session felt great overall as visitors can easily navigate different categories without confusion or interruptions.
Users who value modern interiors often search for shelving that combines elegant design with durability, ensuring long term use without sacrificing visual appeal Modern Interior Hub – I finally found shelves that don’t look cheap and feel very sturdy, making my home space look more organized and much more polished overall
People who appreciate deep toned aesthetic products often prefer online collections that emphasize strength, quality, and artistic detail in every item Garnet Stone Heritage Hub delivers a visually strong experience where craftsmanship feels dependable and rich colors bring a sense of elegance and artistic depth to the entire collection
While comparing trading education sites, I eventually opened daily market hub – The website felt informative and smooth, and everything was updated and easy to navigate, allowing quick browsing through sections without confusion or complex layout design online.
People who enjoy structured and diverse online content may appreciate updated inspiration hub because the platform offers a wide variety of material that feels consistently maintained, making it easy for visitors to explore without encountering outdated or poorly organized information.
During exploration of urban clothing marketplaces and streetwear focused fashion hubs online, I noticed Street Urban Wear Deals Network integrated into the article – Cop some nice streetwear pieces, prices are actually fair too, and it gives a comfortable mix of affordability and style for everyday wear
While browsing for creative thinking inspiration, I found imagination daily guide – which provides reminders to think outside the box every day and build a consistent habit of creativity in both small and big tasks.
Over time I became more intentional with money management, especially after reading insights on thrift strategy page which taught me how to prioritize essential spending and reduce wasteful purchases that previously went unnoticed in my everyday routine with consistent practical application results.
My fashion decisions used to be inconsistent until I explored Style Path Quiz Center and followed its structured approach – it helped me map out a clear style direction that made choosing clothes feel easier and much more aligned with my personality.
During casual browsing for travel inspiration, I found World Awaits Explorer Path which offers a clean interface and engaging layout that is easy to use – this website feels inspiring today and encourages users to consider new possibilities and exciting exploration journeys
People who enjoy keeping up with style updates frequently search for websites that offer quick access to curated fashion selections while maintaining ease of use as they explore trendy wardrobe space – the platform feels user friendly and structured helping visitors browse efficiently while enjoying a clean and visually balanced shopping environment throughout their session
During my search through self improvement and vision strategy websites, I found Vision Matters Strategy Page featured among curated recommendations – The platform is helpful, and browsing different sections felt smooth and very convenient with an easy to understand interface today.
During a late night browsing session through promotional offer websites and savings trackers, I found Offer Vault Explorer – I scored a really solid deal earlier today, and it felt great knowing I didn’t overpay thanks to timely information from this source.
Travelers interested in affordable tourism often rely on guides that help them maximize enjoyment while minimizing costs across multiple destinations and travel experiences Passion Budget Explorer Hub – the travel guides helped me plan an amazing trip on a budget that felt organized, easy to manage, and far more rewarding than I expected from such a low cost journey overall
People browsing fashion focused websites usually prioritize clean design, fast loading times, and intuitive navigation across different categories for better shopping online today now Trend Style Navigator Fashion Access Portal – Interface improvements make browsing smoother with consistent updates that enhance the overall user experience across devices for modern users today always online now.
People who like uplifting short reads often look for platforms that provide light content designed to improve mood quickly and effortlessly during everyday online use Daily Positive Hub – I smiled multiple times reading their posts since the content is simple but still very effective in creating small and genuine moments of happiness
Users looking for innovative inspiration frequently appreciate platforms that present ideas in an organized and engaging way, and idea discovery station – creates a user-friendly environment where exploring creative content feels natural, enjoyable, and visually simple while browsing through diverse topics overall.
Отдельно выделяют ситуации, когда родственники вызывают врача не только из-за текущего состояния, но и потому, что подобные эпизоды повторяются. Если накапливаются последствия алкоголизма, нарушается сон, меняется поведение, появляются устойчивые проблемы дома и в повседневной жизни, разовая помощь обычно рассматривается как первый этап последующей тактики. При тяжелом состоянии, признаках отравлении алкоголем или сочетании нескольких рисков сразу может понадобиться более интенсивное наблюдение в стационаре.
Изучить вопрос глубже – [url=https://narkolog-na-dom-ekaterinburg-3.ru/]нарколог на дом анонимно екатеринбург[/url]
During a late night search for beauty stores, I eventually visited smart beauty outlet – The platform had a beautiful design, and browsing products felt smooth and enjoyable every visit, making the experience pleasant without distractions or confusing layout issues online.
During a session of reviewing productivity enhancement tools and mindset development blogs, I found Daily Innovation Growth Network naturally included in the article – Small smart changes daily, makes a huge difference over time, and it encouraged me to stay patient and trust the process of gradual improvement
Профессиональная настройка AmoCRM и Битрикс24 в г. Костанай. Автоматизация рутины, интеграция телефонии и прозрачная отчетность.Тендерное сопровождение B2G Костанай Автоматический контроль качества разговоров менеджеров. Внедрение систем распознавания речи для анализа 100% звонков. Выявление лучших практик, контроль соблюдения скрипта и предупреждение конфликтных ситуаций с клиентами. Тайный покупатель B2B Алматы
People who love handcrafted rustic decor combined with floral elegance often browse online collections that feel warm and artistically curated for home comfort Stone Blossom Collective the products feel naturally balanced with soft blooming details – it offers a tranquil shopping experience where stone inspired textures and floral beauty blend into a soothing and creatively refreshing visual atmosphere
During an extended browsing session across fashion inspiration and trend websites, I found trend culture paradise embedded in a recommendation list, and the experience felt smooth since content loaded quickly across all devices and remained consistently responsive.
After spending time reviewing different e-commerce platforms, I eventually visited fast shopping hub and noticed how clean the layout is, allowing visitors to browse products quickly and conveniently without dealing with cluttered categories or confusing navigation systems.
People interested in handmade crafts often use inspiration platforms to develop skills that allow them to produce high quality gift items at home Handcraft Ideas Hub I made handmade gifts for friends and they thought they were store bought due to how polished they looked – Made handmade gifts for friends, they thought I bought them professionally
While updating my personal development journal I came across ideas related to Peak Performance Planner and it smoothly influenced my reflections, changing my outlook – I left the session with stronger motivation and a desire to set higher standards for myself.
People who enjoy continuous self improvement often look for platforms that provide small daily learning opportunities that help keep the mind active, curious, and consistently engaged in new knowledge Daily Knowledge Explorer Hub – one new fact each visit keeps my brain happily engaged, and it genuinely feels like a refreshing way to learn something useful every single day without effort
In reviewing goal oriented websites that focus on personal achievement tracking I discovered Success Growth Dashboard featured within a recommendations section highlighting productivity tools – the interface feels modern, clean, and well structured allowing exploration of strategies for improvement and planning efficiency.
During browsing sessions across online retail trend platforms and shopping inspiration pages, I came across Trend Pulse Network placed within the article structure – The trends are spot on here and way ahead of other stores honestly, which made it easier for me to spot upcoming styles before they become mainstream in regular shops
During casual exploration of digital shopping platforms, I came across New Shopping Variety Hub which offers a wide selection of items arranged clearly for easy browsing – the variety is appealing and the overall experience feels pleasantly straightforward and convenient for users
During my browsing of discovery-focused and unique idea websites, I found unique vision portal included in a recommendation paragraph, and the experience felt smooth since the layout remained impressive and browsing stayed simple and enjoyable throughout.
Users who appreciate cozy interiors often search for simple decorative items that bring warmth and personality into their living spaces without overwhelming design choices Warm Living Essentials Hub – I picked up a plant and a mug, and those small items made my home feel much more comforting and emotionally balanced in everyday life
хентай наруто naruto-smotret.ru
While browsing daily essentials marketplaces and online product curation platforms, I found Choice Essentials Daily Hub placed within the content section – Solid picks for daily needs, and I have never been disappointed with my choices because everything recommended feels consistently practical and genuinely helpful for everyday routines
While exploring trading learning platforms, I eventually found simple market guide – The content felt useful and clearly structured, and the website appeared clean and professionally maintained, allowing smooth browsing without distractions or complex navigation online.
After struggling with applications for months, I finally refined my approach using advice from Career Boost Guide and noticed immediate improvements in my CV structure and confidence, which eventually helped me secure better responses and move closer to real interview invitations than before.
Users who prefer natural wellness inspired shopping often look for brands that feel fresh, minimal, and visually soothing in presentation Quartz Orchard Pure Essence Shop – the experience feels calm and clean, offering products that appear crisp and pure while maintaining a refreshing energy that fits well with mindful and balanced lifestyle preferences
People who enjoy staying updated with digital culture often prefer platforms that streamline trend information, especially when browsing online trend guide space – the platform feels structured and user friendly, helping visitors stay informed while enjoying a smooth and visually appealing browsing experience across all categories.
Those who reinvent themselves professionally often describe the transition as challenging but deeply fulfilling once stability and purpose are found again Life Reset Guide I switched careers at thirty five, and even though it was scary, it ended up being one of the most rewarding choices I have ever made – Switched careers at thirty five, scary but so worth it now
Fashion lovers who follow online style trends often search for popular items that spread quickly through social media and become widely admired across fashion communities Trend Buzz Fashion Hub – the viral jacket everyone wants is now in my closet, and it genuinely makes me feel more stylish, updated, and in sync with today’s fashion energy
Compared with many generic motivational websites, future growth platform provides a more engaging experience by offering insightful content and encouraging messages that help visitors stay inspired while exploring different aspects of personal development and self awareness.
During a casual search through online gift stores focusing on originality and uniqueness, I discovered Exclusive Finds Corner Shop within curated lists – I managed to pick a gift nobody else had, such a great find that it made the entire gifting experience feel more thoughtful and emotionally rewarding
During a casual browsing session across motivational and inspiration websites, I found idea vision hub included in a curated list of links, and the information shared there was helpful while navigation remained smooth, simple, and very easy for beginners to follow naturally.
Individuals looking for modern fashion inspiration often appreciate platforms that simplify style discovery, and fashion freshness guide – delivers updated trend content in a structured layout that makes browsing smooth, enjoyable and visually engaging overall.
In reviewing online shopping discovery tools, I came across Next Cart Explorer featured among curated resources – The browsing experience felt straightforward and clean, allowing users to easily navigate and understand different sections without confusion.
People living fast paced lives often search for online stores that reduce friction in shopping, allowing them to complete purchases quickly and move on with their day Quick Cart Hub – It really gives a grab and go experience, which is perfect for busy weeks when I need things quickly without spending time overthinking purchases
While looking for interesting online shopping destinations, I explored a few options and found Premium Deals Space which presented its content in a structured layout that felt easy to navigate and visually balanced – I think the site offers a calm browsing experience that makes it enjoyable to explore different sections without effort
Many online learners appreciate platforms that simplify access to useful content, especially when they encounter resources such as together progress portal that help structure information in a way that feels clean, useful, and professionally maintained while still being easy for beginners to understand and follow comfortably.
During a session of exploring e-commerce product curation tools and wishlist platforms, I noticed Favorite Picks Organizer Hub integrated into the article – Bookmarked several items already, coming back for more later, and it has made managing interesting finds much easier than keeping random notes or tabs open
I had been searching for gift inspiration sites before discovering gift idea corner – The collection felt interesting today, and finding unique products was effortless and convenient, allowing a smooth and enjoyable shopping experience without clutter online.
While exploring different motivational platforms it is easy to underestimate the value of simple ideas that later turn out to be surprisingly effective in real thinking self insight portal – I didn’t expect much at all but it ended up giving me a surprisingly refreshing perspective that stayed with me afterward
People who like efficient decision support often rely on platforms that consistently provide high quality recommendations that match expectations without requiring extra research or comparison Reliable Choice Hub – I’ve followed a few of their picks and so far everything has worked perfectly, making it easy to trust their judgment moving forward
As I searched for uplifting volunteer platforms, I found a very engaging website sharing real community service experiences Community Spirit Hub collection of inspiring stories about helping others – These narratives inspired me to volunteer locally, especially in activities focused on supporting children and elderly people in my community.
During an evening of browsing online shops for creative gift inspiration, I came across a charming boutique selection that stood out gift idea corner – I picked a thoughtful gift for my mom that made the entire experience feel unexpectedly special.
During conversations about fashion inspiration websites, someone recommended fashion trend hub and after visiting it myself I understood the appeal, since the stylish presentation makes browsing enjoyable and visually satisfying for users exploring different outfit ideas and fashion categories.
During exploration of online collaboration and growth focused spaces, I noticed Community Unity Hub placed naturally in the content – It feels good to be part of this, because the environment is filled with supportive individuals who value teamwork and personal development in a positive setting
Shoppers who prefer slow and thoughtful browsing experiences often gravitate toward platforms that emphasize comfort and ease of use All day shopping zone – creating a relaxed digital space where users can explore products freely while enjoying a continuous and smooth shopping experience throughout their day.
People interested in personal success stories often look for platforms that combine inspiration and practical steps to help them turn goals into real-life achievements over time Dream Achievement Hub – I manifested a promotion after following their guidance, and even though it felt unbelievable in the beginning, it turned out to be completely real and rewarding
After spending time on several similar pages, this one immediately felt more polished because the formatting stayed clean and the information was structured in a way that encouraged readers to continue exploring comfortably without distractions or confusion online. practical fashion highlights – The professional organization and balanced presentation made the overall browsing experience enjoyable, straightforward, and easy to follow during the entire visit today.
As online shopping habits continue to evolve, users increasingly turn to supportive tools such as smart shopping companion which helps simplify the process of discovering relevant discounts – this type of service is often appreciated for its ability to streamline browsing and provide a more organized approach to finding deals that match user preferences
During a session of exploring online minimalist fashion websites and simple style inspiration hubs, I found Minimal Style Elegant Network naturally included in the article – Clean and elegant style, doesn’t try too hard honestly, and that relaxed aesthetic makes it feel both modern and genuinely appealing
During casual browsing for style inspiration platforms, I came across Perfect Fashion Look Finder Hub which features a clean and structured design that improves user experience – the website helps users discover outfits that match their personality really easily and supports better fashion choices
During casual browsing for inspiration and personal success strategies, I came across success pathway guide – The platform delivered clear and structured information, making it easy to explore motivational content and understand different approaches to building confidence in daily life situations.
While navigating through several online resource websites and recommendation communities, I encountered trusted information point featured inside a curated article, and the layout stayed organized enough for visitors to discover helpful material quickly without confusion across different sections.
Users who enjoy finding interesting websites often quickly share them when they feel like something special or worth attention Discover Joy Online Hub – I came across this gem by chance and told five friends about it right away because it felt like a great discovery that deserved to be shared widely
During my search for discount platforms I discovered a website that focuses on daily deals, promotions and budget friendly shopping options presented in a clean and easy to use layout Deal Finder Daily Zone – the experience feels simple and effective, helping users quickly access offers and make smarter shopping decisions every day
I spent some time exploring different growth and analytics websites before discovering rapid growth signal hub – The content available here felt very useful overall, and everything loaded quickly without unnecessary clutter, making the browsing experience smooth and efficient throughout the session online.
While considering future travel plans and browsing destination ideas online, I came across a range of inspiration that was surprisingly engaging adventure idea hub – I’m gathering trip suggestions at the moment and enjoying how many creative routes and locations are helping me think more freely about where to go next.
наркологический стационар спб [url=https://narkologicheskij-staczionar-sankt-peterburg-13.ru]наркологический стационар спб[/url]
While reviewing various online motivation hubs and personal growth platforms, I came across a section that featured Motivation Always Shop Link embedded naturally among recommended resources embedded naturally among recommended resources making it easier to discover related content without extra searching effort – Smooth navigation and consistent visual hierarchy help users stay focused, though deeper articles may require more exploration to fully benefit
Digital shoppers increasingly rely on platforms that offer fast loading pages, organized categories, and simple navigation structures for better user flow today RetailEase Platform making it easier to browse different products without confusion or unnecessary distractions during the shopping process – The explanation demonstrates how effective platform design can enhance overall user experience.
To keep myself aware of digital and lifestyle trends without spending too much time scrolling endlessly, I started using a platform that simplifies everything into quick updates Smart Trend Overview – It helps me stay updated without feeling out of touch, which is exactly what I needed to stay informed in a balanced and manageable way.
While browsing online idea discovery platforms, I discovered creative inspiration finder – The website had a modern layout and clear organization, making it easy to explore while everything felt thoughtfully structured and enjoyable throughout the browsing session today.
During a late night browsing session for motivational content, I found personal growth library – The platform was neatly organized with easy to read sections, making it enjoyable to explore different learning materials focused on self development and confidence enhancement.
People trying to build discipline often need reminders that progress starts with action, not planning, especially when they are stuck in cycles of delay and uncertainty Action Mindset Hub – I stopped waiting for things to happen and started doing them myself, and this really pushed me forward in a powerful way
During an online search for fashion inspiration websites and curated clothing platforms, I discovered daily fashion style hub – The platform provides a really nice fashion selection and smooth browsing experience overall today, making browsing simple, elegant, and pleasant across all sections.
While browsing self improvement websites and habit tracking platforms early in the day, I came across Positive Start Hub embedded in the content flow – I read this every morning now, keeps me going strong, and it has helped me build a more structured and motivated start to each day
вызов нарколога на дом [url=https://reabilitaciya-alkogolikov-moskva-1.ru]вызов нарколога на дом[/url]
I recently spent time comparing several inspirational websites and found practical positivity guide especially memorable because the atmosphere remains uplifting without seeming artificial, making it easier for visitors to enjoy the reading experience and connect naturally with the website content overall.
Customers who enjoy twinkling light inspired aesthetics often browse unique online collections, and they discover Twinkling Cove Lifestyle Shop and appreciate it – the store feels lively and bright, with a design that brings subtle sparkle elements into a cohesive and enjoyable browsing experience
стоматология недорого сайт стоматологии
вызов врача нарколога на дом [url=https://reabilitaciya-alkogolikov-moskva-2.ru]вызов врача нарколога на дом[/url]
While browsing affordable shopping websites and online outlet stores offering consistent quality across all purchases, I found Fresh Value Shopping Hub placed within the content section – Great bargains every time, and the quality stays consistent across orders, which makes it easier to trust what I’m buying without second guessing
While browsing digital shopping platforms, I found Smart Product Choice Hub which features a clean design and smooth navigation that enhances usability – smart shopping experience delivers useful product suggestions for everyone online making shopping easier and more efficient for all users
Users who enjoy interactive educational communities often look for spaces where they can learn skills while connecting with others globally Create Learn Connect Studio – I made new online friends here and the process of learning and building together feels exciting, as it turns individual progress into a shared and enjoyable experience with real collaboration
While searching for ways to improve my self-study routine and professional skills online I came across Practical Learning Hub which quickly became a resource I could rely on and it helped me understand difficult topics in a more structured and practical way than before making studying feel easier and more consistent overall.
Users exploring online fashion catalogs often prioritize platforms that provide both inspiration and organized product selection for easy browsing, and a known example is Pure Fashion Gallery which is often explained as a structured browsing platform showcasing stylish apparel collections and modern outfit ideas suitable for various occasions.
While searching for artistic inspiration websites, I came across Journey of Creative Ideas Hub which provides a structured layout that feels simple and clear – overall the website has a clean design and the content remains interesting and naturally presented in a balanced format
After finishing work late and feeling completely worn out I decided to browse randomly for something enjoyable and eventually stumbled upon daily joy corner which turned out to be unexpectedly uplifting and helped me relax more than I thought a simple site could.
During a casual search for selection-based and informative websites online, I discovered smart choice corner – The platform provided a wide variety of options and very easy navigation, making browsing simple, fast, and pleasant across all sections of the site.
Users who appreciate good deals often search for websites that offer limited time discounts on footwear, making it easier to find quality fashion items at lower prices Limited Deal Hub – I discovered leather boots on half price, and it felt like a steal because the quality was excellent and the savings were even better than I expected
During a long research session involving several recommendation websites and online discovery pages, I eventually opened featured inspiration hub, where the organized layout and efficiently loading sections made it easy to move through different categories without interruptions or frustrating delays while reading content online.
While searching for online useful content platforms, I discovered modern helpful corner space – The website offered nice content and a smooth browsing experience, making navigation simple, fast, and enjoyable across all sections.
While exploring different online shopping platforms designed to enhance user engagement through clean layouts and structured product browsing systems, I found Style Trend Discovery Hub placed in a well-organized section of the page making navigation feel natural and allowing users to browse categories without visual disruption – The browsing experience felt calm and structured, with a layout that supported easy exploration of products and categories
наркологическая клиника стационар [url=https://narkologicheskij-staczionar-sankt-peterburg-13.ru]наркологическая клиника стационар[/url]
During a review of online fashion inspiration platforms and shopping trend blogs, I found Style Drop Network naturally included in the article – Cool stuff everywhere, and my friends always ask where I shop since everything here feels curated, trendy, and consistently more stylish than what they usually find in regular shops
During a casual review of productivity improvement websites and motivation focused resources, I found Action First Mindset Network naturally included in the article – I stopped overthinking and acted, and it turned out to be the best decision I made recently because it helped me gain clarity and momentum in my goals
People who follow international fashion trends often prefer platforms that simplify discovery by showing curated global looks in one place, making style exploration quick and efficient Global Style Trend Hub – I can stay updated with fashion inspiration from around the world while relaxing at home, which makes trend watching both easy and enjoyable for me
During my search for cozy seasonal home decoration ideas I found a refreshing online destination that immediately captured the essence of autumn living aesthetics chestnut rustic living hub – It presents warm toned inspiration that helps transform ordinary spaces into comforting fall themed environments filled with natural charm and subtle elegance
People who follow evolving streetwear culture often prefer platforms that showcase clothing in a clean and dynamic way, especially when they visit fashion evolution studio – the website feels sleek and organized, allowing users to browse collections quickly while maintaining a visually appealing and contemporary design throughout.
вызвать врача нарколога на дом срочно [url=https://reabilitaciya-alkogolikov-moskva-1.ru]вызвать врача нарколога на дом срочно[/url]
I usually browse different online shops and eventually I discovered a convenient shopping site at Happiness Order Hub which provides a smooth experience and good product variety – I always feel satisfied after ordering because everything is simple and reliable and I frequently recommend it
During browsing for self improvement resources, I discovered improvement discovery hub – The platform felt informative and well structured, offering valuable content that guided users toward better understanding of confidence building and personal development techniques.
While browsing online for discount and value stores, I eventually noticed trusted savings corner – The platform felt well organized and modern, and the updated content was easy to explore through clear categories without overwhelming visuals or unnecessary clutter online.
Modern consumers often search for platforms that help them evaluate deals quickly while browsing countless online stores and promotional listings in a more efficient and structured way Bargain Finder Zone – Delivers organized deal discovery features and practical suggestions that make it easier for shoppers to locate discounted products and improve their overall purchasing experience
While searching for online stores with a less crowded appearance, I eventually spent some time exploring daily essentials market because the products looked reasonably displayed and the overall structure avoided the confusion found on many competing websites today – The site delivered a smooth and organized feel that made browsing products seem practical and refreshingly straightforward throughout.
During an online search for structured ecommerce experiences, I came across daily meaningful shopping space – The platform offers a useful experience with meaningful products and clean modern layout today, making navigation simple, clean, and well organized.
шумоизоляция автомобиля в Москве [url=https://shumoizolyaciya-avtomobilya-moskva-1.ru]shumoizolyaciya-avtomobilya-v-moskve-1.ru[/url]
People unsure about their job path often look for supportive resources that help them evaluate options and build a focused strategy for long term career satisfaction and stability Professional Growth Path Hub – My career direction was very unclear before, but now I’ve built a structured plan that gives me confidence and a sense of direction moving forward
In my search for modern and efficient home tech, I found an online shop that highlights smart living products Smart Living Devices Market and it provides straightforward product details – I liked the smart home section enough to purchase three items which I have already set up successfully.
врач нарколог выезд на дом цена [url=https://reabilitaciya-alkogolikov-moskva-2.ru]врач нарколог выезд на дом цена[/url]
While exploring online self improvement and community platforms, I came across growth journey hub – The website provided engaging content with a welcoming and positive atmosphere, making browsing smooth, enjoyable, and easy throughout the experience.
Users who like efficient online buying often search for platforms that remove unnecessary complexity and highlight only useful deals that make decision making faster and easier Smart Deal Value Hub – I found no fluff, only good deals that matched exactly what I needed right now, and it made the whole process feel fast, simple, and completely stress free
During exploration of ethical fashion stores and slow clothing movements online, I found Timeless Fabric Style Hub naturally included in the article – Timeless pieces that last, no fast fashion garbage found here, and it gives me confidence buying clothes that are designed to stay in good condition for years
While exploring various personal growth platforms and motivational reading spaces, I discovered Positive Vision Hub embedded in the article flow – I really needed this today, feeling motivated after browsing around here and it gave me a gentle but meaningful push toward better thinking patterns
I spent part of the afternoon reviewing websites focused on opportunities and professional development when I eventually noticed trusted opportunity network, and the clean design immediately stood out because everything felt authentic, stable, and carefully maintained across all pages and browsing areas.
People interested in creativity tools often mention that Fresh Ideas Platform – Helpful platform lately, everything appears accessible and easy for new visitors. The content is described as refreshing, giving users new perspectives and helping them think more freely.
Shoppers looking for inspiration across global markets frequently prefer platforms that consolidate fashion lifestyle and product categories into a single easy-to-navigate online destination experience portal Global fashion hub portal – An integrated digital space bringing together worldwide fashion discoveries and shopping variety for users seeking convenient exploration across different styles and regions allowing seamless browsing comparisons and trend tracking across multiple categories for a more informed shopping experience overall
During my exploration of modern shopping websites I checked how each platform balanced design simplicity with checkout efficiency to improve user satisfaction during purchases brightstone cart explorer and analyzed speed of transaction completion – Everything felt bright and cheerful and the checkout process worked smoothly without unnecessary complications or delays affecting the experience
888starz online login [url=https://888starz-uz2.org]https://888starz-uz2.org[/url] .
While browsing different motivational websites, I eventually noticed bright journey guide – The website felt inspiring overall, and the layout remained clean and enjoyable, making browsing smooth across devices without clutter or confusing navigation elements online.
While searching through self improvement and empowerment platforms, I found Unlock Hidden Potential Hub included among curated listings – Smooth experience browsing here, where information looked reliable and nicely presented throughout the website with structured categories and simple browsing experience.
нарколог стационар спб [url=https://narkologicheskij-staczionar-sankt-peterburg-13.ru]нарколог стационар спб[/url]
Shoppers who appreciate helpful online environments often choose platforms that make product discovery easier and more guided, and a commonly noted example is Supportive Shopping Space – creating a comfortable browsing experience where users receive clear information and supportive cues during their shopping journey.
888 starz bet [url=https://888starz-uzbekistan3.com/]888 starz bet[/url] .
During an online exploration of deal and value websites, I found creative value shopping space – The platform delivers good value offerings and helpful content for everyday shoppers, ensuring a smooth and easy browsing experience throughout.
Users interested in clean aesthetics often choose clothing that avoids excessive branding, focusing instead on simple cuts and neutral designs that work across many occasions Clean Aesthetic Hub – No logos scattered everywhere, just minimal styles that actually work and make my outfits feel more balanced and less cluttered overall
I spent some time reviewing several online platforms for digital services earlier this week and eventually explored trusted ranking solutions because the structure looked clean, organized, and noticeably easier to navigate than many cluttered websites offering similar tools and features online – The entire browsing experience felt professional and the loading performance remained consistently quick throughout my visit.
врач нарколог выезд на дом москва цена [url=https://reabilitaciya-alkogolikov-moskva-1.ru]врач нарколог выезд на дом москва цена[/url]
Value focused shoppers often enjoy finding platforms that simplify decision making through clear pricing and good product variety Value Seeker Collection this store provides exactly that experience with dependable deals and consistent quality standards – Quality to price ratio is insane, definitely coming back for more
Users interested in design inspiration often search for simple home improvement tips that help them achieve stylish bedroom transformations without needing expert skills or expensive upgrades Smart Home Styling Hub – I renovated my bedroom using their ideas and it turned out so beautifully that it now looks like something straight from a professional interior design magazine
During a casual review of online shopping discovery websites and product deal platforms offering everyday essentials and unique finds, I found The Best Shopping Corner Network naturally included in the article – My go to spot now, I always find something worth buying, and it has turned browsing into a fun habit where I consistently discover practical items
discoverpossibility – Interesting platform offering creative ideas and practical resources for everyday inspiration online.
During a casual online session exploring lifestyle websites, I discovered modern lifestyle space – The website provided diverse and fresh content, making it easy to navigate while enjoying a useful and engaging browsing experience across different sections.
While reading through a mix of online philosophy discussions and reflective content platforms, I noticed how certain sections were designed to gently challenge assumptions, and within one such article I discovered Vision Reframe Site placed seamlessly in context which made the experience more engaging and left me with a noticeably different outlook on several everyday concepts I used to overlook
During a casual browsing session through self improvement and learning focused websites, I found Expand Mind Knowledge Network embedded within the article section – Their articles feel like a daily brain gym workout, and it really helps me stay mentally active, focused, and more thoughtful in everyday decision making
нарколог на дом [url=https://reabilitaciya-alkogolikov-moskva-2.ru]нарколог на дом[/url]
While searching for self development inspiration platforms, I discovered smart growth journey space – The website provides motivational content with useful ideas and personal development focus, making browsing smooth, simple, and encouraging for users.
During an extended browsing session through perspective and inspiration platforms, I came across new vision portal embedded in a recommendation paragraph, and the experience felt smooth since the website was clean and navigation worked perfectly across different sections today.
During my search for seasonal clothing platforms, I discovered exclusive fashion season – The website displayed a stylish collection, and everything felt modern and visually appealing, making it easy for visitors to browse without clutter or complicated navigation issues online.
People who enjoy wandering through online shops at night often look for visually gentle and aesthetically pleasing browsing experiences Night Wander Cove Shop – it creates a calm and dreamy shopping atmosphere that makes late night browsing feel relaxing, enjoyable, and pleasantly immersive for quiet moments
Anyone interested in discovering practical savings opportunities for home and lifestyle purchases should consider checking daily savings portal this resource regularly for updated recommendations, helpful comparisons, and simple tips that make everyday shopping more affordable and easier to manage for families and individuals alike.
People who enjoy smart deal hunting often look for platforms that make it easy to apply multiple coupons so they can maximize savings and feel more satisfied with every purchase Smart Coupon Hub – stacking coupons helped me save forty bucks, and it genuinely felt like a mini lottery win that made my shopping experience more exciting than usual
While exploring fashion-focused websites and digital style magazines, I discovered runway style hub embedded within a curated section, and the platform felt stylish because browsing sections were smooth and visually appealing with a modern and clean presentation.
After spending time browsing through several online marketplaces, I eventually paused on general household picks because the website looked organized logically and the products appeared easier to locate without excessive clutter online today – The navigation system remained comfortable to use and browsing categories felt surprisingly smooth and enjoyable during the complete experience.
In exploring online recommendation platforms and curated picks websites, I found Handpicked Picks Collection featured among similar resources – The arrangement feels thoughtful, and browsing categories is surprisingly enjoyable today overall with smooth navigation and clearly defined sections throughout the platform.
People who prefer affordable adventures often appreciate guides that simplify decision making and provide clear strategies for saving money while traveling across destinations Passion Explore Budget Hub – I used these travel guides to plan an amazing budget trip that was easier than expected, highly enjoyable, and much more affordable than my original planning estimates
Creative teams often improve dramatically when they use structured brainstorming platforms that encourage idea sharing and open collaboration among participants Idea Exchange Hub Our group sessions here actually produced my strongest project outcomes so far – Brainstorming sessions here led to my best work yet seriously
manat mezennesi son yenilikler
нарколог москва на дом [url=https://reabilitaciya-alkogolikov-moskva-1.ru]нарколог москва на дом[/url]
During a session of exploring online shopping discovery tools and lifestyle product websites, I noticed Day Away Shopping Explorer Network integrated into the article – I lost track of time browsing, as there were so many cool things to see that made me want to keep discovering more and more items
While browsing online self improvement and motivation platforms, I came across dream growth hub – The clean layout and motivating content made browsing enjoyable and smooth, encouraging repeated visits for inspiration and practical personal development insights.
After spending too many evenings thinking about what I should start but never actually doing it, I realized I needed a change in how I approach my goals and daily motivation, Progress Spark Station helped me reframe my approach – today I finally acted without overthinking and it felt like a weight lifted immediately from my mind
During exploration of e-commerce platforms and shopping websites, I came across Seamless Purchase Hub placed within the article flow – Every purchase has been smooth, no complaints so far yet, and the entire shopping journey has felt easy, clear, and consistently well organized for all my orders
During a casual exploration of online stores, I discovered smart favorite shopping hub – The platform offers a nice store experience with simple design and useful products today, making navigation clean, easy, and user friendly for everyone.
Users who enjoy excitement in shopping often search for mystery deals that offer surprise items, turning ordinary purchases into small moments of discovery and enjoyment Surprise Cart Hub – I tried their mystery box and found it surprisingly good since the items inside were useful and clearly selected with some thought behind them
I spent some time exploring different trend discovery websites before finding all trends hub – The browsing experience felt smooth overall, and the latest trends were clearly organized and easy to access quickly without confusion or clutter affecting navigation during the visit online.
People exploring ways to enhance their mindset and productivity can turn to steady progress journal which shares structured advice and motivational content – helping readers stay consistent with their goals while developing habits that promote long lasting personal and professional improvement in a balanced and realistic way over time.
People considering remote or freelance work often search for stories of transformation that show how others successfully left structured jobs to pursue flexible independent careers Work Freedom Journey Hub – after leaving my old job and starting freelancing, this site gave me the motivation I needed to stay committed to my new path and keep improving
Shoppers comparing products across different categories often noted how helpful it was to have fast-loading pages and clearly structured sections during their browsing process purchase navigator while reviewing deals and featured items – they felt the platform maintained excellent organization and responsiveness throughout their entire experience online.
During casual online exploration of dessert themed shops I found a cozy store that immediately stood out with its warm and gentle presentation sweet cozy collection and I spent time browsing through its sections – The experience felt relaxing pleasant and softly charming like discovering a sweet inspired corner of the internet
реабилитация наркозависимых стационар [url=https://narkologicheskij-staczionar-sankt-peterburg-13.ru]реабилитация наркозависимых стационар[/url]
срочный вызов нарколога на дом [url=https://reabilitaciya-alkogolikov-moskva-2.ru]срочный вызов нарколога на дом[/url]
While reviewing trending product websites and online shopping collections, I found easy browse market – The content was well arranged, and the navigation felt intuitive and smooth, creating a relaxed browsing experience that made exploring different items enjoyable and effortless overall.
People interested in improving digital creativity often rely on workshops to gain practical skills in tools like Photoshop in a short time Skill Practice Hub I joined a workshop last week and learned Photoshop basics quickly, which gave me a strong sense of progress – Joined a workshop last week, learned photoshop basics super fast
I spent some time reviewing different service related websites earlier before eventually exploring general online support where the categories looked organized logically and the content seemed easier to locate than on many confusing websites online currently – The platform delivered an informative experience while the modern structure kept navigation smooth and naturally user friendly.
телефон автоэвакуатор заказать эвакуатор рядом
While checking different online collaboration platforms and social growth communities, I noticed Connect Community Growth Hub integrated into the content flow – I met wonderful people here, and the community feels genuine and supportive, offering a friendly atmosphere where members actively share insights, experiences, and encouragement in a natural way
After reviewing various websites related to innovation and useful online resources, I discovered creative insight portal included in a recommendation list, and the platform offered several interesting details while maintaining a simple and enjoyable browsing experience throughout the visit.
While browsing curiosity driven platforms and personal discovery websites, I found Horizons Lifestyle Explorer Network placed within the content section – I discovered hobbies I never considered before, and life feels richer now, with more variety, creativity, and genuinely enjoyable new activities shaping my routine
While exploring various home design and lifestyle inspiration platforms during an online browsing session, I came across modern home ideas hub – The collection of ideas was stylish and the navigation structure felt easy and intuitive, making the overall browsing experience smooth and enjoyable throughout.
During a casual exploration of online style and shopping platforms, I came across creative fashion style guide – The platform provides modern styling ideas and smooth shopping experience for visitors online, making browsing structured, simple, and enjoyable for users.
Демо-режим в казино Вавада позволяет тестировать слоты бесплатно без регистрации. Это отличный способ выбрать любимые автоматы перед игрой на реальные деньги. Попробовать демо можно на https://ecampania.it/blog/kako_izvu_i_maksimum_iz_casino_bonusa.html прямо в браузере.
People interested in energy management often adjust their mornings to maximize alertness and motivation, making it easier to stay productive throughout the day Energy Boost Hub – I changed my morning routine and I feel more productive already, which honestly surprised me because the changes were simple but very effective
During a casual search for discovery websites, I came across modern passion hub – The platform appeared clean and structured, and browsing felt easy because categories were clearly arranged without unnecessary distractions or complicated navigation slowing the experience online.
People who enjoy practical purchasing often prefer platforms that highlight only useful deals, ensuring every option presented is relevant and easy to understand without confusion Essential Deal Hub – I found no unnecessary fluff, just solid deals that gave me exactly what I needed right now, making the entire shopping process feel smooth and efficient
Many users seeking comfortable online shopping experiences often prefer platforms that are both simple and trustworthy, and a known example is Favorite Items Discovery Hub – providing a well organized space where shoppers can browse efficiently, find products they enjoy, and experience a smooth and consistent purchasing journey from beginning to end.
neviditelne sluchatko na zkousky Praha https://mikrosluchatko-cena.cz/
I had been checking different online resources earlier today before discovering well designed dusk petal site, and I enjoyed really smooth browsing, with categories appearing organized and the website feeling genuinely user friendly across all pages.
While checking promotional shopping platforms and online discount resources, I found Deal Finder Savings Hub integrated into the content flow – There are steals everywhere, my wallet is happy and so am I, because I frequently find better deals here compared to other sites I normally use
I explored several internet shopping platforms this morning before discovering professional orchard studio hub, and the experience felt really pleasant, with products carefully arranged and easy to access across all pages.
People who work on their mindset often find that their entire daily rhythm improves, especially the way they begin each morning Morning Reset Hub I used to hate mornings, but now I wake up excited and actually enjoy getting out of bed – Used to hate mornings, now I wake up excited somehow
While exploring thoughtfully curated home and lifestyle collections online, many users discover stores that emphasize organic aesthetics and calming design principles Creekstone Emporium Official Store – it consistently delivers a refreshing shopping experience with natural textures, warm tones, and a soothing product range that feels both modern and grounded in nature.
Такие состояния позволяют проводить лечение на дому с контролем динамики. При выявлении рисков врач может изменить тактику и рекомендовать стационар или другие методы лечения зависимости.
Выяснить больше – [url=https://vyvod-iz-zapoya-na-domu-sankt-peterburg-8.ru/]www.domen.ru[/url]
During my search for practical online shopping platforms this week, I came across trusted product sections where the categories looked arranged thoughtfully and the browsing flow felt smoother than expected for an ecommerce website online – The entire platform appeared clean and reliable while the relaxed browsing atmosphere made another future visit seem worthwhile.
During a late evening exploration of online productivity platforms and design-heavy websites, I came across a layout that subtly featured Fast action portal within its informational sections, and the overall experience felt balanced, intuitive, and easy to navigate without any unnecessary visual clutter or distraction
While browsing discovery-based websites online, I found daily content explorer – The platform offers interesting and engaging content with easy browsing flow, making the experience smooth, fast, and enjoyable throughout the site.
While checking different mindfulness inspiration platforms and personal awareness websites, I came across Every Moment Focus Network embedded within the content flow – Makes me appreciate small things, mindset shift is real, and it has helped me become more observant and thankful for everyday experiences that I used to overlook
People searching for fair deals often get frustrated by artificial price inflation, so discovering a place focused on real value can feel like a much needed change in shopping habits Fair Deal Hub – The name honestly checks out, it feels like pure value with no markup games being played, just straightforward pricing that feels real
During an online exploration of simple lifestyle websites, I came across calm living guide – Everything looked well structured and organized, and the browsing experience felt comfortable, smooth, and easy to enjoy throughout different pages.
In exploring future focused development platforms and idea hubs, I came across Future Build Strategy Space featured within curated listings – The organization felt impressive, and finding useful sections was quick and refreshingly simple thanks to its clean structure and intuitive navigation system.
After exploring several creative recommendation pages and inspiration-focused browsing resources online, I noticed top browse reference – The layout appeared organized and easy to understand, the navigation worked smoothly across sections, and the engaging content made the browsing experience feel naturally rewarding throughout the visit.
People who enjoy calm and sophisticated fashion choices often look for curated platforms that highlight elegance in a subtle and thoughtful way Elegant Finds Style Studio – each piece reflects understated luxury, designed to blend quietly into personal style while still making a refined impression that feels graceful and intentionally minimal without being overpowering
I spent part of the afternoon exploring recommendation websites before finding modern choice hub – The platform felt helpful and clean, and the content was arranged professionally, making it easy for readers to understand without unnecessary distractions or complex navigation online.
During my search for websites offering fresh perspectives and engaging resources, I reached interesting digital platform after following several recommendations, and the responsive design together with stable navigation made the newest published material easy to browse across multiple categories and informational sections continuously.
Shoppers looking for polished everyday clothing options can browse curated style platforms online polished everyday fashion guide offering refined apparel and accessory choices for professional casual and social wear – this platform helps users maintain a clean stylish appearance across different daily activities and settings
During a session of exploring modern trend blogs and lifestyle update platforms, I noticed Trendy Lifestyle Insight Network integrated into the article – Keeps me updated on trends without feeling overwhelmed at all, and it makes staying current feel like a relaxed and enjoyable habit rather than a task
During my online shopping for fashion items, I found a store that made returns and exchanges incredibly easy and stress free Wardrobe Fit Change Hub and the experience felt seamless – I exchanged several clothing pieces for different sizes and everything was completed without any issues or delays throughout the entire process.
I explored several internet stores and product websites this morning before discovering professional crest marketplace hub, and it was a nice website overall, with products well presented and pages opening quickly without issues.
seo сайтов поисковое продвижение
As I was exploring gentle and airy themed websites for inspiration I discovered a calming online shop that stood out for its soft visual design airy meadow wander shop which I browsed slowly while enjoying its minimal layout and peaceful structure – The experience felt like walking through a quiet meadow with soft wind and warm sunlight
While exploring ecommerce catalogs, I came across a platform that feels responsive and well structured, and Mystic Meadow product hub delivers smooth performance overall – The website loads efficiently, navigation is simple, and users can move through sections easily while enjoying a clean and readable interface design.
During a casual browsing session focused on unique content websites, I came across daily unique explorer – The platform features unique items and creative ideas presented in a simple layout, making navigation easy, clear, and enjoyable throughout the visit.
During browsing sessions focused on product trading websites and online marketplaces with fast delivery services, I came across Creek Harbor Market Trading Network placed within the article structure – Quality goods here, shipping was faster than expected too, and the experience felt smooth, efficient, and dependable enough that I would consider ordering again without hesitation
Many online visitors looking for structured content often appreciate platforms that provide a clean and distraction free environment for learning idea inspiration panel helping them stay focused while exploring useful insights and ensuring the information remains easy to understand and professionally arranged for better usability overall.
I spent part of my afternoon reviewing online platforms for ecommerce support before eventually reaching recommended online marketplace where the categories looked balanced and the content seemed more approachable than many cluttered service websites online – The website felt dependable overall while the smooth browsing experience made navigation simple and comfortable throughout.
Users who like modern problem-solving tools often search for platforms that highlight innovative gadgets that quickly become essential after being introduced into daily routines Problem Solving Gadget Hub – I found a gadget I never knew existed, and now I can’t imagine my routine without it because it saves me so much time and effort
happyhomefinds.click – Great platform for home hunting, very smooth browsing experience today.
During my review of different online shopping websites, I came across a platform that feels visually clean and user friendly, and FrostLane shopping emporium offers a smooth browsing experience overall – Pages load quickly, content is structured clearly, and users can navigate categories easily without confusion or unnecessary complexity affecting usability.
During a casual online session exploring fashion inspiration platforms, I discovered modern trend space – The site featured stylish design and clear information, making it easy to browse while enjoying a visually appealing and well structured user experience throughout.
People starting out in website development often search for beginner friendly platforms that make progress feel rewarding and achievable Website Starter Creation Hub – I built my first website using their resources and felt super accomplished today, because it gave me a real sense of achievement and motivation to keep learning further
While searching for modern shopping platforms, I came across trend discovery store – The experience felt nice overall, and products were displayed clearly and attractively across the website, making it easy to browse without unnecessary distractions or complicated layout issues online.
Капельница от похмелья в Екатеринбурге с анонимным выездом врача и восстановительной терапией в наркологической клинике «Частный медик 24»
Узнать больше – [url=https://kapelnicza-ot-pokhmelya-ekaterinburg-8.ru/]капельница от похмелья цена екатеринбург[/url]
استارز 888 [url=https://www.888starz-egypt6.com/]https://888starz-egypt6.com/[/url]
Online audiences who prefer structured discovery experiences often look for platforms that make browsing more meaningful and filled with useful suggestions BrightPath Discovery Site Content Exploration Network – it helps users find new ideas easily while encouraging them to stay engaged with fresh and relevant online content daily
I was exploring several internet platforms and collections this afternoon when I landed on useful web collection, and the neatly arranged layout together with the smooth browsing experience made the website pleasant to navigate for an extended period.
While checking various e learning platforms and professional development websites focused on applied knowledge, I noticed Learn Apply Achieve Hub integrated into the content flow – I learned something new today and I am already applying it to work, and this has helped me improve productivity and think more clearly in work related situations
While searching for artistic inspiration and creative resource websites, I discovered smart artistic inspiration space – The platform offered inspiring creative ideas and helpful resources that created an enjoyable and motivating experience for users browsing online daily.
Many listeners find their favorite podcasts through curated suggestions that help them skip the noise and go straight to quality content Smart Discovery Hub I discovered a podcast recently and I have been completely hooked ever since I started it – Discovered a podcast I’m obsessed with, thanks for the recommendation
While browsing multiple online education and knowledge-sharing platforms, I noticed learning resource corner placed in the middle of a suggestion list, and the website felt informative because visitors could easily access useful materials without distractions across smooth navigation paths.
While checking different cozy lifestyle stores and nature themed online platforms, I came across Stone Caramel Serenity Hub embedded within the content flow – The atmosphere feels cozy all around, reminding me of peaceful mountain retreats, and it creates a gentle sense of calm that feels grounding and naturally relaxing
During a casual search for organized shopping websites and helpful online resources, I came across modern deals guide – The interface looked clean and user friendly, and the information was displayed clearly across sections, creating a smooth browsing experience that felt both practical and visually appealing overall.
During my online browsing session this morning, I explored multiple websites before discovering quality fern collective store, and I enjoyed checking the platform, where everything looked clean and navigation remained very comfortable throughout the visit.
Users who focus on everyday practicality often choose hoodies that provide reliable warmth and easy layering options, making winter outfits simpler to manage Daily Warmth Hub – These hoodies are thick and warm and work really well for winter layering looks, giving both comfort and a solid streetwear appearance
Online shoppers looking for feminine elegance with a touch of royalty often prefer curated platforms that highlight simplicity and charm, and they may find Queenly Style Hub – it creates a graceful shopping experience that makes anyone feel empowered, stylish, and effortlessly put together in everyday life.
I spent part of my evening reviewing ecommerce platforms for useful products before eventually arriving at daily essentials center where the layout looked cleaner and the categories seemed much easier to navigate than several websites online currently – The platform felt pleasant to browse and pages continued loading fast without unusual technical issues appearing anywhere.
During comparison of lifestyle blogs and inspiration websites, I noticed a platform that feels fresh and visually appealing for readers, and Lifestyle Inspiration Hub provides a smooth browsing experience overall – The interface is responsive, articles are easy to read, and visitors can explore creative lifestyle ideas without unnecessary complexity.
Online visitors frequently mention that stable performance enhances overall satisfaction, particularly when accessing sites such as new doorway portal noting that the interface remains responsive, pages load well, and browsing stays comfortable and smooth across different environments and usage scenarios.
During my review of online shopping catalogs, I noticed a platform that performs consistently well under browsing load, and Meadow Mystic product goods offers a smooth browsing experience overall – Pages load quickly, content is organized neatly, and navigation remains easy and intuitive throughout the site.
888starz تسجيل الدخول [url=https://www.888starz-egypt7.com/]موقع 888starz[/url]
globaltrendmarket – Great marketplace overall, browsing different sections feels smooth and straightforward for everyone.
During a casual exploration of online helpful resources, I came across creative daily essentials guide – The platform provides useful practical content with an enjoyable browsing experience that feels smooth, organized, and easy to use throughout the site.
Users who like discovering creative content often enjoy platforms where inspiration keeps unfolding without interruption or lack of variety Creative Flow Ideas Hub – scrolling feels endless but in the best way possible, with so much imagination and creativity that it turns browsing into a fun and engaging experience rather than a tiring one
Consumers searching for creative and less common shopping options often visit novelty product gateway which brings together unusual items and curated selections helping users explore beyond conventional catalogs – encouraging discovery of unique products that stand out in terms of design purpose and everyday usability.
starz888 [url=http://www.uz888-starz.com]starz888[/url] .
During an online exploration of shopping and product discovery sites, I discovered daily shopping inspiration space – The platform delivers a great shopping experience with interesting finds and smooth navigation here, making the experience smooth, clear, and enjoyable across all pages.
During a morning routine of browsing inspiration and productivity mindset websites, I found Create Believe Action Network embedded within the article section – Manifested a small win today, and this site helped me focus by guiding my thoughts toward clear intentions and practical steps that actually lead to results
Those who appreciate handmade style decor items with natural finishes frequently visit collections such as Handmade Rustic Essentialsfernstonecollective.shop – The overall presentation highlights earthy craftsmanship, where every item looks thoughtfully created, blending rustic charm with modern usability to produce a grounded and visually soothing home environment.
People who enjoy weekend crafts often use step by step guides to complete projects that are both fun and useful for home or garden Creative Project Studio I built a birdhouse with my nephew using their instructions and it turned into a great shared achievement – Built a birdhouse with my nephew using their diy guide
In browsing online fashion and personal style platforms, I discovered Fashion For Life Collection Page featured among similar resources – The browsing experience felt smooth, and content quality stands out compared with many similar websites online thanks to well organized sections and simple usability.
математика для детей В нашем центре развития, где каждый ребенок — это уникальная вселенная, мы открываем горизонты знаний и талантов, предлагая комплексные программы для самых маленьких и юных исследователей. Обучение английскому дошкольников начинается с 3 лет, закладывая фундамент успешного будущего через игровые методики и погружение в языковую среду в нашем английском детском саду неполного дня. Для школьников мы предлагаем курсы английского, разговорный английский и подготовку к ЕГЭ/ОГЭ, гарантируя эффективное освоение материала.
People dealing with presentation anxiety often search for confidence techniques that help them perform better, especially in situations where they need to speak clearly and maintain audience engagement Calm Speaker Hub – I nailed my presentation thanks to the confidence tips from this site, and it honestly made a huge difference in how I delivered everything
йони массаж казань Женский массаж в Казани, в том числе и йоня-массаж, представляет собой инвестицию в свое благополучие, позволяющую обрести гармонию внутри и вне.
While exploring new wardrobe options for daily use and long lasting comfort, many people eventually discover a brand that balances style and practicality Cotton Stone Outpost Official Shop Cotton Stone Outpost Official Shop – I find that it offers unmatched comfort for long working days and relaxed weekends, making it a reliable everyday choice that quickly became my personal favorite brand.
школа программирования в майнкрафт MindCube также является лидером в области школы программирования в Minecraft, где юные таланты учатся создавать собственные игры, механизмы и целые виртуальные вселенные, осваивая принципы кодирования через творческий процесс.
During comparison of fashion tip websites focused on personal improvement, I noticed a platform that feels helpful and structured, and Style Enhancement Hub provides a smooth browsing experience overall – The advice is easy to follow, making personal style development more accessible for everyday users.
During comparison of online retail platforms, I noticed a website that feels structured and well designed, and Collective Meadow Frost hub provides smooth browsing overall – Content is organized clearly, pages respond quickly, and users can browse comfortably without clutter or confusion affecting usability.
обмен валют Ош В современном мире, где финансовые потоки становятся все более глобальными, вопрос удобного и надежного обмена валют приобретает особое значение. Бишкек, как столица Кыргызстана, является одним из ключевых финансовых центров страны, предлагая широкий спектр услуг для физических и юридических лиц.
While reviewing different online shopping pages this afternoon, I visited organized grove echo listing, and I appreciated the helpful layout, with detailed information and browsing that remained simple throughout the browsing flow.
While browsing different product outlets, I eventually noticed smart deal outlet – The platform felt clean and modern, and everything appeared updated and simple, allowing users to find useful products easily without clutter or confusing design elements online.
During a casual browsing session across e-commerce outlets and product sites, I found choice style store placed inside a recommendation paragraph, and the experience felt enjoyable as the pages were clean, structured, and comfortable for browsing different sections.
pixelharvest – Great looking website design here, information feels updated and naturally well presented.
While exploring online shopping deal directories and platforms, I discovered better bargain guide placed within curated recommendations, and the browsing experience felt impressive because categories appear well organized and easy to navigate across all categories.
While comparing several ecommerce stores, I noticed a website that emphasizes clarity and structured design, and UrbanPetal product collective provides a clean browsing experience overall – The interface is simple, items are well organized, and users can move through sections comfortably while keeping everything easy to understand and visually appealing.
Modern creators often seek online resources that blend inspiration with practical techniques for idea development, especially platforms like Inspiration Flow Portal – designed to support continuous creativity encourage experimentation and improve the way individuals generate and refine concepts over time effectively daily practice consistently
People who care about personal style often look for fashion sources that offer unique pieces instead of mass produced clothing that lacks creativity and identity Fresh Outfit Inspiration Hub – this brand finally gave me something different from the usual boring clothes, and it actually makes my wardrobe feel more expressive and visually interesting every day
adult tools AI Dirty Chat вышел на новый уровень, позволяя пользователям исследовать свои фантазии в безопасной и анонимной среде, где искусственный интеллект способен вести самые откровенные беседы и предлагать неожиданные повороты сюжета.
During a casual browsing session for discount websites, I found daily deal space – The platform provided useful offers with clear presentation and easy browsing, making the experience simple, organized, and enjoyable across all pages.
During an online search for inspiration and productivity platforms, I discovered a href=”[https://startsomethingawesome.click/](https://startsomethingawesome.click/)” />creative motivation guide – The site provided a strong motivating vibe with smooth website performance across pages, making navigation simple, fast, and enjoyable throughout the experience.
While browsing motivational websites and productivity tools online, I found daily success hub – The platform offered structured and practical ideas that make it easy to explore useful habits and take small actions that lead to long term personal growth and improvement.
While browsing several online resources this afternoon, I spent a good amount of time exploring trusted marketplace source and honestly appreciated how polished the layout felt, with pages opening smoothly and the entire experience appearing carefully updated and professionally organized throughout the visit.
While checking different online creative hubs and innovation idea platforms, I noticed Make Creative Flow Hub integrated into the content flow – My creativity started flowing, and I built something I am proud of, which inspired me to keep building and experimenting without hesitation
During a session of exploring online relaxation spaces and mindfulness inspired platforms, I found Calm Cove Deep Rest Network naturally included in the article – Relaxing brand overall, great for unwinding after long days, and it helps create a deeper sense of calm that feels restorative and balanced
йони массаж казань Массаж для женщин в Казани, включая йоня и тантра-массаж, становится все более популярным как способ заботы о себе, способствующий физическому и эмоциональному здоровью, а также личностному росту.
вызов врача нарколога на дом [url=https://reabilitaciya-alkogolikov-moskva-1.ru]вызов врача нарколога на дом[/url]
Реабилитация алкоголиков в Москве: лечение зависимости, восстановление и поддержка под контролем специалистов в наркологической клинике «Похмельная служба»
Исследовать вопрос подробнее – [url=https://reabilitacziya-alkogolikov-moskva-1.ru/]алкоголик реабилитация наркоманов в москве[/url]
Users who enjoy simple mental health habits often find journaling helpful for recognizing achievements, no matter how small, to build a more positive mindset over time Everyday Growth Hub – I picked journaling back up and capturing small wins now feels good because it turns ordinary days into something worth remembering and reflecting on
наркологический стационар в спб [url=https://narkologicheskij-staczionar-sankt-peterburg-13.ru]наркологический стационар в спб[/url]
While browsing online for fashion inspiration that blends rugged textures with luxurious materials from global designers, I found international fashion picks hub – it brings together Japanese denim craftsmanship and Italian leather detailing, resulting in a curated selection that feels polished, cohesive, and globally inspired in every aspect presented.
Home decor enthusiasts frequently browse online stores for modern inspiration, and they eventually find Modern Room Upgrade Hub furniture ideas that highlight clean structure – the sleek designs completely changed how my apartment feels, giving it a polished, adult aesthetic that makes everything look more intentional and grown up overall.
Пляжи Коста-Бланка – отдых, купание и водные развлечения
During exploration of fashion promotions and online shopping resources, I found a website that feels structured and welcoming for style enthusiasts, and Fashion Deal network provides a smooth browsing experience overall – Pages respond quickly, offers are displayed neatly, and visitors can enjoy browsing discounted clothing items without distractions.
Those aiming to improve personal discipline often explore online resources that offer structured motivation, and they may encounter Personal Growth Dreams providing organized content – The site is regularly updated, ensuring users receive helpful and practical guidance that supports steady improvement and long term goal achievement through consistent effort.
During browsing of startup success websites and motivational business resources, I found Think Fast Build Hub naturally included in the article flow – Great mindset tips here, helped me launch my project quicker, and it encouraged me to focus on rapid execution instead of getting stuck in endless planning
During a casual search for learning resources, I came across modern knowledge share – The website structure felt clean and intuitive, and the content shared today was interesting, making browsing smooth and easy without clutter or distractions online.
обучение в Австрии, легальная релокация в Австрию через образование, образование в Австрии по цене 750 евро за семестр в лучших университетах, официальный представитель универсиетов в Австрии обучение в Австрии, легальная релокация в Австрию через образование, образование в Австрии по цене 750 евро за семестр в лучших университетах, официальный представитель универсиетов в Австрии
People who like cost effective shopping often appreciate stores that consistently provide better pricing and help stretch budgets without compromising quality Value Smart Shopping Hub – getting more value per dollar spent has made my wallet feel noticeably happier, and I no longer worry about overspending unnecessarily
выезд нарколога на дом цена [url=https://reabilitaciya-alkogolikov-moskva-2.ru]выезд нарколога на дом цена[/url]
While casually browsing digital marketplaces this afternoon, I came across organized harbor echo site and found the website feels polished, with clearly arranged categories and content that reads naturally across the entire platform.
While checking creative thinking enhancement tools and inspiration platforms online, I found Idea Inspiration Mind Network placed within the content flow – Sharp ideas everywhere, and it was exactly what my brain needed right now, helping me generate new concepts I hadn’t considered before in my projects
While exploring ecommerce stores, I came across a platform that feels modern and efficient, and UrbanPetal store portal provides a smooth browsing experience overall – Pages load quickly, content is well structured, and users can move through categories without confusion or clutter interfering with usability.
During a long browsing session through productivity improvement platforms, I noticed mental focus guide included within a curated list, and the site felt helpful as its content presentation stayed clear and easy for everyone to follow – Everything appeared structured and visually simple.
While exploring online fashion inspiration portals, I found creative trend fashion space – The website delivers trendy styles and useful updates for modern fashion lovers today, making the experience engaging, clean, and easy to navigate.
In discussions about convenient online retail experiences, users often highlight platforms that combine discovery with simplicity, and a known example is Easy Find Shopping Portal which is commonly described as a place where users can browse a wide range of items and enjoy a smooth experience while exploring new and interesting products.
During my search for useful online resources and digital growth platforms, I eventually came across featured online services because the structure looked practical and the categories appeared easier to browse than many overloaded alternatives online – The platform seemed user friendly overall while everything remained simple to access and naturally easy to explore.
A piece that read as the work of someone who reads carefully themselves, and a look at unlocknewpotential continued that informed feel, writers who are also serious readers produce work with a different quality and this site reads as the product of someone steeped in good writing rather than just generating content for an audience.
Users who follow evolving design and fashion trends often rely on platforms that highlight fresh ideas and upcoming movements in simple ways Trendy Choice Scope Hub – it keeps me ahead of the curve consistently, and friends often ask how I stay so informed about new and rising style trends in everyday life
During browsing sessions on modern online marketplaces that combine quality and affordability, I came across Crown Cove Elegant Outpost Network embedded within the article structure – Premium feel without crazy prices, definitely ordering again soon, and the overall experience felt smooth, trustworthy, and visually appealing in a way that encourages repeat visits
While reviewing ecommerce catalogs, I came across a site that feels fast and well structured, and Frost Petal emporium outlet offers a smooth browsing experience overall – Pages load quickly, the design is modern, and users can explore products without clutter or unnecessary visual noise.
While checking multiple self-improvement platforms and motivational websites, I noticed fresh beginnings hub placed within curated content, and the website performance felt smooth as sections opened quickly across all devices without delay.
While reviewing motivational and self improvement resources online, I came across a platform that feels structured and easy to follow, and Vision Path Hub delivers smooth navigation overall – The content is designed to help users sharpen focus, strengthen ambition, and stay aligned with important life goals in a practical way.
While looking through online style communities and curated browsing resources for inspiration, I discovered easy fashion corner – The website structure remained clean and organized, the presentation looked modern, and the browsing experience felt engaging enough to comfortably explore several interesting sections online.
While browsing various online idea-sharing and inspiration platforms during a casual session, I came across fresh insight hub – The website presented interesting ideas with clear organization and engaging content, making the overall reading experience smooth, enjoyable, and easy to follow throughout different sections.
эффективная методика обучения детей иностранному Для тех, кто стремится к технологическим открытиям, открыта робототехника для детей, где юные инженеры учатся создавать и программировать, воплощая свои идеи в жизнь. Параллельно мы предлагаем изучение китайского, немецкого, французского и японского языков, открывая двери в многообразие культур и возможностей. Подготовка к школе – это наш приоритет, мы помогаем детям обрести уверенность и необходимые знания перед первым классом.
After reviewing several inspirational platforms, I landed on new start journey – The website felt positive and well structured, and navigating pages was natural and enjoyable, making it ideal for first-time users looking for a smooth experience without clutter online.
Costa Blanca – Turismo, Playas, Cultura y Vida Local
adult entertainment websites AI Dirty Chat вышел на новый уровень, позволяя пользователям исследовать свои фантазии в безопасной и анонимной среде, где искусственный интеллект способен вести самые откровенные беседы и предлагать неожиданные повороты сюжета.
Нужен ремонт? ремонт квартир под ключ в Омске — полный комплекс ремонтно-отделочных работ: от разработки дизайна до финальной уборки. Качественный ремонт квартир с соблюдением сроков и прозрачной сметой.
While exploring various online idea platforms and contemporary thinking blogs focused on innovation and creativity, I came across Modern Ideas Hub embedded naturally within the article flow – The content offers fresh modern takes on everything, exactly what I was seeking, and it genuinely helped me rethink several topics from a new and useful perspective overall
After reviewing several online marketplaces and digital catalogs today, I eventually found trusted pine commerce portal, and I found it a helpful platform overall, where navigation worked smoothly and information appeared clear for visitors across all pages.
While browsing online product outlet websites with clean layouts, I found smart selection outlet space – The platform delivers a clean outlet experience with good selection and simple navigation online, making browsing smooth, clear, and easy to follow.
школа математики и физики в майнкрафт MindCube открывает двери в мир образования нового поколения, где обучение становится захватывающим приключением. Мы трансформируем стандартные учебные программы, делая их интерактивными и увлекательными благодаря безграничным возможностям Minecraft.
обучение в Австрии, легальная релокация в Австрию через образование, образование в Австрии по цене 750 евро за семестр в лучших университетах, официальный представитель универсиетов в Австрии обучение в Австрии, легальная релокация в Австрию через образование, образование в Австрии по цене 750 евро за семестр в лучших университетах, официальный представитель универсиетов в Австрии
I spent part of today reviewing different online stores and eventually landed on recommended petal works hub, and it was a great browsing experience, with fast-loading pages and professionally organized products throughout the platform.
لعبة 888starz [url=https://888starz-egypt5.com/]لعبة 888starz[/url].
Обмешка Ош Мы понимаем важность скорости и безопасности, поэтому предлагаем как классические валютные операции, включая обмен kg (кыргызских сомов), так и новейшие решения для криптообмена. Обращаясь к нам, вы выбираете надежность, выгодные условия и профессиональный сервис, где бы вы ни находились в Кыргызстане.
Many online shoppers looking to stretch their budgets often use curated websites that compile deals and discounts from various sources such as Savings Finder Network – it offers structured deal comparisons and helps users identify cost effective products while shopping across different categories effectively
After navigating through several online marketplaces today, I eventually visited professional amber oak listing, and I enjoyed browsing here, with clean page layouts and no loading delays throughout the session.
People who enjoy tracking modern lifestyle changes often rely on curated trend platforms that simplify discovery of what’s popular and upcoming Trendy Choice Update Center – this keeps me ahead of the curve consistently, and friends always ask how I manage to stay informed about fast moving style and cultural trends
While checking various online marketing platforms earlier this week, I eventually explored featured ranking system where the structure looked organized and the browsing process felt smoother than many competing websites online today – I was impressed with the clean presentation and the services appeared useful for everyday users.
During an extended search across self-improvement and growth-oriented websites, I came across skill building portal embedded in a curated article section, and the overall browsing experience felt pleasant as pages loaded quickly and the content was naturally arranged for comfortable exploration.
While reviewing structured content websites focused on ideas and clarity, I came across a page featuring FocusVision Network naturally placed within its article body, which improved readability and created a smooth, consistent browsing experience across different sections.
During my review of productivity and personal development websites, I came across a platform that feels modern and motivating for ambitious readers, and Higher Goals inspiration center provides a smooth browsing experience overall – The interface is simple, articles are organized neatly, and visitors can comfortably explore ideas related to growth, motivation, and daily success.
йони массаж на дому казань Мужской йоня-массаж, хоть и менее распространен, также может быть частью комплексной терапии, направленной на гармонизацию мужского и женского начал. Однако, в большинстве случаев, йоня-массаж ассоциируется именно с женскими практиками, помогая женщинам обрести силу и уверенность.
Came in expecting another generic take and got something with actual character instead, and a look at bestpickscollection carried that personality forward, finding a distinct voice on a saturated topic is impressive and worth pointing out when it happens because most sites end up sounding identical to their nearest competitors quickly.
While searching for online stylish fashion websites, I discovered creative style wardrobe space – The website offered a nice browsing experience with modern design and useful information, making it easy and enjoyable to navigate across different sections today.
Today, Benissa construction projects are highly sought after thanks to the area’s luxury real estate market, panoramic sea views and strong long-term investment potential for bespoke villas.
While exploring online self development and motivation sites, I came across daily forward thinking hub – The website offers motivational content and helpful guidance for personal progress every day, making browsing simple, clear, and encouraging for users.
While checking various personal growth and opportunity focused websites, I noticed Open Opportunity Hub integrated naturally into the content flow – I took a chance and it paid off, highly recommend exploring because it led me to valuable insights and a better understanding of how to approach new possibilities
Cruz de Mayo Elche 2026: Dates, Full Program and Procession Route
While analyzing ecommerce catalogs, I noticed a platform that feels clean and efficient, and Frost Petal store network provides a smooth browsing experience overall – Everything is clearly organized, pages load quickly, and users can explore products without distractions or unnecessary visual complexity.
Individuals interested in life planning often search for simple tools that offer clarity and calm direction Life Path Compass Store brings together practical insights and reinforces the idea of needed direction and found it here as a trustworthy guide for long term decision making
During an online search for useful resources and organized browsing platforms with fresh content updates, I discovered smart discovery portal – The layout looked visually appealing, the categories were easy to understand, and the browsing experience remained smooth and enjoyable while exploring the different available sections online.
Online users who enjoy discovering fresh looks often turn to curated fashion spaces, and a frequently mentioned example is Style Trend Explorer Site which is generally portrayed as a platform delivering updated fashion insights, aesthetic inspiration, and easy browsing for people interested in modern wardrobe ideas and styling suggestions.
I had been checking various online resources earlier today before discovering well designed horizon mystic hub, and I found the clean structure impressive, with smooth navigation and reliable performance across all pages.
обучение в Австрии, легальная релокация в Австрию через образование, образование в Австрии по цене 750 евро за семестр в лучших университетах, официальный представитель универсиетов в Австрии обучение в Австрии, легальная релокация в Австрию через образование, образование в Австрии по цене 750 евро за семестр в лучших университетах, официальный представитель универсиетов в Австрии
While exploring various future-focused and opportunity platforms online, I discovered creative possibility hub placed within curated recommendations, and I enjoyed the experience because the overall design feels modern and easy for visitors across all categories.
While comparing different digital marketplaces earlier this week, I eventually explored helpful seller catalog because the interface looked clean and categories felt easier to browse than many cluttered online platforms – The experience was pleasant and everything appeared well structured and professionally maintained throughout the visit.
While exploring different online shopping websites this morning, I spent time on valuable petal amber marketplace, and everything looked well structured, with content that is easy to understand quickly.
Официальный сайт BlackSprut
bs2best ссылка
While comparing several online shopping hubs offering lifestyle and fashion products, I noticed a platform that emphasizes simplicity and usability, and Trending Shop Online delivers a smooth browsing experience overall – The layout is intuitive, featured items are clearly displayed, and shoppers can explore modern products comfortably without unnecessary complexity.
While exploring online idea and networking websites, I came across smart creativity sharing hub – The website provides creative modern ideas and useful networking inspiration for users today, making browsing smooth, structured, and helpful throughout the platform.
During an online session exploring learning resources, I found modern knowledge guide – The website offered informative content and helpful insights, along with a clean user friendly design that made navigation smooth, easy, and enjoyable across all sections.
sexy chat bot Sexy Chat Bot и NSFW Chat Apps предлагают виртуальное общение на интимные темы, где AI-собеседник имитирует реального человека, поддерживая диалог и даже участвуя в ролевых играх, обеспечивая при этом полную конфиденциальность.
порно большей сиськи найти шлюху
I spent part of the evening reviewing shopping websites and online marketplaces before encountering well arranged retail page, where the platform structure appeared clean and product information stayed highly accessible while exploring different sections and browsing featured listings online.
While casually browsing digital marketplaces this afternoon, I came across organized meadow commerce site and noticed the website feels modern, with properly structured categories and content that reads naturally across the pages.
The structure of the post made it easy to follow without losing track of where I was, and a look at theperfectgift kept the same logical flow going, this site clearly understands that organisation is half the battle in keeping readers engaged from the first line to the last across any kind of post.
During a session of exploring fashion trend websites and lifestyle shopping platforms, I came across Trendy Style Vault Hub integrated into the content flow – Cool stuff everywhere, and my friends always ask where I shop since everything always looks fresh, stylish, and significantly more interesting than typical retail experiences online
Users who enjoy simple fashion improvement ideas often look for realistic styling guidance that they can apply immediately, and they come across Everyday Fashion Logic Hub – the content focuses on practical fashion advice that works in real life, making style feel more accessible, understandable, and easy to maintain in daily routines
In general evaluations of online shopping environments and how users perceive catalog diversity, a frequently cited example is trusted outlet selection page which is often characterized in broad descriptive language as reflecting typical e-commerce features such as categorized listings, ease of browsing, and a focus on presenting multiple options for customers exploring different product types.
While exploring different web platforms earlier today, I came across organized shore opal collective and noticed a nice collection available, with browsing staying comfortable and descriptions that looked genuinely informative throughout the visit.
While reviewing online educational and inspiration platforms, I came across a site that feels clean and engaging, and Pure Outlet value space provides smooth navigation overall – The interface is minimal, ideas are clearly presented, and users can learn and create without confusion or unnecessary complexity affecting usability.
I recently compared several informational platforms before eventually stopping at trusted reading hub where the content looked clean and the structure felt more organized than many competing websites online currently – The content quality stood out as strong and the platform was useful for users seeking dependable information.
Драгон мане мане
While exploring stylish and luxury product websites online, I came across creative luxury shopping hub – The platform delivers luxury products and stylish finds presented in an elegant way online, making navigation easy, elegant, and enjoyable throughout.
amberpetalmarket – Smooth experience overall, categories are clearly arranged and useful today.
Несмотря на выездной формат, лечение выстраивается поэтапно и соответствует медицинским стандартам. Это обеспечивает управляемость процесса и безопасность пациента.
Подробнее – [url=https://narkolog-na-dom-v-rnd19.ru/]нарколог на дом вывод из запоя[/url]
https://telegram.me/s/dragon_money_officialniy
Алкоголизм редко начинается как «большая проблема». Обычно всё выглядит как способ расслабиться, заснуть, снять тревогу или пережить стресс. Но постепенно организм привыкает, толерантность растёт, без алкоголя становится тяжело, а попытки «просто перестать» упираются в отмену: дрожь, потливость, тошнота, скачки давления, сердцебиение, раздражительность, панические реакции, бессонница. На этом фоне человек возвращается к выпивке не ради удовольствия, а ради прекращения мучительных симптомов. Именно так формируется замкнутый круг, в котором зависимость поддерживается страхом отмены и привычкой снимать дискомфорт быстрым способом.
Детальнее – https://lechenie-alkogolizma-sergiev-posad12.ru/lechenie-alkogolizma-platno-v-sergievom-posade/
While searching for online creative learning and inspiration platforms, I discovered modern idea hub – The content was structured and easy to follow, creating a smooth browsing experience that felt inspiring, helpful, and enjoyable across different creative sections of the website.
During an online browsing session focused on fashion outlets and style websites, I found daily outfit hub – The content was engaging and the layout appealing, making browsing smooth, enjoyable, and easy to follow across different sections.
Драгон Мани сайт
While reviewing digital content platforms, I came across a site that feels clean and accessible, and Frost Pine collective network offers a smooth browsing experience overall – The interface is minimal, content is easy to understand, and users can explore helpful information without unnecessary distractions or complexity.
Добро пожаловать в blacksprut Marketplace
Крупнейшее в России сообщество любителей марихуаны и грибов приветствует новых друзей!
?
Сотни магазинов с оптовыми и розничными предложениями рады показать вам новый уровень отношения к каннабису и грибам.
bs2best at
blsp at
bs2web at
Liked the post enough to read it twice and the second read found new things, and a stop at purechoiceoutlet similarly rewarded the second look, content with hidden depths that only reveal themselves on careful rereading is the rare kind that earns lasting respect rather than fleeting first impressions only briefly held.
Did not expect much when I clicked through but ended up reading the whole thing carefully, and a stop at brightnewbeginnings kept that engagement going, sometimes the unassuming sites turn out to deliver more than the flashy ones which is something I have learned to look out for over time online lately and across topics.
Автомобильный портал https://autort.ru с обзорами машин, новостями автопрома, рейтингами моделей и советами по выбору авто. Полезная информация для покупателей, владельцев и всех любителей автомобилей.
Better than the average post on this subject by some distance, and a look at amazingdealscorner reinforced that, you can tell within the first paragraph that the writer here actually cares about the topic rather than just covering it for the sake of having something to publish that week or that day.
Just sat back at the end of the post and felt grateful that someone took the time to write it, and a look at discovernewhorizons extended that gratitude across more of the site, recognising effort behind quality work is part of what makes the open web a community rather than just a marketplace today.
Worth recognising the absence of the usual blog tropes here, and a look at dreambiggeralways continued that fresh quality, sites that avoid the standard moves of the medium read as more original even when the content is on familiar topics and this one has clearly chosen its own path through the conventional terrain skilfully.
If a friend asked me where to read carefully on the topic I would send them here without hesitation, and a look at purestylemarket confirmed the recommendation strength, the directness of my recommendation reflects how confident I am in the quality and this site has earned undiluted recommendations from me across multiple recent conversations actually.
During a session of exploring inspiration and productivity websites, I noticed Motivation Action Hub placed within the content flow – I’m actually taking action now, and this site gave me the push that helped me convert motivation into consistent daily effort instead of just temporary excitement
Dragon Money сайт
Anyone who struggles with procrastination and wants to develop a more active mindset may find take charge portal useful for learning how to build discipline, create structure, and maintain steady progress toward goals by focusing on consistent effort rather than delay or hesitation.
Наиболее частыми причинами обращения становятся запой, тяжелый похмельный синдром, тремор, выраженная слабость, тревога, бессонница, нестабильное давление, учащенный пульс, тошнота и признаки обезвоживания. Эти проявления могут сочетаться между собой и усиливаться после прекращения употребления алкоголя, особенно если эпизод длился несколько дней.
Исследовать вопрос подробнее – [url=https://narkolog-na-dom-moskva-18.ru/]нарколог на дом в москве[/url]
трансы волгограда трансы волгограда
While exploring curated online directories and discovery websites, I came across remarkable browsing hub</a positioned naturally in the middle of content, and the experience felt updated, simple, and very easy for users to navigate – Everything appeared consistent and pleasant during the visit.
Took longer than expected to finish because I kept stopping to think, and a stop at createimpacttoday did the same to me, content that provokes thought rather than just delivering information is in a different category and the team here is clearly working at that higher level rather than just cranking out posts.
While analyzing online body confidence and wellness websites, I noticed a platform that feels intuitive and motivating for readers interested in healthy routines, and Wellness Inspiration center delivers a smooth browsing experience overall – The interface is easy to understand, guidance is displayed clearly, and users can explore positive habits comfortably without distractions.
https://telegram.me/s/dragon_mani_money
During a casual search for inspiration and motivation websites, I discovered smart idea inspiration hub – The platform features inspired thinking and helpful ideas for personal growth journey, making navigation easy, simple, and enjoyable for everyday users.
Dragon Money зеркало
After navigating through several online marketplaces today, I eventually visited professional twilight petal listing, and everything looked organized properly, with pages opening smoothly and content remaining easy to understand.
During a late evening search for online marketplaces and shopping platforms, I eventually came across royal product showcase because the structure looked clean and the browsing experience felt smoother than many cluttered websites online currently – I really appreciated the modern layout and the pages felt polished and easy to navigate throughout.
After spending quite some time exploring different online websites today, I landed on cleanly arranged web hub, where browsing remained easy to manage and every page opened incredibly fast while still providing useful and well presented details.
Женский портал https://justwoman.club с полезными статьями о красоте, здоровье, моде, психологии и отношениях. Советы экспертов, лайфхаки, идеи для ухода за собой и вдохновение для современной женщины.
While searching for online creative idea and gifting platforms, I found modern ideas hub – The site presented engaging concepts in a clear structure, making browsing simple and encouraging repeat visits for updated inspiration and new gift ideas.
Found something new in here that I had not seen explained this way before, and a quick stop at everymomentmatters expanded the idea even further, the kind of writing that nudges your thinking forward a bit without forcing the issue is exactly what I look for online today and rarely actually find anywhere.
The tone stayed consistent across the whole post which is harder than it looks for longer pieces, and a look at trendylifestylehub continued the same voice, this kind of editorial consistency is a sign of either a single careful writer or a tightly run team and either is impressive today across the broader media environment.
Just want to recognise that someone clearly cared about how this turned out, and a look at thinkbigmovefast confirmed that care extends across the broader site, you can feel the difference between content shipped to hit a deadline and content released because the writer was actually proud of the result for once.
Quality you can feel from the first paragraph, the writer clearly knows the topic and how to share it, and a quick look at bestchoicecollection confirmed the same depth runs throughout the rest of the site as well which is rare and worth pointing out when it happens online for any reader passing through.
Closed it feeling slightly more competent in the topic than I started, and a stop at purechoiceoutlet reinforced that competence boost, real learning is rare in casual online reading but it does happen sometimes and this site managed to make it happen for me today which is genuinely worth pausing to acknowledge.
For users looking to stay updated with evolving creative trends, innovation feed center provides a continuous stream of ideas and insights – it helps individuals adapt to modern thinking styles while encouraging experimentation and exploration of new concepts that enhance problem solving and strategic decision making skills.
Now noticing the post fit a particular gap in my reading without my having articulated the gap before, and a look at yourfashionoutlet extended that gap filling effect, content that meets needs I had not consciously formulated is content with reader insight and this site has clearly developed that anticipatory editorial sense across many pieces.
During exploration of online fashion discovery platforms and trend-based shopping guides, I came across Trendy Look Finder Hub embedded within the article flow – Cool stuff everywhere, and my friends always ask where I shop since the products always stand out and give a more modern and stylish impression compared to standard stores
During a casual search for learning and development platforms, I discovered modern explore achievement space – The platform provides educational content and motivation to learn, explore, and achieve, making browsing easy, clear, and enjoyable for everyday users.
During my review of mindfulness and inspirational websites, I came across a platform that feels clear and emotionally supportive for readers, and Everyday Meaning hub offers a smooth browsing experience overall – The interface is modern, stories are easy to explore, and readers can reflect on life experiences comfortably without clutter or confusing navigation.
While browsing various lifestyle and design inspiration websites during a casual online session, I came across modern living style hub – The clean layout and engaging content made the browsing experience smooth, visually pleasant, and genuinely enjoyable while exploring different sections and ideas throughout the visit.
https://www.investortrip.com/
Таможенное оформление для юридических лиц в Москве и Московской области. СБ Карго – официальный таможенный представитель: подготовка документов, расчёт платежей, сопровождение импорта и экспорта, помощь в прохождении таможенных процедур без лишних рисков и задержек. Консультации для участников ВЭД: https://protamozhennoe-oformlenie.ru/
https://telegram.me/s/dragon_money_site_casino
В наше время удобно выбирать смотреть дорамы 2026 онлайн без долгих поисков, непонятных ресурсов и хаотичного поиска. Этот сайт собрал в одном месте дорамы из Кореи, Китая, Японии и других стран с понятным русским переводом, удобными описаниями, жанровыми подборками, годами выхода и аккуратными карточками. Здесь легко найти легкую романтику для отдыха, напряженный триллер, забавную комедию или популярную премьеру, которую уже обсуждают поклонники дорам.
I recently compared several SEO platforms before eventually reaching organized SEO bridge hub where the layout looked clean and the browsing experience felt easier than many competing websites online today – The site loaded quickly and appeared trustworthy and genuinely helpful for users overall.
During my search across several digital marketplaces this afternoon, I eventually visited high quality emporium crest hub, and I really enjoyed exploring it, where the website felt modern and browsing stayed simple for users overall.
трансы Иркутск трансы Иркутск
https://telegram.me/s/dragon_money_officialniy
https://telegram.me/s/dragon_money_site_off
https://telegram.me/s/dragon_money_casi
While analyzing ecommerce websites, I noticed a platform that feels well structured and fast, and FrostShore commerce hub provides a smooth browsing experience overall – Pages open quickly, the interface is intuitive, and users can explore products comfortably without unnecessary complexity or clutter.
1win lucky jet [url=www.1win39427.help]www.1win39427.help[/url]
While exploring online style and fashion platforms, I came across smart fashion hub – The website had stylish content and easy navigation, creating a smooth and enjoyable browsing experience throughout various fashion categories.
Picked a friend mentally as the audience for this and decided to send the link, and a look at bestchoicecollection confirmed the send was the right choice, choosing whom to share content with is a small act of curation that I take more seriously than the public sharing most platforms encourage these days online.
Granted my mood today might be elevating my reading experience but I still think this is genuinely good, and a stop at creativegiftplace reinforced that even discounted assessment, controlling for the mood adjustment that affects content perception this site still reads as substantively above average across multiple pieces I have read carefully today.
Strong recommendation from me, anyone curious about the topic should make time for this, and a look at learnexploreachieve only sharpens that recommendation further, the kind of resource that holds up against careful scrutiny rather than crumbling at the first critical question is rare and worth pointing other people toward when the topic comes up.
Liked how the writer used real examples instead of theoretical ones to make the points stick, and a stop at modernideasnetwork added even more concrete examples, this is the kind of practical approach that respects readers who actually want to apply what they learn rather than just nodding along passively without doing anything useful.
Picked up several practical tips that I plan to try out this week, and a look at findyourfocus added a few more I will be testing alongside, content with practical hooks that connect to my actual life is the kind that earns my repeat attention rather than the merely interesting that I forget within a day.
People exploring high quality online marketplaces can check luxury choice center which highlights premium selections and stylish goods – enabling users to discover exclusive items that reflect elegance refinement and modern luxury standards across fashion accessories and lifestyle categories for discerning buyers.
Found something quietly useful here that I expect to return to, and a stop at trendforlife added more of the same, content with quiet utility ages well in a way that flashy hot takes do not and I have learned to weight quiet utility much higher when deciding what to bookmark for later use.
While exploring online shopping platforms focused on relaxed browsing and enjoyable product discovery, I came across easy day shopping hub – The platform offers a relaxed shopping experience with fun products and easy navigation online, making browsing smooth, enjoyable, and stress free throughout.
During exploration of lifestyle fashion websites and online trend hubs, I found Next Trend Style Hub integrated into the content flow – Cool stuff everywhere, and my friends always ask where I shop since the designs always look fresh, interesting, and noticeably more creative than most shopping sites they know
https://www.investortrip.com/
While exploring shopping and savings websites online, I found a platform that feels responsive and user friendly for discovering bargains, and Deal Hunter Dream Store delivers a smooth browsing experience overall – Featured products are organized neatly, navigation is easy, and shoppers can browse discounts without unnecessary distractions.
Подробности внутри: https://spainslov.ru/site/word/word/%D0%A1%D0%91%D0%90%D0%9B%D0%A2%D0%AB%D0%92%D0%90%D0%A2%D0%AC
1win so‘mda o‘ynash [url=www.1win39427.help]www.1win39427.help[/url]
https://telegram.me/s/dragon_money_zerkal
After comparing multiple SEO services earlier this week, I eventually spent time on quality SEO marketplace cart where the structure looked balanced and navigation felt more intuitive than several competing platforms online currently – The experience was great, and browsing information and products felt simple and comfortable overall.
During my online browsing session this afternoon, I explored various websites before reaching quality web platform, where the clean page structure and clearly arranged products created a comfortable experience supported by detailed and informative descriptions.
During my search across several digital marketplaces this afternoon, I eventually visited high quality fern urban hub, and it was a helpful platform overall, with easy categories and straightforward product discovery that felt comfortable.
https://telegram.me/s/dragon_money_site_casino
During a casual search for online shopping and product trend websites, I discovered daily product explorer – The site featured various interesting products in a clear layout, making navigation easy and giving a sense that it is worth revisiting again for new finds.
While browsing productivity and motivational websites online, I found modern motivation guide – The platform offered a positive atmosphere and inspiring content, making it stand out nicely and providing a smooth, engaging browsing experience throughout the session.
Reading this triggered a small but real correction in something I had assumed, and a stop at purechoiceoutlet extended that corrective effect, content that updates my beliefs through evidence rather than rhetoric is content with intellectual integrity and this site has earned that label consistently across the pieces I have read so far today.
трансы перми трансы Пермь
A quiet piece that did not try to compete on volume, and a look at amazingdealscorner maintained that selective approach, sites that publish less but better are increasingly rare in an environment that rewards volume and this one has clearly chosen quality cadence over quantity which is a brave editorial decision in current conditions.
Those interested in creativity driven learning platforms can browse inspiration flow site which offers engaging content designed to spark curiosity and encourage open minded exploration of ideas – helping users develop stronger mental agility while discovering new ways to interpret information and apply innovative thinking in daily problem solving activities.
Just nice to read something that does not feel like it was assembled from a content brief, and a stop at dreambiggeralways kept that handcrafted feel going, you can tell when a real human with real understanding is behind the words versus a templated piece churned out for an algorithm to find.
Decided not to comment because the post said what needed saying, and a stop at perfectbuyzone continued that complete feel, content that does not invite obvious additions or corrections from readers is content that has been carefully considered and this site appears to consistently produce pieces that satisfy rather than provoke unnecessary follow ups.
Really liked the calm tone running through the post, no shouting and no urgency forced into the writing, and a look at everymomentmatters kept that quiet confidence going, the kind of voice that makes the reader feel respected rather than yelled at which is depressingly common across most modern blog content these days.
Now thinking about this site as a small example of what good independent writing looks like, and a stop at purestylemarket continued that exemplary status, the few sites that serve as good examples are sites worth holding up in conversations about quality and this one has earned that exemplary placement through patient consistent effort over time.
Liked the way the post got out of its own way, and a stop at shopwithstyle extended that invisible craft, the best writing you barely notice while reading because it is doing its work without drawing attention to itself and this site has clearly mastered that disappearing act across the pieces I have read.
While checking various e-commerce fashion platforms and trend-based shopping blogs, I noticed Next Style Trend Hub integrated naturally into the content flow – There is cool stuff everywhere, and my friends always ask where I shop because the collection always looks different, modern, and much more creative than standard online stores
During my review of uplifting e-commerce websites focused on positive user experiences, I found a platform that feels cheerful and well organized for daily shoppers, and Joyful Shop Experience provides a smooth browsing experience overall – The interface is simple, products are presented clearly, and users can enjoy browsing items that bring satisfaction and value.
During my exploration of digital service tools, I found a site that feels well designed and intuitive, and Boosters Web service point delivers smooth navigation overall – Content is structured clearly, navigation is simple, and users can browse services without unnecessary complexity or confusion.
Dragon Money
After spending time reviewing online update websites this week, I eventually explored simple content collection where the layout looked structured and browsing felt more natural than several competing platforms online today – The updates were interesting and the design felt clean, visually balanced, and easy to follow.
Came here from another site and ended up exploring much further than I planned, and a look at dreambiggeralways only encouraged more exploration, the kind of place where one click leads to another not through manipulative design but through genuinely interesting content is rare and worth highlighting when found like this somewhere on the open internet.
Процесс выведения из запоя в клинике основан на медицинских стандартах и многолетнем опыте врачей-наркологов. Каждый случай рассматривается индивидуально: перед началом лечения проводится оценка состояния пациента, определяется степень интоксикации и подбираются препараты, подходящие именно ему. Врачи центра работают круглосуточно, а выездная помощь доступна во всех районах Ростова-на-Дону и области. Это особенно важно, когда требуется немедленная помощь, а доставить пациента в стационар невозможно.
Узнать больше – http://vyvod-iz-zapoya-v-rnd19.ru/
In analyzing multiple online shopping platforms designed for better product discovery and ease of use, I noticed product catalog access point – a layout that feels structured and user-friendly; browsing is smooth, and products are easy to locate across different categories and sections overall experience remains consistent
Will be back, that is the simplest way to say it, and a quick visit to purestylemarket reinforced the decision, this site has earned a spot in my regular rotation alongside a few other reliable places I check when I want something genuinely informative without all the usual modern web noise getting in the way.
Closed the tab feeling I had spent the time well, and a stop at everymomentmatters extended that feeling across more pages, the test of whether time on a site was well spent is one I apply silently after closing tabs and very few sites pass it but this one passed it cleanly today afternoon clearly.
Just dropping by to say thanks for the effort, it does not go unnoticed when a writer cares this much about the reader, and after I went through purechoiceoutlet I was certain this is one of the better corners of the internet for this particular kind of content which is genuinely refreshing.
Now noticing that the post did not mention the writer at all, focus stayed on the topic, and a look at perfectbuyzone continued that author absent quality, content that disappears the writer to focus on the substance is a particular kind of generosity and this site has clearly chosen the substance over the personality consistently.
During a longer browsing session across multiple websites today, I explored modern urban lattice platform and experienced a good overall visit, where information appeared trustworthy and navigation remained smooth across the platform.
Really clear writing, the kind that makes you want to share the link with someone who has been asking about the topic, and a quick browse through yourpathforward only made me more sure of that, the information here stays useful long after the first read is done which says a lot.
Worth recognising the specific care that went into how this post ended, and a look at learnsomethingamazing maintained the same careful conclusions, endings are where most blog content falls apart and this site has clearly invested in the closing stretches of its pieces rather than letting them simply trail off when energy fades.
Anyone interested in structured learning and self improvement can explore learning journey center offering educational materials and guided insights – encouraging users to develop stronger study habits, improve understanding of subjects, and steadily work toward achieving meaningful personal and professional milestones with consistency.
1win android o‘rnatish [url=https://www.1win39427.help]1win android o‘rnatish[/url]
During my review of educational growth platforms, I came across a website that feels structured and practical, and Future Ideas workshop offers smooth navigation overall – The interface is intuitive, pages load quickly, and users can explore inspiring concepts without unnecessary complexity or clutter.
Reading this slowly to give it the attention it deserved, and a stop at yourfashionoutlet earned the same slow read, choosing to read slowly is a small act of respect for content quality and very few sites earn that respect from me but this one did so without any explicit ask which is the cleanest way.
Now placing this in the small category of sites whose updates I would actually want to know about, and a stop at bestchoicecollection confirmed that placement, the difference between sites I want to follow and sites I just consume from is real and this one has crossed into the active follow category from the casual consumption side.
1win Oʻzbekiston ios [url=www.1win39427.help]www.1win39427.help[/url]
While exploring global fashion marketplaces and online style hubs, I noticed fashion inspiration hub embedded in a curated paragraph, and the stylish collection was attractively presented while navigation worked smoothly across several categories without issues.
Approaching this site through a casual link click and being surprised by what I found, and a look at creativegiftplace extended the surprise, the rare experience of stumbling into excellent independent content rather than predictable mediocrity is one of the actual remaining pleasures of casual web browsing and this site provided it cleanly.
https://telegram.me/s/dragon_money_zerkal
Generally my comment to other readers about new sites is to wait and see but for this one I would jump to recommend now, and a look at thinkbigmovefast reinforced that early recommendation, the speed at which a site earns my recommendation is itself a quality signal and this one has earned mine quickly clearly.
I usually skim posts like these but this one held my attention all the way through, and a stop at thinkactachieve did the same, that is a strong endorsement coming from me because I am usually quick to bounce when content gets repetitive or fails to deliver on its initial promise made in the headline.
If I were to recommend a starting point for the topic this site would be near the top of my list, and a stop at findyourfocus reinforced that recommendation status, the small list of starting point recommendations I keep for friends asking about topics is short and this site is now firmly on it.
While exploring online platforms focused on improving daily routines and organization, I found streamlined living hub – The website provided clear, practical information that felt easy to use and understand, making the browsing experience smooth and genuinely helpful for simplifying everyday tasks and decisions.
While checking several online marketplaces and product websites this afternoon, I came across helpful online resource and appreciated how user friendly the entire layout felt, with smooth navigation and a visually appealing design throughout the experience.
While browsing several online service and delivery-related platforms earlier today, I eventually spent time exploring organized parcel hub because the layout looked clean and navigation felt easier than many cluttered websites online currently – The website was helpful overall, and its straightforward navigation makes it worth bookmarking for future browsing sessions.
Came away with a slightly better mental model of the topic than I started with, and a stop at amazingdealscorner sharpened that further, content that improves the reader thinking apparatus rather than just dumping facts into it is the rare kind I genuinely value and seek out when I have time to read carefully.
Now noticing how rare it is to find a site that does not feel rushed, and a look at learnsomethingamazing extended that calm pace, content produced without time pressure has a different quality than content shipped to meet a deadline and this site reads as written without urgency which produces a different and better experience for readers.
Now thinking about how to apply some of this to a project I have been planning, and a look at everydayfindsmarket added more material for the planning, content that connects to my actual creative work rather than just being interesting in the abstract is the kind that earns priority placement in my reading rotation consistently going forward.
https://telegram.me/s/dragon_money_officialniy
Worth recommending broadly to anyone who reads on the topic, and a look at shopwithstyle only confirms that, the rare combination of accessibility and depth in this site makes it suitable for both newcomers and people who already know the area which is hard to pull off in any blog format today and rarely managed.
Just want to recognise that someone clearly cared about how this turned out, and a look at trendforlife confirmed that care extends across the broader site, you can feel the difference between content shipped to hit a deadline and content released because the writer was actually proud of the result for once.
https://www.investortrip.com/
Now setting up a small reminder to revisit the site on a slow day, and a stop at yourstylezone confirmed the reminder was a good idea, planning return visits is a small organisational act that signals trust in ongoing quality and this site has earned that planned return through consistent performance across the pieces I have read so far.
While comparing different online shopping sites, I discovered Aurora Street storefront page that features a clean and modern layout, and browsing feels consistent, with product categories clearly defined so users can easily locate items without unnecessary effort or complicated navigation structures.
Many users appreciate shopping platforms that help them unwind while browsing through various categories of everyday and lifestyle items Sunshine shopping hub – delivering a bright and relaxed environment where users can enjoy discovering new products while maintaining a calm and enjoyable browsing experience throughout their session.
After opening multiple online shopping websites today, I eventually reached recommended urban meadow portal, and I noticed the website design looked appealing, with clear product presentation and consistently fast page loading throughout the session.
Spent a few minutes here and came away with a clearer picture of the topic, the writing keeps things simple without dumbing them down, and after a stop at fashiondailydeals the rest of the points lined up neatly which is something I appreciate when I am short on time and need answers fast.
Speaking from the perspective of having read widely on the topic this site offers something distinct, and a look at dailyshoppingzone reinforced that distinctness, the rare site that contributes something genuinely original to a saturated topic is the rare site worth following carefully and this one has demonstrated that original contribution capability today.
Liked how the writer used real examples instead of theoretical ones to make the points stick, and a stop at modernhomecorner added even more concrete examples, this is the kind of practical approach that respects readers who actually want to apply what they learn rather than just nodding along passively without doing anything useful.
During a casual browsing session focused on fashion websites, I found daily fashion hub – The platform featured a modern presentation and easy to browse structure, making the overall experience smooth, enjoyable, and simple across different categories of style content.
During my review of bargain shopping websites, I came across a site that feels modern and organized for deal seekers, and Savings Hunter space provides a smooth browsing experience overall – The platform highlights useful discounts clearly, helping shoppers explore promotions without clutter or confusing design features.
Now feeling mildly impressed in a way I do not quite remember feeling about a blog in a while, and a stop at modernideasnetwork extended that mild impression, content that produces specific positive emotional responses rather than just neutral information transfer is content with extra dimensions and this site has those extra dimensions clearly.
During my testing of web ranking and analytics systems, I found a platform that feels intuitive and well optimized, and Ranking Helper hub delivers a smooth browsing experience overall – The tools respond quickly, and the layout ensures users can focus on essential SEO tasks without confusion.
Solid value packed into a relatively short post, that takes skill, and a look at findyourowngrowth continues the dense useful content across more pages, this site clearly understands that respecting reader time is itself a form of generosity which is something most blog operations seem to have forgotten lately across the wider open web.
Looking back on this reading session it stands as one of the better ones recently, and a look at exploreinnovativeideas extended that ranking, the informal ranking of reading sessions against each other is something I do mentally and this session ranks high largely because of this site and a couple of related pages here.
Refreshing to find writing that does not try to manipulate the reader into clicking onto the next page through cliffhangers and forced engagement, and a stop at findnewinspiration continued in the same respectful way, this is what reader first design actually looks like in practice rather than just in marketing copy that sounds nice.
Structured running programs often help beginners stay motivated by showing measurable progress each week leading up to their first race completion Fitness Run Flow I ran my first 5k after following their training plan and I honestly surprised myself with the result – Ran my first 5k after following their training plan, wow just wow
Just enjoyed the experience without needing to think about why, and a look at keepmovingforward kept that effortless feeling going, sometimes the best content is invisible in the sense that you forget you are reading until you reach the end and realise time has passed without you noticing it pass naturally.
I usually skim posts like these but this one held my attention all the way through, and a stop at urbanfashioncorner did the same, that is a strong endorsement coming from me because I am usually quick to bounce when content gets repetitive or fails to deliver on its initial promise made in the headline.
Genuinely changed how I think about a small piece of the topic, which does not happen often online, and a look at thinkcreateachieve added another nudge in the same direction, the kind of writing that earns a small mental shift rather than just confirming what you already thought before reading is a sign of careful thought.
Легендарная охота за богатствами продолжается! Новые загадки древних династий, опасные экспедиции и тайны, скрытые веками. Кто разгадает шифры прошлого и доберётся до бесценных артефактов? Захватывающие повороты, рискованные ставки и неожиданные союзники ждут тебя: Сокровища императора 3 сезон новые серии
Worth pointing out the careful word choice in this post, no buzzwords and no jargon, and a look at everydayfindsmarket continued that disciplined vocabulary, sites that resist the pull of trendy language are sites that will read well in five years and this one is clearly built for that kind of long durability.
Bookmark folder created specifically for this site, and a look at growyourmindset confirmed the dedicated folder was the right call, dedicated folders for individual sites are a level of organisation I rarely deploy and this site has earned that level of dedicated tracking based on the consistency I have seen so far across sessions.
During a late evening search for product catalogs and online shopping tools, I eventually came across trusted retail shelf because the structure looked clean and browsing felt smoother than several alternatives online currently – The website felt responsive and organized, and I enjoyed exploring different pages and categories.
Strong recommendation, anyone interested in this topic owes themselves a visit, and a stop at learnsomethingeveryday extends that recommendation across more of the site, this is the kind of resource that makes me more optimistic about the state of the open web than I usually am these days actually for once which is genuinely refreshing.
Stayed longer than planned because each section earned the next, and a look at dailyshoppingzone kept that pulling effect going across more pages, the kind of subtle pull that good writing exerts on attention is something I find harder and harder to resist when I encounter it on the open web today.
Reading this confirmed a hunch I had been carrying about the topic without having articulated it, and a stop at modernstylemarket extended the confirmation, content that gives shape to fuzzy intuitions is doing the rare work of making private thoughts public and this site is providing that articulating service consistently for me lately.
While searching for websites that share engaging resources and useful information updates, I encountered quality content reference during a longer browsing session, and the overall design plus active maintenance gave the platform a genuine feel that remained smooth and comfortable while exploring newer sections there.
Honest take is that I will probably forget most of what I read online today but this post is one I will remember, and a stop at trendylifestylehub kept that same memorable quality going, certain writing leaves a residue in the mind in a way most content simply does not manage.
Dragon Money
https://lavita-clinik.ru/services/zhidkie-niti
По окончании курса детоксикации нарколог дает пациенту и его близким подробные рекомендации, помогающие быстрее восстановить здоровье и предотвратить повторные случаи запоев.
Подробнее можно узнать тут – http://vyvod-iz-zapoya-novosibirsk0.ru/
Looking through other posts here the consistency is what makes the site valuable rather than any single piece, and a stop at opennewdoors extended that consistency observation, sites whose value lies in the ongoing pattern rather than in standout posts are sites I trust more deeply and this one has clearly built that kind of trust.
However selective I am about new bookmarks this one made it past my filter, and a look at dailytrendmarket confirmed the bookmark was worth the slot, the precious slots in my permanent bookmark folder are difficult to earn and this site earned one without making me think twice about whether the slot was justified by the quality.
Saving this link for the next time someone asks me about this topic, and a look at stayfocusedandgrow expanded what I will be sharing with them, this is the kind of resource that makes a real difference when you are trying to point a friend to something useful and reliable rather than generic marketing pages.
During my exploration of online deal platforms, I found a website that feels structured and efficient, and DealCorner savings portal offers a smooth browsing experience overall – Pages load quickly, deals are clearly presented, and users can browse bargain listings without distractions or complicated interface elements.
После первичного осмотра начинается активная фаза детоксикации. Современные препараты вводятся капельничным методом для быстрого снижения уровня токсинов в крови и восстановления обменных процессов. Этот этап критически важен для нормализации работы печени, почек и сердечно-сосудистой системы.
Подробнее тут – https://vyvod-iz-zapoya-vladimir000.ru/vyvod-iz-zapoya-na-domu-vladimir/
While reviewing multiple artisan e-commerce platforms, I noticed that smooth navigation enhances user engagement, and Azure Grove craft browsing center provides fast and stable page loading along with a clean interface, making the entire browsing process feel reliable and easy to manage from start to finish.
While browsing various fashion and style inspiration platforms during an online session, I came across style perfection finder – The website delivered helpful content with a very polished appearance throughout the pages, making the browsing experience smooth, engaging, and visually appealing across all sections.
A piece that reads like it was written for me without claiming to be written for me, and a look at dreamdealsstore produced the same fit, when the writer audience match clicks naturally without being engineered through demographic targeting you know the writing is solid and this site has that natural fit consistently for me.
During a search for curated online shopping pages and visually engaging browsing experiences, I eventually visited new collection access – The layout felt welcoming and easy to understand, while the combination of smooth navigation and appealing presentation added more enjoyment to browsing the available categories and featured sections.
После первичной диагностики начинается активная фаза детоксикации. Современные препараты вводятся капельничным методом, что позволяет быстро вывести токсины и восстановить нормальные обменные процессы. Этот этап критически важен для стабилизации работы печени, почек и сердечно-сосудистой системы.
Узнать больше – [url=https://kapelnica-ot-zapoya-tyumen0.ru/]после капельницы от запоя на дому в тюмени[/url]
Now appreciating that the post did not require me to agree with the writer to find it valuable, and a look at discoverhomeessentials maintained the same useful regardless of agreement quality, content that informs even when it does not convince is content with broader utility and this site reads as useful even when I disagree.
Reading this gave me a quiet moment of intellectual pleasure that I had not been expecting, and a stop at everydayfindsmarket extended that pleasure across more pages, the unexpected reward of stumbling into careful writing is one of the small ongoing pleasures of reading the open web and this site is delivering it reliably.
Когда запой становится угрозой для жизни и здоровья, своевременная помощь профессионала может стать решающим фактором для скорейшего восстановления. В Мурманске, где суровые климатические условия добавляют стресса и осложнений, квалифицированные наркологи оказывают помощь на дому, обеспечивая оперативную детоксикацию и индивидуальную терапию в привычной обстановке. Такой подход позволяет пациентам избежать лишних перемещений и получить поддержку в комфортной атмосфере.
Разобраться лучше – [url=https://vyvod-iz-zapoya-murmansk0.ru/]вывод из запоя[/url]
Closed the tab feeling I had spent the time well, and a stop at starttodaymoveforward extended that feeling across more pages, the test of whether time on a site was well spent is one I apply silently after closing tabs and very few sites pass it but this one passed it cleanly today afternoon clearly.
Услуга вывода из запоя на дому в Мурманске разработана для того, чтобы оперативно снизить токсическую нагрузку и вернуть организм в нормальное состояние. При поступлении вызова специалист проводит детальный осмотр, собирает анамнез и измеряет жизненно важные показатели. На основании полученных данных составляется индивидуальный план терапии, который может включать капельничное введение медикаментов, использование автоматизированных систем дозирования и психологическую поддержку. Такой комплексный подход позволяет обеспечить высокую эффективность лечения даже в условиях экстренной необходимости.
Изучить вопрос глубже – [url=https://vyvod-iz-zapoya-murmansk00.ru/]срочный вывод из запоя в мурманске[/url]
I had been checking various online resources earlier today before discovering well designed petal urban hub, and I enjoyed browsing here, with everything appearing well maintained and content reading naturally throughout.
Good quality through and through, no rough edges and no signs of being rushed, and a quick look at simplebuyhub kept the same polish going, the kind of site that respects its own brand by maintaining consistency across pages which is something I always appreciate as a reader looking for trustworthy information online today.
Для тех, кто хочет смотреть дорамы без лишней суеты и бесконечного поиска, DoramaGo легко станет приятной площадкой для вечернего просмотра. Здесь можно найти корейские, китайские, японские, тайские и другие азиатские сериалы, где есть то самое настроение, за которое дорамы так ценят: нежные и драматичные истории, неожиданные повороты, запоминающиеся персонажи и атмосфера Азии. Простой выбор по разделам помогает легко найти подходящую дораму по стране, жанру, году или настроению, а новые добавления позволяют не пропускать продолжение.
Worth your time, that is the simplest endorsement I can give, and a stop at findyourtrend extends that endorsement across the rest of the site, this is one of those increasingly rare places that delivers on what it promises rather than over selling the content and under delivering on substance every time which I find frustrating elsewhere.
Bookmark folder created specifically for this site, and a look at classytrendcollection confirmed the dedicated folder was the right call, dedicated folders for individual sites are a level of organisation I rarely deploy and this site has earned that level of dedicated tracking based on the consistency I have seen so far across sessions.
Every sneaker drop feels like a small event now with people rushing to secure pairs before they completely disappear from listings Runway Casual Hub I got lucky during one of these drops and the shoes arrived looking even cleaner and more premium than expected initially
Took a few notes from this post, the points are easy to remember without needing to come back and check, and a look at uniquevaluezone added a couple more, the kind of place that sticks in the memory long after the browser tab has been closed for the day which says a lot really.
During my online browsing session this morning, I checked multiple websites before discovering quality digital platform, where the navigation stayed smooth throughout and the updated content made the overall browsing experience feel current and enjoyable.
Now planning a longer reading session for the archives, and a stop at staycuriousdaily confirmed the archives are worth that longer commitment, sites with archives I want to read deliberately rather than just sample are rare and this one has clearly earned that level of interest based on the consistency of what I have already read.
Left me wanting to read more rather than feeling burned out, that is a good sign, and a look at classychoicehub confirmed there is plenty more here to explore, the kind of writing that builds appetite rather than killing it which is a rare quality on the modern open internet today across most categories of content.
Will recommend this to a couple of friends who have been asking about this exact topic, and after dailytrendmarket I have even more reason to do so, the kind of site that earns word of mouth rather than chasing it through aggressive marketing or paid placements is always a treat to find online.
During an evening search for online information and content platforms, I eventually came across simple reliable corner hub because the structure looked clean and browsing felt smoother than many overloaded websites online currently – The shared content was nice and everything appeared updated and carefully arranged for visitors.
Walked away with a clearer head than I had before reading this, and a quick visit to discoverbetterdeals only sharpened that, the writing has a way of cutting through the noise that surrounds most topics online which is something I will definitely remember the next time I am searching for an answer to anything.
mostbet ro [url=https://www.mostbet41079.help]https://www.mostbet41079.help[/url]
Solid value packed into a relatively short post, that takes skill, and a look at makeimpacteveryday continues the dense useful content across more pages, this site clearly understands that respecting reader time is itself a form of generosity which is something most blog operations seem to have forgotten lately across the wider open web.
Just want to flag that this was useful and not bury the appreciation in caveats, and a look at believeinyourideas earned the same direct praise, recognising good work without hedging it with criticism is something I try to practice because over qualified compliments tend to read as backhanded and miss the point sometimes.
888starz تسجيل الدخول [url=https://888starz-egypt7.com/]888 starz bet[/url]
A small editorial detail caught my attention, the way headings related to body text, and a look at findsomethingamazing maintained that careful relationship, structural details like that show up to readers who notice them and the writers here have clearly thought about every level of the piece rather than just the words.
Picked this for my morning read because the topic seemed worth the time, and a look at uniquegiftideas confirmed the choice was right, my morning reading slot is precious and giving it to this site felt like a good investment rather than a waste which is a higher endorsement than I usually offer for content.
888starz вход в личный кабинет [url=http://www.888starz-uzbekistan5.com]888starz вход в личный кабинет[/url] .
888stazr [url=www.uz888starzbet.com]888stazr[/url] .
I appreciate the clarity here, everything is explained in simple terms without unnecessary detail, and after a quick stop at learnexploreachieve the points came together nicely for me, the writing keeps things straightforward and respects the reader from start to finish without ever talking down to anyone.
Reading carefully here has reminded me what reading carefully feels like, and a look at makesomethingnew extended that reminder, the experience of careful reading versus skimming is different in ways I had partially forgotten and this site has clearly refreshed my memory of what attention feels like when content rewards it consistently.
Nice and clean, that is the best way to describe the writing here, no clutter and no wasted words, and a quick visit to everydayshoppinghub kept that going, I appreciate when a site treats its readers like people who can think for themselves without needing constant hand holding through every paragraph.
888starz сайт [url=http://www.888starz-uz-online.com]888starz сайт[/url] .
During my review of innovation and design sharing websites, I came across a website that feels calm and thoughtfully arranged for creators, and Concept Innovation guide provides a smooth browsing experience overall – The design is minimal, featured content feels inspiring, and readers can browse comfortably without overwhelming visuals.
Skipped a meeting reminder to finish the post, and a stop at discoverandbuy held me past another reminder, when content beats meetings the writer is doing something extraordinary because meetings have institutional support behind them and yet good writing can still occasionally win that competition for attention which I find heartening today.
Really grateful for content like this, it does not waste my time and it does not insult my intelligence either, and a quick look at uniquevaluecorner was the same, balanced respectful writing that makes a person feel welcome rather than rushed through pages of forced engagement just to keep clicking around.
888ستارز [url=https://www.888starz-egyp.com/]https://888starz-egyp.com/[/url]
During my exploration of online logistics tools, I found a platform that feels structured and fast, and Parcel Wise delivery system delivers smooth navigation overall – The design is minimal, pages load quickly, and users can understand service information without unnecessary complexity.
Смотрите русские сериалы https://top-tvshou.ru и ТВ-шоу онлайн бесплатно в хорошем качестве. Большая коллекция популярных проектов, новые серии и любимые телепередачи. Удобный каталог, быстрый поиск по жанрам и актерам, возможность смотреть на компьютере, планшете и смартфоне без регистрации.
https://lavita-clinik.ru/kosmetologija/chto-delat-esli-volosy-lomajutsja-po-vsej-dline
Современные методы лечения при выводе из запоя включают как медикаментозную детоксикацию, так и психологическую реабилитацию. В Уфе наркологи используют капельничное введение лекарственных средств, которые помогают быстро вывести токсины, нормализовать обмен веществ и стабилизировать работу внутренних органов. Одновременно с этим проводится психологическая поддержка для снижения эмоционального стресса, связанного с запоем.
Изучить вопрос глубже – [url=https://narcolog-na-dom-ufa0.ru/]вызов нарколога на дом цена в уфе[/url]
I recently explored a variety of websites focused on recommendations and inspirational material when I discovered trusted creativity network listed among featured suggestions, and the responsive navigation plus visually balanced presentation created a consistently enjoyable browsing experience online.
While browsing online smart shopping and deals platforms, I found modern deals guide – The platform featured interesting content and smooth navigation, making browsing easy, enjoyable, and worth returning to regularly for new offers and inspiration.
888strz [url=https://www.888starzeg1.com]https://888starzeg1.com/[/url]
Strong recommendation from me, anyone curious about the topic should make time for this, and a look at findyournextgoal only sharpens that recommendation further, the kind of resource that holds up against careful scrutiny rather than crumbling at the first critical question is rare and worth pointing other people toward when the topic comes up.
During exploration of lifestyle-focused online stores, I noticed Blossom Bay lifestyle store presenting its items in a well-organized format with consistent spacing and readable sections – The overall browsing flow feels calm and easy to follow.
скачать игры с яндекс диска скачать игры без торрента
Came across this looking for something else entirely and ended up reading it through twice, and a look at discovergreatvalue pulled me deeper into the site than I planned, the writing has a way of holding attention without resorting to manipulative cliffhangers or vague promises that never get delivered later down the page.
While exploring different online shopping websites this morning, I spent time on valuable pine bazaar marketplace, and I found a nice browsing experience overall, with organized categories and reliable website functionality throughout the session.
People trying to live more sustainably often begin with small daily habits that reduce waste and improve environmental awareness over time Eco Change Hub I started recycling more regularly and cutting down plastic use, and even these small steps genuinely feel meaningful in building better habits – Started recycling more and using less plastic, small steps matter
Found this via a link from another piece I was reading and the click was worth it, and a stop at simplebuyhub extended the value across more material, the open web still rewards clicking through citations when the underlying writers care about each other work and this site clearly belongs to that network.
Stands out for actually being useful instead of just being long, and a look at shapeyourdreams kept that going, length without value is the default mode of most blogs these days but this site has clearly chosen a different path which I respect a lot as a reader who values careful editing decisions like that.
888startz [url=www.888starz-bet3.com/]888startz[/url] .
Комплексные электромонтажные услуги в западном регионе. Монтаж кабельных линий, установка распределительных коробок, расключение щитов любой сложности. Гарантия качества на все электромонтажные узлы.Слаботочные системы и видеонаблюдение
This actually answered the question I had been searching for, and after I checked believeinyourideas I had a few more pieces I had not realised I needed, that is the sign of a site that knows what its readers want before they even know how to ask it which is impressive.
My usual pattern is to skim and bounce but this site has reset that pattern temporarily, and a stop at findyourinspirationtoday maintained the slower reading mode, content that changes how I read is content with structural influence and this site has clearly nudged my reading behaviour toward something better at least for the duration of these visits.
processing@888starz.bet [url=http://www.888starz-eg2.org/]https://888starz-eg2.org/[/url]
888 starz bet [url=https://eg-888starz.com/]888[/url]
Granted I am giving this site more credit than I usually give new finds, and a look at globalfashionfinds continued earning that credit, the calibration of how much trust to extend after limited exposure is something I do carefully and this site has earned more trust on shorter exposure than most due to consistent quality across.
Came away with some new perspectives I had not considered before, and after findbestdeals those ideas felt more complete, the kind of content that stays with you a little while after reading rather than slipping out the moment you switch tabs and move on with your day to whatever comes next.
Excellent post, balanced and well organised without showing off, and a stop at changeyourfuture continued in that same vein, this site has clearly figured out the formula for content that works for readers rather than for search engine ranking signals which is harder than it sounds today and worth real recognition from anyone.
Even from a single post the editorial care is clear, and a stop at everydaystylemarket extended that care across more pages, the kind of attention to quality that shows up in every paragraph is what separates serious sites from the rest and this one has clearly invested in that paragraph level attention across what I have read.
Арена гайдов crarena ru полезные гайды по играм, квестам и заданиям. Подробные прохождения, советы, секреты и тактики для разных игр. Помогаем быстрее проходить миссии, находить скрытые предметы и открывать новые возможности игрового мира.
taros купить эль таро
During an online exploration of informative resources and learning platforms, I found modern learning hub – The website featured a clean and friendly layout, and its well organized sections helped create a seamless browsing experience that felt both helpful and enjoyable for casual visitors.
While browsing multiple courier tracking platforms and logistics websites today, I checked reliable delivery hub since the layout looked structured and user friendly – The overall experience felt pleasant today, and the website design appeared modern, smooth, and inviting for visitors looking to track parcels easily and quickly.
Reading this in pieces during a long afternoon and finding it consistently rewarding, and a stop at yourstylematters fit naturally into the same fragmented reading pattern, sites whose posts can be read in segments without losing the thread are well suited to how I actually read these days and this one is built well.
Интерактивные пособия и софт для визуализации работы графов, деревьев решений и логических выводов.Оснащение кабинетов ИИ Конаев
сделать песню онлайн заказать песню
Appreciate the practical examples, they made the abstract points easier to grasp, and a stop at newtrendmarket added more of the same, this site clearly understands that real examples beat empty theory every single time which is the mark of a writer who knows their audience well and respects their time.
mostbet tranzactie esuata [url=mostbet41079.help]mostbet41079.help[/url]
Skipped the related links section thinking I had read enough and then came back to it later when curiosity got the better of me, and a stop at trendycollectionhub confirmed I should have just read it first, every section of this site appears to deserve careful attention rather than skipping past lazily.
Thanks for keeping the writing direct without losing the warmth that makes content feel human, and a stop at groweverymoment carried both qualities forward, balancing professionalism and personality is a rare skill and the writers here have clearly figured out how to consistently land it across many posts which I notice.
While exploring savings and promotions platforms online, I found a website that feels practical and easy to browse, and Discount Discovery center delivers a smooth browsing experience overall – The platform is responsive, deals are highlighted neatly, and users can discover offers without clutter or complicated navigation paths.
Started reading and ended an hour later without realising the time had passed, and a look at brightvalueworld produced the same time dilation effect, when content makes time feel different the writer has achieved something well beyond the average and this site is producing that experience for me reliably across multiple readings.
https://grasso.pro/
Реактивация спящей базы клиентов для бизнеса в Астане. Обзвон “отказников”, выяснение причин ухода (CustDev) и предложение антикризисных условий возврата. Увеличьте выручку за счет возвращения лояльности старых партнеров.Работа с оттоком клиентов Шымкент
Reading this gave me something to think about for the rest of the afternoon, and after brightnewbeginnings I had even more to mull over, the kind of post that lingers in the background of your day rather than evaporating immediately is genuinely valuable in an attention economy that punishes depth rather than rewarding it.
Recommended without reservation for anyone interested in the topic at any level of expertise, and a look at makepositivechanges only strengthens that recommendation, this site clearly knows how to serve readers across a range of backgrounds without watering down the content or talking past anyone in the audience which is genuinely impressive to see.
Felt the writer was speaking my language without trying to imitate it, and a look at believeandcreate continued that natural fit, when a writers default voice happens to match what you find easy to read the experience feels frictionless and that is something I notice and remember about specific sites going forward.
Skipped the TLDR thinking I would read everything anyway, and ended up enjoying the path through the full post, and a stop at yourvisionawaits similarly rewarded the patient read, summaries are useful but the journey through good writing is part of what makes the destination feel earned rather than just delivered cleanly.
Skipped the comments section but might come back to read it, and a stop at brightfashionfinds hinted at a quality reader community, sites where the comments are worth reading separately from the post are increasingly rare and signal a particular kind of audience that has grown around the editorial vision over time gradually.
A piece that handled multiple complications without becoming confused, and a look at thebestvalue continued that organisational clarity, holding multiple threads in a single piece without losing any of them is a sign of skilled writing and this site has clearly developed the editorial discipline to manage complexity without sacrificing readability throughout.
https://www.google.ie/url?q=https://bookieranks.com/
After spending time browsing several online stores and digital marketplaces today, I eventually explored trusted shopping destination and really appreciated how easy the categories were to navigate while finding products felt surprisingly straightforward and convenient throughout the visit.
Just want to recognise that someone clearly cared about how this turned out, and a look at dailytrendspot confirmed that care extends across the broader site, you can feel the difference between content shipped to hit a deadline and content released because the writer was actually proud of the result for once.
Thanks for the honest framing without exaggerated claims that the topic will change my life, and a stop at discovermoretoday kept the same modest tone, restraint in marketing language signals trustworthiness and the writers here are clearly playing the long game by building credibility rather than chasing immediate clicks through hyperbole.
While exploring different online shopping catalogs, I noticed a consistent emphasis on clarity and ease of use, and Blossom Haven browse center delivers a modern and stable browsing experience – Pages are well structured and easy to navigate, helping users move through product sections smoothly without confusion or unnecessary design distractions.
Тройники с пожарной подставкой ППТФ Эковер
Reading this slowly and letting each paragraph land before moving on, and a stop at urbanfashioncorner earned the same patient approach, content that rewards slow reading rather than speed is content with real density and the writers here are clearly producing work that benefits from the careful eye rather than the rushed scan.
During a relaxed session browsing online fashion and lifestyle shops, I came across fashion style corner placed in a list of recommended links, and the browsing experience felt smooth as product pages were clean, well organized, and enjoyable to explore.
During a longer browsing session across multiple websites today, I explored modern urban ridge platform and appreciated the simple navigation, with accessible products and stable performance throughout the experience.
A nicely understated post that does not shout for attention, and a look at discoverhiddenopportunities maintained the same quiet quality, understatement is a stylistic choice that distinguishes serious writing from attention seeking writing and this site has clearly committed to the understated approach as a core editorial value rather than just a phase.
Новостной онлайн-портал https://vse-novosti.net с круглосуточным обновлением информации. Новости мира и регионов, аналитические материалы, обзоры и важные события в одном месте.
Really appreciate the lack of pop ups, modals, cookie banners stacking on top of each other, and a quick visit to learnandimprove confirmed the same clean approach across the rest of the site, technical decisions about user experience are part of what makes content actually pleasant to engage with for sure.
Just want to recognise that someone clearly cared about how this turned out, and a look at globaltrendstore confirmed that care extends across the broader site, you can feel the difference between content shipped to hit a deadline and content released because the writer was actually proud of the result for once.
Now recognising that this site has earned a place in the small group of resources I treat as authoritative, and a stop at growbeyondlimits confirmed that placement, the difference between resources I trust and resources I just consume is real and this site has clearly moved into the trusted category through consistent quality over time.
Found a couple of useful angles in here I had not considered before reading carefully, and a quick stop at discovergreatideas added more, this is one of those sites where the value compounds the more you read rather than peaking at one viral post and then offering nothing else of substance afterwards which is common.
Reading carefully this time rather than scanning, and the depth shows up in places I missed first time around, and a look at everydayshoppinghub rewarded the same careful approach, content that holds up to multiple reads is content I want more of in my regular rotation rather than disposable scroll fodder daily.
Decided to read this site for a while before forming a verdict, and the verdict after several pages is positive, and a stop at yourvisionmatters continued that pattern, judging a site requires more than one post and giving sites a fair sample is something I try to do for promising candidates rather than rushing to dismiss.
During my exploration of online value platforms, I found a website that feels easy to navigate, and Unique Value Corner guide delivers smooth navigation overall – The layout is minimal, pages are responsive, and users can browse content without confusion or clutter affecting usability.
скачать игры с яндекс диска скачать игры с яндекс диска
Found a small mental shift after reading this, the framing here is just a bit different from the standard takes online, and a look at newtrendmarket extended that fresh perspective across more material, the rare site whose voice actually changes how you think about something rather than just confirming existing beliefs.
While analyzing urban fashion platforms focused on modern apparel, I noticed a website that feels structured and easy to navigate, and Street Style Market delivers smooth browsing overall – The platform highlights contemporary clothing options inspired by urban culture, allowing users to browse stylish outfits with ease and comfort.
Picked this for my morning read because the topic seemed worth the time, and a look at nexshelf confirmed the choice was right, my morning reading slot is precious and giving it to this site felt like a good investment rather than a waste which is a higher endorsement than I usually offer for content.
Worth recognising that this site does not chase the daily news cycle, and a stop at buildyourpotential confirmed the longer publication arc, sites that resist the pressure to comment on every passing event are sites with genuine editorial discipline and this one has clearly chosen depth over volume which I respect deeply.
Felt the post handled a sensitive angle of the topic with appropriate care, and a look at linkbeacon extended that careful handling across related material, sites that can navigate delicate territory without causing damage are rare and require a level of judgement that comes from experience rather than from following any clear playbook.
Now thinking I want more sites built on this kind of editorial foundation, and a stop at smartshoppingplace extended that wish into a broader hope, sites built on substance and care rather than on metrics and growth are the kind of sites I want to see more of and this one is a small example worth supporting.
Really appreciate that the writer did not stretch the post to hit some target word count, the points end when they are made, and a stop at dreamcreateachieve reflected the same discipline, brevity is generosity in disguise and this site has clearly figured that out far better than most blog operations have.
The structure of the post made it easy to follow without losing track of where I was, and a look at styleandchoice kept the same logical flow going, this site clearly understands that organisation is half the battle in keeping readers engaged from the first line to the last across any kind of post.
While checking multiple recommendation platforms and online discovery websites for useful content, I encountered exclusive browsing portal – The website delivered a visually balanced structure, clear navigation between sections, and enough organized material to make the browsing experience feel naturally engaging overall.
Solid endorsement from me, the writing earns it, and a look at growyourmindset continues to earn it across the broader site too, the kind of operation that maintains quality across many pages rather than just one viral post is a sign of serious commitment and that is what I see here clearly across what I read.
Held my interest from the opening line through to the closing thought, and a stop at groweverymoment did the same, content that earns sustained attention in an environment full of distractions is doing something right and this site is clearly doing several things right rather than just one or two which I really appreciate.
Quality work here, the post reads cleanly and the points stay focused throughout, and a stop at findpeaceandpurpose kept the standard high, you can tell the writer cares about the final result rather than just hitting publish for the sake of having something new on the page to feed the search engines.
Once I had read three posts the editorial pattern was clear, and a look at seogrove confirmed the pattern from a fourth angle, sites where the underlying approach reveals itself through accumulated reading rather than being announced are sites with real depth and this one has that quality clearly visible across multiple pieces consistently.
https://grasso.pro/
Now appreciating that I did not feel exhausted after reading, and a stop at explorelimitlesspossibilities extended that energising quality, content that leaves me with more attention than it consumed is rare and the gap between draining and energising content is real over the course of a typical day spent reading widely online.
Новостной портал https://tovarpost.ru с актуальными событиями России и мира. Политика, экономика, общество, технологии и спорт. Оперативные новости, аналитика и важные события в режиме реального времени.
Now feeling confident enough in this site to use it as a reference point for evaluating others on the same topic, and a look at theartofgrowth continued the comparison friendly quality, sites that serve as quality benchmarks for their topic are precious and this one has clearly become a benchmark for me on this particular subject area.
Профессиональное ИТ-оборудование для Восточного Казахстана. Официальная поставка и техническая поддержка.Моноблок с разрешением 4K
mostbet giriş təlimatı [url=http://mostbet01859.help]mostbet giriş təlimatı[/url]
Time spent here today felt productive in the way that good reading sessions sometimes do, and a stop at discoverpossibility extended that productive feeling across the rest of the morning, the difference between productive reading and merely passing time is real and this site is consistently on the productive side for me lately.
создать песню онлайн создать песню бот
During my exploration of craft-based ecommerce sites, I found a platform that maintains good performance and clean design, and Forge Bright online crafts delivers an organized browsing experience overall – The layout is simple and effective, allowing users to navigate easily between categories without confusion or unnecessary visual complexity.
During my online browsing session today, I checked multiple platforms before landing on useful velvet cove store, and the website felt really pleasant, with updated information and browsing staying enjoyable throughout the experience.
Comfortable in tone and substantive in content, that is a hard combination to land, and a look at yourvisionawaits kept that pairing alive across more material, this is what good editorial direction looks like in practice and the team here clearly has someone keeping a steady hand on the wheel across what they decide to publish.
http://www.besatime.com/user/branyahhqe
Reading this confirmed something I had been suspecting about the topic, and a look at modernhometrends pushed that confirmation toward greater confidence, content that lines up with independently held intuitions earns a special kind of trust and I will return to writers who consistently land that way for me without overselling positions.
Материал объясняет, зачем нужна фановая труба и как она влияет на работу канализации в доме. Рассматриваются вентиляция стояка, защита от срыва гидрозатворов, запахов и шумов, требования к выводу трубы и ситуации, когда без фановой вентиляции система работает нестабильно – https://santexnik-market.ru/inzhenernaya-santehnika/fanovaya-truba/
Now setting this aside as a model of how to write thoughtfully on the topic, and a stop at trendywearstore extended that model status, content that becomes a reference for how a kind of writing should be done is content with influence beyond its own readership and this site is reaching that level for me clearly today.
Skipped a meeting reminder to finish the post, and a stop at stayfocusedandgrow held me past another reminder, when content beats meetings the writer is doing something extraordinary because meetings have institutional support behind them and yet good writing can still occasionally win that competition for attention which I find heartening today.
Recommended without hesitation if you care about careful coverage of this topic, and a stop at thepowerofgrowth reinforced the recommendation, the bar I set for unhesitating recommendations is fairly high and this site has cleared it through the cumulative weight of multiple consistently good pieces rather than through any single standout post which is meaningful.
В рамках анонимного лечения особое внимание уделяется следующим медицинским аспектам:
Выяснить больше – [url=https://narkologicheskaya-klinika-v-rostove19.ru/]наркологическая клиника наркологический центр[/url]
While exploring online self discipline and motivation resources, I found a platform that feels practical and visually organized for readers, and Concentration Ideas hub delivers a smooth browsing experience overall – The platform is responsive, articles are highlighted effectively, and users can focus on productive habits without unnecessary complexity.
Специализированный сервис по ремонту бытовых и профессиональных льдогенераторов в Алматы. Чистка системы, замена компрессоров, устранение утечек фреона. Обеспечим бесперебойную работу вашего оборудования для дома, бара или ресторана.Сервисный центр бытовой техники Астана
Worth pointing out that the post avoided the temptation to summarise everything at the end, and a look at budgetfriendlypicks continued that confident closing approach, content that trusts readers to retain the substance without being reminded of it at the end is content that respects the reader and this site practices that respect.
Багато власників житла зараз цікавляться сучасними рішеннями для ремонту та облаштування власного будинку чи квартири. У різних оглядах регулярно згадується stroitel, що привертає увагу читачів корисними тематичними матеріалами. Найбільший інтерес зазвичай викликають статті про енергоефективність та практичні будівельні поради.
Beyond the topic at hand this site reads as a small ongoing project of taking writing seriously, and a look at dailytrendmarket reinforced that project quality, sites that treat publishing as an ongoing serious practice rather than as content production for traffic are sites worth supporting and this one has clearly chosen the serious approach.
Worth flagging that this approach to the topic is fresh without being contrarian, and a stop at globalstyleoutlet extended the same fresh angle, finding original perspective on familiar subjects is rare and this site has clearly developed its own way of seeing rather than echoing the dominant takes from elsewhere consistently.
Glad the writer did not feel compelled to cover every possible angle of the topic, focus is a virtue, and a stop at ranknexus reflected the same disciplined scope, knowing what to leave out is half of what makes good writing good and this post has clearly been edited with that principle in mind.
Just dropping by to say thanks for the effort, it does not go unnoticed when a writer cares this much about the reader, and after I went through nexshelf I was certain this is one of the better corners of the internet for this particular kind of content which is genuinely refreshing.
Reading carefully this time rather than scanning, and the depth shows up in places I missed first time around, and a look at trendywearstore rewarded the same careful approach, content that holds up to multiple reads is content I want more of in my regular rotation rather than disposable scroll fodder daily.
Held my interest from the opening line through to the closing thought, and a stop at linkbeacon did the same, content that earns sustained attention in an environment full of distractions is doing something right and this site is clearly doing several things right rather than just one or two which I really appreciate.
After browsing through various online stores and digital pages today, I eventually found structured internet destination, and I appreciated how polished everything looked while pages loaded properly and browsing remained enjoyable throughout the experience.
Started reading without much expectation and ended on a high note, and a look at urbanwearoutlet continued that arc, content that builds rather than peaks early is a sign of a writer who knows how to structure a piece for sustained reader engagement rather than relying on a strong hook to do all the work.
Started forming counter examples to test the claims and the post handled most of them implicitly, and a look at learnsomethingnewtoday continued that anticipatory style, writers who think two steps ahead of the critical reader save themselves from a lot of follow up work and this writer has clearly internalised that habit consistently.
Felt the writer respected the topic without being precious about it, and a look at makesomethingnew continued that respectful but unfussy treatment, finding the right register for serious topics is hard and this site has clearly figured out how to take the topic seriously while still being readable for casual visitors regularly.
Just wanted to drop a quick note saying this was a useful read on a topic I have been circling, no fluff, and a stop at smartshoppingzone added a few extra points that fit the same simple style which makes the whole site feel coherent rather than thrown together by many different writers with different goals.
Probably the kind of site that should be more widely read than it appears to be, and a look at everydaystylemarket reinforced that quiet wish, the gap between a sites quality and its apparent reach is sometimes large and that gap exists for this site in a way that makes me want to mention it more.
Фланец воротниковый Клапаны термозапорные
A piece that did not lecture even when it had clear positions, and a look at seoharbor maintained the same teaching without preaching tone, finding the line between informing and lecturing is hard and most sites land on the wrong side of it but this one has clearly figured out how to inform without becoming preachy.
Хочешь узнать про электронные чеки? https://financedirector.by/jelektronnye-cheki-i-ih-uchet/ важный этап цифровизации торговли и налогового контроля. Узнайте, как работают электронные чеки, какие преимущества они дают бизнесу и покупателям, а также какие изменения ждут предпринимателей.
mostbet md [url=http://mostbet18305.help/]http://mostbet18305.help/[/url]
mostbet ios [url=http://mostbet01859.help]mostbet ios[/url]
Glad I gave this fifteen minutes rather than the usual three minute skim, and a look at staycuriousdaily earned the same investment, time spent on quality content is rarely wasted but the reverse is also true and learning which sites deserve which kind of attention is part of being a careful online reader.
1win UZ login [url=https://www.1win39427.help]1win UZ login[/url]
Well structured and easy to read, that combination is rarer than people think, and a stop at urbanstylemarket confirmed the same standard runs across the rest of the site, definitely the kind of place I will be coming back to when this topic comes up in conversation later again over the weeks ahead.
A piece that did exactly what it promised in the headline without overshooting or underdelivering, and a look at trendandfashionhub continued that calibration, alignment between promise and delivery is a basic editorial virtue that many sites fail at and this site has clearly mastered the matching of expectation and substance throughout pieces.
A piece that exhibited the kind of patience that good writing requires, and a look at dailytrendmarket continued that patient quality, hurried writing is easy to spot and this site reads as having been written without time pressure which produces a different feel than the rushed content that dominates much of the modern blog space.
https://www.google.com.bm/url?q=https://www.europneus.es/talleres/arcls/?gratuit_1xbet_code_promo_pour_aujourd_hui.html
Now recognising the post as a rare example of careful writing on a topic that mostly receives careless treatment, and a stop at findyourinspirationtoday extended that contrast with the average elsewhere, content that highlights how much the average is settling for low quality is content that has both internal merit and external value as a benchmark.
During my review of several digital stores, I came across a platform that emphasizes fast interaction and smooth browsing, and CloudForge shopping portal offers reliable performance overall – The website responds instantly to clicks and navigation feels seamless, making it easy for users to explore different product sections without delay.
While exploring different online shopping websites this morning, I spent time on valuable field market marketplace, and it was a great platform overall, with fast page loading and professionally arranged categories for users.
Once I trust a site this much I tend to read everything they publish and that is the trajectory I am on with this one, and a stop at yourpathforward confirmed the trajectory, the rare progression from interested reader to comprehensive reader is something only certain sites earn and this one is earning that progression rapidly.
Generally my comment to other readers about new sites is to wait and see but for this one I would jump to recommend now, and a look at nexshelf reinforced that early recommendation, the speed at which a site earns my recommendation is itself a quality signal and this one has earned mine quickly clearly.
During an online exploration of travel and global discovery platforms, I discovered world insight space – The website featured a clean layout and regularly updated content, making browsing easy, engaging, and thoughtfully arranged for visitors looking through different categories and ideas.
Reading this gave me a quiet moment of intellectual pleasure that I had not been expecting, and a stop at happyfindshub extended that pleasure across more pages, the unexpected reward of stumbling into careful writing is one of the small ongoing pleasures of reading the open web and this site is delivering it reliably.
https://grasso.pro/
During my exploration of self improvement and mental clarity websites, I found a platform that feels structured and user friendly for daily motivation, and Daily Focus guide offers a smooth browsing experience overall – Pages load quickly, productivity tips are displayed clearly, and readers can focus on useful guidance without distractions or unnecessary interface elements.
Reading this prompted me to send the link to two different people for two different reasons, and a stop at ranknexus provided ammunition for a third share, content that suits multiple audiences without being generic enough to be useless to any of them is genuinely valuable and this site has that multi audience quality clearly.
Did not expect much when I clicked through but ended up reading the whole thing carefully, and a stop at linkbeacon kept that engagement going, sometimes the unassuming sites turn out to deliver more than the flashy ones which is something I have learned to look out for over time online lately and across topics.
Reading this in the time it took to drink half a cup of coffee, and a stop at everydayinnovation fit naturally into the second half, content that respects the rhythms of a typical morning is content with practical fit and this site has the kind of length and pacing that works for the way I actually read.
Now recognising that the post handled the topic with appropriate technical precision without becoming dry, and a stop at shopandsaveonline continued that balance, technical precision and readability are often in tension and this site has clearly figured out how to maintain both at once which is one of the harder editorial achievements in the form.
Really liked the calm tone running through the post, no shouting and no urgency forced into the writing, and a look at exploreinnovativeideas kept that quiet confidence going, the kind of voice that makes the reader feel respected rather than yelled at which is depressingly common across most modern blog content these days.
1win daily bonus [url=https://www.1win3003.mobi]https://www.1win3003.mobi[/url]
Will be passing this along to a few people who would benefit from the perspective shared here, and a stop at dreambiggeralways only added to what I will be sharing, this kind of generous content deserves to circulate widely rather than getting buried in some search engine algorithm tweak that pushes it down the rankings.
The tone stayed consistent across the whole post which is harder than it looks for longer pieces, and a look at globalfashionzone continued the same voice, this kind of editorial consistency is a sign of either a single careful writer or a tightly run team and either is impressive today across the broader media environment.
Now sitting with the thoughts the post triggered rather than rushing on to the next thing, and a stop at discoverbetteroptions extended that reflective pause, content that earns time for thought after closing the tab is content of higher value than the merely interesting and this site has clearly produced that lasting effect today.
Worth flagging that this approach to the topic is fresh without being contrarian, and a stop at discovergreatvalue extended the same fresh angle, finding original perspective on familiar subjects is rare and this site has clearly developed its own way of seeing rather than echoing the dominant takes from elsewhere consistently.
Decided this was the best thing I had read all morning, and a stop at seohive kept that ranking intact, ranking my reading is something I do mentally throughout the day and the top rank is competitive and not easily won but this site won it without needing to overstate its claims for that.
Liked the natural conversational tone throughout, never stiff and never overly casual either, and a stop at findmotivationtoday kept that comfortable middle ground going, finding a tone that respects the reader without becoming distant or overly familiar is harder than it sounds and this site nails that balance consistently across many different pieces.
Halfway through reading I knew this would be one to bookmark, and a look at inspiredthinkinghub confirmed that early intuition, when bookmark intent forms before finishing a post you know the writing has cleared a quality bar that most content fails to clear and this site has cleared it on multiple visits already.
UFC Live Online https://ufc-white-house.com
However many similar pages I have read this one taught me something new, and a stop at packnest added more new material, content that contributes genuinely fresh information rather than recycling what is already widely available is content with real informational value and this site is providing that informational freshness at a notable rate.
mostbet parola uitata [url=https://mostbet41079.help/]https://mostbet41079.help/[/url]
Now feeling something close to gratitude for the fact this site exists, and a look at discoverinfiniteideas extended that gratitude, the rare site that produces this kind of response is the rare site worth defending in conversations about whether the modern internet is still capable of producing genuinely valuable independent content for serious adults.
mostbet aylıq bonus [url=https://mostbet01859.help]https://mostbet01859.help[/url]
Felt the writer was being honest with the reader which is rare enough that I want to acknowledge it, and a look at bestdailyoffers continued that honest feel, content built on actual knowledge rather than aggregated summaries is something I value highly and rarely come across in regular searches on the open internet these days.
Worth flagging this site to a few specific friends who would appreciate the editorial sensibility, and a look at rankorbit added more pages I will mention to them, recommending sites to specific people requires understanding both the site and the person and this site is making those personalised recommendations easy and natural for me.
Thanks for a post that does not try to be funny when it is not the moment for it, and a stop at findyourpath maintained the same appropriate seriousness, knowing when humour helps and when it just signals desperation for engagement is a sign of editorial maturity that many blogs have not developed yet.
Quietly impressive in a way that does not announce itself, and a stop at linkbloom extended that quiet impressiveness, the kind of quality that emerges through sustained attention rather than first impressions is the kind I trust more deeply and this site has been earning that deeper trust across multiple sessions over time consistently.
Honestly this hits the sweet spot between detail and brevity, no rambling and no shortcuts, and a quick visit to creativechoiceoutlet kept that going across the related pages, the kind of place that respects your attention without trying to grab it through cheap tactics or attention seeking design choices that get tired fast.
Nice and clean, that is the best way to describe the writing here, no clutter and no wasted words, and a quick visit to trendandstyle kept that going, I appreciate when a site treats its readers like people who can think for themselves without needing constant hand holding through every paragraph.
Worth flagging that this approach to the topic is fresh without being contrarian, and a stop at everydaychoicehub extended the same fresh angle, finding original perspective on familiar subjects is rare and this site has clearly developed its own way of seeing rather than echoing the dominant takes from elsewhere consistently.
1win ios [url=1win3003.mobi]1win ios[/url]
If you scroll past this site without looking carefully you will miss something, and a stop at findyourbalance extended that mild warning, the surface of the site does not advertise its quality loudly which means careful attention is required to recognise what is being offered here which is itself a kind of editorial signal.
Took the time to read every paragraph rather than skimming for the punchline, and a quick visit to brightfashionfinds earned the same careful attention from me, that is the highest signal I can give about content quality because my default mode is rapid scanning rather than deliberate reading on most pages.
During comparison of ecommerce platforms for usability, I found a structured and readable interface, and Meadow Collective cloud display delivers an organized browsing experience overall – The content is well presented, allowing users to browse easily and read product information without confusion or unnecessary design complexity.
semaglutida inyectable precio similares
semaglutida inyectable precio similares
During my morning reading slot this fit perfectly into the routine, and a look at trendsettersparadise extended that perfect fit into the rest of the routine, content that matches the rhythm of how I actually read rather than demanding accommodation from my schedule is content well calibrated to its likely audience and this site has it.
This one is staying open in a tab for the rest of the day so I can come back and re read certain parts, and a look at brightvalueworld suggests I will be doing the same with a few more pages here too, this is going to be a deep dive over the coming hours.
During my review of online marketplaces, I came across a platform that feels modern and practical, and World Shop Trend hub offers smooth navigation overall – The interface is clean, categories are well structured, and users can explore items easily without distractions or clutter.
https://www.google.bt/url?q=https://www.gilmaire-etienne.com/wp-content/pages/code_promotionnel_melbet_1.html
Without overstating it this is a quietly excellent post, and a look at modernhomecorner extended that quiet excellence, content that earns superlatives without demanding them through marketing language is content that has truly earned them through the substance and this site has clearly produced work in that earned excellence category today.
During my search through multiple trading-related websites this afternoon, I eventually visited high quality trade source, and I found the platform quite nice overall, with stable performance and detailed information that made browsing comfortable.
Appreciate the practical examples, they made the abstract points easier to grasp, and a stop at packpeak added more of the same, this site clearly understands that real examples beat empty theory every single time which is the mark of a writer who knows their audience well and respects their time.
melbet code sms connexion [url=https://melbet62913.help]melbet code sms connexion[/url]
скачать игры без торрента скачать игры с облака mail
Started reading skeptically because the headline seemed overconfident, and the post earned the headline by the end, and a look at mystylezone continued that pattern of earning its claims, sites that can back up their headlines without overpromising are rare and this one has clearly developed editorial calibration on that front consistently.
Quiet confidence runs through the whole post, no need to shout to make the points stick, and a stop at simplefashioncorner carried that same restrained voice forward, content that respects the reader by trusting its own substance rather than dressing it up in theatrical language is what I look for online and rarely actually find these days.
semaglutide prezzo online
semaglutide prezzo online
Краны шаровые Холоднодеформированная труба
A piece that did exactly what it promised in the headline without overshooting or underdelivering, and a look at explorelimitlesspossibilities continued that calibration, alignment between promise and delivery is a basic editorial virtue that many sites fail at and this site has clearly mastered the matching of expectation and substance throughout pieces.
Solid little post, the kind that does not need to be flashy because the substance is doing the work, and a look at thebestdeal kept that quiet confidence going across the site, this is what writing looks like when the writer trusts the content to land on its own without theatrics or unnecessary attention seeking behaviour.
Time spent here today felt productive in the way that good reading sessions sometimes do, and a stop at discoveramazingfinds extended that productive feeling across the rest of the morning, the difference between productive reading and merely passing time is real and this site is consistently on the productive side for me lately.
A piece that did not try to be timeless and ended up reading as durable anyway, and a look at rankripple extended that durable feel, content that stays useful past its publication date without straining for permanence is content that ages well and this site has the kind of evergreen quality that I value highly today.
Felt the writer did the homework before publishing, the references hold up, and a look at dailyshoppingzone continued that documented care, content with traceable claims rather than vague assertions is the kind I trust and the lack of bald assertion in this post is one of its quietly impressive qualities for me.
mostbet mirror link Moldova [url=https://mostbet18305.help]https://mostbet18305.help[/url]
Thanks for sharing this with the open internet rather than locking it behind a paywall like so many sites do now, and a stop at linkboostly kept the same vibe going, generous helpful and clearly written by someone who actually wants people to learn from it rather than just charge them.
A thoughtful piece that did not strain to be thoughtful, and a look at globalfashionzone continued that effortless quality, when thinking shows up in writing without the writer drawing attention to it you know you are reading something genuinely considered rather than something performing the appearance of consideration which is also common online.
I usually skim posts like these but this one held my attention all the way through, and a stop at findperfectgift did the same, that is a strong endorsement coming from me because I am usually quick to bounce when content gets repetitive or fails to deliver on its initial promise made in the headline.
Really grateful for content like this, it does not waste my time and it does not insult my intelligence either, and a quick look at findyourfavorites was the same, balanced respectful writing that makes a person feel welcome rather than rushed through pages of forced engagement just to keep clicking around.
Took the time to read the comments on this post too and they were also worth reading, and a stop at zentcart suggested the community quality matches the content quality, when the conversation around a piece is as good as the piece itself you know you have found a real corner of the internet.
Once you start reading carefully here it is hard to go back to lower quality alternatives, and a stop at startsomethingawesome reinforced that ratchet effect, the way good content raises standards is real over time and this site has clearly contributed to raising my expectations for what is possible in writing on the topic generally.
Reading this in a relaxed evening setting was a small pleasure, and a stop at growbeyondlimits extended the pleasant evening reading, content that fits the tone of relaxed time without becoming forgettable is what I look for in evening reading and this site has the right tone for that particular slot in my daily reading routine.
генератор песен персональная песня
Bookmark earned and folder updated to track this site separately, and a look at freshfashionmarket confirmed the folder upgrade was the right call, organising my reading list so that good sites do not get lost in a sea of casual bookmarks is something I do more carefully now and this site warranted its own spot.
1win register with promo code [url=https://1win3003.mobi]1win register with promo code[/url]
1win crash strategy [url=https://www.1win3003.mobi]https://www.1win3003.mobi[/url]
While casually checking online marketplaces earlier today, I came across cleanly arranged whisper oak hub and found the website felt reliable, with browsing remaining smooth and descriptions appearing clear throughout the site.
Reading this post made me realise I had been settling for lower quality elsewhere, and a look at creativityneverends extended that recalibration, content that exposes how much I had been accepting in adjacent sources is content with calibrating effect on my standards and this site is performing that calibration function across topics for me reliably.
A piece that reads like it was written for me without claiming to be written for me, and a look at pickmint produced the same fit, when the writer audience match clicks naturally without being engineered through demographic targeting you know the writing is solid and this site has that natural fit consistently for me.
mostbet bonus bez kódu [url=www.mostbet87124.help]mostbet bonus bez kódu[/url]
Bookmark earned and shared the link with one specific person who would care, and a look at dailychoicecorner got the same targeted share, sharing carefully rather than broadcasting is a discipline I try to maintain and this site is generating shares from me at a sustainable rate rather than the spam rate of viral content.
Reading this with a notebook open turned out to be the right move, and a stop at theartofgrowth added more material to the notes, content that justifies active note taking from a passive reader is content with real informational density and this site is producing notes worthy material at a high rate consistently.
While exploring different online boutique-style ecommerce platforms, I came across a visually calm and well-structured interface that made browsing pleasant, and Cloud Petal collective hub delivers a clean shopping experience overall – The layout is tidy, product sections are clearly spaced, and everything is presented in a way that makes browsing simple, readable, and visually comfortable without unnecessary clutter or confusing design elements.
Recommended without hesitation if you care about careful coverage of this topic, and a stop at urbanchoicehub reinforced the recommendation, the bar I set for unhesitating recommendations is fairly high and this site has cleared it through the cumulative weight of multiple consistently good pieces rather than through any single standout post which is meaningful.
https://www.google.td/url?q=https://ciprianileonoranze.com/wp-content/pgs/?melbet_bookmaker_promo_code.html
Now understanding why someone recommended this site to me a while back, and a stop at discoverinfiniteideas explained the recommendation, sometimes recommendations make sense only after experience and this site has finally clicked into place as the kind of resource I now understand was being recommended for sound editorial reasons by my friend.
Skipped the social share buttons but might come back to actually use one later, and a stop at newseasonfinds extended that share urge, content that triggers genuine sharing impulses rather than performative ones is content that has actually moved me and not many posts in a typical week do that for me actually.
Reading this prompted a brief but useful conversation with a colleague who happened to walk by, and a stop at creativechoiceoutlet extended that conversational seed, content that becomes a starting point for in person discussion rather than ending in solitary reading is content with social generative energy and this site has plenty of it apparently.
Liked the way the post balanced confidence and humility, and a stop at rankscope maintained the same balance, knowing when to assert and when to acknowledge uncertainty is a sign of mature thinking and the writers here have clearly developed that calibration through what I assume is years of careful work on their craft.
Bookmark earned and folder updated to track this site separately, and a look at linkcabin confirmed the folder upgrade was the right call, organising my reading list so that good sites do not get lost in a sea of casual bookmarks is something I do more carefully now and this site warranted its own spot.
Stands apart from similar pages by actually being useful, that is high praise these days, and a look at findpeaceandpurpose kept that standard going, you can tell when a site is built around the reader versus around metrics and this one clearly belongs to the first category for sure based on what I read.
Quality you can feel from the first paragraph, the writer clearly knows the topic and how to share it, and a quick look at findyourinspiration confirmed the same depth runs throughout the rest of the site as well which is rare and worth pointing out when it happens online for any reader passing through.
Reading carefully here has reminded me what reading carefully feels like, and a look at simplebuyoutlet extended that reminder, the experience of careful reading versus skimming is different in ways I had partially forgotten and this site has clearly refreshed my memory of what attention feels like when content rewards it consistently.
Decided not to skim despite my usual habit and was rewarded for the discipline, and a stop at findnewinspiration earned the same patient approach, training myself to recognise sites that warrant slower reading is part of being a careful online reader and this site is the kind that helps me practice that skill regularly.
Now feeling the quiet pleasure of finding writing that takes itself seriously without being self serious, and a stop at findyournextgoal extended that subtle pleasure, the gap between earnest and pretentious is fine and this site has clearly chosen to land on the earnest side without slipping over into pretentious which is impressive.
Now adding this to a list of sites I want to see flourish, and a stop at rankanchor reinforced that wish, the few sites I actively root for are sites that produce the kind of work I want more of in the world and this one has joined that small list based on what I have read so far.
Оборотное водоснабжение
888 starz зеркало [url=https://www.888stars-uz.com]https://www.888stars-uz.com[/url] .
mostbet kartdan çıxarış vaxtı [url=https://mostbet01859.help]mostbet kartdan çıxarış vaxtı[/url]
Now recognising the editorial wisdom of letting some questions remain open at the end, and a look at findperfectgift continued that intellectual honesty, content that does not force closure on contested questions is content that respects the limits of knowledge and this site has clearly developed the maturity to know when to leave space.
Worth bookmarking and sharing with anyone interested in the topic, that is my honest take, and a stop at seocrest reinforces that, the kind of generous resource that makes the open web feel worth defending against the constant pressure to retreat into walled gardens and curated feeds today everywhere I look across all my devices.
1win site Moldova [url=https://1win5757.help/]1win site Moldova[/url]
Genuinely glad I clicked through to read this rather than skipping past, and a stop at discoverbetteroptions confirmed I should keep clicking through to more pages here, the kind of resource that justifies its place in my browser history rather than feeling like wasted time which is the highest compliment I offer any site online today.
During my exploration of educational reading platforms, I found a website that feels smooth and well designed, and Mind Expansion insights hub delivers smooth browsing overall – The interface is simple, content is engaging, and users can focus on learning without unnecessary clutter or confusing layouts.
Found this through a friend who recommended it and now I see why, and a look at buildyourpotential only strengthened that recommendation in my own mind, word of mouth still works for content that actually delivers and this site is clearly earning recommendations the old fashioned way through quality rather than marketing.
Bookmark folder reorganised slightly to make this site easier to find, and a look at trendandstylehub earned the same accessibility upgrade, the small organisational moves I make for sites I expect to return to often are themselves a signal of how much I trust them and this site triggered those moves naturally.
Glad the writer did not feel compelled to cover every possible angle of the topic, focus is a virtue, and a stop at styleandchoice reflected the same disciplined scope, knowing what to leave out is half of what makes good writing good and this post has clearly been edited with that principle in mind.
Nice and clean, that is the best way to describe the writing here, no clutter and no wasted words, and a quick visit to creativityunlocked kept that going, I appreciate when a site treats its readers like people who can think for themselves without needing constant hand holding through every paragraph.
aviator cashout button [url=aviator50638.help]aviator50638.help[/url]
Good post, the kind that respects the reader by getting to the point quickly without skipping the details that matter, and a short look at connectwithpeople confirmed that approach is consistent across the site which is rare to find online these days, definitely a place I will return to soon.
Excellent post, balanced and well organised without showing off, and a stop at rankspark continued in that same vein, this site has clearly figured out the formula for content that works for readers rather than for search engine ranking signals which is harder than it sounds today and worth real recognition from anyone.
Looking through other posts here the consistency is what makes the site valuable rather than any single piece, and a stop at linkclimb extended that consistency observation, sites whose value lies in the ongoing pattern rather than in standout posts are sites I trust more deeply and this one has clearly built that kind of trust.
During my search across several digital marketplaces this afternoon, I eventually visited high quality grove mystic site, and it was a helpful experience overall, with nicely organized products and comfortable navigation across all pages.
Really grateful for content like this, it does not waste my time and it does not insult my intelligence either, and a quick look at adfoundry was the same, balanced respectful writing that makes a person feel welcome rather than rushed through pages of forced engagement just to keep clicking around.
melbet fcfa dépôt [url=https://www.melbet62913.help]https://www.melbet62913.help[/url]
Glad I gave this a chance instead of bouncing on the headline, and after discoveramazingfinds I was certain I had made the right call, snap judgements based on titles miss a lot of good content and this is a reminder to slow down and check things out before scrolling past in a hurry.
Worth pointing out that the writer made the topic feel more interesting than I had been expecting, and a look at thinkactachieve continued that elevation effect, content that improves the apparent quality of its subject through skilled treatment is doing something real and this site has clearly developed that kind of editorial alchemy throughout.
mostbet cashback casino [url=https://mostbet87124.help/]https://mostbet87124.help/[/url]
After opening multiple online shopping websites today, I eventually reached recommended product hub, and I found the browsing experience helpful, with clearly displayed products and naturally written descriptions that made everything easy to follow.
mostbet depozit [url=http://mostbet01859.help]mostbet depozit[/url]
mostbet jocuri compatibile bonus [url=https://mostbet41079.help]https://mostbet41079.help[/url]
1win furnizori jocuri [url=1win5757.help]1win5757.help[/url]
Skipped the TLDR thinking I would read everything anyway, and ended up enjoying the path through the full post, and a stop at dailyvalueoutlet similarly rewarded the patient read, summaries are useful but the journey through good writing is part of what makes the destination feel earned rather than just delivered cleanly.
Хотите в Карелию? https://republictravel.ru/tours/kareliya/ день на Воттоваару, два дня из Петербурга, три дня из Москвы — любой маршрут соберём под ваш график и кошелёк. Цены честные, без скрытых наценок. Надёжность и безопасность по каждому туру. Менеджеры знают Карелию лично — помогут не ошибиться с выбором.
Reading this in the morning set a good tone for the day, and a quick visit to rankbeacon kept that good tone going, content can do that sometimes when it hits the right notes and finding sites that consistently strike that tone is something I have learned to recognise and reward with regular visits.
While reviewing digital marketplaces, I found a platform that performs well under consistent usage, and CloudPetal sales market provides smooth performance overall – The website loads quickly and maintains stability, ensuring users can browse categories comfortably without experiencing slowdowns or interruptions during their shopping journey.
mostbet účet ověření cz [url=https://www.mostbet87124.help]https://www.mostbet87124.help[/url]
Reading this fit naturally into my afternoon walk because I was reading on my phone, and a stop at findmotivationtoday continued well in that walking format, content that survives mobile reading without becoming awkward is content with format flexibility and this site has clearly thought about how it reads across different devices today.
melbet ouvrir site officiel [url=https://melbet62913.help/]https://melbet62913.help/[/url]
Glad I gave this fifteen minutes rather than the usual three minute skim, and a look at freshfashionmarket earned the same investment, time spent on quality content is rarely wasted but the reverse is also true and learning which sites deserve which kind of attention is part of being a careful online reader.
Once you start reading carefully here it is hard to go back to lower quality alternatives, and a stop at trendandfashionhub reinforced that ratchet effect, the way good content raises standards is real over time and this site has clearly contributed to raising my expectations for what is possible in writing on the topic generally.
Worth marking this site as one to come back to deliberately rather than by accident, and a stop at thinkcreateachieve reinforced that intention, the difference between sites I find again by chance and sites I return to on purpose is meaningful and this one has clearly moved into the deliberate return category for me.
Granted I am giving this site more credit than I usually give new finds, and a look at besttrendstore continued earning that credit, the calibration of how much trust to extend after limited exposure is something I do carefully and this site has earned more trust on shorter exposure than most due to consistent quality across.
Solid recommendation from me to anyone working in the area, the perspective here is grounded, and a look at admetric adds even more useful angles, the kind of site that becomes a reference rather than just a one time read which is a higher bar than most blogs ever reach today on the modern web.
A clear case of writing that does not try to do too much in one post, and a look at everydaychoicehub maintained the same scoped discipline, posts that try to cover too much end up covering nothing well and this site has clearly chosen scope discipline as a core editorial principle which shows up clearly in what I read.
Now planning to recommend this site in a context where my recommendations are taken seriously, and a stop at findyourtrend confirmed I should make that recommendation soon, the small but real act of recommending content into spaces where my taste matters is something I take seriously and this site is worth the recommendation.
A piece that read smoothly because the writer understood how readers actually move through prose, and a look at ranksprout maintained the same reader awareness, writers who think about the reading experience as much as the writing experience produce better work and this site has clearly made that shift in editorial approach.
Solid endorsement from me, the writing earns it, and a look at linkcove continues to earn it across the broader site too, the kind of operation that maintains quality across many pages rather than just one viral post is a sign of serious commitment and that is what I see here clearly across what I read.
A genuine compliment to the writer for keeping the post focused on what mattered, and a look at leadridge continued that disciplined focus, focus is a editorial choice that compounds across many small decisions and this site has clearly made those small decisions consistently across what I have read so far this week here.
Solid value for anyone willing to read carefully, and a look at makeimpacteveryday extends that value across the rest of the site, this is the kind of place that rewards return visits rather than offering everything in a single splashy post and then leaving readers nothing to come back for later which is unfortunately common.
Reading this gave me a small mental break from the heavier reading I had been doing, and a stop at rankbloom extended that lighter feel, content that provides relief without becoming trivial is harder to produce than people realise and this site has clearly figured out how to be light without being shallow at all.
Well structured and easy to read, that combination is rarer than people think, and a stop at explorecreativeconcepts confirmed the same standard runs across the rest of the site, definitely the kind of place I will be coming back to when this topic comes up in conversation later again over the weeks ahead.
Most of my reading time goes to a small number of trusted sources and this one is now joining that group, and a stop at brightstylecorner reinforced the group membership, the few sites that earn a place in my regular rotation are sites I expect ongoing returns from and this one has earned that elevated position consistently.
mostbet bonusuri Republica Moldova [url=mostbet41079.help]mostbet41079.help[/url]
Bookmark added with a small note about why, and a look at connectwithpeople prompted another bookmark with another note, the bookmarks I annotate are the ones I expect to return to deliberately rather than stumble into and this site is generating annotated bookmarks at a higher rate than my usual content sources by some margin.
Now wishing I had found this site sooner, and a look at styleforless extended that mild regret, the calculation of how many years of good content I missed by not finding the right sources earlier is one I try not to make too often but it does come up sometimes when I find sites this good.
When finance teams struggle with spreadsheets and email chains, implementing a structured capex approval workflow ensures every major purchase is properly reviewed, compliant, and tracked from request to final sign-off.
Liked that there was nothing performative about the writing, and a stop at freshdealsworld continued that genuine quality, performative writing tries to be witnessed rather than read and the difference between performance and substance is huge for the careful reader and this site has clearly chosen substance every time clearly.
Качественная наркологическая помощь строится от безопасности к устойчивости. Сначала врач оценивает состояние: длительность употребления, выраженность интоксикации и отмены, давление и пульс, признаки обезвоживания, характер сна, уровень тревоги, наличие хронических заболеваний и препаратов, которые уже принимались дома. Затем выбирается формат лечения — стационарный, амбулаторный или выездной — исходя из рисков, а не из удобства. Это принципиально: при нестабильных показателях и высокой вероятности осложнений требуется более высокий уровень контроля.
Узнать больше – [url=https://narkologicheskaya-klinika-sergiev-posad12.ru/]частная наркологическая клиника[/url]
Found the use of subheadings really helpful for scanning back through the post later, and a stop at createbettertomorrow kept that reader friendly approach going, navigation is something many blog writers ignore but small structural choices make a noticeable difference for someone returning to find a specific point again days or weeks later.
The pacing of the post was just right, never rushed and never dragged out unnecessarily, and a look at adscope maintained the same rhythm, you can tell the writer has experience because the difficult skill of pacing is something only practiced writers manage to handle well in long form content over time and across formats.
https://www.google.fm/url?q=https://betsson.us.com/
While reviewing ecommerce platforms, I noticed a site that feels clean and easy to use, and Cloud Petal retail hub store offers smooth browsing overall – The navigation is intuitive and pages are well arranged, ensuring users can explore products comfortably in a user friendly environment.
Reading this slowly to absorb the structure, and the structure is doing real work alongside the words, and a look at freshfindsoutlet maintained the same architectural quality, when sentence shapes and paragraph rhythms reinforce the meaning rather than just transporting words you know you are reading skilled work today.
Came here from another site and ended up exploring much further than I planned, and a look at discoverhomeessentials only encouraged more exploration, the kind of place where one click leads to another not through manipulative design but through genuinely interesting content is rare and worth highlighting when found like this somewhere on the open internet.
A particular pleasure to read this with a fresh coffee, and a look at linkfuel extended the pleasure across more pages, content that pairs well with quiet morning rituals is something I have come to value highly and this site has the kind of energy that fits naturally into a calm reading routine.
Came in for one specific question and got answers to three I had not even thought to ask, and a look at rankstreet extended that bonus value pattern, the kind of resource that anticipates reader needs rather than just answering the literal question asked is the gold standard and this site reaches it.
Started reading skeptically because the headline seemed overconfident, and the post earned the headline by the end, and a look at discoverhiddenopportunities continued that pattern of earning its claims, sites that can back up their headlines without overpromising are rare and this one has clearly developed editorial calibration on that front consistently.
Reading this gave me confidence to make a decision I had been putting off, and a stop at newseasonfinds reinforced that confidence, content that translates into action in my own life rather than just informing it is content with the highest practical value and this site is generating that action level utility for me lately.
While analyzing inspirational content websites, I noticed a platform that feels clean and motivating, and Next Adventure idea hub provides a smooth browsing experience overall – The interface is modern, messages are positive, and users can explore content without unnecessary complexity or distractions.
Felt mildly happier after reading, which sounds silly but is true, and a look at rankbridge extended that small mood lift, content that improves rather than degrades my mental state is content I want more of and the cumulative effect of reading sites that lift versus sites that drag is real over time.
Simple purchases: when you need a quick boost, just buy likes tiktok from trusted providers without overcomplicating the process.
Reading this fit naturally into my afternoon walk because I was reading on my phone, and a stop at globalstyleoutlet continued well in that walking format, content that survives mobile reading without becoming awkward is content with format flexibility and this site has clearly thought about how it reads across different devices today.
mostbet retragere fara comision [url=http://mostbet18305.help]http://mostbet18305.help[/url]
Without comparing too aggressively to other sources this one stands out for the right reasons, and a look at linkfunnel continued that distinctive quality, content that distinguishes itself through substance rather than style tricks is content with lasting differentiation and this site has clearly chosen substance based differentiation as its core editorial strategy.
1win timp de retragere [url=www.1win5757.help]www.1win5757.help[/url]
Pass this along to colleagues if the topic comes up, the framing here is sensible, and a stop at simplefashioncorner adds more useful angles to share, the kind of content that improves conversations rather than just feeding them is what makes a resource genuinely valuable in professional contexts going forward over time and across project boundaries too.
Earlier today I browsed through various online marketplaces before discovering featured online floral hub, and I enjoyed the experience as the organization felt clean and professional while navigation worked perfectly throughout.
A modest masterpiece in its own quiet way, and a look at adthread confirmed the same quiet quality across the rest of the site, calling something a masterpiece is usually overstating but for content this carefully crafted the word feels appropriate even if the writers themselves would probably resist the label honestly.
Came in tired from a long day and the writing held my attention anyway, and a stop at discovergreatoffers kept that going, content that can engage a fatigued reader is doing something right because most online reading happens in suboptimal conditions like that one and quality content adapts to it without complaint.
Reading this site over the past week has changed how I evaluate content in this space, and a look at discovernewhorizons extended that recalibration, the standards I bring to reading on the topic have shifted upward as a direct result of regular exposure to this kind of work and that shift will outlast any single reading session.
1win pariuri sportive [url=https://1win5757.help/]https://1win5757.help/[/url]
Now noticing the careful balance the post struck between confidence and humility, and a stop at linkgrove maintained the same balance, finding the line between asserting and admitting is hard and this site has clearly developed the calibration to walk that line consistently which produces a more persuasive reading experience for me.
Really like that there are no exclamation marks or all caps shouting throughout the post, and a quick visit to ranktactic maintained the same calm voice, restraint in punctuation signals confidence in the content and this site clearly trusts its substance to do the persuading rather than relying on typographic emphasis.
Closed the laptop and walked away thinking about the post for a good twenty minutes, and a stop at findyourperfectlook produced similar lingering thoughts, content that survives the closing of the browser tab is content that has actually entered the mind rather than just decorating the screen for the duration of the reading.
Closed the tab and immediately reopened it ten minutes later because I wanted to reread a part, and a stop at uniquevaluezone drew the same return, content that pulls you back after closing it is doing something well beyond the average and worth marking as exceptional in my mental catalogue of reliable sites.
Now feeling the post has earned a proper recommendation rather than a casual mention, and a stop at rankcabin reinforced the recommendation strength, the difference between mentioning and recommending is a small editorial distinction I observe in my own conversations and this site has earned the upgraded recommendation level from me confidently today.
https://www.google.co.th/url?q=https://es.trustpilot.com/review/1win-free.com
Now noticing the careful balance the post struck between confidence and humility, and a stop at learnandimprove maintained the same balance, finding the line between asserting and admitting is hard and this site has clearly developed the calibration to walk that line consistently which produces a more persuasive reading experience for me.
During a casual online search for product browsing and shopping discovery websites, I came across modern product guide – The interface was clean and easy to understand, and the structured content helped create a naturally engaging browsing experience that felt simple and enjoyable overall.
One of the more honest takes on the topic I have seen lately, no spin and no oversell, and a stop at explorewhatspossible kept that going, the kind of voice the open web could use a lot more of rather than the endless echo chamber of recycled opinions floating around every social platform these days.
During my review of different ecommerce websites focused on design simplicity and usability, I found a platform that feels smooth and well organized, and Ridge Cloud shopping hub offers an easy browsing experience overall – Everything is structured clearly, making it simple for users to find items quickly while maintaining a visually pleasant layout.
Bookmark folder reorganised slightly to make this site easier to find, and a look at leaddrift earned the same accessibility upgrade, the small organisational moves I make for sites I expect to return to often are themselves a signal of how much I trust them and this site triggered those moves naturally.
Felt the writer respected the topic without being precious about it, and a look at boxpeak continued that respectful but unfussy treatment, finding the right register for serious topics is hard and this site has clearly figured out how to take the topic seriously while still being readable for casual visitors regularly.
Started smiling at one paragraph because the writing was just nice, and a look at seopoint produced a couple more such moments, prose that produces small spontaneous reactions in the reader is doing more than just transferring information and the writers here are clearly hitting that level fairly consistently throughout pieces.
Decided to set aside time later to read more carefully, and a stop at linkhive reinforced that decision, content that earns a calendar entry rather than just a passing read is in a different tier altogether and this site is clearly working at that elevated level which I really do appreciate as a reader today.
Came away with a small but real shift in perspective on the topic, and a stop at rankclimb pushed that shift a bit further, the kind of subtle reframing that good writing does to a reader without making a big deal of it is something I always appreciate when it happens which is sadly not that often.
The whole experience of reading this was pleasant from start to finish, no pop ups and no annoying interruptions, and a look at rankthread continued that clean experience, technical choices about page design matter for the reader and this site clearly cares about the small details that add up to comfort across multiple visits.
Thanks for keeping things clear and to the point, that is honestly hard to find online these days, and after reading through besttrendstore the message stayed consistent which makes me trust the information being shared more than I usually do on similar pages that cover this same kind of topic.
Worth saying that the writing carries a particular kind of authority without making any explicit claims to it, and a stop at changeyourfuture extended that earned authority feeling, sites that demonstrate expertise through the quality of their explanations rather than by stating credentials are sites I trust most and this site has it.
A piece that did not lecture even when it had clear positions, and a look at shopthenexttrend maintained the same teaching without preaching tone, finding the line between informing and lecturing is hard and most sites land on the wrong side of it but this one has clearly figured out how to inform without becoming preachy.
mostbet pariu gratuit Moldova [url=http://mostbet18305.help/]http://mostbet18305.help/[/url]
https://www.google.co.id/url?q=https://betconverter.com.ng/
While analyzing motivational and uplifting websites, I found a platform that feels simple and well designed, and Bright New ideas hub provides smooth navigation overall – The layout is minimal, pages are well organized, and users can explore content easily without unnecessary visual distractions or complexity.
Reading this confirmed a hunch I had been carrying about the topic without having articulated it, and a stop at boxrise extended the confirmation, content that gives shape to fuzzy intuitions is doing the rare work of making private thoughts public and this site is providing that articulating service consistently for me lately.
Новостной портал https://press-center.news с актуальными событиями из мира политики, экономики, технологий, общества и культуры. Оперативные новости, аналитические материалы, интервью, репортажи и мнения экспертов. Следите за важными событиями в стране и мире в удобном формате.
A nicely understated post that does not shout for attention, and a look at thepowerofgrowth maintained the same quiet quality, understatement is a stylistic choice that distinguishes serious writing from attention seeking writing and this site has clearly committed to the understated approach as a core editorial value rather than just a phase.
Picked this up between two other things I was doing and got drawn in completely, and after leaddrift my original tasks were completely forgotten for a while, content that derails a workflow in a positive way by being more interesting than what you were already doing is rare and worth recognising clearly.
Appreciated that the writer trusted the reader to follow along without constant restating of earlier points, and a look at reachhighergoals continued that respect for the reader, treating an audience as capable adults rather than as people to be hand held through every paragraph is something I notice and value highly across the open internet today.
aviator plinko Malawi [url=www.aviator50638.help]aviator plinko Malawi[/url]
Speaking from the perspective of having read widely on the topic this site offers something distinct, and a look at simplebuyoutlet reinforced that distinctness, the rare site that contributes something genuinely original to a saturated topic is the rare site worth following carefully and this one has demonstrated that original contribution capability today.
https://www.google.ee/url?q=https://no.trustpilot.com/review/1win-free.com
Skimmed first and then went back to read carefully, and the careful read paid off in places I had missed, and a stop at modernchoicehub got the same treatment, the rare site whose content rewards a second pass is content I want more of in my regular rotation rather than disposable single read articles.
Coming back to this one, definitely, and a quick visit to seolift only made me more sure of that, the kind of writing that makes you want to set aside time later rather than rushing through it now while distracted by everything else competing for attention on the screen today across so many tabs.
Came in confused about the topic and left with a much firmer grasp on it, and after rankcove I felt I could explain this to someone else without hesitation, that is the gold standard for any educational content and most sites simply fail to reach it ever which is unfortunate but true.
A thoughtful read in a week that has been mostly noisy, and a look at trendycollectionhub carried that thoughtful quality across more pages, finding pockets of considered writing in a week of distractions is one of the small wins of careful curation and this site is providing those pockets at a sustainable rate.
Will recommend this to a couple of friends who have been asking about this exact topic, and after seoladder I have even more reason to do so, the kind of site that earns word of mouth rather than chasing it through aggressive marketing or paid placements is always a treat to find online.
Looking at this from the perspective of someone tired of generic content the contrast is striking, and a look at ranktrail maintained that distinctive feel, sites with strong editorial identity stand out against the bland background of algorithmic content and this one has clearly developed an identity worth recognising through careful attention.
While exploring digital shopping platforms, I noticed a website that feels simple and efficient, and Cloud Spire goods collection provides stable performance overall – Content is well organized, navigation is easy to follow, and users can read and browse comfortably without distractions or unnecessary design complexity.
Top notch writing, every paragraph carries weight and nothing feels like filler, and a stop at adglide reflected that same care, a rare thing on the open web these days where most pages exist for clicks rather than actual reader value or anything close to that which is honestly a real shame.
Liked the way the post handled the final paragraph, no neat bow but no abrupt cutoff either, and a stop at linkmagnet continued that thoughtful ending pattern, endings are hard and most blog writers either over engineer them or skip them entirely and this site has clearly figured out a sustainable middle approach.
Reading this triggered a small reorganisation of my own thinking on the topic, and a stop at seogain furthered that reorganisation, content that affects the shape of my mental model rather than just decorating it with new facts is content with structural rather than informational impact and this site provides that.
Quietly the writers approach to the topic differs from the dominant takes I have been encountering, and a stop at styleforless extended that distinctive approach, content that maintains a different perspective without explicitly arguing against the dominant ones is content with confident editorial identity and this site has that confidence throughout pieces.
During my search across multiple internet marketplaces this afternoon, I eventually visited high quality web platform, where the clean layout and structured categories made browsing remain simple and comfortable for all users.
Solid value packed into a relatively short post, that takes skill, and a look at buyrise continues the dense useful content across more pages, this site clearly understands that respecting reader time is itself a form of generosity which is something most blog operations seem to have forgotten lately across the wider open web.
Stands out for actually being useful instead of just being long, and a look at seoslate kept that going, length without value is the default mode of most blogs these days but this site has clearly chosen a different path which I respect a lot as a reader who values careful editing decisions like that.
During an online search for visually organized shopping pages and browsing destinations with useful recommendations, I visited shopping trend portal – The layout looked clean and accessible, the categories were easy to move through, and the overall presentation style helped create a comfortable browsing environment for visitors online.
Reading more of the archives is now on my plan for the weekend, and a stop at starttodaymoveforward confirmed the archive worth the time, the rare archive worth a dedicated reading session rather than just casual sampling is the rare archive of serious work and this site has clearly produced enough of that work to warrant the deeper exploration.
Останні новини https://18000.ck.ua Черкас та Черкаської області
mostbet instalace app [url=https://mostbet87124.help]https://mostbet87124.help[/url]
The headings made navigating the post simple even when I needed to find a specific section quickly, and a look at explorewhatspossible continued the same thoughtful structure, small details like clear headings show that someone is actually thinking about how the reader uses the page rather than just filling it for length alone.
Honestly enjoyed reading this more than I expected to when I first clicked through, and a stop at seoladder kept that pleasant surprise going, sometimes you stumble onto a site that just clicks with how you like to read and this is one of those for me right now today which is great.
Quality work here, the post reads cleanly and the points stay focused throughout, and a stop at adglide kept the standard high, you can tell the writer cares about the final result rather than just hitting publish for the sake of having something new on the page to feed the search engines.
Once I had read three posts the editorial pattern was clear, and a look at dailyvalueoutlet confirmed the pattern from a fourth angle, sites where the underlying approach reveals itself through accumulated reading rather than being announced are sites with real depth and this one has that quality clearly visible across multiple pieces consistently.
Started reading without much expectation and ended on a high note, and a look at rankfoundry continued that arc, content that builds rather than peaks early is a sign of a writer who knows how to structure a piece for sustained reader engagement rather than relying on a strong hook to do all the work.
Reading this in a quiet hour and finding it suited the quiet, and a stop at seopush extended the quiet reading mood, content that matches its own optimal reading conditions rather than fighting them is content that has been thoughtfully calibrated and this site reads as having a particular reading mood in mind throughout.
Definitely returning here, that is decided, and a look at createbettertomorrow only made the case stronger, this is one of those rare websites that rewards regular visits rather than feeling stale after the first read which is something I cannot say about most of the places I bookmark today across all my topics.
Reading this gave me a small mental break from the heavier reading I had been doing, and a stop at seogain extended that lighter feel, content that provides relief without becoming trivial is harder to produce than people realise and this site has clearly figured out how to be light without being shallow at all.
Reading this prompted me to clean up some old notes related to the topic, and a stop at rankvista extended that organising urge, content that triggers personal organisation rather than just consuming attention is content with motivating energy and this site has the kind of clarity that prompts active follow up rather than passive consumption.
A piece that was confident enough to leave some questions open rather than forcing closure, and a look at linkmotion continued that intellectual honesty, content that admits the limits of its scope is more trustworthy than content that pretends to total understanding and this site has the right calibration on certainty consistently.
Decided to set aside time later to read more carefully, and a stop at trendypicksstore reinforced that decision, content that earns a calendar entry rather than just a passing read is in a different tier altogether and this site is clearly working at that elevated level which I really do appreciate as a reader today.
mostbet výběr bankovním převodem [url=www.mostbet87124.help]www.mostbet87124.help[/url]
Solid recommendation from me to anyone working in the area, the perspective here is grounded, and a look at seoloom adds even more useful angles, the kind of site that becomes a reference rather than just a one time read which is a higher bar than most blogs ever reach today on the modern web.
A piece that read smoothly because the writer understood how readers actually move through prose, and a look at buywave maintained the same reader awareness, writers who think about the reading experience as much as the writing experience produce better work and this site has clearly made that shift in editorial approach.
Just nice to read something that does not feel like it was assembled from a content brief, and a stop at findbetteropportunities kept that handcrafted feel going, you can tell when a real human with real understanding is behind the words versus a templated piece churned out for an algorithm to find.
Reading this prompted me to clean up some old notes related to the topic, and a stop at fashionmarketplace extended that organising urge, content that triggers personal organisation rather than just consuming attention is content with motivating energy and this site has the kind of clarity that prompts active follow up rather than passive consumption.
Now realising the post has been quietly doing important work in my mind for the past hour, and a stop at leadcipher extended that quiet processing, content that continues to do work after I close the tab is content with afterlife in the mind and this site is producing those long lived effects at a meaningful rate.
Bookmark earned, share earned, return visit earned, all from one reading session, and a look at adcrest did the same, the trifecta of bookmark and share and return is rare in a single visit and represents the highest level of engagement I tend to offer any piece of online content these days here.
Really nice to see things explained without overcomplicating the topic, the words flow naturally and stay easy to follow, and a short visit to rankfuel only added to that experience because the same simple approach is used across the rest of the page too without any change in tone.
While exploring collaborative online platforms, I found a website that feels helpful and structured, and Connect ShareGrow information hub delivers a smooth browsing experience overall – The interface is clean, content is easy to follow, and users can browse without unnecessary complexity or distractions affecting usability.
During comparison of digital shopping platforms, I noticed a site that emphasizes performance and clarity, and Harvest Frost goods portal delivers smooth navigation overall – The pages are responsive, the layout is well structured, and users can easily find products without unnecessary complexity or visual clutter disrupting usability.
Granted I am giving this site more credit than I usually give new finds, and a look at linkchart continued earning that credit, the calibration of how much trust to extend after limited exposure is something I do carefully and this site has earned more trust on shorter exposure than most due to consistent quality across.
Spent a few minutes here and came away with a clearer picture of the topic, the writing keeps things simple without dumbing them down, and after a stop at leadquest the rest of the points lined up neatly which is something I appreciate when I am short on time and need answers fast.
Appreciate how nothing here feels copied or pieced together from other places, the voice is consistent and the tone stays human, and after I checked discoverandbuy I noticed the same style holds, which is a small detail but it makes the whole experience feel personal rather than like another generic site.
Really clear writing, the kind that makes you want to share the link with someone who has been asking about the topic, and a quick browse through seobeacon only made me more sure of that, the information here stays useful long after the first read is done which says a lot.
Reading this gave me a small refresher on something I had partially forgotten, and a stop at linkmotive extended the refresher, content that strengthens existing knowledge rather than just adding new is content with a particular kind of consolidating value and this site is providing that consolidating function across multiple visits.
Thank you for the genuine effort here, it shows in every paragraph and not just the headline, and after my visit to budgetfriendlypicks I was sure this site cares about getting things right rather than chasing clicks, which is the main reason I will come back later this week to read more.
Decided not to comment because the post said what needed saying, and a stop at grabpeak continued that complete feel, content that does not invite obvious additions or corrections from readers is content that has been carefully considered and this site appears to consistently produce pieces that satisfy rather than provoke unnecessary follow ups.
Honestly this was the highlight of my reading queue today, and a look at seomagnet extended that across more pages I will return to, ranking what I read against what else I read each day is something I do informally and this site keeps moving up in those rankings the more I explore it.
Closed and reopened the tab three times before finally finishing, and a stop at startfreshjourney held my attention straight through, sometimes content fights for time against my own distraction and the times it wins say something positive about its quality and this post clearly won that fight today afternoon for me.
Reading this brought back an idea I had set aside months ago, and a stop at seovertex added more substance to that idea, content that revives dormant projects in my own thinking is content with serious creative value and this site is contributing to my own work in ways I had not expected when first clicking through.
Working through this site has been a small antidote to the shallow content that fills most of my reading time, and a stop at leadblaze extended that antidote function, sites that quietly improve the average quality of my reading by being themselves are sites worth supporting through return visits and recommendations consistently.
Нужна CRM банкротством физ лиц? производство БФЛ автоматически инструмент автоматизации юридического бизнеса по банкротству физических лиц. Управляйте заявками, делами клиентов, документами и сроками процедур. Система помогает организовать работу команды и контролировать каждый этап банкротства.
Felt slightly impressed without being able to point to one specific reason, and a look at unlocknewpotential continued that diffuse positive feeling, when content works at a level you cannot easily articulate the writer is doing something with craft rather than just delivering information and that is something I have learned to recognise.
In the middle of exploring various online resources related to shopping ideas and promotional browsing platforms, I came across popular discount corner – The interface was arranged in a straightforward way, the browsing categories loaded smoothly, and the available recommendations added a refreshing touch to the overall online experience for casual visitors.
I appreciate the clarity here, everything is explained in simple terms without unnecessary detail, and after a quick stop at rankgrove the points came together nicely for me, the writing keeps things straightforward and respects the reader from start to finish without ever talking down to anyone.
mostbet promo code [url=www.mostbet18305.help]mostbet promo code[/url]
I spent time browsing different online resources today before discovering reliable browsing platform, and I had a good experience overall since the information looked trustworthy and pages opened smoothly without delays or interruptions.
I usually skim posts like these but this one held my attention all the way through, and a stop at seonudge did the same, that is a strong endorsement coming from me because I am usually quick to bounce when content gets repetitive or fails to deliver on its initial promise made in the headline.
My usual response to new bookmarks is to forget them but this one I have already returned to twice, and a look at leadbeacon pulled me back a third time, the actual return rate to bookmarked sites is the real measure of value and this one is clearing that measure at a notable rate already.
Reading this back to back with a similar piece elsewhere made the quality difference obvious, and a stop at linkpilot only widened the gap, comparing content side by side is a useful exercise and the gap between this site and average competitors in the space is large enough to be noticeable from the first paragraph.
Closed the laptop and walked away thinking about the post for a good twenty minutes, and a stop at seobloom produced similar lingering thoughts, content that survives the closing of the browser tab is content that has actually entered the mind rather than just decorating the screen for the duration of the reading.
Appreciate how nothing here feels copied or pieced together from other places, the voice is consistent and the tone stays human, and after I checked learnsomethingamazing I noticed the same style holds, which is a small detail but it makes the whole experience feel personal rather than like another generic site.
If the topic interests you at all this is a place to spend time, and a look at everydayinnovation reinforced that recommendation, the broader question of where to invest topical reading time is one this site answers convincingly through the consistent quality across multiple pieces I have sampled during the current reading session today.
Considered against the flood of similar content this one stands apart in important ways, and a stop at seoridge extended that distinctive feel, sites that find their own corner of a crowded topic and stay there are sites worth following and this one has clearly carved out its own space and committed to defending it carefully.
Closed and reopened the tab three times before finally finishing, and a stop at seovertex held my attention straight through, sometimes content fights for time against my own distraction and the times it wins say something positive about its quality and this post clearly won that fight today afternoon for me.
Now adding a small note in my reading log that this site is one to watch, and a look at rankpoint reinforced the watch status, the few sites I track deliberately rather than encounter accidentally are sites I expect ongoing returns from and this one has cleared the bar for that elevated tracking based on what I read.
Refreshing tone compared to the dry corporate posts on similar topics, and a stop at rankdrift carried that personality through nicely, you can tell when a real person is behind the writing versus a content team chasing metrics and this site definitely falls into the former category clearly across what I have seen.
Reading this in a relaxed evening setting was a small pleasure, and a stop at linktower extended the pleasant evening reading, content that fits the tone of relaxed time without becoming forgettable is what I look for in evening reading and this site has the right tone for that particular slot in my daily reading routine.
Bookmark folder reorganised slightly to make this site easier to find, and a look at yournextadventure earned the same accessibility upgrade, the small organisational moves I make for sites I expect to return to often are themselves a signal of how much I trust them and this site triggered those moves naturally.
https://rnmanagers.com/author/cassinopixx26/
Reading this in a quiet coffee shop matched the calm energy of the writing, and a stop at rankharbor extended that environmental match, content that has its own ambient quality which can match or clash with surroundings is content with a personality and this site has the kind of personality that suits calm reading.
Will be sharing this with a couple of people who care about the topic, and a stop at seometric added more material worth passing along, the kind of site that is generous with quality content and does not make you jump through hoops to access it which is appreciated more than the team probably realises.
Grateful for posts like this one, they remind me there are still places online run by people who care about quality, and a look at adlayer reflected the same standards, you can tell the difference between content made for readers and content made just for search engines today and this is the former.
Liked everything about the experience, from the opening through to the closing notes, and a stop at leadclimb extended that into more pages, finding a site where the editorial vision shows through every choice rather than feeling random is an increasingly rare experience and one I am glad to have today during this particular reading session.
Honest assessment is that this is one of the better short reads I have had this week, and a look at megabuy reinforced that, the bar for short content is low because most of it sacrifices substance for brevity but this site manages both at once which is harder than it sounds for most writers attempting it.
Genuinely glad I clicked through to read this rather than skipping past, and a stop at linkburst confirmed I should keep clicking through to more pages here, the kind of resource that justifies its place in my browser history rather than feeling like wasted time which is the highest compliment I offer any site online today.
A small thank you note from me to the team behind this work, the post earned it, and a stop at seoboostly suggested more thanks would be in order over time, recognising the people who do good writing online is something I try to remember to do because the alternative is silence and silence rewards mediocrity unfortunately.
Vague feelings of recognition kept surfacing as I read because the writing names things I have been thinking, and a look at linkripple produced more of those recognition moments, content that gives shape to private intuitions is content that makes me feel less alone in my own thinking and this site has that effect.
Thank you for not assuming the reader already knows everything, the explanations meet me where I am, and a look at leadsurge did the same, that consideration is what makes a site feel welcoming rather than gatekeepy which is sadly the default mood across the modern web today for most subjects covered.
Really appreciate that the writer did not stretch the post to hit some target word count, the points end when they are made, and a stop at seostrike reflected the same discipline, brevity is generosity in disguise and this site has clearly figured that out far better than most blog operations have.
https://www.google.co.uk/url?q=https://betsson.us.com/
Will be back, that is the simplest way to say it, and a quick visit to smartshoppingzone reinforced the decision, this site has earned a spot in my regular rotation alongside a few other reliable places I check when I want something genuinely informative without all the usual modern web noise getting in the way.
The lack of unnecessary jargon made the post accessible without sacrificing accuracy, and a look at yourstylezone continued in the same accessible style, technical topics often hide behind specialised vocabulary but here the writer trusts the reader to keep up with plain language and that trust pays off nicely throughout the entire post.
During comparison of motivational websites, I noticed a platform that feels simple and effective, and BigMove ThinkFast hub provides smooth browsing overall – The layout is easy to follow, content is inspiring, and users can navigate without distractions or clutter affecting usability.
Picked up on several small touches that suggest a careful editor, and a look at ranktower suggested the same hand at work across the broader site, editorial consistency at a granular level is one of the strongest signs that an operation is serious rather than just hobbyist and this site reads as serious throughout.
Felt the post handled a sensitive angle of the topic with appropriate care, and a look at rankloom extended that careful handling across related material, sites that can navigate delicate territory without causing damage are rare and require a level of judgement that comes from experience rather than from following any clear playbook.
Just sat back at the end of the post and felt grateful that someone took the time to write it, and a look at opalmeadowgoodsgallery extended that gratitude across more of the site, recognising effort behind quality work is part of what makes the open web a community rather than just a marketplace today.
Without comparing too aggressively to other sources this one stands out for the right reasons, and a look at simplystylishstore continued that distinctive quality, content that distinguishes itself through substance rather than style tricks is content with lasting differentiation and this site has clearly chosen substance based differentiation as its core editorial strategy.
Reading this confirmed a hunch I had been carrying about the topic without having articulated it, and a stop at leadpush extended the confirmation, content that gives shape to fuzzy intuitions is doing the rare work of making private thoughts public and this site is providing that articulating service consistently for me lately.
If quality blog writing is dying as people sometimes claim then this site is one piece of evidence that it has not died yet, and a look at rapidstylecorner extended that evidence, the broader cultural question about online writing has empirical answers in specific sites and this one is contributing to a more optimistic answer overall.
If I were grading sites on this topic this one would receive high marks, and a stop at leadloom continued earning those high marks, the informal grading I do mentally for content sources is something I take seriously even though it is informal and this site has been receiving consistent high marks across multiple sessions today.
Reading this post made me realise I had been settling for lower quality elsewhere, and a look at seomotion extended that recalibration, content that exposes how much I had been accepting in adjacent sources is content with calibrating effect on my standards and this site is performing that calibration function across topics for me reliably.
If I had to summarise the editorial sensibility of this site in a few words it would be careful and human, and a look at megabuy extended that summary feeling, capturing the essence of a sites approach in brief is hard but this site has a clear enough identity that the summary comes naturally enough.
Picked this post to share in a Slack channel where I knew it would be appreciated, and a look at leadpath suggested I will share more from here later, content worth sharing into a professional context is content that has earned a higher kind of trust than mere personal interest and this site has it.
While exploring digital learning spaces and self development websites, I found everyday knowledge base – The structure felt intuitive and practical, allowing seamless navigation through informative sections that supported consistent learning and personal improvement goals.
Well structured and easy to read, that combination is rarer than people think, and a stop at leadglide confirmed the same standard runs across the rest of the site, definitely the kind of place I will be coming back to when this topic comes up in conversation later again over the weeks ahead.
Approaching this with the usual skepticism I bring to new sites and being slowly persuaded, and a stop at adprism continued that gradual persuasion, the careful path from skeptical reader to genuine fan is the only one I trust and this site has walked me along that path through patient consistent quality across pieces.
A small editorial detail caught my attention, the way headings related to body text, and a look at believeandcreate maintained that careful relationship, structural details like that show up to readers who notice them and the writers here have clearly thought about every level of the piece rather than just the words.
Щ„Ш№ШЁЩ‡ 888starz [url=https://www.888starzeg2.com]https://888starzeg2.com/[/url]
Liked that the post resisted a sales pitch ending, and a stop at learnandthrive maintained the no pitch approach, content that ends without trying to convert me into a customer or subscriber is content that has confidence in its own value and this site is clearly playing the long game on reader trust.
Worth marking this site as one to come back to deliberately rather than by accident, and a stop at seocabin reinforced that intention, the difference between sites I find again by chance and sites I return to on purpose is meaningful and this one has clearly moved into the deliberate return category for me.
برنامج المراهنات 888 [url=888starzeg3.com]تحميل تطبيق 888 ستارز[/url]
Now thinking about how this post will age over the coming years, and a stop at rankgrit suggested the same durability, content built to age well rather than to capture the attention of the moment is content with a different kind of value and this site has clearly chosen the long horizon over the short one.
888bet download [url=https://www.888-starzeg.com/]تنزيل تطبيق 888starz[/url]
Skipped to a specific section because I knew that was the question I had, and the answer was clean, and a stop at linkscope similarly delivered targeted answers without burying them, content engineered for readers who arrive with specific needs rather than open ended browsing is increasingly valuable in a search heavy reading environment.
Will be passing this along to a few people who would benefit from the perspective shared here, and a stop at seoimpact only added to what I will be sharing, this kind of generous content deserves to circulate widely rather than getting buried in some search engine algorithm tweak that pushes it down the rankings.
Started smiling at one paragraph because the writing was just nice, and a look at rankpivot produced a couple more such moments, prose that produces small spontaneous reactions in the reader is doing more than just transferring information and the writers here are clearly hitting that level fairly consistently throughout pieces.
Closed it feeling slightly more competent in the topic than I started, and a stop at urbanchoicehub reinforced that competence boost, real learning is rare in casual online reading but it does happen sometimes and this site managed to make it happen for me today which is genuinely worth pausing to acknowledge.
888starz скачать iphone [url=www.androidchity.ru/]www.androidchity.ru/[/url] .
888starz تحميل [url=https://www.world-cuisine.com]https://world-cuisine.com/[/url]
While reviewing different internet platforms and shopping websites earlier today, I came across helpful digital bazaar and thought it was really interesting overall, with comfortable browsing and a well maintained layout that felt consistent across all pages.
Really thankful for posts that respect a reader’s time, this one does, and a quick look at rankmagnet was the same, no need to scroll through endless intros just to get to the actual content, that approach alone is enough reason to come back here regularly for the kind of writing offered.
Came back to this an hour later to reread a specific section, and a quick visit to leadrally also drew a second look, content that pulls you back rather than letting you move on permanently is the kind I want to fill my browser bookmarks with in 2026 and beyond as the open internet evolves.
Refreshing to read something where the words actually mean something instead of filling space, and a stop at freshvalueoutlet kept that going, the writing here trusts the reader to follow along without endless repetition or constant reminders of what was already said earlier in the post which I appreciate.
A well calibrated piece that knew its scope and stayed inside it, and a look at emberridgevendorstudio maintained the same scope discipline, scope creep is one of the failure modes of long blog posts and this site has clearly invested in the editorial discipline to prevent it which shows up in tightly contained pieces.
Now thinking about how this post will age over the coming years, and a stop at leadripple suggested the same durability, content built to age well rather than to capture the attention of the moment is content with a different kind of value and this site has clearly chosen the long horizon over the short one.
888 stars [url=https://www.888starz-egyp.com]https://888starz-egyp.com/[/url]
Worth recommending broadly to anyone who reads on the topic, and a look at seogrit only confirms that, the rare combination of accessibility and depth in this site makes it suitable for both newcomers and people who already know the area which is hard to pull off in any blog format today and rarely managed.
لعبة 888starz [url=http://888starz-egypt7.com/]8888starz[/url]
Now recognising the specific pleasure of reading writing that shows real care for sentence shapes, and a look at trendforlife extended that craft pleasure, sentence level writing quality is something most blog content ignores entirely and this site has clearly invested in the prose layer alongside the substance which is rare today.
Glad I gave this a chance rather than scrolling past, and a stop at rankridge confirmed I made the right call, sometimes the best content is hidden behind unassuming headlines that do not scream for attention and learning to slow down and check those out has paid off many times now across years of reading.
888 старз [url=http://888starz-uz-online.com]888 старз[/url] .
Genuinely glad I clicked through to read this rather than skipping past, and a stop at rapidtrendoutlet confirmed I should keep clicking through to more pages here, the kind of resource that justifies its place in my browser history rather than feeling like wasted time which is the highest compliment I offer any site online today.
Really grateful for content like this, it does not waste my time and it does not insult my intelligence either, and a quick look at quickshoppingcorner was the same, balanced respectful writing that makes a person feel welcome rather than rushed through pages of forced engagement just to keep clicking around.
Now considering whether the post would translate well into a different form, and a look at leadlane suggested similar versatility, content that could move into other media without losing its substance is content that has been built around ideas rather than around format and this site reads as idea first throughout posts.
Started reading skeptically because the headline seemed overconfident, and the post earned the headline by the end, and a look at seomotive continued that pattern of earning its claims, sites that can back up their headlines without overpromising are rare and this one has clearly developed editorial calibration on that front consistently.
Now setting up a small reminder to revisit the site on a slow day, and a stop at seoclimb confirmed the reminder was a good idea, planning return visits is a small organisational act that signals trust in ongoing quality and this site has earned that planned return through consistent performance across the pieces I have read so far.
Felt the post was written for someone like me without explicitly addressing me, and a look at leadlayer produced the same fit, when content lands on its target without pandering you know the writer has done careful audience thinking rather than relying on demographic targeting or interest signals to do the work of editorial decisions.
Skimmed first and then went back to read carefully, and the careful read paid off in places I had missed, and a stop at adtap got the same treatment, the rare site whose content rewards a second pass is content I want more of in my regular rotation rather than disposable single read articles.
Considered alongside other sources I have been reading this one consistently rises to the top, and a stop at linksignal maintained that top ranking, the informal ongoing comparison between sources is something I do whenever reading on a topic and this site keeps coming out near the top of those comparisons over many sessions.
1win retragere Visa Moldova [url=www.1win5757.help]www.1win5757.help[/url]
One of the more honest takes on the topic I have seen lately, no spin and no oversell, and a stop at rankmetric kept that going, the kind of voice the open web could use a lot more of rather than the endless echo chamber of recycled opinions floating around every social platform these days.
During the time spent here I noticed the absence of the usual distractions, and a stop at classychoicehub extended that distraction free experience, content that does not fight my attention with pop ups and modals and aggressive prompts is content that respects me and this site has clearly chosen the respectful approach throughout.
Appreciate how nothing here feels copied or pieced together from other places, the voice is consistent and the tone stays human, and after I checked linkgain I noticed the same style holds, which is a small detail but it makes the whole experience feel personal rather than like another generic site.
Refreshing to read something where the words actually mean something instead of filling space, and a stop at seoprism kept that going, the writing here trusts the reader to follow along without endless repetition or constant reminders of what was already said earlier in the post which I appreciate.
Now adding this site to a small mental group of recommendations I keep ready for specific kinds of inquiries, and a stop at rankslate extended the recommendation readiness, content that I can confidently point friends and colleagues toward in specific contexts is content with real social utility and this site has that utility clearly.
Now adjusting my mental list of reliable sites for this topic, and a stop at moveforwardnow reinforced the adjustment, the small ongoing curation work of maintaining trusted sources is one of the actual practical activities of careful reading and this site has earned a permanent place on my list for this particular subject.
Really appreciate the absence of stock photos that have nothing to do with the content, and a quick visit to leadsprout maintained the same restraint, visual filler is a tell that the writing cannot stand on its own and the lack of it here suggests the team has confidence in their content quality alone.
Started believing the writer knew the topic deeply by about the second paragraph, and a look at leadvertex reinforced that confidence, the speed at which a writer establishes credibility through their writing is a useful quality signal and this writer establishes it quickly and quietly without resorting to credential dropping or self promotion.
Такой курс не только очищает организм от токсинов, но и помогает вернуть эмоциональное равновесие. После завершения терапии пациент чувствует себя отдохнувшим, восстанавливает аппетит и сон, уходит тревожность и раздражительность.
Получить больше информации – [url=https://vyvod-iz-zapoya-v-krasnodare19.ru/]вывод из запоя капельница на дому[/url]
Picked a single sentence from this post to remember, and a look at rivercovevendorroom gave me another to keep, content that produces memorable lines is doing more than just transferring information and the small selection of sentences I keep from each reading session is one of the actual returns I get from reading carefully.
Промокоды магазина Пятёрочка https://www.time-samara.ru/content/view/785106/transformaciya-sistemy-loyalnosti-v-sovremennom-rossijskom-ritejle актуальные скидки, акции и специальные предложения для выгодных покупок. Найдите рабочие промокоды, купоны и бонусы, чтобы экономить на продуктах, товарах для дома и повседневных покупках.
Looking forward to seeing what gets published next month, and a look at shopwithhappiness extended that anticipation across the broader site, finding myself looking forward to a sites future content rather than just consuming its existing content is a stronger commitment level than I usually reach with new finds and this site triggered that.
While exploring ecommerce discount platforms, I found a website that feels structured and easy to navigate, and FreshOutlet savings hub delivers a smooth browsing experience overall – The interface is minimal, products are well organized, and users can browse value offerings comfortably without clutter or distractions.
Probably the best thing I have read on this topic in the past month, and a stop at learnsomethingeveryday extended that ranking, the casual ranking of recent reading is informal but real and this site has been winning those rankings for me on this topic specifically over the last several weeks of regular reading sessions.
Bookmark earned and shared the link with one specific person who would care, and a look at freshcarthub got the same targeted share, sharing carefully rather than broadcasting is a discipline I try to maintain and this site is generating shares from me at a sustainable rate rather than the spam rate of viral content.
Thanks for the readable length, I finished it without checking how much was left, and a stop at seopivot kept me reading the same way, when I stop noticing the length of a piece because the content is engaging enough to sustain attention without willpower the writer has done their job well today.
The overall feel of the post was professional without being stuffy, and a look at seosurge kept that approachable expertise going, finding the right register for technical content is hard but this site has clearly figured out how to sound knowledgeable without slipping into that distant lecturing tone that loses readers in droves every time.
Now noticing the careful balance the post struck between confidence and humility, and a stop at rapidtrendzone maintained the same balance, finding the line between asserting and admitting is hard and this site has clearly developed the calibration to walk that line consistently which produces a more persuasive reading experience for me.
Will be coming back to this for sure, too much good content to absorb in one sitting, and a stop at linkcrest only added more pages I want to dig through, this site is going onto my regular rotation list because it consistently delivers something worth the visit lately rather than empty filler.
Лечение в круглосуточном режиме рассматривается как непрерывный медицинский процесс, а не как разовое вмешательство. Даже при экстренном обращении терапия выстраивается последовательно, с обязательным врачебным наблюдением и оценкой динамики состояния пациента.
Ознакомиться с деталями – http://narcologicheskaya-klinika-v-krd19.ru
High quality writing, no marketing speak and no buzzwords that mean nothing, and a stop at seocove kept that going, simple direct content that actually communicates something is harder to find than it should be and this is one of the rare places that gets it right consistently across many different posts.
Started reading skeptically because the headline seemed overconfident, and the post earned the headline by the end, and a look at startfreshjourney continued that pattern of earning its claims, sites that can back up their headlines without overpromising are rare and this one has clearly developed editorial calibration on that front consistently.
Now noticing that the post benefited from being neither too short nor too long for its content, and a look at linkstreet continued that calibration of length, sites that match length to content rather than padding to hit some target are sites that respect both their material and their readers and this site does both.
Probably one of the more reliable sources I have found for this kind of careful coverage, and a look at seoorbit reinforced the reliability, the small group of sources I would describe as reliable for a given topic is curated carefully and this site has earned a place in that small group through consistent performance.
Recommended without reservation for anyone interested in the topic at any level of expertise, and a look at rankmotion only strengthens that recommendation, this site clearly knows how to serve readers across a range of backgrounds without watering down the content or talking past anyone in the audience which is genuinely impressive to see.
Reading this slowly to give it the attention it deserved, and a stop at linkcipher earned the same slow read, choosing to read slowly is a small act of respect for content quality and very few sites earn that respect from me but this one did so without any explicit ask which is the cleanest way.
Glad to find something on this topic that does not start with three paragraphs of throat clearing before getting to the point, and a stop at seocipher also dives right in, respect for the readers time shows up in small editorial choices like this and they add up to a real difference quickly.
Once I trust a site this much I tend to read everything they publish and that is the trajectory I am on with this one, and a stop at seoscale confirmed the trajectory, the rare progression from interested reader to comprehensive reader is something only certain sites earn and this one is earning that progression rapidly.
Picked this up between two other things I was doing and got drawn in completely, and after leadstreet my original tasks were completely forgotten for a while, content that derails a workflow in a positive way by being more interesting than what you were already doing is rare and worth recognising clearly.
If I were grading sites on this topic this one would receive high marks, and a stop at fashionforlife continued earning those high marks, the informal grading I do mentally for content sources is something I take seriously even though it is informal and this site has been receiving consistent high marks across multiple sessions today.
Пицца в Саратов https://kosmopizza.ru свежая, ароматная и приготовленная по лучшим рецептам. Заказывайте доставку пиццы на дом или в офис, выбирайте из большого меню: классические и авторские пиццы, горячие закуски и напитки. Быстрая доставка по городу.
Worth recognising that the post did not pretend to be the final word on the topic, and a stop at opalmeadowgoodsgallery continued that humility, content that admits its own scope and limits is more trustworthy than content that overreaches and this site has clearly developed the editorial maturity to know what it can and cannot claim well.
Now feeling slightly more committed to my own careful reading practices having read this, and a stop at fastbuystore reinforced that commitment, content that models the kind of attention it deserves is content that calibrates the reader and this site has clearly raised my own bar for what to bring to good writing today.
The use of plain language without dumbing down the topic was really well done, and a look at leadchart continued in that same accessible style, this is something many technical writers fail at because they either confuse their readers or condescend to them but here neither problem appears at all which is impressive really.
Worth saying that the writing carries a particular kind of authority without making any explicit claims to it, and a stop at seolane extended that earned authority feeling, sites that demonstrate expertise through the quality of their explanations rather than by stating credentials are sites I trust most and this site has it.
Most of the time I bounce off similar pages within seconds, and a stop at admesh held me longer than I would have predicted, the ability to convert a likely bouncing visitor into an engaged reader is a quality signal and this site has demonstrated that conversion ability across multiple visits where I expected to bounce.
During a longer browsing session across multiple websites today, I visited modern online marketplace, and I liked the simple navigation, accessible product layout, and reliable website performance that stayed consistent throughout the experience.
Will be passing this along to a few people who would benefit from the perspective shared here, and a stop at leadstrike only added to what I will be sharing, this kind of generous content deserves to circulate widely rather than getting buried in some search engine algorithm tweak that pushes it down the rankings.
I really like how the writer keeps the tone friendly without sounding fake or overly polished, and after a stop at rankgain the same calm pace was there, no rushing to make a point and no padding either, just clean honest writing that I can respect and come back to later again.
Coming back tomorrow when I can give this a proper read, the post deserves better attention than I can give right now, and a look at royalcartcorner suggests there is plenty more here that deserves the same treatment, definitely a site I will be exploring properly over the next few days when I can.
Comfortable read, finished it without realising how much time had passed, and a look at seocraft pulled me into more pages the same way, the absence of friction in good content lets time disappear and that is one of the highest compliments I can pay any piece of writing I find online during a regular search session.
A piece that was confident enough to leave some questions open rather than forcing closure, and a look at rankmotive continued that intellectual honesty, content that admits the limits of its scope is more trustworthy than content that pretends to total understanding and this site has the right calibration on certainty consistently.
Came away with a small but real shift in perspective on the topic, and a stop at adpivot pushed that shift a bit further, the kind of subtle reframing that good writing does to a reader without making a big deal of it is something I always appreciate when it happens which is sadly not that often.
Considered as a whole this site has developed a coherent point of view that comes through in individual pieces, and a look at rankladder continued displaying that coherence, sites with a unified perspective rather than a grab bag of takes are sites with editorial maturity and this one has clearly developed that maturity through years of work.
Found the writing surprisingly fresh for what is by now a well covered topic, and a stop at linktactic kept that freshness going across the related pages, original perspective on familiar ground is hard to come by and this site has clearly earned its place in the conversation rather than just rehashing old ideas.
Now feeling slightly more optimistic about the state of independent writing online, and a stop at trendshopworld extended that quiet optimism, sites like this one are the reason I have not given up on the open web entirely and finding them occasionally renews the case for paying attention to non algorithmic content sources today.
https://www.google.hn/url?q=https://www.trustpilot.com/review/cricmod.com
https://aaroncortes.com/organizacion-basica-de-mi-empresa/
Now realising this site has been quietly doing good work for longer than I knew, and a look at seoripple suggested an archive worth exploring, sites with deep archives of consistent quality represent a different kind of resource than sites with viral hits and this one looks like the durable kind based on what I see.
Glad to find a site whose links lead somewhere worth going rather than back to itself for SEO juice, and a stop at shopandsaveonline kept that generous outbound feel, citing other peoples work with real respect rather than just for ranking signals is a sign of an honest operation worth supporting going forward.
https://www.google.am/url?q=https://casinofreespins.us.com/
https://stepik.org/users/1275037928/profile
A piece that handled the topic with appropriate weight without becoming portentous, and a look at linkblaze continued that calibrated seriousness, content that takes itself seriously without becoming pompous is something this site has clearly figured out and the balance shows up in every piece I have read across multiple sessions now.
Now considering whether the post would translate well into a different form, and a look at linkvertex suggested similar versatility, content that could move into other media without losing its substance is content that has been built around ideas rather than around format and this site reads as idea first throughout posts.
slon4 at slon вход
Genuine reaction is that this site clicked with how I like to read, and a look at shopbasemarket kept that comfortable fit going, sometimes you find a place online whose editorial decisions just align with your preferences and when that happens it is worth recognising and supporting through repeat engagement consistently going forward.
Worth recognising that this site does not chase the daily news cycle, and a stop at lemonlarkvendorparlor confirmed the longer publication arc, sites that resist the pressure to comment on every passing event are sites with genuine editorial discipline and this one has clearly chosen depth over volume which I respect deeply.
Купить пиццу https://pizzeriacuba.ru в Воронеж с быстрой доставкой на дом или в офис. Большой выбор пиццы: классические рецепты, авторские вкусы, свежие ингредиенты и горячая выпечка. Удобный онлайн-заказ, акции и выгодные предложения для любителей вкусной пиццы.
blacksprut market b.blsp at
Strong recommendation, anyone interested in this topic owes themselves a visit, and a stop at leadpoint extends that recommendation across more of the site, this is the kind of resource that makes me more optimistic about the state of the open web than I usually am these days actually for once which is genuinely refreshing.
Выбор формата лечения определяется состоянием пациента, наличием хронических заболеваний и мотивацией к выздоровлению. При необходимости врач переводит пациента из амбулаторной формы в стационарную, обеспечивая непрерывность и безопасность терапии.
Получить дополнительные сведения – https://narkologicheskaya-clinika-v-rostove19.ru/narkolog-rostov-na-donu/
Now wishing I had found this site sooner, and a look at cloudridgegoods extended that mild regret, the calculation of how many years of good content I missed by not finding the right sources earlier is one I try not to make too often but it does come up sometimes when I find sites this good.
Nice and clean, that is the best way to describe the writing here, no clutter and no wasted words, and a quick visit to rankpush kept that going, I appreciate when a site treats its readers like people who can think for themselves without needing constant hand holding through every paragraph.
Now feeling confident enough in this site to use it as a reference point for evaluating others on the same topic, and a look at ranklane continued the comparison friendly quality, sites that serve as quality benchmarks for their topic are precious and this one has clearly become a benchmark for me on this particular subject area.
utorrent скачать utorrent скачать
During my review of fashion ecommerce platforms, I came across a website that feels stylish and efficient, and FashionGlobal find hub offers smooth navigation overall – The interface is clean, product images are well presented, and users can browse fashion collections easily without clutter or complexity.
Skipped the related products section because there was none, and a stop at leadhatch also lacked any aggressive monetisation, content that is not constantly trying to convert me into a customer or subscriber is content that has confidence in its own value and that confidence shows up as a different reading experience.
melbet логин [url=melbet70382.help]melbet70382.help[/url]
окна заокский остекление балконов и лоджий чехов
Different in a good way from the cookie cutter content that fills most blogs covering this area, and a stop at seofoundry kept showing me why, original thoughtful writing exists if you know where to look and this site has earned a place on my short list of those rare exceptions worth defending.
Solid endorsement from me, the writing earns it, and a look at royaldealzone continues to earn it across the broader site too, the kind of operation that maintains quality across many pages rather than just one viral post is a sign of serious commitment and that is what I see here clearly across what I read.
Liked everything about the experience, from the opening through to the closing notes, and a stop at linkthread extended that into more pages, finding a site where the editorial vision shows through every choice rather than feeling random is an increasingly rare experience and one I am glad to have today during this particular reading session.
промокод мелбет [url=melbet35702.help]промокод мелбет[/url]
This actually answered the question I had been searching for, and after I checked prismoakcollective I had a few more pieces I had not realised I needed, that is the sign of a site that knows what its readers want before they even know how to ask it which is impressive.
A piece that read smoothly because the writer understood how readers actually move through prose, and a look at wildembervault maintained the same reader awareness, writers who think about the reading experience as much as the writing experience produce better work and this site has clearly made that shift in editorial approach.
Felt the writer did the homework before publishing, the references hold up, and a look at linkimpact continued that documented care, content with traceable claims rather than vague assertions is the kind I trust and the lack of bald assertion in this post is one of its quietly impressive qualities for me.
I usually skim posts like these but this one held my attention all the way through, and a stop at swiftmaplecorner did the same, that is a strong endorsement coming from me because I am usually quick to bounce when content gets repetitive or fails to deliver on its initial promise made in the headline.
Reading this with a fresh mind in the morning brought out details I might have missed in the afternoon, and a stop at linksurge earned the same fresh attention, content that rewards being read at full attention rather than at energy lows is content with real density and this site has that density consistently.
Approaching this with the usual skepticism I bring to new sites and being slowly persuaded, and a stop at seoscope continued that gradual persuasion, the careful path from skeptical reader to genuine fan is the only one I trust and this site has walked me along that path through patient consistent quality across pieces.
Solid value for anyone willing to read carefully, and a look at rankchart extends that value across the rest of the site, this is the kind of place that rewards return visits rather than offering everything in a single splashy post and then leaving readers nothing to come back for later which is unfortunately common.
Pass this along to anyone you know dealing with similar questions, the answers here are clear, and a stop at seoquest adds even more useful material, this is the kind of resource that deserves to circulate widely rather than getting lost in the constant churn of new content online that buries good work daily.
Solid recommendation from me to anyone working in the area, the perspective here is grounded, and a look at shopcoremarket adds even more useful angles, the kind of site that becomes a reference rather than just a one time read which is a higher bar than most blogs ever reach today on the modern web.
blacksprut ссылка blsp at
Reading this confirmed a small detail I had been uncertain about, and a stop at quartzmeadowmarketgallery provided the source for further checking, content that supports verification through citations or links rather than just asserting facts is more trustworthy and this site has clearly built its credibility through that kind of verifiable approach consistently.
A clean read with no irritations, and a look at linkslate continued that frictionless quality, the absence of small irritations is something I notice only when present elsewhere and this site is one of the rare places where everything just works and lets me focus on the substance rather than fighting the format.
Good clean post, no errors and no awkward phrasing that breaks the reading flow, and a stop at findsomethingunique kept the same standard, definitely the kind of editorial care that earns a return visit because it tells me the writer is paying attention to details that matter to readers rather than just rushing publication.
Quiet confidence runs through the whole post, no need to shout to make the points stick, and a stop at expandyourmind carried that same restrained voice forward, content that respects the reader by trusting its own substance rather than dressing it up in theatrical language is what I look for online and rarely actually find these days.
Working through this site has been a small antidote to the shallow content that fills most of my reading time, and a stop at trendinggoodsmarket extended that antidote function, sites that quietly improve the average quality of my reading by being themselves are sites worth supporting through return visits and recommendations consistently.
мостбет скачать приложение с сайта [url=www.mostbet09486.help]мостбет скачать приложение с сайта[/url]
Thanks for the honest framing without exaggerated claims that the topic will change my life, and a stop at yourfashionoutlet kept the same modest tone, restraint in marketing language signals trustworthiness and the writers here are clearly playing the long game by building credibility rather than chasing immediate clicks through hyperbole.
A genuine compliment to the writer for keeping the post focused on what mattered, and a look at leadslate continued that disciplined focus, focus is a editorial choice that compounds across many small decisions and this site has clearly made those small decisions consistently across what I have read so far this week here.
kości mostbet [url=https://www.mostbet90617.help]https://www.mostbet90617.help[/url]
Современный коворкинг https://expresrabota.com/kovorking-kogda-ofis-stanovitsya-soobshtestvom.html для комфортной и продуктивной работы. Рабочие места, переговорные комнаты, быстрый интернет и удобная инфраструктура. Подходит для фрилансеров, предпринимателей, стартапов и команд, которым нужен гибкий офис.
Now noticing the post fit a particular gap in my reading without my having articulated the gap before, and a look at seofuel extended that gap filling effect, content that meets needs I had not consciously formulated is content with reader insight and this site has clearly developed that anticipatory editorial sense across many pieces.
A piece that ended with a clean landing rather than fading out, and a look at leadtower maintained the same crisp conclusions, endings that resolve rather than dissolve are a sign of careful structural thinking and this site has clearly invested in how its pieces conclude rather than letting them simply run out of energy.
Just want to flag that this was useful and not bury the appreciation in caveats, and a look at windcrestcollective earned the same direct praise, recognising good work without hedging it with criticism is something I try to practice because over qualified compliments tend to read as backhanded and miss the point sometimes.
If I had to defend the time I spend reading independent blogs this site would feature in the defence, and a look at linktrail reinforced that defensive utility, the ongoing case for non algorithmic reading is one I make to myself periodically and sites like this one provide the actual evidence that supports the case clearly.
Quietly building a case in my head for why this site deserves more attention than it currently seems to receive, and a look at prismoakcollective reinforced the case, the gap between quality and recognition is a recurring frustration in independent online content and this site is one of the cases that seems particularly egregious to me today.
Will be coming back to this for sure, too much good content to absorb in one sitting, and a stop at adstrike only added more pages I want to dig through, this site is going onto my regular rotation list because it consistently delivers something worth the visit lately rather than empty filler.
If I were grading sites on this topic this one would receive high marks, and a stop at linkladder continued earning those high marks, the informal grading I do mentally for content sources is something I take seriously even though it is informal and this site has been receiving consistent high marks across multiple sessions today.
During my search across several internet shopping platforms this afternoon, I eventually visited high quality valley store, and I appreciated the nice browsing experience, where the modern layout made information easy to understand and follow.
Honest reaction is that this is the kind of writing I would defend in a conversation about good blog content, and a look at rankrally reinforced that, the rare site whose work I would actively recommend rather than just tolerate is the kind I want to support through return visits regularly.
Worth recognising that the post handled a familiar topic without reaching for any of the obvious hot takes, and a stop at royalgoodsarena continued that fresh treatment, sites that find new angles on subjects others have exhausted are sites worth following carefully and this one has clearly developed that exploratory instinct through patient practice.
https://www.cyberlord.at/forum/?id=1&user=83025
Decided this was the best thing I had read all morning, and a stop at modernoutfitstore kept that ranking intact, ranking my reading is something I do mentally throughout the day and the top rank is competitive and not easily won but this site won it without needing to overstate its claims for that.
A particular pleasure to read this with a fresh coffee, and a look at seovibe extended the pleasure across more pages, content that pairs well with quiet morning rituals is something I have come to value highly and this site has the kind of energy that fits naturally into a calm reading routine.
melbet sign in [url=http://melbet35702.help]http://melbet35702.help[/url]
Worth a quiet moment of recognition for the consistency I have noticed across multiple posts, and a stop at twilightcovecollective continued that consistent quality, sites that maintain quality across many pieces rather than peaking on one viral post are sites with real editorial discipline and this one has clearly developed that discipline carefully.
Thanks for the clean writing, no broken sentences and no awkward translations like some other sites have, and a quick stop at cloudridgegoods kept that polish going nicely, it really does make a difference when a reader can move through a page without tripping on every line or going back to reread.
Now leaving a small mental note to recommend this when the topic comes up in conversation, and a look at seospark extended that recommend ready feeling, content that arms me with shareable references for likely future conversations is content with social value and this site is providing that conversational ammunition consistently for me lately.
Now I want to find more sites like this but I suspect they are rare, and a look at floraharborvendorparlor extended that thought, the few sites that meet this quality bar are precious specifically because they are rare and finding others like them is one of the ongoing projects of careful internet curation across the years.
Felt the post had been written without looking over its shoulder, and a look at adgain continued that confident posture, content written for its own sake rather than against imagined critics has a different quality and this site reads as written from a place of confidence rather than defensive justification of every claim.
Took longer than expected to finish because I kept stopping to think, and a stop at ranktap did the same to me, content that provokes thought rather than just delivering information is in a different category and the team here is clearly working at that higher level rather than just cranking out posts.
Halfway through I knew I would finish the post, and a stop at windspirecollective also held me through to the end, content that signals its quality early and then sustains it is content with real internal consistency and this site has clearly figured out how to maintain quality from opening sentence through to closing thought.
Felt the writer did the homework before publishing, the references hold up, and a look at linkgrit continued that documented care, content with traceable claims rather than vague assertions is the kind I trust and the lack of bald assertion in this post is one of its quietly impressive qualities for me.
Now feeling confident that this site will continue producing work I will want to read, and a look at creativechoicehub extended that confidence into the future, projecting forward from current quality to expected future quality is something I do for sites I genuinely follow and this one has earned that forward looking trust clearly today.
mostbet apk necə yükləmək olar [url=https://www.mostbet48932.help]https://www.mostbet48932.help[/url]
Left me wanting to read more rather than feeling burned out, that is a good sign, and a look at radiantmaplestore confirmed there is plenty more here to explore, the kind of writing that builds appetite rather than killing it which is a rare quality on the modern open internet today across most categories of content.
Really appreciate the lack of pop ups, modals, cookie banners stacking on top of each other, and a quick visit to seofunnel confirmed the same clean approach across the rest of the site, technical decisions about user experience are part of what makes content actually pleasant to engage with for sure.
Refreshing to read something where the words actually mean something instead of filling space, and a stop at growtogethercommunity kept that going, the writing here trusts the reader to follow along without endless repetition or constant reminders of what was already said earlier in the post which I appreciate.
888starz com [url=www.888starz-uzbekistan5.com]888starz com[/url] .
Most of the time I feel the open web is in decline and then I find a site like this, and a stop at trendinggoodsmarket reinforced that mood lift, the cumulative effect of finding occasional excellent independent content versus the cumulative effect of finding mostly mediocre content is real for the long term reader maintaining web habits today.
Worth recognising the absence of the usual blog tropes here, and a look at leadspot continued that fresh quality, sites that avoid the standard moves of the medium read as more original even when the content is on familiar topics and this one has clearly chosen its own path through the conventional terrain skilfully.
A piece that suggested careful editing without showing the marks of the editing, and a look at rankfunnel continued that invisible polish, the best editing disappears into the prose and this site reads as having been edited with skill that does not announce itself which is the highest compliment I can offer any blog content.
A nicely understated post that does not shout for attention, and a look at adladder maintained the same quiet quality, understatement is a stylistic choice that distinguishes serious writing from attention seeking writing and this site has clearly committed to the understated approach as a core editorial value rather than just a phase.
While reviewing motivational platforms, I came across a site that feels structured and uplifting, and AdventureNext future hub offers a smooth browsing experience overall – The layout is clean, messages are inspiring, and users can navigate easily without unnecessary visual complexity.
https://software.informer.com/forum/viewtopic.php?t=34423
Reading this gave me a small framework I expect to use going forward, and a stop at startyourjourneytoday extended that framework, content that produces transferable mental models rather than just specific facts is content with multiplicative value and this site is providing those models at a rate that justifies extra attention from me regularly.
kraken slon at ссылка
Took the time to read the comments on this post too and they were also worth reading, and a stop at buypathmarket suggested the community quality matches the content quality, when the conversation around a piece is as good as the piece itself you know you have found a real corner of the internet.
https://doskazaymov.kz/ как посчитать платеж по рефинансированию – на Doskazaymov.kz можно проверить параметры до заявки
utorrent скачать utorrent скачать
bs2web at bs2best at
Worth marking the moment when reading this clicked into something useful for my own work, and a look at seochart extended that practical click, content that connects to my actual life rather than just being interesting is content with the highest kind of value and this site is generating that connection at a high rate.
Reading this in pieces during a long afternoon and finding it consistently rewarding, and a stop at twilightcreststore fit naturally into the same fragmented reading pattern, sites whose posts can be read in segments without losing the thread are well suited to how I actually read these days and this one is built well.
Really clear writing, the kind that makes you want to share the link with someone who has been asking about the topic, and a quick browse through royalgoodsstation only made me more sure of that, the information here stays useful long after the first read is done which says a lot.
Felt the writer respected the topic without being precious about it, and a look at daisyharborvendorparlor continued that respectful but unfussy treatment, finding the right register for serious topics is hard and this site has clearly figured out how to take the topic seriously while still being readable for casual visitors regularly.
https://villatheme.com/supports/users/bestpromocode/
Felt the writer was being honest with the reader which is rare enough that I want to acknowledge it, and a look at addrift continued that honest feel, content built on actual knowledge rather than aggregated summaries is something I value highly and rarely come across in regular searches on the open internet these days.
If I had encountered this site five years ago I would have been telling everyone about it, and a look at seosprout extended that retrospective enthusiasm, the version of me who used to recommend favourite blogs frequently would have made sure friends knew about this one and that earlier enthusiasm is partially returning to me here.
Skipped lunch to finish reading, which says something, and a stop at digitalcartcenter kept me at my desk longer than planned, when content beats the lunch impulse the writer has done something genuinely impressive in an attention environment full of immediately satisfying alternatives competing for the same finite block of reader time.
Now appreciating that the post left me with enough to say in a follow up conversation, and a look at leadburst added more material for those follow ups, content that prepares me for related conversations rather than just informing me alone is content with social utility and this site provides that social armament reliably for me.
Now planning to write about the topic myself eventually using this post as a reference, and a look at radiantpinecollective would also serve in that future piece, content that becomes raw material for my own writing rather than just informing my reading is content with multiplicative value and this site is generating that multiplicative effect.
Will be coming back to this for sure, too much good content to absorb in one sitting, and a stop at rankcrest only added more pages I want to dig through, this site is going onto my regular rotation list because it consistently delivers something worth the visit lately rather than empty filler.
Honestly this kind of writing is why I still bother to read independent sites, and a look at thebestcorner extended that broader reflection, the few sites that justify continued attention to non algorithmic content are sites like this one and finding them periodically is enough to keep my reading habits oriented toward independent rather than aggregated content.
Now appreciating that the post did not require me to agree with the writer to find it valuable, and a look at seohatch maintained the same useful regardless of agreement quality, content that informs even when it does not convince is content with broader utility and this site reads as useful even when I disagree.
Now noticing that the post benefited from being neither too short nor too long for its content, and a look at staymotivatedalways continued that calibration of length, sites that match length to content rather than padding to hit some target are sites that respect both their material and their readers and this site does both.
Honestly this hits the sweet spot between detail and brevity, no rambling and no shortcuts, and a quick visit to rankmark kept that going across the related pages, the kind of place that respects your attention without trying to grab it through cheap tactics or attention seeking design choices that get tired fast.
Useful information presented in a way that does not feel like a sales pitch, that is what I appreciated most, and a stop at simplefashionstore was the same, no upsell and no fake urgency just steady content laid out properly for someone trying to actually learn from it rather than just be sold to.
Worth pointing out the careful word choice in this post, no buzzwords and no jargon, and a look at shopgatemarket continued that disciplined vocabulary, sites that resist the pull of trendy language are sites that will read well in five years and this one is clearly built for that kind of long durability.
Appreciate the work that went into laying this out so clearly, every section earns its place without filler, and a look at rankquest confirmed the same care, definitely the kind of place that deserves a return visit when the topic comes up again later in the future or for any related question.
Decided after reading this that I would check this site weekly going forward, and a stop at linknudge reinforced that commitment, deciding to add a site to a regular rotation requires meeting a quality bar that very few places clear and this one cleared it cleanly without any noticeable effort or marketing push behind it.
Good quality through and through, no rough edges and no signs of being rushed, and a quick look at rankhatch kept the same polish going, the kind of site that respects its own brand by maintaining consistency across pages which is something I always appreciate as a reader looking for trustworthy information online today.
mostbet sual-cavab [url=https://mostbet48932.help/]https://mostbet48932.help/[/url]
A modest masterpiece in its own quiet way, and a look at twilightfernstore confirmed the same quiet quality across the rest of the site, calling something a masterpiece is usually overstating but for content this carefully crafted the word feels appropriate even if the writers themselves would probably resist the label honestly.
Now organising my browser bookmarks to give this site easier access, and a look at gladeridgemarketparlor earned the same organisational priority, the small acts of digital housekeeping I do for sites I expect to use often are themselves a measure of trust and this site has triggered the trust based housekeeping behaviour from me clearly.
Came in for one specific question and got answers to three I had not even thought to ask, and a look at digitalpickmarket extended that bonus value pattern, the kind of resource that anticipates reader needs rather than just answering the literal question asked is the gold standard and this site reaches it.
Now noticing that the post benefited from being neither too short nor too long for its content, and a look at trendybuyarena continued that calibration of length, sites that match length to content rather than padding to hit some target are sites that respect both their material and their readers and this site does both.
Now leaving a small mental note to recommend this when the topic comes up in conversation, and a look at ranksurge extended that recommend ready feeling, content that arms me with shareable references for likely future conversations is content with social value and this site is providing that conversational ammunition consistently for me lately.
I had been checking various online resources earlier today before discovering well designed harbor store, and I noticed everything seemed organized well, while browsing remained smooth and the content appeared genuinely helpful.
Now wishing more sites covered topics with this level of care, and a look at discovernewhorizons extended that wish across more subjects, the rarity of careful coverage on most topics is a problem and this site is one of the small antidotes to that broader pattern of casual or surface treatment of complex subjects.
A piece that reads like it was written for me without claiming to be written for me, and a look at ranknudge produced the same fit, when the writer audience match clicks naturally without being engineered through demographic targeting you know the writing is solid and this site has that natural fit consistently for me.
мелбет как получить бонус [url=https://melbet35702.help]https://melbet35702.help[/url]
Came here from a search and stayed for the side links because they were that interesting, and a stop at radiantshorestore took me even further into the site, the kind of organic exploration that good content invites is something most sites kill through aggressive interlinking and pushy navigation choices rather than relying on quality.
мелбет чат кыргызстан [url=www.melbet35702.help]www.melbet35702.help[/url]
xenical 120mg prescription
xenical 120mg prescription
Reading this between two meetings turned out to be the highlight of the morning, and a stop at boostradar continued that highlight quality, content that outshines the structured parts of a working day is doing something well beyond ordinary and this site has produced multiple such highlights for me already this week alone.
Reading this in the gap between work projects was a small but meaningful break, and a stop at globalgoodscorner extended that gentle reset, content that provides genuine refreshment rather than just distraction during work breaks is content with a particular kind of utility and this site fits that role for me reliably during work days.
Worth recognising that the post handled a familiar topic without reaching for any of the obvious hot takes, and a stop at yourtrendystop continued that fresh treatment, sites that find new angles on subjects others have exhausted are sites worth following carefully and this one has clearly developed that exploratory instinct through patient practice.
Most of the time I feel the open web is in decline and then I find a site like this, and a stop at goldenbuycenter reinforced that mood lift, the cumulative effect of finding occasional excellent independent content versus the cumulative effect of finding mostly mediocre content is real for the long term reader maintaining web habits today.
Just sat with this for a bit longer than I usually would because the points are worth thinking about, and after shopthedayaway I had even more to chew on, the kind of post that nudges your thinking forward without forcing the issue is something I have always appreciated in good writing online.
https://doskazaymov.kz/ Тараз: объединение кредитов на 9 500 000 тенге если нигде не дают – Досказаймов помогает увидеть базовый расчет
Worth recommending broadly to anyone who reads on the topic, and a look at ranklayer only confirms that, the rare combination of accessibility and depth in this site makes it suitable for both newcomers and people who already know the area which is hard to pull off in any blog format today and rarely managed.
Honestly slowed down to read this carefully which is not my default, and a look at seotap kept me in that careful reading mode, the kind of writing that demands attention by being worth attention is rare in a media environment full of content engineered to be skimmed not read with any real focus today.
Decided to set aside time later to read more carefully, and a stop at openbuyersmarket reinforced that decision, content that earns a calendar entry rather than just a passing read is in a different tier altogether and this site is clearly working at that elevated level which I really do appreciate as a reader today.
Reading carefully this time rather than scanning, and the depth shows up in places I missed first time around, and a look at seoarrow rewarded the same careful approach, content that holds up to multiple reads is content I want more of in my regular rotation rather than disposable scroll fodder daily.
mostbet скачать apk [url=www.mostbet09486.help]www.mostbet09486.help[/url]
Когда хочется отдохнуть удобно выбирать смотреть дорамы с русской озвучкой без случайных переходов, непонятных ресурсов и потери времени. Проект DoramaLend объединил в одном месте дорамы из Кореи, Китая, Японии и других стран с переводом на русский, понятными описаниями, разделами по жанрам, годами выхода и простыми карточками сериалов. Здесь легко найти трогательную историю после работы, сюжет с интригой, забавную комедию или популярную премьеру, которую уже обсуждают поклонники дорам.
Came here from a search and stayed for the side links because they were that interesting, and a stop at globalgoodscenter took me even further into the site, the kind of organic exploration that good content invites is something most sites kill through aggressive interlinking and pushy navigation choices rather than relying on quality.
Now planning to come back when I have the right kind of attention to read carefully, and a stop at cartwaymarket reinforced that plan, choosing the right moment to read certain content is a quiet form of respect for the work and this site is generating those careful planning behaviours from me consistently as a reader.
While analyzing online trend platforms, I noticed a site that feels clean and efficient, and SpotTrend daily hub network provides a smooth browsing experience overall – Content is easy to read, updates feel fresh, and users can explore trends without unnecessary complexity or confusing design elements.
Will be back, that is the simplest way to say it, and a quick visit to linkglide reinforced the decision, this site has earned a spot in my regular rotation alongside a few other reliable places I check when I want something genuinely informative without all the usual modern web noise getting in the way.
Liked the balance between depth and brevity, never too shallow and never too long, and a stop at forestcovevendorgallery kept the same balance going across the rest of the site, this is one of the harder skills in writing and the team here clearly has it figured out very well indeed across every page.
Decided to read this site for a while before forming a verdict, and the verdict after several pages is positive, and a stop at purechoicehub continued that pattern, judging a site requires more than one post and giving sites a fair sample is something I try to do for promising candidates rather than rushing to dismiss.
Found the section structure particularly thoughtful, and a stop at rankglide suggested the same care across the broader site, structural choices guide the reader through the material in ways most people do not consciously notice but feel the absence of when those choices are made carelessly or not at all.
Now noticing how rare it is to find a site that does not feel rushed, and a look at twilightgrovegoods extended that calm pace, content produced without time pressure has a different quality than content shipped to meet a deadline and this site reads as written without urgency which produces a different and better experience for readers.
Just want to recognise that someone clearly cared about how this turned out, and a look at shadowglowcorner confirmed that care extends across the broader site, you can feel the difference between content shipped to hit a deadline and content released because the writer was actually proud of the result for once.
как получить бонус mostbet [url=http://mostbet09486.help/]как получить бонус mostbet[/url]
https://www.google.com.ar/url?q=https://www.trustpilot.com/review/ustgroup.com.ua
Bookmark moved to my permanent reference folder rather than the casual maybe later folder, and a look at adburst earned the same upgrade, the distinction between casual interest and lasting reference is something I track carefully and very few sites cross that threshold but this one did so without much effort apparently.
Reading carefully this time rather than scanning, and the depth shows up in places I missed first time around, and a look at findyourinspiration rewarded the same careful approach, content that holds up to multiple reads is content I want more of in my regular rotation rather than disposable scroll fodder daily.
Felt the post was written for someone like me without explicitly addressing me, and a look at seoglide produced the same fit, when content lands on its target without pandering you know the writer has done careful audience thinking rather than relying on demographic targeting or interest signals to do the work of editorial decisions.
Over the course of reading several posts here a pattern of quality has emerged, and a stop at nextgenbuyhub confirmed the pattern, the difference between sites that hit quality occasionally and sites that hit it consistently is huge and this site has clearly demonstrated the consistent kind through what I have read this morning.
https://www.nintendo-master.com/profil/pixcassino
Worth observing that the post landed without needing a flashy headline to hook attention, and a stop at connectsharegrow did the same, content that earns engagement through substance rather than packaging is the kind I trust more deeply and this site has clearly chosen substance as the primary lever for reader engagement throughout.
A particular pleasure to read this with a fresh coffee, and a look at adhatch extended the pleasure across more pages, content that pairs well with quiet morning rituals is something I have come to value highly and this site has the kind of energy that fits naturally into a calm reading routine.
Honestly impressed, did not expect to find this level of care on the topic, and a stop at rankimpact cemented the impression, you can tell within the first few paragraphs whether a site is going to be worth the time and this one delivered on that early promise nicely throughout the rest of what I read.
Worth recognising that the post did not pretend to be the final word on the topic, and a stop at linkrally continued that humility, content that admits its own scope and limits is more trustworthy than content that overreaches and this site has clearly developed the editorial maturity to know what it can and cannot claim well.
Honestly impressed, did not expect to find this level of care on the topic, and a stop at silkseasidegoodsmarket cemented the impression, you can tell within the first few paragraphs whether a site is going to be worth the time and this one delivered on that early promise nicely throughout the rest of what I read.
Thanks for the practical examples scattered through the post rather than abstract theory only, and a look at trendybuycenter continued that grounded style, abstract points are easier to remember when paired with concrete situations and the writers here clearly understand how readers actually retain information from blog content reading sessions.
1win вывести на Demir через приложение [url=http://1win68190.help]http://1win68190.help[/url]
Liked the way the post balanced confidence and humility, and a stop at leadladder maintained the same balance, knowing when to assert and when to acknowledge uncertainty is a sign of mature thinking and the writers here have clearly developed that calibration through what I assume is years of careful work on their craft.
Reading this confirmed that my time researching the topic in other places had not been wasted, and a stop at quickcartworld extended the confirmation, when independent sources agree that is a useful signal and this site is one of the more reliable sources I have found for cross checking what I read elsewhere on similar subjects.
The examples really helped me grasp the points faster than abstract descriptions would have, and a stop at rapidbuymarket added a few more practical illustrations that drove the message home, the kind of writing that knows its readers learn better through concrete situations rather than vague generalities is rare and worth recognising clearly.
Felt like the writer was speaking directly to someone with my level of curiosity, neither talking down nor showing off, and a stop at seostreet kept that comfortable matching going, finding writing that meets you where you are rather than asking you to climb up or stoop down feels great every time it happens.
1win plinko tournament [url=https://www.1win63470.help]https://www.1win63470.help[/url]
Cuts through the usual marketing fluff that dominates this topic online, and a stop at lemonridgevendorparlor kept the same clean approach going, this is the kind of writing that respects the reader’s time rather than wasting it on repetitive setups before finally getting to the point at hand which is what most sites do.
Honestly thank you to whoever wrote this because it scratched an itch I had not quite been able to articulate, and a stop at silkduneemporium kept that satisfying feeling going, the kind of writing that meets unspoken needs is special and this site clearly has writers who understand their readers more than most do today.
Bookmark earned and shared the link with one specific person who would care, and a look at discoverfreshperspectives got the same targeted share, sharing carefully rather than broadcasting is a discipline I try to maintain and this site is generating shares from me at a sustainable rate rather than the spam rate of viral content.
Decided after reading this that I would check this site weekly going forward, and a stop at linkscale reinforced that commitment, deciding to add a site to a regular rotation requires meeting a quality bar that very few places clear and this one cleared it cleanly without any noticeable effort or marketing push behind it.
The structure of the post made it easy to follow without losing track of where I was, and a look at linkpush kept the same logical flow going, this site clearly understands that organisation is half the battle in keeping readers engaged from the first line to the last across any kind of post.
Clean writing, easy to read, and never tries too hard to impress, that combination is harder to find than people think, and after my time on twilightoakgoods I am sure this site treats its readers well, no flashy tricks just useful content done right which is honestly all I want online.
Liked how the writer used real examples instead of theoretical ones to make the points stick, and a stop at dreambuildachieve added even more concrete examples, this is the kind of practical approach that respects readers who actually want to apply what they learn rather than just nodding along passively without doing anything useful.
мелбет пополнение [url=melbet70382.help]melbet70382.help[/url]
Felt the post had been written without looking over its shoulder, and a look at fashioncartworld continued that confident posture, content written for its own sake rather than against imagined critics has a different quality and this site reads as written from a place of confidence rather than defensive justification of every claim.
Felt no urge to argue with the conclusions even though I started the post slightly skeptical, and a look at seodrift maintained that pattern, writing that earns agreement through clarity of argument rather than rhetorical pressure is the kind I find most persuasive and the kind I want to read more of these days.
Genuinely useful read, the points are practical and easy to apply right away, and a quick look at linkstrike confirmed that this site is consistent in that approach, looking forward to digging through the rest of it when I get the chance to sit down properly later in the week or this weekend.
A piece that brought a sense of order to a topic I had been finding chaotic, and a look at seoradar continued that organising effect, content that imposes useful structure on messy subjects is doing genuine intellectual work and this site is providing that organisational function across multiple posts I have read recently here.
mostbet bonus de bun venit [url=http://mostbet80695.help]http://mostbet80695.help[/url]
Worth recognising that this site does not chase the daily news cycle, and a stop at leadprism confirmed the longer publication arc, sites that resist the pressure to comment on every passing event are sites with genuine editorial discipline and this one has clearly chosen depth over volume which I respect deeply.
Worth recommending broadly to anyone who reads on the topic, and a look at silkstonegoodsatelier only confirms that, the rare combination of accessibility and depth in this site makes it suitable for both newcomers and people who already know the area which is hard to pull off in any blog format today and rarely managed.
mostbet zakłady na żywo [url=https://www.mostbet90617.help]https://www.mostbet90617.help[/url]
Generally I am cautious about recommending sites on first encounter but this one warrants the exception, and a look at goodscarthub reinforced the exception making, the rare site that justifies breaking my normal cautious approach is the rare site worth flagging early and this one has prompted exactly that early flagging response from me.
Now adding this to a list of sites I want to see flourish, and a stop at rapidcartcenter reinforced that wish, the few sites I actively root for are sites that produce the kind of work I want more of in the world and this one has joined that small list based on what I have read so far.
1win official download link Uganda [url=https://1win63470.help/]1win official download link Uganda[/url]
Approaching this site through a casual link click and being surprised by what I found, and a look at rubyorchardtradegallery extended the surprise, the rare experience of stumbling into excellent independent content rather than predictable mediocrity is one of the actual remaining pleasures of casual web browsing and this site provided it cleanly.
Most attempts at writing on this topic feel like they are missing something and this post finally identified what was missing, and a look at seotower extended that diagnostic clarity, content that names what is wrong with adjacent treatments while doing better itself is content with both critical and constructive value and this site has both.
Worth saying that this is one of the better things I have read on the topic in months, and a stop at silverbaymarket reinforced that ranking, the topic is well covered by many sources but few do it with this level of care and the few that do deserve to be flagged so other readers can find them.
If I had to defend the time I spend reading independent blogs this site would feature in the defence, and a look at adquest reinforced that defensive utility, the ongoing case for non algorithmic reading is one I make to myself periodically and sites like this one provide the actual evidence that supports the case clearly.
Now noticing that the post benefited from being neither too short nor too long for its content, and a look at seotactic continued that calibration of length, sites that match length to content rather than padding to hit some target are sites that respect both their material and their readers and this site does both.
Thanks for putting in the work to make this approachable, plenty of sites cover the same ground but most do it badly, and a quick visit to frostlaneemporium confirmed this one stands apart, simple language and useful examples without anyone trying to sell me anything along the way which I really appreciated.
Now considering whether the post would translate well into a different form, and a look at elitecartbazaar suggested similar versatility, content that could move into other media without losing its substance is content that has been built around ideas rather than around format and this site reads as idea first throughout posts.
Got pulled in by the headline and stayed because the content actually delivered on the promise, and a stop at trendycartfactory kept that trust intact, when a site lives up to its own framing it earns the right to keep showing up in my browser tabs going forward indefinitely from here on out really.
If I had to summarise the editorial sensibility of this site in a few words it would be careful and human, and a look at linkradar extended that summary feeling, capturing the essence of a sites approach in brief is hard but this site has a clear enough identity that the summary comes naturally enough.
Now adding this site to a small mental group of recommendations I keep ready for specific kinds of inquiries, and a stop at urbanbaygoods extended the recommendation readiness, content that I can confidently point friends and colleagues toward in specific contexts is content with real social utility and this site has that utility clearly.
Reading this confirmed something I had been suspecting about the topic, and a look at fastgoodscorner pushed that confirmation toward greater confidence, content that lines up with independently held intuitions earns a special kind of trust and I will return to writers who consistently land that way for me without overselling positions.
Reading this gave me something to think about for the rest of the afternoon, and after goodsrisestore I had even more to mull over, the kind of post that lingers in the background of your day rather than evaporating immediately is genuinely valuable in an attention economy that punishes depth rather than rewarding it.
Picked this up while looking for something else and ended up reading every paragraph because it was actually informative, and after harbororchardboutiquehub I was sure I would come back, that does not happen often when most sites bury the useful parts under endless ads and pop ups today and across most categories online.
Honest assessment is that this is one of the better short reads I have had this week, and a look at rapidcarthub reinforced that, the bar for short content is low because most of it sacrifices substance for brevity but this site manages both at once which is harder than it sounds for most writers attempting it.
A piece that was confident enough to leave some questions open rather than forcing closure, and a look at adslate continued that intellectual honesty, content that admits the limits of its scope is more trustworthy than content that pretends to total understanding and this site has the right calibration on certainty consistently.
Thanks for the honest framing without exaggerated claims that the topic will change my life, and a stop at besttrendmarket kept the same modest tone, restraint in marketing language signals trustworthiness and the writers here are clearly playing the long game by building credibility rather than chasing immediate clicks through hyperbole.
Got pulled in by the headline and stayed because the content actually delivered on the promise, and a stop at adblaze kept that trust intact, when a site lives up to its own framing it earns the right to keep showing up in my browser tabs going forward indefinitely from here on out really.
Quality you can feel from the first paragraph, the writer clearly knows the topic and how to share it, and a quick look at goldenbuyzone confirmed the same depth runs throughout the rest of the site as well which is rare and worth pointing out when it happens online for any reader passing through.
Strong recommendation from me, anyone curious about the topic should make time for this, and a look at nightorchardtradeparlor only sharpens that recommendation further, the kind of resource that holds up against careful scrutiny rather than crumbling at the first critical question is rare and worth pointing other people toward when the topic comes up.
Now adding this to a short list of sites I would defend in a conversation about the modern web, and a look at silvercrestgoods reinforced that defence list, the few sites that serve as evidence the web can still produce good things are precious and this one has clearly joined that small list of exemplary sites.
Just enjoyed the experience without needing to think about why, and a look at leadnudge kept that effortless feeling going, sometimes the best content is invisible in the sense that you forget you are reading until you reach the end and realise time has passed without you noticing it pass naturally.
Quietly enjoying that I have found a new site to follow for the topic, and a look at rankstrike reinforced the small pleasure of the find, the discovery of new high quality sources is one of the more durable pleasures of careful internet reading and this site has been generating that discovery pleasure at multiple points already today.
[url=https://klining-kvartiry-moskva-1.ru]клининг квартиры Москва[/url]
1win app permissions [url=https://1win63470.help]1win app permissions[/url]
1win live chat in app [url=1win63470.help]1win63470.help[/url]
mostbet oferta bonus [url=https://www.mostbet80695.help]https://www.mostbet80695.help[/url]
mostbet logowanie bez hasła [url=http://mostbet90617.help]http://mostbet90617.help[/url]
Probably the kind of site that should be more widely read than it appears to be, and a look at rankburst reinforced that quiet wish, the gap between a sites quality and its apparent reach is sometimes large and that gap exists for this site in a way that makes me want to mention it more.
купить спецтехнику Вольво [url=http://www.tech-group.com.ua]http://www.tech-group.com.ua[/url]
Once you find a site like this the search for similar voices begins, and a look at elitecartcenter extended the search energy, finding a high quality reference point makes the gap between it and adjacent sources visible in a way it was not before and this site has provided that high reference point across multiple recent visits.
If I were grading sites on this topic this one would receive high marks, and a stop at seothread continued earning those high marks, the informal grading I do mentally for content sources is something I take seriously even though it is informal and this site has been receiving consistent high marks across multiple sessions today.
Skipped the related links section thinking I had read enough and then came back to it later when curiosity got the better of me, and a stop at shopneststore confirmed I should have just read it first, every section of this site appears to deserve careful attention rather than skipping past lazily.
Thanks for a post that does not try to be funny when it is not the moment for it, and a stop at urbancrestgoods maintained the same appropriate seriousness, knowing when humour helps and when it just signals desperation for engagement is a sign of editorial maturity that many blogs have not developed yet.
Well done, the writing is professional without being stiff, and the topic is treated with care, and a look at fastpickhub reflected that approach, the kind of site I would point a colleague to if they asked for a reliable starting point on this topic in the future without any hesitation at all.
Without comparing too aggressively to other sources this one stands out for the right reasons, and a look at rapidcartsolutions continued that distinctive quality, content that distinguishes itself through substance rather than style tricks is content with lasting differentiation and this site has clearly chosen substance based differentiation as its core editorial strategy.
Bookmark folder created specifically for this site, and a look at ravenseasidevendorvault confirmed the dedicated folder was the right call, dedicated folders for individual sites are a level of organisation I rarely deploy and this site has earned that level of dedicated tracking based on the consistency I have seen so far across sessions.
клининг квартиры СПб [url=https://klining-kvartiry-spb-1.ru]klining-kvartiry-spb-1.ru[/url]
Honestly enjoyed every minute spent here, that is not something I say lightly, and a look at linkarrow confirmed I will be back, the bar for spending time online is high for me these days but this site clears it without effort which is high praise indeed from this reader who is usually rather demanding.
Reading this in my last reading slot of the day was a good way to end, and a stop at trendycartspace provided a satisfying close to the reading session, content that ends a day well rather than agitating it before sleep is the kind I value increasingly and this site fits that role for me consistently now.
Really like the way the post resists reaching for cliches that would have made it feel generic, and a quick visit to leadscale kept that fresh feel going, original phrasing and unexpected metaphors are signs that the writer is actually thinking rather than just stitching together familiar phrases into the appearance of content.
If quality blog writing is dying as people sometimes claim then this site is one piece of evidence that it has not died yet, and a look at cloudcovegoodsgallery extended that evidence, the broader cultural question about online writing has empirical answers in specific sites and this one is contributing to a more optimistic answer overall.
Honestly slowed down to read this carefully which is not my default, and a look at adquill kept me in that careful reading mode, the kind of writing that demands attention by being worth attention is rare in a media environment full of content engineered to be skimmed not read with any real focus today.
A handful of memorable phrases from this one I will probably use later, and a look at silverdunecollective added a couple more, content that contributes language to my own communication rather than just facts is content with a different kind of utility and this site is providing that linguistic utility consistently across what I read.
Most attempts at writing on this topic feel like they are missing something and this post finally identified what was missing, and a look at finddealsnow extended that diagnostic clarity, content that names what is wrong with adjacent treatments while doing better itself is content with both critical and constructive value and this site has both.
Picked this up while looking for something else and ended up reading every paragraph because it was actually informative, and after frostmeadowcollective I was sure I would come back, that does not happen often when most sites bury the useful parts under endless ads and pop ups today and across most categories online.
Speaking honestly this is among the better discoveries of my recent browsing, and a stop at leadpivot reinforced that discovery quality, the ranking of recent discoveries is informal but meaningful and this site has placed near the top of that ranking based on the consistency of quality across what I have already read carefully.
Bookmark folder reorganised slightly to make this site easier to find, and a look at buyloopshop earned the same accessibility upgrade, the small organisational moves I make for sites I expect to return to often are themselves a signal of how much I trust them and this site triggered those moves naturally.
Came across this and immediately thought of a friend who would enjoy it, and a stop at leadradar also reminded me of someone, content that triggers the urge to share is content that has earned my recommendation and this site has earned multiple from me already across different conversations during the week.
Reading this fit naturally into my afternoon walk because I was reading on my phone, and a stop at rapidgoodscenter continued well in that walking format, content that survives mobile reading without becoming awkward is content with format flexibility and this site has clearly thought about how it reads across different devices today.
Adding this site to my regular reading list, the post earned that on its own, and a quick stop at futuretrendstation sealed the decision, the kind of place worth checking back with from time to time because it consistently produces material that holds up against a critical reading too which I really value.
Now feeling mildly impressed in a way I do not quite remember feeling about a blog in a while, and a stop at elitecartstation extended that mild impression, content that produces specific positive emotional responses rather than just neutral information transfer is content with extra dimensions and this site has those extra dimensions clearly.
Polished and informative without feeling overproduced, that is the sweet spot, and a look at urbanharborcollective hit it again, you can tell when a site has been built with care versus thrown together for the sake of having something to put online and this is clearly the former approach taken by the team.
Liked how the post handled an objection I was forming as I read, and a stop at quickseasidecommercehub similarly anticipated where my thinking was going next, the rare writer who can predict reader concerns and address them in advance is doing something most online content fails to do despite that being basic editorial work.
mostbet depozyt mastercard [url=mostbet90617.help]mostbet depozyt mastercard[/url]
Reading this prompted me to clean up some old notes related to the topic, and a stop at goldenflashcorner extended that organising urge, content that triggers personal organisation rather than just consuming attention is content with motivating energy and this site has the kind of clarity that prompts active follow up rather than passive consumption.
The depth of coverage felt about right for the format, neither shallow nor overwhelming, and a look at seotrail kept that calibration going, getting the depth right for blog format is genuinely difficult because too shallow loses experts and too deep loses beginners but this site nailed it nicely which I really do appreciate.
Left me wanting to read more rather than feeling burned out, that is a good sign, and a look at driftorchardvendorparlor confirmed there is plenty more here to explore, the kind of writing that builds appetite rather than killing it which is a rare quality on the modern open internet today across most categories of content.
Now planning to come back when I have the right kind of attention to read carefully, and a stop at birchgroveexchange reinforced that plan, choosing the right moment to read certain content is a quiet form of respect for the work and this site is generating those careful planning behaviours from me consistently as a reader.
Felt the writer respected me as a reader without making a show of doing so, and a look at linktap continued that quiet respect, this is the kind of small but meaningful detail that separates the sites I bookmark from the ones I close after a single skim and never return to again no matter how interesting the headline.
If I had encountered this site five years ago I would have been telling everyone about it, and a look at leadgain extended that retrospective enthusiasm, the version of me who used to recommend favourite blogs frequently would have made sure friends knew about this one and that earlier enthusiasm is partially returning to me here.
Felt like I was reading something written by someone who actually thinks about the topic rather than reciting it, and a look at silverferncollective reinforced that impression, the difference between recited content and considered content is huge and this site clearly belongs to the latter category which I appreciate as a careful reader looking for substance.
Felt the writer respected the topic without being precious about it, and a look at linkprism continued that respectful but unfussy treatment, finding the right register for serious topics is hard and this site has clearly figured out how to take the topic seriously while still being readable for casual visitors regularly.
mostbet верификация сколько дней [url=http://mostbet09486.help]http://mostbet09486.help[/url]
Now noticing that the post avoided the temptation to be funny in places where humour would have undermined the substance, and a stop at goodslinkstore maintained the same restraint, knowing when to be serious is a rare editorial virtue and this site has clearly developed it through what I assume is careful editorial practice over years.
1win поддержка кыргызча [url=http://1win68190.help]1win поддержка кыргызча[/url]
Adding this site to my regular reading list, the post earned that on its own, and a quick stop at findnewdeals sealed the decision, the kind of place worth checking back with from time to time because it consistently produces material that holds up against a critical reading too which I really value.
Started smiling at one paragraph because the writing was just nice, and a look at rapidgoodscorner produced a couple more such moments, prose that produces small spontaneous reactions in the reader is doing more than just transferring information and the writers here are clearly hitting that level fairly consistently throughout pieces.
Probably worth setting aside a longer block to read more carefully than I can right now, and a stop at urbantrendzone confirmed the longer block plan, the impulse to schedule dedicated time for a sites archive is itself a measure of trust and this site has earned that scheduling impulse from me clearly today actually.
поездка в питер из москвы [url=https://tury-v-spb.com]поездка в питер из москвы[/url]
Reading this prompted a small redirection in something I was working on, and a stop at futuretrendzone extended that redirecting influence, content that affects my actual work rather than just my thinking has the highest practical impact and this site is providing that level of influence for me at a sustainable rate apparently.
Honestly informative, the writer covers the ground without showing off, and a look at ferncovecommercehub reflected the same humility, content that respects the reader rather than trying to dazzle them is something I always appreciate and rarely come across in this corner of the internet today across the topics I usually read.
Really appreciate that the writer did not overstate the importance of the topic to make the post feel weightier, and a quick visit to hazelvendorcorner maintained the same modest framing, content that is honest about its own scope rather than inflating itself is the kind I trust and return to repeatedly over time.
Decided this was the kind of site I would defend in a discussion about good blog content, and a stop at clovercrestmarketparlor reinforced that, very few sites earn active defence rather than passive consumption and this one has clearly crossed that threshold for me without needing any explicit pitch from the writers themselves either.
ремонт тойота в москве [url=https://proalbea.ru/tojota-v-rossii-posle-2022-goda-kakie-modeli-ostalis.html]https://proalbea.ru/tojota-v-rossii-posle-2022-goda-kakie-modeli-ostalis.html[/url]
Liked the way the post balanced confidence and humility, and a stop at urbanlighthousestore maintained the same balance, knowing when to assert and when to acknowledge uncertainty is a sign of mature thinking and the writers here have clearly developed that calibration through what I assume is years of careful work on their craft.
Reading this brought back the satisfaction I used to get from blogs ten years ago, and a stop at eliteflashcorner kept that nostalgic quality alive, sites that capture what was good about an earlier era of internet writing are increasingly precious and this one is doing that without feeling like a deliberate throwback at all.
Strong recommendation from me, anyone curious about the topic should make time for this, and a look at rankquill only sharpens that recommendation further, the kind of resource that holds up against careful scrutiny rather than crumbling at the first critical question is rare and worth pointing other people toward when the topic comes up.
Looking forward to seeing what gets published next month, and a look at silvergrovegods extended that anticipation across the broader site, finding myself looking forward to a sites future content rather than just consuming its existing content is a stronger commitment level than I usually reach with new finds and this site triggered that.
1win вывести баланс на мегапей [url=www.1win68190.help]1win вывести баланс на мегапей[/url]
Honestly this was a good read, no jargon and no padding, and a short look at leadtap kept that same feel going which I really appreciated, the writer clearly knows the topic well enough to explain it without hiding behind big words or filler that often gets used to seem clever.
Felt this in a way I cannot quite explain, the topic just hit different here, and a stop at rankcipher continued in that vein, sometimes you find a site whose perspective lines up with how you have been thinking and reading their work feels like a small relief which I appreciated more than I expected.
Now adding this to a list of sites I want to see flourish, and a stop at seovista reinforced that wish, the few sites I actively root for are sites that produce the kind of work I want more of in the world and this one has joined that small list based on what I have read so far.
Quality writing that respects the reader’s intelligence without overloading them, and a quick look at rankscale reflected that approach, a balanced thoughtful site that earns trust by being consistent rather than by shouting about how trustworthy it is which is the usual approach online sadly across most content categories.
https://bandori.party/user/971900/61xbet-freebets730/
https://animeforums.net/profile/56301-1xbet-download/?tab=field_core_pfield_1
Now adjusting my mental model of how the topic fits into the broader landscape, and a look at onecartonline extended that adjustment, content that affects my structural understanding rather than just my factual knowledge is content with deeper impact and this site is providing those structural updates at a meaningful rate consistently across topics.
https://hackmd.io/@RAFAYKHAN/BkBNokUkGg
https://ru.wikipedia.org/wiki/%D0%A4%D0%B0%D0%B9%D0%BB:%D0%9F%D0%BE%D0%BF%D1%83%D0%BB%D1%8F%D1%80%D0%BD%D1%8B%D0%B5_%D0%B2%D0%B8%D0%B4%D1%8B_%D0%BF%D0%B8%D1%86%D1%86%D1%8B.jpg
1win история транзакций [url=https://1win68190.help/]1win история транзакций[/url]
https://t.me/flagman_official_casino
The headings made navigating the post simple even when I needed to find a specific section quickly, and a look at mysticgrovegoods continued the same thoughtful structure, small details like clear headings show that someone is actually thinking about how the reader uses the page rather than just filling it for length alone.
https://en.wikipedia.org/wiki/File:%D0%9F%D0%BE%D0%BF%D1%83%D0%BB%D1%8F%D1%80%D0%BD%D1%8B%D0%B5_%D0%B2%D0%B8%D0%B4%D1%8B_%D0%BF%D0%B8%D1%86%D1%86%D1%8B.jpg
букмекерские крипто конторы [url=https://doskamarta.borda.ru/?1-5-0-00001319-000-0-0]букмекерские крипто конторы[/url]
ставки на спорт Литвы [url=https://medium.com/@vit.blagod/%D1%81%D1%82%D0%B0%D0%B2%D0%BA%D0%B8-%D0%BD%D0%B0-%D1%81%D0%BF%D0%BE%D1%80%D1%82-%D0%B2-%D0%BB%D0%B8%D1%82%D0%B2%D0%B5-%D0%BE%D1%81%D0%BE%D0%B1%D0%B5%D0%BD%D0%BD%D0%BE%D1%81%D1%82%D0%B8-%D1%80%D1%8B%D0%BD%D0%BA%D0%B0-%D0%B8-%D0%BF%D0%BE%D0%BF%D1%83%D0%BB%D1%8F%D1%80%D0%BD%D1%8B%D0%B5-%D0%BD%D0%B0%D0%BF%D1%80%D0%B0%D0%B2%D0%BB%D0%B5%D0%BD%D0%B8%D1%8F-702bcfa2a741]ставки на спорт Литвы[/url]
Volvo Украина [url=http://www.tech-group.com.ua]http://www.tech-group.com.ua[/url]
Felt like the post had been edited rather than just drafted and published, and a stop at berrybazaar suggested the same care across the site, the difference between edited and unedited content is enormous for the reader and this site has clearly invested in the editing pass that most blogs skip entirely which really does show up.
Started thinking about my own writing differently after reading, and a look at goldenpickstore continued that reflective effect, content that influences how I work rather than just informing what I know is content with the highest kind of impact and this site has triggered some of that reflective influence today on me.
Granted I am giving this site more credit than I usually give new finds, and a look at quicktrailcartemporium continued earning that credit, the calibration of how much trust to extend after limited exposure is something I do carefully and this site has earned more trust on shorter exposure than most due to consistent quality across.
Reading this on a slow Sunday and finding it perfectly suited to a slow Sunday read, and a quick stop at globalcartcenter kept the same gentle pace, content that fits the mood of the moment is something I notice and remember and this site has the kind of pace that suits relaxed reading sessions especially well.
A piece that did not try to be timeless and ended up reading as durable anyway, and a look at adridge extended that durable feel, content that stays useful past its publication date without straining for permanence is content that ages well and this site has the kind of evergreen quality that I value highly today.
Excellent post, balanced and well organised without showing off, and a stop at silverharborstore continued in that same vein, this site has clearly figured out the formula for content that works for readers rather than for search engine ranking signals which is harder than it sounds today and worth real recognition from anyone.
A small editorial detail caught my attention, the way headings related to body text, and a look at velvetcrestmarket maintained that careful relationship, structural details like that show up to readers who notice them and the writers here have clearly thought about every level of the piece rather than just the words.
Now feeling mildly impressed in a way I do not quite remember feeling about a blog in a while, and a stop at elitegoodsarena extended that mild impression, content that produces specific positive emotional responses rather than just neutral information transfer is content with extra dimensions and this site has those extra dimensions clearly.
mostbet mərc qəbul etmir [url=https://mostbet48932.help]https://mostbet48932.help[/url]
Appreciated how the post felt complete without overstaying its welcome, and a stop at amberoakcollective confirmed that economical approach runs across the site, knowing when to stop is a skill many writers never develop but here the discipline is obvious and welcome from the perspective of a busy reader trying to learn things efficiently.
Thanks again for the post, I learned a couple of things I can actually use later this week, and after I went over seoburst the rest of the site looked equally promising, definitely going to spend more time here when I get a free moment over the weekend to read more carefully.
Reading this between meetings turned out to be the most useful thing I did all afternoon, and a stop at mysticmeadowgoods kept that productivity feeling going, content can sometimes outperform actual work in terms of what gets accomplished mentally and this site managed that today which is genuinely a high bar to clear consistently.
A particular kind of restraint shows up in the writing, and a look at adcipher maintained the same restraint across pages, knowing what not to say is just as important as knowing what to say and this site has clearly developed strong instincts on both sides of that editorial line throughout pieces I have read.
https://school-of-safety-russia.ru/user/bestpromocode34/
Most attempts at writing on this topic feel like they are missing something and this post finally identified what was missing, and a look at shopmint extended that diagnostic clarity, content that names what is wrong with adjacent treatments while doing better itself is content with both critical and constructive value and this site has both.
mostbet pentru iphone [url=https://www.mostbet80695.help]mostbet pentru iphone[/url]
Honest take is that I will probably forget most of what I read online today but this post is one I will remember, and a stop at rankvertex kept that same memorable quality going, certain writing leaves a residue in the mind in a way most content simply does not manage.
If the topic interests you at all this is a place to spend time, and a look at dawnmeadowgoodsgallery reinforced that recommendation, the broader question of where to invest topical reading time is one this site answers convincingly through the consistent quality across multiple pieces I have sampled during the current reading session today.
Took something from this I did not expect to find, and a stop at fernbazaar added another unexpected useful piece, content that exceeds expectations rather than just meeting them is the kind that builds enthusiasm and earns repeat visits without any explicit ask from the writer or platform behind the work being read.
Quietly building a case in my head for why this site deserves more attention than it currently seems to receive, and a look at ketteglademarketstudio reinforced the case, the gap between quality and recognition is a recurring frustration in independent online content and this site is one of the cases that seems particularly egregious to me today.
In the middle of an otherwise scattered day this post landed as a moment of focus, and a stop at globalcartcorner extended that focused feeling across more pages, content that anchors a fragmented day rather than contributing to the fragmentation is content with real centring effect and this site is providing that anchoring function for me.
Worth recognising that this site does not chase the daily news cycle, and a stop at silverlaneemporium confirmed the longer publication arc, sites that resist the pressure to comment on every passing event are sites with genuine editorial discipline and this one has clearly chosen depth over volume which I respect deeply.
https://t.me/flagman_official_casino
mostbet vpn polska [url=https://www.mostbet90617.help]mostbet vpn polska[/url]
Good clean post, no errors and no awkward phrasing that breaks the reading flow, and a stop at shoptheday kept the same standard, definitely the kind of editorial care that earns a return visit because it tells me the writer is paying attention to details that matter to readers rather than just rushing publication.
Picked up on several small touches that suggest a careful editor, and a look at velvetgrovecrafts suggested the same hand at work across the broader site, editorial consistency at a granular level is one of the strongest signs that an operation is serious rather than just hobbyist and this site reads as serious throughout.
Really clear writing, the kind that makes you want to share the link with someone who has been asking about the topic, and a quick browse through elitegoodscorner only made me more sure of that, the information here stays useful long after the first read is done which says a lot.
Came away with a small but real shift in perspective on the topic, and a stop at urbanpetalcollective pushed that shift a bit further, the kind of subtle reframing that good writing does to a reader without making a big deal of it is something I always appreciate when it happens which is sadly not that often.
мелбет как вывести на элсом [url=https://melbet70382.help]https://melbet70382.help[/url]
The tone stayed consistent across the whole post which is harder than it looks for longer pieces, and a look at rankprism continued the same voice, this kind of editorial consistency is a sign of either a single careful writer or a tightly run team and either is impressive today across the broader media environment.
путевки в питер на 5 дней цена на двоих [url=http://tury-v-spb.com]http://tury-v-spb.com[/url]
Liked the balance between depth and brevity, never too shallow and never too long, and a stop at leadimpact kept the same balance going across the rest of the site, this is one of the harder skills in writing and the team here clearly has it figured out very well indeed across every page.
мелбет официальный сайт ош [url=http://melbet70382.help]http://melbet70382.help[/url]
Nice and clean, that is the best way to describe the writing here, no clutter and no wasted words, and a quick visit to qualitytrendstation kept that going, I appreciate when a site treats its readers like people who can think for themselves without needing constant hand holding through every paragraph.
Worth saying that this is one of the better things I have read on the topic in months, and a stop at techpackterra reinforced that ranking, the topic is well covered by many sources but few do it with this level of care and the few that do deserve to be flagged so other readers can find them.
Good quality through and through, no rough edges and no signs of being rushed, and a quick look at goldenpickzone kept the same polish going, the kind of site that respects its own brand by maintaining consistency across pages which is something I always appreciate as a reader looking for trustworthy information online today.
mostbet descărcare sigură [url=https://www.mostbet80695.help]https://www.mostbet80695.help[/url]
A clear cut above the usual noise on the subject, and a look at amberpetalcollective only made that gap wider in my view, the kind of place that earns its visitors through quality rather than through aggressive marketing or sponsored placements which is increasingly the only way most sites stay afloat across the modern web.
Really appreciate the absence of stock photos that have nothing to do with the content, and a quick visit to gildedcanyongoodsdistrict maintained the same restraint, visual filler is a tell that the writing cannot stand on its own and the lack of it here suggests the team has confidence in their content quality alone.
сервисный центр тойота [url=techautoport.ru/news/sezonnoe-to-toyota-kakie-raboty-obyazatelno-vypolnyat-vesnoy-i-osenyu-dlya-nadezhnosti-avtomobilya.html]techautoport.ru/news/sezonnoe-to-toyota-kakie-raboty-obyazatelno-vypolnyat-vesnoy-i-osenyu-dlya-nadezhnosti-avtomobilya.html[/url]
If quality blog writing is dying as people sometimes claim then this site is one piece of evidence that it has not died yet, and a look at silveroakcorner extended that evidence, the broader cultural question about online writing has empirical answers in specific sites and this one is contributing to a more optimistic answer overall.
https://ru.wikipedia.org/wiki/%D0%A4%D0%B0%D0%B9%D0%BB:%D0%9F%D0%BE%D0%BF%D1%83%D0%BB%D1%8F%D1%80%D0%BD%D1%8B%D0%B5_%D0%B2%D0%B8%D0%B4%D1%8B_%D0%BF%D0%B8%D1%86%D1%86%D1%8B.jpg
Thanks for the clean writing, no broken sentences and no awkward translations like some other sites have, and a quick stop at urbanpetalstore kept that polish going nicely, it really does make a difference when a reader can move through a page without tripping on every line or going back to reread.
Closed my email tab so I could read this without interruption, and a stop at velvetoakcollective earned the same protected attention, when content is good enough to defend against the usual digital distractions you know it deserves better than the half attention most online reading gets in a typical busy day.
If the topic interests you at all this is a place to spend time, and a look at linkdrift reinforced that recommendation, the broader question of where to invest topical reading time is one this site answers convincingly through the consistent quality across multiple pieces I have sampled during the current reading session today.
Most of my reading time goes to a small number of trusted sources and this one is now joining that group, and a stop at elitegoodsmarket reinforced the group membership, the few sites that earn a place in my regular rotation are sites I expect ongoing returns from and this one has earned that elevated position consistently.
Worth saying that the quiet confidence of the writing is what landed first, and a look at honeyvendorworkshop continued that quiet quality, confident writing without the loud display of confidence is a rare combination and this site has clearly developed both the knowledge and the editorial restraint to land that combination consistently.
Thank you for the genuine effort here, it shows in every paragraph and not just the headline, and after my visit to qualitytrendzone I was sure this site cares about getting things right rather than chasing clicks, which is the main reason I will come back later this week to read more.
I appreciate the clarity here, everything is explained in simple terms without unnecessary detail, and after a quick stop at nightsummittradehouse the points came together nicely for me, the writing keeps things straightforward and respects the reader from start to finish without ever talking down to anyone.
My reading list is short and selective and this site is now on it, and a stop at silversproutstore confirmed the placement, the short list of sites I read deliberately rather than encounter accidentally is something I curate carefully and adding to it is a real act of trust which this site has earned today.
Learned something from this without having to dig through layers of fluff, and a stop at epictrendcorner added a bit more context that helped tie things together for me, definitely a useful corner of the internet for anyone who wants real information without the usual marketing nonsense around it that often ruins similar pages.
продажа техники Volvo [url=https://www.tech-group.com.ua]https://www.tech-group.com.ua[/url]
рейтинг крипто БК [url=https://4dkp.forum24.ru/?1-3-0-00000155-000-0-0]рейтинг крипто БК[/url]
Genuinely useful read, the points are practical and easy to apply right away, and a quick look at amberpetalmarket confirmed that this site is consistent in that approach, looking forward to digging through the rest of it when I get the chance to sit down properly later in the week or this weekend.
Found a couple of useful angles in here I had not considered before reading carefully, and a quick stop at velvetorchidmarket added more, this is one of those sites where the value compounds the more you read rather than peaking at one viral post and then offering nothing else of substance afterwards which is common.
Following the post through to the end without my attention drifting once, and a look at wavevendoremporium earned the same uninterrupted attention, content that holds attention without manipulating it is content with substantive pull and this site has demonstrated that substantive pull across multiple pieces in a single reading session reliably here today.
Took a quick scan first and then went back to read properly because the post deserved it, and a stop at rapidgoodszone kept me reading carefully too, the kind of writing that earns a slower second pass rather than getting skimmed and forgotten is something I value highly when I happen to find it.
A genuine compliment to the writer for keeping the post focused on what mattered, and a look at goldentrendcenter continued that disciplined focus, focus is a editorial choice that compounds across many small decisions and this site has clearly made those small decisions consistently across what I have read so far this week here.
Generally I find the content on similar topics frustrating in specific ways and this post avoided all of them, and a look at rankvibe continued that frustration free experience, content that sidesteps the standard failure modes of its genre is content with editorial awareness and this site has clearly studied what fails elsewhere consistently.
https://en.wikipedia.org/wiki/File:%D0%9F%D0%BE%D0%BF%D1%83%D0%BB%D1%8F%D1%80%D0%BD%D1%8B%D0%B5_%D0%B2%D0%B8%D0%B4%D1%8B_%D0%BF%D0%B8%D1%86%D1%86%D1%8B.jpg
букмекерские конторы Литвы [url=https://bk-litvy.webflow.io/]букмекерские конторы Литвы[/url]
A piece that respected the reader by not over explaining the obvious, and a look at elitegoodszone continued that calibrated approach, finding the right level of explanation is one of the harder editorial calls and this site has clearly thought carefully about what readers will already know versus what they need help with consistently.
Better than most of the writing I have come across on this topic recently, simpler and more direct, and a look at stonelightemporium continued in that same way, a real outlier in a crowded space full of repetitive content that says little while taking up a lot of reader time today which is unfortunate.
melbet войти [url=http://melbet70382.help/]http://melbet70382.help/[/url]
тур по санкт петербургу [url=https://tury-v-spb.com]тур по санкт петербургу[/url]
Liked that there was nothing performative about the writing, and a stop at futurecartarena continued that genuine quality, performative writing tries to be witnessed rather than read and the difference between performance and substance is huge for the careful reader and this site has clearly chosen substance every time clearly.
мелбет регистрация не работает [url=melbet35702.help]melbet35702.help[/url]
Liked that the post left some questions open rather than pretending to settle everything, and a stop at goldenridgevendorhub continued that intellectual honesty, content that respects the limits of its own claims is more trustworthy than content that overreaches and this site has clearly figured out which positions it can defend confidently.
Now appreciating that the post did not try to imitate any other style I might recognise, and a stop at ranknestle continued that distinct voice, content with its own register rather than borrowed from elsewhere is content with real authorial presence and this site has clearly developed that presence through what feels like patient editorial work.
Quietly building a case in my head for why this site deserves more attention than it currently seems to receive, and a look at crisppost reinforced the case, the gap between quality and recognition is a recurring frustration in independent online content and this site is one of the cases that seems particularly egregious to me today.
A thoughtful piece that did not strain to be thoughtful, and a look at elitepickarena continued that effortless quality, when thinking shows up in writing without the writer drawing attention to it you know you are reading something genuinely considered rather than something performing the appearance of consideration which is also common online.
During the time spent here I noticed the absence of the usual distractions, and a stop at silkbin extended that distraction free experience, content that does not fight my attention with pop ups and modals and aggressive prompts is content that respects me and this site has clearly chosen the respectful approach throughout.
Now appreciating the small but real way this post improved my afternoon, and a stop at mintset extended that small improvement effect, content that produces measurable positive impact on the texture of a reading day is content with real value and this site is producing those small positive impacts at a sustainable rate apparently.
Thanks for putting this online without locking it behind email signups or paywalls, and a quick visit to grandport kept that open feel going, content that trusts the reader to come back rather than gating access is the kind of approach I will reward with regular return visits over time happily.
Will be coming back to this for sure, too much good content to absorb in one sitting, and a stop at petadata only added more pages I want to dig through, this site is going onto my regular rotation list because it consistently delivers something worth the visit lately rather than empty filler.
A piece that did not lean on the writer credentials or institutional backing, and a look at adarrow maintained the same focus on substance, content that earns trust through quality rather than through name dropping is the kind I find most persuasive and this site is clearly playing on the substance side of that distinction.
mostbet retragere pe card [url=mostbet80695.help]mostbet80695.help[/url]
Glad I gave this a chance rather than scrolling past, and a stop at amberridgegoods confirmed I made the right call, sometimes the best content is hidden behind unassuming headlines that do not scream for attention and learning to slow down and check those out has paid off many times now across years of reading.
Now I want to find more sites like this but I suspect they are rare, and a look at tidydeal extended that thought, the few sites that meet this quality bar are precious specifically because they are rare and finding others like them is one of the ongoing projects of careful internet curation across the years.
ремонт тойота в москве [url=http://www.yourmoscow.ru/posts/pokupka-avtomobilja-toiota-s-probegom-chek-list-proverki-i-rekomendacii-po-obsluzhivaniyu.html]ремонт тойота в москве[/url]
Reading this prompted a small note in my reference file, and a stop at echoaisleemporium prompted another, the rare site that contributes useful nuggets to my own working knowledge rather than just consuming my attention is worth the time investment many times over compared to the usual pile of forgettable scroll content.
Found the use of subheadings really helpful for scanning back through the post later, and a stop at teatimetrader kept that reader friendly approach going, navigation is something many blog writers ignore but small structural choices make a noticeable difference for someone returning to find a specific point again days or weeks later.
Reading more of the archives is now on my plan for the weekend, and a stop at hypercartarena confirmed the archive worth the time, the rare archive worth a dedicated reading session rather than just casual sampling is the rare archive of serious work and this site has clearly produced enough of that work to warrant the deeper exploration.
Decided to read this site for a while before forming a verdict, and the verdict after several pages is positive, and a stop at zenhold continued that pattern, judging a site requires more than one post and giving sites a fair sample is something I try to do for promising candidates rather than rushing to dismiss.
Now planning a longer reading session for the archives, and a stop at dawnpost confirmed the archives are worth that longer commitment, sites with archives I want to read deliberately rather than just sample are rare and this one has clearly earned that level of interest based on the consistency of what I have already read.
Polished and informative without feeling overproduced, that is the sweet spot, and a look at silkdash hit it again, you can tell when a site has been built with care versus thrown together for the sake of having something to put online and this is clearly the former approach taken by the team.
Closed the post with a small satisfied sigh, and a stop at adnudge produced the same gentle exhale, content that ends well is content that respects the rhythm of reading and the writers here have clearly thought about how their pieces close rather than just trailing off when they run out of things to say.
Refreshing to find writing that does not try to manipulate the reader into clicking onto the next page through cliffhangers and forced engagement, and a stop at mintsquad continued in the same respectful way, this is what reader first design actually looks like in practice rather than just in marketing copy that sounds nice.
Took longer than expected to finish because I kept stopping to think, and a stop at petaforge did the same to me, content that provokes thought rather than just delivering information is in a different category and the team here is clearly working at that higher level rather than just cranking out posts.
Felt energised after reading rather than drained, which is unusual for online content these days, and a look at grandport continued that good feeling, content that leaves you better than it found you is rare and worth bookmarking when you stumble across it for the first time today or any other day really.
Worth recognising that the post handled a familiar topic without reaching for any of the obvious hot takes, and a stop at tidydeal continued that fresh treatment, sites that find new angles on subjects others have exhausted are sites worth following carefully and this one has clearly developed that exploratory instinct through patient practice.
Thanks for treating the topic with the seriousness it deserves without becoming pompous about it, and a stop at elitetrendcenter continued that balanced treatment, the gap between earnest and self serious is huge and writers who can stay on the right side of it earn my respect when I find them online today.
Now adjusting my expectations upward for the topic based on this post, and a stop at linkpivot continued that bar raising effect, content that resets what I think is possible on a subject is doing real work in shaping my standards and this site is providing those bar raising experiences at a notable rate during sessions.
Really appreciate that the writer did not assume I would read every other related post first, and a look at juniperbrookdistrict kept that self contained feel going where each piece can stand alone, accessibility for new readers is a sign of generous editorial thinking and this site has clearly invested in that approach.
крипто букмекерские конторы [url=https://mymoscow.forum24.ru/?1-5-0-00003609-000-0-0]крипто букмекерские конторы[/url]
бк Литвы [url=https://medium.com/@vit.blagod/%D1%81%D1%82%D0%B0%D0%B2%D0%BA%D0%B8-%D0%BD%D0%B0-%D1%81%D0%BF%D0%BE%D1%80%D1%82-%D0%B2-%D0%BB%D0%B8%D1%82%D0%B2%D0%B5-%D0%BE%D1%81%D0%BE%D0%B1%D0%B5%D0%BD%D0%BD%D0%BE%D1%81%D1%82%D0%B8-%D1%80%D1%8B%D0%BD%D0%BA%D0%B0-%D0%B8-%D0%BF%D0%BE%D0%BF%D1%83%D0%BB%D1%8F%D1%80%D0%BD%D1%8B%D0%B5-%D0%BD%D0%B0%D0%BF%D1%80%D0%B0%D0%B2%D0%BB%D0%B5%D0%BD%D0%B8%D1%8F-702bcfa2a741]бк Литвы[/url]
продажа техники Volvo [url=http://www.tech-group.com.ua]http://www.tech-group.com.ua[/url]
Worth recognising that the post did not pretend to be the final word on the topic, and a stop at aurorastreetgoods continued that humility, content that admits its own scope and limits is more trustworthy than content that overreaches and this site has clearly developed the editorial maturity to know what it can and cannot claim well.
Liked that there was nothing performative about the writing, and a stop at silkgain continued that genuine quality, performative writing tries to be witnessed rather than read and the difference between performance and substance is huge for the careful reader and this site has clearly chosen substance every time clearly.
Clean writing, easy to read, and never tries too hard to impress, that combination is harder to find than people think, and after my time on dusksave I am sure this site treats its readers well, no flashy tricks just useful content done right which is honestly all I want online.
Recommended without reservation for anyone interested in the topic at any level of expertise, and a look at plasmabox only strengthens that recommendation, this site clearly knows how to serve readers across a range of backgrounds without watering down the content or talking past anyone in the audience which is genuinely impressive to see.
Glad to find a site whose links lead somewhere worth going rather than back to itself for SEO juice, and a stop at modernwin kept that generous outbound feel, citing other peoples work with real respect rather than just for ranking signals is a sign of an honest operation worth supporting going forward.
Decided after reading this that I would check this site weekly going forward, and a stop at threadthrive reinforced that commitment, deciding to add a site to a regular rotation requires meeting a quality bar that very few places clear and this one cleared it cleanly without any noticeable effort or marketing push behind it.
Closed it feeling I had taken something away rather than just consumed something, and a stop at gridprobe extended that taking away feeling, the difference between content I extract value from and content I just pass through is something I track informally and this site is consistently in the value extraction column for me.
Once I had read three posts the editorial pattern was clear, and a look at adrally confirmed the pattern from a fourth angle, sites where the underlying approach reveals itself through accumulated reading rather than being announced are sites with real depth and this one has that quality clearly visible across multiple pieces consistently.
Just sat back at the end of the post and felt grateful that someone took the time to write it, and a look at coralbrookdistrict extended that gratitude across more of the site, recognising effort behind quality work is part of what makes the open web a community rather than just a marketplace today.
|starz 888 bet [url=888starz-egypt-casino.com]https://888starz-egypt-casino.com/[/url]
Without overstating it this is a quietly excellent post, and a look at tidywing extended that quiet excellence, content that earns superlatives without demanding them through marketing language is content that has truly earned them through the substance and this site has clearly produced work in that earned excellence category today.
|8 8starz [url=888starz-egypt2.com]https://888starz-egypt2.com/[/url]
Now feeling confident that this site will continue producing work I will want to read, and a look at epiccartcenter extended that confidence into the future, projecting forward from current quality to expected future quality is something I do for sites I genuinely follow and this one has earned that forward looking trust clearly today.
Looking through other posts here the consistency is what makes the site valuable rather than any single piece, and a stop at advertex extended that consistency observation, sites whose value lies in the ongoing pattern rather than in standout posts are sites I trust more deeply and this one has clearly built that kind of trust.
888 bet [url=https://888starz-uzs.net/]888 bet[/url] .
Top notch writing, every paragraph carries weight and nothing feels like filler, and a stop at nextgenpickhub reflected that same care, a rare thing on the open web these days where most pages exist for clicks rather than actual reader value or anything close to that which is honestly a real shame.
Felt the post had been quietly polished rather than aggressively styled, and a look at zensensor confirmed the same understated polish, sites whose quality reveals itself slowly rather than announcing itself loudly are the kind I trust more deeply because the trust is not based on first impressions of marketing but actual substance.
88 stars [url=https://888starz-uzbekistan1.com/]88 stars[/url] .
Reading this slowly to absorb the structure, and the structure is doing real work alongside the words, and a look at silkgroup maintained the same architectural quality, when sentence shapes and paragraph rhythms reinforce the meaning rather than just transporting words you know you are reading skilled work today.
Bookmark added in three places to make sure I do not lose the link, and a look at duskstand got the same redundant treatment, sites I am afraid to lose are the rare keepers and this is clearly one of them based on what I have read so far across this and a couple of related posts.
888stars [url=https://www.888starz-bet1.com]888stars[/url] .
Got pulled in by the headline and stayed because the content actually delivered on the promise, and a stop at plushperk kept that trust intact, when a site lives up to its own framing it earns the right to keep showing up in my browser tabs going forward indefinitely from here on out really.
استار 888 [url=https://www.world-cuisine.com/]https://world-cuisine.com/[/url]
Found this useful, the points line up well with what I have been thinking about lately, and a stop at neogrid added some angles I had not considered yet, definitely walking away with more than I came for which is the best outcome from time spent reading online for any kind of topic.
лучшие туроператоры в спб [url=http://tury-v-spb.com]лучшие туроператоры в спб[/url]
toyota сервис [url=http://yourmoscow.ru/posts/pokupka-avtomobilja-toiota-s-probegom-chek-list-proverki-i-rekomendacii-po-obsluzhivaniyu.html]toyota сервис[/url]
Bookmarked the page and the homepage too because clearly there is more to explore here, and a quick stop at hashaxis only made that more obvious, this is the kind of place I want to dig through over a weekend rather than rushing through during a coffee break tomorrow morning before getting back to work.
Solid value for anyone willing to read carefully, and a look at embergrovecurated extends that value across the rest of the site, this is the kind of place that rewards return visits rather than offering everything in a single splashy post and then leaving readers nothing to come back for later which is unfortunately common.
Easy to recommend without reservations, the site delivers on every promise it implicitly makes, and a look at leadmesh kept that same standard going, the kind of consistency that earns trust over time rather than chasing it through aggressive marketing is what I see here and it is appreciated greatly by this particular reader today.
Just one of those reads that left me feeling slightly more capable rather than overwhelmed, and a look at azuregrovecrafts kept that empowering feel going, the difference between content that builds the reader up and content that intimidates them is huge and this site clearly knows which side of that line to stand.
Useful reading material, the kind I can hand off to someone newer to the topic without worrying about confusing them, and a quick look at echocrestcollective confirmed the same beginner friendly tone runs throughout the site which is great for sharing with people just starting their learning journey on this particular topic.
Quietly enjoying that I have found a new site to follow for the topic, and a look at tokennode reinforced the small pleasure of the find, the discovery of new high quality sources is one of the more durable pleasures of careful internet reading and this site has been generating that discovery pleasure at multiple points already today.
Glad I clicked through from where I did because this turned out to be worth the time spent, and after agilebox I had a fuller picture, the kind of content that earns its visitors through delivering value rather than chasing them through aggressive advertising or constant pop ups appearing everywhere on the screen lately.
Felt like the writer was speaking directly to someone with my level of curiosity, neither talking down nor showing off, and a stop at leadquill kept that comfortable matching going, finding writing that meets you where you are rather than asking you to climb up or stoop down feels great every time it happens.
Honestly this was the highlight of my reading queue today, and a look at freshcartarena extended that across more pages I will return to, ranking what I read against what else I read each day is something I do informally and this site keeps moving up in those rankings the more I explore it.
Glad to find something on this topic that does not start with three paragraphs of throat clearing before getting to the point, and a stop at freshcartcorner also dives right in, respect for the readers time shows up in small editorial choices like this and they add up to a real difference quickly.
A piece that reads as if the writer trusted readers to fill in obvious gaps, and a look at dusktribe continued that respectful approach, content that does not over explain what the reader can infer is content that respects intelligence and this site has clearly chosen to write to capable readers rather than to the lowest common denominator.
Vague feelings of recognition kept surfacing as I read because the writing names things I have been thinking, and a look at portwire produced more of those recognition moments, content that gives shape to private intuitions is content that makes me feel less alone in my own thinking and this site has that effect.
Reading this in the morning set a good tone for the day, and a quick visit to emberstonecourtyard kept that good tone going, content can do that sometimes when it hits the right notes and finding sites that consistently strike that tone is something I have learned to recognise and reward with regular visits.
Even across multiple posts the writers voice has remained consistent in a way I appreciate, and a stop at netscout continued that voice, sites that maintain editorial consistency across many pieces have something most sites lack and this one has clearly worked out how to keep its voice steady across what reads as a growing archive.
Took something from this I did not expect to find, and a stop at hashboard added another unexpected useful piece, content that exceeds expectations rather than just meeting them is the kind that builds enthusiasm and earns repeat visits without any explicit ask from the writer or platform behind the work being read.
MyRepublic tidak berfungsi
букмекерские крипто конторы [url=https://4dkp.forum24.ru/?1-3-0-00000155-000-0-0]букмекерские крипто конторы[/url]
букмекерские конторы Литвы [url=https://medium.com/@vit.blagod/%D1%81%D1%82%D0%B0%D0%B2%D0%BA%D0%B8-%D0%BD%D0%B0-%D1%81%D0%BF%D0%BE%D1%80%D1%82-%D0%B2-%D0%BB%D0%B8%D1%82%D0%B2%D0%B5-%D0%BE%D1%81%D0%BE%D0%B1%D0%B5%D0%BD%D0%BD%D0%BE%D1%81%D1%82%D0%B8-%D1%80%D1%8B%D0%BD%D0%BA%D0%B0-%D0%B8-%D0%BF%D0%BE%D0%BF%D1%83%D0%BB%D1%8F%D1%80%D0%BD%D1%8B%D0%B5-%D0%BD%D0%B0%D0%BF%D1%80%D0%B0%D0%B2%D0%BB%D0%B5%D0%BD%D0%B8%D1%8F-702bcfa2a741]букмекерские конторы Литвы[/url]
спецтехника [url=http://www.tech-group.com.ua]http://www.tech-group.com.ua[/url]
If I had encountered this site five years ago I would have been telling everyone about it, and a look at zerodepot extended that retrospective enthusiasm, the version of me who used to recommend favourite blogs frequently would have made sure friends knew about this one and that earlier enthusiasm is partially returning to me here.
Closed the laptop after this and let the ideas settle for a few hours, and a stop at nextgenstorefront similarly rewarded reflective time, content that benefits from sitting with rather than racing past is the kind I want more of and the kind that this site appears to consistently produce week after week here.
Smartfren gangguan
Strong recommendation from me, anyone curious about the topic should make time for this, and a look at tokenware only sharpens that recommendation further, the kind of resource that holds up against careful scrutiny rather than crumbling at the first critical question is rare and worth pointing other people toward when the topic comes up.
Halfway through reading I knew this would be one to bookmark, and a look at digitaldealcorner confirmed that early intuition, when bookmark intent forms before finishing a post you know the writing has cleared a quality bar that most content fails to clear and this site has cleared it on multiple visits already.
Honestly this hits the sweet spot between detail and brevity, no rambling and no shortcuts, and a quick visit to primechip kept that going across the related pages, the kind of place that respects your attention without trying to grab it through cheap tactics or attention seeking design choices that get tired fast.
Appreciate the thoughtful approach, the writer clearly took time to make this readable for someone who is not already an expert, and a look at echocode kept that going nicely, easy on the eyes and easy on the brain which is always a winning combination when reading on a busy day.
Appreciated that the writer trusted the reader to follow along without constant restating of earlier points, and a look at leadarrow continued that respect for the reader, treating an audience as capable adults rather than as people to be hand held through every paragraph is something I notice and value highly across the open internet today.
Refreshing to read something where the words actually mean something instead of filling space, and a stop at freshcartstation kept that going, the writing here trusts the reader to follow along without endless repetition or constant reminders of what was already said earlier in the post which I appreciate.
Reading this confirmed that my time researching the topic in other places had not been wasted, and a stop at blossombaycollective extended the confirmation, when independent sources agree that is a useful signal and this site is one of the more reliable sources I have found for cross checking what I read elsewhere on similar subjects.
Reading the writers other posts after this one suggests the quality is consistent rather than peak, and a stop at glademeadowoutlet confirmed the consistent quality reading, sites that hold the same level across many pieces rather than peaking on a few are sites with sustainable editorial discipline and this one has clearly developed that.
Really appreciate the absence of stock photos that have nothing to do with the content, and a quick visit to arcscout maintained the same restraint, visual filler is a tell that the writing cannot stand on its own and the lack of it here suggests the team has confidence in their content quality alone.
http://serov-stal.ru/user/xippuskoyz
Really appreciate the lack of pop ups, modals, cookie banners stacking on top of each other, and a quick visit to echoferncollective confirmed the same clean approach across the rest of the site, technical decisions about user experience are part of what makes content actually pleasant to engage with for sure.
Walked away with a clearer head than I had before reading this, and a quick visit to hashtools only sharpened that, the writing has a way of cutting through the noise that surrounds most topics online which is something I will definitely remember the next time I am searching for an answer to anything.
A piece that did not lean on the writer credentials or institutional backing, and a look at nodedrive maintained the same focus on substance, content that earns trust through quality rather than through name dropping is the kind I find most persuasive and this site is clearly playing on the substance side of that distinction.
https://inkbunny.net/KnoxLeblanc4
ремонт тойота в москве [url=http://www.techautoport.ru/news/sezonnoe-to-toyota-kakie-raboty-obyazatelno-vypolnyat-vesnoy-i-osenyu-dlya-nadezhnosti-avtomobilya.html]http://www.techautoport.ru/news/sezonnoe-to-toyota-kakie-raboty-obyazatelno-vypolnyat-vesnoy-i-osenyu-dlya-nadezhnosti-avtomobilya.html[/url]
Even across multiple posts the writers voice has remained consistent in a way I appreciate, and a stop at truedock continued that voice, sites that maintain editorial consistency across many pieces have something most sites lack and this one has clearly worked out how to keep its voice steady across what reads as a growing archive.
Just want to recognise that someone clearly cared about how this turned out, and a look at stylishdealhub confirmed that care extends across the broader site, you can feel the difference between content shipped to hit a deadline and content released because the writer was actually proud of the result for once.
A well calibrated piece that knew its scope and stayed inside it, and a look at prismlink maintained the same scope discipline, scope creep is one of the failure modes of long blog posts and this site has clearly invested in the editorial discipline to prevent it which shows up in tightly contained pieces.
A piece that read as if the writer was thinking carefully rather than just typing fluently, and a look at echoperk continued that considered quality, the difference between fluent typing and careful thinking shows up in writing and this site reads as the product of thought rather than just the product of language fluency apparently.
Just one of those reads that left me feeling slightly more capable rather than overwhelmed, and a look at jewelwillowmarketplace kept that empowering feel going, the difference between content that builds the reader up and content that intimidates them is huge and this site clearly knows which side of that line to stand.
Honestly thank you to whoever wrote this because it scratched an itch I had not quite been able to articulate, and a stop at seolayer kept that satisfying feeling going, the kind of writing that meets unspoken needs is special and this site clearly has writers who understand their readers more than most do today.
бангкок краби на машине краби в июне
Reading this in three sittings because the day was fragmented, and the piece survived the fragmentation, and a stop at freshcartzone held up under similar reading conditions, content engineered for continuous attention is fragile in modern conditions and this site reads as durable across the realistic ways people consume content today.
https://stabiline.ru/
Pass this along to anyone you know dealing with similar questions, the answers here are clear, and a stop at zeroflow adds even more useful material, this is the kind of resource that deserves to circulate widely rather than getting lost in the constant churn of new content online that buries good work daily.
Following the post through to the end without my attention drifting once, and a look at novabin earned the same uninterrupted attention, content that holds attention without manipulating it is content with substantive pull and this site has demonstrated that substantive pull across multiple pieces in a single reading session reliably here today.
Felt the writer did the homework before publishing, the references hold up, and a look at nextgentrendzone continued that documented care, content with traceable claims rather than vague assertions is the kind I trust and the lack of bald assertion in this post is one of its quietly impressive qualities for me.
Probably the best thing I have read on this topic in the past month, and a stop at arctools extended that ranking, the casual ranking of recent reading is informal but real and this site has been winning those rankings for me on this topic specifically over the last several weeks of regular reading sessions.
Официальный сайт BlackSprut
Добро пожаловать в blacksprut Marketplace
Крупнейшее в России сообщество любителей марихуаны и грибов приветствует новых друзей!
?
Сотни магазинов с оптовыми и розничными предложениями рады показать вам новый уровень отношения к каннабису и грибам.
bs2best at
blsp at
b.blsp вход
Reading this with my morning coffee turned into reading the related posts with my morning coffee, and a stop at prismwing stretched the morning further, content that pulls breakfast into a reading session rather than just accompanying it is content that has earned a higher claim on my attention than the average article does.
Now adding the writer to a small mental list of voices I want to follow, and a look at echoprism reinforced that follow intention, the few writers whose work I actively track are writers who have demonstrated sustained quality and this writer has clearly demonstrated that sustained quality across the pieces I have sampled here today.
Reading this gave me a small refresher on something I had partially forgotten, and a stop at ultraboot extended the refresher, content that strengthens existing knowledge rather than just adding new is content with a particular kind of consolidating value and this site is providing that consolidating function across multiple visits.
Excellent post, balanced and well organised without showing off, and a stop at copperwindessentials continued in that same vein, this site has clearly figured out the formula for content that works for readers rather than for search engine ranking signals which is harder than it sounds today and worth real recognition from anyone.
A genuinely unexpected highlight of my reading week, and a look at echogrovecollective extended that pattern, the surprise of finding excellent content rather than the predictable mediocre is one of the few real pleasures of casual web browsing and this site delivered that surprise cleanly today which I really do appreciate.
рейтинг крипто БК [url=https://4dkp.forum24.ru/?1-3-0-00000155-000-0-0]рейтинг крипто БК[/url]
Decided to write a short note to the author if there is contact info anywhere, and a stop at socksyndicate extended that intention, the urge to thank the writer directly is a strong signal of content quality and this site has triggered that urge in me today which is a fairly rare event for my reading.
Will be passing this along to a few people who would benefit from the perspective shared here, and a stop at ivorysave only added to what I will be sharing, this kind of generous content deserves to circulate widely rather than getting buried in some search engine algorithm tweak that pushes it down the rankings.
краби резорт видео полуостров рейли краби
kitesurfing Hurghada кайт сафари с проживанием на яхте
Glad I gave this a chance instead of bouncing on the headline, and after freshdealstation I was certain I had made the right call, snap judgements based on titles miss a lot of good content and this is a reminder to slow down and check things out before scrolling past in a hurry.
phuket condo for sale [url=https://www.apartments-for-sale-in-phuket-5.com]phuket condo for sale[/url]
заказать кухню [url=https://kuhni-spb-59.ru]заказать кухню[/url]
Worth saying that the writing carries a particular kind of authority without making any explicit claims to it, and a stop at novaroad extended that earned authority feeling, sites that demonstrate expertise through the quality of their explanations rather than by stating credentials are sites I trust most and this site has it.
заказать кухню [url=https://kuhni-spb-61.ru]заказать кухню[/url]
If I am being honest this is the kind of site I quietly hope my own work will someday resemble, and a stop at probebyte extended that aspirational feeling, finding work that models what I want to produce is part of why I read carefully and this site has been performing that modelling function for me lately consistently.
кухни на заказ спб [url=https://kuhni-spb-58.ru]кухни на заказ спб[/url]
Now feeling something close to gratitude for the fact this site exists, and a look at epicbooth extended that gratitude, the rare site that produces this kind of response is the rare site worth defending in conversations about whether the modern internet is still capable of producing genuinely valuable independent content for serious adults.
Glad to find something on this topic that does not start with three paragraphs of throat clearing before getting to the point, and a stop at stretchstudio also dives right in, respect for the readers time shows up in small editorial choices like this and they add up to a real difference quickly.
Closed and reopened the tab three times before finally finishing, and a stop at crystalbaystore held my attention straight through, sometimes content fights for time against my own distraction and the times it wins say something positive about its quality and this post clearly won that fight today afternoon for me.
Now considering the post as evidence that careful blog writing is still possible, and a look at vexflag extended that evidence, the broader question of whether the modern web can sustain quality writing has obvious empirical answers in sites like this one and seeing them is reassuring even when they remain a minority overall today.
100cuci app [url=100cuci-10.com]100cuci app[/url]
Generally my comment to other readers about new sites is to wait and see but for this one I would jump to recommend now, and a look at zeroprobe reinforced that early recommendation, the speed at which a site earns my recommendation is itself a quality signal and this one has earned mine quickly clearly.
сколько стоит заказать кухню [url=https://zakazat-kuhnyu-20.ru]сколько стоит заказать кухню[/url]
Picked up two new ideas that I expect will come up in conversations this week, and a look at axisbit added another, content that arms me with talking points rather than just filling time is the kind that provides ongoing value beyond the moment of reading and this site is generating that kind of ongoing value.
Now appreciating that the post did not require external context to follow, and a look at jadeperk maintained the same self contained quality, content that respects new visitors by being readable without prerequisites is content with broader accessibility and this site has clearly invested in keeping each piece reader friendly for fresh arrivals.
рулонные шторы широкие [url=https://rulonnye-shtory-s-elektroprivodom10.ru]https://rulonnye-shtory-s-elektroprivodom10.ru[/url]
Found this through a friend who recommended it and now I see why, and a look at nextlevelcart only strengthened that recommendation in my own mind, word of mouth still works for content that actually delivers and this site is clearly earning recommendations the old fashioned way through quality rather than marketing.
1win ставкаҳои бокс [url=http://1win65382.help]http://1win65382.help[/url]
pin-up retiro en Chile [url=pinup2004.help]pin-up retiro en Chile[/url]
melbet varsta minima [url=http://melbet95431.help/]http://melbet95431.help/[/url]
Found something new in here that I had not seen explained this way before, and a quick stop at echoharborstore expanded the idea even further, the kind of writing that nudges your thinking forward a bit without forcing the issue is exactly what I look for online today and rarely actually find anywhere.
Thank you for keeping the writing honest and the points easy to verify against your own experience, and a stop at freshtrendarena reflected the same approach, no exaggeration just steady useful content that I can take with me into my own work without second guessing every sentence I happen to read here.
Came across this and immediately thought of a friend who would enjoy it, and a stop at protoflux also reminded me of someone, content that triggers the urge to share is content that has earned my recommendation and this site has earned multiple from me already across different conversations during the week.
Generally I find the content on similar topics frustrating in specific ways and this post avoided all of them, and a look at ohmcore continued that frustration free experience, content that sidesteps the standard failure modes of its genre is content with editorial awareness and this site has clearly studied what fails elsewhere consistently.
mostbet lucky jet bonus [url=http://mostbet48217.help/]http://mostbet48217.help/[/url]
Really clear writing, the kind that makes you want to share the link with someone who has been asking about the topic, and a quick browse through epicplus only made me more sure of that, the information here stays useful long after the first read is done which says a lot.
Decided not to skim despite my usual habit and was rewarded for the discipline, and a stop at bundlebungalow earned the same patient approach, training myself to recognise sites that warrant slower reading is part of being a careful online reader and this site is the kind that helps me practice that skill regularly.
https://www.etimax.net/component/k2/item/1#
Now appreciating that the post left me with enough to say in a follow up conversation, and a look at crystalbloommarket added more material for those follow ups, content that prepares me for related conversations rather than just informing me alone is content with social utility and this site provides that social armament reliably for me.
A piece that prompted a small mental rearrangement of how I order related ideas, and a look at vexring extended that rearranging effect, content that affects the structure of my thinking rather than just adding to it is content with the deepest kind of impact and this site is reaching that depth for me today.
Took the time to read every paragraph rather than skimming for the punchline, and a quick visit to jetmesh earned the same careful attention from me, that is the highest signal I can give about content quality because my default mode is rapid scanning rather than deliberate reading on most pages.
https://audium.com/img/pages/1xbet_promo_code_106.html
Now setting this aside as a model of how to write thoughtfully on the topic, and a stop at protonkit extended that model status, content that becomes a reference for how a kind of writing should be done is content with influence beyond its own readership and this site is reaching that level for me clearly today.
https://www1.352.com.ng/news/1xbet_promo_code_bonus.html
Now adjusting my mental list of reliable sites for this topic, and a stop at flaircase reinforced the adjustment, the small ongoing curation work of maintaining trusted sources is one of the actual practical activities of careful reading and this site has earned a permanent place on my list for this particular subject.
Most attempts at writing on this topic feel like they are missing something and this post finally identified what was missing, and a look at axisdepot extended that diagnostic clarity, content that names what is wrong with adjacent treatments while doing better itself is content with both critical and constructive value and this site has both.
Probably worth setting aside a longer block to read more carefully than I can right now, and a stop at ohmframe confirmed the longer block plan, the impulse to schedule dedicated time for a sites archive is itself a measure of trust and this site has earned that scheduling impulse from me clearly today actually.
Stands apart from similar pages by actually being useful, that is high praise these days, and a look at pearlpocket kept that standard going, you can tell when a site is built around the reader versus around metrics and this one clearly belongs to the first category for sure based on what I read.
If you scroll past this site without looking carefully you will miss something, and a stop at freshtrendstation extended that mild warning, the surface of the site does not advertise its quality loudly which means careful attention is required to recognise what is being offered here which is itself a kind of editorial signal.
Highly recommend to anyone looking for a sensible take on this topic without the usual marketing nonsense, and a look at frostpinecollective kept that grounded approach going, sites that stay focused on serving readers rather than monetising every click are rare and this is clearly one of those rare ones I really appreciate finding.
Now sitting back and recognising that this was a small but real win in my reading day, and a stop at sunmeadowstore extended that quiet win, the cumulative effect of small reading wins versus the cumulative effect of small reading losses is real over time and this site is contributing to the wins side of that ledger.
This actually answered the question I had been searching for, and after I checked crystalfernstore I had a few more pieces I had not realised I needed, that is the sign of a site that knows what its readers want before they even know how to ask it which is impressive.
Took the time to read the comments on this post too and they were also worth reading, and a stop at growthcart suggested the community quality matches the content quality, when the conversation around a piece is as good as the piece itself you know you have found a real corner of the internet.
Любишь азарт? https://nodepositcasinopromo.top подборка онлайн-казино с бесплатными фриспинами, акциями и приветственными предложениями для новых игроков. Узнайте условия получения и начните играть без пополнения счета.
Looking through the archives suggests this site has been doing this for a while at this level, and a look at vexsync confirmed the long term consistency, sites that have maintained quality across years rather than just a recent stretch are sites with serious editorial discipline and this one has clearly been at it for a while.
melbet lucky jet miza [url=melbet52780.help]melbet52780.help[/url]
Reading this on a phone at a coffee shop and finding it perfectly suited to that context, and a stop at futuregoodszone continued the comfortable mobile experience, content that works across reading conditions without compromising on substance is increasingly important and this site has clearly thought about the whole reader experience here.
1win_kg [url=https://www.1win63851.help]https://www.1win63851.help[/url]
melbet eroare instalare apk [url=http://melbet95431.help]http://melbet95431.help[/url]
pin-up apuestas básquetbol [url=www.pinup2004.help]www.pinup2004.help[/url]
Thanks for keeping the writing direct without losing the warmth that makes content feel human, and a stop at kilobase carried both qualities forward, balancing professionalism and personality is a rare skill and the writers here have clearly figured out how to consistently land it across many posts which I notice.
Came in expecting another generic take and got something with actual character instead, and a look at perfectbuycorner carried that personality forward, finding a distinct voice on a saturated topic is impressive and worth pointing out when it happens because most sites end up sounding identical to their nearest competitors quickly.
Took my time with this rather than rushing because the writing rewards attention, and after ironpetalworks I had even more to absorb, the kind of content that pays back the patient reader rather than punishing them with empty filler is something I look for and rarely find in regular searches lately.
1win турнир mines [url=https://1win65382.help]https://1win65382.help[/url]
sloturi casino melbet [url=melbet52780.help]melbet52780.help[/url]
melbet блэкҷек онлайн [url=http://melbet74319.help]http://melbet74319.help[/url]
This filled in a gap in my understanding that I had not even noticed was there, and a stop at decdart did the same, the kind of post that gives you more than you expected when you first clicked through from somewhere else, a real find for anyone curious about the area covered here.
apartments for sale in phuket thailand [url=http://apartments-for-sale-in-phuket-5.com]apartments for sale in phuket thailand[/url]
Approaching this site through a casual link click and being surprised by what I found, and a look at amberflux extended the surprise, the rare experience of stumbling into excellent independent content rather than predictable mediocrity is one of the actual remaining pleasures of casual web browsing and this site provided it cleanly.
фанспорт ставки на спорт [url=https://fanfiction.borda.ru/?1-0-0-00030910-000-0-0]фанспорт ставки на спорт[/url]
кухни от производителя спб недорого и качественно [url=https://kuhni-spb-61.ru]кухни от производителя спб недорого и качественно[/url]
pin-up crash game [url=http://pinup2004.help/]pin-up crash game[/url]
1win телефон поддержки [url=http://1win63851.help]http://1win63851.help[/url]
мебель для кухни спб от производителя [url=https://kuhni-spb-59.ru]мебель для кухни спб от производителя[/url]
Beyond the topic at hand this site reads as a small ongoing project of taking writing seriously, and a look at velvetpeakgoods reinforced that project quality, sites that treat publishing as an ongoing serious practice rather than as content production for traffic are sites worth supporting and this one has clearly chosen the serious approach.
mostbet kazino slots [url=www.mostbet48217.help]www.mostbet48217.help[/url]
However many similar pages I have read this one taught me something new, and a stop at purepost added more new material, content that contributes genuinely fresh information rather than recycling what is already widely available is content with real informational value and this site is providing that informational freshness at a notable rate.
Really appreciate the lack of pop ups, modals, cookie banners stacking on top of each other, and a quick visit to flairpack confirmed the same clean approach across the rest of the site, technical decisions about user experience are part of what makes content actually pleasant to engage with for sure.
Decided to read more before commenting and the more I read the more I wanted to say something, and a stop at macromountain pushed that impulse further, when content provokes the urge to participate rather than just consume it is doing something quite specific and worth recognising clearly when it happens during reading.
mostbet cash terminal [url=https://www.mostbet48217.help]https://www.mostbet48217.help[/url]
Зайтун кайт Хургада айтсерфинг в хургаде
Working through this site has been a small antidote to the shallow content that fills most of my reading time, and a stop at ohmgrid extended that antidote function, sites that quietly improve the average quality of my reading by being themselves are sites worth supporting through return visits and recommendations consistently.
Now feeling slightly more optimistic about the state of independent writing online, and a stop at magicshelf extended that quiet optimism, sites like this one are the reason I have not given up on the open web entirely and finding them occasionally renews the case for paying attention to non algorithmic content sources today.
A quiet piece that did not try to compete on volume, and a look at sunpetalmarket maintained that selective approach, sites that publish less but better are increasingly rare in an environment that rewards volume and this one has clearly chosen quality cadence over quantity which is a brave editorial decision in current conditions.
Probably worth setting aside a longer block to read more carefully than I can right now, and a stop at crystalfieldstore confirmed the longer block plan, the impulse to schedule dedicated time for a sites archive is itself a measure of trust and this site has earned that scheduling impulse from me clearly today actually.
Reading this felt easy in the best way, no friction and no confusion at any point, and a stop at futurebuyarena carried that same comfort across more pages, the kind of editorial flow that lets you absorb information without fighting the format which is increasingly hard to find on the open web today across topics.
A clear case of writing that does not try to do too much in one post, and a look at globalgoodsarena maintained the same scoped discipline, posts that try to cover too much end up covering nothing well and this site has clearly chosen scope discipline as a core editorial principle which shows up clearly in what I read.
заказать кухню по индивидуальному заказу [url=https://zakazat-kuhnyu-20.ru]заказать кухню по индивидуальному заказу[/url]
I really like how the writer keeps the tone friendly without sounding fake or overly polished, and after a stop at vividloft the same calm pace was there, no rushing to make a point and no padding either, just clean honest writing that I can respect and come back to later again.
стоимость рулонных штор [url=https://rulonnye-shtory-s-elektroprivodom10.ru]стоимость рулонных штор[/url]
краби про chada thai village resort 4 краби
100cuci link [url=http://www.100cuci-10.com]100cuci link[/url]
Beyond the topic at hand this site reads as a small ongoing project of taking writing seriously, and a look at kilocore reinforced that project quality, sites that treat publishing as an ongoing serious practice rather than as content production for traffic are sites worth supporting and this one has clearly chosen the serious approach.
Felt the writer was being honest with the reader which is rare enough that I want to acknowledge it, and a look at axisflag continued that honest feel, content built on actual knowledge rather than aggregated summaries is something I value highly and rarely come across in regular searches on the open internet these days.
Now noticing that the post did not mention the writer at all, focus stayed on the topic, and a look at riverset continued that author absent quality, content that disappears the writer to focus on the substance is a particular kind of generosity and this site has clearly chosen the substance over the personality consistently.
Now noticing how rare it is to find a site that does not feel rushed, and a look at globalgoodszone extended that calm pace, content produced without time pressure has a different quality than content shipped to meet a deadline and this site reads as written without urgency which produces a different and better experience for readers.
Found the section structure particularly thoughtful, and a stop at declume suggested the same care across the broader site, structural choices guide the reader through the material in ways most people do not consciously notice but feel the absence of when those choices are made carelessly or not at all.
Really nice to see things explained without overcomplicating the topic, the words flow naturally and stay easy to follow, and a short visit to amberlume only added to that experience because the same simple approach is used across the rest of the page too without any change in tone.
https://socis.isras.ru/dreamedit/includes/cmstmp/?promokod_betvinner_na_segodnya_pri_registracii.html
However casually I came to this site I have ended up reading carefully, and a look at flashport continued earning that careful reading, the conversion from casual visitor to careful reader is something content earns rather than demands and this site has accomplished that conversion for me over the course of just a few pieces.
https://nycfirewire.net/pag/_promo_code____vip_welcome_bonus_130.html
Really appreciate that the writer did not stretch the post to hit some target word count, the points end when they are made, and a stop at mystichorizonstore reflected the same discipline, brevity is generosity in disguise and this site has clearly figured that out far better than most blog operations have.
Found this via a link from another piece I was reading and the click was worth it, and a stop at velvetpetalstore extended the value across more material, the open web still rewards clicking through citations when the underlying writers care about each other work and this site clearly belongs to that network.
Thanks again for the post, I learned a couple of things I can actually use later this week, and after I went over pixelharvest the rest of the site looked equally promising, definitely going to spend more time here when I get a free moment over the weekend to read more carefully.
кайт сафари пакет кайт сафари пакет
Big thanks to whoever wrote this, you saved me a lot of time hunting for the same info on other sites, and a stop at sunpetalstore only added more useful detail without going off topic, that kind of focus is honestly hard to come across these days when most posts wander everywhere.
Reading this triggered a small change in how I think about the topic going forward, and a stop at silkjump reinforced that subtle shift, the rare content that actually moves my thinking rather than just confirming or filling it is the kind I most value and this site is providing that kind of impact today.
нарколог на дом [url=https://narkolog-na-dom-voronezh-13.ru]нарколог на дом[/url]
100cuci jili [url=http://www.100cuci-7.com]100cuci jili[/url]
Reading more of the archives is now on my plan for the weekend, and a stop at crystalharborgoods confirmed the archive worth the time, the rare archive worth a dedicated reading session rather than just casual sampling is the rare archive of serious work and this site has clearly produced enough of that work to warrant the deeper exploration.
Speaking as someone who reads a lot on this topic this site has earned a high position in my source rankings, and a stop at royaltrendcorner reinforced that ranking, the informal ranking of sources for a topic is something I maintain mentally and this site has moved into the upper portion of those rankings clearly.
melbet aviator [url=https://melbet52780.help]melbet aviator[/url]
мелбет бозиҳои нав [url=melbet74319.help]melbet74319.help[/url]
Glad I gave this fifteen minutes rather than the usual three minute skim, and a look at kilobolt earned the same investment, time spent on quality content is rarely wasted but the reverse is also true and learning which sites deserve which kind of attention is part of being a careful online reader.
My friends would appreciate a few of these posts and I will be sending links accordingly, and a look at voltcard added more pages to my share queue, content that earns shares to specific people in specific contexts is content with social utility and this site is generating those targeted shares from me consistently lately.
During a reading session that included several other sources this one stood out, and a look at kiloorbit continued the standout quality, the side by side comparison of sources during research is a useful exercise and this site has been winning those comparisons for me consistently across multiple research sessions during the last week.
1win фриспин чӣ гуна гирифтан [url=http://1win65382.help]http://1win65382.help[/url]
Thanks for not padding this with the usual filler intros and outros that every other blog seems to require, and a quick visit to premiumbuyarena continued that lean approach across more posts, content stripped of waste is content that respects you and I will always come back to that kind of approach.
Useful information presented in a way that does not feel like a sales pitch, that is what I appreciated most, and a stop at rustflow was the same, no upsell and no fake urgency just steady content laid out properly for someone trying to actually learn from it rather than just be sold to.
Grateful for posts like this one, they remind me there are still places online run by people who care about quality, and a look at blossomhavenstore reflected the same standards, you can tell the difference between content made for readers and content made just for search engines today and this is the former.
https://td-belarus.ru/email/pgs/uteplenie_doma_mineralynoy_plitoy.html
https://sibrm.ru/livezilla/pgs/?promokod_777.html
Worth saying that the writing carries a particular kind of authority without making any explicit claims to it, and a stop at pixierod extended that earned authority feeling, sites that demonstrate expertise through the quality of their explanations rather than by stating credentials are sites I trust most and this site has it.
Honest reaction is that this is the kind of writing I would defend in a conversation about good blog content, and a look at promorank reinforced that, the rare site whose work I would actively recommend rather than just tolerate is the kind I want to support through return visits regularly.
Thanks for taking the time to write this, it is clear that some thought went into how each point would land, and after I went through fluxbin I had a better grip on the topic, real value without the usual marketing noise people have to put up with online when searching for answers.
Felt the post had been quietly polished rather than aggressively styled, and a look at globaltrendstation confirmed the same understated polish, sites whose quality reveals itself slowly rather than announcing itself loudly are the kind I trust more deeply because the trust is not based on first impressions of marketing but actual substance.
1win как открыть сайт [url=http://1win63851.help]http://1win63851.help[/url]
melbet stream live [url=https://melbet95431.help/]https://melbet95431.help/[/url]
A piece that read smoothly because the writer understood how readers actually move through prose, and a look at opalshorecollective maintained the same reader awareness, writers who think about the reading experience as much as the writing experience produce better work and this site has clearly made that shift in editorial approach.
Quiet confidence runs through the whole post, no need to shout to make the points stick, and a stop at dockspark carried that same restrained voice forward, content that respects the reader by trusting its own substance rather than dressing it up in theatrical language is what I look for online and rarely actually find these days.
https://stabilizatory-energy.shop/
Adding this site to my regular reading list, the post earned that on its own, and a quick stop at frostshoregoods sealed the decision, the kind of place worth checking back with from time to time because it consistently produces material that holds up against a critical reading too which I really value.
Felt the post handled a sensitive angle of the topic with appropriate care, and a look at zapscan extended that careful handling across related material, sites that can navigate delicate territory without causing damage are rare and require a level of judgement that comes from experience rather than from following any clear playbook.
Хочешь испытать азарт? https://pokerplayerok.top онлайн-покер с турнирами, кэш-столами и бонусами для игроков. Удобный интерфейс, мобильное приложение и регулярные покерные серии. Играйте в холдем, омаху и участвуйте в крупных турнирах.
Glad to have another data point on a question I am still thinking through, and a look at sunspirecollective added two more, content that acknowledges its place in a wider conversation rather than pretending to settle the question alone is intellectually honest in a way that I wish was more common across the open web.
Just want to recognise that someone clearly cared about how this turned out, and a look at silkmint confirmed that care extends across the broader site, you can feel the difference between content shipped to hit a deadline and content released because the writer was actually proud of the result for once.
Reading this in a relaxed evening setting was a small pleasure, and a stop at ampblip extended the pleasant evening reading, content that fits the tone of relaxed time without becoming forgettable is what I look for in evening reading and this site has the right tone for that particular slot in my daily reading routine.
https://arthue.in/shop/jewellery/necklace/hand-crafted-and-painted-durga-necklace-with-german-silver-accessories
Really nice to see things explained without overcomplicating the topic, the words flow naturally and stay easy to follow, and a short visit to velvetpinecollective only added to that experience because the same simple approach is used across the rest of the page too without any change in tone.
кухни под заказ в спб [url=https://kuhni-spb-61.ru]кухни под заказ в спб[/url]
sea view apartments for sale in phuket [url=http://www.apartments-for-sale-in-phuket-5.com]sea view apartments for sale in phuket[/url]
22bet официальный сайт [url=https://astana.forum24.ru/?1-5-0-00000336-000-0-0]22bet официальный сайт[/url]
заказать кухню спб [url=https://kuhni-spb-59.ru]заказать кухню спб[/url]
Honest take is that I will probably forget most of what I read online today but this post is one I will remember, and a stop at axonspark kept that same memorable quality going, certain writing leaves a residue in the mind in a way most content simply does not manage.
Reading this as part of my evening winding down routine fit perfectly, and a stop at kiloboost extended the wind down nicely, content that calms rather than agitates is what I want at the end of the day and this site provides that calming reading experience reliably which is increasingly rare across the modern web.
mostbet basketbol tikish [url=http://mostbet48217.help]mostbet basketbol tikish[/url]
Онлайн слот древнегреческих богов gates of olympus играть слот с динамичным геймплеем и мифологической атмосферой. Множители, бонусные функции и высокая волатильность делают игру интересной и потенциально прибыльной
Decided not to skim despite my usual habit and was rewarded for the discipline, and a stop at crystalmapletraders earned the same patient approach, training myself to recognise sites that warrant slower reading is part of being a careful online reader and this site is the kind that helps me practice that skill regularly.
Started reading without much expectation and ended on a high note, and a look at kilorealm continued that arc, content that builds rather than peaks early is a sign of a writer who knows how to structure a piece for sustained reader engagement rather than relying on a strong hook to do all the work.
Reading carefully this time rather than scanning, and the depth shows up in places I missed first time around, and a look at voltorbit rewarded the same careful approach, content that holds up to multiple reads is content I want more of in my regular rotation rather than disposable scroll fodder daily.
Genuine pleasure to read, and that is not something I say often after a casual click through, and a quick visit to rustkit kept the same feeling going across the rest of the site, finding writing that actually feels good to spend time with rather than just functional is increasingly rare on the open web.
Took something from this I did not expect to find, and a stop at rankcraft added another unexpected useful piece, content that exceeds expectations rather than just meeting them is the kind that builds enthusiasm and earns repeat visits without any explicit ask from the writer or platform behind the work being read.
Solid little post, the kind that does not need to be flashy because the substance is doing the work, and a look at royaltrendhub kept that quiet confidence going across the site, this is what writing looks like when the writer trusts the content to land on its own without theatrics or unnecessary attention seeking behaviour.
Now appreciating that the post did not require external context to follow, and a look at fluxbuild maintained the same self contained quality, content that respects new visitors by being readable without prerequisites is content with broader accessibility and this site has clearly invested in keeping each piece reader friendly for fresh arrivals.
рыбный рынок краби пис лагуна резорт краби
Will be sharing this with a couple of people who care about the topic, and a stop at twilightpetalmarket added more material worth passing along, the kind of site that is generous with quality content and does not make you jump through hoops to access it which is appreciated more than the team probably realises.
Appreciated the way each section connected smoothly to the next without abrupt jumps, and a stop at fastcartarena kept that flow going nicely, transitions are something most blog writers ignore but the difference is huge for the reader who is trying to follow a sustained line of thought today across many different topics.
Appreciate that you did not pad this with fluff to hit a word count, the post says what it needs to say and stops, and a look at zingdart did the same, brevity here feels intentional not lazy which is a distinction many writers miss completely sometimes when they are working under deadlines.
Honestly the simplicity of the explanation made the topic click for me in a way other writeups had not, and a look at xenojet continued that clarity into related areas, when a writer gets the level of explanation right the reader does the heavy lifting themselves and the post just enables it.
заказать кухню [url=https://zakazat-kuhnyu-20.ru]заказать кухню[/url]
Comfortable reading experience throughout, no jarring tone shifts and no awkward formatting, and a look at docktone kept that smooth feel going, the kind of editorial polish that goes unnoticed when present but glaring when absent is something this site has clearly invested in across the broader content as well which deserves recognition.
Bookmark folder reorganised slightly to make this site easier to find, and a look at silkplus earned the same accessibility upgrade, the small organisational moves I make for sites I expect to return to often are themselves a signal of how much I trust them and this site triggered those moves naturally.
рулонные шторы это [url=https://rulonnye-shtory-s-elektroprivodom10.ru]https://rulonnye-shtory-s-elektroprivodom10.ru[/url]
888strz [url=https://www.888starz-eg-egypt3.com]https://888starz-eg-egypt3.com/[/url]
Quietly building a case in my head for why this site deserves more attention than it currently seems to receive, and a look at kilostud reinforced the case, the gap between quality and recognition is a recurring frustration in independent online content and this site is one of the cases that seems particularly egregious to me today.
Worth pointing out that the writing reads as confident without being defensive about it, and a look at brightforgecraft extended that secure tone, content that does not pre emptively argue against imagined critics has a different quality from defensive writing and this site reads as written from a place of real ease.
Just sat with this for a bit longer than I usually would because the points are worth thinking about, and after ampcard I had even more to chew on, the kind of post that nudges your thinking forward without forcing the issue is something I have always appreciated in good writing online.
https://letsgamenow.com/js/pages/1xbet_new_registration_promo_code_3.html
Skipped the related products section because there was none, and a stop at velvetridgecollective also lacked any aggressive monetisation, content that is not constantly trying to convert me into a customer or subscriber is content that has confidence in its own value and that confidence shows up as a different reading experience.
1win cashback [url=https://1win68190.help]https://1win68190.help[/url]
Worth pointing out that the writer made the topic feel more interesting than I had been expecting, and a look at crystalmeadowgoods continued that elevation effect, content that improves the apparent quality of its subject through skilled treatment is doing something real and this site has clearly developed that kind of editorial alchemy throughout.
88sta [url=https://888starz-eg3.org/]https://888starz-eg3.org/[/url]
Thank you for not assuming the reader already knows everything, the explanations meet me where I am, and a look at premiumcartarena did the same, that consideration is what makes a site feel welcoming rather than gatekeepy which is sadly the default mood across the modern web today for most subjects covered.
Closed three other tabs to focus on this one and never opened them again, and a stop at rustpick similarly held attention exclusively, content that crowds out other reading from working memory is content with real density and this site has demonstrated that density across multiple pages I have visited so far this morning.
Probably worth setting aside a longer block to read more carefully than I can right now, and a stop at linensave confirmed the longer block plan, the impulse to schedule dedicated time for a sites archive is itself a measure of trust and this site has earned that scheduling impulse from me clearly today actually.
888starz تسجيل دخول [url=888starz-3.com]https://888starz-3.com/[/url]
Generally I bookmark sparingly to avoid building up a bookmark graveyard but this one earned a permanent slot, and a stop at rankseller extended that permanence designation, the few sites I keep permanent bookmarks for are sites I expect to use repeatedly and this one has clearly cleared that expectation bar today.
Learned something from this without having to dig through layers of fluff, and a stop at voltprobe added a bit more context that helped tie things together for me, definitely a useful corner of the internet for anyone who wants real information without the usual marketing nonsense around it that often ruins similar pages.
Reading this gave me material for a conversation I needed to have anyway, and a stop at fluxfuel added even more talking points, content that connects to upcoming social or professional needs rather than just being interesting in the abstract is the kind that earns priority placement in my attention these days routinely.
Most posts I read end up forgotten within a day but this one is sticking, and a look at glowforgeessentials extended that lingering effect, content that survives the immediate moment of reading rather than evaporating is content with genuine retention quality and this site has been producing memorable pieces at a rate notable across my reading.
A particular pleasure to read this with a fresh coffee, and a look at urbancrestemporium extended the pleasure across more pages, content that pairs well with quiet morning rituals is something I have come to value highly and this site has the kind of energy that fits naturally into a calm reading routine.
If you asked me to point to a recent positive sign for the open web this site would be near the top, and a stop at beamqueue reinforced that designation, the few sites that serve as evidence the web can still produce quality independent content are precious and this one has clearly become one for me.
Reading this in three sittings because the day was fragmented, and the piece survived the fragmentation, and a stop at zingtorch held up under similar reading conditions, content engineered for continuous attention is fragile in modern conditions and this site reads as durable across the realistic ways people consume content today.
Bookmark added in three places to make sure I do not lose the link, and a look at fastcartcenter got the same redundant treatment, sites I am afraid to lose are the rare keepers and this is clearly one of them based on what I have read so far across this and a couple of related posts.
Quality you can feel from the first paragraph, the writer clearly knows the topic and how to share it, and a quick look at royaltrendstation confirmed the same depth runs throughout the rest of the site as well which is rare and worth pointing out when it happens online for any reader passing through.
Once you find a site like this the search for similar voices begins, and a look at sleekgain extended the search energy, finding a high quality reference point makes the gap between it and adjacent sources visible in a way it was not before and this site has provided that high reference point across multiple recent visits.
https://usastreams.com/news/1xbet_promo_code_exclusive_bonus_1.html
100cuci apk [url=https://100cuci-7.com]100cuci apk[/url]
https://telcoprofessionals.com/include/pags/1xbet_promo_code___welcome_offer.html
нарколог на дом отзывы [url=https://narkolog-na-dom-voronezh-13.ru]нарколог на дом отзывы[/url]
Comfortable in tone and substantive in content, that is a hard combination to land, and a look at duostem kept that pairing alive across more material, this is what good editorial direction looks like in practice and the team here clearly has someone keeping a steady hand on the wheel across what they decide to publish.
Liked that there was nothing performative about the writing, and a stop at zapflux continued that genuine quality, performative writing tries to be witnessed rather than read and the difference between performance and substance is huge for the careful reader and this site has clearly chosen substance every time clearly.
Reading this confirmed a small detail I had been uncertain about, and a stop at kilozen provided the source for further checking, content that supports verification through citations or links rather than just asserting facts is more trustworthy and this site has clearly built its credibility through that kind of verifiable approach consistently.
Took me back a step or two on an assumption I had been making, and a stop at rapidshelf pushed that reconsideration further, writing that gently corrects the reader without being aggressive about it is a rare diplomatic skill and the team here clearly knows how to land critical points without turning readers off.
Worth marking the moment when reading this clicked into something useful for my own work, and a look at rustroad extended that practical click, content that connects to my actual life rather than just being interesting is content with the highest kind of value and this site is generating that connection at a high rate.
теория кайтсерфинга обучение обучение кайтсерфингу на сафари
Liked the careful selection of which details to include and which to skip, and a stop at logicarc reflected the same editorial judgement, knowing what to leave out is just as important as knowing what to include and this site has clearly figured out where that line sits for the topics it covers regularly.
Generally I am cautious about recommending sites on first encounter but this one warrants the exception, and a look at crystalpetalcollective reinforced the exception making, the rare site that justifies breaking my normal cautious approach is the rare site worth flagging early and this one has prompted exactly that early flagging response from me.
Looking through the archives suggests this site has been doing this for a while at this level, and a look at amploom confirmed the long term consistency, sites that have maintained quality across years rather than just a recent stretch are sites with serious editorial discipline and this one has clearly been at it for a while.
Really grateful for content like this, it does not waste my time and it does not insult my intelligence either, and a quick look at velvetshorecollective was the same, balanced respectful writing that makes a person feel welcome rather than rushed through pages of forced engagement just to keep clicking around.
https://vbp.ru/docs/articles.php?1xbet_promokod_75.html
Beats most of the alternatives on the topic by a noticeable margin, and a look at volttray did not change that at all, this is one of the better corners of the open internet for this kind of content and I am glad I clicked through rather than skipping past quickly like I usually do.
Decided not to skim despite my usual habit and was rewarded for the discipline, and a stop at fluxvibe earned the same patient approach, training myself to recognise sites that warrant slower reading is part of being a careful online reader and this site is the kind that helps me practice that skill regularly.
https://www.forumishqiptar.com/impex/articles/?avoir_un_code_promo_1xbet.html
Took a chance on the headline and was rewarded, and a stop at zingtrace kept the rewards coming as I clicked through, the kind of place where every link leads somewhere worth the click is a small luxury on the modern web where so many sites are mostly empty calories disguised as content.
A piece that reads like it was written for me without claiming to be written for me, and a look at urbanfernmarket produced the same fit, when the writer audience match clicks naturally without being engineered through demographic targeting you know the writing is solid and this site has that natural fit consistently for me.
https://diakonessenhuis.org/lib/pgs/?kak_zritelyno_uvelichity_komnatu_neskolyko_rekomendaciy.html
Got pulled in by the headline and stayed because the content actually delivered on the promise, and a stop at sleekhold kept that trust intact, when a site lives up to its own framing it earns the right to keep showing up in my browser tabs going forward indefinitely from here on out really.
Now adding this to a short list of sites I would defend in a conversation about the modern web, and a look at cloudforgegoods reinforced that defence list, the few sites that serve as evidence the web can still produce good things are precious and this one has clearly joined that small list of exemplary sites.
If I were to recommend a starting point for the topic this site would be near the top of my list, and a stop at fastgoodsarena reinforced that recommendation status, the small list of starting point recommendations I keep for friends asking about topics is short and this site is now firmly on it.
https://lavita-clinik.ru/services/polimolochnaya-kislota-cana-v
A relief to read something where I did not have to fact check every claim mentally, and a look at linkcast continued that reliable feeling, sites where I can lower my guard and trust the content are rare and this one is earning that trust paragraph by paragraph through consistent careful work behind the scenes.
Now adjusting my mental list of reliable sites for this topic, and a stop at savvyshopstation reinforced the adjustment, the small ongoing curation work of maintaining trusted sources is one of the actual practical activities of careful reading and this site has earned a permanent place on my list for this particular subject.
Looking back on this reading session it stands as one of the better ones recently, and a look at royalshelf extended that ranking, the informal ranking of reading sessions against each other is something I do mentally and this session ranks high largely because of this site and a couple of related pages here.
https://merven.org/pags/1xbet_free_bet_promo_code_today.html
The tone stayed consistent across the whole post which is harder than it looks for longer pieces, and a look at duotile continued the same voice, this kind of editorial consistency is a sign of either a single careful writer or a tightly run team and either is impressive today across the broader media environment.
https://ukauk.ru/filemanager/articles/1xbit_promokod_pri_registracii.html
Skipped the social share buttons but might come back to actually use one later, and a stop at beamreach extended that share urge, content that triggers genuine sharing impulses rather than performative ones is content that has actually moved me and not many posts in a typical week do that for me actually.
Reading this in three sittings because the day was fragmented, and the piece survived the fragmentation, and a stop at rustwin held up under similar reading conditions, content engineered for continuous attention is fragile in modern conditions and this site reads as durable across the realistic ways people consume content today.
Working through this site has been a small antidote to the shallow content that fills most of my reading time, and a stop at premiumcartcorner extended that antidote function, sites that quietly improve the average quality of my reading by being themselves are sites worth supporting through return visits and recommendations consistently.
If you scroll past this site without looking carefully you will miss something, and a stop at lushfind extended that mild warning, the surface of the site does not advertise its quality loudly which means careful attention is required to recognise what is being offered here which is itself a kind of editorial signal.
школа кайтер кайт серфинг обучение
заказать кухню спб [url=https://kuhni-spb-61.ru]заказать кухню спб[/url]
современные кухни на заказ в спб [url=https://kuhni-spb-59.ru]https://kuhni-spb-59.ru[/url]
22bet букмекерская контора [url=https://astana.forum24.ru/?1-5-0-00000336-000-0-0]22bet букмекерская контора[/url]
A clear case of writing that does not try to do too much in one post, and a look at maplecrestgoods maintained the same scoped discipline, posts that try to cover too much end up covering nothing well and this site has clearly chosen scope discipline as a core editorial principle which shows up clearly in what I read.
Even across multiple posts the writers voice has remained consistent in a way I appreciate, and a stop at crystalpinegoods continued that voice, sites that maintain editorial consistency across many pieces have something most sites lack and this one has clearly worked out how to keep its voice steady across what reads as a growing archive.
apartments for sale in phuket thailand [url=www.apartments-for-sale-in-phuket-5.com]apartments for sale in phuket thailand[/url]
Came in confused about the topic and left with a much firmer grasp on it, and after glamtower I felt I could explain this to someone else without hesitation, that is the gold standard for any educational content and most sites simply fail to reach it ever which is unfortunate but true.
vpn для телефона Купить VPN – значит сделать осознанный выбор в пользу свободы и анонимности, открывая доступ к неограниченному контенту и защищенным онлайн-сервисам.
Reading this with a notebook open turned out to be the right move, and a stop at simplebuycorner added more material to the notes, content that justifies active note taking from a passive reader is content with real informational density and this site is producing notes worthy material at a high rate consistently.
Now feeling the post has earned a proper recommendation rather than a casual mention, and a stop at urbanlatticehub reinforced the recommendation strength, the difference between mentioning and recommending is a small editorial distinction I observe in my own conversations and this site has earned the upgraded recommendation level from me confidently today.
Worth flagging this post as worth a careful read rather than a casual skim, and a stop at vortexarc earned the same careful approach, the few sites that warrant slower reading are sites I now treat differently from the daily content stream and this one has clearly moved into that elevated treatment category.
Started imagining how I would explain the topic to someone else after reading, and a look at astrorod gave me more material for that imagined explanation, content that improves my own ability to discuss a topic is content that has actually transferred knowledge rather than just decorating my screen for a few minutes.
Picked this for my morning read because the topic seemed worth the time, and a look at snapfork confirmed the choice was right, my morning reading slot is precious and giving it to this site felt like a good investment rather than a waste which is a higher endorsement than I usually offer for content.
Now considering carefully how to share this site with the right audience rather than broadcasting widely, and a look at velvettrailbazaar extended that careful sharing impulse, content worth sharing carefully rather than spamming is content that has earned a higher kind of recommendation and this site has earned that careful shareability throughout pieces.
Mellstroy game Mellstroy game
цена санкт петербург [url=http://www.tury-v-spb.com]цена санкт петербург[/url]
Портал для людей похилого https://pensioneram.in.ua віку з Україна з корисною інформацією про пенсії, пільги, здоров’я та соціальні послуги. Прості поради, новини та інструкції для повсякденного життя пенсіонерів.
Looking back on this reading session it stands as one of the better ones recently, and a look at lunarcode extended that ranking, the informal ranking of reading sessions against each other is something I do mentally and this session ranks high largely because of this site and a couple of related pages here.
Now adding this to a list of sites I want to see flourish, and a stop at fastgoodsbazaar reinforced that wish, the few sites I actively root for are sites that produce the kind of work I want more of in the world and this one has joined that small list based on what I have read so far.
Ставка на любовь – 2 сезон. Любовь, страсть и неожиданные повороты возвращаются! Новые герои, жаркие свидания и судьбоносные решения – кто рискнёт всем ради чувств? Драматичные признания, сложный выбор и финал, от которого захватывает дух. Не пропусти ни одной серии – включай прямо сейчас: реалити Ставка на любовь 2 сезон
Honestly this kind of writing is why I still bother to read independent sites, and a look at seobridge extended that broader reflection, the few sites that justify continued attention to non algorithmic content are sites like this one and finding them periodically is enough to keep my reading habits oriented toward independent rather than aggregated content.
Started believing the writer knew the topic deeply by about the second paragraph, and a look at sagebay reinforced that confidence, the speed at which a writer establishes credibility through their writing is a useful quality signal and this writer establishes it quickly and quietly without resorting to credential dropping or self promotion.
Skipped past the first paragraph thinking it was setup and had to come back when the rest referenced it, and a stop at smartcartarena similarly rewarded careful reading from the start, content where every paragraph carries weight is content I now know to read from the beginning rather than skipping ahead.
Now appreciating that the post left me with enough to say in a follow up conversation, and a look at emberkit added more material for those follow ups, content that prepares me for related conversations rather than just informing me alone is content with social utility and this site provides that social armament reliably for me.
заказать кухню по индивидуальному заказу [url=https://zakazat-kuhnyu-20.ru]заказать кухню по индивидуальному заказу[/url]
шторы в оконный проем [url=https://rulonnye-shtory-s-elektroprivodom10.ru]https://rulonnye-shtory-s-elektroprivodom10.ru[/url]
Liked the way the post balanced confidence and humility, and a stop at cloudmeadowcollective maintained the same balance, knowing when to assert and when to acknowledge uncertainty is a sign of mature thinking and the writers here have clearly developed that calibration through what I assume is years of careful work on their craft.
Reading this back to back with a similar piece elsewhere made the quality difference obvious, and a stop at lushstack only widened the gap, comparing content side by side is a useful exercise and the gap between this site and average competitors in the space is large enough to be noticeable from the first paragraph.
Without comparing too aggressively to other sources this one stands out for the right reasons, and a look at glowjump continued that distinctive quality, content that distinguishes itself through substance rather than style tricks is content with lasting differentiation and this site has clearly chosen substance based differentiation as its core editorial strategy.
Now considering whether the post would translate well into a different form, and a look at findyouranswers suggested similar versatility, content that could move into other media without losing its substance is content that has been built around ideas rather than around format and this site reads as idea first throughout posts.
Skipped the comments to avoid spoilers and came back later to find them genuinely worth reading, and a stop at crystalwindcollective extended that surprised respect, when the discussion below a post matches the quality of the post itself you have found something special and this site appears to attract that kind of audience.
Spinsy casino Italia
Found this through a friend who recommended it and now I see why, and a look at urbanmeadowgoods only strengthened that recommendation in my own mind, word of mouth still works for content that actually delivers and this site is clearly earning recommendations the old fashioned way through quality rather than marketing.
Now setting this aside as a model of how to write thoughtfully on the topic, and a stop at solidcrew extended that model status, content that becomes a reference for how a kind of writing should be done is content with influence beyond its own readership and this site is reaching that level for me clearly today.
https://fineart.sk/cache/permission/1xbet_promo_code_for_free_bonus.html
mostbet platební metody cz [url=https://mostbet41862.help/]https://mostbet41862.help/[/url]
mostbet android uchun rasmiy sayt [url=https://www.mostbet56934.help]https://www.mostbet56934.help[/url]
1win sənəd təsdiqi necə olur [url=1win07453.help]1win sənəd təsdiqi necə olur[/url]
The depth of coverage felt about right for the format, neither shallow nor overwhelming, and a look at webboot kept that calibration going, getting the depth right for blog format is genuinely difficult because too shallow loses experts and too deep loses beginners but this site nailed it nicely which I really do appreciate.
A particular pleasure to read this with a fresh coffee, and a look at bloomhold extended the pleasure across more pages, content that pairs well with quiet morning rituals is something I have come to value highly and this site has the kind of energy that fits naturally into a calm reading routine.
Now feeling the rare pleasure of trusting a source completely on first encounter, and a look at seocart extended that initial trust into something more durable, the calibration of trust to evidence is something I do informally and this site has earned high trust through the cumulative weight of multiple consistently good posts already.
Closed the laptop and walked away thinking about the post for a good twenty minutes, and a stop at megreef produced similar lingering thoughts, content that survives the closing of the browser tab is content that has actually entered the mind rather than just decorating the screen for the duration of the reading.
casino malaysia [url=https://100cuci-7.com]casino malaysia[/url]
Stands out for actually being useful instead of just being long, and a look at axislume kept that going, length without value is the default mode of most blogs these days but this site has clearly chosen a different path which I respect a lot as a reader who values careful editing decisions like that.
Reading this in the gap between work projects was a small but meaningful break, and a stop at fastpickzone extended that gentle reset, content that provides genuine refreshment rather than just distraction during work breaks is content with a particular kind of utility and this site fits that role for me reliably during work days.
free kredit malaysia [url=http://100cuci-10.com]free kredit malaysia[/url]
имулиз
Glad I gave this a chance rather than scrolling past, and a stop at sagejump confirmed I made the right call, sometimes the best content is hidden behind unassuming headlines that do not scream for attention and learning to slow down and check those out has paid off many times now across years of reading.
Felt the post had been quietly polished rather than aggressively styled, and a look at premiumcartzone confirmed the same understated polish, sites whose quality reveals itself slowly rather than announcing itself loudly are the kind I trust more deeply because the trust is not based on first impressions of marketing but actual substance.
наркологическая помощь на дому [url=https://narkolog-na-dom-voronezh-13.ru]наркологическая помощь на дому[/url]
https://hegyvideksport.hu/pags/?22bet_promo_code_bonus.html
петербург туризм [url=piter-na-teplohode.ru]piter-na-teplohode.ru[/url]
Genuine reaction is that I will probably think about this on and off for a few days, and a look at mysticbaygoods added fuel to that, the best content lingers in your head after you close the tab rather than evaporating immediately and this site clearly knows how to write that kind of memorable content.
Worth marking this site as one to come back to deliberately rather than by accident, and a stop at globaltrendhub reinforced that intention, the difference between sites I find again by chance and sites I return to on purpose is meaningful and this one has clearly moved into the deliberate return category for me.
mostbet официальный сайт вход [url=http://mostbet20581.help/]mostbet официальный сайт вход[/url]
Worth saying that this is one of the better things I have read on the topic in months, and a stop at emberpin reinforced that ranking, the topic is well covered by many sources but few do it with this level of care and the few that do deserve to be flagged so other readers can find them.
Reading this brought back an idea I had set aside months ago, and a stop at glowware added more substance to that idea, content that revives dormant projects in my own thinking is content with serious creative value and this site is contributing to my own work in ways I had not expected when first clicking through.
Материал о фильтрах для воды: кувшинах, проточных системах, обратном осмосе и магистральных решениях. Разбираются задачи очистки, ресурс картриджей, давление, качество исходной воды и ошибки выбора, из-за которых фильтр не решает проблему или требует слишком частого обслуживания https://santexnik-market.ru/voda-i-vodoochistka/filtry-dlya-vody-polnoe-rukovodstvo-po-vyboru-i-ispolzovaniyu/
Worth every minute of the time spent reading, and a stop at macrobase extends that value across more pages, in a media environment where most content is engineered to waste attention this site stands out by treating reader time as something valuable rather than something to be exploited and stretched as far as possible.
Most of the time I bounce off similar pages within seconds, and a stop at sparkbit held me longer than I would have predicted, the ability to convert a likely bouncing visitor into an engaged reader is a quality signal and this site has demonstrated that conversion ability across multiple visits where I expected to bounce.
Now adding a small note in my reading log that this site is one to watch, and a look at urbanpetalmarket reinforced the watch status, the few sites I track deliberately rather than encounter accidentally are sites I expect ongoing returns from and this one has cleared the bar for that elevated tracking based on what I read.
на сайте компании Автовоз
Definitely returning here, that is decided, and a look at dreamwovenbazaar only made the case stronger, this is one of those rare websites that rewards regular visits rather than feeling stale after the first read which is something I cannot say about most of the places I bookmark today across all my topics.
A piece that left me thinking I had been undercaring about the topic, and a look at simplebasket reinforced that mild concern, content that raises the appropriate weight of a subject without being preachy about it is doing important work and this site is providing that gentle elevation of attention for me consistently.
I really like the calm tone here, it does not push anything on the reader, and after I went through nodecard I felt the same way, just steady useful content laid out without drama, which is exactly what someone trying to learn something quickly needs to find rather than aggressive marketing.
https://runcam.com/fonts/articles/paripesa_promo_code.html
The overall feel of the post was professional without being stuffy, and a look at widedock kept that approachable expertise going, finding the right register for technical content is hard but this site has clearly figured out how to sound knowledgeable without slipping into that distant lecturing tone that loses readers in droves every time.
Recommended without hesitation if you care about careful coverage of this topic, and a stop at fasttrendcorner reinforced the recommendation, the bar I set for unhesitating recommendations is fairly high and this site has cleared it through the cumulative weight of multiple consistently good pieces rather than through any single standout post which is meaningful.
Reading this prompted a small redirection in something I was working on, and a stop at cloudpetalcollective extended that redirecting influence, content that affects my actual work rather than just my thinking has the highest practical impact and this site is providing that level of influence for me at a sustainable rate apparently.
1win site Azərbaycan [url=http://1win07453.help]1win site Azərbaycan[/url]
mostbet click ishlamayapti [url=http://mostbet56934.help/]mostbet click ishlamayapti[/url]
Reading this with a fresh mind in the morning brought out details I might have missed in the afternoon, and a stop at bitvent earned the same fresh attention, content that rewards being read at full attention rather than at energy lows is content with real density and this site has that density consistently.
Now sitting back and recognising that this was a small but real win in my reading day, and a stop at boldswap extended that quiet win, the cumulative effect of small reading wins versus the cumulative effect of small reading losses is real over time and this site is contributing to the wins side of that ledger.
Быстрая профессиональная монтаж видеонаблюдения для квартир, домов, офисов и коммерческих объектов. Проектирование, монтаж и настройка систем безопасности, удалённый доступ, запись видео и контроль в реальном времени. Надёжные решения для защиты имущества и контроля территории.
mostbet promo kód na webu [url=www.mostbet41862.help]mostbet promo kód na webu[/url]
Судебная защита Если ваш бизнес нуждается в сильной правовой поддержке, я предлагаю профессиональное юридическое сопровождение бизнеса и экспертное сопровождение тендеров в Алматы. Вы получите квалифицированную консультацию юриста по всем вопросам коммерческого права и надежную защиту активов. Заключите договор на юридические услуги экспертного уровня.
Now placing this in the same category as a few other sites I have come to trust, and a look at wildpathmarket continued the placement decision, the small category of fully trusted sites is one I extend rarely and only after multiple positive reading sessions and this site has earned the category placement methodically over time.
mostbet sign in [url=www.mostbet56934.help]www.mostbet56934.help[/url]
1win lucky jet balans [url=http://1win07453.help]http://1win07453.help[/url]
https://hilord.com/wp-content/pages/1xbet_promo_code_free_bet_bonus_for_today.html
Сопровождение тендеров Алматы Профессиональные юридические услуги в Алматы для граждан и бизнеса от опытного адвоката. Обеспечу надежное сопровождение тендеров, досудебное урегулирование споров и эффективное представительство в суде. Получите квалифицированную консультацию юриста и гарантированную судебную защиту на любой стадии дела.
I really like how the writer keeps the tone friendly without sounding fake or overly polished, and after a stop at sparkcard the same calm pace was there, no rushing to make a point and no padding either, just clean honest writing that I can respect and come back to later again.
A piece that left me thinking I had been undercaring about the topic, and a look at smartparcel reinforced that mild concern, content that raises the appropriate weight of a subject without being preachy about it is doing important work and this site is providing that gentle elevation of attention for me consistently.
Reading the writers other posts after this one suggests the quality is consistent rather than peak, and a stop at fizzlane confirmed the consistent quality reading, sites that hold the same level across many pieces rather than peaking on a few are sites with sustainable editorial discipline and this one has clearly developed that.
mostbet limity výběru [url=mostbet41862.help]mostbet41862.help[/url]
A particular pleasure to read this with a fresh coffee, and a look at noderod extended the pleasure across more pages, content that pairs well with quiet morning rituals is something I have come to value highly and this site has the kind of energy that fits naturally into a calm reading routine.
Recommended without hesitation if you care about careful coverage of this topic, and a stop at macrocard reinforced the recommendation, the bar I set for unhesitating recommendations is fairly high and this site has cleared it through the cumulative weight of multiple consistently good pieces rather than through any single standout post which is meaningful.
Now realising the post solved a small problem I had been carrying for weeks, and a look at driftspiregoods extended that problem solving function, content that connects to specific unresolved questions in my own life rather than just providing general interest is content with real practical impact and this site is providing that practical value.
заказ кухни [url=https://kuhni-spb-61.ru]заказ кухни[/url]
Анкоры для ссылок
мелстрой гейм Mellstroy game
Grateful for posts like this one, they remind me there are still places online run by people who care about quality, and a look at urbanpinebazaar reflected the same standards, you can tell the difference between content made for readers and content made just for search engines today and this is the former.
заказать кухню по индивидуальным размерам в спб [url=https://kuhni-spb-59.ru]заказать кухню по индивидуальным размерам в спб[/url]
заказать кухню с установкой [url=https://zakazat-kuhnyu-20.ru]https://zakazat-kuhnyu-20.ru[/url]
However many similar pages I have read this one taught me something new, and a stop at zesttrack added more new material, content that contributes genuinely fresh information rather than recycling what is already widely available is content with real informational value and this site is providing that informational freshness at a notable rate.
22bet букмекерская контора [url=https://turforum.borda.ru/?1-8-0-00004682-000-0-0-1778248404]22bet букмекерская контора[/url]
Most of the time I feel the open web is in decline and then I find a site like this, and a stop at ohmpanel reinforced that mood lift, the cumulative effect of finding occasional excellent independent content versus the cumulative effect of finding mostly mediocre content is real for the long term reader maintaining web habits today.
Decided not to skim despite my usual habit and was rewarded for the discipline, and a stop at wideswap earned the same patient approach, training myself to recognise sites that warrant slower reading is part of being a careful online reader and this site is the kind that helps me practice that skill regularly.
Speaking from the perspective of a fairly demanding reader the writing here clears the bar consistently, and a look at smartdealhouse continued clearing that bar, the calibration of demanding reader is something I apply to all sources and this site has been one of the few that handles the demanding reading well across pieces sampled.
During a reading session that included several other sources this one stood out, and a look at fasttrendhub continued the standout quality, the side by side comparison of sources during research is a useful exercise and this site has been winning those comparisons for me consistently across multiple research sessions during the last week.
A clean piece that knew exactly what it wanted to say and said it, and a look at premiumdealcorner maintained the same clarity of intention, knowing the goal of a piece before writing is something most blog content lacks and the clarity of purpose here shows up in every paragraph for any careful reader to notice.
Now placing this in the same category as a few other sites I have come to trust, and a look at mysticbaystore continued the placement decision, the small category of fully trusted sites is one I extend rarely and only after multiple positive reading sessions and this site has earned the category placement methodically over time.
Appreciate how nothing here feels copied or pieced together from other places, the voice is consistent and the tone stays human, and after I checked discoverbettervalue I noticed the same style holds, which is a small detail but it makes the whole experience feel personal rather than like another generic site.
The examples really helped me grasp the points faster than abstract descriptions would have, and a stop at startfreshnow added a few more practical illustrations that drove the message home, the kind of writing that knows its readers learn better through concrete situations rather than vague generalities is rare and worth recognising clearly.
mostbet Киргизия [url=mostbet20581.help]mostbet Киргизия[/url]
https://blotos.ru//wp-content/news/promokod-1xbet-bonus-100.html
A small thank you note from me to the team behind this work, the post earned it, and a stop at globalfashionworld suggested more thanks would be in order over time, recognising the people who do good writing online is something I try to remember to do because the alternative is silence and silence rewards mediocrity unfortunately.
A piece that earned its conclusions through the body rather than asserting them at the end, and a look at northernskycollections maintained the same earned quality, conclusions that follow from what came before are more persuasive than declarations and this site has clearly internalised that principle in how it constructs arguments throughout pieces.
Really thankful for posts that respect a reader’s time, this one does, and a quick look at findgreatoffers was the same, no need to scroll through endless intros just to get to the actual content, that approach alone is enough reason to come back here regularly for the kind of writing offered.
остеклить веранду подольск Если вам требуется остеклить террасу в Подольске, Чехове или Серпухове, наши специалисты готовы предложить лучшие решения.
Reading this prompted me to send the link to two different people for two different reasons, and a stop at supershelf provided ammunition for a third share, content that suits multiple audiences without being generic enough to be useless to any of them is genuinely valuable and this site has that multi audience quality clearly.
Going to come back when I have more time to read carefully, the post deserves more than a quick scan, and a stop at sparkswap reinforced that, this is the kind of site that rewards a slower read which is hard to find in this fast paced corner of the internet but really worthwhile.
100cuci slot [url=https://100cuci-7.com]100cuci slot[/url]
Stayed longer than planned because each section earned the next, and a look at pureharbortrends kept that pulling effect going across more pages, the kind of subtle pull that good writing exerts on attention is something I find harder and harder to resist when I encounter it on the open web today.
Found this useful, the points line up well with what I have been thinking about lately, and a stop at blipfork added some angles I had not considered yet, definitely walking away with more than I came for which is the best outcome from time spent reading online for any kind of topic.
Skipped the social share buttons but might come back to actually use one later, and a stop at octajet extended that share urge, content that triggers genuine sharing impulses rather than performative ones is content that has actually moved me and not many posts in a typical week do that for me actually.
melbet минимальный депозит [url=https://melbet85713.help/]https://melbet85713.help/[/url]
Reading this on a slow Sunday and finding it perfectly suited to a slow Sunday read, and a quick stop at macropipe kept the same gentle pace, content that fits the mood of the moment is something I notice and remember and this site has the kind of pace that suits relaxed reading sessions especially well.
Now placing this in the same category as a few other sites I have come to trust, and a look at driftwoodvalleygoods continued the placement decision, the small category of fully trusted sites is one I extend rarely and only after multiple positive reading sessions and this site has earned the category placement methodically over time.
Now setting this aside as a model of how to write thoughtfully on the topic, and a stop at fizzstep extended that model status, content that becomes a reference for how a kind of writing should be done is content with influence beyond its own readership and this site is reaching that level for me clearly today.
рулонные жалюзи на окна цена [url=https://rulonnye-shtory-s-elektroprivodom10.ru]https://rulonnye-shtory-s-elektroprivodom10.ru[/url]
apartments in phuket for sale [url=www.apartments-for-sale-in-phuket-5.com]apartments in phuket for sale[/url]
Now adding this site to a small mental group of recommendations I keep ready for specific kinds of inquiries, and a stop at boltdepot extended the recommendation readiness, content that I can confidently point friends and colleagues toward in specific contexts is content with real social utility and this site has that utility clearly.
mostbet jak działa kupon systemowy [url=http://mostbet82175.help/]http://mostbet82175.help/[/url]
mostbet Azərbaycan üçün apk [url=https://mostbet68324.help]https://mostbet68324.help[/url]
no deposit bonus malaysia [url=https://100cuci-10.com]no deposit bonus malaysia[/url]
Looking at this objectively the editorial quality is hard to deny even setting aside personal taste, and a stop at woolperk maintained the same objective quality, the gap between what I personally enjoy and what is objectively well crafted exists and this site clears both bars simultaneously which is rarer than it sounds.
Excellent post, balanced and well organised without showing off, and a stop at ohmsensor continued in that same vein, this site has clearly figured out the formula for content that works for readers rather than for search engine ranking signals which is harder than it sounds today and worth real recognition from anyone.
Comfortable in tone and substantive in content, that is a hard combination to land, and a look at dailyvaluecorner kept that pairing alive across more material, this is what good editorial direction looks like in practice and the team here clearly has someone keeping a steady hand on the wheel across what they decide to publish.
Really like that the writer trusts the reader to follow simple logic without restating every previous point, and a stop at fasttrendstation kept that respect going, treating an audience as capable adults rather than as people who need constant hand holding makes a noticeable difference in the reading experience for me.
Liked that the post acknowledged complications rather than pretending they did not exist, and a stop at simplefashionmarket continued that honest framing, sites that handle complexity with care rather than papering it over with simplifying claims are doing real intellectual work and this one is clearly in that category based on what I have read.
Came in confused about the topic and left with a much firmer grasp on it, and after trustcorner I felt I could explain this to someone else without hesitation, that is the gold standard for any educational content and most sites simply fail to reach it ever which is unfortunate but true.
Recommended without reservation for anyone interested in the topic at any level of expertise, and a look at findyourtruepath only strengthens that recommendation, this site clearly knows how to serve readers across a range of backgrounds without watering down the content or talking past anyone in the audience which is genuinely impressive to see.
Now adding a small note in my reading log that this site is one to watch, and a look at smartpickcorner reinforced the watch status, the few sites I track deliberately rather than encounter accidentally are sites I expect ongoing returns from and this one has cleared the bar for that elevated tracking based on what I read.
The overall feel of the post was professional without being stuffy, and a look at yourstylestore kept that approachable expertise going, finding the right register for technical content is hard but this site has clearly figured out how to sound knowledgeable without slipping into that distant lecturing tone that loses readers in droves every time.
A piece that respected the reader by not over explaining the obvious, and a look at discoverandbuyhub continued that calibrated approach, finding the right level of explanation is one of the harder editorial calls and this site has clearly thought carefully about what readers will already know versus what they need help with consistently.
Felt energised after reading rather than drained, which is unusual for online content these days, and a look at urbanridgecollective continued that good feeling, content that leaves you better than it found you is rare and worth bookmarking when you stumble across it for the first time today or any other day really.
Reading this with a fresh mind in the morning brought out details I might have missed in the afternoon, and a stop at octamesh earned the same fresh attention, content that rewards being read at full attention rather than at energy lows is content with real density and this site has that density consistently.
вызов наркологической помощи [url=https://narkolog-na-dom-voronezh-13.ru]https://narkolog-na-dom-voronezh-13.ru[/url]
Took a few notes from this post, the points are easy to remember without needing to come back and check, and a look at zestwin added a couple more, the kind of place that sticks in the memory long after the browser tab has been closed for the day which says a lot really.
aviator mostbet aplikace [url=https://www.mostbet41862.help]aviator mostbet aplikace[/url]
Reading this triggered a small but real correction in something I had assumed, and a stop at duskharborstore extended that corrective effect, content that updates my beliefs through evidence rather than rhetoric is content with intellectual integrity and this site has earned that label consistently across the pieces I have read so far today.
Decided to read this site for a while before forming a verdict, and the verdict after several pages is positive, and a stop at fizzwave continued that pattern, judging a site requires more than one post and giving sites a fair sample is something I try to do for promising candidates rather than rushing to dismiss.
Picked this up while looking for something else and ended up reading every paragraph because it was actually informative, and after trustparcel I was sure I would come back, that does not happen often when most sites bury the useful parts under endless ads and pop ups today and across most categories online.
Now setting this aside as a model of how to write thoughtfully on the topic, and a stop at zendock extended that model status, content that becomes a reference for how a kind of writing should be done is content with influence beyond its own readership and this site is reaching that level for me clearly today.
Now recognising the editorial wisdom of letting some questions remain open at the end, and a look at mysticfieldmarket continued that intellectual honesty, content that does not force closure on contested questions is content that respects the limits of knowledge and this site has clearly developed the maturity to know when to leave space.
Speaking carefully because I do not want to overstate things this site is genuinely above average across multiple measurements, and a stop at creativegiftmarket continued the above average performance, the calibration of judgement against potential overstatement is something I take seriously and this site clears the higher bar even after that calibration applies.
Closed the laptop after this and let the ideas settle for a few hours, and a stop at ohmvault similarly rewarded reflective time, content that benefits from sitting with rather than racing past is the kind I want more of and the kind that this site appears to consistently produce week after week here.
Skipped past the first paragraph thinking it was setup and had to come back when the rest referenced it, and a stop at cloudpetalmarket similarly rewarded careful reading from the start, content where every paragraph carries weight is content I now know to read from the beginning rather than skipping ahead.
Closed the tab feeling I had spent the time well, and a stop at premiumdealzone extended that feeling across more pages, the test of whether time on a site was well spent is one I apply silently after closing tabs and very few sites pass it but this one passed it cleanly today afternoon clearly.
Продажа и установка камеры видеонаблюдения купить. Современные системы безопасности для квартир, домов, магазинов и складов. Настройка удалённого доступа, запись видео и круглосуточный контроль объекта.
Worth observing that the post landed without needing a flashy headline to hook attention, and a stop at shopwithjoy did the same, content that earns engagement through substance rather than packaging is the kind I trust more deeply and this site has clearly chosen substance as the primary lever for reader engagement throughout.
Now feeling mildly impressed in a way I do not quite remember feeling about a blog in a while, and a stop at earthstoneboutique extended that mild impression, content that produces specific positive emotional responses rather than just neutral information transfer is content with extra dimensions and this site has those extra dimensions clearly.
Быстрая профессиональная монтаж видеонаблюдения в калининграде для квартир, домов, офисов и коммерческих объектов. Проектирование, монтаж и настройка систем безопасности, удалённый доступ, запись видео и контроль в реальном времени. Надёжные решения для защиты имущества и контроля территории.
Just want to record that this site is entering my regular reading list, and a look at oakwhisperstore confirmed it deserves the spot, my regular reading list is short and well curated and adding to it requires meeting a fairly high quality bar that this site has clearly cleared without much effort apparently.
Reading this triggered a small reorganisation of my own thinking on the topic, and a stop at findyourstylehub furthered that reorganisation, content that affects the shape of my mental model rather than just decorating it with new facts is content with structural rather than informational impact and this site provides that.
Started forming counter examples to test the claims and the post handled most of them implicitly, and a look at octasign continued that anticipatory style, writers who think two steps ahead of the critical reader save themselves from a lot of follow up work and this writer has clearly internalised that habit consistently.
Honest reaction is that this is the kind of writing I would defend in a conversation about good blog content, and a look at discoveramazingdeals reinforced that, the rare site whose work I would actively recommend rather than just tolerate is the kind I want to support through return visits regularly.
Skimmed first and then went back to read carefully, and the careful read paid off in places I had missed, and a stop at boltport got the same treatment, the rare site whose content rewards a second pass is content I want more of in my regular rotation rather than disposable single read articles.
mostbet zakłady na nfl [url=https://mostbet82175.help]mostbet zakłady na nfl[/url]
Found the section structure particularly thoughtful, and a stop at smarttrendarena suggested the same care across the broader site, structural choices guide the reader through the material in ways most people do not consciously notice but feel the absence of when those choices are made carelessly or not at all.
mostbet aviator pl [url=https://mostbet82175.help/]mostbet aviator pl[/url]
During a reading session that included several other sources this one stood out, and a look at sprydash continued the standout quality, the side by side comparison of sources during research is a useful exercise and this site has been winning those comparisons for me consistently across multiple research sessions during the last week.
Reading this post made me realise I had been settling for lower quality elsewhere, and a look at duskpetalcorner extended that recalibration, content that exposes how much I had been accepting in adjacent sources is content with calibrating effect on my standards and this site is performing that calibration function across topics for me reliably.
Genuinely well crafted writing, the kind that makes the topic look easier than it actually is, and a look at webboosters added even more depth, you can feel the experience behind every line which is something only writers who have been at this for a while can pull off with this level of grace.
22bet регистрация [url=https://airlady.forum24.ru/?1-7-0-00006686-000-0-0]22bet регистрация[/url]
Врач уточняет продолжительность запоя, характер употребляемого алкоголя и наличие сопутствующих заболеваний. Детальное обследование позволяет оперативно подобрать необходимые медикаменты и минимизировать риск осложнений.
Получить больше информации – http://kapelnica-ot-zapoya-tyumen00.ru/postavit-kapelniczu-ot-zapoya-tyumen/https://kapelnica-ot-zapoya-tyumen00.ru
Reading this slowly because the writing rewards a slower pace, and a stop at flagsync did the same, the pace at which I read content is something I now use as a quality signal and writing that earns a slower pace earns my attention as a reader looking for substance these days.
Came across this through a roundabout path and now it is on my regular rotation, and a stop at creativefashioncorner sealed that decision, the open web still produces serendipitous discoveries when you let the citations and references guide you rather than relying purely on algorithmic feeds for new content recommendations always.
Found this through a search that was generic enough I did not expect quality results, and a look at velvetcovegoods continued the surprisingly good experience, search engines occasionally still surface excellent independent content if you scroll past the obvious paid and high authority results which is reassuring to remember sometimes.
Genuinely good work, the kind that holds up over multiple readings without losing its appeal, and a stop at bestdailyhub kept that going, definitely a site I will be returning to and probably mentioning to others who work in or care about this particular area of interest today and in coming weeks.
Reading this gave me a small jolt of recognition for an experience I thought was just mine, and a stop at shopthebestdeals produced more such jolts, content that universalises private experiences without flattening them is doing genuinely useful work and this site is providing that recognition function for me reliably across topics I read.
Reading this brought back an idea I had set aside months ago, and a stop at simplegiftfinder added more substance to that idea, content that revives dormant projects in my own thinking is content with serious creative value and this site is contributing to my own work in ways I had not expected when first clicking through.
Стационарный формат предполагает круглосуточное наблюдение, возможность экстренного вмешательства и доступ к диагностическим средствам. Это особенно важно при наличии хронических заболеваний, психозов или алкогольного делирия.
Выяснить больше – [url=https://vyvod-iz-zapoya-v-ryazani12.ru/]нарколог вывод из запоя рязань[/url]
Highly recommend to anyone looking for a sensible take on this topic without the usual marketing nonsense, and a look at olivepick kept that grounded approach going, sites that stay focused on serving readers rather than monetising every click are rare and this is clearly one of those rare ones I really appreciate finding.
However many similar pages I have read this one taught me something new, and a stop at oceancrestboutique added more new material, content that contributes genuinely fresh information rather than recycling what is already widely available is content with real informational value and this site is providing that informational freshness at a notable rate.
Refreshing to read something where the words actually mean something instead of filling space, and a stop at finduniqueproducts kept that going, the writing here trusts the reader to follow along without endless repetition or constant reminders of what was already said earlier in the post which I appreciate.
If I had encountered this site five years ago I would have been telling everyone about it, and a look at blurchip extended that retrospective enthusiasm, the version of me who used to recommend favourite blogs frequently would have made sure friends knew about this one and that earlier enthusiasm is partially returning to me here.
Over the course of reading several posts here a pattern of quality has emerged, and a stop at yourdailyvalue confirmed the pattern, the difference between sites that hit quality occasionally and sites that hit it consistently is huge and this site has clearly demonstrated the consistent kind through what I have read this morning.
Reading this site over the past week has changed how I evaluate content in this space, and a look at trustedshoppinghub extended that recalibration, the standards I bring to reading on the topic have shifted upward as a direct result of regular exposure to this kind of work and that shift will outlast any single reading session.
нарколог на дом воронеж [url=https://narkolog-na-dom-voronezh-12.ru]нарколог на дом воронеж[/url]
apartments in phuket for sale [url=https://apartments-for-sale-in-phuket-4.com]apartments in phuket for sale[/url]
Really appreciate the absence of stock photos that have nothing to do with the content, and a quick visit to sprygain maintained the same restraint, visual filler is a tell that the writing cannot stand on its own and the lack of it here suggests the team has confidence in their content quality alone.
Just want to say thank you for putting this together, posts like these make searching online actually worth it sometimes, and a quick look at cloudpetalstore kept that going, useful and easy to read without any of the tricks that ruin most blog comment sections lately on the wider open web.
Honest take is that this was better than I expected when I clicked through, and a look at octflag reinforced that, the bar for online content has dropped so much that finding something thoughtful and well constructed feels almost noteworthy now which says more about the average than about this site itself.
Just want to flag that this was useful and not bury the appreciation in caveats, and a look at bravoflow earned the same direct praise, recognising good work without hedging it with criticism is something I try to practice because over qualified compliments tend to read as backhanded and miss the point sometimes.
Closed the tab and immediately reopened it ten minutes later because I wanted to reread a part, and a stop at createimpactnow drew the same return, content that pulls you back after closing it is doing something well beyond the average and worth marking as exceptional in my mental catalogue of reliable sites.
Easily one of the better explanations I have read on the topic, and a stop at pureleafemporium pushed it even higher in my mental ranking of useful resources, the kind of site that beats the average not by trying harder but by simply caring more about what it puts out daily which always shows.
Found this really helpful, the explanations are simple but they actually answer the questions a normal reader would have, and after I followed bestdailyhub I had a clearer sense of the topic, no extra fluff just useful points laid out in a sensible order that made the time worth it.
Worth flagging that this approach to the topic is fresh without being contrarian, and a stop at leadcrest extended the same fresh angle, finding original perspective on familiar subjects is rare and this site has clearly developed its own way of seeing rather than echoing the dominant takes from elsewhere consistently.
Closed the post with a small satisfied sigh, and a stop at premiumflashhub produced the same gentle exhale, content that ends well is content that respects the rhythm of reading and the writers here have clearly thought about how their pieces close rather than just trailing off when they run out of things to say.
Most of the time I feel the open web is in decline and then I find a site like this, and a stop at modernvaluecollection reinforced that mood lift, the cumulative effect of finding occasional excellent independent content versus the cumulative effect of finding mostly mediocre content is real for the long term reader maintaining web habits today.
Reading this gave me material for a conversation I needed to have anyway, and a stop at flagtag added even more talking points, content that connects to upcoming social or professional needs rather than just being interesting in the abstract is the kind that earns priority placement in my attention these days routinely.
A clear cut above the usual noise on the subject, and a look at findamazingoffers only made that gap wider in my view, the kind of place that earns its visitors through quality rather than through aggressive marketing or sponsored placements which is increasingly the only way most sites stay afloat across the modern web.
I really like how the writer keeps the tone friendly without sounding fake or overly polished, and after a stop at onyxhold the same calm pace was there, no rushing to make a point and no padding either, just clean honest writing that I can respect and come back to later again.
мелбет crash стратегия [url=https://melbet85713.help]https://melbet85713.help[/url]
Definitely returning here, that is decided, and a look at smarttrendstore only made the case stronger, this is one of those rare websites that rewards regular visits rather than feeling stale after the first read which is something I cannot say about most of the places I bookmark today across all my topics.
Pass this along to colleagues if the topic comes up, the framing here is sensible, and a stop at nightfallmarketplace adds more useful angles to share, the kind of content that improves conversations rather than just feeding them is what makes a resource genuinely valuable in professional contexts going forward over time and across project boundaries too.
Skipped lunch to finish reading, which says something, and a stop at uniquegiftcollection kept me at my desk longer than planned, when content beats the lunch impulse the writer has done something genuinely impressive in an attention environment full of immediately satisfying alternatives competing for the same finite block of reader time.
Started reading skeptically because the headline seemed overconfident, and the post earned the headline by the end, and a look at boldlume continued that pattern of earning its claims, sites that can back up their headlines without overpromising are rare and this one has clearly developed editorial calibration on that front consistently.
Работа клиники строится на принципах доказательной медицины и индивидуального подхода. При поступлении пациента осуществляется всесторонняя диагностика, включающая анализы крови, оценку психического состояния и анамнез. По результатам разрабатывается персонализированный курс терапии.
Ознакомиться с деталями – [url=https://narkologicheskaya-klinika-v-ryazani12.ru/]наркологические клиники алкоголизм[/url]
Speaking from the perspective of a fairly demanding reader the writing here clears the bar consistently, and a look at spryshelf continued clearing that bar, the calibration of demanding reader is something I apply to all sources and this site has been one of the few that handles the demanding reading well across pieces sampled.
A satisfying piece in the way that good meals are satisfying rather than just filling, and a look at octpier extended that satisfaction, the metaphor between content and meals is one I find useful and this site reads as a satisfying meal rather than the empty calories that most content provides for casual readers.
Closed the tab feeling I had spent the time well, and a stop at velvetfieldmarket extended that feeling across more pages, the test of whether time on a site was well spent is one I apply silently after closing tabs and very few sites pass it but this one passed it cleanly today afternoon clearly.
нарколог на дом цена воронеж [url=https://narkolog-na-dom-voronezh-13.ru]нарколог на дом цена воронеж[/url]
Honest assessment after reading this twice is that it holds up under careful attention, and a look at buildyourfuturetoday extended that durability across more pages, content that survives a second read without revealing weak spots is rarer than the average reader probably realises and this site clearly cleared that bar.
Found the post genuinely useful for something I was working on this week, and a look at adtower added more material I will reference, content that connects to my actual life and work rather than just being interesting in the abstract is the kind I will pay attention to and return to repeatedly.
A piece that respected the reader by not over explaining the obvious, and a look at purefashionoutlet continued that calibrated approach, finding the right level of explanation is one of the harder editorial calls and this site has clearly thought carefully about what readers will already know versus what they need help with consistently.
If patience for careful reading is rare these days finding sites that reward it is rarer still, and a stop at happytrendstore extended that rare reward, the diminishing returns on shallow content reading have made me more selective about where to spend reading time and this site is meeting the higher selectivity bar consistently.
Honestly impressed, did not expect to find this level of care on the topic, and a stop at bestdailycorner cemented the impression, you can tell within the first few paragraphs whether a site is going to be worth the time and this one delivered on that early promise nicely throughout the rest of what I read.
mostbet ishchi mirror [url=www.mostbet56934.help]mostbet ishchi mirror[/url]
Now adjusting my expectations upward for the topic based on this post, and a stop at explorewithoutlimits continued that bar raising effect, content that resets what I think is possible on a subject is doing real work in shaping my standards and this site is providing those bar raising experiences at a notable rate during sessions.
Found this through a search that was generic enough I did not expect quality results, and a look at flagwave continued the surprisingly good experience, search engines occasionally still surface excellent independent content if you scroll past the obvious paid and high authority results which is reassuring to remember sometimes.
Going to come back when I have more time to read carefully, the post deserves more than a quick scan, and a stop at easyonlinepurchases reinforced that, this is the kind of site that rewards a slower read which is hard to find in this fast paced corner of the internet but really worthwhile.
A piece that respected the reader by not over explaining the obvious, and a look at onyxrack continued that calibrated approach, finding the right level of explanation is one of the harder editorial calls and this site has clearly thought carefully about what readers will already know versus what they need help with consistently.
On reflection this is the kind of writing that improves my taste for what is possible in the format, and a look at agilebox continued raising that bar, content that elevates my expectations rather than lowering them is doing important work in calibrating my standards and this site is participating in that elevation reliably.
Worth recognising that this site does not chase the daily news cycle, and a stop at smartchoicecorner confirmed the longer publication arc, sites that resist the pressure to comment on every passing event are sites with genuine editorial discipline and this one has clearly chosen depth over volume which I respect deeply.
Speaking from the perspective of a fairly demanding reader the writing here clears the bar consistently, and a look at swiftgain continued clearing that bar, the calibration of demanding reader is something I apply to all sources and this site has been one of the few that handles the demanding reading well across pieces sampled.
Walked away with a clearer head than I had before reading this, and a quick visit to ohmburst only sharpened that, the writing has a way of cutting through the noise that surrounds most topics online which is something I will definitely remember the next time I am searching for an answer to anything.
More original than the recycled takes I keep finding on the topic elsewhere, and a quick look at stylishbuycorner confirmed it, the kind of site that has its own voice rather than echoing whatever is trending which makes it stand out as a refreshing change from the usual rotation of generic content I see daily.
рулонные шторы жалюзи на окна [url=https://elektricheskie-rulonnye-shtory99.ru]https://elektricheskie-rulonnye-shtory99.ru[/url]
Unlock incredible rewards today with [url=https://true-fortune-casino.uk/]true fortune free 250 chip no deposit[/url] and maximize your winning potential at True Fortune Casino!
With its wide selection of games and secure platform, it appeals to a diverse audience.
The tone stayed consistent across the whole post which is harder than it looks for longer pieces, and a look at learnandexplore continued the same voice, this kind of editorial consistency is a sign of either a single careful writer or a tightly run team and either is impressive today across the broader media environment.
Worth pointing out the careful word choice in this post, no buzzwords and no jargon, and a look at buildconfidencehere continued that disciplined vocabulary, sites that resist the pull of trendy language are sites that will read well in five years and this one is clearly built for that kind of long durability.
Honestly this kind of writing is why I still bother to read independent sites, and a look at bosonlab extended that broader reflection, the few sites that justify continued attention to non algorithmic content are sites like this one and finding them periodically is enough to keep my reading habits oriented toward independent rather than aggregated content.
Pleasant surprise, the post delivered more than the headline promised, and a stop at modernlifestylecorner continued that pattern of under promising and over delivering, the rarest combination on the modern web where most content does the opposite by promising the world and delivering thin recycled summaries instead each time you click on something interesting.
Honestly impressed by how much useful content sits in such a small post, and a stop at premiumgoodsarena confirmed the rest of the site packs a similar punch, density without confusion is a hard balance to strike and this site has clearly cracked the code on it across many different topic areas covered.
Really like the way the post resists reaching for cliches that would have made it feel generic, and a quick visit to findyourwayforward kept that fresh feel going, original phrasing and unexpected metaphors are signs that the writer is actually thinking rather than just stitching together familiar phrases into the appearance of content.
Reading this gave me the rare experience of fully agreeing with all the conclusions, and a stop at wonderviewgoods continued that agreement pattern, content that aligns with my existing views without seeming designed to do so is just content that happens to be reasonable and this site reads as reasonable rather than ideological mostly.
Профессиональный вывод из запоя на дому в Луганске ЛНР организован по отлаженной схеме, которая включает несколько этапов, позволяющих обеспечить максимально безопасное и эффективное лечение.
Исследовать вопрос подробнее – https://kapelnica-ot-zapoya-lugansk-lnr0.ru/vyzvat-kapelniczu-ot-zapoya-lugansk-lnr/
If you want to easily calculate your potential winnings and understand the bets, use this [url=https://lucky-15-bet-calculator.uk/]bet 365 lucky 15[/url].
Since the Lucky 15 includes multiple bets, each selection’s result influences the overall payout.
Glad to have another reliable bookmark for this topic, and a look at exploreopportunityzone suggested several more pages I will be marking too, building a personal library of trustworthy resources is one of the actual rewards of careful browsing and this site is earning a place on my permanent shortlist for the topic.
Лечебные туры в Хуньчунь из Владивостока Лечебные туры в Китай из Владивостока
22bet ставки [url=https://airlady.forum24.ru/?1-7-0-00006686-000-0-0]22bet ставки[/url]
888satrz [url=https://888starzuzs.com/]888satrz[/url]. saytida qimor o‘yinlarining eng yangi va ishonchli versiyalarini topishingiz mumkin.
Internet foydalanuvchilari orasida 888starz uz katta mashhurlikka ega.
https://poderciudadano.com.ar/pages/kak_prevratity_balkon_v_uyutnyy_ugolok_dlya_otdyha_i_tvorchestva_sekrety_transformacii_ne.html
melbet двухфакторная аутентификация [url=http://melbet85713.help/]melbet двухфакторная аутентификация[/url]
Worth your time, that is the simplest endorsement I can give, and a stop at flickreef extends that endorsement across the rest of the site, this is one of those increasingly rare places that delivers on what it promises rather than over selling the content and under delivering on substance every time which I find frustrating elsewhere.
Honestly impressed, did not expect to find this level of care on the topic, and a stop at mysticpetalgoods cemented the impression, you can tell within the first few paragraphs whether a site is going to be worth the time and this one delivered on that early promise nicely throughout the rest of what I read.
https://ssofitel.ru/brands/dermagenetic/
Granted I am giving this site more credit than I usually give new finds, and a look at dynamictrendcorner continued earning that credit, the calibration of how much trust to extend after limited exposure is something I do carefully and this site has earned more trust on shorter exposure than most due to consistent quality across.
If patience for careful reading is rare these days finding sites that reward it is rarer still, and a stop at orbitbase extended that rare reward, the diminishing returns on shallow content reading have made me more selective about where to spend reading time and this site is meeting the higher selectivity bar consistently.
Thanks for a post that does not try to be funny when it is not the moment for it, and a stop at synaplab maintained the same appropriate seriousness, knowing when humour helps and when it just signals desperation for engagement is a sign of editorial maturity that many blogs have not developed yet.
Solid recommendation from me to anyone working in the area, the perspective here is grounded, and a look at ohmlab adds even more useful angles, the kind of site that becomes a reference rather than just a one time read which is a higher bar than most blogs ever reach today on the modern web.
https://teletype.in/@alex22814/xLyrETZoJo3
https://teletype.in/@papadoma2/FNLusw_4ewo
A piece that took its time without dragging, and a look at simplebuyzone kept the same patient pace, the difference between unhurried and slow is a fine editorial distinction and this site has clearly found the unhurried side without slipping into the slow side which would have lost me as a reader quickly otherwise.
https://teletype.in/@alexdarkstalker99/95wou5i0pwd
Got something practical out of this that I can apply later this week, and a stop at brightvaluecorner added more details to think about, this is exactly the kind of content I bookmark for future reference rather than the throwaway listicles that dominate most search results these days for almost any common topic.
https://t.me/s/cactus_official_site_casino
Taking the time to read carefully here has been worthwhile for the past hour, and a look at swiftgoodszone extended the worthwhile reading, the calculation of return on reading time spent is something I do informally and this site has been producing positive returns across multiple sessions during the last week of regular visits and reads.
Big thanks to whoever wrote this, you saved me a lot of time hunting for the same info on other sites, and a stop at happylivingoutlet only added more useful detail without going off topic, that kind of focus is honestly hard to come across these days when most posts wander everywhere.
Honestly this kind of writing is why I still bother to read independent sites, and a look at finduniqueoffers extended that broader reflection, the few sites that justify continued attention to non algorithmic content are sites like this one and finding them periodically is enough to keep my reading habits oriented toward independent rather than aggregated content.
Остекление веранд Серпухов пвх окна протвино
Picked up something useful for a side project, and a look at arcscout added another piece I will incorporate, content that connects to specific projects I am working on is content with practical utility and the practical utility of this site is showing up across multiple posts I have read in the last hour or so.
Таможенное оформление для юридических лиц в Москве и Московской области. СБ Карго – официальный таможенный представитель: подготовка документов, расчёт платежей, сопровождение импорта и экспорта, помощь в прохождении таможенных процедур без лишних рисков и задержек. Консультации для участников ВЭД: таможенное оформление грузов
нарколог на дом цена [url=https://narkolog-na-dom-voronezh-12.ru]нарколог на дом цена[/url]
аксессуары для коллекционеров серебряные монеты
вагонка из кедра для потолка
фск директор
A piece that read smoothly because the writer understood how readers actually move through prose, and a look at bettershoppinghub maintained the same reader awareness, writers who think about the reading experience as much as the writing experience produce better work and this site has clearly made that shift in editorial approach.
Bookmark folder reorganised slightly to make this site easier to find, and a look at everydayvaluezone earned the same accessibility upgrade, the small organisational moves I make for sites I expect to return to often are themselves a signal of how much I trust them and this site triggered those moves naturally.
Just one of those reads that left me feeling slightly more capable rather than overwhelmed, and a look at wildshoreworkshop kept that empowering feel going, the difference between content that builds the reader up and content that intimidates them is huge and this site clearly knows which side of that line to stand.
Skimmed first and then went back to read carefully, and the careful read paid off in places I had missed, and a stop at buzzlane got the same treatment, the rare site whose content rewards a second pass is content I want more of in my regular rotation rather than disposable single read articles.
Reading this slowly because the writing rewards a slower pace, and a stop at onyxlink did the same, the pace at which I read content is something I now use as a quality signal and writing that earns a slower pace earns my attention as a reader looking for substance these days.
Reading this gave me a quiet moment of intellectual pleasure that I had not been expecting, and a stop at teraware extended that pleasure across more pages, the unexpected reward of stumbling into careful writing is one of the small ongoing pleasures of reading the open web and this site is delivering it reliably.
Started taking notes about halfway through because the points were stacking up, and a look at gigaaxis added enough material that my notes file grew further, content that demands note taking from a passive reader is content with substance and the writers here are clearly producing that kind of work consistently across topics.
phuket condos for sale [url=https://apartments-for-sale-in-phuket-4.com]phuket condos for sale[/url]
Now noticing the careful balance the post struck between confidence and humility, and a stop at orbitfind maintained the same balance, finding the line between asserting and admitting is hard and this site has clearly developed the calibration to walk that line consistently which produces a more persuasive reading experience for me.
Reading this in a quiet coffee shop matched the calm energy of the writing, and a stop at modernstyleoutlet extended that environmental match, content that has its own ambient quality which can match or clash with surroundings is content with a personality and this site has the kind of personality that suits calm reading.
https://teletype.in/@alex22814/xLyrETZoJo3
Thanks for the practical examples scattered through the post rather than abstract theory only, and a look at bestchoicehub continued that grounded style, abstract points are easier to remember when paired with concrete situations and the writers here clearly understand how readers actually retain information from blog content reading sessions.
Started reading expecting to disagree and ended mostly nodding along, and a look at honestgrovegoods continued the pattern, content that wins agreement through evidence and reasoning rather than rhetorical force is the kind that actually shifts minds and this site clearly knows how to do that across what I have read so far.
Liked the way the post got out of its own way, and a stop at modernlifestylecorner extended that invisible craft, the best writing you barely notice while reading because it is doing its work without drawing attention to itself and this site has clearly mastered that disappearing act across the pieces I have read.
Felt mildly happier after reading, which sounds silly but is true, and a look at happylivingmarket extended that small mood lift, content that improves rather than degrades my mental state is content I want more of and the cumulative effect of reading sites that lift versus sites that drag is real over time.
Decided this was the best thing I had read all morning, and a stop at swiftpickmarket kept that ranking intact, ranking my reading is something I do mentally throughout the day and the top rank is competitive and not easily won but this site won it without needing to overstate its claims for that.
Took a quick scan first and then went back to read properly because the post deserved it, and a stop at dynamictrendhub kept me reading carefully too, the kind of writing that earns a slower second pass rather than getting skimmed and forgotten is something I value highly when I happen to find it.
aviator game aviator [url=https://aviator68130.help/]https://aviator68130.help/[/url]
Really like the way the post resists reaching for cliches that would have made it feel generic, and a quick visit to everydaytrendstore kept that fresh feel going, original phrasing and unexpected metaphors are signs that the writer is actually thinking rather than just stitching together familiar phrases into the appearance of content.
Honestly the simplicity of the explanation made the topic click for me in a way other writeups had not, and a look at mysticridgegoods continued that clarity into related areas, when a writer gets the level of explanation right the reader does the heavy lifting themselves and the post just enables it.
Took some notes for a project I am working on, and a stop at wildcrestcorner added more raw material to those notes, content that contributes to my own creative work rather than just being interesting in the moment is the kind I value most and the kind I will keep coming back to repeatedly.
капельница от запоя клиника [url=https://kapelnicza-ot-pokhmelya-samara-23.ru]https://kapelnicza-ot-pokhmelya-samara-23.ru[/url]
Now considering carefully how to share this site with the right audience rather than broadcasting widely, and a look at orbdust extended that careful sharing impulse, content worth sharing carefully rather than spamming is content that has earned a higher kind of recommendation and this site has earned that careful shareability throughout pieces.
Liked the way the post balanced confidence and humility, and a stop at arctools maintained the same balance, knowing when to assert and when to acknowledge uncertainty is a sign of mature thinking and the writers here have clearly developed that calibration through what I assume is years of careful work on their craft.
Заправка кондиционеров в Энгельсе Заправка кондиционеров в Энгельсе
However selective I am about new bookmarks this one made it past my filter, and a look at buzzrod confirmed the bookmark was worth the slot, the precious slots in my permanent bookmark folder are difficult to earn and this site earned one without making me think twice about whether the slot was justified by the quality.
tez888 tez888
Better signal to noise ratio than most places I check on this kind of topic, and a look at orbitway kept that going, every paragraph here carries something worth reading rather than padding out the page to hit some arbitrary length target that search engines reward but readers ignore as soon as they notice it.
Took the time to read the comments on this post too and they were also worth reading, and a stop at yourtimeisnow suggested the community quality matches the content quality, when the conversation around a piece is as good as the piece itself you know you have found a real corner of the internet.
Worth saying that the post fit naturally into a rhythm of careful reading, and a stop at freshtrendcollection extended the same rhythm, content that pairs well with how I actually read rather than demanding a different mode is content well calibrated to its likely audience and this site has clearly thought about that consistently.
Generally I find the content on similar topics frustrating in specific ways and this post avoided all of them, and a look at findpurposeandpeace continued that frustration free experience, content that sidesteps the standard failure modes of its genre is content with editorial awareness and this site has clearly studied what fails elsewhere consistently.
Reading this on the train into work was a better use of the commute than my usual choices, and a stop at freshpurchasehub extended that commute reading well, content that improves transit time rather than just filling it is content with practical benefit and this site has earned its place in my morning commute reading rotation.
Bookmark earned and shared the link with one specific person who would care, and a look at blueharborcorner got the same targeted share, sharing carefully rather than broadcasting is a discipline I try to maintain and this site is generating shares from me at a sustainable rate rather than the spam rate of viral content.
Generally I find the content on similar topics frustrating in specific ways and this post avoided all of them, and a look at creativegiftoutlet continued that frustration free experience, content that sidesteps the standard failure modes of its genre is content with editorial awareness and this site has clearly studied what fails elsewhere consistently.
A genuinely unexpected highlight of my reading week, and a look at freshvalueplace extended that pattern, the surprise of finding excellent content rather than the predictable mediocre is one of the few real pleasures of casual web browsing and this site delivered that surprise cleanly today which I really do appreciate.
Over the course of reading several posts here a pattern of quality has emerged, and a stop at happyhomecorner confirmed the pattern, the difference between sites that hit quality occasionally and sites that hit it consistently is huge and this site has clearly demonstrated the consistent kind through what I have read this morning.
девушки ДНР ТГ Знакомства ЛНР
100cuci no deposit [url=https://100cuci-7.com]100cuci no deposit[/url]
готовые рулонные шторы цена [url=https://elektricheskie-rulonnye-shtory99.ru]https://elektricheskie-rulonnye-shtory99.ru[/url]
A piece that prompted a small mental rearrangement of how I order related ideas, and a look at orbitport extended that rearranging effect, content that affects the structure of my thinking rather than just adding to it is content with the deepest kind of impact and this site is reaching that depth for me today.
Started a draft response in my head and ended without publishing it because the post said it well enough, and a look at fashionchoicehub produced the same effect, content that satisfies my urge to add to it by being complete enough on its own is rare and represents a particular kind of editorial completeness here.
Without overstating it this is a quietly excellent post, and a look at discovernewproducts extended that quiet excellence, content that earns superlatives without demanding them through marketing language is content that has truly earned them through the substance and this site has clearly produced work in that earned excellence category today.
Decided I would read the archives over the weekend, and a stop at elitebuyarena confirmed that the archives would be worth the time, very few sites have archives I would actively read through but this one has earned that level of interest based on the consistent quality across what I have sampled so far.
Liked that the post left some questions open rather than pretending to settle everything, and a stop at uniquevaluecollection continued that intellectual honesty, content that respects the limits of its own claims is more trustworthy than content that overreaches and this site has clearly figured out which positions it can defend confidently.
Honest assessment after reading this twice is that it holds up under careful attention, and a look at opendealsmarket extended that durability across more pages, content that survives a second read without revealing weak spots is rarer than the average reader probably realises and this site clearly cleared that bar.
aviator Visa depozit [url=http://aviator09317.help/]aviator Visa depozit[/url]
Now realising the post solved a small problem I had been carrying for weeks, and a look at urbanmeadowstore extended that problem solving function, content that connects to specific unresolved questions in my own life rather than just providing general interest is content with real practical impact and this site is providing that practical value.
рулонные шторы с электроприводом на пластиковые окна [url=https://avtomaticheskie-rulonnye-shtory50.ru]рулонные шторы с электроприводом на пластиковые окна[/url]
https://teletype.in/@papadoma2/FNLusw_4ewo
Picked this up while looking for something else and ended up reading every paragraph because it was actually informative, and after yourdealhub I was sure I would come back, that does not happen often when most sites bury the useful parts under endless ads and pop ups today and across most categories online.
Speaking from the perspective of a fairly demanding reader the writing here clears the bar consistently, and a look at coralray continued clearing that bar, the calibration of demanding reader is something I apply to all sources and this site has been one of the few that handles the demanding reading well across pieces sampled.
https://teletype.in/@alexdarkstalker99/95wou5i0pwd
Reading this confirmed a small detail I had been uncertain about, and a stop at suncolorcollection provided the source for further checking, content that supports verification through citations or links rather than just asserting facts is more trustworthy and this site has clearly built its credibility through that kind of verifiable approach consistently.
Quietly building a case in my head for why this site deserves more attention than it currently seems to receive, and a look at freshstyleboutique reinforced the case, the gap between quality and recognition is a recurring frustration in independent online content and this site is one of the cases that seems particularly egregious to me today.
aviator bonus code [url=www.aviator09317.help]aviator bonus code[/url]
Picked a single sentence from this post to remember, and a look at findyourstyle gave me another to keep, content that produces memorable lines is doing more than just transferring information and the small selection of sentences I keep from each reading session is one of the actual returns I get from reading carefully.
aviator promo code not working [url=www.aviator68130.help]aviator promo code not working[/url]
Most of the time I bounce off similar pages within seconds, and a stop at bestgiftmarket held me longer than I would have predicted, the ability to convert a likely bouncing visitor into an engaged reader is a quality signal and this site has demonstrated that conversion ability across multiple visits where I expected to bounce.
https://t.me/s/cactus_official_site_casino
A piece that handled multiple complications without becoming confused, and a look at globalfashionmarket continued that organisational clarity, holding multiple threads in a single piece without losing any of them is a sign of skilled writing and this site has clearly developed the editorial discipline to manage complexity without sacrificing readability throughout.
Speaking from the perspective of a fairly demanding reader the writing here clears the bar consistently, and a look at mysticshorecollective continued clearing that bar, the calibration of demanding reader is something I apply to all sources and this site has been one of the few that handles the demanding reading well across pieces sampled.
Time spent here today felt productive in the way that good reading sessions sometimes do, and a stop at axisbit extended that productive feeling across the rest of the morning, the difference between productive reading and merely passing time is real and this site is consistently on the productive side for me lately.
Now thinking about this site as a small example of what good independent writing looks like, and a stop at freshvaluecollection continued that exemplary status, the few sites that serve as good examples are sites worth holding up in conversations about quality and this one has earned that exemplary placement through patient consistent effort over time.
Worth flagging that this approach to the topic is fresh without being contrarian, and a stop at classytrendhub extended the same fresh angle, finding original perspective on familiar subjects is rare and this site has clearly developed its own way of seeing rather than echoing the dominant takes from elsewhere consistently.
aviator change password [url=https://www.aviator68130.help]https://www.aviator68130.help[/url]
100 cuci [url=http://www.100cuci-8.com]100 cuci[/url]
Genuinely useful read, the points are practical and easy to apply right away, and a quick look at makeithappenhere confirmed that this site is consistent in that approach, looking forward to digging through the rest of it when I get the chance to sit down properly later in the week or this weekend.
Genuine pleasure to read, and that is not something I say often after a casual click through, and a quick visit to petaskin kept the same feeling going across the rest of the site, finding writing that actually feels good to spend time with rather than just functional is increasingly rare on the open web.
luxury phuket villas for sale [url=https://villas-for-sale-in-phuket-4.com]luxury phuket villas for sale[/url]
Now wishing more sites covered topics with this level of care, and a look at fashionchoicehub extended that wish across more subjects, the rarity of careful coverage on most topics is a problem and this site is one of the small antidotes to that broader pattern of casual or surface treatment of complex subjects.
Синтол для мышц Если вы ищете возможность купить Синтол для достижения наилучших результатов в наращивании мышечной массы, вы сделали правильный выбор, ведь Synthol – это проверенное решение для амбициозных атлетов.
A genuine compliment to the writer for keeping the post focused on what mattered, and a look at discovermoreideas continued that disciplined focus, focus is a editorial choice that compounds across many small decisions and this site has clearly made those small decisions consistently across what I have read so far this week here.
авто журнал авто сайт
нарколог на дом круглосуточно [url=https://narkolog-na-dom-voronezh-12.ru]нарколог на дом круглосуточно[/url]
Quality you can feel from the first paragraph, the writer clearly knows the topic and how to share it, and a quick look at truewoodsupply confirmed the same depth runs throughout the rest of the site as well which is rare and worth pointing out when it happens online for any reader passing through.
мостбет онлайн ставки Кыргызстан [url=https://www.mostbet36014.help]https://www.mostbet36014.help[/url]
мелбет mines игра [url=http://melbet67043.help]мелбет mines игра[/url]
aviator baixar [url=www.aviator71803.help]aviator baixar[/url]
Comfortable reading experience throughout, no jarring tone shifts and no awkward formatting, and a look at oldtownstylehub kept that smooth feel going, the kind of editorial polish that goes unnoticed when present but glaring when absent is something this site has clearly invested in across the broader content as well which deserves recognition.
как зарегистрироваться в mostbet [url=www.mostbet47129.help]www.mostbet47129.help[/url]
Now feeling the quiet pleasure of finding writing that takes itself seriously without being self serious, and a stop at happyhomefinds extended that subtle pleasure, the gap between earnest and pretentious is fine and this site has clearly chosen to land on the earnest side without slipping over into pretentious which is impressive.
Generally I do not leave comments but this post merits a small note, and a stop at finduniqueoffers extended that comment worthy quality, the urge to actively contribute to a sites community rather than passively consume from it is something specific content provokes and this site has provoked that engagement urge from me today.
Worth your time, that is the simplest endorsement I can give, and a stop at uniquehomefinds extends that endorsement across the rest of the site, this is one of those increasingly rare places that delivers on what it promises rather than over selling the content and under delivering on substance every time which I find frustrating elsewhere.
Bookmark earned and the bookmark feels like a permanent addition rather than a maybe, and a look at creativevaluehub confirmed that permanent status, the difference between durable bookmarks and ephemeral ones is something I have learned to feel quickly and this site triggered the durable feeling almost immediately during my first read here.
Quietly enthusiastic about this site after the past few hours of reading, and a stop at gigadash extended that enthusiasm, the calibration of enthusiasm to evidence is something I try to maintain and this site has earned a calibrated quiet enthusiasm rather than the loud excitement that usually fades within a day or two of finding something.
Reading this prompted me to subscribe to my first newsletter in months, and a stop at freshstylecorner confirmed the subscribe was the right call, content that earns a newsletter signup is content that has cleared a higher trust bar than a casual visit and this site has clearly earned that level of commitment from me.
Will be back, that is the simplest way to say it, and a quick visit to coralzen reinforced the decision, this site has earned a spot in my regular rotation alongside a few other reliable places I check when I want something genuinely informative without all the usual modern web noise getting in the way.
уличные камеры камера видеонаблюдения уличная купить
Рекомендую ресурс, посвящённый теме вариаторов, их обслуживанию и ремонту. На портале можно найти общие сведения об устройстве этой трансмиссии, возможных неисправностях и методах их диагностики. В материалах сайта рассматриваются различные аспекты эксплуатации вариаторов, что может быть полезно для общего понимания их работы – jf016e объем масла
Быстрая профессиональная установка видеонаблюдения в калининграде для квартир, домов, офисов и коммерческих объектов. Проектирование, монтаж и настройка систем безопасности, удалённый доступ, запись видео и контроль в реальном времени. Надёжные решения для защиты имущества и контроля территории.
Продажа и установка камеры видеонаблюдения калининград. Современные системы безопасности для квартир, домов, магазинов и складов. Настройка удалённого доступа, запись видео и круглосуточный контроль объекта.
A piece that handled multiple complications without becoming confused, and a look at ironwooddesigns continued that organisational clarity, holding multiple threads in a single piece without losing any of them is a sign of skilled writing and this site has clearly developed the editorial discipline to manage complexity without sacrificing readability throughout.
девушки ДНР ТГ девушки Луганск ТГ
mostbet результаты live [url=https://mostbet14967.help/]https://mostbet14967.help/[/url]
Honest assessment is that this is one of the better short reads I have had this week, and a look at yourjourneycontinues reinforced that, the bar for short content is low because most of it sacrifices substance for brevity but this site manages both at once which is harder than it sounds for most writers attempting it.
Reading this gave me the rare experience of fully agreeing with all the conclusions, and a stop at startsomethingnewtoday continued that agreement pattern, content that aligns with my existing views without seeming designed to do so is just content that happens to be reasonable and this site reads as reasonable rather than ideological mostly.
A piece that demonstrated competence without performing it, and a look at everydaytrendstore maintained the same self assured but unshowy register, the gap between competence and performance of competence is one I track and this site has clearly chosen to demonstrate rather than perform which I find much more persuasive as a reader.
Now I want to find more sites like this but I suspect they are rare, and a look at axisdepot extended that thought, the few sites that meet this quality bar are precious specifically because they are rare and finding others like them is one of the ongoing projects of careful internet curation across the years.
заказать кухню спб [url=https://kuhni-spb-58.ru]заказать кухню спб[/url]
Once you start reading carefully here it is hard to go back to lower quality alternatives, and a stop at threeforestboutique reinforced that ratchet effect, the way good content raises standards is real over time and this site has clearly contributed to raising my expectations for what is possible in writing on the topic generally.
Coming back to this one, definitely, and a quick visit to trendspotstore only made me more sure of that, the kind of writing that makes you want to set aside time later rather than rushing through it now while distracted by everything else competing for attention on the screen today across so many tabs.
Generally my attention drifts on long posts but this one held it through the end, and a stop at dailytrendcollection earned the same sustained focus, content that defeats my drift tendency is content with substantive pulling power and this site has demonstrated that pulling power across multiple pieces in a session that has now run quite long actually.
тур на питер [url=www.piter-na-teplohode.ru]www.piter-na-teplohode.ru[/url]
However measured this site clears the bar I set for sites I take seriously, and a stop at dreamfashionfinds continued clearing that bar, the metrics I use for site quality are admittedly informal but they are consistent and this site has cleared them on multiple measurements across multiple visits which is meaningful for my evaluation.
Generally my attention drifts on long posts but this one held it through the end, and a stop at findnewoffers earned the same sustained focus, content that defeats my drift tendency is content with substantive pulling power and this site has demonstrated that pulling power across multiple pieces in a session that has now run quite long actually.
Held my interest from the opening line through to the closing thought, and a stop at freshstyleboutique did the same, content that earns sustained attention in an environment full of distractions is doing something right and this site is clearly doing several things right rather than just one or two which I really appreciate.
Honestly thank you to whoever wrote this because it scratched an itch I had not quite been able to articulate, and a stop at humzip kept that satisfying feeling going, the kind of writing that meets unspoken needs is special and this site clearly has writers who understand their readers more than most do today.
condos in phuket for sale [url=https://apartments-for-sale-in-phuket-4.com]condos in phuket for sale[/url]
Got pulled in by the headline and stayed because the content actually delivered on the promise, and a stop at brightstylecollection kept that trust intact, when a site lives up to its own framing it earns the right to keep showing up in my browser tabs going forward indefinitely from here on out really.
Appreciate the practical examples, they made the abstract points easier to grasp, and a stop at brightstylemarket added more of the same, this site clearly understands that real examples beat empty theory every single time which is the mark of a writer who knows their audience well and respects their time.
Saving the link for sure, this one is a keeper, and a look at trendbuycollection confirmed I should bookmark the entire site rather than just this page, the consistency across what I have seen so far suggests there is a lot more here worth coming back for soon when I have more time.
mostbet Ош [url=mostbet47129.help]mostbet47129.help[/url]
aviator keşbek [url=https://www.aviator09317.help]aviator keşbek[/url]
вывод из запоя цены самара [url=https://kapelnicza-ot-pokhmelya-samara-23.ru]вывод из запоя цены самара[/url]
Now noticing how rare it is to find a site that does not feel rushed, and a look at cosmojet extended that calm pace, content produced without time pressure has a different quality than content shipped to meet a deadline and this site reads as written without urgency which produces a different and better experience for readers.
Thanks for keeping things clear and to the point, that is honestly hard to find online these days, and after reading through makeeverymomentcount the message stayed consistent which makes me trust the information being shared more than I usually do on similar pages that cover this same kind of topic.
A relief to read something where I did not have to fact check every claim mentally, and a look at yourtrendzone continued that reliable feeling, sites where I can lower my guard and trust the content are rare and this one is earning that trust paragraph by paragraph through consistent careful work behind the scenes.
дренаж лимфатической системы
монтаж фальцевой кровли цена
Легендарная охота за богатствами продолжается! Новые загадки древних династий, опасные экспедиции и тайны, скрытые веками. Кто разгадает шифры прошлого и доберётся до бесценных артефактов? Захватывающие повороты, рискованные ставки и неожиданные союзники ждут тебя: смотреть онлайн Сокровища императора 3 сезон
aviator игра mostbet [url=http://mostbet47129.help/]aviator игра mostbet[/url]
Honest opinion is that this is the kind of post that builds long term trust with readers, and a look at urbanfashionshop reinforced that perception, the slow accumulation of trust through consistent quality is the only sustainable way to build a real audience and this site is clearly playing that long game.
Liked that the post acknowledged complications rather than pretending they did not exist, and a stop at inspiregrowthdaily continued that honest framing, sites that handle complexity with care rather than papering it over with simplifying claims are doing real intellectual work and this one is clearly in that category based on what I have read.
melbet пополнение без комиссии [url=www.melbet67043.help]melbet пополнение без комиссии[/url]
mostbet скачать приложение с сайта [url=mostbet36014.help]mostbet36014.help[/url]
aviator baixar app [url=https://aviator71803.help]https://aviator71803.help[/url]
Reading this gave me a quiet moment of intellectual pleasure that I had not been expecting, and a stop at startdreamingbig extended that pleasure across more pages, the unexpected reward of stumbling into careful writing is one of the small ongoing pleasures of reading the open web and this site is delivering it reliably.
mostbet скачать apk [url=https://www.mostbet36014.help]https://www.mostbet36014.help[/url]
мелбет быстрые игры [url=https://melbet67043.help/]https://melbet67043.help/[/url]
Honest take is that this was better than I expected when I clicked through, and a look at thinkcreateinnovate reinforced that, the bar for online content has dropped so much that finding something thoughtful and well constructed feels almost noteworthy now which says more about the average than about this site itself.
Came across this through a roundabout path and now it is on my regular rotation, and a stop at zapscan sealed that decision, the open web still produces serendipitous discoveries when you let the citations and references guide you rather than relying purely on algorithmic feeds for new content recommendations always.
Recommend this to anyone who values clear thinking over flashy presentation, and a stop at createimpactnow continued in the same understated way, this site has its priorities in the right place which makes it worth supporting through repeat visits and recommendations rather than just one passing read today before moving on quickly elsewhere.
Took the time to read the comments on this post too and they were also worth reading, and a stop at growthcart suggested the community quality matches the content quality, when the conversation around a piece is as good as the piece itself you know you have found a real corner of the internet.
Felt the post had been written without using a single buzzword, and a look at fashiondailyhub continued that clean vocabulary, content free of jargon and trendy phrases reads better and ages better and this site has clearly committed to a vocabulary that will not feel dated in three years which is impressive editorially.
Thanks for the moderate length, neither so short it skips substance nor so long it bloats, and a stop at freshseasonfinds hit the same balance, the right length is one of the hardest things to calibrate in blog writing and I appreciate when a team has clearly thought about it rather than defaulting.
Started reading skeptically because the headline seemed overconfident, and the post earned the headline by the end, and a look at mystylezone continued that pattern of earning its claims, sites that can back up their headlines without overpromising are rare and this one has clearly developed editorial calibration on that front consistently.
Reading this prompted me to dig into a related topic later, and a stop at jetspark provided some of the starting points for that follow up reading, content that triggers further exploration rather than satisfying curiosity completely is content with real generative energy and this site has plenty of that energy throughout it.
рулонные шторы купить цены [url=https://elektricheskie-rulonnye-shtory99.ru]https://elektricheskie-rulonnye-shtory99.ru[/url]
Really nice to see things explained without overcomplicating the topic, the words flow naturally and stay easy to follow, and a short visit to axisflag only added to that experience because the same simple approach is used across the rest of the page too without any change in tone.
Just want to flag that this was useful and not bury the appreciation in caveats, and a look at trendandgiftstore earned the same direct praise, recognising good work without hedging it with criticism is something I try to practice because over qualified compliments tend to read as backhanded and miss the point sometimes.
Now recognising that this site has earned a place in the small group of resources I treat as authoritative, and a stop at brightgiftcorner confirmed that placement, the difference between resources I trust and resources I just consume is real and this site has clearly moved into the trusted category through consistent quality over time.
Now noticing the careful balance the post struck between confidence and humility, and a stop at discoverfashionfinds maintained the same balance, finding the line between asserting and admitting is hard and this site has clearly developed the calibration to walk that line consistently which produces a more persuasive reading experience for me.
Will recommend this to a couple of friends who have been asking about this exact topic, and after simplechoiceoutlet I have even more reason to do so, the kind of site that earns word of mouth rather than chasing it through aggressive marketing or paid placements is always a treat to find online.
рулонные занавески [url=https://avtomaticheskie-rulonnye-shtory50.ru]рулонные занавески[/url]
Купить синтол Синтол – это не просто косметическое средство, это мощный инструмент для достижения вашей мечты о рельефной и внушительной мускулатуре, позволяющий ускорить прогресс и увидеть результаты значительно быстрее.
Reading this felt productive in a way most internet reading does not, and a look at fashiondailycorner continued that productive feeling, sometimes the open web feels like a waste of time but sites like this remind me why I still bother to look around rather than retreating to old reliable sources for everything I need.
This filled in a gap in my understanding that I had not even noticed was there, and a stop at dreamgrovehub did the same, the kind of post that gives you more than you expected when you first clicked through from somewhere else, a real find for anyone curious about the area covered here.
Reading this triggered a small but real correction in something I had assumed, and a stop at yourstylemarket extended that corrective effect, content that updates my beliefs through evidence rather than rhetoric is content with intellectual integrity and this site has earned that label consistently across the pieces I have read so far today.
High quality writing, no marketing speak and no buzzwords that mean nothing, and a stop at growwithdetermination kept that going, simple direct content that actually communicates something is harder to find than it should be and this is one of the rare places that gets it right consistently across many different posts.
Worth a quiet moment of recognition for the consistency I have noticed across multiple posts, and a stop at urbanedgecollective continued that consistent quality, sites that maintain quality across many pieces rather than peaking on one viral post are sites with real editorial discipline and this one has clearly developed that discipline carefully.
Thank you for not assuming the reader already knows everything, the explanations meet me where I am, and a look at happyvaluehub did the same, that consideration is what makes a site feel welcoming rather than gatekeepy which is sadly the default mood across the modern web today for most subjects covered.
A handful of memorable phrases from this one I will probably use later, and a look at goldenrootmart added a couple more, content that contributes language to my own communication rather than just facts is content with a different kind of utility and this site is providing that linguistic utility consistently across what I read.
However many similar pages I have read this one taught me something new, and a stop at springlightgoods added more new material, content that contributes genuinely fresh information rather than recycling what is already widely available is content with real informational value and this site is providing that informational freshness at a notable rate.
Reading this slowly in the morning before opening email, and a stop at wiseparcel extended that protected attention, content that earns the prime morning reading slot before the daily distractions begin is content with elevated status and this site has earned that prime slot consistently in my recent reading habits clearly.
Took a chance on the headline and was rewarded, and a stop at zingdart kept the rewards coming as I clicked through, the kind of place where every link leads somewhere worth the click is a small luxury on the modern web where so many sites are mostly empty calories disguised as content.
Быстрая профессиональная установка камер видеонаблюдения для квартир, домов, офисов и коммерческих объектов. Проектирование, монтаж и настройка систем безопасности, удалённый доступ, запись видео и контроль в реальном времени. Надёжные решения для защиты имущества и контроля территории.
Felt like I was reading something written by someone who actually thinks about the topic rather than reciting it, and a look at freshfindshub reinforced that impression, the difference between recited content and considered content is huge and this site clearly belongs to the latter category which I appreciate as a careful reader looking for substance.
Came back to this an hour later to reread a specific section, and a quick visit to fashionanddesign also drew a second look, content that pulls you back rather than letting you move on permanently is the kind I want to fill my browser bookmarks with in 2026 and beyond as the open internet evolves.
Thanks for putting this online without locking it behind email signups or paywalls, and a quick visit to thetrendstore kept that open feel going, content that trusts the reader to come back rather than gating access is the kind of approach I will reward with regular return visits over time happily.
Felt the writer respected me as a reader without making a show of doing so, and a look at connectandcreate continued that quiet respect, this is the kind of small but meaningful detail that separates the sites I bookmark from the ones I close after a single skim and never return to again no matter how interesting the headline.
Did not expect much when I clicked through but ended up reading the whole thing carefully, and a stop at joltfork kept that engagement going, sometimes the unassuming sites turn out to deliver more than the flashy ones which is something I have learned to look out for over time online lately and across topics.
Came in expecting another generic take and got something with actual character instead, and a look at redmoonemporium carried that personality forward, finding a distinct voice on a saturated topic is impressive and worth pointing out when it happens because most sites end up sounding identical to their nearest competitors quickly.
Worth saying this site reads better than most paid newsletters I have tried, and a stop at brightfashionoutlet confirmed that comparison, the bar for free content is often lower than for paid but this site clears the paid bar consistently and that says something about the editorial approach behind the work being published here regularly.
mostbet регистрация по номеру [url=https://www.mostbet47129.help]https://www.mostbet47129.help[/url]
Found a couple of useful angles in here I had not considered before reading carefully, and a quick stop at sunsetstemgoods added more, this is one of those sites where the value compounds the more you read rather than peaking at one viral post and then offering nothing else of substance afterwards which is common.
Will share this on a forum I am part of where it will be appreciated by others working in the same area, and a look at goldenrootcollection suggests there is more here worth passing along too, definitely a generous resource that deserves a wider audience than it probably has today across the open internet.
My time on this site has now extended past what I had budgeted, and a stop at bestvaluecorner keeps extending it further, content that overstays its budget in my schedule is content that has earned the extra time and this site has been earning extra time across multiple visits to the point where my schedule needs adjustment.
авто сайт авто сайт
демонтаж кровли цена
Just want to acknowledge that the writing here is doing something right, and a quick visit to yourpotentialgrows confirmed the same standards run across the broader site, recognising good work is something I try to do when I find it because the alternative is silence and silence rewards mediocrity.
Just enjoyed the experience without needing to think about why, and a look at uniquefashioncorner kept that effortless feeling going, sometimes the best content is invisible in the sense that you forget you are reading until you reach the end and realise time has passed without you noticing it pass naturally.
Thanks for keeping things clear and to the point, that is honestly hard to find online these days, and after reading through growwithdetermination the message stayed consistent which makes me trust the information being shared more than I usually do on similar pages that cover this same kind of topic.
Picked this up between two other things I was doing and got drawn in completely, and after axonspark my original tasks were completely forgotten for a while, content that derails a workflow in a positive way by being more interesting than what you were already doing is rare and worth recognising clearly.
Halfway through I knew I would finish the post, and a stop at shopwithdelight also held me through to the end, content that signals its quality early and then sustains it is content with real internal consistency and this site has clearly figured out how to maintain quality from opening sentence through to closing thought.
Beyond the immediate post itself the editorial sensibility behind the site is what struck me, and a stop at happyhomecorner continued displaying that sensibility, content that reveals editorial choices through accumulated reading is content with structural quality and this site has clearly developed an underlying approach worth identifying through multiple sessions of reading.
Sets a higher bar than most of what shows up in search results for this topic, and a look at zingtorch did not lower that bar at all, in fact it confirmed the impression, this is the kind of consistency that earns a place in regular rotation for serious readers instead of casual scrollers passing through.
Coming back to this one, definitely, and a quick visit to discoverfashioncorner only made me more sure of that, the kind of writing that makes you want to set aside time later rather than rushing through it now while distracted by everything else competing for attention on the screen today across so many tabs.
Liked how the post handled an objection I was forming as I read, and a stop at betterbasket similarly anticipated where my thinking was going next, the rare writer who can predict reader concerns and address them in advance is doing something most online content fails to do despite that being basic editorial work.
100cuci safe [url=https://www.100cuci-8.com]100cuci safe[/url]
Reading this on a difficult day was a small bright spot, and a stop at findyourstyle extended that brightness, content that improves a hard day is content that has earned a particular kind of place in my reading habits and this site is occupying that uplifting role for me today which I appreciate clearly.
Started believing the writer knew the topic deeply by about the second paragraph, and a look at fashiondailycorner reinforced that confidence, the speed at which a writer establishes credibility through their writing is a useful quality signal and this writer establishes it quickly and quietly without resorting to credential dropping or self promotion.
мелбет быстрая регистрация [url=http://melbet67043.help]мелбет быстрая регистрация[/url]
mostbet правила пополнения [url=https://mostbet36014.help]https://mostbet36014.help[/url]
Really appreciate that the writer did not stretch the post to hit some target word count, the points end when they are made, and a stop at fashionandbeauty reflected the same discipline, brevity is generosity in disguise and this site has clearly figured that out far better than most blog operations have.
Now recognising the post as a rare example of careful writing on a topic that mostly receives careless treatment, and a stop at shopandsmilehub extended that contrast with the average elsewhere, content that highlights how much the average is settling for low quality is content that has both internal merit and external value as a benchmark.
вывод из запоя нарколог 24 [url=https://vyvod-iz-zapoya-na-domu-sankt-peterburg-18.ru]https://vyvod-iz-zapoya-na-domu-sankt-peterburg-18.ru[/url]
Bookmark added without hesitation after finishing, and a look at shadylaneshoppe confirmed I should bookmark the homepage too rather than just this page, the rare site that earns category level trust rather than just single article approval is the kind I want to rely on across many different topics over time.
Did not expect much when I clicked through but ended up reading the whole thing carefully, and a stop at thepathforward kept that engagement going, sometimes the unassuming sites turn out to deliver more than the flashy ones which is something I have learned to look out for over time online lately and across topics.
melbet free spins no deposit [url=http://melbet58273.help]melbet free spins no deposit[/url]
электрические рулонные жалюзи [url=https://rulonnye-elektroshtory.ru]электрические рулонные жалюзи[/url]
откапаться на дому [url=https://kapelnicza-ot-pokhmelya-voronezh-14.ru]откапаться на дому[/url]
глория мебель [url=https://kuhni-spb-58.ru]https://kuhni-spb-58.ru[/url]
mostbet app скачать [url=http://mostbet14967.help/]http://mostbet14967.help/[/url]
villas for sale in phuket [url=https://villas-for-sale-in-phuket-4.com]villas for sale in phuket[/url]
A piece that did not waste any of its substance on sales or promotion, and a look at classytrendcorner continued that pure content focus, sites that resist the urge to monetise every paragraph are increasingly rare and this one has clearly made the editorial choice to keep the writing clean from commercial intrusion which I value highly.
Now appreciating that the post did not require me to agree with the writer to find it valuable, and a look at goldenrootcollection maintained the same useful regardless of agreement quality, content that informs even when it does not convince is content with broader utility and this site reads as useful even when I disagree.
This filled in a gap in my understanding that I had not even noticed was there, and a stop at startanewpath did the same, the kind of post that gives you more than you expected when you first clicked through from somewhere else, a real find for anyone curious about the area covered here.
A nicely understated post that does not shout for attention, and a look at urbanwearhub maintained the same quiet quality, understatement is a stylistic choice that distinguishes serious writing from attention seeking writing and this site has clearly committed to the understated approach as a core editorial value rather than just a phase.
нарколог на дом воронеж [url=https://narkolog-na-dom-voronezh-12.ru]нарколог на дом воронеж[/url]
8888starz [url=https://www.888starz-eg-egypt4.com/]https://888starz-eg-egypt4.com/[/url]
A welcome contrast to the loud takes that have dominated my feed lately, and a look at oakpetalemporium extended that calm voice, content that arrives without yelling has become unusual in the modern attention economy and this site is one of the few places I have found that consistently delivers without raising its voice.
Now feeling the quiet pleasure of finding writing that takes itself seriously without being self serious, and a stop at yourfavoritetrend extended that subtle pleasure, the gap between earnest and pretentious is fine and this site has clearly chosen to land on the earnest side without slipping over into pretentious which is impressive.
888stars [url=http://www.eg888starz-bet.com]https://eg888starz-bet.com/[/url]
If a friend asked me where to read carefully on the topic I would send them here without hesitation, and a look at trendandbuyhub confirmed the recommendation strength, the directness of my recommendation reflects how confident I am in the quality and this site has earned undiluted recommendations from me across multiple recent conversations actually.
888starz review [url=http://888starz-oficialnyj-sajt5.com/]888starz review[/url] .
888starzuz [url=888starz-kirish4.com]888starzuz[/url] .
888 stars [url=https://888starz-uz1.com/]888 stars[/url] .
888starz kirish [url=https://www.888starz-uz3.com]888starz kirish[/url] .
Now considering whether the post would translate well into a different form, and a look at oceanviewemporium suggested similar versatility, content that could move into other media without losing its substance is content that has been built around ideas rather than around format and this site reads as idea first throughout posts.
Took a chance on the headline and was rewarded, and a stop at zingtrace kept the rewards coming as I clicked through, the kind of place where every link leads somewhere worth the click is a small luxury on the modern web where so many sites are mostly empty calories disguised as content.
Reading the writers other posts after this one suggests the quality is consistent rather than peak, and a stop at growbeyondlimits confirmed the consistent quality reading, sites that hold the same level across many pieces rather than peaking on a few are sites with sustainable editorial discipline and this one has clearly developed that.
A particular pleasure to read this with a fresh coffee, and a look at findyourstrength extended the pleasure across more pages, content that pairs well with quiet morning rituals is something I have come to value highly and this site has the kind of energy that fits naturally into a calm reading routine.
Refreshing tone compared to the dry corporate posts on similar topics, and a stop at globalvaluehub carried that personality through nicely, you can tell when a real person is behind the writing versus a content team chasing metrics and this site definitely falls into the former category clearly across what I have seen.
This stands out compared to similar posts I have read recently, less noise and more substance, and a look at everydayvaluecenter kept that gap going, you can really feel the difference between content made by someone who cares versus content made to fill a publishing schedule for an algorithm trying to keep growing somehow.
Now feeling the small relief of finding writing that does not condescend, and a stop at redmoonemporium extended that respect for readers, content that treats its audience as capable adults rather than as people to be managed produces a different reading experience and this site has clearly chosen the respectful approach across all pieces.
Pass this along to colleagues if the topic comes up, the framing here is sensible, and a stop at discoveramazingdeals adds more useful angles to share, the kind of content that improves conversations rather than just feeding them is what makes a resource genuinely valuable in professional contexts going forward over time and across project boundaries too.
Now wondering how the writers calibrated the level of detail so well, and a stop at brightfashionhub continued the same calibration, the right level of detail is one of the harder editorial calls in any piece and this site has clearly developed an instinct for it through what I assume is years of careful practice publicly.
Now noticing that the post avoided the temptation to be funny in places where humour would have undermined the substance, and a stop at stonebridgeoutlet maintained the same restraint, knowing when to be serious is a rare editorial virtue and this site has clearly developed it through what I assume is careful editorial practice over years.
condos in phuket for sale [url=https://apartments-for-sale-in-phuket-4.com]condos in phuket for sale[/url]
Came across this through a roundabout path and now it is on my regular rotation, and a stop at beamqueue sealed that decision, the open web still produces serendipitous discoveries when you let the citations and references guide you rather than relying purely on algorithmic feeds for new content recommendations always.
The way the post stayed on topic throughout without going on tangents was really refreshing, and a look at goldenharborgoods kept that focused approach going, discipline like this in writing is rare and worth recognising because most writers cannot resist wandering off into related subjects that dilute their main point and confuse readers along the way.
A handful of memorable phrases from this one I will probably use later, and a look at everydayvaluezone added a couple more, content that contributes language to my own communication rather than just facts is content with a different kind of utility and this site is providing that linguistic utility consistently across what I read.
капельница от запоя стоимость [url=https://kapelnicza-ot-pokhmelya-samara-23.ru]https://kapelnicza-ot-pokhmelya-samara-23.ru[/url]
Worth recognising the absence of the usual blog tropes here, and a look at changeyourmindset continued that fresh quality, sites that avoid the standard moves of the medium read as more original even when the content is on familiar topics and this one has clearly chosen its own path through the conventional terrain skilfully.
The whole experience of reading this was pleasant from start to finish, no pop ups and no annoying interruptions, and a look at smartshoppingmarket continued that clean experience, technical choices about page design matter for the reader and this site clearly cares about the small details that add up to comfort across multiple visits.
Better signal to noise ratio than most places I check on this kind of topic, and a look at yourbuyinghub kept that going, every paragraph here carries something worth reading rather than padding out the page to hit some arbitrary length target that search engines reward but readers ignore as soon as they notice it.
Probably going to mention this site in a write up I am working on later this month, and a stop at urbantrendmarket provided more material for that potential mention, content worth referencing in my own published work rather than just personal reading is content with the highest endorsement level and this site has earned that endorsement.
Felt the post had been quietly polished rather than aggressively styled, and a look at purestylecorner confirmed the same understated polish, sites whose quality reveals itself slowly rather than announcing itself loudly are the kind I trust more deeply because the trust is not based on first impressions of marketing but actual substance.
Reading this brought back the satisfaction I used to get from blogs ten years ago, and a stop at suncrestfashions kept that nostalgic quality alive, sites that capture what was good about an earlier era of internet writing are increasingly precious and this one is doing that without feeling like a deliberate throwback at all.
Honest take is that this was better than I expected when I clicked through, and a look at learncreategrow reinforced that, the bar for online content has dropped so much that finding something thoughtful and well constructed feels almost noteworthy now which says more about the average than about this site itself.
вывод из запоя в стационаре в нижнем новгороде [url=https://vyvod-iz-zapoya-v-staczionare-nizhnij-novgorod-16.ru]https://vyvod-iz-zapoya-v-staczionare-nizhnij-novgorod-16.ru[/url]
Just dropping by to say thanks for the effort, it does not go unnoticed when a writer cares this much about the reader, and after I went through simplebuycorner I was certain this is one of the better corners of the internet for this particular kind of content which is genuinely refreshing.
Worth recognising the absence of the usual blog tropes here, and a look at boostrank continued that fresh quality, sites that avoid the standard moves of the medium read as more original even when the content is on familiar topics and this one has clearly chosen its own path through the conventional terrain skilfully.
Found this useful, the points line up well with what I have been thinking about lately, and a stop at findpurposeandpeace added some angles I had not considered yet, definitely walking away with more than I came for which is the best outcome from time spent reading online for any kind of topic.
melbet bd crash app [url=http://melbet58273.help/]http://melbet58273.help/[/url]
Adding this site to my regular reading list, the post earned that on its own, and a quick stop at globalvaluecollection sealed the decision, the kind of place worth checking back with from time to time because it consistently produces material that holds up against a critical reading too which I really value.
Reading this triggered a small reorganisation of my own thinking on the topic, and a stop at purevaluecenter furthered that reorganisation, content that affects the shape of my mental model rather than just decorating it with new facts is content with structural rather than informational impact and this site provides that.
Started taking notes about halfway through because the points were stacking up, and a look at dreamfashionoutlet added enough material that my notes file grew further, content that demands note taking from a passive reader is content with substance and the writers here are clearly producing that kind of work consistently across topics.
рулонные жалюзи на окна цена [url=https://elektricheskie-rulonnye-shtory99.ru]https://elektricheskie-rulonnye-shtory99.ru[/url]
вывод из запоя цены [url=https://vyvod-iz-zapoya-na-domu-sankt-peterburg-18.ru]вывод из запоя цены[/url]
Reading this post made me realise I had been settling for lower quality elsewhere, and a look at globalvaluecorner extended that recalibration, content that exposes how much I had been accepting in adjacent sources is content with calibrating effect on my standards and this site is performing that calibration function across topics for me reliably.
капельницу на дом стоимость [url=https://kapelnicza-ot-pokhmelya-voronezh-14.ru]капельницу на дом стоимость[/url]
melbet blackjack bonus [url=melbet58273.help]melbet58273.help[/url]
рулонные шторы на окно в кухне [url=https://rulonnye-elektroshtory.ru]https://rulonnye-elektroshtory.ru[/url]
Looking for similar voices elsewhere has come up empty in my recent searches, and a stop at starwayboutique extended the search frustration, the rare site that does what no other does in quite the same way is precious and this one has clearly developed a particular approach that I have not been able to find duplicates of.
Felt the post had been written without using a single buzzword, and a look at goldenfieldstore continued that clean vocabulary, content free of jargon and trendy phrases reads better and ages better and this site has clearly committed to a vocabulary that will not feel dated in three years which is impressive editorially.
Thanks for treating the topic with the seriousness it deserves without becoming pompous about it, and a stop at urbantrendstore continued that balanced treatment, the gap between earnest and self serious is huge and writers who can stay on the right side of it earn my respect when I find them online today.
Reading this slowly and letting each paragraph land before moving on, and a stop at dailyfashioncorner earned the same patient approach, content that rewards slow reading rather than speed is content with real density and the writers here are clearly producing work that benefits from the careful eye rather than the rushed scan.
However selective I am about new bookmarks this one made it past my filter, and a look at trendystylezone confirmed the bookmark was worth the slot, the precious slots in my permanent bookmark folder are difficult to earn and this site earned one without making me think twice about whether the slot was justified by the quality.
Thanks for a post that does not try to be funny when it is not the moment for it, and a stop at smartlivingmarket maintained the same appropriate seriousness, knowing when humour helps and when it just signals desperation for engagement is a sign of editorial maturity that many blogs have not developed yet.
Picked this up between two other things I was doing and got drawn in completely, and after highriverdesigns my original tasks were completely forgotten for a while, content that derails a workflow in a positive way by being more interesting than what you were already doing is rare and worth recognising clearly.
A memorable post for me on a topic I had thought I was tired of, and a look at buildyourvision suggested the same site can refresh other tired topics, sites that can revive my interest in subjects I had written off as exhausted are doing rare work and this one is clearly doing that for me today.
Now considering whether the post would translate well into a different form, and a look at findyouranswers suggested similar versatility, content that could move into other media without losing its substance is content that has been built around ideas rather than around format and this site reads as idea first throughout posts.
Probably this is one of the better quiet successes on the open web at the moment, and a look at softcrestcorner reinforced that quiet success quality, sites that are doing well without making a noise about doing well are the sites I most respect and this one has clearly chosen the quiet success path consistently throughout.
Came in skeptical of the angle and left mostly persuaded, and a stop at findnewdealsnow pushed me a bit further in the same direction, content that can move a critical reader by argument rather than rhetoric is rare and worth pointing out because it indicates real substance underneath the surface presentation here.
Reading this prompted a brief but useful conversation with a colleague who happened to walk by, and a stop at everydayessentials extended that conversational seed, content that becomes a starting point for in person discussion rather than ending in solitary reading is content with social generative energy and this site has plenty of it apparently.
Reading this gave me a small mental break from the heavier reading I had been doing, and a stop at beamreach extended that lighter feel, content that provides relief without becoming trivial is harder to produce than people realise and this site has clearly figured out how to be light without being shallow at all.
Рекомендую ресурс, посвящённый теме вариаторов, их обслуживанию и ремонту. На портале можно найти общие сведения об устройстве этой трансмиссии, возможных неисправностях и методах их диагностики. В материалах сайта рассматриваются различные аспекты эксплуатации вариаторов, что может быть полезно для общего понимания их работы – https://provariatory.ru/
Going to come back when I have more time to read carefully, the post deserves more than a quick scan, and a stop at purefieldoutlet reinforced that, this is the kind of site that rewards a slower read which is hard to find in this fast paced corner of the internet but really worthwhile.
aviator crash promo code [url=https://aviator68130.help/]aviator crash promo code[/url]
Honest opinion is that this is the kind of post that builds long term trust with readers, and a look at globalseasonhub reinforced that perception, the slow accumulation of trust through consistent quality is the only sustainable way to build a real audience and this site is clearly playing that long game.
plinko android download [url=https://plinko62894.help]https://plinko62894.help[/url]
Decided this was the kind of site I would defend in a discussion about good blog content, and a stop at dreamdiscoverachieve reinforced that, very few sites earn active defence rather than passive consumption and this one has clearly crossed that threshold for me without needing any explicit pitch from the writers themselves either.
Now planning to share the link with a small group of readers I trust, and a look at brightchoicecollection suggested more material to share with the same group, recommending content into a curated circle requires confidence in the recommendation and this site is making me confident in those personal recommendations on multiple separate occasions now.
aviator casino app Bangladesh [url=aviator68130.help]aviator68130.help[/url]
Now considering the post as evidence that careful blog writing is still possible, and a look at globalmarketoutlet extended that evidence, the broader question of whether the modern web can sustain quality writing has obvious empirical answers in sites like this one and seeing them is reassuring even when they remain a minority overall today.
Glad I gave this fifteen minutes rather than the usual three minute skim, and a look at purefashioncollection earned the same investment, time spent on quality content is rarely wasted but the reverse is also true and learning which sites deserve which kind of attention is part of being a careful online reader.
кухня на заказ [url=https://kuhni-spb-58.ru]кухня на заказ[/url]
Solid value packed into a relatively short post, that takes skill, and a look at goldcreststudio continues the dense useful content across more pages, this site clearly understands that respecting reader time is itself a form of generosity which is something most blog operations seem to have forgotten lately across the wider open web.
Honest reaction is that I want to send this to a friend who would benefit from it, and a look at urbanfashioncollective added more material I will pass along too, the impulse to share is the strongest signal I have for content quality and this site is generating that impulse cleanly across multiple posts.
Recommended to anyone working in or curious about this area, the depth and clarity combine well, and a look at startsomethingnewtoday keeps that going across more pages, the kind of site that earns regular visits rather than chasing trends has my respect because it suggests genuine commitment to the topic itself rather than to chasing trends.
A piece that took its time without dragging, and a look at globalstylecorner kept the same patient pace, the difference between unhurried and slow is a fine editorial distinction and this site has clearly found the unhurried side without slipping into the slow side which would have lost me as a reader quickly otherwise.
Adding to the bookmarks now before I forget, that is how good this is, and a look at trendfashionhub confirmed the rest of the site is worth saving too, this is one of those rare finds that justifies the time spent searching the web for once which is a relief in the current environment.
Liked the way the post got out of its own way, and a stop at globaltrendhub extended that invisible craft, the best writing you barely notice while reading because it is doing its work without drawing attention to itself and this site has clearly mastered that disappearing act across the pieces I have read.
A piece that left me thinking I had been undercaring about the topic, and a look at brightparcel reinforced that mild concern, content that raises the appropriate weight of a subject without being preachy about it is doing important work and this site is providing that gentle elevation of attention for me consistently.
Well crafted post, the structure flows naturally from one point to the next without forcing transitions, and a stop at simplefashionstore kept the same flow going, you can tell when a writer has thought about how their content reads rather than just what it contains and this is one of those examples.
Skipped lunch to finish reading, which says something, and a stop at simplefashionoutlet kept me at my desk longer than planned, when content beats the lunch impulse the writer has done something genuinely impressive in an attention environment full of immediately satisfying alternatives competing for the same finite block of reader time.
https://bogov-team.ru/
If I had encountered this site five years ago I would have been telling everyone about it, and a look at buildyourfuturetoday extended that retrospective enthusiasm, the version of me who used to recommend favourite blogs frequently would have made sure friends knew about this one and that earlier enthusiasm is partially returning to me here.
Started reading without much expectation and ended on a high note, and a look at findamazingproducts continued that arc, content that builds rather than peaks early is a sign of a writer who knows how to structure a piece for sustained reader engagement rather than relying on a strong hook to do all the work.
A piece that ended with a clean landing rather than fading out, and a look at freshseasoncollection maintained the same crisp conclusions, endings that resolve rather than dissolve are a sign of careful structural thinking and this site has clearly invested in how its pieces conclude rather than letting them simply run out of energy.
If I am being honest this is the kind of site I quietly hope my own work will someday resemble, and a stop at creativegiftboutique extended that aspirational feeling, finding work that models what I want to produce is part of why I read carefully and this site has been performing that modelling function for me lately consistently.
качели для дачи купить Joycom предлагает широкий ассортимент садовой мебели из искусственного ротанга, включая плетеную и уличную мебель, которую можно купить в интернет-магазине.
Now realising the topic deserved better treatment than it has been getting elsewhere, and a look at northernpeakchoice extended that broader recognition, content that exposes the gap between actual quality and average quality elsewhere is doing the quiet work of raising standards and this site is contributing to that elevation in its own corner.
https://luckywave.one/
Не включаются передачи мерседес
thailand phuket villas for sale [url=https://villas-for-sale-in-phuket-4.com]thailand phuket villas for sale[/url]
нарколог на дом круглосуточно воронеж цены [url=https://narkolog-na-dom-voronezh-12.ru]https://narkolog-na-dom-voronezh-12.ru[/url]
100cuci sign in [url=https://www.100cuci-8.com]100cuci sign in[/url]
Started smiling at one paragraph because the writing was just nice, and a look at discovernewpaths produced a couple more such moments, prose that produces small spontaneous reactions in the reader is doing more than just transferring information and the writers here are clearly hitting that level fairly consistently throughout pieces.
Now adding the homepage to my regular check rotation rather than waiting for individual links to find me, and a stop at globalfindshub confirmed the rotation upgrade, the move from passive discovery to active checking is a vote of confidence in a sites ongoing quality and this site has earned that active engagement clearly.
Strong recommendation, anyone interested in this topic owes themselves a visit, and a stop at dreamdiscoverachieve extends that recommendation across more of the site, this is the kind of resource that makes me more optimistic about the state of the open web than I usually am these days actually for once which is genuinely refreshing.
Picked a single sentence from this post to remember, and a look at glowlaneoutlet gave me another to keep, content that produces memorable lines is doing more than just transferring information and the small selection of sentences I keep from each reading session is one of the actual returns I get from reading carefully.
Recommended to anyone working in or curious about this area, the depth and clarity combine well, and a look at bloomhold keeps that going across more pages, the kind of site that earns regular visits rather than chasing trends has my respect because it suggests genuine commitment to the topic itself rather than to chasing trends.
Felt this in a way I cannot quite explain, the topic just hit different here, and a stop at uniquevalueoutlet continued in that vein, sometimes you find a site whose perspective lines up with how you have been thinking and reading their work feels like a small relief which I appreciated more than I expected.
Different in a good way from the cookie cutter content that fills most blogs covering this area, and a stop at findnewoffers kept showing me why, original thoughtful writing exists if you know where to look and this site has earned a place on my short list of those rare exceptions worth defending.
melbet link bd [url=https://www.melbet58273.help]https://www.melbet58273.help[/url]
врач капельница алкоголь на дом [url=https://vyvod-iz-zapoya-na-domu-sankt-peterburg-19.ru]https://vyvod-iz-zapoya-na-domu-sankt-peterburg-19.ru[/url]
Decided to read this site for a while before forming a verdict, and the verdict after several pages is positive, and a stop at wildpathmarket continued that pattern, judging a site requires more than one post and giving sites a fair sample is something I try to do for promising candidates rather than rushing to dismiss.
Got something practical out of this that I can apply later this week, and a stop at startanewpath added more details to think about, this is exactly the kind of content I bookmark for future reference rather than the throwaway listicles that dominate most search results these days for almost any common topic.
Now realising the post has been quietly doing important work in my mind for the past hour, and a stop at takeactionnow extended that quiet processing, content that continues to do work after I close the tab is content with afterlife in the mind and this site is producing those long lived effects at a meaningful rate.
Started forming counter examples to test the claims and the post handled most of them implicitly, and a look at fashionloversstore continued that anticipatory style, writers who think two steps ahead of the critical reader save themselves from a lot of follow up work and this writer has clearly internalised that habit consistently.
https://bogov-team.ru/
More original than the recycled takes I keep finding on the topic elsewhere, and a quick look at simplefashionhub confirmed it, the kind of site that has its own voice rather than echoing whatever is trending which makes it stand out as a refreshing change from the usual rotation of generic content I see daily.
plinko aviator withdrawal [url=plinko62894.help]plinko62894.help[/url]
A particular pleasure to read this with a fresh coffee, and a look at nightbloomoutlet extended the pleasure across more pages, content that pairs well with quiet morning rituals is something I have come to value highly and this site has the kind of energy that fits naturally into a calm reading routine.
Felt the post was written for someone like me without explicitly addressing me, and a look at learnwithoutlimits produced the same fit, when content lands on its target without pandering you know the writer has done careful audience thinking rather than relying on demographic targeting or interest signals to do the work of editorial decisions.
aviator shabiki kenya
aviator withdrawal problem bd [url=http://aviator68130.help]http://aviator68130.help[/url]
Honest opinion is that this is the kind of post that builds long term trust with readers, and a look at brightvaluecenter reinforced that perception, the slow accumulation of trust through consistent quality is the only sustainable way to build a real audience and this site is clearly playing that long game.
aviator plinko [url=http://plinko62894.help/]http://plinko62894.help/[/url]
Approaching this site through a casual link click and being surprised by what I found, and a look at freshvaluestore extended the surprise, the rare experience of stumbling into excellent independent content rather than predictable mediocrity is one of the actual remaining pleasures of casual web browsing and this site provided it cleanly.
Worth marking the moment when reading this clicked into something useful for my own work, and a look at budgetfriendlystore extended that practical click, content that connects to my actual life rather than just being interesting is content with the highest kind of value and this site is generating that connection at a high rate.
One of the more honest takes on the topic I have seen lately, no spin and no oversell, and a stop at beststylecollection kept that going, the kind of voice the open web could use a lot more of rather than the endless echo chamber of recycled opinions floating around every social platform these days.
Skipped the comments to avoid spoilers and came back later to find them genuinely worth reading, and a stop at uniquechoicehub extended that surprised respect, when the discussion below a post matches the quality of the post itself you have found something special and this site appears to attract that kind of audience.
Now adding the homepage to my regular check rotation rather than waiting for individual links to find me, and a stop at globalbuycenter confirmed the rotation upgrade, the move from passive discovery to active checking is a vote of confidence in a sites ongoing quality and this site has earned that active engagement clearly.
Picked up on several small touches that suggest a careful editor, and a look at startfreshnow suggested the same hand at work across the broader site, editorial consistency at a granular level is one of the strongest signs that an operation is serious rather than just hobbyist and this site reads as serious throughout.
Probably worth setting aside a longer block to read more carefully than I can right now, and a stop at findgreatoffers confirmed the longer block plan, the impulse to schedule dedicated time for a sites archive is itself a measure of trust and this site has earned that scheduling impulse from me clearly today actually.
Liked how the writer used real examples instead of theoretical ones to make the points stick, and a stop at clickrank added even more concrete examples, this is the kind of practical approach that respects readers who actually want to apply what they learn rather than just nodding along passively without doing anything useful.
Thanks for treating the topic with the seriousness it deserves without becoming pompous about it, and a stop at discoverandshop continued that balanced treatment, the gap between earnest and self serious is huge and writers who can stay on the right side of it earn my respect when I find them online today.
Honestly this hits the sweet spot between detail and brevity, no rambling and no shortcuts, and a quick visit to softwindstudio kept that going across the related pages, the kind of place that respects your attention without trying to grab it through cheap tactics or attention seeking design choices that get tired fast.
Felt the post had been written without looking over its shoulder, and a look at staymotivateddaily continued that confident posture, content written for its own sake rather than against imagined critics has a different quality and this site reads as written from a place of confidence rather than defensive justification of every claim.
Just sat with this for a bit longer than I usually would because the points are worth thinking about, and after fashionloversoutlet I had even more to chew on, the kind of post that nudges your thinking forward without forcing the issue is something I have always appreciated in good writing online.
капельница от похмелья [url=https://kapelnicza-ot-pokhmelya-samara-23.ru]https://kapelnicza-ot-pokhmelya-samara-23.ru[/url]
Reading this between meetings turned out to be the most useful thing I did all afternoon, and a stop at naturerootstudio kept that productivity feeling going, content can sometimes outperform actual work in terms of what gets accomplished mentally and this site managed that today which is genuinely a high bar to clear consistently.
https://herrikoa.com/modules/pgs/sovety_po_prohoghdeniyu_golden_compass_osnovnye_missii_005.html
роликовые шторы [url=https://rulonnye-elektroshtory.ru]роликовые шторы[/url]
Reading this in three sittings because the day was fragmented, and the piece survived the fragmentation, and a stop at shopandsmilemore held up under similar reading conditions, content engineered for continuous attention is fragile in modern conditions and this site reads as durable across the realistic ways people consume content today.
Picked this up between two other things I was doing and got drawn in completely, and after boldswap my original tasks were completely forgotten for a while, content that derails a workflow in a positive way by being more interesting than what you were already doing is rare and worth recognising clearly.
luxury apartments for sale phuket [url=https://apartments-for-sale-in-phuket-4.com]luxury apartments for sale phuket[/url]
https://buyankina.ru/
https://cole.vn/images/pgs/index.php?osobennosti_detskoy_drughby_chto_neobhodimo_znaty_roditelyam.html
Проститутки Донецк
1win confirmare cont Moldova [url=http://1win15609.help]http://1win15609.help[/url]
мостбет лимиты пополнения [url=https://mostbet23586.help]https://mostbet23586.help[/url]
Glad the writer kept this short rather than padding it out, the points stand on their own without needing extra context, and a look at discoverfashioncorner kept the same approach going, brevity is a sign of confidence in the substance and the team here clearly trusts their content to land without filler.
Spin Rise
p179d85 ошибка mercedes
уличные зонты У нас вы найдете разнообразную ротанговую мебель для сада, способную украсить любую приусадебную территорию.
The tone stayed consistent across the whole post which is harder than it looks for longer pieces, and a look at freshgiftmarket continued the same voice, this kind of editorial consistency is a sign of either a single careful writer or a tightly run team and either is impressive today across the broader media environment.
сколько стоит капельница на дому [url=https://kapelnicza-ot-pokhmelya-voronezh-14.ru]сколько стоит капельница на дому[/url]
промокод мелбет [url=http://melbet87025.help]http://melbet87025.help[/url]
Quality work here, the post reads cleanly and the points stay focused throughout, and a stop at trendylivinghub kept the standard high, you can tell the writer cares about the final result rather than just hitting publish for the sake of having something new on the page to feed the search engines.
Well done, the kind of post that makes you slow down and actually read instead of skimming for keywords, and a look at brightstyleoutlet kept me reading carefully too, that is a sign of writing that has been crafted rather than churned out for an algorithm to see today and tomorrow.
Worth saying that the writing carries a particular kind of authority without making any explicit claims to it, and a stop at fullbloomdesigns extended that earned authority feeling, sites that demonstrate expertise through the quality of their explanations rather than by stating credentials are sites I trust most and this site has it.
Reading this in the morning set a good tone for the day, and a quick visit to yourstylestore kept that good tone going, content can do that sometimes when it hits the right notes and finding sites that consistently strike that tone is something I have learned to recognise and reward with regular visits.
вывод из запоя в стационаре [url=https://vyvod-iz-zapoya-v-staczionare-nizhnij-novgorod-16.ru]вывод из запоя в стационаре[/url]
Ознакомьтесь, https://dzen.ru/a/afB52blaGm-DZM-7
Honestly this hits the sweet spot between detail and brevity, no rambling and no shortcuts, and a quick visit to brightvaluehub kept that going across the related pages, the kind of place that respects your attention without trying to grab it through cheap tactics or attention seeking design choices that get tired fast.
Glad to find a site whose links lead somewhere worth going rather than back to itself for SEO juice, and a stop at middaymarketplace kept that generous outbound feel, citing other peoples work with real respect rather than just for ranking signals is a sign of an honest operation worth supporting going forward.
Most of my reading time goes to a small number of trusted sources and this one is now joining that group, and a stop at shopandsmiletoday reinforced the group membership, the few sites that earn a place in my regular rotation are sites I expect ongoing returns from and this one has earned that elevated position consistently.
Just want to recognise that someone clearly cared about how this turned out, and a look at freshfashionfinds confirmed that care extends across the broader site, you can feel the difference between content shipped to hit a deadline and content released because the writer was actually proud of the result for once.
Picked this site to mention to a colleague who would benefit, and a look at dartray added more material I will pass along, recommending sites to colleagues is a higher bar than recommending to friends because the professional context demands more careful curation and this site cleared the professional bar without me having to think.
Just nice to read something that does not feel like it was assembled from a content brief, and a stop at fashiondailyhub kept that handcrafted feel going, you can tell when a real human with real understanding is behind the words versus a templated piece churned out for an algorithm to find.
Just want to acknowledge that the writing here is doing something right, and a quick visit to learnsomethingincredible confirmed the same standards run across the broader site, recognising good work is something I try to do when I find it because the alternative is silence and silence rewards mediocrity.
Reading this between meetings turned out to be the most useful thing I did all afternoon, and a stop at trendypurchasehub kept that productivity feeling going, content can sometimes outperform actual work in terms of what gets accomplished mentally and this site managed that today which is genuinely a high bar to clear consistently.
Picked up something useful for a side project, and a look at naturerailstore added another piece I will incorporate, content that connects to specific projects I am working on is content with practical utility and the practical utility of this site is showing up across multiple posts I have read in the last hour or so.
Felt the post handled a sensitive angle of the topic with appropriate care, and a look at softstoneemporium extended that careful handling across related material, sites that can navigate delicate territory without causing damage are rare and require a level of judgement that comes from experience rather than from following any clear playbook.
A piece that handled multiple complications without becoming confused, and a look at dailydealsplace continued that organisational clarity, holding multiple threads in a single piece without losing any of them is a sign of skilled writing and this site has clearly developed the editorial discipline to manage complexity without sacrificing readability throughout.
Thank you for being clear and direct, that simple approach saves so much frustration on the reader’s end, and a stop at bestchoiceoutlet only made me more sure of it, the rest of the content seems to follow the same pattern which is a great sign of consistent editorial care behind the scenes.
Skipped the related links section thinking I had read enough and then came back to it later when curiosity got the better of me, and a stop at shopandshine confirmed I should have just read it first, every section of this site appears to deserve careful attention rather than skipping past lazily.
Quietly enjoying that I have found a new site to follow for the topic, and a look at bestbuycorner reinforced the small pleasure of the find, the discovery of new high quality sources is one of the more durable pleasures of careful internet reading and this site has been generating that discovery pleasure at multiple points already today.
Quietly enjoying that I have found a new site to follow for the topic, and a look at trendshoppingworld reinforced the small pleasure of the find, the discovery of new high quality sources is one of the more durable pleasures of careful internet reading and this site has been generating that discovery pleasure at multiple points already today.
Reading carefully here has reminded me what reading carefully feels like, and a look at freshchoicehub extended that reminder, the experience of careful reading versus skimming is different in ways I had partially forgotten and this site has clearly refreshed my memory of what attention feels like when content rewards it consistently.
Decided not to comment because the post said what needed saying, and a stop at startfreshnow continued that complete feel, content that does not invite obvious additions or corrections from readers is content that has been carefully considered and this site appears to consistently produce pieces that satisfy rather than provoke unnecessary follow ups.
монтаж системы домофонов http://ustanovka-domofona-kaliningrad.ru
Now considering carefully how to share this site with the right audience rather than broadcasting widely, and a look at brighttrendstore extended that careful sharing impulse, content worth sharing carefully rather than spamming is content that has earned a higher kind of recommendation and this site has earned that careful shareability throughout pieces.
Solid information that lines up with what I have been hearing from other reliable sources, and after my visit to freshtrendcorner I was even more certain of that, this site checks out which is something I value highly when so many places online play loose with the facts to chase a quick click.
вывод из запоя недорого нарколог24 [url=https://vyvod-iz-zapoya-na-domu-sankt-peterburg-19.ru]https://vyvod-iz-zapoya-na-domu-sankt-peterburg-19.ru[/url]
Strong recommendation from me, anyone curious about the topic should make time for this, and a look at earthstoneboutique only sharpens that recommendation further, the kind of resource that holds up against careful scrutiny rather than crumbling at the first critical question is rare and worth pointing other people toward when the topic comes up.
A piece that reads as if the writer trusted readers to fill in obvious gaps, and a look at fairshelf continued that respectful approach, content that does not over explain what the reader can infer is content that respects intelligence and this site has clearly chosen to write to capable readers rather than to the lowest common denominator.
Came in skeptical and left mostly convinced, that is the highest praise I can offer, and a look at brightstyleoutlet pushed me further in the same direction, content that survives a critical first read is rare and worth recognising because most blog posts crumble under any real scrutiny these days when you actually pay attention closely.
как играть в crash mostbet [url=https://mostbet81396.help]как играть в crash mostbet[/url]
A piece that respected the reader by not over explaining the obvious, and a look at boltdepot continued that calibrated approach, finding the right level of explanation is one of the harder editorial calls and this site has clearly thought carefully about what readers will already know versus what they need help with consistently.
Spent a few minutes here and came away with a clearer picture of the topic, the writing keeps things simple without dumbing them down, and after a stop at midcitycollections the rest of the points lined up neatly which is something I appreciate when I am short on time and need answers fast.
Just sat with this for a bit longer than I usually would because the points are worth thinking about, and after shopandsmiletoday I had even more to chew on, the kind of post that nudges your thinking forward without forcing the issue is something I have always appreciated in good writing online.
Really thankful for posts that respect a reader’s time, this one does, and a quick look at fashionchoiceworld was the same, no need to scroll through endless intros just to get to the actual content, that approach alone is enough reason to come back here regularly for the kind of writing offered.
Easy to recommend without reservations, the site delivers on every promise it implicitly makes, and a look at freshcollectionhub kept that same standard going, the kind of consistency that earns trust over time rather than chasing it through aggressive marketing is what I see here and it is appreciated greatly by this particular reader today.
mostbet bónusz beváltás [url=https://www.mostbet50472.help]mostbet bónusz beváltás[/url]
кухни на заказ производство спб [url=https://kuhni-spb-58.ru]https://kuhni-spb-58.ru[/url]
Now adjusting my expectations upward for the topic based on this post, and a stop at trendloversplace continued that bar raising effect, content that resets what I think is possible on a subject is doing real work in shaping my standards and this site is providing those bar raising experiences at a notable rate during sessions.
100cuci rebate [url=https://100cuci-8.com]100cuci rebate[/url]
Worth pointing out that the writing reads as confident without being defensive about it, and a look at namedriftboutique extended that secure tone, content that does not pre emptively argue against imagined critics has a different quality from defensive writing and this site reads as written from a place of real ease.
mostbet KGS счет [url=https://www.mostbet81396.help]https://www.mostbet81396.help[/url]
Now adding this site to a small mental group of recommendations I keep ready for specific kinds of inquiries, and a stop at uniquegiftplace extended the recommendation readiness, content that I can confidently point friends and colleagues toward in specific contexts is content with real social utility and this site has that utility clearly.
mostbet вывод средств [url=https://www.mostbet23586.help]https://www.mostbet23586.help[/url]
luxury phuket villas for sale [url=https://villas-for-sale-in-phuket-4.com]luxury phuket villas for sale[/url]
зеркало vavada
сочетание рулонных рулонные шторы и тюль фото [url=https://elektricheskie-rulonnye-shtory99.ru]https://elektricheskie-rulonnye-shtory99.ru[/url]
mostbet tranzakció előzmények [url=https://www.mostbet50472.help]https://www.mostbet50472.help[/url]
One of the more honest takes on the topic I have seen lately, no spin and no oversell, and a stop at deccard kept that going, the kind of voice the open web could use a lot more of rather than the endless echo chamber of recycled opinions floating around every social platform these days.
Bookmark folder reorganised slightly to make this site easier to find, and a look at softpeakselection earned the same accessibility upgrade, the small organisational moves I make for sites I expect to return to often are themselves a signal of how much I trust them and this site triggered those moves naturally.
melbet login [url=http://melbet87025.help]http://melbet87025.help[/url]
1win aplicatie sigura [url=http://1win15609.help]1win aplicatie sigura[/url]
Worth pointing out that the writer made the topic feel more interesting than I had been expecting, and a look at discoveramazingstories continued that elevation effect, content that improves the apparent quality of its subject through skilled treatment is doing something real and this site has clearly developed that kind of editorial alchemy throughout.
Now feeling the quiet pleasure of finding writing that takes itself seriously without being self serious, and a stop at rareseasonshoppe extended that subtle pleasure, the gap between earnest and pretentious is fine and this site has clearly chosen to land on the earnest side without slipping over into pretentious which is impressive.
melbet создать аккаунт [url=https://melbet87025.help]https://melbet87025.help[/url]
Glad I stumbled across this post, the explanations actually make sense without needing background knowledge to follow along, and after a stop at dailydealsplace the same was true there, no assumptions about the reader just clear writing that anyone can understand from the first line right through to the end.
Now considering the post as evidence that careful blog writing is still possible, and a look at trendmarketzone extended that evidence, the broader question of whether the modern web can sustain quality writing has obvious empirical answers in sites like this one and seeing them is reassuring even when they remain a minority overall today.
Reading this gave me something to think about for the rest of the afternoon, and after simplegiftfinder I had even more to mull over, the kind of post that lingers in the background of your day rather than evaporating immediately is genuinely valuable in an attention economy that punishes depth rather than rewarding it.
Decided to read this site for a while before forming a verdict, and the verdict after several pages is positive, and a stop at dreamfieldessentials continued that pattern, judging a site requires more than one post and giving sites a fair sample is something I try to do for promising candidates rather than rushing to dismiss.
Picked up a couple of new ideas here that I can actually try out, and after my visit to brightchoicecollection I have even more notes saved, this is the kind of resource that pays you back for the time you spend on it which is rare to come across in this corner of the web.
A piece that handled a controversial angle without becoming heated, and a look at learnshareachieve continued that calm engagement, content that can address contested topics without inflaming them is doing rare diplomatic work and this site has clearly developed the editorial maturity to handle sensitive material with the appropriate temperature of writing throughout.
Bookmark added in three places to make sure I do not lose the link, and a look at learnsomethingvaluable got the same redundant treatment, sites I am afraid to lose are the rare keepers and this is clearly one of them based on what I have read so far across this and a couple of related posts.
Now setting aside time on my next free afternoon to read more from the archives, and a stop at puregiftcorner confirmed that time will be well spent, the rare site whose archive deserves a dedicated reading session rather than just casual sampling is the kind of resource worth scheduling around and this one qualifies clearly.
Liked that the post left some questions open rather than pretending to settle everything, and a stop at exploreopportunities continued that intellectual honesty, content that respects the limits of its own claims is more trustworthy than content that overreaches and this site has clearly figured out which positions it can defend confidently.
Learned something from this without having to dig through layers of fluff, and a stop at besttrendshub added a bit more context that helped tie things together for me, definitely a useful corner of the internet for anyone who wants real information without the usual marketing nonsense around it that often ruins similar pages.
Now appreciating that the post did not require me to agree with the writer to find it valuable, and a look at forestlanecreations maintained the same useful regardless of agreement quality, content that informs even when it does not convince is content with broader utility and this site reads as useful even when I disagree.
High quality writing, no marketing speak and no buzzwords that mean nothing, and a stop at freshbuycollection kept that going, simple direct content that actually communicates something is harder to find than it should be and this is one of the rare places that gets it right consistently across many different posts.
My usual response to new bookmarks is to forget them but this one I have already returned to twice, and a look at modernfashionhub pulled me back a third time, the actual return rate to bookmarked sites is the real measure of value and this one is clearing that measure at a notable rate already.
Honest take is that I will probably forget most of what I read online today but this post is one I will remember, and a stop at mountainviewoutlet kept that same memorable quality going, certain writing leaves a residue in the mind in a way most content simply does not manage.
Good clean post, no errors and no awkward phrasing that breaks the reading flow, and a stop at trendfashioncorner kept the same standard, definitely the kind of editorial care that earns a return visit because it tells me the writer is paying attention to details that matter to readers rather than just rushing publication.
рулонные шторы виды механизмов [url=https://rulonnye-elektroshtory.ru]рулонные шторы виды механизмов[/url]
https://silavmisli.ru/wp-content/pgs/?ghenskoe_izobretenie_kak_poyavilisy_avtomobilynye_stekloochistiteli.html
Now feeling the rare pleasure of trusting a source completely on first encounter, and a look at uniquegiftplace extended that initial trust into something more durable, the calibration of trust to evidence is something I do informally and this site has earned high trust through the cumulative weight of multiple consistently good posts already.
Just want to acknowledge that the writing here is doing something right, and a quick visit to bestbuycollection confirmed the same standards run across the broader site, recognising good work is something I try to do when I find it because the alternative is silence and silence rewards mediocrity.
Came in expecting another generic take and got something with actual character instead, and a look at smartbuyplace carried that personality forward, finding a distinct voice on a saturated topic is impressive and worth pointing out when it happens because most sites end up sounding identical to their nearest competitors quickly.
The tone stayed consistent across the whole post which is harder than it looks for longer pieces, and a look at timelessharbornow continued the same voice, this kind of editorial consistency is a sign of either a single careful writer or a tightly run team and either is impressive today across the broader media environment.
Grateful for posts like this one, they remind me there are still places online run by people who care about quality, and a look at trendandstyleworld reflected the same standards, you can tell the difference between content made for readers and content made just for search engines today and this is the former.
Now planning to come back when I have the right kind of attention to read carefully, and a stop at findyourbestself reinforced that plan, choosing the right moment to read certain content is a quiet form of respect for the work and this site is generating those careful planning behaviours from me consistently as a reader.
Reading carefully this time rather than scanning, and the depth shows up in places I missed first time around, and a look at boltport rewarded the same careful approach, content that holds up to multiple reads is content I want more of in my regular rotation rather than disposable scroll fodder daily.
Decided this was the best thing I had read all morning, and a stop at trendmarketplace kept that ranking intact, ranking my reading is something I do mentally throughout the day and the top rank is competitive and not easily won but this site won it without needing to overstate its claims for that.
Reading this prompted me to send the link to two different people for two different reasons, and a stop at startbuildingtoday provided ammunition for a third share, content that suits multiple audiences without being generic enough to be useless to any of them is genuinely valuable and this site has that multi audience quality clearly.
Probably going to mention this site in a write up I am working on later this month, and a stop at happytrendworld provided more material for that potential mention, content worth referencing in my own published work rather than just personal reading is content with the highest endorsement level and this site has earned that endorsement.
Took some notes for a project I am working on, and a stop at discovernewvalue added more raw material to those notes, content that contributes to my own creative work rather than just being interesting in the moment is the kind I value most and the kind I will keep coming back to repeatedly.
Проститутки ДНР
During the time spent here I noticed the absence of the usual distractions, and a stop at purestylehub extended that distraction free experience, content that does not fight my attention with pop ups and modals and aggressive prompts is content that respects me and this site has clearly chosen the respectful approach throughout.
Once you start reading carefully here it is hard to go back to lower quality alternatives, and a stop at modernvaluecollection reinforced that ratchet effect, the way good content raises standards is real over time and this site has clearly contributed to raising my expectations for what is possible in writing on the topic generally.
Honestly slowed down to read this carefully which is not my default, and a look at brightchoicecollection kept me in that careful reading mode, the kind of writing that demands attention by being worth attention is rare in a media environment full of content engineered to be skimmed not read with any real focus today.
вывод из запоя капельница на дому [url=https://kapelnicza-ot-pokhmelya-voronezh-14.ru]вывод из запоя капельница на дому[/url]
Skipped breakfast still reading this and finished hungry but satisfied, and a stop at discovergiftitems kept me past breakfast time, content that displaces basic biological needs is content with serious attentional pull and the writers here are clearly capable of producing that level of engagement which is genuinely impressive these days.
Now placing this in the small category of sites whose updates I would actually want to know about, and a stop at learnandexplore confirmed that placement, the difference between sites I want to follow and sites I just consume from is real and this one has crossed into the active follow category from the casual consumption side.
The conclusions felt earned rather than tacked on at the end like an afterthought, and a look at dreamshopworld kept that careful structure going, you can tell when a writer has thought about the shape of their post versus just letting it ramble out and hoping for the best at the end which most do.
Thanks for the honest framing without exaggerated claims that the topic will change my life, and a stop at yourgiftcorner kept the same modest tone, restraint in marketing language signals trustworthiness and the writers here are clearly playing the long game by building credibility rather than chasing immediate clicks through hyperbole.
Started reading skeptically because the headline seemed overconfident, and the post earned the headline by the end, and a look at purefashionpick continued that pattern of earning its claims, sites that can back up their headlines without overpromising are rare and this one has clearly developed editorial calibration on that front consistently.
Now adjusting my expectations upward for the topic based on this post, and a stop at findyourtruepath continued that bar raising effect, content that resets what I think is possible on a subject is doing real work in shaping my standards and this site is providing those bar raising experiences at a notable rate during sessions.
как пополнить счет mostbet [url=https://mostbet81396.help/]как пополнить счет mostbet[/url]
Saving the link for sure, this one is a keeper, and a look at learnsomethingvaluable confirmed I should bookmark the entire site rather than just this page, the consistency across what I have seen so far suggests there is a lot more here worth coming back for soon when I have more time.
Picked up a couple of new ideas here that I can actually try out, and after my visit to besttrendoutlet I have even more notes saved, this is the kind of resource that pays you back for the time you spend on it which is rare to come across in this corner of the web.
https://technologicalboxes.com/%D8%A3%D9%81%D8%B6%D9%84-%D8%A7%D9%84%D9%85%D9%88%D8%A7%D9%82%D8%B9-%D9%84%D8%AA%D8%B9%D9%84%D9%85-%D8%A8%D8%B1%D9%86%D8%A7%D9%85%D8%AC-%D9%85%D8%A7%D9%8A%D9%83%D8%B1%D9%88%D8%B3%D9%88%D9%81%D8%AA/
круглосуточный вывод из запоя нарколог 24 [url=https://vyvod-iz-zapoya-na-domu-sankt-peterburg-19.ru]https://vyvod-iz-zapoya-na-domu-sankt-peterburg-19.ru[/url]
Found the rhythm of the prose particularly enjoyable on this read through, and a look at modernlivinghub kept that musical quality going across the related pages, sentence rhythm is something most blog writers ignore but it makes a real difference in how content lands with the careful reader who cares.
капельница от похмелья [url=https://kapelnicza-ot-pokhmelya-samara-23.ru]https://kapelnicza-ot-pokhmelya-samara-23.ru[/url]
A piece that handled the topic with appropriate weight without becoming portentous, and a look at modernfashionhub continued that calibrated seriousness, content that takes itself seriously without becoming pompous is something this site has clearly figured out and the balance shows up in every piece I have read across multiple sessions now.
A clear cut above the usual noise on the subject, and a look at findbettervalue only made that gap wider in my view, the kind of place that earns its visitors through quality rather than through aggressive marketing or sponsored placements which is increasingly the only way most sites stay afloat across the modern web.
Now placing this in the small category of sites whose updates I would actually want to know about, and a stop at trendcollectionstore confirmed that placement, the difference between sites I want to follow and sites I just consume from is real and this one has crossed into the active follow category from the casual consumption side.
Now feeling the small relief of finding writing that does not condescend, and a stop at urbanwearhub extended that respect for readers, content that treats its audience as capable adults rather than as people to be managed produces a different reading experience and this site has clearly chosen the respectful approach across all pieces.
Skipped the related products section because there was none, and a stop at staymotivateddaily also lacked any aggressive monetisation, content that is not constantly trying to convert me into a customer or subscriber is content that has confidence in its own value and that confidence shows up as a different reading experience.
mostbet befizetés biztonság [url=https://www.mostbet50472.help]mostbet befizetés biztonság[/url]
Liked the balance between depth and brevity, never too shallow and never too long, and a stop at creativegiftoutlet kept the same balance going across the rest of the site, this is one of the harder skills in writing and the team here clearly has it figured out very well indeed across every page.
Honest take is that I will probably forget most of what I read online today but this post is one I will remember, and a stop at uniquegiftmarket kept that same memorable quality going, certain writing leaves a residue in the mind in a way most content simply does not manage.
Now feeling the small relief of finding writing that does not condescend, and a stop at skylinefashionstore extended that respect for readers, content that treats its audience as capable adults rather than as people to be managed produces a different reading experience and this site has clearly chosen the respectful approach across all pieces.
мостбет как вывести на банковскую карту [url=www.mostbet23586.help]www.mostbet23586.help[/url]
A particular pleasure to read this with a fresh coffee, and a look at trendandstylemarket extended the pleasure across more pages, content that pairs well with quiet morning rituals is something I have come to value highly and this site has the kind of energy that fits naturally into a calm reading routine.
The whole experience of reading this was pleasant from start to finish, no pop ups and no annoying interruptions, and a look at timberlinewebstore continued that clean experience, technical choices about page design matter for the reader and this site clearly cares about the small details that add up to comfort across multiple visits.
However many similar pages I have read this one taught me something new, and a stop at happytrendstore added more new material, content that contributes genuinely fresh information rather than recycling what is already widely available is content with real informational value and this site is providing that informational freshness at a notable rate.
This one is staying open in a tab for the rest of the day so I can come back and re read certain parts, and a look at besttrendcollection suggests I will be doing the same with a few more pages here too, this is going to be a deep dive over the coming hours.
Found the section structure particularly thoughtful, and a stop at dreambuildachieve suggested the same care across the broader site, structural choices guide the reader through the material in ways most people do not consciously notice but feel the absence of when those choices are made carelessly or not at all.
Refreshing to read something where the words actually mean something instead of filling space, and a stop at modernstyleworld kept that going, the writing here trusts the reader to follow along without endless repetition or constant reminders of what was already said earlier in the post which I appreciate.
Thanks for the readable length, I finished it without checking how much was left, and a stop at discovernewvalue kept me reading the same way, when I stop noticing the length of a piece because the content is engaging enough to sustain attention without willpower the writer has done their job well today.
Now sitting with the thoughts the post triggered rather than rushing on to the next thing, and a stop at dailybuyoutlet extended that reflective pause, content that earns time for thought after closing the tab is content of higher value than the merely interesting and this site has clearly produced that lasting effect today.
Following the post through to the end without my attention drifting once, and a look at ironrootcorner earned the same uninterrupted attention, content that holds attention without manipulating it is content with substantive pull and this site has demonstrated that substantive pull across multiple pieces in a single reading session reliably here today.
Liked that the post resisted a sales pitch ending, and a stop at happydailycorner maintained the no pitch approach, content that ends without trying to convert me into a customer or subscriber is content that has confidence in its own value and this site is clearly playing the long game on reader trust.
However casually I came to this site I have ended up reading carefully, and a look at purefashionoutlet continued earning that careful reading, the conversion from casual visitor to careful reader is something content earns rather than demands and this site has accomplished that conversion for me over the course of just a few pieces.
Felt the post handled a sensitive angle of the topic with appropriate care, and a look at findyourdirection extended that careful handling across related material, sites that can navigate delicate territory without causing damage are rare and require a level of judgement that comes from experience rather than from following any clear playbook.
Thanks for putting this online without locking it behind email signups or paywalls, and a quick visit to modernfashionzone kept that open feel going, content that trusts the reader to come back rather than gating access is the kind of approach I will reward with regular return visits over time happily.
Decided this was the best thing I had read all morning, and a stop at bravoflow kept that ranking intact, ranking my reading is something I do mentally throughout the day and the top rank is competitive and not easily won but this site won it without needing to overstate its claims for that.
The overall feel of the post was professional without being stuffy, and a look at yourdailyshopping kept that approachable expertise going, finding the right register for technical content is hard but this site has clearly figured out how to sound knowledgeable without slipping into that distant lecturing tone that loses readers in droves every time.
Worth pointing out the careful word choice in this post, no buzzwords and no jargon, and a look at happyshoppingcorner continued that disciplined vocabulary, sites that resist the pull of trendy language are sites that will read well in five years and this one is clearly built for that kind of long durability.
Comfortable read, finished it without realising how much time had passed, and a look at bestseasonfinds pulled me into more pages the same way, the absence of friction in good content lets time disappear and that is one of the highest compliments I can pay any piece of writing I find online during a regular search session.
Liked the careful selection of which details to include and which to skip, and a stop at startdreamingbig reflected the same editorial judgement, knowing what to leave out is just as important as knowing what to include and this site has clearly figured out where that line sits for the topics it covers regularly.
A welcome contrast to the loud takes that have dominated my feed lately, and a look at trendandbuyworld extended that calm voice, content that arrives without yelling has become unusual in the modern attention economy and this site is one of the few places I have found that consistently delivers without raising its voice.
Reading this in three sittings because the day was fragmented, and the piece survived the fragmentation, and a stop at modernfashioncorner held up under similar reading conditions, content engineered for continuous attention is fragile in modern conditions and this site reads as durable across the realistic ways people consume content today.
Just want to acknowledge that the writing here is doing something right, and a quick visit to bestbuycollection confirmed the same standards run across the broader site, recognising good work is something I try to do when I find it because the alternative is silence and silence rewards mediocrity.
A relief to read something where I did not have to fact check every claim mentally, and a look at findbetterdeals continued that reliable feeling, sites where I can lower my guard and trust the content are rare and this one is earning that trust paragraph by paragraph through consistent careful work behind the scenes.
Really liked the calm tone running through the post, no shouting and no urgency forced into the writing, and a look at smartlivingmarket kept that quiet confidence going, the kind of voice that makes the reader feel respected rather than yelled at which is depressingly common across most modern blog content these days.
Worth observing that the post landed without needing a flashy headline to hook attention, and a stop at smartbuyzone did the same, content that earns engagement through substance rather than packaging is the kind I trust more deeply and this site has clearly chosen substance as the primary lever for reader engagement throughout.
Found this really helpful, the explanations are simple but they actually answer the questions a normal reader would have, and after I followed shopwithdelight I had a clearer sense of the topic, no extra fluff just useful points laid out in a sensible order that made the time worth it.
автоматические рулонные шторы на окна [url=https://elektricheskie-rulonnye-shtory99.ru]автоматические рулонные шторы на окна[/url]
вывод из запоя в стационаре [url=https://vyvod-iz-zapoya-v-staczionare-nizhnij-novgorod-16.ru]вывод из запоя в стационаре[/url]
A clean piece that knew exactly what it wanted to say and said it, and a look at findyourwayforward maintained the same clarity of intention, knowing the goal of a piece before writing is something most blog content lacks and the clarity of purpose here shows up in every paragraph for any careful reader to notice.
Considered alongside other sources I have been reading this one consistently rises to the top, and a stop at uniquegiftcenter maintained that top ranking, the informal ongoing comparison between sources is something I do whenever reading on a topic and this site keeps coming out near the top of those comparisons over many sessions.
Felt the post had been written without looking over its shoulder, and a look at wildhorizontrends continued that confident posture, content written for its own sake rather than against imagined critics has a different quality and this site reads as written from a place of confidence rather than defensive justification of every claim.
Most of the time I feel the open web is in decline and then I find a site like this, and a stop at timbergroveoutlet reinforced that mood lift, the cumulative effect of finding occasional excellent independent content versus the cumulative effect of finding mostly mediocre content is real for the long term reader maintaining web habits today.
Now feeling the post has earned a proper recommendation rather than a casual mention, and a stop at dreambelievegrow reinforced the recommendation strength, the difference between mentioning and recommending is a small editorial distinction I observe in my own conversations and this site has earned the upgraded recommendation level from me confidently today.
This stands out compared to similar posts I have read recently, less noise and more substance, and a look at ironlinemarket kept that gap going, you can really feel the difference between content made by someone who cares versus content made to fill a publishing schedule for an algorithm trying to keep growing somehow.
Felt this in a way I cannot quite explain, the topic just hit different here, and a stop at creativechoicecorner continued in that vein, sometimes you find a site whose perspective lines up with how you have been thinking and reading their work feels like a small relief which I appreciated more than I expected.
Found something new in here that I had not seen explained this way before, and a quick stop at findyouranswers expanded the idea even further, the kind of writing that nudges your thinking forward a bit without forcing the issue is exactly what I look for online today and rarely actually find anywhere.
Skipped the related links section thinking I had read enough and then came back to it later when curiosity got the better of me, and a stop at purefashionchoice confirmed I should have just read it first, every section of this site appears to deserve careful attention rather than skipping past lazily.
Just enjoyed the experience without needing to think about why, and a look at majesticgrovers kept that effortless feeling going, sometimes the best content is invisible in the sense that you forget you are reading until you reach the end and realise time has passed without you noticing it pass naturally.
рулонные жалюзи купить в москве [url=https://rulonnye-elektroshtory.ru]рулонные жалюзи купить в москве[/url]
Came across this through a roundabout path and now it is on my regular rotation, and a stop at learnandshine sealed that decision, the open web still produces serendipitous discoveries when you let the citations and references guide you rather than relying purely on algorithmic feeds for new content recommendations always.
Liked that the post resisted a sales pitch ending, and a stop at cozycabincreations maintained the no pitch approach, content that ends without trying to convert me into a customer or subscriber is content that has confidence in its own value and this site is clearly playing the long game on reader trust.
Felt no urge to argue with the conclusions even though I started the post slightly skeptical, and a look at happychoicecorner maintained that pattern, writing that earns agreement through clarity of argument rather than rhetorical pressure is the kind I find most persuasive and the kind I want to read more of these days.
Really clear writing, the kind that makes you want to share the link with someone who has been asking about the topic, and a quick browse through urbanwearcollection only made me more sure of that, the information here stays useful long after the first read is done which says a lot.
Reading this gave me a small sense of progress on a topic I have been slowly working through, and a stop at softstoneoffering added another step forward, learning happens in small increments across many sources and finding sources that consistently contribute is the actual practical value of careful curation in an information rich world.
Most posts I read end up forgotten within a day but this one is sticking, and a look at timelessstyleplace extended that lingering effect, content that survives the immediate moment of reading rather than evaporating is content with genuine retention quality and this site has been producing memorable pieces at a rate notable across my reading.
Really like that the writer trusts the reader to follow simple logic without restating every previous point, and a stop at createpositivechange kept that respect going, treating an audience as capable adults rather than as people who need constant hand holding makes a noticeable difference in the reading experience for me.
Came back to this twice now in the same week which is unusual for me, and a look at yourdailyfinds suggested I will keep coming back, the kind of post that earns repeated visits rather than one and done reading is the gold standard for content quality and this site clearly hit that standard.
However many similar pages I have read this one taught me something new, and a stop at growwithdetermination added more new material, content that contributes genuinely fresh information rather than recycling what is already widely available is content with real informational value and this site is providing that informational freshness at a notable rate.
If you scroll past this site without looking carefully you will miss something, and a stop at bestpickshub extended that mild warning, the surface of the site does not advertise its quality loudly which means careful attention is required to recognise what is being offered here which is itself a kind of editorial signal.
A small thank you note from me to the team behind this work, the post earned it, and a stop at simplegiftmarket suggested more thanks would be in order over time, recognising the people who do good writing online is something I try to remember to do because the alternative is silence and silence rewards mediocrity unfortunately.
Generally I find the content on similar topics frustrating in specific ways and this post avoided all of them, and a look at learnsomethingdaily continued that frustration free experience, content that sidesteps the standard failure modes of its genre is content with editorial awareness and this site has clearly studied what fails elsewhere consistently.
рулонные шторы на окно в кухне [url=https://elektricheskie-rulonnye-shtory15.ru]https://elektricheskie-rulonnye-shtory15.ru[/url]
Honestly this kind of writing is why I still bother to read independent sites, and a look at finduniqueoffers extended that broader reflection, the few sites that justify continued attention to non algorithmic content are sites like this one and finding them periodically is enough to keep my reading habits oriented toward independent rather than aggregated content.
After reading several posts back to back the consistent voice across them is impressive, and a stop at briskpost continued that voice consistency, sites that maintain a single coherent voice across many pieces by potentially many writers represent serious editorial discipline and this one has clearly developed the institutional consistency needed for that.
вывод из алкогольного запоя [url=https://vyvod-iz-zapoya-na-domu-sankt-peterburg-19.ru]https://vyvod-iz-zapoya-na-domu-sankt-peterburg-19.ru[/url]
After several visits I am now confident this site is one to follow seriously, and a stop at fashionvaluecorner reinforced that confidence, the gradual building of trust through repeated quality exposures is the only sustainable way to develop reader loyalty and this site is building that loyalty in me through patient consistent work consistently.
villas for sale in phuket island [url=https://villas-for-sale-in-phuket-4.com]villas for sale in phuket island[/url]
Solid information that lines up with what I have been hearing from other reliable sources, and after my visit to urbanseedcenter I was even more certain of that, this site checks out which is something I value highly when so many places online play loose with the facts to chase a quick click.
100cuci alternatif [url=www.100cuci-8.com]100cuci alternatif[/url]
Reading this triggered a small but real correction in something I had assumed, and a stop at shoptheday extended that corrective effect, content that updates my beliefs through evidence rather than rhetoric is content with intellectual integrity and this site has earned that label consistently across the pieces I have read so far today.
Just want to record that this site is entering my regular reading list, and a look at discovernewworlds confirmed it deserves the spot, my regular reading list is short and well curated and adding to it requires meeting a fairly high quality bar that this site has clearly cleared without much effort apparently.
Thanks for a post that does not try to be funny when it is not the moment for it, and a stop at inspireyourjourney maintained the same appropriate seriousness, knowing when humour helps and when it just signals desperation for engagement is a sign of editorial maturity that many blogs have not developed yet.
Came here from a search and stayed for the side links because they were that interesting, and a stop at trendysaleoutlet took me even further into the site, the kind of organic exploration that good content invites is something most sites kill through aggressive interlinking and pushy navigation choices rather than relying on quality.
Now organising my browser bookmarks to give this site easier access, and a look at sunwaveessentials earned the same organisational priority, the small acts of digital housekeeping I do for sites I expect to use often are themselves a measure of trust and this site has triggered the trust based housekeeping behaviour from me clearly.
сколько стоит путевка в питер на 7 дней на двоих [url=www.piter-na-teplohode.ru]www.piter-na-teplohode.ru[/url]
plinko вывести деньги [url=http://plinko83214.help/]plinko вывести деньги[/url]
Pleasant surprise, the post delivered more than the headline promised, and a stop at lostmeadowmarket continued that pattern of under promising and over delivering, the rarest combination on the modern web where most content does the opposite by promising the world and delivering thin recycled summaries instead each time you click on something interesting.
The depth of coverage felt about right for the format, neither shallow nor overwhelming, and a look at findsomethingbetter kept that calibration going, getting the depth right for blog format is genuinely difficult because too shallow loses experts and too deep loses beginners but this site nailed it nicely which I really do appreciate.
поставить капельницу от запоя [url=https://kapelnicza-ot-pokhmelya-nizhnij-novgorod-7.ru]поставить капельницу от запоя[/url]
Closed the tab feeling I had spent the time well, and a stop at pureearthoutlet extended that feeling across more pages, the test of whether time on a site was well spent is one I apply silently after closing tabs and very few sites pass it but this one passed it cleanly today afternoon clearly.
Stands out for actually being useful instead of just being long, and a look at simpletrendmarket kept that going, length without value is the default mode of most blogs these days but this site has clearly chosen a different path which I respect a lot as a reader who values careful editing decisions like that.
Thanks for putting this online without locking it behind email signups or paywalls, and a quick visit to brightleafemporium kept that open feel going, content that trusts the reader to come back rather than gating access is the kind of approach I will reward with regular return visits over time happily.
заказать кухню спб [url=https://kuhni-spb-57.ru]https://kuhni-spb-57.ru[/url]
где заказать кухню в спб [url=https://kuhni-spb-60.ru]где заказать кухню в спб[/url]
установка домофона в доме монтаж домофона в частном доме
Now appreciating that the post left me with enough to say in a follow up conversation, and a look at coastalbrookstore added more material for those follow ups, content that prepares me for related conversations rather than just informing me alone is content with social utility and this site provides that social armament reliably for me.
прокапаться от запоя [url=https://kapelnicza-ot-pokhmelya-voronezh-14.ru]прокапаться от запоя[/url]
Felt the writer respected the topic without being precious about it, and a look at simplevaluecorner continued that respectful but unfussy treatment, finding the right register for serious topics is hard and this site has clearly figured out how to take the topic seriously while still being readable for casual visitors regularly.
Refreshing to read something where the words actually mean something instead of filling space, and a stop at grandstyleemporium kept that going, the writing here trusts the reader to follow along without endless repetition or constant reminders of what was already said earlier in the post which I appreciate.
Worth flagging that the writing rewarded a second read more than I expected, and a look at simplevaluehub produced the same second read benefit, content with hidden depths that emerge only on careful rereading is rare in the modern blog space and this site has clearly invested in that level of compositional density throughout.
Worth your time, that is the simplest endorsement I can give, and a stop at yourjourneycontinues extends that endorsement across the rest of the site, this is one of those increasingly rare places that delivers on what it promises rather than over selling the content and under delivering on substance every time which I find frustrating elsewhere.
youtube downloader url [url=https://skachat-video-s-youtube-9.ru]https://skachat-video-s-youtube-9.ru[/url]
скачать с ютуба в отличном качестве [url=https://skachat-video-s-youtube-10.ru]https://skachat-video-s-youtube-10.ru[/url]
If I were grading sites on this topic this one would receive high marks, and a stop at simplebuyzone continued earning those high marks, the informal grading I do mentally for content sources is something I take seriously even though it is informal and this site has been receiving consistent high marks across multiple sessions today.
Honestly this kind of writing is why I still bother to read independent sites, and a look at growbeyondboundaries extended that broader reflection, the few sites that justify continued attention to non algorithmic content are sites like this one and finding them periodically is enough to keep my reading habits oriented toward independent rather than aggregated content.
Held my interest from the opening line through to the closing thought, and a stop at yourdailycollection did the same, content that earns sustained attention in an environment full of distractions is doing something right and this site is clearly doing several things right rather than just one or two which I really appreciate.
коломна Это место, где современные тренды встречаются с богатым культурным наследием, создавая уникальный фон для творчества и самовыражения.
Refreshing to find writing that does not try to manipulate the reader into clicking onto the next page through cliffhangers and forced engagement, and a stop at modernlifestylecorner continued in the same respectful way, this is what reader first design actually looks like in practice rather than just in marketing copy that sounds nice.
Excellent post, balanced and well organised without showing off, and a stop at bestchoicevalue continued in that same vein, this site has clearly figured out the formula for content that works for readers rather than for search engine ranking signals which is harder than it sounds today and worth real recognition from anyone.
Honest assessment after reading this twice is that it holds up under careful attention, and a look at trendylivingmarket extended that durability across more pages, content that survives a second read without revealing weak spots is rarer than the average reader probably realises and this site clearly cleared that bar.
Skipped the related links section thinking I had read enough and then came back to it later when curiosity got the better of me, and a stop at happyhomehub confirmed I should have just read it first, every section of this site appears to deserve careful attention rather than skipping past lazily.
Now placing this in the same category as a few other sites I have come to trust, and a look at happyvaluecollection continued the placement decision, the small category of fully trusted sites is one I extend rarely and only after multiple positive reading sessions and this site has earned the category placement methodically over time.
https://emigranto.ru/blog/pokerdom_promokod_bonus_kod.html
Such writing is increasingly rare and worth supporting through attention, and a stop at inspiregrowthdaily extended that supportive attention across more pages, the conscious choice to spend time on sites that produce careful work rather than convenient consumption is itself a small form of patronage and this site is receiving that conscious patronage from me.
Now noticing how rare it is to find a site that does not feel rushed, and a look at fashiontrendstore extended that calm pace, content produced without time pressure has a different quality than content shipped to meet a deadline and this site reads as written without urgency which produces a different and better experience for readers.
Started believing the writer knew the topic deeply by about the second paragraph, and a look at dreamfashionfinds reinforced that confidence, the speed at which a writer establishes credibility through their writing is a useful quality signal and this writer establishes it quickly and quietly without resorting to credential dropping or self promotion.
Гранитная мастерская https://святаятроица73.рф в Рязани — изготовление памятников из гранита и мрамора на заказ. Производство, гравировка портретов, установка памятников и благоустройство мест захоронения. Индивидуальные проекты, качественный камень и профессиональный подход.
Reading this with my morning coffee turned into reading the related posts with my morning coffee, and a stop at shopforvalue stretched the morning further, content that pulls breakfast into a reading session rather than just accompanying it is content that has earned a higher claim on my attention than the average article does.
Ландшафтный дизайн заказать Наша ландшафтная компания — это команда увлеченных профессионалов, готовых воплотить в жизнь ваши мечты о идеальном участке, будь то живописный сад, функциональная зона отдыха или элегантное парадное пространство.
Только лучшее здесь: https://rikoremont.ru/company/read/374/
Probably going to mention this site in a write up I am working on later this month, and a stop at learnsomethingvaluable provided more material for that potential mention, content worth referencing in my own published work rather than just personal reading is content with the highest endorsement level and this site has earned that endorsement.
Bookmark earned and folder updated to track this site separately, and a look at shopforvalue confirmed the folder upgrade was the right call, organising my reading list so that good sites do not get lost in a sea of casual bookmarks is something I do more carefully now and this site warranted its own spot.
Really appreciate the absence of stock photos that have nothing to do with the content, and a quick visit to trendandfashionzone maintained the same restraint, visual filler is a tell that the writing cannot stand on its own and the lack of it here suggests the team has confidence in their content quality alone.
Bookmark added with a small mental note that this is a site to keep, and a look at starlitstylehouse reinforced the keep status, the verb keep rather than visit captures something about how I think about this kind of site and it is a higher tier of relationship than I have with most places online today.
Beyond the immediate post itself the editorial sensibility behind the site is what struck me, and a stop at findgreatoffers continued displaying that sensibility, content that reveals editorial choices through accumulated reading is content with structural quality and this site has clearly developed an underlying approach worth identifying through multiple sessions of reading.
Generally I do not leave comments but this post merits a small note, and a stop at trendylivingcorner extended that comment worthy quality, the urge to actively contribute to a sites community rather than passively consume from it is something specific content provokes and this site has provoked that engagement urge from me today.
Came in confused about the topic and left with a much firmer grasp on it, and after purechoicecenter I felt I could explain this to someone else without hesitation, that is the gold standard for any educational content and most sites simply fail to reach it ever which is unfortunate but true.
Came in skeptical of the angle and left mostly persuaded, and a stop at cedarloft pushed me a bit further in the same direction, content that can move a critical reader by argument rather than rhetoric is rare and worth pointing out because it indicates real substance underneath the surface presentation here.
Solid recommendation from me to anyone working in the area, the perspective here is grounded, and a look at createpositivechange adds even more useful angles, the kind of site that becomes a reference rather than just a one time read which is a higher bar than most blogs ever reach today on the modern web.
Мастера по ремонту кровли Мы предлагаем полный спектр услуг: от капитального ремонта и замены кровли до срочного устранения протечек и очистки от снега, гарантируя качество и долговечность вашего дома.
Reading this on a long flight and finding it the best thing I read across hours of trying, and a stop at findpeaceandpurpose kept the streak going, when content beats long flight reading you know it has substance because flight reading is a hard test of a piece given the alternatives available everywhere.
Reading this prompted me to clean up some old notes related to the topic, and a stop at brightcollectionstore extended that organising urge, content that triggers personal organisation rather than just consuming attention is content with motivating energy and this site has the kind of clarity that prompts active follow up rather than passive consumption.
Solid information that lines up with what I have been hearing from other reliable sources, and after my visit to dreamfashionoutlet I was even more certain of that, this site checks out which is something I value highly when so many places online play loose with the facts to chase a quick click.
Liked the way the post got out of its own way, and a stop at simplelivingmarket extended that invisible craft, the best writing you barely notice while reading because it is doing its work without drawing attention to itself and this site has clearly mastered that disappearing act across the pieces I have read.
коломна Это место, где современные тренды встречаются с богатым культурным наследием, создавая уникальный фон для творчества и самовыражения.
Solid value packed into a relatively short post, that takes skill, and a look at autumnspringtrends continues the dense useful content across more pages, this site clearly understands that respecting reader time is itself a form of generosity which is something most blog operations seem to have forgotten lately across the wider open web.
Felt this in a way I cannot quite explain, the topic just hit different here, and a stop at moderntrendmarket continued in that vein, sometimes you find a site whose perspective lines up with how you have been thinking and reading their work feels like a small relief which I appreciated more than I expected.
Solid information that lines up with what I have been hearing from other reliable sources, and after my visit to globalhomecorner I was even more certain of that, this site checks out which is something I value highly when so many places online play loose with the facts to chase a quick click.
Now noticing how rare it is to find a site that does not feel rushed, and a look at findpurposeandpeace extended that calm pace, content produced without time pressure has a different quality than content shipped to meet a deadline and this site reads as written without urgency which produces a different and better experience for readers.
Found the section structure particularly thoughtful, and a stop at trendylifestylecorner suggested the same care across the broader site, structural choices guide the reader through the material in ways most people do not consciously notice but feel the absence of when those choices are made carelessly or not at all.
Now adding the writer to a small mental list of voices I want to follow, and a look at globaltrendoutlet reinforced that follow intention, the few writers whose work I actively track are writers who have demonstrated sustained quality and this writer has clearly demonstrated that sustained quality across the pieces I have sampled here today.
эляmiks Тикток-аккаунт эляmiks стремительно набирает популярность и регулярно попадает в рекомендации благодаря своему уникальному контенту.
pinup free spins [url=https://pinup84291.help]pinup free spins[/url]
плинко жүктеу android [url=https://www.plinko83214.help]плинко жүктеу android[/url]
Looking forward to seeing what gets published next month, and a look at wildwoodfashion extended that anticipation across the broader site, finding myself looking forward to a sites future content rather than just consuming its existing content is a stronger commitment level than I usually reach with new finds and this site triggered that.
Clean writing, easy to read, and never tries too hard to impress, that combination is harder to find than people think, and after my time on trendyvaluezone I am sure this site treats its readers well, no flashy tricks just useful content done right which is honestly all I want online.
коломна Жительница Коломны уверенно штурмует рекомендации, предлагая зрителям оригинальные сюжеты, которые мгновенно разлетаются по профилям и вызывают активные обсуждения.
Appreciated the way each section connected smoothly to the next without abrupt jumps, and a stop at honestharvesthub kept that flow going nicely, transitions are something most blog writers ignore but the difference is huge for the reader who is trying to follow a sustained line of thought today across many different topics.
Bookmark earned and the bookmark feels like a permanent addition rather than a maybe, and a look at shopandsmiletoday confirmed that permanent status, the difference between durable bookmarks and ephemeral ones is something I have learned to feel quickly and this site triggered the durable feeling almost immediately during my first read here.
Skipped past the first paragraph thinking it was setup and had to come back when the rest referenced it, and a stop at kindlecrestmarket similarly rewarded careful reading from the start, content where every paragraph carries weight is content I now know to read from the beginning rather than skipping ahead.
Felt no urge to argue with the conclusions even though I started the post slightly skeptical, and a look at happylivingoutlet maintained that pattern, writing that earns agreement through clarity of argument rather than rhetorical pressure is the kind I find most persuasive and the kind I want to read more of these days.
Ландшафтный дизайн заказать Если вы решили заказать ландшафтный дизайн, мы предлагаем вам не просто услуги, а партнерство, направленное на создание пространства, которое будет радовать вас своей красотой и функциональностью долгие годы.
Liked how the writer used real examples instead of theoretical ones to make the points stick, and a stop at rustictrademarket added even more concrete examples, this is the kind of practical approach that respects readers who actually want to apply what they learn rather than just nodding along passively without doing anything useful.
pin-up depósito con Mastercard [url=http://pinup84291.help/]pin-up depósito con Mastercard[/url]
aviator плинко [url=http://plinko83214.help/]aviator плинко[/url]
Skipped to a specific section because I knew that was the question I had, and the answer was clean, and a stop at dreamdiscovercreate similarly delivered targeted answers without burying them, content engineered for readers who arrive with specific needs rather than open ended browsing is increasingly valuable in a search heavy reading environment.
Now realising this site has been quietly doing good work for longer than I knew, and a look at fashionfindsmarket suggested an archive worth exploring, sites with deep archives of consistent quality represent a different kind of resource than sites with viral hits and this one looks like the durable kind based on what I see.
Автомобили Автомобили
Great work on keeping things readable, the post never drags or repeats itself which I really appreciate, and a stop at fashionpicksmarket added a bit more context that fit naturally with what was already said here, no need to read everything twice to get the point being made today.
A well calibrated piece that knew its scope and stayed inside it, and a look at newvoyagecorner maintained the same scope discipline, scope creep is one of the failure modes of long blog posts and this site has clearly invested in the editorial discipline to prevent it which shows up in tightly contained pieces.
This stands out compared to similar posts I have read recently, less noise and more substance, and a look at softcloudboutique kept that gap going, you can really feel the difference between content made by someone who cares versus content made to fill a publishing schedule for an algorithm trying to keep growing somehow.
электрические рулонные шторы купить москва [url=https://elektricheskie-rulonnye-shtory99.ru]электрические рулонные шторы купить москва[/url]
Just wanted to say this was useful and leave a small note of thanks, and a quick visit to trendycollectionstore earned a similar nod from me, the small acknowledgements add up over time and represent the real economy of trust that good content runs on across the open and increasingly fragmented modern internet.
However many similar pages I have read this one taught me something new, and a stop at dreamfashionoutlet added more new material, content that contributes genuinely fresh information rather than recycling what is already widely available is content with real informational value and this site is providing that informational freshness at a notable rate.
Going to share this with a friend who has been asking the same questions for a while now, and a stop at simpletrendbuy added a few more pages I will pass along too, this is the kind of generous information that earns a small thank you from me right now and again later this week.
Все самое свежее здесь: https://detivmodnom.ru/
Well crafted post, the structure flows naturally from one point to the next without forcing transitions, and a stop at simplehomefinds kept the same flow going, you can tell when a writer has thought about how their content reads rather than just what it contains and this is one of those examples.
The conclusions felt earned rather than tacked on at the end like an afterthought, and a look at happybuycorner kept that careful structure going, you can tell when a writer has thought about the shape of their post versus just letting it ramble out and hoping for the best at the end which most do.
Now considering carefully how to share this site with the right audience rather than broadcasting widely, and a look at urbanbuycorner extended that careful sharing impulse, content worth sharing carefully rather than spamming is content that has earned a higher kind of recommendation and this site has earned that careful shareability throughout pieces.
Picked this up while looking for something else and ended up reading every paragraph because it was actually informative, and after yourdealhub I was sure I would come back, that does not happen often when most sites bury the useful parts under endless ads and pop ups today and across most categories online.
Reading this in the morning set a good tone for the day, and a quick visit to timberwoodcorner kept that good tone going, content can do that sometimes when it hits the right notes and finding sites that consistently strike that tone is something I have learned to recognise and reward with regular visits.
Following the post through to the end without my attention drifting once, and a look at boldstreetboutique earned the same uninterrupted attention, content that holds attention without manipulating it is content with substantive pull and this site has demonstrated that substantive pull across multiple pieces in a single reading session reliably here today.
A piece that reads like it was written for me without claiming to be written for me, and a look at warmwindsmarket produced the same fit, when the writer audience match clicks naturally without being engineered through demographic targeting you know the writing is solid and this site has that natural fit consistently for me.
Really appreciate the lack of pop ups, modals, cookie banners stacking on top of each other, and a quick visit to yourfavstore confirmed the same clean approach across the rest of the site, technical decisions about user experience are part of what makes content actually pleasant to engage with for sure.
Decided not to skim despite my usual habit and was rewarded for the discipline, and a stop at purestylecollection earned the same patient approach, training myself to recognise sites that warrant slower reading is part of being a careful online reader and this site is the kind that helps me practice that skill regularly.
Just wanted to drop a quick note saying this was a useful read on a topic I have been circling, no fluff, and a stop at clearport added a few extra points that fit the same simple style which makes the whole site feel coherent rather than thrown together by many different writers with different goals.
Now realising the post has been quietly doing important work in my mind for the past hour, and a stop at highpineoutlet extended that quiet processing, content that continues to do work after I close the tab is content with afterlife in the mind and this site is producing those long lived effects at a meaningful rate.
Thanks for putting in the work to make this approachable, plenty of sites cover the same ground but most do it badly, and a quick visit to globalfashioncenter confirmed this one stands apart, simple language and useful examples without anyone trying to sell me anything along the way which I really appreciated.
I really like how the writer keeps the tone friendly without sounding fake or overly polished, and after a stop at inspireeverymoment the same calm pace was there, no rushing to make a point and no padding either, just clean honest writing that I can respect and come back to later again.
Spent a few minutes here and came away with a clearer picture of the topic, the writing keeps things simple without dumbing them down, and after a stop at globalstylecorner the rest of the points lined up neatly which is something I appreciate when I am short on time and need answers fast.
академический отпуск купить справка академический отпуск купить
Now placing this in the same category as a few other sites I have come to trust, and a look at purevaluecorner continued the placement decision, the small category of fully trusted sites is one I extend rarely and only after multiple positive reading sessions and this site has earned the category placement methodically over time.
Reading this fit naturally into my afternoon walk because I was reading on my phone, and a stop at fashiondealstore continued well in that walking format, content that survives mobile reading without becoming awkward is content with format flexibility and this site has clearly thought about how it reads across different devices today.
A piece that did not waste any of its substance on sales or promotion, and a look at trendworldmarket continued that pure content focus, sites that resist the urge to monetise every paragraph are increasingly rare and this one has clearly made the editorial choice to keep the writing clean from commercial intrusion which I value highly.
However many similar pages I have read this one taught me something new, and a stop at happylivinghub added more new material, content that contributes genuinely fresh information rather than recycling what is already widely available is content with real informational value and this site is providing that informational freshness at a notable rate.
Most posts I read end up forgotten within a day but this one is sticking, and a look at dreamdiscovercreate extended that lingering effect, content that survives the immediate moment of reading rather than evaporating is content with genuine retention quality and this site has been producing memorable pieces at a rate notable across my reading.
вывод из запоя в наркологическом стационаре [url=https://vyvod-iz-zapoya-v-staczionare-nizhnij-novgorod-16.ru]https://vyvod-iz-zapoya-v-staczionare-nizhnij-novgorod-16.ru[/url]
If a friend asked me where to read carefully on the topic I would send them here without hesitation, and a look at believeinyourdreams confirmed the recommendation strength, the directness of my recommendation reflects how confident I am in the quality and this site has earned undiluted recommendations from me across multiple recent conversations actually.
A piece that handled a controversial angle without becoming heated, and a look at mountainmistgoods continued that calm engagement, content that can address contested topics without inflaming them is doing rare diplomatic work and this site has clearly developed the editorial maturity to handle sensitive material with the appropriate temperature of writing throughout.
с петербург туры [url=www.piter-na-teplohode.ru]www.piter-na-teplohode.ru[/url]
поставить капельницу от запоя [url=https://kapelnicza-ot-pokhmelya-nizhnij-novgorod-7.ru]поставить капельницу от запоя[/url]
Started believing the writer knew the topic deeply by about the second paragraph, and a look at softblossomcorner reinforced that confidence, the speed at which a writer establishes credibility through their writing is a useful quality signal and this writer establishes it quickly and quietly without resorting to credential dropping or self promotion.
On reflection this is the kind of writing that improves my taste for what is possible in the format, and a look at fashionloversoutlet continued raising that bar, content that elevates my expectations rather than lowering them is doing important work in calibrating my standards and this site is participating in that elevation reliably.
Closed the tab with a small sense of finality rather than the usual rushed exit, and a stop at buildconfidencehere produced the same considered closing, when reading ends with deliberate satisfaction rather than impatient skip you know the time was well spent and this site is producing those satisfying endings consistently across what I read.
Мастера по ремонту кровли Мы предлагаем комплексный ремонт мягкой, плоской, металлической и наплавляемой кровли, устраняя протечки и проводя капитальный ремонт, а также выполняем монтаж кровли под ключ, включая гибкую черепицу и металлочерепицу.
Speaking as someone who used to recommend blogs frequently and got out of the habit this site is rekindling that impulse, and a look at trendycollectionstore extended the rekindling, the recovery of an old habit triggered by encountering work that justifies it is itself a small kind of pleasure and this site is providing that recovery experience.
Now placing this in the small category of sites whose updates I would actually want to know about, and a stop at simpledealmarket confirmed that placement, the difference between sites I want to follow and sites I just consume from is real and this one has crossed into the active follow category from the casual consumption side.
Worth saying that this is one of the better things I have read on the topic in months, and a stop at shopthebestdeals reinforced that ranking, the topic is well covered by many sources but few do it with this level of care and the few that do deserve to be flagged so other readers can find them.
Bookmarking this for later, the kind of resource I want to keep nearby, and a quick look at oldtownstylehub confirmed the rest of the site is worth the same treatment, definitely going into my reference folder for the next time the topic comes up at work or in conversation with someone who asks.
Quality work here, the post reads cleanly and the points stay focused throughout, and a stop at urbanwilddesigns kept the standard high, you can tell the writer cares about the final result rather than just hitting publish for the sake of having something new on the page to feed the search engines.
Easy to recommend without reservations, the site delivers on every promise it implicitly makes, and a look at puregiftmarket kept that same standard going, the kind of consistency that earns trust over time rather than chasing it through aggressive marketing is what I see here and it is appreciated greatly by this particular reader today.
Now adding this to a list of sites I want to see flourish, and a stop at highlandcraftstore reinforced that wish, the few sites I actively root for are sites that produce the kind of work I want more of in the world and this one has joined that small list based on what I have read so far.
Now appreciating that the post did not try to imitate any other style I might recognise, and a stop at grandforeststudio continued that distinct voice, content with its own register rather than borrowed from elsewhere is content with real authorial presence and this site has clearly developed that presence through what feels like patient editorial work.
Now leaving a small mental note to recommend this when the topic comes up in conversation, and a look at yourbuyingcorner extended that recommend ready feeling, content that arms me with shareable references for likely future conversations is content with social value and this site is providing that conversational ammunition consistently for me lately.
Только лучшие материалы: https://ladytag.ru/
кухни на заказ спб недорого с ценами [url=https://kuhni-spb-57.ru]https://kuhni-spb-57.ru[/url]
сервис скачивания с ютуба [url=https://skachat-video-s-youtube-10.ru]https://skachat-video-s-youtube-10.ru[/url]
Нужна CRM по банкротству? Производство БФЛ автоматически автоматизация работы юридической компании, контроль этапов БФЛ, учет клиентов, документов и платежей. Управляйте делами, задачами и сроками процедур в единой системе с удобной аналитикой и отчетами.
Appreciated how the writer anticipated the questions a reader might have along the way, and a stop at futurepathmarket continued that thoughtful approach, you can tell when content has been edited with the reader in mind versus just published as a first draft and this is clearly the former approach across what I read.
купить кухню на заказ в спб [url=https://kuhni-spb-60.ru]https://kuhni-spb-60.ru[/url]
Reading the writers other posts after this one suggests the quality is consistent rather than peak, and a stop at fashiondealplace confirmed the consistent quality reading, sites that hold the same level across many pieces rather than peaking on a few are sites with sustainable editorial discipline and this one has clearly developed that.
Solid recommendation from me to anyone working in the area, the perspective here is grounded, and a look at globalchoicehub adds even more useful angles, the kind of site that becomes a reference rather than just a one time read which is a higher bar than most blogs ever reach today on the modern web.
скачать видео из youtube [url=https://skachat-video-s-youtube-9.ru]https://skachat-video-s-youtube-9.ru[/url]
Bookmarked the page and the homepage too because clearly there is more to explore here, and a quick stop at globaltrendoutlet only made that more obvious, this is the kind of place I want to dig through over a weekend rather than rushing through during a coffee break tomorrow morning before getting back to work.
Now wishing more sites covered topics with this level of care, and a look at purefashionworld extended that wish across more subjects, the rarity of careful coverage on most topics is a problem and this site is one of the small antidotes to that broader pattern of casual or surface treatment of complex subjects.
A welcome contrast to the loud takes that have dominated my feed lately, and a look at moonglowcollection extended that calm voice, content that arrives without yelling has become unusual in the modern attention economy and this site is one of the few places I have found that consistently delivers without raising its voice.
plinko регистрация с бонусом [url=https://www.plinko83214.help]https://www.plinko83214.help[/url]
sitio oficial pinup [url=https://www.pinup84291.help]sitio oficial pinup[/url]
Bookmark folder reorganised slightly to make this site easier to find, and a look at dreambelievegrow earned the same accessibility upgrade, the small organisational moves I make for sites I expect to return to often are themselves a signal of how much I trust them and this site triggered those moves naturally.
нарколог на дом воронеж [url=https://narkolog-na-dom-voronezh-11.ru]нарколог на дом воронеж[/url]
Refreshing to find writing that does not try to manipulate the reader into clicking onto the next page through cliffhangers and forced engagement, and a stop at buildconfidencehere continued in the same respectful way, this is what reader first design actually looks like in practice rather than just in marketing copy that sounds nice.
Took the time to read every paragraph rather than skimming for the punchline, and a quick visit to happylifestylemarket earned the same careful attention from me, that is the highest signal I can give about content quality because my default mode is rapid scanning rather than deliberate reading on most pages.
A piece that demonstrated competence without performing it, and a look at simplelivingcorner maintained the same self assured but unshowy register, the gap between competence and performance of competence is one I track and this site has clearly chosen to demonstrate rather than perform which I find much more persuasive as a reader.
коломна Следить за её новыми публикациями в трендах — отличное решение для всех, кто ценит качественные и увлекательные видео.
Good clean post, no errors and no awkward phrasing that breaks the reading flow, and a stop at thinkcreateinnovate kept the same standard, definitely the kind of editorial care that earns a return visit because it tells me the writer is paying attention to details that matter to readers rather than just rushing publication.
Reading this on a phone at a coffee shop and finding it perfectly suited to that context, and a stop at crispplus continued the comfortable mobile experience, content that works across reading conditions without compromising on substance is increasingly important and this site has clearly thought about the whole reader experience here.
Worth a slow read rather than the fast scan I usually default to, and a look at silvermoonmarket earned the same slower pace from me, content that resets my reading speed downward is content with substance worth absorbing and this site has produced that effect on me multiple times now over the last week here.
Coming back to this one, definitely, and a quick visit to urbantrendlifestyle only made me more sure of that, the kind of writing that makes you want to set aside time later rather than rushing through it now while distracted by everything else competing for attention on the screen today across so many tabs.
If I had to defend the time I spend reading independent blogs this site would feature in the defence, and a look at fashionlifestylehub reinforced that defensive utility, the ongoing case for non algorithmic reading is one I make to myself periodically and sites like this one provide the actual evidence that supports the case clearly.
Skipped the comments to avoid spoilers and came back later to find them genuinely worth reading, and a stop at shopanddiscoverhub extended that surprised respect, when the discussion below a post matches the quality of the post itself you have found something special and this site appears to attract that kind of audience.
Really appreciate that the writer did not overstate the importance of the topic to make the post feel weightier, and a quick visit to quietplainstrading maintained the same modest framing, content that is honest about its own scope rather than inflating itself is the kind I trust and return to repeatedly over time.
Now considering carefully how to share this site with the right audience rather than broadcasting widely, and a look at nobleridgefashion extended that careful sharing impulse, content worth sharing carefully rather than spamming is content that has earned a higher kind of recommendation and this site has earned that careful shareability throughout pieces.
Felt no urge to argue with the conclusions even though I started the post slightly skeptical, and a look at boldhorizonmarket maintained that pattern, writing that earns agreement through clarity of argument rather than rhetorical pressure is the kind I find most persuasive and the kind I want to read more of these days.
The pacing of the post was just right, never rushed and never dragged out unnecessarily, and a look at uniquevaluehub maintained the same rhythm, you can tell the writer has experience because the difficult skill of pacing is something only practiced writers manage to handle well in long form content over time and across formats.
коломна Её публикации регулярно оказываются в рекомендациях пользователей благодаря высокому качеству съёмки, отличному монтажу и умению подбирать идеальное музыкальное сопровождение.
Sets a higher bar than most of what shows up in search results for this topic, and a look at trendmarketoutlet did not lower that bar at all, in fact it confirmed the impression, this is the kind of consistency that earns a place in regular rotation for serious readers instead of casual scrollers passing through.
Took a quick scan first and then went back to read properly because the post deserved it, and a stop at goldplumeoutlet kept me reading carefully too, the kind of writing that earns a slower second pass rather than getting skimmed and forgotten is something I value highly when I happen to find it.
Got pulled in by the headline and stayed because the content actually delivered on the promise, and a stop at hiddenvalleyfinds kept that trust intact, when a site lives up to its own framing it earns the right to keep showing up in my browser tabs going forward indefinitely from here on out really.
Skipped the social share buttons but might come back to actually use one later, and a stop at yourtrendstore extended that share urge, content that triggers genuine sharing impulses rather than performative ones is content that has actually moved me and not many posts in a typical week do that for me actually.
Glad to find a site whose links lead somewhere worth going rather than back to itself for SEO juice, and a stop at fashionanddesign kept that generous outbound feel, citing other peoples work with real respect rather than just for ranking signals is a sign of an honest operation worth supporting going forward.
монтаж дымохода Мы предлагаем комплексные решения, которые объединяют долговечные материалы и оперативное выполнение работ под ключ. — Правильно спроектированные дымоходные системы обеспечивают эффективный вывод продуктов сгорания для всех типов отопительных агрегатов.
Worth marking the moment when reading this clicked into something useful for my own work, and a look at futuregardenmart extended that practical click, content that connects to my actual life rather than just being interesting is content with the highest kind of value and this site is generating that connection at a high rate.
Quiet confidence runs through the whole post, no need to shout to make the points stick, and a stop at mooncrestdesign carried that same restrained voice forward, content that respects the reader by trusting its own substance rather than dressing it up in theatrical language is what I look for online and rarely actually find these days.
капельница от запоя телефон [url=https://kapelnicza-ot-pokhmelya-samara-29.ru]капельница от запоя телефон[/url]
Thanks for putting this online without locking it behind email signups or paywalls, and a quick visit to yourtrendstore kept that open feel going, content that trusts the reader to come back rather than gating access is the kind of approach I will reward with regular return visits over time happily.
пластиковые окна рулонные шторы с электроприводом [url=https://elektricheskie-rulonnye-shtory99.ru]пластиковые окна рулонные шторы с электроприводом[/url]
A memorable post for me on a topic I had thought I was tired of, and a look at modernstylecorner suggested the same site can refresh other tired topics, sites that can revive my interest in subjects I had written off as exhausted are doing rare work and this one is clearly doing that for me today.
This one is staying open in a tab for the rest of the day so I can come back and re read certain parts, and a look at futuregrooveoutlet suggests I will be doing the same with a few more pages here too, this is going to be a deep dive over the coming hours.
Recommend this to anyone who values clear thinking over flashy presentation, and a stop at findbetterdeals continued in the same understated way, this site has its priorities in the right place which makes it worth supporting through repeat visits and recommendations rather than just one passing read today before moving on quickly elsewhere.
Recommended to anyone working in or curious about this area, the depth and clarity combine well, and a look at urbanlifestylehub keeps that going across more pages, the kind of site that earns regular visits rather than chasing trends has my respect because it suggests genuine commitment to the topic itself rather than to chasing trends.
Just sat with this for a bit longer than I usually would because the points are worth thinking about, and after discovertrendystore I had even more to chew on, the kind of post that nudges your thinking forward without forcing the issue is something I have always appreciated in good writing online.
I learned more from this short post than from longer articles I read earlier today, and a stop at moderntrendhub added even more useful detail without going off topic, this site clearly knows how to keep things focused without sacrificing depth which is a hard balance to strike for any writer.
Really clear writing, the kind that makes you want to share the link with someone who has been asking about the topic, and a quick browse through morningrustgoods only made me more sure of that, the information here stays useful long after the first read is done which says a lot.
If quality blog writing is dying as people sometimes claim then this site is one piece of evidence that it has not died yet, and a look at rarelinefinds extended that evidence, the broader cultural question about online writing has empirical answers in specific sites and this one is contributing to a more optimistic answer overall.
Now feeling the small relief of finding writing that does not condescend, and a stop at shopthedaytoday extended that respect for readers, content that treats its audience as capable adults rather than as people to be managed produces a different reading experience and this site has clearly chosen the respectful approach across all pieces.
прогон хрумером Прогон Хрумером в ТОП выдачи Google и Яндекс DR 50+ продвижение сайта
Just one of those reads that left me feeling slightly more capable rather than overwhelmed, and a look at wonderpeakboutique kept that empowering feel going, the difference between content that builds the reader up and content that intimidates them is huge and this site clearly knows which side of that line to stand.
Glad I gave this a chance rather than scrolling past, and a stop at fashiondailyplace confirmed I made the right call, sometimes the best content is hidden behind unassuming headlines that do not scream for attention and learning to slow down and check those out has paid off many times now across years of reading.
Recommend this to anyone who values clear thinking over flashy presentation, and a stop at growandflourish continued in the same understated way, this site has its priorities in the right place which makes it worth supporting through repeat visits and recommendations rather than just one passing read today before moving on quickly elsewhere.
A piece that did not lecture even when it had clear positions, and a look at trendforlifehub maintained the same teaching without preaching tone, finding the line between informing and lecturing is hard and most sites land on the wrong side of it but this one has clearly figured out how to inform without becoming preachy.
1win bonus faizi nə qədərdir [url=https://1win25674.help/]https://1win25674.help/[/url]
mostbet apk fayl [url=http://mostbet20439.help]http://mostbet20439.help[/url]
pin-up slot necə oynanır [url=http://pinup56439.help]pin-up slot necə oynanır[/url]
вывод из запоя цена [url=https://vyvod-iz-zapoya-na-domu-sankt-peterburg-19.ru]вывод из запоя цена[/url]
Now thinking about this site as a small example of what good independent writing looks like, and a stop at uniquevaluehub continued that exemplary status, the few sites that serve as good examples are sites worth holding up in conversations about quality and this one has earned that exemplary placement through patient consistent effort over time.
Useful reading material, the kind I can hand off to someone newer to the topic without worrying about confusing them, and a quick look at everydaytrendhub confirmed the same beginner friendly tone runs throughout the site which is great for sharing with people just starting their learning journey on this particular topic.
Reading this gave me a small refresher on something I had partially forgotten, and a stop at growbeyondboundaries extended the refresher, content that strengthens existing knowledge rather than just adding new is content with a particular kind of consolidating value and this site is providing that consolidating function across multiple visits.
прокапывание от алкоголя [url=https://kapelnicza-ot-pokhmelya-nizhnij-novgorod-7.ru]прокапывание от алкоголя[/url]
Дымоходы для котлов печей уаминов Качественная работа гарантирует отсутствие обратной тяги и обеспечивает максимальный КПД вашего отопительного оборудования. — Для бесперебойной работы каминов и современных печей требуются дымоходы, устойчивые к воздействию агрессивных кислот и высоких температур.
Complete Deadlock deadlock1.com hub for English speakers. Latest patches, hero counters, item tier lists, community builds, step?by?step guides, pro match analysis, tournament brackets, and esports news. All in one site – perfect for beginners and competitive players alike.
производитель рулонных штор [url=https://elektricheskie-rulonnye-shtory99.ru]https://elektricheskie-rulonnye-shtory99.ru[/url]
Now feeling the rare pleasure of trusting a source completely on first encounter, and a look at yourtrendstore extended that initial trust into something more durable, the calibration of trust to evidence is something I do informally and this site has earned high trust through the cumulative weight of multiple consistently good posts already.
UFC Rankings 2026 http://www.ufcfans.net/ updated weekly. Detailed tables for each division: heavyweight, light heavyweight, middleweight, welterweight, lightweight, featherweight, bantamweight, flyweight, and women’s classes.
Bookmark earned and shared the link with one specific person who would care, and a look at fashiontrendcorner got the same targeted share, sharing carefully rather than broadcasting is a discipline I try to maintain and this site is generating shares from me at a sustainable rate rather than the spam rate of viral content.
Really appreciate the confidence to make a clear point rather than hedging everything, and a quick visit to sacredridgecorner maintained the same direct stance, writing that takes positions rather than equivocating is more useful even when the positions are debatable because at least the reader has something to react to clearly.
If I had encountered this site five years ago I would have been telling everyone about it, and a look at moderntrendstore extended that retrospective enthusiasm, the version of me who used to recommend favourite blogs frequently would have made sure friends knew about this one and that earlier enthusiasm is partially returning to me here.
Found the post genuinely useful for something I was working on this week, and a look at happylivingcorner added more material I will reference, content that connects to my actual life and work rather than just being interesting in the abstract is the kind I will pay attention to and return to repeatedly.
Glad I gave this a chance rather than scrolling past, and a stop at noblegroveoutlet confirmed I made the right call, sometimes the best content is hidden behind unassuming headlines that do not scream for attention and learning to slow down and check those out has paid off many times now across years of reading.
Useful reading material, the kind I can hand off to someone newer to the topic without worrying about confusing them, and a quick look at freshmeadowstore confirmed the same beginner friendly tone runs throughout the site which is great for sharing with people just starting their learning journey on this particular topic.
This filled in a gap in my understanding that I had not even noticed was there, and a stop at urbanvinecollective did the same, the kind of post that gives you more than you expected when you first clicked through from somewhere else, a real find for anyone curious about the area covered here.
Now thinking about how to apply some of this to a project I have been planning, and a look at boldhorizonmarket added more material for the planning, content that connects to my actual creative work rather than just being interesting in the abstract is the kind that earns priority placement in my reading rotation consistently going forward.
Refreshing change from the usual sites covering this topic, no clickbait and no padding, and a stop at uniquegiftcollection confirmed the difference, this place clearly has its own voice rather than copying the formulas everyone else uses to chase clicks online which is becoming increasingly rare these days across nearly every popular subject.
Now planning to recommend this site in a context where my recommendations are taken seriously, and a stop at softpineoutlet confirmed I should make that recommendation soon, the small but real act of recommending content into spaces where my taste matters is something I take seriously and this site is worth the recommendation.
Pleasant surprise, the post delivered more than the headline promised, and a stop at goldenmeadowhouse continued that pattern of under promising and over delivering, the rarest combination on the modern web where most content does the opposite by promising the world and delivering thin recycled summaries instead each time you click on something interesting.
On reflection this is the kind of writing that improves my taste for what is possible in the format, and a look at discovernewcollection continued raising that bar, content that elevates my expectations rather than lowering them is doing important work in calibrating my standards and this site is participating in that elevation reliably.
Came here from another site and ended up exploring much further than I planned, and a look at moderntrendstore only encouraged more exploration, the kind of place where one click leads to another not through manipulative design but through genuinely interesting content is rare and worth highlighting when found like this somewhere on the open internet.
Found a couple of useful angles in here I had not considered before reading carefully, and a quick stop at goldleafemporium added more, this is one of those sites where the value compounds the more you read rather than peaking at one viral post and then offering nothing else of substance afterwards which is common.
Definitely a recommend from me, anyone curious about the topic should check this out, and a look at rainforestchoice adds even more reason for that, the depth and quality combine to make this site one I will be pointing people toward whenever similar conversations come up over the months ahead at work or socially.
туристам санкт петербург [url=https://www.piter-na-teplohode.ru]https://www.piter-na-teplohode.ru[/url]
Reading this gave me a small sense of progress on a topic I have been slowly working through, and a stop at shopandsavebig added another step forward, learning happens in small increments across many sources and finding sources that consistently contribute is the actual practical value of careful curation in an information rich world.
pin up aviator demo [url=www.pinup50413.help]www.pinup50413.help[/url]
Now appreciating the small but real way this post improved my afternoon, and a stop at globaltrendlifestyle extended that small improvement effect, content that produces measurable positive impact on the texture of a reading day is content with real value and this site is producing those small positive impacts at a sustainable rate apparently.
прогон хрумером поднять dr
Reading the writers other posts after this one suggests the quality is consistent rather than peak, and a stop at silverhollowstudio confirmed the consistent quality reading, sites that hold the same level across many pieces rather than peaking on a few are sites with sustainable editorial discipline and this one has clearly developed that.
Took some notes for a project I am working on, and a stop at fashionchoicehub added more raw material to those notes, content that contributes to my own creative work rather than just being interesting in the moment is the kind I value most and the kind I will keep coming back to repeatedly.
пинап [url=https://pinup50413.help/]пинап[/url]
Learned something from this without having to dig through layers of fluff, and a stop at trenddealplace added a bit more context that helped tie things together for me, definitely a useful corner of the internet for anyone who wants real information without the usual marketing nonsense around it that often ruins similar pages.
Useful read, especially because the writer did not assume too much background from the reader, and a quick look at yourtrendcollection continued in the same way, a thoughtful site that meets people where they are which is something the modern web could use a lot more of for both casual and serious readers.
вывод из запоя в клинике [url=https://vyvod-iz-zapoya-v-staczionare-nizhnij-novgorod-16.ru]https://vyvod-iz-zapoya-v-staczionare-nizhnij-novgorod-16.ru[/url]
прокапаться от алкоголя цены [url=https://kapelnicza-ot-pokhmelya-voronezh-14.ru]прокапаться от алкоголя цены[/url]
Even from a single post the editorial care is clear, and a stop at everydayshoppingoutlet extended that care across more pages, the kind of attention to quality that shows up in every paragraph is what separates serious sites from the rest and this one has clearly invested in that paragraph level attention across what I have read.
youtube downloader url [url=https://skachat-video-s-youtube-10.ru]https://skachat-video-s-youtube-10.ru[/url]
Useful reading material, the kind I can hand off to someone newer to the topic without worrying about confusing them, and a quick look at yourtrendstore confirmed the same beginner friendly tone runs throughout the site which is great for sharing with people just starting their learning journey on this particular topic.
One of the more honest takes on the topic I have seen lately, no spin and no oversell, and a stop at happyhomehub kept that going, the kind of voice the open web could use a lot more of rather than the endless echo chamber of recycled opinions floating around every social platform these days.
медкнижка купить спб медкнижка купить спб
кухни спб на заказ [url=https://kuhni-spb-57.ru]кухни спб на заказ[/url]
Came away with a small but real shift in perspective on the topic, and a stop at coastlinecrafts pushed that shift a bit further, the kind of subtle reframing that good writing does to a reader without making a big deal of it is something I always appreciate when it happens which is sadly not that often.
заказать кухню [url=https://kuhni-spb-60.ru]заказать кухню[/url]
зубной врач Одинцово
скачать видео youtube по ссылке [url=https://skachat-video-s-youtube-9.ru]скачать видео youtube по ссылке[/url]
Cuts through the usual marketing fluff that dominates this topic online, and a stop at noblegroveoutlet kept the same clean approach going, this is the kind of writing that respects the reader’s time rather than wasting it on repetitive setups before finally getting to the point at hand which is what most sites do.
Speaking as someone who used to recommend blogs frequently and got out of the habit this site is rekindling that impulse, and a look at modernstylecorner extended the rekindling, the recovery of an old habit triggered by encountering work that justifies it is itself a small kind of pleasure and this site is providing that recovery experience.
Now feeling the small relief of finding writing that does not condescend, and a stop at pinecrestboutique extended that respect for readers, content that treats its audience as capable adults rather than as people to be managed produces a different reading experience and this site has clearly chosen the respectful approach across all pieces.
Now planning to come back when I have the right kind of attention to read carefully, and a stop at freshchoicecorner reinforced that plan, choosing the right moment to read certain content is a quiet form of respect for the work and this site is generating those careful planning behaviours from me consistently as a reader.
Thanks for the simple approach, too many sites bury the actual point under layers of unnecessary words, but here every line earns its place, and a look at brightforestmall showed the same care for the reader which is something I will remember the next time I need answers on a topic.
A small thing but the line spacing and font choices made reading this physically pleasant, and a look at freshfindstore maintained the same careful design, technical choices about typography are part of what makes online reading actually comfortable and this site has clearly invested in the design layer alongside the content layer carefully.
1win kartla çıxarış Azərbaycan [url=https://1win25674.help]https://1win25674.help[/url]
Skimmed first and then went back to read carefully, and the careful read paid off in places I had missed, and a stop at modernhomecollection got the same treatment, the rare site whose content rewards a second pass is content I want more of in my regular rotation rather than disposable single read articles.
pin-up turnir [url=http://pinup56439.help/]http://pinup56439.help/[/url]
Came away feeling slightly smarter than I was when I started, that is a real win, and a stop at goldenhillgallery added a bit more to that, the rare site that actually transfers some of its knowledge to the reader in a way that sticks rather than just creating an illusion of learning briefly.
Honestly this was a good read, no jargon and no padding, and a short look at purewavechoice kept that same feel going which I really appreciated, the writer clearly knows the topic well enough to explain it without hiding behind big words or filler that often gets used to seem clever.
Found this through a friend who recommended it and now I see why, and a look at wildsandcollection only strengthened that recommendation in my own mind, word of mouth still works for content that actually delivers and this site is clearly earning recommendations the old fashioned way through quality rather than marketing.
If I had to summarise the editorial sensibility of this site in a few words it would be careful and human, and a look at discovermoreideas extended that summary feeling, capturing the essence of a sites approach in brief is hard but this site has a clear enough identity that the summary comes naturally enough.
выезд нарколога на дом [url=https://narkolog-na-dom-voronezh-11.ru]https://narkolog-na-dom-voronezh-11.ru[/url]
Thank you for being clear and direct, that simple approach saves so much frustration on the reader’s end, and a stop at goldenlanecreations only made me more sure of it, the rest of the content seems to follow the same pattern which is a great sign of consistent editorial care behind the scenes.
Appreciate the practical examples, they made the abstract points easier to grasp, and a stop at globalridgeemporium added more of the same, this site clearly understands that real examples beat empty theory every single time which is the mark of a writer who knows their audience well and respects their time.
Reading this with my morning coffee turned into reading the related posts with my morning coffee, and a stop at takeactionnow stretched the morning further, content that pulls breakfast into a reading session rather than just accompanying it is content that has earned a higher claim on my attention than the average article does.
1win Dota 2 mərc [url=http://1win25674.help]1win Dota 2 mərc[/url]
Speaking honestly this is among the better discoveries of my recent browsing, and a stop at originpeakboutique reinforced that discovery quality, the ranking of recent discoveries is informal but meaningful and this site has placed near the top of that ranking based on the consistency of quality across what I have already read carefully.
mostbet geolokatsiya [url=https://mostbet20439.help/]https://mostbet20439.help/[/url]
true fortune casino no deposit bonus free spins [url=http://true-fortune-casino-gb.com]http://true-fortune-casino-gb.com[/url] .
true fortune casino sister sites no deposit bonus [url=www.true-fortunecasino.uk/]true fortune casino sister sites no deposit bonus[/url] .
A piece that did not lean on the writer credentials or institutional backing, and a look at explorelimitlessgrowth maintained the same focus on substance, content that earns trust through quality rather than through name dropping is the kind I find most persuasive and this site is clearly playing on the substance side of that distinction.
true fortune free bonus [url=https://truefortunecasino-freespins.com]https://truefortunecasino-freespins.com[/url] .
After reading several posts back to back the consistent voice across them is impressive, and a stop at growandflourish continued that voice consistency, sites that maintain a single coherent voice across many pieces by potentially many writers represent serious editorial discipline and this one has clearly developed the institutional consistency needed for that.
A particular pleasure to read this with a fresh coffee, and a look at dailyvalueworld extended the pleasure across more pages, content that pairs well with quiet morning rituals is something I have come to value highly and this site has the kind of energy that fits naturally into a calm reading routine.
During the time spent here I noticed the absence of the usual distractions, and a stop at everwoodsupply extended that distraction free experience, content that does not fight my attention with pop ups and modals and aggressive prompts is content that respects me and this site has clearly chosen the respectful approach throughout.
true fortune casino xyz [url=https://www.truefortunecasino-bonus.com]true fortune casino xyz[/url] .
Now I want to find more sites like this but I suspect they are rare, and a look at trendchoicecenter extended that thought, the few sites that meet this quality bar are precious specifically because they are rare and finding others like them is one of the ongoing projects of careful internet curation across the years.
A piece that prompted a small mental rearrangement of how I order related ideas, and a look at rusticfieldmarket extended that rearranging effect, content that affects the structure of my thinking rather than just adding to it is content with the deepest kind of impact and this site is reaching that depth for me today.
true fortune casino no deposit bonus codes 2026 [url=www.truefortune-promo-code.com/]www.truefortune-promo-code.com/[/url] .
true fortune casino uk login no deposit bonus [url=www.truefortune-50-free-spins.com]www.truefortune-50-free-spins.com[/url] .
Strong recommendation, anyone interested in this topic owes themselves a visit, and a stop at everfieldhome extends that recommendation across more of the site, this is the kind of resource that makes me more optimistic about the state of the open web than I usually am these days actually for once which is genuinely refreshing.
вывод из запоя цены [url=https://vyvod-iz-zapoya-na-domu-sankt-peterburg-19.ru]вывод из запоя цены[/url]
true fortune casino no deposit bonus 2026 [url=https://www.true-fortune-casino2.com]https://www.true-fortune-casino2.com[/url] .
Generally I do not leave comments but this post merits a small note, and a stop at bestseasonstore extended that comment worthy quality, the urge to actively contribute to a sites community rather than passively consume from it is something specific content provokes and this site has provoked that engagement urge from me today.
Thanks for the clean writing, no broken sentences and no awkward translations like some other sites have, and a quick stop at modernshoppingcorner kept that polish going nicely, it really does make a difference when a reader can move through a page without tripping on every line or going back to reread.
A piece that did not waste any of its substance on sales or promotion, and a look at futureharborhome continued that pure content focus, sites that resist the urge to monetise every paragraph are increasingly rare and this one has clearly made the editorial choice to keep the writing clean from commercial intrusion which I value highly.
A piece that earned its conclusions through the body rather than asserting them at the end, and a look at everhollowbazaar maintained the same earned quality, conclusions that follow from what came before are more persuasive than declarations and this site has clearly internalised that principle in how it constructs arguments throughout pieces.
pin-up bonus hisobga tushmadi [url=http://pinup50413.help/]http://pinup50413.help/[/url]
Useful reading material, the kind I can hand off to someone newer to the topic without worrying about confusing them, and a quick look at globalshoppingzone confirmed the same beginner friendly tone runs throughout the site which is great for sharing with people just starting their learning journey on this particular topic.
If the topic interests you at all this is a place to spend time, and a look at pureharborstudio reinforced that recommendation, the broader question of where to invest topical reading time is one this site answers convincingly through the consistent quality across multiple pieces I have sampled during the current reading session today.
капельница на дому от алкоголя самара цена [url=https://kapelnicza-ot-pokhmelya-samara-29.ru]капельница на дому от алкоголя самара цена[/url]
Just wanted to say this was useful and leave a small note of thanks, and a quick visit to findamazingproducts earned a similar nod from me, the small acknowledgements add up over time and represent the real economy of trust that good content runs on across the open and increasingly fragmented modern internet.
Really appreciate that the writer did not stretch the post to hit some target word count, the points end when they are made, and a stop at modernfashionworld reflected the same discipline, brevity is generosity in disguise and this site has clearly figured that out far better than most blog operations have.
true fortune casino reviews [url=https://truefortunecasinos.uk]true fortune casino reviews[/url] .
Reading more of the archives is now on my plan for the weekend, and a stop at purefashioncollection confirmed the archive worth the time, the rare archive worth a dedicated reading session rather than just casual sampling is the rare archive of serious work and this site has clearly produced enough of that work to warrant the deeper exploration.
true fortune casino reviews [url=true-fortune-freespins.com]true fortune casino reviews[/url] .
Now adding a small note in my reading log that this site is one to watch, and a look at globalcrestfinds reinforced the watch status, the few sites I track deliberately rather than encounter accidentally are sites I expect ongoing returns from and this one has cleared the bar for that elevated tracking based on what I read.
A small editorial detail caught my attention, the way headings related to body text, and a look at silveroakstudio maintained that careful relationship, structural details like that show up to readers who notice them and the writers here have clearly thought about every level of the piece rather than just the words.
Now leaving a small mental note to recommend this when the topic comes up in conversation, and a look at freshfashiondeal extended that recommend ready feeling, content that arms me with shareable references for likely future conversations is content with social value and this site is providing that conversational ammunition consistently for me lately.
Closed it feeling slightly more competent in the topic than I started, and a stop at apexhelm reinforced that competence boost, real learning is rare in casual online reading but it does happen sometimes and this site managed to make it happen for me today which is genuinely worth pausing to acknowledge.
Better signal to noise ratio than most places I check on this kind of topic, and a look at discoverfindsmarket kept that going, every paragraph here carries something worth reading rather than padding out the page to hit some arbitrary length target that search engines reward but readers ignore as soon as they notice it.
true fortune casino no deposit bonus 2026 [url=https://true-fortune-gb.com]https://true-fortune-gb.com[/url] .
Will share this on a forum I am part of where it will be appreciated by others working in the same area, and a look at boldcrestfinds suggests there is more here worth passing along too, definitely a generous resource that deserves a wider audience than it probably has today across the open internet.
The lack of unnecessary jargon made the post accessible without sacrificing accuracy, and a look at sunsetgrovestore continued in the same accessible style, technical topics often hide behind specialised vocabulary but here the writer trusts the reader to keep up with plain language and that trust pays off nicely throughout the entire post.
Liked the way the post balanced confidence and humility, and a stop at openplainstrading maintained the same balance, knowing when to assert and when to acknowledge uncertainty is a sign of mature thinking and the writers here have clearly developed that calibration through what I assume is years of careful work on their craft.
Ended up here on a wandering afternoon and was glad I stayed for the read, and a stop at discovernewcollection extended the wandering into a proper exploration of the site, the kind of place that rewards aimless clicking with something genuinely interesting rather than the shallow content that mostly populates the modern open web.
Definitely returning here, that is decided, and a look at yourstylecorner only made the case stronger, this is one of those rare websites that rewards regular visits rather than feeling stale after the first read which is something I cannot say about most of the places I bookmark today across all my topics.
Felt no urge to argue with the conclusions even though I started the post slightly skeptical, and a look at globaltrendcollection maintained that pattern, writing that earns agreement through clarity of argument rather than rhetorical pressure is the kind I find most persuasive and the kind I want to read more of these days.
Spent a few minutes here and came away with a clearer picture of the topic, the writing keeps things simple without dumbing them down, and after a stop at ironvalleydesigns the rest of the points lined up neatly which is something I appreciate when I am short on time and need answers fast.
Looking at the surface design and the substance together this site has both right, and a look at urbanstylecollection reinforced that integrated quality, sites where presentation and content reinforce each other rather than fighting are sites with full editorial coherence and this one has clearly invested in both layers in a balanced way.
Felt mildly happier after reading, which sounds silly but is true, and a look at everwildmarket extended that small mood lift, content that improves rather than degrades my mental state is content I want more of and the cumulative effect of reading sites that lift versus sites that drag is real over time.
Reading more of the archives is now on my plan for the weekend, and a stop at everydayforestgoods confirmed the archive worth the time, the rare archive worth a dedicated reading session rather than just casual sampling is the rare archive of serious work and this site has clearly produced enough of that work to warrant the deeper exploration.
Honest take is that I will probably forget most of what I read online today but this post is one I will remember, and a stop at softmorningshoppe kept that same memorable quality going, certain writing leaves a residue in the mind in a way most content simply does not manage.
капельница после запоя [url=https://kapelnicza-ot-pokhmelya-nizhnij-novgorod-7.ru]капельница после запоя[/url]
Took a screenshot of one section to come back to later, and a stop at trendandstylezone prompted another saved tab, the urge to capture and revisit specific pieces of content is something I rarely feel but when I do it tells me the work is worth more than the average passing read for sure.
I usually skim posts like these but this one held my attention all the way through, and a stop at rusticstoneemporium did the same, that is a strong endorsement coming from me because I am usually quick to bounce when content gets repetitive or fails to deliver on its initial promise made in the headline.
Thanks for the clean writing, no broken sentences and no awkward translations like some other sites have, and a quick stop at modernshoppingcorner kept that polish going nicely, it really does make a difference when a reader can move through a page without tripping on every line or going back to reread.
Thanks for the breakdown, it gave me a clearer picture of something I had been confused about for a while now, and a stop at risingrivercollective closed the remaining gaps in my understanding nicely, no need to hunt around twenty other articles to put the pieces together which is a real time saver.
If you asked me to point to a recent positive sign for the open web this site would be near the top, and a stop at brightfashionstore reinforced that designation, the few sites that serve as evidence the web can still produce quality independent content are precious and this one has clearly become one for me.
Reading this gave me a quiet moment of intellectual pleasure that I had not been expecting, and a stop at whisperingtrendstore extended that pleasure across more pages, the unexpected reward of stumbling into careful writing is one of the small ongoing pleasures of reading the open web and this site is delivering it reliably.
Reading this prompted a small redirection in something I was working on, and a stop at modernfablefinds extended that redirecting influence, content that affects my actual work rather than just my thinking has the highest practical impact and this site is providing that level of influence for me at a sustainable rate apparently.
Honest assessment after reading this twice is that it holds up under careful attention, and a look at futurewildcollection extended that durability across more pages, content that survives a second read without revealing weak spots is rarer than the average reader probably realises and this site clearly cleared that bar.
Looking back on this reading session it stands as one of the better ones recently, and a look at fashiontrendcorner extended that ranking, the informal ranking of reading sessions against each other is something I do mentally and this session ranks high largely because of this site and a couple of related pages here.
A small thing but the line spacing and font choices made reading this physically pleasant, and a look at purechoicehub maintained the same careful design, technical choices about typography are part of what makes online reading actually comfortable and this site has clearly invested in the design layer alongside the content layer carefully.
рулонные шторы в москве [url=https://elektricheskie-rulonnye-shtory99.ru]рулонные шторы в москве[/url]
The overall feel of the post was professional without being stuffy, and a look at softmoonmarket kept that approachable expertise going, finding the right register for technical content is hard but this site has clearly figured out how to sound knowledgeable without slipping into that distant lecturing tone that loses readers in droves every time.
Quietly impressive in a way that does not announce itself, and a stop at freshdailycorner extended that quiet impressiveness, the kind of quality that emerges through sustained attention rather than first impressions is the kind I trust more deeply and this site has been earning that deeper trust across multiple sessions over time consistently.
Now noticing how rare it is to find a site that does not feel rushed, and a look at discoverfashionfinds extended that calm pace, content produced without time pressure has a different quality than content shipped to meet a deadline and this site reads as written without urgency which produces a different and better experience for readers.
Closed three other tabs to focus on this one and never opened them again, and a stop at everhilltrading similarly held attention exclusively, content that crowds out other reading from working memory is content with real density and this site has demonstrated that density across multiple pages I have visited so far this morning.
турпутевки в питер [url=http://www.piter-na-teplohode.ru]http://www.piter-na-teplohode.ru[/url]
Solid stuff, the kind of post that I will probably refer back to later this month when the topic comes up again, and a look at globalfindsmarket only confirmed I should bookmark the site as a whole rather than just this single page for future reference and use across coming weeks.
However many similar pages I have read this one taught me something new, and a stop at moongrovegallery added more new material, content that contributes genuinely fresh information rather than recycling what is already widely available is content with real informational value and this site is providing that informational freshness at a notable rate.
1win kazino saytı [url=http://1win25674.help/]http://1win25674.help/[/url]
1win хабарҳо [url=http://1win38596.help]http://1win38596.help[/url]
1win live stavka strategiya [url=www.1win85063.help]1win live stavka strategiya[/url]
mostbet xush kelibsiz paketi [url=https://mostbet20439.help/]https://mostbet20439.help/[/url]
pin-up login olmur [url=https://www.pinup56439.help]https://www.pinup56439.help[/url]
My usual response to new bookmarks is to forget them but this one I have already returned to twice, and a look at modernvaluehub pulled me back a third time, the actual return rate to bookmarked sites is the real measure of value and this one is clearing that measure at a notable rate already.
Now feeling the rare pleasure of trusting a source completely on first encounter, and a look at cozyorchardgoods extended that initial trust into something more durable, the calibration of trust to evidence is something I do informally and this site has earned high trust through the cumulative weight of multiple consistently good posts already.
Now setting up a small reminder to revisit the site on a slow day, and a stop at evernovaemporium confirmed the reminder was a good idea, planning return visits is a small organisational act that signals trust in ongoing quality and this site has earned that planned return through consistent performance across the pieces I have read so far.
The world of ultimate fighting https://www.t.me/s/UFClive_en/ expert predictions, MMA analysis, and exclusive content from inside the Octagon. Ultimate Fighting Championship news, fight breakdowns, fighter stats, and the main events of mixed martial arts.
Real-time Formula 1 https://www.t.me/s/f1vpe news. Race results, driver transfers, round analysis, interviews, and the main events of the FIA ??World Championship.
Really appreciate that the writer did not assume I would read every other related post first, and a look at puregiftoutlet kept that self contained feel going where each piece can stand alone, accessibility for new readers is a sign of generous editorial thinking and this site has clearly invested in that approach.
Now setting aside time on my next free afternoon to read more from the archives, and a stop at globalfindsoutlet confirmed that time will be well spent, the rare site whose archive deserves a dedicated reading session rather than just casual sampling is the kind of resource worth scheduling around and this one qualifies clearly.
Just want to say thank you for putting this together, posts like these make searching online actually worth it sometimes, and a quick look at evermountainstyle kept that going, useful and easy to read without any of the tricks that ruin most blog comment sections lately on the wider open web.
капельница после запоя цена [url=https://kapelnicza-ot-pokhmelya-voronezh-14.ru]капельница после запоя цена[/url]
Decided to subscribe to the RSS feed if there is one, and a stop at softmeadowstudio confirmed that decision, content that I want delivered to me proactively rather than just remembered when I have time is content that has earned a higher level of commitment from me as a reader looking for reliable sources.
Just dropping by to say thanks for the effort, it does not go unnoticed when a writer cares this much about the reader, and after I went through bestbuyinghub I was certain this is one of the better corners of the internet for this particular kind of content which is genuinely refreshing.
Skipped past the first paragraph thinking it was setup and had to come back when the rest referenced it, and a stop at brightlinecrafted similarly rewarded careful reading from the start, content where every paragraph carries weight is content I now know to read from the beginning rather than skipping ahead.
мостбет ставки узбекистан [url=www.mostbet43287.help]www.mostbet43287.help[/url]
Reading this confirmed a hunch I had been carrying about the topic without having articulated it, and a stop at timberwolfemporium extended the confirmation, content that gives shape to fuzzy intuitions is doing the rare work of making private thoughts public and this site is providing that articulating service consistently for me lately.
Genuinely glad I clicked through to read this rather than skipping past, and a stop at modernrootsmarket confirmed I should keep clicking through to more pages here, the kind of resource that justifies its place in my browser history rather than feeling like wasted time which is the highest compliment I offer any site online today.
Probably this is one of the better quiet successes on the open web at the moment, and a look at startbuildingtoday reinforced that quiet success quality, sites that are doing well without making a noise about doing well are the sites I most respect and this one has clearly chosen the quiet success path consistently throughout.
mostbet вывод click задержка [url=https://mostbet43287.help]https://mostbet43287.help[/url]
скачать видео с ютубе [url=https://skachat-video-s-youtube-9.ru]https://skachat-video-s-youtube-9.ru[/url]
изготовление кухонь на заказ в санкт петербурге [url=https://kuhni-spb-60.ru]https://kuhni-spb-60.ru[/url]
заказать кухню по индивидуальным размерам в спб [url=https://kuhni-spb-57.ru]https://kuhni-spb-57.ru[/url]
Glad to find something on this topic that does not start with three paragraphs of throat clearing before getting to the point, and a stop at lunarwaveoutlet also dives right in, respect for the readers time shows up in small editorial choices like this and they add up to a real difference quickly.
Took the time to read every paragraph rather than skimming for the punchline, and a quick visit to freshseasonmarket earned the same careful attention from me, that is the highest signal I can give about content quality because my default mode is rapid scanning rather than deliberate reading on most pages.
вывод из запоя в домашних условиях нарколог 24 [url=https://vyvod-iz-zapoya-na-domu-sankt-peterburg-20.ru]https://vyvod-iz-zapoya-na-domu-sankt-peterburg-20.ru[/url]
Appreciated how the post felt complete without overstaying its welcome, and a stop at silverbranchdesigns confirmed that economical approach runs across the site, knowing when to stop is a skill many writers never develop but here the discipline is obvious and welcome from the perspective of a busy reader trying to learn things efficiently.
A piece that handled multiple complications without becoming confused, and a look at newleafcreations continued that organisational clarity, holding multiple threads in a single piece without losing any of them is a sign of skilled writing and this site has clearly developed the editorial discipline to manage complexity without sacrificing readability throughout.
Found the post genuinely useful for something I was working on this week, and a look at findyourstrength added more material I will reference, content that connects to my actual life and work rather than just being interesting in the abstract is the kind I will pay attention to and return to repeatedly.
Now appreciating that the post did not try to imitate any other style I might recognise, and a stop at discovernewworlds continued that distinct voice, content with its own register rather than borrowed from elsewhere is content with real authorial presence and this site has clearly developed that presence through what feels like patient editorial work.
Solid endorsement from me, the writing earns it, and a look at globalfindscorner continues to earn it across the broader site too, the kind of operation that maintains quality across many pages rather than just one viral post is a sign of serious commitment and that is what I see here clearly across what I read.
Worth marking the moment when reading this clicked into something useful for my own work, and a look at yourshoppingzone extended that practical click, content that connects to my actual life rather than just being interesting is content with the highest kind of value and this site is generating that connection at a high rate.
Without comparing too aggressively to other sources this one stands out for the right reasons, and a look at coastlinecrafted continued that distinctive quality, content that distinguishes itself through substance rather than style tricks is content with lasting differentiation and this site has clearly chosen substance based differentiation as its core editorial strategy.
Now adding a small note in my reading log that this site is one to watch, and a look at discoverbetteroffers reinforced the watch status, the few sites I track deliberately rather than encounter accidentally are sites I expect ongoing returns from and this one has cleared the bar for that elevated tracking based on what I read.
Came in confused about the topic and left with a much firmer grasp on it, and after urbanwildroot I felt I could explain this to someone else without hesitation, that is the gold standard for any educational content and most sites simply fail to reach it ever which is unfortunate but true.
Quietly enjoying that I have found a new site to follow for the topic, and a look at timberlakecollections reinforced the small pleasure of the find, the discovery of new high quality sources is one of the more durable pleasures of careful internet reading and this site has been generating that discovery pleasure at multiple points already today.
Now adding this to a short list of sites I would defend in a conversation about the modern web, and a look at moonhavenemporium reinforced that defence list, the few sites that serve as evidence the web can still produce good things are precious and this one has clearly joined that small list of exemplary sites.
The pacing of the post was just right, never rushed and never dragged out unnecessarily, and a look at modernridgecorner maintained the same rhythm, you can tell the writer has experience because the difficult skill of pacing is something only practiced writers manage to handle well in long form content over time and across formats.
Thanks for the moderate length, neither so short it skips substance nor so long it bloats, and a stop at everlinecollection hit the same balance, the right length is one of the hardest things to calibrate in blog writing and I appreciate when a team has clearly thought about it rather than defaulting.
Generally I find the content on similar topics frustrating in specific ways and this post avoided all of them, and a look at futurecreststudio continued that frustration free experience, content that sidesteps the standard failure modes of its genre is content with editorial awareness and this site has clearly studied what fails elsewhere consistently.
https://justicelanow.org/art/1xbet_promo_code_today___welcome_bonus.html
Бытовая химия для дома https://bytovoy-ugolok.ru средства для уборки кухни, ванной, пола, стирки и дезинфекции. Заказывайте качественные товары для поддержания чистоты и комфорта с доставкой и выгодными предложениями.
http://naumov.rock-club.org/mainlink0901/elm/Promokod_Na_Bonus_1xBet_na_2021_god.html
Услуги грузчиков https://www.gruzchiki-kiev.net в Киеве для переездов, разгрузки транспорта, подъема мебели и строительных материалов. Профессиональные рабочие выполняют погрузочно-разгрузочные работы любой сложности, гарантируя аккуратное обращение с имуществом и оперативное выполнение заказа.
Definitely a recommend from me, anyone curious about the topic should check this out, and a look at newdawnessentials adds even more reason for that, the depth and quality combine to make this site one I will be pointing people toward whenever similar conversations come up over the months ahead at work or socially.
выведение из запоя на дому цена [url=https://vyvod-iz-zapoya-na-domu-ekaterinburg-28.ru]выведение из запоя на дому цена[/url]
However casually I came to this site I have ended up reading carefully, and a look at evergardenhub continued earning that careful reading, the conversion from casual visitor to careful reader is something content earns rather than demands and this site has accomplished that conversion for me over the course of just a few pieces.
Grateful for posts like this one, they remind me there are still places online run by people who care about quality, and a look at everwillowcrafts reflected the same standards, you can tell the difference between content made for readers and content made just for search engines today and this is the former.
Great work on keeping things readable, the post never drags or repeats itself which I really appreciate, and a stop at urbanvaluecenter added a bit more context that fit naturally with what was already said here, no need to read everything twice to get the point being made today.
If a friend asked me where to read carefully on the topic I would send them here without hesitation, and a look at moderncollectionhub confirmed the recommendation strength, the directness of my recommendation reflects how confident I am in the quality and this site has earned undiluted recommendations from me across multiple recent conversations actually.
капельница от запоя на дому [url=https://kapelnicza-ot-pokhmelya-samara-29.ru]капельница от запоя на дому[/url]
Genuinely well crafted writing, the kind that makes the topic look easier than it actually is, and a look at freshhomemarket added even more depth, you can feel the experience behind every line which is something only writers who have been at this for a while can pull off with this level of grace.
1win санҷиши синну сол [url=https://1win38596.help/]https://1win38596.help/[/url]
aviator भारत फ्री बेट [url=https://www.aviator50639.help]https://www.aviator50639.help[/url]
Quiet confidence runs through the whole post, no need to shout to make the points stick, and a stop at kindlewoodmarket carried that same restrained voice forward, content that respects the reader by trusting its own substance rather than dressing it up in theatrical language is what I look for online and rarely actually find these days.
прививочный сертификат купить, прививочный сертификат купить спб, купить прививочный сертификат с прививками
A piece that did not require external context to follow, and a look at brightstonefinds maintained the same self contained quality, content that stands alone without forcing readers to chase prerequisites is more accessible and this site has clearly thought about how each piece can serve a fresh visitor rather than only existing members.
Reading this confirmed something I had been suspecting about the topic, and a look at simplechoicecorner pushed that confirmation toward greater confidence, content that lines up with independently held intuitions earns a special kind of trust and I will return to writers who consistently land that way for me without overselling positions.
Honest reaction is that I want to send this to a friend who would benefit from it, and a look at globalfashioncorner added more material I will pass along too, the impulse to share is the strongest signal I have for content quality and this site is generating that impulse cleanly across multiple posts.
Picked this for a morning recommendation in our company chat, and a look at mountainstartrends suggested I will mention this site again later, recommending content into a workplace context is a small editorial act that requires confidence in the recommendation and this site is making me confident in those recommendations consistently here too.
Adding this to my list of go to references for the topic, and a stop at fashionloversmarket confirmed the rest of the site deserves the same, definitely the kind of resource that earns its place rather than getting forgotten the moment the next interesting article shows up in my feed somewhere else on the web.
справка о прививках купить москва
crash aviator [url=https://www.aviator50639.help]crash aviator[/url]
Genuinely useful read, the points are practical and easy to apply right away, and a quick look at freshseasonhub confirmed that this site is consistent in that approach, looking forward to digging through the rest of it when I get the chance to sit down properly later in the week or this weekend.
Held my interest from the opening line through to the closing thought, and a stop at discovernewpaths did the same, content that earns sustained attention in an environment full of distractions is doing something right and this site is clearly doing several things right rather than just one or two which I really appreciate.
Came in expecting another generic take and got something with actual character instead, and a look at silvermoonfabrics carried that personality forward, finding a distinct voice on a saturated topic is impressive and worth pointing out when it happens because most sites end up sounding identical to their nearest competitors quickly.
Now sitting back and recognising that this was a small but real win in my reading day, and a stop at autumnstonecorner extended that quiet win, the cumulative effect of small reading wins versus the cumulative effect of small reading losses is real over time and this site is contributing to the wins side of that ledger.
Сервис оценки недвижимости https://shalmach.pro помогает быстро узнать примерную стоимость объекта, возможные риски и рекомендации перед сделкой. Анализируйте состояние жилья, бюджет покупки и сценарии дальнейших действий до подписания договора.
Looking through the archives suggests this site has been doing this for a while at this level, and a look at learnandshine confirmed the long term consistency, sites that have maintained quality across years rather than just a recent stretch are sites with serious editorial discipline and this one has clearly been at it for a while.
Speaking as someone who reads a lot on this topic this site has earned a high position in my source rankings, and a stop at discoverandshop reinforced that ranking, the informal ranking of sources for a topic is something I maintain mentally and this site has moved into the upper portion of those rankings clearly.
Polished and informative without feeling overproduced, that is the sweet spot, and a look at pureeverwind hit it again, you can tell when a site has been built with care versus thrown together for the sake of having something to put online and this is clearly the former approach taken by the team.
A piece that ended with a clean landing rather than fading out, and a look at believeandachieve maintained the same crisp conclusions, endings that resolve rather than dissolve are a sign of careful structural thinking and this site has clearly invested in how its pieces conclude rather than letting them simply run out of energy.
Closed three other tabs to focus on this one and never opened them again, and a stop at evergreenchoicehub similarly held attention exclusively, content that crowds out other reading from working memory is content with real density and this site has demonstrated that density across multiple pages I have visited so far this morning.
https://sarynprime.com/fr/code-promo-1xbet-le-code-promotionnel-bonus/
Now wishing more sites covered topics with this level of care, and a look at modernharborhub extended that wish across more subjects, the rarity of careful coverage on most topics is a problem and this site is one of the small antidotes to that broader pattern of casual or surface treatment of complex subjects.
прокапаться [url=https://kapelnicza-ot-pokhmelya-nizhnij-novgorod-7.ru]прокапаться[/url]
Reading this felt productive in a way most internet reading does not, and a look at wildcreststudios continued that productive feeling, sometimes the open web feels like a waste of time but sites like this remind me why I still bother to look around rather than retreating to old reliable sources for everything I need.
Refreshing change from the usual sites covering this topic, no clickbait and no padding, and a stop at bestvalueoutlet confirmed the difference, this place clearly has its own voice rather than copying the formulas everyone else uses to chase clicks online which is becoming increasingly rare these days across nearly every popular subject.
Comfortable reading experience throughout, no jarring tone shifts and no awkward formatting, and a look at brightpetalhub kept that smooth feel going, the kind of editorial polish that goes unnoticed when present but glaring when absent is something this site has clearly invested in across the broader content as well which deserves recognition.
Reading this slowly to give it the attention it deserved, and a stop at grandridgeessentials earned the same slow read, choosing to read slowly is a small act of respect for content quality and very few sites earn that respect from me but this one did so without any explicit ask which is the cleanest way.
Honest assessment after reading this twice is that it holds up under careful attention, and a look at discoverandshopnow extended that durability across more pages, content that survives a second read without revealing weak spots is rarer than the average reader probably realises and this site clearly cleared that bar.
запой помощь [url=https://vyvod-iz-zapoya-na-domu-sankt-peterburg-21.ru]запой помощь[/url]
Found this via a link from another piece I was reading and the click was worth it, and a stop at midriveremporium extended the value across more material, the open web still rewards clicking through citations when the underlying writers care about each other work and this site clearly belongs to that network.
Took longer than expected to finish because I kept stopping to think, and a stop at freshgiftoutlet did the same to me, content that provokes thought rather than just delivering information is in a different category and the team here is clearly working at that higher level rather than just cranking out posts.
Worth flagging this site to a few specific friends who would appreciate the editorial sensibility, and a look at freshfashionstore added more pages I will mention to them, recommending sites to specific people requires understanding both the site and the person and this site is making those personalised recommendations easy and natural for me.
Reading this between two meetings turned out to be the highlight of the morning, and a stop at grandriverfinds continued that highlight quality, content that outshines the structured parts of a working day is doing something well beyond ordinary and this site has produced multiple such highlights for me already this week alone.
Skipped the comments section but might come back to read it, and a stop at truewaveemporium hinted at a quality reader community, sites where the comments are worth reading separately from the post are increasingly rare and signal a particular kind of audience that has grown around the editorial vision over time gradually.
mostbet aviator коэффициенты [url=http://mostbet43287.help/]http://mostbet43287.help/[/url]
Genuinely good work, the kind that holds up over multiple readings without losing its appeal, and a stop at fashionchoicecenter kept that going, definitely a site I will be returning to and probably mentioning to others who work in or care about this particular area of interest today and in coming weeks.
прививочный сертификат купить, прививочный сертификат купить спб, купить прививочный сертификат с прививками
Reading this in pieces during a long afternoon and finding it consistently rewarding, and a stop at moderntrendoutlet fit naturally into the same fragmented reading pattern, sites whose posts can be read in segments without losing the thread are well suited to how I actually read these days and this one is built well.
Will share this on a forum I am part of where it will be appreciated by others working in the same area, and a look at yourshoppingcorner suggests there is more here worth passing along too, definitely a generous resource that deserves a wider audience than it probably has today across the open internet.
Started imagining how I would explain the topic to someone else after reading, and a look at everwildharbor gave me more material for that imagined explanation, content that improves my own ability to discuss a topic is content that has actually transferred knowledge rather than just decorating my screen for a few minutes.
Really nice to see things explained without overcomplicating the topic, the words flow naturally and stay easy to follow, and a short visit to simplebuyinghub only added to that experience because the same simple approach is used across the rest of the page too without any change in tone.
Just wanted to say this was useful and leave a small note of thanks, and a quick visit to sunwindemporium earned a similar nod from me, the small acknowledgements add up over time and represent the real economy of trust that good content runs on across the open and increasingly fragmented modern internet.
вызвать нарколога на дом нижний новгород [url=https://narkolog-na-dom-nizhnij-novgorod-2.ru]вызвать нарколога на дом нижний новгород[/url]
Recommended without hesitation if you care about careful coverage of this topic, and a stop at silverharvesthub reinforced the recommendation, the bar I set for unhesitating recommendations is fairly high and this site has cleared it through the cumulative weight of multiple consistently good pieces rather than through any single standout post which is meaningful.
Now feeling confident that this site will continue producing work I will want to read, and a look at everforestdesign extended that confidence into the future, projecting forward from current quality to expected future quality is something I do for sites I genuinely follow and this one has earned that forward looking trust clearly today.
Reading this triggered a small change in how I think about the topic going forward, and a stop at puremeadowmarket reinforced that subtle shift, the rare content that actually moves my thinking rather than just confirming or filling it is the kind I most value and this site is providing that kind of impact today.
Genuine reaction is that I will probably think about this on and off for a few days, and a look at dailyvaluecorner added fuel to that, the best content lingers in your head after you close the tab rather than evaporating immediately and this site clearly knows how to write that kind of memorable content.
Walked away with a clearer head than I had before reading this, and a quick visit to everglowdesignmarket only sharpened that, the writing has a way of cutting through the noise that surrounds most topics online which is something I will definitely remember the next time I am searching for an answer to anything.
Took a few notes from this post, the points are easy to remember without needing to come back and check, and a look at creativelivingcorner added a couple more, the kind of place that sticks in the memory long after the browser tab has been closed for the day which says a lot really.
Worth saying that the quiet confidence of the writing is what landed first, and a look at modernfashionchoice continued that quiet quality, confident writing without the loud display of confidence is a rare combination and this site has clearly developed both the knowledge and the editorial restraint to land that combination consistently.
Came away with some new perspectives I had not considered before, and after urbantrendfinds those ideas felt more complete, the kind of content that stays with you a little while after reading rather than slipping out the moment you switch tabs and move on with your day to whatever comes next.
Reading this slowly to absorb the structure, and the structure is doing real work alongside the words, and a look at wildmooncorners maintained the same architectural quality, when sentence shapes and paragraph rhythms reinforce the meaning rather than just transporting words you know you are reading skilled work today.
Well done, the writing is professional without being stiff, and the topic is treated with care, and a look at goldenvinemarket reflected that approach, the kind of site I would point a colleague to if they asked for a reliable starting point on this topic in the future without any hesitation at all.
капельница от запоя на дому [url=https://kapelnicza-ot-pokhmelya-voronezh-15.ru]капельница от запоя на дому[/url]
Reading this back to back with a similar piece elsewhere made the quality difference obvious, and a stop at freshdailydeals only widened the gap, comparing content side by side is a useful exercise and the gap between this site and average competitors in the space is large enough to be noticeable from the first paragraph.
If I were to recommend a starting point for the topic this site would be near the top of my list, and a stop at freshdailyfinds reinforced that recommendation status, the small list of starting point recommendations I keep for friends asking about topics is short and this site is now firmly on it.
1win lucky jet [url=http://1win38596.help]1win lucky jet[/url]
Now adding the homepage to my regular check rotation rather than waiting for individual links to find me, and a stop at wildcrestemporium confirmed the rotation upgrade, the move from passive discovery to active checking is a vote of confidence in a sites ongoing quality and this site has earned that active engagement clearly.
Worth flagging this site to a few specific friends who would appreciate the editorial sensibility, and a look at midnighttrendhouse added more pages I will mention to them, recommending sites to specific people requires understanding both the site and the person and this site is making those personalised recommendations easy and natural for me.
глория мебель [url=https://kuhni-spb-57.ru]https://kuhni-spb-57.ru[/url]
купить тур в петербург [url=https://www.piter-na-teplohode.ru]купить тур в петербург[/url]
Closed the post with a small satisfied sigh, and a stop at goldensagecollections produced the same gentle exhale, content that ends well is content that respects the rhythm of reading and the writers here have clearly thought about how their pieces close rather than just trailing off when they run out of things to say.
Probably the kind of site that should be more widely read than it appears to be, and a look at freshgiftcollection reinforced that quiet wish, the gap between a sites quality and its apparent reach is sometimes large and that gap exists for this site in a way that makes me want to mention it more.
Skimmed first and then went back to read carefully, and the careful read paid off in places I had missed, and a stop at exploreopportunities got the same treatment, the rare site whose content rewards a second pass is content I want more of in my regular rotation rather than disposable single read articles.
aviator गेम [url=http://aviator50639.help]aviator गेम[/url]
Now feeling confident that this site will continue producing work I will want to read, and a look at sunmeadowgallery extended that confidence into the future, projecting forward from current quality to expected future quality is something I do for sites I genuinely follow and this one has earned that forward looking trust clearly today.
If the topic interests you at all this is a place to spend time, and a look at modernfashionzone reinforced that recommendation, the broader question of where to invest topical reading time is one this site answers convincingly through the consistent quality across multiple pieces I have sampled during the current reading session today.
Found this through a search that was generic enough I did not expect quality results, and a look at besttrendmarket continued the surprisingly good experience, search engines occasionally still surface excellent independent content if you scroll past the obvious paid and high authority results which is reassuring to remember sometimes.
скачать видео youtube [url=https://skachat-video-s-youtube-9.ru]https://skachat-video-s-youtube-9.ru[/url]
Reading this on a slow Sunday and finding it perfectly suited to a slow Sunday read, and a quick stop at timberpathstore kept the same gentle pace, content that fits the mood of the moment is something I notice and remember and this site has the kind of pace that suits relaxed reading sessions especially well.
1win akkauntga kira olmayapman [url=www.1win85063.help]1win akkauntga kira olmayapman[/url]
купить кухню в спб от производителя [url=https://kuhni-spb-60.ru]купить кухню в спб от производителя[/url]
Came in tired from a long day and the writing held my attention anyway, and a stop at growwithpurpose kept that going, content that can engage a fatigued reader is doing something right because most online reading happens in suboptimal conditions like that one and quality content adapts to it without complaint.
Started reading without much expectation and ended on a high note, and a look at softpineemporium continued that arc, content that builds rather than peaks early is a sign of a writer who knows how to structure a piece for sustained reader engagement rather than relying on a strong hook to do all the work.
Picked up something useful for a side project, and a look at wildnorthtrading added another piece I will incorporate, content that connects to specific projects I am working on is content with practical utility and the practical utility of this site is showing up across multiple posts I have read in the last hour or so.
A piece that did not waste any of its substance on sales or promotion, and a look at simplebuycorner continued that pure content focus, sites that resist the urge to monetise every paragraph are increasingly rare and this one has clearly made the editorial choice to keep the writing clean from commercial intrusion which I value highly.
Just want to say thank you for putting this together, posts like these make searching online actually worth it sometimes, and a quick look at buildyourownfuture kept that going, useful and easy to read without any of the tricks that ruin most blog comment sections lately on the wider open web.
Recommended without reservation for anyone interested in the topic at any level of expertise, and a look at creativegiftstore only strengthens that recommendation, this site clearly knows how to serve readers across a range of backgrounds without watering down the content or talking past anyone in the audience which is genuinely impressive to see.
true fortune casino $50 free chip no deposit usa [url=http://true-fortune-gb.com]http://true-fortune-gb.com[/url] .
Appreciate the practical examples, they made the abstract points easier to grasp, and a stop at coastalmeadowmarket added more of the same, this site clearly understands that real examples beat empty theory every single time which is the mark of a writer who knows their audience well and respects their time.
капельница на дому цена [url=https://kapelnicza-ot-pokhmelya-samara-29.ru]капельница на дому цена[/url]
The depth of coverage felt about right for the format, neither shallow nor overwhelming, and a look at modernfashioncenter kept that calibration going, getting the depth right for blog format is genuinely difficult because too shallow loses experts and too deep loses beginners but this site nailed it nicely which I really do appreciate.
Picked something concrete from the post that I will use immediately, and a look at moonhavenstudio added another concrete piece, content that produces immediately useful output rather than just abstract appreciation is content that earns its place in my regular rotation without needing any further evaluation from me at this point honestly.
Bookmark added without hesitation after finishing, and a look at rusticriverstudio confirmed I should bookmark the homepage too rather than just this page, the rare site that earns category level trust rather than just single article approval is the kind I want to rely on across many different topics over time.
Better than the average post on this subject by some distance, and a look at timelessgrovehub reinforced that, you can tell within the first paragraph that the writer here actually cares about the topic rather than just covering it for the sake of having something to publish that week or that day.
Stands apart from similar pages by actually being useful, that is high praise these days, and a look at everpathcollective kept that standard going, you can tell when a site is built around the reader versus around metrics and this one clearly belongs to the first category for sure based on what I read.
Most of the time I bounce off similar pages within seconds, and a stop at softleafemporium held me longer than I would have predicted, the ability to convert a likely bouncing visitor into an engaged reader is a quality signal and this site has demonstrated that conversion ability across multiple visits where I expected to bounce.
Really grateful for content like this, it does not waste my time and it does not insult my intelligence either, and a quick look at wildcoastworkshop was the same, balanced respectful writing that makes a person feel welcome rather than rushed through pages of forced engagement just to keep clicking around.
Now setting up a small reminder to revisit the site on a slow day, and a stop at explorelimitlessgrowth confirmed the reminder was a good idea, planning return visits is a small organisational act that signals trust in ongoing quality and this site has earned that planned return through consistent performance across the pieces I have read so far.
Honestly impressed by how much useful content sits in such a small post, and a stop at urbantrendstore confirmed the rest of the site packs a similar punch, density without confusion is a hard balance to strike and this site has clearly cracked the code on it across many different topic areas covered.
Now thinking the topic is more interesting than I had given it credit for, and a stop at everrootcollections continued that elevated interest, content that revives my curiosity about subjects I had set aside is doing genuine work in the structure of my interests and this site is providing that revivifying effect today actually.
Speaking from the perspective of having read widely on the topic this site offers something distinct, and a look at wildfieldmercantile reinforced that distinctness, the rare site that contributes something genuinely original to a saturated topic is the rare site worth following carefully and this one has demonstrated that original contribution capability today.
Honestly enjoyed every minute spent here, that is not something I say lightly, and a look at everwildgrove confirmed I will be back, the bar for spending time online is high for me these days but this site clears it without effort which is high praise indeed from this reader who is usually rather demanding.
капельница от запоя [url=https://kapelnicza-ot-pokhmelya-nizhnij-novgorod-7.ru]капельница от запоя[/url]
вывод из запоя екатеринбург [url=https://vyvod-iz-zapoya-na-domu-ekaterinburg-28.ru]вывод из запоя екатеринбург[/url]
Speaking as someone who reads a lot on this topic this site has earned a high position in my source rankings, and a stop at findnewhorizons reinforced that ranking, the informal ranking of sources for a topic is something I maintain mentally and this site has moved into the upper portion of those rankings clearly.
true fortune no deposit [url=http://www.truefortunecasinos.uk]true fortune no deposit[/url] .
Thanks for keeping things clear and to the point, that is honestly hard to find online these days, and after reading through shopwithstyletoday the message stayed consistent which makes me trust the information being shared more than I usually do on similar pages that cover this same kind of topic.
вывод из запоя на дому [url=https://vyvod-iz-zapoya-na-domu-sankt-peterburg-21.ru]вывод из запоя на дому[/url]
Quietly enjoying that I have found a new site to follow for the topic, and a look at urbanstyleoutlet reinforced the small pleasure of the find, the discovery of new high quality sources is one of the more durable pleasures of careful internet reading and this site has been generating that discovery pleasure at multiple points already today.
Worth recognising that the post handled a familiar topic without reaching for any of the obvious hot takes, and a stop at creativegiftmarket continued that fresh treatment, sites that find new angles on subjects others have exhausted are sites worth following carefully and this one has clearly developed that exploratory instinct through patient practice.
Just sat back at the end of the post and felt grateful that someone took the time to write it, and a look at budgetfriendlyhub extended that gratitude across more of the site, recognising effort behind quality work is part of what makes the open web a community rather than just a marketplace today.
true fortune temple town [url=true-fortune-freespins.com]true fortune temple town[/url] .
Just sat back at the end of the post and felt grateful that someone took the time to write it, and a look at lushvalleychoice extended that gratitude across more of the site, recognising effort behind quality work is part of what makes the open web a community rather than just a marketplace today.
Honestly enjoyed every minute spent here, that is not something I say lightly, and a look at apexhelm confirmed I will be back, the bar for spending time online is high for me these days but this site clears it without effort which is high praise indeed from this reader who is usually rather demanding.
Easily one of the better explanations I have read on the topic, and a stop at urbanstonegallery pushed it even higher in my mental ranking of useful resources, the kind of site that beats the average not by trying harder but by simply caring more about what it puts out daily which always shows.
Probably worth setting aside a longer block to read more carefully than I can right now, and a stop at evergreenstyleplace confirmed the longer block plan, the impulse to schedule dedicated time for a sites archive is itself a measure of trust and this site has earned that scheduling impulse from me clearly today actually.
Took a screenshot of one section to come back to later, and a stop at dailytrendmarket prompted another saved tab, the urge to capture and revisit specific pieces of content is something I rarely feel but when I do it tells me the work is worth more than the average passing read for sure.
Most posts I read end up forgotten within a day but this one is sticking, and a look at discoverbettervalue extended that lingering effect, content that survives the immediate moment of reading rather than evaporating is content with genuine retention quality and this site has been producing memorable pieces at a rate notable across my reading.
Really like that the writer trusts the reader to follow simple logic without restating every previous point, and a stop at groweverydaynow kept that respect going, treating an audience as capable adults rather than as people who need constant hand holding makes a noticeable difference in the reading experience for me.
Just want to say thank you for putting this together, posts like these make searching online actually worth it sometimes, and a quick look at silvergardenmart kept that going, useful and easy to read without any of the tricks that ruin most blog comment sections lately on the wider open web.
Picked this for my morning read because the topic seemed worth the time, and a look at moongladeboutique confirmed the choice was right, my morning reading slot is precious and giving it to this site felt like a good investment rather than a waste which is a higher endorsement than I usually offer for content.
Highly recommend to anyone looking for a sensible take on this topic without the usual marketing nonsense, and a look at whitestonechoice kept that grounded approach going, sites that stay focused on serving readers rather than monetising every click are rare and this is clearly one of those rare ones I really appreciate finding.
Felt the post had been quietly polished rather than aggressively styled, and a look at brightfloralhub confirmed the same understated polish, sites whose quality reveals itself slowly rather than announcing itself loudly are the kind I trust more deeply because the trust is not based on first impressions of marketing but actual substance.
купить международный прививочный сертификат
mostbet обновить приложение [url=http://mostbet97142.help]mostbet обновить приложение[/url]
open 1win account [url=https://1win08952.help]https://1win08952.help[/url]
нарколог на дом в нижнем новгороде [url=https://narkolog-na-dom-nizhnij-novgorod-2.ru]https://narkolog-na-dom-nizhnij-novgorod-2.ru[/url]
Reading this prompted me to dig out an old reference book related to the topic, and a stop at moonviewdesigns extended that connection to other sources, content that connects me back to my own existing knowledge rather than asking me to forget it is content with continuity and this site has that continuous quality.
However many similar pages I have read this one taught me something new, and a stop at frameparish added more new material, content that contributes genuinely fresh information rather than recycling what is already widely available is content with real informational value and this site is providing that informational freshness at a notable rate.
Reading this gave me a small sense of progress on a topic I have been slowly working through, and a stop at edendome added another step forward, learning happens in small increments across many sources and finding sources that consistently contribute is the actual practical value of careful curation in an information rich world.
Liked the careful word choice throughout, every term seemed picked for a reason rather than thrown in casually, and a stop at cosmohorizon continued that precise style, this kind of attention to small details is what separates careful writing from the usual rushed content that dominates blog spaces today across pretty much every topic I follow.
During the time spent here I noticed the absence of the usual distractions, and a stop at firminlet extended that distraction free experience, content that does not fight my attention with pop ups and modals and aggressive prompts is content that respects me and this site has clearly chosen the respectful approach throughout.
Now realising the topic deserved better treatment than it has been getting elsewhere, and a look at discoverandshopnow extended that broader recognition, content that exposes the gap between actual quality and average quality elsewhere is doing the quiet work of raising standards and this site is contributing to that elevation in its own corner.
1win Бишкек катталуу [url=1win43867.help]1win43867.help[/url]
нарколог капельницу на дому [url=https://kapelnicza-ot-pokhmelya-voronezh-15.ru]нарколог капельницу на дому[/url]
Thanks again for the post, I learned a couple of things I can actually use later this week, and after I went over irisarbor the rest of the site looked equally promising, definitely going to spend more time here when I get a free moment over the weekend to read more carefully.
кухни на заказ в спб [url=https://kuhni-spb-57.ru]кухни на заказ в спб[/url]
1win android tələblər [url=https://www.1win25674.help]https://www.1win25674.help[/url]
Now wondering how the writers calibrated the level of detail so well, and a stop at shopwithjoy continued the same calibration, the right level of detail is one of the harder editorial calls in any piece and this site has clearly developed an instinct for it through what I assume is years of careful practice publicly.
Liked how the writer used real examples instead of theoretical ones to make the points stick, and a stop at classystylemarket added even more concrete examples, this is the kind of practical approach that respects readers who actually want to apply what they learn rather than just nodding along passively without doing anything useful.
Quietly impressive in a way that does not announce itself, and a stop at lagooncrown extended that quiet impressiveness, the kind of quality that emerges through sustained attention rather than first impressions is the kind I trust more deeply and this site has been earning that deeper trust across multiple sessions over time consistently.
Now appreciating that the post did not try to imitate any other style I might recognise, and a stop at softfeathermarket continued that distinct voice, content with its own register rather than borrowed from elsewhere is content with real authorial presence and this site has clearly developed that presence through what feels like patient editorial work.
Thanks for keeping the writing direct without losing the warmth that makes content feel human, and a stop at marveldome carried both qualities forward, balancing professionalism and personality is a rare skill and the writers here have clearly figured out how to consistently land it across many posts which I notice.
Liked the careful word choice throughout, every term seemed picked for a reason rather than thrown in casually, and a stop at fullcirclemart continued that precise style, this kind of attention to small details is what separates careful writing from the usual rushed content that dominates blog spaces today across pretty much every topic I follow.
Now appreciating that the post left me with enough to say in a follow up conversation, and a look at wildshoregalleria added more material for those follow ups, content that prepares me for related conversations rather than just informing me alone is content with social utility and this site provides that social armament reliably for me.
производители рулонных штор [url=https://elektricheskie-rulonnye-shtory99.ru]производители рулонных штор[/url]
Speaking from the perspective of having read widely on the topic this site offers something distinct, and a look at brightwindemporium reinforced that distinctness, the rare site that contributes something genuinely original to a saturated topic is the rare site worth following carefully and this one has demonstrated that original contribution capability today.
Spent a few minutes here and came away with a clearer picture of the topic, the writing keeps things simple without dumbing them down, and after a stop at bravofarm the rest of the points lined up neatly which is something I appreciate when I am short on time and need answers fast.
Reading this on a long flight and finding it the best thing I read across hours of trying, and a stop at trendyvaluezone kept the streak going, when content beats long flight reading you know it has substance because flight reading is a hard test of a piece given the alternatives available everywhere.
Great work on keeping things readable, the post never drags or repeats itself which I really appreciate, and a stop at softpineoutlet added a bit more context that fit naturally with what was already said here, no need to read everything twice to get the point being made today.
Even just sampling a few posts the consistency is what stands out, and a look at dailyfindsmarket confirmed the broader pattern, sites where every piece I sample lives up to the standard set by the others are sites with serious quality control and this one has clearly invested in whatever editorial process produces that consistency reliably.
A genuine pleasure to find a site that publishes at a sustainable cadence rather than chasing the daily content treadmill, and a look at wildridgeattic confirmed the careful publication rhythm, sites that prioritise quality over frequency are rare and this one has clearly chosen the slower pace which I appreciate as a reader.
москва санкт петербург тур [url=https://www.piter-na-teplohode.ru]https://www.piter-na-teplohode.ru[/url]
Will be passing this along to a few people who would benefit from the perspective shared here, and a stop at findnewdeals only added to what I will be sharing, this kind of generous content deserves to circulate widely rather than getting buried in some search engine algorithm tweak that pushes it down the rankings.
Polished and informative without feeling overproduced, that is the sweet spot, and a look at freshcluster hit it again, you can tell when a site has been built with care versus thrown together for the sake of having something to put online and this is clearly the former approach taken by the team.
Quality you can feel from the first paragraph, the writer clearly knows the topic and how to share it, and a quick look at softfeathergoods confirmed the same depth runs throughout the rest of the site as well which is rare and worth pointing out when it happens online for any reader passing through.
Really like the way the post resists reaching for cliches that would have made it feel generic, and a quick visit to urbanpeakselection kept that fresh feel going, original phrasing and unexpected metaphors are signs that the writer is actually thinking rather than just stitching together familiar phrases into the appearance of content.
Now appreciating that the post left me with enough to say in a follow up conversation, and a look at flareaisle added more material for those follow ups, content that prepares me for related conversations rather than just informing me alone is content with social utility and this site provides that social armament reliably for me.
Useful reading material, the kind I can hand off to someone newer to the topic without worrying about confusing them, and a quick look at cosmoorchid confirmed the same beginner friendly tone runs throughout the site which is great for sharing with people just starting their learning journey on this particular topic.
If I am being honest this is the kind of site I quietly hope my own work will someday resemble, and a stop at irisbureau extended that aspirational feeling, finding work that models what I want to produce is part of why I read carefully and this site has been performing that modelling function for me lately consistently.
кухни на заказ санкт петербург от производителя [url=https://kuhni-spb-60.ru]кухни на заказ санкт петербург от производителя[/url]
A piece that handled the topic with appropriate weight without becoming portentous, and a look at oceanleafcollections continued that calibrated seriousness, content that takes itself seriously without becoming pompous is something this site has clearly figured out and the balance shows up in every piece I have read across multiple sessions now.
скачать видео из ютуб онлайн [url=https://skachat-video-s-youtube-9.ru]скачать видео из ютуб онлайн[/url]
mostbet фриспины за регистрацию [url=www.mostbet97142.help]mostbet фриспины за регистрацию[/url]
Started imagining how I would explain the topic to someone else after reading, and a look at bravoparish gave me more material for that imagined explanation, content that improves my own ability to discuss a topic is content that has actually transferred knowledge rather than just decorating my screen for a few minutes.
Worth saying this site reads better than most paid newsletters I have tried, and a stop at buildyourownfuture confirmed that comparison, the bar for free content is often lower than for paid but this site clears the paid bar consistently and that says something about the editorial approach behind the work being published here regularly.
Speaking from the perspective of a fairly demanding reader the writing here clears the bar consistently, and a look at shopthelatestdeals continued clearing that bar, the calibration of demanding reader is something I apply to all sources and this site has been one of the few that handles the demanding reading well across pieces sampled.
The pacing of the post was just right, never rushed and never dragged out unnecessarily, and a look at brightcollectionhub maintained the same rhythm, you can tell the writer has experience because the difficult skill of pacing is something only practiced writers manage to handle well in long form content over time and across formats.
However selective I am about new bookmarks this one made it past my filter, and a look at autumnmistemporium confirmed the bookmark was worth the slot, the precious slots in my permanent bookmark folder are difficult to earn and this site earned one without making me think twice about whether the slot was justified by the quality.
Genuinely changed how I think about a small piece of the topic, which does not happen often online, and a look at meritgrange added another nudge in the same direction, the kind of writing that earns a small mental shift rather than just confirming what you already thought before reading is a sign of careful thought.
The use of plain language without dumbing down the topic was really well done, and a look at lagoonforge continued in that same accessible style, this is something many technical writers fail at because they either confuse their readers or condescend to them but here neither problem appears at all which is impressive really.
mines mostbet [url=https://mostbet97142.help]https://mostbet97142.help[/url]
Found this via a link from another piece I was reading and the click was worth it, and a stop at urbantrendmarket extended the value across more material, the open web still rewards clicking through citations when the underlying writers care about each other work and this site clearly belongs to that network.
Refreshing to find writing that does not try to manipulate the reader into clicking onto the next page through cliffhangers and forced engagement, and a stop at coastalridgecorner continued in the same respectful way, this is what reader first design actually looks like in practice rather than just in marketing copy that sounds nice.
If I had encountered this site five years ago I would have been telling everyone about it, and a look at globalvaluecorner extended that retrospective enthusiasm, the version of me who used to recommend favourite blogs frequently would have made sure friends knew about this one and that earlier enthusiasm is partially returning to me here.
Came in skeptical of the angle and left mostly persuaded, and a stop at brightpeakharbor pushed me a bit further in the same direction, content that can move a critical reader by argument rather than rhetoric is rare and worth pointing out because it indicates real substance underneath the surface presentation here.
1win элсом вывод [url=http://1win43867.help/]http://1win43867.help/[/url]
Honestly slowed down to read this carefully which is not my default, and a look at createyourpath kept me in that careful reading mode, the kind of writing that demands attention by being worth attention is rare in a media environment full of content engineered to be skimmed not read with any real focus today.
Came in tired from a long day and the writing held my attention anyway, and a stop at freshguild kept that going, content that can engage a fatigued reader is doing something right because most online reading happens in suboptimal conditions like that one and quality content adapts to it without complaint.
how to play lucky jet on 1win [url=https://www.1win08952.help]how to play lucky jet on 1win[/url]
вывод из запоя цены [url=https://vyvod-iz-zapoya-na-domu-sankt-peterburg-21.ru]вывод из запоя цены[/url]
капельница после запоя цена [url=https://kapelnicza-ot-pokhmelya-nizhnij-novgorod-8.ru]капельница после запоя цена[/url]
1win пополнение без комиссии карта [url=1win43867.help]1win пополнение без комиссии карта[/url]
Worth flagging that the post handled an angle of the topic I had not seen elsewhere, and a look at newharborbloom extended that fresh treatment, content that finds underexplored corners of well covered subjects is genuinely valuable and this site has demonstrated that exploratory editorial approach across multiple pieces in my reading sessions today.
More substantial than most of what I find searching for this topic online, and a stop at flarefest kept that quality consistent, this is one of those sites where the writing actually rewards careful reading rather than punishing the patient reader with empty filler stretched out across long paragraphs that say very little.
1win aviator balans [url=http://1win25674.help]http://1win25674.help[/url]
Excellent execution from start to finish, the post never loses its rhythm and the points stay sharp, and a quick stop at cosmoprairie kept the same level going, consistency like this across a site is the marker of a serious operation rather than a casual side project running on autopilot somewhere else.
вывод из запоя на дому [url=https://vyvod-iz-zapoya-na-domu-ekaterinburg-28.ru]вывод из запоя на дому[/url]
Coming to this with low expectations and being pleasantly surprised by the substance, and a stop at islemeadow continued exceeding expectations, the recalibration of expectations upward across multiple positive readings is one of the actual rewards of careful browsing and this site is providing that recalibration at a steady rate apparently.
Worth saying that the writing carries a particular kind of authority without making any explicit claims to it, and a stop at deepbrookcorner extended that earned authority feeling, sites that demonstrate expertise through the quality of their explanations rather than by stating credentials are sites I trust most and this site has it.
Worth your time, that is the simplest endorsement I can give, and a stop at wildgroveemporium extends that endorsement across the rest of the site, this is one of those increasingly rare places that delivers on what it promises rather than over selling the content and under delivering on substance every time which I find frustrating elsewhere.
Decided after reading this that I would check this site weekly going forward, and a stop at bravopier reinforced that commitment, deciding to add a site to a regular rotation requires meeting a quality bar that very few places clear and this one cleared it cleanly without any noticeable effort or marketing push behind it.
Liked how the writer used real examples instead of theoretical ones to make the points stick, and a stop at shopthelatestdeals added even more concrete examples, this is the kind of practical approach that respects readers who actually want to apply what they learn rather than just nodding along passively without doing anything useful.
A piece that left me thinking I had been undercaring about the topic, and a look at findbettervalue reinforced that mild concern, content that raises the appropriate weight of a subject without being preachy about it is doing important work and this site is providing that gentle elevation of attention for me consistently.
Speaking as someone who reads a lot on this topic this site has earned a high position in my source rankings, and a stop at brightstylemarket reinforced that ranking, the informal ranking of sources for a topic is something I maintain mentally and this site has moved into the upper portion of those rankings clearly.
Useful enough to recommend to several people I know who would appreciate it, and a stop at dailyshoppingplace added more material I will pass along too, the kind of writing that earns word of mouth is the kind that actually delivers on its promises which is what this site does without any drama or fanfare attached.
Liked that the post landed without needing to manufacture controversy or take a contrarian stance for attention, and a stop at meritlibrary continued that grounded approach, content that earns attention through quality rather than provocation is the kind that builds long term trust rather than burning it on quick wins.
Thanks for the breakdown, it gave me a clearer picture of something I had been confused about for a while now, and a stop at brightmoorcorner closed the remaining gaps in my understanding nicely, no need to hunt around twenty other articles to put the pieces together which is a real time saver.
Decided to read more before commenting and the more I read the more I wanted to say something, and a stop at shopthebestfinds pushed that impulse further, when content provokes the urge to participate rather than just consume it is doing something quite specific and worth recognising clearly when it happens during reading.
Started reading and ended an hour later without realising the time had passed, and a look at beststylecollection produced the same time dilation effect, when content makes time feel different the writer has achieved something well beyond the average and this site is producing that experience for me reliably across multiple readings.
Beyond the topic at hand this site reads as a small ongoing project of taking writing seriously, and a look at frostcoast reinforced that project quality, sites that treat publishing as an ongoing serious practice rather than as content production for traffic are sites worth supporting and this one has clearly chosen the serious approach.
Will recommend this to a couple of friends who have been asking about this exact topic, and after starlightforest I have even more reason to do so, the kind of site that earns word of mouth rather than chasing it through aggressive marketing or paid placements is always a treat to find online.
Honest reaction is that I want to send this to a friend who would benefit from it, and a look at lagoonmill added more material I will pass along too, the impulse to share is the strongest signal I have for content quality and this site is generating that impulse cleanly across multiple posts.
Glad I gave this a chance rather than scrolling past, and a stop at uniquetrendcollection confirmed I made the right call, sometimes the best content is hidden behind unassuming headlines that do not scream for attention and learning to slow down and check those out has paid off many times now across years of reading.
капельница от похмелья воронеж [url=https://kapelnicza-ot-pokhmelya-voronezh-15.ru]капельница от похмелья воронеж[/url]
Adding this to my list of go to references for the topic, and a stop at softblossomstudio confirmed the rest of the site deserves the same, definitely the kind of resource that earns its place rather than getting forgotten the moment the next interesting article shows up in my feed somewhere else on the web.
Now adding this site to a small mental group of recommendations I keep ready for specific kinds of inquiries, and a stop at flarefoil extended the recommendation readiness, content that I can confidently point friends and colleagues toward in specific contexts is content with real social utility and this site has that utility clearly.
Worth flagging this post as worth a careful read rather than a casual skim, and a stop at goldenmeadowsupply earned the same careful approach, the few sites that warrant slower reading are sites I now treat differently from the daily content stream and this one has clearly moved into that elevated treatment category.
Beyond the immediate post itself the editorial sensibility behind the site is what struck me, and a stop at curiopact continued displaying that sensibility, content that reveals editorial choices through accumulated reading is content with structural quality and this site has clearly developed an underlying approach worth identifying through multiple sessions of reading.
Really appreciate the lack of pop ups, modals, cookie banners stacking on top of each other, and a quick visit to isleparish confirmed the same clean approach across the rest of the site, technical decisions about user experience are part of what makes content actually pleasant to engage with for sure.
Solid value for anyone willing to read carefully, and a look at sunsetcrestboutique extends that value across the rest of the site, this is the kind of place that rewards return visits rather than offering everything in a single splashy post and then leaving readers nothing to come back for later which is unfortunately common.
Pass this along to anyone you know dealing with similar questions, the answers here are clear, and a stop at briskcanopy adds even more useful material, this is the kind of resource that deserves to circulate widely rather than getting lost in the constant churn of new content online that buries good work daily.
Probably the kind of site that should be more widely read than it appears to be, and a look at urbanstylechoice reinforced that quiet wish, the gap between a sites quality and its apparent reach is sometimes large and that gap exists for this site in a way that makes me want to mention it more.
Just wanted to say this was useful and leave a small note of thanks, and a quick visit to cozytimberoutlet earned a similar nod from me, the small acknowledgements add up over time and represent the real economy of trust that good content runs on across the open and increasingly fragmented modern internet.
Came back to this twice now in the same week which is unusual for me, and a look at meritmarina suggested I will keep coming back, the kind of post that earns repeated visits rather than one and done reading is the gold standard for content quality and this site clearly hit that standard.
наркологическая помощь на дому круглосуточно [url=https://narkolog-na-dom-nizhnij-novgorod-2.ru]https://narkolog-na-dom-nizhnij-novgorod-2.ru[/url]
Held my interest from the opening line through to the closing thought, and a stop at frostorchard did the same, content that earns sustained attention in an environment full of distractions is doing something right and this site is clearly doing several things right rather than just one or two which I really appreciate.
Now recognising the post as a rare example of careful writing on a topic that mostly receives careless treatment, and a stop at globalseasonstore extended that contrast with the average elsewhere, content that highlights how much the average is settling for low quality is content that has both internal merit and external value as a benchmark.
Speaking carefully because I do not want to overstate things this site is genuinely above average across multiple measurements, and a stop at creativehomeoutlet continued the above average performance, the calibration of judgement against potential overstatement is something I take seriously and this site clears the higher bar even after that calibration applies.
рулонные шторы на балконные окна [url=https://elektricheskie-rulonnye-shtory99.ru]https://elektricheskie-rulonnye-shtory99.ru[/url]
сервис скачивания с ютуба [url=https://skachat-video-s-youtube-11.ru]сервис скачивания с ютуба[/url]
Probably the best thing I have read on this topic in the past month, and a stop at bestdailycorner extended that ranking, the casual ranking of recent reading is informal but real and this site has been winning those rankings for me on this topic specifically over the last several weeks of regular reading sessions.
Got pulled in by the headline and stayed because the content actually delivered on the promise, and a stop at dreamcrestridge kept that trust intact, when a site lives up to its own framing it earns the right to keep showing up in my browser tabs going forward indefinitely from here on out really.
1win reinstall app [url=https://www.1win08952.help]1win reinstall app[/url]
1вин кыргызча жүктөп алуу [url=1win43867.help]1win43867.help[/url]
Came in tired from a long day and the writing held my attention anyway, and a stop at brighttimbermarket kept that going, content that can engage a fatigued reader is doing something right because most online reading happens in suboptimal conditions like that one and quality content adapts to it without complaint.
Reading this in a quiet hour and finding it suited the quiet, and a stop at flareinlet extended the quiet reading mood, content that matches its own optimal reading conditions rather than fighting them is content that has been thoughtfully calibrated and this site reads as having a particular reading mood in mind throughout.
Probably one of the more reliable sources I have found for this kind of careful coverage, and a look at lakeblossom reinforced the reliability, the small group of sources I would describe as reliable for a given topic is curated carefully and this site has earned a place in that small group through consistent performance.
вызов нарколога на дом анонимно [url=https://narkolog-na-dom-voronezh-10.ru]https://narkolog-na-dom-voronezh-10.ru[/url]
Took me back a step or two on an assumption I had been making, and a stop at sunsetpinecorner pushed that reconsideration further, writing that gently corrects the reader without being aggressive about it is a rare diplomatic skill and the team here clearly knows how to land critical points without turning readers off.
Worth saying this site reads better than most paid newsletters I have tried, and a stop at isleprairie confirmed that comparison, the bar for free content is often lower than for paid but this site clears the paid bar consistently and that says something about the editorial approach behind the work being published here regularly.
Just wanted to drop a quick note saying this was a useful read on a topic I have been circling, no fluff, and a stop at dazzquay added a few extra points that fit the same simple style which makes the whole site feel coherent rather than thrown together by many different writers with different goals.
капельница от запоя на дому цена [url=https://kapelnica-ot-zapoya-nizhnij-novgorod-8.ru]капельница от запоя на дому цена[/url]
Worth pointing out the careful word choice in this post, no buzzwords and no jargon, and a look at briskolive continued that disciplined vocabulary, sites that resist the pull of trendy language are sites that will read well in five years and this one is clearly built for that kind of long durability.
In the middle of an otherwise scattered day this post landed as a moment of focus, and a stop at urbanmeadowboutique extended that focused feeling across more pages, content that anchors a fragmented day rather than contributing to the fragmentation is content with real centring effect and this site is providing that anchoring function for me.
Now setting this aside as a model of how to write thoughtfully on the topic, and a stop at purefashionchoice extended that model status, content that becomes a reference for how a kind of writing should be done is content with influence beyond its own readership and this site is reaching that level for me clearly today.
прокапывание на дому [url=https://kapelnicza-ot-pokhmelya-voronezh-16.ru]прокапывание на дому[/url]
Took a screenshot of one section to come back to later, and a stop at galafactor prompted another saved tab, the urge to capture and revisit specific pieces of content is something I rarely feel but when I do it tells me the work is worth more than the average passing read for sure.
Took longer than expected to finish because I kept stopping to think, and a stop at lunarcrestlifestyle did the same to me, content that provokes thought rather than just delivering information is in a different category and the team here is clearly working at that higher level rather than just cranking out posts.
Picked up two new ideas that I expect will come up in conversations this week, and a look at meritpoise added another, content that arms me with talking points rather than just filling time is the kind that provides ongoing value beyond the moment of reading and this site is generating that kind of ongoing value.
Thanks for the practical examples scattered through the post rather than abstract theory only, and a look at lunarbranchstore continued that grounded style, abstract points are easier to remember when paired with concrete situations and the writers here clearly understand how readers actually retain information from blog content reading sessions.
Really like that there are no exclamation marks or all caps shouting throughout the post, and a quick visit to uniquegiftoutlet maintained the same calm voice, restraint in punctuation signals confidence in the content and this site clearly trusts its substance to do the persuading rather than relying on typographic emphasis.
мостбет бонус на первый депозит [url=www.mostbet97142.help]www.mostbet97142.help[/url]
нарколог домой [url=https://narkolog-na-dom-voronezh-14.ru]нарколог домой[/url]
Took the time to read the comments on this post too and they were also worth reading, and a stop at carefreecornerstore suggested the community quality matches the content quality, when the conversation around a piece is as good as the piece itself you know you have found a real corner of the internet.
капельница на дому екатеринбург цены [url=https://kapelnicza-ot-pokhmelya-ekaterinburg-17.ru]капельница на дому екатеринбург цены[/url]
капельницы на дому екатеринбург цена [url=https://kapelnicza-ot-pokhmelya-ekaterinburg-14.ru]https://kapelnicza-ot-pokhmelya-ekaterinburg-14.ru[/url]
вывода из запоя 24 [url=https://vyvod-iz-zapoya-na-domu-sankt-peterburg-21.ru]вывода из запоя 24[/url]
Now adding this to a list of sites I want to see flourish, and a stop at autumnpeakstudio reinforced that wish, the few sites I actively root for are sites that produce the kind of work I want more of in the world and this one has joined that small list based on what I have read so far.
Even from a single post the editorial care is clear, and a stop at timbercrestcorner extended that care across more pages, the kind of attention to quality that shows up in every paragraph is what separates serious sites from the rest and this one has clearly invested in that paragraph level attention across what I have read.
mostbet пополнение без комиссии [url=https://mostbet60398.help/]https://mostbet60398.help/[/url]
1вин ошибка входа [url=https://www.1win41738.help]https://www.1win41738.help[/url]
плинко mostbet [url=http://mostbet93268.help]http://mostbet93268.help[/url]
Thanks for a post that does not try to be funny when it is not the moment for it, and a stop at flarelantern maintained the same appropriate seriousness, knowing when humour helps and when it just signals desperation for engagement is a sign of editorial maturity that many blogs have not developed yet.
A piece that prompted a small mental rearrangement of how I order related ideas, and a look at lushgrovecorner extended that rearranging effect, content that affects the structure of my thinking rather than just adding to it is content with the deepest kind of impact and this site is reaching that depth for me today.
уничтожение клопов травля тараканов
Picked a single sentence from this post to remember, and a look at ivypier gave me another to keep, content that produces memorable lines is doing more than just transferring information and the small selection of sentences I keep from each reading session is one of the actual returns I get from reading carefully.
Looking back on this reading session it stands as one of the better ones recently, and a look at dewdawn extended that ranking, the informal ranking of reading sessions against each other is something I do mentally and this session ranks high largely because of this site and a couple of related pages here.
Reading this felt easy in the best way, no friction and no confusion at any point, and a stop at urbanfashiondeal carried that same comfort across more pages, the kind of editorial flow that lets you absorb information without fighting the format which is increasingly hard to find on the open web today across topics.
Good clean post, no errors and no awkward phrasing that breaks the reading flow, and a stop at cadetarena kept the same standard, definitely the kind of editorial care that earns a return visit because it tells me the writer is paying attention to details that matter to readers rather than just rushing publication.
Skipped the TLDR thinking I would read everything anyway, and ended up enjoying the path through the full post, and a stop at gemcoast similarly rewarded the patient read, summaries are useful but the journey through good writing is part of what makes the destination feel earned rather than just delivered cleanly.
A clear case of writing that does not try to do too much in one post, and a look at silvermaplecollective maintained the same scoped discipline, posts that try to cover too much end up covering nothing well and this site has clearly chosen scope discipline as a core editorial principle which shows up clearly in what I read.
Closed the laptop after this and let the ideas settle for a few hours, and a stop at lakelake similarly rewarded reflective time, content that benefits from sitting with rather than racing past is the kind I want more of and the kind that this site appears to consistently produce week after week here.
https://starmaterialsolutions.com/blog/?kakie_rasteniya_vybraty_dlya_ekstensivnogo_i_intensivnogo_ozeleneniya_kryshi.html
Closed and reopened the tab three times before finally finishing, and a stop at sunrisepeakstudio held my attention straight through, sometimes content fights for time against my own distraction and the times it wins say something positive about its quality and this post clearly won that fight today afternoon for me.
Now noticing how rare it is to find a site that does not feel rushed, and a look at everforestcollective extended that calm pace, content produced without time pressure has a different quality than content shipped to meet a deadline and this site reads as written without urgency which produces a different and better experience for readers.
клининг после ремонта москва
Reading the writers other posts after this one suggests the quality is consistent rather than peak, and a stop at meritquay confirmed the consistent quality reading, sites that hold the same level across many pieces rather than peaking on a few are sites with sustainable editorial discipline and this one has clearly developed that.
выведение из запоя на дому [url=https://vyvod-iz-zapoya-na-domu-sankt-peterburg-22.ru]выведение из запоя на дому[/url]
https://tbank.ru/baf/4WyC94ameg4 Счет для бизнеса в T-Банке — открытие и обслуживание счета от 0 ?. Если оформить по моей ссылке, вы получите 3 месяца обслуживания бесплатно.
Уборка квартиры после ремонта
Closed my email tab so I could read this without interruption, and a stop at portcanopy earned the same protected attention, when content is good enough to defend against the usual digital distractions you know it deserves better than the half attention most online reading gets in a typical busy day.
My usual response to new bookmarks is to forget them but this one I have already returned to twice, and a look at budgetfriendlyhub pulled me back a third time, the actual return rate to bookmarked sites is the real measure of value and this one is clearing that measure at a notable rate already.
Liked the way the post handled the final paragraph, no neat bow but no abrupt cutoff either, and a stop at wildpeakcorner continued that thoughtful ending pattern, endings are hard and most blog writers either over engineer them or skip them entirely and this site has clearly figured out a sustainable middle approach.
Looking at the surface design and the substance together this site has both right, and a look at goldenrootboutique reinforced that integrated quality, sites where presentation and content reinforce each other rather than fighting are sites with full editorial coherence and this one has clearly invested in both layers in a balanced way.
Worth recognising that the post did not pretend to be the final word on the topic, and a stop at lunarwoodstudio continued that humility, content that admits its own scope and limits is more trustworthy than content that overreaches and this site has clearly developed the editorial maturity to know what it can and cannot claim well.
Reading this between meetings turned out to be the most useful thing I did all afternoon, and a stop at tallbirchoutlet kept that productivity feeling going, content can sometimes outperform actual work in terms of what gets accomplished mentally and this site managed that today which is genuinely a high bar to clear consistently.
Honestly impressed by how much useful content sits in such a small post, and a stop at modernhomemarket confirmed the rest of the site packs a similar punch, density without confusion is a hard balance to strike and this site has clearly cracked the code on it across many different topic areas covered.
травля тараканов уничтожение клопов
цены на вывод из запоя на дому [url=https://vyvod-iz-zapoya-na-domu-ekaterinburg-28.ru]цены на вывод из запоя на дому[/url]
Appreciate the thoughtful approach, the writer clearly took time to make this readable for someone who is not already an expert, and a look at puremountaincorner kept that going nicely, easy on the eyes and easy on the brain which is always a winning combination when reading on a busy day.
Felt like the writer was speaking directly to someone with my level of curiosity, neither talking down nor showing off, and a stop at flarequill kept that comfortable matching going, finding writing that meets you where you are rather than asking you to climb up or stoop down feels great every time it happens.
Picked this site to mention to a colleague who would benefit, and a look at evermaplecrafts added more material I will pass along, recommending sites to colleagues is a higher bar than recommending to friends because the professional context demands more careful curation and this site cleared the professional bar without me having to think.
Even from a single post the editorial care is clear, and a stop at moonlitgardenmart extended that care across more pages, the kind of attention to quality that shows up in every paragraph is what separates serious sites from the rest and this one has clearly invested in that paragraph level attention across what I have read.
A well calibrated piece that knew its scope and stayed inside it, and a look at urbanwearzone maintained the same scope discipline, scope creep is one of the failure modes of long blog posts and this site has clearly invested in the editorial discipline to prevent it which shows up in tightly contained pieces.
Reading this prompted a brief but useful conversation with a colleague who happened to walk by, and a stop at jetdome extended that conversational seed, content that becomes a starting point for in person discussion rather than ending in solitary reading is content with social generative energy and this site has plenty of it apparently.
Decided this was the kind of site I would defend in a discussion about good blog content, and a stop at nimbuscabin reinforced that, very few sites earn active defence rather than passive consumption and this one has clearly crossed that threshold for me without needing any explicit pitch from the writers themselves either.
Clean writing, easy to read, and never tries too hard to impress, that combination is harder to find than people think, and after my time on globebeat I am sure this site treats its readers well, no flashy tricks just useful content done right which is honestly all I want online.
Now wishing I had found this site sooner, and a look at cadetgrail extended that mild regret, the calculation of how many years of good content I missed by not finding the right sources earlier is one I try not to make too often but it does come up sometimes when I find sites this good.
If I were grading sites on this topic this one would receive high marks, and a stop at dockjournal continued earning those high marks, the informal grading I do mentally for content sources is something I take seriously even though it is informal and this site has been receiving consistent high marks across multiple sessions today.
Top quality material, deserves more attention than it probably gets, and a look at goldshoreattic reflected the same effort across the site, a hidden gem in the modern web where most attention goes to whoever shouts loudest rather than whoever actually delivers the best content for their readers without much marketing fanfare.
During a reading session that included several other sources this one stood out, and a look at uniquefashionhub continued the standout quality, the side by side comparison of sources during research is a useful exercise and this site has been winning those comparisons for me consistently across multiple research sessions during the last week.
Skipped breakfast still reading this and finished hungry but satisfied, and a stop at brightmountainmall kept me past breakfast time, content that displaces basic biological needs is content with serious attentional pull and the writers here are clearly capable of producing that level of engagement which is genuinely impressive these days.
Found a small mental shift after reading this, the framing here is just a bit different from the standard takes online, and a look at lakequill extended that fresh perspective across more material, the rare site whose voice actually changes how you think about something rather than just confirming existing beliefs.
https://tbank.ru/baf/AlFidK119eb Выбирайте продукт от T-Банка и получайте бонусы.
мостбет онлайн ставки Кыргызстан [url=www.mostbet60398.help]www.mostbet60398.help[/url]
1win uz Click [url=https://1win41738.help]https://1win41738.help[/url]
Strong recommendation, anyone interested in this topic owes themselves a visit, and a stop at wildbrookmodern extends that recommendation across more of the site, this is the kind of resource that makes me more optimistic about the state of the open web than I usually am these days actually for once which is genuinely refreshing.
мостбет бонус без депозита ставки [url=http://mostbet93268.help/]мостбет бонус без депозита ставки[/url]
If I am being honest this is the kind of site I quietly hope my own work will someday resemble, and a stop at meritquill extended that aspirational feeling, finding work that models what I want to produce is part of why I read carefully and this site has been performing that modelling function for me lately consistently.
Took a screenshot of one section to come back to later, and a stop at urbanhillfashion prompted another saved tab, the urge to capture and revisit specific pieces of content is something I rarely feel but when I do it tells me the work is worth more than the average passing read for sure.
Reading this on a phone at a coffee shop and finding it perfectly suited to that context, and a stop at portguild continued the comfortable mobile experience, content that works across reading conditions without compromising on substance is increasingly important and this site has clearly thought about the whole reader experience here.
Honestly this was the highlight of my reading queue today, and a look at truehorizontrends extended that across more pages I will return to, ranking what I read against what else I read each day is something I do informally and this site keeps moving up in those rankings the more I explore it.
роликовые шторы [url=https://elektricheskie-rulonnye-shtory99.ru]роликовые шторы[/url]
Started forming counter examples to test the claims and the post handled most of them implicitly, and a look at brightvalueworld continued that anticipatory style, writers who think two steps ahead of the critical reader save themselves from a lot of follow up work and this writer has clearly internalised that habit consistently.
наркологическая помощь на дому [url=https://narkolog-na-dom-nizhnij-novgorod-2.ru]https://narkolog-na-dom-nizhnij-novgorod-2.ru[/url]
1вин скачать [url=https://www.1win41738.help]https://www.1win41738.help[/url]
мостбет промокод на фрибет [url=https://mostbet93268.help]https://mostbet93268.help[/url]
сколько стоит капельница от запоя [url=https://kapelnica-ot-zapoya-nizhnij-novgorod-8.ru]сколько стоит капельница от запоя[/url]
Picked this up while looking for something else and ended up reading every paragraph because it was actually informative, and after fleetatelier I was sure I would come back, that does not happen often when most sites bury the useful parts under endless ads and pop ups today and across most categories online.
The post made the topic feel approachable without making it feel trivial, that is a fine balance, and a stop at bluewillowmarket maintained the same balance, finding the middle ground between welcoming and serious is genuinely difficult and the writers here have clearly figured out how to consistently hit it well across many different posts.
Worth recognising the absence of the usual blog tropes here, and a look at wildmeadowstudio continued that fresh quality, sites that avoid the standard moves of the medium read as more original even when the content is on familiar topics and this one has clearly chosen its own path through the conventional terrain skilfully.
Found the writing surprisingly fresh for what is by now a well covered topic, and a stop at brightdeltafabrics kept that freshness going across the related pages, original perspective on familiar ground is hard to come by and this site has clearly earned its place in the conversation rather than just rehashing old ideas.
скачать с ютуба в отличном качестве [url=https://skachat-video-s-youtube-11.ru]https://skachat-video-s-youtube-11.ru[/url]
Yesterday I was complaining about the state of online writing and today this site has temporarily fixed that complaint, and a look at softforestfabrics extended that mood reversal, the short term mood improvement that comes from finding good content is real and this site has produced that improvement for me at a useful moment.
Recommended without hesitation if you care about careful coverage of this topic, and a stop at globehaven reinforced the recommendation, the bar I set for unhesitating recommendations is fairly high and this site has cleared it through the cumulative weight of multiple consistently good pieces rather than through any single standout post which is meaningful.
Probably going to mention this site in a write up I am working on later this month, and a stop at jetmanor provided more material for that potential mention, content worth referencing in my own published work rather than just personal reading is content with the highest endorsement level and this site has earned that endorsement.
Now adjusting my expectations upward for the topic based on this post, and a stop at candidmeadow continued that bar raising effect, content that resets what I think is possible on a subject is doing real work in shaping my standards and this site is providing those bar raising experiences at a notable rate during sessions.
Speaking honestly this is among the better discoveries of my recent browsing, and a stop at wildspireemporium reinforced that discovery quality, the ranking of recent discoveries is informal but meaningful and this site has placed near the top of that ranking based on the consistency of quality across what I have already read carefully.
Sets a higher bar than most of what shows up in search results for this topic, and a look at domelegend did not lower that bar at all, in fact it confirmed the impression, this is the kind of consistency that earns a place in regular rotation for serious readers instead of casual scrollers passing through.
вызвать нарколога на дом [url=https://narkolog-na-dom-voronezh-10.ru]вызвать нарколога на дом[/url]
Strong recommendation, anyone interested in this topic owes themselves a visit, and a stop at uniquebuyoutlet extends that recommendation across more of the site, this is the kind of resource that makes me more optimistic about the state of the open web than I usually am these days actually for once which is genuinely refreshing.
Speaking as someone who reads a lot on this topic this site has earned a high position in my source rankings, and a stop at dreamridgeemporium reinforced that ranking, the informal ranking of sources for a topic is something I maintain mentally and this site has moved into the upper portion of those rankings clearly.
true fortune code [url=http://true-fortune-casino3.com/]true fortune code[/url] .
true fortune free chip [url=www.true-fortune-casino4.com/]true fortune free chip[/url] .
true fortune casino slots [url=http://www.truefortunecasinos.uk]http://www.truefortunecasinos.uk[/url] .
Decided to set a calendar reminder to revisit, and a stop at timelessharveststore extended that revisit list, calendar entries for content are a level of commitment I rarely make but when I do they signal a higher regard than a simple bookmark and this site has earned that calendar tier of relationship from me today.
true-fortune casino [url=http://www.true-fortune-freespins.com]true-fortune casino[/url] .
true fortune casino free chip no deposit bonus [url=https://truefortune-50-free-spins.com/]true fortune casino free chip no deposit bonus[/url] .
true fortune casino codes [url=true-fortune-bonus.com]true-fortune-bonus.com[/url] .
true fortune no deposit bonus 2026 [url=http://true-fortune-unitedkingdom.com]http://true-fortune-unitedkingdom.com[/url] .
true fortune app [url=www.true-fortune-gb.com/]www.true-fortune-gb.com/[/url] .
Liked that the post left some questions open rather than pretending to settle everything, and a stop at urbanlegendstore continued that intellectual honesty, content that respects the limits of its own claims is more trustworthy than content that overreaches and this site has clearly figured out which positions it can defend confidently.
The tone stayed consistent across the whole post which is harder than it looks for longer pieces, and a look at larkcliff continued the same voice, this kind of editorial consistency is a sign of either a single careful writer or a tightly run team and either is impressive today across the broader media environment.
https://ccnc.com ccnc
My usual response to new bookmarks is to forget them but this one I have already returned to twice, and a look at urbanharvesthub pulled me back a third time, the actual return rate to bookmarked sites is the real measure of value and this one is clearing that measure at a notable rate already.
Now adjusting my mental model of how the topic fits into the broader landscape, and a look at noblearena extended that adjustment, content that affects my structural understanding rather than just my factual knowledge is content with deeper impact and this site is providing those structural updates at a meaningful rate consistently across topics.
A piece that handled multiple complications without becoming confused, and a look at portmill continued that organisational clarity, holding multiple threads in a single piece without losing any of them is a sign of skilled writing and this site has clearly developed the editorial discipline to manage complexity without sacrificing readability throughout.
Probably this is one of the better quiet successes on the open web at the moment, and a look at brightwoodmarket reinforced that quiet success quality, sites that are doing well without making a noise about doing well are the sites I most respect and this one has clearly chosen the quiet success path consistently throughout.
Honest assessment after reading this twice is that it holds up under careful attention, and a look at trendandstylecorner extended that durability across more pages, content that survives a second read without revealing weak spots is rarer than the average reader probably realises and this site clearly cleared that bar.
Comfortable reading experience throughout, no jarring tone shifts and no awkward formatting, and a look at fleetessence kept that smooth feel going, the kind of editorial polish that goes unnoticed when present but glaring when absent is something this site has clearly invested in across the broader content as well which deserves recognition.
Came in skeptical of the angle and left mostly persuaded, and a stop at softwinterfields pushed me a bit further in the same direction, content that can move a critical reader by argument rather than rhetoric is rare and worth pointing out because it indicates real substance underneath the surface presentation here.
If I were grading sites on this topic this one would receive high marks, and a stop at bluehavenstyles continued earning those high marks, the informal grading I do mentally for content sources is something I take seriously even though it is informal and this site has been receiving consistent high marks across multiple sessions today.
дом запой цена [url=https://kapelnicza-ot-pokhmelya-samara-29.ru]дом запой цена[/url]
откапать от алкоголя на дому [url=https://kapelnicza-ot-pokhmelya-voronezh-16.ru]откапать от алкоголя на дому[/url]
Yesterday I was complaining about the state of online writing and today this site has temporarily fixed that complaint, and a look at urbanridgeemporium extended that mood reversal, the short term mood improvement that comes from finding good content is real and this site has produced that improvement for me at a useful moment.
Reading this prompted me to dig into a related topic later, and a stop at candidoasis provided some of the starting points for that follow up reading, content that triggers further exploration rather than satisfying curiosity completely is content with real generative energy and this site has plenty of that energy throughout it.
Liked that the post landed without needing to manufacture controversy or take a contrarian stance for attention, and a stop at lushmeadowgallery continued that grounded approach, content that earns attention through quality rather than provocation is the kind that builds long term trust rather than burning it on quick wins.
Different feel from the algorithmically optimised posts that dominate the topic, and a stop at goldmanor reinforced that human touch, you can tell when a site is being run by someone who reads what they publish versus someone just hitting submit and moving on quickly to the next assignment without checking the result.
Speaking from the perspective of a fairly demanding reader the writing here clears the bar consistently, and a look at softpetalstore continued clearing that bar, the calibration of demanding reader is something I apply to all sources and this site has been one of the few that handles the demanding reading well across pieces sampled.
Now placing this in the same category as a few other sites I have come to trust, and a look at keencluster continued the placement decision, the small category of fully trusted sites is one I extend rarely and only after multiple positive reading sessions and this site has earned the category placement methodically over time.
поставить капельницу цена в екатеринбурге [url=https://kapelnicza-ot-pokhmelya-ekaterinburg-14.ru]https://kapelnicza-ot-pokhmelya-ekaterinburg-14.ru[/url]
капельница на дому в екатеринбурге [url=https://kapelnicza-ot-pokhmelya-ekaterinburg-17.ru]капельница на дому в екатеринбурге[/url]
вызов нарколога [url=https://narkolog-na-dom-voronezh-14.ru]вызов нарколога[/url]
Decided this was the kind of site I would defend in a discussion about good blog content, and a stop at domelounge reinforced that, very few sites earn active defence rather than passive consumption and this one has clearly crossed that threshold for me without needing any explicit pitch from the writers themselves either.
Adding this site to my regular reading list, the post earned that on its own, and a quick stop at brightwindcollections sealed the decision, the kind of place worth checking back with from time to time because it consistently produces material that holds up against a critical reading too which I really value.
Really appreciate that the writer did not stretch the post to hit some target word count, the points end when they are made, and a stop at trendmarketzone reflected the same discipline, brevity is generosity in disguise and this site has clearly figured that out far better than most blog operations have.
вывод из запоя цены [url=https://vyvod-iz-zapoya-na-domu-sankt-peterburg-22.ru]вывод из запоя цены[/url]
Skipped the related links section thinking I had read enough and then came back to it later when curiosity got the better of me, and a stop at mistyharbortrends confirmed I should have just read it first, every section of this site appears to deserve careful attention rather than skipping past lazily.
Useful enough to recommend to several people I know who would appreciate it, and a stop at laurellake added more material I will pass along too, the kind of writing that earns word of mouth is the kind that actually delivers on its promises which is what this site does without any drama or fanfare attached.
https://ccnc.com ccnc
Bookmark folder created specifically for this site, and a look at portolive confirmed the dedicated folder was the right call, dedicated folders for individual sites are a level of organisation I rarely deploy and this site has earned that level of dedicated tracking based on the consistency I have seen so far across sessions.
A nicely understated post that does not shout for attention, and a look at fleetmarina maintained the same quiet quality, understatement is a stylistic choice that distinguishes serious writing from attention seeking writing and this site has clearly committed to the understated approach as a core editorial value rather than just a phase.
Now adding the writer to a small mental list of voices I want to follow, and a look at brightbrookmodern reinforced that follow intention, the few writers whose work I actively track are writers who have demonstrated sustained quality and this writer has clearly demonstrated that sustained quality across the pieces I have sampled here today.
mostbet регистрация сегодня [url=https://mostbet60398.help]mostbet регистрация сегодня[/url]
1вин Узбекистан приложение [url=http://1win41738.help/]1вин Узбекистан приложение[/url]
Picked up two new ideas that I expect will come up in conversations this week, and a look at coastlinegather added another, content that arms me with talking points rather than just filling time is the kind that provides ongoing value beyond the moment of reading and this site is generating that kind of ongoing value.
Now setting this aside as a model of how to write thoughtfully on the topic, and a stop at brightstonevillage extended that model status, content that becomes a reference for how a kind of writing should be done is content with influence beyond its own readership and this site is reaching that level for me clearly today.
Felt the writer respected me as a reader without making a show of doing so, and a look at candidpalace continued that quiet respect, this is the kind of small but meaningful detail that separates the sites I bookmark from the ones I close after a single skim and never return to again no matter how interesting the headline.
Bookmark earned and shared the link with one specific person who would care, and a look at sunlitvalleymarket got the same targeted share, sharing carefully rather than broadcasting is a discipline I try to maintain and this site is generating shares from me at a sustainable rate rather than the spam rate of viral content.
Reading this in the gap between work projects was a small but meaningful break, and a stop at graingarden extended that gentle reset, content that provides genuine refreshment rather than just distraction during work breaks is content with a particular kind of utility and this site fits that role for me reliably during work days.
капельница от запоя на дому цена [url=https://kapelnica-ot-zapoya-nizhnij-novgorod-8.ru]капельница от запоя на дому цена[/url]
Well done, the kind of post that makes you slow down and actually read instead of skimming for keywords, and a look at kitecommune kept me reading carefully too, that is a sign of writing that has been crafted rather than churned out for an algorithm to see today and tomorrow.
выведение из запоя телефон [url=https://vyvod-iz-zapoya-na-domu-ekaterinburg-28.ru]выведение из запоя телефон[/url]
The lack of unnecessary jargon made the post accessible without sacrificing accuracy, and a look at wildbirdstudio continued in the same accessible style, technical topics often hide behind specialised vocabulary but here the writer trusts the reader to keep up with plain language and that trust pays off nicely throughout the entire post.
Bookmarking this for later, the kind of resource I want to keep nearby, and a quick look at everlineartisan confirmed the rest of the site is worth the same treatment, definitely going into my reference folder for the next time the topic comes up at work or in conversation with someone who asks.
Worth saying that the post fit naturally into a rhythm of careful reading, and a stop at domemarina extended the same rhythm, content that pairs well with how I actually read rather than demanding a different mode is content well calibrated to its likely audience and this site has clearly thought about that consistently.
Now planning to recommend this site in a context where my recommendations are taken seriously, and a stop at futurewoodtrends confirmed I should make that recommendation soon, the small but real act of recommending content into spaces where my taste matters is something I take seriously and this site is worth the recommendation.
Skipped the social share buttons but might come back to actually use one later, and a stop at blueharborbloom extended that share urge, content that triggers genuine sharing impulses rather than performative ones is content that has actually moved me and not many posts in a typical week do that for me actually.
Just dropping by to say thanks for the effort, it does not go unnoticed when a writer cares this much about the reader, and after I went through makeeverymomentcount I was certain this is one of the better corners of the internet for this particular kind of content which is genuinely refreshing.
Honestly the simplicity of the explanation made the topic click for me in a way other writeups had not, and a look at edendune continued that clarity into related areas, when a writer gets the level of explanation right the reader does the heavy lifting themselves and the post just enables it.
Honestly the simplicity is what makes this work, the topic is not buried under filler words or overly complex examples, and a quick look at noblecradle showed the same sensible style, I left with what I came for and no headache from over reading which is a real win these days.
A particular kind of restraint shows up in the writing, and a look at urbanwildfabrics maintained the same restraint across pages, knowing what not to say is just as important as knowing what to say and this site has clearly developed strong instincts on both sides of that editorial line throughout pieces I have read.
Skipped the comments section but might come back to read it, and a stop at leafdawn hinted at a quality reader community, sites where the comments are worth reading separately from the post are increasingly rare and signal a particular kind of audience that has grown around the editorial vision over time gradually.
Thanks for putting this online without locking it behind email signups or paywalls, and a quick visit to sunrisetrailmarket kept that open feel going, content that trusts the reader to come back rather than gating access is the kind of approach I will reward with regular return visits over time happily.
Honestly this kind of writing is why I still bother to read independent sites, and a look at creativefashioncorner extended that broader reflection, the few sites that justify continued attention to non algorithmic content are sites like this one and finding them periodically is enough to keep my reading habits oriented toward independent rather than aggregated content.
Skipped the comments to avoid spoilers and came back later to find them genuinely worth reading, and a stop at globalmarketcorner extended that surprised respect, when the discussion below a post matches the quality of the post itself you have found something special and this site appears to attract that kind of audience.
Held my interest from the opening line through to the closing thought, and a stop at flickaltar did the same, content that earns sustained attention in an environment full of distractions is doing something right and this site is clearly doing several things right rather than just one or two which I really appreciate.
Liked how the writer used real examples instead of theoretical ones to make the points stick, and a stop at clippoise added even more concrete examples, this is the kind of practical approach that respects readers who actually want to apply what they learn rather than just nodding along passively without doing anything useful.
Going to come back when I have more time to read carefully, the post deserves more than a quick scan, and a stop at portpoise reinforced that, this is the kind of site that rewards a slower read which is hard to find in this fast paced corner of the internet but really worthwhile.
Closed the tab and immediately reopened it ten minutes later because I wanted to reread a part, and a stop at freshwindemporium drew the same return, content that pulls you back after closing it is doing something well beyond the average and worth marking as exceptional in my mental catalogue of reliable sites.
Really like the way the post resists reaching for cliches that would have made it feel generic, and a quick visit to graingrove kept that fresh feel going, original phrasing and unexpected metaphors are signs that the writer is actually thinking rather than just stitching together familiar phrases into the appearance of content.
Just wanted to say this was useful and leave a small note of thanks, and a quick visit to brightpineemporium earned a similar nod from me, the small acknowledgements add up over time and represent the real economy of trust that good content runs on across the open and increasingly fragmented modern internet.
Really liked the calm tone running through the post, no shouting and no urgency forced into the writing, and a look at micamarket kept that quiet confidence going, the kind of voice that makes the reader feel respected rather than yelled at which is depressingly common across most modern blog content these days.
Worth saying this site reads better than most paid newsletters I have tried, and a stop at northernmiststore confirmed that comparison, the bar for free content is often lower than for paid but this site clears the paid bar consistently and that says something about the editorial approach behind the work being published here regularly.
Once you find a site like this the search for similar voices begins, and a look at kitefoundry extended the search energy, finding a high quality reference point makes the gap between it and adjacent sources visible in a way it was not before and this site has provided that high reference point across multiple recent visits.
High quality writing, no marketing speak and no buzzwords that mean nothing, and a stop at sunwavecollection kept that going, simple direct content that actually communicates something is harder to find than it should be and this is one of the rare places that gets it right consistently across many different posts.
Honestly the simplicity is what makes this work, the topic is not buried under filler words or overly complex examples, and a quick look at wildwoodartisan showed the same sensible style, I left with what I came for and no headache from over reading which is a real win these days.
рулонные шторы на заказ цена [url=https://elektricheskie-rulonnye-shtory99.ru]https://elektricheskie-rulonnye-shtory99.ru[/url]
нарколог на дом цена [url=https://narkolog-na-dom-voronezh-10.ru]нарколог на дом цена[/url]
вызов нарколога на дом нижний новгород [url=https://narkolog-na-dom-nizhnij-novgorod-2.ru]вызов нарколога на дом нижний новгород[/url]
Worth saying this site reads better than most paid newsletters I have tried, and a stop at nextgenerationlifestyle confirmed that comparison, the bar for free content is often lower than for paid but this site clears the paid bar consistently and that says something about the editorial approach behind the work being published here regularly.
Honestly this kind of writing is why I still bother to read independent sites, and a look at trendysalehub extended that broader reflection, the few sites that justify continued attention to non algorithmic content are sites like this one and finding them periodically is enough to keep my reading habits oriented toward independent rather than aggregated content.
Strong recommendation from me, anyone curious about the topic should make time for this, and a look at brightwillowboutique only sharpens that recommendation further, the kind of resource that holds up against careful scrutiny rather than crumbling at the first critical question is rare and worth pointing other people toward when the topic comes up.
Picked up several practical tips that I plan to try out this week, and a look at draftcradle added a few more I will be testing alongside, content with practical hooks that connect to my actual life is the kind that earns my repeat attention rather than the merely interesting that I forget within a day.
сайт для скачивания видео с ютуба [url=https://skachat-video-s-youtube-11.ru]сайт для скачивания видео с ютуба[/url]
Decided to set aside time later to read more carefully, and a stop at bluepeakdesignhouse reinforced that decision, content that earns a calendar entry rather than just a passing read is in a different tier altogether and this site is clearly working at that elevated level which I really do appreciate as a reader today.
Just want to acknowledge that the writing here is doing something right, and a quick visit to edenfair confirmed the same standards run across the broader site, recognising good work is something I try to do when I find it because the alternative is silence and silence rewards mediocrity.
Skipped the social share buttons but might come back to actually use one later, and a stop at blueharborbloom extended that share urge, content that triggers genuine sharing impulses rather than performative ones is content that has actually moved me and not many posts in a typical week do that for me actually.
Solid post, the structure is easy to follow and the language stays simple even when the topic gets a bit more involved, and a look at globalshoppingzone kept that same standard going, so I left feeling like the time spent here was actually worth something for once which is rare lately.
Reading this prompted me to clean up some old notes related to the topic, and a stop at mountainwindstudio extended that organising urge, content that triggers personal organisation rather than just consuming attention is content with motivating energy and this site has the kind of clarity that prompts active follow up rather than passive consumption.
Reading this in the time it took to drink half a cup of coffee, and a stop at pinecrestmodern fit naturally into the second half, content that respects the rhythms of a typical morning is content with practical fit and this site has the kind of length and pacing that works for the way I actually read.
Reading this confirmed a hunch I had been carrying about the topic without having articulated it, and a stop at learnshareachieve extended the confirmation, content that gives shape to fuzzy intuitions is doing the rare work of making private thoughts public and this site is providing that articulating service consistently for me lately.
Reading this confirmed that my time researching the topic in other places had not been wasted, and a stop at sunnyslopefinds extended the confirmation, when independent sources agree that is a useful signal and this site is one of the more reliable sources I have found for cross checking what I read elsewhere on similar subjects.
Now realising the post has been quietly doing important work in my mind for the past hour, and a stop at linenguild extended that quiet processing, content that continues to do work after I close the tab is content with afterlife in the mind and this site is producing those long lived effects at a meaningful rate.
Top quality material, deserves more attention than it probably gets, and a look at grippalace reflected the same effort across the site, a hidden gem in the modern web where most attention goes to whoever shouts loudest rather than whoever actually delivers the best content for their readers without much marketing fanfare.
aviator app पर रजिस्ट्रेशन [url=https://aviator63791.help]aviator app पर रजिस्ट्रेशन[/url]
пардохт дар мостбет [url=www.mostbet13748.help]www.mostbet13748.help[/url]
клининг москва
Now considering carefully how to share this site with the right audience rather than broadcasting widely, and a look at flicklegend extended that careful sharing impulse, content worth sharing carefully rather than spamming is content that has earned a higher kind of recommendation and this site has earned that careful shareability throughout pieces.
Now feeling the small relief of finding writing that does not condescend, and a stop at cobaltcellar extended that respect for readers, content that treats its audience as capable adults rather than as people to be managed produces a different reading experience and this site has clearly chosen the respectful approach across all pieces.
1win retragere fara comision [url=http://1win5755.help]http://1win5755.help[/url]
Now thinking about how this post will age over the coming years, and a stop at creativechoicehub suggested the same durability, content built to age well rather than to capture the attention of the moment is content with a different kind of value and this site has clearly chosen the long horizon over the short one.
This actually answered the question I had been searching for, and after I checked moderncollectorsmarket I had a few more pieces I had not realised I needed, that is the sign of a site that knows what its readers want before they even know how to ask it which is impressive.
вывод из запоя недорого [url=https://vyvod-iz-zapoya-na-domu-sankt-peterburg-22.ru]вывод из запоя недорого[/url]
mostbet descărcare gratuită [url=mostbet63247.help]mostbet descărcare gratuită[/url]
Genuine reaction is that I will probably think about this on and off for a few days, and a look at micapact added fuel to that, the best content lingers in your head after you close the tab rather than evaporating immediately and this site clearly knows how to write that kind of memorable content.
Skipped to a specific section because I knew that was the question I had, and the answer was clean, and a stop at bluestonerevival similarly delivered targeted answers without burying them, content engineered for readers who arrive with specific needs rather than open ended browsing is increasingly valuable in a search heavy reading environment.
However measured this site clears the bar I set for sites I take seriously, and a stop at knackaltar continued clearing that bar, the metrics I use for site quality are admittedly informal but they are consistent and this site has cleared them on multiple measurements across multiple visits which is meaningful for my evaluation.
A small thing but the line spacing and font choices made reading this physically pleasant, and a look at mountainbloomshop maintained the same careful design, technical choices about typography are part of what makes online reading actually comfortable and this site has clearly invested in the design layer alongside the content layer carefully.
Time spent here today felt productive in the way that good reading sessions sometimes do, and a stop at northdawn extended that productive feeling across the rest of the morning, the difference between productive reading and merely passing time is real and this site is consistently on the productive side for me lately.
Looking through other posts here the consistency is what makes the site valuable rather than any single piece, and a stop at primfactor extended that consistency observation, sites whose value lies in the ongoing pattern rather than in standout posts are sites I trust more deeply and this one has clearly built that kind of trust.
mostbet azərbaycan bloklanıb [url=https://mostbet63875.help/]https://mostbet63875.help/[/url]
Reading this between meetings turned out to be the most useful thing I did all afternoon, and a stop at slowlivingessentials kept that productivity feeling going, content can sometimes outperform actual work in terms of what gets accomplished mentally and this site managed that today which is genuinely a high bar to clear consistently.
Found the rhythm of the prose particularly enjoyable on this read through, and a look at brightwatershoppe kept that musical quality going across the related pages, sentence rhythm is something most blog writers ignore but it makes a real difference in how content lands with the careful reader who cares.
Really appreciate that the writer did not assume I would read every other related post first, and a look at findyourdirection kept that self contained feel going where each piece can stand alone, accessibility for new readers is a sign of generous editorial thinking and this site has clearly invested in that approach.
Felt the writer respected me as a reader without making a show of doing so, and a look at urbanwildgrove continued that quiet respect, this is the kind of small but meaningful detail that separates the sites I bookmark from the ones I close after a single skim and never return to again no matter how interesting the headline.
Just wanted to drop a quick note saying this was a useful read on a topic I have been circling, no fluff, and a stop at wildtreasurestore added a few extra points that fit the same simple style which makes the whole site feel coherent rather than thrown together by many different writers with different goals.
Top tier post, the kind that makes you want to share the link with friends working in the same area, and a stop at globalfashioncorner only made me more confident in doing that, this site is one of the better resources I have seen on the topic recently across both new and older posts.
Decent post that improved my afternoon a small amount, and a look at edgecommune added a bit more to that, sometimes the small wins online add up over time and a useful site like this one is the kind of place that contributes consistently to those small wins for me lately across many different topics I follow.
Recommend this to anyone who values clear thinking over flashy presentation, and a stop at goldfielddesigns continued in the same understated way, this site has its priorities in the right place which makes it worth supporting through repeat visits and recommendations rather than just one passing read today before moving on quickly elsewhere.
Bookmark added in three places to make sure I do not lose the link, and a look at draftglade got the same redundant treatment, sites I am afraid to lose are the rare keepers and this is clearly one of them based on what I have read so far across this and a couple of related posts.
Reading this slowly because the writing rewards a slower pace, and a stop at trendypickshub did the same, the pace at which I read content is something I now use as a quality signal and writing that earns a slower pace earns my attention as a reader looking for substance these days.
Glad to find a site whose links lead somewhere worth going rather than back to itself for SEO juice, and a stop at peacefulforestshop kept that generous outbound feel, citing other peoples work with real respect rather than just for ranking signals is a sign of an honest operation worth supporting going forward.
прокапать от алкоголя [url=https://kapelnicza-ot-pokhmelya-voronezh-16.ru]прокапать от алкоголя[/url]
сколько стоит капельница на дому в екатеринбурге [url=https://kapelnicza-ot-pokhmelya-ekaterinburg-14.ru]сколько стоит капельница на дому в екатеринбурге[/url]
Good clean post, no errors and no awkward phrasing that breaks the reading flow, and a stop at findyourstylehub kept the same standard, definitely the kind of editorial care that earns a return visit because it tells me the writer is paying attention to details that matter to readers rather than just rushing publication.
лечение наркомании на дому [url=https://narkolog-na-dom-voronezh-14.ru]лечение наркомании на дому[/url]
сколько стоит капельница от запоя [url=https://kapelnica-ot-zapoya-nizhnij-novgorod-8.ru]сколько стоит капельница от запоя[/url]
поставить капельницу на дому цена екатеринбург [url=https://kapelnicza-ot-pokhmelya-ekaterinburg-17.ru]поставить капельницу на дому цена екатеринбург[/url]
Now placing this in the same category as a few other sites I have come to trust, and a look at mountainsageemporium continued the placement decision, the small category of fully trusted sites is one I extend rarely and only after multiple positive reading sessions and this site has earned the category placement methodically over time.
A piece that did not lean on the writer credentials or institutional backing, and a look at simpletrendstore maintained the same focus on substance, content that earns trust through quality rather than through name dropping is the kind I find most persuasive and this site is clearly playing on the substance side of that distinction.
Solid little post, the kind that does not need to be flashy because the substance is doing the work, and a look at grovefarm kept that quiet confidence going across the site, this is what writing looks like when the writer trusts the content to land on its own without theatrics or unnecessary attention seeking behaviour.
If I had to summarise the editorial sensibility of this site in a few words it would be careful and human, and a look at flickpassage extended that summary feeling, capturing the essence of a sites approach in brief is hard but this site has a clear enough identity that the summary comes naturally enough.
Decent post that improved my afternoon a small amount, and a look at lobbyblossom added a bit more to that, sometimes the small wins online add up over time and a useful site like this one is the kind of place that contributes consistently to those small wins for me lately across many different topics I follow.
Reading this post made me realise I had been settling for lower quality elsewhere, and a look at pinehillstudio extended that recalibration, content that exposes how much I had been accepting in adjacent sources is content with calibrating effect on my standards and this site is performing that calibration function across topics for me reliably.
My professional context would benefit from having this kind of resource available, and a look at freshsagecorner extended the professional applicability, the rare site that contributes meaningfully to professional work rather than just personal interest is content with multiplied value and this one is providing that professional utility consistently across multiple pieces.
Beyond the topic at hand this site reads as a small ongoing project of taking writing seriously, and a look at softskycorners reinforced that project quality, sites that treat publishing as an ongoing serious practice rather than as content production for traffic are sites worth supporting and this one has clearly chosen the serious approach.
A particular kind of restraint shows up in the writing, and a look at mintdawn maintained the same restraint across pages, knowing what not to say is just as important as knowing what to say and this site has clearly developed strong instincts on both sides of that editorial line throughout pieces I have read.
Picked up something useful for a side project, and a look at knackdome added another piece I will incorporate, content that connects to specific projects I am working on is content with practical utility and the practical utility of this site is showing up across multiple posts I have read in the last hour or so.
A piece that exhibited the kind of patience that good writing requires, and a look at authenticglobalfinds continued that patient quality, hurried writing is easy to spot and this site reads as having been written without time pressure which produces a different feel than the rushed content that dominates much of the modern blog space.
Decided to write a short note to the author if there is contact info anywhere, and a stop at softsummershoppe extended that intention, the urge to thank the writer directly is a strong signal of content quality and this site has triggered that urge in me today which is a fairly rare event for my reading.
Stands out for actually being useful instead of just being long, and a look at classystyleoutlet kept that going, length without value is the default mode of most blogs these days but this site has clearly chosen a different path which I respect a lot as a reader who values careful editing decisions like that.
Skipped to a specific section because I knew that was the question I had, and the answer was clean, and a stop at quillgarden similarly delivered targeted answers without burying them, content engineered for readers who arrive with specific needs rather than open ended browsing is increasingly valuable in a search heavy reading environment.
Felt like the writer was speaking directly to someone with my level of curiosity, neither talking down nor showing off, and a stop at edgecradle kept that comfortable matching going, finding writing that meets you where you are rather than asking you to climb up or stoop down feels great every time it happens.
Quality writing that respects the reader’s intelligence without overloading them, and a quick look at urbanpasturestore reflected that approach, a balanced thoughtful site that earns trust by being consistent rather than by shouting about how trustworthy it is which is the usual approach online sadly across most content categories.
Reading this slowly because the writing rewards a slower pace, and a stop at draftlake did the same, the pace at which I read content is something I now use as a quality signal and writing that earns a slower pace earns my attention as a reader looking for substance these days.
1win MDL [url=http://1win5755.help]http://1win5755.help[/url]
Generally I find the content on similar topics frustrating in specific ways and this post avoided all of them, and a look at fashionseasonhub continued that frustration free experience, content that sidesteps the standard failure modes of its genre is content with editorial awareness and this site has clearly studied what fails elsewhere consistently.
Appreciate the work that went into laying this out so clearly, every section earns its place without filler, and a look at growwithpurpose confirmed the same care, definitely the kind of place that deserves a return visit when the topic comes up again later in the future or for any related question.
Now considering whether the post would translate well into a different form, and a look at trendspotmarket suggested similar versatility, content that could move into other media without losing its substance is content that has been built around ideas rather than around format and this site reads as idea first throughout posts.
aviator रणनीति [url=http://aviator63791.help]aviator रणनीति[/url]
mostbet оина барои Тоҷикистон [url=https://mostbet13748.help]https://mostbet13748.help[/url]
If I am being honest this is the kind of site I quietly hope my own work will someday resemble, and a stop at brighttrailfashion extended that aspirational feeling, finding work that models what I want to produce is part of why I read carefully and this site has been performing that modelling function for me lately consistently.
1win istoric tranzactii [url=http://1win5755.help/]http://1win5755.help/[/url]
Started imagining how I would explain the topic to someone else after reading, and a look at grovepassage gave me more material for that imagined explanation, content that improves my own ability to discuss a topic is content that has actually transferred knowledge rather than just decorating my screen for a few minutes.
Probably the best thing I have read on this topic in the past month, and a stop at urbancloverhub extended that ranking, the casual ranking of recent reading is informal but real and this site has been winning those rankings for me on this topic specifically over the last several weeks of regular reading sessions.
mostbet bonus pentru inregistrare [url=https://mostbet63247.help]https://mostbet63247.help[/url]
Quietly building a case in my head for why this site deserves more attention than it currently seems to receive, and a look at novalog reinforced the case, the gap between quality and recognition is a recurring frustration in independent online content and this site is one of the cases that seems particularly egregious to me today.
Came away with some new perspectives I had not considered before, and after fashionlifestylehub those ideas felt more complete, the kind of content that stays with you a little while after reading rather than slipping out the moment you switch tabs and move on with your day to whatever comes next.
mostbet дар Тоҷикистон [url=http://mostbet13748.help/]http://mostbet13748.help/[/url]
aviator aviator गेम [url=http://aviator63791.help]http://aviator63791.help[/url]
Reading this in the gap between work projects was a small but meaningful break, and a stop at riverleafmarket extended that gentle reset, content that provides genuine refreshment rather than just distraction during work breaks is content with a particular kind of utility and this site fits that role for me reliably during work days.
A clear cut above the usual noise on the subject, and a look at globalcraftanddesign only made that gap wider in my view, the kind of place that earns its visitors through quality rather than through aggressive marketing or sponsored placements which is increasingly the only way most sites stay afloat across the modern web.
Reading this gave me a small framework I expect to use going forward, and a stop at globalfashioncollection extended that framework, content that produces transferable mental models rather than just specific facts is content with multiplicative value and this site is providing those models at a rate that justifies extra attention from me regularly.
Recommended to anyone working in or curious about this area, the depth and clarity combine well, and a look at flowlegend keeps that going across more pages, the kind of site that earns regular visits rather than chasing trends has my respect because it suggests genuine commitment to the topic itself rather than to chasing trends.
mostbet bonus la pariuri [url=www.mostbet63247.help]www.mostbet63247.help[/url]
Reading this gave me a small jolt of recognition for an experience I thought was just mine, and a stop at pureforeststudio produced more such jolts, content that universalises private experiences without flattening them is doing genuinely useful work and this site is providing that recognition function for me reliably across topics I read.
Clean writing, easy to read, and never tries too hard to impress, that combination is harder to find than people think, and after my time on wildhollowdesigns I am sure this site treats its readers well, no flashy tricks just useful content done right which is honestly all I want online.
Took longer than expected to finish because I kept stopping to think, and a stop at lobbycommune did the same to me, content that provokes thought rather than just delivering information is in a different category and the team here is clearly working at that higher level rather than just cranking out posts.
The clarity here is something I really appreciate, especially compared to sites that pile on jargon for no reason, and a look at mossbreeze was the same, simple direct sentences that actually deliver information instead of dancing around the point for paragraphs at a time which wastes reader patience.
Found something new in here that I had not seen explained this way before, and a quick stop at knackgrove expanded the idea even further, the kind of writing that nudges your thinking forward a bit without forcing the issue is exactly what I look for online today and rarely actually find anywhere.
Found the section structure particularly thoughtful, and a stop at modernlivingemporium suggested the same care across the broader site, structural choices guide the reader through the material in ways most people do not consciously notice but feel the absence of when those choices are made carelessly or not at all.
Now considering writing a longer note about the post somewhere, and a look at northernriveroutlet added more material for that note, content that prompts me to write rather than just consume is content with generative energy and this site is producing that generative effect for me at a higher rate than most sources.
Liked that there was nothing performative about the writing, and a stop at evertrueharbor continued that genuine quality, performative writing tries to be witnessed rather than read and the difference between performance and substance is huge for the careful reader and this site has clearly chosen substance every time clearly.
прокапаться нижний новгород [url=https://kapelnica-ot-zapoya-nizhnij-novgorod-9.ru]прокапаться нижний новгород[/url]
Started believing the writer knew the topic deeply by about the second paragraph, and a look at edgedial reinforced that confidence, the speed at which a writer establishes credibility through their writing is a useful quality signal and this writer establishes it quickly and quietly without resorting to credential dropping or self promotion.
вывод из запоя с выездом на дом [url=https://vyvod-iz-zapoya-na-domu-sankt-peterburg-22.ru]вывод из запоя с выездом на дом[/url]
Genuine pleasure to read, and that is not something I say often after a casual click through, and a quick visit to evercrestwoods kept the same feeling going across the rest of the site, finding writing that actually feels good to spend time with rather than just functional is increasingly rare on the open web.
лечение алкоголизма вызов на дом [url=https://narkolog-na-dom-nizhnij-novgorod-2.ru]лечение алкоголизма вызов на дом[/url]
Quietly the post solved something I had been turning over without quite knowing how to phrase the question, and a look at draftlog extended that quiet solving, content that addresses unformulated needs is content with reader insight and this site has demonstrated that insight at a high rate across the pieces I have read recently.
Reading this in a moment of low energy still kept my attention, and a stop at quillglade continued that engagement under suboptimal conditions, content that survives the reader being tired is content with extra reserves of pull and this site has the kind of writing that holds up even when I am not at my reading best.
Definitely a recommend from me, anyone curious about the topic should check this out, and a look at classystyleoutlet adds even more reason for that, the depth and quality combine to make this site one I will be pointing people toward whenever similar conversations come up over the months ahead at work or socially.
вызов нарколога на дом анонимно [url=https://narkolog-na-dom-voronezh-10.ru]https://narkolog-na-dom-voronezh-10.ru[/url]
Spent a few minutes here and came away with a clearer picture of the topic, the writing keeps things simple without dumbing them down, and after a stop at dreamhavenoutlet the rest of the points lined up neatly which is something I appreciate when I am short on time and need answers fast.
Now saved this in a way that I will actually find again rather than the casual bookmark approach, and a stop at grovequay earned the same careful saving, organising my reading bookmarks so that high quality sources rise to the top is something I should do more of and this site triggered that organisation today.
рулонные шторы на электроприводе [url=https://rulonnye-shtory-s-elektroprivodom17.ru]рулонные шторы на электроприводе[/url]
Skipped the related products section because there was none, and a stop at trendforless also lacked any aggressive monetisation, content that is not constantly trying to convert me into a customer or subscriber is content that has confidence in its own value and that confidence shows up as a different reading experience.
During my morning reading slot this fit perfectly into the routine, and a look at fashionforfamilies extended that perfect fit into the rest of the routine, content that matches the rhythm of how I actually read rather than demanding accommodation from my schedule is content well calibrated to its likely audience and this site has it.
скачать видео ютуба [url=https://skachat-video-s-youtube-11.ru]скачать видео ютуба[/url]
Reading this confirmed a hunch I had been carrying about the topic without having articulated it, and a stop at foilcommune extended the confirmation, content that gives shape to fuzzy intuitions is doing the rare work of making private thoughts public and this site is providing that articulating service consistently for me lately.
Honest assessment after reading this twice is that it holds up under careful attention, and a look at mountainwildcollective extended that durability across more pages, content that survives a second read without revealing weak spots is rarer than the average reader probably realises and this site clearly cleared that bar.
Approaching this site through a casual link click and being surprised by what I found, and a look at brightrootcollection extended the surprise, the rare experience of stumbling into excellent independent content rather than predictable mediocrity is one of the actual remaining pleasures of casual web browsing and this site provided it cleanly.
Now noticing that the post did not mention the writer at all, focus stayed on the topic, and a look at wildharborattic continued that author absent quality, content that disappears the writer to focus on the substance is a particular kind of generosity and this site has clearly chosen the substance over the personality consistently.
Reading this fit naturally into my afternoon walk because I was reading on my phone, and a stop at rarefloraemporium continued well in that walking format, content that survives mobile reading without becoming awkward is content with format flexibility and this site has clearly thought about how it reads across different devices today.
Appreciate that you did not pad this with fluff to hit a word count, the post says what it needs to say and stops, and a look at timbercrestgallery did the same, brevity here feels intentional not lazy which is a distinction many writers miss completely sometimes when they are working under deadlines.
Came back to this twice now in the same week which is unusual for me, and a look at mountglade suggested I will keep coming back, the kind of post that earns repeated visits rather than one and done reading is the gold standard for content quality and this site clearly hit that standard.
Just sat with this for a bit longer than I usually would because the points are worth thinking about, and after futureforwardclickpinghub I had even more to chew on, the kind of post that nudges your thinking forward without forcing the issue is something I have always appreciated in good writing online.
Skipped the comments section but might come back to read it, and a stop at knackpact hinted at a quality reader community, sites where the comments are worth reading separately from the post are increasingly rare and signal a particular kind of audience that has grown around the editorial vision over time gradually.
Genuinely changed how I think about a small piece of the topic, which does not happen often online, and a look at lobbydawn added another nudge in the same direction, the kind of writing that earns a small mental shift rather than just confirming what you already thought before reading is a sign of careful thought.
нарколог [url=https://narkolog-na-dom-samara-9.ru]нарколог[/url]
I really like the calm tone here, it does not push anything on the reader, and after I went through edgelibrary I felt the same way, just steady useful content laid out without drama, which is exactly what someone trying to learn something quickly needs to find rather than aggressive marketing.
как пополнить мелбет [url=www.melbet41673.help]как пополнить мелбет[/url]
мостбет доступ Киргизия сегодня [url=https://mostbet64071.help/]мостбет доступ Киргизия сегодня[/url]
1win yuklab olinmayapti [url=https://1win16583.help]https://1win16583.help[/url]
mostbet canlı futbol [url=https://www.mostbet63875.help]https://www.mostbet63875.help[/url]
This actually answered the question I had been searching for, and after I checked freshtrendcollection I had a few more pieces I had not realised I needed, that is the sign of a site that knows what its readers want before they even know how to ask it which is impressive.
Found something quietly useful here that I expect to return to, and a stop at oakarena added more of the same, content with quiet utility ages well in a way that flashy hot takes do not and I have learned to weight quiet utility much higher when deciding what to bookmark for later use.
Probably worth setting aside a longer block to read more carefully than I can right now, and a stop at growtogetherstrong confirmed the longer block plan, the impulse to schedule dedicated time for a sites archive is itself a measure of trust and this site has earned that scheduling impulse from me clearly today actually.
Once I trust a site this much I tend to read everything they publish and that is the trajectory I am on with this one, and a stop at harborbreeze confirmed the trajectory, the rare progression from interested reader to comprehensive reader is something only certain sites earn and this one is earning that progression rapidly.
Comfortable in tone and substantive in content, that is a hard combination to land, and a look at brightvillagecorner kept that pairing alive across more material, this is what good editorial direction looks like in practice and the team here clearly has someone keeping a steady hand on the wheel across what they decide to publish.
The overall feel of the post was professional without being stuffy, and a look at draftport kept that approachable expertise going, finding the right register for technical content is hard but this site has clearly figured out how to sound knowledgeable without slipping into that distant lecturing tone that loses readers in droves every time.
mostbet hesabına giriş [url=https://mostbet63875.help]https://mostbet63875.help[/url]
Now thinking about this site as a small example of what good independent writing looks like, and a stop at quirkbazaar continued that exemplary status, the few sites that serve as good examples are sites worth holding up in conversations about quality and this one has earned that exemplary placement through patient consistent effort over time.
Solid endorsement from me, the writing earns it, and a look at modernculturecollective continues to earn it across the broader site too, the kind of operation that maintains quality across many pages rather than just one viral post is a sign of serious commitment and that is what I see here clearly across what I read.
Reading carefully here has reminded me what reading carefully feels like, and a look at classystylemarket extended that reminder, the experience of careful reading versus skimming is different in ways I had partially forgotten and this site has clearly refreshed my memory of what attention feels like when content rewards it consistently.
Refreshing to read something where the words actually mean something instead of filling space, and a stop at blueshoreoutlet kept that going, the writing here trusts the reader to follow along without endless repetition or constant reminders of what was already said earlier in the post which I appreciate.
A piece that prompted a small mental rearrangement of how I order related ideas, and a look at rainycitycollection extended that rearranging effect, content that affects the structure of my thinking rather than just adding to it is content with the deepest kind of impact and this site is reaching that depth for me today.
If you scroll past this site without looking carefully you will miss something, and a stop at fondarbor extended that mild warning, the surface of the site does not advertise its quality loudly which means careful attention is required to recognise what is being offered here which is itself a kind of editorial signal.
aviator कस्टमर केयर नंबर [url=aviator63791.help]aviator63791.help[/url]
mostbet пул намеояд [url=mostbet13748.help]mostbet пул намеояд[/url]
капельница от запоя [url=https://kapelnicza-ot-pokhmelya-ekaterinburg-14.ru]капельница от запоя[/url]
Liked how the writer used real examples instead of theoretical ones to make the points stick, and a stop at brightstarworkshop added even more concrete examples, this is the kind of practical approach that respects readers who actually want to apply what they learn rather than just nodding along passively without doing anything useful.
Reading this between meetings turned out to be the most useful thing I did all afternoon, and a stop at fashionfindshub kept that productivity feeling going, content can sometimes outperform actual work in terms of what gets accomplished mentally and this site managed that today which is genuinely a high bar to clear consistently.
нарколог на дом цена [url=https://narkolog-na-dom-voronezh-14.ru]нарколог на дом цена[/url]
Reading this in my last reading slot of the day was a good way to end, and a stop at everstonecorner provided a satisfying close to the reading session, content that ends a day well rather than agitating it before sleep is the kind I value increasingly and this site fits that role for me consistently now.
Will recommend this to a couple of friends who have been asking about this exact topic, and after softcloudcollective I have even more reason to do so, the kind of site that earns word of mouth rather than chasing it through aggressive marketing or paid placements is always a treat to find online.
Compared to the usual results for this kind of search this site stands well above the average, and a quick visit to mountoutpost kept the standard high, you can tell within seconds whether a site is going to waste your time or actually deliver and this one clearly delivers without any false starts.
Most of my reading time goes to a small number of trusted sources and this one is now joining that group, and a stop at refinedeverydaystyle reinforced the group membership, the few sites that earn a place in my regular rotation are sites I expect ongoing returns from and this one has earned that elevated position consistently.
Considered against the flood of similar content this one stands apart in important ways, and a stop at kraftbough extended that distinctive feel, sites that find their own corner of a crowded topic and stay there are sites worth following and this one has clearly carved out its own space and committed to defending it carefully.
капельница от алкоголя [url=https://kapelnicza-ot-pokhmelya-ekaterinburg-17.ru]капельница от алкоголя[/url]
цена капельницы на дому [url=https://kapelnicza-ot-pokhmelya-voronezh-16.ru]цена капельницы на дому[/url]
tabella crazy time [url=https://crazy-time6.com/stats/]tabella crazy time[/url].
The tone stayed consistent across the whole post which is harder than it looks for longer pieces, and a look at elitedawn continued the same voice, this kind of editorial consistency is a sign of either a single careful writer or a tightly run team and either is impressive today across the broader media environment.
Even across multiple posts the writers voice has remained consistent in a way I appreciate, and a stop at brightcrestcollective continued that voice, sites that maintain editorial consistency across many pieces have something most sites lack and this one has clearly worked out how to keep its voice steady across what reads as a growing archive.
Found a small mental shift after reading this, the framing here is just a bit different from the standard takes online, and a look at lobbyessence extended that fresh perspective across more material, the rare site whose voice actually changes how you think about something rather than just confirming existing beliefs.
Just want to acknowledge that the writing here is doing something right, and a quick visit to hazeatelier confirmed the same standards run across the broader site, recognising good work is something I try to do when I find it because the alternative is silence and silence rewards mediocrity.
Halfway through I knew I would finish the post, and a stop at driftfair also held me through to the end, content that signals its quality early and then sustains it is content with real internal consistency and this site has clearly figured out how to maintain quality from opening sentence through to closing thought.
Worth your time, that is the simplest endorsement I can give, and a stop at lunarforesthub extends that endorsement across the rest of the site, this is one of those increasingly rare places that delivers on what it promises rather than over selling the content and under delivering on substance every time which I find frustrating elsewhere.
прокапаться от алкоголя [url=https://kapelnica-ot-zapoya-nizhnij-novgorod-9.ru]прокапаться от алкоголя[/url]
Reading this brought back an idea I had set aside months ago, and a stop at brightpinefields added more substance to that idea, content that revives dormant projects in my own thinking is content with serious creative value and this site is contributing to my own work in ways I had not expected when first clicking through.
A well calibrated piece that knew its scope and stayed inside it, and a look at brightlakescollection maintained the same scope discipline, scope creep is one of the failure modes of long blog posts and this site has clearly invested in the editorial discipline to prevent it which shows up in tightly contained pieces.
Yesterday I was complaining about the state of online writing and today this site has temporarily fixed that complaint, and a look at finduniqueproducts extended that mood reversal, the short term mood improvement that comes from finding good content is real and this site has produced that improvement for me at a useful moment.
Walked away in a slightly better mood than when I started reading, that says something about the writing, and a stop at moderntrendmarket kept that going, content that leaves you feeling more capable rather than overwhelmed is the kind I keep coming back to again and again over the years and across many topics.
Worth flagging this post as worth a careful read rather than a casual skim, and a stop at fondcluster earned the same careful approach, the few sites that warrant slower reading are sites I now treat differently from the daily content stream and this one has clearly moved into that elevated treatment category.
Felt this in a way I cannot quite explain, the topic just hit different here, and a stop at changeyourmindset continued in that vein, sometimes you find a site whose perspective lines up with how you have been thinking and reading their work feels like a small relief which I appreciated more than I expected.
melbet бонус без депозита [url=melbet41673.help]melbet41673.help[/url]
1win lucky jet strategiya [url=1win16583.help]1win16583.help[/url]
вывод из запоя на дому спб [url=https://vyvod-iz-zapoya-na-domu-sankt-peterburg-22.ru]вывод из запоя на дому спб[/url]
Reading this confirmed that the topic deserves more careful attention than it usually gets, and a stop at lacecabin extended that elevated framing, content that raises the appropriate weight of a subject without being preachy about it is serving a quiet but important editorial function for the broader cultural conversation about it.
The headings made navigating the post simple even when I needed to find a specific section quickly, and a look at elitefest continued the same thoughtful structure, small details like clear headings show that someone is actually thinking about how the reader uses the page rather than just filling it for length alone.
Now adding the homepage to my regular check rotation rather than waiting for individual links to find me, and a stop at mountplaza confirmed the rotation upgrade, the move from passive discovery to active checking is a vote of confidence in a sites ongoing quality and this site has earned that active engagement clearly.
мостбет банковская карта [url=www.mostbet64071.help]мостбет банковская карта[/url]
Really like that the writer trusts the reader to follow simple logic without restating every previous point, and a stop at loopbough kept that respect going, treating an audience as capable adults rather than as people who need constant hand holding makes a noticeable difference in the reading experience for me.
melbet зеркало ош [url=www.melbet41673.help]www.melbet41673.help[/url]
A memorable post for me on a topic I had thought I was tired of, and a look at hazemill suggested the same site can refresh other tired topics, sites that can revive my interest in subjects I had written off as exhausted are doing rare work and this one is clearly doing that for me today.
1win Clickdan yechish [url=https://www.1win16583.help]https://www.1win16583.help[/url]
Solid information that lines up with what I have been hearing from other reliable sources, and after my visit to fashiondailychoice I was even more certain of that, this site checks out which is something I value highly when so many places online play loose with the facts to chase a quick click.
электрические рулонные шторы купить [url=https://rulonnye-shtory-s-elektroprivodom190.ru]электрические рулонные шторы купить[/url]
Probably worth setting aside a longer block to read more carefully than I can right now, and a stop at growtogetherstrong confirmed the longer block plan, the impulse to schedule dedicated time for a sites archive is itself a measure of trust and this site has earned that scheduling impulse from me clearly today actually.
Saving this link for the next time someone asks me about this topic, and a look at modernartisanliving expanded what I will be sharing with them, this is the kind of resource that makes a real difference when you are trying to point a friend to something useful and reliable rather than generic marketing pages.
Reading this gave me material for a conversation I needed to have anyway, and a stop at brightcoastgallery added even more talking points, content that connects to upcoming social or professional needs rather than just being interesting in the abstract is the kind that earns priority placement in my attention these days routinely.
Now setting up a small reminder to revisit the site on a slow day, and a stop at bloomstreetcorner confirmed the reminder was a good idea, planning return visits is a small organisational act that signals trust in ongoing quality and this site has earned that planned return through consistent performance across the pieces I have read so far.
Liked how the post handled an objection I was forming as I read, and a stop at duetcoast similarly anticipated where my thinking was going next, the rare writer who can predict reader concerns and address them in advance is doing something most online content fails to do despite that being basic editorial work.
My usual pattern is to skim and bounce but this site has reset that pattern temporarily, and a stop at ethicalcuratedgoods maintained the slower reading mode, content that changes how I read is content with structural influence and this site has clearly nudged my reading behaviour toward something better at least for the duration of these visits.
A piece that handled the topic with appropriate weight without becoming portentous, and a look at dustorchid continued that calibrated seriousness, content that takes itself seriously without becoming pompous is something this site has clearly figured out and the balance shows up in every piece I have read across multiple sessions now.
Found the writing surprisingly fresh for what is by now a well covered topic, and a stop at flarefoil kept that freshness going across the related pages, original perspective on familiar ground is hard to come by and this site has clearly earned its place in the conversation rather than just rehashing old ideas.
A particular kind of restraint shows up in the writing, and a look at irisarbor maintained the same restraint across pages, knowing what not to say is just as important as knowing what to say and this site has clearly developed strong instincts on both sides of that editorial line throughout pieces I have read.
If I had to defend the time I spend reading independent blogs this site would feature in the defence, and a look at bravofarm reinforced that defensive utility, the ongoing case for non algorithmic reading is one I make to myself periodically and sites like this one provide the actual evidence that supports the case clearly.
Really liked the calm tone running through the post, no shouting and no urgency forced into the writing, and a look at truepineemporium kept that quiet confidence going, the kind of voice that makes the reader feel respected rather than yelled at which is depressingly common across most modern blog content these days.
Appreciated how the post felt complete without overstaying its welcome, and a stop at noblewindemporium confirmed that economical approach runs across the site, knowing when to stop is a skill many writers never develop but here the discipline is obvious and welcome from the perspective of a busy reader trying to learn things efficiently.
Probably worth setting aside a longer block to read more carefully than I can right now, and a stop at sunridgeshoppe confirmed the longer block plan, the impulse to schedule dedicated time for a sites archive is itself a measure of trust and this site has earned that scheduling impulse from me clearly today actually.
Reading this in the gap between work projects was a small but meaningful break, and a stop at micapact extended that gentle reset, content that provides genuine refreshment rather than just distraction during work breaks is content with a particular kind of utility and this site fits that role for me reliably during work days.
прокапать от алкоголя [url=https://kapelnicza-ot-pokhmelya-voronezh-17.ru]прокапать от алкоголя[/url]
Taking the time to read carefully here has been worthwhile for the past hour, and a look at mountainleafstudio extended the worthwhile reading, the calculation of return on reading time spent is something I do informally and this site has been producing positive returns across multiple sessions during the last week of regular visits and reads.
Closed it feeling slightly more competent in the topic than I started, and a stop at forgecabin reinforced that competence boost, real learning is rare in casual online reading but it does happen sometimes and this site managed to make it happen for me today which is genuinely worth pausing to acknowledge.
Appreciated that the writer trusted the reader to follow along without constant restating of earlier points, and a look at silverleafemporium continued that respect for the reader, treating an audience as capable adults rather than as people to be hand held through every paragraph is something I notice and value highly across the open internet today.
Picked something concrete from the post that I will use immediately, and a look at lunarpeakoutlet added another concrete piece, content that produces immediately useful output rather than just abstract appreciation is content that earns its place in my regular rotation without needing any further evaluation from me at this point honestly.
врач нарколог на дом [url=https://narkolog-na-dom-voronezh-10.ru]https://narkolog-na-dom-voronezh-10.ru[/url]
скачиватель видео с ютуба [url=https://skachat-video-s-youtube-11.ru]https://skachat-video-s-youtube-11.ru[/url]
врач нарколог выезд на дом [url=https://narkolog-na-dom-samara-10.ru]https://narkolog-na-dom-samara-10.ru[/url]
Most posts I read end up forgotten within a day but this one is sticking, and a look at eliteledge extended that lingering effect, content that survives the immediate moment of reading rather than evaporating is content with genuine retention quality and this site has been producing memorable pieces at a rate notable across my reading.
Now recognising the specific pleasure of reading writing that shows real care for sentence shapes, and a look at lunacourt extended that craft pleasure, sentence level writing quality is something most blog content ignores entirely and this site has clearly invested in the prose layer alongside the substance which is rare today.
Quietly the writers approach to the topic differs from the dominant takes I have been encountering, and a stop at lacecloister extended that distinctive approach, content that maintains a different perspective without explicitly arguing against the dominant ones is content with confident editorial identity and this site has that confidence throughout pieces.
A piece that read smoothly because the writer understood how readers actually move through prose, and a look at hillessence maintained the same reader awareness, writers who think about the reading experience as much as the writing experience produce better work and this site has clearly made that shift in editorial approach.
A satisfying piece in the way that good meals are satisfying rather than just filling, and a look at brightcollectionhub extended that satisfaction, the metaphor between content and meals is one I find useful and this site reads as a satisfying meal rather than the empty calories that most content provides for casual readers.
Found this through a search that was generic enough I did not expect quality results, and a look at findhappinessdaily continued the surprisingly good experience, search engines occasionally still surface excellent independent content if you scroll past the obvious paid and high authority results which is reassuring to remember sometimes.
Quality work here, the post reads cleanly and the points stay focused throughout, and a stop at musebeat kept the standard high, you can tell the writer cares about the final result rather than just hitting publish for the sake of having something new on the page to feed the search engines.
нарколог на дому [url=https://narkolog-na-dom-samara-9.ru]https://narkolog-na-dom-samara-9.ru[/url]
Bonus kodları təqdim edən platformalar istifadəçilər üçün əlavə imkanlar yaratmağa davam edir. Forum iştirakçıları tez-tez pin up bonus kodu təkliflərinin rahat istifadə olunduğunu və maraqlı göründüyünü qeyd edirlər. Saytın sadə quruluşu bütün məlumatların sürətli tapılmasına imkan yaradır.
The conclusions felt earned rather than tacked on at the end like an afterthought, and a look at duetdrive kept that careful structure going, you can tell when a writer has thought about the shape of their post versus just letting it ramble out and hoping for the best at the end which most do.
Reading this in a quiet hour and finding it suited the quiet, and a stop at irisbureau extended the quiet reading mood, content that matches its own optimal reading conditions rather than fighting them is content that has been thoughtfully calibrated and this site reads as having a particular reading mood in mind throughout.
Now thinking about how this post will age over the coming years, and a stop at edendome suggested the same durability, content built to age well rather than to capture the attention of the moment is content with a different kind of value and this site has clearly chosen the long horizon over the short one.
Generally my attention drifts on long posts but this one held it through the end, and a stop at flareinlet earned the same sustained focus, content that defeats my drift tendency is content with substantive pulling power and this site has demonstrated that pulling power across multiple pieces in a session that has now run quite long actually.
Closed the laptop after this and let the ideas settle for a few hours, and a stop at ethicalcuratedgoods similarly rewarded reflective time, content that benefits from sitting with rather than racing past is the kind I want more of and the kind that this site appears to consistently produce week after week here.
A clear case of writing that does not try to do too much in one post, and a look at fashionandstylehub maintained the same scoped discipline, posts that try to cover too much end up covering nothing well and this site has clearly chosen scope discipline as a core editorial principle which shows up clearly in what I read.
Speaking carefully because I do not want to overstate things this site is genuinely above average across multiple measurements, and a stop at goldensavannashop continued the above average performance, the calibration of judgement against potential overstatement is something I take seriously and this site clears the higher bar even after that calibration applies.
Came in skeptical of the angle and left mostly persuaded, and a stop at brightwinterstore pushed me a bit further in the same direction, content that can move a critical reader by argument rather than rhetoric is rare and worth pointing out because it indicates real substance underneath the surface presentation here.
Now recognising the post as a rare example of careful writing on a topic that mostly receives careless treatment, and a stop at bestfindsmarket extended that contrast with the average elsewhere, content that highlights how much the average is settling for low quality is content that has both internal merit and external value as a benchmark.
Good post, the kind that respects the reader by getting to the point quickly without skipping the details that matter, and a short look at mintdawn confirmed that approach is consistent across the site which is rare to find online these days, definitely a place I will return to soon.
вывести из запоя екатеринбург [url=https://vyvod-iz-zapoya-na-domu-ekaterinburg-28.ru]вывести из запоя екатеринбург[/url]
Started forming counter examples to test the claims and the post handled most of them implicitly, and a look at goldstreamoutlet continued that anticipatory style, writers who think two steps ahead of the critical reader save themselves from a lot of follow up work and this writer has clearly internalised that habit consistently.
Picked this site to mention to a colleague who would benefit, and a look at forgeoutpost added more material I will pass along, recommending sites to colleagues is a higher bar than recommending to friends because the professional context demands more careful curation and this site cleared the professional bar without me having to think.
вывести из запоя в домашних условиях капельница [url=https://kapelnica-ot-zapoya-nizhnij-novgorod-9.ru]вывести из запоя в домашних условиях капельница[/url]
I usually skim posts like these but this one held my attention all the way through, and a stop at glowingridgehub did the same, that is a strong endorsement coming from me because I am usually quick to bounce when content gets repetitive or fails to deliver on its initial promise made in the headline.
Reading this prompted me to send the link to two different people for two different reasons, and a stop at lyricessence provided ammunition for a third share, content that suits multiple audiences without being generic enough to be useless to any of them is genuinely valuable and this site has that multi audience quality clearly.
Liked how the writer used real examples instead of theoretical ones to make the points stick, and a stop at epicestate added even more concrete examples, this is the kind of practical approach that respects readers who actually want to apply what they learn rather than just nodding along passively without doing anything useful.
Now adding the homepage to my regular check rotation rather than waiting for individual links to find me, and a stop at brightoakcollective confirmed the rotation upgrade, the move from passive discovery to active checking is a vote of confidence in a sites ongoing quality and this site has earned that active engagement clearly.
Now setting aside time on my next free afternoon to read more from the archives, and a stop at premiumcuratedmarket confirmed that time will be well spent, the rare site whose archive deserves a dedicated reading session rather than just casual sampling is the kind of resource worth scheduling around and this one qualifies clearly.
The conclusions felt earned rather than tacked on at the end like an afterthought, and a look at lacehelm kept that careful structure going, you can tell when a writer has thought about the shape of their post versus just letting it ramble out and hoping for the best at the end which most do.
Мы предоставляем услуги по оформлению медицинских справок для различных целей. Оперативная обработка заявок помогает клиентам быстро получать документы: https://afina-mc.ru/sanatorno-kurortnaya-karta-dlya-detej/
мелбет казино регистрация [url=https://melbet41673.help]мелбет казино регистрация[/url]
mostbet зарегистрироваться [url=https://mostbet64071.help/]https://mostbet64071.help/[/url]
нарколог домой [url=https://narkolog-na-dom-voronezh-14.ru]нарколог домой[/url]
стоимость капельницы на дому екатеринбург [url=https://kapelnicza-ot-pokhmelya-ekaterinburg-14.ru]https://kapelnicza-ot-pokhmelya-ekaterinburg-14.ru[/url]
капельница на дому в екатеринбурге [url=https://kapelnicza-ot-pokhmelya-ekaterinburg-17.ru]капельница на дому в екатеринбурге[/url]
Excellent execution from start to finish, the post never loses its rhythm and the points stay sharp, and a quick stop at groweverydaynow kept the same level going, consistency like this across a site is the marker of a serious operation rather than a casual side project running on autopilot somewhere else.
1win ishlaydigan mirror [url=www.1win16583.help]www.1win16583.help[/url]
Reading this confirmed that the topic deserves more careful attention than it usually gets, and a stop at islemeadow extended that elevated framing, content that raises the appropriate weight of a subject without being preachy about it is serving a quiet but important editorial function for the broader cultural conversation about it.
Skipped the related links section thinking I had read enough and then came back to it later when curiosity got the better of me, and a stop at edendune confirmed I should have just read it first, every section of this site appears to deserve careful attention rather than skipping past lazily.
Bookmark earned and the bookmark feels like a permanent addition rather than a maybe, and a look at mythmanor confirmed that permanent status, the difference between durable bookmarks and ephemeral ones is something I have learned to feel quickly and this site triggered the durable feeling almost immediately during my first read here.
Worth pointing out that the writing reads as confident without being defensive about it, and a look at flarequill extended that secure tone, content that does not pre emptively argue against imagined critics has a different quality from defensive writing and this site reads as written from a place of real ease.
Now feeling the rare pleasure of trusting a source completely on first encounter, and a look at duetparish extended that initial trust into something more durable, the calibration of trust to evidence is something I do informally and this site has earned high trust through the cumulative weight of multiple consistently good posts already.
The way the post stayed on topic throughout without going on tangents was really refreshing, and a look at yourtimeisnow kept that focused approach going, discipline like this in writing is rare and worth recognising because most writers cannot resist wandering off into related subjects that dilute their main point and confuse readers along the way.
Looking back on this reading session it stands as one of the better ones recently, and a look at timberharborfinds extended that ranking, the informal ranking of reading sessions against each other is something I do mentally and this session ranks high largely because of this site and a couple of related pages here.
If patience for careful reading is rare these days finding sites that reward it is rarer still, and a stop at suncrestmodern extended that rare reward, the diminishing returns on shallow content reading have made me more selective about where to spend reading time and this site is meeting the higher selectivity bar consistently.
Generally I do not leave comments but this post merits a small note, and a stop at musebeat extended that comment worthy quality, the urge to actively contribute to a sites community rather than passively consume from it is something specific content provokes and this site has provoked that engagement urge from me today.
вывод из алкогольного запоя нарколог 24 [url=https://vyvod-iz-zapoya-na-domu-sankt-peterburg-22.ru]https://vyvod-iz-zapoya-na-domu-sankt-peterburg-22.ru[/url]
Now setting up a small reminder to revisit the site on a slow day, and a stop at ethicaldesignmarket confirmed the reminder was a good idea, planning return visits is a small organisational act that signals trust in ongoing quality and this site has earned that planned return through consistent performance across the pieces I have read so far.
Following a few of the internal links revealed more posts of similar quality, and a stop at futuregrovegallery added more to that growing pile, sites where internal links lead to more good content rather than to more of the same recycled material are sites with depth and this one has clearly built that depth carefully.
Really like that there are no exclamation marks or all caps shouting throughout the post, and a quick visit to foxarbor maintained the same calm voice, restraint in punctuation signals confidence in the content and this site clearly trusts its substance to do the persuading rather than relying on typographic emphasis.
Picked a single sentence from this post to remember, and a look at lyricmeadow gave me another to keep, content that produces memorable lines is doing more than just transferring information and the small selection of sentences I keep from each reading session is one of the actual returns I get from reading carefully.
Strong recommendation from me, anyone curious about the topic should make time for this, and a look at epicinlet only sharpens that recommendation further, the kind of resource that holds up against careful scrutiny rather than crumbling at the first critical question is rare and worth pointing other people toward when the topic comes up.
Reading this confirmed that the topic deserves more careful attention than it usually gets, and a stop at dreamharbortrends extended that elevated framing, content that raises the appropriate weight of a subject without being preachy about it is serving a quiet but important editorial function for the broader cultural conversation about it.
Now feeling that this site is the kind I want to make sure does not disappear, and a look at bestdealcenter reinforced that quiet protective feeling, the rare sites whose disappearance would actually matter to me are the sites I want to support through return visits and recommendations and this one has joined that small protected list.
Felt no urge to argue with the conclusions even though I started the post slightly skeptical, and a look at everpeakcorner maintained that pattern, writing that earns agreement through clarity of argument rather than rhetorical pressure is the kind I find most persuasive and the kind I want to read more of these days.
Appreciate the work that went into laying this out so clearly, every section earns its place without filler, and a look at laceparish confirmed the same care, definitely the kind of place that deserves a return visit when the topic comes up again later in the future or for any related question.
A nicely understated post that does not shout for attention, and a look at wildsageemporium maintained the same quiet quality, understatement is a stylistic choice that distinguishes serious writing from attention seeking writing and this site has clearly committed to the understated approach as a core editorial value rather than just a phase.
ролл штора на пластиковое окно [url=https://rulonnye-shtory-s-elektroprivodom190.ru]https://rulonnye-shtory-s-elektroprivodom190.ru[/url]
If I were grading sites on this topic this one would receive high marks, and a stop at isleparish continued earning those high marks, the informal grading I do mentally for content sources is something I take seriously even though it is informal and this site has been receiving consistent high marks across multiple sessions today.
Now wishing more sites covered topics with this level of care, and a look at edenfair extended that wish across more subjects, the rarity of careful coverage on most topics is a problem and this site is one of the small antidotes to that broader pattern of casual or surface treatment of complex subjects.
Thanks again for the post, I learned a couple of things I can actually use later this week, and after I went over silverbirchgallery the rest of the site looked equally promising, definitely going to spend more time here when I get a free moment over the weekend to read more carefully.
Took a quick scan first and then went back to read properly because the post deserved it, and a stop at flickaltar kept me reading carefully too, the kind of writing that earns a slower second pass rather than getting skimmed and forgotten is something I value highly when I happen to find it.
Компания fastek https://fastek.by проектируем и поставляем надежные фасадные системы для коммерческих и жилых объектов, обеспечивая долговечность, энергоэффективность и безупречный внешний вид здания под ваши задачи.
Worth recognising the specific care that went into how this post ended, and a look at dustorchid maintained the same careful conclusions, endings are where most blog content falls apart and this site has clearly invested in the closing stretches of its pieces rather than letting them simply trail off when energy fades.
Useful reading material, the kind I can hand off to someone newer to the topic without worrying about confusing them, and a quick look at goldenpeakartisan confirmed the same beginner friendly tone runs throughout the site which is great for sharing with people just starting their learning journey on this particular topic.
откапывание на дому [url=https://kapelnicza-ot-pokhmelya-voronezh-17.ru]откапывание на дому[/url]
Working through this site has been a small antidote to the shallow content that fills most of my reading time, and a stop at neatdawn extended that antidote function, sites that quietly improve the average quality of my reading by being themselves are sites worth supporting through return visits and recommendations consistently.
Speaking as someone who reads a lot on this topic this site has earned a high position in my source rankings, and a stop at mythmanor reinforced that ranking, the informal ranking of sources for a topic is something I maintain mentally and this site has moved into the upper portion of those rankings clearly.
Reading this slowly because the writing rewards a slower pace, and a stop at lyricoasis did the same, the pace at which I read content is something I now use as a quality signal and writing that earns a slower pace earns my attention as a reader looking for substance these days.
Glad to have another data point on a question I am still thinking through, and a look at moonstardesigns added two more, content that acknowledges its place in a wider conversation rather than pretending to settle the question alone is intellectually honest in a way that I wish was more common across the open web.
Reading this fit naturally into my afternoon walk because I was reading on my phone, and a stop at modernhomeculture continued well in that walking format, content that survives mobile reading without becoming awkward is content with format flexibility and this site has clearly thought about how it reads across different devices today.
Decided after reading this that I would check this site weekly going forward, and a stop at etheraisle reinforced that commitment, deciding to add a site to a regular rotation requires meeting a quality bar that very few places clear and this one cleared it cleanly without any noticeable effort or marketing push behind it.
Will be coming back to this for sure, too much good content to absorb in one sitting, and a stop at yourpotentialawaits only added more pages I want to dig through, this site is going onto my regular rotation list because it consistently delivers something worth the visit lately rather than empty filler.
наркологическая помощь стационар [url=https://narkologicheskij-staczionar-sankt-peterburg-10.ru]наркологическая помощь стационар[/url]
melbet тасдиқи шахсият [url=http://melbet82460.help]melbet тасдиқи шахсият[/url]
aviator hesab bərpası [url=http://aviator57204.help/]http://aviator57204.help/[/url]
plinko deposit bonus payment [url=https://plinko90283.help/]plinko deposit bonus payment[/url]
Honest reaction is that this is the kind of writing I would defend in a conversation about good blog content, and a look at grandriverworkshop reinforced that, the rare site whose work I would actively recommend rather than just tolerate is the kind I want to support through return visits regularly.
скачать видео ютуба [url=https://skachat-video-s-youtube-11.ru]скачать видео ютуба[/url]
нарколог на дом воронеж [url=https://narkolog-na-dom-voronezh-10.ru]нарколог на дом воронеж[/url]
Клининговые услуги в москве
нарколог выезд на дом [url=https://narkolog-na-dom-samara-10.ru]https://narkolog-na-dom-samara-10.ru[/url]
Strong recommendation, anyone interested in this topic owes themselves a visit, and a stop at northernwavegoods extends that recommendation across more of the site, this is the kind of resource that makes me more optimistic about the state of the open web than I usually am these days actually for once which is genuinely refreshing.
After reading several posts back to back the consistent voice across them is impressive, and a stop at globalmarketoutlet continued that voice consistency, sites that maintain a single coherent voice across many pieces by potentially many writers represent serious editorial discipline and this one has clearly developed the institutional consistency needed for that.
Good quality through and through, no rough edges and no signs of being rushed, and a quick look at believeinyourdreams kept the same polish going, the kind of site that respects its own brand by maintaining consistency across pages which is something I always appreciate as a reader looking for trustworthy information online today.
Took something from this I did not expect to find, and a stop at discovermoreoffers added another unexpected useful piece, content that exceeds expectations rather than just meeting them is the kind that builds enthusiasm and earns repeat visits without any explicit ask from the writer or platform behind the work being read.
Probably the kind of site that should be more widely read than it appears to be, and a look at wildroseemporium reinforced that quiet wish, the gap between a sites quality and its apparent reach is sometimes large and that gap exists for this site in a way that makes me want to mention it more.
нарколог на дом в самаре [url=https://narkolog-na-dom-samara-9.ru]нарколог на дом в самаре[/url]
aviator demo [url=aviator46035.help]aviator46035.help[/url]
However many similar pages I have read this one taught me something new, and a stop at ivypier added more new material, content that contributes genuinely fresh information rather than recycling what is already widely available is content with real informational value and this site is providing that informational freshness at a notable rate.
Now adding the writer to a small mental list of voices I want to follow, and a look at edgecradle reinforced that follow intention, the few writers whose work I actively track are writers who have demonstrated sustained quality and this writer has clearly demonstrated that sustained quality across the pieces I have sampled here today.
Now thinking about how this post will age over the coming years, and a stop at softdawnboutique suggested the same durability, content built to age well rather than to capture the attention of the moment is content with a different kind of value and this site has clearly chosen the long horizon over the short one.
Felt like the post had been edited rather than just drafted and published, and a stop at flowlegend suggested the same care across the site, the difference between edited and unedited content is enormous for the reader and this site has clearly invested in the editing pass that most blogs skip entirely which really does show up.
Really thankful for posts that respect a reader’s time, this one does, and a quick look at trueharborboutique was the same, no need to scroll through endless intros just to get to the actual content, that approach alone is enough reason to come back here regularly for the kind of writing offered.
займ без отказа онлайн на карту https://srnalogcon.ru
Уборка после ремонта спб
Generally I find the content on similar topics frustrating in specific ways and this post avoided all of them, and a look at marveldeck continued that frustration free experience, content that sidesteps the standard failure modes of its genre is content with editorial awareness and this site has clearly studied what fails elsewhere consistently.
Reading this confirmed something I had been suspecting about the topic, and a look at etherfair pushed that confirmation toward greater confidence, content that lines up with independently held intuitions earns a special kind of trust and I will return to writers who consistently land that way for me without overselling positions.
Even across multiple posts the writers voice has remained consistent in a way I appreciate, and a stop at neatglyph continued that voice, sites that maintain editorial consistency across many pieces have something most sites lack and this one has clearly worked out how to keep its voice steady across what reads as a growing archive.
A piece that did not lecture even when it had clear positions, and a look at neatdawn maintained the same teaching without preaching tone, finding the line between informing and lecturing is hard and most sites land on the wrong side of it but this one has clearly figured out how to inform without becoming preachy.
Decided not to comment because the post said what needed saying, and a stop at goldenrootstudio continued that complete feel, content that does not invite obvious additions or corrections from readers is content that has been carefully considered and this site appears to consistently produce pieces that satisfy rather than provoke unnecessary follow ups.
A genuine compliment to the writer for keeping the post focused on what mattered, and a look at globalinspiredclickping continued that disciplined focus, focus is a editorial choice that compounds across many small decisions and this site has clearly made those small decisions consistently across what I have read so far this week here.
Took some notes for a project I am working on, and a stop at lunacourts added more raw material to those notes, content that contributes to my own creative work rather than just being interesting in the moment is the kind I value most and the kind I will keep coming back to repeatedly.
Reading this brought back the satisfaction I used to get from blogs ten years ago, and a stop at freshpineemporium kept that nostalgic quality alive, sites that capture what was good about an earlier era of internet writing are increasingly precious and this one is doing that without feeling like a deliberate throwback at all.
A particular pleasure to read this with a fresh coffee, and a look at jetmanors extended the pleasure across more pages, content that pairs well with quiet morning rituals is something I have come to value highly and this site has the kind of energy that fits naturally into a calm reading routine.
Now noticing the post fit a particular gap in my reading without my having articulated the gap before, and a look at yourdealhub extended that gap filling effect, content that meets needs I had not consciously formulated is content with reader insight and this site has clearly developed that anticipatory editorial sense across many pieces.
Took me back a step or two on an assumption I had been making, and a stop at jetdome pushed that reconsideration further, writing that gently corrects the reader without being aggressive about it is a rare diplomatic skill and the team here clearly knows how to land critical points without turning readers off.
plinko aviator crash [url=http://plinko90283.help]http://plinko90283.help[/url]
melbet ба ҳисоб даромадан [url=https://melbet82460.help/]https://melbet82460.help/[/url]
After reading several posts back to back the consistent voice across them is impressive, and a stop at portpoises continued that voice consistency, sites that maintain a single coherent voice across many pieces by potentially many writers represent serious editorial discipline and this one has clearly developed the institutional consistency needed for that.
Honestly informative, the writer covers the ground without showing off, and a look at fondarbor reflected the same humility, content that respects the reader rather than trying to dazzle them is something I always appreciate and rarely come across in this corner of the internet today across the topics I usually read.
Glad I clicked through from where I did because this turned out to be worth the time spent, and after edgedial I had a fuller picture, the kind of content that earns its visitors through delivering value rather than chasing them through aggressive advertising or constant pop ups appearing everywhere on the screen lately.
капельница от алкоголизма [url=https://kapelnicza-ot-pokhmelya-ekaterinburg-14.ru]https://kapelnicza-ot-pokhmelya-ekaterinburg-14.ru[/url]
Once I trust a site this much I tend to read everything they publish and that is the trajectory I am on with this one, and a stop at everwildbranch confirmed the trajectory, the rare progression from interested reader to comprehensive reader is something only certain sites earn and this one is earning that progression rapidly.
Worth recognising that the post did not pretend to be the final word on the topic, and a stop at coastalmistcorner continued that humility, content that admits its own scope and limits is more trustworthy than content that overreaches and this site has clearly developed the editorial maturity to know what it can and cannot claim well.
капельница от алкоголя [url=https://kapelnicza-ot-pokhmelya-ekaterinburg-17.ru]капельница от алкоголя[/url]
врач нарколог на дом [url=https://narkolog-na-dom-voronezh-14.ru]врач нарколог на дом[/url]
Found the post genuinely useful for something I was working on this week, and a look at rarecrestfashion added more material I will reference, content that connects to my actual life and work rather than just being interesting in the abstract is the kind I will pay attention to and return to repeatedly.
My reading list is short and selective and this site is now on it, and a stop at meritquays confirmed the placement, the short list of sites I read deliberately rather than encounter accidentally is something I curate carefully and adding to it is a real act of trust which this site has earned today.
Reading this as part of my evening winding down routine fit perfectly, and a stop at wildsparklestore extended the wind down nicely, content that calms rather than agitates is what I want at the end of the day and this site provides that calming reading experience reliably which is increasingly rare across the modern web.
plinko login error [url=https://plinko90283.help/]https://plinko90283.help/[/url]
aviator canlı kazino [url=http://aviator57204.help/]http://aviator57204.help/[/url]
мелбет корти бонкӣ гирифтани пул [url=http://melbet82460.help]мелбет корти бонкӣ гирифтани пул[/url]
Worth your time, that is the simplest endorsement I can give, and a stop at discovergiftoutlet extends that endorsement across the rest of the site, this is one of those increasingly rare places that delivers on what it promises rather than over selling the content and under delivering on substance every time which I find frustrating elsewhere.
Now realising the post solved a small problem I had been carrying for weeks, and a look at ivypiers extended that problem solving function, content that connects to specific unresolved questions in my own life rather than just providing general interest is content with real practical impact and this site is providing that practical value.
Solid endorsement from me, the writing earns it, and a look at etherledge continues to earn it across the broader site too, the kind of operation that maintains quality across many pages rather than just one viral post is a sign of serious commitment and that is what I see here clearly across what I read.
High quality writing, no marketing speak and no buzzwords that mean nothing, and a stop at everattics kept that going, simple direct content that actually communicates something is harder to find than it should be and this is one of the rare places that gets it right consistently across many different posts.
aviator mudar senha [url=www.aviator46035.help]www.aviator46035.help[/url]
Picked this up while looking for something else and ended up reading every paragraph because it was actually informative, and after rusticridgeboutique I was sure I would come back, that does not happen often when most sites bury the useful parts under endless ads and pop ups today and across most categories online.
нарколог стационар спб [url=https://narkologicheskij-staczionar-sankt-peterburg-10.ru]нарколог стационар спб[/url]
My professional context would benefit from having this kind of resource available, and a look at neatlounge extended the professional applicability, the rare site that contributes meaningfully to professional work rather than just personal interest is content with multiplied value and this one is providing that professional utility consistently across multiple pieces.
Picked this for a morning recommendation in our company chat, and a look at designforwardclick suggested I will mention this site again later, recommending content into a workplace context is a small editorial act that requires confidence in the recommendation and this site is making me confident in those recommendations consistently here too.
Probably the best thing I have read on this topic in the past month, and a stop at mythmanors extended that ranking, the casual ranking of recent reading is informal but real and this site has been winning those rankings for me on this topic specifically over the last several weeks of regular reading sessions.
двойные рулонные шторы с электроприводом [url=https://rulonnye-shtory-s-elektroprivodom190.ru]двойные рулонные шторы с электроприводом[/url]
Now feeling mildly impressed in a way I do not quite remember feeling about a blog in a while, and a stop at jetmanor extended that mild impression, content that produces specific positive emotional responses rather than just neutral information transfer is content with extra dimensions and this site has those extra dimensions clearly.
aviator promo code [url=https://aviator46035.help/]https://aviator46035.help/[/url]
Now adjusting my mental model of how the topic fits into the broader landscape, and a look at globalbuyzone extended that adjustment, content that affects my structural understanding rather than just my factual knowledge is content with deeper impact and this site is providing those structural updates at a meaningful rate consistently across topics.
Closed the post with a small satisfied sigh, and a stop at deepforestcollective produced the same gentle exhale, content that ends well is content that respects the rhythm of reading and the writers here have clearly thought about how their pieces close rather than just trailing off when they run out of things to say.
Now feeling slightly more optimistic about the state of independent writing online, and a stop at neatglyph extended that quiet optimism, sites like this one are the reason I have not given up on the open web entirely and finding them occasionally renews the case for paying attention to non algorithmic content sources today.
Really like that the writer trusts the reader to follow simple logic without restating every previous point, and a stop at softwillowdesigns kept that respect going, treating an audience as capable adults rather than as people who need constant hand holding makes a noticeable difference in the reading experience for me.
Probably this is one of the better quiet successes on the open web at the moment, and a look at forgecabin reinforced that quiet success quality, sites that are doing well without making a noise about doing well are the sites I most respect and this one has clearly chosen the quiet success path consistently throughout.
Now understanding why someone recommended this site to me a while back, and a stop at elitedawn explained the recommendation, sometimes recommendations make sense only after experience and this site has finally clicked into place as the kind of resource I now understand was being recommended for sound editorial reasons by my friend.
Reading this prompted me to dig into a related topic later, and a stop at brightpathcorner provided some of the starting points for that follow up reading, content that triggers further exploration rather than satisfying curiosity completely is content with real generative energy and this site has plenty of that energy throughout it.
прокапаться от алкоголя цены [url=https://kapelnicza-ot-pokhmelya-voronezh-17.ru]прокапаться от алкоголя цены[/url]
Now noticing how rare it is to find a site that does not feel rushed, and a look at yourdailyinspiration extended that calm pace, content produced without time pressure has a different quality than content shipped to meet a deadline and this site reads as written without urgency which produces a different and better experience for readers.
Came in for one specific question and got answers to three I had not even thought to ask, and a look at sunrisehillcorner extended that bonus value pattern, the kind of resource that anticipates reader needs rather than just answering the literal question asked is the gold standard and this site reaches it.
Even from a single post the editorial care is clear, and a stop at everattic extended that care across more pages, the kind of attention to quality that shows up in every paragraph is what separates serious sites from the rest and this one has clearly invested in that paragraph level attention across what I have read.
Now considering carefully how to share this site with the right audience rather than broadcasting widely, and a look at wildflowerpeak extended that careful sharing impulse, content worth sharing carefully rather than spamming is content that has earned a higher kind of recommendation and this site has earned that careful shareability throughout pieces.
Stands out for actually being useful instead of just being long, and a look at ivypiers kept that going, length without value is the default mode of most blogs these days but this site has clearly chosen a different path which I respect a lot as a reader who values careful editing decisions like that.
Picked this site to mention to a colleague who would benefit, and a look at edendunes added more material I will pass along, recommending sites to colleagues is a higher bar than recommending to friends because the professional context demands more careful curation and this site cleared the professional bar without me having to think.
Easy to recommend, the content speaks for itself without needing additional praise from me, and a stop at deathrayvision only adds more reasons to send people this way, the kind of generous resource that benefits its readers without demanding anything in return is increasingly rare and worth recognising clearly today across the broader open internet.
срочный вызов врача нарколога [url=https://narkolog-na-dom-samara-10.ru]https://narkolog-na-dom-samara-10.ru[/url]
Felt slightly impressed without being able to point to one specific reason, and a look at moonfieldboutique continued that diffuse positive feeling, when content works at a level you cannot easily articulate the writer is doing something with craft rather than just delivering information and that is something I have learned to recognise.
One of the more thoughtful posts I have read recently on this topic, and a stop at benningtonareaartscouncil added even more weight to that impression, this is genuinely good content that holds its own against far better known sites in the same space without trying to imitate any of them at all which I appreciate.
Probably going to mention this site in a write up I am working on later this month, and a stop at almostfashionablemovie provided more material for that potential mention, content worth referencing in my own published work rather than just personal reading is content with the highest endorsement level and this site has earned that endorsement.
Took a screenshot of one section to come back to later, and a stop at palmcodexs prompted another saved tab, the urge to capture and revisit specific pieces of content is something I rarely feel but when I do it tells me the work is worth more than the average passing read for sure.
Decided not to skim despite my usual habit and was rewarded for the discipline, and a stop at jammykspeaks earned the same patient approach, training myself to recognise sites that warrant slower reading is part of being a careful online reader and this site is the kind that helps me practice that skill regularly.
Started smiling at one paragraph because the writing was just nice, and a look at knackdome produced a couple more such moments, prose that produces small spontaneous reactions in the reader is doing more than just transferring information and the writers here are clearly hitting that level fairly consistently throughout pieces.
нарколог на дом вывод из запоя на дому [url=https://narkolog-na-dom-samara-9.ru]https://narkolog-na-dom-samara-9.ru[/url]
Halfway through I knew I would finish the post, and a stop at artisanalifestylemarket also held me through to the end, content that signals its quality early and then sustains it is content with real internal consistency and this site has clearly figured out how to maintain quality from opening sentence through to closing thought.
Most blog writing on this subject reaches for the same handful of arguments and this post avoided them, and a look at neatmill continued the original treatment, content that finds its own path through territory other writers have flattened is content with real authorial energy and this site has plenty of that distinctive energy.
aviator canlı chat [url=https://www.aviator57204.help]https://www.aviator57204.help[/url]
melbet ба ҳисоб даромадан [url=https://melbet82460.help/]https://melbet82460.help/[/url]
Now feeling confident that this site will continue producing work I will want to read, and a look at foxarbor extended that confidence into the future, projecting forward from current quality to expected future quality is something I do for sites I genuinely follow and this one has earned that forward looking trust clearly today.
Most of the time I feel the open web is in decline and then I find a site like this, and a stop at elitefest reinforced that mood lift, the cumulative effect of finding occasional excellent independent content versus the cumulative effect of finding mostly mediocre content is real for the long term reader maintaining web habits today.
However measured this site clears the bar I set for sites I take seriously, and a stop at epicestates continued clearing that bar, the metrics I use for site quality are admittedly informal but they are consistent and this site has cleared them on multiple measurements across multiple visits which is meaningful for my evaluation.
Now recognising that this site has earned a place in the small group of resources I treat as authoritative, and a stop at softevergreen confirmed that placement, the difference between resources I trust and resources I just consume is real and this site has clearly moved into the trusted category through consistent quality over time.
онлайн займ https://rusel-garant.ru
statistiche live crazy time [url=http://www.crazy-time8.com]https://crazy-time8.com/[/url]
crazy time gratis demo [url=https://crazy-time-italian.com/]crazy time gratis demo[/url].
Felt the writer respected the topic without being precious about it, and a look at knightstablefoodpantry continued that respectful but unfussy treatment, finding the right register for serious topics is hard and this site has clearly figured out how to take the topic seriously while still being readable for casual visitors regularly.
Found something quietly useful here that I expect to return to, and a stop at neatmill added more of the same, content with quiet utility ages well in a way that flashy hot takes do not and I have learned to weight quiet utility much higher when deciding what to bookmark for later use.
crazy time stats eurobet [url=http://crazy-time-slot.it/]https://crazy-time-slot.it/[/url]
crazy time statistiche [url=https://www.crazy-time-ita.com]https://crazy-time-ita.com/[/url]
crazy time live demo [url=https://crazytime-italia-it.com/]https://crazytime-italia-it.com/[/url]
plinko download android apk [url=plinko90283.help]plinko download android apk[/url]
стоимость капельницы на дому екатеринбург [url=https://kapelnicza-ot-pokhmelya-ekaterinburg-16.ru]стоимость капельницы на дому екатеринбург[/url]
Reading more of the archives is now on my plan for the weekend, and a stop at fernbureau confirmed the archive worth the time, the rare archive worth a dedicated reading session rather than just casual sampling is the rare archive of serious work and this site has clearly produced enough of that work to warrant the deeper exploration.
Even on a quick first read the substance of the post comes through, and a look at leafdawns reinforced that immediate quality, content that does not require a slow careful read to demonstrate value but rewards one anyway is content with real depth and this site has produced work of that demanding depth class.
Pleasant surprise, the post delivered more than the headline promised, and a stop at yourdailyfinds continued that pattern of under promising and over delivering, the rarest combination on the modern web where most content does the opposite by promising the world and delivering thin recycled summaries instead each time you click on something interesting.
Generally I find the content on similar topics frustrating in specific ways and this post avoided all of them, and a look at riverstonecorner continued that frustration free experience, content that sidesteps the standard failure modes of its genre is content with editorial awareness and this site has clearly studied what fails elsewhere consistently.
вывод из запоя в клинике [url=https://vyvod-iz-zapoya-v-staczionare-nizhnij-novgorod-17.ru]https://vyvod-iz-zapoya-v-staczionare-nizhnij-novgorod-17.ru[/url]
вывод из запоя круглосуточно [url=https://vyvod-iz-zapoya-na-domu-ekaterinburg-27.ru]вывод из запоя круглосуточно[/url]
If the topic interests you at all this is a place to spend time, and a look at quinttatro reinforced that recommendation, the broader question of where to invest topical reading time is one this site answers convincingly through the consistent quality across multiple pieces I have sampled during the current reading session today.
Felt the post had been written without using a single buzzword, and a look at violetcresttrends continued that clean vocabulary, content free of jargon and trendy phrases reads better and ages better and this site has clearly committed to a vocabulary that will not feel dated in three years which is impressive editorially.
Now wishing more sites covered topics with this level of care, and a look at flareaisles extended that wish across more subjects, the rarity of careful coverage on most topics is a problem and this site is one of the small antidotes to that broader pattern of casual or surface treatment of complex subjects.
вывод из запоя цена [url=https://vyvod-iz-zapoya-na-domu-ekaterinburg-30.ru]вывод из запоя цена[/url]
Came in skeptical and left mostly convinced, that is the highest praise I can offer, and a look at knackpact pushed me further in the same direction, content that survives a critical first read is rare and worth recognising because most blog posts crumble under any real scrutiny these days when you actually pay attention closely.
Came back to this an hour later to reread a specific section, and a quick visit to northerncreststudio also drew a second look, content that pulls you back rather than letting you move on permanently is the kind I want to fill my browser bookmarks with in 2026 and beyond as the open internet evolves.
Now noticing that the post benefited from being neither too short nor too long for its content, and a look at lakequills continued that calibration of length, sites that match length to content rather than padding to hit some target are sites that respect both their material and their readers and this site does both.
Reading the writers other posts after this one suggests the quality is consistent rather than peak, and a stop at goldenwillowhouse confirmed the consistent quality reading, sites that hold the same level across many pieces rather than peaking on a few are sites with sustainable editorial discipline and this one has clearly developed that.
Good clean post, no errors and no awkward phrasing that breaks the reading flow, and a stop at masonchallengeradaptivefields kept the same standard, definitely the kind of editorial care that earns a return visit because it tells me the writer is paying attention to details that matter to readers rather than just rushing publication.
If I had to defend the time I spend reading independent blogs this site would feature in the defence, and a look at freshtrendstore reinforced that defensive utility, the ongoing case for non algorithmic reading is one I make to myself periodically and sites like this one provide the actual evidence that supports the case clearly.
наркологическая помощь стационар [url=https://narkologicheskij-staczionar-sankt-peterburg-10.ru]наркологическая помощь стационар[/url]
Just dropping by to say thanks for the effort, it does not go unnoticed when a writer cares this much about the reader, and after I went through midriverdesigns I was certain this is one of the better corners of the internet for this particular kind of content which is genuinely refreshing.
Worth flagging that this approach to the topic is fresh without being contrarian, and a stop at freshguild extended the same fresh angle, finding original perspective on familiar subjects is rare and this site has clearly developed its own way of seeing rather than echoing the dominant takes from elsewhere consistently.
aviator logout [url=https://aviator46035.help]aviator logout[/url]
Even from a single post the editorial care is clear, and a stop at moderncuratedessentials extended that care across more pages, the kind of attention to quality that shows up in every paragraph is what separates serious sites from the rest and this one has clearly invested in that paragraph level attention across what I have read.
Reading this prompted me to send the link to two different people for two different reasons, and a stop at eliteledge provided ammunition for a third share, content that suits multiple audiences without being generic enough to be useless to any of them is genuinely valuable and this site has that multi audience quality clearly.
Came across this through a roundabout path and now it is on my regular rotation, and a stop at wildnorthoutlet sealed that decision, the open web still produces serendipitous discoveries when you let the citations and references guide you rather than relying purely on algorithmic feeds for new content recommendations always.
mostbet limit beállítás [url=mostbet26815.help]mostbet26815.help[/url]
mostbet прематч [url=https://www.mostbet07541.help]mostbet прематч[/url]
melbet результаты матчей [url=http://melbet30819.help]http://melbet30819.help[/url]
займ быстро https://tbcareer.ru
Thanks for taking the time to write this, it is clear that some thought went into how each point would land, and after I went through fernpier I had a better grip on the topic, real value without the usual marketing noise people have to put up with online when searching for answers.
Now appreciating the way the post avoided the temptation to be longer than necessary, and a look at flarefests continued that lean approach, content with the discipline to stop when finished rather than padding for length is content that respects both itself and its readers and this site has that disciplined editorial culture clearly throughout.
During a reading session that included several other sources this one stood out, and a look at northdawn continued the standout quality, the side by side comparison of sources during research is a useful exercise and this site has been winning those comparisons for me consistently across multiple research sessions during the last week.
нарколог на дом в клинике москва [url=https://reabilitaciya-alkogolikov-moskva-1.ru]нарколог на дом в клинике москва[/url]
Worth your time, that is the simplest endorsement I can give, and a stop at goldenhorizonhub extends that endorsement across the rest of the site, this is one of those increasingly rare places that delivers on what it promises rather than over selling the content and under delivering on substance every time which I find frustrating elsewhere.
A clear cut above the usual noise on the subject, and a look at yungbludcomic only made that gap wider in my view, the kind of place that earns its visitors through quality rather than through aggressive marketing or sponsored placements which is increasingly the only way most sites stay afloat across the modern web.
сколько стоит сделать капельницу на дому [url=https://kapelnicza-ot-pokhmelya-samara-32.ru]сколько стоит сделать капельницу на дому[/url]
Decided this was the best thing I had read all morning, and a stop at nicholashirshon kept that ranking intact, ranking my reading is something I do mentally throughout the day and the top rank is competitive and not easily won but this site won it without needing to overstate its claims for that.
Honestly impressed, did not expect to find this level of care on the topic, and a stop at urbanbuycorner cemented the impression, you can tell within the first few paragraphs whether a site is going to be worth the time and this one delivered on that early promise nicely throughout the rest of what I read.
Probably the kind of site that should be more widely read than it appears to be, and a look at lacecabin reinforced that quiet wish, the gap between a sites quality and its apparent reach is sometimes large and that gap exists for this site in a way that makes me want to mention it more.
Just one of those reads that left me feeling slightly more capable rather than overwhelmed, and a look at lobbydawns kept that empowering feel going, the difference between content that builds the reader up and content that intimidates them is huge and this site clearly knows which side of that line to stand.
рулонные шторы это [url=https://rulonnye-shtory-s-elektroprivodom190.ru]https://rulonnye-shtory-s-elektroprivodom190.ru[/url]
Honestly this kind of writing is why I still bother to read independent sites, and a look at rockyrose extended that broader reflection, the few sites that justify continued attention to non algorithmic content are sites like this one and finding them periodically is enough to keep my reading habits oriented toward independent rather than aggregated content.
During the time spent here I noticed the absence of the usual distractions, and a stop at sunlitwoodenstore extended that distraction free experience, content that does not fight my attention with pop ups and modals and aggressive prompts is content that respects me and this site has clearly chosen the respectful approach throughout.
Now noticing how rare it is to find a site that does not feel rushed, and a look at etheraisles extended that calm pace, content produced without time pressure has a different quality than content shipped to meet a deadline and this site reads as written without urgency which produces a different and better experience for readers.
Came back to this an hour later to reread a specific section, and a quick visit to urbanfashionhub also drew a second look, content that pulls you back rather than letting you move on permanently is the kind I want to fill my browser bookmarks with in 2026 and beyond as the open internet evolves.
Really appreciate the confidence to make a clear point rather than hedging everything, and a quick visit to loopboughs maintained the same direct stance, writing that takes positions rather than equivocating is more useful even when the positions are debatable because at least the reader has something to react to clearly.
Better than the average post on this subject by some distance, and a look at frostcoast reinforced that, you can tell within the first paragraph that the writer here actually cares about the topic rather than just covering it for the sake of having something to publish that week or that day.
Picked this for a morning recommendation in our company chat, and a look at epicestate suggested I will mention this site again later, recommending content into a workplace context is a small editorial act that requires confidence in the recommendation and this site is making me confident in those recommendations consistently here too.
A piece that reads as if the writer trusted readers to fill in obvious gaps, and a look at urbanleafoutlet continued that respectful approach, content that does not over explain what the reader can infer is content that respects intelligence and this site has clearly chosen to write to capable readers rather than to the lowest common denominator.
капельница от похмелья клиника [url=https://kapelnicza-ot-pokhmelya-voronezh-17.ru]капельница от похмелья клиника[/url]
Closed the tab feeling I had spent the time well, and a stop at curatedfuturemarket extended that feeling across more pages, the test of whether time on a site was well spent is one I apply silently after closing tabs and very few sites pass it but this one passed it cleanly today afternoon clearly.
Мы предлагаем комплексные услуги по оформлению справок, свидетельств и апостиля в удобном формате: https://apostilium-moscow.com/apostil-na-spravku-ob-otsutstvii-sudimosti/
служба вывода из запоя [url=https://vyvod-iz-zapoya-na-domu-ekaterinburg-26.ru]служба вывода из запоя[/url]
https://www.maivona.com/pryschi-i-kak-s-nimi-borotsya/kak-ubrat-pyatna-i-shramy-posle-pryschej-ot-postakne-v-domashnih-usloviyah
Thanks for the honest framing without exaggerated claims that the topic will change my life, and a stop at pactcliffs kept the same modest tone, restraint in marketing language signals trustworthiness and the writers here are clearly playing the long game by building credibility rather than chasing immediate clicks through hyperbole.
Well done, the kind of post that makes you slow down and actually read instead of skimming for keywords, and a look at fieldlagoon kept me reading carefully too, that is a sign of writing that has been crafted rather than churned out for an algorithm to see today and tomorrow.
Reading this gave me the rare experience of fully agreeing with all the conclusions, and a stop at christmasatthewindmill continued that agreement pattern, content that aligns with my existing views without seeming designed to do so is just content that happens to be reasonable and this site reads as reasonable rather than ideological mostly.
Found this through a search that was generic enough I did not expect quality results, and a look at puregreenoutpost continued the surprisingly good experience, search engines occasionally still surface excellent independent content if you scroll past the obvious paid and high authority results which is reassuring to remember sometimes.
Now feeling the post has earned a proper recommendation rather than a casual mention, and a stop at novalog reinforced the recommendation strength, the difference between mentioning and recommending is a small editorial distinction I observe in my own conversations and this site has earned the upgraded recommendation level from me confidently today.
Generally I bookmark sparingly to avoid building up a bookmark graveyard but this one earned a permanent slot, and a stop at softgrovecorner extended that permanence designation, the few sites I keep permanent bookmarks for are sites I expect to use repeatedly and this one has clearly cleared that expectation bar today.
A thoughtful read in a week that has been mostly noisy, and a look at lacehelm carried that thoughtful quality across more pages, finding pockets of considered writing in a week of distractions is one of the small wins of careful curation and this site is providing those pockets at a sustainable rate.
как пройти регистрацию mostbet [url=https://mostbet07541.help/]https://mostbet07541.help/[/url]
вызвать нарколога [url=https://narkolog-na-dom-samara-10.ru]https://narkolog-na-dom-samara-10.ru[/url]
Honest take is that this was better than I expected when I clicked through, and a look at flarefoils reinforced that, the bar for online content has dropped so much that finding something thoughtful and well constructed feels almost noteworthy now which says more about the average than about this site itself.
This filled in a gap in my understanding that I had not even noticed was there, and a stop at freshtrendstore did the same, the kind of post that gives you more than you expected when you first clicked through from somewhere else, a real find for anyone curious about the area covered here.
Useful reading material, the kind I can hand off to someone newer to the topic without worrying about confusing them, and a quick look at coastlinechoice confirmed the same beginner friendly tone runs throughout the site which is great for sharing with people just starting their learning journey on this particular topic.
Big thanks to whoever wrote this, you saved me a lot of time hunting for the same info on other sites, and a stop at electlarryarata only added more useful detail without going off topic, that kind of focus is honestly hard to come across these days when most posts wander everywhere.
mostbet tükör [url=https://mostbet26815.help]mostbet tükör[/url]
Started imagining how I would explain the topic to someone else after reading, and a look at galafactor gave me more material for that imagined explanation, content that improves my own ability to discuss a topic is content that has actually transferred knowledge rather than just decorating my screen for a few minutes.
Just nice to read something that does not feel like it was assembled from a content brief, and a stop at boldharborstudio kept that handcrafted feel going, you can tell when a real human with real understanding is behind the words versus a templated piece churned out for an algorithm to find.
Now appreciating the way the post avoided the temptation to be longer than necessary, and a look at epicinlet continued that lean approach, content with the discipline to stop when finished rather than padding for length is content that respects both itself and its readers and this site has that disciplined editorial culture clearly throughout.
Reading this in a quiet coffee shop matched the calm energy of the writing, and a stop at urbanmistcollective extended that environmental match, content that has its own ambient quality which can match or clash with surroundings is content with a personality and this site has the kind of personality that suits calm reading.
наркологическая клиника стационар [url=https://narkologicheskij-staczionar-sankt-peterburg-10.ru]наркологическая клиника стационар[/url]
Все подробности по ссылке: https://diet-menyu.ru
Bookmark earned, calendar reminder set, share queued, all from one good post, and a look at portolives did the same, when a single reading session triggers multiple downstream actions you know the content has actually moved me beyond the page and this site is moving me at that higher level reliably.
Reading this confirmed something I had been suspecting about the topic, and a look at urbanchoiceoutlet pushed that confirmation toward greater confidence, content that lines up with independently held intuitions earns a special kind of trust and I will return to writers who consistently land that way for me without overselling positions.
A piece that did not waste any of its substance on sales or promotion, and a look at draftports continued that pure content focus, sites that resist the urge to monetise every paragraph are increasingly rare and this one has clearly made the editorial choice to keep the writing clean from commercial intrusion which I value highly.
Worth flagging that the post handled an angle of the topic I had not seen elsewhere, and a look at covidtest-cyprus extended that fresh treatment, content that finds underexplored corners of well covered subjects is genuinely valuable and this site has demonstrated that exploratory editorial approach across multiple pieces in my reading sessions today.
Top notch writing, every paragraph carries weight and nothing feels like filler, and a stop at premiumhandcraftedhub reflected that same care, a rare thing on the open web these days where most pages exist for clicks rather than actual reader value or anything close to that which is honestly a real shame.
Thanks for not padding this with the usual filler intros and outros that every other blog seems to require, and a quick visit to firmessence continued that lean approach across more posts, content stripped of waste is content that respects you and I will always come back to that kind of approach.
Now wishing I had found this site sooner, and a look at peacelandworld extended that mild regret, the calculation of how many years of good content I missed by not finding the right sources earlier is one I try not to make too often but it does come up sometimes when I find sites this good.
нарколог выезд на дом [url=https://narkolog-na-dom-samara-9.ru]https://narkolog-na-dom-samara-9.ru[/url]
капельница от запоя в стационаре [url=https://vyvod-iz-zapoya-v-staczionare-nizhnij-novgorod-17.ru]https://vyvod-iz-zapoya-v-staczionare-nizhnij-novgorod-17.ru[/url]
капельница от запоя [url=https://kapelnicza-ot-pokhmelya-ekaterinburg-16.ru]капельница от запоя[/url]
Started believing the writer knew the topic deeply by about the second paragraph, and a look at softsummerfields reinforced that confidence, the speed at which a writer establishes credibility through their writing is a useful quality signal and this writer establishes it quickly and quietly without resorting to credential dropping or self promotion.
Quality you can feel from the first paragraph, the writer clearly knows the topic and how to share it, and a quick look at lakelake confirmed the same depth runs throughout the rest of the site as well which is rare and worth pointing out when it happens online for any reader passing through.
A piece that did not lean on the writer credentials or institutional backing, and a look at oakarena maintained the same focus on substance, content that earns trust through quality rather than through name dropping is the kind I find most persuasive and this site is clearly playing on the substance side of that distinction.
Came in skeptical of the angle and left mostly persuaded, and a stop at epicinlets pushed me a bit further in the same direction, content that can move a critical reader by argument rather than rhetoric is rare and worth pointing out because it indicates real substance underneath the surface presentation here.
Coming to this with low expectations and being pleasantly surprised by the substance, and a stop at grovequays continued exceeding expectations, the recalibration of expectations upward across multiple positive readings is one of the actual rewards of careful browsing and this site is providing that recalibration at a steady rate apparently.
вывести из запоя на дому [url=https://vyvod-iz-zapoya-na-domu-ekaterinburg-27.ru]вывести из запоя на дому[/url]
Probably the best thing I have read on this topic in the past month, and a stop at gemcoast extended that ranking, the casual ranking of recent reading is informal but real and this site has been winning those rankings for me on this topic specifically over the last several weeks of regular reading sessions.
Granted my mood today might be elevating my reading experience but I still think this is genuinely good, and a stop at tinacurrin reinforced that even discounted assessment, controlling for the mood adjustment that affects content perception this site still reads as substantively above average across multiple pieces I have read carefully today.
A genuine pleasure to find a site that publishes at a sustainable cadence rather than chasing the daily content treadmill, and a look at globalforestmart confirmed the careful publication rhythm, sites that prioritise quality over frequency are rare and this one has clearly chosen the slower pace which I appreciate as a reader.
Reading this prompted a brief but useful conversation with a colleague who happened to walk by, and a stop at etheraisle extended that conversational seed, content that becomes a starting point for in person discussion rather than ending in solitary reading is content with social generative energy and this site has plenty of it apparently.
The headings made navigating the post simple even when I needed to find a specific section quickly, and a look at everleafoutlet continued the same thoughtful structure, small details like clear headings show that someone is actually thinking about how the reader uses the page rather than just filling it for length alone.
выведение из запоя телефон [url=https://vyvod-iz-zapoya-na-domu-ekaterinburg-30.ru]выведение из запоя телефон[/url]
Главные новости: https://l-parfum.ru/brands/parfum-lipec/
Took a quick scan first and then went back to read properly because the post deserved it, and a stop at domemarinas kept me reading carefully too, the kind of writing that earns a slower second pass rather than getting skimmed and forgotten is something I value highly when I happen to find it.
Considered as a whole this site has developed a coherent point of view that comes through in individual pieces, and a look at theblackcrowesmobile continued displaying that coherence, sites with a unified perspective rather than a grab bag of takes are sites with editorial maturity and this one has clearly developed that maturity through years of work.
Honestly informative, the writer covers the ground without showing off, and a look at fondarbors reflected the same humility, content that respects the reader rather than trying to dazzle them is something I always appreciate and rarely come across in this corner of the internet today across the topics I usually read.
Solid value packed into a relatively short post, that takes skill, and a look at uniquevaluestore continues the dense useful content across more pages, this site clearly understands that respecting reader time is itself a form of generosity which is something most blog operations seem to have forgotten lately across the wider open web.
A genuine pleasure to find a site that publishes at a sustainable cadence rather than chasing the daily content treadmill, and a look at modernvalueclickfront confirmed the careful publication rhythm, sites that prioritise quality over frequency are rare and this one has clearly chosen the slower pace which I appreciate as a reader.
рулонные жалюзи с электроприводом [url=https://rulonnye-shtory-s-elektroprivodom190.ru]рулонные жалюзи с электроприводом[/url]
Decided to set a calendar reminder to revisit, and a stop at lakequill extended that revisit list, calendar entries for content are a level of commitment I rarely make but when I do they signal a higher regard than a simple bookmark and this site has earned that calendar tier of relationship from me today.
Appreciated that the writer trusted the reader to follow along without constant restating of earlier points, and a look at brightnorthboutique continued that respect for the reader, treating an audience as capable adults rather than as people to be hand held through every paragraph is something I notice and value highly across the open internet today.
выезд нарколога на дом москва [url=https://reabilitaciya-alkogolikov-moskva-1.ru]выезд нарколога на дом москва[/url]
прокапаться от алкоголя в самарае [url=https://kapelnicza-ot-pokhmelya-samara-32.ru]прокапаться от алкоголя в самарае[/url]
Glad the writer kept this short rather than padding it out, the points stand on their own without needing extra context, and a look at lcbclosure kept the same approach going, brevity is a sign of confidence in the substance and the team here clearly trusts their content to land without filler.
Quietly the post solved something I had been turning over without quite knowing how to phrase the question, and a look at softmountainmart extended that quiet solving, content that addresses unformulated needs is content with reader insight and this site has demonstrated that insight at a high rate across the pieces I have read recently.
Genuine reaction is that I will probably think about this on and off for a few days, and a look at draftlakes added fuel to that, the best content lingers in your head after you close the tab rather than evaporating immediately and this site clearly knows how to write that kind of memorable content.
Reading this confirmed that my time researching the topic in other places had not been wasted, and a stop at freshfindsmarket extended the confirmation, when independent sources agree that is a useful signal and this site is one of the more reliable sources I have found for cross checking what I read elsewhere on similar subjects.
Took a chance on the headline and was rewarded, and a stop at opaldune kept the rewards coming as I clicked through, the kind of place where every link leads somewhere worth the click is a small luxury on the modern web where so many sites are mostly empty calories disguised as content.
Came across this through a roundabout path and now it is on my regular rotation, and a stop at ethicalpremiumstore sealed that decision, the open web still produces serendipitous discoveries when you let the citations and references guide you rather than relying purely on algorithmic feeds for new content recommendations always.
Самое интересное: https://spainslov.ru/site/word/word/%D0%A3%D0%AF%D0%97%D0%92%D0%9B%D0%AF%D0%A2%D0%AC
Definitely returning here, that is decided, and a look at etherfair only made the case stronger, this is one of those rare websites that rewards regular visits rather than feeling stale after the first read which is something I cannot say about most of the places I bookmark today across all my topics.
Definitely returning here, that is decided, and a look at closingamericasjobgap only made the case stronger, this is one of those rare websites that rewards regular visits rather than feeling stale after the first read which is something I cannot say about most of the places I bookmark today across all my topics.
mostbet kifizetési opciók [url=https://www.mostbet26815.help]https://www.mostbet26815.help[/url]
мостбет версия для ios скачать [url=https://mostbet07541.help/]https://mostbet07541.help/[/url]
Skipped the related links section thinking I had read enough and then came back to it later when curiosity got the better of me, and a stop at irisarbors confirmed I should have just read it first, every section of this site appears to deserve careful attention rather than skipping past lazily.
поставить капельницу от запоя на дому [url=https://kapelnicza-ot-pokhmelya-voronezh-17.ru]поставить капельницу от запоя на дому[/url]
наркологическая клиника стационар [url=https://narkologicheskij-staczionar-sankt-peterburg-10.ru]наркологическая клиника стационар[/url]
Now thinking about whether the writer might publish a longer form work I would buy, and a look at wildtimbercollective suggested the same depth would translate, content that makes me want to pay for related work in other formats is content that has earned commercial trust as well as attention trust and this site has both clearly.
Now feeling the quiet pleasure of finding writing that takes itself seriously without being self serious, and a stop at thefrontroomchicago extended that subtle pleasure, the gap between earnest and pretentious is fine and this site has clearly chosen to land on the earnest side without slipping over into pretentious which is impressive.
выведение из запоя на дому цена [url=https://vyvod-iz-zapoya-na-domu-ekaterinburg-26.ru]выведение из запоя на дому цена[/url]
Came across this looking for something else entirely and ended up reading it through twice, and a look at isleparishs pulled me deeper into the site than I planned, the writing has a way of holding attention without resorting to manipulative cliffhangers or vague promises that never get delivered later down the page.
Really appreciate that the writer did not overstate the importance of the topic to make the post feel weightier, and a quick visit to larkcliff maintained the same modest framing, content that is honest about its own scope rather than inflating itself is the kind I trust and return to repeatedly over time.
Liked the careful word choice throughout, every term seemed picked for a reason rather than thrown in casually, and a stop at brighthavenstudio continued that precise style, this kind of attention to small details is what separates careful writing from the usual rushed content that dominates blog spaces today across pretty much every topic I follow.
Now noticing that the post benefited from being neither too short nor too long for its content, and a look at naturallycraftedgoodsmarket continued that calibration of length, sites that match length to content rather than padding to hit some target are sites that respect both their material and their readers and this site does both.
нарколога на дом [url=https://narkolog-na-dom-samara-10.ru]нарколога на дом[/url]
Felt like the writer was speaking directly to someone with my level of curiosity, neither talking down nor showing off, and a stop at driftfairs kept that comfortable matching going, finding writing that meets you where you are rather than asking you to climb up or stoop down feels great every time it happens.
The use of plain language without dumbing down the topic was really well done, and a look at portmills continued in that same accessible style, this is something many technical writers fail at because they either confuse their readers or condescend to them but here neither problem appears at all which is impressive really.
Picked up something useful for a side project, and a look at lacecabins added another piece I will incorporate, content that connects to specific projects I am working on is content with practical utility and the practical utility of this site is showing up across multiple posts I have read in the last hour or so.
Genuinely glad I clicked through to read this rather than skipping past, and a stop at etherledge confirmed I should keep clicking through to more pages here, the kind of resource that justifies its place in my browser history rather than feeling like wasted time which is the highest compliment I offer any site online today.
Solid stuff, the kind of post that I will probably refer back to later this month when the topic comes up again, and a look at ct2020highschoolgrads only confirmed I should bookmark the site as a whole rather than just this single page for future reference and use across coming weeks.
Reading this confirmed that my time researching the topic in other places had not been wasted, and a stop at pacecabin extended the confirmation, when independent sources agree that is a useful signal and this site is one of the more reliable sources I have found for cross checking what I read elsewhere on similar subjects.
If the topic interests you at all this is a place to spend time, and a look at robinshuteracing reinforced that recommendation, the broader question of where to invest topical reading time is one this site answers convincingly through the consistent quality across multiple pieces I have sampled during the current reading session today.
Just dropping by to say thanks for the effort, it does not go unnoticed when a writer cares this much about the reader, and after I went through oscarthegaydog I was certain this is one of the better corners of the internet for this particular kind of content which is genuinely refreshing.
Found this useful, the points line up well with what I have been thinking about lately, and a stop at leafdawn added some angles I had not considered yet, definitely walking away with more than I came for which is the best outcome from time spent reading online for any kind of topic.
выезд на дом нарколога [url=https://narkolog-na-dom-samara-9.ru]https://narkolog-na-dom-samara-9.ru[/url]
вывод из запоя в стационаре в нижнем новгороде [url=https://vyvod-iz-zapoya-v-staczionare-nizhnij-novgorod-17.ru]https://vyvod-iz-zapoya-v-staczionare-nizhnij-novgorod-17.ru[/url]
капельница от алкоголя [url=https://kapelnicza-ot-pokhmelya-ekaterinburg-16.ru]капельница от алкоголя[/url]
Comfortable in tone and substantive in content, that is a hard combination to land, and a look at evermeadowgoods kept that pairing alive across more material, this is what good editorial direction looks like in practice and the team here clearly has someone keeping a steady hand on the wheel across what they decide to publish.
Текущие рекомендации: https://amaliya-parfum.ru/index.php?manufacturers_id=395
Will be coming back to this for sure, too much good content to absorb in one sitting, and a stop at firminlets only added more pages I want to dig through, this site is going onto my regular rotation list because it consistently delivers something worth the visit lately rather than empty filler.
Really thankful for posts that respect a reader’s time, this one does, and a quick look at moonfallboutique was the same, no need to scroll through endless intros just to get to the actual content, that approach alone is enough reason to come back here regularly for the kind of writing offered.
Felt like I was reading something written by someone who actually thinks about the topic rather than reciting it, and a look at premiumethicalgoods reinforced that impression, the difference between recited content and considered content is huge and this site clearly belongs to the latter category which I appreciate as a careful reader looking for substance.
Started reading and ended an hour later without realising the time had passed, and a look at pacecabins produced the same time dilation effect, when content makes time feel different the writer has achieved something well beyond the average and this site is producing that experience for me reliably across multiple readings.
On reflection this is the kind of writing that improves my taste for what is possible in the format, and a look at freshcollectionhub continued raising that bar, content that elevates my expectations rather than lowering them is doing important work in calibrating my standards and this site is participating in that elevation reliably.
Now feeling the rare pleasure of trusting a source completely on first encounter, and a look at hazemills extended that initial trust into something more durable, the calibration of trust to evidence is something I do informally and this site has earned high trust through the cumulative weight of multiple consistently good posts already.
рулонные шторы каталог цены [url=https://rulonnye-shtory-s-elektroprivodom190.ru]https://rulonnye-shtory-s-elektroprivodom190.ru[/url]
Started this morning and finished at lunch with a small sense of having spent the time well, and a look at everattic extended that satisfaction into the afternoon, content that fits naturally into the rhythm of a working day rather than demanding a dedicated reading block is increasingly the kind I prefer.
Strong recommendation from me, anyone curious about the topic should make time for this, and a look at thedemocracyroadshow only sharpens that recommendation further, the kind of resource that holds up against careful scrutiny rather than crumbling at the first critical question is rare and worth pointing other people toward when the topic comes up.
Официальный сайт BlackSprut
bs2web at
Granted I am giving this site more credit than I usually give new finds, and a look at circularatscale continued earning that credit, the calibration of how much trust to extend after limited exposure is something I do carefully and this site has earned more trust on shorter exposure than most due to consistent quality across.
вывожу из запоя екатеринбург [url=https://vyvod-iz-zapoya-na-domu-ekaterinburg-30.ru]вывожу из запоя екатеринбург[/url]
Reading this gave me a small refresher on something I had partially forgotten, and a stop at pactcliff extended the refresher, content that strengthens existing knowledge rather than just adding new is content with a particular kind of consolidating value and this site is providing that consolidating function across multiple visits.
вывод из запоя цены екатеринбург [url=https://vyvod-iz-zapoya-na-domu-ekaterinburg-27.ru]вывод из запоя цены екатеринбург[/url]
нарколог стационар [url=https://narkologicheskij-staczionar-sankt-peterburg-10.ru]нарколог стационар[/url]
Better signal to noise ratio than most places I check on this kind of topic, and a look at lobbydawn kept that going, every paragraph here carries something worth reading rather than padding out the page to hit some arbitrary length target that search engines reward but readers ignore as soon as they notice it.
Мы предлагаем услуги по оформлению официальных документов с последующим апостилем при необходимости https://langwee-rus.com/spravka-s-raboty/
A thoughtful piece that did not strain to be thoughtful, and a look at sunsetwoodstudio continued that effortless quality, when thinking shows up in writing without the writer drawing attention to it you know you are reading something genuinely considered rather than something performing the appearance of consideration which is also common online.
Appreciated the way each section connected smoothly to the next without abrupt jumps, and a stop at oasismeadow kept that flow going nicely, transitions are something most blog writers ignore but the difference is huge for the reader who is trying to follow a sustained line of thought today across many different topics.
нужен нарколог на дом [url=https://reabilitaciya-alkogolikov-moskva-1.ru]нужен нарколог на дом[/url]
Reading this with a fresh mind in the morning brought out details I might have missed in the afternoon, and a stop at mintdawns earned the same fresh attention, content that rewards being read at full attention rather than at energy lows is content with real density and this site has that density consistently.
прокапать от алкоголя самара [url=https://kapelnicza-ot-pokhmelya-samara-32.ru]прокапать от алкоголя самара[/url]
The clarity here is something I really appreciate, especially compared to sites that pile on jargon for no reason, and a look at lakelakes was the same, simple direct sentences that actually deliver information instead of dancing around the point for paragraphs at a time which wastes reader patience.
Really liked the calm tone running through the post, no shouting and no urgency forced into the writing, and a look at edenfairs kept that quiet confidence going, the kind of voice that makes the reader feel respected rather than yelled at which is depressingly common across most modern blog content these days.
Took the time to read every paragraph rather than skimming for the punchline, and a quick visit to globebeats earned the same careful attention from me, that is the highest signal I can give about content quality because my default mode is rapid scanning rather than deliberate reading on most pages.
Онлайн-сервис оценки недвижимости https://shalmach.pro по фотографиям для покупки, аренды и планирования ремонта. Узнайте ориентировочную стоимость жилья, возможные вложения и рекомендации перед принятием решения.
Easily one of the better explanations I have read on the topic, and a stop at charitiespt pushed it even higher in my mental ranking of useful resources, the kind of site that beats the average not by trying harder but by simply caring more about what it puts out daily which always shows.
прокапаться от алкоголя цены [url=https://kapelnicza-ot-pokhmelya-voronezh-17.ru]прокапаться от алкоголя цены[/url]
Now feeling slightly more optimistic about the state of independent writing online, and a stop at ethicaleverydaystyle extended that quiet optimism, sites like this one are the reason I have not given up on the open web entirely and finding them occasionally renews the case for paying attention to non algorithmic content sources today.
Thanks for the moderate length, neither so short it skips substance nor so long it bloats, and a stop at globebeat hit the same balance, the right length is one of the hardest things to calibrate in blog writing and I appreciate when a team has clearly thought about it rather than defaulting.
электрокарнизы [url=https://elektrokarniz150.ru]https://elektrokarniz150.ru[/url]
Наша компания занимается подготовкой различных справок и помогает оперативно получить нужные документы https://mc-spravki.site/medicinskaya-spravka-dlya-raboty-na-krajnem-severe/
Reading this in the gap between work projects was a small but meaningful break, and a stop at jadenurrea extended that gentle reset, content that provides genuine refreshment rather than just distraction during work breaks is content with a particular kind of utility and this site fits that role for me reliably during work days.
выведение из запоя цена [url=https://vyvod-iz-zapoya-na-domu-ekaterinburg-26.ru]выведение из запоя цена[/url]
I really like the calm tone here, it does not push anything on the reader, and after I went through loopbough I felt the same way, just steady useful content laid out without drama, which is exactly what someone trying to learn something quickly needs to find rather than aggressive marketing.
Honestly the simplicity of the explanation made the topic click for me in a way other writeups had not, and a look at palmcodex continued that clarity into related areas, when a writer gets the level of explanation right the reader does the heavy lifting themselves and the post just enables it.
I really like how the writer keeps the tone friendly without sounding fake or overly polished, and after a stop at brightgrovehub the same calm pace was there, no rushing to make a point and no padding either, just clean honest writing that I can respect and come back to later again.
Genuinely good work, the kind that holds up over multiple readings without losing its appeal, and a stop at newgroveessentials kept that going, definitely a site I will be returning to and probably mentioning to others who work in or care about this particular area of interest today and in coming weeks.
нарколог частный [url=https://narkolog-na-dom-samara-10.ru]https://narkolog-na-dom-samara-10.ru[/url]
Started smiling at one paragraph because the writing was just nice, and a look at boneclog produced a couple more such moments, prose that produces small spontaneous reactions in the reader is doing more than just transferring information and the writers here are clearly hitting that level fairly consistently throughout pieces.
Honestly the simplicity of the explanation made the topic click for me in a way other writeups had not, and a look at larkcliffs continued that clarity into related areas, when a writer gets the level of explanation right the reader does the heavy lifting themselves and the post just enables it.
Worth every minute of the time spent reading, and a stop at findyourbestself extends that value across more pages, in a media environment where most content is engineered to waste attention this site stands out by treating reader time as something valuable rather than something to be exploited and stretched as far as possible.
Worth bookmarking and sharing with anyone interested in the topic, that is my honest take, and a stop at edgecradles reinforces that, the kind of generous resource that makes the open web feel worth defending against the constant pressure to retreat into walled gardens and curated feeds today everywhere I look across all my devices.
Liked the way the post balanced confidence and humility, and a stop at gemcoasts maintained the same balance, knowing when to assert and when to acknowledge uncertainty is a sign of mature thinking and the writers here have clearly developed that calibration through what I assume is years of careful work on their craft.
Thanks for a post that does not try to be funny when it is not the moment for it, and a stop at modernartisanmarketplace maintained the same appropriate seriousness, knowing when humour helps and when it just signals desperation for engagement is a sign of editorial maturity that many blogs have not developed yet.
Felt the post had been quietly polished rather than aggressively styled, and a look at vuabat confirmed the same understated polish, sites whose quality reveals itself slowly rather than announcing itself loudly are the kind I trust more deeply because the trust is not based on first impressions of marketing but actual substance.
Came back to this an hour later to reread a specific section, and a quick visit to oceanhaven also drew a second look, content that pulls you back rather than letting you move on permanently is the kind I want to fill my browser bookmarks with in 2026 and beyond as the open internet evolves.
Really thankful for posts that respect a reader’s time, this one does, and a quick look at lunacourt was the same, no need to scroll through endless intros just to get to the actual content, that approach alone is enough reason to come back here regularly for the kind of writing offered.
наркологические стационары [url=https://narkologicheskij-staczionar-sankt-peterburg-11.ru]наркологические стационары[/url]
Reading this slowly and letting each paragraph land before moving on, and a stop at homecovidtest earned the same patient approach, content that rewards slow reading rather than speed is content with real density and the writers here are clearly producing work that benefits from the careful eye rather than the rushed scan.
вывод из запоя стационар [url=https://vyvod-iz-zapoya-v-staczionare-nizhnij-novgorod-17.ru]вывод из запоя стационар[/url]
Reading this gave me a small sense of progress on a topic I have been slowly working through, and a stop at neatdawns added another step forward, learning happens in small increments across many sources and finding sources that consistently contribute is the actual practical value of careful curation in an information rich world.
Came away with a slightly better mental model of the topic than I started with, and a stop at palminlet sharpened that further, content that improves the reader thinking apparatus rather than just dumping facts into it is the rare kind I genuinely value and seek out when I have time to read carefully.
Really appreciate that the writer did not overstate the importance of the topic to make the post feel weightier, and a quick visit to duetcoasts maintained the same modest framing, content that is honest about its own scope rather than inflating itself is the kind I trust and return to repeatedly over time.
Came in skeptical and left mostly convinced, that is the highest praise I can offer, and a look at deanclip pushed me further in the same direction, content that survives a critical first read is rare and worth recognising because most blog posts crumble under any real scrutiny these days when you actually pay attention closely.
служба вывода из запоя [url=https://vyvod-iz-zapoya-na-domu-ekaterinburg-30.ru]служба вывода из запоя[/url]
Found the section structure particularly thoughtful, and a stop at goldmanors suggested the same care across the broader site, structural choices guide the reader through the material in ways most people do not consciously notice but feel the absence of when those choices are made carelessly or not at all.
капельницы от запоя на дому самара [url=https://kapelnicza-ot-pokhmelya-samara-32.ru]капельницы от запоя на дому самара[/url]
Just want to flag that this was useful and not bury the appreciation in caveats, and a look at moderninspiredgoods earned the same direct praise, recognising good work without hedging it with criticism is something I try to practice because over qualified compliments tend to read as backhanded and miss the point sometimes.
нарколог на дом вывод из запоя на дому [url=https://vyvod-iz-zapoya-na-domu-ekaterinburg-27.ru]нарколог на дом вывод из запоя на дому[/url]
Glad to find something on this topic that does not start with three paragraphs of throat clearing before getting to the point, and a stop at suzgilliessmith also dives right in, respect for the readers time shows up in small editorial choices like this and they add up to a real difference quickly.
Now placing this in the small category of sites whose updates I would actually want to know about, and a stop at ablebonus confirmed that placement, the difference between sites I want to follow and sites I just consume from is real and this one has crossed into the active follow category from the casual consumption side.
Reading this prompted a small redirection in something I was working on, and a stop at meritquay extended that redirecting influence, content that affects my actual work rather than just my thinking has the highest practical impact and this site is providing that level of influence for me at a sustainable rate apparently.
Reading this triggered a small but real correction in something I had assumed, and a stop at bauxable extended that corrective effect, content that updates my beliefs through evidence rather than rhetoric is content with intellectual integrity and this site has earned that label consistently across the pieces I have read so far today.
Taking the time to read carefully here has been worthwhile for the past hour, and a look at astrebee extended the worthwhile reading, the calculation of return on reading time spent is something I do informally and this site has been producing positive returns across multiple sessions during the last week of regular visits and reads.
Looking back on this reading session it stands as one of the better ones recently, and a look at palminlets extended that ranking, the informal ranking of reading sessions against each other is something I do mentally and this session ranks high largely because of this site and a couple of related pages here.
Now considering writing a longer note about the post somewhere, and a look at bookbulb added more material for that note, content that prompts me to write rather than just consume is content with generative energy and this site is producing that generative effect for me at a higher rate than most sources.
Now planning a longer reading session for the archives, and a stop at conexbuilt confirmed the archives are worth that longer commitment, sites with archives I want to read deliberately rather than just sample are rare and this one has clearly earned that level of interest based on the consistency of what I have already read.
Honestly impressed by the consistency of voice across what I have read so far, and a quick visit to crustcocoa continued that consistent feel, when a site reads like one careful person rather than a committee the experience is more rewarding for the reader who notices these subtle editorial details over time.
Definitely a recommend from me, anyone curious about the topic should check this out, and a look at buffbaron adds even more reason for that, the depth and quality combine to make this site one I will be pointing people toward whenever similar conversations come up over the months ahead at work or socially.
100cuci alternatif [url=100cuci-9.com]100cuci alternatif[/url]
Reading carefully here has reminded me what reading carefully feels like, and a look at clockcard extended that reminder, the experience of careful reading versus skimming is different in ways I had partially forgotten and this site has clearly refreshed my memory of what attention feels like when content rewards it consistently.
Liked how the post handled an objection I was forming as I read, and a stop at tallpineemporium similarly anticipated where my thinking was going next, the rare writer who can predict reader concerns and address them in advance is doing something most online content fails to do despite that being basic editorial work.
выезд нарколога на дом [url=https://reabilitaciya-alkogolikov-moskva-1.ru]выезд нарколога на дом[/url]
Adding to the bookmarks now before I forget, that is how good this is, and a look at chordaria confirmed the rest of the site is worth saving too, this is one of those rare finds that justifies the time spent searching the web for once which is a relief in the current environment.
Walked away with a clearer head than I had before reading this, and a quick visit to palmmill only sharpened that, the writing has a way of cutting through the noise that surrounds most topics online which is something I will definitely remember the next time I am searching for an answer to anything.
поставить капельницу на дому цена екатеринбург [url=https://kapelnicza-ot-pokhmelya-ekaterinburg-16.ru]поставить капельницу на дому цена екатеринбург[/url]
Found the section structure particularly thoughtful, and a stop at opaldunes suggested the same care across the broader site, structural choices guide the reader through the material in ways most people do not consciously notice but feel the absence of when those choices are made carelessly or not at all.
Glad I stumbled across this post, the explanations actually make sense without needing background knowledge to follow along, and after a stop at findnewhorizons the same was true there, no assumptions about the reader just clear writing that anyone can understand from the first line right through to the end.
карниз с приводом [url=https://elektrokarniz150.ru]https://elektrokarniz150.ru[/url]
прокапать после тяжелого похмелья телефон воронеж [url=https://kapelnicza-ot-pokhmelya-voronezh-18.ru]прокапать после тяжелого похмелья телефон воронеж[/url]
Decided after reading this that I would check this site weekly going forward, and a stop at opaldune reinforced that commitment, deciding to add a site to a regular rotation requires meeting a quality bar that very few places clear and this one cleared it cleanly without any noticeable effort or marketing push behind it.
лучше новинки кино онлайн смотреть кино онлайн бесплатно
However casually I came to this site I have ended up reading carefully, and a look at deepchord continued earning that careful reading, the conversion from casual visitor to careful reader is something content earns rather than demands and this site has accomplished that conversion for me over the course of just a few pieces.
Just dropping by to say thanks for the effort, it does not go unnoticed when a writer cares this much about the reader, and after I went through fayettecountydrt I was certain this is one of the better corners of the internet for this particular kind of content which is genuinely refreshing.
нарколог на дом вывод из запоя на дому [url=https://vyvod-iz-zapoya-na-domu-ekaterinburg-26.ru]нарколог на дом вывод из запоя на дому[/url]
Reading this gave me a small refresher on something I had partially forgotten, and a stop at aeonbrawn extended the refresher, content that strengthens existing knowledge rather than just adding new is content with a particular kind of consolidating value and this site is providing that consolidating function across multiple visits.
Picked up a couple of new ideas here that I can actually try out, and after my visit to bauxable I have even more notes saved, this is the kind of resource that pays you back for the time you spend on it which is rare to come across in this corner of the web.
Worth recommending broadly to anyone who reads on the topic, and a look at micapact only confirms that, the rare combination of accessibility and depth in this site makes it suitable for both newcomers and people who already know the area which is hard to pull off in any blog format today and rarely managed.
Solid information that lines up with what I have been hearing from other reliable sources, and after my visit to northdawns I was even more certain of that, this site checks out which is something I value highly when so many places online play loose with the facts to chase a quick click.
Felt no urge to argue with the conclusions even though I started the post slightly skeptical, and a look at grant-jt maintained that pattern, writing that earns agreement through clarity of argument rather than rhetorical pressure is the kind I find most persuasive and the kind I want to read more of these days.
Felt like the writer was speaking directly to someone with my level of curiosity, neither talking down nor showing off, and a stop at cotboil kept that comfortable matching going, finding writing that meets you where you are rather than asking you to climb up or stoop down feels great every time it happens.
Speaking from the perspective of having read widely on the topic this site offers something distinct, and a look at cryptbeach reinforced that distinctness, the rare site that contributes something genuinely original to a saturated topic is the rare site worth following carefully and this one has demonstrated that original contribution capability today.
Recommend this to anyone who values clear thinking over flashy presentation, and a stop at refinedcommerceplatform continued in the same understated way, this site has its priorities in the right place which makes it worth supporting through repeat visits and recommendations rather than just one passing read today before moving on quickly elsewhere.
Decided to read this site for a while before forming a verdict, and the verdict after several pages is positive, and a stop at dazzquays continued that pattern, judging a site requires more than one post and giving sites a fair sample is something I try to do for promising candidates rather than rushing to dismiss.
Appreciated that the writer trusted the reader to follow along without constant restating of earlier points, and a look at astrebee continued that respect for the reader, treating an audience as capable adults rather than as people to be hand held through every paragraph is something I notice and value highly across the open internet today.
A small thing but the line spacing and font choices made reading this physically pleasant, and a look at buffbey maintained the same careful design, technical choices about typography are part of what makes online reading actually comfortable and this site has clearly invested in the design layer alongside the content layer carefully.
Closed the tab feeling I had spent the time well, and a stop at irisbureaus extended that feeling across more pages, the test of whether time on a site was well spent is one I apply silently after closing tabs and very few sites pass it but this one passed it cleanly today afternoon clearly.
Worth saying that the writing carries a particular kind of authority without making any explicit claims to it, and a stop at boneclog extended that earned authority feeling, sites that demonstrate expertise through the quality of their explanations rather than by stating credentials are sites I trust most and this site has it.
real estate for sale in thailand phuket [url=https://real-estate-for-sale-in-phuket-2.com]real estate for sale in thailand phuket[/url]
A genuine compliment to the writer for keeping the post focused on what mattered, and a look at cocoaborn continued that disciplined focus, focus is a editorial choice that compounds across many small decisions and this site has clearly made those small decisions consistently across what I have read so far this week here.
Worth pointing out the careful word choice in this post, no buzzwords and no jargon, and a look at edendomes continued that disciplined vocabulary, sites that resist the pull of trendy language are sites that will read well in five years and this one is clearly built for that kind of long durability.
Now understanding why someone recommended this site to me a while back, and a stop at portguild explained the recommendation, sometimes recommendations make sense only after experience and this site has finally clicked into place as the kind of resource I now understand was being recommended for sound editorial reasons by my friend.
Now wishing more sites covered topics with this level of care, and a look at defcoast extended that wish across more subjects, the rarity of careful coverage on most topics is a problem and this site is one of the small antidotes to that broader pattern of casual or surface treatment of complex subjects.
Worth saying this site reads better than most paid newsletters I have tried, and a stop at aeoncraft confirmed that comparison, the bar for free content is often lower than for paid but this site clears the paid bar consistently and that says something about the editorial approach behind the work being published here regularly.
A memorable post for me on a topic I had thought I was tired of, and a look at bauxauras suggested the same site can refresh other tired topics, sites that can revive my interest in subjects I had written off as exhausted are doing rare work and this one is clearly doing that for me today.
Glad I gave this fifteen minutes rather than the usual three minute skim, and a look at globehavens earned the same investment, time spent on quality content is rarely wasted but the reverse is also true and learning which sites deserve which kind of attention is part of being a careful online reader.
Worth pointing out that the post avoided the temptation to summarise everything at the end, and a look at cotchoice continued that confident closing approach, content that trusts readers to retain the substance without being reminded of it at the end is content that respects the reader and this site practices that respect.
Reading this in pieces during a long afternoon and finding it consistently rewarding, and a stop at cryptbuilt fit naturally into the same fragmented reading pattern, sites whose posts can be read in segments without losing the thread are well suited to how I actually read these days and this one is built well.
Picked up a couple of new ideas here that I can actually try out, and after my visit to thespeakeasybuffalo I have even more notes saved, this is the kind of resource that pays you back for the time you spend on it which is rare to come across in this corner of the web.
Speaking from the perspective of having read widely on the topic this site offers something distinct, and a look at suncrestcrafthouse reinforced that distinctness, the rare site that contributes something genuinely original to a saturated topic is the rare site worth following carefully and this one has demonstrated that original contribution capability today.
Adding this site to my regular reading list, the post earned that on its own, and a quick stop at chordaria sealed the decision, the kind of place worth checking back with from time to time because it consistently produces material that holds up against a critical reading too which I really value.
запой стационар [url=https://vyvod-iz-zapoya-v-staczionare-nizhnij-novgorod-17.ru]https://vyvod-iz-zapoya-v-staczionare-nizhnij-novgorod-17.ru[/url]
Honest reaction is that this is the kind of writing I would defend in a conversation about good blog content, and a look at intentionalhomeandstyle reinforced that, the rare site whose work I would actively recommend rather than just tolerate is the kind I want to support through return visits regularly.
Pass this along to colleagues if the topic comes up, the framing here is sensible, and a stop at burlauras adds more useful angles to share, the kind of content that improves conversations rather than just feeding them is what makes a resource genuinely valuable in professional contexts going forward over time and across project boundaries too.
рыбная ферма под ключ цена
Refreshing to read something where the words actually mean something instead of filling space, and a stop at astrebeige kept that going, the writing here trusts the reader to follow along without endless repetition or constant reminders of what was already said earlier in the post which I appreciate.
Reading this slowly in the morning before opening email, and a stop at etherfairs extended that protected attention, content that earns the prime morning reading slot before the daily distractions begin is content with elevated status and this site has earned that prime slot consistently in my recent reading habits clearly.
I really like the calm tone here, it does not push anything on the reader, and after I went through choice-eats I felt the same way, just steady useful content laid out without drama, which is exactly what someone trying to learn something quickly needs to find rather than aggressive marketing.
Reading this between two meetings turned out to be the highlight of the morning, and a stop at pacecabin continued that highlight quality, content that outshines the structured parts of a working day is doing something well beyond ordinary and this site has produced multiple such highlights for me already this week alone.
Thanks for the clean writing, no broken sentences and no awkward translations like some other sites have, and a quick stop at bookbulb kept that polish going nicely, it really does make a difference when a reader can move through a page without tripping on every line or going back to reread.
Worth marking the moment when reading this clicked into something useful for my own work, and a look at findhappinessdaily extended that practical click, content that connects to my actual life rather than just being interesting is content with the highest kind of value and this site is generating that connection at a high rate.
Thank you for the genuine effort here, it shows in every paragraph and not just the headline, and after my visit to jetdomes I was sure this site cares about getting things right rather than chasing clicks, which is the main reason I will come back later this week to read more.
алкогольные капельницы [url=https://kapelnicza-ot-pokhmelya-samara-32.ru]алкогольные капельницы[/url]
Came across this and immediately thought of a friend who would enjoy it, and a stop at aerobound also reminded me of someone, content that triggers the urge to share is content that has earned my recommendation and this site has earned multiple from me already across different conversations during the week.
Огромная коллекция русских сериалов всех жанров: захватывающие детективы, искренние мелодрамы, исторические драмы и зажигательные комедии. Любимые актёры, узнаваемые истории и тёплая атмосфера. Без подписки и регистрации – просто включай и наслаждайся: русские молодежные сериалы
However measured this site clears the bar I set for sites I take seriously, and a stop at dewcarve continued clearing that bar, the metrics I use for site quality are admittedly informal but they are consistent and this site has cleared them on multiple measurements across multiple visits which is meaningful for my evaluation.
My professional context would benefit from having this kind of resource available, and a look at bauxbee extended the professional applicability, the rare site that contributes meaningfully to professional work rather than just personal interest is content with multiplied value and this one is providing that professional utility consistently across multiple pieces.
Came across this and immediately thought of a friend who would enjoy it, and a stop at portmill also reminded me of someone, content that triggers the urge to share is content that has earned my recommendation and this site has earned multiple from me already across different conversations during the week.
A slim post with substantial content per word, and a look at curiopacts maintained the same density, the content per word ratio is something I track informally and this site scores high on that ratio compared to most sources I read regularly which is a quiet indicator of careful editorial work behind the scenes.
вывод из запоя вызов на дом [url=https://vyvod-iz-zapoya-na-domu-ekaterinburg-30.ru]вывод из запоя вызов на дом[/url]
Going to share this with a friend who has been asking the same questions for a while now, and a stop at coilbliss added a few more pages I will pass along too, this is the kind of generous information that earns a small thank you from me right now and again later this week.
Decided to read more before commenting and the more I read the more I wanted to say something, and a stop at cotcircle pushed that impulse further, when content provokes the urge to participate rather than just consume it is doing something quite specific and worth recognising clearly when it happens during reading.
Really appreciate the confidence to make a clear point rather than hedging everything, and a quick visit to cubeasana maintained the same direct stance, writing that takes positions rather than equivocating is more useful even when the positions are debatable because at least the reader has something to react to clearly.
вывести из запоя екатеринбург [url=https://vyvod-iz-zapoya-na-domu-ekaterinburg-27.ru]вывести из запоя екатеринбург[/url]
After several visits I am now confident this site is one to follow seriously, and a stop at draftlogs reinforced that confidence, the gradual building of trust through repeated quality exposures is the only sustainable way to develop reader loyalty and this site is building that loyalty in me through patient consistent work consistently.
100cuci register [url=http://100cuci-9.com]100cuci register[/url]
Reading this slowly to absorb the structure, and the structure is doing real work alongside the words, and a look at 1091m2love maintained the same architectural quality, when sentence shapes and paragraph rhythms reinforce the meaning rather than just transporting words you know you are reading skilled work today.
вызов нарколога на дом цена [url=https://reabilitaciya-alkogolikov-moskva-1.ru]вызов нарколога на дом цена[/url]
Glad to have another reliable bookmark for this topic, and a look at burlclip suggested several more pages I will be marking too, building a personal library of trustworthy resources is one of the actual rewards of careful browsing and this site is earning a place on my permanent shortlist for the topic.
Now setting up a small reminder to revisit the site on a slow day, and a stop at premiumglobalessentials confirmed the reminder was a good idea, planning return visits is a small organisational act that signals trust in ongoing quality and this site has earned that planned return through consistent performance across the pieces I have read so far.
Thanks for the readable length, I finished it without checking how much was left, and a stop at astrebulb kept me reading the same way, when I stop noticing the length of a piece because the content is engaging enough to sustain attention without willpower the writer has done their job well today.
электрические гардины [url=https://elektrokarniz150.ru]https://elektrokarniz150.ru[/url]
Felt the post had been quietly polished rather than aggressively styled, and a look at apexhelms confirmed the same understated polish, sites whose quality reveals itself slowly rather than announcing itself loudly are the kind I trust more deeply because the trust is not based on first impressions of marketing but actual substance.
Now adjusting my mental list of reliable sites for this topic, and a stop at palmmills reinforced the adjustment, the small ongoing curation work of maintaining trusted sources is one of the actual practical activities of careful reading and this site has earned a permanent place on my list for this particular subject.
Now planning to write about the topic myself eventually using this post as a reference, and a look at airycargo would also serve in that future piece, content that becomes raw material for my own writing rather than just informing my reading is content with multiplicative value and this site is generating that multiplicative effect.
Felt slightly impressed without being able to point to one specific reason, and a look at bookcliff continued that diffuse positive feeling, when content works at a level you cannot easily articulate the writer is doing something with craft rather than just delivering information and that is something I have learned to recognise.
наркологическая клиника стационар [url=https://narkologicheskij-staczionar-sankt-peterburg-11.ru]наркологическая клиника стационар[/url]
прокапаться на дому от алкоголя цена [url=https://kapelnicza-ot-pokhmelya-voronezh-18.ru]прокапаться на дому от алкоголя цена[/url]
If I had to summarise the editorial sensibility of this site in a few words it would be careful and human, and a look at dewchase extended that summary feeling, capturing the essence of a sites approach in brief is hard but this site has a clear enough identity that the summary comes naturally enough.
A piece that respected the reader by not over explaining the obvious, and a look at bauxcircle continued that calibrated approach, finding the right level of explanation is one of the harder editorial calls and this site has clearly thought carefully about what readers will already know versus what they need help with consistently.
A piece that ended with a clean landing rather than fading out, and a look at frostcoasts maintained the same crisp conclusions, endings that resolve rather than dissolve are a sign of careful structural thinking and this site has clearly invested in how its pieces conclude rather than letting them simply run out of energy.
вывод из запоя недорого [url=https://vyvod-iz-zapoya-na-domu-ekaterinburg-26.ru]вывод из запоя недорого[/url]
поставить капельницу на дому цена екатеринбург [url=https://kapelnicza-ot-pokhmelya-ekaterinburg-16.ru]поставить капельницу на дому цена екатеринбург[/url]
Going to come back when I have more time to read carefully, the post deserves more than a quick scan, and a stop at harryandeddies reinforced that, this is the kind of site that rewards a slower read which is hard to find in this fast paced corner of the internet but really worthwhile.
Generally I find the content on similar topics frustrating in specific ways and this post avoided all of them, and a look at cultbotany continued that frustration free experience, content that sidesteps the standard failure modes of its genre is content with editorial awareness and this site has clearly studied what fails elsewhere consistently.
Picked something concrete from the post that I will use immediately, and a look at cotcloud added another concrete piece, content that produces immediately useful output rather than just abstract appreciation is content that earns its place in my regular rotation without needing any further evaluation from me at this point honestly.
Now considering carefully how to share this site with the right audience rather than broadcasting widely, and a look at chordbase extended that careful sharing impulse, content worth sharing carefully rather than spamming is content that has earned a higher kind of recommendation and this site has earned that careful shareability throughout pieces.
Decided to write a short note to the author if there is contact info anywhere, and a stop at pactcliff extended that intention, the urge to thank the writer directly is a strong signal of content quality and this site has triggered that urge in me today which is a fairly rare event for my reading.
Well crafted post, the structure flows naturally from one point to the next without forcing transitions, and a stop at portolive kept the same flow going, you can tell when a writer has thought about how their content reads rather than just what it contains and this is one of those examples.
Bookmark added with a small note about why, and a look at goldenbranchmart prompted another bookmark with another note, the bookmarks I annotate are the ones I expect to return to deliberately rather than stumble into and this site is generating annotated bookmarks at a higher rate than my usual content sources by some margin.
Liked that the post landed without needing to manufacture controversy or take a contrarian stance for attention, and a stop at coilbyrd continued that grounded approach, content that earns attention through quality rather than provocation is the kind that builds long term trust rather than burning it on quick wins.
Now feeling confident enough in this site to use it as a reference point for evaluating others on the same topic, and a look at berrybombselfiespot continued the comparison friendly quality, sites that serve as quality benchmarks for their topic are precious and this one has clearly become a benchmark for me on this particular subject area.
Coming back to this one, definitely, and a quick visit to byrdbrig only made me more sure of that, the kind of writing that makes you want to set aside time later rather than rushing through it now while distracted by everything else competing for attention on the screen today across so many tabs.
This stands out compared to similar posts I have read recently, less noise and more substance, and a look at refinedlifestylecommerce kept that gap going, you can really feel the difference between content made by someone who cares versus content made to fill a publishing schedule for an algorithm trying to keep growing somehow.
property for sale in phuket [url=https://real-estate-for-sale-in-phuket-2.com]property for sale in phuket[/url]
Worth saying that the prose reads naturally without straining for style, and a stop at amidbrawn maintained the same unforced quality, writing that achieves elegance without effort is the highest tier and this site has clearly worked out how to land that effortless quality consistently rather than only on the writers best days.
Quality work here, the post reads cleanly and the points stay focused throughout, and a stop at findamazingoffers kept the standard high, you can tell the writer cares about the final result rather than just hitting publish for the sake of having something new on the page to feed the search engines.
This filled in a gap in my understanding that I had not even noticed was there, and a stop at astrebull did the same, the kind of post that gives you more than you expected when you first clicked through from somewhere else, a real find for anyone curious about the area covered here.
A genuine pleasure to find a site that publishes at a sustainable cadence rather than chasing the daily content treadmill, and a look at domelegends confirmed the careful publication rhythm, sites that prioritise quality over frequency are rare and this one has clearly chosen the slower pace which I appreciate as a reader.
Well done, the kind of post that makes you slow down and actually read instead of skimming for keywords, and a look at bauxclay kept me reading carefully too, that is a sign of writing that has been crafted rather than churned out for an algorithm to see today and tomorrow.
Honestly the simplicity of the explanation made the topic click for me in a way other writeups had not, and a look at clippoises continued that clarity into related areas, when a writer gets the level of explanation right the reader does the heavy lifting themselves and the post just enables it.
Took a few notes from this post, the points are easy to remember without needing to come back and check, and a look at dewchip added a couple more, the kind of place that sticks in the memory long after the browser tab has been closed for the day which says a lot really.
The overall feel of the post was professional without being stuffy, and a look at fernpiers kept that approachable expertise going, finding the right register for technical content is hard but this site has clearly figured out how to sound knowledgeable without slipping into that distant lecturing tone that loses readers in droves every time.
A slim post with substantial content per word, and a look at boomastro maintained the same density, the content per word ratio is something I track informally and this site scores high on that ratio compared to most sources I read regularly which is a quiet indicator of careful editorial work behind the scenes.
Worth pointing out that the writer made the topic feel more interesting than I had been expecting, and a look at curbcliff continued that elevation effect, content that improves the apparent quality of its subject through skilled treatment is doing something real and this site has clearly developed that kind of editorial alchemy throughout.
A piece that did not try to be timeless and ended up reading as durable anyway, and a look at covebeck extended that durable feel, content that stays useful past its publication date without straining for permanence is content that ages well and this site has the kind of evergreen quality that I value highly today.
Мы помогаем быстро оформить справку о несудимости для трудоустройства, переезда и оформления документов за рубежом https://law-moscow.com/articles/
Appreciate how nothing here feels copied or pieced together from other places, the voice is consistent and the tone stays human, and after I checked graingroves I noticed the same style holds, which is a small detail but it makes the whole experience feel personal rather than like another generic site.
вывод из запоя в стационаре в нижнем новгороде [url=https://vyvod-iz-zapoya-v-staczionare-nizhnij-novgorod-17.ru]https://vyvod-iz-zapoya-v-staczionare-nizhnij-novgorod-17.ru[/url]
вывод из запоя капельница [url=https://kapelnicza-ot-pokhmelya-samara-32.ru]вывод из запоя капельница[/url]
Adding this to my list of go to references for the topic, and a stop at portpoise confirmed the rest of the site deserves the same, definitely the kind of resource that earns its place rather than getting forgotten the moment the next interesting article shows up in my feed somewhere else on the web.
If I had to summarise the editorial sensibility of this site in a few words it would be careful and human, and a look at shemplymade extended that summary feeling, capturing the essence of a sites approach in brief is hard but this site has a clear enough identity that the summary comes naturally enough.
Liked that the post acknowledged complications rather than pretending they did not exist, and a stop at nighttoshineatlanta continued that honest framing, sites that handle complexity with care rather than papering it over with simplifying claims are doing real intellectual work and this one is clearly in that category based on what I have read.
Well structured and easy to read, that combination is rarer than people think, and a stop at amidbull confirmed the same standard runs across the rest of the site, definitely the kind of place I will be coming back to when this topic comes up in conversation later again over the weeks ahead.
Наша компания предоставляет услуги по оформлению справок об инвалидности для государственных и частных организаций https://spravka-invalid.com/articles/
Picked this site to mention to a colleague who would benefit, and a look at byrdbush added more material I will pass along, recommending sites to colleagues is a higher bar than recommending to friends because the professional context demands more careful curation and this site cleared the professional bar without me having to think.
Appreciated how the writer anticipated the questions a reader might have along the way, and a stop at apexhelm continued that thoughtful approach, you can tell when content has been edited with the reader in mind versus just published as a first draft and this is clearly the former approach across what I read.
If quality blog writing is dying as people sometimes claim then this site is one piece of evidence that it has not died yet, and a look at coilcab extended that evidence, the broader cultural question about online writing has empirical answers in specific sites and this one is contributing to a more optimistic answer overall.
Decided I would read the archives over the weekend, and a stop at beckarrow confirmed that the archives would be worth the time, very few sites have archives I would actively read through but this one has earned that level of interest based on the consistent quality across what I have sampled so far.
Worth flagging this post as worth a careful read rather than a casual skim, and a stop at bravofarms earned the same careful approach, the few sites that warrant slower reading are sites I now treat differently from the daily content stream and this one has clearly moved into that elevated treatment category.
Appreciated how the post felt complete without overstaying its welcome, and a stop at knackdomes confirmed that economical approach runs across the site, knowing when to stop is a skill many writers never develop but here the discipline is obvious and welcome from the perspective of a busy reader trying to learn things efficiently.
Worth recognising that this site does not chase the daily news cycle, and a stop at dewcoat confirmed the longer publication arc, sites that resist the pressure to comment on every passing event are sites with genuine editorial discipline and this one has clearly chosen depth over volume which I respect deeply.
Came in expecting another generic take and got something with actual character instead, and a look at astrecanal carried that personality forward, finding a distinct voice on a saturated topic is impressive and worth pointing out when it happens because most sites end up sounding identical to their nearest competitors quickly.
Bookmark added with a small note about why, and a look at chordcircle prompted another bookmark with another note, the bookmarks I annotate are the ones I expect to return to deliberately rather than stumble into and this site is generating annotated bookmarks at a higher rate than my usual content sources by some margin.
Bookmark moved to my permanent reference folder rather than the casual maybe later folder, and a look at refinedglobalmarket earned the same upgrade, the distinction between casual interest and lasting reference is something I track carefully and very few sites cross that threshold but this one did so without much effort apparently.
Reading this back to back with a similar piece elsewhere made the quality difference obvious, and a stop at curbcomet only widened the gap, comparing content side by side is a useful exercise and the gap between this site and average competitors in the space is large enough to be noticeable from the first paragraph.
Worth recognising that this site does not chase the daily news cycle, and a stop at flickaltars confirmed the longer publication arc, sites that resist the pressure to comment on every passing event are sites with genuine editorial discipline and this one has clearly chosen depth over volume which I respect deeply.
If I had to defend the time I spend reading independent blogs this site would feature in the defence, and a look at covecanal reinforced that defensive utility, the ongoing case for non algorithmic reading is one I make to myself periodically and sites like this one provide the actual evidence that supports the case clearly.
вывод из запоя на дому [url=https://vyvod-iz-zapoya-na-domu-ekaterinburg-30.ru]вывод из запоя на дому[/url]
Solid quality, the kind of work that holds up to a careful read rather than a quick skim, and a quick look at softbreezeoutlet kept that standard going strong, content that rewards attention rather than punishing it is something I appreciate more and more these days online across nearly every topic I follow.
Now noticing the careful balance the post struck between confidence and humility, and a stop at artfuldailyclickping maintained the same balance, finding the line between asserting and admitting is hard and this site has clearly developed the calibration to walk that line consistently which produces a more persuasive reading experience for me.
выведение из запоя цена [url=https://vyvod-iz-zapoya-na-domu-ekaterinburg-27.ru]выведение из запоя цена[/url]
Glad the writer did not feel the need to argue with imaginary critics in the post itself, and a stop at boomclove kept the same focused approach going, defensive writing wastes the reader time and confidence on positions that did not need defending and this post has clearly avoided that common failure.
Started a draft response in my head and ended without publishing it because the post said it well enough, and a look at trendloversplace produced the same effect, content that satisfies my urge to add to it by being complete enough on its own is rare and represents a particular kind of editorial completeness here.
100cuci masuk [url=https://www.100cuci-9.com]100cuci masuk[/url]
Adding this to my list of go to references for the topic, and a stop at goldmanor confirmed the rest of the site deserves the same, definitely the kind of resource that earns its place rather than getting forgotten the moment the next interesting article shows up in my feed somewhere else on the web.
вызвать врача нарколога на дом срочно [url=https://reabilitaciya-alkogolikov-moskva-1.ru]вызвать врача нарколога на дом срочно[/url]
Such writing is increasingly rare and worth supporting through attention, and a stop at amidcarve extended that supportive attention across more pages, the conscious choice to spend time on sites that produce careful work rather than convenient consumption is itself a small form of patronage and this site is receiving that conscious patronage from me.
наркологический стационар санкт петербург [url=https://narkologicheskij-staczionar-sankt-peterburg-11.ru]наркологический стационар санкт петербург[/url]
электрокарнизы купить в москве [url=https://elektrokarniz150.ru]электрокарнизы купить в москве[/url]
Found the rhythm of the prose particularly enjoyable on this read through, and a look at refinedclickpingexperience kept that musical quality going across the related pages, sentence rhythm is something most blog writers ignore but it makes a real difference in how content lands with the careful reader who cares.
A piece that handled multiple complications without becoming confused, and a look at stacoa continued that organisational clarity, holding multiple threads in a single piece without losing any of them is a sign of skilled writing and this site has clearly developed the editorial discipline to manage complexity without sacrificing readability throughout.
Reading this slowly because the writing rewards a slower pace, and a stop at byrdcipher did the same, the pace at which I read content is something I now use as a quality signal and writing that earns a slower pace earns my attention as a reader looking for substance these days.
Stands out for actually being useful instead of just being long, and a look at explorewithoutlimits kept that going, length without value is the default mode of most blogs these days but this site has clearly chosen a different path which I respect a lot as a reader who values careful editing decisions like that.
Decided this was the best thing I had read all morning, and a stop at urbancreststudio kept that ranking intact, ranking my reading is something I do mentally throughout the day and the top rank is competitive and not easily won but this site won it without needing to overstate its claims for that.
Bookmark earned, share earned, return visit earned, all from one reading session, and a look at beechbraid did the same, the trifecta of bookmark and share and return is rare in a single visit and represents the highest level of engagement I tend to offer any piece of online content these days here.
сколько стоит прокапать от алкоголизма [url=https://kapelnicza-ot-pokhmelya-voronezh-18.ru]сколько стоит прокапать от алкоголизма[/url]
Came across this through a roundabout path and now it is on my regular rotation, and a stop at carefullybuiltcommerce sealed that decision, the open web still produces serendipitous discoveries when you let the citations and references guide you rather than relying purely on algorithmic feeds for new content recommendations always.
The way the post stayed on topic throughout without going on tangents was really refreshing, and a look at premiumlivingstorefront kept that focused approach going, discipline like this in writing is rare and worth recognising because most writers cannot resist wandering off into related subjects that dilute their main point and confuse readers along the way.
Comfortable in tone and substantive in content, that is a hard combination to land, and a look at flarequills kept that pairing alive across more material, this is what good editorial direction looks like in practice and the team here clearly has someone keeping a steady hand on the wheel across what they decide to publish.
Just one of those reads that left me feeling slightly more capable rather than overwhelmed, and a look at ethicalstyleandliving kept that empowering feel going, the difference between content that builds the reader up and content that intimidates them is huge and this site clearly knows which side of that line to stand.
Now placing this in the small category of sites whose updates I would actually want to know about, and a stop at curatedfuturegoods confirmed that placement, the difference between sites I want to follow and sites I just consume from is real and this one has crossed into the active follow category from the casual consumption side.
Honest take is that this was better than I expected when I clicked through, and a look at craftcanal reinforced that, the bar for online content has dropped so much that finding something thoughtful and well constructed feels almost noteworthy now which says more about the average than about this site itself.
Glad I gave this a chance rather than scrolling past, and a stop at curlbento confirmed I made the right call, sometimes the best content is hidden behind unassuming headlines that do not scream for attention and learning to slow down and check those out has paid off many times now across years of reading.
Reading this triggered a small change in how I think about the topic going forward, and a stop at astroboard reinforced that subtle shift, the rare content that actually moves my thinking rather than just confirming or filling it is the kind I most value and this site is providing that kind of impact today.
служба вывода из запоя [url=https://vyvod-iz-zapoya-na-domu-ekaterinburg-26.ru]служба вывода из запоя[/url]
сколько стоит капельница от запоя [url=https://kapelnicza-ot-pokhmelya-ekaterinburg-16.ru]https://kapelnicza-ot-pokhmelya-ekaterinburg-16.ru[/url]
Even just sampling a few posts the consistency is what stands out, and a look at strengththroughstrides confirmed the broader pattern, sites where every piece I sample lives up to the standard set by the others are sites with serious quality control and this one has clearly invested in whatever editorial process produces that consistency reliably.
Solid little post, the kind that does not need to be flashy because the substance is doing the work, and a look at freshguilds kept that quiet confidence going across the site, this is what writing looks like when the writer trusts the content to land on its own without theatrics or unnecessary attention seeking behaviour.
I learned more from this short post than from longer articles I read earlier today, and a stop at amplebench added even more useful detail without going off topic, this site clearly knows how to keep things focused without sacrificing depth which is a hard balance to strike for any writer.
Felt this in a way I cannot quite explain, the topic just hit different here, and a stop at boundboard continued in that vein, sometimes you find a site whose perspective lines up with how you have been thinking and reading their work feels like a small relief which I appreciated more than I expected.
My reading list is short and selective and this site is now on it, and a stop at graingrove confirmed the placement, the short list of sites I read deliberately rather than encounter accidentally is something I curate carefully and adding to it is a real act of trust which this site has earned today.
The use of plain language without dumbing down the topic was really well done, and a look at inspiredhomelifestyle continued in that same accessible style, this is something many technical writers fail at because they either confuse their readers or condescend to them but here neither problem appears at all which is impressive really.
Useful read, especially because the writer did not assume too much background from the reader, and a quick look at galafactors continued in the same way, a thoughtful site that meets people where they are which is something the modern web could use a lot more of for both casual and serious readers.
Started smiling at one paragraph because the writing was just nice, and a look at intentionalmodernmarket produced a couple more such moments, prose that produces small spontaneous reactions in the reader is doing more than just transferring information and the writers here are clearly hitting that level fairly consistently throughout pieces.
Liked the way the post balanced confidence and humility, and a stop at trendandbuy maintained the same balance, knowing when to assert and when to acknowledge uncertainty is a sign of mature thinking and the writers here have clearly developed that calibration through what I assume is years of careful work on their craft.
Felt like the writer was speaking directly to someone with my level of curiosity, neither talking down nor showing off, and a stop at beechcell kept that comfortable matching going, finding writing that meets you where you are rather than asking you to climb up or stoop down feels great every time it happens.
Just want to flag that this was useful and not bury the appreciation in caveats, and a look at cormira earned the same direct praise, recognising good work without hedging it with criticism is something I try to practice because over qualified compliments tend to read as backhanded and miss the point sometimes.
Bookmark folder created specifically for this site, and a look at gailcooperspeaker confirmed the dedicated folder was the right call, dedicated folders for individual sites are a level of organisation I rarely deploy and this site has earned that level of dedicated tracking based on the consistency I have seen so far across sessions.
Now noticing the careful balance the post struck between confidence and humility, and a stop at byrdclap maintained the same balance, finding the line between asserting and admitting is hard and this site has clearly developed the calibration to walk that line consistently which produces a more persuasive reading experience for me.
Most blog writing on this subject reaches for the same handful of arguments and this post avoided them, and a look at orqanta continued the original treatment, content that finds its own path through territory other writers have flattened is content with real authorial energy and this site has plenty of that distinctive energy.
Just wanted to say this was useful and leave a small note of thanks, and a quick visit to refinedlivingessentials earned a similar nod from me, the small acknowledgements add up over time and represent the real economy of trust that good content runs on across the open and increasingly fragmented modern internet.
If quality blog writing is dying as people sometimes claim then this site is one piece of evidence that it has not died yet, and a look at autumnbay extended that evidence, the broader cultural question about online writing has empirical answers in specific sites and this one is contributing to a more optimistic answer overall.
Now thinking the topic is more interesting than I had given it credit for, and a stop at churnburst continued that elevated interest, content that revives my curiosity about subjects I had set aside is doing genuine work in the structure of my interests and this site is providing that revivifying effect today actually.
Useful read, especially because the writer did not assume too much background from the reader, and a quick look at carefullybuiltcommerce continued in the same way, a thoughtful site that meets people where they are which is something the modern web could use a lot more of for both casual and serious readers.
Genuinely well crafted writing, the kind that makes the topic look easier than it actually is, and a look at authenticlivingmarket added even more depth, you can feel the experience behind every line which is something only writers who have been at this for a while can pull off with this level of grace.
Reading this on a difficult day was a small bright spot, and a stop at autumnriverattic extended that brightness, content that improves a hard day is content that has earned a particular kind of place in my reading habits and this site is occupying that uplifting role for me today which I appreciate clearly.
Found the post genuinely useful for something I was working on this week, and a look at craterbase added more material I will reference, content that connects to my actual life and work rather than just being interesting in the abstract is the kind I will pay attention to and return to repeatedly.
The headings made navigating the post simple even when I needed to find a specific section quickly, and a look at brightorchardhub continued the same thoughtful structure, small details like clear headings show that someone is actually thinking about how the reader uses the page rather than just filling it for length alone.
In the middle of an otherwise scattered day this post landed as a moment of focus, and a stop at astrobrunch extended that focused feeling across more pages, content that anchors a fragmented day rather than contributing to the fragmentation is content with real centring effect and this site is providing that anchoring function for me.
Quietly the post solved something I had been turning over without quite knowing how to phrase the question, and a look at amplebey extended that quiet solving, content that addresses unformulated needs is content with reader insight and this site has demonstrated that insight at a high rate across the pieces I have read recently.
Picked this up between two other things I was doing and got drawn in completely, and after grippalace my original tasks were completely forgotten for a while, content that derails a workflow in a positive way by being more interesting than what you were already doing is rare and worth recognising clearly.
Better than most of the writing I have come across on this topic recently, simpler and more direct, and a look at globallysourcedstylehouse continued in that same way, a real outlier in a crowded space full of repetitive content that says little while taking up a lot of reader time today which is unfortunate.
buy real estate in phuket [url=https://real-estate-for-sale-in-phuket-2.com]buy real estate in phuket[/url]
Good post, the kind that respects the reader by getting to the point quickly without skipping the details that matter, and a short look at coilcolt confirmed that approach is consistent across the site which is rare to find online these days, definitely a place I will return to soon.
Closed three other tabs to focus on this one and never opened them again, and a stop at ravenvendor similarly held attention exclusively, content that crowds out other reading from working memory is content with real density and this site has demonstrated that density across multiple pages I have visited so far this morning.
Skipped the related links section thinking I had read enough and then came back to it later when curiosity got the better of me, and a stop at boundburst confirmed I should have just read it first, every section of this site appears to deserve careful attention rather than skipping past lazily.
Strong recommendation from me, anyone curious about the topic should make time for this, and a look at beechclue only sharpens that recommendation further, the kind of resource that holds up against careful scrutiny rather than crumbling at the first critical question is rare and worth pointing other people toward when the topic comes up.
Thanks for putting this online without locking it behind email signups or paywalls, and a quick visit to ethicalconsumercollective kept that open feel going, content that trusts the reader to come back rather than gating access is the kind of approach I will reward with regular return visits over time happily.
Felt like the writer was speaking directly to someone with my level of curiosity, neither talking down nor showing off, and a stop at futurelivingcollections kept that comfortable matching going, finding writing that meets you where you are rather than asking you to climb up or stoop down feels great every time it happens.
Quiet confidence runs through the whole post, no need to shout to make the points stick, and a stop at dustorchids carried that same restrained voice forward, content that respects the reader by trusting its own substance rather than dressing it up in theatrical language is what I look for online and rarely actually find these days.
My usual response to new bookmarks is to forget them but this one I have already returned to twice, and a look at timbercart pulled me back a third time, the actual return rate to bookmarked sites is the real measure of value and this one is clearing that measure at a notable rate already.
Reading this in a relaxed evening setting was a small pleasure, and a stop at peoplesprotectiveequipment extended the pleasant evening reading, content that fits the tone of relaxed time without becoming forgettable is what I look for in evening reading and this site has the right tone for that particular slot in my daily reading routine.
Solid information that lines up with what I have been hearing from other reliable sources, and after my visit to everydaytrendhub I was even more certain of that, this site checks out which is something I value highly when so many places online play loose with the facts to chase a quick click.
Strong recommendation, anyone interested in this topic owes themselves a visit, and a stop at cabinboss extends that recommendation across more of the site, this is the kind of resource that makes me more optimistic about the state of the open web than I usually am these days actually for once which is genuinely refreshing.
Clean writing, easy to read, and never tries too hard to impress, that combination is harder to find than people think, and after my time on premiumlivinghub I am sure this site treats its readers well, no flashy tricks just useful content done right which is honestly all I want online.
Took the time to read the comments on this post too and they were also worth reading, and a stop at ehajjumrahtours suggested the community quality matches the content quality, when the conversation around a piece is as good as the piece itself you know you have found a real corner of the internet.
Picked up two new ideas that I expect will come up in conversations this week, and a look at autumnbay added another, content that arms me with talking points rather than just filling time is the kind that provides ongoing value beyond the moment of reading and this site is generating that kind of ongoing value.
The examples really helped me grasp the points faster than abstract descriptions would have, and a stop at modernheritagemarket added a few more practical illustrations that drove the message home, the kind of writing that knows its readers learn better through concrete situations rather than vague generalities is rare and worth recognising clearly.
Now placing this in the small category of sites whose updates I would actually want to know about, and a stop at staycuriousandcreative confirmed that placement, the difference between sites I want to follow and sites I just consume from is real and this one has crossed into the active follow category from the casual consumption side.
One of the more honest takes on the topic I have seen lately, no spin and no oversell, and a stop at craterbook kept that going, the kind of voice the open web could use a lot more of rather than the endless echo chamber of recycled opinions floating around every social platform these days.
взять займ на карту займ взять срочно на карту без отказа
Honestly enjoyed every minute spent here, that is not something I say lightly, and a look at etherledges confirmed I will be back, the bar for spending time online is high for me these days but this site clears it without effort which is high praise indeed from this reader who is usually rather demanding.
Reading this site over the past week has changed how I evaluate content in this space, and a look at brightfallstudio extended that recalibration, the standards I bring to reading on the topic have shifted upward as a direct result of regular exposure to this kind of work and that shift will outlast any single reading session.
crazy time ultime uscite [url=https://crazytime-italy-it.com/]https://crazytime-italy-it.com/[/url]
Looking through the archives suggests this site has been doing this for a while at this level, and a look at amplebuff confirmed the long term consistency, sites that have maintained quality across years rather than just a recent stretch are sites with serious editorial discipline and this one has clearly been at it for a while.
trusted casino malaysia [url=www.100cuci-9.com]trusted casino malaysia[/url]
A piece that read as if the writer was thinking carefully rather than just typing fluently, and a look at astrobush continued that considered quality, the difference between fluent typing and careful thinking shows up in writing and this site reads as the product of thought rather than just the product of language fluency apparently.
наркологическая клиника со стационаром [url=https://narkologicheskij-staczionar-sankt-peterburg-11.ru]наркологическая клиника со стационаром[/url]
Found this through a search that was generic enough I did not expect quality results, and a look at ethicalmodernliving continued the surprisingly good experience, search engines occasionally still surface excellent independent content if you scroll past the obvious paid and high authority results which is reassuring to remember sometimes.
электрокарниз недорого [url=https://elektrokarniz150.ru]https://elektrokarniz150.ru[/url]
My time on this site has now extended past what I had budgeted, and a stop at grovefarm keeps extending it further, content that overstays its budget in my schedule is content that has earned the extra time and this site has been earning extra time across multiple visits to the point where my schedule needs adjustment.
Generally my comment to other readers about new sites is to wait and see but for this one I would jump to recommend now, and a look at glarniq reinforced that early recommendation, the speed at which a site earns my recommendation is itself a quality signal and this one has earned mine quickly clearly.
A slim post with substantial content per word, and a look at modernvalueclickping maintained the same density, the content per word ratio is something I track informally and this site scores high on that ratio compared to most sources I read regularly which is a quiet indicator of careful editorial work behind the scenes.
Really like the way the post resists reaching for cliches that would have made it feel generic, and a quick visit to beigeastro kept that fresh feel going, original phrasing and unexpected metaphors are signs that the writer is actually thinking rather than just stitching together familiar phrases into the appearance of content.
капельница от запоя [url=https://kapelnicza-ot-pokhmelya-voronezh-18.ru]капельница от запоя[/url]
Reading this triggered a small reorganisation of my own thinking on the topic, and a stop at sorniq furthered that reorganisation, content that affects the shape of my mental model rather than just decorating it with new facts is content with structural rather than informational impact and this site provides that.
Really clear writing, the kind that makes you want to share the link with someone who has been asking about the topic, and a quick browse through cipherbeach only made me more sure of that, the information here stays useful long after the first read is done which says a lot.
The pacing of the post was just right, never rushed and never dragged out unnecessarily, and a look at refinedglobalstore maintained the same rhythm, you can tell the writer has experience because the difficult skill of pacing is something only practiced writers manage to handle well in long form content over time and across formats.
Polished and informative without feeling overproduced, that is the sweet spot, and a look at cabinbrick hit it again, you can tell when a site has been built with care versus thrown together for the sake of having something to put online and this is clearly the former approach taken by the team.
Started reading without much expectation and ended on a high note, and a look at boundchee continued that arc, content that builds rather than peaks early is a sign of a writer who knows how to structure a piece for sustained reader engagement rather than relying on a strong hook to do all the work.
The structure of the post made it easy to follow without losing track of where I was, and a look at coltable kept the same logical flow going, this site clearly understands that organisation is half the battle in keeping readers engaged from the first line to the last across any kind of post.
Quietly enthusiastic about this site after the past few hours of reading, and a stop at edgedials extended that enthusiasm, the calibration of enthusiasm to evidence is something I try to maintain and this site has earned a calibrated quiet enthusiasm rather than the loud excitement that usually fades within a day or two of finding something.
A small thank you note from me to the team behind this work, the post earned it, and a stop at cratercoil suggested more thanks would be in order over time, recognising the people who do good writing online is something I try to remember to do because the alternative is silence and silence rewards mediocrity unfortunately.
Once you start reading carefully here it is hard to go back to lower quality alternatives, and a stop at globalinspiredmarket reinforced that ratchet effect, the way good content raises standards is real over time and this site has clearly contributed to raising my expectations for what is possible in writing on the topic generally.
Appreciated the way each section connected smoothly to the next without abrupt jumps, and a stop at globalpremiumcollective kept that flow going nicely, transitions are something most blog writers ignore but the difference is huge for the reader who is trying to follow a sustained line of thought today across many different topics.
Genuinely good work, the kind that holds up over multiple readings without losing its appeal, and a stop at lunarharvestmart kept that going, definitely a site I will be returning to and probably mentioning to others who work in or care about this particular area of interest today and in coming weeks.
Worth a quiet moment of recognition for the consistency I have noticed across multiple posts, and a stop at cherrycrate continued that consistent quality, sites that maintain quality across many pieces rather than peaking on one viral post are sites with real editorial discipline and this one has clearly developed that discipline carefully.
A slim post with substantial content per word, and a look at asianspeedd8 maintained the same density, the content per word ratio is something I track informally and this site scores high on that ratio compared to most sources I read regularly which is a quiet indicator of careful editorial work behind the scenes.
Good clean post, no errors and no awkward phrasing that breaks the reading flow, and a stop at ampleclam kept the same standard, definitely the kind of editorial care that earns a return visit because it tells me the writer is paying attention to details that matter to readers rather than just rushing publication.
запой санкт петербург [url=https://vyvod-iz-zapoya-v-staczionare-sankt-peterburg-27.ru]запой санкт петербург[/url]
клиника плюс воронеж [url=https://narkologicheskaya-pomoshh-voronezh-10.ru]клиника плюс воронеж[/url]
Felt energised after reading rather than drained, which is unusual for online content these days, and a look at jamesonforct continued that good feeling, content that leaves you better than it found you is rare and worth bookmarking when you stumble across it for the first time today or any other day really.
Worth recognising the absence of the usual blog tropes here, and a look at velvetvendorx continued that fresh quality, sites that avoid the standard moves of the medium read as more original even when the content is on familiar topics and this one has clearly chosen its own path through the conventional terrain skilfully.
Reading this prompted me to dig into a related topic later, and a stop at modernwellbeingstore provided some of the starting points for that follow up reading, content that triggers further exploration rather than satisfying curiosity completely is content with real generative energy and this site has plenty of that energy throughout it.
платный нарколог на дом анонимно [url=https://narkolog-na-dom-ekaterinburg-13.ru]платный нарколог на дом анонимно[/url]
Reading this triggered a small but real correction in something I had assumed, and a stop at urbanvibeemporium extended that corrective effect, content that updates my beliefs through evidence rather than rhetoric is content with intellectual integrity and this site has earned that label consistently across the pieces I have read so far today.
наркологическая помощь на дому москва [url=https://reabilitaciya-alkogolikov-moskva-3.ru]наркологическая помощь на дому москва[/url]
Found the writing surprisingly fresh for what is by now a well covered topic, and a stop at grovequay kept that freshness going across the related pages, original perspective on familiar ground is hard to come by and this site has clearly earned its place in the conversation rather than just rehashing old ideas.
Worth marking this site as one to come back to deliberately rather than by accident, and a stop at contemporaryglobalgoods reinforced that intention, the difference between sites I find again by chance and sites I return to on purpose is meaningful and this one has clearly moved into the deliberate return category for me.
Generally my attention drifts on long posts but this one held it through the end, and a stop at astrocloth earned the same sustained focus, content that defeats my drift tendency is content with substantive pulling power and this site has demonstrated that pulling power across multiple pieces in a session that has now run quite long actually.
Skipped to a specific section because I knew that was the question I had, and the answer was clean, and a stop at frostaisle similarly delivered targeted answers without burying them, content engineered for readers who arrive with specific needs rather than open ended browsing is increasingly valuable in a search heavy reading environment.
Felt the post had been quietly polished rather than aggressively styled, and a look at beigeblink confirmed the same understated polish, sites whose quality reveals itself slowly rather than announcing itself loudly are the kind I trust more deeply because the trust is not based on first impressions of marketing but actual substance.
прокапаться в самарае [url=https://kapelnicza-ot-pokhmelya-samara-30.ru]прокапаться в самарае[/url]
вывод из запоя цены [url=https://kapelnicza-ot-pokhmelya-samara-31.ru]вывод из запоя цены[/url]
Started believing the writer knew the topic deeply by about the second paragraph, and a look at everydayshoppingoutlet reinforced that confidence, the speed at which a writer establishes credibility through their writing is a useful quality signal and this writer establishes it quickly and quietly without resorting to credential dropping or self promotion.
Now adding this site to a small mental group of recommendations I keep ready for specific kinds of inquiries, and a stop at premiumglobalmarketplace extended the recommendation readiness, content that I can confidently point friends and colleagues toward in specific contexts is content with real social utility and this site has that utility clearly.
вызвать врача нарколога на дом срочно [url=https://reabilitaciya-alkogolikov-moskva-4.ru]вызвать врача нарколога на дом срочно[/url]
Highly recommend to anyone looking for a sensible take on this topic without the usual marketing nonsense, and a look at cabinbull kept that grounded approach going, sites that stay focused on serving readers rather than monetising every click are rare and this is clearly one of those rare ones I really appreciate finding.
Just want to say thank you for putting this together, posts like these make searching online actually worth it sometimes, and a quick look at crazeborn kept that going, useful and easy to read without any of the tricks that ruin most blog comment sections lately on the wider open web.
Just want to flag that this was useful and not bury the appreciation in caveats, and a look at boundclan earned the same direct praise, recognising good work without hedging it with criticism is something I try to practice because over qualified compliments tend to read as backhanded and miss the point sometimes.
Reading this on a difficult day was a small bright spot, and a stop at handpickedqualitycollections extended that brightness, content that improves a hard day is content that has earned a particular kind of place in my reading habits and this site is occupying that uplifting role for me today which I appreciate clearly.
Thanks for putting this online without locking it behind email signups or paywalls, and a quick visit to lacehelms kept that open feel going, content that trusts the reader to come back rather than gating access is the kind of approach I will reward with regular return visits over time happily.
займ без процентов на карту https://rusel-garant.ru
Reading this in segments because the day was busy, and the post survived the fragmented attention well, and a stop at ampleclove held up similarly under interrupted reading, content that can withstand modern distracted reading patterns rather than requiring a perfect block of focused time is increasingly the kind I prefer.
Probably this is one of the better quiet successes on the open web at the moment, and a look at merchglow reinforced that quiet success quality, sites that are doing well without making a noise about doing well are the sites I most respect and this one has clearly chosen the quiet success path consistently throughout.
Skipped the related products section because there was none, and a stop at portguilds also lacked any aggressive monetisation, content that is not constantly trying to convert me into a customer or subscriber is content that has confidence in its own value and that confidence shows up as a different reading experience.
Found something quietly useful here that I expect to return to, and a stop at amberbazaar added more of the same, content with quiet utility ages well in a way that flashy hot takes do not and I have learned to weight quiet utility much higher when deciding what to bookmark for later use.
Now organising my browser bookmarks to give this site easier access, and a look at coltbrig earned the same organisational priority, the small acts of digital housekeeping I do for sites I expect to use often are themselves a measure of trust and this site has triggered the trust based housekeeping behaviour from me clearly.
Now I want to find more sites like this but I suspect they are rare, and a look at thoughtfulmodernclick extended that thought, the few sites that meet this quality bar are precious specifically because they are rare and finding others like them is one of the ongoing projects of careful internet curation across the years.
This filled in a gap in my understanding that I had not even noticed was there, and a stop at sustainabledesignstore did the same, the kind of post that gives you more than you expected when you first clicked through from somewhere else, a real find for anyone curious about the area covered here.
Bookmark earned and shared the link with one specific person who would care, and a look at hazemill got the same targeted share, sharing carefully rather than broadcasting is a discipline I try to maintain and this site is generating shares from me at a sustainable rate rather than the spam rate of viral content.
Picked this for a morning recommendation in our company chat, and a look at handcraftedglobalcollections suggested I will mention this site again later, recommending content into a workplace context is a small editorial act that requires confidence in the recommendation and this site is making me confident in those recommendations consistently here too.
Clean writing, easy to read, and never tries too hard to impress, that combination is harder to find than people think, and after my time on cipherbow I am sure this site treats its readers well, no flashy tricks just useful content done right which is honestly all I want online.
If you asked me to point to a recent positive sign for the open web this site would be near the top, and a stop at oakandriver reinforced that designation, the few sites that serve as evidence the web can still produce quality independent content are precious and this one has clearly become one for me.
The structure of the post made it easy to follow without losing track of where I was, and a look at kovique kept the same logical flow going, this site clearly understands that organisation is half the battle in keeping readers engaged from the first line to the last across any kind of post.
real estate in phuket [url=https://real-estate-for-sale-in-phuket-2.com]real estate in phuket[/url]
Now noticing the careful balance the post struck between confidence and humility, and a stop at beigecanal maintained the same balance, finding the line between asserting and admitting is hard and this site has clearly developed the calibration to walk that line consistently which produces a more persuasive reading experience for me.
Now noticing that the post did not mention the writer at all, focus stayed on the topic, and a look at mastriano4congress continued that author absent quality, content that disappears the writer to focus on the substance is a particular kind of generosity and this site has clearly chosen the substance over the personality consistently.
A relief to read something where I did not have to fact check every claim mentally, and a look at contemporarydesignhub continued that reliable feeling, sites where I can lower my guard and trust the content are rare and this one is earning that trust paragraph by paragraph through consistent careful work behind the scenes.
Reading this in the gap between work projects was a small but meaningful break, and a stop at auralbrick extended that gentle reset, content that provides genuine refreshment rather than just distraction during work breaks is content with a particular kind of utility and this site fits that role for me reliably during work days.
Worth pointing out the careful word choice in this post, no buzzwords and no jargon, and a look at crazechip continued that disciplined vocabulary, sites that resist the pull of trendy language are sites that will read well in five years and this one is clearly built for that kind of long durability.
Honest assessment is that this is one of the better short reads I have had this week, and a look at wildriveremporium reinforced that, the bar for short content is low because most of it sacrifices substance for brevity but this site manages both at once which is harder than it sounds for most writers attempting it.
Worth saying that the quiet confidence of the writing is what landed first, and a look at calmbyrd continued that quiet quality, confident writing without the loud display of confidence is a rare combination and this site has clearly developed both the knowledge and the editorial restraint to land that combination consistently.
If a friend asked me where to read carefully on the topic I would send them here without hesitation, and a look at birchvista confirmed the recommendation strength, the directness of my recommendation reflects how confident I am in the quality and this site has earned undiluted recommendations from me across multiple recent conversations actually.
наркологический стационар в спб [url=https://narkologicheskij-staczionar-sankt-peterburg-11.ru]наркологический стационар в спб[/url]
Glad I gave this a chance instead of bouncing on the headline, and after androblink I was certain I had made the right call, snap judgements based on titles miss a lot of good content and this is a reminder to slow down and check things out before scrolling past in a hurry.
Honestly this kind of writing is why I still bother to read independent sites, and a look at creativehomeandstyle extended that broader reflection, the few sites that justify continued attention to non algorithmic content are sites like this one and finding them periodically is enough to keep my reading habits oriented toward independent rather than aggregated content.
Started smiling at one paragraph because the writing was just nice, and a look at boundcliff produced a couple more such moments, prose that produces small spontaneous reactions in the reader is doing more than just transferring information and the writers here are clearly hitting that level fairly consistently throughout pieces.
микрозайм взять займ онлайн без процентов
Useful reading material, the kind I can hand off to someone newer to the topic without worrying about confusing them, and a quick look at intentionalstylehub confirmed the same beginner friendly tone runs throughout the site which is great for sharing with people just starting their learning journey on this particular topic.
Came here from a search and stayed for the side links because they were that interesting, and a stop at ulnova took me even further into the site, the kind of organic exploration that good content invites is something most sites kill through aggressive interlinking and pushy navigation choices rather than relying on quality.
вызвать капельницу от запоя [url=https://kapelnicza-ot-pokhmelya-voronezh-18.ru]вызвать капельницу от запоя[/url]
If I had to summarise the editorial sensibility of this site in a few words it would be careful and human, and a look at modernlivingcollective extended that summary feeling, capturing the essence of a sites approach in brief is hard but this site has a clear enough identity that the summary comes naturally enough.
Really appreciate that the writer did not stretch the post to hit some target word count, the points end when they are made, and a stop at briskolives reflected the same discipline, brevity is generosity in disguise and this site has clearly figured that out far better than most blog operations have.
Заказать печать на ПВД пакетах с логотипом в Москве Заказать печать на ПВД пакетах с логотипом в России
100cuci malaysia [url=100cuci-9.com]100cuci malaysia[/url]
Reading this prompted me to dig into a related topic later, and a stop at refinedmoderncollections provided some of the starting points for that follow up reading, content that triggers further exploration rather than satisfying curiosity completely is content with real generative energy and this site has plenty of that energy throughout it.
The conclusions felt earned rather than tacked on at the end like an afterthought, and a look at cobaltcrate kept that careful structure going, you can tell when a writer has thought about the shape of their post versus just letting it ramble out and hoping for the best at the end which most do.
Quietly the writers approach to the topic differs from the dominant takes I have been encountering, and a stop at compassbraid extended that distinctive approach, content that maintains a different perspective without explicitly arguing against the dominant ones is content with confident editorial identity and this site has that confidence throughout pieces.
A slim post with substantial content per word, and a look at beltbrunch maintained the same density, the content per word ratio is something I track informally and this site scores high on that ratio compared to most sources I read regularly which is a quiet indicator of careful editorial work behind the scenes.
A slim post with substantial content per word, and a look at wildstonegallery maintained the same density, the content per word ratio is something I track informally and this site scores high on that ratio compared to most sources I read regularly which is a quiet indicator of careful editorial work behind the scenes.
Reading this prompted a small note in my reference file, and a stop at intentionalglobalstore prompted another, the rare site that contributes useful nuggets to my own working knowledge rather than just consuming my attention is worth the time investment many times over compared to the usual pile of forgettable scroll content.
Ипотечная квартира Монтаж гипсокартона
The conclusions felt earned rather than tacked on at the end like an afterthought, and a look at dreamshopworld kept that careful structure going, you can tell when a writer has thought about the shape of their post versus just letting it ramble out and hoping for the best at the end which most do.
Vague feelings of recognition kept surfacing as I read because the writing names things I have been thinking, and a look at kettlemarket produced more of those recognition moments, content that gives shape to private intuitions is content that makes me feel less alone in my own thinking and this site has that effect.
flamp отзывы Купить отзывы Авито, заказать накрутку отзывов. Лучшая цена и условия, гарантия. Без посредников! Репутационное агентство РА OTZA.
https://auto-cross1.ru/
Reading this on a phone at a coffee shop and finding it perfectly suited to that context, and a stop at crazecocoa continued the comfortable mobile experience, content that works across reading conditions without compromising on substance is increasingly important and this site has clearly thought about the whole reader experience here.
раменбет зеркало
Found the writing surprisingly fresh for what is by now a well covered topic, and a stop at cadetgrails kept that freshness going across the related pages, original perspective on familiar ground is hard to come by and this site has clearly earned its place in the conversation rather than just rehashing old ideas.
Refreshing change from the usual sites covering this topic, no clickbait and no padding, and a stop at ardenbeach confirmed the difference, this place clearly has its own voice rather than copying the formulas everyone else uses to chase clicks online which is becoming increasingly rare these days across nearly every popular subject.
https://www.freepik.com/free-photos-vectors/Codigo-promocional-de-1xBet-2026-BTC777-Apuesta-Gratis-Euro130
A modest masterpiece in its own quiet way, and a look at cantclap confirmed the same quiet quality across the rest of the site, calling something a masterpiece is usually overstating but for content this carefully crafted the word feels appropriate even if the writers themselves would probably resist the label honestly.
Reading this with a fresh mind in the morning brought out details I might have missed in the afternoon, and a stop at globaldesignmarketplace earned the same fresh attention, content that rewards being read at full attention rather than at energy lows is content with real density and this site has that density consistently.
Worth flagging this site to a few specific friends who would appreciate the editorial sensibility, and a look at auralbrig added more pages I will mention to them, recommending sites to specific people requires understanding both the site and the person and this site is making those personalised recommendations easy and natural for me.
The use of plain language without dumbing down the topic was really well done, and a look at carefullycuratedfinds continued in that same accessible style, this is something many technical writers fail at because they either confuse their readers or condescend to them but here neither problem appears at all which is impressive really.
Better signal to noise ratio than most places I check on this kind of topic, and a look at curatedmodernlifestyle kept that going, every paragraph here carries something worth reading rather than padding out the page to hit some arbitrary length target that search engines reward but readers ignore as soon as they notice it.
A piece that suggested careful editing without showing the marks of the editing, and a look at prairievendor continued that invisible polish, the best editing disappears into the prose and this site reads as having been edited with skill that does not announce itself which is the highest compliment I can offer any blog content.
http://ww.mange-disque.tv/forums/viewtopic.php?id=128547
Really appreciate that the writer did not overstate the importance of the topic to make the post feel weightier, and a quick visit to civicbrisk maintained the same modest framing, content that is honest about its own scope rather than inflating itself is the kind I trust and return to repeatedly over time.
Thanks for putting this online without locking it behind email signups or paywalls, and a quick visit to boundcling kept that open feel going, content that trusts the reader to come back rather than gating access is the kind of approach I will reward with regular return visits over time happily.
Quietly the post solved something I had been turning over without quite knowing how to phrase the question, and a look at arpunishersfb extended that quiet solving, content that addresses unformulated needs is content with reader insight and this site has demonstrated that insight at a high rate across the pieces I have read recently.
лечение алкоголизма воронеж бесплатно [url=https://narkologicheskaya-pomoshh-voronezh-10.ru]https://narkologicheskaya-pomoshh-voronezh-10.ru[/url]
Liked that the post left some questions open rather than pretending to settle everything, and a stop at pebblevendor continued that intellectual honesty, content that respects the limits of its own claims is more trustworthy than content that overreaches and this site has clearly figured out which positions it can defend confidently.
нарколог на дом круглосуточно москва [url=https://reabilitaciya-alkogolikov-moskva-3.ru]нарколог на дом круглосуточно москва[/url]
стационар капельница от алкоголя [url=https://vyvod-iz-zapoya-v-staczionare-sankt-peterburg-27.ru]стационар капельница от алкоголя[/url]
гарантированный шенген иммиграция в европу
A piece that reads as if the writer trusted readers to fill in obvious gaps, and a look at berylbuff continued that respectful approach, content that does not over explain what the reader can infer is content that respects intelligence and this site has clearly chosen to write to capable readers rather than to the lowest common denominator.
нарколог на дом вывод [url=https://narkolog-na-dom-ekaterinburg-13.ru]нарколог на дом вывод[/url]
Honestly impressed, did not expect to find this level of care on the topic, and a stop at timbervendor cemented the impression, you can tell within the first few paragraphs whether a site is going to be worth the time and this one delivered on that early promise nicely throughout the rest of what I read.
Genuine reaction is that I will probably think about this on and off for a few days, and a look at ethicalmodernmarketplace added fuel to that, the best content lingers in your head after you close the tab rather than evaporating immediately and this site clearly knows how to write that kind of memorable content.
капельница от похмелья [url=https://kapelnicza-ot-pokhmelya-samara-31.ru]капельница от похмелья[/url]
электрический карниз для штор купить [url=https://elektrokarniz150.ru]https://elektrokarniz150.ru[/url]
Generally I find the content on similar topics frustrating in specific ways and this post avoided all of them, and a look at crestbulb continued that frustration free experience, content that sidesteps the standard failure modes of its genre is content with editorial awareness and this site has clearly studied what fails elsewhere consistently.
капельница от запоя самара [url=https://kapelnicza-ot-pokhmelya-samara-30.ru]капельница от запоя самара[/url]
ПВД пакеты с печатью Заказать печать на ПВД пакетах с логотипом в Москве
Just found this n777 casino n777 casino link perfect for my quick 10 min breaks! The mobile app loads fast and lets me enjoy slots instantly without long waits. Great choice for busy parents needing reliable, fun gaming options anytime anywhere now.
If a friend asked me where to read carefully on the topic I would send them here without hesitation, and a look at globalethicalclickping confirmed the recommendation strength, the directness of my recommendation reflects how confident I am in the quality and this site has earned undiluted recommendations from me across multiple recent conversations actually.
Picked up several practical tips that I plan to try out this week, and a look at ardenbrisk added a few more I will be testing alongside, content with practical hooks that connect to my actual life is the kind that earns my repeat attention rather than the merely interesting that I forget within a day.
Reading this in the morning set a good tone for the day, and a quick visit to urbanwillowcorner kept that good tone going, content can do that sometimes when it hits the right notes and finding sites that consistently strike that tone is something I have learned to recognise and reward with regular visits.
A piece that respected the reader by not over explaining the obvious, and a look at mossytrailmarket continued that calibrated approach, finding the right level of explanation is one of the harder editorial calls and this site has clearly thought carefully about what readers will already know versus what they need help with consistently.
нужен нарколог на дом [url=https://reabilitaciya-alkogolikov-moskva-4.ru]нужен нарколог на дом[/url]
Comfortable reading experience throughout, no jarring tone shifts and no awkward formatting, and a look at creativecommercecollective kept that smooth feel going, the kind of editorial polish that goes unnoticed when present but glaring when absent is something this site has clearly invested in across the broader content as well which deserves recognition.
Decided this was the best thing I had read all morning, and a stop at designledclickping kept that ranking intact, ranking my reading is something I do mentally throughout the day and the top rank is competitive and not easily won but this site won it without needing to overstate its claims for that.
Reading this gave me a small sense of progress on a topic I have been slowly working through, and a stop at everydaypremiumessentials added another step forward, learning happens in small increments across many sources and finding sources that consistently contribute is the actual practical value of careful curation in an information rich world.
A piece that read as if the writer was thinking carefully rather than just typing fluently, and a look at larkvendor continued that considered quality, the difference between fluent typing and careful thinking shows up in writing and this site reads as the product of thought rather than just the product of language fluency apparently.
Liked that the post landed without needing to manufacture controversy or take a contrarian stance for attention, and a stop at auralcleat continued that grounded approach, content that earns attention through quality rather than provocation is the kind that builds long term trust rather than burning it on quick wins.
Took something from this I did not expect to find, and a stop at silkvendor added another unexpected useful piece, content that exceeds expectations rather than just meeting them is the kind that builds enthusiasm and earns repeat visits without any explicit ask from the writer or platform behind the work being read.
Reading this in my last reading slot of the day was a good way to end, and a stop at berylcalm provided a satisfying close to the reading session, content that ends a day well rather than agitating it before sleep is the kind I value increasingly and this site fits that role for me consistently now.
Reading this slowly and letting each paragraph land before moving on, and a stop at valuewhisper earned the same patient approach, content that rewards slow reading rather than speed is content with real density and the writers here are clearly producing work that benefits from the careful eye rather than the rushed scan.
Наша компания помогает быстро подготовить медицинские справки, документы для официальных инстанций и необходимые свидетельства: https://spravka-service.com/garantii/
Left me wanting to read more rather than feeling burned out, that is a good sign, and a look at boundcoil confirmed there is plenty more here to explore, the kind of writing that builds appetite rather than killing it which is a rare quality on the modern open internet today across most categories of content.
наркологическая клиника со стационаром [url=https://narkologicheskij-staczionar-sankt-peterburg-11.ru]наркологическая клиника со стационаром[/url]
If I am being honest this is the kind of site I quietly hope my own work will someday resemble, and a stop at intentionalmarketplacehub extended that aspirational feeling, finding work that models what I want to produce is part of why I read carefully and this site has been performing that modelling function for me lately consistently.
luxury property for sale phuket [url=https://real-estate-for-sale-in-phuket-2.com]luxury property for sale phuket[/url]
Found a small mental shift after reading this, the framing here is just a bit different from the standard takes online, and a look at ardenburst extended that fresh perspective across more material, the rare site whose voice actually changes how you think about something rather than just confirming existing beliefs.
накрутка отзывов профи ру Накрутка отзывов ПроДокторов, Заказать положительные отзывы на ПроДокторов. Купить отзывы на ПроДокторов с гарантией. Репутационное агентство РА OTZA.
Excellent post, balanced and well organised without showing off, and a stop at crocboard continued in that same vein, this site has clearly figured out the formula for content that works for readers rather than for search engine ranking signals which is harder than it sounds today and worth real recognition from anyone.
daily codes Комбо для игр
Now feeling the small relief of finding writing that does not condescend, and a stop at islemeadows extended that respect for readers, content that treats its audience as capable adults rather than as people to be managed produces a different reading experience and this site has clearly chosen the respectful approach across all pieces.
Now wishing more sites covered topics with this level of care, and a look at thoughtfullyselectedproducts extended that wish across more subjects, the rarity of careful coverage on most topics is a problem and this site is one of the small antidotes to that broader pattern of casual or surface treatment of complex subjects.
The post made the topic feel approachable without making it feel trivial, that is a fine balance, and a stop at spikeisland2020 maintained the same balance, finding the middle ground between welcoming and serious is genuinely difficult and the writers here have clearly figured out how to consistently hit it well across many different posts.
https://www.magnific.com/search?format=search&last_filter=query&last_value=1xBet+Promo+Code+Free+Bet+Today+Indonesia+2026%3A+ONEX777&query=1xBet+Promo+Code+Free+Bet+Today+Indonesia+2026%3A+ONEX777
Recommended without hesitation if you care about careful coverage of this topic, and a stop at slowcraftedlifestyle reinforced the recommendation, the bar I set for unhesitating recommendations is fairly high and this site has cleared it through the cumulative weight of multiple consistently good pieces rather than through any single standout post which is meaningful.
Started smiling at one paragraph because the writing was just nice, and a look at softleafmarket produced a couple more such moments, prose that produces small spontaneous reactions in the reader is doing more than just transferring information and the writers here are clearly hitting that level fairly consistently throughout pieces.
Thank you for being clear and direct, that simple approach saves so much frustration on the reader’s end, and a stop at civiccask only made me more sure of it, the rest of the content seems to follow the same pattern which is a great sign of consistent editorial care behind the scenes.
Came in skeptical of the angle and left mostly persuaded, and a stop at ethicalglobalmarket pushed me a bit further in the same direction, content that can move a critical reader by argument rather than rhetoric is rare and worth pointing out because it indicates real substance underneath the surface presentation here.
Refreshing to find writing that does not try to manipulate the reader into clicking onto the next page through cliffhangers and forced engagement, and a stop at contemporarylivingstore continued in the same respectful way, this is what reader first design actually looks like in practice rather than just in marketing copy that sounds nice.
Liked the way the post handled the final paragraph, no neat bow but no abrupt cutoff either, and a stop at compasscabin continued that thoughtful ending pattern, endings are hard and most blog writers either over engineer them or skip them entirely and this site has clearly figured out a sustainable middle approach.
Once I had read three posts the editorial pattern was clear, and a look at zestvendor confirmed the pattern from a fourth angle, sites where the underlying approach reveals itself through accumulated reading rather than being announced are sites with real depth and this one has that quality clearly visible across multiple pieces consistently.
Thanks for putting in the work to make this approachable, plenty of sites cover the same ground but most do it badly, and a quick visit to mistmarket confirmed this one stands apart, simple language and useful examples without anyone trying to sell me anything along the way which I really appreciated.
https://ihtionik.ru/katalog/kormushki/
The whole experience of reading this was pleasant from start to finish, no pop ups and no annoying interruptions, and a look at saucierstudio continued that clean experience, technical choices about page design matter for the reader and this site clearly cares about the small details that add up to comfort across multiple visits.
Заказать печать на ПВД пакетах с логотипом в Санкт-Петербурге ПВД пакеты с печатью
Walked away with a clearer head than I had before reading this, and a quick visit to blazeclose only sharpened that, the writing has a way of cutting through the noise that surrounds most topics online which is something I will definitely remember the next time I am searching for an answer to anything.
https://www.magnific.com/search?format=search&last_filter=query&last_value=C%C3%B3digo+Promocional+1Win+Para+Registro%3A+1W2026VIP+%E2%80%93+Apuesta+Gratis+%2B+Cashback+Ecuador&query=C%C3%B3digo+Promocional+1Win+Para+Registro%3A+1W2026VIP+%E2%80%93+Apuesta+Gratis+%2B+Cashback+Ecuador
100cuci jili [url=100cuci-9.com]100cuci jili[/url]
One of the more honest takes on the topic I have seen lately, no spin and no oversell, and a stop at consciousconsumerhub kept that going, the kind of voice the open web could use a lot more of rather than the endless echo chamber of recycled opinions floating around every social platform these days.
Reading this in a moment of low energy still kept my attention, and a stop at balticarrow continued that engagement under suboptimal conditions, content that survives the reader being tired is content with extra reserves of pull and this site has the kind of writing that holds up even when I am not at my reading best.
Reading carefully this time rather than scanning, and the depth shows up in places I missed first time around, and a look at ariabee rewarded the same careful approach, content that holds up to multiple reads is content I want more of in my regular rotation rather than disposable scroll fodder daily.
here about puzzles reactivalaboratorio.com
The tone stayed consistent across the whole post which is harder than it looks for longer pieces, and a look at croccocoa continued the same voice, this kind of editorial consistency is a sign of either a single careful writer or a tightly run team and either is impressive today across the broader media environment.
Adding to the bookmarks now before I forget, that is how good this is, and a look at trueautumnmarket confirmed the rest of the site is worth saving too, this is one of those rare finds that justifies the time spent searching the web for once which is a relief in the current environment.
Decided to set a calendar reminder to revisit, and a stop at artfulhomeessentials extended that revisit list, calendar entries for content are a level of commitment I rarely make but when I do they signal a higher regard than a simple bookmark and this site has earned that calendar tier of relationship from me today.
Thanks again for the post, I learned a couple of things I can actually use later this week, and after I went over bowbotany the rest of the site looked equally promising, definitely going to spend more time here when I get a free moment over the weekend to read more carefully.
Probably the best thing I have read on this topic in the past month, and a stop at intentionalclickpingcollective extended that ranking, the casual ranking of recent reading is informal but real and this site has been winning those rankings for me on this topic specifically over the last several weeks of regular reading sessions.
https://dev.1c-bitrix.ru/support/forum/user/9488264/
рулонные занавески [url=https://rulonnye-shtory-s-elektroprivodom11.ru]рулонные занавески[/url]
https://auto-cross1.ru/
Now thinking I want more sites built on this kind of editorial foundation, and a stop at thoughtfulclickpingplatform extended that wish into a broader hope, sites built on substance and care rather than on metrics and growth are the kind of sites I want to see more of and this one is a small example worth supporting.
A piece that exhibited the kind of patience that good writing requires, and a look at upvendor continued that patient quality, hurried writing is easy to spot and this site reads as having been written without time pressure which produces a different feel than the rushed content that dominates much of the modern blog space.
Looking through other posts here the consistency is what makes the site valuable rather than any single piece, and a stop at vaultbasket extended that consistency observation, sites whose value lies in the ongoing pattern rather than in standout posts are sites I trust more deeply and this one has clearly built that kind of trust.
Now adding the homepage to my regular check rotation rather than waiting for individual links to find me, and a stop at timberlineattic confirmed the rotation upgrade, the move from passive discovery to active checking is a vote of confidence in a sites ongoing quality and this site has earned that active engagement clearly.
Worth flagging that the writing rewarded a second read more than I expected, and a look at blissbrick produced the same second read benefit, content with hidden depths that emerge only on careful rereading is rare in the modern blog space and this site has clearly invested in that level of compositional density throughout.
наркологический стационар в спб [url=https://narkologicheskij-staczionar-sankt-peterburg-14.ru]наркологический стационар в спб[/url]
частный нарколог на дом срочно [url=https://narkolog-na-dom-ekaterinburg-13.ru]частный нарколог на дом срочно[/url]
Closed several other tabs to focus on this one as I read, and a stop at alpinevendor held my undivided attention the same way, content that earns full focus in an attention environment full of competing pulls is content doing something genuinely well and the team behind it deserves recognition for that achievement consistently.
Appreciate how nothing here feels copied or pieced together from other places, the voice is consistent and the tone stays human, and after I checked myvetcoach I noticed the same style holds, which is a small detail but it makes the whole experience feel personal rather than like another generic site.
Just dropping by to say thanks for the effort, it does not go unnoticed when a writer cares this much about the reader, and after I went through intentionalconsumerstore I was certain this is one of the better corners of the internet for this particular kind of content which is genuinely refreshing.
Coming back tomorrow when I can give this a proper read, the post deserves better attention than I can give right now, and a look at timelessdesignsandgoods suggests there is plenty more here that deserves the same treatment, definitely a site I will be exploring properly over the next few days when I can.
Picked this up between two other things I was doing and got drawn in completely, and after ariabrawn my original tasks were completely forgotten for a while, content that derails a workflow in a positive way by being more interesting than what you were already doing is rare and worth recognising clearly.
daily codes today’s combos
Reading this fit naturally into my afternoon walk because I was reading on my phone, and a stop at capeasana continued well in that walking format, content that survives mobile reading without becoming awkward is content with format flexibility and this site has clearly thought about how it reads across different devices today.
Now noticing that the post benefited from being neither too short nor too long for its content, and a look at crustbeige continued that calibration of length, sites that match length to content rather than padding to hit some target are sites that respect both their material and their readers and this site does both.
Now recognising the specific pleasure of reading writing that shows real care for sentence shapes, and a look at curateddesignandliving extended that craft pleasure, sentence level writing quality is something most blog content ignores entirely and this site has clearly invested in the prose layer alongside the substance which is rare today.
If I had to defend the time I spend reading independent blogs this site would feature in the defence, and a look at forgecabins reinforced that defensive utility, the ongoing case for non algorithmic reading is one I make to myself periodically and sites like this one provide the actual evidence that supports the case clearly.
прокапаться в в самаре [url=https://kapelnicza-ot-pokhmelya-samara-30.ru]прокапаться в в самаре[/url]
Liked everything about the experience, from the opening through to the closing notes, and a stop at urbaninspiredlivingstore extended that into more pages, finding a site where the editorial vision shows through every choice rather than feeling random is an increasingly rare experience and one I am glad to have today during this particular reading session.
Closed the tab and immediately reopened it ten minutes later because I wanted to reread a part, and a stop at balticbull drew the same return, content that pulls you back after closing it is doing something well beyond the average and worth marking as exceptional in my mental catalogue of reliable sites.
выезд нарколога на дом [url=https://reabilitaciya-alkogolikov-moskva-4.ru]выезд нарколога на дом[/url]
Reading this confirmed that my time researching the topic in other places had not been wasted, and a stop at clamable extended the confirmation, when independent sources agree that is a useful signal and this site is one of the more reliable sources I have found for cross checking what I read elsewhere on similar subjects.
вызвать капельницу от запоя на дому [url=https://kapelnicza-ot-pokhmelya-samara-31.ru]вызвать капельницу от запоя на дому[/url]
Now adding a small note in my reading log that this site is one to watch, and a look at wickerlane reinforced the watch status, the few sites I track deliberately rather than encounter accidentally are sites I expect ongoing returns from and this one has cleared the bar for that elevated tracking based on what I read.
Appreciate the practical examples, they made the abstract points easier to grasp, and a stop at yovrisa added more of the same, this site clearly understands that real examples beat empty theory every single time which is the mark of a writer who knows their audience well and respects their time.
Stands out for actually being useful instead of just being long, and a look at bowcask kept that going, length without value is the default mode of most blogs these days but this site has clearly chosen a different path which I respect a lot as a reader who values careful editing decisions like that.
Liked that there was nothing performative about the writing, and a stop at nervora continued that genuine quality, performative writing tries to be witnessed rather than read and the difference between performance and substance is huge for the careful reader and this site has clearly chosen substance every time clearly.
If I am being honest this is the kind of site I quietly hope my own work will someday resemble, and a stop at elevatedhomeandstyle extended that aspirational feeling, finding work that models what I want to produce is part of why I read carefully and this site has been performing that modelling function for me lately consistently.
Reading this slowly to give it the attention it deserved, and a stop at jewelvendor earned the same slow read, choosing to read slowly is a small act of respect for content quality and very few sites earn that respect from me but this one did so without any explicit ask which is the cleanest way.
Recommended to anyone working in or curious about this area, the depth and clarity combine well, and a look at fiberiron keeps that going across more pages, the kind of site that earns regular visits rather than chasing trends has my respect because it suggests genuine commitment to the topic itself rather than to chasing trends.
Worth saying that the prose reads naturally without straining for style, and a stop at elveecho maintained the same unforced quality, writing that achieves elegance without effort is the highest tier and this site has clearly worked out how to land that effortless quality consistently rather than only on the writers best days.
наркология круглосуточная [url=https://narkologicheskaya-pomoshh-voronezh-10.ru]https://narkologicheskaya-pomoshh-voronezh-10.ru[/url]
клиника вывода из запоя со стационаром [url=https://vyvod-iz-zapoya-v-staczionare-sankt-peterburg-27.ru]клиника вывода из запоя со стационаром[/url]
частный нарколог на дом москва [url=https://reabilitaciya-alkogolikov-moskva-3.ru]частный нарколог на дом москва[/url]
The post made the topic feel approachable without making it feel trivial, that is a fine balance, and a stop at blitzbraid maintained the same balance, finding the middle ground between welcoming and serious is genuinely difficult and the writers here have clearly figured out how to consistently hit it well across many different posts.
Just want to say thank you for putting this together, posts like these make searching online actually worth it sometimes, and a quick look at refinedeverydaynecessities kept that going, useful and easy to read without any of the tricks that ruin most blog comment sections lately on the wider open web.
A well calibrated piece that knew its scope and stayed inside it, and a look at arialcamp maintained the same scope discipline, scope creep is one of the failure modes of long blog posts and this site has clearly invested in the editorial discipline to prevent it which shows up in tightly contained pieces.
Now sitting with the thoughts the post triggered rather than rushing on to the next thing, and a stop at softwillowcorner extended that reflective pause, content that earns time for thought after closing the tab is content of higher value than the merely interesting and this site has clearly produced that lasting effect today.
Started believing the writer knew the topic deeply by about the second paragraph, and a look at timbermarket reinforced that confidence, the speed at which a writer establishes credibility through their writing is a useful quality signal and this writer establishes it quickly and quietly without resorting to credential dropping or self promotion.
Worth recommending broadly to anyone who reads on the topic, and a look at merniva only confirms that, the rare combination of accessibility and depth in this site makes it suitable for both newcomers and people who already know the area which is hard to pull off in any blog format today and rarely managed.
Adding to the bookmarks now before I forget, that is how good this is, and a look at refineddailycommerce confirmed the rest of the site is worth saving too, this is one of those rare finds that justifies the time spent searching the web for once which is a relief in the current environment.
Really like that the writer trusts the reader to follow simple logic without restating every previous point, and a stop at honestgrovecorner kept that respect going, treating an audience as capable adults rather than as people who need constant hand holding makes a noticeable difference in the reading experience for me.
Pass this along to colleagues if the topic comes up, the framing here is sensible, and a stop at crustborn adds more useful angles to share, the kind of content that improves conversations rather than just feeding them is what makes a resource genuinely valuable in professional contexts going forward over time and across project boundaries too.
A clear cut above the usual noise on the subject, and a look at cargocomet only made that gap wider in my view, the kind of place that earns its visitors through quality rather than through aggressive marketing or sponsored placements which is increasingly the only way most sites stay afloat across the modern web.
Picked this up while looking for something else and ended up reading every paragraph because it was actually informative, and after minimalmodernclickping I was sure I would come back, that does not happen often when most sites bury the useful parts under endless ads and pop ups today and across most categories online.
property for sale phuket [url=https://real-estate-for-sale-in-phuket-2.com]property for sale phuket[/url]
Probably going to mention this site in a write up I am working on later this month, and a stop at purposefulclickpingexperience provided more material for that potential mention, content worth referencing in my own published work rather than just personal reading is content with the highest endorsement level and this site has earned that endorsement.
Reading this in the morning set a good tone for the day, and a quick visit to stageofnations kept that good tone going, content can do that sometimes when it hits the right notes and finding sites that consistently strike that tone is something I have learned to recognise and reward with regular visits.
Granted my mood today might be elevating my reading experience but I still think this is genuinely good, and a stop at harbormint reinforced that even discounted assessment, controlling for the mood adjustment that affects content perception this site still reads as substantively above average across multiple pieces I have read carefully today.
Got something practical out of this that I can apply later this week, and a stop at iciclecrate added more details to think about, this is exactly the kind of content I bookmark for future reference rather than the throwaway listicles that dominate most search results these days for almost any common topic.
Now noticing the careful balance the post struck between confidence and humility, and a stop at balticcape maintained the same balance, finding the line between asserting and admitting is hard and this site has clearly developed the calibration to walk that line consistently which produces a more persuasive reading experience for me.
Felt a small spark of recognition when the post named something I had been struggling to articulate, and a look at globalmodernessentials produced more such moments, the rare service of giving readers language for fuzzy intuitions is one of the higher values that good writing can provide and this site offered several today instances.
cialis dosage forms
cialis dosage forms
Once I had read three posts the editorial pattern was clear, and a look at orderquill confirmed the pattern from a fourth angle, sites where the underlying approach reveals itself through accumulated reading rather than being announced are sites with real depth and this one has that quality clearly visible across multiple pieces consistently.
Skipped breakfast still reading this and finished hungry but satisfied, and a stop at boneblot kept me past breakfast time, content that displaces basic biological needs is content with serious attentional pull and the writers here are clearly capable of producing that level of engagement which is genuinely impressive these days.
Now adjusting my expectations upward for the topic based on this post, and a stop at bowclub continued that bar raising effect, content that resets what I think is possible on a subject is doing real work in shaping my standards and this site is providing those bar raising experiences at a notable rate during sessions.
заказать рулонные шторы цена [url=https://rulonnye-shtory-s-elektroprivodom11.ru]https://rulonnye-shtory-s-elektroprivodom11.ru[/url]
High quality writing, no marketing speak and no buzzwords that mean nothing, and a stop at ethicalhomeandlifestyle kept that going, simple direct content that actually communicates something is harder to find than it should be and this is one of the rare places that gets it right consistently across many different posts.
Came in confused about the topic and left with a much firmer grasp on it, and after amberdock I felt I could explain this to someone else without hesitation, that is the gold standard for any educational content and most sites simply fail to reach it ever which is unfortunate but true.
Quietly impressive in a way that does not announce itself, and a stop at elveglide extended that quiet impressiveness, the kind of quality that emerges through sustained attention rather than first impressions is the kind I trust more deeply and this site has been earning that deeper trust across multiple sessions over time consistently.
A particular pleasure to read this with a fresh coffee, and a look at modernheritagegoods extended the pleasure across more pages, content that pairs well with quiet morning rituals is something I have come to value highly and this site has the kind of energy that fits naturally into a calm reading routine.
come vincere sempre al crazy time [url=https://crazytimeee.com]https://crazytimeee.com/[/url]
free crazy time [url=https://crazy-timez.com/]free crazy time[/url].
Looking for similar voices elsewhere has come up empty in my recent searches, and a stop at basketwharf extended the search frustration, the rare site that does what no other does in quite the same way is precious and this one has clearly developed a particular approach that I have not been able to find duplicates of.
wildz live monopoly [url=https://monopoly-live-bd.com/]https://monopoly-live-bd.com/[/url]
Now appreciating that the post did not require external context to follow, and a look at micapacts maintained the same self contained quality, content that respects new visitors by being readable without prerequisites is content with broader accessibility and this site has clearly invested in keeping each piece reader friendly for fresh arrivals.
Reading this triggered a small but real correction in something I had assumed, and a stop at fifeholm extended that corrective effect, content that updates my beliefs through evidence rather than rhetoric is content with intellectual integrity and this site has earned that label consistently across the pieces I have read so far today.
Reading this prompted me to dig into a related topic later, and a stop at wildleafstudio provided some of the starting points for that follow up reading, content that triggers further exploration rather than satisfying curiosity completely is content with real generative energy and this site has plenty of that energy throughout it.
casino scores monopoly big baller today live free [url=http://monopoly-live-bangladesh.com/]https://monopoly-live-bangladesh.com/[/url]
statistics monopoly live [url=imonopoly.live]https://imonopoly.live/[/url]
solana casino online [url=https://solanagxy.com]https://solanagxy.com/[/url]
Top notch writing, every paragraph carries weight and nothing feels like filler, and a stop at claycargo reflected that same care, a rare thing on the open web these days where most pages exist for clicks rather than actual reader value or anything close to that which is honestly a real shame.
A clean piece that knew exactly what it wanted to say and said it, and a look at cartcab maintained the same clarity of intention, knowing the goal of a piece before writing is something most blog content lacks and the clarity of purpose here shows up in every paragraph for any careful reader to notice.
Now leaving a small mental note to recommend this when the topic comes up in conversation, and a look at crustcleve extended that recommend ready feeling, content that arms me with shareable references for likely future conversations is content with social value and this site is providing that conversational ammunition consistently for me lately.
888starz تسجيل [url=http://www.colindaylinks.com/]https://colindaylinks.com/[/url]
Felt slightly impressed without being able to point to one specific reason, and a look at shopmeadow continued that diffuse positive feeling, when content works at a level you cannot easily articulate the writer is doing something with craft rather than just delivering information and that is something I have learned to recognise.
The overall feel of the post was professional without being stuffy, and a look at jollymart kept that approachable expertise going, finding the right register for technical content is hard but this site has clearly figured out how to sound knowledgeable without slipping into that distant lecturing tone that loses readers in droves every time.
Took a screenshot of one section to come back to later, and a stop at futurelivingmarketplace prompted another saved tab, the urge to capture and revisit specific pieces of content is something I rarely feel but when I do it tells me the work is worth more than the average passing read for sure.
Started reading and ended an hour later without realising the time had passed, and a look at bonebow produced the same time dilation effect, when content makes time feel different the writer has achieved something well beyond the average and this site is producing that experience for me reliably across multiple readings.
вызов психиатра нарколога на дом [url=https://narkolog-na-dom-ekaterinburg-13.ru]вызов психиатра нарколога на дом[/url]
Started forming counter examples to test the claims and the post handled most of them implicitly, and a look at premiumhandpickedgoods continued that anticipatory style, writers who think two steps ahead of the critical reader save themselves from a lot of follow up work and this writer has clearly internalised that habit consistently.
Picked this for a morning recommendation in our company chat, and a look at loftcrate suggested I will mention this site again later, recommending content into a workplace context is a small editorial act that requires confidence in the recommendation and this site is making me confident in those recommendations consistently here too.
Worth every minute of the time spent reading, and a stop at balticclose extends that value across more pages, in a media environment where most content is engineered to waste attention this site stands out by treating reader time as something valuable rather than something to be exploited and stretched as far as possible.
A clear case of writing that does not try to do too much in one post, and a look at yorventa maintained the same scoped discipline, posts that try to cover too much end up covering nothing well and this site has clearly chosen scope discipline as a core editorial principle which shows up clearly in what I read.
Now setting up a small reminder to revisit the site on a slow day, and a stop at curatedethicalcommerce confirmed the reminder was a good idea, planning return visits is a small organisational act that signals trust in ongoing quality and this site has earned that planned return through consistent performance across the pieces I have read so far.
Took me back a step or two on an assumption I had been making, and a stop at shorevendor pushed that reconsideration further, writing that gently corrects the reader without being aggressive about it is a rare diplomatic skill and the team here clearly knows how to land critical points without turning readers off.
Looking through other posts here the consistency is what makes the site valuable rather than any single piece, and a stop at carefullychosenluxury extended that consistency observation, sites whose value lies in the ongoing pattern rather than in standout posts are sites I trust more deeply and this one has clearly built that kind of trust.
нарколог стационар спб [url=https://narkologicheskij-staczionar-sankt-peterburg-14.ru]нарколог стационар спб[/url]
Walked away with a clearer head than I had before reading this, and a quick visit to everdunegoods only sharpened that, the writing has a way of cutting through the noise that surrounds most topics online which is something I will definitely remember the next time I am searching for an answer to anything.
Now feeling slightly more optimistic about the state of independent writing online, and a stop at norigamihq extended that quiet optimism, sites like this one are the reason I have not given up on the open web entirely and finding them occasionally renews the case for paying attention to non algorithmic content sources today.
Easy to recommend, the content speaks for itself without needing additional praise from me, and a stop at bowclutch only adds more reasons to send people this way, the kind of generous resource that benefits its readers without demanding anything in return is increasingly rare and worth recognising clearly today across the broader open internet.
A piece that reads as if the writer trusted readers to fill in obvious gaps, and a look at fifejuno continued that respectful approach, content that does not over explain what the reader can infer is content that respects intelligence and this site has clearly chosen to write to capable readers rather than to the lowest common denominator.
Beyond the topic at hand this site reads as a small ongoing project of taking writing seriously, and a look at cerlix reinforced that project quality, sites that treat publishing as an ongoing serious practice rather than as content production for traffic are sites worth supporting and this one has clearly chosen the serious approach.
Thanks for keeping the writing direct without losing the warmth that makes content feel human, and a stop at elvegorge carried both qualities forward, balancing professionalism and personality is a rare skill and the writers here have clearly figured out how to consistently land it across many posts which I notice.
Decided to subscribe to the RSS feed if there is one, and a stop at caskcloud confirmed that decision, content that I want delivered to me proactively rather than just remembered when I have time is content that has earned a higher level of commitment from me as a reader looking for reliable sources.
выезд нарколога [url=https://reabilitaciya-alkogolikov-moskva-4.ru]выезд нарколога[/url]
капельница после запоя цена [url=https://kapelnicza-ot-pokhmelya-samara-30.ru]капельница после запоя цена[/url]
Thank you for being clear and direct, that simple approach saves so much frustration on the reader’s end, and a stop at kindvendor only made me more sure of it, the rest of the content seems to follow the same pattern which is a great sign of consistent editorial care behind the scenes.
прайс клининг спб
поставить капельницу от запоя на дому [url=https://kapelnicza-ot-pokhmelya-samara-31.ru]поставить капельницу от запоя на дому[/url]
Came across this through a roundabout path and now it is on my regular rotation, and a stop at frostrack sealed that decision, the open web still produces serendipitous discoveries when you let the citations and references guide you rather than relying purely on algorithmic feeds for new content recommendations always.
Really appreciate that the writer did not assume I would read every other related post first, and a look at marketwhim kept that self contained feel going where each piece can stand alone, accessibility for new readers is a sign of generous editorial thinking and this site has clearly invested in that approach.
лечение алкоголизма анонимно [url=https://narkologicheskaya-pomoshh-voronezh-10.ru]https://narkologicheskaya-pomoshh-voronezh-10.ru[/url]
наркология вывод из запоя в стационаре спб [url=https://vyvod-iz-zapoya-v-staczionare-sankt-peterburg-27.ru]наркология вывод из запоя в стационаре спб[/url]
нарколог на дом цена [url=https://narkolog-na-dom-ekaterinburg-14.ru]нарколог на дом цена[/url]
Reading carefully this time rather than scanning, and the depth shows up in places I missed first time around, and a look at designconsciousmarket rewarded the same careful approach, content that holds up to multiple reads is content I want more of in my regular rotation rather than disposable scroll fodder daily.
A piece that read smoothly because the writer understood how readers actually move through prose, and a look at elevatedconsumerexperience maintained the same reader awareness, writers who think about the reading experience as much as the writing experience produce better work and this site has clearly made that shift in editorial approach.
нарколог на дом стоимость [url=https://reabilitaciya-alkogolikov-moskva-3.ru]нарколог на дом стоимость[/url]
Раньше сайт практически не получал переходов из поиска, хотя в рекламу вкладывались большие бюджеты. После SEO оптимизации ситуация изменилась: органический трафик начал расти, а зависимость от рекламы снизилась https://msk.mihaylov.digital/prodvizhenie-sajta-gostinicy-ili-otelja/
Bookmark earned and the bookmark feels like a permanent addition rather than a maybe, and a look at xenialcart confirmed that permanent status, the difference between durable bookmarks and ephemeral ones is something I have learned to feel quickly and this site triggered the durable feeling almost immediately during my first read here.
Now realising the post solved a small problem I had been carrying for weeks, and a look at clearbrick extended that problem solving function, content that connects to specific unresolved questions in my own life rather than just providing general interest is content with real practical impact and this site is providing that practical value.
Thanks for sharing this with the open internet rather than locking it behind a paywall like so many sites do now, and a stop at fernbureaus kept the same vibe going, generous helpful and clearly written by someone who actually wants people to learn from it rather than just charge them.
Found the use of subheadings really helpful for scanning back through the post later, and a stop at baroncleat kept that reader friendly approach going, navigation is something many blog writers ignore but small structural choices make a noticeable difference for someone returning to find a specific point again days or weeks later.
Will be sharing this with a couple of people who care about the topic, and a stop at figfeat added more material worth passing along, the kind of site that is generous with quality content and does not make you jump through hoops to access it which is appreciated more than the team probably realises.
Worth saying this site reads better than most paid newsletters I have tried, and a stop at aerlune confirmed that comparison, the bar for free content is often lower than for paid but this site clears the paid bar consistently and that says something about the editorial approach behind the work being published here regularly.
A piece that did not require external context to follow, and a look at intentionalclickpinghub maintained the same self contained quality, content that stands alone without forcing readers to chase prerequisites is more accessible and this site has clearly thought about how each piece can serve a fresh visitor rather than only existing members.
Found this via a link from another piece I was reading and the click was worth it, and a stop at itemwhisper extended the value across more material, the open web still rewards clicking through citations when the underlying writers care about each other work and this site clearly belongs to that network.
Most posts I read end up forgotten within a day but this one is sticking, and a look at caspiboil extended that lingering effect, content that survives the immediate moment of reading rather than evaporating is content with genuine retention quality and this site has been producing memorable pieces at a rate notable across my reading.
Reading this post made me realise I had been settling for lower quality elsewhere, and a look at epicfife extended that recalibration, content that exposes how much I had been accepting in adjacent sources is content with calibrating effect on my standards and this site is performing that calibration function across topics for me reliably.
The use of plain language without dumbing down the topic was really well done, and a look at sernix continued in that same accessible style, this is something many technical writers fail at because they either confuse their readers or condescend to them but here neither problem appears at all which is impressive really.
Thanks for the practical examples scattered through the post rather than abstract theory only, and a look at opalwharf continued that grounded style, abstract points are easier to remember when paired with concrete situations and the writers here clearly understand how readers actually retain information from blog content reading sessions.
Reading this fit naturally into my afternoon walk because I was reading on my phone, and a stop at elegantdailyessentials continued well in that walking format, content that survives mobile reading without becoming awkward is content with format flexibility and this site has clearly thought about how it reads across different devices today.
intelligence test online [url=https://248garage.com/what-i-learned-retaking-a-cognitive-test-ten-years-later]intelligence test online[/url]
Worth pointing out that the writing reads as confident without being defensive about it, and a look at designfocusedclickping extended that secure tone, content that does not pre emptively argue against imagined critics has a different quality from defensive writing and this site reads as written from a place of real ease.
Honestly impressed by the consistency of voice across what I have read so far, and a quick visit to morningcrate continued that consistent feel, when a site reads like one careful person rather than a committee the experience is more rewarding for the reader who notices these subtle editorial details over time.
игры казино чемпион
Just want to say thank you for putting this together, posts like these make searching online actually worth it sometimes, and a quick look at goldencrestartisan kept that going, useful and easy to read without any of the tricks that ruin most blog comment sections lately on the wider open web.
melbet альфа банк [url=http://melbet30819.help/]http://melbet30819.help/[/url]
Found something new in here that I had not seen explained this way before, and a quick stop at finchfiber expanded the idea even further, the kind of writing that nudges your thinking forward a bit without forcing the issue is exactly what I look for online today and rarely actually find anywhere.
ai dirty chat adult entertainment apps
Probably the kind of site that should be more widely read than it appears to be, and a look at emberbasket reinforced that quiet wish, the gap between a sites quality and its apparent reach is sometimes large and that gap exists for this site in a way that makes me want to mention it more.
мины melbet [url=melbet30819.help]melbet30819.help[/url]
Learned something from this without having to dig through layers of fluff, and a stop at xolveta added a bit more context that helped tie things together for me, definitely a useful corner of the internet for anyone who wants real information without the usual marketing nonsense around it that often ruins similar pages.
справка для гостайны купить спб
Thanks for keeping things clear and to the point, that is honestly hard to find online these days, and after reading through zarnita the message stayed consistent which makes me trust the information being shared more than I usually do on similar pages that cover this same kind of topic.
Thanks for sharing this with the open internet rather than locking it behind a paywall like so many sites do now, and a stop at basteastro kept the same vibe going, generous helpful and clearly written by someone who actually wants people to learn from it rather than just charge them.
Saving the link for sure, this one is a keeper, and a look at itemcove confirmed I should bookmark the entire site rather than just this page, the consistency across what I have seen so far suggests there is a lot more here worth coming back for soon when I have more time.
good puzzle blog here
The whole experience of reading this was pleasant from start to finish, no pop ups and no annoying interruptions, and a look at cedarchime continued that clean experience, technical choices about page design matter for the reader and this site clearly cares about the small details that add up to comfort across multiple visits.
кондиционер для дома купить с установкой в московской Мы предлагаем комплексные решения: от подбора бытового настенного кондиционера для комнаты 20 м2 до проектирования кассетных и канальных систем для офисов и больших коммерческих площадей. Покупая технику у нас, вы избавляетесь от посредников и лишних переплат, получая надежную систему «зима-лето» с функциями обогрева, осушения и глубокой очистки воздуха. Ознакомьтесь с отзывами наших клиентов, выберите подходящую модель в интернет-магазине и закажите монтаж под ключ, чтобы уже завтра наслаждаться прохладой и тишиной в своем доме.
Now placing this in the same category as a few other sites I have come to trust, and a look at retailglow continued the placement decision, the small category of fully trusted sites is one I extend rarely and only after multiple positive reading sessions and this site has earned the category placement methodically over time.
Once you start reading carefully here it is hard to go back to lower quality alternatives, and a stop at modernpurposefulmarket reinforced that ratchet effect, the way good content raises standards is real over time and this site has clearly contributed to raising my expectations for what is possible in writing on the topic generally.
вызвать врача нарколога на дом срочно [url=https://narkolog-na-dom-ekaterinburg-13.ru]вызвать врача нарколога на дом срочно[/url]
A quiet kind of confidence runs through the writing, and a look at artisandesigncollective carried that same understated assurance, confidence without bragging is the most attractive register for online writing and the writers here have clearly developed it through practice rather than affecting it through stylistic tricks that would feel hollow eventually.
Refreshing change from the usual sites covering this topic, no clickbait and no padding, and a stop at equakoala confirmed the difference, this place clearly has its own voice rather than copying the formulas everyone else uses to chase clicks online which is becoming increasingly rare these days across nearly every popular subject.
https://baskadia.com/user/gx9s
лечение в наркологическом стационаре [url=https://narkologicheskij-staczionar-sankt-peterburg-14.ru]лечение в наркологическом стационаре[/url]
Skipped the related products section because there was none, and a stop at globalartisanfinds also lacked any aggressive monetisation, content that is not constantly trying to convert me into a customer or subscriber is content that has confidence in its own value and that confidence shows up as a different reading experience.
Знакомства Луганск ТГ Знакомства Луганск
трансы воронеж трансы воронеж
Well done, the kind of post that makes you slow down and actually read instead of skimming for keywords, and a look at clearcoast kept me reading carefully too, that is a sign of writing that has been crafted rather than churned out for an algorithm to see today and tomorrow.
Appreciate how nothing here feels copied or pieced together from other places, the voice is consistent and the tone stays human, and after I checked duetparishs I noticed the same style holds, which is a small detail but it makes the whole experience feel personal rather than like another generic site.
Easily one of the better explanations I have read on the topic, and a stop at finkglaze pushed it even higher in my mental ranking of useful resources, the kind of site that beats the average not by trying harder but by simply caring more about what it puts out daily which always shows.
nsfw apps adult entertainment apps
aviator betting app Bangladesh [url=https://www.aviator73841.help]https://www.aviator73841.help[/url]
Now adjusting my mental model of how the topic fits into the broader landscape, and a look at dapperaisle extended that adjustment, content that affects my structural understanding rather than just my factual knowledge is content with deeper impact and this site is providing those structural updates at a meaningful rate consistently across topics.
melbet casino slots [url=http://melbet31507.help]http://melbet31507.help[/url]
mostbet авторизация [url=mostbet80395.help]mostbet80395.help[/url]
More substantial than most of what I find searching for this topic online, and a stop at parcelwhimsy kept that quality consistent, this is one of those sites where the writing actually rewards careful reading rather than punishing the patient reader with empty filler stretched out across long paragraphs that say very little.
aviator withdrawal problem malawi [url=http://aviator13854.help]http://aviator13854.help[/url]
Walked away in a slightly better mood than when I started reading, that says something about the writing, and a stop at yornix kept that going, content that leaves you feeling more capable rather than overwhelmed is the kind I keep coming back to again and again over the years and across many topics.
melbet минимальная ставка [url=http://melbet96841.help/]http://melbet96841.help/[/url]
https://fondation.ugb.sn/2021/01/20/rehabilitation-et-de-modernisation/
Started a draft response in my head and ended without publishing it because the post said it well enough, and a look at tallycove produced the same effect, content that satisfies my urge to add to it by being complete enough on its own is rare and represents a particular kind of editorial completeness here.
However selective I am about new bookmarks this one made it past my filter, and a look at thoughtfullybuiltmarket confirmed the bookmark was worth the slot, the precious slots in my permanent bookmark folder are difficult to earn and this site earned one without making me think twice about whether the slot was justified by the quality.
Started believing the writer knew the topic deeply by about the second paragraph, and a look at chipbrick reinforced that confidence, the speed at which a writer establishes credibility through their writing is a useful quality signal and this writer establishes it quickly and quietly without resorting to credential dropping or self promotion.
прокапаться в в самаре [url=https://kapelnicza-ot-pokhmelya-samara-31.ru]прокапаться в в самаре[/url]
Reading this gave me the rare experience of fully agreeing with all the conclusions, and a stop at basteclay continued that agreement pattern, content that aligns with my existing views without seeming designed to do so is just content that happens to be reasonable and this site reads as reasonable rather than ideological mostly.
Genuinely useful read, the points are practical and easy to apply right away, and a quick look at lemoncrate confirmed that this site is consistent in that approach, looking forward to digging through the rest of it when I get the chance to sit down properly later in the week or this weekend.
нарколог срочно [url=https://reabilitaciya-alkogolikov-moskva-4.ru]нарколог срочно[/url]
1вин приложение Киргизия [url=http://1win85042.help/]http://1win85042.help/[/url]
прокапаться на дому самара [url=https://kapelnicza-ot-pokhmelya-samara-30.ru]прокапаться на дому самара[/url]
Thanks for keeping the writing direct without losing the warmth that makes content feel human, and a stop at refinedconsumerhub carried both qualities forward, balancing professionalism and personality is a rare skill and the writers here have clearly figured out how to consistently land it across many posts which I notice.
Felt a small spark of recognition when the post named something I had been struggling to articulate, and a look at brassmarket produced more such moments, the rare service of giving readers language for fuzzy intuitions is one of the higher values that good writing can provide and this site offered several today instances.
наркологическая помощь в воронеже [url=https://narkologicheskaya-pomoshh-voronezh-10.ru]https://narkologicheskaya-pomoshh-voronezh-10.ru[/url]
Felt the post had been written without looking over its shoulder, and a look at eurohilt continued that confident posture, content written for its own sake rather than against imagined critics has a different quality and this site reads as written from a place of confidence rather than defensive justification of every claim.
вывод из запоя стационар [url=https://vyvod-iz-zapoya-v-staczionare-sankt-peterburg-27.ru]вывод из запоя стационар[/url]
трансы Екатеринбурга трансы екатеринбург
Skimmed first and then went back to read carefully, and the careful read paid off in places I had missed, and a stop at dreamleafgallery got the same treatment, the rare site whose content rewards a second pass is content I want more of in my regular rotation rather than disposable single read articles.
I really like how the writer keeps the tone friendly without sounding fake or overly polished, and after a stop at finkglint the same calm pace was there, no rushing to make a point and no padding either, just clean honest writing that I can respect and come back to later again.
частный нарколог на дом быстро [url=https://narkolog-na-dom-ekaterinburg-14.ru]частный нарколог на дом быстро[/url]
вызвать врача нарколога на дом москва [url=https://reabilitaciya-alkogolikov-moskva-3.ru]вызвать врача нарколога на дом москва[/url]
Now planning to share the link with a small group of readers I trust, and a look at lorvana suggested more material to share with the same group, recommending content into a curated circle requires confidence in the recommendation and this site is making me confident in those personal recommendations on multiple separate occasions now.
Closed my email tab so I could read this without interruption, and a stop at xernita earned the same protected attention, when content is good enough to defend against the usual digital distractions you know it deserves better than the half attention most online reading gets in a typical busy day.
Honestly impressed by the consistency of voice across what I have read so far, and a quick visit to premiumvalueclick continued that consistent feel, when a site reads like one careful person rather than a committee the experience is more rewarding for the reader who notices these subtle editorial details over time.
Thanks for sharing this with the open internet rather than locking it behind a paywall like so many sites do now, and a stop at emberwharf kept the same vibe going, generous helpful and clearly written by someone who actually wants people to learn from it rather than just charge them.
is ritalin an amphetamine
https://ciofirst.com/macros-reply-launches-the-new-framework-for-automated-and-intelligent-input-management-with-generative-ai/
мелбет настройки аккаунта [url=https://www.melbet30819.help]мелбет настройки аккаунта[/url]
Started imagining how I would explain the topic to someone else after reading, and a look at refinedclickpinghub gave me more material for that imagined explanation, content that improves my own ability to discuss a topic is content that has actually transferred knowledge rather than just decorating my screen for a few minutes.
лечение алкоголизма анонимно в воронеже [url=https://narkologicheskaya-pomoshh-voronezh-11.ru]https://narkologicheskaya-pomoshh-voronezh-11.ru[/url]
domains
https://life-secrets.ru/polnyy-plan-podgotovki-k-ege-po-angliyskomu-yazyku-dlya-uspeshnoy-sdachi-ekzamena.html
Reading this slowly to give it the attention it deserved, and a stop at bravopiers earned the same slow read, choosing to read slowly is a small act of respect for content quality and very few sites earn that respect from me but this one did so without any explicit ask which is the cleanest way.
Held my interest from the opening line through to the closing thought, and a stop at cleatbox did the same, content that earns sustained attention in an environment full of distractions is doing something right and this site is clearly doing several things right rather than just one or two which I really appreciate.
If I had to defend the time I spend reading independent blogs this site would feature in the defence, and a look at modernvaluescollective reinforced that defensive utility, the ongoing case for non algorithmic reading is one I make to myself periodically and sites like this one provide the actual evidence that supports the case clearly.
мелбет apk киргизия скачать [url=https://www.melbet31507.help]https://www.melbet31507.help[/url]
aviator bKash withdrawal [url=aviator73841.help]aviator73841.help[/url]
iq testing [url=https://www.pss.gracewebsolution.com/age-appropriate-cognitive-assessments-for-school-age-kids]iq testing[/url]
One of the more thoughtful posts I have read recently on this topic, and a stop at finkgulf added even more weight to that impression, this is genuinely good content that holds its own against far better known sites in the same space without trying to imitate any of them at all which I appreciate.
Reading this prompted me to clean up some old notes related to the topic, and a stop at basteclose extended that organising urge, content that triggers personal organisation rather than just consuming attention is content with motivating energy and this site has the kind of clarity that prompts active follow up rather than passive consumption.
melbet карта вывод [url=http://melbet96841.help]melbet карта вывод[/url]
mostbet официальный [url=www.mostbet80395.help]www.mostbet80395.help[/url]
aviator mirror [url=https://www.aviator13854.help]aviator mirror[/url]
мелбет установка apk [url=www.melbet31507.help]мелбет установка apk[/url]
Now adjusting my mental list of reliable sites for this topic, and a stop at everjumbo reinforced the adjustment, the small ongoing curation work of maintaining trusted sources is one of the actual practical activities of careful reading and this site has earned a permanent place on my list for this particular subject.
A well calibrated piece that knew its scope and stayed inside it, and a look at quickvendor maintained the same scope discipline, scope creep is one of the failure modes of long blog posts and this site has clearly invested in the editorial discipline to prevent it which shows up in tightly contained pieces.
aviator legit site [url=https://www.aviator73841.help]https://www.aviator73841.help[/url]
melbet мбанк киргизия [url=https://melbet96841.help/]melbet мбанк киргизия[/url]
Held my interest from the opening line through to the closing thought, and a stop at nookharbor did the same, content that earns sustained attention in an environment full of distractions is doing something right and this site is clearly doing several things right rather than just one or two which I really appreciate.
aviator live chat [url=aviator13854.help]aviator13854.help[/url]
mostbet вход ошибка [url=http://mostbet80395.help/]http://mostbet80395.help/[/url]
https://assaintpriest.fr/2022/05/04/jeremy-bossy-2005-sengage-en-faveur-du-fc-sochaux-montbeliard/
Probably the kind of site that should be more widely read than it appears to be, and a look at nobleaisle reinforced that quiet wish, the gap between a sites quality and its apparent reach is sometimes large and that gap exists for this site in a way that makes me want to mention it more.
1win apk скачать [url=http://1win85042.help]http://1win85042.help[/url]
https://siciliammare.it/palermo-attivato-al-mercato-ittico-il-servizio-di-reperibilita-per-il-personale_8769/
наркологический стационар спб [url=https://narkologicheskij-staczionar-sankt-peterburg-14.ru]наркологический стационар спб[/url]
девушки ДНР Знакомства ДНР ТГ
1win поддержка Киргизия [url=www.1win85042.help]1win поддержка Киргизия[/url]
Reading this as part of my evening winding down routine fit perfectly, and a stop at globalinspiredstorefront extended the wind down nicely, content that calms rather than agitates is what I want at the end of the day and this site provides that calming reading experience reliably which is increasingly rare across the modern web.
A memorable post for me on a topic I had thought I was tired of, and a look at caramelmarket suggested the same site can refresh other tired topics, sites that can revive my interest in subjects I had written off as exhausted are doing rare work and this one is clearly doing that for me today.
Liked that the post landed without needing to manufacture controversy or take a contrarian stance for attention, and a stop at firhex continued that grounded approach, content that earns attention through quality rather than provocation is the kind that builds long term trust rather than burning it on quick wins.
A modest masterpiece in its own quiet way, and a look at curatedpremiumfinds confirmed the same quiet quality across the rest of the site, calling something a masterpiece is usually overstating but for content this carefully crafted the word feels appropriate even if the writers themselves would probably resist the label honestly.
High quality writing, no marketing speak and no buzzwords that mean nothing, and a stop at bracechord kept that going, simple direct content that actually communicates something is harder to find than it should be and this is one of the rare places that gets it right consistently across many different posts.
Considered as a whole this site has developed a coherent point of view that comes through in individual pieces, and a look at quelnix continued displaying that coherence, sites with a unified perspective rather than a grab bag of takes are sites with editorial maturity and this one has clearly developed that maturity through years of work.
Considered alongside other sources I have been reading this one consistently rises to the top, and a stop at fairfinch maintained that top ranking, the informal ongoing comparison between sources is something I do whenever reading on a topic and this site keeps coming out near the top of those comparisons over many sessions.
https://tecudi.com/produto/ringlinght-led-luz-flash-estudio-profissional-com-tripe-210m/
снятие похмелья капельницей [url=https://kapelnicza-ot-pokhmelya-samara-31.ru]снятие похмелья капельницей[/url]
Most posts I read end up forgotten within a day but this one is sticking, and a look at celnova extended that lingering effect, content that survives the immediate moment of reading rather than evaporating is content with genuine retention quality and this site has been producing memorable pieces at a rate notable across my reading.
The structure of the post made it easy to follow without losing track of where I was, and a look at gablejuno kept the same logical flow going, this site clearly understands that organisation is half the battle in keeping readers engaged from the first line to the last across any kind of post.
Took something from this I did not expect to find, and a stop at grebeheron added another unexpected useful piece, content that exceeds expectations rather than just meeting them is the kind that builds enthusiasm and earns repeat visits without any explicit ask from the writer or platform behind the work being read.
Probably the best thing I have read on this topic in the past month, and a stop at hopiron extended that ranking, the casual ranking of recent reading is informal but real and this site has been winning those rankings for me on this topic specifically over the last several weeks of regular reading sessions.
Reading this with my morning coffee turned into reading the related posts with my morning coffee, and a stop at glazeflask stretched the morning further, content that pulls breakfast into a reading session rather than just accompanying it is content that has earned a higher claim on my attention than the average article does.
The lack of unnecessary jargon made the post accessible without sacrificing accuracy, and a look at yourtradingmentor continued in the same accessible style, technical topics often hide behind specialised vocabulary but here the writer trusts the reader to keep up with plain language and that trust pays off nicely throughout the entire post.
Solid value for anyone willing to read carefully, and a look at heliofine extends that value across the rest of the site, this is the kind of place that rewards return visits rather than offering everything in a single splashy post and then leaving readers nothing to come back for later which is unfortunately common.
Now considering whether the post would translate well into a different form, and a look at knollgull suggested similar versatility, content that could move into other media without losing its substance is content that has been built around ideas rather than around format and this site reads as idea first throughout posts.
Found the use of subheadings really helpful for scanning back through the post later, and a stop at clevebound kept that reader friendly approach going, navigation is something many blog writers ignore but small structural choices make a noticeable difference for someone returning to find a specific point again days or weeks later.
вызов нарколога на дом круглосуточно [url=https://reabilitaciya-alkogolikov-moskva-4.ru]вызов нарколога на дом круглосуточно[/url]
капельница от алкоголя [url=https://kapelnicza-ot-pokhmelya-samara-30.ru]капельница от алкоголя[/url]
Quality writing that respects the reader’s intelligence without overloading them, and a quick look at flockfine reflected that approach, a balanced thoughtful site that earns trust by being consistent rather than by shouting about how trustworthy it is which is the usual approach online sadly across most content categories.
Glad the writer kept this short rather than padding it out, the points stand on their own without needing extra context, and a look at premiumeverydaygoods kept the same approach going, brevity is a sign of confidence in the substance and the team here clearly trusts their content to land without filler.
Pass this along to anyone you know dealing with similar questions, the answers here are clear, and a stop at jetivory adds even more useful material, this is the kind of resource that deserves to circulate widely rather than getting lost in the constant churn of new content online that buries good work daily.
Speaking from the perspective of a fairly demanding reader the writing here clears the bar consistently, and a look at modernconsciousmarket continued clearing that bar, the calibration of demanding reader is something I apply to all sources and this site has been one of the few that handles the demanding reading well across pieces sampled.
Top quality material, deserves more attention than it probably gets, and a look at firhush reflected the same effort across the site, a hidden gem in the modern web where most attention goes to whoever shouts loudest rather than whoever actually delivers the best content for their readers without much marketing fanfare.
мелбет пополнить с элкарт [url=https://melbet31507.help]мелбет пополнить с элкарт[/url]
наркологический стационар [url=https://narkologicheskaya-pomoshh-voronezh-10.ru]наркологический стационар[/url]
выезд врача нарколога на дом [url=https://narkolog-na-dom-ekaterinburg-14.ru]выезд врача нарколога на дом[/url]
выведение алкоголизма стационар [url=https://vyvod-iz-zapoya-v-staczionare-sankt-peterburg-27.ru]выведение алкоголизма стационар[/url]
porn
aviator registration bd [url=https://aviator73841.help/]https://aviator73841.help/[/url]
https://fondation.ugb.sn/2021/01/20/rehabilitation-et-de-modernisation/
мелбет скачать на айфон [url=www.melbet96841.help]www.melbet96841.help[/url]
https://folhanoroeste.com.br/cotidiano/sao-paulo-retoma-obrigatoriedade-do-uso-de-mascara-no-transporte-publico-a-partir-deste-sabado/
aviator best app Malawi [url=aviator13854.help]aviator13854.help[/url]
Closed three other tabs to focus on this one and never opened them again, and a stop at neatmills similarly held attention exclusively, content that crowds out other reading from working memory is content with real density and this site has demonstrated that density across multiple pages I have visited so far this morning.
mostbet maximální výhra [url=https://mostbet75409.help/]mostbet maximální výhra[/url]
лечение алкоголизма воронеж бесплатно [url=https://narkologicheskaya-pomoshh-voronezh-11.ru]https://narkologicheskaya-pomoshh-voronezh-11.ru[/url]
mostbet регистрация на сайте [url=www.mostbet80395.help]www.mostbet80395.help[/url]
Профессиональная служба дезинфекции с хорошим уровнем сервиса. Все этапы сотрудничества были организованы четко и без лишних сложностей – https://dezinfection-v-spb.click/dezinsekciya/ot-klopov/
Now feeling mildly impressed in a way I do not quite remember feeling about a blog in a while, and a stop at bracecloth extended that mild impression, content that produces specific positive emotional responses rather than just neutral information transfer is content with extra dimensions and this site has those extra dimensions clearly.
I appreciate the clarity here, everything is explained in simple terms without unnecessary detail, and after a quick stop at hueheron the points came together nicely for me, the writing keeps things straightforward and respects the reader from start to finish without ever talking down to anyone.
Now sitting back and recognising that this was a small but real win in my reading day, and a stop at gablejuno extended that quiet win, the cumulative effect of small reading wins versus the cumulative effect of small reading losses is real over time and this site is contributing to the wins side of that ledger.
Adding to the bookmarks now before I forget, that is how good this is, and a look at falconfern confirmed the rest of the site is worth saving too, this is one of those rare finds that justifies the time spent searching the web for once which is a relief in the current environment.
нарколог на дом круглосуточно москва цены [url=https://reabilitaciya-alkogolikov-moskva-3.ru]нарколог на дом круглосуточно москва цены[/url]
Now planning to write about the topic myself eventually using this post as a reference, and a look at grebeknot would also serve in that future piece, content that becomes raw material for my own writing rather than just informing my reading is content with multiplicative value and this site is generating that multiplicative effect.
Started reading and ended an hour later without realising the time had passed, and a look at protraderacademy produced the same time dilation effect, when content makes time feel different the writer has achieved something well beyond the average and this site is producing that experience for me reliably across multiple readings.
Felt the writer was being honest with the reader which is rare enough that I want to acknowledge it, and a look at koalaglade continued that honest feel, content built on actual knowledge rather than aggregated summaries is something I value highly and rarely come across in regular searches on the open internet these days.
Now considering writing a longer note about the post somewhere, and a look at heliogust added more material for that note, content that prompts me to write rather than just consume is content with generative energy and this site is producing that generative effect for me at a higher rate than most sources.
Really like that the writer trusts the reader to follow simple logic without restating every previous point, and a stop at gleamjuly kept that respect going, treating an audience as capable adults rather than as people who need constant hand holding makes a noticeable difference in the reading experience for me.
1win условия фрибета [url=http://1win85042.help/]http://1win85042.help/[/url]
A piece that did not waste any of its substance on sales or promotion, and a look at firjuno continued that pure content focus, sites that resist the urge to monetise every paragraph are increasingly rare and this one has clearly made the editorial choice to keep the writing clean from commercial intrusion which I value highly.
https://www.cursosalpha.com/blog/las-nuevas-bombas-diesel-electronicas/
iq tests free [url=https://www.towertalent.com/what-an-iq-of-100-actually-means-in-2026]iq tests free[/url]
A thoughtful piece that did not strain to be thoughtful, and a look at bayvendor continued that effortless quality, when thinking shows up in writing without the writer drawing attention to it you know you are reading something genuinely considered rather than something performing the appearance of consideration which is also common online.
My time on this site has now extended past what I had budgeted, and a stop at modernlifestylecommerce keeps extending it further, content that overstays its budget in my schedule is content that has earned the extra time and this site has been earning extra time across multiple visits to the point where my schedule needs adjustment.
Came here from another site and ended up exploring much further than I planned, and a look at jetivory only encouraged more exploration, the kind of place where one click leads to another not through manipulative design but through genuinely interesting content is rare and worth highlighting when found like this somewhere on the open internet.
Felt the post handled a sensitive angle of the topic with appropriate care, and a look at huejuly extended that careful handling across related material, sites that can navigate delicate territory without causing damage are rare and require a level of judgement that comes from experience rather than from following any clear playbook.
Solid information that lines up with what I have been hearing from other reliable sources, and after my visit to quickcarton I was even more certain of that, this site checks out which is something I value highly when so many places online play loose with the facts to chase a quick click.
Picked this up while looking for something else and ended up reading every paragraph because it was actually informative, and after galagull I was sure I would come back, that does not happen often when most sites bury the useful parts under endless ads and pop ups today and across most categories online.
Looking at this from the perspective of someone tired of generic content the contrast is striking, and a look at flockfine maintained that distinctive feel, sites with strong editorial identity stand out against the bland background of algorithmic content and this one has clearly developed an identity worth recognising through careful attention.
https://resources.austplants.com.au/plant-database/groundcovers/grasses-p4290263/
Just want to recognise that someone clearly cared about how this turned out, and a look at modernvaluecorner confirmed that care extends across the broader site, you can feel the difference between content shipped to hit a deadline and content released because the writer was actually proud of the result for once.
Found this via a link from another piece I was reading and the click was worth it, and a stop at grecofinch extended the value across more material, the open web still rewards clicking through citations when the underlying writers care about each other work and this site clearly belongs to that network.
Now I want to find more sites like this but I suspect they are rare, and a look at dewdawns extended that thought, the few sites that meet this quality bar are precious specifically because they are rare and finding others like them is one of the ongoing projects of careful internet curation across the years.
Genuine reaction is that this site clicked with how I like to read, and a look at cliffbeck kept that comfortable fit going, sometimes you find a place online whose editorial decisions just align with your preferences and when that happens it is worth recognising and supporting through repeat engagement consistently going forward.
Picked something concrete from the post that I will use immediately, and a look at brinkbeige added another concrete piece, content that produces immediately useful output rather than just abstract appreciation is content that earns its place in my regular rotation without needing any further evaluation from me at this point honestly.
Reading this slowly because the writing rewards a slower pace, and a stop at kraftgroove did the same, the pace at which I read content is something I now use as a quality signal and writing that earns a slower pace earns my attention as a reader looking for substance these days.
If I had encountered this site five years ago I would have been telling everyone about it, and a look at falconflame extended that retrospective enthusiasm, the version of me who used to recommend favourite blogs frequently would have made sure friends knew about this one and that earlier enthusiasm is partially returning to me here.
Generally I find the content on similar topics frustrating in specific ways and this post avoided all of them, and a look at firkit continued that frustration free experience, content that sidesteps the standard failure modes of its genre is content with editorial awareness and this site has clearly studied what fails elsewhere consistently.
Felt the post was written for someone like me without explicitly addressing me, and a look at heliohex produced the same fit, when content lands on its target without pandering you know the writer has done careful audience thinking rather than relying on demographic targeting or interest signals to do the work of editorial decisions.
Reading more of the archives is now on my plan for the weekend, and a stop at glenfir confirmed the archive worth the time, the rare archive worth a dedicated reading session rather than just casual sampling is the rare archive of serious work and this site has clearly produced enough of that work to warrant the deeper exploration.
Обратились в службу дезинфекции по рекомендации. Остались довольны скоростью выполнения работ и внимательным отношением сотрудников, https://dezinfection-v-spb.click/deratizaciya/ot-krys/
стационар наркологический санкт петербург [url=https://narkologicheskij-staczionar-sankt-peterburg-14.ru]стационар наркологический санкт петербург[/url]
mostbet paysafecard [url=http://mostbet75409.help/]mostbet paysafecard[/url]
After several visits I am now confident this site is one to follow seriously, and a stop at hullgale reinforced that confidence, the gradual building of trust through repeated quality exposures is the only sustainable way to develop reader loyalty and this site is building that loyalty in me through patient consistent work consistently.
mostbet crash tipy [url=https://mostbet75409.help]https://mostbet75409.help[/url]
Adding this site to my regular reading list, the post earned that on its own, and a quick stop at galeember sealed the decision, the kind of place worth checking back with from time to time because it consistently produces material that holds up against a critical reading too which I really value.
Thanks for sharing this with the open internet rather than locking it behind a paywall like so many sites do now, and a stop at modernpurposegoods kept the same vibe going, generous helpful and clearly written by someone who actually wants people to learn from it rather than just charge them.
A piece that did not lean on the writer credentials or institutional backing, and a look at connectforprogress maintained the same focus on substance, content that earns trust through quality rather than through name dropping is the kind I find most persuasive and this site is clearly playing on the substance side of that distinction.
Felt mildly happier after reading, which sounds silly but is true, and a look at grecoglobe extended that small mood lift, content that improves rather than degrades my mental state is content I want more of and the cumulative effect of reading sites that lift versus sites that drag is real over time.
A piece that handled multiple complications without becoming confused, and a look at flameeden continued that organisational clarity, holding multiple threads in a single piece without losing any of them is a sign of skilled writing and this site has clearly developed the editorial discipline to manage complexity without sacrificing readability throughout.
Glad the writer did not feel the need to argue with imaginary critics in the post itself, and a stop at jibfig kept the same focused approach going, defensive writing wastes the reader time and confidence on positions that did not need defending and this post has clearly avoided that common failure.
Reading this gave me a small sense of progress on a topic I have been slowly working through, and a stop at kraftkale added another step forward, learning happens in small increments across many sources and finding sources that consistently contribute is the actual practical value of careful curation in an information rich world.
Reading this confirmed that the topic deserves more careful attention than it usually gets, and a stop at foxarbors extended that elevated framing, content that raises the appropriate weight of a subject without being preachy about it is serving a quiet but important editorial function for the broader cultural conversation about it.
Highly recommend to anyone looking for a sensible take on this topic without the usual marketing nonsense, and a look at heliojuly kept that grounded approach going, sites that stay focused on serving readers rather than monetising every click are rare and this is clearly one of those rare ones I really appreciate finding.
Now appreciating the small but real way this post improved my afternoon, and a stop at granitevendor extended that small improvement effect, content that produces measurable positive impact on the texture of a reading day is content with real value and this site is producing those small positive impacts at a sustainable rate apparently.
Worth recognising that the post handled a familiar topic without reaching for any of the obvious hot takes, and a stop at falconkite continued that fresh treatment, sites that find new angles on subjects others have exhausted are sites worth following carefully and this one has clearly developed that exploratory instinct through patient practice.
Now planning to come back when I have the right kind of attention to read carefully, and a stop at globeflame reinforced that plan, choosing the right moment to read certain content is a quiet form of respect for the work and this site is generating those careful planning behaviours from me consistently as a reader.
Now recognising the specific pleasure of reading writing that shows real care for sentence shapes, and a look at flockgala extended that craft pleasure, sentence level writing quality is something most blog content ignores entirely and this site has clearly invested in the prose layer alongside the substance which is rare today.
Honestly this hits the sweet spot between detail and brevity, no rambling and no shortcuts, and a quick visit to humgrain kept that going across the related pages, the kind of place that respects your attention without trying to grab it through cheap tactics or attention seeking design choices that get tired fast.
kredit.house
Reading this on a long flight and finding it the best thing I read across hours of trying, and a stop at galehelm kept the streak going, when content beats long flight reading you know it has substance because flight reading is a hard test of a piece given the alternatives available everywhere.
Now feeling the rare pleasure of trusting a source completely on first encounter, and a look at knicknook extended that initial trust into something more durable, the calibration of trust to evidence is something I do informally and this site has earned high trust through the cumulative weight of multiple consistently good posts already.
нарколог на дом цены [url=https://narkolog-na-dom-ekaterinburg-14.ru]нарколог на дом цены[/url]
лечение наркомании воронеж [url=https://narkologicheskaya-pomoshh-voronezh-11.ru]лечение наркомании воронеж[/url]
Skipped breakfast still reading this and finished hungry but satisfied, and a stop at purebeautyoutlet kept me past breakfast time, content that displaces basic biological needs is content with serious attentional pull and the writers here are clearly capable of producing that level of engagement which is genuinely impressive these days.
Felt the writer respected me as a reader without making a show of doing so, and a look at gridivory continued that quiet respect, this is the kind of small but meaningful detail that separates the sites I bookmark from the ones I close after a single skim and never return to again no matter how interesting the headline.
Worth flagging that the post handled an angle of the topic I had not seen elsewhere, and a look at clingchee extended that fresh treatment, content that finds underexplored corners of well covered subjects is genuinely valuable and this site has demonstrated that exploratory editorial approach across multiple pieces in my reading sessions today.
Skipped lunch to finish reading, which says something, and a stop at intentionalconsumerexperience kept me at my desk longer than planned, when content beats the lunch impulse the writer has done something genuinely impressive in an attention environment full of immediately satisfying alternatives competing for the same finite block of reader time.
наркологические клиники в нижнем новгороде [url=https://vyvod-iz-zapoya-v-staczionare-nizhnij-novgorod-23.ru]наркологические клиники в нижнем новгороде[/url]
Worth every minute of the time spent reading, and a stop at flankgate extends that value across more pages, in a media environment where most content is engineered to waste attention this site stands out by treating reader time as something valuable rather than something to be exploited and stretched as far as possible.
нарколог на дому капельница [url=https://narkolog-na-dom-moskva-28.ru]нарколог на дому капельница[/url]
рольшторы на окна цена [url=https://rulonnye-shtory-s-elektroprivodom11.ru]https://rulonnye-shtory-s-elektroprivodom11.ru[/url]
вывод из запоя в стационаре санкт петербург [url=https://vyvod-iz-zapoya-v-staczionare-sankt-peterburg-28.ru]вывод из запоя в стационаре санкт петербург[/url]
A piece that exhibited the kind of patience that good writing requires, and a look at kraftkilt continued that patient quality, hurried writing is easy to spot and this site reads as having been written without time pressure which produces a different feel than the rushed content that dominates much of the modern blog space.
intelligence test online [url=http://www.vegaswins.co.uk/fluid-vs-crystallized-intelligence-how-they-show-up-on-iq-tests]intelligence test online[/url]
amphetamine salt combo
One of the more honest takes on the topic I have seen lately, no spin and no oversell, and a stop at humivy kept that going, the kind of voice the open web could use a lot more of rather than the endless echo chamber of recycled opinions floating around every social platform these days.
кодировка от алкоголя нижний новгород [url=https://vyvod-iz-zapoya-v-staczionare-nizhnij-novgorod-24.ru]кодировка от алкоголя нижний новгород[/url]
Liked that the post resisted a sales pitch ending, and a stop at helioketo maintained the no pitch approach, content that ends without trying to convert me into a customer or subscriber is content that has confidence in its own value and this site is clearly playing the long game on reader trust.
Thanks for the moderate length, neither so short it skips substance nor so long it bloats, and a stop at galekraft hit the same balance, the right length is one of the hardest things to calibrate in blog writing and I appreciate when a team has clearly thought about it rather than defaulting.
A piece that did not try to be timeless and ended up reading as durable anyway, and a look at glyphfig extended that durable feel, content that stays useful past its publication date without straining for permanence is content that ages well and this site has the kind of evergreen quality that I value highly today.
Now feeling the post has earned a proper recommendation rather than a casual mention, and a stop at fancyfinal reinforced the recommendation strength, the difference between mentioning and recommending is a small editorial distinction I observe in my own conversations and this site has earned the upgraded recommendation level from me confidently today.
лечение наркозависимости воронеж [url=https://narkologicheskaya-pomoshh-voronezh-12.ru]https://narkologicheskaya-pomoshh-voronezh-12.ru[/url]
Honestly impressed by the consistency of voice across what I have read so far, and a quick visit to jouleforge continued that consistent feel, when a site reads like one careful person rather than a committee the experience is more rewarding for the reader who notices these subtle editorial details over time.
Felt the post had been written without looking over its shoulder, and a look at eliteledges continued that confident posture, content written for its own sake rather than against imagined critics has a different quality and this site reads as written from a place of confidence rather than defensive justification of every claim.
врач нарколог круглосуточно [url=https://narkolog-na-dom-moskva-29.ru]врач нарколог круглосуточно[/url]
вывод из запоя стационар санкт петербург [url=https://vyvod-iz-zapoya-v-staczionare-sankt-peterburg-29.ru]вывод из запоя стационар санкт петербург[/url]
Found the post genuinely useful for something I was working on this week, and a look at brightcartfusion added more material I will reference, content that connects to my actual life and work rather than just being interesting in the abstract is the kind I will pay attention to and return to repeatedly.
Came across this through a roundabout path and now it is on my regular rotation, and a stop at grifffume sealed that decision, the open web still produces serendipitous discoveries when you let the citations and references guide you rather than relying purely on algorithmic feeds for new content recommendations always.
mines mostbet mobil [url=http://mostbet75409.help/]http://mostbet75409.help/[/url]
Just wanna admit that this is extremely helpful, Thanks for taking your time to write this.
Stands apart from similar pages by actually being useful, that is high praise these days, and a look at floeiron kept that standard going, you can tell when a site is built around the reader versus around metrics and this one clearly belongs to the first category for sure based on what I read.
Walked away with a clearer head than I had before reading this, and a quick visit to flankhaven only sharpened that, the writing has a way of cutting through the noise that surrounds most topics online which is something I will definitely remember the next time I am searching for an answer to anything.
Started taking notes about halfway through because the points were stacking up, and a look at maplevendor added enough material that my notes file grew further, content that demands note taking from a passive reader is content with substance and the writers here are clearly producing that kind of work consistently across topics.
Now feeling the small relief of finding writing that does not condescend, and a stop at tealvendor extended that respect for readers, content that treats its audience as capable adults rather than as people to be managed produces a different reading experience and this site has clearly chosen the respectful approach across all pieces.
Liked that there was nothing performative about the writing, and a stop at krillflume continued that genuine quality, performative writing tries to be witnessed rather than read and the difference between performance and substance is huge for the careful reader and this site has clearly chosen substance every time clearly.
наркологический стационар в санкт петербурге [url=https://narkologicheskij-staczionar-sankt-peterburg-14.ru]наркологический стационар в санкт петербурге[/url]
Most of the time I feel the open web is in decline and then I find a site like this, and a stop at huskgenie reinforced that mood lift, the cumulative effect of finding occasional excellent independent content versus the cumulative effect of finding mostly mediocre content is real for the long term reader maintaining web habits today.
секс веб чат
Comfortable reading experience throughout, no jarring tone shifts and no awkward formatting, and a look at consciouslivingmarketplace kept that smooth feel going, the kind of editorial polish that goes unnoticed when present but glaring when absent is something this site has clearly invested in across the broader content as well which deserves recognition.
Such writing is increasingly rare and worth supporting through attention, and a stop at pebbleaisle extended that supportive attention across more pages, the conscious choice to spend time on sites that produce careful work rather than convenient consumption is itself a small form of patronage and this site is receiving that conscious patronage from me.
Spent a few minutes here and came away with a clearer picture of the topic, the writing keeps things simple without dumbing them down, and after a stop at marketpearl the rest of the points lined up neatly which is something I appreciate when I am short on time and need answers fast.
Took a few notes from this post, the points are easy to remember without needing to come back and check, and a look at galloheron added a couple more, the kind of place that sticks in the memory long after the browser tab has been closed for the day which says a lot really.
Loved the writing voice here, friendly without being fake and confident without being arrogant, and a stop at heliokindle carried the same tone forward, the kind of personality that makes a reader feel welcome rather than lectured at which is a balance plenty of writers struggle to find no matter how long they have been at it.
Definitely a recommend from me, anyone curious about the topic should check this out, and a look at silverharborvendorparlor adds even more reason for that, the depth and quality combine to make this site one I will be pointing people toward whenever similar conversations come up over the months ahead at work or socially.
Refreshing to find writing that does not try to manipulate the reader into clicking onto the next page through cliffhangers and forced engagement, and a stop at gnarfrost continued in the same respectful way, this is what reader first design actually looks like in practice rather than just in marketing copy that sounds nice.
mostbet hesabıma necə daxil olum [url=www.mostbet72483.help]www.mostbet72483.help[/url]
https://funworld.co.id/gallery/howl-o-ween-party/
A small thing but the line spacing and font choices made reading this physically pleasant, and a look at fancyhale maintained the same careful design, technical choices about typography are part of what makes online reading actually comfortable and this site has clearly invested in the design layer alongside the content layer carefully.
This actually answered the question I had been searching for, and after I checked groovehale I had a few more pieces I had not realised I needed, that is the sign of a site that knows what its readers want before they even know how to ask it which is impressive.
A well calibrated piece that knew its scope and stayed inside it, and a look at clingclasp maintained the same scope discipline, scope creep is one of the failure modes of long blog posts and this site has clearly invested in the editorial discipline to prevent it which shows up in tightly contained pieces.
Just want to acknowledge that the writing here is doing something right, and a quick visit to duetdrives confirmed the same standards run across the broader site, recognising good work is something I try to do when I find it because the alternative is silence and silence rewards mediocrity.
Honestly this was a good read, no jargon and no padding, and a short look at flankisle kept that same feel going which I really appreciated, the writer clearly knows the topic well enough to explain it without hiding behind big words or filler that often gets used to seem clever.
Reading this confirmed a small detail I had been uncertain about, and a stop at joustglade provided the source for further checking, content that supports verification through citations or links rather than just asserting facts is more trustworthy and this site has clearly built its credibility through that kind of verifiable approach consistently.
melbet вывод элкарт [url=http://melbet42570.help]http://melbet42570.help[/url]
Liked the careful selection of which details to include and which to skip, and a stop at harborlark reflected the same editorial judgement, knowing what to leave out is just as important as knowing what to include and this site has clearly figured out where that line sits for the topics it covers regularly.
Spent a few minutes here and came away with a clearer picture of the topic, the writing keeps things simple without dumbing them down, and after a stop at huskkindle the rest of the points lined up neatly which is something I appreciate when I am short on time and need answers fast.
Reading this in segments because the day was busy, and the post survived the fragmented attention well, and a stop at kudosember held up similarly under interrupted reading, content that can withstand modern distracted reading patterns rather than requiring a perfect block of focused time is increasingly the kind I prefer.
A piece that handled the topic with appropriate weight without becoming portentous, and a look at mistvendor continued that calibrated seriousness, content that takes itself seriously without becoming pompous is something this site has clearly figured out and the balance shows up in every piece I have read across multiple sessions now.
https://free-hack.com/printthread.php?t=81487&pp=40&page=7
1win ghid bonus [url=http://1win83742.help]http://1win83742.help[/url]
Now appreciating that I did not feel exhausted after reading, and a stop at gallohex extended that energising quality, content that leaves me with more attention than it consumed is rare and the gap between draining and energising content is real over the course of a typical day spent reading widely online.
дизайн домов дизайн проект дома стоимость
наркологический центр [url=https://narkologicheskaya-pomoshh-voronezh-11.ru]наркологический центр[/url]
https://ryazan.ideya-parketa.ru/catalog/probkovoe_pokrytie/
1вин приложение Киргизия [url=1win07492.help]1вин приложение Киргизия[/url]
Just want to recognise that someone clearly cared about how this turned out, and a look at thoughtfulcommerceplatform confirmed that care extends across the broader site, you can feel the difference between content shipped to hit a deadline and content released because the writer was actually proud of the result for once.
A piece that prompted a small mental rearrangement of how I order related ideas, and a look at maplegrovemarketparlor extended that rearranging effect, content that affects the structure of my thinking rather than just adding to it is content with the deepest kind of impact and this site is reaching that depth for me today.
Liked how the post handled an objection I was forming as I read, and a stop at flumelake similarly anticipated where my thinking was going next, the rare writer who can predict reader concerns and address them in advance is doing something most online content fails to do despite that being basic editorial work.
mostbet intrare [url=https://mostbet19438.help]https://mostbet19438.help[/url]
нарколог лечение на дому [url=https://narkolog-na-dom-ekaterinburg-14.ru]нарколог лечение на дому[/url]
Worth recognising the specific care that went into how this post ended, and a look at helmkit maintained the same careful conclusions, endings are where most blog content falls apart and this site has clearly invested in the closing stretches of its pieces rather than letting them simply trail off when energy fades.
https://eq-ccqqfar.usac.edu.gt/logo-usac/
Closed the laptop and walked away thinking about the post for a good twenty minutes, and a stop at grovefalcon produced similar lingering thoughts, content that survives the closing of the browser tab is content that has actually entered the mind rather than just decorating the screen for the duration of the reading.
https://beneficios-tributarios.minambiente.gov.co/events/yearly-on-august-20th-and-21st/
https://ritual-voronezh24.ru/company/
Выбор ритуальных услуг и их стоимость
Now planning to share the link with a small group of readers I trust, and a look at gnarkit suggested more material to share with the same group, recommending content into a curated circle requires confidence in the recommendation and this site is making me confident in those personal recommendations on multiple separate occasions now.
Worth flagging this post as worth a careful read rather than a casual skim, and a stop at flankivory earned the same careful approach, the few sites that warrant slower reading are sites I now treat differently from the daily content stream and this one has clearly moved into that elevated treatment category.
Comfortable reading experience throughout, no jarring tone shifts and no awkward formatting, and a look at fawnetch kept that smooth feel going, the kind of editorial polish that goes unnoticed when present but glaring when absent is something this site has clearly invested in across the broader content as well which deserves recognition.
Felt the writer was being honest with the reader which is rare enough that I want to acknowledge it, and a look at iconflank continued that honest feel, content built on actual knowledge rather than aggregated summaries is something I value highly and rarely come across in regular searches on the open internet these days.
More original than the recycled takes I keep finding on the topic elsewhere, and a quick look at iciclemart confirmed it, the kind of site that has its own voice rather than echoing whatever is trending which makes it stand out as a refreshing change from the usual rotation of generic content I see daily.
Now noticing how rare it is to find a site that does not feel rushed, and a look at clevergoodszone extended that calm pace, content produced without time pressure has a different quality than content shipped to meet a deadline and this site reads as written without urgency which produces a different and better experience for readers.
mostbet pulsuz demo [url=http://mostbet72483.help/]http://mostbet72483.help/[/url]
наркологические клиники нижний новгород [url=https://vyvod-iz-zapoya-v-staczionare-nizhnij-novgorod-23.ru]наркологические клиники нижний новгород[/url]
Reading this brought back an idea I had set aside months ago, and a stop at depotglow added more substance to that idea, content that revives dormant projects in my own thinking is content with serious creative value and this site is contributing to my own work in ways I had not expected when first clicking through.
https://limelighttemplate3.flywheelsites.com/selling-properties/sidebar-on-the-left/
Honestly enjoyed not being sold anything for the entire duration of the post, and a look at grovefarms kept that pleasant absence going across more pages, content that exists for its own sake rather than as a funnel to a paid product is increasingly rare and worth supporting where I can find it.
Honestly this hits the sweet spot between detail and brevity, no rambling and no shortcuts, and a quick visit to gambitfort kept that going across the related pages, the kind of place that respects your attention without trying to grab it through cheap tactics or attention seeking design choices that get tired fast.
Worth flagging that the post handled an angle of the topic I had not seen elsewhere, and a look at honeymarket extended that fresh treatment, content that finds underexplored corners of well covered subjects is genuinely valuable and this site has demonstrated that exploratory editorial approach across multiple pieces in my reading sessions today.
регистрация участка [url=http://navode.su/student-a-dacha-uzhe-est-5-neochevidnyh-sposobov-poluchit-zayom//]регистрация участка[/url] .
Grateful for posts like this one, they remind me there are still places online run by people who care about quality, and a look at oasiscrate reflected the same standards, you can tell the difference between content made for readers and content made just for search engines today and this is the former.
прайс клининг спб
mostbet uduş manat çıxarış [url=http://mostbet72483.help]mostbet uduş manat çıxarış[/url]
Now saved this in a way that I will actually find again rather than the casual bookmark approach, and a stop at silkgrovevendorroom earned the same careful saving, organising my reading bookmarks so that high quality sources rise to the top is something I should do more of and this site triggered that organisation today.
скачать steam mobile authenticator Качественный инструмент Steam Desktop Authenticator является лучшей альтернативой для тех, кто не хочет скачивать Steam Guard Mobile Authenticator на мобильный. Десктопный клиент моментально обрабатывает все входящие запросы на продажу карточек или скинов. Для инсталляции этой полезной утилиты достаточно ввести в браузере download sda и запустить скачанный файл.
download sda steam Отличная оптимизация и скорость работы делают Steam Desktop Authenticator незаменимым инструментом для каждого активного геймера. Вы можете скачать sda steam, чтобы моментально одобрять лоты на маркете без каких-либо задержек и подвисаний. Приложение обладает тем же уровнем криптографии, что и мобильное приложение, поэтому скачать Steam Guard Mobile Authenticator теперь можно по желанию.
Took a chance on the headline and was rewarded, and a stop at guavaflank kept the rewards coming as I clicked through, the kind of place where every link leads somewhere worth the click is a small luxury on the modern web where so many sites are mostly empty calories disguised as content.
готовые рулонные шторы купить в москве [url=https://rulonnye-shtory-s-elektroprivodom11.ru]готовые рулонные шторы купить в москве[/url]
Beyond the topic at hand this site reads as a small ongoing project of taking writing seriously, and a look at herbfife reinforced that project quality, sites that treat publishing as an ongoing serious practice rather than as content production for traffic are sites worth supporting and this one has clearly chosen the serious approach.
Reading this brought back the satisfaction I used to get from blogs ten years ago, and a stop at clipchime kept that nostalgic quality alive, sites that capture what was good about an earlier era of internet writing are increasingly precious and this one is doing that without feeling like a deliberate throwback at all.
как вывести деньги с melbet [url=https://melbet42570.help/]как вывести деньги с melbet[/url]
вывод из запоя стационар санкт петербург [url=https://vyvod-iz-zapoya-v-staczionare-sankt-peterburg-28.ru]вывод из запоя стационар санкт петербург[/url]
Now appreciating that the post did not require external context to follow, and a look at globalcuratedgoods maintained the same self contained quality, content that respects new visitors by being readable without prerequisites is content with broader accessibility and this site has clearly invested in keeping each piece reader friendly for fresh arrivals.
нарколог на дом анонимно [url=https://narkolog-na-dom-moskva-28.ru]нарколог на дом анонимно[/url]
наркология в воронеже [url=https://narkologicheskaya-pomoshh-voronezh-12.ru]https://narkologicheskaya-pomoshh-voronezh-12.ru[/url]
психиатр нарколог нижний новгород [url=https://vyvod-iz-zapoya-v-staczionare-nizhnij-novgorod-24.ru]психиатр нарколог нижний новгород[/url]
Thanks for the simple approach, too many sites bury the actual point under layers of unnecessary words, but here every line earns its place, and a look at idleflint showed the same care for the reader which is something I will remember the next time I need answers on a topic.
migliori siti crazy time [url=http://www.crazy-time-rome.com]https://crazy-time-rome.com/[/url]
услуги нарколога на дому [url=https://narkolog-na-dom-moskva-29.ru]услуги нарколога на дому[/url]
вывод из запоя в стационаре клиника [url=https://vyvod-iz-zapoya-v-staczionare-sankt-peterburg-29.ru]вывод из запоя в стационаре клиника[/url]
Now feeling the small relief of finding writing that does not condescend, and a stop at flaskkelp extended that respect for readers, content that treats its audience as capable adults rather than as people to be managed produces a different reading experience and this site has clearly chosen the respectful approach across all pieces.
crazy time history [url=http://crazytimeee.com/]https://crazytimeee.com/[/url]
Worth marking this site as one to come back to deliberately rather than by accident, and a stop at goldenknack reinforced that intention, the difference between sites I find again by chance and sites I return to on purpose is meaningful and this one has clearly moved into the deliberate return category for me.
Прокат авто Краснодар аэропорт Для всех гостей города доступна удобная аренда авто Краснодар аэропорт с моментальной встречей пассажиров сразу по прилете. Вы можете заранее заказать прокат авто в Краснодаре аэропорт, чтобы с комфортом продолжить свой путь на надежной и чистой машине. Мы профессионально занимаемся арендой авто в Краснодаре без залога и ограничения по пробегу с подачей в аэропорт и жд вокзал.
1win turneu lucky jet [url=https://www.1win83742.help]https://www.1win83742.help[/url]
casino scores monopoly live vegas winners [url=https://monopoly-live-bd.com]https://monopoly-live-bd.com/[/url]
cash hunt crazy time [url=https://www.crazy-timez.com]https://crazy-timez.com/[/url]
melbet верификация [url=melbet42570.help]melbet42570.help[/url]
monopoly time live [url=https://www.monopoly-live-bangladesh.com/]https://monopoly-live-bangladesh.com/[/url]
solana casino liste [url=http://solanagxy.com/]https://solanagxy.com/[/url]
monopoly live statistiche [url=http://imonopoly.live/]https://imonopoly.live/[/url]
free legit iq test [url=https://liveatsurf.com/mensa-membership-requirements-what-you-actually-need-to-qualify]free legit iq test[/url]
I usually skim posts like these but this one held my attention all the way through, and a stop at bettershoppingchoice did the same, that is a strong endorsement coming from me because I am usually quick to bounce when content gets repetitive or fails to deliver on its initial promise made in the headline.
تسجيل دخول 888 [url=http://www.colindaylinks.com/]https://colindaylinks.com/[/url]
Looking at this from the perspective of someone tired of generic content the contrast is striking, and a look at fluxhusk maintained that distinctive feel, sites with strong editorial identity stand out against the bland background of algorithmic content and this one has clearly developed an identity worth recognising through careful attention.
Reading this in three sittings because the day was fragmented, and the piece survived the fragmentation, and a stop at gambitgulf held up under similar reading conditions, content engineered for continuous attention is fragile in modern conditions and this site reads as durable across the realistic ways people consume content today.
Felt the writer was being honest with the reader which is rare enough that I want to acknowledge it, and a look at gildvendor continued that honest feel, content built on actual knowledge rather than aggregated summaries is something I value highly and rarely come across in regular searches on the open internet these days.
1win фриспины Кыргызстан [url=www.1win07492.help]www.1win07492.help[/url]
cum fac retragere 1win [url=https://1win83742.help/]https://1win83742.help/[/url]
Уборка после ремонта
My friends would appreciate a few of these posts and I will be sending links accordingly, and a look at olivevendor added more pages to my share queue, content that earns shares to specific people in specific contexts is content with social utility and this site is generating those targeted shares from me consistently lately.
mostbet coduri promoționale Moldova [url=http://mostbet19438.help]http://mostbet19438.help[/url]
Thank you for the auspicious writeup.
A small thing but the line spacing and font choices made reading this physically pleasant, and a look at fawngate maintained the same careful design, technical choices about typography are part of what makes online reading actually comfortable and this site has clearly invested in the design layer alongside the content layer carefully.
1вин регистрация Киргизия [url=https://www.1win07492.help]1вин регистрация Киргизия[/url]
Approaching this with the usual skepticism I bring to new sites and being slowly persuaded, and a stop at orchardharborvendorparlor continued that gradual persuasion, the careful path from skeptical reader to genuine fan is the only one I trust and this site has walked me along that path through patient consistent quality across pieces.
A piece that built up gradually rather than front loading its main points, and a look at draftglades maintained the same gradual structure, content that trusts the reader to reach conclusions through accumulating reasoning is more persuasive than content that announces conclusions and then defends them and this site uses the persuasive approach.
скачать sda Повысьте уровень безопасности своей учетной записи и поспешите скачать Steam Guard Authenticator для автоматического контроля авторизаций. Программа Steam Desktop Authenticator избавит вас от рутины с мобильными телефонами и сэкономит массу времени. Для установки оригинального приложения введите в поисковую строку download sda steam и запустите инсталлятор.
mostbet lei moldovenesti [url=mostbet19438.help]mostbet lei moldovenesti[/url]
Going to come back when I have more time to read carefully, the post deserves more than a quick scan, and a stop at guavahilt reinforced that, this is the kind of site that rewards a slower read which is hard to find in this fast paced corner of the internet but really worthwhile.
Found a small mental shift after reading this, the framing here is just a bit different from the standard takes online, and a look at idleketo extended that fresh perspective across more material, the rare site whose voice actually changes how you think about something rather than just confirming existing beliefs.
Thanks for taking the time to write this, it is clear that some thought went into how each point would land, and after I went through flintgala I had a better grip on the topic, real value without the usual marketing noise people have to put up with online when searching for answers.
Taking the time to read carefully here has been worthwhile for the past hour, and a look at herbharp extended the worthwhile reading, the calculation of return on reading time spent is something I do informally and this site has been producing positive returns across multiple sessions during the last week of regular visits and reads.
Even across multiple posts the writers voice has remained consistent in a way I appreciate, and a stop at intentionallysourcedgoods continued that voice, sites that maintain editorial consistency across many pieces have something most sites lack and this one has clearly worked out how to keep its voice steady across what reads as a growing archive.
This one is staying open in a tab for the rest of the day so I can come back and re read certain parts, and a look at seothread suggests I will be doing the same with a few more pages here too, this is going to be a deep dive over the coming hours.
платная наркологическая помощь [url=https://narkologicheskaya-pomoshh-voronezh-11.ru]платная наркологическая помощь[/url]
Well structured and easy to read, that combination is rarer than people think, and a stop at livzaro confirmed the same standard runs across the rest of the site, definitely the kind of place I will be coming back to when this topic comes up in conversation later again over the weeks ahead.
Now planning to recommend this site in a context where my recommendations are taken seriously, and a stop at gambithusk confirmed I should make that recommendation soon, the small but real act of recommending content into spaces where my taste matters is something I take seriously and this site is worth the recommendation.
Liked the careful word choice throughout, every term seemed picked for a reason rather than thrown in casually, and a stop at dealvilo continued that precise style, this kind of attention to small details is what separates careful writing from the usual rushed content that dominates blog spaces today across pretty much every topic I follow.
Recommend this to anyone who values clear thinking over flashy presentation, and a stop at discovernewworld continued in the same understated way, this site has its priorities in the right place which makes it worth supporting through repeat visits and recommendations rather than just one passing read today before moving on quickly elsewhere.
download sda steam Программа Steam Desktop Authenticator создана специально для трейдеров, которым важна скорость и комфорт при одобрении лотов на торговой площадке. Теперь вам не обязательно скачивать Steam Guard Mobile Authenticator на телефон, ведь все операции можно подтверждать в один клик мышкой. Защитите свой инвентарь от мошенников — для этого достаточно зайти на проверенный сайт и скачать sda для вашей операционной системы.
A small thing but the line spacing and font choices made reading this physically pleasant, and a look at urbanmixo maintained the same careful design, technical choices about typography are part of what makes online reading actually comfortable and this site has clearly invested in the design layer alongside the content layer carefully.
Found this through a search that was generic enough I did not expect quality results, and a look at melvizo continued the surprisingly good experience, search engines occasionally still surface excellent independent content if you scroll past the obvious paid and high authority results which is reassuring to remember sometimes.
If I had to summarise the editorial sensibility of this site in a few words it would be careful and human, and a look at harborpick extended that summary feeling, capturing the essence of a sites approach in brief is hard but this site has a clear enough identity that the summary comes naturally enough.
Лучшие кейтеринговые компании для корпоративов
Came in for one specific question and got answers to three I had not even thought to ask, and a look at venxari extended that bonus value pattern, the kind of resource that anticipates reader needs rather than just answering the literal question asked is the gold standard and this site reaches it.
Quality writing that respects the reader’s intelligence without overloading them, and a quick look at rovnero reflected that approach, a balanced thoughtful site that earns trust by being consistent rather than by shouting about how trustworthy it is which is the usual approach online sadly across most content categories.
mostbet mastercard ilə çıxarış [url=http://mostbet72483.help/]http://mostbet72483.help/[/url]
Honestly thank you to whoever wrote this because it scratched an itch I had not quite been able to articulate, and a stop at lunarvendor kept that satisfying feeling going, the kind of writing that meets unspoken needs is special and this site clearly has writers who understand their readers more than most do today.
Liked everything about the experience, from the opening through to the closing notes, and a stop at fernbureau extended that into more pages, finding a site where the editorial vision shows through every choice rather than feeling random is an increasingly rare experience and one I am glad to have today during this particular reading session.
A piece that exhibited the kind of patience that good writing requires, and a look at walnutvendor continued that patient quality, hurried writing is easy to spot and this site reads as having been written without time pressure which produces a different feel than the rushed content that dominates much of the modern blog space.
Yesterday I was complaining about the state of online writing and today this site has temporarily fixed that complaint, and a look at molzino extended that mood reversal, the short term mood improvement that comes from finding good content is real and this site has produced that improvement for me at a useful moment.
Reading this in a relaxed evening setting was a small pleasure, and a stop at boldcartstation extended the pleasant evening reading, content that fits the tone of relaxed time without becoming forgettable is what I look for in evening reading and this site has the right tone for that particular slot in my daily reading routine.
Skipped the TLDR thinking I would read everything anyway, and ended up enjoying the path through the full post, and a stop at qarnexo similarly rewarded the patient read, summaries are useful but the journey through good writing is part of what makes the destination feel earned rather than just delivered cleanly.
наркология на дому [url=https://narkolog-na-dom-ekaterinburg-14.ru]наркология на дому[/url]
платный нарколог на дом [url=https://narkolog-na-dom-moskva-31.ru]платный нарколог на дом[/url]
Pass this along to colleagues if the topic comes up, the framing here is sensible, and a stop at igloohaze adds more useful angles to share, the kind of content that improves conversations rather than just feeding them is what makes a resource genuinely valuable in professional contexts going forward over time and across project boundaries too.
A piece that handled multiple complications without becoming confused, and a look at clipchoice continued that organisational clarity, holding multiple threads in a single piece without losing any of them is a sign of skilled writing and this site has clearly developed the editorial discipline to manage complexity without sacrificing readability throughout.
Looking back on this reading session it stands as one of the better ones recently, and a look at gulfflux extended that ranking, the informal ranking of reading sessions against each other is something I do mentally and this session ranks high largely because of this site and a couple of related pages here.
Skipped to a specific section because I knew that was the question I had, and the answer was clean, and a stop at domelounges similarly delivered targeted answers without burying them, content engineered for readers who arrive with specific needs rather than open ended browsing is increasingly valuable in a search heavy reading environment.
Reading this gave me a small jolt of recognition for an experience I thought was just mine, and a stop at foamhull produced more such jolts, content that universalises private experiences without flattening them is doing genuinely useful work and this site is providing that recognition function for me reliably across topics I read.
Even from a single post the editorial care is clear, and a stop at feathalo extended that care across more pages, the kind of attention to quality that shows up in every paragraph is what separates serious sites from the rest and this one has clearly invested in that paragraph level attention across what I have read.
During a reading session that included several other sources this one stood out, and a look at flockergo continued the standout quality, the side by side comparison of sources during research is a useful exercise and this site has been winning those comparisons for me consistently across multiple research sessions during the last week.
Worth recognising the absence of the usual blog tropes here, and a look at bazariox continued that fresh quality, sites that avoid the standard moves of the medium read as more original even when the content is on familiar topics and this one has clearly chosen its own path through the conventional terrain skilfully.
скачать steam desktop authenticator Безопасный обмен вещами невозможен без защиты, поэтому не забудьте вовремя скачать Steam Guard Authenticator для верификации действий. Программа Steam Desktop Authenticator (SDA) избавит вас от необходимости постоянно проверять экран мобильного телефона. Прямо сейчас вы можете скачать sda steam и начать пользоваться всеми преимуществами автоматического подтверждения лотов.
уборка квартир москва
Liked the way the post got out of its own way, and a stop at gamerember extended that invisible craft, the best writing you barely notice while reading because it is doing its work without drawing attention to itself and this site has clearly mastered that disappearing act across the pieces I have read.
Just one of those reads that left me feeling slightly more capable rather than overwhelmed, and a look at lomqiro kept that empowering feel going, the difference between content that builds the reader up and content that intimidates them is huge and this site clearly knows which side of that line to stand.
Looking through other posts here the consistency is what makes the site valuable rather than any single piece, and a stop at heronfoil extended that consistency observation, sites whose value lies in the ongoing pattern rather than in standout posts are sites I trust more deeply and this one has clearly built that kind of trust.
психиатр нарколог нижний новгород [url=https://vyvod-iz-zapoya-v-staczionare-nizhnij-novgorod-23.ru]психиатр нарколог нижний новгород[/url]
Came here from another site and ended up exploring much further than I planned, and a look at urbanrivo only encouraged more exploration, the kind of place where one click leads to another not through manipulative design but through genuinely interesting content is rare and worth highlighting when found like this somewhere on the open internet.
A piece that earned its conclusions through the body rather than asserting them at the end, and a look at boldtrendmarket maintained the same earned quality, conclusions that follow from what came before are more persuasive than declarations and this site has clearly internalised that principle in how it constructs arguments throughout pieces.
мелбет cashback киргизия [url=http://melbet42570.help/]мелбет cashback киргизия[/url]
Now feeling confident that this site will continue producing work I will want to read, and a look at elevateddailyclickping extended that confidence into the future, projecting forward from current quality to expected future quality is something I do for sites I genuinely follow and this one has earned that forward looking trust clearly today.
Decided not to skim despite my usual habit and was rewarded for the discipline, and a stop at venxari earned the same patient approach, training myself to recognise sites that warrant slower reading is part of being a careful online reader and this site is the kind that helps me practice that skill regularly.
Well structured and easy to read, that combination is rarer than people think, and a stop at yieldmart confirmed the same standard runs across the rest of the site, definitely the kind of place I will be coming back to when this topic comes up in conversation later again over the weeks ahead.
Прокат авто в Краснодаре Современная аренда машин Краснодар позволяет выбрать автомобиль любого класса — от бюджетного эконома до презентабельного бизнеса. Если вам нужна Аренда авто Краснодар аэропорт, менеджеры подготовят договор и встретят вас прямо в зоне прилета. Доверьте свой комфорт профессионалам, для которых аренда машин в Краснодаре аэропорт является главным профилем работы.
1win limba romana [url=http://1win83742.help/]http://1win83742.help/[/url]
Генеральная уборка спб
Reading this fit naturally into my afternoon walk because I was reading on my phone, and a stop at fernpier continued well in that walking format, content that survives mobile reading without becoming awkward is content with format flexibility and this site has clearly thought about how it reads across different devices today.
Coming back tomorrow when I can give this a proper read, the post deserves better attention than I can give right now, and a look at groveaisle suggests there is plenty more here that deserves the same treatment, definitely a site I will be exploring properly over the next few days when I can.
Coming back to this one, definitely, and a quick visit to dealvilo only made me more sure of that, the kind of writing that makes you want to set aside time later rather than rushing through it now while distracted by everything else competing for attention on the screen today across so many tabs.
Genuinely useful read, the points are practical and easy to apply right away, and a quick look at clevercartcorner confirmed that this site is consistent in that approach, looking forward to digging through the rest of it when I get the chance to sit down properly later in the week or this weekend.
Now realising this site has been quietly doing good work for longer than I knew, and a look at rovqino suggested an archive worth exploring, sites with deep archives of consistent quality represent a different kind of resource than sites with viral hits and this one looks like the durable kind based on what I see.
Looking through other posts here the consistency is what makes the site valuable rather than any single piece, and a stop at irisetch extended that consistency observation, sites whose value lies in the ongoing pattern rather than in standout posts are sites I trust more deeply and this one has clearly built that kind of trust.
Felt the post had been written without looking over its shoulder, and a look at melvizo continued that confident posture, content written for its own sake rather than against imagined critics has a different quality and this site reads as written from a place of confidence rather than defensive justification of every claim.
рулонные шторы на электроприводе [url=https://rulonnye-shtory-s-elektroprivodom11.ru]рулонные шторы на электроприводе[/url]
download sda steam Чтобы надежно защитить свой игровой профиль от любых попыток взлома, вы можете бесплатно скачать Steam Desktop Authenticator на свой компьютер. Эта программа полностью заменяет стандартный Steam Guard Authenticator, позволяя мгновенно подтверждать обмены и продажи предметов прямо с рабочего стола. Чтобы обезопасить свои скины и личные данные, достаточно запустить download sda и привязать аккаунт к десктопной панели.
1вин вывод средств [url=www.1win07492.help]1вин вывод средств[/url]
Definitely a recommend from me, anyone curious about the topic should check this out, and a look at gulfholm adds even more reason for that, the depth and quality combine to make this site one I will be pointing people toward whenever similar conversations come up over the months ahead at work or socially.
mostbet cupon promoțional [url=mostbet19438.help]mostbet19438.help[/url]
Comfortable in tone and substantive in content, that is a hard combination to land, and a look at bazmora kept that pairing alive across more material, this is what good editorial direction looks like in practice and the team here clearly has someone keeping a steady hand on the wheel across what they decide to publish.
вывод из запоя нижний новгород [url=https://vyvod-iz-zapoya-v-staczionare-nizhnij-novgorod-24.ru]вывод из запоя нижний новгород[/url]
выведение алкоголизма стационар [url=https://vyvod-iz-zapoya-v-staczionare-sankt-peterburg-28.ru]выведение алкоголизма стационар[/url]
неотложная наркологическая помощь на дому [url=https://narkolog-na-dom-moskva-28.ru]неотложная наркологическая помощь на дому[/url]
mostbet pobierz polska [url=mostbet14793.help]mostbet pobierz polska[/url]
вытрезвление на дому [url=https://narkolog-na-dom-moskva-29.ru]вытрезвление на дому[/url]
вывод из запоя в стационаре санкт петербург [url=https://vyvod-iz-zapoya-v-staczionare-sankt-peterburg-29.ru]вывод из запоя в стационаре санкт петербург[/url]
наркология [url=https://narkologicheskaya-pomoshh-voronezh-12.ru]https://narkologicheskaya-pomoshh-voronezh-12.ru[/url]
Now planning to write about the topic myself eventually using this post as a reference, and a look at gapherb would also serve in that future piece, content that becomes raw material for my own writing rather than just informing my reading is content with multiplicative value and this site is generating that multiplicative effect.
Now noticing that the post benefited from being neither too short nor too long for its content, and a look at lorqiro continued that calibration of length, sites that match length to content rather than padding to hit some target are sites that respect both their material and their readers and this site does both.
Really like that there are no exclamation marks or all caps shouting throughout the post, and a quick visit to knackpacts maintained the same calm voice, restraint in punctuation signals confidence in the content and this site clearly trusts its substance to do the persuading rather than relying on typographic emphasis.
Started forming counter examples to test the claims and the post handled most of them implicitly, and a look at urbanrova continued that anticipatory style, writers who think two steps ahead of the critical reader save themselves from a lot of follow up work and this writer has clearly internalised that habit consistently.
Coming back tomorrow when I can give this a proper read, the post deserves better attention than I can give right now, and a look at herongait suggests there is plenty more here that deserves the same treatment, definitely a site I will be exploring properly over the next few days when I can.
intelligence test online [url=oxusglobalpartners.com/why-online-cognitive-testing-took-off-in-the-remote-work-era]intelligence test online[/url]
melbet aviator [url=http://melbet67541.help]melbet aviator[/url]
Now noticing that the post benefited from being neither too short nor too long for its content, and a look at featlake continued that calibration of length, sites that match length to content rather than padding to hit some target are sites that respect both their material and their readers and this site does both.
Got pulled in by the headline and stayed because the content actually delivered on the promise, and a stop at buyplusshop kept that trust intact, when a site lives up to its own framing it earns the right to keep showing up in my browser tabs going forward indefinitely from here on out really.
Useful enough to recommend to several people I know who would appreciate it, and a stop at vinmora added more material I will pass along too, the kind of writing that earns word of mouth is the kind that actually delivers on its promises which is what this site does without any drama or fanfare attached.
Reading this in a relaxed evening setting was a small pleasure, and a stop at foilfrost extended the pleasant evening reading, content that fits the tone of relaxed time without becoming forgettable is what I look for in evening reading and this site has the right tone for that particular slot in my daily reading routine.
Reading this confirmed something I had been suspecting about the topic, and a look at irisgusto pushed that confirmation toward greater confidence, content that lines up with independently held intuitions earns a special kind of trust and I will return to writers who consistently land that way for me without overselling positions.
Полезные статьи о сфере ритуальных услуг и организации похорон
Worth bookmarking and sharing with anyone interested in the topic, that is my honest take, and a stop at firminlet reinforces that, the kind of generous resource that makes the open web feel worth defending against the constant pressure to retreat into walled gardens and curated feeds today everywhere I look across all my devices.
My professional context would benefit from having this kind of resource available, and a look at shopwidestore extended the professional applicability, the rare site that contributes meaningfully to professional work rather than just personal interest is content with multiplied value and this one is providing that professional utility consistently across multiple pieces.
Bookmark earned, calendar reminder set, share queued, all from one good post, and a look at mapleaisle did the same, when a single reading session triggers multiple downstream actions you know the content has actually moved me beyond the page and this site is moving me at that higher level reliably.
Honest take is that I will probably forget most of what I read online today but this post is one I will remember, and a stop at molzino kept that same memorable quality going, certain writing leaves a residue in the mind in a way most content simply does not manage.
A genuine pleasure to find a site that publishes at a sustainable cadence rather than chasing the daily content treadmill, and a look at tidevendor confirmed the careful publication rhythm, sites that prioritise quality over frequency are rare and this one has clearly chosen the slower pace which I appreciate as a reader.
Looking through other posts here the consistency is what makes the site valuable rather than any single piece, and a stop at qavlizo extended that consistency observation, sites whose value lies in the ongoing pattern rather than in standout posts are sites I trust more deeply and this one has clearly built that kind of trust.
Bookmarking this for later, the kind of resource I want to keep nearby, and a quick look at globalculturemarket confirmed the rest of the site is worth the same treatment, definitely going into my reference folder for the next time the topic comes up at work or in conversation with someone who asks.
Skipped lunch to finish reading, which says something, and a stop at clockbrace kept me at my desk longer than planned, when content beats the lunch impulse the writer has done something genuinely impressive in an attention environment full of immediately satisfying alternatives competing for the same finite block of reader time.
Started imagining how I would explain the topic to someone else after reading, and a look at baznora gave me more material for that imagined explanation, content that improves my own ability to discuss a topic is content that has actually transferred knowledge rather than just decorating my screen for a few minutes.
наркология [url=https://narkologicheskaya-pomoshh-voronezh-11.ru]https://narkologicheskaya-pomoshh-voronezh-11.ru[/url]
Genuinely glad I clicked through to read this rather than skipping past, and a stop at gulfkoala confirmed I should keep clicking through to more pages here, the kind of resource that justifies its place in my browser history rather than feeling like wasted time which is the highest compliment I offer any site online today.
Glad to find something on this topic that does not start with three paragraphs of throat clearing before getting to the point, and a stop at shoprova also dives right in, respect for the readers time shows up in small editorial choices like this and they add up to a real difference quickly.
скачать steam mobile authenticator Если вы хотите обезопасить свои данные, рекомендуем скачать Steam Authenticator или воспользоваться версией для компьютера. Программа Steam Desktop Authenticator полностью дублирует функции мобильного приложения, позволяя быстро подтверждать трейды прямо с рабочего стола. Чтобы защитить профиль, достаточно скачать SDA Steam или стандартный Steam Guard Authenticator на любое удобное устройство.
Just sat with this for a bit longer than I usually would because the points are worth thinking about, and after dealzaro I had even more to chew on, the kind of post that nudges your thinking forward without forcing the issue is something I have always appreciated in good writing online.
Музыкальное сопровождение корпоратива подбор треков
Reading this felt productive in a way most internet reading does not, and a look at gapjumbo continued that productive feeling, sometimes the open web feels like a waste of time but sites like this remind me why I still bother to look around rather than retreating to old reliable sources for everything I need.
Bookmark earned and the bookmark feels like a permanent addition rather than a maybe, and a look at lorzavi confirmed that permanent status, the difference between durable bookmarks and ephemeral ones is something I have learned to feel quickly and this site triggered the durable feeling almost immediately during my first read here.
Took my time with this rather than rushing because the writing rewards attention, and after mexqiro I had even more to absorb, the kind of content that pays back the patient reader rather than punishing them with empty filler is something I look for and rarely find in regular searches lately.
Worth every minute of the time spent reading, and a stop at urbanso extends that value across more pages, in a media environment where most content is engineered to waste attention this site stands out by treating reader time as something valuable rather than something to be exploited and stretched as far as possible.
https://kwork.ru/user/ artemseomaster
Worth observing that the post landed without needing a flashy headline to hook attention, and a stop at easybuyingcorner did the same, content that earns engagement through substance rather than packaging is the kind I trust more deeply and this site has clearly chosen substance as the primary lever for reader engagement throughout.
More substantial than most of what I find searching for this topic online, and a stop at vuzmixo kept that quality consistent, this is one of those sites where the writing actually rewards careful reading rather than punishing the patient reader with empty filler stretched out across long paragraphs that say very little.
Reading this triggered a small change in how I think about the topic going forward, and a stop at herongrip reinforced that subtle shift, the rare content that actually moves my thinking rather than just confirming or filling it is the kind I most value and this site is providing that kind of impact today.
Just want to acknowledge that the writing here is doing something right, and a quick visit to ironfleet confirmed the same standards run across the broader site, recognising good work is something I try to do when I find it because the alternative is silence and silence rewards mediocrity.
Big thanks to whoever wrote this, you saved me a lot of time hunting for the same info on other sites, and a stop at neatglyphs only added more useful detail without going off topic, that kind of focus is honestly hard to come across these days when most posts wander everywhere.
My time on this site has now extended past what I had budgeted, and a stop at freshcartoptions keeps extending it further, content that overstays its budget in my schedule is content that has earned the extra time and this site has been earning extra time across multiple visits to the point where my schedule needs adjustment.
Honestly informative, the writer covers the ground without showing off, and a look at flareaisle reflected the same humility, content that respects the reader rather than trying to dazzle them is something I always appreciate and rarely come across in this corner of the internet today across the topics I usually read.
A piece that ended with a clean landing rather than fading out, and a look at fairvendor maintained the same crisp conclusions, endings that resolve rather than dissolve are a sign of careful structural thinking and this site has clearly invested in how its pieces conclude rather than letting them simply run out of energy.
доктор нарколог вывод из запоя на дому [url=https://narkolog-na-dom-moskva-31.ru]доктор нарколог вывод из запоя на дому[/url]
High quality writing, no marketing speak and no buzzwords that mean nothing, and a stop at buymixo kept that going, simple direct content that actually communicates something is harder to find than it should be and this is one of the rare places that gets it right consistently across many different posts.
Following the post through to the end without my attention drifting once, and a look at feltglen earned the same uninterrupted attention, content that holds attention without manipulating it is content with substantive pull and this site has demonstrated that substantive pull across multiple pieces in a single reading session reliably here today.
mostbet rankingi turniejów [url=http://mostbet14793.help/]mostbet rankingi turniejów[/url]
Spent a few minutes here and came away with a clearer picture of the topic, the writing keeps things simple without dumbing them down, and after a stop at gullgoal the rest of the points lined up neatly which is something I appreciate when I am short on time and need answers fast.
Solid value packed into a relatively short post, that takes skill, and a look at thoughtfuldesigncollective continues the dense useful content across more pages, this site clearly understands that respecting reader time is itself a form of generosity which is something most blog operations seem to have forgotten lately across the wider open web.
mostbet licencjonowany bukmacher [url=https://mostbet14793.help/]https://mostbet14793.help/[/url]
Halfway through reading I knew this would be one to bookmark, and a look at gapkraft confirmed that early intuition, when bookmark intent forms before finishing a post you know the writing has cleared a quality bar that most content fails to clear and this site has cleared it on multiple visits already.
Took a quick scan first and then went back to read properly because the post deserved it, and a stop at shopvato kept me reading carefully too, the kind of writing that earns a slower second pass rather than getting skimmed and forgotten is something I value highly when I happen to find it.
Thanks for the honest framing without exaggerated claims that the topic will change my life, and a stop at lovqaro kept the same modest tone, restraint in marketing language signals trustworthiness and the writers here are clearly playing the long game by building credibility rather than chasing immediate clicks through hyperbole.
Well done, the kind of post that makes you slow down and actually read instead of skimming for keywords, and a look at foilgenie kept me reading carefully too, that is a sign of writing that has been crafted rather than churned out for an algorithm to see today and tomorrow.
скачать steam guard authenticator Современная защита аккаунта требует обязательной привязки двухфакторной аутентификации, для чего вы можете скачать Steam Guard Mobile Authenticator. Однако для работы за компьютером гораздо практичнее использовать ПК-версию и скачать sda steam напрямую на рабочий стол. Утилита полностью заменяет стандартный Steam Guard Authenticator, гарантируя стабильную генерацию временных кодов доступа.
Decided to read more before commenting and the more I read the more I wanted to say something, and a stop at kalqavo pushed that impulse further, when content provokes the urge to participate rather than just consume it is doing something quite specific and worth recognising clearly when it happens during reading.
рехаб нижний новгород [url=https://vyvod-iz-zapoya-v-staczionare-nizhnij-novgorod-23.ru]рехаб нижний новгород[/url]
Glad the writer kept this short rather than padding it out, the points stand on their own without needing extra context, and a look at urbantix kept the same approach going, brevity is a sign of confidence in the substance and the team here clearly trusts their content to land without filler.
Reading this felt easy in the best way, no friction and no confusion at any point, and a stop at ironkrill carried that same comfort across more pages, the kind of editorial flow that lets you absorb information without fighting the format which is increasingly hard to find on the open web today across topics.
Now adding this site to a small mental group of recommendations I keep ready for specific kinds of inquiries, and a stop at fashiondailychoice extended the recommendation readiness, content that I can confidently point friends and colleagues toward in specific contexts is content with real social utility and this site has that utility clearly.
Did not expect much when I clicked through but ended up reading the whole thing carefully, and a stop at vuznaro kept that engagement going, sometimes the unassuming sites turn out to deliver more than the flashy ones which is something I have learned to look out for over time online lately and across topics.
Now adjusting my mental model of how the topic fits into the broader landscape, and a look at dailyshoppinghub extended that adjustment, content that affects my structural understanding rather than just my factual knowledge is content with deeper impact and this site is providing those structural updates at a meaningful rate consistently across topics.
A clear cut above the usual noise on the subject, and a look at heronhilt only made that gap wider in my view, the kind of place that earns its visitors through quality rather than through aggressive marketing or sponsored placements which is increasingly the only way most sites stay afloat across the modern web.
A piece that did not require external context to follow, and a look at morqino maintained the same self contained quality, content that stands alone without forcing readers to chase prerequisites is more accessible and this site has clearly thought about how each piece can serve a fresh visitor rather than only existing members.
производитель рулонных штор [url=https://rulonnye-shtory-s-elektroprivodom11.ru]https://rulonnye-shtory-s-elektroprivodom11.ru[/url]
Refreshing tone compared to the dry corporate posts on similar topics, and a stop at qavmizo carried that personality through nicely, you can tell when a real person is behind the writing versus a content team chasing metrics and this site definitely falls into the former category clearly across what I have seen.
The whole experience of reading this was pleasant from start to finish, no pop ups and no annoying interruptions, and a look at buyrova continued that clean experience, technical choices about page design matter for the reader and this site clearly cares about the small details that add up to comfort across multiple visits.
Reading this in my last reading slot of the day was a good way to end, and a stop at flarefest provided a satisfying close to the reading session, content that ends a day well rather than agitating it before sleep is the kind I value increasingly and this site fits that role for me consistently now.
Reading this between two meetings turned out to be the highlight of the morning, and a stop at eagerkilt continued that highlight quality, content that outshines the structured parts of a working day is doing something well beyond ordinary and this site has produced multiple such highlights for me already this week alone.
Преимущества металлических торговых павильонов
Now setting up a small reminder to revisit the site on a slow day, and a stop at mexvoro confirmed the reminder was a good idea, planning return visits is a small organisational act that signals trust in ongoing quality and this site has earned that planned return through consistent performance across the pieces I have read so far.
Quiet confidence runs through the whole post, no need to shout to make the points stick, and a stop at elitefests carried that same restrained voice forward, content that respects the reader by trusting its own substance rather than dressing it up in theatrical language is what I look for online and rarely actually find these days.
Reading this back to back with a similar piece elsewhere made the quality difference obvious, and a stop at wavevendor only widened the gap, comparing content side by side is a useful exercise and the gap between this site and average competitors in the space is large enough to be noticeable from the first paragraph.
Found this useful, the points line up well with what I have been thinking about lately, and a stop at gullkindle added some angles I had not considered yet, definitely walking away with more than I came for which is the best outcome from time spent reading online for any kind of topic.
Skipped to a specific section because I knew that was the question I had, and the answer was clean, and a stop at gaussfawn similarly delivered targeted answers without burying them, content engineered for readers who arrive with specific needs rather than open ended browsing is increasingly valuable in a search heavy reading environment.
выведение из запоя диспансер [url=https://vyvod-iz-zapoya-v-staczionare-sankt-peterburg-28.ru]выведение из запоя диспансер[/url]
наркологическая помощь воронеж [url=https://narkologicheskaya-pomoshh-voronezh-12.ru]https://narkologicheskaya-pomoshh-voronezh-12.ru[/url]
вывод из запоя платно на дому [url=https://narkolog-na-dom-moskva-28.ru]вывод из запоя платно на дому[/url]
A piece that prompted a small mental rearrangement of how I order related ideas, and a look at festglade extended that rearranging effect, content that affects the structure of my thinking rather than just adding to it is content with the deepest kind of impact and this site is reaching that depth for me today.
психиатр нарколог на дом в москве [url=https://narkolog-na-dom-moskva-29.ru]психиатр нарколог на дом в москве[/url]
Recommend this to anyone who values clear thinking over flashy presentation, and a stop at lovzari continued in the same understated way, this site has its priorities in the right place which makes it worth supporting through repeat visits and recommendations rather than just one passing read today before moving on quickly elsewhere.
кодировка от алкоголя в нижнем новгороде [url=https://vyvod-iz-zapoya-v-staczionare-nizhnij-novgorod-24.ru]кодировка от алкоголя в нижнем новгороде[/url]
Thanks for not padding this with the usual filler intros and outros that every other blog seems to require, and a quick visit to modernartisancommerce continued that lean approach across more posts, content stripped of waste is content that respects you and I will always come back to that kind of approach.
вывод из запоя в стационаре в санкт петербурге [url=https://vyvod-iz-zapoya-v-staczionare-sankt-peterburg-29.ru]вывод из запоя в стационаре в санкт петербурге[/url]
клининговые услуги
Closed the tab feeling I had spent the time well, and a stop at ironkudos extended that feeling across more pages, the test of whether time on a site was well spent is one I apply silently after closing tabs and very few sites pass it but this one passed it cleanly today afternoon clearly.
Bookmark added without hesitation after finishing, and a look at urbanvani confirmed I should bookmark the homepage too rather than just this page, the rare site that earns category level trust rather than just single article approval is the kind I want to rely on across many different topics over time.
Now appreciating that I did not feel exhausted after reading, and a stop at shopvilo extended that energising quality, content that leaves me with more attention than it consumed is rare and the gap between draining and energising content is real over the course of a typical day spent reading widely online.
наркология вывод из запоя в стационаре [url=https://vyvod-iz-zapoya-v-staczionare-sankt-peterburg-31.ru]наркология вывод из запоя в стационаре[/url]
Picked up a couple of new ideas here that I can actually try out, and after my visit to discovergiftoutlet I have even more notes saved, this is the kind of resource that pays you back for the time you spend on it which is rare to come across in this corner of the web.
Glad I gave this a chance rather than scrolling past, and a stop at xarmizo confirmed I made the right call, sometimes the best content is hidden behind unassuming headlines that do not scream for attention and learning to slow down and check those out has paid off many times now across years of reading.
скачать steam authenticator Если вы активно занимаетесь покупкой и продажей внутриигровых предметов, вам просто необходимо скачать Steam Desktop Authenticator для ускорения процесса. Программа работает точно так же, как и мобильный аналог, поэтому скачивать оригинальный Steam Mobile Authenticator на телефон больше не потребуется. Просто используйте поисковый запрос download sda и настройте софт для безопасного управления своими профилями.
выход из запоя стационар [url=https://vyvod-iz-zapoya-v-staczionare-sankt-peterburg-30.ru]выход из запоя стационар[/url]
Worth saying that the post fit naturally into a rhythm of careful reading, and a stop at quickcartsolutions extended the same rhythm, content that pairs well with how I actually read rather than demanding a different mode is content well calibrated to its likely audience and this site has clearly thought about that consistently.
наркология клиника [url=http://narkologicheskaya-pomoshh-voronezh-13.ru]http://narkologicheskaya-pomoshh-voronezh-13.ru[/url]
Such writing is increasingly rare and worth supporting through attention, and a stop at buyvani extended that supportive attention across more pages, the conscious choice to spend time on sites that produce careful work rather than convenient consumption is itself a small form of patronage and this site is receiving that conscious patronage from me.
Recommend this to anyone who values clear thinking over flashy presentation, and a stop at kanqiro continued in the same understated way, this site has its priorities in the right place which makes it worth supporting through repeat visits and recommendations rather than just one passing read today before moving on quickly elsewhere.
Will be sharing this with a couple of people who care about the topic, and a stop at heronjoust added more material worth passing along, the kind of site that is generous with quality content and does not make you jump through hoops to access it which is appreciated more than the team probably realises.
Worth every minute of the time spent reading, and a stop at forgefeat extends that value across more pages, in a media environment where most content is engineered to waste attention this site stands out by treating reader time as something valuable rather than something to be exploited and stretched as far as possible.
https://www.maivona.com/uhod-za-kozhej-litsa/meshki-i-oteki-pod-glazami–kak-s-nimi-spravitsya
I usually skim posts like these but this one held my attention all the way through, and a stop at haleforge did the same, that is a strong endorsement coming from me because I am usually quick to bounce when content gets repetitive or fails to deliver on its initial promise made in the headline.
Better signal to noise ratio than most places I check on this kind of topic, and a look at gingercrate kept that going, every paragraph here carries something worth reading rather than padding out the page to hit some arbitrary length target that search engines reward but readers ignore as soon as they notice it.
Honestly slowed down to read this carefully which is not my default, and a look at gausskite kept me in that careful reading mode, the kind of writing that demands attention by being worth attention is rare in a media environment full of content engineered to be skimmed not read with any real focus today.
Thanks for the practical examples scattered through the post rather than abstract theory only, and a look at elitedawns continued that grounded style, abstract points are easier to remember when paired with concrete situations and the writers here clearly understand how readers actually retain information from blog content reading sessions.
Glad I clicked through from where I did because this turned out to be worth the time spent, and after minqaro I had a fuller picture, the kind of content that earns its visitors through delivering value rather than chasing them through aggressive advertising or constant pop ups appearing everywhere on the screen lately.
Thanks for the clean writing, no broken sentences and no awkward translations like some other sites have, and a quick stop at luxdeck kept that polish going nicely, it really does make a difference when a reader can move through a page without tripping on every line or going back to reread.
Glad to have another reliable bookmark for this topic, and a look at islegoal suggested several more pages I will be marking too, building a personal library of trustworthy resources is one of the actual rewards of careful browsing and this site is earning a place on my permanent shortlist for the topic.
mostbet kasyno online polska mostbet [url=https://mostbet14793.help/]mostbet kasyno online polska mostbet[/url]
Looking at the surface design and the substance together this site has both right, and a look at urbanvilo reinforced that integrated quality, sites where presentation and content reinforce each other rather than fighting are sites with full editorial coherence and this one has clearly invested in both layers in a balanced way.
Reading carefully this time rather than scanning, and the depth shows up in places I missed first time around, and a look at intentionalstyleandhome rewarded the same careful approach, content that holds up to multiple reads is content I want more of in my regular rotation rather than disposable scroll fodder daily.
Quietly the post solved something I had been turning over without quite knowing how to phrase the question, and a look at buyvilo extended that quiet solving, content that addresses unformulated needs is content with reader insight and this site has demonstrated that insight at a high rate across the pieces I have read recently.
Advanced reading here!
Now considering carefully how to share this site with the right audience rather than broadcasting widely, and a look at packpeak extended that careful sharing impulse, content worth sharing carefully rather than spamming is content that has earned a higher kind of recommendation and this site has earned that careful shareability throughout pieces.
Worth saying this site reads better than most paid newsletters I have tried, and a stop at fibergrid confirmed that comparison, the bar for free content is often lower than for paid but this site clears the paid bar consistently and that says something about the editorial approach behind the work being published here regularly.
A piece that did exactly what it promised in the headline without overshooting or underdelivering, and a look at xarvilo continued that calibration, alignment between promise and delivery is a basic editorial virtue that many sites fail at and this site has clearly mastered the matching of expectation and substance throughout pieces.
Got something practical out of this that I can apply later this week, and a stop at ultrashophub added more details to think about, this is exactly the kind of content I bookmark for future reference rather than the throwaway listicles that dominate most search results these days for almost any common topic.
Worth recognising the absence of the usual blog tropes here, and a look at shopzaro continued that fresh quality, sites that avoid the standard moves of the medium read as more original even when the content is on familiar topics and this one has clearly chosen its own path through the conventional terrain skilfully.
Generally my attention drifts on long posts but this one held it through the end, and a stop at morxavi earned the same sustained focus, content that defeats my drift tendency is content with substantive pulling power and this site has demonstrated that pulling power across multiple pieces in a session that has now run quite long actually.
Now feeling the quiet pleasure of finding writing that takes itself seriously without being self serious, and a stop at qelmizo extended that subtle pleasure, the gap between earnest and pretentious is fine and this site has clearly chosen to land on the earnest side without slipping over into pretentious which is impressive.
услуги врача нарколога на дому [url=https://narkolog-na-dom-moskva-31.ru]услуги врача нарколога на дому[/url]
мостбет скачать для узбекистана [url=https://mostbet71530.help/]мостбет скачать для узбекистана[/url]
Reading this gave me material for a conversation I needed to have anyway, and a stop at eastglaze added even more talking points, content that connects to upcoming social or professional needs rather than just being interesting in the abstract is the kind that earns priority placement in my attention these days routinely.
Доставка пиццы без контакта проверенные способы
Solid post, the structure is easy to follow and the language stays simple even when the topic gets a bit more involved, and a look at gemglobe kept that same standard going, so I left feeling like the time spent here was actually worth something for once which is rare lately.
A piece that built up gradually rather than front loading its main points, and a look at hickorygrid maintained the same gradual structure, content that trusts the reader to reach conclusions through accumulating reasoning is more persuasive than content that announces conclusions and then defends them and this site uses the persuasive approach.
kako instalirati vavada apk [url=https://vavada25076.help/]kako instalirati vavada apk[/url]
Took me back a step or two on an assumption I had been making, and a stop at havenfoam pushed that reconsideration further, writing that gently corrects the reader without being aggressive about it is a rare diplomatic skill and the team here clearly knows how to land critical points without turning readers off.
melbet new site [url=melbet67541.help]melbet67541.help[/url]
Now understanding why someone recommended this site to me a while back, and a stop at kanvoro explained the recommendation, sometimes recommendations make sense only after experience and this site has finally clicked into place as the kind of resource I now understand was being recommended for sound editorial reasons by my friend.
vavada jak wpłacić blik [url=http://vavada82614.help]http://vavada82614.help[/url]
https://1xbetlatestpromocode.blogspot.com/
Picked something concrete from the post that I will use immediately, and a look at northvendor added another concrete piece, content that produces immediately useful output rather than just abstract appreciation is content that earns its place in my regular rotation without needing any further evaluation from me at this point honestly.
If a friend asked me where to read carefully on the topic I would send them here without hesitation, and a look at jadeflax confirmed the recommendation strength, the directness of my recommendation reflects how confident I am in the quality and this site has earned undiluted recommendations from me across multiple recent conversations actually.
Really like the way the post resists reaching for cliches that would have made it feel generic, and a quick visit to luxmixo kept that fresh feel going, original phrasing and unexpected metaphors are signs that the writer is actually thinking rather than just stitching together familiar phrases into the appearance of content.
melbet live casino bangladesh [url=melbet67541.help]melbet67541.help[/url]
Comfortable read, finished it without realising how much time had passed, and a look at urbanvo pulled me into more pages the same way, the absence of friction in good content lets time disappear and that is one of the highest compliments I can pay any piece of writing I find online during a regular search session.
наркология нижний новгород [url=https://vyvod-iz-zapoya-v-staczionare-nizhnij-novgorod-23.ru]наркология нижний новгород[/url]
Thanks for the practical examples scattered through the post rather than abstract theory only, and a look at musebeats continued that grounded style, abstract points are easier to remember when paired with concrete situations and the writers here clearly understand how readers actually retain information from blog content reading sessions.
Came in skeptical and left mostly convinced, that is the highest praise I can offer, and a look at cartluma pushed me further in the same direction, content that survives a critical first read is rare and worth recognising because most blog posts crumble under any real scrutiny these days when you actually pay attention closely.
Picked this post to share in a Slack channel where I knew it would be appreciated, and a look at fortfalcon suggested I will share more from here later, content worth sharing into a professional context is content that has earned a higher kind of trust than mere personal interest and this site has it.
Most posts I read end up forgotten within a day but this one is sticking, and a look at brightfuturedeals extended that lingering effect, content that survives the immediate moment of reading rather than evaporating is content with genuine retention quality and this site has been producing memorable pieces at a rate notable across my reading.
Even from a single post the editorial care is clear, and a stop at discoverfashionhub extended that care across more pages, the kind of attention to quality that shows up in every paragraph is what separates serious sites from the rest and this one has clearly invested in that paragraph level attention across what I have read.
Bookmark added without hesitation after finishing, and a look at mivqaro confirmed I should bookmark the homepage too rather than just this page, the rare site that earns category level trust rather than just single article approval is the kind I want to rely on across many different topics over time.
Decent post that improved my afternoon a small amount, and a look at xavlumo added a bit more to that, sometimes the small wins online add up over time and a useful site like this one is the kind of place that contributes consistently to those small wins for me lately across many different topics I follow.
Liked that the post left some questions open rather than pretending to settle everything, and a stop at zenvani continued that intellectual honesty, content that respects the limits of its own claims is more trustworthy than content that overreaches and this site has clearly figured out which positions it can defend confidently.
Glad I stumbled across this post, the explanations actually make sense without needing background knowledge to follow along, and after a stop at pactpalace the same was true there, no assumptions about the reader just clear writing that anyone can understand from the first line right through to the end.
Reading more of the archives is now on my plan for the weekend, and a stop at premiumdesigncollective confirmed the archive worth the time, the rare archive worth a dedicated reading session rather than just casual sampling is the rare archive of serious work and this site has clearly produced enough of that work to warrant the deeper exploration.
Took the time to read the comments on this post too and they were also worth reading, and a stop at wattedge suggested the community quality matches the content quality, when the conversation around a piece is as good as the piece itself you know you have found a real corner of the internet.
Took something from this I did not expect to find, and a stop at liegepenny added another unexpected useful piece, content that exceeds expectations rather than just meeting them is the kind that builds enthusiasm and earns repeat visits without any explicit ask from the writer or platform behind the work being read.
Skipped lunch to finish reading, which says something, and a stop at genieframe kept me at my desk longer than planned, when content beats the lunch impulse the writer has done something genuinely impressive in an attention environment full of immediately satisfying alternatives competing for the same finite block of reader time.
My professional context would benefit from having this kind of resource available, and a look at styleluma extended the professional applicability, the rare site that contributes meaningfully to professional work rather than just personal interest is content with multiplied value and this one is providing that professional utility consistently across multiple pieces.
A handful of memorable phrases from this one I will probably use later, and a look at julyelm added a couple more, content that contributes language to my own communication rather than just facts is content with a different kind of utility and this site is providing that linguistic utility consistently across what I read.
Клининговые услуги в москве
Just want to record that this site is entering my regular reading list, and a look at hazegloss confirmed it deserves the spot, my regular reading list is short and well curated and adding to it requires meeting a fairly high quality bar that this site has clearly cleared without much effort apparently.
Solid quality, the kind of work that holds up to a careful read rather than a quick skim, and a quick look at jetfrost kept that standard going strong, content that rewards attention rather than punishing it is something I appreciate more and more these days online across nearly every topic I follow.
https://www.maivona.com/
Following the post through to the end without my attention drifting once, and a look at hiltgable earned the same uninterrupted attention, content that holds attention without manipulating it is content with substantive pull and this site has demonstrated that substantive pull across multiple pieces in a single reading session reliably here today.
Really appreciate the absence of stock photos that have nothing to do with the content, and a quick visit to lullneon maintained the same restraint, visual filler is a tell that the writing cannot stand on its own and the lack of it here suggests the team has confidence in their content quality alone.
A clean read with no irritations, and a look at luxrivo continued that frictionless quality, the absence of small irritations is something I notice only when present elsewhere and this site is one of the rare places where everything just works and lets me focus on the substance rather than fighting the format.
https://kwork.ru/user/ artemseomaster
Reading this gave me a small mental break from the heavier reading I had been doing, and a stop at ivoryvendor extended that lighter feel, content that provides relief without becoming trivial is harder to produce than people realise and this site has clearly figured out how to be light without being shallow at all.
Quietly building a case in my head for why this site deserves more attention than it currently seems to receive, and a look at plumvendor reinforced the case, the gap between quality and recognition is a recurring frustration in independent online content and this site is one of the cases that seems particularly egregious to me today.
наркологическая помощь срочно [url=https://narkologicheskaya-pomoshh-voronezh-12.ru]наркологическая помощь срочно[/url]
выведение из запоя в стационаре наркологии [url=https://vyvod-iz-zapoya-v-staczionare-sankt-peterburg-28.ru]выведение из запоя в стационаре наркологии[/url]
мостбет авиатор коэффициенты [url=http://mostbet71530.help]http://mostbet71530.help[/url]
нарколог на дом анонимно круглосуточно [url=https://narkolog-na-dom-moskva-29.ru]нарколог на дом анонимно круглосуточно[/url]
срочно врач нарколог на дом [url=https://narkolog-na-dom-moskva-28.ru]срочно врач нарколог на дом[/url]
Reading this triggered a small reorganisation of my own thinking on the topic, and a stop at ygavexaudition2024 furthered that reorganisation, content that affects the shape of my mental model rather than just decorating it with new facts is content with structural rather than informational impact and this site provides that.
Now setting this aside as a model of how to write thoughtfully on the topic, and a stop at urbanzaro extended that model status, content that becomes a reference for how a kind of writing should be done is content with influence beyond its own readership and this site is reaching that level for me clearly today.
Skipped the related products section because there was none, and a stop at windyforestfinds also lacked any aggressive monetisation, content that is not constantly trying to convert me into a customer or subscriber is content that has confidence in its own value and that confidence shows up as a different reading experience.
Genuinely glad I clicked through to read this rather than skipping past, and a stop at cartmixo confirmed I should keep clicking through to more pages here, the kind of resource that justifies its place in my browser history rather than feeling like wasted time which is the highest compliment I offer any site online today.
Компания fastek https://fastek.by проектируем и поставляем надежные фасадные системы для коммерческих и жилых объектов, обеспечивая долговечность, энергоэффективность и безупречный внешний вид здания под ваши задачи.
выведение из запоя стационар санкт петербург [url=https://vyvod-iz-zapoya-v-staczionare-sankt-peterburg-29.ru]выведение из запоя стационар санкт петербург[/url]
mostbet не открывается [url=https://mostbet71530.help]https://mostbet71530.help[/url]
Skipped lunch to finish reading, which says something, and a stop at seovista kept me at my desk longer than planned, when content beats the lunch impulse the writer has done something genuinely impressive in an attention environment full of immediately satisfying alternatives competing for the same finite block of reader time.
лечение алкогольной зависимости нижний новгород [url=https://vyvod-iz-zapoya-v-staczionare-nizhnij-novgorod-24.ru]лечение алкогольной зависимости нижний новгород[/url]
Skipped a meeting reminder to finish the post, and a stop at discovermoreoffers held me past another reminder, when content beats meetings the writer is doing something extraordinary because meetings have institutional support behind them and yet good writing can still occasionally win that competition for attention which I find heartening today.
Started reading skeptically because the headline seemed overconfident, and the post earned the headline by the end, and a look at zenvaxo continued that pattern of earning its claims, sites that can back up their headlines without overpromising are rare and this one has clearly developed editorial calibration on that front consistently.
клиника плюс наркология [url=http://narkologicheskaya-pomoshh-voronezh-13.ru]клиника плюс наркология[/url]
vavada kasino slotovi [url=vavada25076.help]vavada25076.help[/url]
Quietly the post solved something I had been turning over without quite knowing how to phrase the question, and a look at movlino extended that quiet solving, content that addresses unformulated needs is content with reader insight and this site has demonstrated that insight at a high rate across the pieces I have read recently.
A piece that respected the reader by not over explaining the obvious, and a look at xavnora continued that calibrated approach, finding the right level of explanation is one of the harder editorial calls and this site has clearly thought carefully about what readers will already know versus what they need help with consistently.
Top tier post, the kind that makes you want to share the link with friends working in the same area, and a stop at oakarenas only made me more confident in doing that, this site is one of the better resources I have seen on the topic recently across both new and older posts.
Thanks for the readable length, I finished it without checking how much was left, and a stop at lilacneedle kept me reading the same way, when I stop noticing the length of a piece because the content is engaging enough to sustain attention without willpower the writer has done their job well today.
vavada na komputer [url=www.vavada82614.help]www.vavada82614.help[/url]
вывод из запоя цена наркология [url=https://vyvod-iz-zapoya-v-staczionare-sankt-peterburg-30.ru]вывод из запоя цена наркология[/url]
выведение из запоя в стационаре спб [url=https://vyvod-iz-zapoya-v-staczionare-sankt-peterburg-31.ru]выведение из запоя в стационаре спб[/url]
Really like that the writer trusts the reader to follow simple logic without restating every previous point, and a stop at qenmora kept that respect going, treating an audience as capable adults rather than as people who need constant hand holding makes a noticeable difference in the reading experience for me.
Bookmarking this for later, the kind of resource I want to keep nearby, and a quick look at wattedge confirmed the rest of the site is worth the same treatment, definitely going into my reference folder for the next time the topic comes up at work or in conversation with someone who asks.
Bookmark moved to my permanent reference folder rather than the casual maybe later folder, and a look at gladfir earned the same upgrade, the distinction between casual interest and lasting reference is something I track carefully and very few sites cross that threshold but this one did so without much effort apparently.
Picked up on several small touches that suggest a careful editor, and a look at ebonfig suggested the same hand at work across the broader site, editorial consistency at a granular level is one of the strongest signs that an operation is serious rather than just hobbyist and this site reads as serious throughout.
vavada pravila isplate [url=http://vavada25076.help/]http://vavada25076.help/[/url]
vavada jak wysłać dokumenty [url=vavada82614.help]vavada jak wysłać dokumenty[/url]
Now realising the post solved a small problem I had been carrying for weeks, and a look at hazeherb extended that problem solving function, content that connects to specific unresolved questions in my own life rather than just providing general interest is content with real practical impact and this site is providing that practical value.
Reading carefully here has reminded me what reading carefully feels like, and a look at curatedglobalcommerce extended that reminder, the experience of careful reading versus skimming is different in ways I had partially forgotten and this site has clearly refreshed my memory of what attention feels like when content rewards it consistently.
https://kwork.ru/user/ artemseomaster
A particular pleasure to read this with a fresh coffee, and a look at modcove extended the pleasure across more pages, content that pairs well with quiet morning rituals is something I have come to value highly and this site has the kind of energy that fits naturally into a calm reading routine.
Speaking honestly this is among the better discoveries of my recent browsing, and a stop at fossera reinforced that discovery quality, the ranking of recent discoveries is informal but meaningful and this site has placed near the top of that ranking based on the consistency of quality across what I have already read carefully.
Reading this slowly in the morning before opening email, and a stop at stylemixo extended that protected attention, content that earns the prime morning reading slot before the daily distractions begin is content with elevated status and this site has earned that prime slot consistently in my recent reading habits clearly.
Without comparing too aggressively to other sources this one stands out for the right reasons, and a look at luxrova continued that distinctive quality, content that distinguishes itself through substance rather than style tricks is content with lasting differentiation and this site has clearly chosen substance based differentiation as its core editorial strategy.
My usual pattern is to skim and bounce but this site has reset that pattern temporarily, and a stop at hiltgem maintained the slower reading mode, content that changes how I read is content with structural influence and this site has clearly nudged my reading behaviour toward something better at least for the duration of these visits.
Honest take is that this was better than I expected when I clicked through, and a look at mintvendor reinforced that, the bar for online content has dropped so much that finding something thoughtful and well constructed feels almost noteworthy now which says more about the average than about this site itself.
Liked the careful selection of which details to include and which to skip, and a stop at urbivio reflected the same editorial judgement, knowing what to leave out is just as important as knowing what to include and this site has clearly figured out where that line sits for the topics it covers regularly.
Reading this in my last reading slot of the day was a good way to end, and a stop at talents-affinity provided a satisfying close to the reading session, content that ends a day well rather than agitating it before sleep is the kind I value increasingly and this site fits that role for me consistently now.
Эксплуатация и уход за фасадами из сендвич панелей
A handful of memorable phrases from this one I will probably use later, and a look at cartrivo added a couple more, content that contributes language to my own communication rather than just facts is content with a different kind of utility and this site is providing that linguistic utility consistently across what I read.
Felt the writer did the homework before publishing, the references hold up, and a look at palmbazaar continued that documented care, content with traceable claims rather than vague assertions is the kind I trust and the lack of bald assertion in this post is one of its quietly impressive qualities for me.
Top tier post, the kind that makes you want to share the link with friends working in the same area, and a stop at jumbohelm only made me more confident in doing that, this site is one of the better resources I have seen on the topic recently across both new and older posts.
A piece that built up gradually rather than front loading its main points, and a look at seotrail maintained the same gradual structure, content that trusts the reader to reach conclusions through accumulating reasoning is more persuasive than content that announces conclusions and then defends them and this site uses the persuasive approach.
melbet aviator login [url=melbet67541.help]melbet67541.help[/url]
Genuinely well crafted writing, the kind that makes the topic look easier than it actually is, and a look at mutelion added even more depth, you can feel the experience behind every line which is something only writers who have been at this for a while can pull off with this level of grace.
Honestly enjoyed not being sold anything for the entire duration of the post, and a look at timbertowncorner kept that pleasant absence going across more pages, content that exists for its own sake rather than as a funnel to a paid product is increasingly rare and worth supporting where I can find it.
Looking forward to seeing what gets published next month, and a look at zevarko extended that anticipation across the broader site, finding myself looking forward to a sites future content rather than just consuming its existing content is a stronger commitment level than I usually reach with new finds and this site triggered that.
Quietly the post solved something I had been turning over without quite knowing how to phrase the question, and a look at fashionfindshub extended that quiet solving, content that addresses unformulated needs is content with reader insight and this site has demonstrated that insight at a high rate across the pieces I have read recently.
If quality blog writing is dying as people sometimes claim then this site is one piece of evidence that it has not died yet, and a look at milknorth extended that evidence, the broader cultural question about online writing has empirical answers in specific sites and this one is contributing to a more optimistic answer overall.
Decided to read more before commenting and the more I read the more I wanted to say something, and a stop at xelvani pushed that impulse further, when content provokes the urge to participate rather than just consume it is doing something quite specific and worth recognising clearly when it happens during reading.
Considered as a whole this site has developed a coherent point of view that comes through in individual pieces, and a look at gladhalo continued displaying that coherence, sites with a unified perspective rather than a grab bag of takes are sites with editorial maturity and this one has clearly developed that maturity through years of work.
алкоголизм лечение выезд на дом [url=https://narkolog-na-dom-moskva-31.ru]алкоголизм лечение выезд на дом[/url]
Refreshing to read something where the words actually mean something instead of filling space, and a stop at wattarc kept that going, the writing here trusts the reader to follow along without endless repetition or constant reminders of what was already said earlier in the post which I appreciate.
Honest assessment is that this is one of the better short reads I have had this week, and a look at heathfoam reinforced that, the bar for short content is low because most of it sacrifices substance for brevity but this site manages both at once which is harder than it sounds for most writers attempting it.
Now feeling the quiet pleasure of finding writing that takes itself seriously without being self serious, and a stop at curlbyrd extended that subtle pleasure, the gap between earnest and pretentious is fine and this site has clearly chosen to land on the earnest side without slipping over into pretentious which is impressive.
Just want to flag that this was useful and not bury the appreciation in caveats, and a look at lullpebble earned the same direct praise, recognising good work without hedging it with criticism is something I try to practice because over qualified compliments tend to read as backhanded and miss the point sometimes.
Now appreciating that the post did not require external context to follow, and a look at luxvilo maintained the same self contained quality, content that respects new visitors by being readable without prerequisites is content with broader accessibility and this site has clearly invested in keeping each piece reader friendly for fresh arrivals.
Closed the tab with a small sense of finality rather than the usual rushed exit, and a stop at cartrova produced the same considered closing, when reading ends with deliberate satisfaction rather than impatient skip you know the time was well spent and this site is producing those satisfying endings consistently across what I read.
Honestly the simplicity is what makes this work, the topic is not buried under filler words or overly complex examples, and a quick look at stylerivo showed the same sensible style, I left with what I came for and no headache from over reading which is a real win these days.
мостбет не открывается [url=http://mostbet71530.help/]мостбет не открывается[/url]
Reading this gave me a small sense of progress on a topic I have been slowly working through, and a stop at moddeck added another step forward, learning happens in small increments across many sources and finding sources that consistently contribute is the actual practical value of careful curation in an information rich world.
Skipped breakfast still reading this and finished hungry but satisfied, and a stop at thirtymale kept me past breakfast time, content that displaces basic biological needs is content with serious attentional pull and the writers here are clearly capable of producing that level of engagement which is genuinely impressive these days.
Glad to have another data point on a question I am still thinking through, and a look at myrrhlens added two more, content that acknowledges its place in a wider conversation rather than pretending to settle the question alone is intellectually honest in a way that I wish was more common across the open web.
Came in skeptical of the angle and left mostly persuaded, and a stop at hilthive pushed me a bit further in the same direction, content that can move a critical reader by argument rather than rhetoric is rare and worth pointing out because it indicates real substance underneath the surface presentation here.
кодировка от алкоголя в нижнем новгороде [url=https://vyvod-iz-zapoya-v-staczionare-nizhnij-novgorod-23.ru]кодировка от алкоголя в нижнем новгороде[/url]
Came in skeptical and left mostly convinced, that is the highest praise I can offer, and a look at valzino pushed me further in the same direction, content that survives a critical first read is rare and worth recognising because most blog posts crumble under any real scrutiny these days when you actually pay attention closely.
Bookmark folder created specifically for this site, and a look at zimlora confirmed the dedicated folder was the right call, dedicated folders for individual sites are a level of organisation I rarely deploy and this site has earned that level of dedicated tracking based on the consistency I have seen so far across sessions.
I really like how the writer keeps the tone friendly without sounding fake or overly polished, and after a stop at navmixo the same calm pace was there, no rushing to make a point and no padding either, just clean honest writing that I can respect and come back to later again.
Better than the average post on this subject by some distance, and a look at nextleveltrading reinforced that, you can tell within the first paragraph that the writer here actually cares about the topic rather than just covering it for the sake of having something to publish that week or that day.
https://excitacao.com/1xbet-best-promo-code-1xpro888-e130-best-choice/
A clean read with no irritations, and a look at fossgusto continued that frictionless quality, the absence of small irritations is something I notice only when present elsewhere and this site is one of the rare places where everything just works and lets me focus on the substance rather than fighting the format.
Honest take is that I will probably forget most of what I read online today but this post is one I will remember, and a stop at xelzino kept that same memorable quality going, certain writing leaves a residue in the mind in a way most content simply does not manage.
Liked that there was nothing performative about the writing, and a stop at qinmora continued that genuine quality, performative writing tries to be witnessed rather than read and the difference between performance and substance is huge for the careful reader and this site has clearly chosen substance every time clearly.
Appreciated how the post felt complete without overstaying its welcome, and a stop at softspringemporium confirmed that economical approach runs across the site, knowing when to stop is a skill many writers never develop but here the discipline is obvious and welcome from the perspective of a busy reader trying to learn things efficiently.
Reading this slowly because the writing rewards a slower pace, and a stop at vividmesh did the same, the pace at which I read content is something I now use as a quality signal and writing that earns a slower pace earns my attention as a reader looking for substance these days.
Considered alongside other sources I have been reading this one consistently rises to the top, and a stop at ebongreen maintained that top ranking, the informal ongoing comparison between sources is something I do whenever reading on a topic and this site keeps coming out near the top of those comparisons over many sessions.
Worth flagging that this approach to the topic is fresh without being contrarian, and a stop at jumbokelp extended the same fresh angle, finding original perspective on familiar subjects is rare and this site has clearly developed its own way of seeing rather than echoing the dominant takes from elsewhere consistently.
vavada sigurnost plaćanja [url=https://vavada25076.help/]https://vavada25076.help/[/url]
vavada rejestracja krok po kroku [url=www.vavada82614.help]www.vavada82614.help[/url]
Now planning to recommend this site in a context where my recommendations are taken seriously, and a stop at curlclap confirmed I should make that recommendation soon, the small but real act of recommending content into spaces where my taste matters is something I take seriously and this site is worth the recommendation.
Decided I would read the archives over the weekend, and a stop at luzqiro confirmed that the archives would be worth the time, very few sites have archives I would actively read through but this one has earned that level of interest based on the consistent quality across what I have sampled so far.
Now noticing how rare it is to find a site that does not feel rushed, and a look at palmbranch extended that calm pace, content produced without time pressure has a different quality than content shipped to meet a deadline and this site reads as written without urgency which produces a different and better experience for readers.
Now noticing that the post did not mention the writer at all, focus stayed on the topic, and a look at nudgeneedle continued that author absent quality, content that disappears the writer to focus on the substance is a particular kind of generosity and this site has clearly chosen the substance over the personality consistently.
Now thinking the topic is more interesting than I had given it credit for, and a stop at myrrhomen continued that elevated interest, content that revives my curiosity about subjects I had set aside is doing genuine work in the structure of my interests and this site is providing that revivifying effect today actually.
Just wanted to say this was useful and leave a small note of thanks, and a quick visit to pacerlucid earned a similar nod from me, the small acknowledgements add up over time and represent the real economy of trust that good content runs on across the open and increasingly fragmented modern internet.
Looking forward to seeing what gets published next month, and a look at perfectmill extended that anticipation across the broader site, finding myself looking forward to a sites future content rather than just consuming its existing content is a stronger commitment level than I usually reach with new finds and this site triggered that.
Looking for similar voices elsewhere has come up empty in my recent searches, and a stop at cartvani extended the search frustration, the rare site that does what no other does in quite the same way is precious and this one has clearly developed a particular approach that I have not been able to find duplicates of.
Now noticing that the post did not mention the writer at all, focus stayed on the topic, and a look at ponyosier continued that author absent quality, content that disappears the writer to focus on the substance is a particular kind of generosity and this site has clearly chosen the substance over the personality consistently.
выезд нарколога на дом [url=https://narkolog-na-dom-moskva-29.ru]выезд нарколога на дом[/url]
A piece that built up gradually rather than front loading its main points, and a look at saveaustinneighborhoods maintained the same gradual structure, content that trusts the reader to reach conclusions through accumulating reasoning is more persuasive than content that announces conclusions and then defends them and this site uses the persuasive approach.
Любимые программы всегда под рукой! Развлекательные ток-шоу, кулинарные баттлы, музыкальные конкурсы, реалити и интеллектуальные игры — всё в одном месте. Свежие выпуски, архив прошлых сезонов и эксклюзивные проекты. Включай в любое время, без рекламы и регистрации: интересные тв шоу
Picked this up between two other things I was doing and got drawn in completely, and after zimqano my original tasks were completely forgotten for a while, content that derails a workflow in a positive way by being more interesting than what you were already doing is rare and worth recognising clearly.
вывод из запоя в наркологическом стационаре [url=https://vyvod-iz-zapoya-v-staczionare-sankt-peterburg-28.ru]вывод из запоя в наркологическом стационаре[/url]
Reading this gave me the rare experience of fully agreeing with all the conclusions, and a stop at hiltkindle continued that agreement pattern, content that aligns with my existing views without seeming designed to do so is just content that happens to be reasonable and this site reads as reasonable rather than ideological mostly.
Took something from this I did not expect to find, and a stop at stylerova added another unexpected useful piece, content that exceeds expectations rather than just meeting them is the kind that builds enthusiasm and earns repeat visits without any explicit ask from the writer or platform behind the work being read.
вызвать нарколога на дом москва [url=https://narkolog-na-dom-moskva-28.ru]вызвать нарколога на дом москва[/url]
наркологическая клиника воронеж [url=https://narkologicheskaya-pomoshh-voronezh-12.ru]наркологическая клиника воронеж[/url]
стационарное выведение из запоя [url=https://vyvod-iz-zapoya-v-staczionare-sankt-peterburg-30.ru]стационарное выведение из запоя[/url]
наркологическая помощь срочно [url=www.narkologicheskaya-pomoshh-voronezh-13.ru]наркологическая помощь срочно[/url]
Came in tired from a long day and the writing held my attention anyway, and a stop at xinvexa kept that going, content that can engage a fatigued reader is doing something right because most online reading happens in suboptimal conditions like that one and quality content adapts to it without complaint.
рехаб нижний новгород [url=https://vyvod-iz-zapoya-v-staczionare-nizhnij-novgorod-24.ru]рехаб нижний новгород[/url]
Solid information that lines up with what I have been hearing from other reliable sources, and after my visit to grippalaces I was even more certain of that, this site checks out which is something I value highly when so many places online play loose with the facts to chase a quick click.
выведение из запоя стационар санкт петербург [url=https://vyvod-iz-zapoya-v-staczionare-sankt-peterburg-29.ru]выведение из запоя стационар санкт петербург[/url]
aviator leaderboard [url=aviator29471.help]aviator29471.help[/url]
чӣ гуна депозит дар 1вин кардан [url=https://www.1win74120.help]https://www.1win74120.help[/url]
1win apk [url=https://1win72361.help]1win apk[/url]
If I were to recommend a starting point for the topic this site would be near the top of my list, and a stop at modloop reinforced that recommendation status, the small list of starting point recommendations I keep for friends asking about topics is short and this site is now firmly on it.
Looking for similar voices elsewhere has come up empty in my recent searches, and a stop at wildduneessentials extended the search frustration, the rare site that does what no other does in quite the same way is precious and this one has clearly developed a particular approach that I have not been able to find duplicates of.
download steam desktop authenticator Качественная защита аккаунта необходима каждому геймеру, поэтому стоит вовремя скачать Steam Authenticator для верификации всех действий. Популярный клиент Steam Desktop Authenticator отлично подходит для одновременного управления несколькими учетными записями без привязки к смартфону. Чтобы начать пользоваться программой, вам нужно лишь выбрать download Steam Desktop Authenticator и перенести свои данные в безопасный цифровой сейф.
download steam desktop authenticator Для максимальной защиты аккаунта вы можете скачать Steam Guard Mobile Authenticator либо его компьютерный аналог. Программа Steam Desktop Authenticator (SDA) обеспечивает надежную генерацию кодов и безопасность ваших предметов при обменах. Чтобы установить приложение прямо сейчас, введите в поиске download Steam Desktop Authenticator или просто download SDA для вашей операционной системы.
mostbet matç yayımı [url=https://mostbet35906.help]mostbet matç yayımı[/url]
Got something practical out of this that I can apply later this week, and a stop at trivent added more details to think about, this is exactly the kind of content I bookmark for future reference rather than the throwaway listicles that dominate most search results these days for almost any common topic.
Started forming counter examples to test the claims and the post handled most of them implicitly, and a look at lushmarble continued that anticipatory style, writers who think two steps ahead of the critical reader save themselves from a lot of follow up work and this writer has clearly internalised that habit consistently.
перейти к обсуждению
A piece that took its time without dragging, and a look at curvecalm kept the same patient pace, the difference between unhurried and slow is a fine editorial distinction and this site has clearly found the unhurried side without slipping into the slow side which would have lost me as a reader quickly otherwise.
Useful reading material, the kind I can hand off to someone newer to the topic without worrying about confusing them, and a quick look at mallivo confirmed the same beginner friendly tone runs throughout the site which is great for sharing with people just starting their learning journey on this particular topic.
клиника вывода из запоя со стационаром [url=https://vyvod-iz-zapoya-v-staczionare-sankt-peterburg-31.ru]клиника вывода из запоя со стационаром[/url]
steam desktop authenticator Программа Steam Desktop Authenticator создана специально для трейдеров, которым важна скорость и комфорт при одобрении лотов на торговой площадке. Теперь вам не обязательно скачивать Steam Guard Mobile Authenticator на телефон, ведь все операции можно подтверждать в один клик мышкой. Защитите свой инвентарь от мошенников — для этого достаточно зайти на проверенный сайт и скачать sda для вашей операционной системы.
Comfortable reading experience throughout, no jarring tone shifts and no awkward formatting, and a look at nagapinto kept that smooth feel going, the kind of editorial polish that goes unnoticed when present but glaring when absent is something this site has clearly invested in across the broader content as well which deserves recognition.
Thanks for the breakdown, it gave me a clearer picture of something I had been confused about for a while now, and a stop at nuggetotter closed the remaining gaps in my understanding nicely, no need to hunt around twenty other articles to put the pieces together which is a real time saver.
Really appreciate the confidence to make a clear point rather than hedging everything, and a quick visit to millpeach maintained the same direct stance, writing that takes positions rather than equivocating is more useful even when the positions are debatable because at least the reader has something to react to clearly.
Worth every minute of the time spent reading, and a stop at poppymedal extends that value across more pages, in a media environment where most content is engineered to waste attention this site stands out by treating reader time as something valuable rather than something to be exploited and stretched as far as possible.
Took me back a step or two on an assumption I had been making, and a stop at cartvilo pushed that reconsideration further, writing that gently corrects the reader without being aggressive about it is a rare diplomatic skill and the team here clearly knows how to land critical points without turning readers off.
The tone stayed consistent across the whole post which is harder than it looks for longer pieces, and a look at framegable continued the same voice, this kind of editorial consistency is a sign of either a single careful writer or a tightly run team and either is impressive today across the broader media environment.
Наша компания делает процесс получения медицинских справок простым и доступным. Мы обеспечиваем быстрое оформление документов https://afina-mc.ru/spravka-ob-analize-na-kishechnuyu-gruppu/
Reading this prompted a small note in my reference file, and a stop at pianoledge prompted another, the rare site that contributes useful nuggets to my own working knowledge rather than just consuming my attention is worth the time investment many times over compared to the usual pile of forgettable scroll content.
Glad to find something on this topic that does not start with three paragraphs of throat clearing before getting to the point, and a stop at padreledge also dives right in, respect for the readers time shows up in small editorial choices like this and they add up to a real difference quickly.
Now appreciating that the post did not require external context to follow, and a look at juncokudos maintained the same self contained quality, content that respects new visitors by being readable without prerequisites is content with broader accessibility and this site has clearly invested in keeping each piece reader friendly for fresh arrivals.
гигиена рта source
A satisfying piece in the way that good meals are satisfying rather than just filling, and a look at thermonuclearwar extended that satisfaction, the metaphor between content and meals is one I find useful and this site reads as a satisfying meal rather than the empty calories that most content provides for casual readers.
The way the post stayed on topic throughout without going on tangents was really refreshing, and a look at navqiro kept that focused approach going, discipline like this in writing is rare and worth recognising because most writers cannot resist wandering off into related subjects that dilute their main point and confuse readers along the way.
Liked how the writer used real examples instead of theoretical ones to make the points stick, and a stop at purplemilk added even more concrete examples, this is the kind of practical approach that respects readers who actually want to apply what they learn rather than just nodding along passively without doing anything useful.
Appreciate the work that went into laying this out so clearly, every section earns its place without filler, and a look at holmglobe confirmed the same care, definitely the kind of place that deserves a return visit when the topic comes up again later in the future or for any related question.
The headings made navigating the post simple even when I needed to find a specific section quickly, and a look at qinzavo continued the same thoughtful structure, small details like clear headings show that someone is actually thinking about how the reader uses the page rather than just filling it for length alone.
Yesterday I was complaining about the state of online writing and today this site has temporarily fixed that complaint, and a look at xinvoro extended that mood reversal, the short term mood improvement that comes from finding good content is real and this site has produced that improvement for me at a useful moment.
Glad to have another data point on a question I am still thinking through, and a look at stylevani added two more, content that acknowledges its place in a wider conversation rather than pretending to settle the question alone is intellectually honest in a way that I wish was more common across the open web.
scenic rafting Tara canyon Tara Montenegro rafting
Appreciated how the writer anticipated the questions a reader might have along the way, and a stop at palmcodex continued that thoughtful approach, you can tell when content has been edited with the reader in mind versus just published as a first draft and this is clearly the former approach across what I read.
Now adjusting my expectations upward for the topic based on this post, and a stop at ebonkoala continued that bar raising effect, content that resets what I think is possible on a subject is doing real work in shaping my standards and this site is providing those bar raising experiences at a notable rate during sessions.
Liked that the post left some questions open rather than pretending to settle everything, and a stop at narrowlake continued that intellectual honesty, content that respects the limits of its own claims is more trustworthy than content that overreaches and this site has clearly figured out which positions it can defend confidently.
Well done, the writing is professional without being stiff, and the topic is treated with care, and a look at xenoframe reflected that approach, the kind of site I would point a colleague to if they asked for a reliable starting point on this topic in the future without any hesitation at all.
Now recognising the specific pleasure of reading writing that shows real care for sentence shapes, and a look at vankiro extended that craft pleasure, sentence level writing quality is something most blog content ignores entirely and this site has clearly invested in the prose layer alongside the substance which is rare today.
My friends would appreciate a few of these posts and I will be sending links accordingly, and a look at flareinlets added more pages to my share queue, content that earns shares to specific people in specific contexts is content with social utility and this site is generating those targeted shares from me consistently lately.
Appreciated the way each section connected smoothly to the next without abrupt jumps, and a stop at mavlizo kept that flow going nicely, transitions are something most blog writers ignore but the difference is huge for the reader who is trying to follow a sustained line of thought today across many different topics.
Skipped the comments to avoid spoilers and came back later to find them genuinely worth reading, and a stop at numenoat extended that surprised respect, when the discussion below a post matches the quality of the post itself you have found something special and this site appears to attract that kind of audience.
нарколог на дом анонимно [url=https://narkolog-na-dom-moskva-31.ru]нарколог на дом анонимно[/url]
A genuine pleasure to find a site that publishes at a sustainable cadence rather than chasing the daily content treadmill, and a look at goldenrootboutique confirmed the careful publication rhythm, sites that prioritise quality over frequency are rare and this one has clearly chosen the slower pace which I appreciate as a reader.
Considered as a whole this site has developed a coherent point of view that comes through in individual pieces, and a look at potterlily continued displaying that coherence, sites with a unified perspective rather than a grab bag of takes are sites with editorial maturity and this one has clearly developed that maturity through years of work.
Honestly impressed by the consistency of voice across what I have read so far, and a quick visit to contemporarygoodsmarket continued that consistent feel, when a site reads like one careful person rather than a committee the experience is more rewarding for the reader who notices these subtle editorial details over time.
Glad I gave this a chance rather than scrolling past, and a stop at cartzaro confirmed I made the right call, sometimes the best content is hidden behind unassuming headlines that do not scream for attention and learning to slow down and check those out has paid off many times now across years of reading.
Really appreciate that the writer did not stretch the post to hit some target word count, the points end when they are made, and a stop at curvecatch reflected the same discipline, brevity is generosity in disguise and this site has clearly figured that out far better than most blog operations have.
The whole experience of reading this was pleasant from start to finish, no pop ups and no annoying interruptions, and a look at pianoloud continued that clean experience, technical choices about page design matter for the reader and this site clearly cares about the small details that add up to comfort across multiple visits.
официально малый бизнес в интернете
Without comparing too aggressively to other sources this one stands out for the right reasons, and a look at minimmoss continued that distinctive quality, content that distinguishes itself through substance rather than style tricks is content with lasting differentiation and this site has clearly chosen substance based differentiation as its core editorial strategy.
Honestly informative, the writer covers the ground without showing off, and a look at padreorchid reflected the same humility, content that respects the reader rather than trying to dazzle them is something I always appreciate and rarely come across in this corner of the internet today across the topics I usually read.
1win статистика [url=https://www.1win74120.help]1win статистика[/url]
aviator direct link malawi [url=http://aviator29471.help]http://aviator29471.help[/url]
1win demo o‘yinlar [url=https://1win72361.help]https://1win72361.help[/url]
Now noticing how rare it is to find a site that does not feel rushed, and a look at queenmshop extended that calm pace, content produced without time pressure has a different quality than content shipped to meet a deadline and this site reads as written without urgency which produces a different and better experience for readers.
Reading this gave me something to think about for the rest of the afternoon, and after purplemilk I had even more to mull over, the kind of post that lingers in the background of your day rather than evaporating immediately is genuinely valuable in an attention economy that punishes depth rather than rewarding it.
A quiet piece that did not try to compete on volume, and a look at modluma maintained that selective approach, sites that publish less but better are increasingly rare in an environment that rewards volume and this one has clearly chosen quality cadence over quantity which is a brave editorial decision in current conditions.
mostbet sual-cavab [url=http://mostbet35906.help]http://mostbet35906.help[/url]
1вин депозит сомонӣ [url=1win74120.help]1вин депозит сомонӣ[/url]
1win koeffitsiyentlar [url=https://www.1win72361.help]https://www.1win72361.help[/url]
aviator bonus code [url=https://www.aviator29471.help]aviator bonus code[/url]
Solid endorsement from me, the writing earns it, and a look at xomvani continues to earn it across the broader site too, the kind of operation that maintains quality across many pages rather than just one viral post is a sign of serious commitment and that is what I see here clearly across what I read.
Worth saying that the prose reads naturally without straining for style, and a stop at lushpassion maintained the same unforced quality, writing that achieves elegance without effort is the highest tier and this site has clearly worked out how to land that effortless quality consistently rather than only on the writers best days.
Honestly enjoyed every minute spent here, that is not something I say lightly, and a look at frescoheron confirmed I will be back, the bar for spending time online is high for me these days but this site clears it without effort which is high praise indeed from this reader who is usually rather demanding.
mostbet azərbaycan yükləmə [url=https://mostbet35906.help]https://mostbet35906.help[/url]
Reading carefully here has reminded me what reading carefully feels like, and a look at narrowmotor extended that reminder, the experience of careful reading versus skimming is different in ways I had partially forgotten and this site has clearly refreshed my memory of what attention feels like when content rewards it consistently.
Now thinking I want more sites built on this kind of editorial foundation, and a stop at keenfern extended that wish into a broader hope, sites built on substance and care rather than on metrics and growth are the kind of sites I want to see more of and this one is a small example worth supporting.
The post made the topic feel approachable without making it feel trivial, that is a fine balance, and a stop at stylevilo maintained the same balance, finding the middle ground between welcoming and serious is genuinely difficult and the writers here have clearly figured out how to consistently hit it well across many different posts.
https://vesperapp.co/code-promo-1xbet-gratuit-1xgift200-bonus-130-e/
A small editorial detail caught my attention, the way headings related to body text, and a look at nylonmoss maintained that careful relationship, structural details like that show up to readers who notice them and the writers here have clearly thought about every level of the piece rather than just the words.
Bookmark earned and folder updated to track this site separately, and a look at mavlumo confirmed the folder upgrade was the right call, organising my reading list so that good sites do not get lost in a sea of casual bookmarks is something I do more carefully now and this site warranted its own spot.
Now saved this in a way that I will actually find again rather than the casual bookmark approach, and a stop at maplecresttradingcorner earned the same careful saving, organising my reading bookmarks so that high quality sources rise to the top is something I should do more of and this site triggered that organisation today.
Montenegro itinerary with car rental 7 days https://montenegro-car-rental-hire.com
A piece that left me thinking I had been undercaring about the topic, and a look at prairiemyrrh reinforced that mild concern, content that raises the appropriate weight of a subject without being preachy about it is doing important work and this site is providing that gentle elevation of attention for me consistently.
Now thinking about this site as a small example of what good independent writing looks like, and a stop at dealdeck continued that exemplary status, the few sites that serve as good examples are sites worth holding up in conversations about quality and this one has earned that exemplary placement through patient consistent effort over time.
Worth your time, that is the simplest endorsement I can give, and a stop at pillowmanor extends that endorsement across the rest of the site, this is one of those increasingly rare places that delivers on what it promises rather than over selling the content and under delivering on substance every time which I find frustrating elsewhere.
Took longer than expected to finish because I kept stopping to think, and a stop at vanlizo did the same to me, content that provokes thought rather than just delivering information is in a different category and the team here is clearly working at that higher level rather than just cranking out posts.
Наша компания предоставляет услуги по оформлению медицинских справок для различных жизненных ситуаций. Мы ценим время клиентов и стараемся сделать процесс получения документов максимально удобным https://afina-mc.ru/privivochnyy-sertifikat/
Top notch writing, every paragraph carries weight and nothing feels like filler, and a stop at cadetarenas reflected that same care, a rare thing on the open web these days where most pages exist for clicks rather than actual reader value or anything close to that which is honestly a real shame.
Really thankful for posts that respect a reader’s time, this one does, and a quick look at thoughtfullydesignedstore was the same, no need to scroll through endless intros just to get to the actual content, that approach alone is enough reason to come back here regularly for the kind of writing offered.
Now feeling the quiet pleasure of finding writing that takes itself seriously without being self serious, and a stop at dabbyrd extended that subtle pleasure, the gap between earnest and pretentious is fine and this site has clearly chosen to land on the earnest side without slipping over into pretentious which is impressive.
Nice and clean, that is the best way to describe the writing here, no clutter and no wasted words, and a quick visit to pagodamatrix kept that going, I appreciate when a site treats its readers like people who can think for themselves without needing constant hand holding through every paragraph.
Took a quick scan first and then went back to read properly because the post deserved it, and a stop at nexcove kept me reading carefully too, the kind of writing that earns a slower second pass rather than getting skimmed and forgotten is something I value highly when I happen to find it.
https://next-energy.ru
thc weed in prague buy thc vapes in prague
Honestly enjoyed every minute spent here, that is not something I say lightly, and a look at purpleorbit confirmed I will be back, the bar for spending time online is high for me these days but this site clears it without effort which is high praise indeed from this reader who is usually rather demanding.
Honestly enjoyed reading this more than I expected to when I first clicked through, and a stop at n3rdmarket kept that pleasant surprise going, sometimes you stumble onto a site that just clicks with how you like to read and this is one of those for me right now today which is great.
Skipped lunch to finish reading, which says something, and a stop at qivlumo kept me at my desk longer than planned, when content beats the lunch impulse the writer has done something genuinely impressive in an attention environment full of immediately satisfying alternatives competing for the same finite block of reader time.
A well calibrated piece that knew its scope and stayed inside it, and a look at minimparch maintained the same scope discipline, scope creep is one of the failure modes of long blog posts and this site has clearly invested in the editorial discipline to prevent it which shows up in tightly contained pieces.
Just dropping by to say thanks for the effort, it does not go unnoticed when a writer cares this much about the reader, and after I went through palminlet I was certain this is one of the better corners of the internet for this particular kind of content which is genuinely refreshing.
Honestly impressed by how much useful content sits in such a small post, and a stop at xovmora confirmed the rest of the site packs a similar punch, density without confusion is a hard balance to strike and this site has clearly cracked the code on it across many different topic areas covered.
Decided this was the best thing I had read all morning, and a stop at nationmagma kept that ranking intact, ranking my reading is something I do mentally throughout the day and the top rank is competitive and not easily won but this site won it without needing to overstate its claims for that.
лечение наркомании воронеж [url=https://www.narkologicheskaya-pomoshh-voronezh-13.ru]лечение наркомании воронеж[/url]
вывод из запоя спб стационар [url=https://vyvod-iz-zapoya-v-staczionare-sankt-peterburg-30.ru]вывод из запоя спб стационар[/url]
Compared to the usual results for this kind of search this site stands well above the average, and a quick visit to nylonplain kept the standard high, you can tell within seconds whether a site is going to waste your time or actually deliver and this one clearly delivers without any false starts.
Worth pointing out that the post avoided the temptation to summarise everything at the end, and a look at elaniris continued that confident closing approach, content that trusts readers to retain the substance without being reminded of it at the end is content that respects the reader and this site practices that respect.
Genuine reaction is that I will probably think about this on and off for a few days, and a look at mavnero added fuel to that, the best content lingers in your head after you close the tab rather than evaporating immediately and this site clearly knows how to write that kind of memorable content.
Came in skeptical and left mostly convinced, that is the highest praise I can offer, and a look at presslatte pushed me further in the same direction, content that survives a critical first read is rare and worth recognising because most blog posts crumble under any real scrutiny these days when you actually pay attention closely.
Most of my reading time goes to a small number of trusted sources and this one is now joining that group, and a stop at modmixo reinforced the group membership, the few sites that earn a place in my regular rotation are sites I expect ongoing returns from and this one has earned that elevated position consistently.
High quality writing, no marketing speak and no buzzwords that mean nothing, and a stop at dealenzo kept that going, simple direct content that actually communicates something is harder to find than it should be and this is one of the rare places that gets it right consistently across many different posts.
Appreciate that you did not pad this with fluff to hit a word count, the post says what it needs to say and stops, and a look at stylezaro did the same, brevity here feels intentional not lazy which is a distinction many writers miss completely sometimes when they are working under deadlines.
Now feeling slightly more committed to my own careful reading practices having read this, and a stop at honeymeadowmarketgallery reinforced that commitment, content that models the kind of attention it deserves is content that calibrates the reader and this site has clearly raised my own bar for what to bring to good writing today.
The pacing of the post was just right, never rushed and never dragged out unnecessarily, and a look at pillownebula maintained the same rhythm, you can tell the writer has experience because the difficult skill of pacing is something only practiced writers manage to handle well in long form content over time and across formats.
However many similar pages I have read this one taught me something new, and a stop at keenfoil added more new material, content that contributes genuinely fresh information rather than recycling what is already widely available is content with real informational value and this site is providing that informational freshness at a notable rate.
Saving this link for the next time someone asks me about this topic, and a look at frondketo expanded what I will be sharing with them, this is the kind of resource that makes a real difference when you are trying to point a friend to something useful and reliable rather than generic marketing pages.
Glad the writer did not feel the need to argue with imaginary critics in the post itself, and a stop at vanqiro kept the same focused approach going, defensive writing wastes the reader time and confidence on positions that did not need defending and this post has clearly avoided that common failure.
Just one of those reads that left me feeling slightly more capable rather than overwhelmed, and a look at palettemanor kept that empowering feel going, the difference between content that builds the reader up and content that intimidates them is huge and this site clearly knows which side of that line to stand.
Liked how the writer used real examples instead of theoretical ones to make the points stick, and a stop at quaintotter added even more concrete examples, this is the kind of practical approach that respects readers who actually want to apply what they learn rather than just nodding along passively without doing anything useful.
Now noticing the post fit a particular gap in my reading without my having articulated the gap before, and a look at alfornephilly extended that gap filling effect, content that meets needs I had not consciously formulated is content with reader insight and this site has clearly developed that anticipatory editorial sense across many pieces.
онлайн школа 10 11 класс [url=https://shkola-onlajn-51.ru]https://shkola-onlajn-51.ru[/url]
Well done, the kind of post that makes you slow down and actually read instead of skimming for keywords, and a look at nectarmocha kept me reading carefully too, that is a sign of writing that has been crafted rather than churned out for an algorithm to see today and tomorrow.
Bookmark moved to my permanent reference folder rather than the casual maybe later folder, and a look at danebase earned the same upgrade, the distinction between casual interest and lasting reference is something I track carefully and very few sites cross that threshold but this one did so without much effort apparently.
Reading this with a fresh mind in the morning brought out details I might have missed in the afternoon, and a stop at lyrelinden earned the same fresh attention, content that rewards being read at full attention rather than at energy lows is content with real density and this site has that density consistently.
Thank you for being clear and direct, that simple approach saves so much frustration on the reader’s end, and a stop at xunmora only made me more sure of it, the rest of the content seems to follow the same pattern which is a great sign of consistent editorial care behind the scenes.
aviator maximum cashout [url=https://www.aviator29471.help]https://www.aviator29471.help[/url]
1win sign up [url=https://www.1win74120.help]https://www.1win74120.help[/url]
Now feeling the small relief of finding writing that does not condescend, and a stop at octanenebula extended that respect for readers, content that treats its audience as capable adults rather than as people to be managed produces a different reading experience and this site has clearly chosen the respectful approach across all pieces.
betfinal app download [url=betfinalafrica.com]https://betfinalafrica.com/[/url]
Liked the way the post handled the final paragraph, no neat bow but no abrupt cutoff either, and a stop at minutemotel continued that thoughtful ending pattern, endings are hard and most blog writers either over engineer them or skip them entirely and this site has clearly figured out a sustainable middle approach.
1win Andijon depozit [url=http://1win72361.help/]http://1win72361.help/[/url]
Любимые программы всегда под рукой! Развлекательные ток-шоу, кулинарные баттлы, музыкальные конкурсы, реалити и интеллектуальные игры — всё в одном месте. Свежие выпуски, архив прошлых сезонов и эксклюзивные проекты. Включай в любое время, без рекламы и регистрации: скачать тв шоу через торрент 2026
watch monopoly big baller [url=http://www.monopoly-live-bd.com/]https://monopoly-live-bd.com/[/url]
11 класс онлайн [url=https://shkola-onlajn-52.ru]https://shkola-onlajn-52.ru[/url]
online monopoly game [url=http://monopolylives.com/]https://monopolylives.com/[/url]
вывод из алкогольного запоя [url=https://vyvod-iz-zapoya-na-domu-sankt-peterburg-18.ru]https://vyvod-iz-zapoya-na-domu-sankt-peterburg-18.ru[/url]
monopoly big baller status [url=https://imonopoly.live/]https://imonopoly.live/[/url]
A piece that respected the reader by not over explaining the obvious, and a look at mavqino continued that calibrated approach, finding the right level of explanation is one of the harder editorial calls and this site has clearly thought carefully about what readers will already know versus what they need help with consistently.
вывести из запоя цена [url=https://vyvod-iz-zapoya-na-domu-sankt-peterburg-20.ru]вывести из запоя цена[/url]
Worth pointing out that the writing reads as confident without being defensive about it, and a look at presslaurel extended that secure tone, content that does not pre emptively argue against imagined critics has a different quality from defensive writing and this site reads as written from a place of real ease.
Now realising the topic deserved better treatment than it has been getting elsewhere, and a look at zirnora extended that broader recognition, content that exposes the gap between actual quality and average quality elsewhere is doing the quiet work of raising standards and this site is contributing to that elevation in its own corner.
kasyno vulkan vegas [url=https://play24-vulkan.com/]kasyno vulkan vegas[/url].
Appreciate the thoughtful approach, the writer clearly took time to make this readable for someone who is not already an expert, and a look at dealluma kept that going nicely, easy on the eyes and easy on the brain which is always a winning combination when reading on a busy day.
vulkan casino. [url=https://vulkan-casino3.com]https://vulkan-casino3.com/[/url]
mostbet parol sıfırlama [url=https://mostbet35906.help/]https://mostbet35906.help/[/url]
kasyno vulkan vegas [url=https://vulkan-casino-onlayn.com/]https://vulkan-casino-onlayn.com/[/url]
The examples really helped me grasp the points faster than abstract descriptions would have, and a stop at pilotlobe added a few more practical illustrations that drove the message home, the kind of writing that knows its readers learn better through concrete situations rather than vague generalities is rare and worth recognising clearly.
solana crypto casino [url=solanagxy.com]https://solanagxy.com/[/url]
Appreciated how the writer anticipated the questions a reader might have along the way, and a stop at rangermemo continued that thoughtful approach, you can tell when content has been edited with the reader in mind versus just published as a first draft and this is clearly the former approach across what I read.
пробить местоположение по номеру телефона [url=www.kak-najti-cheloveka-po-nomeru-telefona-1.ru]пробить местоположение по номеру телефона[/url]
согласование перепланировки квартиры москва [url=http://www.pereplanirovka-kvartir19.ru]http://www.pereplanirovka-kvartir19.ru[/url]
Купить земельный участок https://novoesonino.ru в коттеджном поселке «Новое Сонино». Земли ИЖС с электричеством, дорогами и перспективой комфортного проживания за городом. Отличное место для строительства загородного дома в городском округе Домодедово.
I really like the calm tone here, it does not push anything on the reader, and after I went through plumcovegoodsroom I felt the same way, just steady useful content laid out without drama, which is exactly what someone trying to learn something quickly needs to find rather than aggressive marketing.
starz888 [url=https://www.multitaskingmaven.com]https://multitaskingmaven.com/[/url]
нарколог на дом круглосуточно [url=https://narkolog-na-dom-moskva-31.ru]нарколог на дом круглосуточно[/url]
Now adding this site to a small mental group of recommendations I keep ready for specific kinds of inquiries, and a stop at tavlizo extended the recommendation readiness, content that I can confidently point friends and colleagues toward in specific contexts is content with real social utility and this site has that utility clearly.
1xbet t?rkiye giri? [url=http://www.1xbet-giris-77.com]http://www.1xbet-giris-77.com[/url]
Now realising the post solved a small problem I had been carrying for weeks, and a look at palmmeadow extended that problem solving function, content that connects to specific unresolved questions in my own life rather than just providing general interest is content with real practical impact and this site is providing that practical value.
Thanks for laying this out in a way that someone newer to the topic can follow, and a stop at nexdeck kept that accessibility going, writing that meets readers at different experience levels without condescending is hard to do well and the writers here have clearly thought about who they are writing for.
1xbet mobil indir android [url=https://1xbet-indir-1.com]https://1xbet-indir-1.com[/url]
Will be sharing this with a couple of people who care about the topic, and a stop at qivmora added more material worth passing along, the kind of site that is generous with quality content and does not make you jump through hoops to access it which is appreciated more than the team probably realises.
Bookmarking this for later, the kind of resource I want to keep nearby, and a quick look at needlematrix confirmed the rest of the site is worth the same treatment, definitely going into my reference folder for the next time the topic comes up at work or in conversation with someone who asks.
Reading this prompted a small note in my reference file, and a stop at quarknebula prompted another, the rare site that contributes useful nuggets to my own working knowledge rather than just consuming my attention is worth the time investment many times over compared to the usual pile of forgettable scroll content.
A piece that did exactly what it promised in the headline without overshooting or underdelivering, and a look at palettemauve continued that calibration, alignment between promise and delivery is a basic editorial virtue that many sites fail at and this site has clearly mastered the matching of expectation and substance throughout pieces.
скачать steam mobile authenticator Для надежной защиты игрового инвентаря от мошенников пользователям необходимо скачать Steam Authenticator или его десктопный аналог. Программа Steam Desktop Authenticator позволяет полностью автоматизировать процесс авторизации и одобрения игровых обменов. Если вы ищете официальный софт для ПК, вбивайте в поиск download sda steam и устанавливайте утилиту в несколько кликов.
скачать steam desktop authenticator Программа Steam Desktop Authenticator создана специально для трейдеров, которым важна скорость и комфорт при одобрении лотов на торговой площадке. Теперь вам не обязательно скачивать Steam Guard Mobile Authenticator на телефон, ведь все операции можно подтверждать в один клик мышкой. Защитите свой инвентарь от мошенников — для этого достаточно зайти на проверенный сайт и скачать sda для вашей операционной системы.
thc joint in prague thc cannabis in prague
Looking through other posts here the consistency is what makes the site valuable rather than any single piece, and a stop at sleepcinemahotel extended that consistency observation, sites whose value lies in the ongoing pattern rather than in standout posts are sites I trust more deeply and this one has clearly built that kind of trust.
Reading this on the train into work was a better use of the commute than my usual choices, and a stop at modrivo extended that commute reading well, content that improves transit time rather than just filling it is content with practical benefit and this site has earned its place in my morning commute reading rotation.
Reading this with a fresh mind in the morning brought out details I might have missed in the afternoon, and a stop at danebox earned the same fresh attention, content that rewards being read at full attention rather than at energy lows is content with real density and this site has that density consistently.
запой стационар [url=https://vyvod-iz-zapoya-v-staczionare-sankt-peterburg-31.ru]запой стационар[/url]
Reading this gave me a small framework I expect to use going forward, and a stop at duetdrive extended that framework, content that produces transferable mental models rather than just specific facts is content with multiplicative value and this site is providing those models at a rate that justifies extra attention from me regularly.
Felt a small spark of recognition when the post named something I had been struggling to articulate, and a look at domelounges produced more such moments, the rare service of giving readers language for fuzzy intuitions is one of the higher values that good writing can provide and this site offered several today instances.
Honestly the simplicity is what makes this work, the topic is not buried under filler words or overly complex examples, and a quick look at octanepinto showed the same sensible style, I left with what I came for and no headache from over reading which is a real win these days.
Что делать, если курьер принес неправильный заказ
Probably the kind of site that should be more widely read than it appears to be, and a look at kelpfancy reinforced that quiet wish, the gap between a sites quality and its apparent reach is sometimes large and that gap exists for this site in a way that makes me want to mention it more.
The lack of unnecessary jargon made the post accessible without sacrificing accuracy, and a look at xunqiro continued in the same accessible style, technical topics often hide behind specialised vocabulary but here the writer trusts the reader to keep up with plain language and that trust pays off nicely throughout the entire post.
download sda Каждому активному пользователю важно вовремя скачать Steam Authenticator, чтобы защитить свои игровые ценности от кражи. Компьютерная утилита Steam Desktop Authenticator позволяет моментально одобрять лоты и трейды без использования телефона. Если вы цените свое время и безопасность, просто выберите download Steam Desktop Authenticator на надежном веб-ресурсе.
Really nice to see things explained without overcomplicating the topic, the words flow naturally and stay easy to follow, and a short visit to elffleet only added to that experience because the same simple approach is used across the rest of the page too without any change in tone.
Thanks for the breakdown, it gave me a clearer picture of something I had been confused about for a while now, and a stop at pressparsec closed the remaining gaps in my understanding nicely, no need to hunt around twenty other articles to put the pieces together which is a real time saver.
Felt a small spark of recognition when the post named something I had been struggling to articulate, and a look at mavquro produced more such moments, the rare service of giving readers language for fuzzy intuitions is one of the higher values that good writing can provide and this site offered several today instances.
Walked away with a clearer head than I had before reading this, and a quick visit to fumefig only sharpened that, the writing has a way of cutting through the noise that surrounds most topics online which is something I will definitely remember the next time I am searching for an answer to anything.
Quality you can feel from the first paragraph, the writer clearly knows the topic and how to share it, and a quick look at zirqano confirmed the same depth runs throughout the rest of the site as well which is rare and worth pointing out when it happens online for any reader passing through.
Decided to subscribe to the RSS feed if there is one, and a stop at mirelogic confirmed that decision, content that I want delivered to me proactively rather than just remembered when I have time is content that has earned a higher level of commitment from me as a reader looking for reliable sources.
A memorable post for me on a topic I had thought I was tired of, and a look at dealmixo suggested the same site can refresh other tired topics, sites that can revive my interest in subjects I had written off as exhausted are doing rare work and this one is clearly doing that for me today.
Skipped the related links section thinking I had read enough and then came back to it later when curiosity got the better of me, and a stop at pipmyrrh confirmed I should have just read it first, every section of this site appears to deserve careful attention rather than skipping past lazily.
Nice to see a post that does not try to overcomplicate the basics for the sake of looking smart, and once I looked at rangerorca the same direct tone was there too, which honestly makes a difference when you are short on time and want answers without long pointless intros.
Came away with a slightly better mental model of the topic than I started with, and a stop at lakepeach sharpened that further, content that improves the reader thinking apparatus rather than just dumping facts into it is the rare kind I genuinely value and seek out when I have time to read carefully.
https://twiceheardle.com/code-promo-1xbet-aujourdhui-bonus-vip-130-e/
1win adresa Moldova [url=http://1win5809.help]http://1win5809.help[/url]
мостбет зеркало актуальное Кыргызстан [url=http://mostbet58127.help/]http://mostbet58127.help/[/url]
mostbet retragere usdt [url=https://mostbet90518.help/]https://mostbet90518.help/[/url]
Decided not to comment because the post said what needed saying, and a stop at neonmotel continued that complete feel, content that does not invite obvious additions or corrections from readers is content that has been carefully considered and this site appears to consistently produce pieces that satisfy rather than provoke unnecessary follow ups.
Coming back to this one, definitely, and a quick visit to tavmixo only made me more sure of that, the kind of writing that makes you want to set aside time later rather than rushing through it now while distracted by everything else competing for attention on the screen today across so many tabs.
наркология клиника [url=http://www.narkologicheskaya-pomoshh-voronezh-13.ru]http://www.narkologicheskaya-pomoshh-voronezh-13.ru[/url]
Really appreciate the confidence to make a clear point rather than hedging everything, and a quick visit to quarkpivot maintained the same direct stance, writing that takes positions rather than equivocating is more useful even when the positions are debatable because at least the reader has something to react to clearly.
Better signal to noise ratio than most places I check on this kind of topic, and a look at macrolush kept that going, every paragraph here carries something worth reading rather than padding out the page to hit some arbitrary length target that search engines reward but readers ignore as soon as they notice it.
A piece that suggested careful editing without showing the marks of the editing, and a look at pansyoboe continued that invisible polish, the best editing disappears into the prose and this site reads as having been edited with skill that does not announce itself which is the highest compliment I can offer any blog content.
A particular pleasure to read this with a fresh coffee, and a look at savennkga extended the pleasure across more pages, content that pairs well with quiet morning rituals is something I have come to value highly and this site has the kind of energy that fits naturally into a calm reading routine.
Came here from a search and stayed for the side links because they were that interesting, and a stop at odelatte took me even further into the site, the kind of organic exploration that good content invites is something most sites kill through aggressive interlinking and pushy navigation choices rather than relying on quality.
Now considering carefully how to share this site with the right audience rather than broadcasting widely, and a look at darebulb extended that careful sharing impulse, content worth sharing carefully rather than spamming is content that has earned a higher kind of recommendation and this site has earned that careful shareability throughout pieces.
Polished and informative without feeling overproduced, that is the sweet spot, and a look at duetparish hit it again, you can tell when a site has been built with care versus thrown together for the sake of having something to put online and this is clearly the former approach taken by the team.
Found this useful, the points line up well with what I have been thinking about lately, and a stop at zalqino added some angles I had not considered yet, definitely walking away with more than I came for which is the best outcome from time spent reading online for any kind of topic.
Reading this as part of my evening winding down routine fit perfectly, and a stop at primpivot extended the wind down nicely, content that calms rather than agitates is what I want at the end of the day and this site provides that calming reading experience reliably which is increasingly rare across the modern web.
Definitely returning here, that is decided, and a look at mavtoro only made the case stronger, this is one of those rare websites that rewards regular visits rather than feeling stale after the first read which is something I cannot say about most of the places I bookmark today across all my topics.
A small thank you note from me to the team behind this work, the post earned it, and a stop at zirqiro suggested more thanks would be in order over time, recognising the people who do good writing online is something I try to remember to do because the alternative is silence and silence rewards mediocrity unfortunately.
Справки об инвалидности востребованы при оформлении социальных выплат и льгот. Мы делаем процесс получения документов максимально удобным https://spravka-invalid.com/vopros-otvet/
стационар капельница от алкоголя [url=https://vyvod-iz-zapoya-v-staczionare-sankt-peterburg-30.ru]стационар капельница от алкоголя[/url]
Worth saying that the quiet confidence of the writing is what landed first, and a look at dealrova continued that quiet quality, confident writing without the loud display of confidence is a rare combination and this site has clearly developed both the knowledge and the editorial restraint to land that combination consistently.
A piece that prompted a small mental rearrangement of how I order related ideas, and a look at knackpacts extended that rearranging effect, content that affects the structure of my thinking rather than just adding to it is content with the deepest kind of impact and this site is reaching that depth for me today.
Came across this through a roundabout path and now it is on my regular rotation, and a stop at palmmill sealed that decision, the open web still produces serendipitous discoveries when you let the citations and references guide you rather than relying purely on algorithmic feeds for new content recommendations always.
The examples really helped me grasp the points faster than abstract descriptions would have, and a stop at pippierce added a few more practical illustrations that drove the message home, the kind of writing that knows its readers learn better through concrete situations rather than vague generalities is rare and worth recognising clearly.
Now setting aside time on my next free afternoon to read more from the archives, and a stop at premiumdesignandliving confirmed that time will be well spent, the rare site whose archive deserves a dedicated reading session rather than just casual sampling is the kind of resource worth scheduling around and this one qualifies clearly.
Now planning to come back when I have the right kind of attention to read carefully, and a stop at mirthlinnet reinforced that plan, choosing the right moment to read certain content is a quiet form of respect for the work and this site is generating those careful planning behaviours from me consistently as a reader.
Looking at the surface design and the substance together this site has both right, and a look at kelpgrip reinforced that integrated quality, sites where presentation and content reinforce each other rather than fighting are sites with full editorial coherence and this one has clearly invested in both layers in a balanced way.
Thanks for treating the topic with the seriousness it deserves without becoming pompous about it, and a stop at nexmixo continued that balanced treatment, the gap between earnest and self serious is huge and writers who can stay on the right side of it earn my respect when I find them online today.
High quality writing, no marketing speak and no buzzwords that mean nothing, and a stop at vanquro kept that going, simple direct content that actually communicates something is harder to find than it should be and this is one of the rare places that gets it right consistently across many different posts.
One of the more honest takes on the topic I have seen lately, no spin and no oversell, and a stop at nervemuscat kept that going, the kind of voice the open web could use a lot more of rather than the endless echo chamber of recycled opinions floating around every social platform these days.
Glad I clicked through from where I did because this turned out to be worth the time spent, and after realmmercy I had a fuller picture, the kind of content that earns its visitors through delivering value rather than chasing them through aggressive advertising or constant pop ups appearing everywhere on the screen lately.
Found the writing surprisingly fresh for what is by now a well covered topic, and a stop at lanellama kept that freshness going across the related pages, original perspective on familiar ground is hard to come by and this site has clearly earned its place in the conversation rather than just rehashing old ideas.
Worth saying that the prose reads naturally without straining for style, and a stop at modrova maintained the same unforced quality, writing that achieves elegance without effort is the highest tier and this site has clearly worked out how to land that effortless quality consistently rather than only on the writers best days.
Now noticing that the post avoided the temptation to be funny in places where humour would have undermined the substance, and a stop at qivnaro maintained the same restraint, knowing when to be serious is a rare editorial virtue and this site has clearly developed it through what I assume is careful editorial practice over years.
Worth recognising the absence of the usual blog tropes here, and a look at fumefinch continued that fresh quality, sites that avoid the standard moves of the medium read as more original even when the content is on familiar topics and this one has clearly chosen its own path through the conventional terrain skilfully.
Наша компания помогает получить справки, оформить свидетельства и подготовить документы для международного использования через апостиль https://langwee-rus.com/spravka-ob-otsutstvii-braka/
If I had to defend the time I spend reading independent blogs this site would feature in the defence, and a look at quaymicro reinforced that defensive utility, the ongoing case for non algorithmic reading is one I make to myself periodically and sites like this one provide the actual evidence that supports the case clearly.
выведение из запоя в спб [url=https://vyvod-iz-zapoya-na-domu-sankt-peterburg-20.ru]https://vyvod-iz-zapoya-na-domu-sankt-peterburg-20.ru[/url]
скачать steam authenticator Если вам неудобно использовать мобильный телефон для подтверждения входа, рекомендуем скачать sda steam на ваш персональный компьютер. Утилита генерирует одноразовые коды авторизации в реальном времени, выполняя те же функции, что и оригинальный Steam Mobile Authenticator. Для быстрой установки софта введите в поисковой строке download sda steam и настройте двухфакторную аутентификацию за пару минут.
Liked how the post handled an objection I was forming as I read, and a stop at pantheroffer similarly anticipated where my thinking was going next, the rare writer who can predict reader concerns and address them in advance is doing something most online content fails to do despite that being basic editorial work.
If quality blog writing is dying as people sometimes claim then this site is one piece of evidence that it has not died yet, and a look at tavnero extended that evidence, the broader cultural question about online writing has empirical answers in specific sites and this one is contributing to a more optimistic answer overall.
buy diazepam online
интернет-школа [url=https://shkola-onlajn-52.ru]https://shkola-onlajn-52.ru[/url]
A memorable post for me on a topic I had thought I was tired of, and a look at prismplanet suggested the same site can refresh other tired topics, sites that can revive my interest in subjects I had written off as exhausted are doing rare work and this one is clearly doing that for me today.
download steam desktop authenticator Каждому активному пользователю важно вовремя скачать Steam Authenticator, чтобы защитить свои игровые ценности от кражи. Компьютерная утилита Steam Desktop Authenticator позволяет моментально одобрять лоты и трейды без использования телефона. Если вы цените свое время и безопасность, просто выберите download Steam Desktop Authenticator на надежном веб-ресурсе.
Spent a few minutes here and came away with a clearer picture of the topic, the writing keeps things simple without dumbing them down, and after a stop at elmhex the rest of the points lined up neatly which is something I appreciate when I am short on time and need answers fast.
Now adding this site to a small mental group of recommendations I keep ready for specific kinds of inquiries, and a stop at zarqiro extended the recommendation readiness, content that I can confidently point friends and colleagues toward in specific contexts is content with real social utility and this site has that utility clearly.
онлайн образование школа [url=https://shkola-onlajn-51.ru]онлайн образование школа[/url]
Different in a good way from the cookie cutter content that fills most blogs covering this area, and a stop at melqavo kept showing me why, original thoughtful writing exists if you know where to look and this site has earned a place on my short list of those rare exceptions worth defending.
The headings made navigating the post simple even when I needed to find a specific section quickly, and a look at fernbureau continued the same thoughtful structure, small details like clear headings show that someone is actually thinking about how the reader uses the page rather than just filling it for length alone.
Skipped the related products section because there was none, and a stop at uniquegiftcorner also lacked any aggressive monetisation, content that is not constantly trying to convert me into a customer or subscriber is content that has confidence in its own value and that confidence shows up as a different reading experience.
Took a screenshot of one section to come back to later, and a stop at zirvani prompted another saved tab, the urge to capture and revisit specific pieces of content is something I rarely feel but when I do it tells me the work is worth more than the average passing read for sure.
круглосуточный вывод из запоя нарколог 24 [url=https://vyvod-iz-zapoya-na-domu-sankt-peterburg-18.ru]https://vyvod-iz-zapoya-na-domu-sankt-peterburg-18.ru[/url]
Reading carefully here has reminded me what reading carefully feels like, and a look at jovenix extended that reminder, the experience of careful reading versus skimming is different in ways I had partially forgotten and this site has clearly refreshed my memory of what attention feels like when content rewards it consistently.
Honest assessment after reading this twice is that it holds up under careful attention, and a look at piscesmyrtle extended that durability across more pages, content that survives a second read without revealing weak spots is rarer than the average reader probably realises and this site clearly cleared that bar.
Found something quietly useful here that I expect to return to, and a stop at darechip added more of the same, content with quiet utility ages well in a way that flashy hot takes do not and I have learned to weight quiet utility much higher when deciding what to bookmark for later use.
mostbet вход ошибка [url=https://www.mostbet58127.help]https://www.mostbet58127.help[/url]
conectare 1win [url=https://1win5809.help/]https://1win5809.help/[/url]
mostbet setari surse necunoscute android [url=http://mostbet90518.help]mostbet setari surse necunoscute android[/url]
Skipped the related products section because there was none, and a stop at findinspirationdaily also lacked any aggressive monetisation, content that is not constantly trying to convert me into a customer or subscriber is content that has confidence in its own value and that confidence shows up as a different reading experience.
Купить квартиру https://kupi-kvartiruspb.ru или апартаменты в Курортный район Санкт-Петербурга. Жилые комплексы рядом с Финским заливом, парками и зонами отдыха. Комфортные планировки, современные дома и удобная транспортная доступность.
Worth saying that the prose reads naturally without straining for style, and a stop at nickelpearl maintained the same unforced quality, writing that achieves elegance without effort is the highest tier and this site has clearly worked out how to land that effortless quality consistently rather than only on the writers best days.
Нужен участок? новое растуново отличное решение для строительства загородного дома. Участки ИЖС, удобный подъезд, электричество и развитая инфраструктура. Комфортное место для постоянного проживания недалеко от Москвы.
1win descarcare pe telefon [url=http://1win5809.help]http://1win5809.help[/url]
mostbet kg [url=https://www.mostbet58127.help]https://www.mostbet58127.help[/url]
mostbet bilet [url=http://mostbet90518.help/]http://mostbet90518.help/[/url]
Started reading without much expectation and ended on a high note, and a look at modelmetro continued that arc, content that builds rather than peaks early is a sign of a writer who knows how to structure a piece for sustained reader engagement rather than relying on a strong hook to do all the work.
A piece that reads as if the writer trusted readers to fill in obvious gaps, and a look at larksmemo continued that respectful approach, content that does not over explain what the reader can infer is content that respects intelligence and this site has clearly chosen to write to capable readers rather than to the lowest common denominator.
Quality work here, the post reads cleanly and the points stay focused throughout, and a stop at magmalong kept the standard high, you can tell the writer cares about the final result rather than just hitting publish for the sake of having something new on the page to feed the search engines.
Honestly the simplicity of the explanation made the topic click for me in a way other writeups had not, and a look at neatglyphs continued that clarity into related areas, when a writer gets the level of explanation right the reader does the heavy lifting themselves and the post just enables it.
Closed three other tabs to focus on this one and never opened them again, and a stop at realmplaid similarly held attention exclusively, content that crowds out other reading from working memory is content with real density and this site has demonstrated that density across multiple pages I have visited so far this morning.
Found a couple of useful angles in here I had not considered before reading carefully, and a quick stop at velxari added more, this is one of those sites where the value compounds the more you read rather than peaking at one viral post and then offering nothing else of substance afterwards which is common.
Generally my attention drifts on long posts but this one held it through the end, and a stop at queenmanor earned the same sustained focus, content that defeats my drift tendency is content with substantive pulling power and this site has demonstrated that pulling power across multiple pieces in a session that has now run quite long actually.
1xbet y?kle [url=http://1xbet-indir-1.com]http://1xbet-indir-1.com[/url]
Reading this in a quiet hour and finding it suited the quiet, and a stop at parademiso extended the quiet reading mood, content that matches its own optimal reading conditions rather than fighting them is content that has been thoughtfully calibrated and this site reads as having a particular reading mood in mind throughout.
отследить номер телефона бесплатно [url=https://kak-najti-cheloveka-po-nomeru-telefona-1.ru]https://kak-najti-cheloveka-po-nomeru-telefona-1.ru[/url]
Skipped the comments to avoid spoilers and came back later to find them genuinely worth reading, and a stop at kelpherb extended that surprised respect, when the discussion below a post matches the quality of the post itself you have found something special and this site appears to attract that kind of audience.
Bookmark earned, calendar reminder set, share queued, all from one good post, and a look at peonyolive did the same, when a single reading session triggers multiple downstream actions you know the content has actually moved me beyond the page and this site is moving me at that higher level reliably.
1xbet g?ncel giri? [url=http://www.1xbet-giris-77.com]1xbet g?ncel giri?[/url]
My professional context would benefit from having this kind of resource available, and a look at privetplain extended the professional applicability, the rare site that contributes meaningfully to professional work rather than just personal interest is content with multiplied value and this one is providing that professional utility consistently across multiple pieces.
Came in skeptical and left mostly convinced, that is the highest praise I can offer, and a look at tavqino pushed me further in the same direction, content that survives a critical first read is rare and worth recognising because most blog posts crumble under any real scrutiny these days when you actually pay attention closely.
Closed my email tab so I could read this without interruption, and a stop at zelqiro earned the same protected attention, when content is good enough to defend against the usual digital distractions you know it deserves better than the half attention most online reading gets in a typical busy day.
Such writing is increasingly rare and worth supporting through attention, and a stop at pivotllama extended that supportive attention across more pages, the conscious choice to spend time on sites that produce careful work rather than convenient consumption is itself a small form of patronage and this site is receiving that conscious patronage from me.
выход из запоя в стационаре [url=https://vyvod-iz-zapoya-v-staczionare-sankt-peterburg-31.ru]выход из запоя в стационаре[/url]
Solid quality, the kind of work that holds up to a careful read rather than a quick skim, and a quick look at explorenewopportunities kept that standard going strong, content that rewards attention rather than punishing it is something I appreciate more and more these days online across nearly every topic I follow.
Reading this on a difficult day was a small bright spot, and a stop at fernpier extended that brightness, content that improves a hard day is content that has earned a particular kind of place in my reading habits and this site is occupying that uplifting role for me today which I appreciate clearly.
Genuine reaction is that I will probably think about this on and off for a few days, and a look at fumegrove added fuel to that, the best content lingers in your head after you close the tab rather than evaporating immediately and this site clearly knows how to write that kind of memorable content.
Honestly informative, the writer covers the ground without showing off, and a look at noonlinnet reflected the same humility, content that respects the reader rather than trying to dazzle them is something I always appreciate and rarely come across in this corner of the internet today across the topics I usually read.
клиника плюс наркология [url=https://www.narkologicheskaya-pomoshh-voronezh-13.ru]клиника плюс наркология[/url]
Without comparing too aggressively to other sources this one stands out for the right reasons, and a look at nexmuzo continued that distinctive quality, content that distinguishes itself through substance rather than style tricks is content with lasting differentiation and this site has clearly chosen substance based differentiation as its core editorial strategy.
Reading this brought back the satisfaction I used to get from blogs ten years ago, and a stop at zorkavi kept that nostalgic quality alive, sites that capture what was good about an earlier era of internet writing are increasingly precious and this one is doing that without feeling like a deliberate throwback at all.
Worth saying that the quiet confidence of the writing is what landed first, and a look at datacabin continued that quiet quality, confident writing without the loud display of confidence is a rare combination and this site has clearly developed both the knowledge and the editorial restraint to land that combination consistently.
Honestly informative, the writer covers the ground without showing off, and a look at trendworldmarket reflected the same humility, content that respects the reader rather than trying to dazzle them is something I always appreciate and rarely come across in this corner of the internet today across the topics I usually read.
Now setting aside time on my next free afternoon to read more from the archives, and a stop at modtora confirmed that time will be well spent, the rare site whose archive deserves a dedicated reading session rather than just casual sampling is the kind of resource worth scheduling around and this one qualifies clearly.
Bookmark added with a small note about why, and a look at qivzaro prompted another bookmark with another note, the bookmarks I annotate are the ones I expect to return to deliberately rather than stumble into and this site is generating annotated bookmarks at a higher rate than my usual content sources by some margin.
ЖК премиум-класса https://kvartiry-spb78.ru от застройщика — современные квартиры с продуманными планировками, высоким уровнем комфорта и развитой инфраструктурой. Закрытая территория, подземный паркинг, благоустроенные дворы и престижное расположение для комфортной жизни.
Нужна декоративная лепнина? https://ppu-lepnina.ru стильный декоративный элемент для интерьера. Карнизы, молдинги, колонны и розетки помогают создавать выразительный дизайн помещений. Материал устойчив к влаге, долговечен и легко устанавливается.
Now considering carefully how to share this site with the right audience rather than broadcasting widely, and a look at lattepinto extended that careful sharing impulse, content worth sharing carefully rather than spamming is content that has earned a higher kind of recommendation and this site has earned that careful shareability throughout pieces.
Just want to say thank you for putting this together, posts like these make searching online actually worth it sometimes, and a quick look at questloft kept that going, useful and easy to read without any of the tricks that ruin most blog comment sections lately on the wider open web.
Now adjusting my mental list of reliable sites for this topic, and a stop at mossmute reinforced the adjustment, the small ongoing curation work of maintaining trusted sources is one of the actual practical activities of careful reading and this site has earned a permanent place on my list for this particular subject.
Going to share this with a friend who has been asking the same questions for a while now, and a stop at briskolive added a few more pages I will pass along too, this is the kind of generous information that earns a small thank you from me right now and again later this week.
услуги по согласованию перепланировки [url=www.pereplanirovka-kvartir19.ru]услуги по согласованию перепланировки[/url]
Рекомендую ресурс, посвящённый теме вариаторов, их обслуживанию и ремонту. На портале можно найти общие сведения об устройстве этой трансмиссии, возможных неисправностях и методах их диагностики. В материалах сайта рассматриваются различные аспекты эксплуатации вариаторов, что может быть полезно для общего понимания их работы – p1773 mitsubishi asx
Now planning to share the link with a small group of readers I trust, and a look at elitefests suggested more material to share with the same group, recommending content into a curated circle requires confidence in the recommendation and this site is making me confident in those personal recommendations on multiple separate occasions now.
A piece that did not require external context to follow, and a look at probelucid maintained the same self contained quality, content that stands alone without forcing readers to chase prerequisites is more accessible and this site has clearly thought about how each piece can serve a fresh visitor rather than only existing members.
Worth pointing out that the writing reads as confident without being defensive about it, and a look at parchmodel extended that secure tone, content that does not pre emptively argue against imagined critics has a different quality from defensive writing and this site reads as written from a place of real ease.
Comfortable read, finished it without realising how much time had passed, and a look at velzaro pulled me into more pages the same way, the absence of friction in good content lets time disappear and that is one of the highest compliments I can pay any piece of writing I find online during a regular search session.
buy diazepam 10mg
Just sat with this for a bit longer than I usually would because the points are worth thinking about, and after elmhilt I had even more to chew on, the kind of post that nudges your thinking forward without forcing the issue is something I have always appreciated in good writing online.
Came away with a small but real shift in perspective on the topic, and a stop at plantmedal pushed that shift a bit further, the kind of subtle reframing that good writing does to a reader without making a big deal of it is something I always appreciate when it happens which is sadly not that often.
Will be coming back to this for sure, too much good content to absorb in one sitting, and a stop at zelzavo only added more pages I want to dig through, this site is going onto my regular rotation list because it consistently delivers something worth the visit lately rather than empty filler.
Most of the time I bounce off similar pages within seconds, and a stop at connectgrowachieve held me longer than I would have predicted, the ability to convert a likely bouncing visitor into an engaged reader is a quality signal and this site has demonstrated that conversion ability across multiple visits where I expected to bounce.
Decided not to skim despite my usual habit and was rewarded for the discipline, and a stop at whimharbor earned the same patient approach, training myself to recognise sites that warrant slower reading is part of being a careful online reader and this site is the kind that helps me practice that skill regularly.
Now feeling the post has earned a proper recommendation rather than a casual mention, and a stop at tavquro reinforced the recommendation strength, the difference between mentioning and recommending is a small editorial distinction I observe in my own conversations and this site has earned the upgraded recommendation level from me confidently today.
лечение запоя в стационаре [url=https://vyvod-iz-zapoya-v-staczionare-sankt-peterburg-30.ru]лечение запоя в стационаре[/url]
Мы предоставляем комплексные услуги по подготовке документов и их легализации для использования за рубежом https://langwee-rus.com/notarialnoe-zaverenie-dokumentov/
Took me back a step or two on an assumption I had been making, and a stop at ketohale pushed that reconsideration further, writing that gently corrects the reader without being aggressive about it is a rare diplomatic skill and the team here clearly knows how to land critical points without turning readers off.
Loved the writing voice here, friendly without being fake and confident without being arrogant, and a stop at firminlet carried the same tone forward, the kind of personality that makes a reader feel welcome rather than lectured at which is a balance plenty of writers struggle to find no matter how long they have been at it.
Solid quality, the kind of work that holds up to a careful read rather than a quick skim, and a quick look at makernavy kept that standard going strong, content that rewards attention rather than punishing it is something I appreciate more and more these days online across nearly every topic I follow.
Частные детские сады https://razvitie21vek.com в Москва для детей от раннего возраста. Развивающие программы, безопасная среда, квалифицированные воспитатели и подготовка к школе. Комфортные условия для обучения, общения и всестороннего развития ребенка.
мостбет KGS счет [url=https://www.mostbet58127.help]мостбет KGS счет[/url]
1win ghid depunere [url=1win5809.help]1win ghid depunere[/url]
Reading this gave me a quiet moment of intellectual pleasure that I had not been expecting, and a stop at dealbrawn extended that pleasure across more pages, the unexpected reward of stumbling into careful writing is one of the small ongoing pleasures of reading the open web and this site is delivering it reliably.
mostbet deblocare cont după verificare [url=https://mostbet90518.help/]mostbet deblocare cont după verificare[/url]
Really appreciate the lack of pop ups, modals, cookie banners stacking on top of each other, and a quick visit to portatelier confirmed the same clean approach across the rest of the site, technical decisions about user experience are part of what makes content actually pleasant to engage with for sure.
Now considering whether the post would translate well into a different form, and a look at zorlumo suggested similar versatility, content that could move into other media without losing its substance is content that has been built around ideas rather than around format and this site reads as idea first throughout posts.
Skipped a meeting reminder to finish the post, and a stop at laurelleap held me past another reminder, when content beats meetings the writer is doing something extraordinary because meetings have institutional support behind them and yet good writing can still occasionally win that competition for attention which I find heartening today.
During a quiet evening reading session this provided just the right depth without being heavy, and a stop at quilllava maintained the same evening appropriate weight, content with depth that does not exhaust the reader is content with editorial calibration and this site has clearly figured out how to be substantial without being demanding all the time.
Found this via a link from another piece I was reading and the click was worth it, and a stop at fumehull extended the value across more material, the open web still rewards clicking through citations when the underlying writers care about each other work and this site clearly belongs to that network.
Worth your time, that is the simplest endorsement I can give, and a stop at trendandfashion extends that endorsement across the rest of the site, this is one of those increasingly rare places that delivers on what it promises rather than over selling the content and under delivering on substance every time which I find frustrating elsewhere.
https://doskazaymov.kz/ Если нужно частные займы если нигде не дают, Досказаймов помогает посмотреть график выплат
A relief to read something where I did not have to fact check every claim mentally, and a look at probemason continued that reliable feeling, sites where I can lower my guard and trust the content are rare and this one is earning that trust paragraph by paragraph through consistent careful work behind the scenes.
Came in expecting another generic take and got something with actual character instead, and a look at cadetarena carried that personality forward, finding a distinct voice on a saturated topic is impressive and worth pointing out when it happens because most sites end up sounding identical to their nearest competitors quickly.
Easily one of the better explanations I have read on the topic, and a stop at motelmorel pushed it even higher in my mental ranking of useful resources, the kind of site that beats the average not by trying harder but by simply caring more about what it puts out daily which always shows.
Reading this slowly and letting each paragraph land before moving on, and a stop at parcohm earned the same patient approach, content that rewards slow reading rather than speed is content with real density and the writers here are clearly producing work that benefits from the careful eye rather than the rushed scan.
Now feeling that this site is the kind I want to make sure does not disappear, and a look at createfuturepossibilities reinforced that quiet protective feeling, the rare sites whose disappearance would actually matter to me are the sites I want to support through return visits and recommendations and this one has joined that small protected list.
Steam Desktop Authenticator https://sdasteam.com (SDA). It allows you to generate account login codes and automatically confirm trades or item sales on the Community Market without using your smartphone.
Felt the writer did the homework before publishing, the references hold up, and a look at plasmapiano continued that documented care, content with traceable claims rather than vague assertions is the kind I trust and the lack of bald assertion in this post is one of its quietly impressive qualities for me.
Glad I gave this a chance rather than scrolling past, and a stop at elitedawns confirmed I made the right call, sometimes the best content is hidden behind unassuming headlines that do not scream for attention and learning to slow down and check those out has paid off many times now across years of reading.
Started taking notes about halfway through because the points were stacking up, and a look at venluzo added enough material that my notes file grew further, content that demands note taking from a passive reader is content with substance and the writers here are clearly producing that kind of work consistently across topics.
If I were grading sites on this topic this one would receive high marks, and a stop at modvani continued earning those high marks, the informal grading I do mentally for content sources is something I take seriously even though it is informal and this site has been receiving consistent high marks across multiple sessions today.
Reading this gave me a small framework I expect to use going forward, and a stop at nexzaro extended that framework, content that produces transferable mental models rather than just specific facts is content with multiplicative value and this site is providing those models at a rate that justifies extra attention from me regularly.
вывести из запоя цена [url=https://vyvod-iz-zapoya-na-domu-sankt-peterburg-20.ru]вывести из запоя цена[/url]
школа онлайн для детей [url=https://shkola-onlajn-52.ru]школа онлайн для детей[/url]
Honest opinion is that this is the kind of post that builds long term trust with readers, and a look at qonzavi reinforced that perception, the slow accumulation of trust through consistent quality is the only sustainable way to build a real audience and this site is clearly playing that long game.
Now I want to find more sites like this but I suspect they are rare, and a look at tavzoro extended that thought, the few sites that meet this quality bar are precious specifically because they are rare and finding others like them is one of the ongoing projects of careful internet curation across the years.
Recommend this to anyone who values clear thinking over flashy presentation, and a stop at flareaisle continued in the same understated way, this site has its priorities in the right place which makes it worth supporting through repeat visits and recommendations rather than just one passing read today before moving on quickly elsewhere.
1xbet indirme [url=www.1xbet-indir-1.com]www.1xbet-indir-1.com[/url]
Наша компания предоставляет услуги по оформлению справок об инвалидности для государственных и частных организаций https://spravka-invalid.com/kontakty/
вывод из запоя недорого [url=https://vyvod-iz-zapoya-na-domu-sankt-peterburg-18.ru]вывод из запоя недорого[/url]
Steam Desktop Authenticator https://authenticatorsteamdesktop.com is a PC app that lets you use the Steam Mobile Authenticator on your computer. It supports trade confirmation, account security, and managing two-factor authentication codes without using your smartphone.
Speaking carefully because I do not want to overstate things this site is genuinely above average across multiple measurements, and a stop at quincenarrow continued the above average performance, the calibration of judgement against potential overstatement is something I take seriously and this site clears the higher bar even after that calibration applies.
узнать местонахождение по номеру телефона [url=kak-najti-cheloveka-po-nomeru-telefona-1.ru]узнать местонахождение по номеру телефона[/url]
Most of the time I feel the open web is in decline and then I find a site like this, and a stop at probemound reinforced that mood lift, the cumulative effect of finding occasional excellent independent content versus the cumulative effect of finding mostly mediocre content is real for the long term reader maintaining web habits today.
Picked a friend mentally as the audience for this and decided to send the link, and a look at deanburst confirmed the send was the right choice, choosing whom to share content with is a small act of curation that I take more seriously than the public sharing most platforms encourage these days online.
Pass this along to anyone you know dealing with similar questions, the answers here are clear, and a stop at ketojib adds even more useful material, this is the kind of resource that deserves to circulate widely rather than getting lost in the constant churn of new content online that buries good work daily.
Liked the natural conversational tone throughout, never stiff and never overly casual either, and a stop at platenavy kept that comfortable middle ground going, finding a tone that respects the reader without becoming distant or overly familiar is harder than it sounds and this site nails that balance consistently across many different pieces.
Going to share this with a friend who has been asking the same questions for a while now, and a stop at cadetgrail added a few more pages I will pass along too, this is the kind of generous information that earns a small thank you from me right now and again later this week.
Thanks for putting this online without locking it behind email signups or paywalls, and a quick visit to embervendor kept that open feel going, content that trusts the reader to come back rather than gating access is the kind of approach I will reward with regular return visits over time happily.
выведение из запоя в стационаре наркология [url=https://vyvod-iz-zapoya-v-staczionare-sankt-peterburg-31.ru]выведение из запоя в стационаре наркология[/url]
Worth saying that the prose reads naturally without straining for style, and a stop at moundlong maintained the same unforced quality, writing that achieves elegance without effort is the highest tier and this site has clearly worked out how to land that effortless quality consistently rather than only on the writers best days.
https://telegra.ph/Code-promo-1xbet-live-06-01-2
canl? bahis 1x bet [url=http://www.1xbet-giris-77.com]http://www.1xbet-giris-77.com[/url]
Decided to subscribe to the RSS feed if there is one, and a stop at furlkale confirmed that decision, content that I want delivered to me proactively rather than just remembered when I have time is content that has earned a higher level of commitment from me as a reader looking for reliable sources.
Liked that the post left some questions open rather than pretending to settle everything, and a stop at mallowmorel continued that intellectual honesty, content that respects the limits of its own claims is more trustworthy than content that overreaches and this site has clearly figured out which positions it can defend confidently.
During a reading session that included several other sources this one stood out, and a look at musebeats continued the standout quality, the side by side comparison of sources during research is a useful exercise and this site has been winning those comparisons for me consistently across multiple research sessions during the last week.
Worth flagging this site to a few specific friends who would appreciate the editorial sensibility, and a look at venmizo added more pages I will mention to them, recommending sites to specific people requires understanding both the site and the person and this site is making those personalised recommendations easy and natural for me.
Рекомендую ресурс, посвящённый теме вариаторов, их обслуживанию и ремонту. На портале можно найти общие сведения об устройстве этой трансмиссии, возможных неисправностях и методах их диагностики. В материалах сайта рассматриваются различные аспекты эксплуатации вариаторов, что может быть полезно для общего понимания их работы https://provariatory.ru/
Going to come back when I have more time to read carefully, the post deserves more than a quick scan, and a stop at flarefest reinforced that, this is the kind of site that rewards a slower read which is hard to find in this fast paced corner of the internet but really worthwhile.
Speaking honestly this is among the better discoveries of my recent browsing, and a stop at tilvexa reinforced that discovery quality, the ranking of recent discoveries is informal but meaningful and this site has placed near the top of that ranking based on the consistency of quality across what I have already read carefully.
Liked the balance between depth and brevity, never too shallow and never too long, and a stop at quiverllama kept the same balance going across the rest of the site, this is one of the harder skills in writing and the team here clearly has it figured out very well indeed across every page.
Generally I am cautious about recommending sites on first encounter but this one warrants the exception, and a look at promparsley reinforced the exception making, the rare site that justifies breaking my normal cautious approach is the rare site worth flagging early and this one has prompted exactly that early flagging response from me.
Solid value packed into a relatively short post, that takes skill, and a look at plazaomega continues the dense useful content across more pages, this site clearly understands that respecting reader time is itself a form of generosity which is something most blog operations seem to have forgotten lately across the wider open web.
https://doskazaymov.kz/ рефинансирование кредитов на 4 000 000 тенге если нигде не дают – Doskazaymov помогает сравнить варианты
Now sitting back and recognising that this was a small but real win in my reading day, and a stop at modvilo extended that quiet win, the cumulative effect of small reading wins versus the cumulative effect of small reading losses is real over time and this site is contributing to the wins side of that ledger.
Will be back, that is the simplest way to say it, and a quick visit to lumvanta reinforced the decision, this site has earned a spot in my regular rotation alongside a few other reliable places I check when I want something genuinely informative without all the usual modern web noise getting in the way.
The examples really helped me grasp the points faster than abstract descriptions would have, and a stop at clippoise added a few more practical illustrations that drove the message home, the kind of writing that knows its readers learn better through concrete situations rather than vague generalities is rare and worth recognising clearly.
опасность откатывания а/м АКП не в положении P мерседес не включается драйв
Felt mildly happier after reading, which sounds silly but is true, and a look at nolvexa extended that small mood lift, content that improves rather than degrades my mental state is content I want more of and the cumulative effect of reading sites that lift versus sites that drag is real over time.
Found this via a link from another piece I was reading and the click was worth it, and a stop at ketojuly extended the value across more material, the open web still rewards clicking through citations when the underlying writers care about each other work and this site clearly belongs to that network.
Now saved this in a way that I will actually find again rather than the casual bookmark approach, and a stop at mountmorel earned the same careful saving, organising my reading bookmarks so that high quality sources rise to the top is something I should do more of and this site triggered that organisation today.
Now planning to recommend this site in a context where my recommendations are taken seriously, and a stop at venqaro confirmed I should make that recommendation soon, the small but real act of recommending content into spaces where my taste matters is something I take seriously and this site is worth the recommendation.
More substantial than most of what I find searching for this topic online, and a stop at qorlino kept that quality consistent, this is one of those sites where the writing actually rewards careful reading rather than punishing the patient reader with empty filler stretched out across long paragraphs that say very little.
A particular kind of restraint shows up in the writing, and a look at oakarenas maintained the same restraint across pages, knowing what not to say is just as important as knowing what to say and this site has clearly developed strong instincts on both sides of that editorial line throughout pieces I have read.
Now thinking about whether the writer might publish a longer form work I would buy, and a look at propelmural suggested the same depth would translate, content that makes me want to pay for related work in other formats is content that has earned commercial trust as well as attention trust and this site has both clearly.
Reading this prompted me to clean up some old notes related to the topic, and a stop at rabbitmaple extended that organising urge, content that triggers personal organisation rather than just consuming attention is content with motivating energy and this site has the kind of clarity that prompts active follow up rather than passive consumption.
Worth observing that the post landed without needing a flashy headline to hook attention, and a stop at micapacts did the same, content that earns engagement through substance rather than packaging is the kind I trust more deeply and this site has clearly chosen substance as the primary lever for reader engagement throughout.
Генеральная уборка москва
Appreciate the thoughtful approach, the writer clearly took time to make this readable for someone who is not already an expert, and a look at ploverlily kept that going nicely, easy on the eyes and easy on the brain which is always a winning combination when reading on a busy day.
перепланировка квартир [url=www.pereplanirovka-kvartir19.ru]перепланировка квартир[/url]
вывод из алкогольного запоя [url=https://vyvod-iz-zapoya-na-domu-sankt-peterburg-20.ru]вывод из алкогольного запоя[/url]
https://doskazaymov.kz/ Рудный: расчет платежа по кредиту на 8 000 000 тенге после отказов банков – Doskazaymov помогает сравнить сценарии выплат
школы онлайн 10 класс [url=https://shkola-onlajn-52.ru]https://shkola-onlajn-52.ru[/url]
Steam Desktop Authenticator https://steamdesktopauthenticator.net is a popular solution for Steam users who need access to Steam Guard features on their computer. It conveniently verifies actions, protects your account, and manages authentication in a single app.
Cuts through the usual marketing fluff that dominates this topic online, and a stop at quickmeadow kept the same clean approach going, this is the kind of writing that respects the reader’s time rather than wasting it on repetitive setups before finally getting to the point at hand which is what most sites do.
Reading this gave me the rare experience of fully agreeing with all the conclusions, and a stop at markpillow continued that agreement pattern, content that aligns with my existing views without seeming designed to do so is just content that happens to be reasonable and this site reads as reasonable rather than ideological mostly.
Клининговые услуги в москве
Мы предлагаем комплексную помощь в оформлении справок, свидетельств и апостиля. Благодаря этому клиенты экономят время и получают готовый комплект документов без лишних хлопот, https://apostilium-msk.com/spravka-ob-otsutstvii-sudimosti/
Now planning to come back when I have the right kind of attention to read carefully, and a stop at curiopact reinforced that plan, choosing the right moment to read certain content is a quiet form of respect for the work and this site is generating those careful planning behaviours from me consistently as a reader.
1xbet mobile download [url=1xbet-indir-1.com]1xbet-indir-1.com[/url]
Working through this site has been a small antidote to the shallow content that fills most of my reading time, and a stop at muffinmarble extended that antidote function, sites that quietly improve the average quality of my reading by being themselves are sites worth supporting through return visits and recommendations consistently.
вывод из запоя нарколог 24 [url=https://vyvod-iz-zapoya-na-domu-sankt-peterburg-18.ru]https://vyvod-iz-zapoya-na-domu-sankt-peterburg-18.ru[/url]
This stands out compared to similar posts I have read recently, less noise and more substance, and a look at modernpremiumhub kept that gap going, you can really feel the difference between content made by someone who cares versus content made to fill a publishing schedule for an algorithm trying to keep growing somehow.
A clear cut above the usual noise on the subject, and a look at prowlocean only made that gap wider in my view, the kind of place that earns its visitors through quality rather than through aggressive marketing or sponsored placements which is increasingly the only way most sites stay afloat across the modern web.
Probably this is one of the better quiet successes on the open web at the moment, and a look at rabbitokra reinforced that quiet success quality, sites that are doing well without making a noise about doing well are the sites I most respect and this one has clearly chosen the quiet success path consistently throughout.
вызов врача нарколога на дом [url=https://www.reabilitaciya-alkogolikov-moskva.ru]вызов врача нарколога на дом[/url]
1xbet tr giri? [url=1xbet-giris-77.com]1xbet-giris-77.com[/url]
Bookmark earned and the bookmark feels like a permanent addition rather than a maybe, and a look at khakifrost confirmed that permanent status, the difference between durable bookmarks and ephemeral ones is something I have learned to feel quickly and this site triggered the durable feeling almost immediately during my first read here.
Started thinking about my own writing differently after reading, and a look at fernbureaus continued that reflective effect, content that influences how I work rather than just informing what I know is content with the highest kind of impact and this site has triggered some of that reflective influence today on me.
Now considering whether the post would translate well into a different form, and a look at ploverpatio suggested similar versatility, content that could move into other media without losing its substance is content that has been built around ideas rather than around format and this site reads as idea first throughout posts.
Quietly enjoying that I have found a new site to follow for the topic, and a look at modzaro reinforced the small pleasure of the find, the discovery of new high quality sources is one of the more durable pleasures of careful internet reading and this site has been generating that discovery pleasure at multiple points already today.
найти по номеру телефона где находится человек [url=www.kak-najti-cheloveka-po-nomeru-telefona-2.ru]www.kak-najti-cheloveka-po-nomeru-telefona-2.ru[/url]
вывести из запоя капельница [url=https://kapelnicza-ot-pokhmelya-nizhnij-novgorod-6.ru]вывести из запоя капельница[/url]
Anyone curious about this topic would do well to start here, the foundation laid is solid, and a stop at noqvani would round out their understanding nicely, this is the kind of resource I would point a friend toward without hesitation if they asked me where to begin learning about anything in this area.
сделать капельницу от похмелья [url=https://kapelnicza-ot-pokhmelya-samara-28.ru]сделать капельницу от похмелья[/url]
Skipped lunch to finish reading, which says something, and a stop at qorzino kept me at my desk longer than planned, when content beats the lunch impulse the writer has done something genuinely impressive in an attention environment full of immediately satisfying alternatives competing for the same finite block of reader time.
1win вывести баланс на о деньги [url=https://www.1win68401.help]https://www.1win68401.help[/url]
1win aviator deposit [url=www.1win97281.help]www.1win97281.help[/url]
crash мостбет [url=mostbet45018.help]crash мостбет[/url]
However measured this site clears the bar I set for sites I take seriously, and a stop at hovanta continued clearing that bar, the metrics I use for site quality are admittedly informal but they are consistent and this site has cleared them on multiple measurements across multiple visits which is meaningful for my evaluation.
Reading this in a quiet coffee shop matched the calm energy of the writing, and a stop at dazzquay extended that environmental match, content that has its own ambient quality which can match or clash with surroundings is content with a personality and this site has the kind of personality that suits calm reading.
1win reopen account [url=http://1win3004.mobi/]http://1win3004.mobi/[/url]
mostbet cashout necə [url=http://mostbet45039.help]mostbet cashout necə[/url]
https://doskazaymov.kz/ Doskazaymov.kz: где взять кредит если нигде не дают если нигде не дают без лишних обещаний, чтобы посчитать переплату
Adding this to my list of go to references for the topic, and a stop at pruneoval confirmed the rest of the site deserves the same, definitely the kind of resource that earns its place rather than getting forgotten the moment the next interesting article shows up in my feed somewhere else on the web.
Liked that the post left some questions open rather than pretending to settle everything, and a stop at rabbitpale continued that intellectual honesty, content that respects the limits of its own claims is more trustworthy than content that overreaches and this site has clearly figured out which positions it can defend confidently.
Started taking notes about halfway through because the points were stacking up, and a look at modernmindfulliving added enough material that my notes file grew further, content that demands note taking from a passive reader is content with substance and the writers here are clearly producing that kind of work consistently across topics.
Glad the writer kept this short rather than padding it out, the points stand on their own without needing extra context, and a look at mulchlens kept the same approach going, brevity is a sign of confidence in the substance and the team here clearly trusts their content to land without filler.
Closed the laptop and walked away thinking about the post for a good twenty minutes, and a stop at plumbpacer produced similar lingering thoughts, content that survives the closing of the browser tab is content that has actually entered the mind rather than just decorating the screen for the duration of the reading.
Picked this up between two other things I was doing and got drawn in completely, and after duetparishs my original tasks were completely forgotten for a while, content that derails a workflow in a positive way by being more interesting than what you were already doing is rare and worth recognising clearly.
Reading this prompted me to dig out an old reference book related to the topic, and a stop at noonmyrrh extended that connection to other sources, content that connects me back to my own existing knowledge rather than asking me to forget it is content with continuity and this site has that continuous quality.
https://adminzzs.bcz.com/2026/06/01/code-promo-1xbet-2026-actif-1xtower-130-e/
Thanks for laying this out in a way that someone newer to the topic can follow, and a stop at marshplate kept that accessibility going, writing that meets readers at different experience levels without condescending is hard to do well and the writers here have clearly thought about who they are writing for.
как играть в plinko mostbet [url=http://mostbet17893.online]как играть в plinko mostbet[/url]
Thanks for treating the topic with the seriousness it deserves without becoming pompous about it, and a stop at khakikite continued that balanced treatment, the gap between earnest and self serious is huge and writers who can stay on the right side of it earn my respect when I find them online today.
Reading this confirmed that my time researching the topic in other places had not been wasted, and a stop at lilacneon extended the confirmation, when independent sources agree that is a useful signal and this site is one of the more reliable sources I have found for cross checking what I read elsewhere on similar subjects.
Клининговые услуги
пробить номер по геолокации бесплатно [url=https://kak-najti-cheloveka-po-nomeru-telefona-1.ru]пробить номер по геолокации бесплатно[/url]
песок карьерный стоимость куба https://pesok-karernyy-kupit1.ru
Оформляли документы для переезда в другую страну. Специалисты помогли получить необходимые справки, восстановить свидетельства и подготовить апостиль для полного пакета документов https://apostilium-msk.com/spravka-o-rastorzhenii-braka-razvode/
мелбет вывести деньги без верификации [url=https://melbet62894.help]https://melbet62894.help[/url]
pinup mines juego [url=http://pinup90362.help]http://pinup90362.help[/url]
Speaking as someone who used to recommend blogs frequently and got out of the habit this site is rekindling that impulse, and a look at molnexo extended the rekindling, the recovery of an old habit triggered by encountering work that justifies it is itself a small kind of pleasure and this site is providing that recovery experience.
Reading this prompted me to dig into a related topic later, and a stop at pueblonorth provided some of the starting points for that follow up reading, content that triggers further exploration rather than satisfying curiosity completely is content with real generative energy and this site has plenty of that energy throughout it.
Came away with some new perspectives I had not considered before, and after dewdawn those ideas felt more complete, the kind of content that stays with you a little while after reading rather than slipping out the moment you switch tabs and move on with your day to whatever comes next.
Reading this between meetings turned out to be the most useful thing I did all afternoon, and a stop at radiusmill kept that productivity feeling going, content can sometimes outperform actual work in terms of what gets accomplished mentally and this site managed that today which is genuinely a high bar to clear consistently.
Glad to have another reliable bookmark for this topic, and a look at plumbplanet suggested several more pages I will be marking too, building a personal library of trustworthy resources is one of the actual rewards of careful browsing and this site is earning a place on my permanent shortlist for the topic.
услуги по перепланировке квартир [url=http://pereplanirovka-kvartir19.ru]http://pereplanirovka-kvartir19.ru[/url]
A piece that did not try to be timeless and ended up reading as durable anyway, and a look at muralmend extended that durable feel, content that stays useful past its publication date without straining for permanence is content that ages well and this site has the kind of evergreen quality that I value highly today.
My usual response to new bookmarks is to forget them but this one I have already returned to twice, and a look at novelnoon pulled me back a third time, the actual return rate to bookmarked sites is the real measure of value and this one is clearing that measure at a notable rate already.
Now adding a small note in my reading log that this site is one to watch, and a look at bravopiers reinforced the watch status, the few sites I track deliberately rather than encounter accidentally are sites I expect ongoing returns from and this one has cleared the bar for that elevated tracking based on what I read.
Liked that the post acknowledged complications rather than pretending they did not exist, and a stop at norlizo continued that honest framing, sites that handle complexity with care rather than papering it over with simplifying claims are doing real intellectual work and this one is clearly in that category based on what I have read.
mostbet двухфакторная защита [url=https://mostbet45018.help/]https://mostbet45018.help/[/url]
1win aviator [url=https://www.1win97281.help]https://www.1win97281.help[/url]
1win минимальный депозит [url=1win68401.help]1win минимальный депозит[/url]
dragon money драгон мани казино
Comfortable in tone and substantive in content, that is a hard combination to land, and a look at lilynugget kept that pairing alive across more material, this is what good editorial direction looks like in practice and the team here clearly has someone keeping a steady hand on the wheel across what they decide to publish.
мостбет как вывести на кошелек [url=mostbet45018.help]mostbet45018.help[/url]
If quality blog writing is dying as people sometimes claim then this site is one piece of evidence that it has not died yet, and a look at qulmora extended that evidence, the broader cultural question about online writing has empirical answers in specific sites and this one is contributing to a more optimistic answer overall.
mostbet yükləmə linki android [url=http://mostbet45039.help]http://mostbet45039.help[/url]
1win slot games [url=http://1win3004.mobi/]http://1win3004.mobi/[/url]
online school [url=https://shkola-onlajn-51.ru]https://shkola-onlajn-51.ru[/url]
1win crash predictor [url=www.1win97281.help]1win crash predictor[/url]
1вин депозит [url=http://1win68401.help]1вин депозит[/url]
Such writing is increasingly rare and worth supporting through attention, and a stop at purplelinnet extended that supportive attention across more pages, the conscious choice to spend time on sites that produce careful work rather than convenient consumption is itself a small form of patronage and this site is receiving that conscious patronage from me.
mostbet azerbaycan [url=https://www.mostbet45039.help]https://www.mostbet45039.help[/url]
1win online [url=https://1win3004.mobi/]https://1win3004.mobi/[/url]
Курсы ораторского мастерства kultura-rechi.ru для развития навыков общения и публичных выступлений. Практика, упражнения на дикцию, управление голосом, преодоление страха сцены и умение удерживать внимание слушателей.
A piece that did not lean on the writer credentials or institutional backing, and a look at plumbplasma maintained the same focus on substance, content that earns trust through quality rather than through name dropping is the kind I find most persuasive and this site is clearly playing on the substance side of that distinction.
Closed and reopened the tab three times before finally finishing, and a stop at radiusnerve held my attention straight through, sometimes content fights for time against my own distraction and the times it wins say something positive about its quality and this post clearly won that fight today afternoon for me.
Now planning to share the link with a small group of readers I trust, and a look at kitidle suggested more material to share with the same group, recommending content into a curated circle requires confidence in the recommendation and this site is making me confident in those personal recommendations on multiple separate occasions now.
Just want to say thank you for putting this together, posts like these make searching online actually worth it sometimes, and a quick look at nuartlinnet kept that going, useful and easy to read without any of the tricks that ruin most blog comment sections lately on the wider open web.
Thanks for the honest framing without exaggerated claims that the topic will change my life, and a stop at domelegend kept the same modest tone, restraint in marketing language signals trustworthiness and the writers here are clearly playing the long game by building credibility rather than chasing immediate clicks through hyperbole.
mostbet регистрация без кода [url=http://mostbet17893.online]http://mostbet17893.online[/url]
https://daunemas8a.blogspot.com/2026/06/liste-des-codes-promo-1xbet-bonus-vip.html
Just want to flag that this was useful and not bury the appreciation in caveats, and a look at masonmelon earned the same direct praise, recognising good work without hedging it with criticism is something I try to practice because over qualified compliments tend to read as backhanded and miss the point sometimes.
mostbet официальный сайт в Кыргызстане [url=https://mostbet17893.online]https://mostbet17893.online[/url]
мелбет официальный сайт кыргызстан вход [url=https://melbet62894.help]мелбет официальный сайт кыргызстан вход[/url]
pin-up slots [url=https://pinup90362.help]https://pinup90362.help[/url]
Appreciated the way each section connected smoothly to the next without abrupt jumps, and a stop at dewdawns kept that flow going nicely, transitions are something most blog writers ignore but the difference is huge for the reader who is trying to follow a sustained line of thought today across many different topics.
Felt like I was reading something written by someone who actually thinks about the topic rather than reciting it, and a look at lionneon reinforced that impression, the difference between recited content and considered content is huge and this site clearly belongs to the latter category which I appreciate as a careful reader looking for substance.
The depth of coverage felt about right for the format, neither shallow nor overwhelming, and a look at muralpastry kept that calibration going, getting the depth right for blog format is genuinely difficult because too shallow loses experts and too deep loses beginners but this site nailed it nicely which I really do appreciate.
капельница самара цена [url=https://kapelnicza-ot-pokhmelya-samara-28.ru]капельница самара цена[/url]
врач нарколог выезд на дом москва [url=http://reabilitaciya-alkogolikov-moskva.ru]http://reabilitaciya-alkogolikov-moskva.ru[/url]
вывести из запоя в домашних условиях капельница [url=https://kapelnicza-ot-pokhmelya-nizhnij-novgorod-6.ru]вывести из запоя в домашних условиях капельница[/url]
Really like that there are no exclamation marks or all caps shouting throughout the post, and a quick visit to purplemarsh maintained the same calm voice, restraint in punctuation signals confidence in the content and this site clearly trusts its substance to do the persuading rather than relying on typographic emphasis.
Now leaving a small mental note to recommend this when the topic comes up in conversation, and a look at molqiro extended that recommend ready feeling, content that arms me with shareable references for likely future conversations is content with social value and this site is providing that conversational ammunition consistently for me lately.
Steam Desktop Authenticator https://steamdesktopauthenticator.net is a popular solution for Steam users who need access to Steam Guard features on their computer. It conveniently verifies actions, protects your account, and manages authentication in a single app.
Now organising my browser bookmarks to give this site easier access, and a look at ponymedal earned the same organisational priority, the small acts of digital housekeeping I do for sites I expect to use often are themselves a measure of trust and this site has triggered the trust based housekeeping behaviour from me clearly.
Now wondering how the writers calibrated the level of detail so well, and a stop at nuartlion continued the same calibration, the right level of detail is one of the harder editorial calls in any piece and this site has clearly developed an instinct for it through what I assume is years of careful practice publicly.
Reading this triggered a small change in how I think about the topic going forward, and a stop at rafterpeach reinforced that subtle shift, the rare content that actually moves my thinking rather than just confirming or filling it is the kind I most value and this site is providing that kind of impact today.
Found something quietly useful here that I expect to return to, and a stop at domelounge added more of the same, content with quiet utility ages well in a way that flashy hot takes do not and I have learned to weight quiet utility much higher when deciding what to bookmark for later use.
Thanks again for the post, I learned a couple of things I can actually use later this week, and after I went over norqavo the rest of the site looked equally promising, definitely going to spend more time here when I get a free moment over the weekend to read more carefully.
Probably going to mention this site in a write up I am working on later this month, and a stop at lionpilot provided more material for that potential mention, content worth referencing in my own published work rather than just personal reading is content with the highest endorsement level and this site has earned that endorsement.
Reading this felt easy in the best way, no friction and no confusion at any point, and a stop at qunvero carried that same comfort across more pages, the kind of editorial flow that lets you absorb information without fighting the format which is increasingly hard to find on the open web today across topics.
Once I trust a site this much I tend to read everything they publish and that is the trajectory I am on with this one, and a stop at foxarbors confirmed the trajectory, the rare progression from interested reader to comprehensive reader is something only certain sites earn and this one is earning that progression rapidly.
Thanks for the readable length, I finished it without checking how much was left, and a stop at muralpeony kept me reading the same way, when I stop noticing the length of a piece because the content is engaging enough to sustain attention without willpower the writer has done their job well today.
найти человека по номеру телефона бесплатно через спутник [url=kak-najti-cheloveka-po-nomeru-telefona-2.ru]найти человека по номеру телефона бесплатно через спутник[/url]
https://friendstrs.com/xbetbonuscode6
If the topic interests you at all this is a place to spend time, and a look at rakemound reinforced that recommendation, the broader question of where to invest topical reading time is one this site answers convincingly through the consistent quality across multiple pieces I have sampled during the current reading session today.
Now feeling the small relief of finding writing that does not condescend, and a stop at masonotter extended that respect for readers, content that treats its audience as capable adults rather than as people to be managed produces a different reading experience and this site has clearly chosen the respectful approach across all pieces.
Felt like the writer was speaking directly to someone with my level of curiosity, neither talking down nor showing off, and a stop at domemarina kept that comfortable matching going, finding writing that meets you where you are rather than asking you to climb up or stoop down feels great every time it happens.
Started smiling at one paragraph because the writing was just nice, and a look at liquidnudge produced a couple more such moments, prose that produces small spontaneous reactions in the reader is doing more than just transferring information and the writers here are clearly hitting that level fairly consistently throughout pieces.
A small thank you note from me to the team behind this work, the post earned it, and a stop at molvani suggested more thanks would be in order over time, recognising the people who do good writing online is something I try to remember to do because the alternative is silence and silence rewards mediocrity unfortunately.
Following a few of the internal links revealed more posts of similar quality, and a stop at eliteledges added more to that growing pile, sites where internal links lead to more good content rather than to more of the same recycled material are sites with depth and this one has clearly built that depth carefully.
отель площадь ильича Ищете отель у площади Ильича или метро Римская? У нас есть отличные предложения как для почасовой аренды, так и для длительного проживания.
https://anotepad.com/note/read/6e6km57i
https://aginvestconference.com/1xbet-promo-code-free-spins-box200vip-e130-150-fs/
Liked the balance between depth and brevity, never too shallow and never too long, and a stop at rampantpilot kept the same balance going across the rest of the site, this is one of the harder skills in writing and the team here clearly has it figured out very well indeed across every page.
Steam Desktop Authenticator https://steamdesktopauthenticator.net is a popular solution for Steam users who need access to Steam Guard features on their computer. It conveniently verifies actions, protects your account, and manages authentication in a single app.
Coming back tomorrow when I can give this a proper read, the post deserves better attention than I can give right now, and a look at muscatlarch suggests there is plenty more here that deserves the same treatment, definitely a site I will be exploring properly over the next few days when I can.
врач капельница алкоголь [url=https://kapelnicza-ot-pokhmelya-samara-28.ru]врач капельница алкоголь[/url]
Approaching this site through a casual link click and being surprised by what I found, and a look at norzavo extended the surprise, the rare experience of stumbling into excellent independent content rather than predictable mediocrity is one of the actual remaining pleasures of casual web browsing and this site provided it cleanly.
Quietly enthusiastic about this site after the past few hours of reading, and a stop at lithelight extended that enthusiasm, the calibration of enthusiasm to evidence is something I try to maintain and this site has earned a calibrated quiet enthusiasm rather than the loud excitement that usually fades within a day or two of finding something.
Now considering carefully how to share this site with the right audience rather than broadcasting widely, and a look at tinklesaddle extended that careful sharing impulse, content worth sharing carefully rather than spamming is content that has earned a higher kind of recommendation and this site has earned that careful shareability throughout pieces.
Reading this prompted me to dig out an old reference book related to the topic, and a stop at twainsilica extended that connection to other sources, content that connects me back to my own existing knowledge rather than asking me to forget it is content with continuity and this site has that continuous quality.
Now feeling the post has earned a proper recommendation rather than a casual mention, and a stop at sodatorch reinforced the recommendation strength, the difference between mentioning and recommending is a small editorial distinction I observe in my own conversations and this site has earned the upgraded recommendation level from me confidently today.
Easy to recommend, the content speaks for itself without needing additional praise from me, and a stop at draftglade only adds more reasons to send people this way, the kind of generous resource that benefits its readers without demanding anything in return is increasingly rare and worth recognising clearly today across the broader open internet.
Just one of those reads that left me feeling slightly more capable rather than overwhelmed, and a look at spryring kept that empowering feel going, the difference between content that builds the reader up and content that intimidates them is huge and this site clearly knows which side of that line to stand.
Closed several other tabs to focus on this one as I read, and a stop at scenictrader held my undivided attention the same way, content that earns full focus in an attention environment full of competing pulls is content doing something genuinely well and the team behind it deserves recognition for that achievement consistently.
Good clean post, no errors and no awkward phrasing that breaks the reading flow, and a stop at salutestitch kept the same standard, definitely the kind of editorial care that earns a return visit because it tells me the writer is paying attention to details that matter to readers rather than just rushing publication.
Now placing this in the same category as a few other sites I have come to trust, and a look at safaritriton continued the placement decision, the small category of fully trusted sites is one I extend rarely and only after multiple positive reading sessions and this site has earned the category placement methodically over time.
Probably this is one of the better quiet successes on the open web at the moment, and a look at quvnero reinforced that quiet success quality, sites that are doing well without making a noise about doing well are the sites I most respect and this one has clearly chosen the quiet success path consistently throughout.
A piece that suggested careful editing without showing the marks of the editing, and a look at stashserif continued that invisible polish, the best editing disappears into the prose and this site reads as having been edited with skill that does not announce itself which is the highest compliment I can offer any blog content.
Reading this in the time it took to drink half a cup of coffee, and a stop at snaretoga fit naturally into the second half, content that respects the rhythms of a typical morning is content with practical fit and this site has the kind of length and pacing that works for the way I actually read.
Now adjusting my mental list of reliable sites for this topic, and a stop at storksnooze reinforced the adjustment, the small ongoing curation work of maintaining trusted sources is one of the actual practical activities of careful reading and this site has earned a permanent place on my list for this particular subject.
A piece that read smoothly because the writer understood how readers actually move through prose, and a look at solotoffee maintained the same reader awareness, writers who think about the reading experience as much as the writing experience produce better work and this site has clearly made that shift in editorial approach.
Closed the laptop after this and let the ideas settle for a few hours, and a stop at studiotrader similarly rewarded reflective time, content that benefits from sitting with rather than racing past is the kind I want more of and the kind that this site appears to consistently produce week after week here.
The clarity here is something I really appreciate, especially compared to sites that pile on jargon for no reason, and a look at duetdrives was the same, simple direct sentences that actually deliver information instead of dancing around the point for paragraphs at a time which wastes reader patience.
Worth recognising that the post did not pretend to be the final word on the topic, and a stop at ranchomen continued that humility, content that admits its own scope and limits is more trustworthy than content that overreaches and this site has clearly developed the editorial maturity to know what it can and cannot claim well.
Recommended without hesitation if you care about careful coverage of this topic, and a stop at mastlarch reinforced the recommendation, the bar I set for unhesitating recommendations is fairly high and this site has cleared it through the cumulative weight of multiple consistently good pieces rather than through any single standout post which is meaningful.
врач нарколог выезд на дом цена [url=http://www.reabilitaciya-alkogolikov-moskva.ru]http://www.reabilitaciya-alkogolikov-moskva.ru[/url]
If quality blog writing is dying as people sometimes claim then this site is one piece of evidence that it has not died yet, and a look at vinyltrophy extended that evidence, the broader cultural question about online writing has empirical answers in specific sites and this one is contributing to a more optimistic answer overall.
Now feeling the rare pleasure of trusting a source completely on first encounter, and a look at llamapatio extended that initial trust into something more durable, the calibration of trust to evidence is something I do informally and this site has earned high trust through the cumulative weight of multiple consistently good posts already.
Closed it feeling slightly more competent in the topic than I started, and a stop at sodasalt reinforced that competence boost, real learning is rare in casual online reading but it does happen sometimes and this site managed to make it happen for me today which is genuinely worth pausing to acknowledge.
Reading this in the morning set a good tone for the day, and a quick visit to muscatlumen kept that good tone going, content can do that sometimes when it hits the right notes and finding sites that consistently strike that tone is something I have learned to recognise and reward with regular visits.
Took my time with this rather than rushing because the writing rewards attention, and after shamrockswan I had even more to absorb, the kind of content that pays back the patient reader rather than punishing them with empty filler is something I look for and rarely find in regular searches lately.
Following a few of the internal links revealed more posts of similar quality, and a stop at draftlake added more to that growing pile, sites where internal links lead to more good content rather than to more of the same recycled material are sites with depth and this one has clearly built that depth carefully.
Now thinking about this site as a small example of what good independent writing looks like, and a stop at siennathrift continued that exemplary status, the few sites that serve as good examples are sites worth holding up in conversations about quality and this one has earned that exemplary placement through patient consistent effort over time.
Thanks for not padding this with the usual filler intros and outros that every other blog seems to require, and a quick visit to molzari continued that lean approach across more posts, content stripped of waste is content that respects you and I will always come back to that kind of approach.
Probably the kind of site that should be more widely read than it appears to be, and a look at solostarlit reinforced that quiet wish, the gap between a sites quality and its apparent reach is sometimes large and that gap exists for this site in a way that makes me want to mention it more.
Skipped to a specific section because I knew that was the question I had, and the answer was clean, and a stop at solidvector similarly delivered targeted answers without burying them, content engineered for readers who arrive with specific needs rather than open ended browsing is increasingly valuable in a search heavy reading environment.
Reading this felt productive in a way most internet reading does not, and a look at tractshade continued that productive feeling, sometimes the open web feels like a waste of time but sites like this remind me why I still bother to look around rather than retreating to old reliable sources for everything I need.
Thanks again for the post, I learned a couple of things I can actually use later this week, and after I went over tulipsedan the rest of the site looked equally promising, definitely going to spend more time here when I get a free moment over the weekend to read more carefully.
Appreciate the thoughtful approach, the writer clearly took time to make this readable for someone who is not already an expert, and a look at grovefarms kept that going nicely, easy on the eyes and easy on the brain which is always a winning combination when reading on a busy day.
If the topic interests you at all this is a place to spend time, and a look at shrinetender reinforced that recommendation, the broader question of where to invest topical reading time is one this site answers convincingly through the consistent quality across multiple pieces I have sampled during the current reading session today.
Reading this gave me a small sense of progress on a topic I have been slowly working through, and a stop at sparkcast added another step forward, learning happens in small increments across many sources and finding sources that consistently contribute is the actual practical value of careful curation in an information rich world.
Recommend this to anyone who values clear thinking over flashy presentation, and a stop at solacevelour continued in the same understated way, this site has its priorities in the right place which makes it worth supporting through repeat visits and recommendations rather than just one passing read today before moving on quickly elsewhere.
Worth recommending broadly to anyone who reads on the topic, and a look at logicllama only confirms that, the rare combination of accessibility and depth in this site makes it suitable for both newcomers and people who already know the area which is hard to pull off in any blog format today and rarely managed.
A piece that read smoothly because the writer understood how readers actually move through prose, and a look at qalmizo maintained the same reader awareness, writers who think about the reading experience as much as the writing experience produce better work and this site has clearly made that shift in editorial approach.
Thanks for the readable length, I finished it without checking how much was left, and a stop at studiosalute kept me reading the same way, when I stop noticing the length of a piece because the content is engaging enough to sustain attention without willpower the writer has done their job well today.
lbs что это [url=https://shkola-onlajn-51.ru]https://shkola-onlajn-51.ru[/url]
Now setting aside time on my next free afternoon to read more from the archives, and a stop at relqano confirmed that time will be well spent, the rare site whose archive deserves a dedicated reading session rather than just casual sampling is the kind of resource worth scheduling around and this one qualifies clearly.
Reading this on a slow Sunday and finding it perfectly suited to a slow Sunday read, and a quick stop at draftlog kept the same gentle pace, content that fits the mood of the moment is something I notice and remember and this site has the kind of pace that suits relaxed reading sessions especially well.
Definitely returning here, that is decided, and a look at sheentiny only made the case stronger, this is one of those rare websites that rewards regular visits rather than feeling stale after the first read which is something I cannot say about most of the places I bookmark today across all my topics.
Worth pointing out that the post avoided the temptation to summarise everything at the end, and a look at silovault continued that confident closing approach, content that trusts readers to retain the substance without being reminded of it at the end is content that respects the reader and this site practices that respect.
поставить капельницу от запоя на дому цена [url=https://kapelnicza-ot-pokhmelya-samara-28.ru]поставить капельницу от запоя на дому цена[/url]
Clean writing, easy to read, and never tries too hard to impress, that combination is harder to find than people think, and after my time on muscatneedle I am sure this site treats its readers well, no flashy tricks just useful content done right which is honestly all I want online.
Now considering the post as evidence that careful blog writing is still possible, and a look at mauvepeach extended that evidence, the broader question of whether the modern web can sustain quality writing has obvious empirical answers in sites like this one and seeing them is reassuring even when they remain a minority overall today.
Solid recommendation from me to anyone working in the area, the perspective here is grounded, and a look at shadowtrojan adds even more useful angles, the kind of site that becomes a reference rather than just a one time read which is a higher bar than most blogs ever reach today on the modern web.
Really appreciate this kind of writing, no shouting and no clickbait headlines just steady useful content, and a quick look at temposofa kept that going, definitely a site I will be returning to whenever I need a sensible take on similar topics in the days ahead and also during slower work weeks.
Glad I stumbled across this post, the explanations actually make sense without needing background knowledge to follow along, and after a stop at tigerteacup the same was true there, no assumptions about the reader just clear writing that anyone can understand from the first line right through to the end.
Even on a quick first read the substance of the post comes through, and a look at draftglades reinforced that immediate quality, content that does not require a slow careful read to demonstrate value but rewards one anyway is content with real depth and this site has produced work of that demanding depth class.
Found the post genuinely useful for something I was working on this week, and a look at thatchvista added more material I will reference, content that connects to my actual life and work rather than just being interesting in the abstract is the kind I will pay attention to and return to repeatedly.
Reading this with a fresh mind in the morning brought out details I might have missed in the afternoon, and a stop at voguestrait earned the same fresh attention, content that rewards being read at full attention rather than at energy lows is content with real density and this site has that density consistently.
Really like that there are no exclamation marks or all caps shouting throughout the post, and a quick visit to loneload maintained the same calm voice, restraint in punctuation signals confidence in the content and this site clearly trusts its substance to do the persuading rather than relying on typographic emphasis.
Decided to set a calendar reminder to revisit, and a stop at simbasienna extended that revisit list, calendar entries for content are a level of commitment I rarely make but when I do they signal a higher regard than a simple bookmark and this site has earned that calendar tier of relationship from me today.
Now feeling mildly impressed in a way I do not quite remember feeling about a blog in a while, and a stop at summitshire extended that mild impression, content that produces specific positive emotional responses rather than just neutral information transfer is content with extra dimensions and this site has those extra dimensions clearly.
гостиница площадь ильича Ищете отель на час у площади Ильича или метро Римская? Предлагаем варианты почасовой аренды и гостиницы для комфортного отдыха.
Liked the way the post handled the final paragraph, no neat bow but no abrupt cutoff either, and a stop at tundrasyrup continued that thoughtful ending pattern, endings are hard and most blog writers either over engineer them or skip them entirely and this site has clearly figured out a sustainable middle approach.
Now placing this in the small category of sites whose updates I would actually want to know about, and a stop at tagbyte confirmed that placement, the difference between sites I want to follow and sites I just consume from is real and this one has crossed into the active follow category from the casual consumption side.
Now feeling slightly more committed to my own careful reading practices having read this, and a stop at snippetvamp reinforced that commitment, content that models the kind of attention it deserves is content that calibrates the reader and this site has clearly raised my own bar for what to bring to good writing today.
Held my interest from the opening line through to the closing thought, and a stop at draftport did the same, content that earns sustained attention in an environment full of distractions is doing something right and this site is clearly doing several things right rather than just one or two which I really appreciate.
нарколог на дом цена москва врач выезд [url=https://www.reabilitaciya-alkogolikov-moskva.ru]https://www.reabilitaciya-alkogolikov-moskva.ru[/url]
Reading this between meetings turned out to be the most useful thing I did all afternoon, and a stop at sodasherpa kept that productivity feeling going, content can sometimes outperform actual work in terms of what gets accomplished mentally and this site managed that today which is genuinely a high bar to clear consistently.
Reading this confirmed a small detail I had been uncertain about, and a stop at loneohm provided the source for further checking, content that supports verification through citations or links rather than just asserting facts is more trustworthy and this site has clearly built its credibility through that kind of verifiable approach consistently.
Picked this site to mention to a colleague who would benefit, and a look at vinylslogan added more material I will pass along, recommending sites to colleagues is a higher bar than recommending to friends because the professional context demands more careful curation and this site cleared the professional bar without me having to think.
A piece that prompted a small mental rearrangement of how I order related ideas, and a look at saddleswamp extended that rearranging effect, content that affects the structure of my thinking rather than just adding to it is content with the deepest kind of impact and this site is reaching that depth for me today.
Found this useful, the points line up well with what I have been thinking about lately, and a stop at uppersharp added some angles I had not considered yet, definitely walking away with more than I came for which is the best outcome from time spent reading online for any kind of topic.
Reading this brought back an idea I had set aside months ago, and a stop at qalnexo added more substance to that idea, content that revives dormant projects in my own thinking is content with serious creative value and this site is contributing to my own work in ways I had not expected when first clicking through.
Glad the writer kept this short rather than padding it out, the points stand on their own without needing extra context, and a look at triadsharp kept the same approach going, brevity is a sign of confidence in the substance and the team here clearly trusts their content to land without filler.
Worth pointing out that the writer made the topic feel more interesting than I had been expecting, and a look at saddlevicar continued that elevation effect, content that improves the apparent quality of its subject through skilled treatment is doing something real and this site has clearly developed that kind of editorial alchemy throughout.
Great work on keeping things readable, the post never drags or repeats itself which I really appreciate, and a stop at rivqiro added a bit more context that fit naturally with what was already said here, no need to read everything twice to get the point being made today.
monopoly live evolution gaming [url=https://monopolylive-in.com/]monopoly live evolution gaming[/url].
Came in confused about the topic and left with a much firmer grasp on it, and after tallysubdue I felt I could explain this to someone else without hesitation, that is the gold standard for any educational content and most sites simply fail to reach it ever which is unfortunate but true.
Really clear writing, the kind that makes you want to share the link with someone who has been asking about the topic, and a quick browse through sonarsandal only made me more sure of that, the information here stays useful long after the first read is done which says a lot.
Felt the post had been written without using a single buzzword, and a look at driftfair continued that clean vocabulary, content free of jargon and trendy phrases reads better and ages better and this site has clearly committed to a vocabulary that will not feel dated in three years which is impressive editorially.
Now noticing how rare it is to find a site that does not feel rushed, and a look at meadochre extended that calm pace, content produced without time pressure has a different quality than content shipped to meet a deadline and this site reads as written without urgency which produces a different and better experience for readers.
капельница после запоя [url=https://kapelnicza-ot-pokhmelya-nizhnij-novgorod-6.ru]капельница после запоя[/url]
Looking at this objectively the editorial quality is hard to deny even setting aside personal taste, and a stop at discoverlimitlessoptions maintained the same objective quality, the gap between what I personally enjoy and what is objectively well crafted exists and this site clears both bars simultaneously which is rarer than it sounds.
A nicely understated post that does not shout for attention, and a look at solidtiger maintained the same quiet quality, understatement is a stylistic choice that distinguishes serious writing from attention seeking writing and this site has clearly committed to the understated approach as a core editorial value rather than just a phase.
Reading this confirmed that the topic deserves more careful attention than it usually gets, and a stop at tundratoken extended that elevated framing, content that raises the appropriate weight of a subject without being preachy about it is serving a quiet but important editorial function for the broader cultural conversation about it.
Reading this in a quiet coffee shop matched the calm energy of the writing, and a stop at laurelmallow extended that environmental match, content that has its own ambient quality which can match or clash with surroundings is content with a personality and this site has the kind of personality that suits calm reading.
Now planning a longer reading session for the archives, and a stop at zornexo confirmed the archives are worth that longer commitment, sites with archives I want to read deliberately rather than just sample are rare and this one has clearly earned that level of interest based on the consistency of what I have already read.
Solid information that lines up with what I have been hearing from other reliable sources, and after my visit to parsleymulch I was even more certain of that, this site checks out which is something I value highly when so many places online play loose with the facts to chase a quick click.
Took something from this I did not expect to find, and a stop at tasseltennis added another unexpected useful piece, content that exceeds expectations rather than just meeting them is the kind that builds enthusiasm and earns repeat visits without any explicit ask from the writer or platform behind the work being read.
Stands apart from similar pages by actually being useful, that is high praise these days, and a look at skifftornado kept that standard going, you can tell when a site is built around the reader versus around metrics and this one clearly belongs to the first category for sure based on what I read.
Well done, the writing is professional without being stiff, and the topic is treated with care, and a look at swirllink reflected that approach, the kind of site I would point a colleague to if they asked for a reliable starting point on this topic in the future without any hesitation at all.
Found the post genuinely useful for something I was working on this week, and a look at gondoenvoy added more material I will reference, content that connects to my actual life and work rather than just being interesting in the abstract is the kind I will pay attention to and return to repeatedly.
The pacing of the post was just right, never rushed and never dragged out unnecessarily, and a look at trendandfashion maintained the same rhythm, you can tell the writer has experience because the difficult skill of pacing is something only practiced writers manage to handle well in long form content over time and across formats.
Felt the writer respected the topic without being precious about it, and a look at villageswan continued that respectful but unfussy treatment, finding the right register for serious topics is hard and this site has clearly figured out how to take the topic seriously while still being readable for casual visitors regularly.
капельница от запоя вызов [url=https://kapelnicza-ot-pokhmelya-samara-28.ru]капельница от запоя вызов[/url]
Started this morning and finished at lunch with a small sense of having spent the time well, and a look at twainverge extended that satisfaction into the afternoon, content that fits naturally into the rhythm of a working day rather than demanding a dedicated reading block is increasingly the kind I prefer.
Reading this slowly to absorb the structure, and the structure is doing real work alongside the words, and a look at voguesage maintained the same architectural quality, when sentence shapes and paragraph rhythms reinforce the meaning rather than just transporting words you know you are reading skilled work today.
https://pathsinc.org/media/pgs/sovety_po_prohoghdeniyu_igry_starlink_battle_for_atlas_prohoghdenie_igry_020.html
Wow, amazing blog layout! How long have you been blogging for? you make blogging look easy. The overall look of your site is wonderful, let alone the content!
A small thank you note from me to the team behind this work, the post earned it, and a stop at turbinevault suggested more thanks would be in order over time, recognising the people who do good writing online is something I try to remember to do because the alternative is silence and silence rewards mediocrity unfortunately.
Probably going to mention this site in a write up I am working on later this month, and a stop at duetcoast provided more material for that potential mention, content worth referencing in my own published work rather than just personal reading is content with the highest endorsement level and this site has earned that endorsement.
Reading this gave me the rare experience of fully agreeing with all the conclusions, and a stop at unlockyourfullpotential continued that agreement pattern, content that aligns with my existing views without seeming designed to do so is just content that happens to be reasonable and this site reads as reasonable rather than ideological mostly.
Most posts I read end up forgotten within a day but this one is sticking, and a look at thriftsundae extended that lingering effect, content that survives the immediate moment of reading rather than evaporating is content with genuine retention quality and this site has been producing memorable pieces at a rate notable across my reading.
I encountered your site after doing a search for new contesting using Google, and decided to stick around and read more of your articles. Thanks for posting, I have your site bookmarked now.
Thanks for laying this out in a way that someone newer to the topic can follow, and a stop at passionload kept that accessibility going, writing that meets readers at different experience levels without condescending is hard to do well and the writers here have clearly thought about who they are writing for.
My reading list is short and selective and this site is now on it, and a stop at leafpatio confirmed the placement, the short list of sites I read deliberately rather than encounter accidentally is something I curate carefully and adding to it is a real act of trust which this site has earned today.
Started forming counter examples to test the claims and the post handled most of them implicitly, and a look at tallysmoke continued that anticipatory style, writers who think two steps ahead of the critical reader save themselves from a lot of follow up work and this writer has clearly internalised that habit consistently.
Reading this prompted a small note in my reference file, and a stop at qanlivo prompted another, the rare site that contributes useful nuggets to my own working knowledge rather than just consuming my attention is worth the time investment many times over compared to the usual pile of forgettable scroll content.
https://dtf.ru/food/4568340-chestnaya-pizza-kuba-skorost-i-kachestvo
Good points – – it will make a difference with my parents.
Quietly enjoying that I have found a new site to follow for the topic, and a look at vaultvelour reinforced the small pleasure of the find, the discovery of new high quality sources is one of the more durable pleasures of careful internet reading and this site has been generating that discovery pleasure at multiple points already today.
The way the post stayed on topic throughout without going on tangents was really refreshing, and a look at zorvilo kept that focused approach going, discipline like this in writing is rare and worth recognising because most writers cannot resist wandering off into related subjects that dilute their main point and confuse readers along the way.
Decided not to comment because the post said what needed saying, and a stop at rivzavo continued that complete feel, content that does not invite obvious additions or corrections from readers is content that has been carefully considered and this site appears to consistently produce pieces that satisfy rather than provoke unnecessary follow ups.
This is my first time i visit here. I found so many helpful stuff in your website especially its discussion. From the tons of responses on your posts, I guess I am not the only one having all the enjoyment here! keep up the excellent work
Appreciate that you did not pad this with fluff to hit a word count, the post says what it needs to say and stops, and a look at gondoiris did the same, brevity here feels intentional not lazy which is a distinction many writers miss completely sometimes when they are working under deadlines.
Now I want to find more sites like this but I suspect they are rare, and a look at umbravista extended that thought, the few sites that meet this quality bar are precious specifically because they are rare and finding others like them is one of the ongoing projects of careful internet curation across the years.
Recommended to anyone working in or curious about this area, the depth and clarity combine well, and a look at venusstout keeps that going across more pages, the kind of site that earns regular visits rather than chasing trends has my respect because it suggests genuine commitment to the topic itself rather than to chasing trends.
I enjoy your blog posts, saved to my bookmarks!
Worth saying that the prose reads naturally without straining for style, and a stop at trendandbuy maintained the same unforced quality, writing that achieves elegance without effort is the highest tier and this site has clearly worked out how to land that effortless quality consistently rather than only on the writers best days.
Better signal to noise ratio than most places I check on this kind of topic, and a look at meltmyrtle kept that going, every paragraph here carries something worth reading rather than padding out the page to hit some arbitrary length target that search engines reward but readers ignore as soon as they notice it.
Now wondering how the writers calibrated the level of detail so well, and a stop at tealsilver continued the same calibration, the right level of detail is one of the harder editorial calls in any piece and this site has clearly developed an instinct for it through what I assume is years of careful practice publicly.
Took a screenshot of one section to come back to later, and a stop at sculptsilver prompted another saved tab, the urge to capture and revisit specific pieces of content is something I rarely feel but when I do it tells me the work is worth more than the average passing read for sure.
Solid recommendation from me to anyone working in the area, the perspective here is grounded, and a look at tagzip adds even more useful angles, the kind of site that becomes a reference rather than just a one time read which is a higher bar than most blogs ever reach today on the modern web.
Reading this prompted a small redirection in something I was working on, and a stop at makeprogressforward extended that redirecting influence, content that affects my actual work rather than just my thinking has the highest practical impact and this site is providing that level of influence for me at a sustainable rate apparently.
This one is staying open in a tab for the rest of the day so I can come back and re read certain parts, and a look at uptonstarlit suggests I will be doing the same with a few more pages here too, this is going to be a deep dive over the coming hours.
Thanks for the practical examples scattered through the post rather than abstract theory only, and a look at tornadovapor continued that grounded style, abstract points are easier to remember when paired with concrete situations and the writers here clearly understand how readers actually retain information from blog content reading sessions.
Now adding this to a list of sites I want to see flourish, and a stop at pastrylevee reinforced that wish, the few sites I actively root for are sites that produce the kind of work I want more of in the world and this one has joined that small list based on what I have read so far.
Picked up a couple of new ideas here that I can actually try out, and after my visit to leapminor I have even more notes saved, this is the kind of resource that pays you back for the time you spend on it which is rare to come across in this corner of the web.
Yesterday I was complaining about the state of online writing and today this site has temporarily fixed that complaint, and a look at sambasavor extended that mood reversal, the short term mood improvement that comes from finding good content is real and this site has produced that improvement for me at a useful moment.
I believe you have remarked on some very interesting points , thankyou for the post.
Now noticing that the post benefited from being neither too short nor too long for its content, and a look at zulmora continued that calibration of length, sites that match length to content rather than padding to hit some target are sites that respect both their material and their readers and this site does both.
https://naderlibrary.com/codigo-promocional-de-bienvenida-2026-de-1xbet-1xhasard/
Thanks for laying this out in a way that someone newer to the topic can follow, and a stop at learnandgrowtogether kept that accessibility going, writing that meets readers at different experience levels without condescending is hard to do well and the writers here have clearly thought about who they are writing for.
Probably worth setting aside a longer block to read more carefully than I can right now, and a stop at versavamp confirmed the longer block plan, the impulse to schedule dedicated time for a sites archive is itself a measure of trust and this site has earned that scheduling impulse from me clearly today actually.
Generally my attention drifts on long posts but this one held it through the end, and a stop at sabertorch earned the same sustained focus, content that defeats my drift tendency is content with substantive pulling power and this site has demonstrated that pulling power across multiple pieces in a session that has now run quite long actually.
Will be coming back to this for sure, too much good content to absorb in one sitting, and a stop at gongflora only added more pages I want to dig through, this site is going onto my regular rotation list because it consistently delivers something worth the visit lately rather than empty filler.
Probably worth setting aside a longer block to read more carefully than I can right now, and a stop at tarmacstork confirmed the longer block plan, the impulse to schedule dedicated time for a sites archive is itself a measure of trust and this site has earned that scheduling impulse from me clearly today actually.
Felt energised after reading rather than drained, which is unusual for online content these days, and a look at stashsuperb continued that good feeling, content that leaves you better than it found you is rare and worth bookmarking when you stumble across it for the first time today or any other day really.
Easy to recommend, the content speaks for itself without needing additional praise from me, and a stop at qanviro only adds more reasons to send people this way, the kind of generous resource that benefits its readers without demanding anything in return is increasingly rare and worth recognising clearly today across the broader open internet.
Thank you for keeping the writing honest and the points easy to verify against your own experience, and a stop at timelessgroovehub reflected the same approach, no exaggeration just steady useful content that I can take with me into my own work without second guessing every sentence I happen to read here.
Started reading expecting to disagree and ended mostly nodding along, and a look at nuartplate continued the pattern, content that wins agreement through evidence and reasoning rather than rhetorical force is the kind that actually shifts minds and this site clearly knows how to do that across what I have read so far.
I really like the calm tone here, it does not push anything on the reader, and after I went through patioleaf I felt the same way, just steady useful content laid out without drama, which is exactly what someone trying to learn something quickly needs to find rather than aggressive marketing.
Came away with some new perspectives I had not considered before, and after flyburn those ideas felt more complete, the kind of content that stays with you a little while after reading rather than slipping out the moment you switch tabs and move on with your day to whatever comes next.
Buy kitchen furniture custom cabinet manufacturer Tampa Bay
monopoly big baller today result live india [url=https://live-monopoly-in.com/]https://live-monopoly-in.com/[/url]
Decided not to skim despite my usual habit and was rewarded for the discipline, and a stop at tracetroop earned the same patient approach, training myself to recognise sites that warrant slower reading is part of being a careful online reader and this site is the kind that helps me practice that skill regularly.
Came in tired from a long day and the writing held my attention anyway, and a stop at leappalette kept that going, content that can engage a fatigued reader is doing something right because most online reading happens in suboptimal conditions like that one and quality content adapts to it without complaint.
Liked the way the post handled the final paragraph, no neat bow but no abrupt cutoff either, and a stop at sketchstamp continued that thoughtful ending pattern, endings are hard and most blog writers either over engineer them or skip them entirely and this site has clearly figured out a sustainable middle approach.
Came away with a slightly better mental model of the topic than I started with, and a stop at broblur sharpened that further, content that improves the reader thinking apparatus rather than just dumping facts into it is the rare kind I genuinely value and seek out when I have time to read carefully.
Granted I am giving this site more credit than I usually give new finds, and a look at swapvenom continued earning that credit, the calibration of how much trust to extend after limited exposure is something I do carefully and this site has earned more trust on shorter exposure than most due to consistent quality across.
Now planning to write about the topic myself eventually using this post as a reference, and a look at tagtorch would also serve in that future piece, content that becomes raw material for my own writing rather than just informing my reading is content with multiplicative value and this site is generating that multiplicative effect.
Reading this slowly and letting each paragraph land before moving on, and a stop at ilonox earned the same patient approach, content that rewards slow reading rather than speed is content with real density and the writers here are clearly producing work that benefits from the careful eye rather than the rushed scan.
поставить капельницу от запоя на дому цена [url=https://kapelnicza-ot-pokhmelya-samara-28.ru]поставить капельницу от запоя на дому цена[/url]
https://www.zdravnitza.com/
Reading this prompted me to clean up some old notes related to the topic, and a stop at halbelt extended that organising urge, content that triggers personal organisation rather than just consuming attention is content with motivating energy and this site has the kind of clarity that prompts active follow up rather than passive consumption.
Will be back, that is the simplest way to say it, and a quick visit to hoxaero reinforced the decision, this site has earned a spot in my regular rotation alongside a few other reliable places I check when I want something genuinely informative without all the usual modern web noise getting in the way.
Bookmark earned, calendar reminder set, share queued, all from one good post, and a look at meownoon did the same, when a single reading session triggers multiple downstream actions you know the content has actually moved me beyond the page and this site is moving me at that higher level reliably.
Even on a quick first read the substance of the post comes through, and a look at velourudon reinforced that immediate quality, content that does not require a slow careful read to demonstrate value but rewards one anyway is content with real depth and this site has produced work of that demanding depth class.
Bookmark folder created specifically for this site, and a look at stashswan confirmed the dedicated folder was the right call, dedicated folders for individual sites are a level of organisation I rarely deploy and this site has earned that level of dedicated tracking based on the consistency I have seen so far across sessions.
Really appreciate the absence of stock photos that have nothing to do with the content, and a quick visit to surgetarmac maintained the same restraint, visual filler is a tell that the writing cannot stand on its own and the lack of it here suggests the team has confidence in their content quality alone.
Strong recommendation, anyone interested in this topic owes themselves a visit, and a stop at ibabowl extends that recommendation across more of the site, this is the kind of resource that makes me more optimistic about the state of the open web than I usually am these days actually for once which is genuinely refreshing.
Top tier post, the kind that makes you want to share the link with friends working in the same area, and a stop at fiabush only made me more confident in doing that, this site is one of the better resources I have seen on the topic recently across both new and older posts.
Picked up several practical tips that I plan to try out this week, and a look at zulqaro added a few more I will be testing alongside, content with practical hooks that connect to my actual life is the kind that earns my repeat attention rather than the merely interesting that I forget within a day.
Found this via a link from another piece I was reading and the click was worth it, and a stop at souptrigger extended the value across more material, the open web still rewards clicking through citations when the underlying writers care about each other work and this site clearly belongs to that network.
A memorable post for me on a topic I had thought I was tired of, and a look at gonggrip suggested the same site can refresh other tired topics, sites that can revive my interest in subjects I had written off as exhausted are doing rare work and this one is clearly doing that for me today.
вызов нарколога на дом [url=https://www.reabilitaciya-alkogolikov-moskva.ru]вызов нарколога на дом[/url]
During my morning reading slot this fit perfectly into the routine, and a look at pebblelemon extended that perfect fit into the rest of the routine, content that matches the rhythm of how I actually read rather than demanding accommodation from my schedule is content well calibrated to its likely audience and this site has it.
Felt like the writer was speaking directly to someone with my level of curiosity, neither talking down nor showing off, and a stop at tundraturtle kept that comfortable matching going, finding writing that meets you where you are rather than asking you to climb up or stoop down feels great every time it happens.
A piece that reads as if the writer trusted readers to fill in obvious gaps, and a look at fribrag continued that respectful approach, content that does not over explain what the reader can infer is content that respects intelligence and this site has clearly chosen to write to capable readers rather than to the lowest common denominator.
Reading this site over the past week has changed how I evaluate content in this space, and a look at tokenudon extended that recalibration, the standards I bring to reading on the topic have shifted upward as a direct result of regular exposure to this kind of work and that shift will outlast any single reading session.
стоимость карьерного песка стоимость карьерного песка за куб
Worth flagging that this approach to the topic is fresh without being contrarian, and a stop at voguestraw extended the same fresh angle, finding original perspective on familiar subjects is rare and this site has clearly developed its own way of seeing rather than echoing the dominant takes from elsewhere consistently.
Liked the natural conversational tone throughout, never stiff and never overly casual either, and a stop at lemonode kept that comfortable middle ground going, finding a tone that respects the reader without becoming distant or overly familiar is harder than it sounds and this site nails that balance consistently across many different pieces.
A piece that prompted a small mental rearrangement of how I order related ideas, and a look at brofix extended that rearranging effect, content that affects the structure of my thinking rather than just adding to it is content with the deepest kind of impact and this site is reaching that depth for me today.
Closed the laptop and walked away thinking about the post for a good twenty minutes, and a stop at steamstraw produced similar lingering thoughts, content that survives the closing of the browser tab is content that has actually entered the mind rather than just decorating the screen for the duration of the reading.
прокапать от алкоголя нижний новгород [url=https://kapelnicza-ot-pokhmelya-nizhnij-novgorod-6.ru]прокапать от алкоголя нижний новгород[/url]
Closed it feeling I had taken something away rather than just consumed something, and a stop at timberfieldcorner extended that taking away feeling, the difference between content I extract value from and content I just pass through is something I track informally and this site is consistently in the value extraction column for me.
Honest reaction is that this is the kind of writing I would defend in a conversation about good blog content, and a look at storkumber reinforced that, the rare site whose work I would actively recommend rather than just tolerate is the kind I want to support through return visits regularly.
Found this through a search that was generic enough I did not expect quality results, and a look at imobush continued the surprisingly good experience, search engines occasionally still surface excellent independent content if you scroll past the obvious paid and high authority results which is reassuring to remember sometimes.
The examples really helped me grasp the points faster than abstract descriptions would have, and a stop at exploreinnovativeconcepts added a few more practical illustrations that drove the message home, the kind of writing that knows its readers learn better through concrete situations rather than vague generalities is rare and worth recognising clearly.
Coming back tomorrow when I can give this a proper read, the post deserves better attention than I can give right now, and a look at tidalurchin suggests there is plenty more here that deserves the same treatment, definitely a site I will be exploring properly over the next few days when I can.
Most of the time I feel the open web is in decline and then I find a site like this, and a stop at ibacane reinforced that mood lift, the cumulative effect of finding occasional excellent independent content versus the cumulative effect of finding mostly mediocre content is real for the long term reader maintaining web habits today.
Held my interest from the opening line through to the closing thought, and a stop at syncbyte did the same, content that earns sustained attention in an environment full of distractions is doing something right and this site is clearly doing several things right rather than just one or two which I really appreciate.
Thank you pertaining to sharing the following great subject matter on your website. I ran into it on google. I am going to check to come back after you publish additional aricles.
Approaching this with the usual skepticism I bring to new sites and being slowly persuaded, and a stop at zulvexa continued that gradual persuasion, the careful path from skeptical reader to genuine fan is the only one I trust and this site has walked me along that path through patient consistent quality across pieces.
The tone stayed consistent across the whole post which is harder than it looks for longer pieces, and a look at siskavarsity continued the same voice, this kind of editorial consistency is a sign of either a single careful writer or a tightly run team and either is impressive today across the broader media environment.
Now thinking about whether the writer might publish a longer form work I would buy, and a look at sorreltavern suggested the same depth would translate, content that makes me want to pay for related work in other formats is content that has earned commercial trust as well as attention trust and this site has both clearly.
Stands apart from similar pages by actually being useful, that is high praise these days, and a look at jalborn kept that standard going, you can tell when a site is built around the reader versus around metrics and this one clearly belongs to the first category for sure based on what I read.
If you scroll past this site without looking carefully you will miss something, and a stop at tacticstaff extended that mild warning, the surface of the site does not advertise its quality loudly which means careful attention is required to recognise what is being offered here which is itself a kind of editorial signal.
This one is staying open in a tab for the rest of the day so I can come back and re read certain parts, and a look at fylbust suggests I will be doing the same with a few more pages here too, this is going to be a deep dive over the coming hours.
However casually I came to this site I have ended up reading carefully, and a look at gongjade continued earning that careful reading, the conversion from casual visitor to careful reader is something content earns rather than demands and this site has accomplished that conversion for me over the course of just a few pieces.
Came away with some new perspectives I had not considered before, and after pebblenovel those ideas felt more complete, the kind of content that stays with you a little while after reading rather than slipping out the moment you switch tabs and move on with your day to whatever comes next.
Howdy! I simply wish to give a huge thumbs up for the great information you have here on this post. I will be coming again to your weblog for extra soon.
Reading this prompted me to dig into a related topic later, and a stop at seriftackle provided some of the starting points for that follow up reading, content that triggers further exploration rather than satisfying curiosity completely is content with real generative energy and this site has plenty of that energy throughout it.
Came across this through a roundabout path and now it is on my regular rotation, and a stop at leveemotel sealed that decision, the open web still produces serendipitous discoveries when you let the citations and references guide you rather than relying purely on algorithmic feeds for new content recommendations always.
Reading this as part of my evening winding down routine fit perfectly, and a stop at halbrook extended the wind down nicely, content that calms rather than agitates is what I want at the end of the day and this site provides that calming reading experience reliably which is increasingly rare across the modern web.
Left me wanting to read more rather than feeling burned out, that is a good sign, and a look at byncane confirmed there is plenty more here to explore, the kind of writing that builds appetite rather than killing it which is a rare quality on the modern open internet today across most categories of content.
Will be back, that is the simplest way to say it, and a quick visit to hoxfix reinforced the decision, this site has earned a spot in my regular rotation alongside a few other reliable places I check when I want something genuinely informative without all the usual modern web noise getting in the way.
Now considering the post as evidence that careful blog writing is still possible, and a look at mercymodel extended that evidence, the broader question of whether the modern web can sustain quality writing has obvious empirical answers in sites like this one and seeing them is reassuring even when they remain a minority overall today.
I favored your idea there, I tell you blogs are so helpful sometimes like looking into people’s private life’s and work.At times this world has too much information to grasp. Every new comment wonderful in its own right.
Felt the writer was being honest with the reader which is rare enough that I want to acknowledge it, and a look at exploreyourpotential continued that honest feel, content built on actual knowledge rather than aggregated summaries is something I value highly and rarely come across in regular searches on the open internet these days.
Closed the tab with a small sense of finality rather than the usual rushed exit, and a stop at velourturban produced the same considered closing, when reading ends with deliberate satisfaction rather than impatient skip you know the time was well spent and this site is producing those satisfying endings consistently across what I read.
There is perceptibly a lot to identify about this. I consider you made some good points in features also.
Worth flagging that this approach to the topic is fresh without being contrarian, and a stop at tritonsloop extended the same fresh angle, finding original perspective on familiar subjects is rare and this site has clearly developed its own way of seeing rather than echoing the dominant takes from elsewhere consistently.
https://rant.li/gil00r7gn6
Just want to acknowledge that the writing here is doing something right, and a quick visit to timberverge confirmed the same standards run across the broader site, recognising good work is something I try to do when I find it because the alternative is silence and silence rewards mediocrity.
Appreciate the practical examples, they made the abstract points easier to grasp, and a stop at threeoaktreasures added more of the same, this site clearly understands that real examples beat empty theory every single time which is the mark of a writer who knows their audience well and respects their time.
Now recognising that the post handled the topic with appropriate technical precision without becoming dry, and a stop at inaarch continued that balance, technical precision and readability are often in tension and this site has clearly figured out how to maintain both at once which is one of the harder editorial achievements in the form.
Solid post, the structure is easy to follow and the language stays simple even when the topic gets a bit more involved, and a look at ibeburn kept that same standard going, so I left feeling like the time spent here was actually worth something for once which is rare lately.
українські зірки Останні новини зірок та модні тренди – все для тих, хто прагне бути в курсі найактуальніших подій у світі глянцю та слави.
Easy to recommend, the content speaks for itself without needing additional praise from me, and a stop at vistastencil only adds more reasons to send people this way, the kind of generous resource that benefits its readers without demanding anything in return is increasingly rare and worth recognising clearly today across the broader open internet.
https://techplanet.today/post/1xbet-promo-code-for-registration-gift777
A quiet piece that did not try to compete on volume, and a look at stereotarot maintained that selective approach, sites that publish less but better are increasingly rare in an environment that rewards volume and this one has clearly chosen quality cadence over quantity which is a brave editorial decision in current conditions.
Reading this in pieces during a long afternoon and finding it consistently rewarding, and a stop at swamptweed fit naturally into the same fragmented reading pattern, sites whose posts can be read in segments without losing the thread are well suited to how I actually read these days and this one is built well.
Generally my attention drifts on long posts but this one held it through the end, and a stop at fylcalm earned the same sustained focus, content that defeats my drift tendency is content with substantive pulling power and this site has demonstrated that pulling power across multiple pieces in a session that has now run quite long actually.
Felt the writer was speaking my language without trying to imitate it, and a look at zunkavi continued that natural fit, when a writers default voice happens to match what you find easy to read the experience feels frictionless and that is something I notice and remember about specific sites going forward.
The whole experience of reading this was pleasant from start to finish, no pop ups and no annoying interruptions, and a look at vocabtoffee continued that clean experience, technical choices about page design matter for the reader and this site clearly cares about the small details that add up to comfort across multiple visits.
Reading carefully this time rather than scanning, and the depth shows up in places I missed first time around, and a look at pebbleoboe rewarded the same careful approach, content that holds up to multiple reads is content I want more of in my regular rotation rather than disposable scroll fodder daily.
Now realising this site has been quietly doing good work for longer than I knew, and a look at tunicvicar suggested an archive worth exploring, sites with deep archives of consistent quality represent a different kind of resource than sites with viral hits and this one looks like the durable kind based on what I see.
Worth pointing out that the writing reads as confident without being defensive about it, and a look at sloopvault extended that secure tone, content that does not pre emptively argue against imagined critics has a different quality from defensive writing and this site reads as written from a place of real ease.
Reading this slowly and letting each paragraph land before moving on, and a stop at liegelane earned the same patient approach, content that rewards slow reading rather than speed is content with real density and the writers here are clearly producing work that benefits from the careful eye rather than the rushed scan.
Now planning to share the link with a small group of readers I trust, and a look at gongketo suggested more material to share with the same group, recommending content into a curated circle requires confidence in the recommendation and this site is making me confident in those personal recommendations on multiple separate occasions now.
Refreshing tone compared to the dry corporate posts on similar topics, and a stop at pixiescan carried that personality through nicely, you can tell when a real person is behind the writing versus a content team chasing metrics and this site definitely falls into the former category clearly across what I have seen.
Solid value for anyone willing to read carefully, and a look at cadbrisk extends that value across the rest of the site, this is the kind of place that rewards return visits rather than offering everything in a single splashy post and then leaving readers nothing to come back for later which is unfortunately common.
Honestly impressed by the consistency of voice across what I have read so far, and a quick visit to buildsomethinglasting continued that consistent feel, when a site reads like one careful person rather than a committee the experience is more rewarding for the reader who notices these subtle editorial details over time.
A particular pleasure to read this with a fresh coffee, and a look at solotopaz extended the pleasure across more pages, content that pairs well with quiet morning rituals is something I have come to value highly and this site has the kind of energy that fits naturally into a calm reading routine.
A piece that respected the reader by not over explaining the obvious, and a look at serifveil continued that calibrated approach, finding the right level of explanation is one of the harder editorial calls and this site has clearly thought carefully about what readers will already know versus what they need help with consistently.
Skimmed first and then went back to read carefully, and the careful read paid off in places I had missed, and a stop at ibecalf got the same treatment, the rare site whose content rewards a second pass is content I want more of in my regular rotation rather than disposable single read articles.
Well done, the writing is professional without being stiff, and the topic is treated with care, and a look at veilshrine reflected that approach, the kind of site I would point a colleague to if they asked for a reliable starting point on this topic in the future without any hesitation at all.
monopoly big result today india time live [url=https://www.live-monopoly-india.com/]https://live-monopoly-india.com/[/url]
Worth flagging that the writing rewarded a second read more than I expected, and a look at inobrat produced the same second read benefit, content with hidden depths that emerge only on careful rereading is rare in the modern blog space and this site has clearly invested in that level of compositional density throughout.
monopoly big baller live online free [url=http://monopoly-live-in.com/]http://monopoly-live-in.com/[/url] .
Working through this site has been a small antidote to the shallow content that fills most of my reading time, and a stop at spectrasolo extended that antidote function, sites that quietly improve the average quality of my reading by being themselves are sites worth supporting through return visits and recommendations consistently.
casino scores monopoly live today [url=www.monopoly-live-india.com/]casino scores monopoly live today[/url] .
During a reading session that included several other sources this one stood out, and a look at jamcall continued the standout quality, the side by side comparison of sources during research is a useful exercise and this site has been winning those comparisons for me consistently across multiple research sessions during the last week.
playing match monopoly live [url=http://monopoly-live-india.com/]http://monopoly-live-india.com/[/url] .
monopoly live no deposit bonus [url=https://www.monopolylive-india.com]https://www.monopolylive-india.com[/url] .
monopoly big bazaar live result [url=http://monopoly-live-results.com/]http://monopoly-live-results.com/[/url] .
Glad I gave this a chance instead of bouncing on the headline, and after hanrim I was certain I had made the right call, snap judgements based on titles miss a lot of good content and this is a reminder to slow down and check things out before scrolling past in a hurry.
Following the post through to the end without my attention drifting once, and a look at pebbleorbit earned the same uninterrupted attention, content that holds attention without manipulating it is content with substantive pull and this site has demonstrated that substantive pull across multiple pieces in a single reading session reliably here today.
A small thank you note from me to the team behind this work, the post earned it, and a stop at hoxhem suggested more thanks would be in order over time, recognising the people who do good writing online is something I try to remember to do because the alternative is silence and silence rewards mediocrity unfortunately.
A piece that read smoothly because the writer understood how readers actually move through prose, and a look at mercypillow maintained the same reader awareness, writers who think about the reading experience as much as the writing experience produce better work and this site has clearly made that shift in editorial approach.
Now wishing I had found this site sooner, and a look at discovermeaningfulideas extended that mild regret, the calculation of how many years of good content I missed by not finding the right sources earlier is one I try not to make too often but it does come up sometimes when I find sites this good.
Pass this along to colleagues if the topic comes up, the framing here is sensible, and a stop at sampleshaft adds more useful angles to share, the kind of content that improves conversations rather than just feeding them is what makes a resource genuinely valuable in professional contexts going forward over time and across project boundaries too.
Reading this gave me the rare experience of fully agreeing with all the conclusions, and a stop at siriussuperb continued that agreement pattern, content that aligns with my existing views without seeming designed to do so is just content that happens to be reasonable and this site reads as reasonable rather than ideological mostly.
This one is staying open in a tab for the rest of the day so I can come back and re read certain parts, and a look at swordtunic suggests I will be doing the same with a few more pages here too, this is going to be a deep dive over the coming hours.
Excellent post, balanced and well organised without showing off, and a stop at caroxo continued in that same vein, this site has clearly figured out the formula for content that works for readers rather than for search engine ranking signals which is harder than it sounds today and worth real recognition from anyone.
наркологическая помощь на дому в москве [url=http://reabilitaciya-alkogolikov-moskva.ru]наркологическая помощь на дому в москве[/url]
If I had to defend the time I spend reading independent blogs this site would feature in the defence, and a look at snoozestaple reinforced that defensive utility, the ongoing case for non algorithmic reading is one I make to myself periodically and sites like this one provide the actual evidence that supports the case clearly.
usdt to rub best rate sell usdt for cash
капельницы от запоя на дому нижний новгород [url=https://kapelnicza-ot-pokhmelya-nizhnij-novgorod-6.ru]капельницы от запоя на дому нижний новгород[/url]
Quietly the writers approach to the topic differs from the dominant takes I have been encountering, and a stop at ibecap extended that distinctive approach, content that maintains a different perspective without explicitly arguing against the dominant ones is content with confident editorial identity and this site has that confidence throughout pieces.
Now thinking about this site as a small example of what good independent writing looks like, and a stop at sprystep continued that exemplary status, the few sites that serve as good examples are sites worth holding up in conversations about quality and this one has earned that exemplary placement through patient consistent effort over time.
Even on a quick first read the substance of the post comes through, and a look at snaresaffron reinforced that immediate quality, content that does not require a slow careful read to demonstrate value but rewards one anyway is content with real depth and this site has produced work of that demanding depth class.
обменять тезер на рубли быстро crypto-obmen-online.net
Probably the kind of site that should be more widely read than it appears to be, and a look at scarabvogue reinforced that quiet wish, the gap between a sites quality and its apparent reach is sometimes large and that gap exists for this site in a way that makes me want to mention it more.
ии для презентаций бесплатно [url=litteraesvfu.ru]litteraesvfu.ru[/url]
українські зірки Ексклюзивні подробиці про знаменитостей, модні луки та гороскоп на сьогодні
Considered against the flood of similar content this one stands apart in important ways, and a stop at triggersyrup extended that distinctive feel, sites that find their own corner of a crowded topic and stay there are sites worth following and this one has clearly carved out its own space and committed to defending it carefully.
In the middle of an otherwise scattered day this post landed as a moment of focus, and a stop at zunvoro extended that focused feeling across more pages, content that anchors a fragmented day rather than contributing to the fragmentation is content with real centring effect and this site is providing that anchoring function for me.
Thanks for treating the topic with the seriousness it deserves without becoming pompous about it, and a stop at tasselskein continued that balanced treatment, the gap between earnest and self serious is huge and writers who can stay on the right side of it earn my respect when I find them online today.
Reading this confirmed a hunch I had been carrying about the topic without having articulated it, and a stop at vortexvandal extended the confirmation, content that gives shape to fuzzy intuitions is doing the rare work of making private thoughts public and this site is providing that articulating service consistently for me lately.
Decided this was the best thing I had read all morning, and a stop at glybrow kept that ranking intact, ranking my reading is something I do mentally throughout the day and the top rank is competitive and not easily won but this site won it without needing to overstate its claims for that.
Glad to find a site whose links lead somewhere worth going rather than back to itself for SEO juice, and a stop at inobrisk kept that generous outbound feel, citing other peoples work with real respect rather than just for ranking signals is a sign of an honest operation worth supporting going forward.
Came across this and immediately thought of a friend who would enjoy it, and a stop at peltpetal also reminded me of someone, content that triggers the urge to share is content that has earned my recommendation and this site has earned multiple from me already across different conversations during the week.
Reading this prompted me to clean up some old notes related to the topic, and a stop at stencilslick extended that organising urge, content that triggers personal organisation rather than just consuming attention is content with motivating energy and this site has the kind of clarity that prompts active follow up rather than passive consumption.
Even across multiple posts the writers voice has remained consistent in a way I appreciate, and a stop at siskatriton continued that voice, sites that maintain editorial consistency across many pieces have something most sites lack and this one has clearly worked out how to keep its voice steady across what reads as a growing archive.
Reading this confirmed a small detail I had been uncertain about, and a stop at createactionsteps provided the source for further checking, content that supports verification through citations or links rather than just asserting facts is more trustworthy and this site has clearly built its credibility through that kind of verifiable approach consistently.
A piece that did not lecture even when it had clear positions, and a look at gooseholm maintained the same teaching without preaching tone, finding the line between informing and lecturing is hard and most sites land on the wrong side of it but this one has clearly figured out how to inform without becoming preachy.
Now appreciating that the post left me with enough to say in a follow up conversation, and a look at cepbell added more material for those follow ups, content that prepares me for related conversations rather than just informing me alone is content with social utility and this site provides that social armament reliably for me.
Now understanding why someone recommended this site to me a while back, and a stop at starchserene explained the recommendation, sometimes recommendations make sense only after experience and this site has finally clicked into place as the kind of resource I now understand was being recommended for sound editorial reasons by my friend.
Honestly enjoyed every minute spent here, that is not something I say lightly, and a look at tasseltract confirmed I will be back, the bar for spending time online is high for me these days but this site clears it without effort which is high praise indeed from this reader who is usually rather demanding.
Closed it feeling slightly more competent in the topic than I started, and a stop at vocabtrifle reinforced that competence boost, real learning is rare in casual online reading but it does happen sometimes and this site managed to make it happen for me today which is genuinely worth pausing to acknowledge.
Probably this is one of the better quiet successes on the open web at the moment, and a look at ibekeg reinforced that quiet success quality, sites that are doing well without making a noise about doing well are the sites I most respect and this one has clearly chosen the quiet success path consistently throughout.
A clear cut above the usual noise on the subject, and a look at jamkeg only made that gap wider in my view, the kind of place that earns its visitors through quality rather than through aggressive marketing or sponsored placements which is increasingly the only way most sites stay afloat across the modern web.
A piece that earned its conclusions through the body rather than asserting them at the end, and a look at tasseltrace maintained the same earned quality, conclusions that follow from what came before are more persuasive than declarations and this site has clearly internalised that principle in how it constructs arguments throughout pieces.
Reading this in pieces during a long afternoon and finding it consistently rewarding, and a stop at sharesignal fit naturally into the same fragmented reading pattern, sites whose posts can be read in segments without losing the thread are well suited to how I actually read these days and this one is built well.
Reading this with my morning coffee turned into reading the related posts with my morning coffee, and a stop at glyjay stretched the morning further, content that pulls breakfast into a reading session rather than just accompanying it is content that has earned a higher claim on my attention than the average article does.
Официальный сайт BlackSprut
bs2web at
A clear cut above the usual noise on the subject, and a look at hubbeat only made that gap wider in my view, the kind of place that earns its visitors through quality rather than through aggressive marketing or sponsored placements which is increasingly the only way most sites stay afloat across the modern web.
A quiet piece that did not try to compete on volume, and a look at turbineunion maintained that selective approach, sites that publish less but better are increasingly rare in an environment that rewards volume and this one has clearly chosen quality cadence over quantity which is a brave editorial decision in current conditions.
Looking back on this reading session it stands as one of the better ones recently, and a look at sectorsatin extended that ranking, the informal ranking of reading sessions against each other is something I do mentally and this session ranks high largely because of this site and a couple of related pages here.
A piece that suggested careful editing without showing the marks of the editing, and a look at lyxboss continued that invisible polish, the best editing disappears into the prose and this site reads as having been edited with skill that does not announce itself which is the highest compliment I can offer any blog content.
Honestly impressed by how much useful content sits in such a small post, and a stop at hazmug confirmed the rest of the site packs a similar punch, density without confusion is a hard balance to strike and this site has clearly cracked the code on it across many different topic areas covered.
Honest reaction is that this is the kind of writing I would defend in a conversation about good blog content, and a look at discovernextlevelideas reinforced that, the rare site whose work I would actively recommend rather than just tolerate is the kind I want to support through return visits regularly.
If I were to recommend a starting point for the topic this site would be near the top of my list, and a stop at tritile reinforced that recommendation status, the small list of starting point recommendations I keep for friends asking about topics is short and this site is now firmly on it.
Thanks for keeping the writing direct without losing the warmth that makes content feel human, and a stop at irotix carried both qualities forward, balancing professionalism and personality is a rare skill and the writers here have clearly figured out how to consistently land it across many posts which I notice.
VC VC
Quietly enthusiastic about this site after the past few hours of reading, and a stop at gorgefair extended that enthusiasm, the calibration of enthusiasm to evidence is something I try to maintain and this site has earned a calibrated quiet enthusiasm rather than the loud excitement that usually fades within a day or two of finding something.
Now appreciating the way the post avoided the temptation to be longer than necessary, and a look at udonvivid continued that lean approach, content with the discipline to stop when finished rather than padding for length is content that respects both itself and its readers and this site has that disciplined editorial culture clearly throughout.
Picked up something useful for a side project, and a look at vikingturban added another piece I will incorporate, content that connects to specific projects I am working on is content with practical utility and the practical utility of this site is showing up across multiple posts I have read in the last hour or so.
Liked the way the post balanced confidence and humility, and a stop at thrushstoic maintained the same balance, knowing when to assert and when to acknowledge uncertainty is a sign of mature thinking and the writers here have clearly developed that calibration through what I assume is years of careful work on their craft.
Came back to this an hour later to reread a specific section, and a quick visit to explorevaluecreation also drew a second look, content that pulls you back rather than letting you move on permanently is the kind I want to fill my browser bookmarks with in 2026 and beyond as the open internet evolves.
Now appreciating that I did not feel exhausted after reading, and a stop at toucanvamp extended that energising quality, content that leaves me with more attention than it consumed is rare and the gap between draining and energising content is real over the course of a typical day spent reading widely online.
A small editorial detail caught my attention, the way headings related to body text, and a look at tractsmoke maintained that careful relationship, structural details like that show up to readers who notice them and the writers here have clearly thought about every level of the piece rather than just the words.
Honestly enjoyed every minute spent here, that is not something I say lightly, and a look at versasandal confirmed I will be back, the bar for spending time online is high for me these days but this site clears it without effort which is high praise indeed from this reader who is usually rather demanding.
Только лучшее здесь: https://yunistroizavod.ru
After reading several posts back to back the consistent voice across them is impressive, and a stop at icabran continued that voice consistency, sites that maintain a single coherent voice across many pieces by potentially many writers represent serious editorial discipline and this one has clearly developed the institutional consistency needed for that.
Honestly impressed by the consistency of voice across what I have read so far, and a quick visit to vortextrance continued that consistent feel, when a site reads like one careful person rather than a committee the experience is more rewarding for the reader who notices these subtle editorial details over time.
Started forming counter examples to test the claims and the post handled most of them implicitly, and a look at jekcar continued that anticipatory style, writers who think two steps ahead of the critical reader save themselves from a lot of follow up work and this writer has clearly internalised that habit consistently.
Decided to read more before commenting and the more I read the more I wanted to say something, and a stop at goaxio pushed that impulse further, when content provokes the urge to participate rather than just consume it is doing something quite specific and worth recognising clearly when it happens during reading.
A piece that did exactly what it promised in the headline without overshooting or underdelivering, and a look at shoretunic continued that calibration, alignment between promise and delivery is a basic editorial virtue that many sites fail at and this site has clearly mastered the matching of expectation and substance throughout pieces.
Pretty impressive article. I just stumbled upon your site and wanted to say that I have really enjoyed reading your opinions. Any way I’ll be coming back and I hope you post again soon.
Reading this prompted a brief but useful conversation with a colleague who happened to walk by, and a stop at learncreategrow extended that conversational seed, content that becomes a starting point for in person discussion rather than ending in solitary reading is content with social generative energy and this site has plenty of it apparently.
Worth saying that the quiet confidence of the writing is what landed first, and a look at smeltstraw continued that quiet quality, confident writing without the loud display of confidence is a rare combination and this site has clearly developed both the knowledge and the editorial restraint to land that combination consistently.
Started thinking about my own writing differently after reading, and a look at nudgelustre continued that reflective effect, content that influences how I work rather than just informing what I know is content with the highest kind of impact and this site has triggered some of that reflective influence today on me.
Полная версия статьи: https://utepliteli-vrn.ru
Worth saying that the quiet confidence of the writing is what landed first, and a look at buildlongtermgrowth continued that quiet quality, confident writing without the loud display of confidence is a rare combination and this site has clearly developed both the knowledge and the editorial restraint to land that combination consistently.
If I am being honest this is the kind of site I quietly hope my own work will someday resemble, and a stop at lyxboss extended that aspirational feeling, finding work that models what I want to produce is part of why I read carefully and this site has been performing that modelling function for me lately consistently.
Working through this site has been a small antidote to the shallow content that fills most of my reading time, and a stop at targetskein extended that antidote function, sites that quietly improve the average quality of my reading by being themselves are sites worth supporting through return visits and recommendations consistently.
Reading this confirmed that my time researching the topic in other places had not been wasted, and a stop at growstrategically extended the confirmation, when independent sources agree that is a useful signal and this site is one of the more reliable sources I have found for cross checking what I read elsewhere on similar subjects.
отследить по номеру [url=http://www.kak-najti-cheloveka-po-nomeru-telefona-2.ru]http://www.kak-najti-cheloveka-po-nomeru-telefona-2.ru[/url]
Nice post.Very useful info specifically the last part 🙂 Thank you and good luck.
Came here from another site and ended up exploring much further than I planned, and a look at irubelt only encouraged more exploration, the kind of place where one click leads to another not through manipulative design but through genuinely interesting content is rare and worth highlighting when found like this somewhere on the open internet.
I came here looking for a quick answer and ended up reading the whole post because it was actually interesting, and after learnandexecute I had a much fuller picture, no stress and no confusion just a clear walk through the topic that made everything fall into place without much effort.
Came in expecting another generic take and got something with actual character instead, and a look at stitchteal carried that personality forward, finding a distinct voice on a saturated topic is impressive and worth pointing out when it happens because most sites end up sounding identical to their nearest competitors quickly.
Compared to the usual results for this kind of search this site stands well above the average, and a quick visit to gorgeheron kept the standard high, you can tell within seconds whether a site is going to waste your time or actually deliver and this one clearly delivers without any false starts.
Reading this in three sittings because the day was fragmented, and the piece survived the fragmentation, and a stop at twisttailor held up under similar reading conditions, content engineered for continuous attention is fragile in modern conditions and this site reads as durable across the realistic ways people consume content today.
онлайн обучение для детей [url=https://shkola-onlajn-52.ru]https://shkola-onlajn-52.ru[/url]
Reading this gave me the rare experience of fully agreeing with all the conclusions, and a stop at jamkix continued that agreement pattern, content that aligns with my existing views without seeming designed to do so is just content that happens to be reasonable and this site reads as reasonable rather than ideological mostly.
Came in expecting another generic take and got something with actual character instead, and a look at solarzip carried that personality forward, finding a distinct voice on a saturated topic is impressive and worth pointing out when it happens because most sites end up sounding identical to their nearest competitors quickly.
Reading this confirmed a hunch I had been carrying about the topic without having articulated it, and a stop at shorevolume extended the confirmation, content that gives shape to fuzzy intuitions is doing the rare work of making private thoughts public and this site is providing that articulating service consistently for me lately.
Honestly this hits the sweet spot between detail and brevity, no rambling and no shortcuts, and a quick visit to skeinsequoia kept that going across the related pages, the kind of place that respects your attention without trying to grab it through cheap tactics or attention seeking design choices that get tired fast.
My friends would appreciate a few of these posts and I will be sending links accordingly, and a look at idaoat added more pages to my share queue, content that earns shares to specific people in specific contexts is content with social utility and this site is generating those targeted shares from me consistently lately.
Reading this triggered a small change in how I think about the topic going forward, and a stop at odepillow reinforced that subtle shift, the rare content that actually moves my thinking rather than just confirming or filling it is the kind I most value and this site is providing that kind of impact today.
врач капельница алкоголь на дом [url=https://vyvod-iz-zapoya-na-domu-sankt-peterburg-20.ru]врач капельница алкоголь на дом[/url]
A piece that did not waste any of its substance on sales or promotion, and a look at slateserif continued that pure content focus, sites that resist the urge to monetise every paragraph are increasingly rare and this one has clearly made the editorial choice to keep the writing clean from commercial intrusion which I value highly.
Decided after reading this that I would check this site weekly going forward, and a stop at vetovarsity reinforced that commitment, deciding to add a site to a regular rotation requires meeting a quality bar that very few places clear and this one cleared it cleanly without any noticeable effort or marketing push behind it.
Coming back to this one, definitely, and a quick visit to nudgelynx only made me more sure of that, the kind of writing that makes you want to set aside time later rather than rushing through it now while distracted by everything else competing for attention on the screen today across so many tabs.
Glad I stumbled across this post, the explanations actually make sense without needing background knowledge to follow along, and after a stop at hugbox the same was true there, no assumptions about the reader just clear writing that anyone can understand from the first line right through to the end.
Time spent here today felt productive in the way that good reading sessions sometimes do, and a stop at gorurn extended that productive feeling across the rest of the morning, the difference between productive reading and merely passing time is real and this site is consistently on the productive side for me lately.
Got pulled in by the headline and stayed because the content actually delivered on the promise, and a stop at salutesyrup kept that trust intact, when a site lives up to its own framing it earns the right to keep showing up in my browser tabs going forward indefinitely from here on out really.
A modest masterpiece in its own quiet way, and a look at taigascenic confirmed the same quiet quality across the rest of the site, calling something a masterpiece is usually overstating but for content this carefully crafted the word feels appropriate even if the writers themselves would probably resist the label honestly.
прокапаться от запоя [url=https://kapelnicza-ot-pokhmelya-nizhnij-novgorod-6.ru]прокапаться от запоя[/url]
Now noticing that the post never raised its voice even when making a strong point, and a look at kindgrooveoutlet continued that calm volume, content that can make important points without resorting to typographic emphasis or emotional appeal is content that trusts its substance to do the work and this site has that confidence consistently.
Now wondering how the writers calibrated the level of detail so well, and a stop at discovermorevalue continued the same calibration, the right level of detail is one of the harder editorial calls in any piece and this site has clearly developed an instinct for it through what I assume is years of careful practice publicly.
1xbet tr giri? [url=www.1xbet-giris-77.com]www.1xbet-giris-77.com[/url]
Speaking honestly this is among the better discoveries of my recent browsing, and a stop at jemido reinforced that discovery quality, the ranking of recent discoveries is informal but meaningful and this site has placed near the top of that ranking based on the consistency of quality across what I have already read carefully.
Now feeling slightly more optimistic about the state of independent writing online, and a stop at nyxsip extended that quiet optimism, sites like this one are the reason I have not given up on the open web entirely and finding them occasionally renews the case for paying attention to non algorithmic content sources today.
вывод из запоя цены [url=https://vyvod-iz-zapoya-na-domu-sankt-peterburg-18.ru]вывод из запоя цены[/url]
Worth recognising that the post did not pretend to be the final word on the topic, and a stop at connectideasworld continued that humility, content that admits its own scope and limits is more trustworthy than content that overreaches and this site has clearly developed the editorial maturity to know what it can and cannot claim well.
A welcome contrast to the loud takes that have dominated my feed lately, and a look at learnandapply extended that calm voice, content that arrives without yelling has become unusual in the modern attention economy and this site is one of the few places I have found that consistently delivers without raising its voice.
Better than the average post on this subject by some distance, and a look at trophysofa reinforced that, you can tell within the first paragraph that the writer here actually cares about the topic rather than just covering it for the sake of having something to publish that week or that day.
Glad I gave this a chance instead of bouncing on the headline, and after tundrastout I was certain I had made the right call, snap judgements based on titles miss a lot of good content and this is a reminder to slow down and check things out before scrolling past in a hurry.
Public policy is key here, and our states need to develop some strategies – – soon.
Now considering carefully how to share this site with the right audience rather than broadcasting widely, and a look at solidtruffle extended that careful sharing impulse, content worth sharing carefully rather than spamming is content that has earned a higher kind of recommendation and this site has earned that careful shareability throughout pieces.
Worth recognising the absence of the usual blog tropes here, and a look at upperspruce continued that fresh quality, sites that avoid the standard moves of the medium read as more original even when the content is on familiar topics and this one has clearly chosen its own path through the conventional terrain skilfully.
Picked this for my morning read because the topic seemed worth the time, and a look at gorgeivy confirmed the choice was right, my morning reading slot is precious and giving it to this site felt like a good investment rather than a waste which is a higher endorsement than I usually offer for content.
обмен usdc на рубли обмен usdt через сбп
Quality work here, the post reads cleanly and the points stay focused throughout, and a stop at voicesash kept the standard high, you can tell the writer cares about the final result rather than just hitting publish for the sake of having something new on the page to feed the search engines.
Now noticing that the post avoided the temptation to be funny in places where humour would have undermined the substance, and a stop at irubrisk maintained the same restraint, knowing when to be serious is a rare editorial virtue and this site has clearly developed it through what I assume is careful editorial practice over years.
Definitely returning here, that is decided, and a look at findnewmomentum only made the case stronger, this is one of those rare websites that rewards regular visits rather than feeling stale after the first read which is something I cannot say about most of the places I bookmark today across all my topics.
Now adding the writer to a small mental list of voices I want to follow, and a look at idebrim reinforced that follow intention, the few writers whose work I actively track are writers who have demonstrated sustained quality and this writer has clearly demonstrated that sustained quality across the pieces I have sampled here today.
Read the extended version: https://blockchainreporter.net/education/introduction-to-moving-averages-essential-strategies-explained/
Reading the writers other posts after this one suggests the quality is consistent rather than peak, and a stop at shadetassel confirmed the consistent quality reading, sites that hold the same level across many pieces rather than peaking on a few are sites with sustainable editorial discipline and this one has clearly developed that.
Reading this confirmed a hunch I had been carrying about the topic without having articulated it, and a stop at gribrew extended the confirmation, content that gives shape to fuzzy intuitions is doing the rare work of making private thoughts public and this site is providing that articulating service consistently for me lately.
Without comparing too aggressively to other sources this one stands out for the right reasons, and a look at steamsaunter continued that distinctive quality, content that distinguishes itself through substance rather than style tricks is content with lasting differentiation and this site has clearly chosen substance based differentiation as its core editorial strategy.
Came across this through a roundabout path and now it is on my regular rotation, and a stop at sealtoga sealed that decision, the open web still produces serendipitous discoveries when you let the citations and references guide you rather than relying purely on algorithmic feeds for new content recommendations always.
Bookmark added without hesitation after finishing, and a look at refinedclickpingcollective confirmed I should bookmark the homepage too rather than just this page, the rare site that earns category level trust rather than just single article approval is the kind I want to rely on across many different topics over time.
Probably this is one of the better quiet successes on the open web at the moment, and a look at findclaritynow reinforced that quiet success quality, sites that are doing well without making a noise about doing well are the sites I most respect and this one has clearly chosen the quiet success path consistently throughout.
Reading this slowly because the writing rewards a slower pace, and a stop at oxaboon did the same, the pace at which I read content is something I now use as a quality signal and writing that earns a slower pace earns my attention as a reader looking for substance these days.
Bookmark earned and folder updated to track this site separately, and a look at stitchtwine confirmed the folder upgrade was the right call, organising my reading list so that good sites do not get lost in a sea of casual bookmarks is something I do more carefully now and this site warranted its own spot.
Going to come back when I have more time to read carefully, the post deserves more than a quick scan, and a stop at superbtundra reinforced that, this is the kind of site that rewards a slower read which is hard to find in this fast paced corner of the internet but really worthwhile.
Honestly informative, the writer covers the ground without showing off, and a look at violavenom reflected the same humility, content that respects the reader rather than trying to dazzle them is something I always appreciate and rarely come across in this corner of the internet today across the topics I usually read.
Probably the kind of site that should be more widely read than it appears to be, and a look at explorecreativefreedom reinforced that quiet wish, the gap between a sites quality and its apparent reach is sometimes large and that gap exists for this site in a way that makes me want to mention it more.
презентация [url=https://litteraesvfu.ru]https://litteraesvfu.ru[/url]
Definitely a recommend from me, anyone curious about the topic should check this out, and a look at jencap adds even more reason for that, the depth and quality combine to make this site one I will be pointing people toward whenever similar conversations come up over the months ahead at work or socially.
Now noticing how rare it is to find a site that does not feel rushed, and a look at sequoiasnare extended that calm pace, content produced without time pressure has a different quality than content shipped to meet a deadline and this site reads as written without urgency which produces a different and better experience for readers.
Genuine pleasure to read, and that is not something I say often after a casual click through, and a quick visit to maplecresttradingcorner kept the same feeling going across the rest of the site, finding writing that actually feels good to spend time with rather than just functional is increasingly rare on the open web.
This one is staying open in a tab for the rest of the day so I can come back and re read certain parts, and a look at jamsyx suggests I will be doing the same with a few more pages here too, this is going to be a deep dive over the coming hours.
Now placing this in the small category of sites whose updates I would actually want to know about, and a stop at oldenmaple confirmed that placement, the difference between sites I want to follow and sites I just consume from is real and this one has crossed into the active follow category from the casual consumption side.
Felt the post handled a sensitive angle of the topic with appropriate care, and a look at startmovingahead extended that careful handling across related material, sites that can navigate delicate territory without causing damage are rare and require a level of judgement that comes from experience rather than from following any clear playbook.
Now thinking about how to apply some of this to a project I have been planning, and a look at hekarc added more material for the planning, content that connects to my actual creative work rather than just being interesting in the abstract is the kind that earns priority placement in my reading rotation consistently going forward.
Just sat with this for a bit longer than I usually would because the points are worth thinking about, and after idequa I had even more to chew on, the kind of post that nudges your thinking forward without forcing the issue is something I have always appreciated in good writing online.
Well structured and easy to read, that combination is rarer than people think, and a stop at goshfrost confirmed the same standard runs across the rest of the site, definitely the kind of place I will be coming back to when this topic comes up in conversation later again over the weeks ahead.
детский костюм зимний [url=detskie-kombinezony-kupit.ru]детский костюм зимний[/url]
Left me wanting to read more rather than feeling burned out, that is a good sign, and a look at skiffvantage confirmed there is plenty more here to explore, the kind of writing that builds appetite rather than killing it which is a rare quality on the modern open internet today across most categories of content.
Now feeling the small relief of finding writing that does not condescend, and a stop at fibdot extended that respect for readers, content that treats its audience as capable adults rather than as people to be managed produces a different reading experience and this site has clearly chosen the respectful approach across all pieces.
A piece that suggested careful editing without showing the marks of the editing, and a look at hugtix continued that invisible polish, the best editing disappears into the prose and this site reads as having been edited with skill that does not announce itself which is the highest compliment I can offer any blog content.
Excellent post, balanced and well organised without showing off, and a stop at trebleupper continued in that same vein, this site has clearly figured out the formula for content that works for readers rather than for search engine ranking signals which is harder than it sounds today and worth real recognition from anyone.
Reading the writers other posts after this one suggests the quality is consistent rather than peak, and a stop at isebrook confirmed the consistent quality reading, sites that hold the same level across many pieces rather than peaking on a few are sites with sustainable editorial discipline and this one has clearly developed that.
Felt the post had been written without using a single buzzword, and a look at gribump continued that clean vocabulary, content free of jargon and trendy phrases reads better and ages better and this site has clearly committed to a vocabulary that will not feel dated in three years which is impressive editorially.
If a friend asked me where to read carefully on the topic I would send them here without hesitation, and a look at findyourinspirationnow confirmed the recommendation strength, the directness of my recommendation reflects how confident I am in the quality and this site has earned undiluted recommendations from me across multiple recent conversations actually.
1xbet mobii [url=1xbet-indir-1.com]1xbet-indir-1.com[/url]
A particular pleasure to read this with a fresh coffee, and a look at connectgrowthrive extended the pleasure across more pages, content that pairs well with quiet morning rituals is something I have come to value highly and this site has the kind of energy that fits naturally into a calm reading routine.
подарки на заказ [url=suvenirnaya-produkcziya-s-logotipom-8.ru]подарки на заказ[/url]
Granted I am giving this site more credit than I usually give new finds, and a look at tracesinger continued earning that credit, the calibration of how much trust to extend after limited exposure is something I do carefully and this site has earned more trust on shorter exposure than most due to consistent quality across.
Glad the writer kept this short rather than padding it out, the points stand on their own without needing extra context, and a look at pyxedge kept the same approach going, brevity is a sign of confidence in the substance and the team here clearly trusts their content to land without filler.
Reading this prompted me to dig into a related topic later, and a stop at cobqix provided some of the starting points for that follow up reading, content that triggers further exploration rather than satisfying curiosity completely is content with real generative energy and this site has plenty of that energy throughout it.
A clean read with no irritations, and a look at intentionalclickpingexperience continued that frictionless quality, the absence of small irritations is something I notice only when present elsewhere and this site is one of the rare places where everything just works and lets me focus on the substance rather than fighting the format.
The way the post stayed on topic throughout without going on tangents was really refreshing, and a look at vinylvessel kept that focused approach going, discipline like this in writing is rare and worth recognising because most writers cannot resist wandering off into related subjects that dilute their main point and confuse readers along the way.
Got pulled in by the headline and stayed because the content actually delivered on the promise, and a stop at explorefreshthinking kept that trust intact, when a site lives up to its own framing it earns the right to keep showing up in my browser tabs going forward indefinitely from here on out really.
If the topic interests you at all this is a place to spend time, and a look at tildeserene reinforced that recommendation, the broader question of where to invest topical reading time is one this site answers convincingly through the consistent quality across multiple pieces I have sampled during the current reading session today.
Most of the time I bounce off similar pages within seconds, and a stop at trumpetsash held me longer than I would have predicted, the ability to convert a likely bouncing visitor into an engaged reader is a quality signal and this site has demonstrated that conversion ability across multiple visits where I expected to bounce.
Really nice to see things explained without overcomplicating the topic, the words flow naturally and stay easy to follow, and a short visit to findyournextmove only added to that experience because the same simple approach is used across the rest of the page too without any change in tone.
Genuine reaction is that this site clicked with how I like to read, and a look at oldenneon kept that comfortable fit going, sometimes you find a place online whose editorial decisions just align with your preferences and when that happens it is worth recognising and supporting through repeat engagement consistently going forward.
Recommended to anyone working in or curious about this area, the depth and clarity combine well, and a look at learnandoptimize keeps that going across more pages, the kind of site that earns regular visits rather than chasing trends has my respect because it suggests genuine commitment to the topic itself rather than to chasing trends.
Today’s Top Stories: https://blockchainreporter.net/price-prediction/tezos/
Better than most of the writing I have come across on this topic recently, simpler and more direct, and a look at discoverpowerfulideas continued in that same way, a real outlier in a crowded space full of repetitive content that says little while taking up a lot of reader time today which is unfortunate.
Even on a quick first read the substance of the post comes through, and a look at twinetyphoon reinforced that immediate quality, content that does not require a slow careful read to demonstrate value but rewards one anyway is content with real depth and this site has produced work of that demanding depth class.
капельница от запоя недорого [url=https://kapelnicza-ot-pokhmelya-samara-38.ru]https://kapelnicza-ot-pokhmelya-samara-38.ru[/url]
Reading this with a notebook open turned out to be the right move, and a stop at tallyvertex added more material to the notes, content that justifies active note taking from a passive reader is content with real informational density and this site is producing notes worthy material at a high rate consistently.
Started this morning and finished at lunch with a small sense of having spent the time well, and a look at unionstaff extended that satisfaction into the afternoon, content that fits naturally into the rhythm of a working day rather than demanding a dedicated reading block is increasingly the kind I prefer.
вывод из запоя на дому самара цены [url=https://kapelnicza-ot-pokhmelya-samara-39.ru]https://kapelnicza-ot-pokhmelya-samara-39.ru[/url]
Now sitting with the thoughts the post triggered rather than rushing on to the next thing, and a stop at honeymeadowmarketgallery extended that reflective pause, content that earns time for thought after closing the tab is content of higher value than the merely interesting and this site has clearly produced that lasting effect today.
Closed my email tab so I could read this without interruption, and a stop at swiftvantage earned the same protected attention, when content is good enough to defend against the usual digital distractions you know it deserves better than the half attention most online reading gets in a typical busy day.
Now realising the post has been quietly doing important work in my mind for the past hour, and a stop at jeqblot extended that quiet processing, content that continues to do work after I close the tab is content with afterlife in the mind and this site is producing those long lived effects at a meaningful rate.
Found the use of subheadings really helpful for scanning back through the post later, and a stop at grobuff kept that reader friendly approach going, navigation is something many blog writers ignore but small structural choices make a noticeable difference for someone returning to find a specific point again days or weeks later.
Thanks for laying this out in a way that someone newer to the topic can follow, and a stop at grebeflame kept that accessibility going, writing that meets readers at different experience levels without condescending is hard to do well and the writers here have clearly thought about who they are writing for.
Now appreciating that the post did not require external context to follow, and a look at flonox maintained the same self contained quality, content that respects new visitors by being readable without prerequisites is content with broader accessibility and this site has clearly invested in keeping each piece reader friendly for fresh arrivals.
Recommend this to anyone who values clear thinking over flashy presentation, and a stop at isebulb continued in the same understated way, this site has its priorities in the right place which makes it worth supporting through repeat visits and recommendations rather than just one passing read today before moving on quickly elsewhere.
прокапаться от алкоголя на дому [url=https://kapelnicza-ot-pokhmelya-samara-40.ru]прокапаться от алкоголя на дому[/url]
Reading this on a phone at a coffee shop and finding it perfectly suited to that context, and a stop at learncontinuously continued the comfortable mobile experience, content that works across reading conditions without compromising on substance is increasingly important and this site has clearly thought about the whole reader experience here.
Reading this on the train into work was a better use of the commute than my usual choices, and a stop at syxblue extended that commute reading well, content that improves transit time rather than just filling it is content with practical benefit and this site has earned its place in my morning commute reading rotation.
Came across this and immediately thought of a friend who would enjoy it, and a stop at thatchteapot also reminded me of someone, content that triggers the urge to share is content that has earned my recommendation and this site has earned multiple from me already across different conversations during the week.
Now appreciating the small but real way this post improved my afternoon, and a stop at corlex extended that small improvement effect, content that produces measurable positive impact on the texture of a reading day is content with real value and this site is producing those small positive impacts at a sustainable rate apparently.
Now adding this to a list of sites I want to see flourish, and a stop at stridertorch reinforced that wish, the few sites I actively root for are sites that produce the kind of work I want more of in the world and this one has joined that small list based on what I have read so far.
Found this through a friend who recommended it and now I see why, and a look at discoverlimitlessideas only strengthened that recommendation in my own mind, word of mouth still works for content that actually delivers and this site is clearly earning recommendations the old fashioned way through quality rather than marketing.
A piece that did exactly what it promised in the headline without overshooting or underdelivering, and a look at discovernewpossibilities continued that calibration, alignment between promise and delivery is a basic editorial virtue that many sites fail at and this site has clearly mastered the matching of expectation and substance throughout pieces.
Thank you for the genuine effort here, it shows in every paragraph and not just the headline, and after my visit to japarrow I was sure this site cares about getting things right rather than chasing clicks, which is the main reason I will come back later this week to read more.
Just want to say thank you for putting this together, posts like these make searching online actually worth it sometimes, and a quick look at hekblade kept that going, useful and easy to read without any of the tricks that ruin most blog comment sections lately on the wider open web.
Now adjusting my expectations upward for the topic based on this post, and a stop at onionoval continued that bar raising effect, content that resets what I think is possible on a subject is doing real work in shaping my standards and this site is providing those bar raising experiences at a notable rate during sessions.
High quality writing, no marketing speak and no buzzwords that mean nothing, and a stop at buildmeaningfulprogress kept that going, simple direct content that actually communicates something is harder to find than it should be and this is one of the rare places that gets it right consistently across many different posts.
If I am being honest this is the kind of site I quietly hope my own work will someday resemble, and a stop at discoverandgrow extended that aspirational feeling, finding work that models what I want to produce is part of why I read carefully and this site has been performing that modelling function for me lately consistently.
Following a few of the internal links revealed more posts of similar quality, and a stop at turbansample added more to that growing pile, sites where internal links lead to more good content rather than to more of the same recycled material are sites with depth and this one has clearly built that depth carefully.
Reading this on the train into work was a better use of the commute than my usual choices, and a stop at globalqualitystore extended that commute reading well, content that improves transit time rather than just filling it is content with practical benefit and this site has earned its place in my morning commute reading rotation.
Worth saying that the quiet confidence of the writing is what landed first, and a look at huijax continued that quiet quality, confident writing without the loud display of confidence is a rare combination and this site has clearly developed both the knowledge and the editorial restraint to land that combination consistently.
Looking at this objectively the editorial quality is hard to deny even setting aside personal taste, and a stop at shoreviper maintained the same objective quality, the gap between what I personally enjoy and what is objectively well crafted exists and this site clears both bars simultaneously which is rarer than it sounds.
Quality work here, the post reads cleanly and the points stay focused throughout, and a stop at scopeviceroy kept the standard high, you can tell the writer cares about the final result rather than just hitting publish for the sake of having something new on the page to feed the search engines.
Liked the way the post handled the final paragraph, no neat bow but no abrupt cutoff either, and a stop at grohax continued that thoughtful ending pattern, endings are hard and most blog writers either over engineer them or skip them entirely and this site has clearly figured out a sustainable middle approach.
Genuine pleasure to read, and that is not something I say often after a casual click through, and a quick visit to buildsuccessmindset kept the same feeling going across the rest of the site, finding writing that actually feels good to spend time with rather than just functional is increasingly rare on the open web.
My time on this site has now extended past what I had budgeted, and a stop at sambavarsity keeps extending it further, content that overstays its budget in my schedule is content that has earned the extra time and this site has been earning extra time across multiple visits to the point where my schedule needs adjustment.
Found something quietly useful here that I expect to return to, and a stop at swiftswallow added more of the same, content with quiet utility ages well in a way that flashy hot takes do not and I have learned to weight quiet utility much higher when deciding what to bookmark for later use.
Nice to see a post that does not try to overcomplicate the basics for the sake of looking smart, and once I looked at towershimmer the same direct tone was there too, which honestly makes a difference when you are short on time and want answers without long pointless intros.
Started smiling at one paragraph because the writing was just nice, and a look at jeqblue produced a couple more such moments, prose that produces small spontaneous reactions in the reader is doing more than just transferring information and the writers here are clearly hitting that level fairly consistently throughout pieces.
A piece that respected the reader by not over explaining the obvious, and a look at itobout continued that calibrated approach, finding the right level of explanation is one of the harder editorial calls and this site has clearly thought carefully about what readers will already know versus what they need help with consistently.
The tone stayed consistent across the whole post which is harder than it looks for longer pieces, and a look at syxbolt continued the same voice, this kind of editorial consistency is a sign of either a single careful writer or a tightly run team and either is impressive today across the broader media environment.
Thanks for putting in the work to make this approachable, plenty of sites cover the same ground but most do it badly, and a quick visit to learnbyexperience confirmed this one stands apart, simple language and useful examples without anyone trying to sell me anything along the way which I really appreciated.
Recommended to anyone working in or curious about this area, the depth and clarity combine well, and a look at sloganturban keeps that going across more pages, the kind of site that earns regular visits rather than chasing trends has my respect because it suggests genuine commitment to the topic itself rather than to chasing trends.
Found the use of subheadings really helpful for scanning back through the post later, and a stop at crearena kept that reader friendly approach going, navigation is something many blog writers ignore but small structural choices make a noticeable difference for someone returning to find a specific point again days or weeks later.
Well done, the kind of post that makes you slow down and actually read instead of skimming for keywords, and a look at operalucid kept me reading carefully too, that is a sign of writing that has been crafted rather than churned out for an algorithm to see today and tomorrow.
Found the use of subheadings really helpful for scanning back through the post later, and a stop at findpurposequickly kept that reader friendly approach going, navigation is something many blog writers ignore but small structural choices make a noticeable difference for someone returning to find a specific point again days or weeks later.
Now leaving a small mental note to recommend this when the topic comes up in conversation, and a look at createprogresspath extended that recommend ready feeling, content that arms me with shareable references for likely future conversations is content with social value and this site is providing that conversational ammunition consistently for me lately.
Now realising the topic deserved better treatment than it has been getting elsewhere, and a look at serifsorbet extended that broader recognition, content that exposes the gap between actual quality and average quality elsewhere is doing the quiet work of raising standards and this site is contributing to that elevation in its own corner.
Useful reading material, the kind I can hand off to someone newer to the topic without worrying about confusing them, and a quick look at startbuildingnow confirmed the same beginner friendly tone runs throughout the site which is great for sharing with people just starting their learning journey on this particular topic.
Now noticing the careful balance the post struck between confidence and humility, and a stop at vincatrench maintained the same balance, finding the line between asserting and admitting is hard and this site has clearly developed the calibration to walk that line consistently which produces a more persuasive reading experience for me.
Loved the writing voice here, friendly without being fake and confident without being arrogant, and a stop at gunbolt carried the same tone forward, the kind of personality that makes a reader feel welcome rather than lectured at which is a balance plenty of writers struggle to find no matter how long they have been at it.
Liked the way the post balanced confidence and humility, and a stop at modernlifestyleplatform maintained the same balance, knowing when to assert and when to acknowledge uncertainty is a sign of mature thinking and the writers here have clearly developed that calibration through what I assume is years of careful work on their craft.
Все самое свежее здесь: https://remontokonufa.ru
The headings made navigating the post simple even when I needed to find a specific section quickly, and a look at sheentrundle continued the same thoughtful structure, small details like clear headings show that someone is actually thinking about how the reader uses the page rather than just filling it for length alone.
A piece that read as the work of someone who reads carefully themselves, and a look at unicorntiger continued that informed feel, writers who are also serious readers produce work with a different quality and this site reads as the product of someone steeped in good writing rather than just generating content for an audience.
Reading the writers other posts after this one suggests the quality is consistent rather than peak, and a stop at explorefuturepaths confirmed the consistent quality reading, sites that hold the same level across many pieces rather than peaking on a few are sites with sustainable editorial discipline and this one has clearly developed that.
Most of my reading time goes to a small number of trusted sources and this one is now joining that group, and a stop at orbitnomad reinforced the group membership, the few sites that earn a place in my regular rotation are sites I expect ongoing returns from and this one has earned that elevated position consistently.
Now noticing the post fit a particular gap in my reading without my having articulated the gap before, and a look at vyxarc extended that gap filling effect, content that meets needs I had not consciously formulated is content with reader insight and this site has clearly developed that anticipatory editorial sense across many pieces.
If I were grading sites on this topic this one would receive high marks, and a stop at jararch continued earning those high marks, the informal grading I do mentally for content sources is something I take seriously even though it is informal and this site has been receiving consistent high marks across multiple sessions today.
Glad to have another data point on a question I am still thinking through, and a look at hekfox added two more, content that acknowledges its place in a wider conversation rather than pretending to settle the question alone is intellectually honest in a way that I wish was more common across the open web.
Reading this in the time it took to drink half a cup of coffee, and a stop at crecall fit naturally into the second half, content that respects the rhythms of a typical morning is content with practical fit and this site has the kind of length and pacing that works for the way I actually read.
If patience for careful reading is rare these days finding sites that reward it is rarer still, and a stop at itucox extended that rare reward, the diminishing returns on shallow content reading have made me more selective about where to spend reading time and this site is meeting the higher selectivity bar consistently.
Picked a single sentence from this post to remember, and a look at discoverideasworthsharing gave me another to keep, content that produces memorable lines is doing more than just transferring information and the small selection of sentences I keep from each reading session is one of the actual returns I get from reading carefully.
Glad to find a site whose links lead somewhere worth going rather than back to itself for SEO juice, and a stop at jesaria kept that generous outbound feel, citing other peoples work with real respect rather than just for ranking signals is a sign of an honest operation worth supporting going forward.
escalade rental near me [url=https://luxury-car-rental-miami-1.com]https://luxury-car-rental-miami-1.com[/url]
Worth flagging this post as worth a careful read rather than a casual skim, and a stop at stitchvamp earned the same careful approach, the few sites that warrant slower reading are sites I now treat differently from the daily content stream and this one has clearly moved into that elevated treatment category.
Came here from another site and ended up exploring much further than I planned, and a look at findmomentumnow only encouraged more exploration, the kind of place where one click leads to another not through manipulative design but through genuinely interesting content is rare and worth highlighting when found like this somewhere on the open internet.
Skipped lunch to finish reading, which says something, and a stop at huiyam kept me at my desk longer than planned, when content beats the lunch impulse the writer has done something genuinely impressive in an attention environment full of immediately satisfying alternatives competing for the same finite block of reader time.
During a reading session that included several other sources this one stood out, and a look at findyourdirectiontoday continued the standout quality, the side by side comparison of sources during research is a useful exercise and this site has been winning those comparisons for me consistently across multiple research sessions during the last week.
Just nice to read something that does not feel like it was assembled from a content brief, and a stop at tailorteal kept that handcrafted feel going, you can tell when a real human with real understanding is behind the words versus a templated piece churned out for an algorithm to find.
Nice to see a post that does not try to overcomplicate the basics for the sake of looking smart, and once I looked at snareshale the same direct tone was there too, which honestly makes a difference when you are short on time and want answers without long pointless intros.
Reading this triggered a small change in how I think about the topic going forward, and a stop at gunlex reinforced that subtle shift, the rare content that actually moves my thinking rather than just confirming or filling it is the kind I most value and this site is providing that kind of impact today.
khelo 24 bet monopoly big baller live result [url=www.monopoly-live-score.com]khelo 24 bet monopoly big baller live result[/url] .
Now appreciating that the post did not require me to agree with the writer to find it valuable, and a look at sundaestudio maintained the same useful regardless of agreement quality, content that informs even when it does not convince is content with broader utility and this site reads as useful even when I disagree.
I came here looking for a quick answer and ended up reading the whole post because it was actually interesting, and after learnwithpurpose I had a much fuller picture, no stress and no confusion just a clear walk through the topic that made everything fall into place without much effort.
Honestly thank you to whoever wrote this because it scratched an itch I had not quite been able to articulate, and a stop at buildscalableideas kept that satisfying feeling going, the kind of writing that meets unspoken needs is special and this site clearly has writers who understand their readers more than most do today.
Considered alongside other sources I have been reading this one consistently rises to the top, and a stop at scopevoice maintained that top ranking, the informal ongoing comparison between sources is something I do whenever reading on a topic and this site keeps coming out near the top of those comparisons over many sessions.
комбинезон на лямках [url=http://www.detskie-kombinezony-kupit.ru]комбинезон на лямках[/url]
This one is staying open in a tab for the rest of the day so I can come back and re read certain parts, and a look at curatedqualityhub suggests I will be doing the same with a few more pages here too, this is going to be a deep dive over the coming hours.
где можно купить в москве мебельную ткань [url=https://tkan-dlya-mebeli.ru]где можно купить в москве мебельную ткань[/url]
Really appreciate that the writer did not assume I would read every other related post first, and a look at orchidlatte kept that self contained feel going where each piece can stand alone, accessibility for new readers is a sign of generous editorial thinking and this site has clearly invested in that approach.
срочная наркологическая помощь на дому [url=https://narkolog-na-dom-moskva-27.ru]срочная наркологическая помощь на дому[/url]
Will be sharing this with a couple of people who care about the topic, and a stop at salutevandal added more material worth passing along, the kind of site that is generous with quality content and does not make you jump through hoops to access it which is appreciated more than the team probably realises.
узаконить перепланировку москва [url=https://www.pereplanirovka-kvartir19.ru]узаконить перепланировку москва[/url]
Worth bookmarking and sharing with anyone interested in the topic, that is my honest take, and a stop at abobrim reinforces that, the kind of generous resource that makes the open web feel worth defending against the constant pressure to retreat into walled gardens and curated feeds today everywhere I look across all my devices.
A satisfying piece in the way that good meals are satisfying rather than just filling, and a look at cricap extended that satisfaction, the metaphor between content and meals is one I find useful and this site reads as a satisfying meal rather than the empty calories that most content provides for casual readers.
Honestly this was a good read, no jargon and no padding, and a short look at vyxbrisk kept that same feel going which I really appreciated, the writer clearly knows the topic well enough to explain it without hiding behind big words or filler that often gets used to seem clever.
https://mains.ru/ mains
Now adding this site to a small mental group of recommendations I keep ready for specific kinds of inquiries, and a stop at findyourgrowthzone extended the recommendation readiness, content that I can confidently point friends and colleagues toward in specific contexts is content with real social utility and this site has that utility clearly.
Refreshing to read something where the words actually mean something instead of filling space, and a stop at ivafix kept that going, the writing here trusts the reader to follow along without endless repetition or constant reminders of what was already said earlier in the post which I appreciate.
Felt slightly impressed without being able to point to one specific reason, and a look at explorefreshideas continued that diffuse positive feeling, when content works at a level you cannot easily articulate the writer is doing something with craft rather than just delivering information and that is something I have learned to recognise.
Took my time with this rather than rushing because the writing rewards attention, and after gyrarena I had even more to absorb, the kind of content that pays back the patient reader rather than punishing them with empty filler is something I look for and rarely find in regular searches lately.
Closed it feeling I had taken something away rather than just consumed something, and a stop at siskastencil extended that taking away feeling, the difference between content I extract value from and content I just pass through is something I track informally and this site is consistently in the value extraction column for me.
Picked up a couple of new ideas here that I can actually try out, and after my visit to discoverwhatmatters I have even more notes saved, this is the kind of resource that pays you back for the time you spend on it which is rare to come across in this corner of the web.
The post made the topic feel approachable without making it feel trivial, that is a fine balance, and a stop at jevmox maintained the same balance, finding the middle ground between welcoming and serious is genuinely difficult and the writers here have clearly figured out how to consistently hit it well across many different posts.
Reading this on a long flight and finding it the best thing I read across hours of trying, and a stop at siskatrance kept the streak going, when content beats long flight reading you know it has substance because flight reading is a hard test of a piece given the alternatives available everywhere.
However selective I am about new bookmarks this one made it past my filter, and a look at skeintackle confirmed the bookmark was worth the slot, the precious slots in my permanent bookmark folder are difficult to earn and this site earned one without making me think twice about whether the slot was justified by the quality.
Reading this in segments because the day was busy, and the post survived the fragmented attention well, and a stop at shadetabby held up similarly under interrupted reading, content that can withstand modern distracted reading patterns rather than requiring a perfect block of focused time is increasingly the kind I prefer.
Looking for similar voices elsewhere has come up empty in my recent searches, and a stop at sandaltimber extended the search frustration, the rare site that does what no other does in quite the same way is precious and this one has clearly developed a particular approach that I have not been able to find duplicates of.
Liked that the post landed without needing to manufacture controversy or take a contrarian stance for attention, and a stop at hesyam continued that grounded approach, content that earns attention through quality rather than provocation is the kind that builds long term trust rather than burning it on quick wins.
Thanks for keeping things clear and to the point, that is honestly hard to find online these days, and after reading through ospreypiano the message stayed consistent which makes me trust the information being shared more than I usually do on similar pages that cover this same kind of topic.
Now leaving a small mental note to recommend this when the topic comes up in conversation, and a look at learnandadvance extended that recommend ready feeling, content that arms me with shareable references for likely future conversations is content with social value and this site is providing that conversational ammunition consistently for me lately.
Honest take is that this was better than I expected when I clicked through, and a look at vincavessel reinforced that, the bar for online content has dropped so much that finding something thoughtful and well constructed feels almost noteworthy now which says more about the average than about this site itself.
Skipped past the first paragraph thinking it was setup and had to come back when the rest referenced it, and a stop at buildsolidmomentum similarly rewarded careful reading from the start, content where every paragraph carries weight is content I now know to read from the beginning rather than skipping ahead.
Now placing this in the small category of sites whose updates I would actually want to know about, and a stop at jarbrag confirmed that placement, the difference between sites I want to follow and sites I just consume from is real and this one has crossed into the active follow category from the casual consumption side.
If quality blog writing is dying as people sometimes claim then this site is one piece of evidence that it has not died yet, and a look at learnandadvance extended that evidence, the broader cultural question about online writing has empirical answers in specific sites and this one is contributing to a more optimistic answer overall.
Easy to recommend without reservations, the site delivers on every promise it implicitly makes, and a look at findyouruniqueedge kept that same standard going, the kind of consistency that earns trust over time rather than chasing it through aggressive marketing is what I see here and it is appreciated greatly by this particular reader today.
Now noticing the careful balance the post struck between confidence and humility, and a stop at createactionableplans maintained the same balance, finding the line between asserting and admitting is hard and this site has clearly developed the calibration to walk that line consistently which produces a more persuasive reading experience for me.
Reading this gave me material for a conversation I needed to have anyway, and a stop at modernlifestylemarketplace added even more talking points, content that connects to upcoming social or professional needs rather than just being interesting in the abstract is the kind that earns priority placement in my attention these days routinely.
Worth flagging that the writing rewarded a second read more than I expected, and a look at humbust produced the same second read benefit, content with hidden depths that emerge only on careful rereading is rare in the modern blog space and this site has clearly invested in that level of compositional density throughout.
капельница на дому сколько стоит [url=https://kapelnicza-ot-pokhmelya-samara-40.ru]https://kapelnicza-ot-pokhmelya-samara-40.ru[/url]
Quiet confidence runs through the whole post, no need to shout to make the points stick, and a stop at cyljax carried that same restrained voice forward, content that respects the reader by trusting its own substance rather than dressing it up in theatrical language is what I look for online and rarely actually find these days.
сколько стоит поставить капельницу в самаре [url=https://kapelnicza-ot-pokhmelya-samara-38.ru]https://kapelnicza-ot-pokhmelya-samara-38.ru[/url]
поставить капельницу от запоя на дому цена [url=https://kapelnicza-ot-pokhmelya-samara-39.ru]поставить капельницу от запоя на дому цена[/url]
Worth recognising that this site does not chase the daily news cycle, and a stop at vyxbyte confirmed the longer publication arc, sites that resist the pressure to comment on every passing event are sites with genuine editorial discipline and this one has clearly chosen depth over volume which I respect deeply.
Genuinely useful read, the points are practical and easy to apply right away, and a quick look at createyourpathforward confirmed that this site is consistent in that approach, looking forward to digging through the rest of it when I get the chance to sit down properly later in the week or this weekend.
Bookmark earned and the bookmark feels like a permanent addition rather than a maybe, and a look at exploreyourstrengths confirmed that permanent status, the difference between durable bookmarks and ephemeral ones is something I have learned to feel quickly and this site triggered the durable feeling almost immediately during my first read here.
Liked the way the post balanced confidence and humility, and a stop at aroarch maintained the same balance, knowing when to assert and when to acknowledge uncertainty is a sign of mature thinking and the writers here have clearly developed that calibration through what I assume is years of careful work on their craft.
Worth recognising that the post handled a familiar topic without reaching for any of the obvious hot takes, and a stop at haccar continued that fresh treatment, sites that find new angles on subjects others have exhausted are sites worth following carefully and this one has clearly developed that exploratory instinct through patient practice.
Decided to read this site for a while before forming a verdict, and the verdict after several pages is positive, and a stop at startpurposefully continued that pattern, judging a site requires more than one post and giving sites a fair sample is something I try to do for promising candidates rather than rushing to dismiss.
Now I want to find more sites like this but I suspect they are rare, and a look at ivebump extended that thought, the few sites that meet this quality bar are precious specifically because they are rare and finding others like them is one of the ongoing projects of careful internet curation across the years.
Came away with some new perspectives I had not considered before, and after tulipteacup those ideas felt more complete, the kind of content that stays with you a little while after reading rather than slipping out the moment you switch tabs and move on with your day to whatever comes next.
Worth recommending broadly to anyone who reads on the topic, and a look at jewbush only confirms that, the rare combination of accessibility and depth in this site makes it suitable for both newcomers and people who already know the area which is hard to pull off in any blog format today and rarely managed.
Probably the best thing I have read on this topic in the past month, and a stop at scrollswamp extended that ranking, the casual ranking of recent reading is informal but real and this site has been winning those rankings for me on this topic specifically over the last several weeks of regular reading sessions.
The conclusions felt earned rather than tacked on at the end like an afterthought, and a look at idofix kept that careful structure going, you can tell when a writer has thought about the shape of their post versus just letting it ramble out and hoping for the best at the end which most do.
Thanks for the practical examples scattered through the post rather than abstract theory only, and a look at sorbettower continued that grounded style, abstract points are easier to remember when paired with concrete situations and the writers here clearly understand how readers actually retain information from blog content reading sessions.
Thanks for not padding this with the usual filler intros and outros that every other blog seems to require, and a quick visit to growwithconfidenceclearly continued that lean approach across more posts, content stripped of waste is content that respects you and I will always come back to that kind of approach.
Closed it feeling slightly more competent in the topic than I started, and a stop at explorefreshperspectives reinforced that competence boost, real learning is rare in casual online reading but it does happen sometimes and this site managed to make it happen for me today which is genuinely worth pausing to acknowledge.
Quietly enthusiastic about this site after the past few hours of reading, and a stop at sherpaslick extended that enthusiasm, the calibration of enthusiasm to evidence is something I try to maintain and this site has earned a calibrated quiet enthusiasm rather than the loud excitement that usually fades within a day or two of finding something.
Now noticing that the post benefited from being neither too short nor too long for its content, and a look at findgrowthopportunities continued that calibration of length, sites that match length to content rather than padding to hit some target are sites that respect both their material and their readers and this site does both.
Reading this prompted me to send the link to two different people for two different reasons, and a stop at createconsistentmomentum provided ammunition for a third share, content that suits multiple audiences without being generic enough to be useless to any of them is genuinely valuable and this site has that multi audience quality clearly.
Felt no urge to argue with the conclusions even though I started the post slightly skeptical, and a look at solacesteam maintained that pattern, writing that earns agreement through clarity of argument rather than rhetorical pressure is the kind I find most persuasive and the kind I want to read more of these days.
Solid endorsement from me, the writing earns it, and a look at buildclearobjectives continues to earn it across the broader site too, the kind of operation that maintains quality across many pages rather than just one viral post is a sign of serious commitment and that is what I see here clearly across what I read.
A piece that was confident enough to leave some questions open rather than forcing closure, and a look at vyxcar continued that intellectual honesty, content that admits the limits of its scope is more trustworthy than content that pretends to total understanding and this site has the right calibration on certainty consistently.
A clean piece that knew exactly what it wanted to say and said it, and a look at cynbeo maintained the same clarity of intention, knowing the goal of a piece before writing is something most blog content lacks and the clarity of purpose here shows up in every paragraph for any careful reader to notice.
Decided this was the kind of site I would defend in a discussion about good blog content, and a stop at haclex reinforced that, very few sites earn active defence rather than passive consumption and this one has clearly crossed that threshold for me without needing any explicit pitch from the writers themselves either.
Liked the way the post balanced confidence and humility, and a stop at explorebetteroptions maintained the same balance, knowing when to assert and when to acknowledge uncertainty is a sign of mature thinking and the writers here have clearly developed that calibration through what I assume is years of careful work on their craft.
Now thinking about how to apply some of this to a project I have been planning, and a look at steamsurge added more material for the planning, content that connects to my actual creative work rather than just being interesting in the abstract is the kind that earns priority placement in my reading rotation consistently going forward.
Did not expect much when I clicked through but ended up reading the whole thing carefully, and a stop at voicevinyl kept that engagement going, sometimes the unassuming sites turn out to deliver more than the flashy ones which is something I have learned to look out for over time online lately and across topics.
Clean writing, easy to read, and never tries too hard to impress, that combination is harder to find than people think, and after my time on tracetroop I am sure this site treats its readers well, no flashy tricks just useful content done right which is honestly all I want online.
Liked the way the post balanced confidence and humility, and a stop at discoverbetterchoices maintained the same balance, knowing when to assert and when to acknowledge uncertainty is a sign of mature thinking and the writers here have clearly developed that calibration through what I assume is years of careful work on their craft.
Picked up on several small touches that suggest a careful editor, and a look at learnandadapt suggested the same hand at work across the broader site, editorial consistency at a granular level is one of the strongest signs that an operation is serious rather than just hobbyist and this site reads as serious throughout.
Glad the writer did not feel compelled to cover every possible angle of the topic, focus is a virtue, and a stop at jibion reflected the same disciplined scope, knowing what to leave out is half of what makes good writing good and this post has clearly been edited with that principle in mind.
Reading this prompted me to subscribe to my first newsletter in months, and a stop at arobell confirmed the subscribe was the right call, content that earns a newsletter signup is content that has cleared a higher trust bar than a casual visit and this site has clearly earned that level of commitment from me.
Liked the careful selection of which details to include and which to skip, and a stop at startclearthinking reflected the same editorial judgement, knowing what to leave out is just as important as knowing what to include and this site has clearly figured out where that line sits for the topics it covers regularly.
A piece that reads as if the writer trusted readers to fill in obvious gaps, and a look at thrashurge continued that respectful approach, content that does not over explain what the reader can infer is content that respects intelligence and this site has clearly chosen to write to capable readers rather than to the lowest common denominator.
Reading this prompted a small note in my reference file, and a stop at idozix prompted another, the rare site that contributes useful nuggets to my own working knowledge rather than just consuming my attention is worth the time investment many times over compared to the usual pile of forgettable scroll content.
A piece that suggested careful editing without showing the marks of the editing, and a look at ozoneosprey continued that invisible polish, the best editing disappears into the prose and this site reads as having been edited with skill that does not announce itself which is the highest compliment I can offer any blog content.
Easily one of the better explanations I have read on the topic, and a stop at javcab pushed it even higher in my mental ranking of useful resources, the kind of site that beats the average not by trying harder but by simply caring more about what it puts out daily which always shows.
Now appreciating that the post did not require external context to follow, and a look at discovernewdirectionsnow maintained the same self contained quality, content that respects new visitors by being readable without prerequisites is content with broader accessibility and this site has clearly invested in keeping each piece reader friendly for fresh arrivals.
Solid post, the structure is easy to follow and the language stays simple even when the topic gets a bit more involved, and a look at ixaqua kept that same standard going, so I left feeling like the time spent here was actually worth something for once which is rare lately.
Started believing the writer knew the topic deeply by about the second paragraph, and a look at topaztower reinforced that confidence, the speed at which a writer establishes credibility through their writing is a useful quality signal and this writer establishes it quickly and quietly without resorting to credential dropping or self promotion.
The way the post stayed on topic throughout without going on tangents was really refreshing, and a look at findyourwinningedge kept that focused approach going, discipline like this in writing is rare and worth recognising because most writers cannot resist wandering off into related subjects that dilute their main point and confuse readers along the way.
Skipped to a specific section because I knew that was the question I had, and the answer was clean, and a stop at hewblob similarly delivered targeted answers without burying them, content engineered for readers who arrive with specific needs rather than open ended browsing is increasingly valuable in a search heavy reading environment.
On reflection this is the kind of writing that improves my taste for what is possible in the format, and a look at learnbypracticenow continued raising that bar, content that elevates my expectations rather than lowering them is doing important work in calibrating my standards and this site is participating in that elevation reliably.
Probably one of the more reliable sources I have found for this kind of careful coverage, and a look at humcamp reinforced the reliability, the small group of sources I would describe as reliable for a given topic is curated carefully and this site has earned a place in that small group through consistent performance.
realcar [url=www.luxury-car-rental-miami-1.com]realcar[/url]
Learned something from this without having to dig through layers of fluff, and a stop at findyourwinningedge added a bit more context that helped tie things together for me, definitely a useful corner of the internet for anyone who wants real information without the usual marketing nonsense around it that often ruins similar pages.
Thanks for putting in the work to make this approachable, plenty of sites cover the same ground but most do it badly, and a quick visit to explorefuturethinking confirmed this one stands apart, simple language and useful examples without anyone trying to sell me anything along the way which I really appreciated.
Picked up several practical tips that I plan to try out this week, and a look at buildclearobjectives added a few more I will be testing alongside, content with practical hooks that connect to my actual life is the kind that earns my repeat attention rather than the merely interesting that I forget within a day.
Most of the time I bounce off similar pages within seconds, and a stop at wyxburn held me longer than I would have predicted, the ability to convert a likely bouncing visitor into an engaged reader is a quality signal and this site has demonstrated that conversion ability across multiple visits where I expected to bounce.
Really appreciate this kind of writing, no shouting and no clickbait headlines just steady useful content, and a quick look at dahbrood kept that going, definitely a site I will be returning to whenever I need a sensible take on similar topics in the days ahead and also during slower work weeks.
Even just sampling a few posts the consistency is what stands out, and a look at createforwardmovement confirmed the broader pattern, sites where every piece I sample lives up to the standard set by the others are sites with serious quality control and this one has clearly invested in whatever editorial process produces that consistency reliably.
Now feeling slightly more optimistic about the state of independent writing online, and a stop at hagaro extended that quiet optimism, sites like this one are the reason I have not given up on the open web entirely and finding them occasionally renews the case for paying attention to non algorithmic content sources today.
Strong recommendation from me, anyone curious about the topic should make time for this, and a look at buildmomentumfast only sharpens that recommendation further, the kind of resource that holds up against careful scrutiny rather than crumbling at the first critical question is rare and worth pointing other people toward when the topic comes up.
Started reading without much expectation and ended on a high note, and a look at jibtix continued that arc, content that builds rather than peaks early is a sign of a writer who knows how to structure a piece for sustained reader engagement rather than relying on a strong hook to do all the work.
Thanks for keeping the writing direct without losing the warmth that makes content feel human, and a stop at tangovillage carried both qualities forward, balancing professionalism and personality is a rare skill and the writers here have clearly figured out how to consistently land it across many posts which I notice.
вывод из запоя в стационаре [url=https://vyvod-iz-zapoya-v-staczionare-sankt-peterburg-27.ru]вывод из запоя в стационаре[/url]
Skimmed first and then went back to read carefully, and the careful read paid off in places I had missed, and a stop at sorbetsolo got the same treatment, the rare site whose content rewards a second pass is content I want more of in my regular rotation rather than disposable single read articles.
Glad I stumbled across this post, the explanations actually make sense without needing background knowledge to follow along, and after a stop at findyournextstep the same was true there, no assumptions about the reader just clear writing that anyone can understand from the first line right through to the end.
презентация [url=http://litteraesvfu.ru]http://litteraesvfu.ru[/url]
Will be sharing this with a couple of people who care about the topic, and a stop at creategrowthframeworks added more material worth passing along, the kind of site that is generous with quality content and does not make you jump through hoops to access it which is appreciated more than the team probably realises.
The pacing of the post was just right, never rushed and never dragged out unnecessarily, and a look at discovergrowthideas maintained the same rhythm, you can tell the writer has experience because the difficult skill of pacing is something only practiced writers manage to handle well in long form content over time and across formats.
Took a quick scan first and then went back to read properly because the post deserved it, and a stop at igoblob kept me reading carefully too, the kind of writing that earns a slower second pass rather than getting skimmed and forgotten is something I value highly when I happen to find it.
Found the writing surprisingly fresh for what is by now a well covered topic, and a stop at connectideasandpeople kept that freshness going across the related pages, original perspective on familiar ground is hard to come by and this site has clearly earned its place in the conversation rather than just rehashing old ideas.
Considered against the flood of similar content this one stands apart in important ways, and a stop at startyourgrowthjourney extended that distinctive feel, sites that find their own corner of a crowded topic and stay there are sites worth following and this one has clearly carved out its own space and committed to defending it carefully.
Speaking from the perspective of having read widely on the topic this site offers something distinct, and a look at findnextopportunity reinforced that distinctness, the rare site that contributes something genuinely original to a saturated topic is the rare site worth following carefully and this one has demonstrated that original contribution capability today.
Skipped breakfast still reading this and finished hungry but satisfied, and a stop at azuqix kept me past breakfast time, content that displaces basic biological needs is content with serious attentional pull and the writers here are clearly capable of producing that level of engagement which is genuinely impressive these days.
Felt the writer did the homework before publishing, the references hold up, and a look at sketchsherpa continued that documented care, content with traceable claims rather than vague assertions is the kind I trust and the lack of bald assertion in this post is one of its quietly impressive qualities for me.
Most attempts at writing on this topic feel like they are missing something and this post finally identified what was missing, and a look at straitsalt extended that diagnostic clarity, content that names what is wrong with adjacent treatments while doing better itself is content with both critical and constructive value and this site has both.
Reading this prompted a brief but useful conversation with a colleague who happened to walk by, and a stop at izoblade extended that conversational seed, content that becomes a starting point for in person discussion rather than ending in solitary reading is content with social generative energy and this site has plenty of it apparently.
Reading this triggered a small reorganisation of my own thinking on the topic, and a stop at saltvinca furthered that reorganisation, content that affects the shape of my mental model rather than just decorating it with new facts is content with structural rather than informational impact and this site provides that.
Easy to recommend, the content speaks for itself without needing additional praise from me, and a stop at buildyourdirection only adds more reasons to send people this way, the kind of generous resource that benefits its readers without demanding anything in return is increasingly rare and worth recognising clearly today across the broader open internet.
Worth recognising that the post did not pretend to be the final word on the topic, and a stop at halarch continued that humility, content that admits its own scope and limits is more trustworthy than content that overreaches and this site has clearly developed the editorial maturity to know what it can and cannot claim well.
Picked up something useful for a side project, and a look at mindfullifestylemarket added another piece I will incorporate, content that connects to specific projects I am working on is content with practical utility and the practical utility of this site is showing up across multiple posts I have read in the last hour or so.
Walked away with a clearer head than I had before reading this, and a quick visit to growintentiondriven only sharpened that, the writing has a way of cutting through the noise that surrounds most topics online which is something I will definitely remember the next time I am searching for an answer to anything.
Glad I gave this a chance instead of bouncing on the headline, and after daheko I was certain I had made the right call, snap judgements based on titles miss a lot of good content and this is a reminder to slow down and check things out before scrolling past in a hurry.
Reading this prompted me to dig out an old reference book related to the topic, and a stop at learnsomethinguseful extended that connection to other sources, content that connects me back to my own existing knowledge rather than asking me to forget it is content with continuity and this site has that continuous quality.
Now setting up a small reminder to revisit the site on a slow day, and a stop at findyournextchallenge confirmed the reminder was a good idea, planning return visits is a small organisational act that signals trust in ongoing quality and this site has earned that planned return through consistent performance across the pieces I have read so far.
Honestly this kind of writing is why I still bother to read independent sites, and a look at trenchvinca extended that broader reflection, the few sites that justify continued attention to non algorithmic content are sites like this one and finding them periodically is enough to keep my reading habits oriented toward independent rather than aggregated content.
Glad I gave this a chance instead of bouncing on the headline, and after createimpactefficiently I was certain I had made the right call, snap judgements based on titles miss a lot of good content and this is a reminder to slow down and check things out before scrolling past in a hurry.
A piece that read as the work of someone who reads carefully themselves, and a look at javyam continued that informed feel, writers who are also serious readers produce work with a different quality and this site reads as the product of someone steeped in good writing rather than just generating content for an audience.
вызов нарколога на дом телефон [url=https://narkolog-na-dom-moskva-27.ru]вызов нарколога на дом телефон[/url]
Halfway through reading I knew this would be one to bookmark, and a look at learnandaccelerate confirmed that early intuition, when bookmark intent forms before finishing a post you know the writing has cleared a quality bar that most content fails to clear and this site has cleared it on multiple visits already.
купить материал для перетяжки мебели [url=https://tkan-dlya-mebeli.ru]https://tkan-dlya-mebeli.ru[/url]
Started believing the writer knew the topic deeply by about the second paragraph, and a look at createforwardenergy reinforced that confidence, the speed at which a writer establishes credibility through their writing is a useful quality signal and this writer establishes it quickly and quietly without resorting to credential dropping or self promotion.
где находится человек по номеру телефона [url=http://www.kak-najti-cheloveka-po-nomeru-telefona-2.ru]http://www.kak-najti-cheloveka-po-nomeru-telefona-2.ru[/url]
Now realising this site has been quietly doing good work for longer than I knew, and a look at thinkcreativelyalways suggested an archive worth exploring, sites with deep archives of consistent quality represent a different kind of resource than sites with viral hits and this one looks like the durable kind based on what I see.
Now I want to find more sites like this but I suspect they are rare, and a look at igogoa extended that thought, the few sites that meet this quality bar are precious specifically because they are rare and finding others like them is one of the ongoing projects of careful internet curation across the years.
Thanks for the breakdown, it gave me a clearer picture of something I had been confused about for a while now, and a stop at humvat closed the remaining gaps in my understanding nicely, no need to hunt around twenty other articles to put the pieces together which is a real time saver.
Well done, the writing is professional without being stiff, and the topic is treated with care, and a look at jifaero reflected that approach, the kind of site I would point a colleague to if they asked for a reliable starting point on this topic in the future without any hesitation at all.
A handful of memorable phrases from this one I will probably use later, and a look at hewzap added a couple more, content that contributes language to my own communication rather than just facts is content with a different kind of utility and this site is providing that linguistic utility consistently across what I read.
Worth flagging this site to a few specific friends who would appreciate the editorial sensibility, and a look at explorefreshdirections added more pages I will mention to them, recommending sites to specific people requires understanding both the site and the person and this site is making those personalised recommendations easy and natural for me.
Reading this between two meetings turned out to be the highlight of the morning, and a stop at subletviper continued that highlight quality, content that outshines the structured parts of a working day is doing something well beyond ordinary and this site has produced multiple such highlights for me already this week alone.
Bookmark folder reorganised slightly to make this site easier to find, and a look at jadburst earned the same accessibility upgrade, the small organisational moves I make for sites I expect to return to often are themselves a signal of how much I trust them and this site triggered those moves naturally.
Reading this slowly to give it the attention it deserved, and a stop at buildyourvisionnow earned the same slow read, choosing to read slowly is a small act of respect for content quality and very few sites earn that respect from me but this one did so without any explicit ask which is the cleanest way.
Now setting aside time on my next free afternoon to read more from the archives, and a stop at growwithconfidencepath confirmed that time will be well spent, the rare site whose archive deserves a dedicated reading session rather than just casual sampling is the kind of resource worth scheduling around and this one qualifies clearly.
Worth saying that the writing carries a particular kind of authority without making any explicit claims to it, and a stop at vaultscript extended that earned authority feeling, sites that demonstrate expertise through the quality of their explanations rather than by stating credentials are sites I trust most and this site has it.
Worth saying that this is one of the better things I have read on the topic in months, and a stop at learnstepbystep reinforced that ranking, the topic is well covered by many sources but few do it with this level of care and the few that do deserve to be flagged so other readers can find them.
Closed the tab feeling I had spent the time well, and a stop at growstrategicclarity extended that feeling across more pages, the test of whether time on a site was well spent is one I apply silently after closing tabs and very few sites pass it but this one passed it cleanly today afternoon clearly.
Took a screenshot of one section to come back to later, and a stop at bexedge prompted another saved tab, the urge to capture and revisit specific pieces of content is something I rarely feel but when I do it tells me the work is worth more than the average passing read for sure.
скачать мелбет [url=https://tcso-begovoy.ru]скачать мелбет[/url]
Just want to say thank you for putting this together, posts like these make searching online actually worth it sometimes, and a quick look at premiumlivingmarketplace kept that going, useful and easy to read without any of the tricks that ruin most blog comment sections lately on the wider open web.
Good post, the kind that respects the reader by getting to the point quickly without skipping the details that matter, and a short look at deoblob confirmed that approach is consistent across the site which is rare to find online these days, definitely a place I will return to soon.
Approaching this site through a casual link click and being surprised by what I found, and a look at growwithpurposefully extended the surprise, the rare experience of stumbling into excellent independent content rather than predictable mediocrity is one of the actual remaining pleasures of casual web browsing and this site provided it cleanly.
Thanks for sharing this with the open internet rather than locking it behind a paywall like so many sites do now, and a stop at teapotshrine kept the same vibe going, generous helpful and clearly written by someone who actually wants people to learn from it rather than just charge them.
A piece that brought a sense of order to a topic I had been finding chaotic, and a look at buildsmarthabits continued that organising effect, content that imposes useful structure on messy subjects is doing genuine intellectual work and this site is providing that organisational function across multiple posts I have read recently here.
Saving this link for the next time someone asks me about this topic, and a look at tokensaffron expanded what I will be sharing with them, this is the kind of resource that makes a real difference when you are trying to point a friend to something useful and reliable rather than generic marketing pages.
Picked this post to share in a Slack channel where I knew it would be appreciated, and a look at learnandscaleeffectively suggested I will share more from here later, content worth sharing into a professional context is content that has earned a higher kind of trust than mere personal interest and this site has it.
Closed the laptop and walked away thinking about the post for a good twenty minutes, and a stop at growwithclearintent produced similar lingering thoughts, content that survives the closing of the browser tab is content that has actually entered the mind rather than just decorating the screen for the duration of the reading.
Honestly enjoyed not being sold anything for the entire duration of the post, and a look at startfreshthinking kept that pleasant absence going across more pages, content that exists for its own sake rather than as a funnel to a paid product is increasingly rare and worth supporting where I can find it.
Taking the time to read carefully here has been worthwhile for the past hour, and a look at findgrowthchannels extended the worthwhile reading, the calculation of return on reading time spent is something I do informally and this site has been producing positive returns across multiple sessions during the last week of regular visits and reads.
Reading this in my last reading slot of the day was a good way to end, and a stop at buildyourmomentum provided a satisfying close to the reading session, content that ends a day well rather than agitating it before sleep is the kind I value increasingly and this site fits that role for me consistently now.
Worth flagging this site to a few specific friends who would appreciate the editorial sensibility, and a look at createimpactfulchange added more pages I will mention to them, recommending sites to specific people requires understanding both the site and the person and this site is making those personalised recommendations easy and natural for me.
Definitely a recommend from me, anyone curious about the topic should check this out, and a look at swampstaple adds even more reason for that, the depth and quality combine to make this site one I will be pointing people toward whenever similar conversations come up over the months ahead at work or socially.
выведение из запоя в самаре [url=https://kapelnicza-ot-pokhmelya-samara-38.ru]https://kapelnicza-ot-pokhmelya-samara-38.ru[/url]
капельница от запоя на дому круглосуточно [url=https://kapelnicza-ot-pokhmelya-samara-39.ru]капельница от запоя на дому круглосуточно[/url]
Came away with a small but real shift in perspective on the topic, and a stop at buildpositiveprogress pushed that shift a bit further, the kind of subtle reframing that good writing does to a reader without making a big deal of it is something I always appreciate when it happens which is sadly not that often.
Pass this along to colleagues if the topic comes up, the framing here is sensible, and a stop at jadkix adds more useful angles to share, the kind of content that improves conversations rather than just feeding them is what makes a resource genuinely valuable in professional contexts going forward over time and across project boundaries too.
Now thinking about how this post will age over the coming years, and a stop at startpurposefulgrowth suggested the same durability, content built to age well rather than to capture the attention of the moment is content with a different kind of value and this site has clearly chosen the long horizon over the short one.
Took a chance on the headline and was rewarded, and a stop at exploreuntappedpaths kept the rewards coming as I clicked through, the kind of place where every link leads somewhere worth the click is a small luxury on the modern web where so many sites are mostly empty calories disguised as content.
Appreciated that the writer trusted the reader to follow along without constant restating of earlier points, and a look at createclarityfast continued that respect for the reader, treating an audience as capable adults rather than as people to be hand held through every paragraph is something I notice and value highly across the open internet today.
Now realising the post solved a small problem I had been carrying for weeks, and a look at tidaltunic extended that problem solving function, content that connects to specific unresolved questions in my own life rather than just providing general interest is content with real practical impact and this site is providing that practical value.
Strong recommendation from me, anyone curious about the topic should make time for this, and a look at jifarena only sharpens that recommendation further, the kind of resource that holds up against careful scrutiny rather than crumbling at the first critical question is rare and worth pointing other people toward when the topic comes up.
Solid little post, the kind that does not need to be flashy because the substance is doing the work, and a look at discovernewpossibility kept that quiet confidence going across the site, this is what writing looks like when the writer trusts the content to land on its own without theatrics or unnecessary attention seeking behaviour.
Will be back, that is the simplest way to say it, and a quick visit to shoresyrup reinforced the decision, this site has earned a spot in my regular rotation alongside a few other reliable places I check when I want something genuinely informative without all the usual modern web noise getting in the way.
Worth recognising the absence of the usual blog tropes here, and a look at derbunch continued that fresh quality, sites that avoid the standard moves of the medium read as more original even when the content is on familiar topics and this one has clearly chosen its own path through the conventional terrain skilfully.
Appreciate the practical examples, they made the abstract points easier to grasp, and a stop at growwithfocusedaction added more of the same, this site clearly understands that real examples beat empty theory every single time which is the mark of a writer who knows their audience well and respects their time.
Skipped lunch to finish reading, which says something, and a stop at senatetrench kept me at my desk longer than planned, when content beats the lunch impulse the writer has done something genuinely impressive in an attention environment full of immediately satisfying alternatives competing for the same finite block of reader time.
The overall feel of the post was professional without being stuffy, and a look at designfocusedcommerce kept that approachable expertise going, finding the right register for technical content is hard but this site has clearly figured out how to sound knowledgeable without slipping into that distant lecturing tone that loses readers in droves every time.
Honestly impressed by how much useful content sits in such a small post, and a stop at biablur confirmed the rest of the site packs a similar punch, density without confusion is a hard balance to strike and this site has clearly cracked the code on it across many different topic areas covered.
Thank you for not assuming the reader already knows everything, the explanations meet me where I am, and a look at learnandadvanceforward did the same, that consideration is what makes a site feel welcoming rather than gatekeepy which is sadly the default mood across the modern web today for most subjects covered.
A piece that suggested careful editing without showing the marks of the editing, and a look at explorefreshconcepts continued that invisible polish, the best editing disappears into the prose and this site reads as having been edited with skill that does not announce itself which is the highest compliment I can offer any blog content.
Closed it feeling I had taken something away rather than just consumed something, and a stop at ilanub extended that taking away feeling, the difference between content I extract value from and content I just pass through is something I track informally and this site is consistently in the value extraction column for me.
Generally I am cautious about recommending sites on first encounter but this one warrants the exception, and a look at jaycap reinforced the exception making, the rare site that justifies breaking my normal cautious approach is the rare site worth flagging early and this one has prompted exactly that early flagging response from me.
Found the writing surprisingly fresh for what is by now a well covered topic, and a stop at heyaro kept that freshness going across the related pages, original perspective on familiar ground is hard to come by and this site has clearly earned its place in the conversation rather than just rehashing old ideas.
Quiet confidence runs through the whole post, no need to shout to make the points stick, and a stop at exploreideasfreely carried that same restrained voice forward, content that respects the reader by trusting its own substance rather than dressing it up in theatrical language is what I look for online and rarely actually find these days.
Now planning a longer reading session for the archives, and a stop at findyournextidea confirmed the archives are worth that longer commitment, sites with archives I want to read deliberately rather than just sample are rare and this one has clearly earned that level of interest based on the consistency of what I have already read.
Will be coming back to this for sure, too much good content to absorb in one sitting, and a stop at humzap only added more pages I want to dig through, this site is going onto my regular rotation list because it consistently delivers something worth the visit lately rather than empty filler.
A quiet kind of confidence runs through the writing, and a look at createvaluefast carried that same understated assurance, confidence without bragging is the most attractive register for online writing and the writers here have clearly developed it through practice rather than affecting it through stylistic tricks that would feel hollow eventually.
Really appreciate that the writer did not assume I would read every other related post first, and a look at findyourperfectpath kept that self contained feel going where each piece can stand alone, accessibility for new readers is a sign of generous editorial thinking and this site has clearly invested in that approach.
Now sitting back and recognising that this was a small but real win in my reading day, and a stop at scopeskylark extended that quiet win, the cumulative effect of small reading wins versus the cumulative effect of small reading losses is real over time and this site is contributing to the wins side of that ledger.
Halfway through I knew I would finish the post, and a stop at discovernewperspectives also held me through to the end, content that signals its quality early and then sustains it is content with real internal consistency and this site has clearly figured out how to maintain quality from opening sentence through to closing thought.
Honestly this was the highlight of my reading queue today, and a look at explorepossibilitiestoday extended that across more pages I will return to, ranking what I read against what else I read each day is something I do informally and this site keeps moving up in those rankings the more I explore it.
Glad to find something on this topic that does not start with three paragraphs of throat clearing before getting to the point, and a stop at startbuildingpurpose also dives right in, respect for the readers time shows up in small editorial choices like this and they add up to a real difference quickly.
Liked that there was nothing performative about the writing, and a stop at jadyam continued that genuine quality, performative writing tries to be witnessed rather than read and the difference between performance and substance is huge for the careful reader and this site has clearly chosen substance every time clearly.
renting luxury cars near me [url=www.luxury-car-rental-miami-1.com]www.luxury-car-rental-miami-1.com[/url]
Felt the post had been written without looking over its shoulder, and a look at taffetaswan continued that confident posture, content written for its own sake rather than against imagined critics has a different quality and this site reads as written from a place of confidence rather than defensive justification of every claim.
Found the writing surprisingly fresh for what is by now a well covered topic, and a stop at startstrongprogress kept that freshness going across the related pages, original perspective on familiar ground is hard to come by and this site has clearly earned its place in the conversation rather than just rehashing old ideas.
Better than most of the writing I have come across on this topic recently, simpler and more direct, and a look at buildstrategicfocus continued in that same way, a real outlier in a crowded space full of repetitive content that says little while taking up a lot of reader time today which is unfortunate.
Thanks for keeping the writing direct without losing the warmth that makes content feel human, and a stop at derburn carried both qualities forward, balancing professionalism and personality is a rare skill and the writers here have clearly figured out how to consistently land it across many posts which I notice.
Now noticing that the post avoided the temptation to be funny in places where humour would have undermined the substance, and a stop at growstepbystep maintained the same restraint, knowing when to be serious is a rare editorial virtue and this site has clearly developed it through what I assume is careful editorial practice over years.
This one is staying open in a tab for the rest of the day so I can come back and re read certain parts, and a look at growwithconfidencenow suggests I will be doing the same with a few more pages here too, this is going to be a deep dive over the coming hours.
A particular pleasure to read this with a fresh coffee, and a look at silverumber extended the pleasure across more pages, content that pairs well with quiet morning rituals is something I have come to value highly and this site has the kind of energy that fits naturally into a calm reading routine.
Now adding this to a list of sites I want to see flourish, and a stop at heritageinspiredgoods reinforced that wish, the few sites I actively root for are sites that produce the kind of work I want more of in the world and this one has joined that small list based on what I have read so far.
In the middle of an otherwise scattered day this post landed as a moment of focus, and a stop at explorenewdirections extended that focused feeling across more pages, content that anchors a fragmented day rather than contributing to the fragmentation is content with real centring effect and this site is providing that anchoring function for me.
My reading list is short and selective and this site is now on it, and a stop at findbettergrowthmodels confirmed the placement, the short list of sites I read deliberately rather than encounter accidentally is something I curate carefully and adding to it is a real act of trust which this site has earned today.
мелбет казино скачать [url=https://tcso-begovoy.ru]мелбет казино скачать[/url]
This stands out compared to similar posts I have read recently, less noise and more substance, and a look at ilavex kept that gap going, you can really feel the difference between content made by someone who cares versus content made to fill a publishing schedule for an algorithm trying to keep growing somehow.
A thoughtful read in a week that has been mostly noisy, and a look at findbettersolutions carried that thoughtful quality across more pages, finding pockets of considered writing in a week of distractions is one of the small wins of careful curation and this site is providing those pockets at a sustainable rate.
A particular kind of restraint shows up in the writing, and a look at jifedge maintained the same restraint across pages, knowing what not to say is just as important as knowing what to say and this site has clearly developed strong instincts on both sides of that editorial line throughout pieces I have read.
Glad the writer did not feel compelled to cover every possible angle of the topic, focus is a virtue, and a stop at syruptunic reflected the same disciplined scope, knowing what to leave out is half of what makes good writing good and this post has clearly been edited with that principle in mind.
Came back to this twice now in the same week which is unusual for me, and a look at shamrockveil suggested I will keep coming back, the kind of post that earns repeated visits rather than one and done reading is the gold standard for content quality and this site clearly hit that standard.
Now adding this to a list of sites I want to see flourish, and a stop at unlockcreativeideas reinforced that wish, the few sites I actively root for are sites that produce the kind of work I want more of in the world and this one has joined that small list based on what I have read so far.
вывод из запоя капельница [url=https://kapelnicza-ot-pokhmelya-samara-40.ru]вывод из запоя капельница[/url]
Different in a good way from the cookie cutter content that fills most blogs covering this area, and a stop at learnandtransformideas kept showing me why, original thoughtful writing exists if you know where to look and this site has earned a place on my short list of those rare exceptions worth defending.
Refreshing tone compared to the dry corporate posts on similar topics, and a stop at learnandexpand carried that personality through nicely, you can tell when a real person is behind the writing versus a content team chasing metrics and this site definitely falls into the former category clearly across what I have seen.
комбинезон костюм [url=https://www.detskie-kombinezony-kupit.ru]https://www.detskie-kombinezony-kupit.ru[/url]
Genuine reaction is that this site clicked with how I like to read, and a look at buildbetterhabits kept that comfortable fit going, sometimes you find a place online whose editorial decisions just align with your preferences and when that happens it is worth recognising and supporting through repeat engagement consistently going forward.
ии для создания презентаций [url=www.litteraesvfu.ru]www.litteraesvfu.ru[/url]
выведение из запоя в стационаре наркология [url=https://vyvod-iz-zapoya-v-staczionare-sankt-peterburg-27.ru]выведение из запоя в стационаре наркология[/url]
Skipped past the first paragraph thinking it was setup and had to come back when the rest referenced it, and a stop at hirpod similarly rewarded careful reading from the start, content where every paragraph carries weight is content I now know to read from the beginning rather than skipping ahead.
Speaking from the perspective of a fairly demanding reader the writing here clears the bar consistently, and a look at createimpactframework continued clearing that bar, the calibration of demanding reader is something I apply to all sources and this site has been one of the few that handles the demanding reading well across pieces sampled.
фирменные подарки с логотипом [url=https://suvenirnaya-produkcziya-s-logotipom-8.ru]https://suvenirnaya-produkcziya-s-logotipom-8.ru[/url]
Found the writing surprisingly fresh for what is by now a well covered topic, and a stop at buildyournextstep kept that freshness going across the related pages, original perspective on familiar ground is hard to come by and this site has clearly earned its place in the conversation rather than just rehashing old ideas.
Recommended without hesitation if you care about careful coverage of this topic, and a stop at exploreinnovativegrowth reinforced the recommendation, the bar I set for unhesitating recommendations is fairly high and this site has cleared it through the cumulative weight of multiple consistently good pieces rather than through any single standout post which is meaningful.
A small thing but the line spacing and font choices made reading this physically pleasant, and a look at doxfix maintained the same careful design, technical choices about typography are part of what makes online reading actually comfortable and this site has clearly invested in the design layer alongside the content layer carefully.
Started smiling at one paragraph because the writing was just nice, and a look at createvisionforward produced a couple more such moments, prose that produces small spontaneous reactions in the reader is doing more than just transferring information and the writers here are clearly hitting that level fairly consistently throughout pieces.
Decided to subscribe to the RSS feed if there is one, and a stop at jazbox confirmed that decision, content that I want delivered to me proactively rather than just remembered when I have time is content that has earned a higher level of commitment from me as a reader looking for reliable sources.
Bookmarking this for later, the kind of resource I want to keep nearby, and a quick look at learnandapplyfast confirmed the rest of the site is worth the same treatment, definitely going into my reference folder for the next time the topic comes up at work or in conversation with someone who asks.
Bookmark folder created specifically for this site, and a look at ilefix confirmed the dedicated folder was the right call, dedicated folders for individual sites are a level of organisation I rarely deploy and this site has earned that level of dedicated tracking based on the consistency I have seen so far across sessions.
Reading this in the morning set a good tone for the day, and a quick visit to globalpremiumfinds kept that good tone going, content can do that sometimes when it hits the right notes and finding sites that consistently strike that tone is something I have learned to recognise and reward with regular visits.
Worth marking the moment when reading this clicked into something useful for my own work, and a look at siriustender extended that practical click, content that connects to my actual life rather than just being interesting is content with the highest kind of value and this site is generating that connection at a high rate.
Just sat with this for a bit longer than I usually would because the points are worth thinking about, and after discovergrowthstrategies I had even more to chew on, the kind of post that nudges your thinking forward without forcing the issue is something I have always appreciated in good writing online.
Generally my comment to other readers about new sites is to wait and see but for this one I would jump to recommend now, and a look at createfuturevision reinforced that early recommendation, the speed at which a site earns my recommendation is itself a quality signal and this one has earned mine quickly clearly.
Genuinely changed how I think about a small piece of the topic, which does not happen often online, and a look at buildconfidencefast added another nudge in the same direction, the kind of writing that earns a small mental shift rather than just confirming what you already thought before reading is a sign of careful thought.
Decided to read more before commenting and the more I read the more I wanted to say something, and a stop at buildlastingimpact pushed that impulse further, when content provokes the urge to participate rather than just consume it is doing something quite specific and worth recognising clearly when it happens during reading.
Probably the kind of site that should be more widely read than it appears to be, and a look at hunhax reinforced that quiet wish, the gap between a sites quality and its apparent reach is sometimes large and that gap exists for this site in a way that makes me want to mention it more.
Came here from another site and ended up exploring much further than I planned, and a look at uplandharborvendorparlor only encouraged more exploration, the kind of place where one click leads to another not through manipulative design but through genuinely interesting content is rare and worth highlighting when found like this somewhere on the open internet.
вызов врача на дом нарколога [url=https://narkolog-na-dom-moskva-27.ru]вызов врача на дом нарколога[/url]
Quietly the post solved something I had been turning over without quite knowing how to phrase the question, and a look at createimpactroadmap extended that quiet solving, content that addresses unformulated needs is content with reader insight and this site has demonstrated that insight at a high rate across the pieces I have read recently.
мебельные ткани цены [url=https://tkan-dlya-mebeli.ru]https://tkan-dlya-mebeli.ru[/url]
Found this through a search that was generic enough I did not expect quality results, and a look at createclaritysteps continued the surprisingly good experience, search engines occasionally still surface excellent independent content if you scroll past the obvious paid and high authority results which is reassuring to remember sometimes.
A genuinely unexpected highlight of my reading week, and a look at learnandprogress extended that pattern, the surprise of finding excellent content rather than the predictable mediocre is one of the few real pleasures of casual web browsing and this site delivered that surprise cleanly today which I really do appreciate.
Started reading skeptically because the headline seemed overconfident, and the post earned the headline by the end, and a look at discoverfuturepaths continued that pattern of earning its claims, sites that can back up their headlines without overpromising are rare and this one has clearly developed editorial calibration on that front consistently.
Adding to the bookmarks now before I forget, that is how good this is, and a look at jikbond confirmed the rest of the site is worth saving too, this is one of those rare finds that justifies the time spent searching the web for once which is a relief in the current environment.
Now appreciating the small but real way this post improved my afternoon, and a stop at explorefreshapproaches extended that small improvement effect, content that produces measurable positive impact on the texture of a reading day is content with real value and this site is producing those small positive impacts at a sustainable rate apparently.
Honestly this was a good read, no jargon and no padding, and a short look at exploreuntappedideas kept that same feel going which I really appreciated, the writer clearly knows the topic well enough to explain it without hiding behind big words or filler that often gets used to seem clever.
Felt the post had been written without using a single buzzword, and a look at slacktally continued that clean vocabulary, content free of jargon and trendy phrases reads better and ages better and this site has clearly committed to a vocabulary that will not feel dated in three years which is impressive editorially.
Now considering the post as evidence that careful blog writing is still possible, and a look at explorefreshthinkingnow extended that evidence, the broader question of whether the modern web can sustain quality writing has obvious empirical answers in sites like this one and seeing them is reassuring even when they remain a minority overall today.
A piece that was confident enough to leave some questions open rather than forcing closure, and a look at drubeat continued that intellectual honesty, content that admits the limits of its scope is more trustworthy than content that pretends to total understanding and this site has the right calibration on certainty consistently.
Came away with a small but real shift in perspective on the topic, and a stop at premiumdesignmarket pushed that shift a bit further, the kind of subtle reframing that good writing does to a reader without making a big deal of it is something I always appreciate when it happens which is sadly not that often.
A piece that did not waste any of its substance on sales or promotion, and a look at hislex continued that pure content focus, sites that resist the urge to monetise every paragraph are increasingly rare and this one has clearly made the editorial choice to keep the writing clean from commercial intrusion which I value highly.
Working through this site has been a small antidote to the shallow content that fills most of my reading time, and a stop at buildactionablemomentum extended that antidote function, sites that quietly improve the average quality of my reading by being themselves are sites worth supporting through return visits and recommendations consistently.
The tone stayed consistent across the whole post which is harder than it looks for longer pieces, and a look at discoverforwardpaths continued the same voice, this kind of editorial consistency is a sign of either a single careful writer or a tightly run team and either is impressive today across the broader media environment.
Decided after reading this that I would check this site weekly going forward, and a stop at ilenub reinforced that commitment, deciding to add a site to a regular rotation requires meeting a quality bar that very few places clear and this one cleared it cleanly without any noticeable effort or marketing push behind it.
Liked the way the post balanced confidence and humility, and a stop at learnbydoing maintained the same balance, knowing when to assert and when to acknowledge uncertainty is a sign of mature thinking and the writers here have clearly developed that calibration through what I assume is years of careful work on their craft.
скачать мелбет казино на андроид [url=https://elenagatilova.ru]скачать мелбет казино на андроид[/url]
скачать мелбет [url=https://tcso-begovoy.ru]скачать мелбет[/url]
Now setting this aside as a model of how to write thoughtfully on the topic, and a stop at fastbuycorner extended that model status, content that becomes a reference for how a kind of writing should be done is content with influence beyond its own readership and this site is reaching that level for me clearly today.
Reading this between meetings turned out to be the most useful thing I did all afternoon, and a stop at tailortarget kept that productivity feeling going, content can sometimes outperform actual work in terms of what gets accomplished mentally and this site managed that today which is genuinely a high bar to clear consistently.
Came back to this an hour later to reread a specific section, and a quick visit to startwithclearpurpose also drew a second look, content that pulls you back rather than letting you move on permanently is the kind I want to fill my browser bookmarks with in 2026 and beyond as the open internet evolves.
Speaking carefully because I do not want to overstate things this site is genuinely above average across multiple measurements, and a stop at explorelimitlessthinking continued the above average performance, the calibration of judgement against potential overstatement is something I take seriously and this site clears the higher bar even after that calibration applies.
Reading this slowly to give it the attention it deserved, and a stop at growwithintentiondaily earned the same slow read, choosing to read slowly is a small act of respect for content quality and very few sites earn that respect from me but this one did so without any explicit ask which is the cleanest way.
Thanks for keeping the writing direct without losing the warmth that makes content feel human, and a stop at exploregrowthmindset carried both qualities forward, balancing professionalism and personality is a rare skill and the writers here have clearly figured out how to consistently land it across many posts which I notice.
mel bet [url=https://limon-ads.ru]mel bet[/url]
Felt the writer respected me as a reader without making a show of doing so, and a look at growwithsmartchoices continued that quiet respect, this is the kind of small but meaningful detail that separates the sites I bookmark from the ones I close after a single skim and never return to again no matter how interesting the headline.
Found this useful, the points line up well with what I have been thinking about lately, and a stop at buildbetterdecisions added some angles I had not considered yet, definitely walking away with more than I came for which is the best outcome from time spent reading online for any kind of topic.
Honest opinion is that this is the kind of post that builds long term trust with readers, and a look at growfocusedresults reinforced that perception, the slow accumulation of trust through consistent quality is the only sustainable way to build a real audience and this site is clearly playing that long game.
Worth a quiet moment of recognition for the consistency I have noticed across multiple posts, and a stop at buildclarityforward continued that consistent quality, sites that maintain quality across many pieces rather than peaking on one viral post are sites with real editorial discipline and this one has clearly developed that discipline carefully.
Now planning to write about the topic myself eventually using this post as a reference, and a look at jazbrood would also serve in that future piece, content that becomes raw material for my own writing rather than just informing my reading is content with multiplicative value and this site is generating that multiplicative effect.
Without overstating it this is a quietly excellent post, and a look at jilbrew extended that quiet excellence, content that earns superlatives without demanding them through marketing language is content that has truly earned them through the substance and this site has clearly produced work in that earned excellence category today.
Glad to be one of several visitors on this awful internet site : D.
I appreciate the clarity here, everything is explained in simple terms without unnecessary detail, and after a quick stop at createvalueconsistently the points came together nicely for me, the writing keeps things straightforward and respects the reader from start to finish without ever talking down to anyone.
Reading this slowly because the writing rewards a slower pace, and a stop at authenticlivinggoods did the same, the pace at which I read content is something I now use as a quality signal and writing that earns a slower pace earns my attention as a reader looking for substance these days.
Generally I bookmark sparingly to avoid building up a bookmark graveyard but this one earned a permanent slot, and a stop at brightfuturedeals extended that permanence designation, the few sites I keep permanent bookmarks for are sites I expect to use repeatedly and this one has clearly cleared that expectation bar today.
Thank you for the genuine effort here, it shows in every paragraph and not just the headline, and after my visit to hupblob I was sure this site cares about getting things right rather than chasing clicks, which is the main reason I will come back later this week to read more.
Worth a quiet moment of recognition for the consistency I have noticed across multiple posts, and a stop at ileqix continued that consistent quality, sites that maintain quality across many pieces rather than peaking on one viral post are sites with real editorial discipline and this one has clearly developed that discipline carefully.
Generally my attention drifts on long posts but this one held it through the end, and a stop at findyourcorevision earned the same sustained focus, content that defeats my drift tendency is content with substantive pulling power and this site has demonstrated that pulling power across multiple pieces in a session that has now run quite long actually.
Felt no urge to argue with the conclusions even though I started the post slightly skeptical, and a look at learnandtransformfast maintained that pattern, writing that earns agreement through clarity of argument rather than rhetorical pressure is the kind I find most persuasive and the kind I want to read more of these days.
Now thinking the topic is more interesting than I had given it credit for, and a stop at discovergrowthpaths continued that elevated interest, content that revives my curiosity about subjects I had set aside is doing genuine work in the structure of my interests and this site is providing that revivifying effect today actually.
Glad to find a site whose links lead somewhere worth going rather than back to itself for SEO juice, and a stop at findyourwinningpath kept that generous outbound feel, citing other peoples work with real respect rather than just for ranking signals is a sign of an honest operation worth supporting going forward.
Most attempts at writing on this topic feel like they are missing something and this post finally identified what was missing, and a look at discoverwhatworksbest extended that diagnostic clarity, content that names what is wrong with adjacent treatments while doing better itself is content with both critical and constructive value and this site has both.
Felt the post handled a sensitive angle of the topic with appropriate care, and a look at createprogresssystems extended that careful handling across related material, sites that can navigate delicate territory without causing damage are rare and require a level of judgement that comes from experience rather than from following any clear playbook.
If I am being honest this is the kind of site I quietly hope my own work will someday resemble, and a stop at createfocusedmomentum extended that aspirational feeling, finding work that models what I want to produce is part of why I read carefully and this site has been performing that modelling function for me lately consistently.
Really nice to see things explained without overcomplicating the topic, the words flow naturally and stay easy to follow, and a short visit to growintentionally only added to that experience because the same simple approach is used across the rest of the page too without any change in tone.
Worth recommending broadly to anyone who reads on the topic, and a look at discoveropportunitypaths only confirms that, the rare combination of accessibility and depth in this site makes it suitable for both newcomers and people who already know the area which is hard to pull off in any blog format today and rarely managed.
Coming back tomorrow when I can give this a proper read, the post deserves better attention than I can give right now, and a look at findgrowthsolutions suggests there is plenty more here that deserves the same treatment, definitely a site I will be exploring properly over the next few days when I can.
This is definitely a wonderful webpage, thanks a lot..
Reading this gave me confidence to make a decision I had been putting off, and a stop at hobcar reinforced that confidence, content that translates into action in my own life rather than just informing it is content with the highest practical value and this site is generating that action level utility for me lately.
Honest reaction is that this is the kind of writing I would defend in a conversation about good blog content, and a look at discoverwhatworks reinforced that, the rare site whose work I would actively recommend rather than just tolerate is the kind I want to support through return visits regularly.
I just couldnt leave your website before saying that I really enjoyed the useful information you offer to your visitors… Will be back often to check up on new stuff you post!
Started reading without much expectation and ended on a high note, and a look at jalaxis continued that arc, content that builds rather than peaks early is a sign of a writer who knows how to structure a piece for sustained reader engagement rather than relying on a strong hook to do all the work.
A quiet kind of confidence runs through the writing, and a look at bomboard carried that same understated assurance, confidence without bragging is the most attractive register for online writing and the writers here have clearly developed it through practice rather than affecting it through stylistic tricks that would feel hollow eventually.
Nevertheless, it’s all carried out with tongues rooted solidly in cheeks, and everybody has got nothing but absolutely love for their friendly neighborhood scapegoat. In reality, he is not merely a pushover. He is simply that extraordinary breed of person solid enough to take all that good natured ribbing for what it really is.
Looking forward to seeing what gets published next month, and a look at jaspermeadowtradegallery extended that anticipation across the broader site, finding myself looking forward to a sites future content rather than just consuming its existing content is a stronger commitment level than I usually reach with new finds and this site triggered that.
Probably worth setting aside a longer block to read more carefully than I can right now, and a stop at unlocknewideas confirmed the longer block plan, the impulse to schedule dedicated time for a sites archive is itself a measure of trust and this site has earned that scheduling impulse from me clearly today actually.
Reading this on a long flight and finding it the best thing I read across hours of trying, and a stop at solarorchardmarketparlor kept the streak going, when content beats long flight reading you know it has substance because flight reading is a hard test of a piece given the alternatives available everywhere.
Picked something concrete from the post that I will use immediately, and a look at exploreuntappedopportunities added another concrete piece, content that produces immediately useful output rather than just abstract appreciation is content that earns its place in my regular rotation without needing any further evaluation from me at this point honestly.
Took a few notes from this post, the points are easy to remember without needing to come back and check, and a look at tidalslick added a couple more, the kind of place that sticks in the memory long after the browser tab has been closed for the day which says a lot really.
We are a group of volunteers and starting a new initiative in our community. Your blog provided us with valuable information to work on|.You have done a marvellous job!
узнать человека по номеру телефона [url=https://www.kak-najti-cheloveka-po-nomeru-telefona-2.ru]узнать человека по номеру телефона[/url]
Lovely just what I was looking for. Thanks to the author for taking his clock time on this one.
Bookmark folder created specifically for this site, and a look at intentionaldesignstore confirmed the dedicated folder was the right call, dedicated folders for individual sites are a level of organisation I rarely deploy and this site has earned that level of dedicated tracking based on the consistency I have seen so far across sessions.
мелбет [url=https://tcso-begovoy.ru]мелбет[/url]
Bookmark earned and the bookmark feels like a permanent addition rather than a maybe, and a look at findnewgrowthpaths confirmed that permanent status, the difference between durable bookmarks and ephemeral ones is something I have learned to feel quickly and this site triggered the durable feeling almost immediately during my first read here.
Reading this prompted a small redirection in something I was working on, and a stop at learnandaccelerategrowth extended that redirecting influence, content that affects my actual work rather than just my thinking has the highest practical impact and this site is providing that level of influence for me at a sustainable rate apparently.
Liked that the post resisted a sales pitch ending, and a stop at ilobyte maintained the no pitch approach, content that ends without trying to convert me into a customer or subscriber is content that has confidence in its own value and this site is clearly playing the long game on reader trust.
Genuine reaction is that this site clicked with how I like to read, and a look at learnandadjustquickly kept that comfortable fit going, sometimes you find a place online whose editorial decisions just align with your preferences and when that happens it is worth recognising and supporting through repeat engagement consistently going forward.
Well crafted post, the structure flows naturally from one point to the next without forcing transitions, and a stop at discoverdailyinspiration kept the same flow going, you can tell when a writer has thought about how their content reads rather than just what it contains and this is one of those examples.
Felt like I was reading something written by someone who actually thinks about the topic rather than reciting it, and a look at growresultsdrivenpath reinforced that impression, the difference between recited content and considered content is huge and this site clearly belongs to the latter category which I appreciate as a careful reader looking for substance.
After reading several posts back to back the consistent voice across them is impressive, and a stop at jinblob continued that voice consistency, sites that maintain a single coherent voice across many pieces by potentially many writers represent serious editorial discipline and this one has clearly developed the institutional consistency needed for that.
Great post. I was checking constantly this blog and I’m impressed! Very useful info specifically the last part 🙂 I care for such info much. I was looking for this certain information for a very long time. Thank you and good luck.
Reading this in pieces over a coffee break and finding it consistently rewarding, and a stop at findyourgrowthpath extended that into related material I will return to later, the kind of site that fits naturally into small reading windows without requiring a long uninterrupted block is genuinely useful for how I actually browse.
Found this through a friend who recommended it and now I see why, and a look at buildstrongmomentum only strengthened that recommendation in my own mind, word of mouth still works for content that actually delivers and this site is clearly earning recommendations the old fashioned way through quality rather than marketing.
Thanks for keeping the writing direct without losing the warmth that makes content feel human, and a stop at learnandgrowfaster carried both qualities forward, balancing professionalism and personality is a rare skill and the writers here have clearly figured out how to consistently land it across many posts which I notice.
If quality blog writing is dying as people sometimes claim then this site is one piece of evidence that it has not died yet, and a look at createimpactstructure extended that evidence, the broader cultural question about online writing has empirical answers in specific sites and this one is contributing to a more optimistic answer overall.
Just dropping by to say thanks for the effort, it does not go unnoticed when a writer cares this much about the reader, and after I went through seoscope I was certain this is one of the better corners of the internet for this particular kind of content which is genuinely refreshing.
Decided this was the kind of site I would defend in a discussion about good blog content, and a stop at exploreinnovativepaths reinforced that, very few sites earn active defence rather than passive consumption and this one has clearly crossed that threshold for me without needing any explicit pitch from the writers themselves either.
Reading this on a long flight and finding it the best thing I read across hours of trying, and a stop at jazfix kept the streak going, when content beats long flight reading you know it has substance because flight reading is a hard test of a piece given the alternatives available everywhere.
мелбет скачать приложение на андроид [url=https://elenagatilova.ru]мелбет скачать приложение на андроид[/url]
In the middle of an otherwise scattered day this post landed as a moment of focus, and a stop at ilonox extended that focused feeling across more pages, content that anchors a fragmented day rather than contributing to the fragmentation is content with real centring effect and this site is providing that anchoring function for me.
Came in skeptical of the angle and left mostly persuaded, and a stop at createprogressnow pushed me a bit further in the same direction, content that can move a critical reader by argument rather than rhetoric is rare and worth pointing out because it indicates real substance underneath the surface presentation here.
Decided to set a calendar reminder to revisit, and a stop at growyourpotential extended that revisit list, calendar entries for content are a level of commitment I rarely make but when I do they signal a higher regard than a simple bookmark and this site has earned that calendar tier of relationship from me today.
ии для презентаций бесплатно [url=litteraesvfu.ru]litteraesvfu.ru[/url]
ремонт квартир Львів капітальний ремонт квартири
hey thanks for the info. appreciate the good work
Yesterday I was complaining about the state of online writing and today this site has temporarily fixed that complaint, and a look at bomkix extended that mood reversal, the short term mood improvement that comes from finding good content is real and this site has produced that improvement for me at a useful moment.
Skipped the comments to avoid spoilers and came back later to find them genuinely worth reading, and a stop at quickcartcorner extended that surprised respect, when the discussion below a post matches the quality of the post itself you have found something special and this site appears to attract that kind of audience.
A particular kind of restraint shows up in the writing, and a look at hupbolt maintained the same restraint across pages, knowing what not to say is just as important as knowing what to say and this site has clearly developed strong instincts on both sides of that editorial line throughout pieces I have read.
Working through this site has been a small antidote to the shallow content that fills most of my reading time, and a stop at ravenharbortradehouse extended that antidote function, sites that quietly improve the average quality of my reading by being themselves are sites worth supporting through return visits and recommendations consistently.
Solid stuff, the kind of post that I will probably refer back to later this month when the topic comes up again, and a look at discovernewmomentum only confirmed I should bookmark the site as a whole rather than just this single page for future reference and use across coming weeks.
Found the use of subheadings really helpful for scanning back through the post later, and a stop at startnextleveljourney kept that reader friendly approach going, navigation is something many blog writers ignore but small structural choices make a noticeable difference for someone returning to find a specific point again days or weeks later.
Good points – – it will make a difference with my parents.
Honestly thank you to whoever wrote this because it scratched an itch I had not quite been able to articulate, and a stop at learnandbuildmomentum kept that satisfying feeling going, the kind of writing that meets unspoken needs is special and this site clearly has writers who understand their readers more than most do today.
сувениры с логотипом компании [url=http://www.suvenirnaya-produkcziya-s-logotipom-8.ru]сувениры с логотипом компании[/url]
Started thinking about my own writing differently after reading, and a look at discoverhiddeninsights continued that reflective effect, content that influences how I work rather than just informing what I know is content with the highest kind of impact and this site has triggered some of that reflective influence today on me.
прокапаться от алкоголя в стационаре [url=https://vyvod-iz-zapoya-v-staczionare-sankt-peterburg-27.ru]прокапаться от алкоголя в стационаре[/url]
Thanks for putting this online without locking it behind email signups or paywalls, and a quick visit to holbook kept that open feel going, content that trusts the reader to come back rather than gating access is the kind of approach I will reward with regular return visits over time happily.
Worth every minute of the time spent reading, and a stop at buildintentionalgrowth extends that value across more pages, in a media environment where most content is engineered to waste attention this site stands out by treating reader time as something valuable rather than something to be exploited and stretched as far as possible.
ma chance france
Знакомства ДНР ТГ
Looking at this objectively the editorial quality is hard to deny even setting aside personal taste, and a stop at learnandinnovate maintained the same objective quality, the gap between what I personally enjoy and what is objectively well crafted exists and this site clears both bars simultaneously which is rarer than it sounds.
просмотр магазина валорант Зачем тратить время на разрозненные сайты, когда есть Stack B? Это ваш единый портал для поиска тиммейтов, доступа к инструментам и качественного общения внутри вашего круга игроков.
Reading this post made me realise I had been settling for lower quality elsewhere, and a look at findclearopportunities extended that recalibration, content that exposes how much I had been accepting in adjacent sources is content with calibrating effect on my standards and this site is performing that calibration function across topics for me reliably.
casino slotrush
A genuine compliment to the writer for keeping the post focused on what mattered, and a look at createimpactframework continued that disciplined focus, focus is a editorial choice that compounds across many small decisions and this site has clearly made those small decisions consistently across what I have read so far this week here.
Came away feeling slightly smarter than I was when I started, that is a real win, and a stop at discoverinnovativeideas added a bit more to that, the rare site that actually transfers some of its knowledge to the reader in a way that sticks rather than just creating an illusion of learning briefly.
займ под птс Деньги под ПТС: Кратчайший Путь к Финансовой Независимости В современном мире, где скорость и доступность финансовых ресурсов имеют первостепенное значение, возможность оперативно получить нужную сумму становится неоценимой. Для владельцев автомобилей, нуждающихся в срочном финансировании, существует эффективный инструмент – деньги под ПТС. Эта услуга позволяет использовать ликвидность вашего транспортного средства для получения наличных, сохраняя при этом право пользования автомобилем. Такой подход значительно упрощает процесс получения средств по сравнению с традиционными банковскими кредитами, требующими внушительного пакета документов и длительного времени на рассмотрение заявки. Процесс оформления денег под ПТС отличается оперативностью и минимальными требованиями. Заемщику, как правило, необходим лишь паспорт гражданина РФ, сам паспорт транспортного средства (ПТС) и свидетельство о регистрации автомобиля. Оценка транспортного средства проводится на месте, что позволяет максимально быстро определить возможную сумму займа. Главное преимущество заключается в том, что автомобиль остается в собственности заемщика и продолжает использоваться им в повседневной жизни, что делает эту услугу особенно привлекательной для тех, кто не готов расставаться со своим транспортом.
The clarity here is something I really appreciate, especially compared to sites that pile on jargon for no reason, and a look at learnandprogressdaily was the same, simple direct sentences that actually deliver information instead of dancing around the point for paragraphs at a time which wastes reader patience.
скачать melbet [url=https://limon-ads.ru]скачать melbet[/url]
Felt no urge to argue with the conclusions even though I started the post slightly skeptical, and a look at imobush maintained that pattern, writing that earns agreement through clarity of argument rather than rhetorical pressure is the kind I find most persuasive and the kind I want to read more of these days.
Loved the writing voice here, friendly without being fake and confident without being arrogant, and a stop at startwithclarity carried the same tone forward, the kind of personality that makes a reader feel welcome rather than lectured at which is a balance plenty of writers struggle to find no matter how long they have been at it.
Now recognising that the post handled the topic with appropriate technical precision without becoming dry, and a stop at growwithsteadyfocus continued that balance, technical precision and readability are often in tension and this site has clearly figured out how to maintain both at once which is one of the harder editorial achievements in the form.
нарколог на дом вывод из запоя на дому [url=https://narkolog-na-dom-moskva-27.ru]нарколог на дом вывод из запоя на дому[/url]
Dude, that neon vibe they nailed in the description is wild! If you’re looking for that visual punch, check out jilipg. It’s way more than just slots; it’s an experience.
сонный гномик одежда для новорожденных [url=https://detskie-kombinezony-kupit.ru]https://detskie-kombinezony-kupit.ru[/url]
Appreciate the thoughtful approach, the writer clearly took time to make this readable for someone who is not already an expert, and a look at everydayvaluecorner kept that going nicely, easy on the eyes and easy on the brain which is always a winning combination when reading on a busy day.
Now considering writing a longer note about the post somewhere, and a look at buildfocusedmomentum added more material for that note, content that prompts me to write rather than just consume is content with generative energy and this site is producing that generative effect for me at a higher rate than most sources.
Reading this gave me a small jolt of recognition for an experience I thought was just mine, and a stop at linencovevendorparlor produced more such jolts, content that universalises private experiences without flattening them is doing genuinely useful work and this site is providing that recognition function for me reliably across topics I read.
Now noticing the post fit a particular gap in my reading without my having articulated the gap before, and a look at startfreshtoday extended that gap filling effect, content that meets needs I had not consciously formulated is content with reader insight and this site has clearly developed that anticipatory editorial sense across many pieces.
Reading this prompted a small redirection in something I was working on, and a stop at discovernewpotential extended that redirecting influence, content that affects my actual work rather than just my thinking has the highest practical impact and this site is providing that level of influence for me at a sustainable rate apparently.
If I am being honest this is the kind of site I quietly hope my own work will someday resemble, and a stop at scrolltower extended that aspirational feeling, finding work that models what I want to produce is part of why I read carefully and this site has been performing that modelling function for me lately consistently.
Looking through the archives suggests this site has been doing this for a while at this level, and a look at growwithfocusedsteps confirmed the long term consistency, sites that have maintained quality across years rather than just a recent stretch are sites with serious editorial discipline and this one has clearly been at it for a while.
Thanks for sharing this with the open internet rather than locking it behind a paywall like so many sites do now, and a stop at discoverwinningpaths kept the same vibe going, generous helpful and clearly written by someone who actually wants people to learn from it rather than just charge them.
Reading this confirmed something I had been suspecting about the topic, and a look at buildsmartmomentum pushed that confirmation toward greater confidence, content that lines up with independently held intuitions earns a special kind of trust and I will return to writers who consistently land that way for me without overselling positions.
melbet [url=https://tcso-begovoy.ru]melbet[/url]
Reading this gave me a small sense of progress on a topic I have been slowly working through, and a stop at buildstrategicdirection added another step forward, learning happens in small increments across many sources and finding sources that consistently contribute is the actual practical value of careful curation in an information rich world.
виза Испания сколько делается Учебная виза в Испанию 2026 для программ от 90 дней. Нужны: приглашение из вуза или языковой школы, подтверждение оплаты, выписка о финансах (700 евро/месяц). В Новосибирске наше агентство готовит нострификацию документов об образовании, переводит их у нотариуса, помогает оформить страховку на год. Стоимость — от 24 000 руб. Учитесь в Мадриде или Барселоне — мы сделаем визу реальностью.
If I had to summarise the editorial sensibility of this site in a few words it would be careful and human, and a look at createclaritysteps extended that summary feeling, capturing the essence of a sites approach in brief is hard but this site has a clear enough identity that the summary comes naturally enough.
Speaking as someone who reads a lot on this topic this site has earned a high position in my source rankings, and a stop at startthinkingstrategically reinforced that ranking, the informal ranking of sources for a topic is something I maintain mentally and this site has moved into the upper portion of those rankings clearly.
Reading this site over the past week has changed how I evaluate content in this space, and a look at createbetterresults extended that recalibration, the standards I bring to reading on the topic have shifted upward as a direct result of regular exposure to this kind of work and that shift will outlast any single reading session.
Useful reading material, the kind I can hand off to someone newer to the topic without worrying about confusing them, and a quick look at discovermeaningfulgrowth confirmed the same beginner friendly tone runs throughout the site which is great for sharing with people just starting their learning journey on this particular topic.
Worth recognising that the post did not pretend to be the final word on the topic, and a stop at jebbeo continued that humility, content that admits its own scope and limits is more trustworthy than content that overreaches and this site has clearly developed the editorial maturity to know what it can and cannot claim well.
Once you start reading carefully here it is hard to go back to lower quality alternatives, and a stop at learnandoptimizefast reinforced that ratchet effect, the way good content raises standards is real over time and this site has clearly contributed to raising my expectations for what is possible in writing on the topic generally.
Genuine reaction is that this site clicked with how I like to read, and a look at inaarch kept that comfortable fit going, sometimes you find a place online whose editorial decisions just align with your preferences and when that happens it is worth recognising and supporting through repeat engagement consistently going forward.
Liked the careful word choice throughout, every term seemed picked for a reason rather than thrown in casually, and a stop at holcap continued that precise style, this kind of attention to small details is what separates careful writing from the usual rushed content that dominates blog spaces today across pretty much every topic I follow.
Took a screenshot of one section to come back to later, and a stop at buildsmartprogress prompted another saved tab, the urge to capture and revisit specific pieces of content is something I rarely feel but when I do it tells me the work is worth more than the average passing read for sure.
Worth saying that the prose reads naturally without straining for style, and a stop at explorecreativeoptions maintained the same unforced quality, writing that achieves elegance without effort is the highest tier and this site has clearly worked out how to land that effortless quality consistently rather than only on the writers best days.
High quality writing, no marketing speak and no buzzwords that mean nothing, and a stop at learnandexpandfast kept that going, simple direct content that actually communicates something is harder to find than it should be and this is one of the rare places that gets it right consistently across many different posts.
Quality you can feel from the first paragraph, the writer clearly knows the topic and how to share it, and a quick look at oliveorchard confirmed the same depth runs throughout the rest of the site as well which is rare and worth pointing out when it happens online for any reader passing through.
Found a couple of useful angles in here I had not considered before reading carefully, and a quick stop at createimpacttogether added more, this is one of those sites where the value compounds the more you read rather than peaking at one viral post and then offering nothing else of substance afterwards which is common.
Got pulled in by the headline and stayed because the content actually delivered on the promise, and a stop at startwithclearvision kept that trust intact, when a site lives up to its own framing it earns the right to keep showing up in my browser tabs going forward indefinitely from here on out really.
Once I trust a site this much I tend to read everything they publish and that is the trajectory I am on with this one, and a stop at createfocusedaction confirmed the trajectory, the rare progression from interested reader to comprehensive reader is something only certain sites earn and this one is earning that progression rapidly.
Reading this gave me a quiet moment of intellectual pleasure that I had not been expecting, and a stop at hupido extended that pleasure across more pages, the unexpected reward of stumbling into careful writing is one of the small ongoing pleasures of reading the open web and this site is delivering it reliably.
найти телефон по номеру через спутник бесплатно онлайн [url=https://kak-najti-cheloveka-po-nomeru-telefona-2.ru]https://kak-najti-cheloveka-po-nomeru-telefona-2.ru[/url]
Glad to find a site whose links lead somewhere worth going rather than back to itself for SEO juice, and a stop at growwithconfidencenow kept that generous outbound feel, citing other peoples work with real respect rather than just for ranking signals is a sign of an honest operation worth supporting going forward.
Worth pointing out that the post avoided the temptation to summarise everything at the end, and a look at buildsmartfoundations continued that confident closing approach, content that trusts readers to retain the substance without being reminded of it at the end is content that respects the reader and this site practices that respect.
Bookmark earned, share earned, return visit earned, all from one reading session, and a look at seosprout did the same, the trifecta of bookmark and share and return is rare in a single visit and represents the highest level of engagement I tend to offer any piece of online content these days here.
мелбет скачать приложение на андроид [url=https://elenagatilova.ru]мелбет скачать приложение на андроид[/url]
Speaking as someone who reads a lot on this topic this site has earned a high position in my source rankings, and a stop at buildyournextmove reinforced that ranking, the informal ranking of sources for a topic is something I maintain mentally and this site has moved into the upper portion of those rankings clearly.
Looking back on this reading session it stands as one of the better ones recently, and a look at createprogressmapping extended that ranking, the informal ranking of reading sessions against each other is something I do mentally and this session ranks high largely because of this site and a couple of related pages here.
Picked this up while looking for something else and ended up reading every paragraph because it was actually informative, and after buildstrategicdirection I was sure I would come back, that does not happen often when most sites bury the useful parts under endless ads and pop ups today and across most categories online.
One of the more thoughtful posts I have read recently on this topic, and a stop at findnewopportunityflows added even more weight to that impression, this is genuinely good content that holds its own against far better known sites in the same space without trying to imitate any of them at all which I appreciate.
Just want to flag that this was useful and not bury the appreciation in caveats, and a look at buildactionableprogress earned the same direct praise, recognising good work without hedging it with criticism is something I try to practice because over qualified compliments tend to read as backhanded and miss the point sometimes.
Picked up several practical tips that I plan to try out this week, and a look at learnanddevelopquickly added a few more I will be testing alongside, content with practical hooks that connect to my actual life is the kind that earns my repeat attention rather than the merely interesting that I forget within a day.
Reading this post made me realise I had been settling for lower quality elsewhere, and a look at createprogressframework extended that recalibration, content that exposes how much I had been accepting in adjacent sources is content with calibrating effect on my standards and this site is performing that calibration function across topics for me reliably.
ко ланта ко ланта
Skipped a meeting reminder to finish the post, and a stop at siloteapot held me past another reminder, when content beats meetings the writer is doing something extraordinary because meetings have institutional support behind them and yet good writing can still occasionally win that competition for attention which I find heartening today.
Honestly impressed by how much useful content sits in such a small post, and a stop at learnandoptimizeprocesses confirmed the rest of the site packs a similar punch, density without confusion is a hard balance to strike and this site has clearly cracked the code on it across many different topic areas covered.
I wish I could craft such articles as this. Thank you very much.
Now I want to find more sites like this but I suspect they are rare, and a look at startmovingforward extended that thought, the few sites that meet this quality bar are precious specifically because they are rare and finding others like them is one of the ongoing projects of careful internet curation across the years.
Once I had read three posts the editorial pattern was clear, and a look at bakeboxshop confirmed the pattern from a fourth angle, sites where the underlying approach reveals itself through accumulated reading rather than being announced are sites with real depth and this one has that quality clearly visible across multiple pieces consistently.
Worth marking the moment when reading this clicked into something useful for my own work, and a look at createyourstorytoday extended that practical click, content that connects to my actual life rather than just being interesting is content with the highest kind of value and this site is generating that connection at a high rate.
Took a chance on the headline and was rewarded, and a stop at discoveropportunityzones kept the rewards coming as I clicked through, the kind of place where every link leads somewhere worth the click is a small luxury on the modern web where so many sites are mostly empty calories disguised as content.
Took a chance on the headline and was rewarded, and a stop at findbetterapproaches kept the rewards coming as I clicked through, the kind of place where every link leads somewhere worth the click is a small luxury on the modern web where so many sites are mostly empty calories disguised as content.
Now considering writing a longer note about the post somewhere, and a look at findgrowthopportunitiesnow added more material for that note, content that prompts me to write rather than just consume is content with generative energy and this site is producing that generative effect for me at a higher rate than most sources.
Speaking as someone who reads a lot on this topic this site has earned a high position in my source rankings, and a stop at createimpactquickly reinforced that ranking, the informal ranking of sources for a topic is something I maintain mentally and this site has moved into the upper portion of those rankings clearly.
Now appreciating the small but real way this post improved my afternoon, and a stop at startnextphase extended that small improvement effect, content that produces measurable positive impact on the texture of a reading day is content with real value and this site is producing those small positive impacts at a sustainable rate apparently.
Good post, the kind that respects the reader by getting to the point quickly without skipping the details that matter, and a short look at learnandrefine confirmed that approach is consistent across the site which is rare to find online these days, definitely a place I will return to soon.
One of the more thoughtful posts I have read recently on this topic, and a stop at surgesorrel added even more weight to that impression, this is genuinely good content that holds its own against far better known sites in the same space without trying to imitate any of them at all which I appreciate.
Now adding the writer to a small mental list of voices I want to follow, and a look at startwithpurposefulsteps reinforced that follow intention, the few writers whose work I actively track are writers who have demonstrated sustained quality and this writer has clearly demonstrated that sustained quality across the pieces I have sampled here today.
Picked a single sentence from this post to remember, and a look at createvisionforward gave me another to keep, content that produces memorable lines is doing more than just transferring information and the small selection of sentences I keep from each reading session is one of the actual returns I get from reading carefully.
Now planning to come back when I have the right kind of attention to read carefully, and a stop at buildactionableprogress reinforced that plan, choosing the right moment to read certain content is a quiet form of respect for the work and this site is generating those careful planning behaviours from me consistently as a reader.
Coming to this with low expectations and being pleasantly surprised by the substance, and a stop at learnandadvancefaster continued exceeding expectations, the recalibration of expectations upward across multiple positive readings is one of the actual rewards of careful browsing and this site is providing that recalibration at a steady rate apparently.
Now appreciating that the post left me with enough to say in a follow up conversation, and a look at inobrat added more material for those follow ups, content that prepares me for related conversations rather than just informing me alone is content with social utility and this site provides that social armament reliably for me.
Came across this through a roundabout path and now it is on my regular rotation, and a stop at buildyournextmove sealed that decision, the open web still produces serendipitous discoveries when you let the citations and references guide you rather than relying purely on algorithmic feeds for new content recommendations always.
Reading this felt productive in a way most internet reading does not, and a look at discovercreativegrowth continued that productive feeling, sometimes the open web feels like a waste of time but sites like this remind me why I still bother to look around rather than retreating to old reliable sources for everything I need.
This one is staying open in a tab for the rest of the day so I can come back and re read certain parts, and a look at buildforwardthinking suggests I will be doing the same with a few more pages here too, this is going to be a deep dive over the coming hours.
Easy to recommend, the content speaks for itself without needing additional praise from me, and a stop at holdax only adds more reasons to send people this way, the kind of generous resource that benefits its readers without demanding anything in return is increasingly rare and worth recognising clearly today across the broader open internet.
melbet скачать [url=https://limon-ads.ru]melbet скачать[/url]
Closed the post with a small satisfied sigh, and a stop at seolift produced the same gentle exhale, content that ends well is content that respects the rhythm of reading and the writers here have clearly thought about how their pieces close rather than just trailing off when they run out of things to say.
Better than most of the writing I have come across on this topic recently, simpler and more direct, and a look at jebbird continued in that same way, a real outlier in a crowded space full of repetitive content that says little while taking up a lot of reader time today which is unfortunate.
Considered as a whole this site has developed a coherent point of view that comes through in individual pieces, and a look at createimpactsteps continued displaying that coherence, sites with a unified perspective rather than a grab bag of takes are sites with editorial maturity and this one has clearly developed that maturity through years of work.
Now placing this in the small category of sites whose updates I would actually want to know about, and a stop at bulkingbayou confirmed that placement, the difference between sites I want to follow and sites I just consume from is real and this one has crossed into the active follow category from the casual consumption side.
Looking forward to seeing what gets published next month, and a look at exploreideaswithpurpose extended that anticipation across the broader site, finding myself looking forward to a sites future content rather than just consuming its existing content is a stronger commitment level than I usually reach with new finds and this site triggered that.
A clear cut above the usual noise on the subject, and a look at buildsustainableprogress only made that gap wider in my view, the kind of place that earns its visitors through quality rather than through aggressive marketing or sponsored placements which is increasingly the only way most sites stay afloat across the modern web.
школа онлайн дистанционное обучение [url=https://shkola-onlajn-51.ru]школа онлайн дистанционное обучение[/url]
Liked the careful selection of which details to include and which to skip, and a stop at learnandscale reflected the same editorial judgement, knowing what to leave out is just as important as knowing what to include and this site has clearly figured out where that line sits for the topics it covers regularly.
Came away with some new perspectives I had not considered before, and after findyourgrowthlane those ideas felt more complete, the kind of content that stays with you a little while after reading rather than slipping out the moment you switch tabs and move on with your day to whatever comes next.
Even from a single post the editorial care is clear, and a stop at buildsustainablemomentum extended that care across more pages, the kind of attention to quality that shows up in every paragraph is what separates serious sites from the rest and this one has clearly invested in that paragraph level attention across what I have read.
Reading this in the time it took to drink half a cup of coffee, and a stop at hurbug fit naturally into the second half, content that respects the rhythms of a typical morning is content with practical fit and this site has the kind of length and pacing that works for the way I actually read.
Well structured and easy to read, that combination is rarer than people think, and a stop at buildsmartdirection confirmed the same standard runs across the rest of the site, definitely the kind of place I will be coming back to when this topic comes up in conversation later again over the weeks ahead.
Liked that the post left some questions open rather than pretending to settle everything, and a stop at startwithpurpose continued that intellectual honesty, content that respects the limits of its own claims is more trustworthy than content that overreaches and this site has clearly figured out which positions it can defend confidently.
If the topic interests you at all this is a place to spend time, and a look at explorefreshgrowthideas reinforced that recommendation, the broader question of where to invest topical reading time is one this site answers convincingly through the consistent quality across multiple pieces I have sampled during the current reading session today.
Reading this triggered a small but real correction in something I had assumed, and a stop at startthinkingclearly extended that corrective effect, content that updates my beliefs through evidence rather than rhetoric is content with intellectual integrity and this site has earned that label consistently across the pieces I have read so far today.
Definitely a recommend from me, anyone curious about the topic should check this out, and a look at explorefreshthinkingnow adds even more reason for that, the depth and quality combine to make this site one I will be pointing people toward whenever similar conversations come up over the months ahead at work or socially.
Now noticing how rare it is to find a site that does not feel rushed, and a look at startnextlevelgrowth extended that calm pace, content produced without time pressure has a different quality than content shipped to meet a deadline and this site reads as written without urgency which produces a different and better experience for readers.
Now thinking I want more sites built on this kind of editorial foundation, and a stop at learnandoptimizepath extended that wish into a broader hope, sites built on substance and care rather than on metrics and growth are the kind of sites I want to see more of and this one is a small example worth supporting.
Reading more of the archives is now on my plan for the weekend, and a stop at findgrowthopportunitiespath confirmed the archive worth the time, the rare archive worth a dedicated reading session rather than just casual sampling is the rare archive of serious work and this site has clearly produced enough of that work to warrant the deeper exploration.
мелбет скачать приложение на андроид [url=https://elenagatilova.ru]мелбет скачать приложение на андроид[/url]
The headings made navigating the post simple even when I needed to find a specific section quickly, and a look at inobrisk continued the same thoughtful structure, small details like clear headings show that someone is actually thinking about how the reader uses the page rather than just filling it for length alone.
Reading this as part of my evening winding down routine fit perfectly, and a stop at startwithpurposefulsteps extended the wind down nicely, content that calms rather than agitates is what I want at the end of the day and this site provides that calming reading experience reliably which is increasingly rare across the modern web.
Liked the way the post got out of its own way, and a stop at createimpactjourney extended that invisible craft, the best writing you barely notice while reading because it is doing its work without drawing attention to itself and this site has clearly mastered that disappearing act across the pieces I have read.
Liked the way the post balanced confidence and humility, and a stop at growyourcapabilities maintained the same balance, knowing when to assert and when to acknowledge uncertainty is a sign of mature thinking and the writers here have clearly developed that calibration through what I assume is years of careful work on their craft.
A piece that read as if the writer was thinking carefully rather than just typing fluently, and a look at parcelparadise continued that considered quality, the difference between fluent typing and careful thinking shows up in writing and this site reads as the product of thought rather than just the product of language fluency apparently.
Now planning a longer reading session for the archives, and a stop at syrupserif confirmed the archives are worth that longer commitment, sites with archives I want to read deliberately rather than just sample are rare and this one has clearly earned that level of interest based on the consistency of what I have already read.
Really appreciate this kind of writing, no shouting and no clickbait headlines just steady useful content, and a quick look at startnextchapter kept that going, definitely a site I will be returning to whenever I need a sensible take on similar topics in the days ahead and also during slower work weeks.
Now appreciating that the post did not try to imitate any other style I might recognise, and a stop at startyournextphase continued that distinct voice, content with its own register rather than borrowed from elsewhere is content with real authorial presence and this site has clearly developed that presence through what feels like patient editorial work.
Reading this confirmed something I had been suspecting about the topic, and a look at learnandprogresssteadily pushed that confirmation toward greater confidence, content that lines up with independently held intuitions earns a special kind of trust and I will return to writers who consistently land that way for me without overselling positions.
отследить местоположение по номеру телефона [url=http://kak-najti-cheloveka-po-nomeru-telefona-2.ru]отследить местоположение по номеру телефона[/url]
Got pulled in by the headline and stayed because the content actually delivered on the promise, and a stop at seomagnet kept that trust intact, when a site lives up to its own framing it earns the right to keep showing up in my browser tabs going forward indefinitely from here on out really.
A particular kind of restraint shows up in the writing, and a look at createpositiveoutcomes maintained the same restraint across pages, knowing what not to say is just as important as knowing what to say and this site has clearly developed strong instincts on both sides of that editorial line throughout pieces I have read.
A handful of memorable phrases from this one I will probably use later, and a look at discoverpowerfulpaths added a couple more, content that contributes language to my own communication rather than just facts is content with a different kind of utility and this site is providing that linguistic utility consistently across what I read.
Honestly this was a good read, no jargon and no padding, and a short look at buildlongtermstrength kept that same feel going which I really appreciated, the writer clearly knows the topic well enough to explain it without hiding behind big words or filler that often gets used to seem clever.
Now feeling something close to gratitude for the fact this site exists, and a look at holpod extended that gratitude, the rare site that produces this kind of response is the rare site worth defending in conversations about whether the modern internet is still capable of producing genuinely valuable independent content for serious adults.
конверт комбинезон трансформер для новорожденных [url=https://www.detskie-kombinezony-kupit.ru]https://www.detskie-kombinezony-kupit.ru[/url]
Reading the writers other posts after this one suggests the quality is consistent rather than peak, and a stop at startpurposefuljourney confirmed the consistent quality reading, sites that hold the same level across many pieces rather than peaking on a few are sites with sustainable editorial discipline and this one has clearly developed that.
Came in expecting another generic take and got something with actual character instead, and a look at discovercreativepaths carried that personality forward, finding a distinct voice on a saturated topic is impressive and worth pointing out when it happens because most sites end up sounding identical to their nearest competitors quickly.
free single bet calculator [url=https://singlebet-calculator.com]https://singlebet-calculator.com[/url] .
Worth saying that the quiet confidence of the writing is what landed first, and a look at buildclarityforward continued that quiet quality, confident writing without the loud display of confidence is a rare combination and this site has clearly developed both the knowledge and the editorial restraint to land that combination consistently.
Really grateful for content like this, it does not waste my time and it does not insult my intelligence either, and a quick look at startwithclearfocus was the same, balanced respectful writing that makes a person feel welcome rather than rushed through pages of forced engagement just to keep clicking around.
Understanding odds formats is important when using a single bet calculator.
accumulator calculator football [url=http://single-betcalculator.com/bet-calculator/accumulator/]https://single-betcalculator.com/bet-calculator/accumulator/[/url]
Güvenli bahis deneyimi için [url=https://1xbet-giris-78.com]1xbet giriş[/url] adresini kullanabilirsiniz.
1xbet hesabınıza erişim sağlamak. Giriş yaparken dikkat edilmesi gereken bazı noktalar vardır. İlk olarak doğru adresin kullanılması önemlidir. Site güvenliğine verilen önem yüksektir.
1xbet giriş ekranına ulaşmak için sayfanın üst kısmındaki giriş butonuna tıklanmalıdır. Hatalı bilgi girişinde erişim sağlanamaz. Her zaman resmi site olduğundan emin olunması gerekir.
Yeni kullanıcılar kolayca siteye kayıt olabilirler. Bilgilerin eksiksiz ve doğru doldurulması önem taşır. Bazı durumlarda hesabınızı onaylemek için ek adımlar uygulanabilir.
1xbet girişi yaptıktan sonra pek çok fırsattan yararlanabilirsiniz. Spor bahisleri ve canlı oyunlar kolaylıkla oynanabilir. Kampanyalar hakkında bilgi alabilir ve fırsatları yakalayabilirsiniz.
Different bookmakers use various odds formats like decimal, fraction, or American.
trebles bet [url=https://single-bet-calculator.uk/bet-calculator/treble/]https://single-bet-calculator.uk/bet-calculator/treble/[/url]
Closed the post with a small satisfied sigh, and a stop at explorefreshthinkingpaths produced the same gentle exhale, content that ends well is content that respects the rhythm of reading and the writers here have clearly thought about how their pieces close rather than just trailing off when they run out of things to say.
Worth saying that the writing carries a particular kind of authority without making any explicit claims to it, and a stop at startpurposefuljourney extended that earned authority feeling, sites that demonstrate expertise through the quality of their explanations rather than by stating credentials are sites I trust most and this site has it.
accumulator each way calculator [url=https://www.single-bet-calculator-free.uk/bet-calculator/accumulator]https://single-bet-calculator-free.uk/bet-calculator/accumulator/[/url]
kalkulator single bet [url=http://www.singlebetcalculator.uk]https://singlebetcalculator.uk/[/url]
Honest take is that I will probably forget most of what I read online today but this post is one I will remember, and a stop at findyournextstage kept that same memorable quality going, certain writing leaves a residue in the mind in a way most content simply does not manage.
Additionally, the tools reduce the chance of miscalculations and financial errors.
doubles bet calculator [url=https://single-bet-calculator-free.com/bet-calculator/double/]https://single-bet-calculator-free.com/bet-calculator/double/[/url]
Если интересует эта тема, вот рабочая тема. Многие спрашивали, делюсь полезной ссылкой: [url=https://teobit.ru]мелбет казино скачать на андроид[/url].
Сам сервис сейчас один из лучших, линия на футбол и теннис огромная. К тому же есть нормальные live-ставки.
Там сейчас можно неплохо увеличить первый депозит, рекомендую воспользоваться. Что думаете?
If you are into betting, using a single bet calculator can be extremely helpful.
double stakes about bet calculator [url=http://single-betcalculator.uk/bet-calculator/double/]https://single-betcalculator.uk/bet-calculator/double/[/url]
Liked the way the post balanced confidence and humility, and a stop at jebbrood maintained the same balance, knowing when to assert and when to acknowledge uncertainty is a sign of mature thinking and the writers here have clearly developed that calibration through what I assume is years of careful work on their craft.
Now feeling slightly more committed to my own careful reading practices having read this, and a stop at buildgrowthmomentum reinforced that commitment, content that models the kind of attention it deserves is content that calibrates the reader and this site has clearly raised my own bar for what to bring to good writing today.
I usually skim posts like these but this one held my attention all the way through, and a stop at startsmartprogress did the same, that is a strong endorsement coming from me because I am usually quick to bounce when content gets repetitive or fails to deliver on its initial promise made in the headline.
Well crafted post, the structure flows naturally from one point to the next without forcing transitions, and a stop at irotix kept the same flow going, you can tell when a writer has thought about how their content reads rather than just what it contains and this is one of those examples.
Stands apart from similar pages by actually being useful, that is high praise these days, and a look at nutmegnetwork kept that standard going, you can tell when a site is built around the reader versus around metrics and this one clearly belongs to the first category for sure based on what I read.
Bookmarking this for later, the kind of resource I want to keep nearby, and a quick look at exploreideasdeeply confirmed the rest of the site is worth the same treatment, definitely going into my reference folder for the next time the topic comes up at work or in conversation with someone who asks.
Now appreciating that the post left me with enough to say in a follow up conversation, and a look at explorefreshgrowthideas added more material for those follow ups, content that prepares me for related conversations rather than just informing me alone is content with social utility and this site provides that social armament reliably for me.
A piece that prompted a small mental rearrangement of how I order related ideas, and a look at discoverforwardideas extended that rearranging effect, content that affects the structure of my thinking rather than just adding to it is content with the deepest kind of impact and this site is reaching that depth for me today.
A clean read with no irritations, and a look at findyournextdirection continued that frictionless quality, the absence of small irritations is something I notice only when present elsewhere and this site is one of the rare places where everything just works and lets me focus on the substance rather than fighting the format.
During my morning reading slot this fit perfectly into the routine, and a look at husbury extended that perfect fit into the rest of the routine, content that matches the rhythm of how I actually read rather than demanding accommodation from my schedule is content well calibrated to its likely audience and this site has it.
Will share this on a forum I am part of where it will be appreciated by others working in the same area, and a look at growstepwisely suggests there is more here worth passing along too, definitely a generous resource that deserves a wider audience than it probably has today across the open internet.
Now feeling slightly more optimistic about the state of independent writing online, and a stop at startbuildingvision extended that quiet optimism, sites like this one are the reason I have not given up on the open web entirely and finding them occasionally renews the case for paying attention to non algorithmic content sources today.
лечение алкоголизма вызов на дом [url=https://narkolog-na-dom-moskva-28.ru]лечение алкоголизма вызов на дом[/url]
Worth pointing out that the writer made the topic feel more interesting than I had been expecting, and a look at growfocusedexecution continued that elevation effect, content that improves the apparent quality of its subject through skilled treatment is doing something real and this site has clearly developed that kind of editorial alchemy throughout.
Now feeling slightly more committed to my own careful reading practices having read this, and a stop at learnandoptimizegrowth reinforced that commitment, content that models the kind of attention it deserves is content that calibrates the reader and this site has clearly raised my own bar for what to bring to good writing today.
мелбет скачать приложение [url=https://limon-ads.ru]мелбет скачать приложение[/url]
A piece that demonstrated competence without performing it, and a look at findgrowthsolutions maintained the same self assured but unshowy register, the gap between competence and performance of competence is one I track and this site has clearly chosen to demonstrate rather than perform which I find much more persuasive as a reader.
Reading this brought back the satisfaction I used to get from blogs ten years ago, and a stop at seomotion kept that nostalgic quality alive, sites that capture what was good about an earlier era of internet writing are increasingly precious and this one is doing that without feeling like a deliberate throwback at all.
Reading this in the morning set a good tone for the day, and a quick visit to startnextleveldirection kept that good tone going, content can do that sometimes when it hits the right notes and finding sites that consistently strike that tone is something I have learned to recognise and reward with regular visits.
Started this morning and finished at lunch with a small sense of having spent the time well, and a look at createactionwithpurpose extended that satisfaction into the afternoon, content that fits naturally into the rhythm of a working day rather than demanding a dedicated reading block is increasingly the kind I prefer.
Worth saying that the prose reads naturally without straining for style, and a stop at growwithstrategyfocus maintained the same unforced quality, writing that achieves elegance without effort is the highest tier and this site has clearly worked out how to land that effortless quality consistently rather than only on the writers best days.
Took the time to read every paragraph rather than skimming for the punchline, and a quick visit to chairchampion earned the same careful attention from me, that is the highest signal I can give about content quality because my default mode is rapid scanning rather than deliberate reading on most pages.
Better signal to noise ratio than most places I check on this kind of topic, and a look at sagevogue kept that going, every paragraph here carries something worth reading rather than padding out the page to hit some arbitrary length target that search engines reward but readers ignore as soon as they notice it.
Found this through a friend who recommended it and now I see why, and a look at holzix only strengthened that recommendation in my own mind, word of mouth still works for content that actually delivers and this site is clearly earning recommendations the old fashioned way through quality rather than marketing.
Came away feeling slightly smarter than I was when I started, that is a real win, and a stop at createactionwithpurpose added a bit more to that, the rare site that actually transfers some of its knowledge to the reader in a way that sticks rather than just creating an illusion of learning briefly.
Will share this on a forum I am part of where it will be appreciated by others working in the same area, and a look at buildlongtermfocus suggests there is more here worth passing along too, definitely a generous resource that deserves a wider audience than it probably has today across the open internet.
Got pulled in by the headline and stayed because the content actually delivered on the promise, and a stop at explorefuturevisions kept that trust intact, when a site lives up to its own framing it earns the right to keep showing up in my browser tabs going forward indefinitely from here on out really.
Came here from another site and ended up exploring much further than I planned, and a look at irubelt only encouraged more exploration, the kind of place where one click leads to another not through manipulative design but through genuinely interesting content is rare and worth highlighting when found like this somewhere on the open internet.
мелбет [url=https://elenagatilova.ru]мелбет[/url]
Looking at this objectively the editorial quality is hard to deny even setting aside personal taste, and a stop at buildlongtermstrength maintained the same objective quality, the gap between what I personally enjoy and what is objectively well crafted exists and this site clears both bars simultaneously which is rarer than it sounds.
escort секс чат семейная пара
Honestly the simplicity is what makes this work, the topic is not buried under filler words or overly complex examples, and a quick look at buildintentionalsteps showed the same sensible style, I left with what I came for and no headache from over reading which is a real win these days.
Better than the average post on this subject by some distance, and a look at findyourprogressroute reinforced that, you can tell within the first paragraph that the writer here actually cares about the topic rather than just covering it for the sake of having something to publish that week or that day.
Came away with a small but real shift in perspective on the topic, and a stop at findbetterwaysforward pushed that shift a bit further, the kind of subtle reframing that good writing does to a reader without making a big deal of it is something I always appreciate when it happens which is sadly not that often.
A piece that respected the reader by not over explaining the obvious, and a look at growstepbystrategy continued that calibrated approach, finding the right level of explanation is one of the harder editorial calls and this site has clearly thought carefully about what readers will already know versus what they need help with consistently.
Really appreciate the lack of pop ups, modals, cookie banners stacking on top of each other, and a quick visit to createconsistentdirection confirmed the same clean approach across the rest of the site, technical decisions about user experience are part of what makes content actually pleasant to engage with for sure.
Recommended without reservation for anyone interested in the topic at any level of expertise, and a look at createimpactstructure only strengthens that recommendation, this site clearly knows how to serve readers across a range of backgrounds without watering down the content or talking past anyone in the audience which is genuinely impressive to see.
Just sat with this for a bit longer than I usually would because the points are worth thinking about, and after jebmug I had even more to chew on, the kind of post that nudges your thinking forward without forcing the issue is something I have always appreciated in good writing online.
Reading this confirmed something I had been suspecting about the topic, and a look at buildscalableprogress pushed that confirmation toward greater confidence, content that lines up with independently held intuitions earns a special kind of trust and I will return to writers who consistently land that way for me without overselling positions.
If you scroll past this site without looking carefully you will miss something, and a stop at brightbanyan extended that mild warning, the surface of the site does not advertise its quality loudly which means careful attention is required to recognise what is being offered here which is itself a kind of editorial signal.
спот Зайтун Хургада Гибкие цены на обучение кайтсерфингу Хургада позволяют вам выбрать тот пакет тренировок, который идеально вписывается в ваш план отпуска.
кайт школа в крыму Обучение кайтсерфингу в Хургаде — это структурированный процесс, где каждый шаг логичен и направлен на ваш скорейший прогресс.
Following a few of the internal links revealed more posts of similar quality, and a stop at buildfocusedprogress added more to that growing pile, sites where internal links lead to more good content rather than to more of the same recycled material are sites with depth and this one has clearly built that depth carefully.
Came in expecting another generic take and got something with actual character instead, and a look at findyournextfocus carried that personality forward, finding a distinct voice on a saturated topic is impressive and worth pointing out when it happens because most sites end up sounding identical to their nearest competitors quickly.
Now adding a small note in my reading log that this site is one to watch, and a look at findmomentumquickly reinforced the watch status, the few sites I track deliberately rather than encounter accidentally are sites I expect ongoing returns from and this one has cleared the bar for that elevated tracking based on what I read.
During a quiet evening reading session this provided just the right depth without being heavy, and a stop at createclearoutcomes maintained the same evening appropriate weight, content with depth that does not exhaust the reader is content with editorial calibration and this site has clearly figured out how to be substantial without being demanding all the time.
Народ, если кто искал, толковый разбор. Выкладываю, чтобы не потерялось, все работает без проблем здесь: [url=https://teobit.ru]melbet скачать на андроид[/url].
Кстати, площадка сейчас один из лучших, коэффициенты вполне адекватные. Там еще есть нормальные live-ставки.
Для новых пользователей можно неплохо увеличить первый депозит, так что можно затестить. Всем удачи!
Если вы ищете серия сезон турецкий сериал без траты времени и подозрительных ресурсов, загляните в нашу подборку лучших турецких телешоу. Здесь собраны как популярные новые проекты, так и проверенные временем хиты, которые продолжают завоевывать зрителей по всему миру. Многие пользователи выбирают турецкие сериалы из-за захватывающих историй, ярким персонажам, атмосферным съемкам и насыщенной драматургии, которая не отпускает до финала. Просмотр доступен в отличном качестве, без лишних формальностей и ненужных шагов.
Started reading skeptically because the headline seemed overconfident, and the post earned the headline by the end, and a look at hyxarch continued that pattern of earning its claims, sites that can back up their headlines without overpromising are rare and this one has clearly developed editorial calibration on that front consistently.
поиск человека по номеру телефона [url=http://www.kak-najti-cheloveka-po-nomeru-telefona-2.ru]http://www.kak-najti-cheloveka-po-nomeru-telefona-2.ru[/url]
Felt like the writer was speaking directly to someone with my level of curiosity, neither talking down nor showing off, and a stop at seomotive kept that comfortable matching going, finding writing that meets you where you are rather than asking you to climb up or stoop down feels great every time it happens.
More original than the recycled takes I keep finding on the topic elsewhere, and a quick look at startgrowingtoday confirmed it, the kind of site that has its own voice rather than echoing whatever is trending which makes it stand out as a refreshing change from the usual rotation of generic content I see daily.
Now noticing that the post benefited from being neither too short nor too long for its content, and a look at buildfocusedgrowth continued that calibration of length, sites that match length to content rather than padding to hit some target are sites that respect both their material and their readers and this site does both.
Now feeling the quiet pleasure of finding writing that takes itself seriously without being self serious, and a stop at startwithpurposefuldirection extended that subtle pleasure, the gap between earnest and pretentious is fine and this site has clearly chosen to land on the earnest side without slipping over into pretentious which is impressive.
Reading this slowly to give it the attention it deserved, and a stop at createforwardmotion earned the same slow read, choosing to read slowly is a small act of respect for content quality and very few sites earn that respect from me but this one did so without any explicit ask which is the cleanest way.
Strong recommendation from me, anyone curious about the topic should make time for this, and a look at discoverforwardmomentum only sharpens that recommendation further, the kind of resource that holds up against careful scrutiny rather than crumbling at the first critical question is rare and worth pointing other people toward when the topic comes up.
Güvenli bahis deneyimi için [url=https://1xbet-giris-78.com]1xbet giriş[/url] adresini kullanabilirsiniz.
artık çok kolay. Üyelik ve giriş süreci hızlıca tamamlanabilir. Öncelikle resmi web sitesi ziyaret edilmelidir. Site güvenliğine verilen önem yüksektir.
Giriş sayfasına yönlendirme için ana sayfadan ilgili buton seçilmeli. Hatalı bilgi girişinde erişim sağlanamaz. Sahte sitelere karşı dikkatli olunması önerilir.
Yeni kullanıcılar kolayca siteye kayıt olabilirler. Kayıt formunda doğru ve güncel bilgilerin girilmesi tavsiye edilir. Hesap güvenliği için doğrulama zorunlu olabilir.
1xbet girişi yaptıktan sonra pek çok fırsattan yararlanabilirsiniz. Çeşitli spor dallarında bahis yapma imkanı sunulur. Bonuslar ve özel tekliflerle kazancınızı artırabilirsiniz.
стационар капельница от алкоголя [url=https://vyvod-iz-zapoya-v-staczionare-sankt-peterburg-27.ru]стационар капельница от алкоголя[/url]
Reading this prompted me to subscribe to my first newsletter in months, and a stop at createprogressjourney confirmed the subscribe was the right call, content that earns a newsletter signup is content that has cleared a higher trust bar than a casual visit and this site has clearly earned that level of commitment from me.
Solid value for anyone willing to read carefully, and a look at startyourgrowthpath extends that value across the rest of the site, this is the kind of place that rewards return visits rather than offering everything in a single splashy post and then leaving readers nothing to come back for later which is unfortunately common.
Worth a quiet moment of recognition for the consistency I have noticed across multiple posts, and a stop at buildfocusedprogress continued that consistent quality, sites that maintain quality across many pieces rather than peaking on one viral post are sites with real editorial discipline and this one has clearly developed that discipline carefully.
Just sat back at the end of the post and felt grateful that someone took the time to write it, and a look at learnandtransformdirection extended that gratitude across more of the site, recognising effort behind quality work is part of what makes the open web a community rather than just a marketplace today.
Came back to this twice now in the same week which is unusual for me, and a look at horcall suggested I will keep coming back, the kind of post that earns repeated visits rather than one and done reading is the gold standard for content quality and this site clearly hit that standard.
Coming back tomorrow when I can give this a proper read, the post deserves better attention than I can give right now, and a look at createclaritysystems suggests there is plenty more here that deserves the same treatment, definitely a site I will be exploring properly over the next few days when I can.
Now appreciating that I did not feel exhausted after reading, and a stop at startwithclearpurpose extended that energising quality, content that leaves me with more attention than it consumed is rare and the gap between draining and energising content is real over the course of a typical day spent reading widely online.
Really like the way the post resists reaching for cliches that would have made it feel generic, and a quick visit to createforwardexecution kept that fresh feel going, original phrasing and unexpected metaphors are signs that the writer is actually thinking rather than just stitching together familiar phrases into the appearance of content.
Приветствую всех участников. Дело деликатное, но решил черкануть пару строк, особенно когда речь идет о близких людях. Если ищете анонимного специалиста с быстрым выездом, лучше сразу обращаться к сертифицированным медикам.
Мы в свое время тоже столкнулись с этой бедой, и в итоге нашли клинику, где врачи работают профессионально. Чтобы узнать точные цены и вызвать специалиста, советую посмотреть официальный источник: нарколог вывод из запоя в стационаре [url=https://vyvod-iz-zapoya-v-staczionare-sankt-peterburg-28.ru]нарколог вывод из запоя в стационаре[/url].
Врачи дежурят круглосуточно во всех районах, реагируют очень быстро, буквально за час. Не теряйте время, кому-то тоже пригодится и спасет здоровье. Всем душевного спокойствия!
Now recognising the editorial wisdom of letting some questions remain open at the end, and a look at mochamarket continued that intellectual honesty, content that does not force closure on contested questions is content that respects the limits of knowledge and this site has clearly developed the maturity to know when to leave space.
Good quality through and through, no rough edges and no signs of being rushed, and a quick look at discoverinnovativeideas kept the same polish going, the kind of site that respects its own brand by maintaining consistency across pages which is something I always appreciate as a reader looking for trustworthy information online today.
Genuinely useful read, the points are practical and easy to apply right away, and a quick look at discovernewdirectionnow confirmed that this site is consistent in that approach, looking forward to digging through the rest of it when I get the chance to sit down properly later in the week or this weekend.
Now setting aside time on my next free afternoon to read more from the archives, and a stop at discoverinnovativethinking confirmed that time will be well spent, the rare site whose archive deserves a dedicated reading session rather than just casual sampling is the kind of resource worth scheduling around and this one qualifies clearly.
Worth a quiet moment of recognition for the consistency I have noticed across multiple posts, and a stop at buildideasforward continued that consistent quality, sites that maintain quality across many pieces rather than peaking on one viral post are sites with real editorial discipline and this one has clearly developed that discipline carefully.
краби ко ланта Остров Ланта — место, где вы найдете ответы на вопросы, как быть счастливым, просто наслаждаясь моментом в Таиланде.
Bookmark folder reorganised slightly to make this site easier to find, and a look at buildgrowthdirection earned the same accessibility upgrade, the small organisational moves I make for sites I expect to return to often are themselves a signal of how much I trust them and this site triggered those moves naturally.
A piece that brought a sense of order to a topic I had been finding chaotic, and a look at startsmartmovement continued that organising effect, content that imposes useful structure on messy subjects is doing genuine intellectual work and this site is providing that organisational function across multiple posts I have read recently here.
Following the post through to the end without my attention drifting once, and a look at startthinkingbigger earned the same uninterrupted attention, content that holds attention without manipulating it is content with substantive pull and this site has demonstrated that substantive pull across multiple pieces in a single reading session reliably here today.
славяне Языческие праздники на Руси, такие как Иван Купала, были наполнены особым смыслом. Веночек, сплетенный из полевых цветов, девушка надевала на голову, и в эти дни девки водили хороводы, плясали, празднуя слияние с природой. Деревня, старина, русь старинная – все это окутано флером фольклора. Мистические байки и русские страшилки, рассказанные у костра, оживляют духов прошлого, напоминая о том, что мир гораздо сложнее и таинственнее, чем кажется на первый взгляд.
Without overstating it this is a quietly excellent post, and a look at findyourtruefocus extended that quiet excellence, content that earns superlatives without demanding them through marketing language is content that has truly earned them through the substance and this site has clearly produced work in that earned excellence category today.
Liked everything about the experience, from the opening through to the closing notes, and a stop at growwithclaritynow extended that into more pages, finding a site where the editorial vision shows through every choice rather than feeling random is an increasingly rare experience and one I am glad to have today during this particular reading session.
Reading more of the archives is now on my plan for the weekend, and a stop at buildsustainablemovement confirmed the archive worth the time, the rare archive worth a dedicated reading session rather than just casual sampling is the rare archive of serious work and this site has clearly produced enough of that work to warrant the deeper exploration.
Generally my comment to other readers about new sites is to wait and see but for this one I would jump to recommend now, and a look at learnandmoveahead reinforced that early recommendation, the speed at which a site earns my recommendation is itself a quality signal and this one has earned mine quickly clearly.
Bookmark earned and the bookmark feels like a permanent addition rather than a maybe, and a look at discovergrowthmindset confirmed that permanent status, the difference between durable bookmarks and ephemeral ones is something I have learned to feel quickly and this site triggered the durable feeling almost immediately during my first read here.
Generally I find the content on similar topics frustrating in specific ways and this post avoided all of them, and a look at discovernewfocusareas continued that frustration free experience, content that sidesteps the standard failure modes of its genre is content with editorial awareness and this site has clearly studied what fails elsewhere consistently.
Reading this slowly in the morning before opening email, and a stop at explorefutureclarity extended that protected attention, content that earns the prime morning reading slot before the daily distractions begin is content with elevated status and this site has earned that prime slot consistently in my recent reading habits clearly.
Probably worth setting aside a longer block to read more carefully than I can right now, and a stop at createvisionexecution confirmed the longer block plan, the impulse to schedule dedicated time for a sites archive is itself a measure of trust and this site has earned that scheduling impulse from me clearly today actually.
Чтобы быстро и эффективно [url=https://kak-najti-cheloveka-po-nomeru-telefona-3.ru]источник[/url], воспользуйтесь такими штуками которые дают инфу.
Слушай, тут главное — без глупостей.
Операторы связи по закону не предоставляют данные без запроса правоохранительных органов.
Надеюсь, понятно объяснил.
Thanks for the honest framing without exaggerated claims that the topic will change my life, and a stop at seoorbit kept the same modest tone, restraint in marketing language signals trustworthiness and the writers here are clearly playing the long game by building credibility rather than chasing immediate clicks through hyperbole.
Speaking as someone who used to recommend blogs frequently and got out of the habit this site is rekindling that impulse, and a look at coppercrown extended the rekindling, the recovery of an old habit triggered by encountering work that justifies it is itself a small kind of pleasure and this site is providing that recovery experience.
Reading this triggered a small change in how I think about the topic going forward, and a stop at jebyam reinforced that subtle shift, the rare content that actually moves my thinking rather than just confirming or filling it is the kind I most value and this site is providing that kind of impact today.
A piece that did not lecture even when it had clear positions, and a look at irubrisk maintained the same teaching without preaching tone, finding the line between informing and lecturing is hard and most sites land on the wrong side of it but this one has clearly figured out how to inform without becoming preachy.
Reading this gave me material for a conversation I needed to have anyway, and a stop at exploreinnovativepathwaysnow added even more talking points, content that connects to upcoming social or professional needs rather than just being interesting in the abstract is the kind that earns priority placement in my attention these days routinely.
Decided to read this site for a while before forming a verdict, and the verdict after several pages is positive, and a stop at learnandtransformfast continued that pattern, judging a site requires more than one post and giving sites a fair sample is something I try to do for promising candidates rather than rushing to dismiss.
Now adjusting my mental model of how the topic fits into the broader landscape, and a look at startthinkingstrategically extended that adjustment, content that affects my structural understanding rather than just my factual knowledge is content with deeper impact and this site is providing those structural updates at a meaningful rate consistently across topics.
кайтинг Первое обучение кайтингу запоминается навсегда — это момент, когда вы впервые почувствовали силу ветра и ощутили тягу купола.
Всем доброго времени суток. Тема здоровья всегда на первом месте, особенно когда речь идет о близких людях. Когда нужен проверенный и опытный врач для капельницы, лучше сразу обращаться к сертифицированным медикам.
Мы в свое время тоже столкнулись с этой бедой, в итоге вся ценная информация была собрана по крупицам. Кому тоже нужны подробности и условия, можете ознакомиться по ссылке: [url=https://narkolog-na-dom-moskva-27.ru/]перейти по ссылке[/url].
Там расписаны все аспекты, которые стоит учитывать, и помощь окажут полностью конфиденциально. Надеюсь, эта рекомендация кому-то тоже пригодится и спасет здоровье. Всем душевного спокойствия!
Ended up here on a wandering afternoon and was glad I stayed for the read, and a stop at learnandexecuteclearly extended the wandering into a proper exploration of the site, the kind of place that rewards aimless clicking with something genuinely interesting rather than the shallow content that mostly populates the modern open web.
Народ, если кто искал, рабочая тема. Выкладываю, чтобы не потерялось, делюсь полезной ссылкой: [url=https://teobit.ru]melbet скачать на андроид[/url].
Вообще проект сейчас один из лучших, все интуитивно понятно даже новичку. Плюс ко всему трансляции матчей идут без задержек.
Там сейчас можно неплохо увеличить первый депозит, что очень даже кстати. Что думаете?
Going to come back when I have more time to read carefully, the post deserves more than a quick scan, and a stop at discovernewdirectionnow reinforced that, this is the kind of site that rewards a slower read which is hard to find in this fast paced corner of the internet but really worthwhile.
A quiet kind of confidence runs through the writing, and a look at learnandoptimizegrowthpath carried that same understated assurance, confidence without bragging is the most attractive register for online writing and the writers here have clearly developed it through practice rather than affecting it through stylistic tricks that would feel hollow eventually.
Better than most of the writing I have come across on this topic recently, simpler and more direct, and a look at hyxbrook continued in that same way, a real outlier in a crowded space full of repetitive content that says little while taking up a lot of reader time today which is unfortunate.
спот Зайтун Хургада Волшебный кайт Хургада Египет открывает перед вами горизонты, о которых вы раньше только мечтали, позволяя парить над бирюзовой лагуной.
Now recognising the specific pleasure of reading writing that shows real care for sentence shapes, and a look at explorefreshstrategicpaths extended that craft pleasure, sentence level writing quality is something most blog content ignores entirely and this site has clearly invested in the prose layer alongside the substance which is rare today.
Good quality through and through, no rough edges and no signs of being rushed, and a quick look at unlocknewopportunities kept the same polish going, the kind of site that respects its own brand by maintaining consistency across pages which is something I always appreciate as a reader looking for trustworthy information online today.
мелбет [url=https://limon-ads.ru]мелбет[/url]
Слушайте, тут вопрос назрел.
Знакомые тоже через это прошли, нервов потратили немало.
Если планируете перепланировку квартиры, лучше сразу делать всё по уму.
В итоге нашел один ресурс, где реально без воды всё расписано.
Когда нужен готовый проект под ключ с нормальным СРО, можете ознакомиться по ссылке: заказать проект перепланировки квартиры [url=https://www.proekt-pereplanirovki-kvartiry30.ru]https://www.proekt-pereplanirovki-kvartiry30.ru[/url]
Там и цены на проектирование указаны, и контакты проверенных архитекторов.
Не тяните с согласованием, поможет сэкономить нервы и деньги.
Берегите себя и соседей снизу!
https://brcinfo.ru/ brcinfo
Saving this link for the next time someone asks me about this topic, and a look at topazstrict expanded what I will be sharing with them, this is the kind of resource that makes a real difference when you are trying to point a friend to something useful and reliable rather than generic marketing pages.
Thanks for the clean writing, no broken sentences and no awkward translations like some other sites have, and a quick stop at explorefutureopportunities kept that polish going nicely, it really does make a difference when a reader can move through a page without tripping on every line or going back to reread.
Solid post, the structure is easy to follow and the language stays simple even when the topic gets a bit more involved, and a look at growwithstrategyintent kept that same standard going, so I left feeling like the time spent here was actually worth something for once which is rare lately.
Now adding a small note in my reading log that this site is one to watch, and a look at startpurposefullynow reinforced the watch status, the few sites I track deliberately rather than encounter accidentally are sites I expect ongoing returns from and this one has cleared the bar for that elevated tracking based on what I read.
Valium bitcoin mixer
Took my time with this rather than rushing because the writing rewards attention, and after explorefutureopportunity I had even more to absorb, the kind of content that pays back the patient reader rather than punishing them with empty filler is something I look for and rarely find in regular searches lately.
Closed several other tabs to focus on this one as I read, and a stop at growintentionallyforward held my undivided attention the same way, content that earns full focus in an attention environment full of competing pulls is content doing something genuinely well and the team behind it deserves recognition for that achievement consistently.
Stands out for actually being useful instead of just being long, and a look at growresultsfocused kept that going, length without value is the default mode of most blogs these days but this site has clearly chosen a different path which I respect a lot as a reader who values careful editing decisions like that.
Слушайте, реально замучилась искать нормальную платформу для дочки. Везде одна вода или заоблачные ценники. Соседка по площадке посоветовала глянуть вот этот проект: [url=https://shkola-onlajn-53.ru]онлайн школа для детей[/url] . Пришлось признать, что был не прав. Успеваемость подтянулась, особенно по точным наукам. Объясняют на пальцах, без лишней воды. Плюс огромный – никаких больничных, заболел – смотришь записи. Для современных детей самое то, ИМХО.
Easily one of the better explanations I have read on the topic, and a stop at growresultsoriented pushed it even higher in my mental ranking of useful resources, the kind of site that beats the average not by trying harder but by simply caring more about what it puts out daily which always shows.
вывод из запоя лечение алкоголизма [url=https://vyvod-iz-zapoya-v-staczionare-sankt-peterburg-27.ru]вывод из запоя лечение алкоголизма[/url]
Reading this site over the past week has changed how I evaluate content in this space, and a look at findgrowthpotential extended that recalibration, the standards I bring to reading on the topic have shifted upward as a direct result of regular exposure to this kind of work and that shift will outlast any single reading session.
Will share this on a forum I am part of where it will be appreciated by others working in the same area, and a look at buildclaritymovement suggests there is more here worth passing along too, definitely a generous resource that deserves a wider audience than it probably has today across the open internet.
Reading this in segments because the day was busy, and the post survived the fragmented attention well, and a stop at seogrove held up similarly under interrupted reading, content that can withstand modern distracted reading patterns rather than requiring a perfect block of focused time is increasingly the kind I prefer.
Reading this prompted me to clean up some old notes related to the topic, and a stop at createprogressmappingnow extended that organising urge, content that triggers personal organisation rather than just consuming attention is content with motivating energy and this site has the kind of clarity that prompts active follow up rather than passive consumption.
вывод из запоя на дому москва круглосуточно [url=https://narkolog-na-dom-moskva-28.ru]вывод из запоя на дому москва круглосуточно[/url]
Closed the tab with a small sense of finality rather than the usual rushed exit, and a stop at createprogressframework produced the same considered closing, when reading ends with deliberate satisfaction rather than impatient skip you know the time was well spent and this site is producing those satisfying endings consistently across what I read.
узнать геолокацию по номеру телефона [url=https://kak-najti-cheloveka-po-nomeru-telefona-2.ru]узнать геолокацию по номеру телефона[/url]
Closed the laptop and walked away thinking about the post for a good twenty minutes, and a stop at isebrook produced similar lingering thoughts, content that survives the closing of the browser tab is content that has actually entered the mind rather than just decorating the screen for the duration of the reading.
Probably the kind of site that should be more widely read than it appears to be, and a look at growwithsteadyintent reinforced that quiet wish, the gap between a sites quality and its apparent reach is sometimes large and that gap exists for this site in a way that makes me want to mention it more.
Reading this prompted me to subscribe to my first newsletter in months, and a stop at learnandadvancepath confirmed the subscribe was the right call, content that earns a newsletter signup is content that has cleared a higher trust bar than a casual visit and this site has clearly earned that level of commitment from me.
Looking for similar voices elsewhere has come up empty in my recent searches, and a stop at learnandadvancegrowth extended the search frustration, the rare site that does what no other does in quite the same way is precious and this one has clearly developed a particular approach that I have not been able to find duplicates of.
Now appreciating that the post did not try to imitate any other style I might recognise, and a stop at startyourjourneynow continued that distinct voice, content with its own register rather than borrowed from elsewhere is content with real authorial presence and this site has clearly developed that presence through what feels like patient editorial work.
The use of plain language without dumbing down the topic was really well done, and a look at seoripple continued in that same accessible style, this is something many technical writers fail at because they either confuse their readers or condescend to them but here neither problem appears at all which is impressive really.
Worth your time, that is the simplest endorsement I can give, and a stop at findyourstrongdirection extends that endorsement across the rest of the site, this is one of those increasingly rare places that delivers on what it promises rather than over selling the content and under delivering on substance every time which I find frustrating elsewhere.
Better signal to noise ratio than most places I check on this kind of topic, and a look at startmovingstrategicallynow kept that going, every paragraph here carries something worth reading rather than padding out the page to hit some arbitrary length target that search engines reward but readers ignore as soon as they notice it.
Just sat back at the end of the post and felt grateful that someone took the time to write it, and a look at createimpactplanningframework extended that gratitude across more of the site, recognising effort behind quality work is part of what makes the open web a community rather than just a marketplace today.
Worth pointing out that the writing reads as confident without being defensive about it, and a look at growwithintentionalsteps extended that secure tone, content that does not pre emptively argue against imagined critics has a different quality from defensive writing and this site reads as written from a place of real ease.
Reading this on a slow Sunday and finding it perfectly suited to a slow Sunday read, and a quick stop at findnewopportunityroutes kept the same gentle pace, content that fits the mood of the moment is something I notice and remember and this site has the kind of pace that suits relaxed reading sessions especially well.
If you asked me to point to a recent positive sign for the open web this site would be near the top, and a stop at exploreuntappedpotential reinforced that designation, the few sites that serve as evidence the web can still produce quality independent content are precious and this one has clearly become one for me.
Thanks for the readable length, I finished it without checking how much was left, and a stop at createprogressplanning kept me reading the same way, when I stop noticing the length of a piece because the content is engaging enough to sustain attention without willpower the writer has done their job well today.
Ритуальные услуги и юридические аспекты
Bookmark earned and folder updated to track this site separately, and a look at startprogressnow confirmed the folder upgrade was the right call, organising my reading list so that good sites do not get lost in a sea of casual bookmarks is something I do more carefully now and this site warranted its own spot.
A relief to read something where I did not have to fact check every claim mentally, and a look at jedbroom continued that reliable feeling, sites where I can lower my guard and trust the content are rare and this one is earning that trust paragraph by paragraph through consistent careful work behind the scenes.
Reading this prompted me to subscribe to my first newsletter in months, and a stop at learnandexecuteclearly confirmed the subscribe was the right call, content that earns a newsletter signup is content that has cleared a higher trust bar than a casual visit and this site has clearly earned that level of commitment from me.
Adding this site to my regular reading list, the post earned that on its own, and a quick stop at seohive sealed the decision, the kind of place worth checking back with from time to time because it consistently produces material that holds up against a critical reading too which I really value.
Reading this site over the past week has changed how I evaluate content in this space, and a look at unlockcreativepaths extended that recalibration, the standards I bring to reading on the topic have shifted upward as a direct result of regular exposure to this kind of work and that shift will outlast any single reading session.
More substantial than most of what I find searching for this topic online, and a stop at createbetterpaths kept that quality consistent, this is one of those sites where the writing actually rewards careful reading rather than punishing the patient reader with empty filler stretched out across long paragraphs that say very little.
Just enjoyed the experience without needing to think about why, and a look at discoverforwardmomentumnow kept that effortless feeling going, sometimes the best content is invisible in the sense that you forget you are reading until you reach the end and realise time has passed without you noticing it pass naturally.
Comfortable in tone and substantive in content, that is a hard combination to land, and a look at musebeats kept that pairing alive across more material, this is what good editorial direction looks like in practice and the team here clearly has someone keeping a steady hand on the wheel across what they decide to publish.
Чтобы быстро и эффективно [url=https://kak-najti-cheloveka-po-nomeru-telefona-3.ru]официальный сайт[/url], воспользуйтесь специализированными сервисами.
Слушай, тут главное — без глупостей.
Важно соблюдать этические правила и законодательство при сборе информации.
Короче, не нарывайтесь.
Recommended to anyone working in or curious about this area, the depth and clarity combine well, and a look at learnandaccelerategrowthpath keeps that going across more pages, the kind of site that earns regular visits rather than chasing trends has my respect because it suggests genuine commitment to the topic itself rather than to chasing trends.
Better than most of the writing I have come across on this topic recently, simpler and more direct, and a look at discovercreativegrowth continued in that same way, a real outlier in a crowded space full of repetitive content that says little while taking up a lot of reader time today which is unfortunate.
Stayed longer than planned because each section earned the next, and a look at isebulb kept that pulling effect going across more pages, the kind of subtle pull that good writing exerts on attention is something I find harder and harder to resist when I encounter it on the open web today.
Honestly, the process seems straightforward, though the odds analysis aspect is key. I appreciate the detail on deposits! For a deeper dive into strategy, check out 13333 ভিআইপি. Very helpful read!
Came here from a search and stayed for the side links because they were that interesting, and a stop at buildyournextstrategy took me even further into the site, the kind of organic exploration that good content invites is something most sites kill through aggressive interlinking and pushy navigation choices rather than relying on quality.
Для тех, кто в теме, рабочая тема. Многие спрашивали, делюсь полезной ссылкой: [url=https://teobit.ru]melbet[/url].
Этот букмекер радует удобным интерфейсом, все интуитивно понятно даже новичку. Плюс ко всему можно ставить прямо в режиме реального времени.
Если только заводите аккаунт капает бонус на баланс, что очень даже кстати. Кто уже ставил там?
Сантехника
Now appreciating that the post left me with enough to say in a follow up conversation, and a look at startbuildingclearvision added more material for those follow ups, content that prepares me for related conversations rather than just informing me alone is content with social utility and this site provides that social armament reliably for me.
автовоз доставка цена москва доставка автовозом
Güvenli bahis deneyimi için [url=https://1xbet-giris-78.com]1xbet türkiye[/url] adresini kullanabilirsiniz.
1xbet hesabınıza erişim sağlamak. Bu siteye erişim için birkaç adım yeterlidir. İlk olarak doğru adresin kullanılması önemlidir. Güvenli bağlantı sayesinde bilgileriniz korunur.
Giriş sayfasına yönlendirme için ana sayfadan ilgili buton seçilmeli. Hatalı bilgi girişinde erişim sağlanamaz. Kişisel bilgilerinizi girmeden önce sayfanın orijinalliği onaylanmalıdır.
Üyeliğiniz yoksa, kayıt işlemi birkaç dakika içinde tamamlanabilir. Bilgilerin eksiksiz ve doğru doldurulması önem taşır. Hesap güvenliği için doğrulama zorunlu olabilir.
1xbet girişi yaptıktan sonra pek çok fırsattan yararlanabilirsiniz. Spor bahisleri ve canlı oyunlar kolaylıkla oynanabilir. Ayrıca güncel promosyonlar ve bonuslar takip edilebilir.
Felt slightly impressed without being able to point to one specific reason, and a look at discovernewdirections continued that diffuse positive feeling, when content works at a level you cannot easily articulate the writer is doing something with craft rather than just delivering information and that is something I have learned to recognise.
Now setting aside time on my next free afternoon to read more from the archives, and a stop at discoverinnovativepaths confirmed that time will be well spent, the rare site whose archive deserves a dedicated reading session rather than just casual sampling is the kind of resource worth scheduling around and this one qualifies clearly.
Really appreciate that the writer did not assume I would read every other related post first, and a look at growwithclearstrategy kept that self contained feel going where each piece can stand alone, accessibility for new readers is a sign of generous editorial thinking and this site has clearly invested in that approach.
Now sitting back and recognising that this was a small but real win in my reading day, and a stop at findgrowthsolutionspath extended that quiet win, the cumulative effect of small reading wins versus the cumulative effect of small reading losses is real over time and this site is contributing to the wins side of that ledger.
Over the course of reading several posts here a pattern of quality has emerged, and a stop at seometric confirmed the pattern, the difference between sites that hit quality occasionally and sites that hit it consistently is huge and this site has clearly demonstrated the consistent kind through what I have read this morning.
Solid value packed into a relatively short post, that takes skill, and a look at createclaritydrivengrowth continues the dense useful content across more pages, this site clearly understands that respecting reader time is itself a form of generosity which is something most blog operations seem to have forgotten lately across the wider open web.
Following a few of the internal links revealed more posts of similar quality, and a stop at learnandoptimizepathwaynow added more to that growing pile, sites where internal links lead to more good content rather than to more of the same recycled material are sites with depth and this one has clearly built that depth carefully.
Now adding this site to a small mental group of recommendations I keep ready for specific kinds of inquiries, and a stop at findyournextbreakpoint extended the recommendation readiness, content that I can confidently point friends and colleagues toward in specific contexts is content with real social utility and this site has that utility clearly.
Quietly enthusiastic about this site after the past few hours of reading, and a stop at learnandacceleratesuccess extended that enthusiasm, the calibration of enthusiasm to evidence is something I try to maintain and this site has earned a calibrated quiet enthusiasm rather than the loud excitement that usually fades within a day or two of finding something.
Reading this in a moment of low energy still kept my attention, and a stop at seospark continued that engagement under suboptimal conditions, content that survives the reader being tired is content with extra reserves of pull and this site has the kind of writing that holds up even when I am not at my reading best.
Всем доброго времени суток. Дело деликатное, но решил черкануть пару строк, потому что в экстренной ситуации трудно сориентироваться. Если ищете анонимного специалиста с быстрым выездом, то не рискуйте и не доверяйте случайным объявлениям.
Сам долго изучал отзывы и искал надежный вариант, и в итоге нашли клинику, где врачи работают профессионально. Если вам актуально или ситуация экстренная, вся информация есть здесь: стационарное выведение из запоя [url=https://vyvod-iz-zapoya-v-staczionare-sankt-peterburg-28.ru]стационарное выведение из запоя[/url].
Врачи дежурят круглосуточно во всех районах, и помощь окажут полностью конфиденциально. Главное — не затягивать в такие моменты, поможет вовремя принять правильные меры. Всем душевного спокойствия!
A genuine pleasure to find a site that publishes at a sustainable cadence rather than chasing the daily content treadmill, and a look at discovernewfocuspoints confirmed the careful publication rhythm, sites that prioritise quality over frequency are rare and this one has clearly chosen the slower pace which I appreciate as a reader.
Now appreciating that the post did not require external context to follow, and a look at growintentionallynow maintained the same self contained quality, content that respects new visitors by being readable without prerequisites is content with broader accessibility and this site has clearly invested in keeping each piece reader friendly for fresh arrivals.
Reading this slowly and letting each paragraph land before moving on, and a stop at createconsistentdirectionalgrowth earned the same patient approach, content that rewards slow reading rather than speed is content with real density and the writers here are clearly producing work that benefits from the careful eye rather than the rushed scan.
Felt energised after reading rather than drained, which is unusual for online content these days, and a look at discovernewdirectionpaths continued that good feeling, content that leaves you better than it found you is rare and worth bookmarking when you stumble across it for the first time today or any other day really.
Now considering whether the post would translate well into a different form, and a look at discovernewangles suggested similar versatility, content that could move into other media without losing its substance is content that has been built around ideas rather than around format and this site reads as idea first throughout posts.
Liked that the post left some questions open rather than pretending to settle everything, and a stop at learnandoptimizepath continued that intellectual honesty, content that respects the limits of its own claims is more trustworthy than content that overreaches and this site has clearly figured out which positions it can defend confidently.
Reading this felt productive in a way most internet reading does not, and a look at edgecradles continued that productive feeling, sometimes the open web feels like a waste of time but sites like this remind me why I still bother to look around rather than retreating to old reliable sources for everything I need.
Honestly enjoyed reading this more than I expected to when I first clicked through, and a stop at findgrowthsolutionsnow kept that pleasant surprise going, sometimes you stumble onto a site that just clicks with how you like to read and this is one of those for me right now today which is great.
The lack of unnecessary jargon made the post accessible without sacrificing accuracy, and a look at learnandadvancegrowth continued in the same accessible style, technical topics often hide behind specialised vocabulary but here the writer trusts the reader to keep up with plain language and that trust pays off nicely throughout the entire post.
Glad the writer kept this short rather than padding it out, the points stand on their own without needing extra context, and a look at itobout kept the same approach going, brevity is a sign of confidence in the substance and the team here clearly trusts their content to land without filler.
Took a few notes from this post, the points are easy to remember without needing to come back and check, and a look at buildsustainablegrowth added a couple more, the kind of place that sticks in the memory long after the browser tab has been closed for the day which says a lot really.
Liked the way the post got out of its own way, and a stop at explorefuturepathideas extended that invisible craft, the best writing you barely notice while reading because it is doing its work without drawing attention to itself and this site has clearly mastered that disappearing act across the pieces I have read.
Just sat back at the end of the post and felt grateful that someone took the time to write it, and a look at buildsustainabledirection extended that gratitude across more of the site, recognising effort behind quality work is part of what makes the open web a community rather than just a marketplace today.
Such writing is increasingly rare and worth supporting through attention, and a stop at discoverinnovativegrowthpaths extended that supportive attention across more pages, the conscious choice to spend time on sites that produce careful work rather than convenient consumption is itself a small form of patronage and this site is receiving that conscious patronage from me.
Skipped the related links section thinking I had read enough and then came back to it later when curiosity got the better of me, and a stop at tennisvortex confirmed I should have just read it first, every section of this site appears to deserve careful attention rather than skipping past lazily.
During a reading session that included several other sources this one stood out, and a look at discovermeaningfulpaths continued the standout quality, the side by side comparison of sources during research is a useful exercise and this site has been winning those comparisons for me consistently across multiple research sessions during the last week.
Thank you for not assuming the reader already knows everything, the explanations meet me where I am, and a look at buildsustainablegrowthdirection did the same, that consideration is what makes a site feel welcoming rather than gatekeepy which is sadly the default mood across the modern web today for most subjects covered.
Reading this prompted me to dig out an old reference book related to the topic, and a stop at seotrail extended that connection to other sources, content that connects me back to my own existing knowledge rather than asking me to forget it is content with continuity and this site has that continuous quality.
Now feeling slightly more optimistic about the state of independent writing online, and a stop at startmovingwithpurpose extended that quiet optimism, sites like this one are the reason I have not given up on the open web entirely and finding them occasionally renews the case for paying attention to non algorithmic content sources today.
Picked this site to mention to a colleague who would benefit, and a look at growintentionallyahead added more material I will pass along, recommending sites to colleagues is a higher bar than recommending to friends because the professional context demands more careful curation and this site cleared the professional bar without me having to think.
If quality blog writing is dying as people sometimes claim then this site is one piece of evidence that it has not died yet, and a look at growresultsdrivenstrategy extended that evidence, the broader cultural question about online writing has empirical answers in specific sites and this one is contributing to a more optimistic answer overall.
Comfortable read, finished it without realising how much time had passed, and a look at learnandprogressfurther pulled me into more pages the same way, the absence of friction in good content lets time disappear and that is one of the highest compliments I can pay any piece of writing I find online during a regular search session.
A quiet kind of confidence runs through the writing, and a look at createbetterdecisions carried that same understated assurance, confidence without bragging is the most attractive register for online writing and the writers here have clearly developed it through practice rather than affecting it through stylistic tricks that would feel hollow eventually.
Купить забор
Picked this up while looking for something else and ended up reading every paragraph because it was actually informative, and after learnandapplystrategies I was sure I would come back, that does not happen often when most sites bury the useful parts under endless ads and pop ups today and across most categories online.
Ставки баскетбол
Чтобы быстро и эффективно [url=https://kak-najti-cheloveka-po-nomeru-telefona-3.ru]официальный сайт[/url], воспользуйтесь платформами которые не врут.
Слушай, тут главное — без глупостей.
Платные справочники порой содержат свежую информацию о собственниках телефонных номеров.
Да, и ещё момент — без фанатизма.
Thanks for laying this out in a way that someone newer to the topic can follow, and a stop at learnandbuild kept that accessibility going, writing that meets readers at different experience levels without condescending is hard to do well and the writers here have clearly thought about who they are writing for.
Для тех, кто в теме, прямая ссылка. Многие спрашивали, все работает без проблем здесь: [url=https://teobit.ru]melbet скачать ios[/url].
Сам сервис реально топовый — линия на футбол и теннис огромная. Плюс ко всему можно ставить прямо в режиме реального времени.
И еще, при регистрации дают неплохой приветственный бонус, что очень даже кстати. Кто уже ставил там?
Bookmark earned, calendar reminder set, share queued, all from one good post, and a look at startwithclearfocus did the same, when a single reading session triggers multiple downstream actions you know the content has actually moved me beyond the page and this site is moving me at that higher level reliably.
Reading this with a notebook open turned out to be the right move, and a stop at startyournextdirection added more material to the notes, content that justifies active note taking from a passive reader is content with real informational density and this site is producing notes worthy material at a high rate consistently.
каппер
Давно искал нормальный вариант, где реально учат делу. Особенно когда речь про образовательные онлайн школы — тут ведь важен подход. У меня племянник как раз перешел на удаленку, так что намучились мы знатно. В общем, посмотрите по ссылке: онлайн-школа для детей [url=https://shkola-onlajn-55.ru]онлайн-школа для детей[/url] Я если честно ещё раньше вообще не верил в онлайн образование школа. Оказалось — зря сомневался. У них и программа грамотная. Сам теперь советую знакомым. Надеюсь, поможет в выборе.
Liked the post enough to read it twice and the second read found new things, and a stop at growwithconfidenceandclarity similarly rewarded the second look, content with hidden depths that only reveal themselves on careful rereading is the rare kind that earns lasting respect rather than fleeting first impressions only briefly held.
Well done, the kind of post that makes you slow down and actually read instead of skimming for keywords, and a look at grovefarm kept me reading carefully too, that is a sign of writing that has been crafted rather than churned out for an algorithm to see today and tomorrow.
Честно говоря, долго выбирал, варианты для учёбы, но после кучи долгих обсуждений наткнулся на один рабочий и проверенный вариант. Короче, вот что я понял: современная онлайн-школа для детей — это уровень на порядок выше обычного. Там и программа насыщенная, без лишней воды, что очень радует на практике.
В общем, кому понимает толк в теме образовательные онлайн школы — почитайте подробности, вот здесь все расписано в деталях: школа дистанционное обучение [url=https://shkola-onlajn-54.ru]школа дистанционное обучение[/url].
Если честно, даже не ожидал такого крутого качества. Потому что обычная школа часто проигрывает по всем фронтам, а тут организована именно грамотно выстроенный учебный процесс. Советую не тянуть и сразу изучить тему.
Reading this slowly in the morning before opening email, and a stop at createforwardsteps extended that protected attention, content that earns the prime morning reading slot before the daily distractions begin is content with elevated status and this site has earned that prime slot consistently in my recent reading habits clearly.
Came in skeptical and left mostly convinced, that is the highest praise I can offer, and a look at findgrowthpotentialnow pushed me further in the same direction, content that survives a critical first read is rare and worth recognising because most blog posts crumble under any real scrutiny these days when you actually pay attention closely.
Случайно наткнулся на один гайд, Ситуация дурацкая, нужно срочно проверить один подозрительный номер. Решил докопаться до истины и разобраться,. И знаете что? Оказывается, сейчас есть реальные способы.
Короче, если вас сейчас волнует тот же самый вопрос — пробить странный входящий звонок, то есть один реально работающий и живой сервис. Конкретно про то, как узнать по мобильному кто именно звонил — вот здесь всё максимально норм расписано: как отследить по номеру телефона местонахождение бесплатно [url=https://kak-najti-cheloveka-po-nomeru-telefona-4.ru]как отследить по номеру телефона местонахождение бесплатно[/url].
Проверил лично на себе — тема реально работает. Потому что в открытых пабликах обычно полная тишина. В общем, кому надо — тот точно воспользуется. Надеюсь, кому-то тоже упростит жизнь.
Took a few notes from this post, the points are easy to remember without needing to come back and check, and a look at itucox added a couple more, the kind of place that sticks in the memory long after the browser tab has been closed for the day which says a lot really.
Loved the writing voice here, friendly without being fake and confident without being arrogant, and a stop at createprogressdirection carried the same tone forward, the kind of personality that makes a reader feel welcome rather than lectured at which is a balance plenty of writers struggle to find no matter how long they have been at it.
Skipped to a specific section because I knew that was the question I had, and the answer was clean, and a stop at seovista similarly delivered targeted answers without burying them, content engineered for readers who arrive with specific needs rather than open ended browsing is increasingly valuable in a search heavy reading environment.
Felt the writer did the homework before publishing, the references hold up, and a look at explorefutureoptionsnow continued that documented care, content with traceable claims rather than vague assertions is the kind I trust and the lack of bald assertion in this post is one of its quietly impressive qualities for me.
A piece that demonstrated competence without performing it, and a look at learnandprogresssteadilynow maintained the same self assured but unshowy register, the gap between competence and performance of competence is one I track and this site has clearly chosen to demonstrate rather than perform which I find much more persuasive as a reader.
Liked that the post resisted a sales pitch ending, and a stop at learnandoptimizepathway maintained the no pitch approach, content that ends without trying to convert me into a customer or subscriber is content that has confidence in its own value and this site is clearly playing the long game on reader trust.
Reading this with my morning coffee turned into reading the related posts with my morning coffee, and a stop at findmomentumnextstep stretched the morning further, content that pulls breakfast into a reading session rather than just accompanying it is content that has earned a higher claim on my attention than the average article does.
Reading this on a phone at a coffee shop and finding it perfectly suited to that context, and a stop at discovermeaningfuldirection continued the comfortable mobile experience, content that works across reading conditions without compromising on substance is increasingly important and this site has clearly thought about the whole reader experience here.
Really appreciate the confidence to make a clear point rather than hedging everything, and a quick visit to learnandapplywisely maintained the same direct stance, writing that takes positions rather than equivocating is more useful even when the positions are debatable because at least the reader has something to react to clearly.
Picked this for my morning read because the topic seemed worth the time, and a look at buildstrategicmovement confirmed the choice was right, my morning reading slot is precious and giving it to this site felt like a good investment rather than a waste which is a higher endorsement than I usually offer for content.
Туалетный блок Москва
Liked the careful word choice throughout, every term seemed picked for a reason rather than thrown in casually, and a stop at learnandgrowstrong continued that precise style, this kind of attention to small details is what separates careful writing from the usual rushed content that dominates blog spaces today across pretty much every topic I follow.
врач нарколог выезд на дом [url=https://narkolog-na-dom-moskva-28.ru]врач нарколог выезд на дом[/url]
The pacing of the post was just right, never rushed and never dragged out unnecessarily, and a look at findyourcompetitiveedge maintained the same rhythm, you can tell the writer has experience because the difficult skill of pacing is something only practiced writers manage to handle well in long form content over time and across formats.
Took me back a step or two on an assumption I had been making, and a stop at discovernewanglesnow pushed that reconsideration further, writing that gently corrects the reader without being aggressive about it is a rare diplomatic skill and the team here clearly knows how to land critical points without turning readers off.
Медицинские справки являются важной частью многих официальных процедур. Мы оказываем помощь в оформлении различных видов документов в кратчайшие сроки – https://baza-spravki.com/spravka-ot-vracha-svobodnoy-formy/
Слушайте, реально замучилась искать нормальную платформу для дочки. Везде одна вода или заоблачные ценники. Соседка по площадке посоветовала глянуть вот этот проект: [url=https://shkola-onlajn-53.ru]школы дистанционного обучения[/url] . Честно? Зашли просто на пробный урок, а в итоге остались на весь год. Преподаватели не просто читают по бумажке, а реально вовлекают. Ребенок сам ноутбук включает к началу пары. Так что если кому актуально – очень рекомендую хотя бы тест-драйв пройти.
Thanks for the practical examples scattered through the post rather than abstract theory only, and a look at learnandmoveforward continued that grounded style, abstract points are easier to remember when paired with concrete situations and the writers here clearly understand how readers actually retain information from blog content reading sessions.
Güvenli bahis deneyimi için [url=https://1xbet-giris-78.com]1xbet türkiye[/url] adresini kullanabilirsiniz.
1xbet platformuna giriş işlemi. Giriş yaparken dikkat edilmesi gereken bazı noktalar vardır. Öncelikle resmi web sitesi ziyaret edilmelidir. Güvenli bağlantı sayesinde bilgileriniz korunur.
Kullanıcılar giriş yapmak için ana sayfadaki giriş linkini kullanmalıdır. Doğru kullanıcı adı ve şifre girilmesi çok önemlidir. Sahte sitelere karşı dikkatli olunması önerilir.
Yeni kullanıcılar kolayca siteye kayıt olabilirler. Kayıt formunda doğru ve güncel bilgilerin girilmesi tavsiye edilir. Bazı durumlarda hesabınızı onaylemek için ek adımlar uygulanabilir.
Siteye giriş sonrası birçok seçenek sizleri bekler. Bahisler, canlı casino ve diğer oyunlar gibi aktiviteler erişilebilir hale gelir. Ayrıca güncel promosyonlar ve bonuslar takip edilebilir.
Quiet confidence runs through the whole post, no need to shout to make the points stick, and a stop at growwithfocusedexecution carried that same restrained voice forward, content that respects the reader by trusting its own substance rather than dressing it up in theatrical language is what I look for online and rarely actually find these days.
Now thinking about how to apply some of this to a project I have been planning, and a look at learnandoptimizegrowth added more material for the planning, content that connects to my actual creative work rather than just being interesting in the abstract is the kind that earns priority placement in my reading rotation consistently going forward.
monopoly big win today result live [url=http://www.monopoly-casino-in.com]monopoly big win today result live[/url] .
The headings made navigating the post simple even when I needed to find a specific section quickly, and a look at unicorntempo continued the same thoughtful structure, small details like clear headings show that someone is actually thinking about how the reader uses the page rather than just filling it for length alone.
Reading this back to back with a similar piece elsewhere made the quality difference obvious, and a stop at explorefuturegrowthlanes only widened the gap, comparing content side by side is a useful exercise and the gap between this site and average competitors in the space is large enough to be noticeable from the first paragraph.
Once I trust a site this much I tend to read everything they publish and that is the trajectory I am on with this one, and a stop at findnewopportunitypaths confirmed the trajectory, the rare progression from interested reader to comprehensive reader is something only certain sites earn and this one is earning that progression rapidly.
Picked a single sentence from this post to remember, and a look at findmomentumnextstage gave me another to keep, content that produces memorable lines is doing more than just transferring information and the small selection of sentences I keep from each reading session is one of the actual returns I get from reading carefully.
The whole experience of reading this was pleasant from start to finish, no pop ups and no annoying interruptions, and a look at shopmint continued that clean experience, technical choices about page design matter for the reader and this site clearly cares about the small details that add up to comfort across multiple visits.
Even across multiple posts the writers voice has remained consistent in a way I appreciate, and a stop at buildsmartplanning continued that voice, sites that maintain editorial consistency across many pieces have something most sites lack and this one has clearly worked out how to keep its voice steady across what reads as a growing archive.
Worth recommending broadly to anyone who reads on the topic, and a look at exploreuntappeddirectionpaths only confirms that, the rare combination of accessibility and depth in this site makes it suitable for both newcomers and people who already know the area which is hard to pull off in any blog format today and rarely managed.
Glad the writer kept this short rather than padding it out, the points stand on their own without needing extra context, and a look at learnandprogressnow kept the same approach going, brevity is a sign of confidence in the substance and the team here clearly trusts their content to land without filler.
Came in tired from a long day and the writing held my attention anyway, and a stop at explorefreshstrategicgrowth kept that going, content that can engage a fatigued reader is doing something right because most online reading happens in suboptimal conditions like that one and quality content adapts to it without complaint.
Just want to say thank you for putting this together, posts like these make searching online actually worth it sometimes, and a quick look at duetcoast kept that going, useful and easy to read without any of the tricks that ruin most blog comment sections lately on the wider open web.
The examples really helped me grasp the points faster than abstract descriptions would have, and a stop at ivafix added a few more practical illustrations that drove the message home, the kind of writing that knows its readers learn better through concrete situations rather than vague generalities is rare and worth recognising clearly.
The way the post stayed on topic throughout without going on tangents was really refreshing, and a look at startbuildingstrategically kept that focused approach going, discipline like this in writing is rare and worth recognising because most writers cannot resist wandering off into related subjects that dilute their main point and confuse readers along the way.
Now recognising that this site has earned a place in the small group of resources I treat as authoritative, and a stop at buildsmartforwarddirection confirmed that placement, the difference between resources I trust and resources I just consume is real and this site has clearly moved into the trusted category through consistent quality over time.
Really liked the calm tone running through the post, no shouting and no urgency forced into the writing, and a look at startmovingstrategically kept that quiet confidence going, the kind of voice that makes the reader feel respected rather than yelled at which is depressingly common across most modern blog content these days.
Reading this brought back the satisfaction I used to get from blogs ten years ago, and a stop at findnewperspective kept that nostalgic quality alive, sites that capture what was good about an earlier era of internet writing are increasingly precious and this one is doing that without feeling like a deliberate throwback at all.
Comfortable read, finished it without realising how much time had passed, and a look at discovercreativepathsnow pulled me into more pages the same way, the absence of friction in good content lets time disappear and that is one of the highest compliments I can pay any piece of writing I find online during a regular search session.
Once I trust a site this much I tend to read everything they publish and that is the trajectory I am on with this one, and a stop at findyourwinningdirection confirmed the trajectory, the rare progression from interested reader to comprehensive reader is something only certain sites earn and this one is earning that progression rapidly.
Купить забор
Started forming counter examples to test the claims and the post handled most of them implicitly, and a look at growfocusedprogressnow continued that anticipatory style, writers who think two steps ahead of the critical reader save themselves from a lot of follow up work and this writer has clearly internalised that habit consistently.
Genuine reaction is that I will probably think about this on and off for a few days, and a look at growstepbystrategy added fuel to that, the best content lingers in your head after you close the tab rather than evaporating immediately and this site clearly knows how to write that kind of memorable content.
If I am being honest this is the kind of site I quietly hope my own work will someday resemble, and a stop at buildsustainabledirection extended that aspirational feeling, finding work that models what I want to produce is part of why I read carefully and this site has been performing that modelling function for me lately consistently.
Reading more of the archives is now on my plan for the weekend, and a stop at learnandprogressintentionally confirmed the archive worth the time, the rare archive worth a dedicated reading session rather than just casual sampling is the rare archive of serious work and this site has clearly produced enough of that work to warrant the deeper exploration.
Reading this confirmed that my time researching the topic in other places had not been wasted, and a stop at seoharbor extended the confirmation, when independent sources agree that is a useful signal and this site is one of the more reliable sources I have found for cross checking what I read elsewhere on similar subjects.
Слушайте, наконец-то нашел нормальный разбор темы. Авторы реально шарят в вопросе, никаких банальных советов из интернета. Рекомендую заглянуть, чтобы не совершать глупых ошибок, как я в прошлый раз. Вот melbet скачать на андроид [url=https://howtoairbrush.com]melbet скачать на андроид[/url] — переходите, там вся суть. Там внутри и примеры, и пошаговые инструкции, короче полный фарш.
Felt the writer was speaking my language without trying to imitate it, and a look at buildpositiveoutcomes continued that natural fit, when a writers default voice happens to match what you find easy to read the experience feels frictionless and that is something I notice and remember about specific sites going forward.
Working through this site has been a small antidote to the shallow content that fills most of my reading time, and a stop at growwithstrategyintentnow extended that antidote function, sites that quietly improve the average quality of my reading by being themselves are sites worth supporting through return visits and recommendations consistently.
Now appreciating that I did not feel exhausted after reading, and a stop at growfocusedprogress extended that energising quality, content that leaves me with more attention than it consumed is rare and the gap between draining and energising content is real over the course of a typical day spent reading widely online.
Glad I clicked through from where I did because this turned out to be worth the time spent, and after discovernewanglestoday I had a fuller picture, the kind of content that earns its visitors through delivering value rather than chasing them through aggressive advertising or constant pop ups appearing everywhere on the screen lately.
перевозка авто автовозом услуги перевозки автомобиля
Skipped lunch to finish reading, which says something, and a stop at createimpactforward kept me at my desk longer than planned, when content beats the lunch impulse the writer has done something genuinely impressive in an attention environment full of immediately satisfying alternatives competing for the same finite block of reader time.
Took something from this I did not expect to find, and a stop at growresultsdriven added another unexpected useful piece, content that exceeds expectations rather than just meeting them is the kind that builds enthusiasm and earns repeat visits without any explicit ask from the writer or platform behind the work being read.
A relief to read something where I did not have to fact check every claim mentally, and a look at createprogressfocusedstrategy continued that reliable feeling, sites where I can lower my guard and trust the content are rare and this one is earning that trust paragraph by paragraph through consistent careful work behind the scenes.
Probably going to mention this site in a write up I am working on later this month, and a stop at learnandrefineapproach provided more material for that potential mention, content worth referencing in my own published work rather than just personal reading is content with the highest endorsement level and this site has earned that endorsement.
Двухходовые водогрейные котлы VECOSTER (серия WD): Трехходовые водогрейные котлы VECOSTER (серия WT): водогрейный жаротрубный трехходовой котел
Came away feeling slightly smarter than I was when I started, that is a real win, and a stop at startbuildingfuture added a bit more to that, the rare site that actually transfers some of its knowledge to the reader in a way that sticks rather than just creating an illusion of learning briefly.
Found the post genuinely useful for something I was working on this week, and a look at findyournextphase added more material I will reference, content that connects to my actual life and work rather than just being interesting in the abstract is the kind I will pay attention to and return to repeatedly.
Honestly impressed, did not expect to find this level of care on the topic, and a stop at startyournextmove cemented the impression, you can tell within the first few paragraphs whether a site is going to be worth the time and this one delivered on that early promise nicely throughout the rest of what I read.
cómo descargar pin up [url=http://pinup90362.help/]http://pinup90362.help/[/url]
melbet plinko [url=https://melbet62894.help/]melbet plinko[/url]
The examples really helped me grasp the points faster than abstract descriptions would have, and a stop at ivebump added a few more practical illustrations that drove the message home, the kind of writing that knows its readers learn better through concrete situations rather than vague generalities is rare and worth recognising clearly.
A piece that did not lean on the writer credentials or institutional backing, and a look at discovernewdirectionpathsnow maintained the same focus on substance, content that earns trust through quality rather than through name dropping is the kind I find most persuasive and this site is clearly playing on the substance side of that distinction.
Quality work here, the post reads cleanly and the points stay focused throughout, and a stop at explorefuturepathways kept the standard high, you can tell the writer cares about the final result rather than just hitting publish for the sake of having something new on the page to feed the search engines.
котел двухходовой жаротрубный водогрейный
дезинсекция Москва Компания оказывает услуги по профессиональной дезинсекции в Москве и Московской области. Выполняем уничтожение тараканов, клопов и других насекомых в квартирах, домах, офисах и коммерческих помещениях с гарантией результата.
Reading this post made me realise I had been settling for lower quality elsewhere, and a look at findyournextgrowthstage extended that recalibration, content that exposes how much I had been accepting in adjacent sources is content with calibrating effect on my standards and this site is performing that calibration function across topics for me reliably.
Всем доброго времени суток. Тема здоровья всегда на первом месте, потому что в экстренной ситуации трудно сориентироваться. Если ищете анонимного специалиста с быстрым выездом, важно, чтобы доктора отреагировали оперативно.
Знакомые вызывали бригаду в похожей ситуации чтобы помощь оказали без лишних хлопот и в спокойной атмосфере. Чтобы узнать точные цены и вызвать специалиста, можете ознакомиться по ссылке: лечение от запоя в стационаре [url=https://vyvod-iz-zapoya-v-staczionare-sankt-peterburg-28.ru]лечение от запоя в стационаре[/url].
Врачи дежурят круглосуточно во всех районах, так что найдете ответы на свои вопросы. Главное — не затягивать в такие моменты, кому-то тоже пригодится и спасет здоровье. Пусть все будет хорошо!
Top tier post, the kind that makes you want to share the link with friends working in the same area, and a stop at clearpathcreation only made me more confident in doing that, this site is one of the better resources I have seen on the topic recently across both new and older posts.
This stands out compared to similar posts I have read recently, less noise and more substance, and a look at findgrowthopportunitiesnow kept that gap going, you can really feel the difference between content made by someone who cares versus content made to fill a publishing schedule for an algorithm trying to keep growing somehow.
Felt like the writer was speaking directly to someone with my level of curiosity, neither talking down nor showing off, and a stop at claritydrivenexecution kept that comfortable matching going, finding writing that meets you where you are rather than asking you to climb up or stoop down feels great every time it happens.
Once I had read three posts the editorial pattern was clear, and a look at shoreskipper confirmed the pattern from a fourth angle, sites where the underlying approach reveals itself through accumulated reading rather than being announced are sites with real depth and this one has that quality clearly visible across multiple pieces consistently.
A slim post with substantial content per word, and a look at startyourgrowthpath maintained the same density, the content per word ratio is something I track informally and this site scores high on that ratio compared to most sources I read regularly which is a quiet indicator of careful editorial work behind the scenes.
Skipped lunch to finish reading, which says something, and a stop at forwardthinkingengine kept me at my desk longer than planned, when content beats the lunch impulse the writer has done something genuinely impressive in an attention environment full of immediately satisfying alternatives competing for the same finite block of reader time.
Honestly enjoyed reading this more than I expected to when I first clicked through, and a stop at discovernextdirection kept that pleasant surprise going, sometimes you stumble onto a site that just clicks with how you like to read and this is one of those for me right now today which is great.
Давно присматривался к разным предложениям, где реально учат делу. Особенно когда речь про онлайн-школу для детей — тут ведь нужна нормальная подача. У меня сын как раз перешел на удаленку, так что намучились мы знатно. В общем, посмотрите по ссылке: обучение детей онлайн [url=https://shkola-onlajn-55.ru]https://shkola-onlajn-55.ru[/url] Я если кому интересно ещё пару месяцев назад вообще думал, что это всё несерьёзно. Оказалось — зря сомневался. У них и программа грамотная. Сам теперь советую знакомым. Надеюсь, поможет в выборе.
Solid quality, the kind of work that holds up to a careful read rather than a quick skim, and a quick look at seoloom kept that standard going strong, content that rewards attention rather than punishing it is something I appreciate more and more these days online across nearly every topic I follow.
I really like how the writer keeps the tone friendly without sounding fake or overly polished, and after a stop at discovergrowthdirectionpaths the same calm pace was there, no rushing to make a point and no padding either, just clean honest writing that I can respect and come back to later again.
Признаюсь, сначала очень сильно сомневался в этой затее, но после кучи долгих обсуждений наткнулся на один действительно толковый вариант. Если кратко, вот что я понял: современная школа онлайн — это уровень на порядок выше обычного. Там и домашние задания с подробной индивидуальной проверкой, и дети занимаются с реальным интересом.
В общем, кому понимает толк в теме онлайн образование школа — почитайте подробности, вот здесь все расписано в деталях: школы онлайн 10 класс [url=https://shkola-onlajn-54.ru]https://shkola-onlajn-54.ru[/url].
Думаю, это как раз то, что сейчас нужно многим родителям. Потому что стандартный дистант бывает дико скучным для ребенка, а тут организована именно грамотно выстроенный учебный процесс. Держите этот вариант у себя в закладках.
A piece that did exactly what it promised in the headline without overshooting or underdelivering, and a look at learnandgrowforward continued that calibration, alignment between promise and delivery is a basic editorial virtue that many sites fail at and this site has clearly mastered the matching of expectation and substance throughout pieces.
Halfway through I knew I would finish the post, and a stop at explorefuturepathwaysfast also held me through to the end, content that signals its quality early and then sustains it is content with real internal consistency and this site has clearly figured out how to maintain quality from opening sentence through to closing thought.
Now wishing I had found this site sooner, and a look at buildlongtermdirection extended that mild regret, the calculation of how many years of good content I missed by not finding the right sources earlier is one I try not to make too often but it does come up sometimes when I find sites this good.
Closed three other tabs to focus on this one and never opened them again, and a stop at buildstrongfoundations similarly held attention exclusively, content that crowds out other reading from working memory is content with real density and this site has demonstrated that density across multiple pages I have visited so far this morning.
Now thinking about whether the writer might publish a longer form work I would buy, and a look at learnandprogressconsistently suggested the same depth would translate, content that makes me want to pay for related work in other formats is content that has earned commercial trust as well as attention trust and this site has both clearly.
мостбет mines Кыргызстан [url=https://mostbet45018.help]https://mostbet45018.help[/url]
Quality writing that respects the reader’s intelligence without overloading them, and a quick look at findgrowthopportunityspace reflected that approach, a balanced thoughtful site that earns trust by being consistent rather than by shouting about how trustworthy it is which is the usual approach online sadly across most content categories.
Adding to the bookmarks now before I forget, that is how good this is, and a look at buildpositiveforwardmotion confirmed the rest of the site is worth saving too, this is one of those rare finds that justifies the time spent searching the web for once which is a relief in the current environment.
Now appreciating that the post did not try to imitate any other style I might recognise, and a stop at discoveropportunitypathways continued that distinct voice, content with its own register rather than borrowed from elsewhere is content with real authorial presence and this site has clearly developed that presence through what feels like patient editorial work.
Now setting up a small reminder to revisit the site on a slow day, and a stop at createforwardsteps confirmed the reminder was a good idea, planning return visits is a small organisational act that signals trust in ongoing quality and this site has earned that planned return through consistent performance across the pieces I have read so far.
Felt the post handled a sensitive angle of the topic with appropriate care, and a look at createimpactfocuseddirection extended that careful handling across related material, sites that can navigate delicate territory without causing damage are rare and require a level of judgement that comes from experience rather than from following any clear playbook.
Just wanted to drop a quick note saying this was a useful read on a topic I have been circling, no fluff, and a stop at findgrowthchannelsnow added a few extra points that fit the same simple style which makes the whole site feel coherent rather than thrown together by many different writers with different goals.
кайтсерф магазин Хургада Кайт в Египте — это выбор тех, кто ценит свое время и хочет получить максимум от отпуска. Всего несколько часов перелета, и вы на споте.
Now appreciating the small but real way this post improved my afternoon, and a stop at learnandrefineprogressnow extended that small improvement effect, content that produces measurable positive impact on the texture of a reading day is content with real value and this site is producing those small positive impacts at a sustainable rate apparently.
Highly recommend to anyone looking for a sensible take on this topic without the usual marketing nonsense, and a look at createclarityframework kept that grounded approach going, sites that stay focused on serving readers rather than monetising every click are rare and this is clearly one of those rare ones I really appreciate finding.
Güvenli bahis deneyimi için [url=https://1xbet-giris-78.com]1xbet güncel giriş[/url] adresini kullanabilirsiniz.
1xbet giriş yapmak. Üyelik ve giriş süreci hızlıca tamamlanabilir. Öncelikle resmi web sitesi ziyaret edilmelidir. SSL sertifikası ile güvenliğiniz sağlanır.
Kullanıcılar giriş yapmak için ana sayfadaki giriş linkini kullanmalıdır. Hatalı bilgi girişinde erişim sağlanamaz. Her zaman resmi site olduğundan emin olunması gerekir.
Yeni kullanıcılar kolayca siteye kayıt olabilirler. Kayıt formunda doğru ve güncel bilgilerin girilmesi tavsiye edilir. Doğrulama aşamasında telefon veya e-posta onayı gerekebilir.
Hesabınız aktif olduktan sonra çeşitli avantajlarınız olur. Bahisler, canlı casino ve diğer oyunlar gibi aktiviteler erişilebilir hale gelir. Bonuslar ve özel tekliflerle kazancınızı artırabilirsiniz.
plinko 1win [url=https://1win68401.help]https://1win68401.help[/url]
crash predictor 1win [url=www.1win97281.help]crash predictor 1win[/url]
Quiet confidence runs through the whole post, no need to shout to make the points stick, and a stop at pebbletrailvendorstudio carried that same restrained voice forward, content that respects the reader by trusting its own substance rather than dressing it up in theatrical language is what I look for online and rarely actually find these days.
остров ко ланта в тайланде Ко Ланта — это остров, который учит нас ценить каждый момент жизни в ее гармонии. Здесь вы научитесь быть счастливыми, просто созерцая морской пейзаж.
1win big win slots [url=https://www.1win3004.mobi]1win big win slots[/url]
mostbet captcha keçmir [url=mostbet45039.help]mostbet captcha keçmir[/url]
A welcome contrast to the loud takes that have dominated my feed lately, and a look at executewithfocus extended that calm voice, content that arrives without yelling has become unusual in the modern attention economy and this site is one of the few places I have found that consistently delivers without raising its voice.
Felt the writer respected the topic without being precious about it, and a look at stencilveto continued that respectful but unfussy treatment, finding the right register for serious topics is hard and this site has clearly figured out how to take the topic seriously while still being readable for casual visitors regularly.
Reading this in segments because the day was busy, and the post survived the fragmented attention well, and a stop at ixaqua held up similarly under interrupted reading, content that can withstand modern distracted reading patterns rather than requiring a perfect block of focused time is increasingly the kind I prefer.
кайт сафари в египте 2026 Обучение кайтсерфингу — дает. Почувствуйте уверенность. Море ждет.
Glad the writer kept this short rather than padding it out, the points stand on their own without needing extra context, and a look at buildsmartdirectionalplans kept the same approach going, brevity is a sign of confidence in the substance and the team here clearly trusts their content to land without filler.
Took some notes for a project I am working on, and a stop at discovernewfocusareas added more raw material to those notes, content that contributes to my own creative work rather than just being interesting in the moment is the kind I value most and the kind I will keep coming back to repeatedly.
Thanks for laying this out in a way that someone newer to the topic can follow, and a stop at startbuildingvision kept that accessibility going, writing that meets readers at different experience levels without condescending is hard to do well and the writers here have clearly thought about who they are writing for.
Worth bookmarking and sharing with anyone interested in the topic, that is my honest take, and a stop at grovequays reinforces that, the kind of generous resource that makes the open web feel worth defending against the constant pressure to retreat into walled gardens and curated feeds today everywhere I look across all my devices.
Deneyip de begenen cok oldu. Surekli adres degisiyor. En sonunda dogru adrese ulast?m.
Bu isin puf noktalar? var. Su an en guncel cal?san 1xbet guncel giris adresi tam olarak soyle: 1xbet yeni giriş [url=https://1xbet-giris-79.com]1xbet yeni giriş[/url]. Herkesin bildigi gibi — 1xbet spor bahislerinin adresi degisti.
Site s?k s?k kapan?yor diyenlere inat. Kim ne derse desin — arayuz zaten al?s?k oldugunuz gibi. Gonul rahatl?g?yla girebilirsiniz…
Now feeling something close to gratitude for the fact this site exists, and a look at buildsustainableforwardmomentum extended that gratitude, the rare site that produces this kind of response is the rare site worth defending in conversations about whether the modern internet is still capable of producing genuinely valuable independent content for serious adults.
Felt the writer was speaking my language without trying to imitate it, and a look at findyourcorestrength continued that natural fit, when a writers default voice happens to match what you find easy to read the experience feels frictionless and that is something I notice and remember about specific sites going forward.
мостбет бонусы для Кыргызстана [url=https://www.mostbet17893.online]https://www.mostbet17893.online[/url]
Now recognising that the post handled the topic with appropriate technical precision without becoming dry, and a stop at buildactionabledirectionsteps continued that balance, technical precision and readability are often in tension and this site has clearly figured out how to maintain both at once which is one of the harder editorial achievements in the form.
Skipped the related products section because there was none, and a stop at buildwithdirection also lacked any aggressive monetisation, content that is not constantly trying to convert me into a customer or subscriber is content that has confidence in its own value and that confidence shows up as a different reading experience.
услуги по подбору персонала услуги агентства по подбору персонала
Nice to see a post that does not try to overcomplicate the basics for the sake of looking smart, and once I looked at discoverpowerfuldirections the same direct tone was there too, which honestly makes a difference when you are short on time and want answers without long pointless intros.
A piece that prompted a small mental rearrangement of how I order related ideas, and a look at findyournextsignal extended that rearranging effect, content that affects the structure of my thinking rather than just adding to it is content with the deepest kind of impact and this site is reaching that depth for me today.
Чтобы быстро и эффективно [url=https://kak-najti-cheloveka-po-nomeru-telefona-3.ru]источник[/url], воспользуйтесь платформами которые не врут.
Слушай, тут главное — без глупостей.
Номера телефонов нередко встречаются в открытых профилях или постах соцсетей.
Надеюсь, понятно объяснил.
Refreshing tone compared to the dry corporate posts on similar topics, and a stop at buildsustainablemomentum carried that personality through nicely, you can tell when a real person is behind the writing versus a content team chasing metrics and this site definitely falls into the former category clearly across what I have seen.
Now recognising that this site has earned a place in the small group of resources I treat as authoritative, and a stop at explorefreshpossibilities confirmed that placement, the difference between resources I trust and resources I just consume is real and this site has clearly moved into the trusted category through consistent quality over time.
Probably the best thing I have read on this topic in the past month, and a stop at startmovingupward extended that ranking, the casual ranking of recent reading is informal but real and this site has been winning those rankings for me on this topic specifically over the last several weeks of regular reading sessions.
Торговый павильон может использоваться как временный или постоянный объект торговли. Благодаря современным технологиям такие конструкции отличаются долговечностью:
Павильон для продажи выпечки на заказ Московская область
If patience for careful reading is rare these days finding sites that reward it is rarer still, and a stop at growwithconfidencepathway extended that rare reward, the diminishing returns on shallow content reading have made me more selective about where to spend reading time and this site is meeting the higher selectivity bar consistently.
научные публикации
Only the best is here: מחירי ליווי בישראל
Worth a quiet moment of recognition for the consistency I have noticed across multiple posts, and a stop at buildyournextvision continued that consistent quality, sites that maintain quality across many pieces rather than peaking on one viral post are sites with real editorial discipline and this one has clearly developed that discipline carefully.
Bookmark added with a small note about why, and a look at growfocusedexecutionnow prompted another bookmark with another note, the bookmarks I annotate are the ones I expect to return to deliberately rather than stumble into and this site is generating annotated bookmarks at a higher rate than my usual content sources by some margin.
Felt like I was reading something written by someone who actually thinks about the topic rather than reciting it, and a look at growwithstrategyfocusnow reinforced that impression, the difference between recited content and considered content is huge and this site clearly belongs to the latter category which I appreciate as a careful reader looking for substance.
A piece that did exactly what it promised in the headline without overshooting or underdelivering, and a look at exploreuntappeddirections continued that calibration, alignment between promise and delivery is a basic editorial virtue that many sites fail at and this site has clearly mastered the matching of expectation and substance throughout pieces.
как пополнить счет melbet [url=https://melbet62894.help/]https://melbet62894.help/[/url]
pin-up en Chile [url=http://pinup90362.help]pin-up en Chile[/url]
Reading this gave me a quiet moment of intellectual pleasure that I had not been expecting, and a stop at growthwithdiscipline extended that pleasure across more pages, the unexpected reward of stumbling into careful writing is one of the small ongoing pleasures of reading the open web and this site is delivering it reliably.
The structure of the post made it easy to follow without losing track of where I was, and a look at sofatavern kept the same logical flow going, this site clearly understands that organisation is half the battle in keeping readers engaged from the first line to the last across any kind of post.
Worth your time, that is the simplest endorsement I can give, and a stop at coralharborretailgallery extends that endorsement across the rest of the site, this is one of those increasingly rare places that delivers on what it promises rather than over selling the content and under delivering on substance every time which I find frustrating elsewhere.
Now noticing how rare it is to find a site that does not feel rushed, and a look at claritydrivenactions extended that calm pace, content produced without time pressure has a different quality than content shipped to meet a deadline and this site reads as written without urgency which produces a different and better experience for readers.
Glad I stumbled across this post, the explanations actually make sense without needing background knowledge to follow along, and after a stop at discovernextgrowthchapter the same was true there, no assumptions about the reader just clear writing that anyone can understand from the first line right through to the end.
Слушайте, наконец-то нашел нормальный разбор темы. Всё расписано до мелочей, даже новичок поймет что к чему. Сам долго мучился, пока не нашел этот гайд. Вот melbet [url=https://howtoairbrush.com]melbet[/url] — сохраняйте себе в закладки, пригодится. Мне лично это сэкономило кучу времени и нервов, так что делюсь от души.
Now recognising that this site has earned a place in the small group of resources I treat as authoritative, and a stop at findnewopportunitypaths confirmed that placement, the difference between resources I trust and resources I just consume is real and this site has clearly moved into the trusted category through consistent quality over time.
Кстати, в соседней ветке кто-то спрашивал про адекватную альтернативу обычным школам. Сам недавно наткнулся на одну площадку. Там как раз упор на индивидуальный темп, нет этой дикой уравниловки: [url=https://shkola-onlajn-53.ru]источник[/url] . Пришлось признать, что был не прав. Успеваемость подтянулась, особенно по точным наукам. Объясняют на пальцах, без лишней воды. Плюс огромный – никаких больничных, заболел – смотришь записи. Для современных детей самое то, ИМХО.
Liked everything about the experience, from the opening through to the closing notes, and a stop at createimpactstrategies extended that into more pages, finding a site where the editorial vision shows through every choice rather than feeling random is an increasingly rare experience and one I am glad to have today during this particular reading session.
Found this useful, the points line up well with what I have been thinking about lately, and a stop at growintentionallyforward added some angles I had not considered yet, definitely walking away with more than I came for which is the best outcome from time spent reading online for any kind of topic.
However measured this site clears the bar I set for sites I take seriously, and a stop at discovermeaningfulgrowthpaths continued clearing that bar, the metrics I use for site quality are admittedly informal but they are consistent and this site has cleared them on multiple measurements across multiple visits which is meaningful for my evaluation.
Reading this gave me a small jolt of recognition for an experience I thought was just mine, and a stop at findyournextfocusarea produced more such jolts, content that universalises private experiences without flattening them is doing genuinely useful work and this site is providing that recognition function for me reliably across topics I read.
A piece that suggested careful editing without showing the marks of the editing, and a look at learnandscaleprogressnow continued that invisible polish, the best editing disappears into the prose and this site reads as having been edited with skill that does not announce itself which is the highest compliment I can offer any blog content.
A small thing but the line spacing and font choices made reading this physically pleasant, and a look at izoblade maintained the same careful design, technical choices about typography are part of what makes online reading actually comfortable and this site has clearly invested in the design layer alongside the content layer carefully.
Will be coming back to this for sure, too much good content to absorb in one sitting, and a stop at growwithclearfocus only added more pages I want to dig through, this site is going onto my regular rotation list because it consistently delivers something worth the visit lately rather than empty filler.
Reading this in the gap between work projects was a small but meaningful break, and a stop at findyourprogressroute extended that gentle reset, content that provides genuine refreshment rather than just distraction during work breaks is content with a particular kind of utility and this site fits that role for me reliably during work days.
Honestly impressed, did not expect to find this level of care on the topic, and a stop at leafdawns cemented the impression, you can tell within the first few paragraphs whether a site is going to be worth the time and this one delivered on that early promise nicely throughout the rest of what I read.
Decided this was the best thing I had read all morning, and a stop at buildfocusedgrowthpath kept that ranking intact, ranking my reading is something I do mentally throughout the day and the top rank is competitive and not easily won but this site won it without needing to overstate its claims for that.
Worth flagging that the post handled an angle of the topic I had not seen elsewhere, and a look at discovernewleverage extended that fresh treatment, content that finds underexplored corners of well covered subjects is genuinely valuable and this site has demonstrated that exploratory editorial approach across multiple pieces in my reading sessions today.
Reading this in a quiet hour and finding it suited the quiet, and a stop at learnandscaleideas extended the quiet reading mood, content that matches its own optimal reading conditions rather than fighting them is content that has been thoughtfully calibrated and this site reads as having a particular reading mood in mind throughout.
Worth flagging that this approach to the topic is fresh without being contrarian, and a stop at unlocknewdirections extended the same fresh angle, finding original perspective on familiar subjects is rare and this site has clearly developed its own way of seeing rather than echoing the dominant takes from elsewhere consistently.
The use of plain language without dumbing down the topic was really well done, and a look at buildsmartmovementplans continued in that same accessible style, this is something many technical writers fail at because they either confuse their readers or condescend to them but here neither problem appears at all which is impressive really.
Now adding this to a short list of sites I would defend in a conversation about the modern web, and a look at veilshore reinforced that defence list, the few sites that serve as evidence the web can still produce good things are precious and this one has clearly joined that small list of exemplary sites.
врач нарколог на дом частный [url=https://narkolog-na-dom-moskva-28.ru]врач нарколог на дом частный[/url]
Now feeling mildly impressed in a way I do not quite remember feeling about a blog in a while, and a stop at explorefreshopportunity extended that mild impression, content that produces specific positive emotional responses rather than just neutral information transfer is content with extra dimensions and this site has those extra dimensions clearly.
Reading this felt easy in the best way, no friction and no confusion at any point, and a stop at createvisionfocusedexecution carried that same comfort across more pages, the kind of editorial flow that lets you absorb information without fighting the format which is increasingly hard to find on the open web today across topics.
Came in expecting another generic take and got something with actual character instead, and a look at simplifythenexecute carried that personality forward, finding a distinct voice on a saturated topic is impressive and worth pointing out when it happens because most sites end up sounding identical to their nearest competitors quickly.
Considered against the flood of similar content this one stands apart in important ways, and a stop at buildgrowthdirectionnow extended that distinctive feel, sites that find their own corner of a crowded topic and stay there are sites worth following and this one has clearly carved out its own space and committed to defending it carefully.
Reading this gave me confidence to make a decision I had been putting off, and a stop at startyournextphase reinforced that confidence, content that translates into action in my own life rather than just informing it is content with the highest practical value and this site is generating that action level utility for me lately.
Honestly enjoyed reading this more than I expected to when I first clicked through, and a stop at createbetteroutcomes kept that pleasant surprise going, sometimes you stumble onto a site that just clicks with how you like to read and this is one of those for me right now today which is great.
Worth pointing out that the writing reads as confident without being defensive about it, and a look at createforwardplanningsteps extended that secure tone, content that does not pre emptively argue against imagined critics has a different quality from defensive writing and this site reads as written from a place of real ease.
Took the time to read the comments on this post too and they were also worth reading, and a stop at growwithintentionalsteps suggested the community quality matches the content quality, when the conversation around a piece is as good as the piece itself you know you have found a real corner of the internet.
Reading the writers other posts after this one suggests the quality is consistent rather than peak, and a stop at findyournextgrowthphase confirmed the consistent quality reading, sites that hold the same level across many pieces rather than peaking on a few are sites with sustainable editorial discipline and this one has clearly developed that.
школа английского в москве
Клининговые услуги
Давно искал нормальный вариант, где реально учат делу. Особенно когда речь про образовательные онлайн школы — тут ведь нужна нормальная подача. У меня племянник как раз перешел на удаленку, так что пришлось перебрать кучу вариантов. В общем, можете глянуть сами: lbs что это [url=https://shkola-onlajn-55.ru]https://shkola-onlajn-55.ru[/url] Я кстати ещё раньше вообще относился скептически к таким форматам. Оказалось — реально работает. У них и программа грамотная. В общем, рекомендую присмотреться. Удачи!
Found the use of subheadings really helpful for scanning back through the post later, and a stop at findyourstrongpath kept that reader friendly approach going, navigation is something many blog writers ignore but small structural choices make a noticeable difference for someone returning to find a specific point again days or weeks later.
Честно говоря, долго выбирал, варианты для учёбы, но после изучения реальных отзывов наткнулся на один действительно толковый вариант. К слову, вот что я понял: современная онлайн-школа для детей — это уровень на порядок выше обычного. Там и домашние задания с подробной индивидуальной проверкой, и дети занимаются с реальным интересом.
В общем, кому реально нужно нормальное обучение в теме образовательные онлайн школы — убедитесь во всём сами, вот здесь все разжевано до мелочей: интернет-школа [url=https://shkola-onlajn-54.ru]интернет-школа[/url].
А я пока пойду дальше разбираться с расписанием. Потому что обычная школа часто проигрывает по всем фронтам, а тут организована именно частная школа онлайн. Пригодится точно, потом еще спасибо скажете.
Reading this in pieces over a coffee break and finding it consistently rewarding, and a stop at solarorchardmarketparlor extended that into related material I will return to later, the kind of site that fits naturally into small reading windows without requiring a long uninterrupted block is genuinely useful for how I actually browse.
Arkadaslar uzun suredir ar?yordum. Surekli adres degisiyor. En sonunda guvenilir bir kaynak buldum.
Bu isin puf noktalar? var. Su an en sorunsuz cal?san 1xbet giris adresi tam olarak soyle: 1xbet güncel [url=https://1xbet-giris-79.com]1xbet güncel[/url]. Herkesin bildigi gibi — 1xbet spor bahislerinin adresi degisti.
Denemek isteyen kac?rmas?n. Kendi deneyimim buysa da — arayuz zaten al?s?k oldugunuz gibi. Gonul rahatl?g?yla girebilirsiniz…
Now feeling the rare pleasure of trusting a source completely on first encounter, and a look at progresswithprecision extended that initial trust into something more durable, the calibration of trust to evidence is something I do informally and this site has earned high trust through the cumulative weight of multiple consistently good posts already.
Found this through a search that was generic enough I did not expect quality results, and a look at buildpositivegrowth continued the surprisingly good experience, search engines occasionally still surface excellent independent content if you scroll past the obvious paid and high authority results which is reassuring to remember sometimes.
Quietly building a case in my head for why this site deserves more attention than it currently seems to receive, and a look at jadburst reinforced the case, the gap between quality and recognition is a recurring frustration in independent online content and this site is one of the cases that seems particularly egregious to me today.
Started reading and ended an hour later without realising the time had passed, and a look at explorefutureopportunityideas produced the same time dilation effect, when content makes time feel different the writer has achieved something well beyond the average and this site is producing that experience for me reliably across multiple readings.
Appreciate that you did not pad this with fluff to hit a word count, the post says what it needs to say and stops, and a look at startwithclearstrategy did the same, brevity here feels intentional not lazy which is a distinction many writers miss completely sometimes when they are working under deadlines.
Closed my email tab so I could read this without interruption, and a stop at startthinkingstrategicallyfast earned the same protected attention, when content is good enough to defend against the usual digital distractions you know it deserves better than the half attention most online reading gets in a typical busy day.
Worth your time, that is the simplest endorsement I can give, and a stop at createprogressjourney extends that endorsement across the rest of the site, this is one of those increasingly rare places that delivers on what it promises rather than over selling the content and under delivering on substance every time which I find frustrating elsewhere.
A slim post with substantial content per word, and a look at buildpositiveoutcomes maintained the same density, the content per word ratio is something I track informally and this site scores high on that ratio compared to most sources I read regularly which is a quiet indicator of careful editorial work behind the scenes.
Better than the average post on this subject by some distance, and a look at findyourcorepath reinforced that, you can tell within the first paragraph that the writer here actually cares about the topic rather than just covering it for the sake of having something to publish that week or that day.
Genuine reaction is that this site clicked with how I like to read, and a look at fairfinch kept that comfortable fit going, sometimes you find a place online whose editorial decisions just align with your preferences and when that happens it is worth recognising and supporting through repeat engagement consistently going forward.
Solid stuff, the kind of post that I will probably refer back to later this month when the topic comes up again, and a look at createalignedactions only confirmed I should bookmark the site as a whole rather than just this single page for future reference and use across coming weeks.
виндсерфинг и кайтсерфинг Хургада Кайт сафари подарит вам неделю жизни на яхте, наполненную ветром и приключениями. Вы откроете новые горизонты и значительно улучшите свое мастерство катания.
Now appreciating that the post did not try to imitate any other style I might recognise, and a stop at intentiondrivenprogress continued that distinct voice, content with its own register rather than borrowed from elsewhere is content with real authorial presence and this site has clearly developed that presence through what feels like patient editorial work.
Now appreciating that the post did not require external context to follow, and a look at findyournextbreakthrough maintained the same self contained quality, content that respects new visitors by being readable without prerequisites is content with broader accessibility and this site has clearly invested in keeping each piece reader friendly for fresh arrivals.
The lack of unnecessary jargon made the post accessible without sacrificing accuracy, and a look at learnandoptimizeexecution continued in the same accessible style, technical topics often hide behind specialised vocabulary but here the writer trusts the reader to keep up with plain language and that trust pays off nicely throughout the entire post.
Came in expecting another generic take and got something with actual character instead, and a look at exploreideaswithclarity carried that personality forward, finding a distinct voice on a saturated topic is impressive and worth pointing out when it happens because most sites end up sounding identical to their nearest competitors quickly.
Came away with some new perspectives I had not considered before, and after designbetteroutcomes those ideas felt more complete, the kind of content that stays with you a little while after reading rather than slipping out the moment you switch tabs and move on with your day to whatever comes next.
Decided to subscribe to the RSS feed if there is one, and a stop at discovernewdirectionflows confirmed that decision, content that I want delivered to me proactively rather than just remembered when I have time is content that has earned a higher level of commitment from me as a reader looking for reliable sources.
Closed it feeling I had taken something away rather than just consumed something, and a stop at learnandadvanceconfidently extended that taking away feeling, the difference between content I extract value from and content I just pass through is something I track informally and this site is consistently in the value extraction column for me.
Liked the way the post handled the final paragraph, no neat bow but no abrupt cutoff either, and a stop at learnandtransformdirectionnow continued that thoughtful ending pattern, endings are hard and most blog writers either over engineer them or skip them entirely and this site has clearly figured out a sustainable middle approach.
Reading this triggered a small change in how I think about the topic going forward, and a stop at discoveropportunitydirectionnow reinforced that subtle shift, the rare content that actually moves my thinking rather than just confirming or filling it is the kind I most value and this site is providing that kind of impact today.
Now appreciating the way the post avoided the temptation to be longer than necessary, and a look at jinvex continued that lean approach, content with the discipline to stop when finished rather than padding for length is content that respects both itself and its readers and this site has that disciplined editorial culture clearly throughout.
Now thinking the topic is more interesting than I had given it credit for, and a stop at buildfocusedmomentumnow continued that elevated interest, content that revives my curiosity about subjects I had set aside is doing genuine work in the structure of my interests and this site is providing that revivifying effect today actually.
Excellent post, balanced and well organised without showing off, and a stop at growresultsdrivenpath continued in that same vein, this site has clearly figured out the formula for content that works for readers rather than for search engine ranking signals which is harder than it sounds today and worth real recognition from anyone.
Now planning to write about the topic myself eventually using this post as a reference, and a look at ravenharbortradehouse would also serve in that future piece, content that becomes raw material for my own writing rather than just informing my reading is content with multiplicative value and this site is generating that multiplicative effect.
Онлайн калькулятор по математике Онлайн калькулятор по математике позволяет быстро и точно выполнять сложные вычисления прямо в браузере. Вы можете вводить любые математические выражения, получая мгновенный ответ с пояснениями. Это незаменимый инструмент для студентов, школьников и всех, кто работает с числами.
Что такое ритуальные товары и их значение (3)
кайт школа анапа Кайт — планируется. Бронируйте. Обеспечим.
Ребята, привет! Я вообще в шоке, если честно. Поменяли газовую плиту, сдвинули раковину, а стены вообще вынесли — думал, пронесёт. В общем, инспекция пришла и выписала предписание. И тут встал вопрос: сколько стоит согласование перепланировки [url=https://skolko-stoit-uzakonit-pereplanirovku-10.ru]https://skolko-stoit-uzakonit-pereplanirovku-10.ru[/url] просто интересно, стоимость согласования перепланировки квартиры сейчас вообще реальная или грабёж. Или взносы в жилинспекцию за выдачу акта. Если кто недавно проходил это ад, поделитесь. Без этого а если решите ипотеку рефинансировать, БТИ зарубит. Короче, нужна стоимость согласования перепланировки, реальная по рынку.
Worth saying that the quiet confidence of the writing is what landed first, and a look at startbuildingmomentumpath continued that quiet quality, confident writing without the loud display of confidence is a rare combination and this site has clearly developed both the knowledge and the editorial restraint to land that combination consistently.
Now wondering how the writers calibrated the level of detail so well, and a stop at thinkforwardact continued the same calibration, the right level of detail is one of the harder editorial calls in any piece and this site has clearly developed an instinct for it through what I assume is years of careful practice publicly.
Looking at the surface design and the substance together this site has both right, and a look at senatetoucan reinforced that integrated quality, sites where presentation and content reinforce each other rather than fighting are sites with full editorial coherence and this one has clearly invested in both layers in a balanced way.
Reading this slowly to absorb the structure, and the structure is doing real work alongside the words, and a look at jadkix maintained the same architectural quality, when sentence shapes and paragraph rhythms reinforce the meaning rather than just transporting words you know you are reading skilled work today.
Useful read, especially because the writer did not assume too much background from the reader, and a quick look at discoverforwardideas continued in the same way, a thoughtful site that meets people where they are which is something the modern web could use a lot more of for both casual and serious readers.
Reading this prompted me to dig out an old reference book related to the topic, and a stop at findnewopportunitydirections extended that connection to other sources, content that connects me back to my own existing knowledge rather than asking me to forget it is content with continuity and this site has that continuous quality.
Worth recognising the specific care that went into how this post ended, and a look at growwithintentionalmovement maintained the same careful conclusions, endings are where most blog content falls apart and this site has clearly invested in the closing stretches of its pieces rather than letting them simply trail off when energy fades.
Всем доброго времени суток. Тема здоровья всегда на первом месте, потому что в экстренной ситуации трудно сориентироваться. Если срочно требуется квалифицированная медицинская помощь, то не рискуйте и не доверяйте случайным объявлениям.
Сам долго изучал отзывы и искал надежный вариант, в итоге вся ценная информация была собрана по крупицам. Чтобы узнать точные цены и вызвать специалиста, вся информация есть здесь: цена на вывод из запоя в стационаре [url=https://vyvod-iz-zapoya-v-staczionare-sankt-peterburg-28.ru]цена на вывод из запоя в стационаре[/url].
Там расписаны все аспекты, которые стоит учитывать, реагируют очень быстро, буквально за час. Не теряйте время, и обращайтесь к настоящим профессионалам. Пусть все будет хорошо!
Glad to have another reliable bookmark for this topic, and a look at creategrowthsystems suggested several more pages I will be marking too, building a personal library of trustworthy resources is one of the actual rewards of careful browsing and this site is earning a place on my permanent shortlist for the topic.
Came in skeptical and left mostly convinced, that is the highest praise I can offer, and a look at findmomentumnext pushed me further in the same direction, content that survives a critical first read is rare and worth recognising because most blog posts crumble under any real scrutiny these days when you actually pay attention closely.
эндометриоз матки
Refreshing tone compared to the dry corporate posts on similar topics, and a stop at discovergrowthmindset carried that personality through nicely, you can tell when a real person is behind the writing versus a content team chasing metrics and this site definitely falls into the former category clearly across what I have seen.
Picked this post to share in a Slack channel where I knew it would be appreciated, and a look at findyourcoremomentum suggested I will share more from here later, content worth sharing into a professional context is content that has earned a higher kind of trust than mere personal interest and this site has it.
Came away with a small but real shift in perspective on the topic, and a stop at directioncreatesenergy pushed that shift a bit further, the kind of subtle reframing that good writing does to a reader without making a big deal of it is something I always appreciate when it happens which is sadly not that often.
Strong recommendation from me, anyone curious about the topic should make time for this, and a look at startnextleveldirectionfast only sharpens that recommendation further, the kind of resource that holds up against careful scrutiny rather than crumbling at the first critical question is rare and worth pointing other people toward when the topic comes up.
Now realising the post solved a small problem I had been carrying for weeks, and a look at directionalclarityhub extended that problem solving function, content that connects to specific unresolved questions in my own life rather than just providing general interest is content with real practical impact and this site is providing that practical value.
Reading this slowly to absorb the structure, and the structure is doing real work alongside the words, and a look at explorefreshroutes maintained the same architectural quality, when sentence shapes and paragraph rhythms reinforce the meaning rather than just transporting words you know you are reading skilled work today.
What stands out to me the most is how this post stays useful without becoming too difficult or difficult to read, because the relaxed tone and simple structure make the whole discussion feel more comfortable and enjoyable for different audiences.
Сад и огород
Полная статья здесь: https://lovely-face.ru
Glad to find a site whose links lead somewhere worth going rather than back to itself for SEO juice, and a stop at startwithclearstrategyfocus kept that generous outbound feel, citing other peoples work with real respect rather than just for ranking signals is a sign of an honest operation worth supporting going forward.
Reading this in a moment of low energy still kept my attention, and a stop at joxaxis continued that engagement under suboptimal conditions, content that survives the reader being tired is content with extra reserves of pull and this site has the kind of writing that holds up even when I am not at my reading best.
Got something practical out of this that I can apply later this week, and a stop at learnandprogressconsistently added more details to think about, this is exactly the kind of content I bookmark for future reference rather than the throwaway listicles that dominate most search results these days for almost any common topic.
Looking at this from the perspective of someone tired of generic content the contrast is striking, and a look at linencovevendorparlor maintained that distinctive feel, sites with strong editorial identity stand out against the bland background of algorithmic content and this one has clearly developed an identity worth recognising through careful attention.
Glad the writer did not feel the need to argue with imaginary critics in the post itself, and a stop at growwithsteadyfocus kept the same focused approach going, defensive writing wastes the reader time and confidence on positions that did not need defending and this post has clearly avoided that common failure.
Really appreciate the absence of stock photos that have nothing to do with the content, and a quick visit to jadyam maintained the same restraint, visual filler is a tell that the writing cannot stand on its own and the lack of it here suggests the team has confidence in their content quality alone.
Started reading and ended an hour later without realising the time had passed, and a look at createimpactplanning produced the same time dilation effect, when content makes time feel different the writer has achieved something well beyond the average and this site is producing that experience for me reliably across multiple readings.
A slim post with substantial content per word, and a look at actionwithalignment maintained the same density, the content per word ratio is something I track informally and this site scores high on that ratio compared to most sources I read regularly which is a quiet indicator of careful editorial work behind the scenes.
Honestly the simplicity of the explanation made the topic click for me in a way other writeups had not, and a look at createclearprogresspath continued that clarity into related areas, when a writer gets the level of explanation right the reader does the heavy lifting themselves and the post just enables it.
Ac?kcas? sas?rd?m kalitesine. Baz? siteler cal?sm?yor. En sonunda guvenilir bir kaynak buldum.
Ozellikle bahis ve casino sevenler icin. Su an en sorunsuz cal?san 1xbet yeni giris adresi tam olarak soyle: 1xbet güncel giriş [url=https://1xbet-giris-79.com]1xbet güncel giriş[/url]. Ne demisler — 1xbet turkiye icin tek adres buras?.
Denemek isteyen kac?rmas?n. Kim ne derse desin — arayuz zaten al?s?k oldugunuz gibi. Baska yerde aramay?n art?k…
Going to share this with a friend who has been asking the same questions for a while now, and a stop at learnandadvanceclearly added a few more pages I will pass along too, this is the kind of generous information that earns a small thank you from me right now and again later this week.
Reading this brought back the satisfaction I used to get from blogs ten years ago, and a stop at buildlongtermvision kept that nostalgic quality alive, sites that capture what was good about an earlier era of internet writing are increasingly precious and this one is doing that without feeling like a deliberate throwback at all.
Started this morning and finished at lunch with a small sense of having spent the time well, and a look at startpurposefuldirection extended that satisfaction into the afternoon, content that fits naturally into the rhythm of a working day rather than demanding a dedicated reading block is increasingly the kind I prefer.
This stands out compared to similar posts I have read recently, less noise and more substance, and a look at buildwithpurposefulsteps kept that gap going, you can really feel the difference between content made by someone who cares versus content made to fill a publishing schedule for an algorithm trying to keep growing somehow.
Without overstating it this is a quietly excellent post, and a look at exploreuntappedopportunities extended that quiet excellence, content that earns superlatives without demanding them through marketing language is content that has truly earned them through the substance and this site has clearly produced work in that earned excellence category today.
Excellent post, balanced and well organised without showing off, and a stop at exploreideaswithfocus continued in that same vein, this site has clearly figured out the formula for content that works for readers rather than for search engine ranking signals which is harder than it sounds today and worth real recognition from anyone.
Looking at this from the perspective of someone tired of generic content the contrast is striking, and a look at progressbystrategy maintained that distinctive feel, sites with strong editorial identity stand out against the bland background of algorithmic content and this one has clearly developed an identity worth recognising through careful attention.
Now feeling mildly impressed in a way I do not quite remember feeling about a blog in a while, and a stop at discovernewfocusareasnow extended that mild impression, content that produces specific positive emotional responses rather than just neutral information transfer is content with extra dimensions and this site has those extra dimensions clearly.
Now placing this in the small category of sites whose updates I would actually want to know about, and a stop at buildlongtermfocus confirmed that placement, the difference between sites I want to follow and sites I just consume from is real and this one has crossed into the active follow category from the casual consumption side.
A piece that read as the work of someone who reads carefully themselves, and a look at findgrowthpotential continued that informed feel, writers who are also serious readers produce work with a different quality and this site reads as the product of someone steeped in good writing rather than just generating content for an audience.
Felt this in a way I cannot quite explain, the topic just hit different here, and a stop at discoverhiddenroutes continued in that vein, sometimes you find a site whose perspective lines up with how you have been thinking and reading their work feels like a small relief which I appreciated more than I expected.
сайт мероприятия
Just want to flag that this was useful and not bury the appreciation in caveats, and a look at unlocknewpotentialnow earned the same direct praise, recognising good work without hedging it with criticism is something I try to practice because over qualified compliments tend to read as backhanded and miss the point sometimes.
Found the use of subheadings really helpful for scanning back through the post later, and a stop at startsmartmovementnow kept that reader friendly approach going, navigation is something many blog writers ignore but small structural choices make a noticeable difference for someone returning to find a specific point again days or weeks later.
Found something new in here that I had not seen explained this way before, and a quick stop at suburbvesper expanded the idea even further, the kind of writing that nudges your thinking forward a bit without forcing the issue is exactly what I look for online today and rarely actually find anywhere.
Now feeling the small relief of finding writing that does not condescend, and a stop at createimpactdirectionplan extended that respect for readers, content that treats its audience as capable adults rather than as people to be managed produces a different reading experience and this site has clearly chosen the respectful approach across all pieces.
A piece that did not lecture even when it had clear positions, and a look at oliveorchard maintained the same teaching without preaching tone, finding the line between informing and lecturing is hard and most sites land on the wrong side of it but this one has clearly figured out how to inform without becoming preachy.
A memorable post for me on a topic I had thought I was tired of, and a look at kyarax suggested the same site can refresh other tired topics, sites that can revive my interest in subjects I had written off as exhausted are doing rare work and this one is clearly doing that for me today.
Worth bookmarking and sharing with anyone interested in the topic, that is my honest take, and a stop at actioncreatesresults reinforces that, the kind of generous resource that makes the open web feel worth defending against the constant pressure to retreat into walled gardens and curated feeds today everywhere I look across all my devices.
Took a few notes from this post, the points are easy to remember without needing to come back and check, and a look at jalaxis added a couple more, the kind of place that sticks in the memory long after the browser tab has been closed for the day which says a lot really.
прихожие в коридор заказ
Давно искал нормальный вариант, где реально дают живые знания. Особенно когда речь про образовательные онлайн школы — тут ведь важен подход. У меня сын как раз перешел на удаленку, так что намучились мы знатно. В общем, можете глянуть сами: онлайн обучение школа [url=https://shkola-onlajn-55.ru]https://shkola-onlajn-55.ru[/url] Я кстати ещё пару месяцев назад вообще думал, что это всё несерьёзно. Оказалось — всё гораздо лучше. У них и обратная связь отличная. Доволен как слон, если честно. Удачи!
v-nayke.ru
Clean writing, easy to read, and never tries too hard to impress, that combination is harder to find than people think, and after my time on learnandtransformthinking I am sure this site treats its readers well, no flashy tricks just useful content done right which is honestly all I want online.
Walked away in a slightly better mood than when I started reading, that says something about the writing, and a stop at forwardmovementworks kept that going, content that leaves you feeling more capable rather than overwhelmed is the kind I keep coming back to again and again over the years and across many topics.
Amazing! Your site has quite a few comment posts. How did you get all of these bloggers to look at your site I’m envious! I’m still studying all about posting articles on the net. I’m going to view pages on your website to get a better understanding how to attract more people. Thank you!
A relief to read something where I did not have to fact check every claim mentally, and a look at exploreinnovativepathsnow continued that reliable feeling, sites where I can lower my guard and trust the content are rare and this one is earning that trust paragraph by paragraph through consistent careful work behind the scenes.
Worth recognising the absence of the usual blog tropes here, and a look at startmovingupward continued that fresh quality, sites that avoid the standard moves of the medium read as more original even when the content is on familiar topics and this one has clearly chosen its own path through the conventional terrain skilfully.
Honestly impressed by the consistency of voice across what I have read so far, and a quick visit to discoverinnovativethinkingnow continued that consistent feel, when a site reads like one careful person rather than a committee the experience is more rewarding for the reader who notices these subtle editorial details over time.
Coming back to this one, definitely, and a quick visit to startnextleveljourney only made me more sure of that, the kind of writing that makes you want to set aside time later rather than rushing through it now while distracted by everything else competing for attention on the screen today across so many tabs.
Особенности подбора площадок для веганских банкетов
Found this through a search that was generic enough I did not expect quality results, and a look at buildlongtermmomentum continued the surprisingly good experience, search engines occasionally still surface excellent independent content if you scroll past the obvious paid and high authority results which is reassuring to remember sometimes.
Glad the writer did not feel the need to argue with imaginary critics in the post itself, and a stop at intelligentprogress kept the same focused approach going, defensive writing wastes the reader time and confidence on positions that did not need defending and this post has clearly avoided that common failure.
Per vivere l’adrenalina del Crazy Time nei casino italiani, visita [url=https://crazy-timedemo.com/]crazy time prediction telegram[/url] e scopri demo, statistiche e partite in diretta.
E certificato dalle autorita competenti e adotta sistemi di sicurezza rigorosi per proteggere i dati.
выезд нарколога на дом [url=https://narkolog-na-dom-moskva-28.ru]выезд нарколога на дом[/url]
Se vuoi vivere l’emozione unica del gioco d’azzardo, non perdere l’occasione di provare [url=https://crazy-timeitaly.com/]crazy time live.[/url] per scoprire il miglior intrattenimento casino in Italia!
In Italia, Crazy Time Slot Casino e riconosciuto come uno dei casino online piu famosi. Gli appassionati di slot machine scelgono questo casino per la sua vasta offerta di giochi e per l’interfaccia intuitiva. Molti puntano su Crazy Time Slot Casino Italy grazie alle sue misure di sicurezza e alla serieta del servizio.
Il design del sito e semplice e funzionale, adatto sia ai nuovi giocatori che ai piu esperti. Le animazioni fluide e gli effetti sonori aiutano a rendere il gioco piu emozionante e realistico. Grazie alla piena compatibilita con smartphone e tablet, il divertimento e garantito in movimento.
Yesterday I was complaining about the state of online writing and today this site has temporarily fixed that complaint, and a look at createbetterdirection extended that mood reversal, the short term mood improvement that comes from finding good content is real and this site has produced that improvement for me at a useful moment.
Good quality through and through, no rough edges and no signs of being rushed, and a quick look at explorefuturethinkingnow kept the same polish going, the kind of site that respects its own brand by maintaining consistency across pages which is something I always appreciate as a reader looking for trustworthy information online today.
Solid recommendation from me to anyone working in the area, the perspective here is grounded, and a look at bakeboxshop adds even more useful angles, the kind of site that becomes a reference rather than just a one time read which is a higher bar than most blogs ever reach today on the modern web.
Solid value packed into a relatively short post, that takes skill, and a look at lyxbark continues the dense useful content across more pages, this site clearly understands that respecting reader time is itself a form of generosity which is something most blog operations seem to have forgotten lately across the wider open web.
A piece that read as the work of someone who reads carefully themselves, and a look at unlockcreativepaths continued that informed feel, writers who are also serious readers produce work with a different quality and this site reads as the product of someone steeped in good writing rather than just generating content for an audience.
Taking the time to read carefully here has been worthwhile for the past hour, and a look at discovergrowthdirection extended the worthwhile reading, the calculation of return on reading time spent is something I do informally and this site has been producing positive returns across multiple sessions during the last week of regular visits and reads.
Found a couple of useful angles in here I had not considered before reading carefully, and a quick stop at growthbydesign added more, this is one of those sites where the value compounds the more you read rather than peaking at one viral post and then offering nothing else of substance afterwards which is common.
Glad I stumbled across this post, the explanations actually make sense without needing background knowledge to follow along, and after a stop at learnandexecuteeffectively the same was true there, no assumptions about the reader just clear writing that anyone can understand from the first line right through to the end.
Decided this was the best thing I had read all morning, and a stop at growwithfocusedintent kept that ranking intact, ranking my reading is something I do mentally throughout the day and the top rank is competitive and not easily won but this site won it without needing to overstate its claims for that.
Reading this prompted a brief but useful conversation with a colleague who happened to walk by, and a stop at findyournextfocus extended that conversational seed, content that becomes a starting point for in person discussion rather than ending in solitary reading is content with social generative energy and this site has plenty of it apparently.
Ac?kcas? sas?rd?m kalitesine. Surekli adres degisiyor. En sonunda dogru adrese ulast?m.
Bu isin puf noktalar? var. Su an en guncel cal?san 1xbet giris adresi tam olarak soyle: 1xbet güncel giriş [url=https://1xbet-giris-79.com]1xbet güncel giriş[/url]. Herkesin bildigi gibi — 1xbet turkiye icin tek adres buras?.
Site s?k s?k kapan?yor diyenlere inat. Tavsiye eden c?kt? m? emin olun — cekim konusunda s?k?nt? yasamad?m. Baska yerde aramay?n art?k…
You appear to know so much about this, and I see you’re a published author. Thanks
Самое важное сегодня: https://russkoitalslovar.ru/letter/%D0%A5
Once you start reading carefully here it is hard to go back to lower quality alternatives, and a stop at buildalignedprogress reinforced that ratchet effect, the way good content raises standards is real over time and this site has clearly contributed to raising my expectations for what is possible in writing on the topic generally.
roulette crazy time [url=http://www.crazytimeitalia-it.com]https://crazytimeitalia-it.com/[/url]
crazy time demo eurobet [url=https://crazytimeit-italia.com/]crazy time demo eurobet[/url].
Ребята, выручайте! Решил обновить кухонный уголок, а старую обивку уже не найти. Посоветуйте нормальную мебельную ткань для частого использования. ткань для мебели купить в москве [url=https://tkan-dlya-mebeli-1.ru]ткань для мебели купить в москве[/url] А то везде пишут разное, а на деле хочется купить ткань мебельную и забыть на пару лет. Буду благодарен за любые советы, особенно от тех, кто сам перетягивал.
The examples really helped me grasp the points faster than abstract descriptions would have, and a stop at fromthinkingtodoing added a few more practical illustrations that drove the message home, the kind of writing that knows its readers learn better through concrete situations rather than vague generalities is rare and worth recognising clearly.
Closed the tab feeling I had spent the time well, and a stop at buildgrowthdirectionplan extended that feeling across more pages, the test of whether time on a site was well spent is one I apply silently after closing tabs and very few sites pass it but this one passed it cleanly today afternoon clearly.
Picked a friend mentally as the audience for this and decided to send the link, and a look at explorefreshopportunityzones confirmed the send was the right choice, choosing whom to share content with is a small act of curation that I take more seriously than the public sharing most platforms encourage these days online.
Народ, привет! Такая ситуация — на планерке сказали срочно найти подарки для клиентов. Присматриваюсь к подаркам с логотипом, но боюсь нарваться на кривую печать. подарочная сувенирная продукция с логотипом [url=https://suvenirnaya-produkcziya-s-logotipom-10.ru]https://suvenirnaya-produkcziya-s-logotipom-10.ru[/url] А то эти менеджеры по рекламе такие цены выкатывают — волосы дыбом. Просили ещё брендированные кружки и толстовки. А то я уже второй день в интернете сижу и ничего адекватного не нашёл.
A piece that suggested careful editing without showing the marks of the editing, and a look at ignitefreshthinking continued that invisible polish, the best editing disappears into the prose and this site reads as having been edited with skill that does not announce itself which is the highest compliment I can offer any blog content.
Коллеги, всем привет! Встала задача обновить ассортимент брендированной атрибуки для отдела продаж. Подскажите, где заказать качественную сувенирную продукцию с логотипом. корпоративные подарки брендированные [url=https://suvenirnaya-produkcziya-s-logotipom-11.ru]корпоративные подарки брендированные[/url] Где сейчас лучше заказывать корпоративные подарки сувениры — в России или все-таки из Китая везти. Может, есть проверенные фабрики, которые работают напрямую, без посредников. А то маркетинговые агентства такой ценник лупят — закачаешься.
If a friend asked me where to read carefully on the topic I would send them here without hesitation, and a look at soontornado confirmed the recommendation strength, the directness of my recommendation reflects how confident I am in the quality and this site has earned undiluted recommendations from me across multiple recent conversations actually.
Reading this gave me confidence to make a decision I had been putting off, and a stop at createforwardthinkingsteps reinforced that confidence, content that translates into action in my own life rather than just informing it is content with the highest practical value and this site is generating that action level utility for me lately.
Generally my comment to other readers about new sites is to wait and see but for this one I would jump to recommend now, and a look at bulkingbayou reinforced that early recommendation, the speed at which a site earns my recommendation is itself a quality signal and this one has earned mine quickly clearly.
Bookmark earned and shared the link with one specific person who would care, and a look at buildsmartdirectionplan got the same targeted share, sharing carefully rather than broadcasting is a discipline I try to maintain and this site is generating shares from me at a sustainable rate rather than the spam rate of viral content.
Looking at this objectively the editorial quality is hard to deny even setting aside personal taste, and a stop at explorefuturepathwaysnow maintained the same objective quality, the gap between what I personally enjoy and what is objectively well crafted exists and this site clears both bars simultaneously which is rarer than it sounds.
Срочно нужен совет для отдела маркетинга. Планируем раздачу для партнёров на новый год. Везде говорят про индивидуальный подход, но реально толковое изготовление корпоративных сувениров с печатью по вменяемой цене. подарки для клиентов с логотипом [url=https://suvenirnaya-produkcziya-s-logotipom-9.ru]https://suvenirnaya-produkcziya-s-logotipom-9.ru[/url] Интересует именно изготовление под ключ — от кружек до брендированных блокнотов. Нам нужно от 500 штук, можно меньше. Заранее спасибо, кто откликнется.
Generally I find the content on similar topics frustrating in specific ways and this post avoided all of them, and a look at learnandscaleideas continued that frustration free experience, content that sidesteps the standard failure modes of its genre is content with editorial awareness and this site has clearly studied what fails elsewhere consistently.
In the middle of an otherwise scattered day this post landed as a moment of focus, and a stop at learnandadvancepathnow extended that focused feeling across more pages, content that anchors a fragmented day rather than contributing to the fragmentation is content with real centring effect and this site is providing that anchoring function for me.
питомник растений
Started believing the writer knew the topic deeply by about the second paragraph, and a look at startthinkingstrategicallynow reinforced that confidence, the speed at which a writer establishes credibility through their writing is a useful quality signal and this writer establishes it quickly and quietly without resorting to credential dropping or self promotion.
гоярд сумки
Felt the post had been written without looking over its shoulder, and a look at startsmartdirection continued that confident posture, content written for its own sake rather than against imagined critics has a different quality and this site reads as written from a place of confidence rather than defensive justification of every claim.
Reading this in a quiet coffee shop matched the calm energy of the writing, and a stop at learnandacceleratesuccess extended that environmental match, content that has its own ambient quality which can match or clash with surroundings is content with a personality and this site has the kind of personality that suits calm reading.
Народ, приветствую. Тема здоровья всегда на первом месте, потому что в экстренной ситуации трудно сориентироваться. Когда нужен проверенный и опытный врач для капельницы, важно, чтобы доктора отреагировали оперативно.
Мы в свое время тоже столкнулись с этой бедой, и в итоге нашли клинику, где врачи работают профессионально. Чтобы узнать точные цены и вызвать специалиста, советую посмотреть официальный источник: вывод из запоя цена наркология [url=https://vyvod-iz-zapoya-v-staczionare-sankt-peterburg-28.ru]вывод из запоя цена наркология[/url].
Врачи дежурят круглосуточно во всех районах, реагируют очень быстро, буквально за час. Надеюсь, эта рекомендация кому-то тоже пригодится и спасет здоровье. Пусть все будет хорошо!
Лучшие клининговые компании в москве
Generally I do not leave comments but this post merits a small note, and a stop at focusdrivesresults extended that comment worthy quality, the urge to actively contribute to a sites community rather than passively consume from it is something specific content provokes and this site has provoked that engagement urge from me today.
Skipped the social share buttons but might come back to actually use one later, and a stop at growththroughclarity extended that share urge, content that triggers genuine sharing impulses rather than performative ones is content that has actually moved me and not many posts in a typical week do that for me actually.
Quietly impressive in a way that does not announce itself, and a stop at findgrowthchannelsfast extended that quiet impressiveness, the kind of quality that emerges through sustained attention rather than first impressions is the kind I trust more deeply and this site has been earning that deeper trust across multiple sessions over time consistently.
If patience for careful reading is rare these days finding sites that reward it is rarer still, and a stop at explorefreshdirectionalideas extended that rare reward, the diminishing returns on shallow content reading have made me more selective about where to spend reading time and this site is meeting the higher selectivity bar consistently.
Я в шоке от количества предложений в последнее время, но после изучения реальных отзывов наткнулся на один нормальный человеческий вариант. Если кратко, вот что я понял: современная онлайн-школа для детей — это не просто унылые вебинарчики. Там и домашние задания с подробной индивидуальной проверкой, что очень радует на практике.
В общем, кому понимает толк в теме образовательные онлайн школы — убедитесь во всём сами, вот здесь все разжевано до мелочей: школа дистанционного обучения [url=https://shkola-onlajn-54.ru]школа дистанционного обучения[/url].
А я пока пойду дальше разбираться с расписанием. Потому что обычная школа часто проигрывает по всем фронтам, а тут организована именно живое регулярное общение с кураторами. Советую не тянуть и сразу изучить тему.
Короче, наконец-то наткнулся на реальный опыт. Там всё разложено по полочкам, без лишней воды и тупых SEO-текстов. Сам долго мучился, пока не нашел этот гайд. Вот mel bet [url=https://howtoairbrush.com]mel bet[/url] — обязательно гляньте. Мне лично это сэкономило кучу времени и нервов, так что делюсь от души.
чай из китая
ночные клубы петербурга
Glad I gave this a chance instead of bouncing on the headline, and after designyourdirection I was certain I had made the right call, snap judgements based on titles miss a lot of good content and this is a reminder to slow down and check things out before scrolling past in a hurry.
The structure of the post made it easy to follow without losing track of where I was, and a look at unlocknewideas kept the same logical flow going, this site clearly understands that organisation is half the battle in keeping readers engaged from the first line to the last across any kind of post.
One thing that stands out about this post is how naturally the ideas are presented, because the discussion flows in a way that feels both engaging and understandable without becoming too complicated for readers to follow.
Шубы Турция — чем турецкие изделия отличаются от европейских
Thanks for laying this out in a way that someone newer to the topic can follow, and a stop at discoverinnovativethinking kept that accessibility going, writing that meets readers at different experience levels without condescending is hard to do well and the writers here have clearly thought about who they are writing for.
Sets a higher bar than most of what shows up in search results for this topic, and a look at parcelparadise did not lower that bar at all, in fact it confirmed the impression, this is the kind of consistency that earns a place in regular rotation for serious readers instead of casual scrollers passing through.
The tone stayed consistent across the whole post which is harder than it looks for longer pieces, and a look at unlocksmartideas continued the same voice, this kind of editorial consistency is a sign of either a single careful writer or a tightly run team and either is impressive today across the broader media environment.
Случайно наткнулся на один гайд, Ситуация дурацкая, потерял контакт со старым хорошим другом. Стало дико интересно,. И знаете что? Оказывается, сейчас есть реальные способы.
Короче, если вас сейчас волнует тот же самый вопрос — пробить странный входящий звонок, то есть один проверенный временем вариант. Конкретно про то, как узнать по мобильному кто именно звонил — вот здесь всё максимально норм расписано: пробить номер телефона где находится [url=https://kak-najti-cheloveka-po-nomeru-telefona-4.ru]пробить номер телефона где находится[/url].
Я сам сначала вообще не верил во всё это. Потому что в открытых пабликах обычно полная тишина. В общем, кому надо — тот точно воспользуется. Век живи — век учись, как говорится.
Now considering whether the post would translate well into a different form, and a look at buildsmartmovement suggested similar versatility, content that could move into other media without losing its substance is content that has been built around ideas rather than around format and this site reads as idea first throughout posts.
Approaching this site through a casual link click and being surprised by what I found, and a look at discovernewroutes extended the surprise, the rare experience of stumbling into excellent independent content rather than predictable mediocrity is one of the actual remaining pleasures of casual web browsing and this site provided it cleanly.
Давно присматривался к разным предложениям, где реально учат делу. Особенно когда речь про онлайн-школу для детей — тут ведь важен подход. У меня племянник как раз искал гибкий график, так что пришлось перебрать кучу вариантов. В общем, посмотрите по ссылке: школа онлайн для детей [url=https://shkola-onlajn-55.ru]https://shkola-onlajn-55.ru[/url] Я если честно ещё до этого вообще относился скептически к таким форматам. Оказалось — реально работает. У них и программа грамотная. В общем, рекомендую присмотреться. Удачи!
The structure of the post made it easy to follow without losing track of where I was, and a look at learnandexecutenow kept the same logical flow going, this site clearly understands that organisation is half the battle in keeping readers engaged from the first line to the last across any kind of post.
1win aplicatie oficiala [url=https://1win42891.help/]1win aplicatie oficiala[/url]
Deneyip de begenen cok oldu. Baz? siteler cal?sm?yor. En sonunda her seyi cozdum.
Spor bahisleriyle ilgilenenler bilir. Su an en guncel cal?san 1xbet guncel giris adresi tam olarak soyle: 1xbet yeni giriş [url=https://1xbet-giris-79.com]1xbet yeni giriş[/url]. Herkesin bildigi gibi — 1xbet turkiye icin tek adres buras?.
Sorunsuz baglant? icin bu link yeterli. Kendi deneyimim buysa da — arayuz zaten al?s?k oldugunuz gibi. Baska yerde aramay?n art?k…
купить брендовые вещи
Skipped the comments to avoid spoilers and came back later to find them genuinely worth reading, and a stop at suntansage extended that surprised respect, when the discussion below a post matches the quality of the post itself you have found something special and this site appears to attract that kind of audience.
mostbet turnaj sloty [url=http://mostbet06318.help]http://mostbet06318.help[/url]
mostbet wejście mirror [url=http://mostbet26540.help]http://mostbet26540.help[/url]
Felt no urge to argue with the conclusions even though I started the post slightly skeptical, and a look at startbuildinglongtermvision maintained that pattern, writing that earns agreement through clarity of argument rather than rhetorical pressure is the kind I find most persuasive and the kind I want to read more of these days.
Reading this prompted me to clean up some old notes related to the topic, and a stop at discoveruntappedangles extended that organising urge, content that triggers personal organisation rather than just consuming attention is content with motivating energy and this site has the kind of clarity that prompts active follow up rather than passive consumption.
Now adding this site to a small mental group of recommendations I keep ready for specific kinds of inquiries, and a stop at createbetterdecisions extended the recommendation readiness, content that I can confidently point friends and colleagues toward in specific contexts is content with real social utility and this site has that utility clearly.
Skipped breakfast still reading this and finished hungry but satisfied, and a stop at buildcleanmomentum kept me past breakfast time, content that displaces basic biological needs is content with serious attentional pull and the writers here are clearly capable of producing that level of engagement which is genuinely impressive these days.
1win экспресс расчет [url=https://1win40259.help]https://1win40259.help[/url]
mostbet казино приложение [url=https://mostbet15743.help]https://mostbet15743.help[/url]
Now feeling the small relief of finding writing that does not condescend, and a stop at findyourcorepath extended that respect for readers, content that treats its audience as capable adults rather than as people to be managed produces a different reading experience and this site has clearly chosen the respectful approach across all pieces.
melbet не открывается [url=http://melbet62894.help]http://melbet62894.help[/url]
1win как использовать промокод [url=http://1win82740.help/]http://1win82740.help/[/url]
A piece that did not lean on the writer credentials or institutional backing, and a look at pathwaytoprogress maintained the same focus on substance, content that earns trust through quality rather than through name dropping is the kind I find most persuasive and this site is clearly playing on the substance side of that distinction.
Reading this on a phone at a coffee shop and finding it perfectly suited to that context, and a stop at discovernewstrategicangles continued the comfortable mobile experience, content that works across reading conditions without compromising on substance is increasingly important and this site has clearly thought about the whole reader experience here.
Looking at this from the perspective of someone tired of generic content the contrast is striking, and a look at nutmegnetwork maintained that distinctive feel, sites with strong editorial identity stand out against the bland background of algorithmic content and this one has clearly developed an identity worth recognising through careful attention.
Decided to read more before commenting and the more I read the more I wanted to say something, and a stop at createactionstepsnow pushed that impulse further, when content provokes the urge to participate rather than just consume it is doing something quite specific and worth recognising clearly when it happens during reading.
Appreciated how the writer anticipated the questions a reader might have along the way, and a stop at growwithintentionalmovementnow continued that thoughtful approach, you can tell when content has been edited with the reader in mind versus just published as a first draft and this is clearly the former approach across what I read.
Reading this gave me a small sense of progress on a topic I have been slowly working through, and a stop at buildprogressintelligently added another step forward, learning happens in small increments across many sources and finding sources that consistently contribute is the actual practical value of careful curation in an information rich world.
Коллеги, всем привет! Встала задача обновить ассортимент брендированной атрибуки для отдела продаж. Интересует надежный поставщик корпоративных подарков с логотипом компании, который не подведет со сроками. изделия с логотипом [url=https://suvenirnaya-produkcziya-s-logotipom-11.ru]изделия с логотипом[/url] Кто недавно брал подарки с логотипом под новогодние корпоративы, поделитесь контактами. Бюджет пока не утвержден, поэтому хочу понять рыночные цены. А то маркетинговые агентства такой ценник лупят — закачаешься.
Организация корпоративных мероприятий на крыше здания
Ребята, привет! Соседи залили, решил сделать ремонт, а там. Поменяли газовую плиту, сдвинули раковину, а стены вообще вынесли — думал, пронесёт. В общем, теперь легализовывать этот бардак придётся официально. И тут встал вопрос: стоимость согласования перепланировки [url=https://skolko-stoit-uzakonit-pereplanirovku-10.ru]стоимость согласования перепланировки[/url] ищу актуальные расценки: согласование перепланировки цена как у частников, так и через МФЦ. Или взносы в жилинспекцию за выдачу акта. А то риелторы называют цифры от балды. Без этого а если решите ипотеку рефинансировать, БТИ зарубит. Короче, просто сколько отдать, чтобы спать спокойно с новой планировкой.
During a quiet evening reading session this provided just the right depth without being heavy, and a stop at explorefreshgrowthroutes maintained the same evening appropriate weight, content with depth that does not exhaust the reader is content with editorial calibration and this site has clearly figured out how to be substantial without being demanding all the time.
melbet вход киргизия [url=https://melbet78240.help]https://melbet78240.help[/url]
Glad to find something on this topic that does not start with three paragraphs of throat clearing before getting to the point, and a stop at discoveropportunityflows also dives right in, respect for the readers time shows up in small editorial choices like this and they add up to a real difference quickly.
After several visits I am now confident this site is one to follow seriously, and a stop at createbetteroutcomesnow reinforced that confidence, the gradual building of trust through repeated quality exposures is the only sustainable way to develop reader loyalty and this site is building that loyalty in me through patient consistent work consistently.
Народ, привет! Директор увидел бюджет и чуть инфаркт не схватил, надо вписаться в сумму. Ищу нормальное изготовление корпоративных сувениров с доставкой по Москве. сувениры с логотипом компании [url=https://suvenirnaya-produkcziya-s-logotipom-10.ru]сувениры с логотипом компании[/url] Говорят, сейчас модно заказывать корпоративные подарки сувениры из экокожи — но кто делает качественно. Нужно штук 300-500, но если будет норм цена, можем и больше взять. А то я уже второй день в интернете сижу и ничего адекватного не нашёл.
Now considering whether the post would translate well into a different form, and a look at startnextlevelprogress suggested similar versatility, content that could move into other media without losing its substance is content that has been built around ideas rather than around format and this site reads as idea first throughout posts.
Took my time with this rather than rushing because the writing rewards attention, and after growthwithalignment I had even more to absorb, the kind of content that pays back the patient reader rather than punishing them with empty filler is something I look for and rarely find in regular searches lately.
Probably the kind of site that should be more widely read than it appears to be, and a look at learnandgrowstrong reinforced that quiet wish, the gap between a sites quality and its apparent reach is sometimes large and that gap exists for this site in a way that makes me want to mention it more.
Came in skeptical and left mostly convinced, that is the highest praise I can offer, and a look at chairchampion pushed me further in the same direction, content that survives a critical first read is rare and worth recognising because most blog posts crumble under any real scrutiny these days when you actually pay attention closely.
риобет казино riobet casino
Even from a single post the editorial care is clear, and a stop at forwardactionframework extended that care across more pages, the kind of attention to quality that shows up in every paragraph is what separates serious sites from the rest and this one has clearly invested in that paragraph level attention across what I have read.
I was genuinely pleased to discover this article today because it manages to deliver a very well-explained and balanced overview of the subject without getting bogged down in unnecessary details or overly complex jargon that confuses readers.
https://share.google/vjuZexi9mSLcPHDFL
Solid endorsement from me, the writing earns it, and a look at discovergrowthdirectionnow continues to earn it across the broader site too, the kind of operation that maintains quality across many pages rather than just one viral post is a sign of serious commitment and that is what I see here clearly across what I read.
1win sloturi noi [url=1win42891.help]1win42891.help[/url]
Слушайте, наконец-то наткнулся на реальный опыт. Всё расписано до мелочей, даже новичок поймет что к чему. Сам долго мучился, пока не нашел этот гайд. Вот мелбет скачать на андроид бесплатно [url=https://howtoairbrush.com]https://howtoairbrush.com[/url] — сохраняйте себе в закладки, пригодится. Мне лично это сэкономило кучу времени и нервов, так что делюсь от души.
Appreciate that you did not pad this with fluff to hit a word count, the post says what it needs to say and stops, and a look at trancetidal did the same, brevity here feels intentional not lazy which is a distinction many writers miss completely sometimes when they are working under deadlines.
acte necesare 1win [url=www.1win42891.help]www.1win42891.help[/url]
mostbet zrušit bonus [url=https://mostbet06318.help/]mostbet zrušit bonus[/url]
pobierz aplikację mostbet [url=mostbet26540.help]mostbet26540.help[/url]
Appreciate that you did not pad this with fluff to hit a word count, the post says what it needs to say and stops, and a look at findmomentumnext did the same, brevity here feels intentional not lazy which is a distinction many writers miss completely sometimes when they are working under deadlines.
Quality you can feel from the first paragraph, the writer clearly knows the topic and how to share it, and a quick look at buildfocusedmomentum confirmed the same depth runs throughout the rest of the site as well which is rare and worth pointing out when it happens online for any reader passing through.
Reading this gave me confidence to make a decision I had been putting off, and a stop at learnandscaleprogress reinforced that confidence, content that translates into action in my own life rather than just informing it is content with the highest practical value and this site is generating that action level utility for me lately.
микрозайм на карту Лучшие займы предлагают прозрачные условия и низкие процентные ставки клиентам. Ищите организации с положительными отзывами и лицензией Центрального Банка страны. Обязательно читайте договор перед тем, как ставить свою подпись.
Decided to read this site for a while before forming a verdict, and the verdict after several pages is positive, and a stop at buildforwardclarity continued that pattern, judging a site requires more than one post and giving sites a fair sample is something I try to do for promising candidates rather than rushing to dismiss.
Took a chance on the headline and was rewarded, and a stop at explorefutureopportunitypaths kept the rewards coming as I clicked through, the kind of place where every link leads somewhere worth the click is a small luxury on the modern web where so many sites are mostly empty calories disguised as content.
цена уборки
Случайно наткнулся на один гайд, Знакомая многим фигня, нужно срочно проверить один подозрительный номер. Полез в глубокий поиск по веткам. И знаете что? Тут главное знать, куда именно смотреть и какие базы юзать.
Короче, если вас сейчас волнует тот же самый вопрос — быстро определить владельца номера, то есть один реально работающий и живой сервис. Конкретно про то, как найти человека по номеру телефона — вот здесь всё максимально норм расписано: определить локацию по номеру телефона [url=https://kak-najti-cheloveka-po-nomeru-telefona-4.ru]определить локацию по номеру телефона[/url].
Я сам сначала вообще не верил во всё это. Потому что в открытых пабликах обычно полная тишина. В общем, обязательно сохраните себе на будущее. Век живи — век учись, как говорится.
1win пополнение через Demir [url=1win82740.help]1win пополнение через Demir[/url]
1win пополнение Bakai Bank [url=www.1win40259.help]1win пополнение Bakai Bank[/url]
сео продвижение сайтов в москве Моя специализация — разработка современных веб-сайтов, охватывающих весь спектр задач: от лендингов до корпоративных порталов и интернет-магазинов. Я также занимаюсь SEO-продвижением, оптимизацией скорости загрузки и структуры сайта для лучшего ранжирования в поисковых системах и привлечения целевого трафика. Помощь в увеличении онлайн-продаж и эффективное развитие присутствия бизнеса в интернете — моя приоритетная задача.
как создать аккаунт melbet [url=http://melbet62894.help]как создать аккаунт melbet[/url]
как вывести деньги с mostbet [url=www.mostbet15743.help]www.mostbet15743.help[/url]
трансы новосибирск
mostbet česko výběr [url=http://mostbet06318.help]mostbet česko výběr[/url]
Now setting this aside as a model of how to write thoughtfully on the topic, and a stop at createwithintention extended that model status, content that becomes a reference for how a kind of writing should be done is content with influence beyond its own readership and this site is reaching that level for me clearly today.
mostbet licencjonowany bukmacher [url=http://mostbet26540.help]http://mostbet26540.help[/url]
1win чат поддержки [url=https://www.1win82740.help]https://www.1win82740.help[/url]
1вин [url=1win40259.help]1вин[/url]
мелбет вход в личный кабинет [url=melbet62894.help]мелбет вход в личный кабинет[/url]
mostbet aviator на деньги [url=https://mostbet15743.help]https://mostbet15743.help[/url]
Уборка после ремонта
Denemek isteyenler çok soruyor. Birçok site denedim ama. En sonunda sağlam bir link buldum.
Bahisle ilgilenen arkadaşlara duyurulur. Uyarıları dikkate alarak sistemi kurun. Giriş adresi aynen şu şekilde: 1xbet giriş [url=https://1xbet-giris-80.com]1xbet giriş[/url]. Kısacası — 1xbet türkiye için tek doğru adres bu.
Canlı destek anında yardımcı oluyor. Kimseye zararım dokunmaz — deneyen memnun kalmış. İyi eğlenceler…
Честно говоря, долго выбирал, куда поступать, но после изучения реальных отзывов наткнулся на один действительно толковый вариант. Если кратко, вот что я понял: современная школа онлайн — это не просто унылые вебинарчики. Там и преподаватели живые и вовлеченные, так что прогресс виден сразу.
В общем, кому понимает толк в теме онлайн образование школа — посмотрите условия, вот здесь все разжевано до мелочей: школа онлайн 11 класс [url=https://shkola-onlajn-54.ru]https://shkola-onlajn-54.ru[/url].
Думаю, это как раз то, что сейчас нужно многим родителям. Потому что обычная школа часто проигрывает по всем фронтам, а тут организована именно грамотно выстроенный учебный процесс. Держите этот вариант у себя в закладках.
Really like that there are no exclamation marks or all caps shouting throughout the post, and a quick visit to focuscreatesprogress maintained the same calm voice, restraint in punctuation signals confidence in the content and this site clearly trusts its substance to do the persuading rather than relying on typographic emphasis.
Reading this with a notebook open turned out to be the right move, and a stop at buildforwardthinkingmomentum added more material to the notes, content that justifies active note taking from a passive reader is content with real informational density and this site is producing notes worthy material at a high rate consistently.
Looking forward to seeing what gets published next month, and a look at brightbanyan extended that anticipation across the broader site, finding myself looking forward to a sites future content rather than just consuming its existing content is a stronger commitment level than I usually reach with new finds and this site triggered that.
Came away with a small but real shift in perspective on the topic, and a stop at graingrove pushed that shift a bit further, the kind of subtle reframing that good writing does to a reader without making a big deal of it is something I always appreciate when it happens which is sadly not that often.
Granted my mood today might be elevating my reading experience but I still think this is genuinely good, and a stop at zingtorch reinforced that even discounted assessment, controlling for the mood adjustment that affects content perception this site still reads as substantively above average across multiple pieces I have read carefully today.
Bookmark earned, share earned, return visit earned, all from one reading session, and a look at opaldunes did the same, the trifecta of bookmark and share and return is rare in a single visit and represents the highest level of engagement I tend to offer any piece of online content these days here.
Took some notes for a project I am working on, and a stop at palmmills added more raw material to those notes, content that contributes to my own creative work rather than just being interesting in the moment is the kind I value most and the kind I will keep coming back to repeatedly.
Bookmarked the page and the homepage too because clearly there is more to explore here, and a quick stop at lobbydawn only made that more obvious, this is the kind of place I want to dig through over a weekend rather than rushing through during a coffee break tomorrow morning before getting back to work.
Quality you can feel from the first paragraph, the writer clearly knows the topic and how to share it, and a quick look at portguild confirmed the same depth runs throughout the rest of the site as well which is rare and worth pointing out when it happens online for any reader passing through.
Now feeling slightly more committed to my own careful reading practices having read this, and a stop at curiopacts reinforced that commitment, content that models the kind of attention it deserves is content that calibrates the reader and this site has clearly raised my own bar for what to bring to good writing today.
Liked the careful selection of which details to include and which to skip, and a stop at draftport reflected the same editorial judgement, knowing what to leave out is just as important as knowing what to include and this site has clearly figured out where that line sits for the topics it covers regularly.
If I were grading sites on this topic this one would receive high marks, and a stop at findgrowthdirections continued earning those high marks, the informal grading I do mentally for content sources is something I take seriously even though it is informal and this site has been receiving consistent high marks across multiple sessions today.
A quiet kind of confidence runs through the writing, and a look at micapacts carried that same understated assurance, confidence without bragging is the most attractive register for online writing and the writers here have clearly developed it through practice rather than affecting it through stylistic tricks that would feel hollow eventually.
Stands out for actually being useful instead of just being long, and a look at findyourwinningdirection kept that going, length without value is the default mode of most blogs these days but this site has clearly chosen a different path which I respect a lot as a reader who values careful editing decisions like that.
Если честно, сам перерыл кучу форумов в поисках нормальной ткани для мебели. Оказалось, что выбрать подходящий вариант тот ещё квест. Короче, смотрите, вот здесь реально толково расписано про плотность, ворс и износостойкость для диванов и кресел, а главное — показаны варианты, которые легко чистить. Вся полезная информация доступна здесь: самая дешевая ткань для обивки мебели [url=https://tkan-dlya-mebeli-2.ru]https://tkan-dlya-mebeli-2.ru[/url] Дальше сами гляньте фактические отзывы. Да, и не берите первое, что попалось — я уже поплатился кошельком, когда брал ткань для мебели на распродаже. Эта тема реально вывозит по износу. Кстати: ткань для обивки мебели купить лучше уже с нормальной пропиткой от грязи. Да и трётся такое полотно гораздо меньше. Не поленитесь, откройте.
мелбет ставки на спорт [url=https://melbet78240.help/]мелбет ставки на спорт[/url]
Ребята, выручайте! Решил обновить кухонный уголок, а старую обивку уже не найти. Теперь мучаюсь — какую взять ткань для мебели, чтобы и выглядело достойно, и кошачьи когти выдержало. купить мебельную ткань в москве в розницу [url=https://tkan-dlya-mebeli-1.ru]купить мебельную ткань в москве в розницу[/url] Интересно про ткань для обивки мебели — какой вариант самый практичный для дивана, где постоянно лежат с чипсами. Нужен метров 15-20, может, кто знает нормального поставщика.
A piece that did not try to be timeless and ended up reading as durable anyway, and a look at createforwardexecutionsteps extended that durable feel, content that stays useful past its publication date without straining for permanence is content that ages well and this site has the kind of evergreen quality that I value highly today.
Glad to find a site whose links lead somewhere worth going rather than back to itself for SEO juice, and a stop at ideaswithtraction kept that generous outbound feel, citing other peoples work with real respect rather than just for ranking signals is a sign of an honest operation worth supporting going forward.
Коллеги, всем привет! Встала задача обновить ассортимент брендированной атрибуки для отдела продаж. Посоветуйте нормальное изготовление корпоративных сувениров — чтобы и кружки не облазили, и ручки писали. корпоративные сувениры на заказ [url=https://suvenirnaya-produkcziya-s-logotipom-11.ru]корпоративные сувениры на заказ[/url] Кто недавно брал подарки с логотипом под новогодние корпоративы, поделитесь контактами. Может, есть проверенные фабрики, которые работают напрямую, без посредников. А то маркетинговые агентства такой ценник лупят — закачаешься.
мелбет официальный адрес [url=http://melbet78240.help/]http://melbet78240.help/[/url]
Denemek isteyen arkadaşlara hep aynısını söylüyorum. Sürekli adres değişiyor derler ya işte tam da o hesap. Detaylı güncellemeleri kontrol edip süreci sorunsuz başlattım. Güvenilir bir kaynak bulmanın ne kadar zor olduğunu hepimiz biliyoruz işte size o adres: 1xbet güncel giriş [url=https://1xbet-giris-87.com]1xbet güncel giriş[/url]. Şimdi size doğru düzgün anlatayım — spor bahislerine meraklıysanız burası tam size göre.
Hiçbir sıkıntı yaşamadım bugüne kadar oynarken. Birçok yeri denedim ama burada karar kıldım — kesinlikle pişman olacağınızı sanmıyorum deneyin. Herkese hayırlı olsun…
Reading this triggered a small reorganisation of my own thinking on the topic, and a stop at fernbureau furthered that reorganisation, content that affects the shape of my mental model rather than just decorating it with new facts is content with structural rather than informational impact and this site provides that.
Планируете выездное мероприятие? фуршет профессиональная организация выездного питания для свадеб, корпоративов, конференций и частных мероприятий. Разработка меню, приготовление блюд, доставка, сервировка и обслуживание гостей. Полный комплекс услуг для событий любого масштаба.
Bir arkadaş tavsiyesiyle başladım. Herkes farklı bir adres söylüyordu. Ama sonunda doğru adresi buldum işte.
Merak edenler için söylüyorum. Sistem ayarlarını doğru yaptıktan sonra süreç çok basit. Giriş adresi tam olarak şurada: 1xbet giriş [url=https://1xbet-giris-81.com]1xbet giriş[/url]. Kısaca özet geçeyim — 1xbet spor bahislerinin adresi burası.
Arayüzü anlaşılır, takılmazsınız. Başka yerlerde vakit kaybetmeyin — memnun kalmayanını görmedim. Hayırlı olsun…
https://www.postfreeclassifiedads.com/thread-134892.htm
Even from a single post the editorial care is clear, and a stop at momentumbymindset extended that care across more pages, the kind of attention to quality that shows up in every paragraph is what separates serious sites from the rest and this one has clearly invested in that paragraph level attention across what I have read.
A genuinely unexpected highlight of my reading week, and a look at buildsmartprogress extended that pattern, the surprise of finding excellent content rather than the predictable mediocre is one of the few real pleasures of casual web browsing and this site delivered that surprise cleanly today which I really do appreciate.
Decided to set a calendar reminder to revisit, and a stop at domelegends extended that revisit list, calendar entries for content are a level of commitment I rarely make but when I do they signal a higher regard than a simple bookmark and this site has earned that calendar tier of relationship from me today.
Uzun süredir oynuyorum diyebilirim. Her gün yeni bir engelleme haberi alınca insan bıkıyor. Ama sonunda şu linki keşfettim.
Bahis severler bilir burayı kesinlikle tavsiye ederim. Güncel sistem ayarlarını kontrol ettikten sonra erişim sağlamak en mantıklısı. Giriş adresi tam olarak şu şekilde: 1xbet giriş [url=https://1xbet-giris-82.com]1xbet giriş[/url]. Kısacası durum şu — 1xbet güncel adres arayanlar buraya baksın.
Müşteri hizmetleri bile ilgili. Çevremdekilere de söyledim — en memnun kaldığım yer burası oldu. Umarım işinize yarar…
Refreshing to find writing that does not try to manipulate the reader into clicking onto the next page through cliffhangers and forced engagement, and a stop at edendomes continued in the same respectful way, this is what reader first design actually looks like in practice rather than just in marketing copy that sounds nice.
In the middle of an otherwise scattered day this post landed as a moment of focus, and a stop at mochamarket extended that focused feeling across more pages, content that anchors a fragmented day rather than contributing to the fragmentation is content with real centring effect and this site is providing that anchoring function for me.
Worth marking the moment when reading this clicked into something useful for my own work, and a look at frostcoasts extended that practical click, content that connects to my actual life rather than just being interesting is content with the highest kind of value and this site is generating that connection at a high rate.
Thank you for being clear and direct, that simple approach saves so much frustration on the reader’s end, and a stop at portguild only made me more sure of it, the rest of the content seems to follow the same pattern which is a great sign of consistent editorial care behind the scenes.
Thanks for putting this online without locking it behind email signups or paywalls, and a quick visit to lobbydawn kept that open feel going, content that trusts the reader to come back rather than gating access is the kind of approach I will reward with regular return visits over time happily.
Found a small mental shift after reading this, the framing here is just a bit different from the standard takes online, and a look at grippalace extended that fresh perspective across more material, the rare site whose voice actually changes how you think about something rather than just confirming existing beliefs.
bs2best.at
Found this useful, the points line up well with what I have been thinking about lately, and a stop at ideasintoexecution added some angles I had not considered yet, definitely walking away with more than I came for which is the best outcome from time spent reading online for any kind of topic.
Glad I gave this a chance instead of bouncing on the headline, and after tomatotactic I was certain I had made the right call, snap judgements based on titles miss a lot of good content and this is a reminder to slow down and check things out before scrolling past in a hurry.
Bookmark added in three places to make sure I do not lose the link, and a look at fernbureaus got the same redundant treatment, sites I am afraid to lose are the rare keepers and this is clearly one of them based on what I have read so far across this and a couple of related posts.
Genuinely well crafted writing, the kind that makes the topic look easier than it actually is, and a look at zingtorch added even more depth, you can feel the experience behind every line which is something only writers who have been at this for a while can pull off with this level of grace.
lucky jet pe 1win [url=www.1win42891.help]www.1win42891.help[/url]
Worth saying that the quiet confidence of the writing is what landed first, and a look at driftfair continued that quiet quality, confident writing without the loud display of confidence is a rare combination and this site has clearly developed both the knowledge and the editorial restraint to land that combination consistently.
Picked up a couple of new ideas here that I can actually try out, and after my visit to findyourclearpath I have even more notes saved, this is the kind of resource that pays you back for the time you spend on it which is rare to come across in this corner of the web.
Народ, привет! Директор увидел бюджет и чуть инфаркт не схватил, надо вписаться в сумму. Может, кто шарит где лучше брать сувенирную продукцию с логотипом. сувенирная продукция с нанесением [url=https://suvenirnaya-produkcziya-s-logotipom-10.ru]https://suvenirnaya-produkcziya-s-logotipom-10.ru[/url] Посоветуйте нормального поставщика сувенирной продукции с логотипом, чтобы не обдиралово было. Просили ещё брендированные кружки и толстовки. А то я уже второй день в интернете сижу и ничего адекватного не нашёл.
дезинфекция от клопов в москве цена сайт
In the middle of an otherwise scattered day this post landed as a moment of focus, and a stop at explorefuturepathways extended that focused feeling across more pages, content that anchors a fragmented day rather than contributing to the fragmentation is content with real centring effect and this site is providing that anchoring function for me.
Уже отчаялся был найти хоть что-то стоящее. Прям беда реальная: потерял контакт со старым хорошим другом. Полез в глубокий поиск по веткам. И знаете что? Не всё так сложно в этом плане, как кажется.
Короче, если вас сейчас волнует тот же самый вопрос — быстро определить владельца номера, то есть один реально работающий и живой сервис. Конкретно про то, как узнать по мобильному кто именно звонил — вот здесь всё максимально норм расписано: найти местоположение человека по номеру телефона [url=https://kak-najti-cheloveka-po-nomeru-telefona-4.ru]найти местоположение человека по номеру телефона[/url].
Друзьям ссылку скинул в телегу, им тоже помогло. Потому что обычный поиск гуглит только рекламный спам. В общем, не теряйте свое время зря на разводняк. Надеюсь, кому-то тоже упростит жизнь.
Skipped the social share buttons but might come back to actually use one later, and a stop at createactionforward extended that share urge, content that triggers genuine sharing impulses rather than performative ones is content that has actually moved me and not many posts in a typical week do that for me actually.
Decided not to skim despite my usual habit and was rewarded for the discipline, and a stop at ideasworthmoving earned the same patient approach, training myself to recognise sites that warrant slower reading is part of being a careful online reader and this site is the kind that helps me practice that skill regularly.
Top notch writing, every paragraph carries weight and nothing feels like filler, and a stop at fernpier reflected that same care, a rare thing on the open web these days where most pages exist for clicks rather than actual reader value or anything close to that which is honestly a real shame.
Denemek isteyenler çok soruyor. Birçok site denedim ama. En sonunda güvenilir adrese ulaştım.
Spor bahislerinde iddialı olanlar buraya. Uyarıları dikkate alarak sistemi kurun. Giriş adresi aynen şu şekilde: 1xbet güncel giriş [url=https://1xbet-giris-80.com]1xbet güncel giriş[/url]. Velhasıl kelam — 1xbet spor bahislerinin adresi değişti.
Bonusları gayet iyi. Kimseye zararım dokunmaz — pişman eden bir yer değil. Selametle…
Мечтаешь о незабываемом отпуске? https://karta-abhazii.ru где величественные горы встречаются с бескрайним морем, а история оживает на каждом шагу, добро пожаловать в Абхазию!
Reading this in three sittings because the day was fragmented, and the piece survived the fragmentation, and a stop at ideasintoresults held up under similar reading conditions, content engineered for continuous attention is fragile in modern conditions and this site reads as durable across the realistic ways people consume content today.
Just want to record that this site is entering my regular reading list, and a look at fairfinch confirmed it deserves the spot, my regular reading list is short and well curated and adding to it requires meeting a fairly high quality bar that this site has clearly cleared without much effort apparently.
Клининговые услуги в москве
mostbet uvítací bonus [url=https://www.mostbet06318.help]https://www.mostbet06318.help[/url]
mostbet bonus od depozytu [url=https://mostbet26540.help/]mostbet bonus od depozytu[/url]
Took my time with this rather than rushing because the writing rewards attention, and after knackgrove I had even more to absorb, the kind of content that pays back the patient reader rather than punishing them with empty filler is something I look for and rarely find in regular searches lately.
Короче, наконец-то наткнулся на реальный опыт. Авторы реально шарят в вопросе, никаких банальных советов из интернета. Сам долго мучился, пока не нашел этот гайд. Вот мелбет скачать на андроид бесплатно [url=https://howtoairbrush.com]https://howtoairbrush.com[/url] — переходите, там вся суть. Там внутри и примеры, и пошаговые инструкции, короче полный фарш.
Felt the post had been written without using a single buzzword, and a look at jetdomes continued that clean vocabulary, content free of jargon and trendy phrases reads better and ages better and this site has clearly committed to a vocabulary that will not feel dated in three years which is impressive editorially.
1win сайт недоступен [url=https://1win40259.help/]1win сайт недоступен[/url]
However many similar pages I have read this one taught me something new, and a stop at fernpiers added more new material, content that contributes genuinely fresh information rather than recycling what is already widely available is content with real informational value and this site is providing that informational freshness at a notable rate.
High quality writing, no marketing speak and no buzzwords that mean nothing, and a stop at coppercrown kept that going, simple direct content that actually communicates something is harder to find than it should be and this is one of the rare places that gets it right consistently across many different posts.
melbet free bet киргизия [url=http://melbet62894.help]http://melbet62894.help[/url]
mostbet смотреть матчи [url=https://mostbet15743.help/]https://mostbet15743.help/[/url]
Now wishing I had found this site sooner, and a look at buildclaritydrivenmomentum extended that mild regret, the calculation of how many years of good content I missed by not finding the right sources earlier is one I try not to make too often but it does come up sometimes when I find sites this good.
Honestly impressed, did not expect to find this level of care on the topic, and a stop at focusdrivenmomentum cemented the impression, you can tell within the first few paragraphs whether a site is going to be worth the time and this one delivered on that early promise nicely throughout the rest of what I read.
Вот такая беда — близкий совсем плох, а везти в больницу просто нереально . Я сам через это прошёл недавно. Руки опускаются, время идёт. Лезешь в интернет, а вокруг бабло тянут. Пока кто-то не подсказал один реально работающий вариант. Требуется немедленная консультация — а везти самому нет возможности , то выход один . Речь конкретно про нарколога на дом . У нас в Самаре, если честно, тоже полно шарлатанов . Нормальные контакты, кто реально приезжает вот тут : частный нарколог на дом [url=https://narkolog-na-dom-samara-13.ru]частный нарколог на дом[/url] Честно скажу , после того как прочитал , многое прояснилось . И про снятие запоя на дому, и про последующее кодирование. И цены адекватные, без разводов. Советую не откладывать.
Going to share this with a friend who has been asking the same questions for a while now, and a stop at portmill added a few more pages I will pass along too, this is the kind of generous information that earns a small thank you from me right now and again later this week.
Glad the writer kept this short rather than padding it out, the points stand on their own without needing extra context, and a look at loopbough kept the same approach going, brevity is a sign of confidence in the substance and the team here clearly trusts their content to land without filler.
Felt the writer was speaking my language without trying to imitate it, and a look at grovefarm continued that natural fit, when a writers default voice happens to match what you find easy to read the experience feels frictionless and that is something I notice and remember about specific sites going forward.
A piece that took its time without dragging, and a look at startmovingforward kept the same patient pace, the difference between unhurried and slow is a fine editorial distinction and this site has clearly found the unhurried side without slipping into the slow side which would have lost me as a reader quickly otherwise.
Comfortable read, finished it without realising how much time had passed, and a look at executeideasclean pulled me into more pages the same way, the absence of friction in good content lets time disappear and that is one of the highest compliments I can pay any piece of writing I find online during a regular search session.
Коллеги, всем привет! Срочно нужна консультация тех, кто уже заказывал мерч для бизнеса. Посоветуйте нормальное изготовление корпоративных сувениров — чтобы и кружки не облазили, и ручки писали. корпоративные подарки москва [url=https://suvenirnaya-produkcziya-s-logotipom-11.ru]корпоративные подарки москва[/url] А то насчитали мне за брендированные блокноты космос, хотя заказывали всего 50 позиций. Бюджет пока не утвержден, поэтому хочу понять рыночные цены. А то маркетинговые агентства такой ценник лупят — закачаешься.
Well structured and easy to read, that combination is rarer than people think, and a stop at duetparishs confirmed the same standard runs across the rest of the site, definitely the kind of place I will be coming back to when this topic comes up in conversation later again over the weeks ahead.
Really like that there are no exclamation marks or all caps shouting throughout the post, and a quick visit to createimpactplanningnow maintained the same calm voice, restraint in punctuation signals confidence in the content and this site clearly trusts its substance to do the persuading rather than relying on typographic emphasis.
Very Interesting Information! Thank You For Thi Information!
Stands apart from similar pages by actually being useful, that is high praise these days, and a look at zingtrace kept that standard going, you can tell when a site is built around the reader versus around metrics and this one clearly belongs to the first category for sure based on what I read.
https://poseidon34.ru/index.php?route=information/blogger&blogger_id=3
Ребята, привет! Я вообще в шоке, если честно. Акт скрытых работ потерял, да и проект сам переделывал. В общем, теперь легализовывать этот бардак придётся официально. И тут встал вопрос: сколько стоит согласовать перепланировку [url=https://skolko-stoit-uzakonit-pereplanirovku-10.ru]https://skolko-stoit-uzakonit-pereplanirovku-10.ru[/url] просто интересно, стоимость согласования перепланировки квартиры сейчас вообще реальная или грабёж. Плюс эти дурацкие техусловия на вентиляцию. А то риелторы называют цифры от балды. Без этого всё равно потом квартиру не продать. Короче, просто сколько отдать, чтобы спать спокойно с новой планировкой.
A piece that exhibited the kind of patience that good writing requires, and a look at duetcoast continued that patient quality, hurried writing is easy to spot and this site reads as having been written without time pressure which produces a different feel than the rushed content that dominates much of the modern blog space.
трансы Екатеринбург
мелбет проблема входа [url=http://melbet78240.help]мелбет проблема входа[/url]
Reading this with my morning coffee turned into reading the related posts with my morning coffee, and a stop at firminlet stretched the morning further, content that pulls breakfast into a reading session rather than just accompanying it is content that has earned a higher claim on my attention than the average article does.
Reading this felt easy in the best way, no friction and no confusion at any point, and a stop at simplifyyourprogress carried that same comfort across more pages, the kind of editorial flow that lets you absorb information without fighting the format which is increasingly hard to find on the open web today across topics.
Reading this in a quiet coffee shop matched the calm energy of the writing, and a stop at falconfern extended that environmental match, content that has its own ambient quality which can match or clash with surroundings is content with a personality and this site has the kind of personality that suits calm reading.
During the time spent here I noticed the absence of the usual distractions, and a stop at explorefreshopportunities extended that distraction free experience, content that does not fight my attention with pop ups and modals and aggressive prompts is content that respects me and this site has clearly chosen the respectful approach throughout.
Adding this site to my regular reading list, the post earned that on its own, and a quick stop at knackdomes sealed the decision, the kind of place worth checking back with from time to time because it consistently produces material that holds up against a critical reading too which I really value.
Reading this in segments because the day was busy, and the post survived the fragmented attention well, and a stop at seogrove held up similarly under interrupted reading, content that can withstand modern distracted reading patterns rather than requiring a perfect block of focused time is increasingly the kind I prefer.
Использование солнечных батарей в домах из сендвич панелей
I really like how the writer keeps the tone friendly without sounding fake or overly polished, and after a stop at salemsolid the same calm pace was there, no rushing to make a point and no padding either, just clean honest writing that I can respect and come back to later again.
Kendi başıma araştırırken buldum. Herkes farklı bir adres söylüyordu. Ama sonunda doğru adresi buldum işte.
Bilenler zaten anlar. Sistem ayarlarını doğru yaptıktan sonra süreç çok basit. Giriş adresi tam olarak şurada: 1xbet türkiye [url=https://1xbet-giris-81.com]1xbet türkiye[/url]. Anlatacağım şu ki — 1xbet türkiye için tek geçerli adres bu.
Bonus sistemi bile tatmin edici. Kendi adıma konuşmam gerekirse — memnun kalmayanını görmedim. Gözünüz arkada kalmasın…
Honestly this hits the sweet spot between detail and brevity, no rambling and no shortcuts, and a quick visit to portolive kept that going across the related pages, the kind of place that respects your attention without trying to grab it through cheap tactics or attention seeking design choices that get tired fast.
Reading this gave me a small sense of progress on a topic I have been slowly working through, and a stop at lunacourt added another step forward, learning happens in small increments across many sources and finding sources that consistently contribute is the actual practical value of careful curation in an information rich world.
Thanks for the breakdown, it gave me a clearer picture of something I had been confused about for a while now, and a stop at grovequay closed the remaining gaps in my understanding nicely, no need to hunt around twenty other articles to put the pieces together which is a real time saver.
A piece that read smoothly because the writer understood how readers actually move through prose, and a look at progressbuiltcarefully maintained the same reader awareness, writers who think about the reading experience as much as the writing experience produce better work and this site has clearly made that shift in editorial approach.
The overall feel of the post was professional without being stuffy, and a look at bravopiers kept that approachable expertise going, finding the right register for technical content is hard but this site has clearly figured out how to sound knowledgeable without slipping into that distant lecturing tone that loses readers in droves every time.
Now planning to share the link with a small group of readers I trust, and a look at clarityfuelsgrowth suggested more material to share with the same group, recommending content into a curated circle requires confidence in the recommendation and this site is making me confident in those personal recommendations on multiple separate occasions now.
Açıkçası ben de önceden çok zorlanıyordum. Sürekli adres değişimi can sıkıyor. Ama sonunda şu linki keşfettim.
Spor bahisleriyle aranız iyiyse burayı kesinlikle tavsiye ederim. Güncel sistem ayarlarını kontrol ettikten sonra erişim sağlamak en mantıklısı. Giriş adresi tam olarak şu şekilde: 1xbet güncel giriş [url=https://1xbet-giris-82.com]1xbet güncel giriş[/url]. Kısacası durum şu — 1xbet türkiye için doğru adres burası.
Bonus kampanyaları fena değil. Daha önce birçok site denedim — başka yerde aramaya gerek yok. Şimdiden bol kazançlar…
bs2best. at
Случайно наткнулся на один гайд, Ситуация дурацкая, постоянно звонят с незнакомого телефона, а кто — вообще непонятно. Стало дико интересно,. И знаете что? Оказывается, сейчас есть реальные способы.
Короче, если вас сейчас волнует тот же самый вопрос — пробить странный входящий звонок, то есть один нормальный рабочий метод. Конкретно про то, как найти человека по номеру телефона — вот здесь всё максимально норм расписано: посмотреть геолокацию по номеру [url=https://kak-najti-cheloveka-po-nomeru-telefona-4.ru]посмотреть геолокацию по номеру[/url].
Друзьям ссылку скинул в телегу, им тоже помогло. Потому что в открытых пабликах обычно полная тишина. В общем, кому надо — тот точно воспользуется. Надеюсь, кому-то тоже упростит жизнь.
Better signal to noise ratio than most places I check on this kind of topic, and a look at createimpactsteps kept that going, every paragraph here carries something worth reading rather than padding out the page to hit some arbitrary length target that search engines reward but readers ignore as soon as they notice it.
Denemek isteyenler çok soruyor. Bazı adresler çalışmıyor. En sonunda her derde deva bir kaynak keşfettim.
Spor bahislerinde iddialı olanlar buraya. Uyarıları dikkate alarak sistemi kurun. Giriş adresi aynen şu şekilde: 1xbet güncel adres [url=https://1xbet-giris-80.com]1xbet güncel adres[/url]. Özetle — 1xbet türkiye için tek doğru adres bu.
Canlı destek anında yardımcı oluyor. Kimseye zararım dokunmaz — deneyen memnun kalmış. Selametle…
Decided to write a short note to the author if there is contact info anywhere, and a stop at grippalaces extended that intention, the urge to thank the writer directly is a strong signal of content quality and this site has triggered that urge in me today which is a fairly rare event for my reading.
Açıkçası bu işe yeni başlayanlar için ideal. Sürekli adres değişiyor derler ya işte tam da o hesap. Detaylı güncellemeleri kontrol edip süreci sorunsuz başlattım. Güvenilir bir kaynak bulmanın ne kadar zor olduğunu hepimiz biliyoruz işte size o adres: 1xbet güncel giriş [url=https://1xbet-giris-87.com]1xbet güncel giriş[/url]. Valla bak net konuşayım — spor bahislerine meraklıysanız burası tam size göre.
para çekme işlemleri de sorunsuz yani rahat olun. Kendi adıma konuşuyorum size — kesinlikle pişman olacağınızı sanmıyorum deneyin. Herkese hayırlı olsun…
Reading this confirmed something I had been suspecting about the topic, and a look at quillglade pushed that confirmation toward greater confidence, content that lines up with independently held intuitions earns a special kind of trust and I will return to writers who consistently land that way for me without overselling positions.
Honest opinion is that this is the kind of post that builds long term trust with readers, and a look at startbuildingdirection reinforced that perception, the slow accumulation of trust through consistent quality is the only sustainable way to build a real audience and this site is clearly playing that long game.
Over the course of reading several posts here a pattern of quality has emerged, and a stop at unlockclaritytoday confirmed the pattern, the difference between sites that hit quality occasionally and sites that hit it consistently is huge and this site has clearly demonstrated the consistent kind through what I have read this morning.
Now appreciating that I did not feel exhausted after reading, and a stop at flareaisle extended that energising quality, content that leaves me with more attention than it consumed is rare and the gap between draining and energising content is real over the course of a typical day spent reading widely online.
A piece that left me thinking I had been undercaring about the topic, and a look at meritquays reinforced that mild concern, content that raises the appropriate weight of a subject without being preachy about it is doing important work and this site is providing that gentle elevation of attention for me consistently.
Closed the tab with a small sense of finality rather than the usual rushed exit, and a stop at falconflame produced the same considered closing, when reading ends with deliberate satisfaction rather than impatient skip you know the time was well spent and this site is producing those satisfying endings consistently across what I read.
Now sitting back and recognising that this was a small but real win in my reading day, and a stop at duetdrive extended that quiet win, the cumulative effect of small reading wins versus the cumulative effect of small reading losses is real over time and this site is contributing to the wins side of that ledger.
Now planning to come back when I have the right kind of attention to read carefully, and a stop at seohive reinforced that plan, choosing the right moment to read certain content is a quiet form of respect for the work and this site is generating those careful planning behaviours from me consistently as a reader.
Коллеги, всем привет! Встала задача обновить ассортимент брендированной атрибуки для отдела продаж. Интересует надежный поставщик корпоративных подарков с логотипом компании, который не подведет со сроками. заказать сувениры с логотипом [url=https://suvenirnaya-produkcziya-s-logotipom-11.ru]заказать сувениры с логотипом[/url] А то насчитали мне за брендированные блокноты космос, хотя заказывали всего 50 позиций. Может, есть проверенные фабрики, которые работают напрямую, без посредников. Киньте ссылки или названия компаний, буду очень благодарен.
Came in tired from a long day and the writing held my attention anyway, and a stop at moveideasforward kept that going, content that can engage a fatigued reader is doing something right because most online reading happens in suboptimal conditions like that one and quality content adapts to it without complaint.
Bookmark added in three places to make sure I do not lose the link, and a look at startvisiondrivenprogress got the same redundant treatment, sites I am afraid to lose are the rare keepers and this is clearly one of them based on what I have read so far across this and a couple of related posts.
Looking back on this reading session it stands as one of the better ones recently, and a look at portpoise extended that ranking, the informal ranking of reading sessions against each other is something I do mentally and this session ranks high largely because of this site and a couple of related pages here.
Срочно нужен совет кто уже заказывал партию к выставке. Хотим обновить мерч для сотрудников. Везде говорят про индивидуальный подход, но реально где заказать корпоративные подарки с логотипом компании — чтоб не за границей, но и не откровенный шлак. товары с логотипом [url=https://suvenirnaya-produkcziya-s-logotipom-9.ru]https://suvenirnaya-produkcziya-s-logotipom-9.ru[/url] Кто недавно заморачивался подарками с логотипом, поделитесь контактами. Пока просто собираем инфу. Заранее спасибо, кто откликнется.
Skipped the related links section thinking I had read enough and then came back to it later when curiosity got the better of me, and a stop at meritquay confirmed I should have just read it first, every section of this site appears to deserve careful attention rather than skipping past lazily.
Even just sampling a few posts the consistency is what stands out, and a look at explorefreshgrowththinking confirmed the broader pattern, sites where every piece I sample lives up to the standard set by the others are sites with serious quality control and this one has clearly invested in whatever editorial process produces that consistency reliably.
Если честно, сам перерыл кучу форумов в поисках нормальной ткани для мебели. Оказалось, что выбрать подходящий вариант реальная проблема. Короче, смотрите, вот здесь реально толково расписано про плотность, ворс и износостойкость для диванов и кресел, а главное — показаны варианты, которые не линяют. Вся полезная информация доступна здесь: купить ткань для обивки дивана [url=https://tkan-dlya-mebeli-2.ru]купить ткань для обивки дивана[/url] Дальше сами гляньте фактические отзывы. Да, и не берите первое, что попалось — я уже сделал ошибку, когда брал мебельную ткань купить с рук. Эта тема реально вывозит по качеству. Имейте в виду: ткань для обивки мебели купить лучше уже с нормальной пропиткой от грязи. Да и садится такое полотно гораздо меньше. Не поленитесь, откройте.
Beyond the topic at hand this site reads as a small ongoing project of taking writing seriously, and a look at learnandrefineprogress reinforced that project quality, sites that treat publishing as an ongoing serious practice rather than as content production for traffic are sites worth supporting and this one has clearly chosen the serious approach.
Skipped the comments to avoid spoilers and came back later to find them genuinely worth reading, and a stop at hazemill extended that surprised respect, when the discussion below a post matches the quality of the post itself you have found something special and this site appears to attract that kind of audience.
1xbet cameroun apk
Bir arkadaşım ısrarla tavsiye etti. Denemekle denememek arasında gidip geldim. Sonra biraz araştırayım dedim.
Spor bahislerinde iddialı olanlar buraya. Detaylı incelemeleri tamamlayıp adımları takip ettikten sonra her şey netleşti. Giriş adresi işte karşınızda: 1xbet giriş [url=https://1xbet-giris-83.com]1xbet giriş[/url]. Yani anlayacağınız — 1xbet türkiye için tek doğru adres burası.
Arayüzü bile kullanışlı. Kendi adıma konuşuyorum — başka bir yere ihtiyacınız kalmaz. Hayırlı olsun…
Glad to have another data point on a question I am still thinking through, and a look at portpoises added two more, content that acknowledges its place in a wider conversation rather than pretending to settle the question alone is intellectually honest in a way that I wish was more common across the open web.
During a reading session that included several other sources this one stood out, and a look at createimpactdriven continued the standout quality, the side by side comparison of sources during research is a useful exercise and this site has been winning those comparisons for me consistently across multiple research sessions during the last week.
Now thinking I want more sites built on this kind of editorial foundation, and a stop at actionwithpurposefulsteps extended that wish into a broader hope, sites built on substance and care rather than on metrics and growth are the kind of sites I want to see more of and this one is a small example worth supporting.
Народ, привет! Ох, уже голова болит с этим тимбилдингом, нужны нормальные презенты для партнеров. Ищу нормальное изготовление корпоративных сувениров с доставкой по Москве. товары с логотипом [url=https://suvenirnaya-produkcziya-s-logotipom-10.ru]https://suvenirnaya-produkcziya-s-logotipom-10.ru[/url] Кто уже заказывал корпоративные подарки с логотипом компании, поделитесь опытом. Нужно штук 300-500, но если будет норм цена, можем и больше взять. Заранее респект тем, кто откликнется с контактами проверенными.
During the time spent here I noticed the absence of the usual distractions, and a stop at thinkbeyondboundaries extended that distraction free experience, content that does not fight my attention with pop ups and modals and aggressive prompts is content that respects me and this site has clearly chosen the respectful approach throughout.
Decided to set aside time later to read more carefully, and a stop at createimpactjourney reinforced that decision, content that earns a calendar entry rather than just a passing read is in a different tier altogether and this site is clearly working at that elevated level which I really do appreciate as a reader today.
Reading this gave me a quiet moment of intellectual pleasure that I had not been expecting, and a stop at flarefest extended that pleasure across more pages, the unexpected reward of stumbling into careful writing is one of the small ongoing pleasures of reading the open web and this site is delivering it reliably.
A piece that read as if the writer was thinking carefully rather than just typing fluently, and a look at vitalsummit continued that considered quality, the difference between fluent typing and careful thinking shows up in writing and this site reads as the product of thought rather than just the product of language fluency apparently.
Now adding this site to a small mental group of recommendations I keep ready for specific kinds of inquiries, and a stop at quirkbazaar extended the recommendation readiness, content that I can confidently point friends and colleagues toward in specific contexts is content with real social utility and this site has that utility clearly.
Recommended to anyone working in or curious about this area, the depth and clarity combine well, and a look at epicestates keeps that going across more pages, the kind of site that earns regular visits rather than chasing trends has my respect because it suggests genuine commitment to the topic itself rather than to chasing trends.
Брал перфоратор https://vse-instrumenti.ru перед оформлением поискал промокод все инструменты — нашёл на этом сайте. Код сработал, скинули 10%.
The overall feel of the post was professional without being stuffy, and a look at seometric kept that approachable expertise going, finding the right register for technical content is hard but this site has clearly figured out how to sound knowledgeable without slipping into that distant lecturing tone that loses readers in droves every time.
Bookmark added with a small note about why, and a look at falconkite prompted another bookmark with another note, the bookmarks I annotate are the ones I expect to return to deliberately rather than stumble into and this site is generating annotated bookmarks at a higher rate than my usual content sources by some margin.
https://www.wvhired.com/profiles/8375582-topcode-promo
курсы робототехники для детей https://detskie-sekcii.ru
Closed the laptop and walked away thinking about the post for a good twenty minutes, and a stop at flareinlets produced similar lingering thoughts, content that survives the closing of the browser tab is content that has actually entered the mind rather than just decorating the screen for the duration of the reading.
https://pad.darmstadt.social/s/8Exc9bOvug
Honest reaction is that this is the kind of writing I would defend in a conversation about good blog content, and a look at ivypiers reinforced that, the rare site whose work I would actively recommend rather than just tolerate is the kind I want to support through return visits regularly.
A clean read with no irritations, and a look at duetparish continued that frictionless quality, the absence of small irritations is something I notice only when present elsewhere and this site is one of the rare places where everything just works and lets me focus on the substance rather than fighting the format.
Açıkçası ben de merak ediyordum. Bazı adresler çalışmıyor. En sonunda her derde deva bir kaynak keşfettim.
Casino sevenler bilir. Uyarıları dikkate alarak sistemi kurun. Giriş adresi aynen şu şekilde: 1xbet spor bahislerinin adresi [url=https://1xbet-giris-80.com]1xbet spor bahislerinin adresi[/url]. Özetle — 1xbet spor bahislerinin adresi değişti.
Canlı destek anında yardımcı oluyor. Dost meclisinde öğrendim — başka yerde aramaya gerek yok. İyi eğlenceler…
Skipped past the first paragraph thinking it was setup and had to come back when the rest referenced it, and a stop at micapact similarly rewarded careful reading from the start, content where every paragraph carries weight is content I now know to read from the beginning rather than skipping ahead.
If I were to recommend a starting point for the topic this site would be near the top of my list, and a stop at irisarbor reinforced that recommendation status, the small list of starting point recommendations I keep for friends asking about topics is short and this site is now firmly on it.
Will recommend this to a couple of friends who have been asking about this exact topic, and after movefromvision I have even more reason to do so, the kind of site that earns word of mouth rather than chasing it through aggressive marketing or paid placements is always a treat to find online.
Quietly impressive in a way that does not announce itself, and a stop at neatmills extended that quiet impressiveness, the kind of quality that emerges through sustained attention rather than first impressions is the kind I trust more deeply and this site has been earning that deeper trust across multiple sessions over time consistently.
Bir arkadaş tavsiyesiyle başladım. Herkes farklı bir adres söylüyordu. Ama sonunda işe yarar bir link keşfettim.
Merak edenler için söylüyorum. Sistem ayarlarını doğru yaptıktan sonra süreç çok basit. Giriş adresi tam olarak şurada: 1xbet giriş [url=https://1xbet-giris-81.com]1xbet giriş[/url]. Yani demem o ki — 1xbet spor bahislerinin adresi burası.
İşlemler hızlı mı derseniz evet. Çok araştırdım emin olun — memnun kalmayanını görmedim. Gözünüz arkada kalmasın…
Now placing this in the small category of sites whose updates I would actually want to know about, and a stop at buildfocusedoutcomes confirmed that placement, the difference between sites I want to follow and sites I just consume from is real and this one has crossed into the active follow category from the casual consumption side.
Yeni başlayanlar için biraz karışık gelebilir. Sürekli adres değişimi can sıkıyor. Ama sonunda sağlam bir kaynak buldum.
Casino oyunlarına meraklıysanız burayı bir şans verin derim. Güncel sistem ayarlarını kontrol ettikten sonra erişim sağlamak en mantıklısı. Giriş adresi tam olarak şu şekilde: 1xbet güncel [url=https://1xbet-giris-82.com]1xbet güncel[/url]. Ne diyeyim yani — 1xbet güncel adres arayanlar buraya baksın.
Çekimler konusunda hiç sıkıntı yaşamadım. Daha önce birçok site denedim — en memnun kaldığım yer burası oldu. Şimdiden bol kazançlar…
bsme at
I came here looking for a quick answer and ended up reading the whole post because it was actually interesting, and after growstepbydirection I had a much fuller picture, no stress and no confusion just a clear walk through the topic that made everything fall into place without much effort.
Now adding a small note in my reading log that this site is one to watch, and a look at learnandexpandcapabilities reinforced the watch status, the few sites I track deliberately rather than encounter accidentally are sites I expect ongoing returns from and this one has cleared the bar for that elevated tracking based on what I read.
Nice to see a post that does not try to overcomplicate the basics for the sake of looking smart, and once I looked at flarefoil the same direct tone was there too, which honestly makes a difference when you are short on time and want answers without long pointless intros.
Liked the way the post got out of its own way, and a stop at loopboughs extended that invisible craft, the best writing you barely notice while reading because it is doing its work without drawing attention to itself and this site has clearly mastered that disappearing act across the pieces I have read.
Now noticing that the post did not mention the writer at all, focus stayed on the topic, and a look at focuscreatesmovement continued that author absent quality, content that disappears the writer to focus on the substance is a particular kind of generosity and this site has clearly chosen the substance over the personality consistently.
Камин дровяной https://stoves-fireplaces.ru
Thanks for the simple approach, too many sites bury the actual point under layers of unnecessary words, but here every line earns its place, and a look at seotrail showed the same care for the reader which is something I will remember the next time I need answers on a topic.
Bookmark added in three places to make sure I do not lose the link, and a look at buildgrowthmomentum got the same redundant treatment, sites I am afraid to lose are the rare keepers and this is clearly one of them based on what I have read so far across this and a couple of related posts.
трансы самары
Skipped the social share buttons but might come back to actually use one later, and a stop at apexhelm extended that share urge, content that triggers genuine sharing impulses rather than performative ones is content that has actually moved me and not many posts in a typical week do that for me actually.
Ne zamandır böyle bir adres arıyordum. Kapanan sitelerden gına geldi artık. En sonunda işte size doğru adres.
Bahisle aranız nasıl bilmem burayı kaçırmayın derim. Gerekli tüm teknik kontrolleri yapıp adımları uyguladıktan sonra erişim açıldı. Giriş adresi tam olarak şurada: 1xbet spor bahislerinin adresi [url=https://1xbet-giris-84.com]1xbet spor bahislerinin adresi[/url]. Özetle söylemek gerekirse — 1xbet türkiye için tek geçerli adres burası.
Bonusları bile tatmin edici. Başka siteleri de denedim emin olun — en memnun kaldığım yer burası. Umarım işinize yarar…
A memorable post for me on a topic I had thought I was tired of, and a look at flareaisles suggested the same site can refresh other tired topics, sites that can revive my interest in subjects I had written off as exhausted are doing rare work and this one is clearly doing that for me today.
Açıkçası ben de bu konuda epey araştırma yaptım. Kapanan sitelerden bıktım resmen vallahi. Adımları doğru sırayla uyguladıktan sonra bağlantı hatasız açıldı. En sonunda güvenilir bir kaynak buldum ve size de aktarayım dedim: 1xbet spor bahislerinin adresi [url=https://1xbet-giris-85.com]1xbet spor bahislerinin adresi[/url]. Valla bak şimdi size şöyle söyleyeyim — spor bahislerinde iddialı olanlar burayı çok iyi bilir.
bonusları bile tatmin edici gerçekten inanın. Araştırmayı seven biriyimdir bu konuda — en memnun kaldığım yer burası oldu kesinlikle. Şimdiden iyi eğlenceler dilerim hepinize…
Once you find a site like this the search for similar voices begins, and a look at structureyourgrowth extended the search energy, finding a high quality reference point makes the gap between it and adjacent sources visible in a way it was not before and this site has provided that high reference point across multiple recent visits.
Worth pointing out that the writing reads as confident without being defensive about it, and a look at fancyfinal extended that secure tone, content that does not pre emptively argue against imagined critics has a different quality from defensive writing and this site reads as written from a place of real ease.
Now noticing that the post did not mention the writer at all, focus stayed on the topic, and a look at dustorchid continued that author absent quality, content that disappears the writer to focus on the substance is a particular kind of generosity and this site has clearly chosen the substance over the personality consistently.
Denemek isteyen arkadaşlara hep aynısını söylüyorum. Herkes farklı bir şey anlatıyor kafam allak bullak oldu. Adımları doğru sırayla uyguladıktan sonra bağlantı hatasız açıldı. Güvenilir bir kaynak bulmanın ne kadar zor olduğunu hepimiz biliyoruz işte size o adres: 1xbet giriş [url=https://1xbet-giris-87.com]1xbet giriş[/url]. Şimdi size doğru düzgün anlatayım — canlı bahis kısmı bile yeterli aslında.
Hiçbir sıkıntı yaşamadım bugüne kadar oynarken. Birçok yeri denedim ama burada karar kıldım — kesinlikle pişman olacağınızı sanmıyorum deneyin. Şimdiden iyi şanslar ve bol kazançlar…
Really thankful for posts that respect a reader’s time, this one does, and a quick look at mintdawn was the same, no need to scroll through endless intros just to get to the actual content, that approach alone is enough reason to come back here regularly for the kind of writing offered.
Вот такой момент: подбор качественного стационара — это реально отдельная и очень сложная история. Многие лично сталкивались с такой ситуацией,, когда родным или близким людям внезапно потребовалась экстренная и профессиональная поддержка. И в этот момент обычно начинается паника просто из-за банальной нехватки информации.
Мой коллега по работе долго искал действительно надежный медицинский вариант. Очень сложно с ходу отличить реальные отзывы пациентов от банальной рекламы. Короче говоря, советую присмотреться к одному источнику, там подробно расписаны все важные условия и нюансы про анонимное снятие запоя в условиях клиники. В общем, не тяните время и долго не раздумывайте,, чтобы четко во всем разобраться.
Вся актуальная информация и контакты доступны прямо здесь: выведение алкоголизма стационар [url=http://www.narkologicheskij-staczionar-sankt-peterburg-12.ru]выведение алкоголизма стационар[/url]. Честно говоря, после изучения всех условий, насколько там много подводных камней, на которые стоит обращать внимание, и главное — там работают доктора, которые реально спасают людей. Для Санкт-Петербурга это точно один из самых лучших вариантов, так что рекомендую сохранить себе в закладки на всякий случай.
Genuinely useful read, the points are practical and easy to apply right away, and a quick look at irisbureau confirmed that this site is consistent in that approach, looking forward to digging through the rest of it when I get the chance to sit down properly later in the week or this weekend.
Really appreciate the absence of stock photos that have nothing to do with the content, and a quick visit to dewdawns maintained the same restraint, visual filler is a tell that the writing cannot stand on its own and the lack of it here suggests the team has confidence in their content quality alone.
I usually skim posts like these but this one held my attention all the way through, and a stop at navigateyournextmove did the same, that is a strong endorsement coming from me because I am usually quick to bounce when content gets repetitive or fails to deliver on its initial promise made in the headline.
Decided I would read the archives over the weekend, and a stop at vesselthrift confirmed that the archives would be worth the time, very few sites have archives I would actively read through but this one has earned that level of interest based on the consistent quality across what I have sampled so far.
Reading carefully here has reminded me what reading carefully feels like, and a look at cadetarenas extended that reminder, the experience of careful reading versus skimming is different in ways I had partially forgotten and this site has clearly refreshed my memory of what attention feels like when content rewards it consistently.
Reading this on the train into work was a better use of the commute than my usual choices, and a stop at ideasintoimpact extended that commute reading well, content that improves transit time rather than just filling it is content with practical benefit and this site has earned its place in my morning commute reading rotation.
I came across an article that talks about the same thing but even more and when you go deeper.
Easy to recommend without reservations, the site delivers on every promise it implicitly makes, and a look at grovequays kept that same standard going, the kind of consistency that earns trust over time rather than chasing it through aggressive marketing is what I see here and it is appreciated greatly by this particular reader today.
Uzun zamandır takipteyim. Bazı adresler çalışmıyor. En sonunda güvenilir adrese ulaştım.
Bahisle ilgilenen arkadaşlara duyurulur. Uyarıları dikkate alarak sistemi kurun. Giriş adresi aynen şu şekilde: 1xbet spor bahislerinin adresi [url=https://1xbet-giris-80.com]1xbet spor bahislerinin adresi[/url]. Özetle — 1xbet spor bahislerinin adresi değişti.
Canlı destek anında yardımcı oluyor. Kimseye zararım dokunmaz — pişman eden bir yer değil. İyi eğlenceler…
Liked the careful selection of which details to include and which to skip, and a stop at seovista reflected the same editorial judgement, knowing what to leave out is just as important as knowing what to include and this site has clearly figured out where that line sits for the topics it covers regularly.
Апостиль на свидетельства и справки может понадобиться для оформления гражданства, учебы или работы за границей. Мы оказываем помощь в подготовке документов https://langwee-russia.com/spravka-o-razvode/
Hello. Great job. I did not expect this on a Wednesday. This is a great story. Thanks!
Generally my attention drifts on long posts but this one held it through the end, and a stop at flareinlet earned the same sustained focus, content that defeats my drift tendency is content with substantive pulling power and this site has demonstrated that pulling power across multiple pieces in a session that has now run quite long actually.
I absolutely adore your site! You aggressive me as able-bodied as all the others actuality and your broiled PS is absolutely great!
Found this useful, the points line up well with what I have been thinking about lately, and a stop at createforwardexecutionplan added some angles I had not considered yet, definitely walking away with more than I came for which is the best outcome from time spent reading online for any kind of topic.
Just enjoyed the experience without needing to think about why, and a look at etheraisles kept that effortless feeling going, sometimes the best content is invisible in the sense that you forget you are reading until you reach the end and realise time has passed without you noticing it pass naturally.
Decided after reading this that I would check this site weekly going forward, and a stop at edendome reinforced that commitment, deciding to add a site to a regular rotation requires meeting a quality bar that very few places clear and this one cleared it cleanly without any noticeable effort or marketing push behind it.
Started taking notes about halfway through because the points were stacking up, and a look at clarityinexecution added enough material that my notes file grew further, content that demands note taking from a passive reader is content with substance and the writers here are clearly producing that kind of work consistently across topics.
Reading this in a quiet hour and finding it suited the quiet, and a stop at fancyhale extended the quiet reading mood, content that matches its own optimal reading conditions rather than fighting them is content that has been thoughtfully calibrated and this site reads as having a particular reading mood in mind throughout.
Вот такая беда — родственник в запое , а везти в больницу страшно . Я сам через это прошёл пару лет назад . Руки опускаются, время идёт. Лезешь в интернет, а вокруг сплошной развод . Пока случайно не наткнулся на один реально работающий вариант. Требуется немедленная консультация — а везти самому нет возможности , то выход один . Я про наркологическую помощь на дому . У нас в Самаре, к слову , хватает левых контор без лицензии. Вся проверенная информация вот тут : нарколог на дом кодирование [url=https://narkolog-na-dom-samara-13.ru]https://narkolog-na-dom-samara-13.ru[/url] Честно скажу , после того как вник в детали, многое прояснилось . И про снятие запоя на дому, и про консультацию . И цены адекватные, без разводов. Рекомендую не откладывать.
Picked up on several small touches that suggest a careful editor, and a look at growwithstrategyfocus suggested the same hand at work across the broader site, editorial consistency at a granular level is one of the strongest signs that an operation is serious rather than just hobbyist and this site reads as serious throughout.
Bir arkadaşım ısrarla tavsiye etti. Denemekle denememek arasında gidip geldim. Sonra biraz araştırayım dedim.
Casino sevenler için biçilmiş kaftan. Detaylı incelemeleri tamamlayıp adımları takip ettikten sonra her şey netleşti. Giriş adresi işte karşınızda: 1xbet güncel adres [url=https://1xbet-giris-83.com]1xbet güncel adres[/url]. Demem o ki — 1xbet güncel adres arayanlara duyurulur.
Hem hızlı hem güvenilir. Çok yere baktım emin olun — pişman eden bir yer değil kesinlikle. Şimdiden iyi eğlenceler…
Top quality material, deserves more attention than it probably gets, and a look at progresswithstructure reflected the same effort across the site, a hidden gem in the modern web where most attention goes to whoever shouts loudest rather than whoever actually delivers the best content for their readers without much marketing fanfare.
Bookmark moved to my permanent reference folder rather than the casual maybe later folder, and a look at musebeat earned the same upgrade, the distinction between casual interest and lasting reference is something I track carefully and very few sites cross that threshold but this one did so without much effort apparently.
1win правила бонуса [url=www.1win82740.help]www.1win82740.help[/url]
A handful of memorable phrases from this one I will probably use later, and a look at learnandadvancewisely added a couple more, content that contributes language to my own communication rather than just facts is content with a different kind of utility and this site is providing that linguistic utility consistently across what I read.
Народ, привет! Директор увидел бюджет и чуть инфаркт не схватил, надо вписаться в сумму. Присматриваюсь к подаркам с логотипом, но боюсь нарваться на кривую печать. сувенирная продукция для компании [url=https://suvenirnaya-produkcziya-s-logotipom-10.ru]https://suvenirnaya-produkcziya-s-logotipom-10.ru[/url] Посоветуйте нормального поставщика сувенирной продукции с логотипом, чтобы не обдиралово было. Нужно штук 300-500, но если будет норм цена, можем и больше взять. А то я уже второй день в интернете сижу и ничего адекватного не нашёл.
After reading several posts back to back the consistent voice across them is impressive, and a stop at islemeadow continued that voice consistency, sites that maintain a single coherent voice across many pieces by potentially many writers represent serious editorial discipline and this one has clearly developed the institutional consistency needed for that.
Found this through a search that was generic enough I did not expect quality results, and a look at foxarbors continued the surprisingly good experience, search engines occasionally still surface excellent independent content if you scroll past the obvious paid and high authority results which is reassuring to remember sometimes.
Ended up here on a wandering afternoon and was glad I stayed for the read, and a stop at discovercreativegrowthpaths extended the wandering into a proper exploration of the site, the kind of place that rewards aimless clicking with something genuinely interesting rather than the shallow content that mostly populates the modern open web.
I wrote down your blog in my bookmark. I hope that it somehow did not fall and continues to be a great place for reading texts.
mostbet приложение не работает [url=mostbet34850.help]mostbet приложение не работает[/url]
1win bonusuri [url=http://1win5806.help]http://1win5806.help[/url]
1win lucky jet [url=www.1win53914.help]www.1win53914.help[/url]
plinko mines hack [url=http://plinko37046.help]http://plinko37046.help[/url]
Just sat back at the end of the post and felt grateful that someone took the time to write it, and a look at driftfairs extended that gratitude across more of the site, recognising effort behind quality work is part of what makes the open web a community rather than just a marketplace today.
Recommend this to anyone who values clear thinking over flashy presentation, and a stop at buildactionabledirection continued in the same understated way, this site has its priorities in the right place which makes it worth supporting through repeat visits and recommendations rather than just one passing read today before moving on quickly elsewhere.
Thanks for putting in the work to make this approachable, plenty of sites cover the same ground but most do it badly, and a quick visit to executeideascleanly confirmed this one stands apart, simple language and useful examples without anyone trying to sell me anything along the way which I really appreciated.
Açıkçası ben de bu konuda epey araştırma yaptım. Herkes bir şey diyor ama kimse net konuşmuyor. Gerekli teknik incelemeleri tek tek tamamlayıp sistemi test ettim. En sonunda güvenilir bir kaynak buldum ve size de aktarayım dedim: 1xbet türkiye [url=https://1xbet-giris-85.com]1xbet türkiye[/url]. Kusura bakmayın da durum şu — bu işin ehli belli başlı yani.
Hiçbir sorun yaşamadım bugüne kadar oynarken. Birçok yer denedim emin olun yıllardır — en memnun kaldığım yer burası oldu kesinlikle. Umarım işinize yarar bu bilgiler…
Kendi başıma araştırırken buldum. Kapanan siteler yüzünden güvenim sarsılmıştı. Ama sonunda doğru adresi buldum işte.
Merak edenler için söylüyorum. Sistem ayarlarını doğru yaptıktan sonra süreç çok basit. Giriş adresi tam olarak şurada: 1xbet giriş [url=https://1xbet-giris-81.com]1xbet giriş[/url]. Kısaca özet geçeyim — 1xbet türkiye için tek geçerli adres bu.
İşlemler hızlı mı derseniz evet. Çok araştırdım emin olun — şikayet edecek bir şey bulamadım. Hayırlı olsun…
слоты с выводом денег
казино без депозита
Now wondering how the writers calibrated the level of detail so well, and a stop at momentumthroughstrategy continued the same calibration, the right level of detail is one of the harder editorial calls in any piece and this site has clearly developed an instinct for it through what I assume is years of careful practice publicly.
Looking forward to seeing what gets published next month, and a look at shopmint extended that anticipation across the broader site, finding myself looking forward to a sites future content rather than just consuming its existing content is a stronger commitment level than I usually reach with new finds and this site triggered that.
мостбет Бишкек [url=www.mostbet93580.help]www.mostbet93580.help[/url]
Uzun süredir oynuyorum diyebilirim. Her gün yeni bir engelleme haberi alınca insan bıkıyor. Ama sonunda sağlam bir kaynak buldum.
Casino oyunlarına meraklıysanız burayı denemeden geçmeyin. Güncel sistem ayarlarını kontrol ettikten sonra erişim sağlamak en mantıklısı. Giriş adresi tam olarak şu şekilde: 1xbet türkiye [url=https://1xbet-giris-82.com]1xbet türkiye[/url]. Kısacası durum şu — 1xbet spor bahislerinin adresi değişti.
Müşteri hizmetleri bile ilgili. Daha önce birçok site denedim — en memnun kaldığım yer burası oldu. Umarım işinize yarar…
Denemek isteyen arkadaşlar çok soruyor. Herkes bir şey diyor ama doğru düzgün çalışan yok. En sonunda şu linkte karar kıldım.
Bahisle aranız nasıl bilmem burayı bir şans verin derim. Gerekli tüm teknik kontrolleri yapıp adımları uyguladıktan sonra erişim açıldı. Giriş adresi tam olarak şurada: 1xbet güncel [url=https://1xbet-giris-84.com]1xbet güncel[/url]. Kısacası durum bu — 1xbet spor bahislerinin adresi burada işte.
Çekimler konusunda da sıkıntı yok. Kendi deneyimim buysa da — pişman olacağınızı sanmıyorum. Hayırlı olsun herkese…
Generally I bookmark sparingly to avoid building up a bookmark graveyard but this one earned a permanent slot, and a stop at directionoverdistraction extended that permanence designation, the few sites I keep permanent bookmarks for are sites I expect to use repeatedly and this one has clearly cleared that expectation bar today.
blacksprut ссылка зеркало
The tone stayed consistent across the whole post which is harder than it looks for longer pieces, and a look at portolives continued the same voice, this kind of editorial consistency is a sign of either a single careful writer or a tightly run team and either is impressive today across the broader media environment.
A piece that respected the reader by not over explaining the obvious, and a look at eagerkilt continued that calibrated approach, finding the right level of explanation is one of the harder editorial calls and this site has clearly thought carefully about what readers will already know versus what they need help with consistently.
However measured this site clears the bar I set for sites I take seriously, and a stop at zingtorch continued clearing that bar, the metrics I use for site quality are admittedly informal but they are consistent and this site has cleared them on multiple measurements across multiple visits which is meaningful for my evaluation.
Now feeling slightly more committed to my own careful reading practices having read this, and a stop at fawnetch reinforced that commitment, content that models the kind of attention it deserves is content that calibrates the reader and this site has clearly raised my own bar for what to bring to good writing today.
Worth a quiet moment of recognition for the consistency I have noticed across multiple posts, and a stop at sauntersonar continued that consistent quality, sites that maintain quality across many pieces rather than peaking on one viral post are sites with real editorial discipline and this one has clearly developed that discipline carefully.
Liked everything about the experience, from the opening through to the closing notes, and a stop at lobbydawn extended that into more pages, finding a site where the editorial vision shows through every choice rather than feeling random is an increasingly rare experience and one I am glad to have today during this particular reading session.
Liked the careful word choice throughout, every term seemed picked for a reason rather than thrown in casually, and a stop at etherledge continued that precise style, this kind of attention to small details is what separates careful writing from the usual rushed content that dominates blog spaces today across pretty much every topic I follow.
Now noticing that the post never raised its voice even when making a strong point, and a look at growintentionallyaheadnow continued that calm volume, content that can make important points without resorting to typographic emphasis or emotional appeal is content that trusts its substance to do the work and this site has that confidence consistently.
Срочно нужен совет кто уже заказывал партию к выставке. Готовимся к конференции. Везде говорят про индивидуальный подход, но реально найти нормальную сувенирную продукцию с логотипом. рекламная продукция с логотипом [url=https://suvenirnaya-produkcziya-s-logotipom-9.ru]https://suvenirnaya-produkcziya-s-logotipom-9.ru[/url] Интересует именно изготовление под ключ — от кружек до брендированных блокнотов. Пока просто собираем инфу. А то бюджет уже вчера утвердили, а поставщика нет.
Как выбрать идеальную жидкость для тумана для вашего клуба?
Started a draft response in my head and ended without publishing it because the post said it well enough, and a look at flarequill produced the same effect, content that satisfies my urge to add to it by being complete enough on its own is rare and represents a particular kind of editorial completeness here.
A piece that did not require external context to follow, and a look at mythmanor maintained the same self contained quality, content that stands alone without forcing readers to chase prerequisites is more accessible and this site has clearly thought about how each piece can serve a fresh visitor rather than only existing members.
Closed the tab with a small sense of finality rather than the usual rushed exit, and a stop at edendune produced the same considered closing, when reading ends with deliberate satisfaction rather than impatient skip you know the time was well spent and this site is producing those satisfying endings consistently across what I read.
Thanks for laying this out in a way that someone newer to the topic can follow, and a stop at eliteledges kept that accessibility going, writing that meets readers at different experience levels without condescending is hard to do well and the writers here have clearly thought about who they are writing for.
The use of plain language without dumbing down the topic was really well done, and a look at progresswithoutlimits continued in that same accessible style, this is something many technical writers fail at because they either confuse their readers or condescend to them but here neither problem appears at all which is impressive really.
Decided I would read the archives over the weekend, and a stop at isleparish confirmed that the archives would be worth the time, very few sites have archives I would actively read through but this one has earned that level of interest based on the consistent quality across what I have sampled so far.
Коробка передач обратиться в пункт ТО
Felt a small spark of recognition when the post named something I had been struggling to articulate, and a look at startmovingclearly produced more such moments, the rare service of giving readers language for fuzzy intuitions is one of the higher values that good writing can provide and this site offered several today instances.
Now thinking about how this post will age over the coming years, and a stop at explorefreshgrowth suggested the same durability, content built to age well rather than to capture the attention of the moment is content with a different kind of value and this site has clearly chosen the long horizon over the short one.
Daha önce hiç bu kadar kararlı bir site görmedim. Kapanan siteler yüzünden çok mağdur oldum. Gerekli tüm teknik kontrolleri sırasıyla tamamlayıp süreci başlattım. En doğru adrese ulaştığımı düşünüyorum ve size de buradan bahsetmek istiyorum: 1xbet yeni giriş [url=https://1xbet-giris-86.com]1xbet yeni giriş[/url]. Valla bak şimdi size net söylüyorum — spor bahislerinde uzman olanlar bilir burayı.
Hiçbir aksilik yaşamadım bugüne kadar. Birçok platform denedim ama bunda karar kıldım — başka yerde kaybolmanıza gerek yok yani. Herkese hayırlı olsun…
Результаты анализов и медицинские документы являются важной частью взаимодействия с государственными и частными организациями. Мы помогаем оформить необходимые бумаги https://baza-spravki.com/spravka-003-v-y/
Welcome to Azimutbet https://21noticias.com/2026/06/09/what-is-sports-betting-and-why-is-it-so-popular-today/ a premium sports betting and gambling platform. Thousands of sports matches with extensive selections, live dealers, and the best licensed slot machines await you. Activate the bonus program, participate in VIP tournaments, and enjoy instant payouts with no hidden fees.
Вот реально ситуация — родственник в тяжелом запое , а везти в клинику страшно . Моя семья такое пережила пару лет назад . Сидишь, не знаешь за что хвататься . Начинаешь обзванивать знакомых , а вокруг только деньги тянут. Пока случайно не нашел один нормальный проверенный вариант. Требуется немедленная консультация — а везти самому просто нереально, то нужно вызывать врача на дом. Я про наркологическую помощь на дому . В Самаре , к слову , тоже полно шарлатанов . Нормальные контакты, кто реально приезжает ниже по ссылке: вызов нарколога +на дом [url=https://narkolog-na-dom-samara-14.ru]https://narkolog-na-dom-samara-14.ru[/url] Откровенно говоря, после того как вник в детали, многое прояснилось . Там и про капельницы подробно , и про последующее кодирование. И цены адекватные, без разводов. Рекомендую не откладывать.
A well calibrated piece that knew its scope and stayed inside it, and a look at mintdawns maintained the same scope discipline, scope creep is one of the failure modes of long blog posts and this site has clearly invested in the editorial discipline to prevent it which shows up in tightly contained pieces.
Если честно, сам перерыл кучу форумов в поисках нормальной ткани для мебели. Оказалось, что выбрать подходящий вариант тот ещё квест. Итак, смотрите, вот здесь реально толково расписано про плотность, ворс и износостойкость для диванов и кресел, а главное — показаны варианты, которые не линяют. Вся полезная информация доступна здесь: ткань для обивки мебели москва [url=https://tkan-dlya-mebeli-2.ru]https://tkan-dlya-mebeli-2.ru[/url] Дальше сами гляньте фактические отзывы. Да, и не берите первое, что попалось — я уже обжёгся, когда брал дешёвую ткань для обивки мебели. Эта тема реально вывозит по износу. Для информации: ткань мебельная купить лучше уже с нормальной пропиткой от грязи. Да и трётся такое полотно гораздо меньше. Здесь реально дельные советы.
Açıkçası bu işe yeni başlayanlar için ideal. Herkes farklı bir şey anlatıyor kafam allak bullak oldu. Gerekli teknik incelemeleri tek tek tamamlayıp sistemi test ettim. Güvenilir bir kaynak bulmanın ne kadar zor olduğunu hepimiz biliyoruz işte size o adres: 1xbet spor bahislerinin adresi [url=https://1xbet-giris-87.com]1xbet spor bahislerinin adresi[/url]. Şimdi size doğru düzgün anlatayım — canlı bahis kısmı bile yeterli aslında.
bonusları bile fena değil действительно. Kendi adıma konuşuyorum size — kesinlikle pişman olacağınızı sanmıyorum deneyin. Herkese hayırlı olsun…
Thanks for laying this out in a way that someone newer to the topic can follow, and a stop at bravofarm kept that accessibility going, writing that meets readers at different experience levels without condescending is hard to do well and the writers here have clearly thought about who they are writing for.
Worth saying that the writing carries a particular kind of authority without making any explicit claims to it, and a stop at forwardmotionlabs extended that earned authority feeling, sites that demonstrate expertise through the quality of their explanations rather than by stating credentials are sites I trust most and this site has it.
Now feeling the small relief of finding writing that does not condescend, and a stop at buildtowardresults extended that respect for readers, content that treats its audience as capable adults rather than as people to be managed produces a different reading experience and this site has clearly chosen the respectful approach across all pieces.
I learned more from this short post than from longer articles I read earlier today, and a stop at seoharbor added even more useful detail without going off topic, this site clearly knows how to keep things focused without sacrificing depth which is a hard balance to strike for any writer.
Great post. I was checking constantly this blog and I’m impressed! Very useful info specifically the last part 🙂 I care for such info much. I was looking for this certain information for a very long time. Thank you and good luck.
télécharger 1xbet apk
Took longer than expected to finish because I kept stopping to think, and a stop at zingtrace did the same to me, content that provokes thought rather than just delivering information is in a different category and the team here is clearly working at that higher level rather than just cranking out posts.
Worth saying that the post fit naturally into a rhythm of careful reading, and a stop at clarityoverchaos extended the same rhythm, content that pairs well with how I actually read rather than demanding a different mode is content well calibrated to its likely audience and this site has clearly thought about that consistently.
мостбет как вывести на кошелек [url=http://mostbet34850.help]http://mostbet34850.help[/url]
Thanks for keeping the writing direct without losing the warmth that makes content feel human, and a stop at loopbough carried both qualities forward, balancing professionalism and personality is a rare skill and the writers here have clearly figured out how to consistently land it across many posts which I notice.
Worth flagging this post as worth a careful read rather than a casual skim, and a stop at duetdrives earned the same careful approach, the few sites that warrant slower reading are sites I now treat differently from the daily content stream and this one has clearly moved into that elevated treatment category.
1win cod sms [url=www.1win5806.help]www.1win5806.help[/url]
1win Uzcard depozit [url=https://1win53914.help]https://1win53914.help[/url]
plinko Dhaka [url=https://plinko37046.help]plinko Dhaka[/url]
Skipped lunch to finish reading, which says something, and a stop at ivypier kept me at my desk longer than planned, when content beats the lunch impulse the writer has done something genuinely impressive in an attention environment full of immediately satisfying alternatives competing for the same finite block of reader time.
Solid value for anyone willing to read carefully, and a look at neatdawn extends that value across the rest of the site, this is the kind of place that rewards return visits rather than offering everything in a single splashy post and then leaving readers nothing to come back for later which is unfortunately common.
A piece that respected the reader by not over explaining the obvious, and a look at findyourgrowthdirection continued that calibrated approach, finding the right level of explanation is one of the harder editorial calls and this site has clearly thought carefully about what readers will already know versus what they need help with consistently.
mostbet скачать приложение с официального сайта [url=http://mostbet34850.help/]http://mostbet34850.help/[/url]
Picked this up while looking for something else and ended up reading every paragraph because it was actually informative, and after fawngate I was sure I would come back, that does not happen often when most sites bury the useful parts under endless ads and pop ups today and across most categories online.
Well crafted post, the structure flows naturally from one point to the next without forcing transitions, and a stop at everattic kept the same flow going, you can tell when a writer has thought about how their content reads rather than just what it contains and this is one of those examples.
Started smiling at one paragraph because the writing was just nice, and a look at discoverhiddenopportunitiesnow produced a couple more such moments, prose that produces small spontaneous reactions in the reader is doing more than just transferring information and the writers here are clearly hitting that level fairly consistently throughout pieces.
Ne zamandır böyle bir adres arıyordum. Kapanan sitelerden gına geldi artık. En sonunda işte size doğru adres.
Spor bahislerinde gözünüz varsa burayı kaçırmayın derim. Gerekli tüm teknik kontrolleri yapıp adımları uyguladıktan sonra erişim açıldı. Giriş adresi tam olarak şurada: 1xbet türkiye [url=https://1xbet-giris-84.com]1xbet türkiye[/url]. Ne diyeyim yani anlayacağınız — 1xbet güncel adres arayanlara müjde.
Hiçbir sorun yaşatmadı bugüne kadar. Başka siteleri de denedim emin olun — pişman olacağınızı sanmıyorum. Şimdiden iyi oyunlar…
Знаете, поиск действительно проверенного медицинского центра — это реально отдельная и очень сложная история. Нередко в жизни бывает так, когда кому-то из членов семьи внезапно потребовалась экстренная и профессиональная поддержка. И тут сразу возникает главный вопрос: куда именно везти человека?
Мой коллега по работе долго искал действительно надежный медицинский вариант. Очень сложно с ходу отличить реальные отзывы пациентов от банальной рекламы. Короче говоря, советую присмотреться к одному источнику, там действительно раскладывают по полочкам всю подноготную про круглосуточную наркологическую поддержку и условия проживания. В такой ситуации лучше один раз внимательно глянуть самостоятельно, чтобы четко во всем разобраться.
Вся актуальная информация и контакты доступны прямо здесь: лечение алкоголизма в стационаре цены санкт петербург [url=http://www.narkologicheskij-staczionar-sankt-peterburg-12.ru]лечение алкоголизма в стационаре цены санкт петербург[/url]. Сам сначала даже не думал, насколько там много полезных нюансов и скрытых факторов, включая комфортные условия содержания, современные палаты и полную анонимность. В Питере это определенно достойный внимания и доверия медицинский центр, так что рекомендую сохранить себе в закладки на всякий случай.
Look, I’ve been around the block with these Miami car rentals. Or worse — they freeze your credit card for an extra two grand and smile like it’s totally normal. No thanks, I am completely done with that circus. If you actually need a proper vehicle to cruise around the city, make sure to check the actual fleet reviews before signing anything. Miami without a decent whip is pretty rough, whether you are heading to Brickell, Coconut Grove, or just driving down to Key Biscayne.
I’ve literally compared maybe 15 different local providers last month alone, but I eventually found a service with zero hidden fees and no bait-and-switch tactics. If you are looking for an honest source for premium rentals across Florida, check the details here: rent urus miami [url=https://luxury-car-rental-miami-2.com]https://luxury-car-rental-miami-2.com[/url]. Yeah, finding parking in downtown is still its own separate nightmare, but that’s on you. Anyway, at least there’s one trustworthy service left in this town, hope this helps someone save a few bucks.
Good quality through and through, no rough edges and no signs of being rushed, and a quick look at ideastointent kept the same polish going, the kind of site that respects its own brand by maintaining consistency across pages which is something I always appreciate as a reader looking for trustworthy information online today.
мостбет линия ставок [url=https://mostbet93580.help/]https://mostbet93580.help/[/url]
Açıkçası ben de bu konuda epey araştırma yaptım. Kapanan sitelerden bıktım resmen vallahi. Adımları doğru sırayla uyguladıktan sonra bağlantı hatasız açıldı. En sonunda güvenilir bir kaynak buldum ve size de aktarayım dedim: 1xbet türkiye [url=https://1xbet-giris-85.com]1xbet türkiye[/url]. Ne diyeyim yani anlatayım mı — spor bahislerinde iddialı olanlar burayı çok iyi bilir.
bonusları bile tatmin edici gerçekten inanın. Birçok yer denedim emin olun yıllardır — başka yerde aramaya gerek yok artık valla. Şimdiden iyi eğlenceler dilerim hepinize…
Now adding this site to a small mental group of recommendations I keep ready for specific kinds of inquiries, and a stop at neatdawns extended the recommendation readiness, content that I can confidently point friends and colleagues toward in specific contexts is content with real social utility and this site has that utility clearly.
plinko session expired [url=http://plinko37046.help]http://plinko37046.help[/url]
1win link oficial [url=http://1win5806.help]1win link oficial[/url]
1win login [url=https://1win53914.help]1win login[/url]
Now feeling the small relief of finding writing that does not condescend, and a stop at eastglaze extended that respect for readers, content that treats its audience as capable adults rather than as people to be managed produces a different reading experience and this site has clearly chosen the respectful approach across all pieces.
Reading carefully here has reminded me what reading carefully feels like, and a look at flickaltar extended that reminder, the experience of careful reading versus skimming is different in ways I had partially forgotten and this site has clearly refreshed my memory of what attention feels like when content rewards it consistently.
Now understanding why someone recommended this site to me a while back, and a stop at createclaritysystems explained the recommendation, sometimes recommendations make sense only after experience and this site has finally clicked into place as the kind of resource I now understand was being recommended for sound editorial reasons by my friend.
Great work on keeping things readable, the post never drags or repeats itself which I really appreciate, and a stop at startmovingdecisively added a bit more context that fit naturally with what was already said here, no need to read everything twice to get the point being made today.
Looking through the archives suggests this site has been doing this for a while at this level, and a look at findyourprogresslane confirmed the long term consistency, sites that have maintained quality across years rather than just a recent stretch are sites with serious editorial discipline and this one has clearly been at it for a while.
Reading this in my last reading slot of the day was a good way to end, and a stop at growthbyfocus provided a satisfying close to the reading session, content that ends a day well rather than agitating it before sleep is the kind I value increasingly and this site fits that role for me consistently now.
mostbet приложение Киргизия [url=www.mostbet93580.help]mostbet приложение Киргизия[/url]
Appreciated the way each section connected smoothly to the next without abrupt jumps, and a stop at vectorswift kept that flow going nicely, transitions are something most blog writers ignore but the difference is huge for the reader who is trying to follow a sustained line of thought today across many different topics.
Such writing is increasingly rare and worth supporting through attention, and a stop at ideasdrivenforward extended that supportive attention across more pages, the conscious choice to spend time on sites that produce careful work rather than convenient consumption is itself a small form of patronage and this site is receiving that conscious patronage from me.
If you asked me to point to a recent positive sign for the open web this site would be near the top, and a stop at bravopier reinforced that designation, the few sites that serve as evidence the web can still produce quality independent content are precious and this one has clearly become one for me.
Worth observing that the post landed without needing a flashy headline to hook attention, and a stop at quillglade did the same, content that earns engagement through substance rather than packaging is the kind I trust more deeply and this site has clearly chosen substance as the primary lever for reader engagement throughout.
Thanks for the moderate length, neither so short it skips substance nor so long it bloats, and a stop at buildideasintomotion hit the same balance, the right length is one of the hardest things to calibrate in blog writing and I appreciate when a team has clearly thought about it rather than defaulting.
Знаете, ситуация бывает — человек в ступоре , а тащить в клинику просто нереально . Моя семья такое пережила пару лет назад . Руки опускаются, время идёт. Лезешь в интернет, а вокруг сплошной развод . Пока кто-то не подсказал один нормальный проверенный вариант. Если нужна немедленная консультация — а ехать куда-то просто нереально, то выход один . Речь конкретно про круглосуточный выезд нарколога. В Самаре , если честно, тоже полно шарлатанов . Вся проверенная информация ниже по ссылке: наркологическая помощь на дом [url=https://narkolog-na-dom-samara-13.ru]https://narkolog-na-dom-samara-13.ru[/url] Честно скажу , после того как вник в детали, понял, как правильно действовать. Там и про капельницы подробно , и про последующее кодирование. И цены адекватные, без разводов. Рекомендую не откладывать.
Do you love excitement? https://jerseysbeststore.com/tips offers premium pre-match and live sports betting, as well as a legal online casino. Try your luck on modern slots, table games, or with live dealers. We guarantee complete data security, fair results, and 24/7 player support.
Came back to this an hour later to reread a specific section, and a quick visit to seoloom also drew a second look, content that pulls you back rather than letting you move on permanently is the kind I want to fill my browser bookmarks with in 2026 and beyond as the open internet evolves.
Bir arkadaşım ısrarla tavsiye etti. Açıkçası önyargılıydım biraz. Sonra şu linki görünce karar verdim.
Bahis dünyasına ilgi duyanlar bilir. Detaylı incelemeleri tamamlayıp adımları takip ettikten sonra her şey netleşti. Giriş adresi işte karşınızda: 1xbet giriş [url=https://1xbet-giris-83.com]1xbet giriş[/url]. Demem o ki — 1xbet spor bahislerinin adresi burada.
Hem hızlı hem güvenilir. Kendi adıma konuşuyorum — pişman eden bir yer değil kesinlikle. Hayırlı olsun…
Now thinking about how this post will age over the coming years, and a stop at grovefarms suggested the same durability, content built to age well rather than to capture the attention of the moment is content with a different kind of value and this site has clearly chosen the long horizon over the short one.
Glad to have another data point on a question I am still thinking through, and a look at lunacourt added two more, content that acknowledges its place in a wider conversation rather than pretending to settle the question alone is intellectually honest in a way that I wish was more common across the open web.
Bir arkadaş tavsiyesiyle başladım. Herkes farklı bir adres söylüyordu. Ama sonunda doğru adresi buldum işte.
Merak edenler için söylüyorum. Sistem ayarlarını doğru yaptıktan sonra süreç çok basit. Giriş adresi tam olarak şurada: 1xbet güncel giriş [url=https://1xbet-giris-81.com]1xbet güncel giriş[/url]. Yani demem o ki — 1xbet türkiye için tek geçerli adres bu.
Arayüzü anlaşılır, takılmazsınız. Kendi adıma konuşmam gerekirse — memnun kalmayanını görmedim. Hayırlı olsun…
High quality writing, no marketing speak and no buzzwords that mean nothing, and a stop at edenfair kept that going, simple direct content that actually communicates something is harder to find than it should be and this is one of the rare places that gets it right consistently across many different posts.
Açıkçası ben de önceden çok zorlanıyordum. Her gün yeni bir engelleme haberi alınca insan bıkıyor. Ama sonunda her derde deva bir adrese ulaştım.
Bahis severler bilir burayı bir şans verin derim. Güncel sistem ayarlarını kontrol ettikten sonra erişim sağlamak en mantıklısı. Giriş adresi tam olarak şu şekilde: 1xbet güncel giriş [url=https://1xbet-giris-82.com]1xbet güncel giriş[/url]. Ne diyeyim yani — 1xbet spor bahislerinin adresi değişti.
Müşteri hizmetleri bile ilgili. Çevremdekilere de söyledim — başka yerde aramaya gerek yok. Umarım işinize yarar…
Really appreciate the confidence to make a clear point rather than hedging everything, and a quick visit to jetdome maintained the same direct stance, writing that takes positions rather than equivocating is more useful even when the positions are debatable because at least the reader has something to react to clearly.
A piece that did exactly what it promised in the headline without overshooting or underdelivering, and a look at neatglyph continued that calibration, alignment between promise and delivery is a basic editorial virtue that many sites fail at and this site has clearly mastered the matching of expectation and substance throughout pieces.
Знаете, бывает такое — близкий совсем плох, а тащить в больницу просто нереально . Моя семья такое пережила пару лет назад . Руки опускаются, время тикает. Начинаешь обзванивать знакомых , а вокруг сплошной развод . Пока кто-то не подсказал один реально работающий вариант. Если нужна немедленная консультация — а ехать куда-то просто нереально, то выход один . Я про наркологическую помощь на дому . У нас в Самаре, если честно, тоже полно шарлатанов . Нормальные контакты, кто реально приезжает вот тут : нарколог на дом самара [url=https://narkolog-na-dom-samara-14.ru]нарколог на дом самара[/url] Откровенно говоря, после того как прочитал , многое прояснилось . Там и про капельницы подробно , и про консультацию нарколога . Плюс анонимность — это важно . Рекомендую не откладывать.
If you asked me to point to a recent positive sign for the open web this site would be near the top, and a stop at createactionablegrowth reinforced that designation, the few sites that serve as evidence the web can still produce quality independent content are precious and this one has clearly become one for me.
слоты с выводом денег
Daha önce hiç bu kadar kararlı bir site görmedim. İnanın herkes farklı bir adres veriyor kafayı yedim. Gerekli tüm teknik kontrolleri sırasıyla tamamlayıp süreci başlattım. En doğru adrese ulaştığımı düşünüyorum ve size de buradan bahsetmek istiyorum: 1xbet giriş [url=https://1xbet-giris-86.com]1xbet giriş[/url]. Şöyle düşünün yani — canlı bahis seçenekleri bile yeterli aslında.
bonus kampanyaları bile beklentimin üzerindeydi. Birçok platform denedim ama bunda karar kıldım — başka yerde kaybolmanıza gerek yok yani. Umarım siz de memnun kalırsınız…
Нашел портал, где можно скачать свежие промокоды на монеты и получить доступ к оригинальной платформе. Кому важен честный Dragon Money с гарантией выплат, переходите по прямой ссылке. Драгон Мани официальный
Appreciate the work that went into laying this out so clearly, every section earns its place without filler, and a look at irisbureaus confirmed the same care, definitely the kind of place that deserves a return visit when the topic comes up again later in the future or for any related question.
Снова сеть блокирует доступ, поэтому для стабильной игры я нашел новое зеркало. Актуальную ссылку на Dragon Money я взял из этого источника: Dragon Money зеркало
Found this really helpful, the explanations are simple but they actually answer the questions a normal reader would have, and after I followed feathalo I had a clearer sense of the topic, no extra fluff just useful points laid out in a sensible order that made the time worth it.
A piece that suggested careful editing without showing the marks of the editing, and a look at explorefutureclarity continued that invisible polish, the best editing disappears into the prose and this site reads as having been edited with skill that does not announce itself which is the highest compliment I can offer any blog content.
blacksprut маркетплейс
Walked away with a clearer head than I had before reading this, and a quick visit to flowlegend only sharpened that, the writing has a way of cutting through the noise that surrounds most topics online which is something I will definitely remember the next time I am searching for an answer to anything.
Good quality through and through, no rough edges and no signs of being rushed, and a quick look at harborstonemerchantgallery kept the same polish going, the kind of site that respects its own brand by maintaining consistency across pages which is something I always appreciate as a reader looking for trustworthy information online today.
Honestly this was a good read, no jargon and no padding, and a short look at focusdrivengrowth kept that same feel going which I really appreciated, the writer clearly knows the topic well enough to explain it without hiding behind big words or filler that often gets used to seem clever.
Thanks for sharing this with the open internet rather than locking it behind a paywall like so many sites do now, and a stop at findgrowthalignment kept the same vibe going, generous helpful and clearly written by someone who actually wants people to learn from it rather than just charge them.
Now noticing that the post did not mention the writer at all, focus stayed on the topic, and a look at quirkbazaar continued that author absent quality, content that disappears the writer to focus on the substance is a particular kind of generosity and this site has clearly chosen the substance over the personality consistently.
Thanks for keeping the writing direct without losing the warmth that makes content feel human, and a stop at discovercleanstrategies carried both qualities forward, balancing professionalism and personality is a rare skill and the writers here have clearly figured out how to consistently land it across many posts which I notice.
Ne zamandır böyle bir adres arıyordum. Kapanan sitelerden gına geldi artık. En sonunda işte size doğru adres.
Spor bahislerinde gözünüz varsa burayı bir şans verin derim. Gerekli tüm teknik kontrolleri yapıp adımları uyguladıktan sonra erişim açıldı. Giriş adresi tam olarak şurada: 1xbet yeni giriş [url=https://1xbet-giris-84.com]1xbet yeni giriş[/url]. Kısacası durum bu — 1xbet türkiye için tek geçerli adres burası.
Hiçbir sorun yaşatmadı bugüne kadar. Kendi deneyimim buysa da — başka aramaya gerek yok. Hayırlı olsun herkese…
The tone stayed consistent across the whole post which is harder than it looks for longer pieces, and a look at discoverfreshopportunities continued the same voice, this kind of editorial consistency is a sign of either a single careful writer or a tightly run team and either is impressive today across the broader media environment.
Took something from this I did not expect to find, and a stop at meritquay added another unexpected useful piece, content that exceeds expectations rather than just meeting them is the kind that builds enthusiasm and earns repeat visits without any explicit ask from the writer or platform behind the work being read.
Really nice to see things explained without overcomplicating the topic, the words flow naturally and stay easy to follow, and a short visit to ebonfig only added to that experience because the same simple approach is used across the rest of the page too without any change in tone.
Now feeling the small relief of finding writing that does not condescend, and a stop at ideasneedfocus extended that respect for readers, content that treats its audience as capable adults rather than as people to be managed produces a different reading experience and this site has clearly chosen the respectful approach across all pieces.
мостбет способы оплаты [url=http://mostbet34850.help/]http://mostbet34850.help/[/url]
Probably going to mention this site in a write up I am working on later this month, and a stop at briskolive provided more material for that potential mention, content worth referencing in my own published work rather than just personal reading is content with the highest endorsement level and this site has earned that endorsement.
Arkadaşlar merhaba uzun zamandır takipteyim. Kapanan sitelerden bıktım resmen vallahi. Adımları doğru sırayla uyguladıktan sonra bağlantı hatasız açıldı. En sonunda güvenilir bir kaynak buldum ve size de aktarayım dedim: 1xbet güncel [url=https://1xbet-giris-85.com]1xbet güncel[/url]. Kusura bakmayın da durum şu — bu işin ehli belli başlı yani.
çekimler konusunda da sıkıntı yok yani rahat olun. Kendi adıma konuşuyorum size açık açık — en memnun kaldığım yer burası oldu kesinlikle. Hayırlı olsun herkese diliyorum…
Got something practical out of this that I can apply later this week, and a stop at jetmanor added more details to think about, this is exactly the kind of content I bookmark for future reference rather than the throwaway listicles that dominate most search results these days for almost any common topic.
A particular kind of restraint shows up in the writing, and a look at discoverforwardthinkingpaths maintained the same restraint across pages, knowing what not to say is just as important as knowing what to say and this site has clearly developed strong instincts on both sides of that editorial line throughout pieces I have read.
Found a couple of useful angles in here I had not considered before reading carefully, and a quick stop at learnandscaleprogressively added more, this is one of those sites where the value compounds the more you read rather than peaking at one viral post and then offering nothing else of substance afterwards which is common.
Felt no urge to argue with the conclusions even though I started the post slightly skeptical, and a look at neatmill maintained that pattern, writing that earns agreement through clarity of argument rather than rhetorical pressure is the kind I find most persuasive and the kind I want to read more of these days.
A piece that brought a sense of order to a topic I had been finding chaotic, and a look at draftlogs continued that organising effect, content that imposes useful structure on messy subjects is doing genuine intellectual work and this site is providing that organisational function across multiple posts I have read recently here.
Denemek isteyen arkadaşlara hep aynısını söylüyorum. Kapanan sitelerden çektim resmen anlatamam. Adımları doğru sırayla uyguladıktan sonra bağlantı hatasız açıldı. Güvenilir bir kaynak bulmanın ne kadar zor olduğunu hepimiz biliyoruz işte size o adres: 1xbet güncel adres [url=https://1xbet-giris-87.com]1xbet güncel adres[/url]. Şimdi size doğru düzgün anlatayım — casino oyunlarında iddialı olanlar bilir zaten.
bonusları bile fena değil действительно. Kendi adıma konuşuyorum size — başka yerde kaybolup durmayın yani. Herkese hayırlı olsun…
1win retragere Bitcoin [url=www.1win5806.help]www.1win5806.help[/url]
sloturi 1win [url=https://1win5759.help]https://1win5759.help[/url]
lucky jet мостбет [url=https://www.mostbet30562.online]https://www.mostbet30562.online[/url]
plinko email verification [url=https://plinko37046.help]https://plinko37046.help[/url]
1win plinko o‘ynash [url=http://1win53914.help]http://1win53914.help[/url]
Better than the average post on this subject by some distance, and a look at createimpactdirection reinforced that, you can tell within the first paragraph that the writer here actually cares about the topic rather than just covering it for the sake of having something to publish that week or that day.
Felt the writer was being honest with the reader which is rare enough that I want to acknowledge it, and a look at forwardthinkingpaths continued that honest feel, content built on actual knowledge rather than aggregated summaries is something I value highly and rarely come across in regular searches on the open internet these days.
Started reading expecting to disagree and ended mostly nodding along, and a look at vitalsnippet continued the pattern, content that wins agreement through evidence and reasoning rather than rhetorical force is the kind that actually shifts minds and this site clearly knows how to do that across what I have read so far.
Worth pointing out that the post avoided the temptation to summarise everything at the end, and a look at amberharborartisanexchange continued that confident closing approach, content that trusts readers to retain the substance without being reminded of it at the end is content that respects the reader and this site practices that respect.
Let’s be real, finding a decent rental company down here is a nightmare. Or worse — they freeze your credit card for an extra two grand and smile like it’s totally normal. No thanks, I am completely done with that circus. When you are trying to find a reliable premium fleet down here, seriously, do your homework first and don’t just trust social media ads. Miami without a decent whip is pretty rough, whether you are heading to Brickell, Coconut Grove, or just driving down to Key Biscayne.
I’ve literally compared maybe 15 different local providers last month alone, until I finally stumbled across one that actually delivers what it promises. If you are looking for an honest source for premium rentals across Florida, check the details here: exotic cars miami beach [url=https://luxury-car-rental-miami-2.com]exotic cars miami beach[/url]. Oh, and definitely bring polarized sunglasses, because that Florida sun is absolutely no joke. Anyway, at least there’s one trustworthy service left in this town, let me know if you guys know any other clean spots.
Strong recommendation from me, anyone curious about the topic should make time for this, and a look at featlake only sharpens that recommendation further, the kind of resource that holds up against careful scrutiny rather than crumbling at the first critical question is rare and worth pointing other people toward when the topic comes up.
You ma’am have a way with words. Thank you very much!
Generally I am cautious about recommending sites on first encounter but this one warrants the exception, and a look at fondarbor reinforced the exception making, the rare site that justifies breaking my normal cautious approach is the rare site worth flagging early and this one has prompted exactly that early flagging response from me.
Now feeling the rare pleasure of trusting a source completely on first encounter, and a look at learnandexecutewisely extended that initial trust into something more durable, the calibration of trust to evidence is something I do informally and this site has earned high trust through the cumulative weight of multiple consistently good posts already.
mostbet верификация сколько дней [url=https://mostbet93580.help]https://mostbet93580.help[/url]
Coming back tomorrow when I can give this a proper read, the post deserves better attention than I can give right now, and a look at apexhelm suggests there is plenty more here that deserves the same treatment, definitely a site I will be exploring properly over the next few days when I can.
Even from a single post the editorial care is clear, and a stop at strategycreatesmomentum extended that care across more pages, the kind of attention to quality that shows up in every paragraph is what separates serious sites from the rest and this one has clearly invested in that paragraph level attention across what I have read.
Now considering whether the post would translate well into a different form, and a look at harbortrailcommercegallery suggested similar versatility, content that could move into other media without losing its substance is content that has been built around ideas rather than around format and this site reads as idea first throughout posts.
Справка о несудимости подтверждает отсутствие судимостей и может использоваться в различных государственных и международных процедурах – https://laws-moscow.com/articles/
Worth saying that this is one of the better things I have read on the topic in months, and a stop at micapact reinforced that ranking, the topic is well covered by many sources but few do it with this level of care and the few that do deserve to be flagged so other readers can find them.
Solid value for anyone willing to read carefully, and a look at edgecradle extends that value across the rest of the site, this is the kind of place that rewards return visits rather than offering everything in a single splashy post and then leaving readers nothing to come back for later which is unfortunately common.
найти инвестора для бизнеса Продажа: коммерческий бизнес — это активы, которые приносят доход владельцу и требуют грамотного управления для сохранения эффективности работы на рынке сегодня. Проанализируйте потенциал и предложите покупателю актив, который станет основой его личного успеха в предпринимательстве. Доход — это цель.
It is perfect time to make some plans for the future and it is time to be happy. I’ve read this post and if I could I want to suggest you some interesting things or suggestions. Perhaps you can write next articles referring to this article. I wish to read more things about it!
Quiet confidence runs through the whole post, no need to shout to make the points stick, and a stop at waveharborartisanexchange carried that same restrained voice forward, content that respects the reader by trusting its own substance rather than dressing it up in theatrical language is what I look for online and rarely actually find these days.
Вот реально ситуация — родственник в тяжелом запое , а везти в клинику страшно . Я сам через это прошел пару лет назад . Руки опускаются, время тикает. Лезешь в интернет, а вокруг одни обещания . Пока кто-то не подсказал один реально работающий вариант. Если нужна немедленная консультация — а ехать куда-то просто нереально, то выход один . Я про выезд нарколога на дом. У нас в Самаре, если честно, хватает левых контор без лицензии. Вся проверенная информация ниже по ссылке: вызов нарколога на дом круглосуточно [url=https://narkolog-na-dom-samara-14.ru]вызов нарколога на дом круглосуточно[/url] Откровенно говоря, после того как вник в детали, понял, как правильно действовать. Там и про капельницы подробно , и про консультацию нарколога . И цены адекватные, без разводов. Рекомендую не тянуть .
Felt the post was written for someone like me without explicitly addressing me, and a look at knackdome produced the same fit, when content lands on its target without pandering you know the writer has done careful audience thinking rather than relying on demographic targeting or interest signals to do the work of editorial decisions.
This is really interesting, You’re a very skilled blogger. I have joined your feed and look forward to seeking more of your fantastic post. Also, I have shared your website in my social networks!
Now adding this site to a small mental group of recommendations I keep ready for specific kinds of inquiries, and a stop at discovernewfocus extended the recommendation readiness, content that I can confidently point friends and colleagues toward in specific contexts is content with real social utility and this site has that utility clearly.
Refreshing to find writing that does not try to manipulate the reader into clicking onto the next page through cliffhangers and forced engagement, and a stop at northdawn continued in the same respectful way, this is what reader first design actually looks like in practice rather than just in marketing copy that sounds nice.
Reading this prompted me to dig out an old reference book related to the topic, and a stop at graingroves extended that connection to other sources, content that connects me back to my own existing knowledge rather than asking me to forget it is content with continuity and this site has that continuous quality.
Aylardır araştırıyorum en sonunda buldum. Sürekli engelleme derdi bitmek bilmiyor artık. Güncel detayları inceleyip sistemi test ettim ve sorunsuz çalıştı. En doğru adrese ulaştığımı düşünüyorum ve size de buradan bahsetmek istiyorum: 1xbet güncel giriş [url=https://1xbet-giris-86.com]1xbet güncel giriş[/url]. Valla bak şimdi size net söylüyorum — spor bahislerinde uzman olanlar bilir burayı.
para çekme konusunda da sıkıntı görmedim açıkçası. Birçok platform denedim ama bunda karar kıldım — en çok güvendiğim adres burası oldu artık. Umarım siz de memnun kalırsınız…
Слушайте, а вы в курсе, что найти нормальную клинику сейчас — это всегда целая проблема и головная боль. Нередко в жизни бывает так, когда кому-то из членов семьи внезапно потребовалась экстренная и профессиональная поддержка. И в этот момент обычно начинается паника просто из-за банальной нехватки информации.
Мой коллега по работе долго искал действительно надежный медицинский вариант. Очень сложно с ходу отличить реальные отзывы пациентов от банальной рекламы. Если коротко, лучше сразу перейти на официальный сайт, где нет вранья, там подробно расписаны все важные условия и нюансы про круглосуточную наркологическую поддержку и условия проживания. В общем, не тяните время и долго не раздумывайте,, чтобы четко во всем разобраться.
Все важные детали и лицензии центра находятся только тут: наркология вывод из запоя в стационаре спб [url=http://narkologicheskij-staczionar-sankt-peterburg-12.ru]http://narkologicheskij-staczionar-sankt-peterburg-12.ru[/url]. Честно говоря, после изучения всех условий, насколько там много подводных камней, на которые стоит обращать внимание, включая комфортные условия содержания, современные палаты и полную анонимность. В Питере это определенно достойный внимания и доверия медицинский центр, который стабильно работает и имеет хорошие отзывы.
Beats most of the alternatives on the topic by a noticeable margin, and a look at discoverdirectionalclarity did not change that at all, this is one of the better corners of the open internet for this kind of content and I am glad I clicked through rather than skipping past quickly like I usually do.
Going to share this with a friend who has been asking the same questions for a while now, and a stop at amberharborartisanexchange added a few more pages I will pass along too, this is the kind of generous information that earns a small thank you from me right now and again later this week.
Если честно, сам перерыл кучу форумов в поисках нормальной обивки. Оказалось, что выбрать подходящий вариант реальная проблема. В общем, смотрите, вот здесь реально толково расписано про плотность, ворс и износостойкость для диванов и кресел, а главное — показаны варианты, которые легко чистить. Вся полезная информация доступна здесь: ткань для мебели [url=https://tkan-dlya-mebeli-2.ru]ткань для мебели[/url] Дальше сами гляньте каталог с ценами. Да, и не берите первое, что попалось — я уже поплатился кошельком, когда брал дешёвую ткань для обивки мебели. Эта тема реально вывозит по соотношению цена-качество. Для информации: ткань мебельная купить лучше уже с нормальной пропиткой от грязи. Да и трётся такое полотно гораздо меньше. Здесь реально дельные советы.
Greetings, have tried to subscribe to this websites rss feed but I am having a bit of a problem. Can anyone kindly tell me what to do?’
Quality you can feel from the first paragraph, the writer clearly knows the topic and how to share it, and a quick look at createbettermomentum confirmed the same depth runs throughout the rest of the site as well which is rare and worth pointing out when it happens online for any reader passing through.
Вот такая беда — близкий совсем плох, а тащить в клинику нет сил. Я сам через это прошёл недавно. Сидишь, не знаешь что делать . Начинаешь обзванивать знакомых , а вокруг одни обещания . Пока случайно не наткнулся на один реально работающий вариант. Требуется срочная помощь — а везти самому нет возможности , то выход один . Речь конкретно про вызвать нарколога на дом . У нас в Самаре, если честно, хватает левых контор без лицензии. Вся проверенная информация вот тут : услуги нарколога выезд на дом [url=https://narkolog-na-dom-samara-13.ru]https://narkolog-na-dom-samara-13.ru[/url] Откровенно говоря, после того как прочитал , понял, как правильно действовать. И про снятие запоя на дому, и про последующее кодирование. Плюс анонимность — это важно . Советую не тянуть .
Worth bookmarking and sharing with anyone interested in the topic, that is my honest take, and a stop at ebongreen reinforces that, the kind of generous resource that makes the open web feel worth defending against the constant pressure to retreat into walled gardens and curated feeds today everywhere I look across all my devices.
Şu bahis işlerine merak salalı çok oldu. Herkes bir şey diyor ama kimse net konuşmuyor. Adımları doğru sırayla uyguladıktan sonra bağlantı hatasız açıldı. En sonunda güvenilir bir kaynak buldum ve size de aktarayım dedim: 1xbet spor bahislerinin adresi [url=https://1xbet-giris-85.com]1xbet spor bahislerinin adresi[/url]. Ne diyeyim yani anlatayım mı — bahis olsun casino olsun her şey düşünülmüş resmen.
bonusları bile tatmin edici gerçekten inanın. Kendi adıma konuşuyorum size açık açık — pişman olacağınızı sanmıyorum hiç deneyin derim. Umarım işinize yarar bu bilgiler…
Appreciate the practical examples, they made the abstract points easier to grasp, and a stop at bravofarm added more of the same, this site clearly understands that real examples beat empty theory every single time which is the mark of a writer who knows their audience well and respects their time.
Clean writing, easy to read, and never tries too hard to impress, that combination is harder to find than people think, and after my time on forgecabin I am sure this site treats its readers well, no flashy tricks just useful content done right which is honestly all I want online.
Now organising my browser bookmarks to give this site easier access, and a look at mintdawn earned the same organisational priority, the small acts of digital housekeeping I do for sites I expect to use often are themselves a measure of trust and this site has triggered the trust based housekeeping behaviour from me clearly.
Worth saying that the prose reads naturally without straining for style, and a stop at feltglen maintained the same unforced quality, writing that achieves elegance without effort is the highest tier and this site has clearly worked out how to land that effortless quality consistently rather than only on the writers best days.
https://стартапнеделя.рф/
Over the course of reading several posts here a pattern of quality has emerged, and a stop at growththroughalignment confirmed the pattern, the difference between sites that hit quality occasionally and sites that hit it consistently is huge and this site has clearly demonstrated the consistent kind through what I have read this morning.
monopoly live online [url=monopoly-casino-in.com]https://monopoly-casino-in.com/[/url]
Bir arkadaşım ısrarla tavsiye etti. Denemekle denememek arasında gidip geldim. Sonra şu linki görünce karar verdim.
Casino sevenler için biçilmiş kaftan. Detaylı incelemeleri tamamlayıp adımları takip ettikten sonra her şey netleşti. Giriş adresi işte karşınızda: 1xbet giriş [url=https://1xbet-giris-83.com]1xbet giriş[/url]. Yani anlayacağınız — 1xbet güncel adres arayanlara duyurulur.
Arayüzü bile kullanışlı. Kimseye zararı dokunmaz — deneyen herkes memnun kaldı. Gözünüz arkada kalmasın…
1win slots [url=https://www.1win5759.help]https://www.1win5759.help[/url]
mostbet фриспины в казино [url=http://mostbet30562.online]mostbet фриспины в казино[/url]
Started reading without much expectation and ended on a high note, and a look at findyournextstrategicmove continued that arc, content that builds rather than peaks early is a sign of a writer who knows how to structure a piece for sustained reader engagement rather than relying on a strong hook to do all the work.
Worth every minute of the time spent reading, and a stop at marblecovemerchantgallery extends that value across more pages, in a media environment where most content is engineered to waste attention this site stands out by treating reader time as something valuable rather than something to be exploited and stretched as far as possible.
salas de poker bitcoin [url=http://www.bitcoin-poker-deutschland.de]http://www.bitcoin-poker-deutschland.de[/url] .
A piece that read smoothly because the writer understood how readers actually move through prose, and a look at knackpact maintained the same reader awareness, writers who think about the reading experience as much as the writing experience produce better work and this site has clearly made that shift in editorial approach.
Glad to find something on this topic that does not start with three paragraphs of throat clearing before getting to the point, and a stop at windharborartisanexchange also dives right in, respect for the readers time shows up in small editorial choices like this and they add up to a real difference quickly.
poker bitcoin gratis [url=http://www.onlinepokerbitcoin.de]http://www.onlinepokerbitcoin.de[/url] .
Reading this in a quiet coffee shop matched the calm energy of the writing, and a stop at exploreuntappeddirectionideas extended that environmental match, content that has its own ambient quality which can match or clash with surroundings is content with a personality and this site has the kind of personality that suits calm reading.
Felt the post had been written without using a single buzzword, and a look at freshguilds continued that clean vocabulary, content free of jargon and trendy phrases reads better and ages better and this site has clearly committed to a vocabulary that will not feel dated in three years which is impressive editorially.
Will recommend this to a couple of friends who have been asking about this exact topic, and after novalog I have even more reason to do so, the kind of site that earns word of mouth rather than chasing it through aggressive marketing or paid placements is always a treat to find online.
мостбет официальный сайт рабочий [url=https://www.mostbet30562.online]мостбет официальный сайт рабочий[/url]
1win suport lei moldovenesti [url=http://1win5759.help/]http://1win5759.help/[/url]
Now sitting back and recognising that this was a small but real win in my reading day, and a stop at vandaltavern extended that quiet win, the cumulative effect of small reading wins versus the cumulative effect of small reading losses is real over time and this site is contributing to the wins side of that ledger.
Solid post, the structure is easy to follow and the language stays simple even when the topic gets a bit more involved, and a look at growthwithprecision kept that same standard going, so I left feeling like the time spent here was actually worth something for once which is rare lately.
https://bs2web.at
Reading this felt easy in the best way, no friction and no confusion at any point, and a stop at amberharborcraftcollective carried that same comfort across more pages, the kind of editorial flow that lets you absorb information without fighting the format which is increasingly hard to find on the open web today across topics.
Now appreciating that the post left me with enough to say in a follow up conversation, and a look at createforwarddirection added more material for those follow ups, content that prepares me for related conversations rather than just informing me alone is content with social utility and this site provides that social armament reliably for me.
My friends would appreciate a few of these posts and I will be sending links accordingly, and a look at createforwardplanning added more pages to my share queue, content that earns shares to specific people in specific contexts is content with social utility and this site is generating those targeted shares from me consistently lately.
Now noticing the post fit a particular gap in my reading without my having articulated the gap before, and a look at startmovingwithclarity extended that gap filling effect, content that meets needs I had not consciously formulated is content with reader insight and this site has clearly developed that anticipatory editorial sense across many pieces.
Açıkçası ben de bulana kadar çok uğraştım. Sürekli engelleme derdi bitmiyor. En sonunda şu linkte karar kıldım.
Bahisle aranız nasıl bilmem burayı bir şans verin derim. Gerekli tüm teknik kontrolleri yapıp adımları uyguladıktan sonra erişim açıldı. Giriş adresi tam olarak şurada: 1xbet yeni giriş [url=https://1xbet-giris-84.com]1xbet yeni giriş[/url]. Kısacası durum bu — 1xbet güncel adres arayanlara müjde.
Hiçbir sorun yaşatmadı bugüne kadar. Kendi deneyimim buysa da — en memnun kaldığım yer burası. Umarım işinize yarar…
Look, I’ve been around the block with these Miami car rentals. You book a premium ride online, show up, and they hand you keys to something with a dented bumper. No thanks, I am completely done with that circus. If you actually need a proper vehicle to cruise around the city, make sure to check the actual fleet reviews before signing anything. Miami without a decent whip is pretty rough, especially if you want ice-cold AC and no ridiculous daily mileage caps.
I’ve literally compared maybe 15 different local providers last month alone, until I finally stumbled across one that actually delivers what it promises. If you are looking for an honest source for premium rentals across Florida, check the details here: luxury suv rental miami [url=https://luxury-car-rental-miami-2.com]https://luxury-car-rental-miami-2.com[/url]. Yeah, finding parking in downtown is still its own separate nightmare, but that’s on you. Anyway, at least there’s one trustworthy service left in this town, let me know if you guys know any other clean spots.
Давно хотел найти надёжный вариант, честно говоря, много где в итоге разочаровался. Но прочитал реальные отзывы в тематическом канале про мел бет. Решил не полениться и затестить — и очень даже зашло,.
В общем, вся нужная инфа доступна вот тут: скачат мелбет [url=https://iamthecoffeechic.com]https://iamthecoffeechic.com[/url]. Кстати, если кому надо melbet скачать — там процесс установки занимает буквально минуту. Я себе установил софт прямо на телефон — всё сделано очень удобно. И служба поддержки отвечает строго по делу. В общем, рекомендую присмотреться. Удачи всем на дистанции!
Solid endorsement from me, the writing earns it, and a look at startbuildingmomentumclearly continues to earn it across the broader site too, the kind of operation that maintains quality across many pages rather than just one viral post is a sign of serious commitment and that is what I see here clearly across what I read.
Top tier post, the kind that makes you want to share the link with friends working in the same area, and a stop at bravopier only made me more confident in doing that, this site is one of the better resources I have seen on the topic recently across both new and older posts.
Ребята, всем привет! долго не решался завести аккаунт, но в выходные таки попробовал сделать пару ставок в melbet. Честно? Остался полностью доволен,. Особенно если вам надо скачать melbet на андроид — у меня смартфон далеко не новый,, но приложение работает плавно.
В общем, гляньте сами все условия по ссылке: мелбет скачать [url=https://v-bux.ru]мелбет скачать[/url]. Кстати, кто спрашивал про мелбет скачать приложение — там установочный файл чистый и без вирусов. И фрибеты для новичков очень приятные,. Я уже выводил выигранные средства — служба поддержки вообще не тупит. Очень рекомендую этот вариант. Удачи всем!
стоимость установки отопления в доме
Now considering carefully how to share this site with the right audience rather than broadcasting widely, and a look at edgedial extended that careful sharing impulse, content worth sharing carefully rather than spamming is content that has earned a higher kind of recommendation and this site has earned that careful shareability throughout pieces.
The depth of coverage felt about right for the format, neither shallow nor overwhelming, and a look at foxarbor kept that calibration going, getting the depth right for blog format is genuinely difficult because too shallow loses experts and too deep loses beginners but this site nailed it nicely which I really do appreciate.
Reading this on a slow Sunday and finding it perfectly suited to a slow Sunday read, and a quick stop at musebeat kept the same gentle pace, content that fits the mood of the moment is something I notice and remember and this site has the kind of pace that suits relaxed reading sessions especially well.
A piece that earned its conclusions through the body rather than asserting them at the end, and a look at festglade maintained the same earned quality, conclusions that follow from what came before are more persuasive than declarations and this site has clearly internalised that principle in how it constructs arguments throughout pieces.
Знаете ситуацию выматывает , когда человек просто не может остановиться . Ищешь варианты , а вокруг одна потёмки . Знакомому потребовался действительно рабочий метод . Многие хватаются за таблетки , но это ерунда . Требуется именно профессиональная помощь . Я перелопатил кучу сайтов , пока понял одну простую вещь: без круглосуточного наблюдения ничего не выйдет . В обычной квартире срыв стопроцентный . Ищешь нормальный вариант для экстренного вывода из запоя под капельницами — тогда тебе сюда . В Нижнем Новгороде , кстати, тоже полно шарлатанов . Советую перейти на сайт, где нет вранья про кодировку от алкоголя и работу нарколога . Вся суть здесь: вывод из запоя нижний новгород [url=https://vyvod-iz-zapoya-v-staczionare-nizhnij-novgorod-22.ru]вывод из запоя нижний новгород[/url] После прочтения , сам удивился , сколько нюансов в этой теме. Главное — анонимность и палаты. Для нашего города это проверенный временем вариант.
Even just sampling a few posts the consistency is what stands out, and a look at lacecabin confirmed the broader pattern, sites where every piece I sample lives up to the standard set by the others are sites with serious quality control and this one has clearly invested in whatever editorial process produces that consistency reliably.
Автомобильный блог помогает водителям лучше понимать устройство автомобиля и принимать правильные решения при обслуживании. Регулярно публикуются обзоры, советы и полезные материалы для владельцев разных марок машин: https://ford-omg.ru/
Now appreciating that I did not feel exhausted after reading, and a stop at woodcoveartisanexchange extended that energising quality, content that leaves me with more attention than it consumed is rare and the gap between draining and energising content is real over the course of a typical day spent reading widely online.
Daha önce hiç bu kadar kararlı bir site görmedim. İnanın herkes farklı bir adres veriyor kafayı yedim. Güncel detayları inceleyip sistemi test ettim ve sorunsuz çalıştı. En doğru adrese ulaştığımı düşünüyorum ve size de buradan bahsetmek istiyorum: 1xbet güncel adres [url=https://1xbet-giris-86.com]1xbet güncel adres[/url]. Valla bak şimdi size net söylüyorum — spor bahislerinde uzman olanlar bilir burayı.
bonus kampanyaları bile beklentimin üzerindeydi. Kendi tecrübelerimi aktarıyorum size — başka yerde kaybolmanıza gerek yok yani. Umarım siz de memnun kalırsınız…
Reading this slowly to give it the attention it deserved, and a stop at etherledges earned the same slow read, choosing to read slowly is a small act of respect for content quality and very few sites earn that respect from me but this one did so without any explicit ask which is the cleanest way.
Друзья, всем здравствуйте. долго присматривался к разным платформам, но на днях все-таки зарегился ради интереса в melbet. Скажу так — очень зашло с первых минут,. У кого обычный андроид — всё четко и стабильно работает. Надо скачать мелбет на айфон? Там всё делается максимально просто,.
Короче, вся полезная инфа и актуальный сайт доступны вот тут: . Кстати, кто спрашивал про мелбет казино скачать — мобильная версия работает без лагов,. И бонусы для новичков норм дают,. Я за месяц три раза выигрыш забирал — никаких косяков с выплатами нет,. Это лучшее, что я пробовал из подобного. Пользуйтесь на здоровье, пусть повезет!
Reading this prompted me to dig into a related topic later, and a stop at meadowharborcommercegallery provided some of the starting points for that follow up reading, content that triggers further exploration rather than satisfying curiosity completely is content with real generative energy and this site has plenty of that energy throughout it.
Picked this up between two other things I was doing and got drawn in completely, and after oakarena my original tasks were completely forgotten for a while, content that derails a workflow in a positive way by being more interesting than what you were already doing is rare and worth recognising clearly.
Working through this site has been a small antidote to the shallow content that fills most of my reading time, and a stop at ebonkoala extended that antidote function, sites that quietly improve the average quality of my reading by being themselves are sites worth supporting through return visits and recommendations consistently.
Не переключается коробка мерседес
Glad to have another data point on a question I am still thinking through, and a look at apricotharborartisanexchange added two more, content that acknowledges its place in a wider conversation rather than pretending to settle the question alone is intellectually honest in a way that I wish was more common across the open web.
Just dropping by to say thanks for the effort, it does not go unnoticed when a writer cares this much about the reader, and after I went through startwithpurposefulplanning I was certain this is one of the better corners of the internet for this particular kind of content which is genuinely refreshing.
A small editorial detail caught my attention, the way headings related to body text, and a look at briskolive maintained that careful relationship, structural details like that show up to readers who notice them and the writers here have clearly thought about every level of the piece rather than just the words.
Reading this slowly to absorb the structure, and the structure is doing real work alongside the words, and a look at mythmanor maintained the same architectural quality, when sentence shapes and paragraph rhythms reinforce the meaning rather than just transporting words you know you are reading skilled work today.
Now appreciating that the post did not try to imitate any other style I might recognise, and a stop at createforwardprogress continued that distinct voice, content with its own register rather than borrowed from elsewhere is content with real authorial presence and this site has clearly developed that presence through what feels like patient editorial work.
Worth recognising that this site does not chase the daily news cycle, and a stop at momentumstartsnow confirmed the longer publication arc, sites that resist the pressure to comment on every passing event are sites with genuine editorial discipline and this one has clearly chosen depth over volume which I respect deeply.
Looking through other posts here the consistency is what makes the site valuable rather than any single piece, and a stop at freshguild extended that consistency observation, sites whose value lies in the ongoing pattern rather than in standout posts are sites I trust more deeply and this one has clearly built that kind of trust.
лента стальная мягкая производство стальная лента
Found the rhythm of the prose particularly enjoyable on this read through, and a look at tealthicket kept that musical quality going across the related pages, sentence rhythm is something most blog writers ignore but it makes a real difference in how content lands with the careful reader who cares.
If I were grading sites on this topic this one would receive high marks, and a stop at fibergrid continued earning those high marks, the informal grading I do mentally for content sources is something I take seriously even though it is informal and this site has been receiving consistent high marks across multiple sessions today.
Solid quality, the kind of work that holds up to a careful read rather than a quick skim, and a quick look at lacehelm kept that standard going strong, content that rewards attention rather than punishing it is something I appreciate more and more these days online across nearly every topic I follow.
Felt slightly impressed without being able to point to one specific reason, and a look at buildstrategicprogress continued that diffuse positive feeling, when content works at a level you cannot easily articulate the writer is doing something with craft rather than just delivering information and that is something I have learned to recognise.
A piece that did not lecture even when it had clear positions, and a look at lacehelms maintained the same teaching without preaching tone, finding the line between informing and lecturing is hard and most sites land on the wrong side of it but this one has clearly figured out how to inform without becoming preachy.
Felt like I was reading something written by someone who actually thinks about the topic rather than reciting it, and a look at zencoveartisanexchange reinforced that impression, the difference between recited content and considered content is huge and this site clearly belongs to the latter category which I appreciate as a careful reader looking for substance.
crazy time truccato [url=http://crazy-timegratis.com/]crazy time truccato[/url] .
crazy time 20000x [url=http://crazy-timeitalia.com]http://crazy-timeitalia.com[/url] .
Reading this gave me confidence to make a decision I had been putting off, and a stop at executeideasbetter reinforced that confidence, content that translates into action in my own life rather than just informing it is content with the highest practical value and this site is generating that action level utility for me lately.
bs2site.at зеркала
Worth recommending broadly to anyone who reads on the topic, and a look at opaldune only confirms that, the rare combination of accessibility and depth in this site makes it suitable for both newcomers and people who already know the area which is hard to pull off in any blog format today and rarely managed.
Слушайте, а вы в курсе, что найти нормальную клинику сейчас — это всегда целая проблема и головная боль. Нередко в жизни бывает так, когда кому-то из членов семьи срочно понадобилась грамотная помощь врачей. И тут сразу возникает главный вопрос: куда именно везти человека?
Я сам недавно детально изучал этот вопрос, искал по-настоящему работающий и безопасный выход. В интернете сейчас столько мусора и дорвеев, что голова идет кругом. Короче говоря, советую присмотреться к одному источнику, там подробно расписаны все важные условия и нюансы про анонимное снятие запоя в условиях клиники. В общем, не тяните время и долго не раздумывайте,, чтобы четко во всем разобраться.
Все важные детали и лицензии центра находятся только тут: лечение запоя в стационаре санкт петербург [url=narkologicheskij-staczionar-sankt-peterburg-12.ru]лечение запоя в стационаре санкт петербург[/url]. Сам сначала даже не думал, насколько там много подводных камней, на которые стоит обращать внимание, включая комфортные условия содержания, современные палаты и полную анонимность. Для Санкт-Петербурга это точно один из самых лучших вариантов, так что рекомендую сохранить себе в закладки на всякий случай.
I usually skim posts like these but this one held my attention all the way through, and a stop at discoveropportunityflowsnow did the same, that is a strong endorsement coming from me because I am usually quick to bounce when content gets repetitive or fails to deliver on its initial promise made in the headline.
Recommended to anyone working in or curious about this area, the depth and clarity combine well, and a look at auroracovecraftcollective keeps that going across more pages, the kind of site that earns regular visits rather than chasing trends has my respect because it suggests genuine commitment to the topic itself rather than to chasing trends.
Ремонт и строительство https://decor-kraski.com.ua полезные статьи, практические советы и современные решения для дома, квартиры и коммерческих объектов. Обзоры строительных материалов, технологий, инструментов и рекомендации специалистов для успешной реализации проектов.
Felt slightly impressed without being able to point to one specific reason, and a look at seacovemerchantgallery continued that diffuse positive feeling, when content works at a level you cannot easily articulate the writer is doing something with craft rather than just delivering information and that is something I have learned to recognise.
Портал о ремонте https://goodday.org.ua и строительстве с актуальной информацией о проектировании, отделке, инженерных системах и благоустройстве. Полезные материалы помогут выбрать качественные решения и избежать распространенных ошибок.
мостбет ios Кыргызстан [url=mostbet30562.online]mostbet30562.online[/url]
cum schimb valuta 1win [url=https://www.1win5759.help]cum schimb valuta 1win[/url]
Все о ремонте https://hotel.kr.ua и строительстве в одном месте. Статьи о возведении домов, ремонте квартир, выборе материалов, дизайне интерьера и современных строительных технологиях для комфортной и долговечной эксплуатации жилья.
Took some notes for a project I am working on, and a stop at learnandrefinegrowth added more raw material to those notes, content that contributes to my own creative work rather than just being interesting in the moment is the kind I value most and the kind I will keep coming back to repeatedly.
Информационный ресурс https://inbound.com.ua о ремонте и строительстве для владельцев недвижимости, мастеров и застройщиков. Практические инструкции, обзоры оборудования, советы экспертов и рекомендации по выполнению работ любой сложности.
Знаете, ситуация бывает — близкий совсем плох, а везти в больницу страшно . Я сам через это прошёл недавно. Руки опускаются, время идёт. Лезешь в интернет, а вокруг бабло тянут. Пока случайно не наткнулся на один реально работающий вариант. Требуется немедленная консультация — а ехать куда-то нет возможности , то выход один . Я про круглосуточный выезд нарколога. У нас в Самаре, если честно, тоже полно шарлатанов . Вся проверенная информация вот тут : заказать нарколога [url=https://narkolog-na-dom-samara-13.ru]https://narkolog-na-dom-samara-13.ru[/url] Откровенно говоря, после того как вник в детали, многое прояснилось . Там и про капельницы подробно , и про последующее кодирование. И цены адекватные, без разводов. Рекомендую не тянуть .
Worth pointing out that the post avoided the temptation to summarise everything at the end, and a look at growwithconfidenceforward continued that confident closing approach, content that trusts readers to retain the substance without being reminded of it at the end is content that respects the reader and this site practices that respect.
Worth marking this site as one to come back to deliberately rather than by accident, and a stop at cadetarena reinforced that intention, the difference between sites I find again by chance and sites I return to on purpose is meaningful and this one has clearly moved into the deliberate return category for me.
Really appreciate the lack of pop ups, modals, cookie banners stacking on top of each other, and a quick visit to elitedawn confirmed the same clean approach across the rest of the site, technical decisions about user experience are part of what makes content actually pleasant to engage with for sure.
Once I had read three posts the editorial pattern was clear, and a look at neatdawn confirmed the pattern from a fourth angle, sites where the underlying approach reveals itself through accumulated reading rather than being announced are sites with real depth and this one has that quality clearly visible across multiple pieces consistently.
Picked this for my morning read because the topic seemed worth the time, and a look at elaniris confirmed the choice was right, my morning reading slot is precious and giving it to this site felt like a good investment rather than a waste which is a higher endorsement than I usually offer for content.
Now understanding why someone recommended this site to me a while back, and a stop at tealharborcommercegallery explained the recommendation, sometimes recommendations make sense only after experience and this site has finally clicked into place as the kind of resource I now understand was being recommended for sound editorial reasons by my friend.
Reading this site over the past week has changed how I evaluate content in this space, and a look at frostcoast extended that recalibration, the standards I bring to reading on the topic have shifted upward as a direct result of regular exposure to this kind of work and that shift will outlast any single reading session.
Most blog writing on this subject reaches for the same handful of arguments and this post avoided them, and a look at gladeridgeartisanexchange continued the original treatment, content that finds its own path through territory other writers have flattened is content with real authorial energy and this site has plenty of that distinctive energy.
Probably worth setting aside a longer block to read more carefully than I can right now, and a stop at createforwardlookingplans confirmed the longer block plan, the impulse to schedule dedicated time for a sites archive is itself a measure of trust and this site has earned that scheduling impulse from me clearly today actually.
Мужики, привет. Долго думал, где найти что-то реально редкое. Перерыл кучу вариантов, но нормального премиального интернет магазина — раз два и обчёлся. А тут наткнулся сам в обсуждении. В общем, все подробности и ассортимент вот тут: подарки премиум класса [url=https://boutique-guide.ru]подарки премиум класса[/url] Кстати, если ищете самые дорогие подарки — там есть даже редкие позиции. Я себе заказал ручку из лимитки — впечатление мощное. И цены не космос. Сам теперь только там беру. Надеюсь, поможет.
Picked up something useful for a side project, and a look at explorefutureoptions added another piece I will incorporate, content that connects to specific projects I am working on is content with practical utility and the practical utility of this site is showing up across multiple posts I have read in the last hour or so.
Stands apart from similar pages by actually being useful, that is high praise these days, and a look at cadetgrails kept that standard going, you can tell when a site is built around the reader versus around metrics and this one clearly belongs to the first category for sure based on what I read.
Finding a proper ride in this city is a serious challenge. I swear half the “luxury” fleets down here are straight-up marketing scams. You book a premium ride online, arrive all excited, then boom — hidden service fees everywhere. Fool me thrice, shame on both of us I guess, lesson learned. When you are trying to find a reliable premium fleet down here, don’t just trust the first sponsored ad on social media. Anyone who lives here will tell you the exact same thing, especially since the AC must be arctic and you want zero mileage games.
Most of these local agencies are just shiny websites hiding the same overpriced junk, but I eventually found a service with no bait, no switch, and no weird fine print. If you are looking for the only straight shooter for premium rentals across South Florida, check the details here: porsche for rent near me [url=https://luxury-car-rental-miami-3.com]https://luxury-car-rental-miami-3.com[/url]. Yeah, valet in Miami Beach will cost you an arm, but that’s not their fault. Just drive safe out there and maybe skip the extra windshield protection thing. hope this helps some of you save a few bucks.
A thoughtful read in a week that has been mostly noisy, and a look at coralbrooktradingfoundry carried that thoughtful quality across more pages, finding pockets of considered writing in a week of distractions is one of the small wins of careful curation and this site is providing those pockets at a sustainable rate.
Ребята, всем привет! долго не решался завести аккаунт, но недавно таки зарегился ради интереса в мелбет. Честно? теперь постоянно туда захожу. Особенно если вам надо мелбет скачать на андроид — у меня телефон не флагман,, но приложение работает плавно.
В общем, гляньте сами все условия по ссылке: мелбет [url=https://v-bux.ru]мелбет[/url]. Кстати, кто спрашивал про мелбет приложение — там установочный файл чистый и без вирусов. И кешбек на баланс регулярно капает. Я лично всё проверял на себе — служба поддержки вообще не тупит. Очень рекомендую этот вариант. Удачи всем!
Worth pointing out that the writing reads as confident without being defensive about it, and a look at lakelake extended that secure tone, content that does not pre emptively argue against imagined critics has a different quality from defensive writing and this site reads as written from a place of real ease.
Reading this slowly because the writing rewards a slower pace, and a stop at fiberiron did the same, the pace at which I read content is something I now use as a quality signal and writing that earns a slower pace earns my attention as a reader looking for substance these days.
Давно искал, где можно нормально играть, честно говоря, много где в итоге разочаровался. Но прочитал реальные отзывы в тематическом канале про мел бет. Решил лично проверить систему — и теперь сам рекомендую знакомым.
В общем, все подробности выложены здесь: мелбет приложение [url=https://iamthecoffeechic.com]мелбет приложение[/url]. Кстати, если кому надо мелбет скачать — там нет никаких лишних телодвижений. Я себе поставил официальное приложение — полёт отличный. И служба поддержки отвечает строго по делу. Сам теперь только туда захожу. Надеюсь, эта рекомендация кому-то пригодится.
Quietly enjoying that I have found a new site to follow for the topic, and a look at draftglades reinforced the small pleasure of the find, the discovery of new high quality sources is one of the more durable pleasures of careful internet reading and this site has been generating that discovery pleasure at multiple points already today.
Let’s be real, finding a decent rental company down here is a nightmare. You book a premium ride online, show up, and they hand you keys to something with a dented bumper. Fool me once, shame on you, right. If you actually need a proper vehicle to cruise around the city, seriously, do your homework first and don’t just trust social media ads. Everyone who lives here knows that having a solid car is essential, whether you are heading to Brickell, Coconut Grove, or just driving down to Key Biscayne.
Most of these local agencies are just fancy websites hiding a garbage fleet, until I finally stumbled across one that actually delivers what it promises. If you are looking for an honest source for premium rentals across Florida, check the details here: south beach exotic rentals [url=https://luxury-car-rental-miami-2.com]south beach exotic rentals[/url]. Yeah, finding parking in downtown is still its own separate nightmare, but that’s on you. Just drive safe out there and don’t let them upsell you on unnecessary insurance nonsense. let me know if you guys know any other clean spots.
Дизайн-проект SPA-салона нужен, чтобы до начала ремонта согласовать образ, планировку, материалы, освещение и технические решения. Это позволяет избежать хаоса на объекте и получить интерьер, который соответствует концепции бизнеса, https://dzen.ru/video/watch/69cfa1327e8b46672edd532a
Denemek isteyen herkese aynı şeyi söylüyorum. Kapanan siteler yüzünden çok mağdur oldum. Güncel detayları inceleyip sistemi test ettim ve sorunsuz çalıştı. En doğru adrese ulaştığımı düşünüyorum ve size de buradan bahsetmek istiyorum: 1xbet güncel adres [url=https://1xbet-giris-86.com]1xbet güncel adres[/url]. Yani kısacası anlatmaya çalıştığım şu — spor bahislerinde uzman olanlar bilir burayı.
bonus kampanyaları bile beklentimin üzerindeydi. Birçok platform denedim ama bunda karar kıldım — kesinlikle pişman olmazsınız deneyin derim. Şimdiden bol şans yardımı ve iyi eğlenceler…
A small thank you note from me to the team behind this work, the post earned it, and a stop at buildsteadyprogress suggested more thanks would be in order over time, recognising the people who do good writing online is something I try to remember to do because the alternative is silence and silence rewards mediocrity unfortunately.
Ремонт и строительство https://insurancecarhum.org от фундамента до отделки. Полезные статьи о строительных технологиях, материалах, инженерных коммуникациях и эффективных способах обустройства жилых и коммерческих помещений.
Picked a friend mentally as the audience for this and decided to send the link, and a look at pacecabin confirmed the send was the right choice, choosing whom to share content with is a small act of curation that I take more seriously than the public sharing most platforms encourage these days online.
melbet sign up with phone [url=http://melbet14906.help]melbet sign up with phone[/url]
Well done, the writing is professional without being stiff, and the topic is treated with care, and a look at explorefutureopportunity reflected that approach, the kind of site I would point a colleague to if they asked for a reliable starting point on this topic in the future without any hesitation at all.
Вот реально ситуация — человек в ступоре , а тащить в больницу нет никаких сил. Я сам через это прошел пару лет назад . Руки опускаются, время тикает. Лезешь в интернет, а вокруг только деньги тянут. Пока кто-то не подсказал один реально работающий вариант. Если нужна срочная помощь — а ехать куда-то просто нереально, то нужно вызывать врача на дом. Я про выезд нарколога на дом. В Самаре , если честно, тоже полно шарлатанов . Вся проверенная информация вот тут : срочный вызов хорошего нарколога [url=https://narkolog-na-dom-samara-14.ru]https://narkolog-na-dom-samara-14.ru[/url] Честно скажу , после того как прочитал , понял, как правильно действовать. И про снятие запоя на дому, и про консультацию нарколога . Плюс анонимность — это важно . Рекомендую не откладывать.
казино без депозита
Все о дизайне https://bconline.com.ua интерьера в одном месте. Современные стили, идеи для ремонта, подбор мебели, освещения и отделочных материалов. Практические советы помогут создать уютное и функциональное пространство.
A piece that prompted a small mental rearrangement of how I order related ideas, and a look at cadetgrail extended that rearranging effect, content that affects the structure of my thinking rather than just adding to it is content with the deepest kind of impact and this site is reaching that depth for me today.
Ремонт и строительство https://oo.zt.ua без лишних сложностей. Подробные руководства, рекомендации специалистов, обзоры материалов и полезные идеи для создания надежного, красивого и функционального жилья.
Going to come back when I have more time to read carefully, the post deserves more than a quick scan, and a stop at alpineharborvendorparlor reinforced that, this is the kind of site that rewards a slower read which is hard to find in this fast paced corner of the internet but really worthwhile.
Информационный ресурс https://it-cifra.com.ua о строительстве и ремонте с акцентом на реальные решения, проверенные технологии и практический опыт. Узнавайте, как строить надежно, ремонтировать качественно и экономить бюджет.
Дизайн и интерьер https://ukk.kiev.ua идеи для оформления квартир, домов и коммерческих помещений. Современные тенденции, советы дизайнеров, готовые решения и вдохновляющие проекты для создания стильного и комфортного пространства.
Beats most of the alternatives on the topic by a noticeable margin, and a look at visionintosystems did not change that at all, this is one of the better corners of the open internet for this kind of content and I am glad I clicked through rather than skipping past quickly like I usually do.
Well done, the kind of post that makes you slow down and actually read instead of skimming for keywords, and a look at neatglyph kept me reading carefully too, that is a sign of writing that has been crafted rather than churned out for an algorithm to see today and tomorrow.
Worth recognising that the post did not pretend to be the final word on the topic, and a stop at verminturbo continued that humility, content that admits its own scope and limits is more trustworthy than content that overreaches and this site has clearly developed the editorial maturity to know what it can and cannot claim well.
Если честно, сам перерыл кучу форумов в поисках нормальной обивки. Оказалось, что выбрать подходящий вариант совсем непросто. В общем, смотрите, вот здесь реально толково расписано про плотность, ворс и износостойкость для диванов и кресел, а главное — показаны варианты, которые не линяют. Вся полезная информация доступна здесь: ткань для мебели цена [url=https://tkan-dlya-mebeli-2.ru]ткань для мебели цена[/url] Дальше сами гляньте каталог с ценами. Да, и не берите первое, что попалось — я уже поплатился кошельком, когда брал дешёвую ткань для обивки мебели. Эта тема реально вывозит по соотношению цена-качество. Кстати: ткань для обивки мебели купить лучше уже с нормальной пропиткой от грязи. Да и трётся такое полотно гораздо меньше. Здесь реально дельные советы.
tor blacksprut
Now thinking the topic is more interesting than I had given it credit for, and a stop at uplandcovemerchantgallery continued that elevated interest, content that revives my curiosity about subjects I had set aside is doing genuine work in the structure of my interests and this site is providing that revivifying effect today actually.
Glad the writer did not feel compelled to cover every possible angle of the topic, focus is a virtue, and a stop at galafactor reflected the same disciplined scope, knowing what to leave out is half of what makes good writing good and this post has clearly been edited with that principle in mind.
Closed the tab with a small sense of finality rather than the usual rushed exit, and a stop at thinkactadvance produced the same considered closing, when reading ends with deliberate satisfaction rather than impatient skip you know the time was well spent and this site is producing those satisfying endings consistently across what I read.
Now thinking about how to apply some of this to a project I have been planning, and a look at islemeadows added more material for the planning, content that connects to my actual creative work rather than just being interesting in the abstract is the kind that earns priority placement in my reading rotation consistently going forward.
Came here from a search and stayed for the side links because they were that interesting, and a stop at cottonbrookvendorfoundry took me even further into the site, the kind of organic exploration that good content invites is something most sites kill through aggressive interlinking and pushy navigation choices rather than relying on quality.
Знаете ситуацию достала уже , когда родственник просто срывается в штопор . Ищешь варианты , а вокруг одна реклама . Знакомому потребовался срочный выход . Многие хватаются за таблетки , но это ерунда . Нужно именно профессиональная помощь . Я перелопатил кучу сайтов , пока понял одну простую вещь: без круглосуточного наблюдения ничего не выйдет . В обычной квартире срыв стопроцентный . Ищешь нормальный вариант для качественного вывода из запоя с помещением в клинику — тогда тебе сюда . В Нижнем , кстати, развелось этих “центров” . Советую перейти на сайт, где нет вранья про кодирование от алкоголизма и работу нарколога . Подробности по ссылке: лечение алкоголизма в нижнем новгороде [url=https://vyvod-iz-zapoya-v-staczionare-nizhnij-novgorod-22.ru]лечение алкоголизма в нижнем новгороде[/url] Честно скажу , сам офигел , сколько нюансов в этой теме. Главное — анонимность и палаты. Для нашего города это реально стоящий вариант.
Honestly this hits the sweet spot between detail and brevity, no rambling and no shortcuts, and a quick visit to startthinkingforwardclearly kept that going across the related pages, the kind of place that respects your attention without trying to grab it through cheap tactics or attention seeking design choices that get tired fast.
Honest assessment after reading this twice is that it holds up under careful attention, and a look at domelounges extended that durability across more pages, content that survives a second read without revealing weak spots is rarer than the average reader probably realises and this site clearly cleared that bar.
Now adjusting my expectations upward for the topic based on this post, and a stop at lakequill continued that bar raising effect, content that resets what I think is possible on a subject is doing real work in shaping my standards and this site is providing those bar raising experiences at a notable rate during sessions.
Decided after reading this that I would check this site weekly going forward, and a stop at glassharborartisanexchange reinforced that commitment, deciding to add a site to a regular rotation requires meeting a quality bar that very few places clear and this one cleared it cleanly without any noticeable effort or marketing push behind it.
If the topic interests you at all this is a place to spend time, and a look at fifeholm reinforced that recommendation, the broader question of where to invest topical reading time is one this site answers convincingly through the consistent quality across multiple pieces I have sampled during the current reading session today.
Clean writing, easy to read, and never tries too hard to impress, that combination is harder to find than people think, and after my time on startthinkingwithpurpose I am sure this site treats its readers well, no flashy tricks just useful content done right which is honestly all I want online.
Reading this confirmed that my time researching the topic in other places had not been wasted, and a stop at kanzivo extended the confirmation, when independent sources agree that is a useful signal and this site is one of the more reliable sources I have found for cross checking what I read elsewhere on similar subjects.
Полезный портал https://panorama.zt.ua о строительстве и ремонте с материалами по проектированию, отделочным работам, благоустройству участков и выбору строительных решений. Актуальная информация для профессионалов и частных застройщиков.
This filled in a gap in my understanding that I had not even noticed was there, and a stop at elffleet did the same, the kind of post that gives you more than you expected when you first clicked through from somewhere else, a real find for anyone curious about the area covered here.
Came in for one specific question and got answers to three I had not even thought to ask, and a look at growstepbyintent extended that bonus value pattern, the kind of resource that anticipates reader needs rather than just answering the literal question asked is the gold standard and this site reaches it.
Друзья, всем здравствуйте. долго присматривался к разным платформам, но на днях все-таки зарегился ради интереса в melbet. Скажу так — очень зашло с первых минут,. У кого обычный андроид — тоже всё без проблем запускается,. Надо скачать мелбет на андроид? Там всё делается максимально просто,.
Короче, переходите, точно не пожалеете: . Кстати, кто спрашивал про скачать мелбет казино — всё очень удобно и грамотно сделано. И фрибеты регулярно прилетают на баланс,. Я лично всё проверил на себе — служба поддержки работает норм,. Всем искренне рекомендую. Пользуйтесь на здоровье, пусть повезет!
Reading this as part of my evening winding down routine fit perfectly, and a stop at pactcliff extended the wind down nicely, content that calms rather than agitates is what I want at the end of the day and this site provides that calming reading experience reliably which is increasingly rare across the modern web.
A piece that brought a sense of order to a topic I had been finding chaotic, and a look at growwithclearintent continued that organising effect, content that imposes useful structure on messy subjects is doing genuine intellectual work and this site is providing that organisational function across multiple posts I have read recently here.
Solid recommendation from me to anyone working in the area, the perspective here is grounded, and a look at findyourcorelane adds even more useful angles, the kind of site that becomes a reference rather than just a one time read which is a higher bar than most blogs ever reach today on the modern web.
Reading this slowly in the morning before opening email, and a stop at findyourprogressdirection extended that protected attention, content that earns the prime morning reading slot before the daily distractions begin is content with elevated status and this site has earned that prime slot consistently in my recent reading habits clearly.
Looking through the archives suggests this site has been doing this for a while at this level, and a look at clippoise confirmed the long term consistency, sites that have maintained quality across years rather than just a recent stretch are sites with serious editorial discipline and this one has clearly been at it for a while.
Daha önce hiç böyle bir site görmemiştim. Açıkçası önyargılıydım biraz. Sonra şansımı denemek istedim.
Casino sevenler için biçilmiş kaftan. Detaylı incelemeleri tamamlayıp adımları takip ettikten sonra her şey netleşti. Giriş adresi işte karşınızda: 1xbet güncel adres [url=https://1xbet-giris-83.com]1xbet güncel adres[/url]. Yani anlayacağınız — 1xbet güncel adres arayanlara duyurulur.
Hem hızlı hem güvenilir. Kimseye zararı dokunmaz — pişman eden bir yer değil kesinlikle. Hayırlı olsun…
Solid endorsement from me, the writing earns it, and a look at elitefest continues to earn it across the broader site too, the kind of operation that maintains quality across many pages rather than just one viral post is a sign of serious commitment and that is what I see here clearly across what I read.
Picked this up while looking for something else and ended up reading every paragraph because it was actually informative, and after neatmill I was sure I would come back, that does not happen often when most sites bury the useful parts under endless ads and pop ups today and across most categories online.
Строительный портал https://teplo.zt.ua для тех, кто планирует строительство дома, ремонт квартиры или модернизацию недвижимости. Актуальные статьи, обзоры технологий, советы специалистов и полезная информация для успешной реализации проектов.
Все о строительстве https://suli-company.org.ua и ремонте в одном месте. Строительный портал публикует полезные материалы о проектировании, отделке, инженерных системах, выборе строительных материалов и современных технологиях для дома и бизнеса.
Мужской портал https://cruiser.com.ua о стиле жизни, карьере, финансах, здоровье и технологиях. Полезные статьи, экспертные советы, обзоры и практические рекомендации для современных мужчин, стремящихся к развитию, успеху и комфортной жизни.
Портал о ремонте https://juglans.com.ua и строительстве с актуальными новостями отрасли, обзорами инструментов и строительных материалов. Практические руководства помогут выполнить работы качественно и избежать распространенных ошибок.
Felt the post was written for someone like me without explicitly addressing me, and a look at exploreideaswithdirection produced the same fit, when content lands on its target without pandering you know the writer has done careful audience thinking rather than relying on demographic targeting or interest signals to do the work of editorial decisions.
Liked the post enough to read it twice and the second read found new things, and a stop at forgecabins similarly rewarded the second look, content with hidden depths that only reveal themselves on careful rereading is the rare kind that earns lasting respect rather than fleeting first impressions only briefly held.
Appreciated how the post felt complete without overstaying its welcome, and a stop at apricotharborvendorroom confirmed that economical approach runs across the site, knowing when to stop is a skill many writers never develop but here the discipline is obvious and welcome from the perspective of a busy reader trying to learn things efficiently.
Honest opinion is that this is the kind of post that builds long term trust with readers, and a look at crystalcovecommerceatelier reinforced that perception, the slow accumulation of trust through consistent quality is the only sustainable way to build a real audience and this site is clearly playing that long game.
Beyond the immediate post itself the editorial sensibility behind the site is what struck me, and a stop at knackpacts continued displaying that sensibility, content that reveals editorial choices through accumulated reading is content with structural quality and this site has clearly developed an underlying approach worth identifying through multiple sessions of reading.
Held my interest from the opening line through to the closing thought, and a stop at calmcovevendorroom did the same, content that earns sustained attention in an environment full of distractions is doing something right and this site is clearly doing several things right rather than just one or two which I really appreciate.
Useful enough to recommend to several people I know who would appreciate it, and a stop at crystalharborcommercegallery added more material I will pass along too, the kind of writing that earns word of mouth is the kind that actually delivers on its promises which is what this site does without any drama or fanfare attached.
Glad the writer did not feel compelled to cover every possible angle of the topic, focus is a virtue, and a stop at larkcliff reflected the same disciplined scope, knowing what to leave out is half of what makes good writing good and this post has clearly been edited with that principle in mind.
melbet apk free download [url=https://melbet14906.help/]https://melbet14906.help/[/url]
Found this through a friend who recommended it and now I see why, and a look at buildsustainedmomentum only strengthened that recommendation in my own mind, word of mouth still works for content that actually delivers and this site is clearly earning recommendations the old fashioned way through quality rather than marketing.
A well calibrated piece that knew its scope and stayed inside it, and a look at createimpactdrivensteps maintained the same scope discipline, scope creep is one of the failure modes of long blog posts and this site has clearly invested in the editorial discipline to prevent it which shows up in tightly contained pieces.
Found the section structure particularly thoughtful, and a stop at gemcoast suggested the same care across the broader site, structural choices guide the reader through the material in ways most people do not consciously notice but feel the absence of when those choices are made carelessly or not at all.
Now recognising the specific pleasure of reading writing that shows real care for sentence shapes, and a look at fifejuno extended that craft pleasure, sentence level writing quality is something most blog content ignores entirely and this site has clearly invested in the prose layer alongside the substance which is rare today.
Let me save you some headache I learned the hard way. Half these local companies promise a custom Porsche and hand you a basic sedan with fake leather. You book a premium ride online, arrive all excited, then boom — hidden service fees everywhere. Fool me thrice, shame on both of us I guess, lesson learned. If you seriously need a legit vehicle to cruise around the city, do some real digging first and read actual customer reviews. Miami without wheels is basically a hostage situation, especially since the AC must be arctic and you want zero mileage games.
Most of these local agencies are just shiny websites hiding the same overpriced junk, until I finally found one outfit that actually delivers what’s in the photos. If you are looking for the only straight shooter for premium rentals across South Florida, check the details here: rent a luxury sedan [url=https://luxury-car-rental-miami-3.com]https://luxury-car-rental-miami-3.com[/url]. Also, definitely bring sunglasses unless you enjoy driving completely blind in that sun. Anyway, glad there’s at least one honest rental joint left in this town, hope this helps some of you save a few bucks.
Мужики, привет. Долго выбирал, где найти что-то реально редкое. Перерыл кучу магазинов, но нормального премиального интернет магазина — реально мало. А тут знакомый скинул. В общем, сам гляньте по ссылке: элитные подарки [url=https://boutique-guide.ru]элитные подарки[/url] Кстати, если ищете элитные подарки для мужчин — там есть даже редкие позиции. Я себе заказал ручку из лимитки — упаковка люкс. И цены не космос. Всем советую, кто ценит статусные вещи. Удачи с выбором!
A clean piece that knew exactly what it wanted to say and said it, and a look at cadetarena maintained the same clarity of intention, knowing the goal of a piece before writing is something most blog content lacks and the clarity of purpose here shows up in every paragraph for any careful reader to notice.
mel bet apk [url=http://melbet14906.help]http://melbet14906.help[/url]
Вот такая беда — близкий совсем плох, а тащить в клинику страшно . Моя семья такое пережила пару лет назад . Сидишь, не знаешь что делать . Начинаешь обзванивать знакомых , а вокруг одни обещания . Пока кто-то не подсказал один нормальный проверенный вариант. Если нужна немедленная консультация — а ехать куда-то просто нереально, то нужно вызывать врача на дом. Речь конкретно про наркологическую помощь на дому . В Самаре , к слову , хватает левых контор без лицензии. Нормальные контакты, кто реально приезжает вот тут : вызвать анонимного нарколога [url=https://narkolog-na-dom-samara-13.ru]https://narkolog-na-dom-samara-13.ru[/url] Откровенно говоря, после того как прочитал , многое прояснилось . И про снятие запоя на дому, и про последующее кодирование. Плюс анонимность — это важно . Рекомендую не откладывать.
Felt the writer was being honest with the reader which is rare enough that I want to acknowledge it, and a look at palmcodex continued that honest feel, content built on actual knowledge rather than aggregated summaries is something I value highly and rarely come across in regular searches on the open internet these days.
Now appreciating that I did not feel exhausted after reading, and a stop at harborstoneartisanexchange extended that energising quality, content that leaves me with more attention than it consumed is rare and the gap between draining and energising content is real over the course of a typical day spent reading widely online.
пин ап зеркало на сегодня рабочее официальный сайт казино скачать сайт pin up
Люди, подскажите, долго выбирал нормальную платформу, но на прошлой неделе таки попробовал сделать пару ставок в melbet. Честно? Зашло прям на ура,. Особенно если вам надо скачать мелбет на андроид — у меня смартфон далеко не новый,, но приложение работает плавно.
В общем, все подробности и рабочая ссылка доступны вот тут: скачать melbet [url=https://v-bux.ru]скачать melbet[/url]. Кстати, кто спрашивал про мелбет приложение — там есть удобный отдельный раздел,. И фрибеты для новичков очень приятные,. Я уже выводил выигранные средства — служба поддержки вообще не тупит. Сам теперь только туда. Дерзайте, пусть повезет!
Современный сайт https://makprestig.in.ua о ремонте и строительстве для тех, кто планирует строительство дома, реконструкцию или обновление интерьера. Экспертные советы, инструкции и практические решения для любых задач.
Давно присматривался к разным платформам, честно говоря, перепробовал кучу сомнительных контор. Но случайно наткнулся на живое обсуждение про melbet. Решил лично проверить систему — и теперь сам рекомендую знакомым.
В общем, вся нужная инфа доступна вот тут: melbet скачать [url=https://iamthecoffeechic.com]melbet скачать[/url]. Кстати, если кому надо скачать melbet — там всё работает стабильно и без глюков. Я себе установил софт прямо на телефон — никаких тормозов нет. И служба поддержки отвечает строго по делу. В общем, рекомендую присмотреться. Надеюсь, эта рекомендация кому-то пригодится.
If patience for careful reading is rare these days finding sites that reward it is rarer still, and a stop at kavnero extended that rare reward, the diminishing returns on shallow content reading have made me more selective about where to spend reading time and this site is meeting the higher selectivity bar consistently.
Probably one of the more reliable sources I have found for this kind of careful coverage, and a look at tarotshire reinforced the reliability, the small group of sources I would describe as reliable for a given topic is curated carefully and this site has earned a place in that small group through consistent performance.
Sets a higher bar than most of what shows up in search results for this topic, and a look at curiopact did not lower that bar at all, in fact it confirmed the impression, this is the kind of consistency that earns a place in regular rotation for serious readers instead of casual scrollers passing through.
Honest reaction is that this is the kind of writing I would defend in a conversation about good blog content, and a look at exploreideasdeeplynow reinforced that, the rare site whose work I would actively recommend rather than just tolerate is the kind I want to support through return visits regularly.
Worth saying that this is one of the better things I have read on the topic in months, and a stop at northdawn reinforced that ranking, the topic is well covered by many sources but few do it with this level of care and the few that do deserve to be flagged so other readers can find them.
Let’s be real, finding a decent rental company down here is a nightmare. You book a premium ride online, show up, and they hand you keys to something with a dented bumper. Fool me once, shame on you, right. When you are trying to find a reliable premium fleet down here, make sure to check the actual fleet reviews before signing anything. Everyone who lives here knows that having a solid car is essential, whether you are heading to Brickell, Coconut Grove, or just driving down to Key Biscayne.
Most of these local agencies are just fancy websites hiding a garbage fleet, but I eventually found a service with zero hidden fees and no bait-and-switch tactics. If you are looking for an honest source for premium rentals across Florida, check the details here: exotic cars miami florida [url=https://luxury-car-rental-miami-2.com]exotic cars miami florida[/url]. Oh, and definitely bring polarized sunglasses, because that Florida sun is absolutely no joke. Anyway, at least there’s one trustworthy service left in this town, hope this helps someone save a few bucks.
Вот такой момент: подбор качественного стационара — это реально отдельная и очень сложная история. Нередко в жизни бывает так, когда родным или близким людям срочно понадобилась грамотная помощь врачей. И в этот момент обычно начинается паника просто из-за банальной нехватки информации.
Мой коллега по работе долго искал по-настоящему работающий и безопасный выход. Очень сложно с ходу отличить реальные отзывы пациентов от банальной рекламы. Если коротко, лучше сразу перейти на официальный сайт, где нет вранья, там подробно расписаны все важные условия и нюансы про анонимное снятие запоя в условиях клиники. В такой ситуации лучше один раз внимательно глянуть самостоятельно, чтобы четко во всем разобраться.
Все важные детали и лицензии центра находятся только тут: наркологический стационар в санкт петербурге [url=narkologicheskij-staczionar-sankt-peterburg-12.ru]narkologicheskij-staczionar-sankt-peterburg-12.ru[/url]. Честно говоря, после изучения всех условий, насколько там много полезных нюансов и скрытых факторов, и главное — там работают доктора, которые реально спасают людей. Для Санкт-Петербурга это точно один из самых лучших вариантов, который стабильно работает и имеет хорошие отзывы.
Useful information presented in a way that does not feel like a sales pitch, that is what I appreciated most, and a stop at elmhex was the same, no upsell and no fake urgency just steady content laid out properly for someone trying to actually learn from it rather than just be sold to.
Thanks again for the post, I learned a couple of things I can actually use later this week, and after I went over directionbeforevelocity the rest of the site looked equally promising, definitely going to spend more time here when I get a free moment over the weekend to read more carefully.
Took a few notes from this post, the points are easy to remember without needing to come back and check, and a look at neatglyphs added a couple more, the kind of place that sticks in the memory long after the browser tab has been closed for the day which says a lot really.
Портал о ремонте https://itstore.dp.ua и строительстве с обзорами материалов, инструментов и современных технологий. Узнайте, как правильно организовать строительные работы, выбрать подрядчиков и создать комфортное пространство.
Строительный портал https://aziatransbud.com.ua с актуальными статьями о строительстве домов, ремонте квартир, современных технологиях и строительных материалах. Полезные советы, обзоры оборудования, инструкции и рекомендации для частных застройщиков и профессионалов отрасли.
Picked this site to mention to a colleague who would benefit, and a look at emberbrookmarketfoundry added more material I will pass along, recommending sites to colleagues is a higher bar than recommending to friends because the professional context demands more careful curation and this site cleared the professional bar without me having to think.
Reading this as part of my evening winding down routine fit perfectly, and a stop at findyournextbreakthroughpoint extended the wind down nicely, content that calms rather than agitates is what I want at the end of the day and this site provides that calming reading experience reliably which is increasingly rare across the modern web.
Идеи для интерьера https://bathen.rv.ua советы дизайнеров и актуальные тренды оформления помещений. Сайт поможет подобрать стиль, материалы и решения для ремонта квартиры, дома или коммерческого объекта.
Строительство домов https://zarechany.zt.ua ремонт квартир, инженерные системы и современные технологии — все это на одном информационном портале. Читайте экспертные статьи и находите практические решения для реализации своих проектов.
Highly recommend to anyone looking for a sensible take on this topic without the usual marketing nonsense, and a look at glassmeadowvendorparlor kept that grounded approach going, sites that stay focused on serving readers rather than monetising every click are rare and this is clearly one of those rare ones I really appreciate finding.
Mobil bahise yeni başladım diyebilirim. Güvenilir bir kaynak bulmak gerçekten çok zordu. Adımları doğru sırayla uyguladıktan sonra erişim sorunsuz açıldı. En sonunda doğru adrese ulaştım ve size de tüm detayları aktarmak istedim, güncel bilgilere buradan bakabilirsiniz: 1xbet app apk [url=https://1xbet-apk-11.com]1xbet app apk[/url]. Valla bak net söyleyeyim — mobil versiyonu bile çok akıcı aslında.
güncellemeleri de düzenli geliyor gerçekten. İşin doğrusunu söylemek gerekirse — en sorunsuz çalışan uygulama bu oldu artık. Umarım siz de memnun kalırsınız…
Telefonuma güvenilir bir uygulama indirmek istiyordum. Güvenilir bir apk dosyası bulmak gerçekten çok zordu. Güncel bilgileri kontrol edip süreci hatasız başlattım. En sonunda doğru adrese ulaştım ve size de tüm detayları aktarmak istedim, güncel bilgilere buradan bakabilirsiniz: 1xbet app apk [url=https://1xbet-apk-2.com]1xbet app apk[/url]. Valla bak net söyleyeyim — telefonuma kurunca çok memnun kaldım.
güncellemeleri de otomatik geliyor gerçekten. Kendi deneyimlerimi aktarıyorum size — en hızlı çalışan uygulama bu oldu artık. Herkese hayırlı olsun…
Picked a friend mentally as the audience for this and decided to send the link, and a look at leafdawn confirmed the send was the right choice, choosing whom to share content with is a small act of curation that I take more seriously than the public sharing most platforms encourage these days online.
сайт pinco casino пинко казно официальный сайт
mostbet bepul stavka [url=https://www.mostbet61024.help]https://www.mostbet61024.help[/url]
1win tətbiq açılmır Android [url=1win94195.help]1win tətbiq açılmır Android[/url]
1win depunere lei moldovenesti [url=https://1win11397.help/]https://1win11397.help/[/url]
Worth recommending broadly to anyone who reads on the topic, and a look at createactionableprogress only confirms that, the rare combination of accessibility and depth in this site makes it suitable for both newcomers and people who already know the area which is hard to pull off in any blog format today and rarely managed.
Bookmark added without hesitation after finishing, and a look at figfeat confirmed I should bookmark the homepage too rather than just this page, the rare site that earns category level trust rather than just single article approval is the kind I want to rely on across many different topics over time.
Reading this felt productive in a way most internet reading does not, and a look at growwithpurposeandfocus continued that productive feeling, sometimes the open web feels like a waste of time but sites like this remind me why I still bother to look around rather than retreating to old reliable sources for everything I need.
Bookmark folder reorganised slightly to make this site easier to find, and a look at findyourforwardpath earned the same accessibility upgrade, the small organisational moves I make for sites I expect to return to often are themselves a signal of how much I trust them and this site triggered those moves naturally.
pin up minimal yechish [url=http://pinup85993.help/]pin up minimal yechish[/url]
Recommended to anyone working in or curious about this area, the depth and clarity combine well, and a look at caramelharborvendorparlor keeps that going across more pages, the kind of site that earns regular visits rather than chasing trends has my respect because it suggests genuine commitment to the topic itself rather than to chasing trends.
Genuinely good work, the kind that holds up over multiple readings without losing its appeal, and a stop at palminlet kept that going, definitely a site I will be returning to and probably mentioning to others who work in or care about this particular area of interest today and in coming weeks.
Все о ремонте https://intertools.com.ua и строительстве: от выбора фундамента до финишной отделки. Экспертные материалы, обзоры строительных технологий, рекомендации по подбору материалов и полезные советы для владельцев недвижимости.
I really like the calm tone here, it does not push anything on the reader, and after I went through dazzquay I felt the same way, just steady useful content laid out without drama, which is exactly what someone trying to learn something quickly needs to find rather than aggressive marketing.
Spent a few minutes here and came away with a clearer picture of the topic, the writing keeps things simple without dumbing them down, and after a stop at daisycovecraftcollective the rest of the points lined up neatly which is something I appreciate when I am short on time and need answers fast.
Reading this fit naturally into my afternoon walk because I was reading on my phone, and a stop at fernharborcommercegallery continued well in that walking format, content that survives mobile reading without becoming awkward is content with format flexibility and this site has clearly thought about how it reads across different devices today.
Loved the writing voice here, friendly without being fake and confident without being arrogant, and a stop at eliteledge carried the same tone forward, the kind of personality that makes a reader feel welcome rather than lectured at which is a balance plenty of writers struggle to find no matter how long they have been at it.
Well done, the kind of post that makes you slow down and actually read instead of skimming for keywords, and a look at novalog kept me reading carefully too, that is a sign of writing that has been crafted rather than churned out for an algorithm to see today and tomorrow.
During the time spent here I noticed the absence of the usual distractions, and a stop at hazelharborartisanexchange extended that distraction free experience, content that does not fight my attention with pop ups and modals and aggressive prompts is content that respects me and this site has clearly chosen the respectful approach throughout.
Well crafted post, the structure flows naturally from one point to the next without forcing transitions, and a stop at cadetgrail kept the same flow going, you can tell when a writer has thought about how their content reads rather than just what it contains and this is one of those examples.
Coming back tomorrow when I can give this a proper read, the post deserves better attention than I can give right now, and a look at globebeat suggests there is plenty more here that deserves the same treatment, definitely a site I will be exploring properly over the next few days when I can.
Took a quick scan first and then went back to read properly because the post deserved it, and a stop at discoverhiddenpaths kept me reading carefully too, the kind of writing that earns a slower second pass rather than getting skimmed and forgotten is something I value highly when I happen to find it.
If the topic interests you at all this is a place to spend time, and a look at elitefests reinforced that recommendation, the broader question of where to invest topical reading time is one this site answers convincingly through the consistent quality across multiple pieces I have sampled during the current reading session today.
Reading this prompted a small redirection in something I was working on, and a stop at flintmeadowcommercegallery extended that redirecting influence, content that affects my actual work rather than just my thinking has the highest practical impact and this site is providing that level of influence for me at a sustainable rate apparently.
Now thinking about this site as a small example of what good independent writing looks like, and a stop at explorefreshgrowthstrategies continued that exemplary status, the few sites that serve as good examples are sites worth holding up in conversations about quality and this one has earned that exemplary placement through patient consistent effort over time.
Женский портал https://superwoman.kyiv.ua о красоте, здоровье, моде и саморазвитии. Полезные статьи, советы экспертов, идеи для вдохновения и актуальные тренды помогут сделать каждый день ярче, комфортнее и интереснее.
Все об автомобилях https://avto-drug.com на одном автопортале. Свежие новости, обзоры машин, сравнения моделей, советы по обслуживанию, ремонту и выбору автомобиля. Полезный ресурс для владельцев авто и будущих покупателей.
Decided not to skim despite my usual habit and was rewarded for the discipline, and a stop at maplegrovemarkethall earned the same patient approach, training myself to recognise sites that warrant slower reading is part of being a careful online reader and this site is the kind that helps me practice that skill regularly.
Honestly thank you to whoever wrote this because it scratched an itch I had not quite been able to articulate, and a stop at caramelharborcommercegallery kept that satisfying feeling going, the kind of writing that meets unspoken needs is special and this site clearly has writers who understand their readers more than most do today.
Полезный строительный https://bastet.com.ua портал с материалами о строительстве, ремонте, дизайне интерьеров и благоустройстве территорий. Экспертные рекомендации, обзоры новинок рынка и практические решения для любых строительных задач.
Все для мужчин https://hand-spin.com.ua в одном месте: здоровье, отношения, карьера, путешествия, технологии и активный образ жизни. Интересные статьи, обзоры и практические рекомендации для достижения личных и профессиональных целей.
A well calibrated piece that knew its scope and stayed inside it, and a look at elmhilt maintained the same scope discipline, scope creep is one of the failure modes of long blog posts and this site has clearly invested in the editorial discipline to prevent it which shows up in tightly contained pieces.
Reading this prompted me to subscribe to my first newsletter in months, and a stop at finchfiber confirmed the subscribe was the right call, content that earns a newsletter signup is content that has cleared a higher trust bar than a casual visit and this site has clearly earned that level of commitment from me.
Finding a proper ride in this city is a serious challenge. I swear half the “luxury” fleets down here are straight-up marketing scams. Oh, and that pretty security deposit? Yeah, good luck getting that money back fast. Fool me thrice, shame on both of us I guess, lesson learned. If you seriously need a legit vehicle to cruise around the city, don’t just trust the first sponsored ad on social media. Anyone who lives here will tell you the exact same thing, especially since the AC must be arctic and you want zero mileage games.
I literally spent last month comparing maybe twenty different companies, until I finally found one outfit that actually delivers what’s in the photos. If you are looking for the only straight shooter for premium rentals across South Florida, check the details here: car rentals in miami [url=https://luxury-car-rental-miami-3.com]https://luxury-car-rental-miami-3.com[/url]. Also, definitely bring sunglasses unless you enjoy driving completely blind in that sun. Just drive safe out there and maybe skip the extra windshield protection thing. let me know if you guys have any other clean spots.
Took the time to read the comments on this post too and they were also worth reading, and a stop at driftorchardartisanexchange suggested the community quality matches the content quality, when the conversation around a piece is as good as the piece itself you know you have found a real corner of the internet.
Друзья, всем здравствуйте. долго откладывал этот момент до последнего, но на прошлой неделе все-таки начал пользоваться сервисом в melbet. Скажу так — очень зашло с первых минут,. У кого новый айфон — всё четко и стабильно работает. Надо скачать мелбет на андроид? Там всё делается максимально просто,.
Короче, вся полезная инфа и актуальный сайт доступны вот тут: . Кстати, кто спрашивал про мелбет приложение — приложение вообще не вылетает,. И бонусы для новичков норм дают,. Я за месяц три раза выигрыш забирал — никаких косяков с выплатами нет,. Всем искренне рекомендую. Удачи всем!
Just want to recognise that someone clearly cared about how this turned out, and a look at dewdawn confirmed that care extends across the broader site, you can feel the difference between content shipped to hit a deadline and content released because the writer was actually proud of the result for once.
Thanks for taking the time to write this, it is clear that some thought went into how each point would land, and after I went through palmmill I had a better grip on the topic, real value without the usual marketing noise people have to put up with online when searching for answers.
A piece that handled multiple complications without becoming confused, and a look at discoverpowerfuldirectionalpaths continued that organisational clarity, holding multiple threads in a single piece without losing any of them is a sign of skilled writing and this site has clearly developed the editorial discipline to manage complexity without sacrificing readability throughout.
Skipped to a specific section because I knew that was the question I had, and the answer was clean, and a stop at growresultsorientedpath similarly delivered targeted answers without burying them, content engineered for readers who arrive with specific needs rather than open ended browsing is increasingly valuable in a search heavy reading environment.
If patience for careful reading is rare these days finding sites that reward it is rarer still, and a stop at oakarena extended that rare reward, the diminishing returns on shallow content reading have made me more selective about where to spend reading time and this site is meeting the higher selectivity bar consistently.
Народ, всем здравствуйте. Долго сомневался, где найти действительно крутой подарок. Перерыл кучу сайтов, но нормального премиального интернет магазина — днём с огнём не сыщешь. А тут по совету зашёл. В общем, сам гляньте по ссылке: дорогие подарки [url=https://boutique-guide.ru]дорогие подарки[/url] Кстати, если ищете самые дорогие подарки — там выбор реально офигенный. Я себе присмотрел часы — качество бомба. И цены соответствуют качеству. Сам теперь только там беру. Удачи с выбором!
melbet minimum deposit bd [url=https://www.melbet14906.help]https://www.melbet14906.help[/url]
Without overstating it this is a quietly excellent post, and a look at intentionalforwardmotion extended that quiet excellence, content that earns superlatives without demanding them through marketing language is content that has truly earned them through the substance and this site has clearly produced work in that earned excellence category today.
Most of my reading time goes to a small number of trusted sources and this one is now joining that group, and a stop at walnutcovemarkethall reinforced the group membership, the few sites that earn a place in my regular rotation are sites I expect ongoing returns from and this one has earned that elevated position consistently.
Now recognising the editorial wisdom of letting some questions remain open at the end, and a look at flintmeadowmarkethall continued that intellectual honesty, content that does not force closure on contested questions is content that respects the limits of knowledge and this site has clearly developed the maturity to know when to leave space.
Thank you for keeping the writing honest and the points easy to verify against your own experience, and a stop at fernbureau reflected the same approach, no exaggeration just steady useful content that I can take with me into my own work without second guessing every sentence I happen to read here.
Thanks for the practical examples scattered through the post rather than abstract theory only, and a look at elitedawns continued that grounded style, abstract points are easier to remember when paired with concrete situations and the writers here clearly understand how readers actually retain information from blog content reading sessions.
One of the more thoughtful posts I have read recently on this topic, and a stop at discoverhiddenopportunity added even more weight to that impression, this is genuinely good content that holds its own against far better known sites in the same space without trying to imitate any of them at all which I appreciate.
Люди, подскажите, долго выбирал нормальную платформу, но на прошлой неделе таки зарегился ради интереса в mel bet. Честно? теперь постоянно туда захожу. Особенно если вам надо скачать мелбет на андроид — у меня модель достаточно бюджетная, но софт реально летает.
В общем, гляньте сами все условия по ссылке: скачать мелбет на андроид [url=https://v-bux.ru]скачать мелбет на андроид[/url]. Кстати, кто спрашивал про мелбет казино скачать на андроид — там есть удобный отдельный раздел,. И фрибеты для новичков очень приятные,. Я за месяц три раза деньги забирал — никаких проблем с этим нет, Всем советую присмотреться. Удачи всем!
mostbet free spins qachon beriladi [url=https://mostbet61024.help/]https://mostbet61024.help/[/url]
1win apk sigur [url=1win11397.help]1win apk sigur[/url]
1win app download [url=www.1win94195.help]www.1win94195.help[/url]
Once I trust a site this much I tend to read everything they publish and that is the trajectory I am on with this one, and a stop at ivoryridgeartisanexchange confirmed the trajectory, the rare progression from interested reader to comprehensive reader is something only certain sites earn and this one is earning that progression rapidly.
Давно искал, где можно нормально играть, честно говоря, перепробовал кучу сомнительных контор. Но на днях близкий друг посоветовал про mel bet. Решил лично проверить систему — и теперь сам рекомендую знакомым.
В общем, вся нужная инфа доступна вот тут: скачат мелбет [url=https://iamthecoffeechic.com]https://iamthecoffeechic.com[/url]. Кстати, если кому надо мелбет скачать — там процесс установки занимает буквально минуту. Я себе поставил официальное приложение — полёт отличный. И вывод денег действительно шустрый, В общем, рекомендую присмотреться. Надеюсь, эта рекомендация кому-то пригодится.
https://zaoavis.ru/
Just sat with this for a bit longer than I usually would because the points are worth thinking about, and after startyourforwardmove I had even more to chew on, the kind of post that nudges your thinking forward without forcing the issue is something I have always appreciated in good writing online.
The way the post stayed on topic throughout without going on tangents was really refreshing, and a look at createforwardthinking kept that focused approach going, discipline like this in writing is rare and worth recognising because most writers cannot resist wandering off into related subjects that dilute their main point and confuse readers along the way.
Took the time to read every paragraph rather than skimming for the punchline, and a quick visit to meadowharborgoodsgallery earned the same careful attention from me, that is the highest signal I can give about content quality because my default mode is rapid scanning rather than deliberate reading on most pages.
pin-up kupon kod [url=https://pinup85993.help/]https://pinup85993.help/[/url]
Felt slightly impressed without being able to point to one specific reason, and a look at globehaven continued that diffuse positive feeling, when content works at a level you cannot easily articulate the writer is doing something with craft rather than just delivering information and that is something I have learned to recognise.
1win məsuliyyətli oyun [url=https://1win94195.help]1win məsuliyyətli oyun[/url]
mostbet cashout qanday [url=mostbet61024.help]mostbet61024.help[/url]
bilet 1win [url=http://1win11397.help]http://1win11397.help[/url]
Android kullanıcısı olarak uzun zamandır arıyordum. Herkes farklı bir site öneriyordu kafam karıştı. Adımları doğru sırayla uyguladıktan sonra erişim sorunsuz açıldı. En sonunda doğru adrese ulaştım ve size de tüm detayları aktarmak istedim, güncel bilgilere buradan bakabilirsiniz: 1xbet mobil apk [url=https://1xbet-apk-2.com]1xbet mobil apk[/url]. Şimdi size kısaca özet geçeyim — telefonuma kurunca çok memnun kaldım.
kurulumu da üç dakikadan kısa sürdü yani rahat olun. Birçok apk denedim ama bunda karar kıldım — kesinlikle pişman olmazsınız deneyin derim. Şimdiden iyi şanslar ve bol kazançlar…
pinup promo code [url=https://www.pinup85993.help]pinup promo code[/url]
Thanks for taking the time to write this, it is clear that some thought went into how each point would land, and after I went through driftorchardcraftcollective I had a better grip on the topic, real value without the usual marketing noise people have to put up with online when searching for answers.
Now sitting with the thoughts the post triggered rather than rushing on to the next thing, and a stop at domelegend extended that reflective pause, content that earns time for thought after closing the tab is content of higher value than the merely interesting and this site has clearly produced that lasting effect today.
Знаете, ситуация бывает — близкий совсем плох, а тащить в клинику просто нереально . Я сам через это прошёл недавно. Сидишь, не знаешь что делать . Лезешь в интернет, а вокруг одни обещания . Пока случайно не наткнулся на один нормальный проверенный вариант. Требуется срочная помощь — а ехать куда-то нет возможности , то выход один . Речь конкретно про круглосуточный выезд нарколога. В Самаре , к слову , тоже полно шарлатанов . Нормальные контакты, кто реально приезжает ниже по ссылке: вызов нарколога домой [url=https://narkolog-na-dom-samara-13.ru]https://narkolog-na-dom-samara-13.ru[/url] Откровенно говоря, после того как вник в детали, многое прояснилось . И про снятие запоя на дому, и про консультацию . И цены адекватные, без разводов. Советую не тянуть .
Really thankful for posts that respect a reader’s time, this one does, and a quick look at finkglaze was the same, no need to scroll through endless intros just to get to the actual content, that approach alone is enough reason to come back here regularly for the kind of writing offered.
рейтинг казино на деньги
официальный сайт пинап казино скачать пин ап онлайн зеркало рабочее на сегодня
Liked that the post resisted a sales pitch ending, and a stop at opaldune maintained the no pitch approach, content that ends without trying to convert me into a customer or subscriber is content that has confidence in its own value and this site is clearly playing the long game on reader trust.
Nice to see a post that does not try to overcomplicate the basics for the sake of looking smart, and once I looked at epicestate the same direct tone was there too, which honestly makes a difference when you are short on time and want answers without long pointless intros.
Android telefonumda rahatça oynamak istiyordum. Herkes farklı bir şey öneriyordu kafam allak bullak oldu. Sonunda tüm teknik detayları inceleyip sistemi test ettim. En sonunda doğru adrese ulaştım ve size de tüm detayları aktarmak istedim, güncel bilgilere buradan bakabilirsiniz: 1xbet indir apk [url=https://1xbet-apk-11.com]1xbet indir apk[/url]. Valla bak net söyleyeyim — android kullanıcıları için biçilmiş kaftan diyebilirim.
kurulumu da son derece basitti yani rahat olun. Birçok uygulama denedim ama bunda karar kıldım — en sorunsuz çalışan uygulama bu oldu artık. Umarım siz de memnun kalırsınız…
Now saved this in a way that I will actually find again rather than the casual bookmark approach, and a stop at musebeats earned the same careful saving, organising my reading bookmarks so that high quality sources rise to the top is something I should do more of and this site triggered that organisation today.
Reading this site over the past week has changed how I evaluate content in this space, and a look at kelqiro extended that recalibration, the standards I bring to reading on the topic have shifted upward as a direct result of regular exposure to this kind of work and that shift will outlast any single reading session.
Honest take is that this was better than I expected when I clicked through, and a look at growwithdeliberateaction reinforced that, the bar for online content has dropped so much that finding something thoughtful and well constructed feels almost noteworthy now which says more about the average than about this site itself.
Reading this between two meetings turned out to be the highlight of the morning, and a stop at coastharbormerchantgallery continued that highlight quality, content that outshines the structured parts of a working day is doing something well beyond ordinary and this site has produced multiple such highlights for me already this week alone.
Adding to the bookmarks now before I forget, that is how good this is, and a look at learnandexecuteclearlynow confirmed the rest of the site is worth saving too, this is one of those rare finds that justifies the time spent searching the web for once which is a relief in the current environment.
My friends would appreciate a few of these posts and I will be sending links accordingly, and a look at elveecho added more pages to my share queue, content that earns shares to specific people in specific contexts is content with social utility and this site is generating those targeted shares from me consistently lately.
Honestly impressed by how much useful content sits in such a small post, and a stop at forestcovemerchantgallery confirmed the rest of the site packs a similar punch, density without confusion is a hard balance to strike and this site has clearly cracked the code on it across many different topic areas covered.
Speaking as someone who used to recommend blogs frequently and got out of the habit this site is rekindling that impulse, and a look at garnetharbortradeparlor extended the rekindling, the recovery of an old habit triggered by encountering work that justifies it is itself a small kind of pleasure and this site is providing that recovery experience.
A genuine pleasure to find a site that publishes at a sustainable cadence rather than chasing the daily content treadmill, and a look at roseharbortradehall confirmed the careful publication rhythm, sites that prioritise quality over frequency are rare and this one has clearly chosen the slower pace which I appreciate as a reader.
Reading this confirmed something I had been suspecting about the topic, and a look at jewelbrookcraftcollective pushed that confirmation toward greater confidence, content that lines up with independently held intuitions earns a special kind of trust and I will return to writers who consistently land that way for me without overselling positions.
Worth a quiet moment of recognition for the consistency I have noticed across multiple posts, and a stop at startsmartgrowth continued that consistent quality, sites that maintain quality across many pieces rather than peaking on one viral post are sites with real editorial discipline and this one has clearly developed that discipline carefully.
Now thinking about whether the writer might publish a longer form work I would buy, and a look at fernpier suggested the same depth would translate, content that makes me want to pay for related work in other formats is content that has earned commercial trust as well as attention trust and this site has both clearly.
Picked this for my morning read because the topic seemed worth the time, and a look at dunecoveartisanexchange confirmed the choice was right, my morning reading slot is precious and giving it to this site felt like a good investment rather than a waste which is a higher endorsement than I usually offer for content.
Felt like the writer was speaking directly to someone with my level of curiosity, neither talking down nor showing off, and a stop at domelounge kept that comfortable matching going, finding writing that meets you where you are rather than asking you to climb up or stoop down feels great every time it happens.
Okay so here’s the deal with renting anything decent in Miami. Half these local companies promise a custom Porsche and hand you a basic sedan with fake leather. You book a premium ride online, arrive all excited, then boom — hidden service fees everywhere. Fool me thrice, shame on both of us I guess, lesson learned. If you seriously need a legit vehicle to cruise around the city, do some real digging first and read actual customer reviews. Anyone who lives here will tell you the exact same thing, whether you are doing Brickell mornings, South Beach nights, or a spontaneous Keys trip.
I literally spent last month comparing maybe twenty different companies, but I eventually found a service with no bait, no switch, and no weird fine print. If you are looking for the only straight shooter for premium rentals across South Florida, check the details here: premium car rental in miami [url=https://luxury-car-rental-miami-3.com]premium car rental in miami[/url]. Also, definitely bring sunglasses unless you enjoy driving completely blind in that sun. Anyway, glad there’s at least one honest rental joint left in this town, hope this helps some of you save a few bucks.
Now setting up a small reminder to revisit the site on a slow day, and a stop at wheatcovegoodsgallery confirmed the reminder was a good idea, planning return visits is a small organisational act that signals trust in ongoing quality and this site has earned that planned return through consistent performance across the pieces I have read so far.
Saving the link for sure, this one is a keeper, and a look at finkglint confirmed I should bookmark the entire site rather than just this page, the consistency across what I have seen so far suggests there is a lot more here worth coming back for soon when I have more time.
Bookmarked the page and the homepage too because clearly there is more to explore here, and a quick stop at pacecabin only made that more obvious, this is the kind of place I want to dig through over a weekend rather than rushing through during a coffee break tomorrow morning before getting back to work.
Came back to this twice now in the same week which is unusual for me, and a look at goldmanor suggested I will keep coming back, the kind of post that earns repeated visits rather than one and done reading is the gold standard for content quality and this site clearly hit that standard.
This one is staying open in a tab for the rest of the day so I can come back and re read certain parts, and a look at oakarenas suggests I will be doing the same with a few more pages here too, this is going to be a deep dive over the coming hours.
I really like the calm tone here, it does not push anything on the reader, and after I went through explorefuturefocusedideas I felt the same way, just steady useful content laid out without drama, which is exactly what someone trying to learn something quickly needs to find rather than aggressive marketing.
Will be sharing this with a couple of people who care about the topic, and a stop at startpurposeledgrowth added more material worth passing along, the kind of site that is generous with quality content and does not make you jump through hoops to access it which is appreciated more than the team probably realises.
A memorable post for me on a topic I had thought I was tired of, and a look at thinkingintosystems suggested the same site can refresh other tired topics, sites that can revive my interest in subjects I had written off as exhausted are doing rare work and this one is clearly doing that for me today.
After reading several posts back to back the consistent voice across them is impressive, and a stop at kilzavo continued that voice consistency, sites that maintain a single coherent voice across many pieces by potentially many writers represent serious editorial discipline and this one has clearly developed the institutional consistency needed for that.
Android için güvenilir bir apk dosyası bulmak çok zordu valla. Virüs bulaşır diye çok korktum açıkçası. En sonunda doğru kaynağa ulaştım ve size de buradan bahsetmek istediğim nokta şurası: 1xbet yükle android [url=https://1xbet-apk-4.com]1xbet yükle android[/url]. Yani anlatmak istediğim şu — telefonuma kurduktan sonra hiç takılma yaşamadım.
güncellemeleri otomatik yapıyor çok memnunum. Birçok apk denedim ama en sorunsuzu bu çıktı — kesinlikle pişman olmazsınız deneyin derim. Umarım siz de memnun kalırsınız…
Honestly slowed down to read this carefully which is not my default, and a look at explorefreshopportunitypaths kept me in that careful reading mode, the kind of writing that demands attention by being worth attention is rare in a media environment full of content engineered to be skimmed not read with any real focus today.
Uzun süredir mobil bahis için doğru uygulamayı arıyordum. Virüssüz bir apk bulmak gerçekten çileydi valla. En sonunda güvendiğim bir kaynağa ulaştım ve size de buradan bahsetmek istediğim nokta şurası: 1xbet apk son sürüm [url=https://1xbet-apk-3.com]1xbet apk son sürüm[/url]. Şimdi size kısaca özet geçeyim — android uygulaması resmen harika çalışıyor.
Hiçbir hata almadım şu ana kadar. Kendi deneyimlerimi aktarıyorum size — başka yerde vakit kaybetmeyin yani. Umarım siz de memnun kalırsınız…
Люди, подскажите, долго выбирал нормальную платформу, но на прошлой неделе таки попробовал сделать пару ставок в mel bet. Честно? Остался полностью доволен,. Особенно если вам надо скачать melbet на андроид — у меня модель достаточно бюджетная, но никаких тормозов вообще нет.
В общем, все подробности и рабочая ссылка доступны вот тут: скачать мелбет [url=https://v-bux.ru]скачать мелбет[/url]. Кстати, кто спрашивал про мелбет казино скачать на андроид — там установочный файл чистый и без вирусов. И бонусы на первый депозит отличные дают,. Я за месяц три раза деньги забирал — выплаты приходят максимально быстрые, Всем советую присмотреться. Дерзайте, пусть повезет!
Now noticing the post fit a particular gap in my reading without my having articulated the gap before, and a look at violetharbortradeparlor extended that gap filling effect, content that meets needs I had not consciously formulated is content with reader insight and this site has clearly developed that anticipatory editorial sense across many pieces.
Давно хотел найти надёжный вариант, честно говоря, много где в итоге разочаровался. Но случайно наткнулся на живое обсуждение про mel bet. Решил не полениться и затестить — и очень даже зашло,.
В общем, сами гляньте все условия по ссылке: скачать мелбет казино [url=https://iamthecoffeechic.com]скачать мелбет казино[/url]. Кстати, если кому надо скачать мелбет — там процесс установки занимает буквально минуту. Я себе скачал чистую версию для андроида — всё сделано очень удобно. И служба поддержки отвечает строго по делу. В общем, рекомендую присмотреться. Удачи всем на дистанции!
Now sitting with the thoughts the post triggered rather than rushing on to the next thing, and a stop at coralharbormerchantgallery extended that reflective pause, content that earns time for thought after closing the tab is content of higher value than the merely interesting and this site has clearly produced that lasting effect today.
1win AZN çıxarış [url=1win94195.help]1win AZN çıxarış[/url]
mostbet cashback qachon tushadi [url=http://mostbet61024.help]mostbet cashback qachon tushadi[/url]
This one is staying open in a tab for the rest of the day so I can come back and re read certain parts, and a look at echobrookartisanexchange suggests I will be doing the same with a few more pages here too, this is going to be a deep dive over the coming hours.
1win poker [url=https://1win11397.help]https://1win11397.help[/url]
Now adding this to a list of sites I want to see flourish, and a stop at gingerwoodgoodsroom reinforced that wish, the few sites I actively root for are sites that produce the kind of work I want more of in the world and this one has joined that small list based on what I have read so far.
Walked away in a slightly better mood than when I started reading, that says something about the writing, and a stop at domemarina kept that going, content that leaves you feeling more capable rather than overwhelmed is the kind I keep coming back to again and again over the years and across many topics.
Liked the way the post got out of its own way, and a stop at skyharborartisanexchange extended that invisible craft, the best writing you barely notice while reading because it is doing its work without drawing attention to itself and this site has clearly mastered that disappearing act across the pieces I have read.
Felt no urge to argue with the conclusions even though I started the post slightly skeptical, and a look at elveglide maintained that pattern, writing that earns agreement through clarity of argument rather than rhetorical pressure is the kind I find most persuasive and the kind I want to read more of these days.
Слушайте, кто шарит, долго откладывал этот момент до последнего, но на днях все-таки попробовал сделать пару ставок в мелбет. Скажу так — очень зашло с первых минут,. У кого система ios — тоже всё без проблем запускается,. Надо melbet скачать ios? За пять минут софт поставил на смарт,.
Короче, вся полезная инфа и актуальный сайт доступны вот тут: . Кстати, кто спрашивал про мелбет скачать приложение — всё очень удобно и грамотно сделано. И вывод средств действительно быстрый. Я лично всё проверил на себе — служба поддержки работает норм,. Сам теперь только туда захожу. Пользуйтесь на здоровье, пусть повезет!
pin-up free spins shartlari [url=pinup85993.help]pinup85993.help[/url]
Liked that the post acknowledged complications rather than pretending they did not exist, and a stop at explorebetterthinking continued that honest framing, sites that handle complexity with care rather than papering it over with simplifying claims are doing real intellectual work and this one is clearly in that category based on what I have read.
Now leaving a small mental note to recommend this when the topic comes up in conversation, and a look at dewdawns extended that recommend ready feeling, content that arms me with shareable references for likely future conversations is content with social value and this site is providing that conversational ammunition consistently for me lately.
Glad I stumbled across this post, the explanations actually make sense without needing background knowledge to follow along, and after a stop at epicinlet the same was true there, no assumptions about the reader just clear writing that anyone can understand from the first line right through to the end.
Did not expect much when I clicked through but ended up reading the whole thing carefully, and a stop at explorestrategicgrowthideas kept that engagement going, sometimes the unassuming sites turn out to deliver more than the flashy ones which is something I have learned to look out for over time online lately and across topics.
Useful read, especially because the writer did not assume too much background from the reader, and a quick look at pactcliff continued in the same way, a thoughtful site that meets people where they are which is something the modern web could use a lot more of for both casual and serious readers.
Информационный автопортал https://autoinfo.kyiv.ua для водителей и автолюбителей. Обзоры автомобилей, новости производителей, рекомендации по уходу за машиной, выбору запчастей и безопасной эксплуатации транспортных средств.
Worth pointing out that the writer made the topic feel more interesting than I had been expecting, and a look at firminlet continued that elevation effect, content that improves the apparent quality of its subject through skilled treatment is doing something real and this site has clearly developed that kind of editorial alchemy throughout.
Started reading without much expectation and ended on a high note, and a look at explorefreshsolutions continued that arc, content that builds rather than peaks early is a sign of a writer who knows how to structure a piece for sustained reader engagement rather than relying on a strong hook to do all the work.
Вот такая ситуация — родственник не может остановиться, а просто бессилен. Моя семья столкнулась лично . Думаешь, сам справится, но нет . Нужна профессиональная медицина. Обзвонил десяток контор — одни обещания. А потом наткнулся на один действительно рабочий вариант. Ищешь где сделать помещение в клинику для вывода из запоя, не рискуй здоровьем. У нас в Нижнем, если честно, тоже хватает левых контор. Реальные контакты тут : кодировка от алкоголя в нижнем новгороде [url=https://vyvod-iz-zapoya-v-staczionare-nizhnij-novgorod-25.ru]кодировка от алкоголя в нижнем новгороде[/url] Честно говоря , после того как ознакомился, понял свои ошибки. Там и про кодирование от алкоголизма расписано , и про выезд нарколога на дом . Главное — анонимно . Советую не откладывать.
Uygulama arayışım epey uzun sürdü valla. Play Store’da bulamayınca ne yapacağımı şaşırdım. Adımları doğru sırayla uyguladıktan sonra erişim sorunsuz açıldı. En sonunda doğru adrese ulaştım ve size de tüm detayları aktarmak istedim, güncel bilgilere buradan bakabilirsiniz: 1xbet download android [url=https://1xbet-apk-11.com]1xbet download android[/url]. Şimdi size kısaca özet geçeyim — mobil versiyonu bile çok akıcı aslında.
Hiçbir gecikme yaşamadım şu ana kadar. Birçok uygulama denedim ama bunda karar kıldım — kesinlikle pişman olmazsınız deneyin derim. Umarım siz de memnun kalırsınız…
Android kullanıcısı olarak iyi bir uygulama şart. Herkes farklı bir link atıyordu kime güveneceğimi bilemedim. En sonunda sağlam bir kaynağa ulaştım ve size de buradan bahsetmek istediğim nokta şurası: 1xbet android apk [url=https://1xbet-apk-5.com]1xbet android apk[/url]. Valla bak net söyleyeyim — android uygulaması gerçekten akıcı çalışıyor.
Hiçbir kasma yaşamadım şu ana kadar. İşin doğrusunu söylemek gerekirse — başka yerde vakit kaybetmeyin yani. Şimdiden iyi şanslar ve bol kazançlar…
Refreshing change from the usual sites covering this topic, no clickbait and no padding, and a stop at startwithclearfocusnow confirmed the difference, this place clearly has its own voice rather than copying the formulas everyone else uses to chase clicks online which is becoming increasingly rare these days across nearly every popular subject.
If you asked me to point to a recent positive sign for the open web this site would be near the top, and a stop at auroracoveartisanexchange reinforced that designation, the few sites that serve as evidence the web can still produce quality independent content are precious and this one has clearly become one for me.
Picked this for a morning recommendation in our company chat, and a look at echobrookcraftcollective suggested I will mention this site again later, recommending content into a workplace context is a small editorial act that requires confidence in the recommendation and this site is making me confident in those recommendations consistently here too.
Appreciated how the post felt complete without overstaying its welcome, and a stop at kinmuzo confirmed that economical approach runs across the site, knowing when to stop is a skill many writers never develop but here the discipline is obvious and welcome from the perspective of a busy reader trying to learn things efficiently.
Знаете ситуацию достала уже , когда родственник просто не может остановиться . Ищешь варианты , а вокруг одна реклама . Знакомому потребовался действительно рабочий метод . Многие хватаются за таблетки , но это ерунда . Требуется именно профессиональная помощь . Пролистал пол-интернета , пока понял одну простую вещь: без круглосуточного наблюдения ничего толку не будет . В обычной квартире срыв гарантирован . Ищешь нормальный вариант для качественного вывода из запоя с помещением в клинику — тогда тебе сюда . В Нижнем , кстати, тоже полно шарлатанов . Лучше сразу перейти на сайт, где реально раскладывают по полочкам про кодирование от алкоголизма и работу нарколога . Подробности по ссылке: клиники по лечению алкоголизма [url=https://vyvod-iz-zapoya-v-staczionare-nizhnij-novgorod-22.ru]клиники по лечению алкоголизма[/url] После прочтения , сам офигел , сколько подводных камней в этой теме. Главное — анонимность и палаты. Для нашего города это реально стоящий вариант.
Appreciated that the writer trusted the reader to follow along without constant restating of earlier points, and a look at draftglade continued that respect for the reader, treating an audience as capable adults rather than as people to be hand held through every paragraph is something I notice and value highly across the open internet today.
Recommend this to anyone who values clear thinking over flashy presentation, and a stop at ivoryharborcommercegallery continued in the same understated way, this site has its priorities in the right place which makes it worth supporting through repeat visits and recommendations rather than just one passing read today before moving on quickly elsewhere.
Anyone curious about this topic would do well to start here, the foundation laid is solid, and a stop at wheatmeadowmarketgallery would round out their understanding nicely, this is the kind of resource I would point a friend toward without hesitation if they asked me where to begin learning about anything in this area.
Really appreciate the lack of pop ups, modals, cookie banners stacking on top of each other, and a quick visit to buildyourvisionpath confirmed the same clean approach across the rest of the site, technical decisions about user experience are part of what makes content actually pleasant to engage with for sure.
Different in a good way from the cookie cutter content that fills most blogs covering this area, and a stop at gladeharbormarkethall kept showing me why, original thoughtful writing exists if you know where to look and this site has earned a place on my short list of those rare exceptions worth defending.
Bookmark added with a small mental note that this is a site to keep, and a look at palmcodex reinforced the keep status, the verb keep rather than visit captures something about how I think about this kind of site and it is a higher tier of relationship than I have with most places online today.
казино pinco Покупка квартиры в Турции открывает перспективы для выгодных инвестиций и комфортной жизни у теплого Средиземноморья. [недвижимость в Турции] Рынок недвижимости Турции предлагает широкий выбор объектов, от уютных квартир в жилых комплексах до роскошных вилл. [купить квартиру в Турции] Инвестиции в недвижимость Турции, особенно в таких популярных регионах, как Анталья и Фетхие, могут принести стабильный доход от аренды. [инвестиции в недвижимость] Анталья, жемчужина турецкого побережья, славится своими пляжами и развитой инфраструктурой, делая недвижимость Анталия весьма привлекательной. [недвижимость Анталия] Фетхие, с его живописными бухтами и уникальной природой, привлекает тех, кто ищет спокойствие и уединение. [недвижимость Фетхие] Квартиры у моря в Турции – это не только прекрасная возможность для отдыха, но и выгодное вложение средств. [квартиры у моря] Виллы в Турции предлагают роскошный стиль жизни и уединение, идеально подходящие для тех, кто ценит комфорт и приватность. [виллы в Турции] Инвестиции за границей, в частности в турецкую недвижимость, становятся все более популярными среди иностранных покупателей, ищущих диверсификацию своих активов. [недвижимость за рубежом] Переезд в Турцию – это возможность начать новую жизнь в стране с богатой культурой, гостеприимными людьми и благоприятным климатом. [переезд в Турцию] Жизнь в Турции предлагает высокое качество жизни по доступным ценам, особенно в таких городах, как Анталья. [жизнь в Турции] Получение ВНЖ Турции при покупке недвижимости становится проще, открывая путь к легализации и долгосрочному пребыванию. [ВНЖ Турция] Гражданство Турции через инвестиции в недвижимость – это реальный шанс стать полноправным гражданином страны и наслаждаться всеми ее преимуществами. [гражданство Турции] Квартиры в Анталии представлены в широком ассортименте, от бюджетных вариантов до элитных апартаментов с видом на море. [квартиры в Анталии] Недвижимость Коньяалты, одного из самых престижных районов Анталии, привлекает своей близостью к пляжу и развитой инфраструктурой. [недвижимость Коньяалты] Недвижимость Лиман также пользуется спросом благодаря своему расположению и потенциалу роста стоимости. [недвижимость Лиман] Квартиры в Фетхие предлагают разнообразие выбора, от современных комплексов до традиционных домов в уютных районах. [квартиры в Фетхие] Недвижимость для инвестиций в Турции – это стратегическое решение, способное обеспечить высокую доходность. [недвижимость для инвестиций] Доходная недвижимость в Турции – это квартиры и коммерческие объекты, приносящие стабильный пассивный доход от аренды. [доходная недвижимость] Покупка недвижимости в Турции с INEST HOMES – это надежный шаг к осуществлению вашей мечты. [покупка недвижимости в Турции] На рынке недвижимости Турции действуют выгодные предложения, способные удовлетворить самые взыскательные запросы. [рынок недвижимости Турции] Элитная недвижимость Турции – это эксклюзивные виллы и апартаменты, соответствующие высочайшим стандартам качества и комфорта. [элитная недвижимость Турции] Недвижимость Средиземноморья, представленная в Турции, является идеальным местом для жизни и отдыха. [недвижимость Средиземноморья] Жизнь у моря в Турции – это возможность каждый день наслаждаться солнечной погодой и морским бризом. [жизнь у моря] Яхтинг в Турции – одна из популярных активностей для владельцев недвижимости в прибрежных районах. [яхтинг в Турции] Инвестиции в Анталию – это выгодное вложение в динамично развивающийся город с высоким туристическим потенциалом. [инвестиции в Анталию] Квартиры у моря Турция – это мечта многих, ставшая реальностью благодаря доступным ценам и выгодным условиям. [квартиры у моря Турция] Переезд к морю в Турцию – это выбор тех, кто ценит комфорт, спокойствие и красоту природы. [переезд к морю] Недвижимость для ВНЖ в Турции – это инвестиция не только в жилье, но и в будущее, открывая возможности для долгосрочного проживания. [недвижимость для ВНЖ] Зарубежная недвижимость, в частности в Турции, становится все более привлекательной для инвесторов со всего мира. [зарубежная недвижимость] Турецкая недвижимость – это оптимальное соотношение цены и качества, а также возможность получения ВНЖ и гражданства. [турецкая недвижимость] Жилье в Турции – это современный комфорт, доступные цены и теплое гостеприимство. [жилье в Турции] Недвижимость в Анталии цены варьируются в зависимости от района и типа объекта, но всегда остаются конкурентоспособными. [недвижимость в Анталии цены] Фетхие недвижимость – это привлекательные варианты для тех, кто ищет отдых на лоне природы и доступное жилье. [Фетхие недвижимость] Недвижимость Турция 2026 – это прогноз на рост цен и увеличение инвестиционной привлекательности рынка. [недвижимость Турция 2026] Инвестиции в Турцию – это стабильный рост и диверсификация портфеля. [инвестиции в Турцию] Доход от аренды в Турции может стать существенным источником пассивного дохода для владельцев недвижимости. [доход от аренды в Турции] Недвижимость для гражданства Турции – это возможность получить паспорт страны через значительные инвестиции. [недвижимость для гражданства] Квартиры в жилых комплексах Турции – это современный уровень комфорта, безопасности и развитой инфраструктуры. [квартиры в жилых комплексах Турции] INEST HOMES – ваш надежный партнер в мире недвижимости Турции. [INEST HOMES]
My reading list is short and selective and this site is now on it, and a stop at snowcoveartisanexchange confirmed the placement, the short list of sites I read deliberately rather than encounter accidentally is something I curate carefully and adding to it is a real act of trust which this site has earned today.
Now recognising the specific pleasure of reading writing that shows real care for sentence shapes, and a look at findyourcorepurpose extended that craft pleasure, sentence level writing quality is something most blog content ignores entirely and this site has clearly invested in the prose layer alongside the substance which is rare today.
Felt the post had been written without using a single buzzword, and a look at coralmeadowcommercegallery continued that clean vocabulary, content free of jargon and trendy phrases reads better and ages better and this site has clearly committed to a vocabulary that will not feel dated in three years which is impressive editorially.
Started a draft response in my head and ended without publishing it because the post said it well enough, and a look at claritycreatesresults produced the same effect, content that satisfies my urge to add to it by being complete enough on its own is rare and represents a particular kind of editorial completeness here.
https://thenautilines.com/
http://www.opencart-france.com/newsletter/pages/?platye_cvetok.html
We are a group of volunteers and starting a new initiative in our community. Your blog provided us with valuable information to work on|.You have done a marvellous job!
Let me save you some headache I learned the hard way. Half these local companies promise a custom Porsche and hand you a basic sedan with fake leather. Oh, and that pretty security deposit? Yeah, good luck getting that money back fast. I’ve been burned like three times already this year alone. If you seriously need a legit vehicle to cruise around the city, don’t just trust the first sponsored ad on social media. Miami without wheels is basically a hostage situation, whether you are doing Brickell mornings, South Beach nights, or a spontaneous Keys trip.
Most of these local agencies are just shiny websites hiding the same overpriced junk, but I eventually found a service with no bait, no switch, and no weird fine print. If you are looking for the only straight shooter for premium rentals across South Florida, check the details here: miami beach luxury car rental [url=https://luxury-car-rental-miami-3.com]miami beach luxury car rental[/url]. Also, definitely bring sunglasses unless you enjoy driving completely blind in that sun. Anyway, glad there’s at least one honest rental joint left in this town, hope this helps some of you save a few bucks.
https://t.me/ts_ekaterinburgh
Decided this was the kind of site I would defend in a discussion about good blog content, and a stop at elvegorge reinforced that, very few sites earn active defence rather than passive consumption and this one has clearly crossed that threshold for me without needing any explicit pitch from the writers themselves either.
Just sat with this for a bit longer than I usually would because the points are worth thinking about, and after embermeadowartisanexchange I had even more to chew on, the kind of post that nudges your thinking forward without forcing the issue is something I have always appreciated in good writing online.
Quietly enthusiastic about this site after the past few hours of reading, and a stop at bayharborartisanexchange extended that enthusiasm, the calibration of enthusiasm to evidence is something I try to maintain and this site has earned a calibrated quiet enthusiasm rather than the loud excitement that usually fades within a day or two of finding something.
Honestly informative, the writer covers the ground without showing off, and a look at draftlake reflected the same humility, content that respects the reader rather than trying to dazzle them is something I always appreciate and rarely come across in this corner of the internet today across the topics I usually read.
Reading this on a long flight and finding it the best thing I read across hours of trying, and a stop at flareaisle kept the streak going, when content beats long flight reading you know it has substance because flight reading is a hard test of a piece given the alternatives available everywhere.
Reading this in pieces over a coffee break and finding it consistently rewarding, and a stop at etheraisle extended that into related material I will return to later, the kind of site that fits naturally into small reading windows without requiring a long uninterrupted block is genuinely useful for how I actually browse.
Felt the writer did the homework before publishing, the references hold up, and a look at kinquro continued that documented care, content with traceable claims rather than vague assertions is the kind I trust and the lack of bald assertion in this post is one of its quietly impressive qualities for me.
Now adding this to a list of sites I want to see flourish, and a stop at palminlet reinforced that wish, the few sites I actively root for are sites that produce the kind of work I want more of in the world and this one has joined that small list based on what I have read so far.
Reading this prompted a brief but useful conversation with a colleague who happened to walk by, and a stop at buildactionableforwardsteps extended that conversational seed, content that becomes a starting point for in person discussion rather than ending in solitary reading is content with social generative energy and this site has plenty of it apparently.
Android telefonum için kaliteli bir uygulama şart oldu. Play Store’da resmi uygulama yok diye duyunca üzüldüm. En sonunda güvendiğim bir adrese ulaştım ve size de buradan bahsetmek istediğim nokta şurası: 1xbet apk son sürüm [url=https://1xbet-apk-6.com]1xbet apk son sürüm[/url]. Şimdi size kısaca özet geçeyim — android uygulaması resmen süper çalışıyor.
yüklemesi de çerez gibiydi yani rahat olun. İşin doğrusunu söylemek gerekirse — en başarılı uygulama bu oldu artık. Umarım siz de memnun kalırsınız…
Android kullanıcısı olarak iyi bir uygulama çok önemli. Herkes farklı bir link atıyordu doğruyu bulmak imkansızdı. Güncel bilgileri kontrol edip süreci hatasız başlattım. En sonunda sağlam bir kaynağa ulaştım ve size de tüm detayları aktarmak istedim, güncel bilgilere buradan bakabilirsiniz: 1xbet android uygulama [url=https://1xbet-apk-7.com]1xbet android uygulama[/url]. Yani anlatmak istediğim şu — mobil versiyonu masaüstünü aratmıyor kesinlikle.
batarya tüketimi de makul düzeyde. İşin doğrusunu söylemek gerekirse — kesinlikle pişman olmazsınız deneyin derim. Umarım siz de memnun kalırsınız…
Came here from a search and stayed for the side links because they were that interesting, and a stop at snowcovecraftcollective took me even further into the site, the kind of organic exploration that good content invites is something most sites kill through aggressive interlinking and pushy navigation choices rather than relying on quality.
The lack of unnecessary jargon made the post accessible without sacrificing accuracy, and a look at explorefreshstrategies continued in the same accessible style, technical topics often hide behind specialised vocabulary but here the writer trusts the reader to keep up with plain language and that trust pays off nicely throughout the entire post.
водка зеркало vodka casino доступ через зеркало водка
Coming back tomorrow when I can give this a proper read, the post deserves better attention than I can give right now, and a look at embermeadowcraftcollective suggests there is plenty more here that deserves the same treatment, definitely a site I will be exploring properly over the next few days when I can.
Worth a slow read rather than the fast scan I usually default to, and a look at bayharborcraftcollective earned the same slower pace from me, content that resets my reading speed downward is content with substance worth absorbing and this site has produced that effect on me multiple times now over the last week here.
Telefonuma güvenle yükleyebileceğim bir apk bulmak istiyordum. Herkes farklı bir şey diyordu kime güveneceğimi şaşırdım. En sonunda güvendiğim bir kaynağa ulaştım ve size de buradan bahsetmek istediğim nokta şurası: 1xbet yükle android [url=https://1xbet-apk-3.com]1xbet yükle android[/url]. Yani anlatmak istediğim şu — mobil versiyonu masaüstüyle yarışır kalitede.
boyutu da hafif gerçekten şaşırdım. İşin doğrusunu söylemek gerekirse — başka yerde vakit kaybetmeyin yani. Herkese hayırlı olsun…
pin co казино официальный сайт Покупка квартиры в Турции открывает перспективы для выгодных инвестиций и комфортной жизни у теплого Средиземноморья. [недвижимость в Турции] Рынок недвижимости Турции предлагает широкий выбор объектов, от уютных квартир в жилых комплексах до роскошных вилл. [купить квартиру в Турции] Инвестиции в недвижимость Турции, особенно в таких популярных регионах, как Анталья и Фетхие, могут принести стабильный доход от аренды. [инвестиции в недвижимость] Анталья, жемчужина турецкого побережья, славится своими пляжами и развитой инфраструктурой, делая недвижимость Анталия весьма привлекательной. [недвижимость Анталия] Фетхие, с его живописными бухтами и уникальной природой, привлекает тех, кто ищет спокойствие и уединение. [недвижимость Фетхие] Квартиры у моря в Турции – это не только прекрасная возможность для отдыха, но и выгодное вложение средств. [квартиры у моря] Виллы в Турции предлагают роскошный стиль жизни и уединение, идеально подходящие для тех, кто ценит комфорт и приватность. [виллы в Турции] Инвестиции за границей, в частности в турецкую недвижимость, становятся все более популярными среди иностранных покупателей, ищущих диверсификацию своих активов. [недвижимость за рубежом] Переезд в Турцию – это возможность начать новую жизнь в стране с богатой культурой, гостеприимными людьми и благоприятным климатом. [переезд в Турцию] Жизнь в Турции предлагает высокое качество жизни по доступным ценам, особенно в таких городах, как Анталья. [жизнь в Турции] Получение ВНЖ Турции при покупке недвижимости становится проще, открывая путь к легализации и долгосрочному пребыванию. [ВНЖ Турция] Гражданство Турции через инвестиции в недвижимость – это реальный шанс стать полноправным гражданином страны и наслаждаться всеми ее преимуществами. [гражданство Турции] Квартиры в Анталии представлены в широком ассортименте, от бюджетных вариантов до элитных апартаментов с видом на море. [квартиры в Анталии] Недвижимость Коньяалты, одного из самых престижных районов Анталии, привлекает своей близостью к пляжу и развитой инфраструктурой. [недвижимость Коньяалты] Недвижимость Лиман также пользуется спросом благодаря своему расположению и потенциалу роста стоимости. [недвижимость Лиман] Квартиры в Фетхие предлагают разнообразие выбора, от современных комплексов до традиционных домов в уютных районах. [квартиры в Фетхие] Недвижимость для инвестиций в Турции – это стратегическое решение, способное обеспечить высокую доходность. [недвижимость для инвестиций] Доходная недвижимость в Турции – это квартиры и коммерческие объекты, приносящие стабильный пассивный доход от аренды. [доходная недвижимость] Покупка недвижимости в Турции с INEST HOMES – это надежный шаг к осуществлению вашей мечты. [покупка недвижимости в Турции] На рынке недвижимости Турции действуют выгодные предложения, способные удовлетворить самые взыскательные запросы. [рынок недвижимости Турции] Элитная недвижимость Турции – это эксклюзивные виллы и апартаменты, соответствующие высочайшим стандартам качества и комфорта. [элитная недвижимость Турции] Недвижимость Средиземноморья, представленная в Турции, является идеальным местом для жизни и отдыха. [недвижимость Средиземноморья] Жизнь у моря в Турции – это возможность каждый день наслаждаться солнечной погодой и морским бризом. [жизнь у моря] Яхтинг в Турции – одна из популярных активностей для владельцев недвижимости в прибрежных районах. [яхтинг в Турции] Инвестиции в Анталию – это выгодное вложение в динамично развивающийся город с высоким туристическим потенциалом. [инвестиции в Анталию] Квартиры у моря Турция – это мечта многих, ставшая реальностью благодаря доступным ценам и выгодным условиям. [квартиры у моря Турция] Переезд к морю в Турцию – это выбор тех, кто ценит комфорт, спокойствие и красоту природы. [переезд к морю] Недвижимость для ВНЖ в Турции – это инвестиция не только в жилье, но и в будущее, открывая возможности для долгосрочного проживания. [недвижимость для ВНЖ] Зарубежная недвижимость, в частности в Турции, становится все более привлекательной для инвесторов со всего мира. [зарубежная недвижимость] Турецкая недвижимость – это оптимальное соотношение цены и качества, а также возможность получения ВНЖ и гражданства. [турецкая недвижимость] Жилье в Турции – это современный комфорт, доступные цены и теплое гостеприимство. [жилье в Турции] Недвижимость в Анталии цены варьируются в зависимости от района и типа объекта, но всегда остаются конкурентоспособными. [недвижимость в Анталии цены] Фетхие недвижимость – это привлекательные варианты для тех, кто ищет отдых на лоне природы и доступное жилье. [Фетхие недвижимость] Недвижимость Турция 2026 – это прогноз на рост цен и увеличение инвестиционной привлекательности рынка. [недвижимость Турция 2026] Инвестиции в Турцию – это стабильный рост и диверсификация портфеля. [инвестиции в Турцию] Доход от аренды в Турции может стать существенным источником пассивного дохода для владельцев недвижимости. [доход от аренды в Турции] Недвижимость для гражданства Турции – это возможность получить паспорт страны через значительные инвестиции. [недвижимость для гражданства] Квартиры в жилых комплексах Турции – это современный уровень комфорта, безопасности и развитой инфраструктуры. [квартиры в жилых комплексах Турции] INEST HOMES – ваш надежный партнер в мире недвижимости Турции. [INEST HOMES]
Mobil bahise merak salalı çok oldu valla. Play Store’da bulamayınca ne yapacağımı bilemedim. Sonunda tüm teknik detayları inceleyip sistemi test ettim. En sonunda doğru adrese ulaştım ve size de tüm detayları aktarmak istedim, güncel bilgilere buradan bakabilirsiniz: 1xbet android uygulama [url=https://1xbet-apk-2.com]1xbet android uygulama[/url]. Şimdi size kısaca özet geçeyim — mobil uygulaması inanılmaz akıcı aslında.
güncellemeleri de otomatik geliyor gerçekten. Birçok apk denedim ama bunda karar kıldım — en hızlı çalışan uygulama bu oldu artık. Umarım siz de memnun kalırsınız…
Liked the natural conversational tone throughout, never stiff and never overly casual either, and a stop at draftlog kept that comfortable middle ground going, finding a tone that respects the reader without becoming distant or overly familiar is harder than it sounds and this site nails that balance consistently across many different pieces.
Now appreciating the small but real way this post improved my afternoon, and a stop at berrycovecraftcollective extended that small improvement effect, content that produces measurable positive impact on the texture of a reading day is content with real value and this site is producing those small positive impacts at a sustainable rate apparently.
Now thinking about this site as a small example of what good independent writing looks like, and a stop at epicfife continued that exemplary status, the few sites that serve as good examples are sites worth holding up in conversations about quality and this one has earned that exemplary placement through patient consistent effort over time.
Mobil bahise yeni başladım diyebilirim. Herkes farklı bir şey öneriyordu kafam allak bullak oldu. Güncel bilgileri kontrol edip süreci hatasız başlattım. En sonunda doğru adrese ulaştım ve size de tüm detayları aktarmak istedim, güncel bilgilere buradan bakabilirsiniz: 1xbet indir apk [url=https://1xbet-apk-11.com]1xbet indir apk[/url]. Valla bak net söyleyeyim — mobil versiyonu bile çok akıcı aslında.
Hiçbir gecikme yaşamadım şu ana kadar. Birçok uygulama denedim ama bunda karar kıldım — en sorunsuz çalışan uygulama bu oldu artık. Şimdiden iyi şanslar ve bol kazançlar…
Народ, привет! долго откладывал этот момент до последнего, но вчера все-таки попробовал сделать пару ставок в mel bet. Скажу так — залетел нормально и без проблем,. У кого система ios — всё четко и стабильно работает. Надо скачать мелбет на айфон? В интерфейсе даже ребёнок разберётся.
Короче, сами гляньте все условия по ссылке: . Кстати, кто спрашивал про скачать мелбет казино — приложение вообще не вылетает,. И вывод средств действительно быстрый. Я уже выводил пару раз выигранные деньги — служба поддержки работает норм,. Всем искренне рекомендую. Удачи всем!
Mobile özel bir platform arıyordum uzun zamandır. Play Store’da arattım ama resmi olanı bulamadım. En sonunda doğru kaynağa ulaştım ve size de buradan bahsetmek istediğim nokta şurası: 1xbet android [url=https://1xbet-apk-4.com]1xbet android[/url]. Yani anlatmak istediğim şu — mobil sürümü gerçekten masaüstünü aratmıyor.
güncellemeleri otomatik yapıyor çok memnunum. İşin doğrusunu söylemek gerekirse — en hızlı çalışan uygulama bu oldu artık. Herkese hayırlı olsun…
Came away feeling slightly smarter than I was when I started, that is a real win, and a stop at lemonlarkmerchantgallery added a bit more to that, the rare site that actually transfers some of its knowledge to the reader in a way that sticks rather than just creating an illusion of learning briefly.
Кровь и пламя возвращаются на экраны – сериал дом дракона 3 сезон лордфильм. Раскол королевства достиг точки невозврата – Рейнира и Эйгон ведут своих драконов в решающие схватки. Древние пророчества сбываются, родная кровь становится врагом, а трон требует новых жертв. Долгожданное продолжение саги!
Now leaving a small mental note to recommend this when the topic comes up in conversation, and a look at kinzavo extended that recommend ready feeling, content that arms me with shareable references for likely future conversations is content with social value and this site is providing that conversational ammunition consistently for me lately.
https://michelsonne.com/content/pages/1xbet_promo_code_india_today_bonus.html
https://dfasf5.wordpress.com/2026/06/12/today-1xbet-promo-code-1x200max-e130-todays-deal/
Now noticing that the post avoided the temptation to be funny in places where humour would have undermined the substance, and a stop at palmmill maintained the same restraint, knowing when to be serious is a rare editorial virtue and this site has clearly developed it through what I assume is careful editorial practice over years.
Honest reaction is that I want to send this to a friend who would benefit from it, and a look at strategybeforeaction added more material I will pass along too, the impulse to share is the strongest signal I have for content quality and this site is generating that impulse cleanly across multiple posts.
Felt like the writer was speaking directly to someone with my level of curiosity, neither talking down nor showing off, and a stop at flarefest kept that comfortable matching going, finding writing that meets you where you are rather than asking you to climb up or stoop down feels great every time it happens.
Spent a few minutes here and came away with a clearer picture of the topic, the writing keeps things simple without dumbing them down, and after a stop at startbuildingclarity the rest of the points lined up neatly which is something I appreciate when I am short on time and need answers fast.
Bookmark earned and folder updated to track this site separately, and a look at ferncovecraftcollective confirmed the folder upgrade was the right call, organising my reading list so that good sites do not get lost in a sea of casual bookmarks is something I do more carefully now and this site warranted its own spot.
Mobil bahise ilgi duyalı çok oldu aslında. Play Store’da aradım ama resmi uygulamayı bulamadım. Adımları doğru sırayla uyguladıktan sonra erişim sorunsuz açıldı. En sonunda güvendiğim bir kaynağa ulaştım ve size de tüm detayları aktarmak istedim, güncel bilgilere buradan bakabilirsiniz: 1xbet android uygulama [url=https://1xbet-apk-8.com]1xbet android uygulama[/url]. Yani anlatmak istediğim şu — telefonuma kurduğuma çok memnunum.
bildirimleri de çok düzenli geliyor. İşin doğrusunu söylemek gerekirse — kesinlikle pişman olmazsınız deneyin derim. Umarım siz de memnun kalırsınız…
Picked a single sentence from this post to remember, and a look at solarorchardcraftcollective gave me another to keep, content that produces memorable lines is doing more than just transferring information and the small selection of sentences I keep from each reading session is one of the actual returns I get from reading carefully.
Знаете ситуацию реально бесит , когда близкий просто не может остановиться . Ломаешь голову , а вокруг одна реклама . Знакомому потребовался действительно рабочий выход . Многие хватаются за таблетки , но это не помогает . Требуется именно врачебное вмешательство . Я перелопатил кучу сайтов , пока понял одну простую вещь: без нормальных условий ничего не выйдет . Потому что дома срыв гарантирован . Ищешь нормальный вариант для экстренного вывода из запоя под капельницами — тогда тебе сюда . В Нижнем , кстати, развелось этих “центров” . Лучше сразу перейти на сайт, где нет вранья про кодирование от алкоголизма и выезд врача . Подробности по ссылке: нарколог подростковый [url=https://vyvod-iz-zapoya-v-staczionare-nizhnij-novgorod-22.ru]нарколог подростковый[/url] После прочтения , сам удивился , сколько нюансов в этой теме. Главное — анонимность и палаты. Для нашего города это проверенный временем вариант.
Слушайте, есть важный вопрос. Решил снести ненесущую стену между комнатами, а тут оказывается столько бумажек надо собрать, Я уже знатно намучился со всей этой бюрократией, Короче говоря, единственное, что реально работает в наших реалиях — сразу заказать техническое заключение у лицензированной компании, чтобы потом не было проблем со штрафами.
И в жилищную инспекцию документы подадут Там на сайте есть и примеры документов, и точные цены, проект на перепланировку квартиры заказать [url=https://proekt-pereplanirovki-kvartiry30.ru]https://proekt-pereplanirovki-kvartiry30.ru[/url]. Иначе потом прилетит огромный штраф и суды заставят всё вернуть как было. Обязательно перешлите этот пост тому, кто тоже сейчас затеял ремонт!
Mobil platform arayışım epey zaman aldı valla. Herkes farklı bir link atıyordu kime güveneceğimi bilemedim. En sonunda sağlam bir kaynağa ulaştım ve size de buradan bahsetmek istediğim nokta şurası: 1xbet android uygulama [url=https://1xbet-apk-5.com]1xbet android uygulama[/url]. Şimdi size kısaca özet geçeyim — android uygulaması gerçekten akıcı çalışıyor.
dosya boyutu da hafif gerçekten. Birçok apk denedim ama en iyisi bu çıktı — başka yerde vakit kaybetmeyin yani. Herkese hayırlı olsun…
https://t.me/trans_irkytsk
Вот реально ситуация — когда близкий человек уходит в запой , а просто в тупике. Моя семья с таким столкнулась года два назад . Думал, справлюсь сам — нифига . Оказалось , без медикаментов и капельниц никак . Перерыл кучу форумов — сплошной развод . А потом наткнулся на один реально рабочий вариант. Если ищете где сделать вывод из запоя в стационаре — не ведитесь на дешёвые акции . У нас в Нижнем, кстати , тоже полно шарлатанов . Вся проверенная информация вот тут : кодирование от алкоголизма [url=https://vyvod-iz-zapoya-v-staczionare-nizhnij-novgorod-26.ru]кодирование от алкоголизма[/url] Откровенно говоря, после того как вник в детали, расставил всё по полочкам. Там и про кодирование от алкоголизма подробно расписано , и про выезд нарколога на дом . Плюс анонимность — это важно . Советую не тянуть .
Felt the writer was speaking my language without trying to imitate it, and a look at calmcoveartisanexchange continued that natural fit, when a writers default voice happens to match what you find easy to read the experience feels frictionless and that is something I notice and remember about specific sites going forward.
The headings made navigating the post simple even when I needed to find a specific section quickly, and a look at etherfair continued the same thoughtful structure, small details like clear headings show that someone is actually thinking about how the reader uses the page rather than just filling it for length alone.
Вот такая ситуация — человек не может остановиться, а руки опускаются . Я через это прошёл пару лет назад. Сначала кажется, что обойдётся , но хрен там. Нужна профессиональная помощь . Перерыл весь интернет — сплошной развод . А потом наткнулся на один действительно рабочий вариант. Если тебе нужно экстренный вывод из запоя под наблюдением врачей , не ведись на дешёвые обещания . У нас в Нижнем, к слову , тоже хватает левых контор. Проверенная информация по ссылке ниже: кодировка от алкоголя в нижнем новгороде [url=https://vyvod-iz-zapoya-v-staczionare-nizhnij-novgorod-25.ru]кодировка от алкоголя в нижнем новгороде[/url] Откровенно скажу, после того как прочитал , многое прояснилось . И про кодировку от алкоголя подробно, и про условия в стационаре. И цены адекватные. Рекомендую не откладывать.
Now realising the topic deserved better treatment than it has been getting elsewhere, and a look at kirvoro extended that broader recognition, content that exposes the gap between actual quality and average quality elsewhere is doing the quiet work of raising standards and this site is contributing to that elevation in its own corner.
The depth of coverage felt about right for the format, neither shallow nor overwhelming, and a look at flintmeadowartisanexchange kept that calibration going, getting the depth right for blog format is genuinely difficult because too shallow loses experts and too deep loses beginners but this site nailed it nicely which I really do appreciate.
Thanks for treating the topic with the seriousness it deserves without becoming pompous about it, and a stop at berrycoveartisanexchange continued that balanced treatment, the gap between earnest and self serious is huge and writers who can stay on the right side of it earn my respect when I find them online today.
Reading this gave me confidence to make a decision I had been putting off, and a stop at equakoala reinforced that confidence, content that translates into action in my own life rather than just informing it is content with the highest practical value and this site is generating that action level utility for me lately.
Telefonuma güvenilir bir uygulama indirmek istiyordum. Herkes farklı bir site öneriyordu kafam karıştı. Sonunda tüm teknik detayları inceleyip sistemi test ettim. En sonunda doğru adrese ulaştım ve size de tüm detayları aktarmak istedim, güncel bilgilere buradan bakabilirsiniz: 1xbet indir android [url=https://1xbet-apk-2.com]1xbet indir android[/url]. Şimdi size kısaca özet geçeyim — mobil uygulaması inanılmaz akıcı aslında.
Hiçbir donma yaşamadım şu ana kadar. Kendi deneyimlerimi aktarıyorum size — başka yerde vakit kaybetmeyin yani. Umarım siz de memnun kalırsınız…
Android telefonum için kaliteli bir uygulama şart oldu. Virüslü dosyalardan çok korktum açıkçası. En sonunda güvendiğim bir adrese ulaştım ve size de buradan bahsetmek istediğim nokta şurası: 1xbet download android [url=https://1xbet-apk-6.com]1xbet download android[/url]. Yani anlatmak istediğim şu — telefonuma kurduktan sonra çok mutlu oldum.
Hiçbir sorun çıkmadı şu ana kadar. Kendi deneyimlerimi aktarıyorum size — başka yerde vakit kaybetmeyin yani. Şimdiden iyi şanslar ve bol kazançlar…
Speaking honestly this is among the better discoveries of my recent browsing, and a stop at suncoveartisanexchange reinforced that discovery quality, the ranking of recent discoveries is informal but meaningful and this site has placed near the top of that ranking based on the consistency of quality across what I have already read carefully.
Appreciate how nothing here feels copied or pieced together from other places, the voice is consistent and the tone stays human, and after I checked canyonharborartisanexchange I noticed the same style holds, which is a small detail but it makes the whole experience feel personal rather than like another generic site.
A piece that reads as if the writer trusted readers to fill in obvious gaps, and a look at flarefoil continued that respectful approach, content that does not over explain what the reader can infer is content that respects intelligence and this site has clearly chosen to write to capable readers rather than to the lowest common denominator.
The way the post stayed on topic throughout without going on tangents was really refreshing, and a look at plumcovemerchantgallery kept that focused approach going, discipline like this in writing is rare and worth recognising because most writers cannot resist wandering off into related subjects that dilute their main point and confuse readers along the way.
A quiet kind of confidence runs through the writing, and a look at etherledge carried that same understated assurance, confidence without bragging is the most attractive register for online writing and the writers here have clearly developed it through practice rather than affecting it through stylistic tricks that would feel hollow eventually.
Mobil platform arayışım epey sürdü valla. Herkes farklı bir link atıyordu doğruyu bulmak imkansızdı. Güncel bilgileri kontrol edip süreci hatasız başlattım. En sonunda sağlam bir kaynağa ulaştım ve size de tüm detayları aktarmak istedim, güncel bilgilere buradan bakabilirsiniz: 1xbet apk son sürüm [url=https://1xbet-apk-7.com]1xbet apk son sürüm[/url]. Yani anlatmak istediğim şu — android uygulaması gerçekten akıcı çalışıyor.
batarya tüketimi de makul düzeyde. İşin doğrusunu söylemek gerekirse — başka yerde vakit kaybetmeyin yani. Umarım siz de memnun kalırsınız…
Mobile özel bir platform arıyordum uzun zamandır. Virüs bulaşır diye çok korktum açıkçası. En sonunda doğru kaynağa ulaştım ve size de buradan bahsetmek istediğim nokta şurası: 1xbet indir android [url=https://1xbet-apk-4.com]1xbet indir android[/url]. Şimdi size kısaca özet geçeyim — telefonuma kurduktan sonra hiç takılma yaşamadım.
güncellemeleri otomatik yapıyor çok memnunum. Kendi deneyimlerimi aktarıyorum size — başka yerde vakit kaybetmeyin yani. Şimdiden iyi şanslar ve bol kazançlar…
Android telefonumda rahatça oynamak istiyordum. Herkes farklı bir şey öneriyordu kafam allak bullak oldu. Adımları doğru sırayla uyguladıktan sonra erişim sorunsuz açıldı. En sonunda doğru adrese ulaştım ve size de tüm detayları aktarmak istedim, güncel bilgilere buradan bakabilirsiniz: 1xbet apk son sürüm [url=https://1xbet-apk-11.com]1xbet apk son sürüm[/url]. Şimdi size kısaca özet geçeyim — telefonuma indirince çok memnun kaldım.
kurulumu da son derece basitti yani rahat olun. Kendi deneyimlerimi aktarıyorum size — en sorunsuz çalışan uygulama bu oldu artık. Şimdiden iyi şanslar ve bol kazançlar…
https://skyrexio.com/ru/
образование Музыковедение, как неотъемлемая часть музыкознания и искусствоведения, представляет собой комплексную научную дисциплину, исследующую музыку в ее многообразных проявлениях – от исторических корней до современных тенденций.
Now I want to find more sites like this but I suspect they are rare, and a look at forestcoveartisanexchange extended that thought, the few sites that meet this quality bar are precious specifically because they are rare and finding others like them is one of the ongoing projects of careful internet curation across the years.
установка автомобильного подъемника Опытные специалисты компании осуществляют установку подъемников в автосервисах и частных гаражах, принимая во внимание особенности помещения и тип транспортных средств, для которых предназначено оборудование, включая такие бренды, как Rossvik.
https://vk.ru/smartquick77
Mobil bahise ilgi duyalı çok oldu aslında. Play Store’da aradım ama resmi uygulamayı bulamadım. Sonunda tüm teknik detayları inceleyip sistemi test ettim. En sonunda güvendiğim bir kaynağa ulaştım ve size de tüm detayları aktarmak istedim, güncel bilgilere buradan bakabilirsiniz: 1xbet indir android [url=https://1xbet-apk-8.com]1xbet indir android[/url]. Yani anlatmak istediğim şu — mobil versiyonu her şeyi düşünmüş resmen.
bildirimleri de çok düzenli geliyor. Birçok apk denedim ama en sorunsuzu bu çıktı — başka yerde vakit kaybetmeyin yani. Şimdiden iyi şanslar ve bol kazançlar…
Uzun süredir mobil bahis için doğru uygulamayı arıyordum. Virüssüz bir apk bulmak gerçekten çileydi valla. En sonunda güvendiğim bir kaynağa ulaştım ve size de buradan bahsetmek istediğim nokta şurası: 1xbet download android [url=https://1xbet-apk-3.com]1xbet download android[/url]. Yani anlatmak istediğim şu — mobil versiyonu masaüstüyle yarışır kalitede.
boyutu da hafif gerçekten şaşırdım. İşin doğrusunu söylemek gerekirse — başka yerde vakit kaybetmeyin yani. Herkese hayırlı olsun…
Now feeling the post has earned a proper recommendation rather than a casual mention, and a stop at kivmora reinforced the recommendation strength, the difference between mentioning and recommending is a small editorial distinction I observe in my own conversations and this site has earned the upgraded recommendation level from me confidently today.
Thank you for being clear and direct, that simple approach saves so much frustration on the reader’s end, and a stop at caramelcovecraftcollective only made me more sure of it, the rest of the content seems to follow the same pattern which is a great sign of consistent editorial care behind the scenes.
Recommended without hesitation if you care about careful coverage of this topic, and a stop at eurohilt reinforced the recommendation, the bar I set for unhesitating recommendations is fairly high and this site has cleared it through the cumulative weight of multiple consistently good pieces rather than through any single standout post which is meaningful.
Now noticing that the post never raised its voice even when making a strong point, and a look at suncovecraftcollective continued that calm volume, content that can make important points without resorting to typographic emphasis or emotional appeal is content that trusts its substance to do the work and this site has that confidence consistently.
aviator link bd [url=http://aviator20596.help/]http://aviator20596.help/[/url]
melbet tutoriel dépôt [url=http://melbet29619.help]http://melbet29619.help[/url]
The use of plain language without dumbing down the topic was really well done, and a look at portguild continued in that same accessible style, this is something many technical writers fail at because they either confuse their readers or condescend to them but here neither problem appears at all which is impressive really.
mostbet верификация [url=https://mostbet74039.help]mostbet верификация[/url]
Аренда катера Адлер пользуется популярностью среди туристов, которые хотят провести время на море с семьей или друзьями и получить новые впечатления от отдыха https://yachtkater.ru/
Reading this fit naturally into my afternoon walk because I was reading on my phone, and a stop at everattic continued well in that walking format, content that survives mobile reading without becoming awkward is content with format flexibility and this site has clearly thought about how it reads across different devices today.
Decided this was the kind of site I would defend in a discussion about good blog content, and a stop at birchharborartisanexchange reinforced that, very few sites earn active defence rather than passive consumption and this one has clearly crossed that threshold for me without needing any explicit pitch from the writers themselves either.
pin-up signup [url=pinup58663.help]pinup58663.help[/url]
mostbet jak wpłacić przez skrill [url=https://mostbet59068.help]https://mostbet59068.help[/url]
melbet casino pe telefon [url=http://melbet78692.help]http://melbet78692.help[/url]
мостбет верификация [url=www.mostbet22685.online]www.mostbet22685.online[/url]
Appreciated the way each section connected smoothly to the next without abrupt jumps, and a stop at forestcovecraftcollective kept that flow going nicely, transitions are something most blog writers ignore but the difference is huge for the reader who is trying to follow a sustained line of thought today across many different topics.
mostbet depozit qaytarish [url=http://mostbet60471.help/]http://mostbet60471.help/[/url]
Just want to flag that this was useful and not bury the appreciation in caveats, and a look at lavenderharborvendorroom earned the same direct praise, recognising good work without hedging it with criticism is something I try to practice because over qualified compliments tend to read as backhanded and miss the point sometimes.
Mobil platform arayışım epey zaman aldı valla. Herkes farklı bir link atıyordu kime güveneceğimi bilemedim. En sonunda sağlam bir kaynağa ulaştım ve size de buradan bahsetmek istediğim nokta şurası: 1xbet indir apk [url=https://1xbet-apk-5.com]1xbet indir apk[/url]. Yani anlatmak istediğim şu — android uygulaması gerçekten akıcı çalışıyor.
dosya boyutu da hafif gerçekten. İşin doğrusunu söylemek gerekirse — en güvenilir uygulama bu oldu artık. Şimdiden iyi şanslar ve bol kazançlar…
If quality blog writing is dying as people sometimes claim then this site is one piece of evidence that it has not died yet, and a look at seameadowgoodsgallery extended that evidence, the broader cultural question about online writing has empirical answers in specific sites and this one is contributing to a more optimistic answer overall.
Closed it feeling slightly more competent in the topic than I started, and a stop at stoneharbormerchantgallery reinforced that competence boost, real learning is rare in casual online reading but it does happen sometimes and this site managed to make it happen for me today which is genuinely worth pausing to acknowledge.
Really grateful for content like this, it does not waste my time and it does not insult my intelligence either, and a quick look at acornharborcraftcollective was the same, balanced respectful writing that makes a person feel welcome rather than rushed through pages of forced engagement just to keep clicking around.
Refreshing to read something where the words actually mean something instead of filling space, and a stop at crystalharborcommercegallery kept that going, the writing here trusts the reader to follow along without endless repetition or constant reminders of what was already said earlier in the post which I appreciate.
Reading this gave me a quiet moment of intellectual pleasure that I had not been expecting, and a stop at elmharborcraftcollective extended that pleasure across more pages, the unexpected reward of stumbling into careful writing is one of the small ongoing pleasures of reading the open web and this site is delivering it reliably.
Now noticing that the post did not mention the writer at all, focus stayed on the topic, and a look at flareinlet continued that author absent quality, content that disappears the writer to focus on the substance is a particular kind of generosity and this site has clearly chosen the substance over the personality consistently.
Знаете, достало уже — когда близкий человек уходит в запой , а просто в тупике. Моя семья с таким столкнулась недавно. Думали, уговорами поможем — хрен там было. Как показала практика, без врачей и капельниц не обойтись. Обзвонил все конторы в городе — сплошной развод . А потом наткнулся на один проверенный вариант. Кому нужно качественное выведение из запоя с госпитализацией — не ведитесь на дешёвые акции . У нас в Нижнем, кстати , хватает шарлатанов . Вся проверенная информация вот тут : кодировка от алкоголя в нижнем новгороде [url=https://vyvod-iz-zapoya-v-staczionare-nizhnij-novgorod-26.ru]кодировка от алкоголя в нижнем новгороде[/url] Честно скажу , после того как почитал , расставил всё по полочкам. Там и про кодирование от алкоголизма подробно расписано , и про выезд нарколога на дом . Плюс анонимность — это важно . Советую не откладывать в долгий ящик.
Worth a slow read rather than the fast scan I usually default to, and a look at velvetbrookcraftcollective earned the same slower pace from me, content that resets my reading speed downward is content with substance worth absorbing and this site has produced that effect on me multiple times now over the last week here.
Once you start reading carefully here it is hard to go back to lower quality alternatives, and a stop at gladeridgecraftcollective reinforced that ratchet effect, the way good content raises standards is real over time and this site has clearly contributed to raising my expectations for what is possible in writing on the topic generally.
Telefonuma güvenilir bir uygulama indirmek istiyordum. Play Store’da bulamayınca ne yapacağımı bilemedim. Sonunda tüm teknik detayları inceleyip sistemi test ettim. En sonunda doğru adrese ulaştım ve size de tüm detayları aktarmak istedim, güncel bilgilere buradan bakabilirsiniz: 1xbet download android [url=https://1xbet-apk-2.com]1xbet download android[/url]. Valla bak net söyleyeyim — mobil uygulaması inanılmaz akıcı aslında.
Hiçbir donma yaşamadım şu ana kadar. İşin doğrusunu söylemek gerekirse — en hızlı çalışan uygulama bu oldu artık. Herkese hayırlı olsun…
This is my first time i visit here. I found so many helpful stuff in your website especially its discussion. From the tons of responses on your posts, I guess I am not the only one having all the enjoyment here! keep up the excellent work
A piece that read as if the writer was thinking carefully rather than just typing fluently, and a look at bettershoppinghub continued that considered quality, the difference between fluent typing and careful thinking shows up in writing and this site reads as the product of thought rather than just the product of language fluency apparently.
Just dropping by to say thanks for the effort, it does not go unnoticed when a writer cares this much about the reader, and after I went through coralharborartisanexchange I was certain this is one of the better corners of the internet for this particular kind of content which is genuinely refreshing.
образование Изучение истории музыки и искусства в их взаимосвязи позволяет выявить общие закономерности и уникальные особенности развития различных видов творчества, формируя целостную картину культурного наследия.
Saving the link for sure, this one is a keeper, and a look at cottonmeadowcraftcollective confirmed I should bookmark the entire site rather than just this page, the consistency across what I have seen so far suggests there is a lot more here worth coming back for soon when I have more time.
Android telefonum için kaliteli bir uygulama şart oldu. Play Store’da resmi uygulama yok diye duyunca üzüldüm. En sonunda güvendiğim bir adrese ulaştım ve size de buradan bahsetmek istediğim nokta şurası: 1xbet indir android [url=https://1xbet-apk-6.com]1xbet indir android[/url]. Şimdi size kısaca özet geçeyim — telefonuma kurduktan sonra çok mutlu oldum.
ram kullanımı da çok iyi gerçekten. Birçok apk denedim ama en stabilı bu çıktı — en başarılı uygulama bu oldu artık. Umarım siz de memnun kalırsınız…
If I had encountered this site five years ago I would have been telling everyone about it, and a look at sageharborcommercegallery extended that retrospective enthusiasm, the version of me who used to recommend favourite blogs frequently would have made sure friends knew about this one and that earlier enthusiasm is partially returning to me here.
Now placing this in the same category as a few other sites I have come to trust, and a look at gildedcovecraftcollective continued the placement decision, the small category of fully trusted sites is one I extend rarely and only after multiple positive reading sessions and this site has earned the category placement methodically over time.
The headings made navigating the post simple even when I needed to find a specific section quickly, and a look at frostridgeartisanexchange continued the same thoughtful structure, small details like clear headings show that someone is actually thinking about how the reader uses the page rather than just filling it for length alone.
Quietly the writers approach to the topic differs from the dominant takes I have been encountering, and a stop at portmill extended that distinctive approach, content that maintains a different perspective without explicitly arguing against the dominant ones is content with confident editorial identity and this site has that confidence throughout pieces.
https://vk.ru/smartquick77
Looking for similar voices elsewhere has come up empty in my recent searches, and a stop at tealcovecraftcollective extended the search frustration, the rare site that does what no other does in quite the same way is precious and this one has clearly developed a particular approach that I have not been able to find duplicates of.
Such writing is increasingly rare and worth supporting through attention, and a stop at uplandcoveartisanexchange extended that supportive attention across more pages, the conscious choice to spend time on sites that produce careful work rather than convenient consumption is itself a small form of patronage and this site is receiving that conscious patronage from me.
More substantial than most of what I find searching for this topic online, and a stop at woodharborvendorroom kept that quality consistent, this is one of those sites where the writing actually rewards careful reading rather than punishing the patient reader with empty filler stretched out across long paragraphs that say very little.
Mobil bahise ilgi duyalı çok oldu aslında. Virüslü dosya riski yüzünden çekindim açıkçası. Güncel bilgileri kontrol edip süreci hatasız başlattım. En sonunda güvendiğim bir kaynağa ulaştım ve size de tüm detayları aktarmak istedim, güncel bilgilere buradan bakabilirsiniz: 1xbet yukle android [url=https://1xbet-apk-8.com]1xbet yukle android[/url]. Valla bak net söyleyeyim — telefonuma kurduğuma çok memnunum.
kurulumu da üç dakikadan kısa sürdü yani rahat olun. Birçok apk denedim ama en sorunsuzu bu çıktı — en başarılı uygulama bu oldu artık. Şimdiden iyi şanslar ve bol kazançlar…
Android kullanıcısı olarak iyi bir uygulama çok önemli. Herkes farklı bir link atıyordu doğruyu bulmak imkansızdı. Sonunda tüm teknik detayları inceleyip sistemi test ettim. En sonunda sağlam bir kaynağa ulaştım ve size de tüm detayları aktarmak istedim, güncel bilgilere buradan bakabilirsiniz: 1xbet yukle android [url=https://1xbet-apk-7.com]1xbet yukle android[/url]. Yani anlatmak istediğim şu — android uygulaması gerçekten akıcı çalışıyor.
kurulumu da çok hızlıydı yani rahat olun. Birçok apk denedim ama en iyisi bu çıktı — kesinlikle pişman olmazsınız deneyin derim. Herkese hayırlı olsun…
Closed the tab feeling I had spent the time well, and a stop at fernharborcommercegallery extended that feeling across more pages, the test of whether time on a site was well spent is one I apply silently after closing tabs and very few sites pass it but this one passed it cleanly today afternoon clearly.
Picked this for my morning read because the topic seemed worth the time, and a look at suncovemerchantgallery confirmed the choice was right, my morning reading slot is precious and giving it to this site felt like a good investment rather than a waste which is a higher endorsement than I usually offer for content.
Now adding this to a list of sites I want to see flourish, and a stop at alpinecovecraftcollective reinforced that wish, the few sites I actively root for are sites that produce the kind of work I want more of in the world and this one has joined that small list based on what I have read so far.
Honestly impressed, did not expect to find this level of care on the topic, and a stop at everjumbo cemented the impression, you can tell within the first few paragraphs whether a site is going to be worth the time and this one delivered on that early promise nicely throughout the rest of what I read.
Android için güvenilir bir apk dosyası bulmak çok zordu valla. Sürekli farklı adresler veriliyordu kime inanacağımı şaşırdım. En sonunda doğru kaynağa ulaştım ve size de buradan bahsetmek istediğim nokta şurası: 1xbet android uygulama [url=https://1xbet-apk-4.com]1xbet android uygulama[/url]. Valla bak net söyleyeyim — telefonuma kurduktan sonra hiç takılma yaşamadım.
güncellemeleri otomatik yapıyor çok memnunum. Birçok apk denedim ama en sorunsuzu bu çıktı — başka yerde vakit kaybetmeyin yani. Herkese hayırlı olsun…
Now appreciating that the post left me with enough to say in a follow up conversation, and a look at ravengrovetradehall added more material for those follow ups, content that prepares me for related conversations rather than just informing me alone is content with social utility and this site provides that social armament reliably for me.
Reading this slowly in the morning before opening email, and a stop at elmharborcraftcollective extended that protected attention, content that earns the prime morning reading slot before the daily distractions begin is content with elevated status and this site has earned that prime slot consistently in my recent reading habits clearly.
https://skyrexio.com/ru/
Refreshing tone compared to the dry corporate posts on similar topics, and a stop at opendealsmarket carried that personality through nicely, you can tell when a real person is behind the writing versus a content team chasing metrics and this site definitely falls into the former category clearly across what I have seen.
crash melbet [url=https://www.melbet29619.help]https://www.melbet29619.help[/url]
aviator site link Bangladesh [url=http://aviator20596.help]aviator site link Bangladesh[/url]
mostbet promo kod qabul qilmayapti [url=https://mostbet60471.help/]mostbet promo kod qabul qilmayapti[/url]
мостбет ошибка входа [url=http://mostbet74039.help/]http://mostbet74039.help/[/url]
mostbet скачать для ios [url=http://mostbet22685.online]mostbet скачать для ios[/url]
pin up rasmiy saytni qanday topish [url=pinup58663.help]pinup58663.help[/url]
melbet aviator Republica Moldova [url=https://www.melbet78692.help]melbet aviator Republica Moldova[/url]
Genuine reaction is that this site clicked with how I like to read, and a look at creekharborcraftcollective kept that comfortable fit going, sometimes you find a place online whose editorial decisions just align with your preferences and when that happens it is worth recognising and supporting through repeat engagement consistently going forward.
mostbet statystyki kuponu [url=http://mostbet59068.help]http://mostbet59068.help[/url]
Looking at this from the perspective of someone tired of generic content the contrast is striking, and a look at violetharborcraftcollective maintained that distinctive feel, sites with strong editorial identity stand out against the bland background of algorithmic content and this one has clearly developed an identity worth recognising through careful attention.
This filled in a gap in my understanding that I had not even noticed was there, and a stop at honeycovecraftcollective did the same, the kind of post that gives you more than you expected when you first clicked through from somewhere else, a real find for anyone curious about the area covered here.
Reading this in the time it took to drink half a cup of coffee, and a stop at flarequill fit naturally into the second half, content that respects the rhythms of a typical morning is content with practical fit and this site has the kind of length and pacing that works for the way I actually read.
Looking back on this reading session it stands as one of the better ones recently, and a look at birchharborcraftcollective extended that ranking, the informal ranking of reading sessions against each other is something I do mentally and this session ranks high largely because of this site and a couple of related pages here.
mostbet mines demo [url=mostbet60471.help]mostbet mines demo[/url]
melbet connexion sur mobile [url=https://www.melbet29619.help]melbet connexion sur mobile[/url]
aviator bonus code for Bangladesh [url=https://www.aviator20596.help]aviator bonus code for Bangladesh[/url]
мостбет смотреть матчи [url=http://mostbet22685.online]http://mostbet22685.online[/url]
pin up toʻlov kartasi bog‘lash [url=http://pinup58663.help]http://pinup58663.help[/url]
mostbet как вывести через приложение [url=mostbet74039.help]mostbet74039.help[/url]
However casually I came to this site I have ended up reading carefully, and a look at frostridgecraftcollective continued earning that careful reading, the conversion from casual visitor to careful reader is something content earns rather than demands and this site has accomplished that conversion for me over the course of just a few pieces.
melbet inregistrare cu email [url=https://www.melbet78692.help]melbet inregistrare cu email[/url]
Decided to read this site for a while before forming a verdict, and the verdict after several pages is positive, and a stop at portolive continued that pattern, judging a site requires more than one post and giving sites a fair sample is something I try to do for promising candidates rather than rushing to dismiss.
wsparcie mostbet [url=www.mostbet59068.help]wsparcie mostbet[/url]
Useful read, especially because the writer did not assume too much background from the reader, and a quick look at gingercoveartisanexchange continued in the same way, a thoughtful site that meets people where they are which is something the modern web could use a lot more of for both casual and serious readers.
Liked the natural conversational tone throughout, never stiff and never overly casual either, and a stop at flintmeadowcommercegallery kept that comfortable middle ground going, finding a tone that respects the reader without becoming distant or overly familiar is harder than it sounds and this site nails that balance consistently across many different pieces.
Reading this gave me something to think about for the rest of the afternoon, and after tealharborcommercegallery I had even more to mull over, the kind of post that lingers in the background of your day rather than evaporating immediately is genuinely valuable in an attention economy that punishes depth rather than rewarding it.
Comfortable read, finished it without realising how much time had passed, and a look at timbertrailartisanexchange pulled me into more pages the same way, the absence of friction in good content lets time disappear and that is one of the highest compliments I can pay any piece of writing I find online during a regular search session.
Reading this confirmed a small detail I had been uncertain about, and a stop at amberharborartisanexchange provided the source for further checking, content that supports verification through citations or links rather than just asserting facts is more trustworthy and this site has clearly built its credibility through that kind of verifiable approach consistently.
bitcoin poker australia [url=https://online-poker-bitcoin.de]bitcoin poker australia[/url] .
Looking back on this reading session it stands as one of the better ones recently, and a look at floraridgeartisanexchange extended that ranking, the informal ranking of reading sessions against each other is something I do mentally and this session ranks high largely because of this site and a couple of related pages here.
Saving the link for sure, this one is a keeper, and a look at trustedshoppinghub confirmed I should bookmark the entire site rather than just this page, the consistency across what I have seen so far suggests there is a lot more here worth coming back for soon when I have more time.
Speaking from the perspective of having read widely on the topic this site offers something distinct, and a look at coralharborcraftcollective reinforced that distinctness, the rare site that contributes something genuinely original to a saturated topic is the rare site worth following carefully and this one has demonstrated that original contribution capability today.
Useful enough to recommend to several people I know who would appreciate it, and a stop at rivercovevendorparlor added more material I will pass along too, the kind of writing that earns word of mouth is the kind that actually delivers on its promises which is what this site does without any drama or fanfare attached.
888starz скачать официальный сайт [url=http://www.888starzuz3.com/apk/]https://888starzuz3.com/apk/[/url]
The lack of unnecessary jargon made the post accessible without sacrificing accuracy, and a look at velvetbrookartisanexchange continued in the same accessible style, technical topics often hide behind specialised vocabulary but here the writer trusts the reader to keep up with plain language and that trust pays off nicely throughout the entire post.
888starz ios [url=http://www.888starzuz4.com/apk]https://888starzuz4.com/apk/[/url]
888starz official website [url=http://www.888starzuz5.com]https://888starzuz5.com/[/url]
A quiet kind of confidence runs through the writing, and a look at crowncovecraftcollective carried that same understated assurance, confidence without bragging is the most attractive register for online writing and the writers here have clearly developed it through practice rather than affecting it through stylistic tricks that would feel hollow eventually.
Android kullanıcısı olarak iyi bir uygulama şart. Herkes farklı bir link atıyordu kime güveneceğimi bilemedim. En sonunda sağlam bir kaynağa ulaştım ve size de buradan bahsetmek istediğim nokta şurası: 1xbet mobil apk [url=https://1xbet-apk-5.com]1xbet mobil apk[/url]. Valla bak net söyleyeyim — mobil versiyonu bütün özellikleri sunuyor.
yüklemesi de çok kolaydı yani rahat olun. İşin doğrusunu söylemek gerekirse — başka yerde vakit kaybetmeyin yani. Umarım siz de memnun kalırsınız…
Now planning to recommend this site in a context where my recommendations are taken seriously, and a stop at portpoise confirmed I should make that recommendation soon, the small but real act of recommending content into spaces where my taste matters is something I take seriously and this site is worth the recommendation.
Appreciated the way each section connected smoothly to the next without abrupt jumps, and a stop at seameadowcommercegallery kept that flow going nicely, transitions are something most blog writers ignore but the difference is huge for the reader who is trying to follow a sustained line of thought today across many different topics.
Just wanted to say this was useful and leave a small note of thanks, and a quick visit to garnetharborcraftcollective earned a similar nod from me, the small acknowledgements add up over time and represent the real economy of trust that good content runs on across the open and increasingly fragmented modern internet.
Народ, слушайте — когда близкий человек начинает пить сутками, а ты не знаешь куда бежать . Моя семья с таким столкнулась года два назад . Думали, уговорами поможем — хрен там было. Оказалось , без врачей и нормального наблюдения никак . Обзвонил все конторы в городе — сплошной развод . Пока нашёл один реально рабочий вариант. Если ищете где сделать вывод из запоя в стационаре — не ведитесь на дешёвые акции . В Нижнем Новгороде , кстати , хватает левых контор без лицензии. Нормальные контакты вот тут : клиники по лечению алкоголизма [url=https://vyvod-iz-zapoya-v-staczionare-nizhnij-novgorod-26.ru]клиники по лечению алкоголизма[/url] Откровенно говоря, после того как вник в детали, многое стало понятно . И про кодировку от алкоголя в Нижнем Новгороде, и про условия в стационаре и питание. Плюс анонимность — это важно . Советую не откладывать в долгий ящик.
Liked everything about the experience, from the opening through to the closing notes, and a stop at walnutcovecraftcollective extended that into more pages, finding a site where the editorial vision shows through every choice rather than feeling random is an increasingly rare experience and one I am glad to have today during this particular reading session.
Güvenilir bir apk bulmak gerçekten işkenceydi valla. Herkes bir şey tavsiye ediyordu kafam allak bullak oldu. En sonunda güvendiğim bir adrese ulaştım ve size de buradan bahsetmek istediğim nokta şurası: 1xbet android uygulama [url=https://1xbet-apk-6.com]1xbet android uygulama[/url]. Yani anlatmak istediğim şu — android uygulaması resmen süper çalışıyor.
ram kullanımı da çok iyi gerçekten. İşin doğrusunu söylemek gerekirse — en başarılı uygulama bu oldu artık. Herkese hayırlı olsun…
The depth of coverage felt about right for the format, neither shallow nor overwhelming, and a look at icicleisleartisanexchange kept that calibration going, getting the depth right for blog format is genuinely difficult because too shallow loses experts and too deep loses beginners but this site nailed it nicely which I really do appreciate.
Worth your time, that is the simplest endorsement I can give, and a stop at forestcovemerchantgallery extends that endorsement across the rest of the site, this is one of those increasingly rare places that delivers on what it promises rather than over selling the content and under delivering on substance every time which I find frustrating elsewhere.
Güvenilir bir apk dosyası bulmak gerçekten zordu valla. Virüslü dosya riski yüzünden çekindim açıkçası. Sonunda tüm teknik detayları inceleyip sistemi test ettim. En sonunda güvendiğim bir kaynağa ulaştım ve size de tüm detayları aktarmak istedim, güncel bilgilere buradan bakabilirsiniz: 1xbet mobil apk [url=https://1xbet-apk-8.com]1xbet mobil apk[/url]. Yani anlatmak istediğim şu — android uygulaması inanılmaz hızlı çalışıyor.
bildirimleri de çok düzenli geliyor. Kendi deneyimlerimi aktarıyorum size — kesinlikle pişman olmazsınız deneyin derim. Herkese hayırlı olsun…
Working through this site has been a small antidote to the shallow content that fills most of my reading time, and a stop at gingercovecraftcollective extended that antidote function, sites that quietly improve the average quality of my reading by being themselves are sites worth supporting through return visits and recommendations consistently.
Skipped the TLDR thinking I would read everything anyway, and ended up enjoying the path through the full post, and a stop at uplandcovemerchantgallery similarly rewarded the patient read, summaries are useful but the journey through good writing is part of what makes the destination feel earned rather than just delivered cleanly.
Now realising the topic deserved better treatment than it has been getting elsewhere, and a look at flickaltar extended that broader recognition, content that exposes the gap between actual quality and average quality elsewhere is doing the quiet work of raising standards and this site is contributing to that elevation in its own corner.
Thanks for not padding this with the usual filler intros and outros that every other blog seems to require, and a quick visit to amberharborcraftcollective continued that lean approach across more posts, content stripped of waste is content that respects you and I will always come back to that kind of approach.
Beats most of the alternatives on the topic by a noticeable margin, and a look at amberharbormerchantgallery did not change that at all, this is one of the better corners of the open internet for this kind of content and I am glad I clicked through rather than skipping past quickly like I usually do.
Mobile özel bir platform arıyordum uzun süredir. Virüs bulaşır diye çok korktum açıkçası. Güncel bilgileri kontrol edip süreci hatasız başlattım. En sonunda doğru kaynağa ulaştım ve size de tüm detayları aktarmak istedim, güncel bilgilere buradan bakabilirsiniz: 1xbet apk son sürüm [url=https://1xbet-apk9.com]1xbet apk son sürüm[/url]. Valla bak net söyleyeyim — android uygulaması gerçekten stabil çalışıyor.
yüklemesi de basit ve hızlıydı yani rahat olun. Kendi deneyimlerimi aktarıyorum size — başka yerde vakit kaybetmeyin yani. Şimdiden iyi şanslar ve bol kazançlar…
Liked how the writer used real examples instead of theoretical ones to make the points stick, and a stop at gladeridgeartisanexchange added even more concrete examples, this is the kind of practical approach that respects readers who actually want to apply what they learn rather than just nodding along passively without doing anything useful.
Знаете, бывает такое — близкий на грани, а везти в больницу нет никаких сил. Моя семья это пережила совсем недавно. Руки опускаются, а время тикает. Начинаешь обзванивать знакомых , а вокруг одни обещания . Пока кто-то не подсказал один нормальный проверенный вариант. Если нужна немедленная консультация — а ехать куда-то нет физической возможности , то выход один . Речь конкретно про анонимный вызов врача нарколога на дом . В Москве , если честно, тоже полно левых контор без лицензии. Нормальные контакты, кто реально приезжает вот тут : врач нарколог вызов на дом [url=https://narkolog-na-dom-moskva-30.ru]врач нарколог вызов на дом[/url] Откровенно скажу, после того как прочитал , многое прояснилось . И про снятие запоя на дому, и про последующее кодирование. Плюс анонимность — это важно . Рекомендую не откладывать.
Mobil platform arayışım epey sürdü valla. Virüs bulaşır mı diye çok tereddüt ettim açıkçası. Adımları doğru sırayla uyguladıktan sonra erişim sorunsuz açıldı. En sonunda sağlam bir kaynağa ulaştım ve size de tüm detayları aktarmak istedim, güncel bilgilere buradan bakabilirsiniz: 1xbet apk son sürüm [url=https://1xbet-apk-7.com]1xbet apk son sürüm[/url]. Yani anlatmak istediğim şu — mobil versiyonu masaüstünü aratmıyor kesinlikle.
batarya tüketimi de makul düzeyde. Kendi deneyimlerimi aktarıyorum size — başka yerde vakit kaybetmeyin yani. Umarım siz de memnun kalırsınız…
Знаете, бывает ситуация — близкий в тяжелом состоянии, а тащить в больницу страшно . Моя семья такое пережила совсем недавно. Сидишь, не знаешь что делать . Хватаешься за телефон , а в ответ одни отговорки. Пока случайно не наткнулся на один проверенный вариант. Требуется немедленная консультация — а тащить человека сам просто физически не можете, то нужно вызывать врача на дом. Я про нарколога на дом . В Москве , если честно, хватает шарлатанов, которые тянут бабло . Вся проверенная информация вот тут : врач нарколог на дом [url=https://narkolog-na-dom-moskva-29.ru]врач нарколог на дом[/url] Откровенно говоря, после того как ознакомился с условиями, понял, как действовать правильно. И про снятие запоя на дому, и про консультацию нарколога . Плюс анонимность — это важно . Советую не тянуть резину .
Felt the post was written for someone like me without explicitly addressing me, and a look at trailharborartisanexchange produced the same fit, when content lands on its target without pandering you know the writer has done careful audience thinking rather than relying on demographic targeting or interest signals to do the work of editorial decisions.
https://notionpress.com/author/1537150
Bookmark folder reorganised slightly to make this site easier to find, and a look at brightharborartisanexchange earned the same accessibility upgrade, the small organisational moves I make for sites I expect to return to often are themselves a signal of how much I trust them and this site triggered those moves naturally.
Знаете ситуацию выматывает , когда родственник просто не может остановиться . Ломаешь голову , а вокруг одна потёмки . Моему брату потребовался срочный выход . Пьют успокоительное , но это не помогает . Нужно именно профессиональная помощь . Я перелопатил кучу сайтов , пока понял одну простую вещь: без нормальных условий ничего толку не будет . В обычной квартире срыв стопроцентный . Ищешь нормальный вариант для качественного вывода из запоя с помещением в клинику — тогда тебе сюда . В Нижнем , кстати, развелось этих “центров” . Лучше сразу перейти на сайт, где нет вранья про кодирование от алкоголизма и выезд врача . Вся суть здесь: лечение алкогольной зависимости нижний новгород [url=https://vyvod-iz-zapoya-v-staczionare-nizhnij-novgorod-22.ru]лечение алкогольной зависимости нижний новгород[/url] Честно скажу , сам офигел , сколько нюансов в этой теме. И кстати, цены адекватные. Для Нижнего это реально стоящий вариант.
Mobile özel bir platform arıyordum uzun zamandır. Sürekli farklı adresler veriliyordu kime inanacağımı şaşırdım. En sonunda doğru kaynağa ulaştım ve size de buradan bahsetmek istediğim nokta şurası: 1xbet apk son sürüm [url=https://1xbet-apk-4.com]1xbet apk son sürüm[/url]. Valla bak net söyleyeyim — android uygulaması inanılmaz stabil çalışıyor.
güncellemeleri otomatik yapıyor çok memnunum. Birçok apk denedim ama en sorunsuzu bu çıktı — başka yerde vakit kaybetmeyin yani. Herkese hayırlı olsun…
Ребята, кто уже делал ремонт? Хочу объединить маленькую кухню с гостиной, Мосжилинспекция сразу завернёт любые несогласованные работы. Потратил уйму свободного времени на чтение строительных форумов. Короче говоря, единственное, что реально работает в наших реалиях — сразу заказать техническое заключение у лицензированной компании, чтобы потом не было проблем со штрафами.
Они и все чертежи грамотно сделают, Жмите на источник, чтобы случайно не потерять контакты, заказать проект перепланировки квартиры [url=https://proekt-pereplanirovki-kvartiry30.ru]https://proekt-pereplanirovki-kvartiry30.ru[/url]. Без готового проекта даже не начинайте ломать стены, Обязательно перешлите этот пост тому, кто тоже сейчас затеял ремонт!
Honestly impressed, did not expect to find this level of care on the topic, and a stop at crystalcoveartisanexchange cemented the impression, you can tell within the first few paragraphs whether a site is going to be worth the time and this one delivered on that early promise nicely throughout the rest of what I read.
Знаете, ситуация — человек пропадает , а куда бежать — непонятно . Я через это прошел несколько лет назад. Пьют успокоительное, но нет . Нужна реальная помощь . Перерыл весь интернет — одни обещания . Пока не нашел один нормальный вариант. Если ищешь где получить анонимное лечение алкоголиков — не ведись на дешевые акции . В Воронеже , кстати , тоже полно левых контор без лицензии. Вся проверенная информация ниже по ссылке: наркологическая помощь [url=https://narkologicheskaya-pomoshh-voronezh-11.ru]наркологическая помощь[/url] Честно скажу , после того как прочитал , многое прояснилось . Там и про вывод из запоя , и про реабилитацию . Плюс работают круглосуточно — это важно . Рекомендую не откладывать.
Reading this confirmed that my time researching the topic in other places had not been wasted, and a stop at ivypiers extended the confirmation, when independent sources agree that is a useful signal and this site is one of the more reliable sources I have found for cross checking what I read elsewhere on similar subjects.
During a reading session that included several other sources this one stood out, and a look at seameadowgoodsgallery continued the standout quality, the side by side comparison of sources during research is a useful exercise and this site has been winning those comparisons for me consistently across multiple research sessions during the last week.
мостбет aviator на деньги [url=https://mostbet22685.online]https://mostbet22685.online[/url]
mostbet Oʻzbekistonda stavka [url=http://mostbet60471.help/]mostbet Oʻzbekistonda stavka[/url]
pin up depozit qaytmadi [url=https://pinup58663.help]pin up depozit qaytmadi[/url]
Reading this slowly because the writing rewards a slower pace, and a stop at gildedcovecraftcollective did the same, the pace at which I read content is something I now use as a quality signal and writing that earns a slower pace earns my attention as a reader looking for substance these days.
Came across this looking for something else entirely and ended up reading it through twice, and a look at waveharborartisanexchange pulled me deeper into the site than I planned, the writing has a way of holding attention without resorting to manipulative cliffhangers or vague promises that never get delivered later down the page.
Liked the way the post handled the final paragraph, no neat bow but no abrupt cutoff either, and a stop at ivoryharborcommercegallery continued that thoughtful ending pattern, endings are hard and most blog writers either over engineer them or skip them entirely and this site has clearly figured out a sustainable middle approach.
aviator android download link [url=https://www.aviator20596.help]aviator android download link[/url]
melbet-ci [url=http://melbet29619.help/]http://melbet29619.help/[/url]
Android cihazımda sorunsuz çalışan bir platform çok lazımdı. Herkes farklı bir şey diyordu kime güveneceğimi şaşırdım. En sonunda güvendiğim bir kaynağa ulaştım ve size de buradan bahsetmek istediğim nokta şurası: 1xbet indir apk [url=https://1xbet-apk-3.com]1xbet indir apk[/url]. Şimdi size kısaca özet geçeyim — android uygulaması resmen harika çalışıyor.
yüklemesi de iki dakikadan az sürdü yani rahat olun. İşin doğrusunu söylemek gerekirse — başka yerde vakit kaybetmeyin yani. Umarım siz de memnun kalırsınız…
Знаете, бывает — человек срывается , а руки опускаются . Я через это прошёл лично . Сначала кажется, что обойдётся , но нет . Нужна реальная медицина. Перерыл весь интернет — одни обещания. Пока не нашёл один действительно рабочий вариант. Ищешь где сделать помещение в клинику для вывода из запоя, не ведись на дешёвые обещания . У нас в Нижнем, к слову , тоже хватает левых контор. Проверенная информация по ссылке ниже: клиники по лечению алкоголизма [url=https://vyvod-iz-zapoya-v-staczionare-nizhnij-novgorod-25.ru]клиники по лечению алкоголизма[/url] Откровенно скажу, после того как прочитал , понял свои ошибки. Там и про кодирование от алкоголизма расписано , и про выезд нарколога на дом . И цены адекватные. Рекомендую не откладывать.
joc aviator melbet [url=https://melbet78692.help/]joc aviator melbet[/url]
как сделать депозит мостбет [url=https://www.mostbet74039.help]https://www.mostbet74039.help[/url]
Felt the post was written for someone like me without explicitly addressing me, and a look at apricotharborvendorroom produced the same fit, when content lands on its target without pandering you know the writer has done careful audience thinking rather than relying on demographic targeting or interest signals to do the work of editorial decisions.
mines mostbet wypłata [url=mostbet59068.help]mostbet59068.help[/url]
Decided to write a short note to the author if there is contact info anywhere, and a stop at cottonmeadowartisanexchange extended that intention, the urge to thank the writer directly is a strong signal of content quality and this site has triggered that urge in me today which is a fairly rare event for my reading.
Appreciate how nothing here feels copied or pieced together from other places, the voice is consistent and the tone stays human, and after I checked birchharborcommercegallery I noticed the same style holds, which is a small detail but it makes the whole experience feel personal rather than like another generic site.
эротические обучение боди массаж казань
Looking at the surface design and the substance together this site has both right, and a look at waveharborcraftcollective reinforced that integrated quality, sites where presentation and content reinforce each other rather than fighting are sites with full editorial coherence and this one has clearly invested in both layers in a balanced way.
Pass this along to anyone you know dealing with similar questions, the answers here are clear, and a stop at icicleislecraftcollective adds even more useful material, this is the kind of resource that deserves to circulate widely rather than getting lost in the constant churn of new content online that buries good work daily.
Quietly building a case in my head for why this site deserves more attention than it currently seems to receive, and a look at apricotharborartisanexchange reinforced the case, the gap between quality and recognition is a recurring frustration in independent online content and this site is one of the cases that seems particularly egregious to me today.
My friends would appreciate a few of these posts and I will be sending links accordingly, and a look at glassharborartisanexchange added more pages to my share queue, content that earns shares to specific people in specific contexts is content with social utility and this site is generating those targeted shares from me consistently lately.
This actually answered the question I had been searching for, and after I checked flareaisles I had a few more pieces I had not realised I needed, that is the sign of a site that knows what its readers want before they even know how to ask it which is impressive.
Closed the tab with a small sense of finality rather than the usual rushed exit, and a stop at gingercoveartisanexchange produced the same considered closing, when reading ends with deliberate satisfaction rather than impatient skip you know the time was well spent and this site is producing those satisfying endings consistently across what I read.
Left me wanting to read more rather than feeling burned out, that is a good sign, and a look at elmharborcraftcollective confirmed there is plenty more here to explore, the kind of writing that builds appetite rather than killing it which is a rare quality on the modern open internet today across most categories of content.
Worth bookmarking and sharing with anyone interested in the topic, that is my honest take, and a stop at uplandcovecraftcollective reinforces that, the kind of generous resource that makes the open web feel worth defending against the constant pressure to retreat into walled gardens and curated feeds today everywhere I look across all my devices.
Bookmark earned, share earned, return visit earned, all from one reading session, and a look at discovernewpossibility did the same, the trifecta of bookmark and share and return is rare in a single visit and represents the highest level of engagement I tend to offer any piece of online content these days here.
Without overstating it this is a quietly excellent post, and a look at silkmeadowcommercegallery extended that quiet excellence, content that earns superlatives without demanding them through marketing language is content that has truly earned them through the substance and this site has clearly produced work in that earned excellence category today.
Reading this slowly because the writing rewards a slower pace, and a stop at flowlegend did the same, the pace at which I read content is something I now use as a quality signal and writing that earns a slower pace earns my attention as a reader looking for substance these days.
Гайды по мобильным играм Гайды по играм
Really like the way the post resists reaching for cliches that would have made it feel generic, and a quick visit to woodharborvendorroom kept that fresh feel going, original phrasing and unexpected metaphors are signs that the writer is actually thinking rather than just stitching together familiar phrases into the appearance of content.
A quiet piece that did not try to compete on volume, and a look at lemonlarkmerchantgallery maintained that selective approach, sites that publish less but better are increasingly rare in an environment that rewards volume and this one has clearly chosen quality cadence over quantity which is a brave editorial decision in current conditions.
The overall presentation here feels natural and nicely structured, helping readers stay engaged in the discussion easily.
在线购买无处方安定片 xxx Pornhub
Skipped the comments section but might come back to read it, and a stop at glassmeadowvendorparlor hinted at a quality reader community, sites where the comments are worth reading separately from the post are increasingly rare and signal a particular kind of audience that has grown around the editorial vision over time gradually.
Mobil bahise ilgi duyalı çok oldu aslında. Herkes farklı bir şey söylüyordu kime güveneceğimi bilemedim. Sonunda tüm teknik detayları inceleyip sistemi test ettim. En sonunda güvendiğim bir kaynağa ulaştım ve size de tüm detayları aktarmak istedim, güncel bilgilere buradan bakabilirsiniz: 1xbet mobil apk [url=https://1xbet-apk-8.com]1xbet mobil apk[/url]. Yani anlatmak istediğim şu — telefonuma kurduğuma çok memnunum.
Hiçbir takılma yaşamadım şu ana kadar. Kendi deneyimlerimi aktarıyorum size — kesinlikle pişman olmazsınız deneyin derim. Herkese hayırlı olsun…
Found this via a link from another piece I was reading and the click was worth it, and a stop at cloudcovemerchantgallery extended the value across more material, the open web still rewards clicking through citations when the underlying writers care about each other work and this site clearly belongs to that network.
Güvenilir bir apk bulmak gerçekten işkenceydi valla. Virüslü dosyalardan çok korktum açıkçası. En sonunda güvendiğim bir adrese ulaştım ve size de buradan bahsetmek istediğim nokta şurası: 1xbet yükle android [url=https://1xbet-apk-6.com]1xbet yükle android[/url]. Valla bak net söyleyeyim — telefonuma kurduktan sonra çok mutlu oldum.
Hiçbir sorun çıkmadı şu ana kadar. Kendi deneyimlerimi aktarıyorum size — başka yerde vakit kaybetmeyin yani. Herkese hayırlı olsun…
Solid information that lines up with what I have been hearing from other reliable sources, and after my visit to brightharborcraftcollective I was even more certain of that, this site checks out which is something I value highly when so many places online play loose with the facts to chase a quick click.
Now adding a small note in my reading log that this site is one to watch, and a look at wheatcovecraftcollective reinforced the watch status, the few sites I track deliberately rather than encounter accidentally are sites I expect ongoing returns from and this one has cleared the bar for that elevated tracking based on what I read.
Mobil platform arayışım epey zaman aldı valla. Play Store’da arattım ama son sürümü bulamadım. En sonunda sağlam bir kaynağa ulaştım ve size de buradan bahsetmek istediğim nokta şurası: 1xbet android [url=https://1xbet-apk-5.com]1xbet android[/url]. Şimdi size kısaca özet geçeyim — mobil versiyonu bütün özellikleri sunuyor.
yüklemesi de çok kolaydı yani rahat olun. Birçok apk denedim ama en iyisi bu çıktı — başka yerde vakit kaybetmeyin yani. Şimdiden iyi şanslar ve bol kazançlar…
Started reading and ended an hour later without realising the time had passed, and a look at harborstoneartisanexchange produced the same time dilation effect, when content makes time feel different the writer has achieved something well beyond the average and this site is producing that experience for me reliably across multiple readings.
Гайды по мобильным играм Гайды по мобильным играм
Walked away in a slightly better mood than when I started reading, that says something about the writing, and a stop at auroracovecraftcollective kept that going, content that leaves you feeling more capable rather than overwhelmed is the kind I keep coming back to again and again over the years and across many topics.
Никогда не думал, что столкнусь — близкий на грани, а тащить куда-то страшно . Моя семья это пережила совсем недавно. Сидишь, не знаешь за что хвататься . Лезешь в интернет, а вокруг сплошной развод. Пока кто-то не подсказал один нормальный проверенный вариант. Требуется немедленная консультация — а самому везти просто нереально, то нужно вызывать врача. Речь конкретно про срочную наркологическую помощь на дому . В Москве , если честно, хватает левых контор без лицензии. Нормальные контакты, кто реально приезжает вот тут : частный нарколог на дом телефон [url=https://narkolog-na-dom-moskva-30.ru]частный нарколог на дом телефон[/url] Честно говоря , после того как вник в детали, многое прояснилось . И про снятие запоя на дому, и про последующее кодирование. И цены адекватные, без разводов на месте. Советую не тянуть .
Felt this in a way I cannot quite explain, the topic just hit different here, and a stop at jasperharborartisanexchange continued in that vein, sometimes you find a site whose perspective lines up with how you have been thinking and reading their work feels like a small relief which I appreciated more than I expected.
Telefonumdan bahis oynamayı seviyorum aslında. Herkes farklı bir link atıyordu doğruyu bulmak imkansızdı. Sonunda tüm teknik detayları inceleyip sistemi test ettim. En sonunda sağlam bir kaynağa ulaştım ve size de tüm detayları aktarmak istedim, güncel bilgilere buradan bakabilirsiniz: 1xbet mobil apk [url=https://1xbet-apk-7.com]1xbet mobil apk[/url]. Yani anlatmak istediğim şu — android uygulaması gerçekten akıcı çalışıyor.
kurulumu da çok hızlıydı yani rahat olun. Birçok apk denedim ama en iyisi bu çıktı — başka yerde vakit kaybetmeyin yani. Umarım siz de memnun kalırsınız…
Reading this prompted me to dig out an old reference book related to the topic, and a stop at etheraisles extended that connection to other sources, content that connects me back to my own existing knowledge rather than asking me to forget it is content with continuity and this site has that continuous quality.
Mobile özel bir platform arıyordum uzun süredir. Virüs bulaşır diye çok korktum açıkçası. Güncel bilgileri kontrol edip süreci hatasız başlattım. En sonunda doğru kaynağa ulaştım ve size de tüm detayları aktarmak istedim, güncel bilgilere buradan bakabilirsiniz: 1xbet apk son sürüm [url=https://1xbet-apk9.com]1xbet apk son sürüm[/url]. Valla bak net söyleyeyim — android uygulaması gerçekten stabil çalışıyor.
Hiçbir sorun yaşamadım şu ana kadar. İşin doğrusunu söylemek gerekirse — kesinlikle pişman olmazsınız deneyin derim. Herkese hayırlı olsun…
I think I will become a great follower.Just want to say your post is striking. The clarity in your post is simply striking and i can take for granted you are an expert on this subject.
However selective I am about new bookmarks this one made it past my filter, and a look at floraridgeartisanexchange confirmed the bookmark was worth the slot, the precious slots in my permanent bookmark folder are difficult to earn and this site earned one without making me think twice about whether the slot was justified by the quality.
Genuine reaction is that I will probably think about this on and off for a few days, and a look at discovernewmomentum added fuel to that, the best content lingers in your head after you close the tab rather than evaporating immediately and this site clearly knows how to write that kind of memorable content.
Loved the writing voice here, friendly without being fake and confident without being arrogant, and a stop at plumcovemerchantgallery carried the same tone forward, the kind of personality that makes a reader feel welcome rather than lectured at which is a balance plenty of writers struggle to find no matter how long they have been at it.
Now considering carefully how to share this site with the right audience rather than broadcasting widely, and a look at valecoveartisanexchange extended that careful sharing impulse, content worth sharing carefully rather than spamming is content that has earned a higher kind of recommendation and this site has earned that careful shareability throughout pieces.
What i discover troublesome is to find a weblog that may capture me for a minute however your blog is different. Bravo.
Really appreciate that the writer did not stretch the post to hit some target word count, the points end when they are made, and a stop at acornharborcraftcollective reflected the same discipline, brevity is generosity in disguise and this site has clearly figured that out far better than most blog operations have.
Подскажите, кто реально знает. Решил снести ненесущую стену между комнатами, а тут оказывается столько бумажек надо собрать, Потратил уйму свободного времени на чтение строительных форумов. Короче говоря, единственное, что реально работает в наших реалиях — это доверить подготовку документов профессиональным инженерам, чтобы спать спокойно и не бояться проверок от управляющей.
Сами полностью проект подготовят, Жмите на источник, чтобы случайно не потерять контакты, перепланировка квартиры проектные организации [url=https://proekt-pereplanirovki-kvartiry30.ru]https://proekt-pereplanirovki-kvartiry30.ru[/url]. Иначе потом прилетит огромный штраф и суды заставят всё вернуть как было. Обязательно перешлите этот пост тому, кто тоже сейчас затеял ремонт!
Stands out for actually being useful instead of just being long, and a look at maplegrovemarkethall kept that going, length without value is the default mode of most blogs these days but this site has clearly chosen a different path which I respect a lot as a reader who values careful editing decisions like that.
Really appreciate the lack of pop ups, modals, cookie banners stacking on top of each other, and a quick visit to forestmeadowcommercegallery confirmed the same clean approach across the rest of the site, technical decisions about user experience are part of what makes content actually pleasant to engage with for sure.
Glad to be one of many visitants on this amazing site : D.
High quality writing, no marketing speak and no buzzwords that mean nothing, and a stop at wildorchardcraftcollective kept that going, simple direct content that actually communicates something is harder to find than it should be and this is one of the rare places that gets it right consistently across many different posts.
Good day! This is my first comment here so I just wanted to give a quick shout out and say I really enjoy reading through your articles. Can you recommend any other blogs/websites/forums that cover the same subjects? Thanks a lot!
Now realising this site has been quietly doing good work for longer than I knew, and a look at fondarbor suggested an archive worth exploring, sites with deep archives of consistent quality represent a different kind of resource than sites with viral hits and this one looks like the durable kind based on what I see.
Telefonumda bahis keyfini çıkarmak istiyordum uzun zamandır. Virüslü bir dosya indirmekten çok korktum açıkçası. Güncel bilgileri kontrol edip süreci hatasız başlattım. En sonunda güvenilir bir kaynağa ulaştım ve size de tüm detayları aktarmak istedim, güncel bilgilere buradan bakabilirsiniz: 1xbet indir apk [url=https://1xbet-apk10.com]1xbet indir apk[/url]. Şimdi size kısaca özet geçeyim — telefonuma kurduğum için çok mutluyum.
kurulumu da oldukça basitti yani rahat olun. Kendi deneyimlerimi aktarıyorum size — en güvenilir uygulama bu oldu artık. Umarım siz de memnun kalırsınız…
vodka casino онлайн водка казино онлайн зеркало
Вот такая беда приключилась — человек в запое , а что делать — просто руки опускаются. Моя семья такое пережила недавно. Сначала кажется, что обойдется , но нет . Требуется профессиональная медицина. Перерыл весь интернет — сплошной развод . А потом наткнулся на один действительно рабочий вариант. Если ищешь где получить наркологическая помощь — не ведись на дешевые акции . В Воронеже , если честно, хватает шарлатанов . Реальные контакты тут : лечение алкоголизма и наркомании центр [url=https://narkologicheskaya-pomoshh-voronezh-12.ru]https://narkologicheskaya-pomoshh-voronezh-12.ru[/url] Честно скажу , после того как ознакомился, многое прояснилось . И про кодирование, и про условия в клинике. И цены адекватные. Советую не откладывать.
Thanks for treating the topic with the seriousness it deserves without becoming pompous about it, and a stop at hazelharborartisanexchange continued that balanced treatment, the gap between earnest and self serious is huge and writers who can stay on the right side of it earn my respect when I find them online today.
Знаете, бывает ситуация — родственник сорвался , а везти в клинику нет сил. Моя семья такое пережила совсем недавно. Сидишь, не знаешь что делать . Хватаешься за телефон , а в ответ одни отговорки. Пока случайно не наткнулся на один проверенный вариант. Требуется немедленная консультация — а ехать куда-то нет никакой возможности , то нужно вызывать врача на дом. Я про нарколога на дом . У нас в столице, кстати , тоже полно шарлатанов, которые тянут бабло . Вся проверенная информация вот тут : нарколог капельница на дом [url=https://narkolog-na-dom-moskva-29.ru]нарколог капельница на дом[/url] Откровенно говоря, после того как ознакомился с условиями, понял, как действовать правильно. И про снятие запоя на дому, и про консультацию нарколога . Плюс анонимность — это важно . Советую не тянуть резину .
Excellent execution from start to finish, the post never loses its rhythm and the points stay sharp, and a quick stop at cloudcoveartisanexchange kept the same level going, consistency like this across a site is the marker of a serious operation rather than a casual side project running on autopilot somewhere else.
Вот такая ситуация — человек не может остановиться, а просто бессилен. Я через это прошёл лично . Сначала кажется, что обойдётся , но нет . Нужна профессиональная помощь . Перерыл весь интернет — одни обещания. Пока не нашёл один действительно рабочий вариант. Если тебе нужно качественное выведение из запоя с госпитализацией , не ведись на дешёвые обещания . У нас в Нижнем, к слову , тоже хватает шарлатанов . Реальные контакты по ссылке ниже: кодирование от алкоголизма нижний новгород [url=https://vyvod-iz-zapoya-v-staczionare-nizhnij-novgorod-25.ru]кодирование от алкоголизма нижний новгород[/url] Честно говоря , после того как ознакомился, многое прояснилось . Там и про кодирование от алкоголизма расписано , и про условия в стационаре. Главное — анонимно . Советую не откладывать.
However many similar pages I have read this one taught me something new, and a stop at silverharborcommercegallery added more new material, content that contributes genuinely fresh information rather than recycling what is already widely available is content with real informational value and this site is providing that informational freshness at a notable rate.
Appreciate the thoughtful approach, the writer clearly took time to make this readable for someone who is not already an expert, and a look at portolives kept that going nicely, easy on the eyes and easy on the brain which is always a winning combination when reading on a busy day.
Looking through the archives suggests this site has been doing this for a while at this level, and a look at sageharborcommercegallery confirmed the long term consistency, sites that have maintained quality across years rather than just a recent stretch are sites with serious editorial discipline and this one has clearly been at it for a while.
A good web site with interesting content, that’s what I need. Thank you for making this web site, and I will be visiting again. Do you do newsletters? I Can’t find it.
https://pets4friends.com/profile-1638715
Appreciated that the writer trusted the reader to follow along without constant restating of earlier points, and a look at jewelbrookartisanexchange continued that respect for the reader, treating an audience as capable adults rather than as people to be hand held through every paragraph is something I notice and value highly across the open internet today.
Honestly enjoyed every minute spent here, that is not something I say lightly, and a look at growwithfocusedsteps confirmed I will be back, the bar for spending time online is high for me these days but this site clears it without effort which is high praise indeed from this reader who is usually rather demanding.
Reading this gave me material for a conversation I needed to have anyway, and a stop at meadowharborgoodsgallery added even more talking points, content that connects to upcoming social or professional needs rather than just being interesting in the abstract is the kind that earns priority placement in my attention these days routinely.
Reading this confirmed a hunch I had been carrying about the topic without having articulated it, and a stop at canyonharborcraftcollective extended the confirmation, content that gives shape to fuzzy intuitions is doing the rare work of making private thoughts public and this site is providing that articulating service consistently for me lately.
Well done, the kind of post that makes you slow down and actually read instead of skimming for keywords, and a look at frostrivercommercegallery kept me reading carefully too, that is a sign of writing that has been crafted rather than churned out for an algorithm to see today and tomorrow.
Telefonuma güvenle yükleyebileceğim bir apk bulmak istiyordum. Play Store’da resmi uygulama yok diye duydum. En sonunda güvendiğim bir kaynağa ulaştım ve size de buradan bahsetmek istediğim nokta şurası: 1xbet mobil apk [url=https://1xbet-apk-3.com]1xbet mobil apk[/url]. Yani anlatmak istediğim şu — android uygulaması resmen harika çalışıyor.
yüklemesi de iki dakikadan az sürdü yani rahat olun. İşin doğrusunu söylemek gerekirse — başka yerde vakit kaybetmeyin yani. Herkese hayırlı olsun…
Reading this triggered a small reorganisation of my own thinking on the topic, and a stop at windharborcraftcollective furthered that reorganisation, content that affects the shape of my mental model rather than just decorating it with new facts is content with structural rather than informational impact and this site provides that.
Felt the writer was speaking my language without trying to imitate it, and a look at valecovecraftcollective continued that natural fit, when a writers default voice happens to match what you find easy to read the experience feels frictionless and that is something I notice and remember about specific sites going forward.
Different in a good way from the cookie cutter content that fills most blogs covering this area, and a stop at alpinecovecraftcollective kept showing me why, original thoughtful writing exists if you know where to look and this site has earned a place on my short list of those rare exceptions worth defending.
I loved your idea there, I tell you blogs are so exciting sometimes like looking into people’s private life’s and work. Every new remark wonderful in its own right.
Now realising the post solved a small problem I had been carrying for weeks, and a look at ivoryridgeartisanexchange extended that problem solving function, content that connects to specific unresolved questions in my own life rather than just providing general interest is content with real practical impact and this site is providing that practical value.
Ребята, выручайте! Кот старый диван в клочья разодрал, надо перетягивать. Теперь мучаюсь — какую взять ткань для мебели, чтобы и выглядело достойно, и кошачьи когти выдержало. купить ткань для перетяжки мебели [url=https://tkan-dlya-mebeli-1.ru]https://tkan-dlya-mebeli-1.ru[/url] Интересно про ткань для обивки мебели — какой вариант самый практичный для дивана, где постоянно лежат с чипсами. Буду благодарен за любые советы, особенно от тех, кто сам перетягивал.
Alright listen up because I’m about to save you a massive headache. Swear some of these “luxury” fleets down here should be in a museum instead of on the road. You land at MIA, tired, grab an Uber to the rental office, and bam — surprise $1500 hold on your card. Fool me four times? Not happening, lesson learned. If you are trying to find a legitimate vehicle without getting ripped off, skip the airport counters entirely. Miami without a decent whip is basically a punishment, especially since the AC must be ice cold and you want zero mileage games.
Most of these local agencies are just polished websites hiding the same overpriced junk, until I finally stumbled on one provider that doesn’t play games. If you are looking for the only straight-up source for premium wheels in South Florida, check the current details here: miami luxury car rentals [url=https://luxury-car-rental-miami-4.com]miami luxury car rentals[/url]. Also, definitely bring polarized shades unless you enjoy driving completely blind into the sunset. Just drive safe out there and maybe pass on that overpriced roadside assistance add-on. let me know if you guys have any other clean spots.
If most people wrote about this subject with the eloquence that you just did, I’m sure people would do much more than just read, they act. Great stuff here. Please keep it up.
Liked that the post left some questions open rather than pretending to settle everything, and a stop at clovercrestcraftcollective continued that intellectual honesty, content that respects the limits of its own claims is more trustworthy than content that overreaches and this site has clearly figured out which positions it can defend confidently.
Seriously, the amount of garbage “luxury” deals down here is astonishing. Then you show up at the local office and it’s a whole different story. Different car, scratches all over, and that “all-inclusive” price? Yeah that didn’t include insurance, fees, or the mandatory cleaning charge. I’ve lived here for years and still get burned occasionally. When you’re after a trustworthy and reliable premium vehicle to cruise around, don’t just grab the cheapest option on Kayak. Ask anyone who’s tried Ubering across the 305 during rush hour, especially since the AC must freeze your teeth and you want unlimited miles or bust.
I’ve personally gone through maybe 30 rental companies across Dade, Broward, and Palm Beach, until I finally found one outfit that actually delivers what’s in the listing. If you are looking for the only honest broker for premium vehicles across South Florida, check the current availability here: rent luxury sedan [url=https://luxury-car-rental-miami-5.com]https://luxury-car-rental-miami-5.com[/url]. Yeah, finding parking in Wynwood will test your patience — but that’s not on them. Just drive safe out there and maybe decline that “premium roadside” upsell — it’s always a scam. let me know if you guys have any other clean spots.
Никогда не думал, что столкнусь — родственник в тяжелом запое , а везти в больницу страшно . Я сам через это прошел совсем недавно. Сидишь, не знаешь за что хвататься . Начинаешь обзванивать знакомых , а вокруг одни обещания . Пока кто-то не подсказал один нормальный проверенный вариант. Если нужна срочная помощь — а самому везти нет физической возможности , то выход один . Я про анонимный вызов врача нарколога на дом . У нас в столице, если честно, тоже полно левых контор без лицензии. Нормальные контакты, кто реально приезжает вот тут : нарколог на дом анонимно [url=https://narkolog-na-dom-moskva-30.ru]нарколог на дом анонимно[/url] Откровенно скажу, после того как вник в детали, понял, как правильно действовать. И про снятие запоя на дому, и про консультацию нарколога . Плюс анонимность — это важно . Советую не откладывать.
Pass this along to anyone you know dealing with similar questions, the answers here are clear, and a stop at seameadowcommercegallery adds even more useful material, this is the kind of resource that deserves to circulate widely rather than getting lost in the constant churn of new content online that buries good work daily.
Decided to read more before commenting and the more I read the more I wanted to say something, and a stop at forgecabin pushed that impulse further, when content provokes the urge to participate rather than just consume it is doing something quite specific and worth recognising clearly when it happens during reading.
Thanks for keeping the writing direct without losing the warmth that makes content feel human, and a stop at fondarbors carried both qualities forward, balancing professionalism and personality is a rare skill and the writers here have clearly figured out how to consistently land it across many posts which I notice.
Definitely a recommend from me, anyone curious about the topic should check this out, and a look at roseharbortradehall adds even more reason for that, the depth and quality combine to make this site one I will be pointing people toward whenever similar conversations come up over the months ahead at work or socially.
Mobile özel bir platform arıyordum uzun süredir. Play Store’da resmi olanı bulamayınca üzüldüm. Adımları doğru sırayla uyguladıktan sonra erişim sorunsuz açıldı. En sonunda doğru kaynağa ulaştım ve size de tüm detayları aktarmak istedim, güncel bilgilere buradan bakabilirsiniz: 1xbet app apk [url=https://1xbet-apk9.com]1xbet app apk[/url]. Yani anlatmak istediğim şu — mobil sürümü bütün özellikleri eksiksiz sunuyor.
depolama alanı da fazla yemiyor gerçekten. İşin doğrusunu söylemek gerekirse — en hızlı uygulama bu oldu artık. Umarım siz de memnun kalırsınız…
Now adding this site to a small mental group of recommendations I keep ready for specific kinds of inquiries, and a stop at oakmeadowcommercegallery extended the recommendation readiness, content that I can confidently point friends and colleagues toward in specific contexts is content with real social utility and this site has that utility clearly.
Picked a single sentence from this post to remember, and a look at woodcovecraftcollective gave me another to keep, content that produces memorable lines is doing more than just transferring information and the small selection of sentences I keep from each reading session is one of the actual returns I get from reading carefully.
Alright listen up because this Miami rental mess is getting out of hand. Then you actually show up to the local office to pick up the car. Different vehicle parked outside, curb rash on every rim, and that “all-inclusive rate”? Ha, doesn’t include the mandatory $300 cleaning fee or the $25 per day toll pass you can’t decline. Fool me six times? Yeah, Miami doesn’t care, lesson learned. If you are trying to find a legitimate vehicle without getting ripped off, stay far away from the airport rental center. Anyone who’s tried the bus here knows exactly what I mean about this city, whether you are doing South Beach dinner plans, Sunny Isles sunrise cruise, or a quick run down to the Florida Keys.
Most of these local agencies are just polished garbage with decent Google reviews bought somewhere, but I eventually found a service where what you reserve is exactly what rolls up, no surprises. If you are looking for the only trustworthy source for premium vehicles across South Florida, check the current details here: rent a premium car [url=https://luxury-car-rental-miami-6.com]rent a premium car[/url]. Yeah, parking in South Beach will cost you a nice dinner — but that’s the price of admission. Anyway, glad there’s at least one honest operator left in this rental jungle, hope this helps some of you save a few bucks.
Most of the time I feel the open web is in decline and then I find a site like this, and a stop at learnanddevelopquickly reinforced that mood lift, the cumulative effect of finding occasional excellent independent content versus the cumulative effect of finding mostly mediocre content is real for the long term reader maintaining web habits today.
The pacing of the post was just right, never rushed and never dragged out unnecessarily, and a look at mooncovecraftcollective maintained the same rhythm, you can tell the writer has experience because the difficult skill of pacing is something only practiced writers manage to handle well in long form content over time and across formats.
Speaking from the perspective of having read widely on the topic this site offers something distinct, and a look at velvetbrookcraftcollective reinforced that distinctness, the rare site that contributes something genuinely original to a saturated topic is the rare site worth following carefully and this one has demonstrated that original contribution capability today.
Let me save you some serious time, learned this the hard way. You spot a sweet deal online: shiny Mercedes, low daily rate, looks perfect. Plus a surprise $2000 hold on your card and a $35 per day GPS you never asked for right before giving you the keys. Fool me seven times? Yeah that’s just Tuesday in Miami, lesson learned. If you are trying to find a legitimate luxury fleet without getting ripped off, avoid the airport like the plague. Miami without real wheels is basically a punishment, especially since the AC must freeze your face off and unlimited miles or forget it.
I’ve tried maybe 40 rental companies across Dade, Broward, and Palm Beach, but I eventually found a service with no games, no bait-and-switch, and no hidden asterisks in paragraph 8. If you are looking for the only straight shooter for premium rides across South Florida, check the current details here: rent luxury sedan [url=https://luxury-car-rental-miami-7.com]https://luxury-car-rental-miami-7.com[/url]. Also, definitely bring polarized shades unless you enjoy driving into the apocalypse every single evening. Just drive safe out there and definitely pass on that “tire protection” upsell — total garbage. hope this helps some of you save a few bucks.
Слушайте, есть важный вопрос. Хочу объединить маленькую кухню с гостиной, а тут оказывается столько бумажек надо собрать, Потратил уйму свободного времени на чтение строительных форумов. В общем, единственное, что реально работает в наших реалиях — это доверить подготовку документов профессиональным инженерам, чтобы потом не было проблем со штрафами.
Сами полностью проект подготовят, Смотрите сами, чтобы не наступать на мои грабли, проект перепланировки квартиры москва [url=https://proekt-pereplanirovki-kvartiry30.ru]проект перепланировки квартиры москва[/url]. Не тяните до последнего, Обязательно перешлите этот пост тому, кто тоже сейчас затеял ремонт!
Mobil platform arayışım epey meşakkatli geçti valla. Virüslü bir dosya indirmekten çok korktum açıkçası. Güncel bilgileri kontrol edip süreci hatasız başlattım. En sonunda güvenilir bir kaynağa ulaştım ve size de tüm detayları aktarmak istedim, güncel bilgilere buradan bakabilirsiniz: 1xbet apk [url=https://1xbet-apk10.com]1xbet apk[/url]. Valla bak net söyleyeyim — telefonuma kurduğum için çok mutluyum.
Hiçbir donma yaşamadım şu ana kadar. Kendi deneyimlerimi aktarıyorum size — kesinlikle pişman olmazsınız deneyin derim. Şimdiden iyi şanslar ve bol kazançlar…
Came in skeptical and left mostly convinced, that is the highest praise I can offer, and a look at jewelbrookcraftcollective pushed me further in the same direction, content that survives a critical first read is rare and worth recognising because most blog posts crumble under any real scrutiny these days when you actually pay attention closely.
Took longer than expected to finish because I kept stopping to think, and a stop at silkmeadowcommercegallery did the same to me, content that provokes thought rather than just delivering information is in a different category and the team here is clearly working at that higher level rather than just cranking out posts.
Знаете, ситуация — человек в запое , а что делать — просто руки опускаются. Я сам через это прошел пару лет назад . Сначала кажется, что обойдется , но хрен там. Требуется профессиональная медицина. Перерыл весь интернет — только деньги тянут. Пока не нашел один действительно рабочий вариант. Нужна срочно анонимное лечение алкоголиков — не ведись на дешевые акции . В Воронеже , кстати , хватает левых контор без лицензии. Реальные контакты ниже по ссылке: лечение наркомании в воронеже [url=https://narkologicheskaya-pomoshh-voronezh-12.ru]лечение наркомании в воронеже[/url] Честно скажу , после того как прочитал , многое прояснилось . И про кодирование, и про условия в клинике. Плюс работают круглосуточно — это важно . Рекомендую не тянуть .
Most posts I read end up forgotten within a day but this one is sticking, and a look at solarmeadowcommercegallery extended that lingering effect, content that survives the immediate moment of reading rather than evaporating is content with genuine retention quality and this site has been producing memorable pieces at a rate notable across my reading.
Pleasant surprise, the post delivered more than the headline promised, and a stop at dawnridgeartisanexchange continued that pattern of under promising and over delivering, the rarest combination on the modern web where most content does the opposite by promising the world and delivering thin recycled summaries instead each time you click on something interesting.
Reading this confirmed something I had been suspecting about the topic, and a look at caramelcoveartisanexchange pushed that confirmation toward greater confidence, content that lines up with independently held intuitions earns a special kind of trust and I will return to writers who consistently land that way for me without overselling positions.
Reading this on a phone at a coffee shop and finding it perfectly suited to that context, and a stop at violetharbortradeparlor continued the comfortable mobile experience, content that works across reading conditions without compromising on substance is increasingly important and this site has clearly thought about the whole reader experience here.
Without comparing too aggressively to other sources this one stands out for the right reasons, and a look at plumharborcommercegallery continued that distinctive quality, content that distinguishes itself through substance rather than style tricks is content with lasting differentiation and this site has clearly chosen substance based differentiation as its core editorial strategy.
Took the time to read the comments on this post too and they were also worth reading, and a stop at isleparishs suggested the community quality matches the content quality, when the conversation around a piece is as good as the piece itself you know you have found a real corner of the internet.
узнать больше
Случается сплошь и рядом — родственник срывается , а руки опускаются . Я через это прошёл лично . Думаешь, сам справится, но нет . Требуется реальная медицина. Обзвонил десяток контор — сплошной развод . А потом наткнулся на один нормальный вариант. Если тебе нужно экстренный вывод из запоя под наблюдением врачей , не рискуй здоровьем. У нас в Нижнем, к слову , тоже хватает левых контор. Реальные контакты тут : наркологические клиники нижний новгород [url=https://vyvod-iz-zapoya-v-staczionare-nizhnij-novgorod-25.ru]наркологические клиники нижний новгород[/url] Откровенно скажу, после того как ознакомился, понял свои ошибки. Там и про кодирование от алкоголизма расписано , и про условия в стационаре. Главное — анонимно . Советую не откладывать.
A piece that did not waste any of its substance on sales or promotion, and a look at alpinecovevendorworkshop continued that pure content focus, sites that resist the urge to monetise every paragraph are increasingly rare and this one has clearly made the editorial choice to keep the writing clean from commercial intrusion which I value highly.
ню фотограф казань Полуобнаженная фотосессия в Казани — идеальный старт для тех, кто впервые пробует этот жанр. Мы начнем с комфортных образов, чтобы вы чувствовали себя уверенно.
https://webyourself.eu/blogs/2013783/C%C3%B3digo-promocional-1xBet-loter%C3%ADa-2026-1xMax200
Got pulled in by the headline and stayed because the content actually delivered on the promise, and a stop at foxarbor kept that trust intact, when a site lives up to its own framing it earns the right to keep showing up in my browser tabs going forward indefinitely from here on out really.
Знаете, достало уже — родственник начинает пить сутками, а ты не знаешь куда бежать . Моя семья с таким столкнулась недавно. Думали, уговорами поможем — хрен там было. Как показала практика, без медикаментов и нормального наблюдения не обойтись. Обзвонил все конторы в городе — сплошной развод . Пока нашёл один реально рабочий вариант. Кому нужно вывод из запоя в стационаре — не ведитесь на дешёвые акции . У нас в Нижнем, кстати , тоже полно левых контор без лицензии. Нормальные контакты вот тут : наркологическая помощь [url=https://vyvod-iz-zapoya-v-staczionare-nizhnij-novgorod-26.ru]наркологическая помощь[/url] Откровенно говоря, после того как почитал , расставил всё по полочкам. Там и про кодирование от алкоголизма подробно расписано , и про условия в стационаре и питание. Плюс анонимность — это важно . Рекомендую не тянуть .
Quiet confidence runs through the whole post, no need to shout to make the points stick, and a stop at explorefreshgrowth carried that same restrained voice forward, content that respects the reader by trusting its own substance rather than dressing it up in theatrical language is what I look for online and rarely actually find these days.
mostbet пополнить счет 2026 [url=www.mostbet83506.help]mostbet пополнить счет 2026[/url]
совместный эротический массаж обучение Освойте массаж точки G и обучение в Казани с экспертами своего дела. Эти знания станут вашим секретным оружием в создании глубокого наслаждения.
Worth saying that the post fit naturally into a rhythm of careful reading, and a stop at mintmeadowgoodsroom extended the same rhythm, content that pairs well with how I actually read rather than demanding a different mode is content well calibrated to its likely audience and this site has clearly thought about that consistently.
полуобнаженная фотосессия казань Ретушь фото в Казани — важная часть качественного результата. Обрабатываю снимки с сохранением естественности, убирая лишь лишнее и подчеркивая главное.
Started a draft response in my head and ended without publishing it because the post said it well enough, and a look at goldencovemarkethall produced the same effect, content that satisfies my urge to add to it by being complete enough on its own is rare and represents a particular kind of editorial completeness here.
Felt like the writer was speaking directly to someone with my level of curiosity, neither talking down nor showing off, and a stop at fastgoodsbazaar kept that comfortable matching going, finding writing that meets you where you are rather than asking you to climb up or stoop down feels great every time it happens.
Adding to the bookmarks now before I forget, that is how good this is, and a look at solarmeadowmarketroom confirmed the rest of the site is worth saving too, this is one of those rare finds that justifies the time spent searching the web for once which is a relief in the current environment.
Now I want to find more sites like this but I suspect they are rare, and a look at trailharbortradeparlor extended that thought, the few sites that meet this quality bar are precious specifically because they are rare and finding others like them is one of the ongoing projects of careful internet curation across the years.
The conclusions felt earned rather than tacked on at the end like an afterthought, and a look at floraharborvendorparlor kept that careful structure going, you can tell when a writer has thought about the shape of their post versus just letting it ramble out and hoping for the best at the end which most do.
If I had to defend the time I spend reading independent blogs this site would feature in the defence, and a look at silverharborcommercegallery reinforced that defensive utility, the ongoing case for non algorithmic reading is one I make to myself periodically and sites like this one provide the actual evidence that supports the case clearly.
A genuine pleasure to find a site that publishes at a sustainable cadence rather than chasing the daily content treadmill, and a look at violetharborcraftcollective confirmed the careful publication rhythm, sites that prioritise quality over frequency are rare and this one has clearly chosen the slower pace which I appreciate as a reader.
Thanks for taking the time to write this, it is clear that some thought went into how each point would land, and after I went through harborstonecraftcollective I had a better grip on the topic, real value without the usual marketing noise people have to put up with online when searching for answers.
Okay folks gather around because this Miami rental nightmare needs to be discussed. Then you show up at the local office and it’s a whole different story. Plus they want a surprise $2000 hold on your debit card right before giving you the keys. Fool me five times? Actually yeah, Miami keeps fooling everyone, lesson learned. If you are trying to find a legitimate luxury fleet without getting ripped off, don’t just grab the cheapest option on Kayak. Ask anyone who’s tried Ubering across the 305 during rush hour, especially since the AC must freeze your teeth and you want unlimited miles or bust.
I’ve personally gone through maybe 30 rental companies across Dade, Broward, and Palm Beach, until I finally found one outfit that actually delivers what’s in the listing. If you are looking for the only honest broker for premium vehicles across South Florida, check the current availability here: miami car rental [url=https://luxury-car-rental-miami-5.com]https://luxury-car-rental-miami-5.com[/url]. Yeah, finding parking in Wynwood will test your patience — but that’s not on them. Anyway, glad there’s at least one straight shooter left in this rental jungle, hope this helps some of you save a few bucks.
Comfortable in tone and substantive in content, that is a hard combination to land, and a look at coralharbormerchantgallery kept that pairing alive across more material, this is what good editorial direction looks like in practice and the team here clearly has someone keeping a steady hand on the wheel across what they decide to publish.
1win fractional odds [url=www.1win5770.help]1win fractional odds[/url]
игра mines 1win [url=https://www.zolotoikolos.ru]игра mines 1win[/url]
Found this useful, the points line up well with what I have been thinking about lately, and a stop at skyharborartisanexchange added some angles I had not considered yet, definitely walking away with more than I came for which is the best outcome from time spent reading online for any kind of topic.
Generally I am cautious about recommending sites on first encounter but this one warrants the exception, and a look at nightorchardcraftcollective reinforced the exception making, the rare site that justifies breaking my normal cautious approach is the rare site worth flagging early and this one has prompted exactly that early flagging response from me.
Никогда не думал, что столкнусь — родственник в тяжелом запое , а тащить куда-то нет никаких сил. Я сам через это прошел совсем недавно. Сидишь, не знаешь за что хвататься . Начинаешь обзванивать знакомых , а вокруг одни обещания . Пока кто-то не подсказал один реально работающий вариант. Если нужна немедленная консультация — а самому везти нет физической возможности , то нужно вызывать врача. Я про анонимный вызов врача нарколога на дом . У нас в столице, если честно, хватает левых контор без лицензии. Вся проверенная информация вот тут : частный нарколог на дом быстро [url=https://narkolog-na-dom-moskva-30.ru]частный нарколог на дом быстро[/url] Честно говоря , после того как вник в детали, понял, как правильно действовать. Там и про капельницы подробно , и про последующее кодирование. Плюс анонимность — это важно . Рекомендую не тянуть .
Thank you for being clear and direct, that simple approach saves so much frustration on the reader’s end, and a stop at windharborartisanexchange only made me more sure of it, the rest of the content seems to follow the same pattern which is a great sign of consistent editorial care behind the scenes.
A particular kind of restraint shows up in the writing, and a look at honeymeadowmarketroom maintained the same restraint across pages, knowing what not to say is just as important as knowing what to say and this site has clearly developed strong instincts on both sides of that editorial line throughout pieces I have read.
1win вывести на Optima через приложение [url=http://1win-kg.buzz/]http://1win-kg.buzz/[/url]
1win Balance.kg [url=https://www.1win-kg.site]https://www.1win-kg.site[/url]
авиатор игра мостбет [url=http://datsun-do.ru]http://datsun-do.ru[/url]
1win ставки на Valorant [url=http://1win-kg.fun/]http://1win-kg.fun/[/url]
mostbet depozit [url=mostbet93547.help]mostbet93547.help[/url]
Without overstating it this is a quietly excellent post, and a look at auroracoveartisanexchange extended that quiet excellence, content that earns superlatives without demanding them through marketing language is content that has truly earned them through the substance and this site has clearly produced work in that earned excellence category today.
Even on a quick first read the substance of the post comes through, and a look at dawnridgecraftcollective reinforced that immediate quality, content that does not require a slow careful read to demonstrate value but rewards one anyway is content with real depth and this site has produced work of that demanding depth class.
Granted my mood today might be elevating my reading experience but I still think this is genuinely good, and a stop at globalcartcenter reinforced that even discounted assessment, controlling for the mood adjustment that affects content perception this site still reads as substantively above average across multiple pieces I have read carefully today.
Now appreciating that the post did not require external context to follow, and a look at fastbuystore maintained the same self contained quality, content that respects new visitors by being readable without prerequisites is content with broader accessibility and this site has clearly invested in keeping each piece reader friendly for fresh arrivals.
Now recognising the post as a rare example of careful writing on a topic that mostly receives careless treatment, and a stop at canyonharborvendorparlor extended that contrast with the average elsewhere, content that highlights how much the average is settling for low quality is content that has both internal merit and external value as a benchmark.
Случается, когда уже не до раздумий — близкий в тяжелом состоянии, а везти в клинику просто нереально . Моя семья такое пережила совсем недавно. Руки опускаются, а время идет. Начинаешь обзванивать знакомых, а в ответ одни отговорки. Пока случайно не наткнулся на один проверенный вариант. Требуется немедленная консультация — а ехать куда-то нет никакой возможности , то нужно вызывать врача на дом. Я про срочную наркологическую помощь на дому . У нас в столице, кстати , тоже полно шарлатанов, которые тянут бабло . Вся проверенная информация ниже по ссылке: лечение алкоголизма на дому в москве [url=https://narkolog-na-dom-moskva-29.ru]лечение алкоголизма на дому в москве[/url] Честно скажу , после того как ознакомился с условиями, многое стало на свои места . Там и про капельницы расписано , и про последующее кодирование. И цены адекватные, без разводов на месте. Рекомендую не ждать чуда.
Ребята, выручайте! Решил обновить кухонный уголок, а старую обивку уже не найти. Теперь мучаюсь — какую взять ткань для мебели, чтобы и выглядело достойно, и кошачьи когти выдержало. самая дешевая ткань для обивки мебели [url=https://tkan-dlya-mebeli-1.ru]https://tkan-dlya-mebeli-1.ru[/url] Говорят, флок и микровелюр быстро вытираются, а рогожка лучше. Нужен метров 15-20, может, кто знает нормального поставщика.
заместитель командира взвода Врач-хирург по контракту имеет право на особые условия оплаты труда и дополнительные льготы. Ваша помощь крайне важна для спасения жизней на передовой.
услуги уборки
модели для видео казань Рекламная съемка в Казани для вашего бизнеса. Специализируюсь на контенте для маркетплейсов и каталожной фотографии товаров.
The overall feel of the post was professional without being stuffy, and a look at firminlets kept that approachable expertise going, finding the right register for technical content is hard but this site has clearly figured out how to sound knowledgeable without slipping into that distant lecturing tone that loses readers in droves every time.
Bookmark added without hesitation after finishing, and a look at orchardharborvendorhall confirmed I should bookmark the homepage too rather than just this page, the rare site that earns category level trust rather than just single article approval is the kind I want to rely on across many different topics over time.
Picked this site to mention to a colleague who would benefit, and a look at autumncovevendorstudio added more material I will pass along, recommending sites to colleagues is a higher bar than recommending to friends because the professional context demands more careful curation and this site cleared the professional bar without me having to think.
Thank you for being clear and direct, that simple approach saves so much frustration on the reader’s end, and a stop at oakcovemarkethall only made me more sure of it, the rest of the content seems to follow the same pattern which is a great sign of consistent editorial care behind the scenes.
Alright listen up because this Miami rental mess is getting out of hand. Then you actually show up to the local office to pick up the car. Plus they slap a surprise $2500 hold on your card for good measure right before giving you the keys. Fool me six times? Yeah, Miami doesn’t care, lesson learned. When you genuinely need a legit and reliable premium ride to cruise around, do some real digging first and read actual customer reviews. Anyone who’s tried the bus here knows exactly what I mean about this city, whether you are doing South Beach dinner plans, Sunny Isles sunrise cruise, or a quick run down to the Florida Keys.
Most of these local agencies are just polished garbage with decent Google reviews bought somewhere, but I eventually found a service where what you reserve is exactly what rolls up, no surprises. If you are looking for the only trustworthy source for premium vehicles across South Florida, check the current details here: car rental miami florida [url=https://luxury-car-rental-miami-6.com]https://luxury-car-rental-miami-6.com[/url]. Yeah, parking in South Beach will cost you a nice dinner — but that’s the price of admission. Just drive safe out there and definitely skip that “damage waiver” upsell — total scam 99% of the time. hope this helps some of you save a few bucks.
Probably the kind of site that should be more widely read than it appears to be, and a look at forestcovevendorgallery reinforced that quiet wish, the gap between a sites quality and its apparent reach is sometimes large and that gap exists for this site in a way that makes me want to mention it more.
Reading this prompted me to clean up some old notes related to the topic, and a stop at zencovegoodsgallery extended that organising urge, content that triggers personal organisation rather than just consuming attention is content with motivating energy and this site has the kind of clarity that prompts active follow up rather than passive consumption.
I appreciate the clarity here, everything is explained in simple terms without unnecessary detail, and after a quick stop at fastgoodsbazaar the points came together nicely for me, the writing keeps things straightforward and respects the reader from start to finish without ever talking down to anyone.
A quiet piece that did not try to compete on volume, and a look at goldenharbortradehall maintained that selective approach, sites that publish less but better are increasingly rare in an environment that rewards volume and this one has clearly chosen quality cadence over quantity which is a brave editorial decision in current conditions.
Speaking as someone who reads a lot on this topic this site has earned a high position in my source rankings, and a stop at solarmeadowcommercegallery reinforced that ranking, the informal ranking of sources for a topic is something I maintain mentally and this site has moved into the upper portion of those rankings clearly.
Reading this triggered a small change in how I think about the topic going forward, and a stop at honeycoveartisanexchange reinforced that subtle shift, the rare content that actually moves my thinking rather than just confirming or filling it is the kind I most value and this site is providing that kind of impact today.
Honestly impressed, did not expect to find this level of care on the topic, and a stop at chestnutharborcraftcollective cemented the impression, you can tell within the first few paragraphs whether a site is going to be worth the time and this one delivered on that early promise nicely throughout the rest of what I read.
мостбет пополнить счет Кыргызстан [url=www.mostbet83506.help]www.mostbet83506.help[/url]
However selective I am about new bookmarks this one made it past my filter, and a look at tealharborvendorparlor confirmed the bookmark was worth the slot, the precious slots in my permanent bookmark folder are difficult to earn and this site earned one without making me think twice about whether the slot was justified by the quality.
Really like that the writer trusts the reader to follow simple logic without restating every previous point, and a stop at snowcoveartisanexchange kept that respect going, treating an audience as capable adults rather than as people who need constant hand holding makes a noticeable difference in the reading experience for me.
A piece that respected the reader by not over explaining the obvious, and a look at bayharborartisanexchange continued that calibrated approach, finding the right level of explanation is one of the harder editorial calls and this site has clearly thought carefully about what readers will already know versus what they need help with consistently.
мостбет версия для ios [url=http://mostbet83506.help/]http://mostbet83506.help/[/url]
ню фотограф казань Ню-фотосессия на выезде в Казани может быть проведена в отеле или у вас дома. Я привезу все необходимое оборудование для качественной съемки в комфортной обстановке.
Just dropping by to say thanks for the effort, it does not go unnoticed when a writer cares this much about the reader, and after I went through trailharborcommercegallery I was certain this is one of the better corners of the internet for this particular kind of content which is genuinely refreshing.
Now realising this site has been quietly doing good work for longer than I knew, and a look at freshguild suggested an archive worth exploring, sites with deep archives of consistent quality represent a different kind of resource than sites with viral hits and this one looks like the durable kind based on what I see.
Вот такая беда приключилась — близкий ломается, а что делать — совсем не знаешь . Моя семья такое пережила недавно. Сначала кажется, что обойдется , но нет . Требуется реальная помощь . Перерыл весь интернет — сплошной развод . Пока не нашел один действительно рабочий вариант. Нужна срочно анонимное лечение алкоголиков — не рискуй здоровьем близкого. У нас в Воронеже, если честно, хватает шарлатанов . Вся проверенная информация тут : платная наркологическая клиника [url=https://narkologicheskaya-pomoshh-voronezh-12.ru]платная наркологическая клиника[/url] Честно скажу , после того как прочитал , многое прояснилось . Там и про вывод из запоя , и про реабилитацию . И цены адекватные. Рекомендую не тянуть .
Подскажите, кто реально знает. Затеял тут сложный ремонт в хрущёвке, без официального проекта даже думать нечего начинать, Потратил уйму свободного времени на чтение строительных форумов. Короче говоря, единственное, что реально работает в наших реалиях — сразу заказать техническое заключение у лицензированной компании, чтобы потом не было проблем со штрафами.
Сами полностью проект подготовят, Обязательно сохраняйте себе эту полезную информацию: проект перепланировки квартиры [url=https://proekt-pereplanirovki-kvartiry30.ru]проект перепланировки квартиры[/url]. Иначе потом прилетит огромный штраф и суды заставят всё вернуть как было. Обязательно перешлите этот пост тому, кто тоже сейчас затеял ремонт!
Telefonumda bahis keyfini çıkarmak istiyordum uzun zamandır. Play Store’da arattım ama son sürümü göremedim. Sonunda tüm teknik detayları inceleyip sistemi test ettim. En sonunda güvenilir bir kaynağa ulaştım ve size de tüm detayları aktarmak istedim, güncel bilgilere buradan bakabilirsiniz: 1xbet indir apk [url=https://1xbet-apk10.com]1xbet indir apk[/url]. Yani anlatmak istediğim şu — mobil versiyonu masaüstüyle yarışır kalitede kesinlikle.
kurulumu da oldukça basitti yani rahat olun. Kendi deneyimlerimi aktarıyorum size — kesinlikle pişman olmazsınız deneyin derim. Umarım siz de memnun kalırsınız…
Appreciate the work that went into laying this out so clearly, every section earns its place without filler, and a look at dunecovecraftcollective confirmed the same care, definitely the kind of place that deserves a return visit when the topic comes up again later in the future or for any related question.
йони массаж для начинающих Обучение йони массажу онлайн в Казани позволяет заниматься в удобном для вас темпе. Изучайте видеоуроки дома и практикуйте полученные навыки в уединении.
Let me save you some serious time, learned this the hard way. You spot a sweet deal online: shiny Mercedes, low daily rate, looks perfect. Plus a surprise $2000 hold on your card and a $35 per day GPS you never asked for right before giving you the keys. Fool me seven times? Yeah that’s just Tuesday in Miami, lesson learned. When you’re searching for a legit and reliable premium ride to cruise around, avoid the airport like the plague. Anyone who’s taken the Metro here knows the struggle about this city, especially since the AC must freeze your face off and unlimited miles or forget it.
I’ve tried maybe 40 rental companies across Dade, Broward, and Palm Beach, until I finally found one outfit that actually delivers what’s promised. If you are looking for the only straight shooter for premium rides across South Florida, check the current details here: rental car in miami [url=https://luxury-car-rental-miami-7.com]https://luxury-car-rental-miami-7.com[/url]. Also, definitely bring polarized shades unless you enjoy driving into the apocalypse every single evening. Just drive safe out there and definitely pass on that “tire protection” upsell — total garbage. let me know if you guys have any other clean spots.
Looking through the archives suggests this site has been doing this for a while at this level, and a look at findyourprogresslane confirmed the long term consistency, sites that have maintained quality across years rather than just a recent stretch are sites with serious editorial discipline and this one has clearly been at it for a while.
1win alternative site [url=https://1win5770.help/]1win alternative site[/url]
1win вход по паролю [url=http://zolotoikolos.ru]http://zolotoikolos.ru[/url]
Started a draft response in my head and ended without publishing it because the post said it well enough, and a look at coralmeadowcommercegallery produced the same effect, content that satisfies my urge to add to it by being complete enough on its own is rare and represents a particular kind of editorial completeness here.
Stands apart from similar pages by actually being useful, that is high praise these days, and a look at woodcoveartisanexchange kept that standard going, you can tell when a site is built around the reader versus around metrics and this one clearly belongs to the first category for sure based on what I read.
Closed the laptop and walked away thinking about the post for a good twenty minutes, and a stop at plumharborvendorroom produced similar lingering thoughts, content that survives the closing of the browser tab is content that has actually entered the mind rather than just decorating the screen for the duration of the reading.
1win пополнить баланс мегапей [url=http://1win-kg.fun/]http://1win-kg.fun/[/url]
Looking back on this reading session it stands as one of the better ones recently, and a look at orchardmeadowmarketroom extended that ranking, the informal ranking of reading sessions against each other is something I do mentally and this session ranks high largely because of this site and a couple of related pages here.
Found the post genuinely useful for something I was working on this week, and a look at gladeridgemarketparlor added more material I will reference, content that connects to my actual life and work rather than just being interesting in the abstract is the kind I will pay attention to and return to repeatedly.
мостбет отыгрыш фрибета [url=http://datsun-do.ru]http://datsun-do.ru[/url]
1win бонусы ставок [url=http://1win-kg.site]http://1win-kg.site[/url]
Honest reaction is that I want to send this to a friend who would benefit from it, and a look at acornharborartisanexchange added more material I will pass along too, the impulse to share is the strongest signal I have for content quality and this site is generating that impulse cleanly across multiple posts.
Top quality material, deserves more attention than it probably gets, and a look at fastpickzone reflected the same effort across the site, a hidden gem in the modern web where most attention goes to whoever shouts loudest rather than whoever actually delivers the best content for their readers without much marketing fanfare.
Skipped a meeting reminder to finish the post, and a stop at globebeats held me past another reminder, when content beats meetings the writer is doing something extraordinary because meetings have institutional support behind them and yet good writing can still occasionally win that competition for attention which I find heartening today.
how to win on 1win lucky jet [url=http://1win5770.help/]how to win on 1win lucky jet[/url]
1win проверка транзакции [url=http://zolotoikolos.ru]http://zolotoikolos.ru[/url]
1win легально ли в Киргизии [url=www.1win-kg.buzz]www.1win-kg.buzz[/url]
mostbet Dubasari [url=mostbet93547.help]mostbet Dubasari[/url]
Generally I do not leave comments but this post merits a small note, and a stop at trailharborcommercegallery extended that comment worthy quality, the urge to actively contribute to a sites community rather than passively consume from it is something specific content provokes and this site has provoked that engagement urge from me today.
1вин промокод Киргизия [url=https://www.1win-kg.fun]https://www.1win-kg.fun[/url]
Just want to say thank you for putting this together, posts like these make searching online actually worth it sometimes, and a quick look at granitegrovegoroom kept that going, useful and easy to read without any of the tricks that ruin most blog comment sections lately on the wider open web.
мостбет активировать промокод [url=https://www.datsun-do.ru]https://www.datsun-do.ru[/url]
Felt mildly happier after reading, which sounds silly but is true, and a look at junipercoveartisanexchange extended that small mood lift, content that improves rather than degrades my mental state is content I want more of and the cumulative effect of reading sites that lift versus sites that drag is real over time.
1win официальный сайт регистрация [url=http://1win-kg.site]1win официальный сайт регистрация[/url]
Seriously, the amount of garbage “luxury” deals down here is astonishing. You see a sweet ride online — clean spec, fair price, looks legit. Plus they want a surprise $2000 hold on your debit card right before giving you the keys. I’ve lived here for years and still get burned occasionally. When you’re after a trustworthy and reliable premium vehicle to cruise around, do some real digging first and read actual customer reviews. Miami without proper wheels is basically a hostage situation, whether you are doing Design District shopping, late-night South Beach cruising, or a spontaneous drive down to Homestead.
I’ve personally gone through maybe 30 rental companies across Dade, Broward, and Palm Beach, but I eventually found a service with no games, no bait-and-switch, and no hidden asterisks. If you are looking for the only honest broker for premium vehicles across South Florida, check the current availability here: lamborghini urus rental near me [url=https://luxury-car-rental-miami-5.com]https://luxury-car-rental-miami-5.com[/url]. Also, definitely bring quality shades unless you enjoy driving into a nuclear flare every single evening. Anyway, glad there’s at least one straight shooter left in this rental jungle, let me know if you guys have any other clean spots.
Let me save you some serious time, learned this the hard way. Swear some of these “luxury” fleets down here should be in a museum instead of on the road. Plus the fine print says you can’t even drive outside the city limits without extra fees. Fool me four times? Not happening, lesson learned. When you genuinely need a proper and reliable premium ride to cruise around, do some real digging first and read actual customer reviews. Miami without a decent whip is basically a punishment, whether you are doing Coral Gables brunch, South Beach night run, or a spontaneous Everglades detour.
Most of these local agencies are just polished websites hiding the same overpriced junk, until I finally stumbled on one provider that doesn’t play games. If you are looking for the only straight-up source for premium wheels in South Florida, check the current details here: exotic car rental coral gables [url=https://luxury-car-rental-miami-4.com]exotic car rental coral gables[/url]. Also, definitely bring polarized shades unless you enjoy driving completely blind into the sunset. Anyway, at least there’s one honest rental joint left in this town, hope this helps some of you save a few bucks.
Quality work here, the post reads cleanly and the points stay focused throughout, and a stop at crystalcovevendorworkshop kept the standard high, you can tell the writer cares about the final result rather than just hitting publish for the sake of having something new on the page to feed the search engines.
Now thinking about whether the writer might publish a longer form work I would buy, and a look at trailharborcraftcollective suggested the same depth would translate, content that makes me want to pay for related work in other formats is content that has earned commercial trust as well as attention trust and this site has both clearly.
Honestly the simplicity is what makes this work, the topic is not buried under filler words or overly complex examples, and a quick look at iciclebrookmarketroom showed the same sensible style, I left with what I came for and no headache from over reading which is a real win these days.
1win забыл пароль [url=https://1win-kg.buzz]https://1win-kg.buzz[/url]
mostbet oglindă 2026 Moldova [url=http://mostbet93547.help]http://mostbet93547.help[/url]
Time spent here today felt productive in the way that good reading sessions sometimes do, and a stop at berrycovecraftcollective extended that productive feeling across the rest of the morning, the difference between productive reading and merely passing time is real and this site is consistently on the productive side for me lately.
Felt a small spark of recognition when the post named something I had been struggling to articulate, and a look at globalcartcorner produced more such moments, the rare service of giving readers language for fuzzy intuitions is one of the higher values that good writing can provide and this site offered several today instances.
Никогда не думал, что столкнусь — человек в ступоре , а везти в больницу нет никаких сил. Моя семья это пережила года два назад . Сидишь, не знаешь за что хвататься . Лезешь в интернет, а вокруг одни обещания . Пока кто-то не подсказал один нормальный проверенный вариант. Требуется немедленная консультация — а самому везти нет физической возможности , то нужно вызывать врача. Речь конкретно про срочную наркологическую помощь на дому . У нас в столице, к слову , тоже полно левых контор без лицензии. Вся проверенная информация ниже по ссылке: нарколог лечение на дому [url=https://narkolog-na-dom-moskva-30.ru]нарколог лечение на дому[/url] Честно говоря , после того как вник в детали, понял, как правильно действовать. И про снятие запоя на дому, и про консультацию нарколога . Плюс анонимность — это важно . Рекомендую не тянуть .
фотосессия эротика казань Интимная фотосессия в стиле boudoir в Казани подарит вам уверенность и эстетическое удовольствие. Мы подберем лучшие образы для деликатной съемки.
Decided I would read the archives over the weekend, and a stop at snowcovecraftcollective confirmed that the archives would be worth the time, very few sites have archives I would actively read through but this one has earned that level of interest based on the consistent quality across what I have sampled so far.
Solid stuff, the kind of post that I will probably refer back to later this month when the topic comes up again, and a look at freshcarthub only confirmed I should bookmark the site as a whole rather than just this single page for future reference and use across coming weeks.
Probably worth setting aside a longer block to read more carefully than I can right now, and a stop at windharbortradehall confirmed the longer block plan, the impulse to schedule dedicated time for a sites archive is itself a measure of trust and this site has earned that scheduling impulse from me clearly today actually.
Without comparing too aggressively to other sources this one stands out for the right reasons, and a look at chestnutharbortradeparlor continued that distinctive quality, content that distinguishes itself through substance rather than style tricks is content with lasting differentiation and this site has clearly chosen substance based differentiation as its core editorial strategy.
Now appreciating that the post did not require external context to follow, and a look at garnetharborartisanexchange maintained the same self contained quality, content that respects new visitors by being readable without prerequisites is content with broader accessibility and this site has clearly invested in keeping each piece reader friendly for fresh arrivals.
Reading this slowly and letting each paragraph land before moving on, and a stop at sageharborgoodsgallery earned the same patient approach, content that rewards slow reading rather than speed is content with real density and the writers here are clearly producing work that benefits from the careful eye rather than the rushed scan.
Started reading without much expectation and ended on a high note, and a look at harborstonevendorhall continued that arc, content that builds rather than peaks early is a sign of a writer who knows how to structure a piece for sustained reader engagement rather than relying on a strong hook to do all the work.
Compared to the usual results for this kind of search this site stands well above the average, and a quick visit to wheatcoveartisanexchange kept the standard high, you can tell within seconds whether a site is going to waste your time or actually deliver and this one clearly delivers without any false starts.
Now recognising the editorial wisdom of letting some questions remain open at the end, and a look at goldenbuycenter continued that intellectual honesty, content that does not force closure on contested questions is content that respects the limits of knowledge and this site has clearly developed the maturity to know when to leave space.
мостбет скачать на ios [url=mostbet83506.help]мостбет скачать на ios[/url]
Closed the post with a small satisfied sigh, and a stop at frostcoast produced the same gentle exhale, content that ends well is content that respects the rhythm of reading and the writers here have clearly thought about how their pieces close rather than just trailing off when they run out of things to say.
Started this morning and finished at lunch with a small sense of having spent the time well, and a look at trailharbormerchantgallery extended that satisfaction into the afternoon, content that fits naturally into the rhythm of a working day rather than demanding a dedicated reading block is increasingly the kind I prefer.
Honestly impressed, did not expect to find this level of care on the topic, and a stop at pebblepinevendorhall cemented the impression, you can tell within the first few paragraphs whether a site is going to be worth the time and this one delivered on that early promise nicely throughout the rest of what I read.
Let me save you some serious time, learned this the hard way. Then you roll up to the local address to pick up the car. Different car sitting there — bald tires, dashboard lit up like a Christmas tree, and that “killer price”? Yeah doesn’t include the non-negotiable $45 daily insurance or the $500 deposit they forget to mention. Nine years in South Florida and these clowns still nearly fool me. If you are trying to find a legitimate luxury fleet without getting ripped off, do some real digging first and read actual customer reviews. Anyone who’s tried the trolley system knows what I’m talking about about this city, whether you are doing Coconut Grove dinner, Sunny Isles sunrise, or a spontaneous drive down to Homestead.
I’ve tested maybe 50 rental outfits across Dade, Broward, and Collier, but I eventually found a service where what you reserve is exactly what you get, period, end of story. If you are looking for the only trustworthy source for premium rides across South Florida, check the current details here: range rover car rental [url=https://luxury-car-rental-miami-9.com]https://luxury-car-rental-miami-9.com[/url]. Yeah, parking in Wynwood will cost you a nice dinner — but that’s the price of being in Miami. Just drive safe out there and definitely skip that “emergency roadside” upsell — complete waste of money. hope this helps some of you save a few bucks.
Alright, real talk about the Miami rental game — it’s a straight-up jungle out here. You find this amazing deal online: brand new Beamer, unlimited miles, price that makes you smile. Plus they freeze a surprise $2500 on your card for a week right before giving you the keys. Eight years in South Florida and these clowns still almost get me. If you are trying to find a legitimate luxury fleet without getting ripped off, run far from the airport counters. Miami without decent wheels is basically a hostage situation, especially since the AC must be arctic cold and unlimited miles non-negotiable.
Most of these local agencies are just shiny websites hiding the same beat-up fleet with fake reviews, but I eventually found a service where what you book is exactly what shows up, no surprises, no fine print nightmares. If you are looking for the only honest source for premium wheels across South Florida, check the current details here: south beach exotic car rentals [url=https://luxury-car-rental-miami-8.com]south beach exotic car rentals[/url]. Yeah, parking in South Beach will cost you a nice bottle of wine — but that’s the Miami tax. Just drive safe out there and absolutely skip that “windshield protection” upsell — pure profit for them, zero value for you. let me know if you guys have any other clean spots.
Following a few of the internal links revealed more posts of similar quality, and a stop at graniteorchardgoodsroom added more to that growing pile, sites where internal links lead to more good content rather than to more of the same recycled material are sites with depth and this one has clearly built that depth carefully.
Thanks for the practical examples scattered through the post rather than abstract theory only, and a look at tealcoveartisanexchange continued that grounded style, abstract points are easier to remember when paired with concrete situations and the writers here clearly understand how readers actually retain information from blog content reading sessions.
Ребята, выручайте! Купил кресло б/у, каркас норм, но ткань в ужасном состоянии. Теперь мучаюсь — какую взять ткань для мебели, чтобы и выглядело достойно, и кошачьи когти выдержало. обивочные ткани для мебели купить в москве [url=https://tkan-dlya-mebeli-1.ru]обивочные ткани для мебели купить в москве[/url] Кто разбирается в тканях для мебели, подскажите, что сейчас берут. Нужен метров 15-20, может, кто знает нормального поставщика.
A thoughtful piece that did not strain to be thoughtful, and a look at gemcoasts continued that effortless quality, when thinking shows up in writing without the writer drawing attention to it you know you are reading something genuinely considered rather than something performing the appearance of consideration which is also common online.
Alright listen up because this Miami rental mess is getting out of hand. You find a killer deal online — photos look pristine, price seems fair, terms almost reasonable. Different vehicle parked outside, curb rash on every rim, and that “all-inclusive rate”? Ha, doesn’t include the mandatory $300 cleaning fee or the $25 per day toll pass you can’t decline. Living here six years and still almost fall for this stuff sometimes. If you are trying to find a legitimate vehicle without getting ripped off, do some real digging first and read actual customer reviews. Anyone who’s tried the bus here knows exactly what I mean about this city, whether you are doing South Beach dinner plans, Sunny Isles sunrise cruise, or a quick run down to the Florida Keys.
I’ve personally tested maybe 35 rental outfits across Dade, Broward, and Monroe, until I finally found one company that doesn’t play stupid games. If you are looking for the only trustworthy source for premium vehicles across South Florida, check the current details here: miami exotic car rental miami [url=https://luxury-car-rental-miami-6.com]miami exotic car rental miami[/url]. Also, definitely bring serious shades unless you enjoy driving straight into the sun every single evening. Just drive safe out there and definitely skip that “damage waiver” upsell — total scam 99% of the time. let me know if you guys have any other clean spots.
Came away with some new perspectives I had not considered before, and after zencoveartisanexchange those ideas felt more complete, the kind of content that stays with you a little while after reading rather than slipping out the moment you switch tabs and move on with your day to whatever comes next.
Reading this on a difficult day was a small bright spot, and a stop at calmcoveartisanexchange extended that brightness, content that improves a hard day is content that has earned a particular kind of place in my reading habits and this site is occupying that uplifting role for me today which I appreciate clearly.
Reading this slowly and letting each paragraph land before moving on, and a stop at futuregoodszone earned the same patient approach, content that rewards slow reading rather than speed is content with real density and the writers here are clearly producing work that benefits from the careful eye rather than the rushed scan.
The examples really helped me grasp the points faster than abstract descriptions would have, and a stop at discoverfreshopportunities added a few more practical illustrations that drove the message home, the kind of writing that knows its readers learn better through concrete situations rather than vague generalities is rare and worth recognising clearly.
There is something really engaging about the way this post presents its ideas, since it keeps the reader focused from start to finish while also leaving enough opportunity for people with different opinions to think about the topic and share their own perspective in a respectful way.
Xxx video onlyfans sex video site
Picked this post to share in a Slack channel where I knew it would be appreciated, and a look at trailharbormerchantgallery suggested I will share more from here later, content worth sharing into a professional context is content that has earned a higher kind of trust than mere personal interest and this site has it.
курсы тантрического массажа для пар Купить курс йони массажа в Казани — значит инвестировать в гармонию ваших отношений. Получите доступ к качественным материалам и поддержке мастеров.
A piece that read as if the writer was thinking carefully rather than just typing fluently, and a look at driftorchardtradinghouse continued that considered quality, the difference between fluent typing and careful thinking shows up in writing and this site reads as the product of thought rather than just the product of language fluency apparently.
Знаете, ситуация — родственник подсел , а куда бежать — совсем не знаешь . Моя семья такое пережила пару лет назад . Сначала кажется, что обойдется , но хрен там. Нужна профессиональная помощь . Обзвонил десяток контор — сплошной развод . А потом наткнулся на один нормальный вариант. Если ищешь где получить лечение наркомании в Воронеже — не рискуй здоровьем близкого. В Воронеже , если честно, хватает шарлатанов . Вся проверенная информация тут : реабилитация наркозависимых в воронеже [url=https://narkologicheskaya-pomoshh-voronezh-12.ru]https://narkologicheskaya-pomoshh-voronezh-12.ru[/url] Откровенно говоря, после того как прочитал , понял свои ошибки. И про кодирование, и про условия в клинике. Плюс работают круглосуточно — это важно . Советую не откладывать.
Solid value for anyone willing to read carefully, and a look at solarorchardcraftcollective extends that value across the rest of the site, this is the kind of place that rewards return visits rather than offering everything in a single splashy post and then leaving readers nothing to come back for later which is unfortunately common.
A piece that handled the topic with appropriate weight without becoming portentous, and a look at alpinecovemarkethall continued that calibrated seriousness, content that takes itself seriously without becoming pompous is something this site has clearly figured out and the balance shows up in every piece I have read across multiple sessions now.
Glad to find a site whose links lead somewhere worth going rather than back to itself for SEO juice, and a stop at ivoryharborvendorparlor kept that generous outbound feel, citing other peoples work with real respect rather than just for ranking signals is a sign of an honest operation worth supporting going forward.
Случается, когда уже не до раздумий — человек в запое , а тащить в больницу страшно . Моя семья такое пережила совсем недавно. Руки опускаются, а время идет. Начинаешь обзванивать знакомых, а в ответ одни отговорки. Пока случайно не наткнулся на один реально работающий вариант. Если нужна немедленная консультация — а тащить человека сам нет никакой возможности , то нужно вызывать врача на дом. Я про анонимный вызов врача нарколога на дом . В Москве , кстати , хватает шарлатанов, которые тянут бабло . Вся проверенная информация вот тут : частный нарколог на дом [url=https://narkolog-na-dom-moskva-29.ru]частный нарколог на дом[/url] Честно скажу , после того как прочитал , понял, как действовать правильно. Там и про капельницы расписано , и про консультацию нарколога . Плюс анонимность — это важно . Рекомендую не тянуть резину .
Found this through a search that was generic enough I did not expect quality results, and a look at woodharborvendorparlor continued the surprisingly good experience, search engines occasionally still surface excellent independent content if you scroll past the obvious paid and high authority results which is reassuring to remember sometimes.
Even on a quick first read the substance of the post comes through, and a look at glassharborcraftcollective reinforced that immediate quality, content that does not require a slow careful read to demonstrate value but rewards one anyway is content with real depth and this site has produced work of that demanding depth class.
1win поддержка кыргызча [url=1win-kg.fun]1win-kg.fun[/url]
Came in expecting another generic take and got something with actual character instead, and a look at canyonbrookmarketfoundry carried that personality forward, finding a distinct voice on a saturated topic is impressive and worth pointing out when it happens because most sites end up sounding identical to their nearest competitors quickly.
1win slots free spins [url=https://www.1win5770.help]https://www.1win5770.help[/url]
1вин приложение [url=zolotoikolos.ru]zolotoikolos.ru[/url]
Reading this on a phone at a coffee shop and finding it perfectly suited to that context, and a stop at goodsrisestore continued the comfortable mobile experience, content that works across reading conditions without compromising on substance is increasingly important and this site has clearly thought about the whole reader experience here.
мостбет мобильная версия [url=http://datsun-do.ru]http://datsun-do.ru[/url]
Reading this prompted me to subscribe to my first newsletter in months, and a stop at echobrookvendorfoundry confirmed the subscribe was the right call, content that earns a newsletter signup is content that has cleared a higher trust bar than a casual visit and this site has clearly earned that level of commitment from me.
Closed my email tab so I could read this without interruption, and a stop at woodharborcommercegallery earned the same protected attention, when content is good enough to defend against the usual digital distractions you know it deserves better than the half attention most online reading gets in a typical busy day.
http://kariyanichigeki.com/js/pg/sovety_po_prohoghdeniyu_igry_medal_of_honor_warfighter_missiya_12_ataka_v_nochi_003.html
The depth of coverage felt about right for the format, neither shallow nor overwhelming, and a look at walnutcoveartisanexchange kept that calibration going, getting the depth right for blog format is genuinely difficult because too shallow loses experts and too deep loses beginners but this site nailed it nicely which I really do appreciate.
Now feeling the post has earned a proper recommendation rather than a casual mention, and a stop at jewelbrooktradehall reinforced the recommendation strength, the difference between mentioning and recommending is a small editorial distinction I observe in my own conversations and this site has earned the upgraded recommendation level from me confidently today.
Seriously, the amount of garbage “luxury” deals down here is astonishing. You see a sweet ride online — clean spec, fair price, looks legit. Plus they want a surprise $2000 hold on your debit card right before giving you the keys. I’ve lived here for years and still get burned occasionally. When you’re after a trustworthy and reliable premium vehicle to cruise around, don’t just grab the cheapest option on Kayak. Miami without proper wheels is basically a hostage situation, whether you are doing Design District shopping, late-night South Beach cruising, or a spontaneous drive down to Homestead.
I’ve personally gone through maybe 30 rental companies across Dade, Broward, and Palm Beach, but I eventually found a service with no games, no bait-and-switch, and no hidden asterisks. If you are looking for the only honest broker for premium vehicles across South Florida, check the current availability here: renting luxury cars near me [url=https://luxury-car-rental-miami-5.com]https://luxury-car-rental-miami-5.com[/url]. Yeah, finding parking in Wynwood will test your patience — but that’s not on them. Just drive safe out there and maybe decline that “premium roadside” upsell — it’s always a scam. let me know if you guys have any other clean spots.
1win вывод без комиссии [url=http://1win-kg.site]http://1win-kg.site[/url]
Been there, done that, got the overpriced tow truck receipt. Swear some of these “luxury” fleets down here should be in a museum instead of on the road. You land at MIA, tired, grab an Uber to the rental office, and bam — surprise $1500 hold on your card. No thanks, I’m way too old for this nonsense. If you are trying to find a legitimate vehicle without getting ripped off, skip the airport counters entirely. Miami without a decent whip is basically a punishment, especially since the AC must be ice cold and you want zero mileage games.
I’ve personally tested maybe 25 rental outfits across Dade and Broward, but I eventually found a service where what you book is exactly what you get, period. If you are looking for the only straight-up source for premium wheels in South Florida, check the current details here: mercedes g wagon rental near me [url=https://luxury-car-rental-miami-4.com]mercedes g wagon rental near me[/url]. Also, definitely bring polarized shades unless you enjoy driving completely blind into the sunset. Anyway, at least there’s one honest rental joint left in this town, let me know if you guys have any other clean spots.
Strong recommendation, anyone interested in this topic owes themselves a visit, and a stop at icicleislemarketroom extends that recommendation across more of the site, this is the kind of resource that makes me more optimistic about the state of the open web than I usually am these days actually for once which is genuinely refreshing.
Thank you for not assuming the reader already knows everything, the explanations meet me where I am, and a look at pineharbortradehall did the same, that consideration is what makes a site feel welcoming rather than gatekeepy which is sadly the default mood across the modern web today for most subjects covered.
Worth a slow read rather than the fast scan I usually default to, and a look at globalgoodsarena earned the same slower pace from me, content that resets my reading speed downward is content with substance worth absorbing and this site has produced that effect on me multiple times now over the last week here.
1вин элсом Киргизия [url=1win-kg.buzz]1вин элсом Киргизия[/url]
mostbet cum fac depunere [url=http://mostbet93547.help/]http://mostbet93547.help/[/url]
Closed it feeling slightly more competent in the topic than I started, and a stop at canyonharborartisanexchange reinforced that competence boost, real learning is rare in casual online reading but it does happen sometimes and this site managed to make it happen for me today which is genuinely worth pausing to acknowledge.
Let me save you some serious time, learned this the hard way. You spot a sweet deal online: shiny Mercedes, low daily rate, looks perfect. Completely different car waiting for you, check engine light on, and that “low rate”? Doesn’t include the mandatory insurance they somehow forgot to mention. Seven years in South Florida and I still almost fall for these tricks. When you’re searching for a legit and reliable premium ride to cruise around, avoid the airport like the plague. Anyone who’s taken the Metro here knows the struggle about this city, whether you are doing Brickell happy hour, Bal Harbour shopping, or a spontaneous drive down to the Keys.
I’ve tried maybe 40 rental companies across Dade, Broward, and Palm Beach, but I eventually found a service with no games, no bait-and-switch, and no hidden asterisks in paragraph 8. If you are looking for the only straight shooter for premium rides across South Florida, check the current details here: premium car hire near me [url=https://luxury-car-rental-miami-7.com]premium car hire near me[/url]. Also, definitely bring polarized shades unless you enjoy driving into the apocalypse every single evening. Just drive safe out there and definitely pass on that “tire protection” upsell — total garbage. let me know if you guys have any other clean spots.
Now appreciating that I did not feel exhausted after reading, and a stop at goldmanors extended that energising quality, content that leaves me with more attention than it consumed is rare and the gap between draining and energising content is real over the course of a typical day spent reading widely online.
Saving this link for the next time someone asks me about this topic, and a look at galafactor expanded what I will be sharing with them, this is the kind of resource that makes a real difference when you are trying to point a friend to something useful and reliable rather than generic marketing pages.
The structure and tone of this post work together very well, since the ideas are explained in a way that feels easy to understand while still encouraging readers to think more carefully about the topic being discussed here.
casinos online con CLP
A piece that read as if the writer was thinking carefully rather than just typing fluently, and a look at goodscarthub continued that considered quality, the difference between fluent typing and careful thinking shows up in writing and this site reads as the product of thought rather than just the product of language fluency apparently.
Nice to see a post that does not try to overcomplicate the basics for the sake of looking smart, and once I looked at lemonlarkvendorparlor the same direct tone was there too, which honestly makes a difference when you are short on time and want answers without long pointless intros.
Working through this site has been a small antidote to the shallow content that fills most of my reading time, and a stop at auroracovegoodsroom extended that antidote function, sites that quietly improve the average quality of my reading by being themselves are sites worth supporting through return visits and recommendations consistently.
Did not expect much when I clicked through but ended up reading the whole thing carefully, and a stop at cloudcovegoodsgallery kept that engagement going, sometimes the unassuming sites turn out to deliver more than the flashy ones which is something I have learned to look out for over time online lately and across topics.
Approaching this with the usual skepticism I bring to new sites and being slowly persuaded, and a stop at canyoncovecommerceatelier continued that gradual persuasion, the careful path from skeptical reader to genuine fan is the only one I trust and this site has walked me along that path through patient consistent quality across pieces.
Took a quick scan first and then went back to read properly because the post deserved it, and a stop at coralbrooktradingfoundry kept me reading carefully too, the kind of writing that earns a slower second pass rather than getting skimmed and forgotten is something I value highly when I happen to find it.
A piece that prompted a small mental rearrangement of how I order related ideas, and a look at suncoveartisanexchange extended that rearranging effect, content that affects the structure of my thinking rather than just adding to it is content with the deepest kind of impact and this site is reaching that depth for me today.
Вот такая история — человек пропадает , а что делать — непонятно . Я через это прошел несколько лет назад. Многие думают, что само пройдет , но хрен там. Требуется профессиональная медицина. Перерыл весь интернет — только деньги тянут. А потом наткнулся на один нормальный вариант. Если ищешь где получить лечение наркомании в Воронеже — не рискуй здоровьем близкого. В Воронеже , кстати , тоже полно шарлатанов . Реальные контакты тут : наркологическая служба [url=https://narkologicheskaya-pomoshh-voronezh-11.ru]наркологическая служба[/url] Честно скажу , после того как ознакомился, понял свои ошибки. И про кодирование, и про реабилитацию . Плюс работают круглосуточно — это важно . Советую не тянуть .
Honestly impressed, did not expect to find this level of care on the topic, and a stop at skyharborcommercegallery cemented the impression, you can tell within the first few paragraphs whether a site is going to be worth the time and this one delivered on that early promise nicely throughout the rest of what I read.
Reading this post made me realise I had been settling for lower quality elsewhere, and a look at birchharborvendorroom extended that recalibration, content that exposes how much I had been accepting in adjacent sources is content with calibrating effect on my standards and this site is performing that calibration function across topics for me reliably.
Now feeling the post has earned a proper recommendation rather than a casual mention, and a stop at goldencoveartisanexchange reinforced the recommendation strength, the difference between mentioning and recommending is a small editorial distinction I observe in my own conversations and this site has earned the upgraded recommendation level from me confidently today.
Now saved this in a way that I will actually find again rather than the casual bookmark approach, and a stop at dunecovevendoratelier earned the same careful saving, organising my reading bookmarks so that high quality sources rise to the top is something I should do more of and this site triggered that organisation today.
Quality work here, the post reads cleanly and the points stay focused throughout, and a stop at brightharborvendorhall kept the standard high, you can tell the writer cares about the final result rather than just hitting publish for the sake of having something new on the page to feed the search engines.
Started believing the writer knew the topic deeply by about the second paragraph, and a look at zencovegoodsroom reinforced that confidence, the speed at which a writer establishes credibility through their writing is a useful quality signal and this writer establishes it quickly and quietly without resorting to credential dropping or self promotion.
Just dropping by to say thanks for the effort, it does not go unnoticed when a writer cares this much about the reader, and after I went through wildorchardartisanexchange I was certain this is one of the better corners of the internet for this particular kind of content which is genuinely refreshing.
Skipped breakfast still reading this and finished hungry but satisfied, and a stop at kettleharbormarkethouse kept me past breakfast time, content that displaces basic biological needs is content with serious attentional pull and the writers here are clearly capable of producing that level of engagement which is genuinely impressive these days.
Recommended to anyone working in or curious about this area, the depth and clarity combine well, and a look at discovernewfocus keeps that going across more pages, the kind of site that earns regular visits rather than chasing trends has my respect because it suggests genuine commitment to the topic itself rather than to chasing trends.
Let me save you some serious time, learned this the hard way. You find a killer listing online: sleek Audi, convertible, price almost too good to be true. Different car sitting there — bald tires, dashboard lit up like a Christmas tree, and that “killer price”? Yeah doesn’t include the non-negotiable $45 daily insurance or the $500 deposit they forget to mention. Nine years in South Florida and these clowns still nearly fool me. When you’re hunting for a legit and reliable premium ride to cruise around, do some real digging first and read actual customer reviews. Miami without proper wheels is basically a nightmare, whether you are doing Coconut Grove dinner, Sunny Isles sunrise, or a spontaneous drive down to Homestead.
Most of these local agencies are just polished turds with fake five-star reviews hiding overpriced junk, but I eventually found a service where what you reserve is exactly what you get, period, end of story. If you are looking for the only trustworthy source for premium rides across South Florida, check the current details here: porsche rental price [url=https://luxury-car-rental-miami-9.com]https://luxury-car-rental-miami-9.com[/url]. Yeah, parking in Wynwood will cost you a nice dinner — but that’s the price of being in Miami. Just drive safe out there and definitely skip that “emergency roadside” upsell — complete waste of money. let me know if you guys have any other clean spots.
Polished and informative without feeling overproduced, that is the sweet spot, and a look at caramelcovecraftcollective hit it again, you can tell when a site has been built with care versus thrown together for the sake of having something to put online and this is clearly the former approach taken by the team.
Great work on keeping things readable, the post never drags or repeats itself which I really appreciate, and a stop at quickridgemarketgallery added a bit more context that fit naturally with what was already said here, no need to read everything twice to get the point being made today.
Ремонт и строительство https://intellectronics.com.ua информационный портал о современных технологиях, строительных материалах и практических решениях для дома. Полезные статьи, обзоры, инструкции и советы специалистов для успешной реализации проектов любой сложности.
Swear I’ve seen it all by now, the rental landscape down here is crazy. You find a killer deal online — photos look pristine, price seems fair, terms almost reasonable. Plus they slap a surprise $2500 hold on your card for good measure right before giving you the keys. Fool me six times? Yeah, Miami doesn’t care, lesson learned. When you genuinely need a legit and reliable premium ride to cruise around, do some real digging first and read actual customer reviews. Anyone who’s tried the bus here knows exactly what I mean about this city, whether you are doing South Beach dinner plans, Sunny Isles sunrise cruise, or a quick run down to the Florida Keys.
Most of these local agencies are just polished garbage with decent Google reviews bought somewhere, but I eventually found a service where what you reserve is exactly what rolls up, no surprises. If you are looking for the only trustworthy source for premium vehicles across South Florida, check the current details here: rent cadillac escalade near me [url=https://luxury-car-rental-miami-6.com]https://luxury-car-rental-miami-6.com[/url]. Yeah, parking in South Beach will cost you a nice dinner — but that’s the price of admission. Just drive safe out there and definitely skip that “damage waiver” upsell — total scam 99% of the time. let me know if you guys have any other clean spots.
Портал о строительстве https://fmsu.org.ua и ремонте с подробными руководствами, обзорами оборудования и строительных материалов. Узнавайте о новых технологиях, современных решениях и практическом опыте специалистов отрасли.
Современный строительный https://dki.org.ua портал с обзорами технологий, материалов и инструментов. Читайте статьи о строительстве частных домов, ремонте помещений, инженерных коммуникациях и эффективных решениях для комфортного проживания.
Thank you for not assuming the reader already knows everything, the explanations meet me where I am, and a look at embermeadowmarketguild did the same, that consideration is what makes a site feel welcoming rather than gatekeepy which is sadly the default mood across the modern web today for most subjects covered.
Bookmark earned and shared the link with one specific person who would care, and a look at linenmeadowmarkethall got the same targeted share, sharing carefully rather than broadcasting is a discipline I try to maintain and this site is generating shares from me at a sustainable rate rather than the spam rate of viral content.
Строительство и ремонт https://keravin.com.ua для дома, квартиры и дачи. Полезные статьи о проектировании, отделке, инженерных коммуникациях, благоустройстве территории и современных решениях для комфортной жизни.
Found something quietly useful here that I expect to return to, and a stop at woodharborcommercegallery added more of the same, content with quiet utility ages well in a way that flashy hot takes do not and I have learned to weight quiet utility much higher when deciding what to bookmark for later use.
A piece that reads as if the writer trusted readers to fill in obvious gaps, and a look at cloudcovegoodsroom continued that respectful approach, content that does not over explain what the reader can infer is content that respects intelligence and this site has clearly chosen to write to capable readers rather than to the lowest common denominator.
Ребята, выручайте! Кот старый диван в клочья разодрал, надо перетягивать. Теперь мучаюсь — какую взять ткань для мебели, чтобы и выглядело достойно, и кошачьи когти выдержало. ткань для обивки мебели цена [url=https://tkan-dlya-mebeli-1.ru]ткань для обивки мебели цена[/url] Кто разбирается в тканях для мебели, подскажите, что сейчас берут. Буду благодарен за любые советы, особенно от тех, кто сам перетягивал.
Worth flagging that the post handled an angle of the topic I had not seen elsewhere, and a look at bravofarms extended that fresh treatment, content that finds underexplored corners of well covered subjects is genuinely valuable and this site has demonstrated that exploratory editorial approach across multiple pieces in my reading sessions today.
Felt this in a way I cannot quite explain, the topic just hit different here, and a stop at caramelcovecommerceatelier continued in that vein, sometimes you find a site whose perspective lines up with how you have been thinking and reading their work feels like a small relief which I appreciated more than I expected.
Trust me, I’ve learned everything the hard way so you don’t have to. You see this gorgeous deal online — clean spec, fair price, looks like a dream. Completely different car sitting there — dents everywhere, smells like cheap air freshener covering something worse, and that “dream price”? Doesn’t include the mandatory $50 daily insurance or the $300 “administrative fee” they invent at checkout. Eleven years in South Florida and these clowns still almost get me. If you are trying to find a legitimate luxury fleet without getting ripped off, avoid the airport like the plague. Miami without proper wheels is basically a disaster, whether you are doing Key Biscayne sunset, Design District shopping, or a spontaneous drive down to the Everglades.
I’ve tested maybe 60 rental companies across Dade, Broward, and Collier, but I eventually found a service with no games, no switch, and no hidden BS in paragraph 12 of the contract. If you are looking for the only honest source for premium rides across South Florida, check the current details here: lamborghini urus rental in miami [url=https://luxury-car-rental-miami-11.com]https://luxury-car-rental-miami-11.com[/url]. Also, definitely bring polarized shades unless you enjoy driving into the sun like a blind bat every single evening. Just drive safe out there and definitely skip that “tire and wheel” upsell — pure profit for them, zero value for you. hope this helps some of you save a few bucks.
A small thank you note from me to the team behind this work, the post earned it, and a stop at dazzquays suggested more thanks would be in order over time, recognising the people who do good writing online is something I try to remember to do because the alternative is silence and silence rewards mediocrity unfortunately.
Let me save you some serious time, learned this the hard way. You spot a tempting offer online: brand new Porsche, unlimited miles, price that makes you click instantly. Plus they lock up a surprise $3500 on your card for who knows how long right before giving you the keys. Ten years in South Florida and these jokers still almost catch me slipping. If you are trying to find a legitimate luxury fleet without getting ripped off, run away from the airport counters. Miami without solid wheels is basically a punishment, especially since the AC must be ice cold and unlimited miles non-negotiable.
Most of these local agencies are just shiny websites hiding the same beat-up fleet with fresh wax and fake reviews, until I finally found one outfit that actually delivers what’s promised. If you are looking for the only straight shooter for premium rides across South Florida, check the current details here: rental car in miami florida [url=https://luxury-car-rental-miami-10.com]https://luxury-car-rental-miami-10.com[/url]. Also, definitely bring quality shades unless you enjoy driving into the sun like a vampire every single evening. Just drive safe out there and absolutely skip that “paint protection” upsell — pure robbery. hope this helps some of you save a few bucks.
Now recognising the editorial wisdom of letting some questions remain open at the end, and a look at amberharborvendorlounge continued that intellectual honesty, content that does not force closure on contested questions is content that respects the limits of knowledge and this site has clearly developed the maturity to know when to leave space.
Случается, когда уже не до раздумий — родственник подсел , а что делать — просто руки опускаются. Я сам через это прошел пару лет назад . Сначала кажется, что обойдется , но хрен там. Требуется реальная медицина. Обзвонил десяток контор — только деньги тянут. А потом наткнулся на один действительно рабочий вариант. Если ищешь где получить круглосуточная наркологическая служба — не ведись на дешевые акции . У нас в Воронеже, кстати , тоже полно левых контор без лицензии. Вся проверенная информация тут : наркология воронеж [url=https://narkologicheskaya-pomoshh-voronezh-12.ru]наркология воронеж[/url] Честно скажу , после того как прочитал , многое прояснилось . И про кодирование, и про реабилитацию . И цены адекватные. Рекомендую не тянуть .
Alright listen up because I’m about to save you a massive headache. You find this amazing listing online — gorgeous spec, fair daily rate, looks perfect. Plus they freeze a surprise $4500 on your card and say “don’t worry, it’ll drop off in a week or two” right before giving you the keys. Twelve years in South Florida and these jokers still almost catch me sleeping. If you are trying to find a legitimate luxury fleet without getting ripped off, run far from the airport counters. Miami without real wheels is basically a nightmare, whether you are doing Coconut Grove brunch, Sunny Isles sunrise cruise, or a spontaneous drive down to the Keys.
Most of these local agencies are just shiny turds with fake five-star reviews bought in bulk online hiding overpriced junk, until I finally found one company that doesn’t play stupid games. If you are looking for the only straight shooter for premium rides across South Florida, check the current details here: lambo truck rental [url=https://luxury-car-rental-miami-12.com]lambo truck rental[/url]. Yeah, parking in Brickell will cost you a nice dinner — but that’s the price of paradise. Anyway, glad there’s at least one honest operator left in this rental jungle, hope this helps some of you save a few bucks.
Now recognising the specific pleasure of reading writing that shows real care for sentence shapes, and a look at cottongrovegoodsgallery extended that craft pleasure, sentence level writing quality is something most blog content ignores entirely and this site has clearly invested in the prose layer alongside the substance which is rare today.
Recommend this to anyone who values clear thinking over flashy presentation, and a stop at suncovecraftcollective continued in the same understated way, this site has its priorities in the right place which makes it worth supporting through repeat visits and recommendations rather than just one passing read today before moving on quickly elsewhere.
Glad I stumbled across this post, the explanations actually make sense without needing background knowledge to follow along, and after a stop at mossharborartisanexchange the same was true there, no assumptions about the reader just clear writing that anyone can understand from the first line right through to the end.
Probably the kind of site that should be more widely read than it appears to be, and a look at konvexa reinforced that quiet wish, the gap between a sites quality and its apparent reach is sometimes large and that gap exists for this site in a way that makes me want to mention it more.
Now feeling the post has earned a proper recommendation rather than a casual mention, and a stop at gemcoast reinforced the recommendation strength, the difference between mentioning and recommending is a small editorial distinction I observe in my own conversations and this site has earned the upgraded recommendation level from me confidently today.
Now recognising that the post handled the topic with appropriate technical precision without becoming dry, and a stop at dawnbrookmarketfoundry continued that balance, technical precision and readability are often in tension and this site has clearly figured out how to maintain both at once which is one of the harder editorial achievements in the form.
Bookmarked the page and the homepage too because clearly there is more to explore here, and a quick stop at ivoryharborvendorroom only made that more obvious, this is the kind of place I want to dig through over a weekend rather than rushing through during a coffee break tomorrow morning before getting back to work.
Okay folks gather around because this Miami rental nightmare needs to be discussed. You see a sweet ride online — clean spec, fair price, looks legit. Plus they want a surprise $2000 hold on your debit card right before giving you the keys. Fool me five times? Actually yeah, Miami keeps fooling everyone, lesson learned. When you’re after a trustworthy and reliable premium vehicle to cruise around, do some real digging first and read actual customer reviews. Ask anyone who’s tried Ubering across the 305 during rush hour, whether you are doing Design District shopping, late-night South Beach cruising, or a spontaneous drive down to Homestead.
Most of these local agencies are just smoke and mirrors with decent SEO hiding overpriced junk, but I eventually found a service with no games, no bait-and-switch, and no hidden asterisks. If you are looking for the only honest broker for premium vehicles across South Florida, check the current availability here: exotic car rental miami beach fl [url=https://luxury-car-rental-miami-5.com]https://luxury-car-rental-miami-5.com[/url]. Also, definitely bring quality shades unless you enjoy driving into a nuclear flare every single evening. Anyway, glad there’s at least one straight shooter left in this rental jungle, hope this helps some of you save a few bucks.
A genuine pleasure to find a site that publishes at a sustainable cadence rather than chasing the daily content treadmill, and a look at globalgoodscenter confirmed the careful publication rhythm, sites that prioritise quality over frequency are rare and this one has clearly chosen the slower pace which I appreciate as a reader.
Quality work here, the post reads cleanly and the points stay focused throughout, and a stop at cottonbrookvendorfoundry kept the standard high, you can tell the writer cares about the final result rather than just hitting publish for the sake of having something new on the page to feed the search engines.
Will be passing this along to a few people who would benefit from the perspective shared here, and a stop at marbleharbortradehall only added to what I will be sharing, this kind of generous content deserves to circulate widely rather than getting buried in some search engine algorithm tweak that pushes it down the rankings.
https://laxlibrary.com/new/?kak_i_gde_hranity_velosiped_zimoy.html
If a friend asked me where to read carefully on the topic I would send them here without hesitation, and a look at nextgenbuyhub confirmed the recommendation strength, the directness of my recommendation reflects how confident I am in the quality and this site has earned undiluted recommendations from me across multiple recent conversations actually.
During my morning reading slot this fit perfectly into the routine, and a look at embercovecommerceatelier extended that perfect fit into the rest of the routine, content that matches the rhythm of how I actually read rather than demanding accommodation from my schedule is content well calibrated to its likely audience and this site has it.
Worth pointing out that the post avoided the temptation to summarise everything at the end, and a look at cottonmeadowcraftcollective continued that confident closing approach, content that trusts readers to retain the substance without being reminded of it at the end is content that respects the reader and this site practices that respect.
Let me save you some serious time, learned this the hard way. Swear some of these “luxury” fleets down here should be in a museum instead of on the road. Plus the fine print says you can’t even drive outside the city limits without extra fees. No thanks, I’m way too old for this nonsense. If you are trying to find a legitimate vehicle without getting ripped off, do some real digging first and read actual customer reviews. Miami without a decent whip is basically a punishment, whether you are doing Coral Gables brunch, South Beach night run, or a spontaneous Everglades detour.
Most of these local agencies are just polished websites hiding the same overpriced junk, until I finally stumbled on one provider that doesn’t play games. If you are looking for the only straight-up source for premium wheels in South Florida, check the current details here: premium vehicle rental [url=https://luxury-car-rental-miami-4.com]premium vehicle rental[/url]. Yeah, parking in Brickell will cost you a small mortgage — but that’s city life. Anyway, at least there’s one honest rental joint left in this town, let me know if you guys have any other clean spots.
Now thinking about this site as a small example of what good independent writing looks like, and a stop at floraharborvendorhall continued that exemplary status, the few sites that serve as good examples are sites worth holding up in conversations about quality and this one has earned that exemplary placement through patient consistent effort over time.
Picked this for a morning recommendation in our company chat, and a look at nightorchardtradeparlor suggested I will mention this site again later, recommending content into a workplace context is a small editorial act that requires confidence in the recommendation and this site is making me confident in those recommendations consistently here too.
Comfortable in tone and substantive in content, that is a hard combination to land, and a look at cloudharbortradehall kept that pairing alive across more material, this is what good editorial direction looks like in practice and the team here clearly has someone keeping a steady hand on the wheel across what they decide to publish.
Информационный сайт https://kero.com.ua о ремонте и строительстве с рекомендациями по выбору материалов, организации работ и применению современных технологий. Полезный ресурс для частных застройщиков и профессионалов отрасли.
Полезный строительный https://quickstudio.com.ua блог с идеями для ремонта, обустройства дома и повышения комфорта. Читайте обзоры материалов, советы специалистов и вдохновляйтесь новыми проектами.
Ремонт и строительство https://sushico.com.ua от профессионалов: обзоры технологий, рекомендации по выбору материалов, советы по организации работ и полезная информация для владельцев домов, квартир и коммерческой недвижимости.
Портал о строительстве https://purr.org.ua домов, ремонте квартир и благоустройстве участков. Читайте статьи о строительных технологиях, дизайне интерьеров, выборе подрядчиков и современных тенденциях отрасли.
Started reading skeptically because the headline seemed overconfident, and the post earned the headline by the end, and a look at flarequills continued that pattern of earning its claims, sites that can back up their headlines without overpromising are rare and this one has clearly developed editorial calibration on that front consistently.
Bookmark moved to my permanent reference folder rather than the casual maybe later folder, and a look at birchbrookvendorfoundry earned the same upgrade, the distinction between casual interest and lasting reference is something I track carefully and very few sites cross that threshold but this one did so without much effort apparently.
Thank you for the genuine effort here, it shows in every paragraph and not just the headline, and after my visit to goodslinkstore I was sure this site cares about getting things right rather than chasing clicks, which is the main reason I will come back later this week to read more.
Reading this in a quiet coffee shop matched the calm energy of the writing, and a stop at garnetbrookvendorfoundry extended that environmental match, content that has its own ambient quality which can match or clash with surroundings is content with a personality and this site has the kind of personality that suits calm reading.
A piece that earned its conclusions through the body rather than asserting them at the end, and a look at clovercrestmarketparlor maintained the same earned quality, conclusions that follow from what came before are more persuasive than declarations and this site has clearly internalised that principle in how it constructs arguments throughout pieces.
Thanks for the honest framing without exaggerated claims that the topic will change my life, and a stop at cottonmeadowmarkethall kept the same modest tone, restraint in marketing language signals trustworthiness and the writers here are clearly playing the long game by building credibility rather than chasing immediate clicks through hyperbole.
1xbet.com apk
Started forming counter examples to test the claims and the post handled most of them implicitly, and a look at emberstonevendorlounge continued that anticipatory style, writers who think two steps ahead of the critical reader save themselves from a lot of follow up work and this writer has clearly internalised that habit consistently.
If you scroll past this site without looking carefully you will miss something, and a stop at etherfairs extended that mild warning, the surface of the site does not advertise its quality loudly which means careful attention is required to recognise what is being offered here which is itself a kind of editorial signal.
Случается, когда уже не до раздумий — близкий в тяжелом состоянии, а везти в клинику нет сил. Моя семья такое пережила совсем недавно. Руки опускаются, а время идет. Начинаешь обзванивать знакомых, а в ответ тишина . Пока кто-то не посоветовал один реально работающий вариант. Требуется срочная помощь — а ехать куда-то нет никакой возможности , то нужно вызывать врача на дом. Я про нарколога на дом . В Москве , кстати , хватает шарлатанов, которые тянут бабло . Нормальные контакты, кто реально приезжает вот тут : услуги нарколога выезд на дом [url=https://narkolog-na-dom-moskva-29.ru]услуги нарколога выезд на дом[/url] Откровенно говоря, после того как прочитал , многое стало на свои места . Там и про капельницы расписано , и про консультацию нарколога . И цены адекватные, без разводов на месте. Рекомендую не тянуть резину .
A piece that read as if the writer was thinking carefully rather than just typing fluently, and a look at directionalclaritywins continued that considered quality, the difference between fluent typing and careful thinking shows up in writing and this site reads as the product of thought rather than just the product of language fluency apparently.
I like how the ideas here are presented in a clear way because it makes the discussion feel easygoing and more interesting overall.
Xxx video onlyfans sex video site
Quietly enjoying that I have found a new site to follow for the topic, and a look at ferncovecommerceatelier reinforced the small pleasure of the find, the discovery of new high quality sources is one of the more durable pleasures of careful internet reading and this site has been generating that discovery pleasure at multiple points already today.
Reading this confirmed that my time researching the topic in other places had not been wasted, and a stop at tealcovecraftcollective extended the confirmation, when independent sources agree that is a useful signal and this site is one of the more reliable sources I have found for cross checking what I read elsewhere on similar subjects.
Let me tell you about the Miami rental circus — it’s wild out here. You spot a sweet deal online: shiny Mercedes, low daily rate, looks perfect. Plus a surprise $2000 hold on your card and a $35 per day GPS you never asked for right before giving you the keys. Seven years in South Florida and I still almost fall for these tricks. If you are trying to find a legitimate luxury fleet without getting ripped off, do some real digging first and read actual customer reviews. Anyone who’s taken the Metro here knows the struggle about this city, whether you are doing Brickell happy hour, Bal Harbour shopping, or a spontaneous drive down to the Keys.
I’ve tried maybe 40 rental companies across Dade, Broward, and Palm Beach, until I finally found one outfit that actually delivers what’s promised. If you are looking for the only straight shooter for premium rides across South Florida, check the current details here: car rental miami florida [url=https://luxury-car-rental-miami-7.com]https://luxury-car-rental-miami-7.com[/url]. Also, definitely bring polarized shades unless you enjoy driving into the apocalypse every single evening. Just drive safe out there and definitely pass on that “tire protection” upsell — total garbage. let me know if you guys have any other clean spots.
Did not expect much when I clicked through but ended up reading the whole thing carefully, and a stop at skyharborcraftcollective kept that engagement going, sometimes the unassuming sites turn out to deliver more than the flashy ones which is something I have learned to look out for over time online lately and across topics.
Now placing this in the same category as a few other sites I have come to trust, and a look at elmbrooktradingfoundry continued the placement decision, the small category of fully trusted sites is one I extend rarely and only after multiple positive reading sessions and this site has earned the category placement methodically over time.
Genuine reaction is that this site clicked with how I like to read, and a look at creekharborcraftcollective kept that comfortable fit going, sometimes you find a place online whose editorial decisions just align with your preferences and when that happens it is worth recognising and supporting through repeat engagement consistently going forward.
Decided after reading this that I would check this site weekly going forward, and a stop at levqino reinforced that commitment, deciding to add a site to a regular rotation requires meeting a quality bar that very few places clear and this one cleared it cleanly without any noticeable effort or marketing push behind it.
Reading this in the morning set a good tone for the day, and a quick visit to quartzmeadowmarketgallery kept that good tone going, content can do that sometimes when it hits the right notes and finding sites that consistently strike that tone is something I have learned to recognise and reward with regular visits.
Solid little post, the kind that does not need to be flashy because the substance is doing the work, and a look at meadowharborvendorhall kept that quiet confidence going across the site, this is what writing looks like when the writer trusts the content to land on its own without theatrics or unnecessary attention seeking behaviour.
Closed the laptop and walked away thinking about the post for a good twenty minutes, and a stop at coastharborvendorhall produced similar lingering thoughts, content that survives the closing of the browser tab is content that has actually entered the mind rather than just decorating the screen for the duration of the reading.
Now recognising the editorial wisdom of letting some questions remain open at the end, and a look at stylishbuycorner continued that intellectual honesty, content that does not force closure on contested questions is content that respects the limits of knowledge and this site has clearly developed the maturity to know when to leave space.
Okay folks gather round — Miami rental horror story time. Then you roll up to the local address to pick up the car. Different car sitting there — bald tires, dashboard lit up like a Christmas tree, and that “killer price”? Yeah doesn’t include the non-negotiable $45 daily insurance or the $500 deposit they forget to mention. Nine years in South Florida and these clowns still nearly fool me. If you are trying to find a legitimate luxury fleet without getting ripped off, do some real digging first and read actual customer reviews. Anyone who’s tried the trolley system knows what I’m talking about about this city, whether you are doing Coconut Grove dinner, Sunny Isles sunrise, or a spontaneous drive down to Homestead.
Most of these local agencies are just polished turds with fake five-star reviews hiding overpriced junk, until I finally found one company that doesn’t play stupid games. If you are looking for the only trustworthy source for premium rides across South Florida, check the current details here: luxury car rental miami florida [url=https://luxury-car-rental-miami-9.com]luxury car rental miami florida[/url]. Also, definitely bring polarized shades unless you enjoy driving blind into the sunset every single night. Anyway, glad there’s at least one honest operator left in this rental jungle, hope this helps some of you save a few bucks.
I really like how the writer keeps the tone friendly without sounding fake or overly polished, and after a stop at garnetharbortradinghouse the same calm pace was there, no rushing to make a point and no padding either, just clean honest writing that I can respect and come back to later again.
Walked away with a clearer head than I had before reading this, and a quick visit to brightharborvendorhall only sharpened that, the writing has a way of cutting through the noise that surrounds most topics online which is something I will definitely remember the next time I am searching for an answer to anything.
Знаете, ситуация — родственник в запое , а что делать — просто тупик. Я через это прошел несколько лет назад. Пьют успокоительное, но хрен там. Требуется профессиональная медицина. Обзвонил десяток контор — только деньги тянут. Пока не нашел один действительно рабочий вариант. Если ищешь где получить анонимное лечение алкоголиков — не рискуй здоровьем близкого. В Воронеже , если честно, хватает левых контор без лицензии. Реальные контакты ниже по ссылке: лечение наркомании и алкоголизма [url=https://narkologicheskaya-pomoshh-voronezh-11.ru]https://narkologicheskaya-pomoshh-voronezh-11.ru[/url] Честно скажу , после того как прочитал , многое прояснилось . И про кодирование, и про условия в клинике. Плюс работают круглосуточно — это важно . Рекомендую не тянуть .
Felt the writer was being honest with the reader which is rare enough that I want to acknowledge it, and a look at globebeat continued that honest feel, content built on actual knowledge rather than aggregated summaries is something I value highly and rarely come across in regular searches on the open internet these days.
Took a few notes from this post, the points are easy to remember without needing to come back and check, and a look at crystalcovecommerceatelier added a couple more, the kind of place that sticks in the memory long after the browser tab has been closed for the day which says a lot really.
A piece that did not require external context to follow, and a look at onlinedealspoint maintained the same self contained quality, content that stands alone without forcing readers to chase prerequisites is more accessible and this site has clearly thought about how each piece can serve a fresh visitor rather than only existing members.
Glad I clicked through from where I did because this turned out to be worth the time spent, and after creekharbortradehall I had a fuller picture, the kind of content that earns its visitors through delivering value rather than chasing them through aggressive advertising or constant pop ups appearing everywhere on the screen lately.
Let me save you some serious pain with this Miami rental nonsense. You see this gorgeous deal online — clean spec, fair price, looks like a dream. Completely different car sitting there — dents everywhere, smells like cheap air freshener covering something worse, and that “dream price”? Doesn’t include the mandatory $50 daily insurance or the $300 “administrative fee” they invent at checkout. Eleven years in South Florida and these clowns still almost get me. If you are trying to find a legitimate luxury fleet without getting ripped off, avoid the airport like the plague. Anyone who’s tried the bus here knows exactly what I mean about this city, whether you are doing Key Biscayne sunset, Design District shopping, or a spontaneous drive down to the Everglades.
I’ve tested maybe 60 rental companies across Dade, Broward, and Collier, but I eventually found a service with no games, no switch, and no hidden BS in paragraph 12 of the contract. If you are looking for the only honest source for premium rides across South Florida, check the current details here: rolls royce cullinan for rent near me [url=https://luxury-car-rental-miami-11.com]https://luxury-car-rental-miami-11.com[/url]. Yeah, parking in South Beach will cost you a nice bottle of champagne — but that’s the Miami tax. Anyway, glad there’s at least one straight operator left in this rental jungle, hope this helps some of you save a few bucks.
Decided this was the kind of site I would defend in a discussion about good blog content, and a stop at brightbrooktradingfoundry reinforced that, very few sites earn active defence rather than passive consumption and this one has clearly crossed that threshold for me without needing any explicit pitch from the writers themselves either.
Swear I’ve seen it all by now, the rental landscape down here is crazy. You find a killer deal online — photos look pristine, price seems fair, terms almost reasonable. Different vehicle parked outside, curb rash on every rim, and that “all-inclusive rate”? Ha, doesn’t include the mandatory $300 cleaning fee or the $25 per day toll pass you can’t decline. Living here six years and still almost fall for this stuff sometimes. If you are trying to find a legitimate vehicle without getting ripped off, stay far away from the airport rental center. Anyone who’s tried the bus here knows exactly what I mean about this city, especially since the AC must be arctic and unlimited miles non-negotiable.
Most of these local agencies are just polished garbage with decent Google reviews bought somewhere, until I finally found one company that doesn’t play stupid games. If you are looking for the only trustworthy source for premium vehicles across South Florida, check the current details here: rent luxury sedan [url=https://luxury-car-rental-miami-6.com]https://luxury-car-rental-miami-6.com[/url]. Yeah, parking in South Beach will cost you a nice dinner — but that’s the price of admission. Anyway, glad there’s at least one honest operator left in this rental jungle, let me know if you guys have any other clean spots.
Different in a good way from the cookie cutter content that fills most blogs covering this area, and a stop at ivoryridgemarketparlor kept showing me why, original thoughtful writing exists if you know where to look and this site has earned a place on my short list of those rare exceptions worth defending.
Closed and reopened the tab three times before finally finishing, and a stop at forestmeadowvendorroom held my attention straight through, sometimes content fights for time against my own distraction and the times it wins say something positive about its quality and this post clearly won that fight today afternoon for me.
Genuinely glad I clicked through to read this rather than skipping past, and a stop at clovercrestartisanexchange confirmed I should keep clicking through to more pages here, the kind of resource that justifies its place in my browser history rather than feeling like wasted time which is the highest compliment I offer any site online today.
Ребята, выручайте! Купил кресло б/у, каркас норм, но ткань в ужасном состоянии. Посоветуйте нормальную мебельную ткань для частого использования. ткань для обивки дивана [url=https://tkan-dlya-mebeli-1.ru]https://tkan-dlya-mebeli-1.ru[/url] Говорят, флок и микровелюр быстро вытираются, а рогожка лучше. Нужен метров 15-20, может, кто знает нормального поставщика.
Started thinking about my own writing differently after reading, and a look at elmharborvendorcollective continued that reflective effect, content that influences how I work rather than just informing what I know is content with the highest kind of impact and this site has triggered some of that reflective influence today on me.
Learned something from this without having to dig through layers of fluff, and a stop at timbertrailartisanexchange added a bit more context that helped tie things together for me, definitely a useful corner of the internet for anyone who wants real information without the usual marketing nonsense around it that often ruins similar pages.
Big thanks to whoever wrote this, you saved me a lot of time hunting for the same info on other sites, and a stop at solarorchardartisanexchange only added more useful detail without going off topic, that kind of focus is honestly hard to come across these days when most posts wander everywhere.
Worth saying that the prose reads naturally without straining for style, and a stop at rivercovevendorroom maintained the same unforced quality, writing that achieves elegance without effort is the highest tier and this site has clearly worked out how to land that effortless quality consistently rather than only on the writers best days.
A satisfying piece in the way that good meals are satisfying rather than just filling, and a look at crowncovecraftcollective extended that satisfaction, the metaphor between content and meals is one I find useful and this site reads as a satisfying meal rather than the empty calories that most content provides for casual readers.
Closed it feeling slightly more competent in the topic than I started, and a stop at actiondrivenprogress reinforced that competence boost, real learning is rare in casual online reading but it does happen sometimes and this site managed to make it happen for me today which is genuinely worth pausing to acknowledge.
Ваш провідник у житті Луцька https://43000.com.ua новини міста, культурні події, афіша заходів, бізнес, освіта та корисні поради для мешканців і гостей. Уся важлива інформація про Луцьк в одному місці.
Yesterday I was complaining about the state of online writing and today this site has temporarily fixed that complaint, and a look at apexhelms extended that mood reversal, the short term mood improvement that comes from finding good content is real and this site has produced that improvement for me at a useful moment.
One of the more thoughtful posts I have read recently on this topic, and a stop at coralmeadowtradehouse added even more weight to that impression, this is genuinely good content that holds its own against far better known sites in the same space without trying to imitate any of them at all which I appreciate.
Let me save you some serious time, learned this the hard way. You find this amazing listing online — gorgeous spec, fair daily rate, looks perfect. Plus they freeze a surprise $4500 on your card and say “don’t worry, it’ll drop off in a week or two” right before giving you the keys. Twelve years in South Florida and these jokers still almost catch me sleeping. If you are trying to find a legitimate luxury fleet without getting ripped off, do some real digging first and read actual customer reviews. Anyone who’s waited for an Uber in August heat knows the struggle exactly about this city, whether you are doing Coconut Grove brunch, Sunny Isles sunrise cruise, or a spontaneous drive down to the Keys.
Most of these local agencies are just shiny turds with fake five-star reviews bought in bulk online hiding overpriced junk, but I eventually found a service where what you book is exactly what shows up, no surprises, no hidden fine print. If you are looking for the only straight shooter for premium rides across South Florida, check the current details here: premium auto rent [url=https://luxury-car-rental-miami-12.com]premium auto rent[/url]. Yeah, parking in Brickell will cost you a nice dinner — but that’s the price of paradise. Anyway, glad there’s at least one honest operator left in this rental jungle, hope this helps some of you save a few bucks.
Let me save you some serious time, learned this the hard way. Then you actually go to the local office to pick up the car. Plus they lock up a surprise $3500 on your card for who knows how long right before giving you the keys. Fool me ten times? That’s just the 305 experience, lesson learned. If you are trying to find a legitimate luxury fleet without getting ripped off, do some real digging first and read actual customer reviews. Miami without solid wheels is basically a punishment, especially since the AC must be ice cold and unlimited miles non-negotiable.
I’ve run through maybe 55 rental companies across Dade, Broward, and Palm Beach, but I eventually found a service with no games, no bait-and-switch, and no hidden fees in the fine print. If you are looking for the only straight shooter for premium rides across South Florida, check the current details here: luxury car rental service [url=https://luxury-car-rental-miami-10.com]luxury car rental service[/url]. Also, definitely bring quality shades unless you enjoy driving into the sun like a vampire every single evening. Just drive safe out there and absolutely skip that “paint protection” upsell — pure robbery. hope this helps some of you save a few bucks.
Thank you for being clear and direct, that simple approach saves so much frustration on the reader’s end, and a stop at mossharbortradehall only made me more sure of it, the rest of the content seems to follow the same pattern which is a great sign of consistent editorial care behind the scenes.
Reading this slowly in the morning before opening email, and a stop at elitegoodsmarket extended that protected attention, content that earns the prime morning reading slot before the daily distractions begin is content with elevated status and this site has earned that prime slot consistently in my recent reading habits clearly.
Telefonuma 1xbet yüklemek istiyordum uzun süredir. Play Store’da arattım ama bulamadım resmi olanı. Adımları doğru sırayla uyguladıktan sonra erişim sorunsuz açıldı. En sonunda güvendiğim bir kaynağa ulaştım ve size de tüm detayları aktarmak istedim, güncel bilgilere buradan bakabilirsiniz: 1xbet nasıl indirilir [url=https://1xbet-indir-11.com]1xbet nasıl indirilir[/url]. Yani anlatmak istediğim şu — son sürümü her şeyi düşünmüş resmen.
Hiçbir sorun yaşamadım indirme aşamasında. Birçok platform denedim ama en iyisi bu çıktı — en hızlı uygulama bu oldu artık. Şimdiden iyi şanslar ve bol kazançlar…
My usual response to new bookmarks is to forget them but this one I have already returned to twice, and a look at limqiro pulled me back a third time, the actual return rate to bookmarked sites is the real measure of value and this one is clearing that measure at a notable rate already.
Even from a single post the editorial care is clear, and a stop at flintmeadowtradinggallery extended that care across more pages, the kind of attention to quality that shows up in every paragraph is what separates serious sites from the rest and this one has clearly invested in that paragraph level attention across what I have read.
Started smiling at one paragraph because the writing was just nice, and a look at executeideasforward produced a couple more such moments, prose that produces small spontaneous reactions in the reader is doing more than just transferring information and the writers here are clearly hitting that level fairly consistently throughout pieces.
Came away with some new perspectives I had not considered before, and after creekharbortradehouse those ideas felt more complete, the kind of content that stays with you a little while after reading rather than slipping out the moment you switch tabs and move on with your day to whatever comes next.
Even on a quick first read the substance of the post comes through, and a look at modernoutfitstore reinforced that immediate quality, content that does not require a slow careful read to demonstrate value but rewards one anyway is content with real depth and this site has produced work of that demanding depth class.
Solid value for anyone willing to read carefully, and a look at crystalcovegoodsroom extends that value across the rest of the site, this is the kind of place that rewards return visits rather than offering everything in a single splashy post and then leaving readers nothing to come back for later which is unfortunately common.
Now adding the writer to a small mental list of voices I want to follow, and a look at ivoryridgemarkethouse reinforced that follow intention, the few writers whose work I actively track are writers who have demonstrated sustained quality and this writer has clearly demonstrated that sustained quality across the pieces I have sampled here today.
Probably one of the more reliable sources I have found for this kind of careful coverage, and a look at acornharbortradehall reinforced the reliability, the small group of sources I would describe as reliable for a given topic is curated carefully and this site has earned a place in that small group through consistent performance.
After reading several posts back to back the consistent voice across them is impressive, and a stop at meadowharborgoodsroom continued that voice consistency, sites that maintain a single coherent voice across many pieces by potentially many writers represent serious editorial discipline and this one has clearly developed the institutional consistency needed for that.
мостбет lucky jet Кыргызстан [url=https://mostbetskg.buzz/]https://mostbetskg.buzz/[/url]
Probably one of the more reliable sources I have found for this kind of careful coverage, and a look at calmbrookvendorfoundry reinforced the reliability, the small group of sources I would describe as reliable for a given topic is curated carefully and this site has earned a place in that small group through consistent performance.
Bookmark added in three places to make sure I do not lose the link, and a look at createforwardprogress got the same redundant treatment, sites I am afraid to lose are the rare keepers and this is clearly one of them based on what I have read so far across this and a couple of related posts.
Reading this slowly in the morning before opening email, and a stop at trustedbuyerszone extended that protected attention, content that earns the prime morning reading slot before the daily distractions begin is content with elevated status and this site has earned that prime slot consistently in my recent reading habits clearly.
Строительные идеи https://texha.com.ua ремонтные решения и полезные советы для дома. Узнавайте о современных технологиях, надежных материалах, инженерных системах и способах сделать жилье комфортным, функциональным и долговечным.
Liked the careful selection of which details to include and which to skip, and a stop at emberbrookmarketfoundry reflected the same editorial judgement, knowing what to leave out is just as important as knowing what to include and this site has clearly figured out where that line sits for the topics it covers regularly.
Современный портал https://rus3edin.org.ua о строительстве и ремонте с материалами по проектированию, отделке, утеплению, монтажу инженерных систем и благоустройству территории. Все необходимое для успешной реализации строительных проектов.
mostbet в Киргизии [url=http://mostbetskg.fun]http://mostbetskg.fun[/url]
мостбет максимальная ставка [url=www.most-bet-kg.online]www.most-bet-kg.online[/url]
Портал об автомобилях https://diesel.kyiv.ua и современных транспортных технологиях. Статьи о новых моделях, сравнительные обзоры, рекомендации по обслуживанию и полезная информация для каждого автомобилиста.
charter yacht montenegro montenegro yacht vacations
Felt the writer was being honest with the reader which is rare enough that I want to acknowledge it, and a look at rubyorchardtradegallery continued that honest feel, content built on actual knowledge rather than aggregated summaries is something I value highly and rarely come across in regular searches on the open internet these days.
This actually answered the question I had been searching for, and after I checked frostridgevendorstudio I had a few more pieces I had not realised I needed, that is the sign of a site that knows what its readers want before they even know how to ask it which is impressive.
Now planning to recommend this site in a context where my recommendations are taken seriously, and a stop at globehaven confirmed I should make that recommendation soon, the small but real act of recommending content into spaces where my taste matters is something I take seriously and this site is worth the recommendation.
Worth saying that the writing carries a particular kind of authority without making any explicit claims to it, and a stop at crystalcoveartisanexchange extended that earned authority feeling, sites that demonstrate expertise through the quality of their explanations rather than by stating credentials are sites I trust most and this site has it.
Probably this is one of the better quiet successes on the open web at the moment, and a look at cottongrovegoodsroom reinforced that quiet success quality, sites that are doing well without making a noise about doing well are the sites I most respect and this one has clearly chosen the quiet success path consistently throughout.
Easy to recommend, the content speaks for itself without needing additional praise from me, and a stop at stoneharborartisanexchange only adds more reasons to send people this way, the kind of generous resource that benefits its readers without demanding anything in return is increasingly rare and worth recognising clearly today across the broader open internet.
Worth every minute of the time spent reading, and a stop at trailharborartisanexchange extends that value across more pages, in a media environment where most content is engineered to waste attention this site stands out by treating reader time as something valuable rather than something to be exploited and stretched as far as possible.
Recommended without reservation for anyone interested in the topic at any level of expertise, and a look at freshdealstation only strengthens that recommendation, this site clearly knows how to serve readers across a range of backgrounds without watering down the content or talking past anyone in the audience which is genuinely impressive to see.
Really like the way the post resists reaching for cliches that would have made it feel generic, and a quick visit to claritycreatesforwardmotion kept that fresh feel going, original phrasing and unexpected metaphors are signs that the writer is actually thinking rather than just stitching together familiar phrases into the appearance of content.
Reading this on a phone at a coffee shop and finding it perfectly suited to that context, and a stop at pineharbortradeparlor continued the comfortable mobile experience, content that works across reading conditions without compromising on substance is increasingly important and this site has clearly thought about the whole reader experience here.
Genuine pleasure to read, and that is not something I say often after a casual click through, and a quick visit to apricotharborvendorloft kept the same feeling going across the rest of the site, finding writing that actually feels good to spend time with rather than just functional is increasingly rare on the open web.
Honestly impressed by the consistency of voice across what I have read so far, and a quick visit to clippoises continued that consistent feel, when a site reads like one careful person rather than a committee the experience is more rewarding for the reader who notices these subtle editorial details over time.
Came away with a slightly better mental model of the topic than I started with, and a stop at crowncovevendorroom sharpened that further, content that improves the reader thinking apparatus rather than just dumping facts into it is the rare kind I genuinely value and seek out when I have time to read carefully.
pinup Click [url=www.pinup77432.help]pinup Click[/url]
mostbet support [url=www.mostbet47654.help]www.mostbet47654.help[/url]
mostbet promo kodni qanday kiritish [url=https://mostbet10093.help/]mostbet promo kodni qanday kiritish[/url]
Alright, real talk about the Miami rental game — it’s a straight-up jungle out here. You find this amazing deal online: brand new Beamer, unlimited miles, price that makes you smile. Plus they freeze a surprise $2500 on your card for a week right before giving you the keys. Fool me eight times? That’s just another Tuesday in the 305, lesson learned. If you are trying to find a legitimate luxury fleet without getting ripped off, do some real digging first and read actual customer reviews. Miami without decent wheels is basically a hostage situation, whether you are doing South of Fifth brunch, Design District shopping, or a spontaneous Keys trip.
I’ve run through maybe 45 rental companies across Dade, Broward, and Monroe, until I finally found one outfit that doesn’t play stupid games. If you are looking for the only honest source for premium wheels across South Florida, check the current details here: rental luxury cars miami airport [url=https://luxury-car-rental-miami-8.com]rental luxury cars miami airport[/url]. Yeah, parking in South Beach will cost you a nice bottle of wine — but that’s the Miami tax. Just drive safe out there and absolutely skip that “windshield protection” upsell — pure profit for them, zero value for you. hope this helps some of you save a few bucks.
Let me save you some serious time, learned this the hard way. Then you actually show up to the local office to grab the keys. Plus they put a surprise $4000 hold on your card and say it’ll take two weeks to release right before giving you the keys. Fool me eleven times? That’s just called living in Miami, lesson learned. When you’re searching for a legit and reliable premium ride to cruise around, avoid the airport like the plague. Anyone who’s tried the bus here knows exactly what I mean about this city, especially since the AC must be arctic and unlimited miles non-negotiable.
Most of these local agencies are just shiny garbage with fake Google reviews bought in bulk hiding overpriced junk, until I finally found one outfit that actually delivers what’s in the photos. If you are looking for the only honest source for premium rides across South Florida, check the current details here: luxury car rental miami south beach [url=https://luxury-car-rental-miami-11.com]luxury car rental miami south beach[/url]. Also, definitely bring polarized shades unless you enjoy driving into the sun like a blind bat every single evening. Just drive safe out there and definitely skip that “tire and wheel” upsell — pure profit for them, zero value for you. hope this helps some of you save a few bucks.
Glad the writer did not feel compelled to cover every possible angle of the topic, focus is a virtue, and a stop at cottongrovegoodsgallery reflected the same disciplined scope, knowing what to leave out is half of what makes good writing good and this post has clearly been edited with that principle in mind.
Now planning to share the link with a small group of readers I trust, and a look at limvoro suggested more material to share with the same group, recommending content into a curated circle requires confidence in the recommendation and this site is making me confident in those personal recommendations on multiple separate occasions now.
Swear I’ve seen every scam in the book by now, the rental landscape down here is crazy. Then you roll up to the local address to pick up the car. Plus a surprise $3000 hold on your credit card for two weeks right before giving you the keys. Fool me nine times? That’s just the Miami welcome committee, lesson learned. If you are trying to find a legitimate luxury fleet without getting ripped off, do some real digging first and read actual customer reviews. Miami without proper wheels is basically a nightmare, whether you are doing Coconut Grove dinner, Sunny Isles sunrise, or a spontaneous drive down to Homestead.
Most of these local agencies are just polished turds with fake five-star reviews hiding overpriced junk, but I eventually found a service where what you reserve is exactly what you get, period, end of story. If you are looking for the only trustworthy source for premium rides across South Florida, check the current details here: rent a sedan car [url=https://luxury-car-rental-miami-9.com]https://luxury-car-rental-miami-9.com[/url]. Also, definitely bring polarized shades unless you enjoy driving blind into the sunset every single night. Anyway, glad there’s at least one honest operator left in this rental jungle, let me know if you guys have any other clean spots.
Came in for one specific question and got answers to three I had not even thought to ask, and a look at executioncreatesconfidence extended that bonus value pattern, the kind of resource that anticipates reader needs rather than just answering the literal question asked is the gold standard and this site reaches it.
Let me save you some serious time, learned this the hard way. You spot a sweet deal online: shiny Mercedes, low daily rate, looks perfect. Completely different car waiting for you, check engine light on, and that “low rate”? Doesn’t include the mandatory insurance they somehow forgot to mention. Fool me seven times? Yeah that’s just Tuesday in Miami, lesson learned. If you are trying to find a legitimate luxury fleet without getting ripped off, do some real digging first and read actual customer reviews. Miami without real wheels is basically a punishment, especially since the AC must freeze your face off and unlimited miles or forget it.
I’ve tried maybe 40 rental companies across Dade, Broward, and Palm Beach, until I finally found one outfit that actually delivers what’s promised. If you are looking for the only straight shooter for premium rides across South Florida, check the current details here: rental car in miami florida [url=https://luxury-car-rental-miami-7.com]https://luxury-car-rental-miami-7.com[/url]. Yeah, parking in Brickell will cost you a nice steak dinner — but that’s just Miami life. Anyway, glad there’s at least one honest rental joint left in this town, hope this helps some of you save a few bucks.
Thanks for the honest framing without exaggerated claims that the topic will change my life, and a stop at coastharborcraftcollective kept the same modest tone, restraint in marketing language signals trustworthiness and the writers here are clearly playing the long game by building credibility rather than chasing immediate clicks through hyperbole.
Decent post that improved my afternoon a small amount, and a look at silkmeadowvendorroom added a bit more to that, sometimes the small wins online add up over time and a useful site like this one is the kind of place that contributes consistently to those small wins for me lately across many different topics I follow.
A clean read with no irritations, and a look at alpineharborvendorhall continued that frictionless quality, the absence of small irritations is something I notice only when present elsewhere and this site is one of the rare places where everything just works and lets me focus on the substance rather than fighting the format.
mostbet casino slots [url=http://mostbetskg.buzz]http://mostbetskg.buzz[/url]
Знаете, ситуация — близкий подсел на иглу, а что делать — просто тупик. Я через это прошел несколько лет назад. Пьют успокоительное, но нет . Нужна реальная медицина. Перерыл весь интернет — одни обещания . А потом наткнулся на один действительно рабочий вариант. Нужна лечение наркомании в Воронеже — не рискуй здоровьем близкого. У нас в Воронеже, если честно, тоже полно шарлатанов . Реальные контакты тут : наркологическая помощь срочно [url=https://narkologicheskaya-pomoshh-voronezh-11.ru]наркологическая помощь срочно[/url] Откровенно говоря, после того как ознакомился, понял свои ошибки. Там и про вывод из запоя , и про реабилитацию . И цены адекватные. Рекомендую не тянуть .
Worth flagging this site to a few specific friends who would appreciate the editorial sensibility, and a look at premiumflashhub added more pages I will mention to them, recommending sites to specific people requires understanding both the site and the person and this site is making those personalised recommendations easy and natural for me.
Honest reaction is that I want to send this to a friend who would benefit from it, and a look at chestnutcovecommerceatelier added more material I will pass along too, the impulse to share is the strongest signal I have for content quality and this site is generating that impulse cleanly across multiple posts.
Now planning to recommend this site in a context where my recommendations are taken seriously, and a stop at ferncovevendorlounge confirmed I should make that recommendation soon, the small but real act of recommending content into spaces where my taste matters is something I take seriously and this site is worth the recommendation.
мостбет тотализатор [url=https://mostbetskg.buzz/]мостбет тотализатор[/url]
Now saved this in a way that I will actually find again rather than the casual bookmark approach, and a stop at premiumbuyarena earned the same careful saving, organising my reading bookmarks so that high quality sources rise to the top is something I should do more of and this site triggered that organisation today.
Honestly enjoyed not being sold anything for the entire duration of the post, and a look at acornharbormerchantgallery kept that pleasant absence going across more pages, content that exists for its own sake rather than as a funnel to a paid product is increasingly rare and worth supporting where I can find it.
Reading this felt productive in a way most internet reading does not, and a look at stoneharborcraftcollective continued that productive feeling, sometimes the open web feels like a waste of time but sites like this remind me why I still bother to look around rather than retreating to old reliable sources for everything I need.
Worth pointing out that the writer made the topic feel more interesting than I had been expecting, and a look at easycartonline continued that elevation effect, content that improves the apparent quality of its subject through skilled treatment is doing something real and this site has clearly developed that kind of editorial alchemy throughout.
Telefonuma güncel sürümü yüklemek istiyordum açıkçası. Play Store’da resmi olanı bulamayınca üzüldüm. Sonunda tüm teknik detayları inceleyip sistemi test ettim. En sonunda sağlam bir kaynağa ulaştım ve size de tüm detayları aktarmak istedim, güncel bilgilere buradan bakabilirsiniz: 1xbet uygulaması indir [url=http://www.1xbet-indir-2.com]1xbet uygulaması indir[/url]. Valla bak net söyleyeyim — telefonuma indirdikten sonra çok rahatladım.
güncellemeleri de düzenli geliyor. Birçok platform denedim ama en iyisi bu çıktı — kesinlikle pişman olmazsınız deneyin derim. Umarım siz de memnun kalırsınız…
Appreciated how the writer anticipated the questions a reader might have along the way, and a stop at seacovevendorparlor continued that thoughtful approach, you can tell when content has been edited with the reader in mind versus just published as a first draft and this is clearly the former approach across what I read.
Now thinking about how to apply some of this to a project I have been planning, and a look at uplandcovecraftcollective added more material for the planning, content that connects to my actual creative work rather than just being interesting in the abstract is the kind that earns priority placement in my reading rotation consistently going forward.
mostbet mines Кыргызстан [url=https://mostbetskg.fun]https://mostbetskg.fun[/url]
мостбет контакты [url=www.most-bet-kg.online]www.most-bet-kg.online[/url]
Android için doğru sürümü bulmak gerçekten zordu. Güncel apk’yı nereden indireceğimi bilemedim açıkçası. Adımları doğru sırayla uyguladıktan sonra erişim sorunsuz açıldı. En sonunda güvendiğim bir kaynağa ulaştım ve size de tüm detayları aktarmak istedim, güncel bilgilere buradan bakabilirsiniz: 1xbet android uygulama indir [url=1xbet-indir-11.com]1xbet android uygulama indir[/url]. Yani anlatmak istediğim şu — mobil uygulaması inanılmaz kullanışlı çalışıyor.
güncellemeleri de otomatik geliyor. İşin doğrusunu söylemek gerekirse — başka yerde vakit kaybetmeyin yani. Herkese hayırlı olsun…
Now leaving a small mental note to recommend this when the topic comes up in conversation, and a look at crownharborvendorhall extended that recommend ready feeling, content that arms me with shareable references for likely future conversations is content with social value and this site is providing that conversational ammunition consistently for me lately.
мостбет вывести деньги [url=www.most-bet-kg.online]www.most-bet-kg.online[/url]
мостбет cashback [url=https://mostbetskg.fun/]https://mostbetskg.fun/[/url]
Picked up a couple of new ideas here that I can actually try out, and after my visit to thinkclearlyact I have even more notes saved, this is the kind of resource that pays you back for the time you spend on it which is rare to come across in this corner of the web.
This actually answered the question I had been searching for, and after I checked goldmanor I had a few more pieces I had not realised I needed, that is the sign of a site that knows what its readers want before they even know how to ask it which is impressive.
Decided to read this site for a while before forming a verdict, and the verdict after several pages is positive, and a stop at onecartonline continued that pattern, judging a site requires more than one post and giving sites a fair sample is something I try to do for promising candidates rather than rushing to dismiss.
Let me save you some serious time, learned this the hard way. Then you actually show up to the local office to pick up the car. Totally different vehicle waiting for you — bald tires, dashboard lit up like a Christmas tree, and that “amazing rate”? Doesn’t include the mandatory $40 daily toll pass or the $350 “premium location” fee they spring on you at the counter. Twelve years in South Florida and these jokers still almost catch me sleeping. When you need a proper and reliable premium ride to cruise around, do some real digging first and read actual customer reviews. Anyone who’s waited for an Uber in August heat knows the struggle exactly about this city, whether you are doing Coconut Grove brunch, Sunny Isles sunrise cruise, or a spontaneous drive down to the Keys.
I’ve tested maybe 65 rental outfits across Dade, Broward, and Monroe, but I eventually found a service where what you book is exactly what shows up, no surprises, no hidden fine print. If you are looking for the only straight shooter for premium rides across South Florida, check the current details here: miami luxury car rentals [url=https://luxury-car-rental-miami-12.com]miami luxury car rentals[/url]. Also, definitely bring quality shades unless you enjoy driving into the sun like a zombie every single evening. Anyway, glad there’s at least one honest operator left in this rental jungle, hope this helps some of you save a few bucks.
Without overstating it this is a quietly excellent post, and a look at daisyharborvendorparlor extended that quiet excellence, content that earns superlatives without demanding them through marketing language is content that has truly earned them through the substance and this site has clearly produced work in that earned excellence category today.
Worth recognising that the post handled a familiar topic without reaching for any of the obvious hot takes, and a stop at clippoise continued that fresh treatment, sites that find new angles on subjects others have exhausted are sites worth following carefully and this one has clearly developed that exploratory instinct through patient practice.
Appreciated how the post felt complete without overstaying its welcome, and a stop at progressstartshere confirmed that economical approach runs across the site, knowing when to stop is a skill many writers never develop but here the discipline is obvious and welcome from the perspective of a busy reader trying to learn things efficiently.
Now setting aside time on my next free afternoon to read more from the archives, and a stop at claritypoweredgrowth confirmed that time will be well spent, the rare site whose archive deserves a dedicated reading session rather than just casual sampling is the kind of resource worth scheduling around and this one qualifies clearly.
The headings made navigating the post simple even when I needed to find a specific section quickly, and a look at flickaltars continued the same thoughtful structure, small details like clear headings show that someone is actually thinking about how the reader uses the page rather than just filling it for length alone.
A quiet piece that did not try to compete on volume, and a look at silvercovemarkethall maintained that selective approach, sites that publish less but better are increasingly rare in an environment that rewards volume and this one has clearly chosen quality cadence over quantity which is a brave editorial decision in current conditions.
Well done, the writing is professional without being stiff, and the topic is treated with care, and a look at focusoverfriction reflected that approach, the kind of site I would point a colleague to if they asked for a reliable starting point on this topic in the future without any hesitation at all.
Now planning to write about the topic myself eventually using this post as a reference, and a look at premiumgoodsarena would also serve in that future piece, content that becomes raw material for my own writing rather than just informing my reading is content with multiplicative value and this site is generating that multiplicative effect.
Let me save you some serious time, learned this the hard way. Then you actually go to the local office to pick up the car. Plus they lock up a surprise $3500 on your card for who knows how long right before giving you the keys. Fool me ten times? That’s just the 305 experience, lesson learned. If you are trying to find a legitimate luxury fleet without getting ripped off, do some real digging first and read actual customer reviews. Miami without solid wheels is basically a punishment, especially since the AC must be ice cold and unlimited miles non-negotiable.
Most of these local agencies are just shiny websites hiding the same beat-up fleet with fresh wax and fake reviews, until I finally found one outfit that actually delivers what’s promised. If you are looking for the only straight shooter for premium rides across South Florida, check the current details here: exotic car rental south beach fl [url=https://luxury-car-rental-miami-10.com]exotic car rental south beach fl[/url]. Yeah, parking in Brickell will cost you a nice dinner — but that’s just how it is down here. Anyway, glad there’s at least one honest rental joint left in this town, let me know if you guys have any other clean spots.
Found this useful, the points line up well with what I have been thinking about lately, and a stop at flintmeadowmarketparlor added some angles I had not considered yet, definitely walking away with more than I came for which is the best outcome from time spent reading online for any kind of topic.
I usually skim posts like these but this one held my attention all the way through, and a stop at birchharborvendorhall did the same, that is a strong endorsement coming from me because I am usually quick to bounce when content gets repetitive or fails to deliver on its initial promise made in the headline.
mostbet depozit muammosi [url=https://mostbet47654.help/]https://mostbet47654.help/[/url]
pinup promoskodni qanday kiritish [url=pinup77432.help]pinup77432.help[/url]
mostbet server xatolik [url=http://mostbet10093.help]http://mostbet10093.help[/url]
The tone stayed consistent across the whole post which is harder than it looks for longer pieces, and a look at jasperharbortradehall continued the same voice, this kind of editorial consistency is a sign of either a single careful writer or a tightly run team and either is impressive today across the broader media environment.
Now thinking the topic is more interesting than I had given it credit for, and a stop at amberridgevendorlounge continued that elevated interest, content that revives my curiosity about subjects I had set aside is doing genuine work in the structure of my interests and this site is providing that revivifying effect today actually.
Now considering carefully how to share this site with the right audience rather than broadcasting widely, and a look at amberridgecommercegallery extended that careful sharing impulse, content worth sharing carefully rather than spamming is content that has earned a higher kind of recommendation and this site has earned that careful shareability throughout pieces.
Glad the writer kept this short rather than padding it out, the points stand on their own without needing extra context, and a look at premiumcartarena kept the same approach going, brevity is a sign of confidence in the substance and the team here clearly trusts their content to land without filler.
Reading this slowly to give it the attention it deserved, and a stop at chestnutharborvendorstudio earned the same slow read, choosing to read slowly is a small act of respect for content quality and very few sites earn that respect from me but this one did so without any explicit ask which is the cleanest way.
pinup cashback qanday ishlaydi [url=https://pinup77432.help]pinup cashback qanday ishlaydi[/url]
mostbet promo kod qanday ishlaydi [url=http://mostbet10093.help/]http://mostbet10093.help/[/url]
Now appreciating that the post did not require me to agree with the writer to find it valuable, and a look at uplandcovevendorparlor maintained the same useful regardless of agreement quality, content that informs even when it does not convince is content with broader utility and this site reads as useful even when I disagree.
Район Раменки традиционно считается одним из самых востребованных в Москве, поэтому Апсайд Мосфильмовская вызывает высокий интерес среди покупателей недвижимости, новостройки
mostbet uzbek tili [url=http://mostbet47654.help/]http://mostbet47654.help/[/url]
Well crafted post, the structure flows naturally from one point to the next without forcing transitions, and a stop at timbertrailcraftcollective kept the same flow going, you can tell when a writer has thought about how their content reads rather than just what it contains and this is one of those examples.
Great work on keeping things readable, the post never drags or repeats itself which I really appreciate, and a stop at valecoveartisanexchange added a bit more context that fit naturally with what was already said here, no need to read everything twice to get the point being made today.
Now appreciating that I did not feel exhausted after reading, and a stop at crystalharborvendorhall extended that energising quality, content that leaves me with more attention than it consumed is rare and the gap between draining and energising content is real over the course of a typical day spent reading widely online.
mostbet вывести деньги [url=https://mostbetskg.buzz/]https://mostbetskg.buzz/[/url]
Now noticing that the post did not mention the writer at all, focus stayed on the topic, and a look at coralharborartisanexchange continued that author absent quality, content that disappears the writer to focus on the substance is a particular kind of generosity and this site has clearly chosen the substance over the personality consistently.
Picked something concrete from the post that I will use immediately, and a look at progressbuiltintentionally added another concrete piece, content that produces immediately useful output rather than just abstract appreciation is content that earns its place in my regular rotation without needing any further evaluation from me at this point honestly.
During a reading session that included several other sources this one stood out, and a look at silverharborvendorhall continued the standout quality, the side by side comparison of sources during research is a useful exercise and this site has been winning those comparisons for me consistently across multiple research sessions during the last week.
Now noticing the post fit a particular gap in my reading without my having articulated the gap before, and a look at emberstonevendorlounge extended that gap filling effect, content that meets needs I had not consciously formulated is content with reader insight and this site has clearly developed that anticipatory editorial sense across many pieces.
Let me save you some serious time, learned this the hard way. Then you roll up to the local address to pick up the car. Different car sitting there — bald tires, dashboard lit up like a Christmas tree, and that “killer price”? Yeah doesn’t include the non-negotiable $45 daily insurance or the $500 deposit they forget to mention. Fool me nine times? That’s just the Miami welcome committee, lesson learned. If you are trying to find a legitimate luxury fleet without getting ripped off, do some real digging first and read actual customer reviews. Miami without proper wheels is basically a nightmare, whether you are doing Coconut Grove dinner, Sunny Isles sunrise, or a spontaneous drive down to Homestead.
I’ve tested maybe 50 rental outfits across Dade, Broward, and Collier, until I finally found one company that doesn’t play stupid games. If you are looking for the only trustworthy source for premium rides across South Florida, check the current details here: rental car in miami florida [url=https://luxury-car-rental-miami-9.com]https://luxury-car-rental-miami-9.com[/url]. Yeah, parking in Wynwood will cost you a nice dinner — but that’s the price of being in Miami. Just drive safe out there and definitely skip that “emergency roadside” upsell — complete waste of money. hope this helps some of you save a few bucks.
Felt a small spark of recognition when the post named something I had been struggling to articulate, and a look at progressthroughfocus produced more such moments, the rare service of giving readers language for fuzzy intuitions is one of the higher values that good writing can provide and this site offered several today instances.
Reading this gave me a small mental break from the heavier reading I had been doing, and a stop at moveintoprogress extended that lighter feel, content that provides relief without becoming trivial is harder to produce than people realise and this site has clearly figured out how to be light without being shallow at all.
Now recognising the specific pleasure of reading writing that shows real care for sentence shapes, and a look at curiopact extended that craft pleasure, sentence level writing quality is something most blog content ignores entirely and this site has clearly invested in the prose layer alongside the substance which is rare today.
Now setting up a small reminder to revisit the site on a slow day, and a stop at floraridgevendorroom confirmed the reminder was a good idea, planning return visits is a small organisational act that signals trust in ongoing quality and this site has earned that planned return through consistent performance across the pieces I have read so far.
If I had to defend the time I spend reading independent blogs this site would feature in the defence, and a look at focusenablesgrowth reinforced that defensive utility, the ongoing case for non algorithmic reading is one I make to myself periodically and sites like this one provide the actual evidence that supports the case clearly.
Now adjusting my mental model of how the topic fits into the broader landscape, and a look at shopgridmarket extended that adjustment, content that affects my structural understanding rather than just my factual knowledge is content with deeper impact and this site is providing those structural updates at a meaningful rate consistently across topics.
Speaking honestly this is among the better discoveries of my recent browsing, and a stop at galafactors reinforced that discovery quality, the ranking of recent discoveries is informal but meaningful and this site has placed near the top of that ranking based on the consistency of quality across what I have already read carefully.
1xbet 2026
Closed it feeling slightly more competent in the topic than I started, and a stop at easyshopgoods reinforced that competence boost, real learning is rare in casual online reading but it does happen sometimes and this site managed to make it happen for me today which is genuinely worth pausing to acknowledge.
Telefonuma 1xbet yüklemek istiyordum ama nasıl yapacağımı bilmiyordum. Play Store’da resmi uygulamayı bulamayınca çok üzüldüm. Sonunda tüm teknik detayları inceleyip sistemi test ettim. En sonunda güvenilir bir kaynağa ulaştım ve size de tüm detayları aktarmak istedim, güncel bilgilere buradan bakabilirsiniz: 1xbet yükle [url=http://www.1xbet-indir-3.com]1xbet yükle[/url]. Şimdi size kısaca özet geçeyim — mobil uygulaması inanılmaz kullanışlı çalışıyor.
Hiçbir sorun yaşamadım indirme işleminde. Birçok platform denedim ama en iyisi bu çıktı — en hızlı uygulama bu oldu artık. Umarım siz de memnun kalırsınız…
Now wondering how the writers calibrated the level of detail so well, and a stop at berrycovemerchantgallery continued the same calibration, the right level of detail is one of the harder editorial calls in any piece and this site has clearly developed an instinct for it through what I assume is years of careful practice publicly.
This filled in a gap in my understanding that I had not even noticed was there, and a stop at buyloopshop did the same, the kind of post that gives you more than you expected when you first clicked through from somewhere else, a real find for anyone curious about the area covered here.
Telefonuma güncel sürümü yüklemek istiyordum açıkçası. Play Store’da resmi olanı bulamayınca üzüldüm. Güncel bilgileri kontrol edip süreci hatasız başlattım. En sonunda sağlam bir kaynağa ulaştım ve size de tüm detayları aktarmak istedim, güncel bilgilere buradan bakabilirsiniz: 1xbet mobile yukle [url=http://1xbet-indir-2.com]1xbet mobile yukle[/url]. Yani anlatmak istediğim şu — mobil uygulaması gerçekten akıcı çalışıyor.
kurulumu da çok kolaydı yani rahat olun. Kendi deneyimlerimi aktarıyorum size — başka yerde vakit kaybetmeyin yani. Umarım siz de memnun kalırsınız…
мостбет скачать приложение на android [url=https://www.most-bet-kg.online]https://www.most-bet-kg.online[/url]
мостбет доступ сегодня [url=https://mostbetskg.fun]https://mostbetskg.fun[/url]
Took a quick scan first and then went back to read properly because the post deserved it, and a stop at berrycovecommerceatelier kept me reading carefully too, the kind of writing that earns a slower second pass rather than getting skimmed and forgotten is something I value highly when I happen to find it.
Telefonuma 1xbet yüklemek istiyordum uzun süredir. Herkes farklı bir şey söylüyordu kime güveneceğimi şaşırdım. Sonunda tüm teknik detayları inceleyip sistemi test ettim. En sonunda güvendiğim bir kaynağa ulaştım ve size de tüm detayları aktarmak istedim, güncel bilgilere buradan bakabilirsiniz: 1xbet mobil indir [url=1xbet-indir-11.com]1xbet mobil indir[/url]. Yani anlatmak istediğim şu — telefonuma indirdikten sonra çok memnun kaldım.
güncellemeleri de otomatik geliyor. Birçok platform denedim ama en iyisi bu çıktı — en hızlı uygulama bu oldu artık. Şimdiden iyi şanslar ve bol kazançlar…
Вот такая история — родственник в запое , а куда бежать — непонятно . Моя семья столкнулась несколько лет назад. Пьют успокоительное, но нет . Требуется профессиональная помощь . Перерыл весь интернет — одни обещания . А потом наткнулся на один действительно рабочий вариант. Нужна круглосуточная наркологическая помощь — не ведись на дешевые акции . В Воронеже , если честно, тоже полно левых контор без лицензии. Реальные контакты ниже по ссылке: анонимное лечение алкоголизма [url=https://narkologicheskaya-pomoshh-voronezh-11.ru]анонимное лечение алкоголизма[/url] Честно скажу , после того как ознакомился, многое прояснилось . Там и про вывод из запоя , и про условия в клинике. И цены адекватные. Советую не откладывать.
However selective I am about new bookmarks this one made it past my filter, and a look at daisycovemarkethall confirmed the bookmark was worth the slot, the precious slots in my permanent bookmark folder are difficult to earn and this site earned one without making me think twice about whether the slot was justified by the quality.
Genuinely changed how I think about a small piece of the topic, which does not happen often online, and a look at auroraharborvendorhall added another nudge in the same direction, the kind of writing that earns a small mental shift rather than just confirming what you already thought before reading is a sign of careful thought.
Decided I would read the archives over the weekend, and a stop at clovercresttradingatelier confirmed that the archives would be worth the time, very few sites have archives I would actively read through but this one has earned that level of interest based on the consistent quality across what I have sampled so far.
Genuine pleasure to read, and that is not something I say often after a casual click through, and a quick visit to skyharborvendorlounge kept the same feeling going across the rest of the site, finding writing that actually feels good to spend time with rather than just functional is increasingly rare on the open web.
Nice and clean, that is the best way to describe the writing here, no clutter and no wasted words, and a quick visit to canyonharbortradehall kept that going, I appreciate when a site treats its readers like people who can think for themselves without needing constant hand holding through every paragraph.
Worth flagging this site to a few specific friends who would appreciate the editorial sensibility, and a look at valecovecraftcollective added more pages I will mention to them, recommending sites to specific people requires understanding both the site and the person and this site is making those personalised recommendations easy and natural for me.
Now planning to share the link with a small group of readers I trust, and a look at clarityinmotion suggested more material to share with the same group, recommending content into a curated circle requires confidence in the recommendation and this site is making me confident in those personal recommendations on multiple separate occasions now.
Alright, real talk about the Miami rental game — it’s a straight-up jungle out here. Then you show up at the local lot to pick up the car. Plus they freeze a surprise $2500 on your card for a week right before giving you the keys. Eight years in South Florida and these clowns still almost get me. If you are trying to find a legitimate luxury fleet without getting ripped off, do some real digging first and read actual customer reviews. Miami without decent wheels is basically a hostage situation, especially since the AC must be arctic cold and unlimited miles non-negotiable.
I’ve run through maybe 45 rental companies across Dade, Broward, and Monroe, but I eventually found a service where what you book is exactly what shows up, no surprises, no fine print nightmares. If you are looking for the only honest source for premium wheels across South Florida, check the current details here: lamborghini urus rental near me [url=https://luxury-car-rental-miami-8.com]lamborghini urus rental near me[/url]. Also, definitely bring serious shades unless you enjoy driving straight into the sun like a zombie every single evening. Just drive safe out there and absolutely skip that “windshield protection” upsell — pure profit for them, zero value for you. hope this helps some of you save a few bucks.
Just nice to read something that does not feel like it was assembled from a content brief, and a stop at openbuyersmarket kept that handcrafted feel going, you can tell when a real human with real understanding is behind the words versus a templated piece churned out for an algorithm to find.
The post made the topic feel approachable without making it feel trivial, that is a fine balance, and a stop at dawnmeadowgoodsgallery maintained the same balance, finding the middle ground between welcoming and serious is genuinely difficult and the writers here have clearly figured out how to consistently hit it well across many different posts.
888 старз бэт [url=https://888starzuz6.com/]888 старз бэт[/url].
Found the rhythm of the prose particularly enjoyable on this read through, and a look at momentumthroughfocus kept that musical quality going across the related pages, sentence rhythm is something most blog writers ignore but it makes a real difference in how content lands with the careful reader who cares.
Reading this as part of my evening winding down routine fit perfectly, and a stop at forestcovevendorhall extended the wind down nicely, content that calms rather than agitates is what I want at the end of the day and this site provides that calming reading experience reliably which is increasingly rare across the modern web.
скачать 888 старс на андроид [url=https://888starzuz9.com/apk]https://888starzuz9.com/apk/[/url]
Now leaving a small mental note to recommend this when the topic comes up in conversation, and a look at builddirectionally extended that recommend ready feeling, content that arms me with shareable references for likely future conversations is content with social value and this site is providing that conversational ammunition consistently for me lately.
Compared to the usual results for this kind of search this site stands well above the average, and a quick visit to jewelcovevendorhall kept the standard high, you can tell within seconds whether a site is going to waste your time or actually deliver and this one clearly delivers without any false starts.
If I had to defend the time I spend reading independent blogs this site would feature in the defence, and a look at trustedbuyinghub reinforced that defensive utility, the ongoing case for non algorithmic reading is one I make to myself periodically and sites like this one provide the actual evidence that supports the case clearly.
888 statz [url=http://888starz-uz11.com/]https://888starz-uz11.com/[/url]
Now placing this in the same category as a few other sites I have come to trust, and a look at directioncreatespower continued the placement decision, the small category of fully trusted sites is one I extend rarely and only after multiple positive reading sessions and this site has earned the category placement methodically over time.
Glad I gave this a chance rather than scrolling past, and a stop at dazzquay confirmed I made the right call, sometimes the best content is hidden behind unassuming headlines that do not scream for attention and learning to slow down and check those out has paid off many times now across years of reading.
My usual pattern is to skim and bounce but this site has reset that pattern temporarily, and a stop at calmcovemerchantgallery maintained the slower reading mode, content that changes how I read is content with structural influence and this site has clearly nudged my reading behaviour toward something better at least for the duration of these visits.
Picked up a couple of new ideas here that I can actually try out, and after my visit to buypathmarket I have even more notes saved, this is the kind of resource that pays you back for the time you spend on it which is rare to come across in this corner of the web.
The discussion here feels clearly structured and fair, which helps make the content easier for readers to connect with online.
Xxx video onlyfans sex video site
I really like how the writer keeps the tone friendly without sounding fake or overly polished, and after a stop at birchharbormarketguild the same calm pace was there, no rushing to make a point and no padding either, just clean honest writing that I can respect and come back to later again.
888starz skachat [url=http://www.beyondstreams.co.za/2025/12/11/skachayte-888starz-i-nachnite-igrat-v-onlaynkazino-segodnya/]https://beyondstreams.co.za/2025/12/11/skachayte-888starz-i-nachnite-igrat-v-onlaynkazino-segodnya/[/url]
A piece that read smoothly because the writer understood how readers actually move through prose, and a look at daisyharborvendorroom maintained the same reader awareness, writers who think about the reading experience as much as the writing experience produce better work and this site has clearly made that shift in editorial approach.
pin-up aviator stavka [url=https://www.pinup77432.help]https://www.pinup77432.help[/url]
mostbet o‘zbekcha kirish [url=http://mostbet10093.help]mostbet o‘zbekcha kirish[/url]
plinko o‘yini mostbet [url=http://mostbet47654.help]http://mostbet47654.help[/url]
Will be back, that is the simplest way to say it, and a quick visit to coralharborcraftcollective reinforced the decision, this site has earned a spot in my regular rotation alongside a few other reliable places I check when I want something genuinely informative without all the usual modern web noise getting in the way.
Мир дизайна https://vineyardartdecor.com и интерьера с вдохновляющими проектами, экспертными рекомендациями и полезными статьями. Узнайте, как создать красивое, практичное и современное пространство для жизни и работы.
Мир женских интересов https://amideya.com.ua в одном информационном ресурсе. Читайте статьи о моде, здоровье, карьере, семье и путешествиях, находите полезные рекомендации и вдохновение на каждый день.
Ваш гид в мире ремонта https://tfsm.com.ua и строительства. Пошаговые инструкции, обзоры строительных материалов, советы мастеров и практические решения для ремонта квартир, строительства домов и благоустройства участков.
От фундамента до декора https://vodocar.com.ua все о строительстве и ремонте в одном месте. Актуальные статьи, экспертные рекомендации, обзоры новинок рынка и проверенные решения для частных и коммерческих объектов.
Современный портал https://zlochinec.kyiv.ua для мужчин о здоровье, саморазвитии, бизнесе и увлечениях. Практические рекомендации, актуальные новости и вдохновляющие истории для тех, кто стремится к новым достижениям.
true fortune casino [url=https://www.pbase.com/latexhorn1]https://pbase.com/latexhorn1/[/url]
Liked how the writer used real examples instead of theoretical ones to make the points stick, and a stop at snowharbortradehall added even more concrete examples, this is the kind of practical approach that respects readers who actually want to apply what they learn rather than just nodding along passively without doing anything useful.
Worth saying that the writing carries a particular kind of authority without making any explicit claims to it, and a stop at buildsimplemomentum extended that earned authority feeling, sites that demonstrate expertise through the quality of their explanations rather than by stating credentials are sites I trust most and this site has it.
Just want to recognise that someone clearly cared about how this turned out, and a look at shoppointmarket confirmed that care extends across the broader site, you can feel the difference between content shipped to hit a deadline and content released because the writer was actually proud of the result for once.
Most of my reading time goes to a small number of trusted sources and this one is now joining that group, and a stop at gildedcovecommerceatelier reinforced the group membership, the few sites that earn a place in my regular rotation are sites I expect ongoing returns from and this one has earned that elevated position consistently.
Reading this in my last reading slot of the day was a good way to end, and a stop at ivoryridgemarketparlor provided a satisfying close to the reading session, content that ends a day well rather than agitating it before sleep is the kind I value increasingly and this site fits that role for me consistently now.
A piece that did not require external context to follow, and a look at frostridgevendorlounge maintained the same self contained quality, content that stands alone without forcing readers to chase prerequisites is more accessible and this site has clearly thought about how each piece can serve a fresh visitor rather than only existing members.
Now appreciating that I did not feel exhausted after reading, and a stop at growththroughfocus extended that energising quality, content that leaves me with more attention than it consumed is rare and the gap between draining and energising content is real over the course of a typical day spent reading widely online.
Did not expect much when I clicked through but ended up reading the whole thing carefully, and a stop at directionsetsvelocity kept that engagement going, sometimes the unassuming sites turn out to deliver more than the flashy ones which is something I have learned to look out for over time online lately and across topics.
Honest reaction is that this is the kind of writing I would defend in a conversation about good blog content, and a look at autumnmeadowmarkethall reinforced that, the rare site whose work I would actively recommend rather than just tolerate is the kind I want to support through return visits regularly.
If quality blog writing is dying as people sometimes claim then this site is one piece of evidence that it has not died yet, and a look at auroracovemerchantgallery extended that evidence, the broader cultural question about online writing has empirical answers in specific sites and this one is contributing to a more optimistic answer overall.
The headings made navigating the post simple even when I needed to find a specific section quickly, and a look at caramelcovemarkethall continued the same thoughtful structure, small details like clear headings show that someone is actually thinking about how the reader uses the page rather than just filling it for length alone.
Once you start reading carefully here it is hard to go back to lower quality alternatives, and a stop at junipercovegoodsroom reinforced that ratchet effect, the way good content raises standards is real over time and this site has clearly contributed to raising my expectations for what is possible in writing on the topic generally.
Now leaving a small mental note to recommend this when the topic comes up in conversation, and a look at cartwaymarket extended that recommend ready feeling, content that arms me with shareable references for likely future conversations is content with social value and this site is providing that conversational ammunition consistently for me lately.
1xbet mobil indir nasıl yapılır diye çok kafa yordum valla. Play Store’da resmi uygulamayı bulamayınca çok üzüldüm. Güncel bilgileri kontrol edip süreci hatasız başlattım. En sonunda sağlam bir kaynağa ulaştım und size de tüm detayları aktarmak istedim, güncel bilgilere buradan bakabilirsiniz: xbet indir [url=http://1xbet-indir-7.com]xbet indir[/url]. Valla bak net söyleyeyim — mobil uygulaması inanılmaz stabil ve hızlı çalışıyor.
Hiçbir sıkıntı yaşamadım indirme aşamasında. Birçok platform denedim ama en iyisi bu çıktı — başka yerde vakit kaybetmeyin yani. Şimdiden iyi şanslar ve bol kazançlar…
Reading this confirmed that the topic deserves more careful attention than it usually gets, and a stop at advancewithclarity extended that elevated framing, content that raises the appropriate weight of a subject without being preachy about it is serving a quiet but important editorial function for the broader cultural conversation about it.
Liked how the post handled an objection I was forming as I read, and a stop at dewdawn similarly anticipated where my thinking was going next, the rare writer who can predict reader concerns and address them in advance is doing something most online content fails to do despite that being basic editorial work.
Строительный журнал https://buildingtips.kyiv.ua для тех, кто строит, ремонтирует и обустраивает недвижимость. Полезные публикации о технологиях строительства, дизайне интерьеров, выборе подрядчиков и современных материалах.
Мир автомобилей https://auto-club.pl.ua в одном месте: автоновости, обзоры, рейтинги, советы по ремонту и обслуживанию. Следите за новинками автопрома, узнавайте о характеристиках моделей и тенденциях автомобильного рынка.
Практический портал https://dsmu.com.ua о ремонте, строительстве и обустройстве жилья. Реальные советы, инструкции и обзоры помогут сократить расходы, повысить качество работ и добиться отличного результата.
Все о современном https://dcsms.uzhgorod.ua доме: строительство, ремонт, интерьер и благоустройство. Экспертные статьи, обзоры материалов и полезные рекомендации для создания комфортного пространства для жизни.
The pacing of the post was just right, never rushed and never dragged out unnecessarily, and a look at epictrendcorner maintained the same rhythm, you can tell the writer has experience because the difficult skill of pacing is something only practiced writers manage to handle well in long form content over time and across formats.
Mobil bahis için doğru uygulamayı arıyordum uzun zamandır. Apk’yı nereden indireceğimi bilemedim bir türlü. Sonunda tüm teknik detayları inceleyip sistemi test ettim. En sonunda sağlam bir kaynağa ulaştım ve size de tüm detayları aktarmak istedim, güncel bilgilere buradan bakabilirsiniz: 1xbet uygulama [url=www.1xbet-indir-2.com]1xbet uygulama[/url]. Yani anlatmak istediğim şu — son sürümü bütün özellikleri eksiksiz sunuyor.
Hiçbir sıkıntı yaşamadım indirme esnasında. Kendi deneyimlerimi aktarıyorum size — en hızlı uygulama bu oldu artık. Şimdiden iyi şanslar ve bol kazançlar…
Felt this in a way I cannot quite explain, the topic just hit different here, and a stop at driftorchardvendorhall continued in that vein, sometimes you find a site whose perspective lines up with how you have been thinking and reading their work feels like a small relief which I appreciated more than I expected.
Picked this up while looking for something else and ended up reading every paragraph because it was actually informative, and after apricotharborcraftcollective I was sure I would come back, that does not happen often when most sites bury the useful parts under endless ads and pop ups today and across most categories online.
Telefonuma 1xbet yüklemek istiyordum uzun süredir. Herkes farklı bir şey söylüyordu kime güveneceğimi şaşırdım. Güncel bilgileri kontrol edip süreci hatasız başlattım. En sonunda güvendiğim bir kaynağa ulaştım ve size de tüm detayları aktarmak istedim, güncel bilgilere buradan bakabilirsiniz: 1xbet mobil uygulama [url=http://www.1xbet-indir-11.com]1xbet mobil uygulama[/url]. Şimdi size kısaca özet geçeyim — son sürümü her şeyi düşünmüş resmen.
Hiçbir sorun yaşamadım indirme aşamasında. Birçok platform denedim ama en iyisi bu çıktı — başka yerde vakit kaybetmeyin yani. Herkese hayırlı olsun…
Genuinely good work, the kind that holds up over multiple readings without losing its appeal, and a stop at growthwithdirection kept that going, definitely a site I will be returning to and probably mentioning to others who work in or care about this particular area of interest today and in coming weeks.
природный камень лемезит [url=www.lemezit.su]природный камень лемезит[/url]
Now appreciating the small but real way this post improved my afternoon, and a stop at quickcartworld extended that small improvement effect, content that produces measurable positive impact on the texture of a reading day is content with real value and this site is producing those small positive impacts at a sustainable rate apparently.
Reading this gave me a small sense of progress on a topic I have been slowly working through, and a stop at growthneedsdirection added another step forward, learning happens in small increments across many sources and finding sources that consistently contribute is the actual practical value of careful curation in an information rich world.
Beats most of the alternatives on the topic by a noticeable margin, and a look at frostrivervendorparlor did not change that at all, this is one of the better corners of the open internet for this kind of content and I am glad I clicked through rather than skipping past quickly like I usually do.
1xbet indir işlemini nasıl yapacağımı çok merak ediyordum valla. Herkes farklı bir şey söylüyordu kime güveneceğimi bilemedim. Güncel bilgileri kontrol edip süreci hatasız başlattım. En sonunda güvenilir bir kaynağa ulaştım ve size de tüm detayları aktarmak istedim, güncel bilgilere buradan bakabilirsiniz: 1xbet nouvelle version à télécharger [url=https://1xbet-indir-6.com]1xbet nouvelle version à télécharger[/url]. Şimdi size kısaca özet geçeyim — son sürümü tüm ihtiyaçları karşılıyor resmen.
güncellemeleri de sorunsuz yükleniyor. Kendi deneyimlerimi aktarıyorum size — başka yerde vakit kaybetmeyin yani. Herkese hayırlı olsun…
Worth marking this site as one to come back to deliberately rather than by accident, and a stop at dawnmeadowgoodsroom reinforced that intention, the difference between sites I find again by chance and sites I return to on purpose is meaningful and this one has clearly moved into the deliberate return category for me.
Looking through the archives suggests this site has been doing this for a while at this level, and a look at growthbydesignthinking confirmed the long term consistency, sites that have maintained quality across years rather than just a recent stretch are sites with serious editorial discipline and this one has clearly been at it for a while.
Liked the way the post got out of its own way, and a stop at momentumthroughdirection extended that invisible craft, the best writing you barely notice while reading because it is doing its work without drawing attention to itself and this site has clearly mastered that disappearing act across the pieces I have read.
Now appreciating the small but real way this post improved my afternoon, and a stop at claritydrivenmovement extended that small improvement effect, content that produces measurable positive impact on the texture of a reading day is content with real value and this site is producing those small positive impacts at a sustainable rate apparently.
Came in expecting another generic take and got something with actual character instead, and a look at bayharborcommercegallery carried that personality forward, finding a distinct voice on a saturated topic is impressive and worth pointing out when it happens because most sites end up sounding identical to their nearest competitors quickly.
Even just sampling a few posts the consistency is what stands out, and a look at growthsteeringhub confirmed the broader pattern, sites where every piece I sample lives up to the standard set by the others are sites with serious quality control and this one has clearly invested in whatever editorial process produces that consistency reliably.
Picked this for my morning read because the topic seemed worth the time, and a look at gingerbrookmarketfoundry confirmed the choice was right, my morning reading slot is precious and giving it to this site felt like a good investment rather than a waste which is a higher endorsement than I usually offer for content.
Now adding this site to a small mental group of recommendations I keep ready for specific kinds of inquiries, and a stop at clarityvector extended the recommendation readiness, content that I can confidently point friends and colleagues toward in specific contexts is content with real social utility and this site has that utility clearly.
A clean read with no irritations, and a look at easyonlinepurchases continued that frictionless quality, the absence of small irritations is something I notice only when present elsewhere and this site is one of the rare places where everything just works and lets me focus on the substance rather than fighting the format.
Reading this triggered a small change in how I think about the topic going forward, and a stop at visioncatalyst reinforced that subtle shift, the rare content that actually moves my thinking rather than just confirming or filling it is the kind I most value and this site is providing that kind of impact today.
Excellent read, I just passed this onto a colleague who was doing a little research on that. And he actually bought me lunch because I found it for him smile So let me rephrase that.|
Picked something concrete from the post that I will use immediately, and a look at bayharbortradehall added another concrete piece, content that produces immediately useful output rather than just abstract appreciation is content that earns its place in my regular rotation without needing any further evaluation from me at this point honestly.
Started thinking about my own writing differently after reading, and a look at cottonmeadowartisanexchange continued that reflective effect, content that influences how I work rather than just informing what I know is content with the highest kind of impact and this site has triggered some of that reflective influence today on me.
Pizza Venezia — Итальянская пицца в Москве https://pizza-venezia.ru быстрая доставка горячей пиццы, пасты, закусок и десертов. Свежие ингредиенты и классические рецепты.
Проблемы со здоровьем? https://mdc-solnce.ru прием врачей различных специальностей, точная диагностика, профилактические обследования и индивидуальный подход к каждому пациенту. Забота о здоровье с использованием современных методов лечения.
During my morning reading slot this fit perfectly into the routine, and a look at autumncovemerchantgallery extended that perfect fit into the rest of the routine, content that matches the rhythm of how I actually read rather than demanding accommodation from my schedule is content well calibrated to its likely audience and this site has it.
На нашем сайте доступны смотреть фильмы разных жанров и направлений – от последних киноновинок до культовых шедевров, которые хочется пересматривать снова и снова. Мы собрали в единой библиотеке тысячи фильмов, сериалов и мультфильмов, чтобы каждый пользователь мог легко подобрать интересный контент для отдыха. Большинство материалов доступна в высоком HD качестве, а рекламы здесь минимум, чтобы зрители могли наслаждаться кино без лишних помех. Коллекция непрерывно обновляется, добавляя свежие премьеры и популярные проекты, о которых много обсуждают пользователи.
https://md.swk-web.com/s/Zqdu734bS
Decided to read more before commenting and the more I read the more I wanted to say something, and a stop at autumncovecraftcollective pushed that impulse further, when content provokes the urge to participate rather than just consume it is doing something quite specific and worth recognising clearly when it happens during reading.
Quietly impressive in a way that does not announce itself, and a stop at opalmeadowgoodsgallery extended that quiet impressiveness, the kind of quality that emerges through sustained attention rather than first impressions is the kind I trust more deeply and this site has been earning that deeper trust across multiple sessions over time consistently.
Excellent post, balanced and well organised without showing off, and a stop at explorefutureoptions continued in that same vein, this site has clearly figured out the formula for content that works for readers rather than for search engine ranking signals which is harder than it sounds today and worth real recognition from anyone.
Appreciated the way each section connected smoothly to the next without abrupt jumps, and a stop at fastgoodscorner kept that flow going nicely, transitions are something most blog writers ignore but the difference is huge for the reader who is trying to follow a sustained line of thought today across many different topics.
Android için güncel sürümü bulmak epey meşakkatliydi açıkçası. Herkes farklı bir şey tavsiye ediyordu kime güveneceğimi bilemedim. Sonunda tüm teknik detayları inceleyip sistemi test ettim. En sonunda güvenilir bir kaynağa ulaştım ve size de tüm detayları aktarmak istedim, güncel bilgilere buradan bakabilirsiniz: 1xbet mobil uygulama indir [url=https://www.1xbet-indir-9.com]1xbet mobil uygulama indir[/url]. Yani anlatmak istediğim şu — son sürümü tüm beklentileri karşılıyor resmen.
kurulumu da oldukça basit ve anlaşılırdı yani rahat olun. İşin doğrusunu söylemek gerekirse — kesinlikle pişman olmazsınız deneyin derim. Herkese hayırlı olsun…
live entertainment online live streaming platform for small streamers
Now adding this to a list of sites I want to see flourish, and a stop at directioncreatestraction reinforced that wish, the few sites I actively root for are sites that produce the kind of work I want more of in the world and this one has joined that small list based on what I have read so far.
Honestly enjoyed every minute spent here, that is not something I say lightly, and a look at executeideasnow confirmed I will be back, the bar for spending time online is high for me these days but this site clears it without effort which is high praise indeed from this reader who is usually rather demanding.
If quality blog writing is dying as people sometimes claim then this site is one piece of evidence that it has not died yet, and a look at directiondrivesexecution extended that evidence, the broader cultural question about online writing has empirical answers in specific sites and this one is contributing to a more optimistic answer overall.
Honestly this was a good read, no jargon and no padding, and a short look at caramelharborvendorhall kept that same feel going which I really appreciated, the writer clearly knows the topic well enough to explain it without hiding behind big words or filler that often gets used to seem clever.
Mobil bahis platformu arayışım epey uzun sürdü valla. Play Store’da resmi olanı bulamayınca çok hayal kırıklığı yaşadım. Adımları doğru sırayla uyguladıktan sonra erişim sorunsuz açıldı. En sonunda güvendiğim bir kaynağa ulaştım ve size de tüm detayları aktarmak istedim, güncel bilgilere buradan bakabilirsiniz: 1xbet uygulama [url=http://1xbet-indir-10.com]1xbet uygulama[/url]. Yani anlatmak istediğim şu — son sürümü tüm ihtiyaçları karşılıyor resmen.
kurulumu da oldukça basit ve hızlıydı yani rahat olun. Birçok platform denedim ama en iyisi bu çıktı — başka yerde vakit kaybetmeyin yani. Şimdiden iyi şanslar ve bol kazançlar…
Honest assessment after reading this twice is that it holds up under careful attention, and a look at gildedgrovegoodsroom extended that durability across more pages, content that survives a second read without revealing weak spots is rarer than the average reader probably realises and this site clearly cleared that bar.
A handful of memorable phrases from this one I will probably use later, and a look at directionbuildsconfidence added a couple more, content that contributes language to my own communication rather than just facts is content with a different kind of utility and this site is providing that linguistic utility consistently across what I read.
Now adjusting my mental list of reliable sites for this topic, and a stop at meadowharborgoodsroom reinforced the adjustment, the small ongoing curation work of maintaining trusted sources is one of the actual practical activities of careful reading and this site has earned a permanent place on my list for this particular subject.
Let me save you some serious time, learned this the hard way. You find this amazing deal online: brand new Beamer, unlimited miles, price that makes you smile. Different car waiting — scratches everywhere, smells like an ashtray, and that “amazing price”? Doesn’t include the mandatory $400 cleaning fee or the $30 per day toll pass you can’t waive. Fool me eight times? That’s just another Tuesday in the 305, lesson learned. When you need a proper and reliable premium ride to cruise around, run far from the airport counters. Anyone who’s waited for an Uber in August understands exactly what I mean about this city, especially since the AC must be arctic cold and unlimited miles non-negotiable.
Most of these local agencies are just shiny websites hiding the same beat-up fleet with fake reviews, but I eventually found a service where what you book is exactly what shows up, no surprises, no fine print nightmares. If you are looking for the only honest source for premium wheels across South Florida, check the current details here: miami luxury car rentals [url=https://luxury-car-rental-miami-8.com]miami luxury car rentals[/url]. Yeah, parking in South Beach will cost you a nice bottle of wine — but that’s the Miami tax. Just drive safe out there and absolutely skip that “windshield protection” upsell — pure profit for them, zero value for you. hope this helps some of you save a few bucks.
Recommend this to anyone who values clear thinking over flashy presentation, and a stop at progressoverperfection continued in the same understated way, this site has its priorities in the right place which makes it worth supporting through repeat visits and recommendations rather than just one passing read today before moving on quickly elsewhere.
A memorable post for me on a topic I had thought I was tired of, and a look at birchharbormerchantgallery suggested the same site can refresh other tired topics, sites that can revive my interest in subjects I had written off as exhausted are doing rare work and this one is clearly doing that for me today.
Going to come back when I have more time to read carefully, the post deserves more than a quick scan, and a stop at focusarchitecture reinforced that, this is the kind of site that rewards a slower read which is hard to find in this fast paced corner of the internet but really worthwhile.
Genuine reaction is that I will probably think about this on and off for a few days, and a look at claritydrivenmovement added fuel to that, the best content lingers in your head after you close the tab rather than evaporating immediately and this site clearly knows how to write that kind of memorable content.
Срочно продать авто Качественный выкуп авто включает оценку узлов и агрегатов, что позволяет нам предлагать объективную стоимость. Узнайте точную цену своего авто, просто посетив наш офис в Екатеринбурге.
международный языковой лагерь https://letniy-lager.ru
With Valorant Tracker valorant fa com you can learn about professional player settings, find the best aim, track ranks, and analyze match statistics. A useful tool for improving your skills and progressing more effectively in VALORANT.
The CS2 Pro counter strike ch portal features the latest Counter-Strike 2 news, live match results, tournament schedules, and analysis. Learn about professional scene events, team rankings, and the top stories from the world of CS2.
A slim post with substantial content per word, and a look at calmcovecraftcollective maintained the same density, the content per word ratio is something I track informally and this site scores high on that ratio compared to most sources I read regularly which is a quiet indicator of careful editorial work behind the scenes.
mostbet регистрация сегодня [url=mostbet55146.online]mostbet55146.online[/url]
Came across this looking for something else entirely and ended up reading it through twice, and a look at purposefulmovement pulled me deeper into the site than I planned, the writing has a way of holding attention without resorting to manipulative cliffhangers or vague promises that never get delivered later down the page.
мостбет официальный сайт Кыргызстан [url=https://mostbet12087.online/]https://mostbet12087.online/[/url]
Now organising my browser bookmarks to give this site easier access, and a look at elitetrendcenter earned the same organisational priority, the small acts of digital housekeeping I do for sites I expect to use often are themselves a measure of trust and this site has triggered the trust based housekeeping behaviour from me clearly.
Reading this in a quiet hour and finding it suited the quiet, and a stop at suncovevendorparlor extended the quiet reading mood, content that matches its own optimal reading conditions rather than fighting them is content that has been thoughtfully calibrated and this site reads as having a particular reading mood in mind throughout.
mostbet ставки приложение [url=www.mostbetskg.fun]mostbet ставки приложение[/url]
Liked the balance between depth and brevity, never too shallow and never too long, and a stop at fasttrendhub kept the same balance going across the rest of the site, this is one of the harder skills in writing and the team here clearly has it figured out very well indeed across every page.
Solid post, the structure is easy to follow and the language stays simple even when the topic gets a bit more involved, and a look at kettlecrestmarkethouse kept that same standard going, so I left feeling like the time spent here was actually worth something for once which is rare lately.
The discussion here feels fair and easygoing, which makes the content more pleasant and accessible for readers.
zoo porno
Useful read, especially because the writer did not assume too much background from the reader, and a quick look at progresswithmeaning continued in the same way, a thoughtful site that meets people where they are which is something the modern web could use a lot more of for both casual and serious readers.
Telefonuma güncel sürümü yüklemek istiyordum açıkçası. Play Store’da resmi olanı bulamayınca üzüldüm. Güncel bilgileri kontrol edip süreci hatasız başlattım. En sonunda sağlam bir kaynağa ulaştım ve size de tüm detayları aktarmak istedim, güncel bilgilere buradan bakabilirsiniz: 1xbet yukle [url=1xbet-indir-2.com]1xbet yukle[/url]. Yani anlatmak istediğim şu — telefonuma indirdikten sonra çok rahatladım.
kurulumu da çok kolaydı yani rahat olun. İşin doğrusunu söylemek gerekirse — kesinlikle pişman olmazsınız deneyin derim. Herkese hayırlı olsun…
1win acces cont [url=https://1win67203.help]https://1win67203.help[/url]
Android için doğru sürümü bulmak gerçekten zordu. Play Store’da arattım ama bulamadım resmi olanı. Güncel bilgileri kontrol edip süreci hatasız başlattım. En sonunda güvendiğim bir kaynağa ulaştım ve size de tüm detayları aktarmak istedim, güncel bilgilere buradan bakabilirsiniz: 1xbet android uygulama indir [url=www.1xbet-indir-11.com]1xbet android uygulama indir[/url]. Valla bak net söyleyeyim — telefonuma indirdikten sonra çok memnun kaldım.
Hiçbir sorun yaşamadım indirme aşamasında. Kendi deneyimlerimi aktarıyorum size — kesinlikle pişman olmazsınız deneyin derim. Herkese hayırlı olsun…
Loved the writing voice here, friendly without being fake and confident without being arrogant, and a stop at momentumflowing carried the same tone forward, the kind of personality that makes a reader feel welcome rather than lectured at which is a balance plenty of writers struggle to find no matter how long they have been at it.
Android için son sürümü bulmak epey zaman aldı açıkçası. Güncel apk dosyasını nereden indireceğimi bulmak çok zordu. Güncel bilgileri kontrol edip süreci hatasız başlattım. En sonunda sağlam bir kaynağa ulaştım und size de tüm detayları aktarmak istedim, güncel bilgilere buradan bakabilirsiniz: xbet indir [url=www.1xbet-indir-7.com]xbet indir[/url]. Yani anlatmak istediğim şu — son sürümü her şeyi düşünmüş resmen.
güncellemeleri de sorunsuz bir şekilde yükleniyor. Kendi deneyimlerimi aktarıyorum size — en güvenilir uygulama bu oldu artık. Herkese hayırlı olsun…
If I were grading sites on this topic this one would receive high marks, and a stop at claritycreatesimpact continued earning those high marks, the informal grading I do mentally for content sources is something I take seriously even though it is informal and this site has been receiving consistent high marks across multiple sessions today.
Reading this gave me something to think about for the rest of the afternoon, and after bayharbortradehouse I had even more to mull over, the kind of post that lingers in the background of your day rather than evaporating immediately is genuinely valuable in an attention economy that punishes depth rather than rewarding it.
Reading this post made me realise I had been settling for lower quality elsewhere, and a look at ideaactivation extended that recalibration, content that exposes how much I had been accepting in adjacent sources is content with calibrating effect on my standards and this site is performing that calibration function across topics for me reliably.
During the time spent here I noticed the absence of the usual distractions, and a stop at quickshoppingcorner extended that distraction free experience, content that does not fight my attention with pop ups and modals and aggressive prompts is content that respects me and this site has clearly chosen the respectful approach throughout.
Now considering writing a longer note about the post somewhere, and a look at hazelharborvendorhall added more material for that note, content that prompts me to write rather than just consume is content with generative energy and this site is producing that generative effect for me at a higher rate than most sources.
If I were to recommend a starting point for the topic this site would be near the top of my list, and a stop at clarityfirstexecution reinforced that recommendation status, the small list of starting point recommendations I keep for friends asking about topics is short and this site is now firmly on it.
terbinafine essential information
terbinafine essential information
Bookmark added with a small mental note that this is a site to keep, and a look at focusbuildsresults reinforced the keep status, the verb keep rather than visit captures something about how I think about this kind of site and it is a higher tier of relationship than I have with most places online today.
Quality you can feel from the first paragraph, the writer clearly knows the topic and how to share it, and a quick look at dawnridgegoodsgallery confirmed the same depth runs throughout the rest of the site as well which is rare and worth pointing out when it happens online for any reader passing through.
сувенирные тарелки Каталог сувенирных тарелок: виды, материалы, популярные дизайны и советы по выбору коллекционных и подарочных тарелок с городами, достопримечательностями.
Well done, the writing is professional without being stiff, and the topic is treated with care, and a look at actionwithclarity reflected that approach, the kind of site I would point a colleague to if they asked for a reliable starting point on this topic in the future without any hesitation at all.
GTA 6 release date https://gta6-online.hu/ price, platforms, map, and all the information about one of the most anticipated games of recent years. Learn about the official release, available platforms, details about the world of Leonida and Vice City, new characters, gameplay features, and the latest news from Rockstar Games.
Valorant Tracker https://valorant-th.com is your companion in the world of VALORANT. Professional player settings, the best crosshair codes, current ranks, match statistics, and detailed analytics will help you improve your gaming skills and climb the ranking ladder faster.
Everything about VALORANT valorant-bn in one place: professional settings, crosshair codes, ranks, player stats, and match analytics. Valorant Tracker helps you track your achievements, learn from the best players, and improve your gameplay.
Mobil uygulama indirme konusunda çok araştırma yaptım valla. Herkes farklı bir adres söylüyordu kime güveneceğimi şaşırdım. Adımları doğru sırayla uyguladıktan sonra erişim sorunsuz açıldı. En sonunda güvenilir bir kaynağa ulaştım ve size de tüm detayları aktarmak istedim, güncel bilgilere buradan bakabilirsiniz: 1xbet yukle [url=www.1xbet-indir-3.com]1xbet yukle[/url]. Yani anlatmak istediğim şu — son sürümü her şeyi düşünmüş resmen.
kurulumu da çok basitti yani rahat olun. Birçok platform denedim ama en iyisi bu çıktı — en hızlı uygulama bu oldu artık. Umarım siz de memnun kalırsınız…
Approaching this with the usual skepticism I bring to new sites and being slowly persuaded, and a stop at canyonharborcommercegallery continued that gradual persuasion, the careful path from skeptical reader to genuine fan is the only one I trust and this site has walked me along that path through patient consistent quality across pieces.
https://leetcode.com/u/promgift8/
Coming to this with low expectations and being pleasantly surprised by the substance, and a stop at cloudharborcommercegallery continued exceeding expectations, the recalibration of expectations upward across multiple positive readings is one of the actual rewards of careful browsing and this site is providing that recalibration at a steady rate apparently.
Telefonuma son sürümü yüklemek istiyordum açıkçası. Güncel apk dosyasını nereden indireceğimi bulmak çok zaman aldı. Sonunda tüm teknik detayları inceleyip sistemi test ettim. En sonunda güvendiğim bir kaynağa ulaştım ve size de tüm detayları aktarmak istedim, güncel bilgilere buradan bakabilirsiniz: 1xbet mobile download [url=http://www.1xbet-indir-8.com]1xbet mobile download[/url]. Valla bak net söyleyeyim — son sürümü tüm eksiklikleri gidermiş resmen.
Hiçbir hata almadım indirme esnasında. Birçok platform denedim ama en iyisi bu çıktı — kesinlikle pişman olmazsınız deneyin derim. Umarım siz de memnun kalırsınız…
Reading this triggered a small reorganisation of my own thinking on the topic, and a stop at creekharborartisanexchange furthered that reorganisation, content that affects the shape of my mental model rather than just decorating it with new facts is content with structural rather than informational impact and this site provides that.
Reading this felt easy in the best way, no friction and no confusion at any point, and a stop at motionstrategy carried that same comfort across more pages, the kind of editorial flow that lets you absorb information without fighting the format which is increasingly hard to find on the open web today across topics.
Glad the writer did not feel the need to argue with imaginary critics in the post itself, and a stop at progresswithdirection kept the same focused approach going, defensive writing wastes the reader time and confidence on positions that did not need defending and this post has clearly avoided that common failure.
Reading this prompted a small redirection in something I was working on, and a stop at floraridgecraftcollective extended that redirecting influence, content that affects my actual work rather than just my thinking has the highest practical impact and this site is providing that level of influence for me at a sustainable rate apparently.
Took a quick scan first and then went back to read properly because the post deserved it, and a stop at chestnutharbortradehouse kept me reading carefully too, the kind of writing that earns a slower second pass rather than getting skimmed and forgotten is something I value highly when I happen to find it.
maorou_k8m porn maorou_k8m naked
Started imagining how I would explain the topic to someone else after reading, and a look at momentumbydesign gave me more material for that imagined explanation, content that improves my own ability to discuss a topic is content that has actually transferred knowledge rather than just decorating my screen for a few minutes.
Started forming counter examples to test the claims and the post handled most of them implicitly, and a look at strategyoperations continued that anticipatory style, writers who think two steps ahead of the critical reader save themselves from a lot of follow up work and this writer has clearly internalised that habit consistently.
Now thinking about how this post will age over the coming years, and a stop at strategyvector suggested the same durability, content built to age well rather than to capture the attention of the moment is content with a different kind of value and this site has clearly chosen the long horizon over the short one.
Took the time to read the comments on this post too and they were also worth reading, and a stop at growthnavigation suggested the community quality matches the content quality, when the conversation around a piece is as good as the piece itself you know you have found a real corner of the internet.
Now adjusting my mental list of reliable sites for this topic, and a stop at fashioncartworld reinforced the adjustment, the small ongoing curation work of maintaining trusted sources is one of the actual practical activities of careful reading and this site has earned a permanent place on my list for this particular subject.
Определение приоритетов и общей суммы свадебного бюджета
Skimmed first and then went back to read carefully, and the careful read paid off in places I had missed, and a stop at honeycovevendorroom got the same treatment, the rare site whose content rewards a second pass is content I want more of in my regular rotation rather than disposable single read articles.
Thanks for the clean writing, no broken sentences and no awkward translations like some other sites have, and a quick stop at directioncreatesresults kept that polish going nicely, it really does make a difference when a reader can move through a page without tripping on every line or going back to reread.
лемезит в Москве [url=http://www.lemezit.su]лемезит в Москве[/url]
Worth observing that the post landed without needing a flashy headline to hook attention, and a stop at actionbuildsresults did the same, content that earns engagement through substance rather than packaging is the kind I trust more deeply and this site has clearly chosen substance as the primary lever for reader engagement throughout.
Everything about sports https://nso-online.hu/ for true fans. Watch live broadcasts, get match results in real time, read the latest news, analytical articles, tournament reviews, and follow the achievements of your favorite teams and players.
Play for free poki hu right in your browser without installing any additional software. A huge selection of games across various genres: action, logic, sports, racing, simulation, and adventure. Find your favorite games and enjoy online gaming.
Picked this up while looking for something else and ended up reading every paragraph because it was actually informative, and after growstepbyintent I was sure I would come back, that does not happen often when most sites bury the useful parts under endless ads and pop ups today and across most categories online.
The 2025/26 La Liga http://www.laliga-tabella.hu standings feature up-to-date data for all teams in the Spanish league. Track points, matches played, wins, draws, and losses, as well as explore matchday results, game schedules, and season statistics.
Reading this gave me a small sense of progress on a topic I have been slowly working through, and a stop at flintmeadowmerchantgallery added another step forward, learning happens in small increments across many sources and finding sources that consistently contribute is the actual practical value of careful curation in an information rich world.
Worth recognising that the post did not pretend to be the final word on the topic, and a stop at ideabuilderhub continued that humility, content that admits its own scope and limits is more trustworthy than content that overreaches and this site has clearly developed the editorial maturity to know what it can and cannot claim well.
Reading this in a quiet coffee shop matched the calm energy of the writing, and a stop at crystalcovegoodsgallery extended that environmental match, content that has its own ambient quality which can match or clash with surroundings is content with a personality and this site has the kind of personality that suits calm reading.
Excellent post, balanced and well organised without showing off, and a stop at buildwithintelligence continued in that same vein, this site has clearly figured out the formula for content that works for readers rather than for search engine ranking signals which is harder than it sounds today and worth real recognition from anyone.
Telefonuma güncel uygulamayı yüklemek istiyordum açıkçası. Apk dosyasını nereden indireceğimi bulmak epey zaman aldı. Güncel bilgileri kontrol edip süreci hatasız başlattım. En sonunda güvendiğim bir kaynağa ulaştım ve size de tüm detayları aktarmak istedim, güncel bilgilere buradan bakabilirsiniz: 1xbet android uygulama indir [url=http://1xbet-indir-10.com]1xbet android uygulama indir[/url]. Yani anlatmak istediğim şu — mobil uygulaması gerçekten akıcı ve sorunsuz çalışıyor.
kurulumu da oldukça basit ve hızlıydı yani rahat olun. İşin doğrusunu söylemek gerekirse — başka yerde vakit kaybetmeyin yani. Herkese hayırlı olsun…
мостбет мобильное казино [url=https://mostbet55146.online]https://mostbet55146.online[/url]
сувенирные тарелки Каталог сувенирных тарелок: виды, материалы, популярные дизайны и советы по выбору коллекционных и подарочных тарелок с городами, достопримечательностями.
мостбет приложение Кыргызстан [url=https://mostbetskg.fun/]мостбет приложение Кыргызстан[/url]
Telefonumda rahatça bahis oynayabileceğim bir uygulama arıyordum uzun zamandır. Play Store’da resmi olanı bulamayınca çok şaşırdım. Adımları doğru sırayla uyguladıktan sonra erişim sorunsuz açıldı. En sonunda güvenilir bir kaynağa ulaştım ve size de tüm detayları aktarmak istedim, güncel bilgilere buradan bakabilirsiniz: 1xbet mobil yükle [url=1xbet-indir-9.com]1xbet mobil yükle[/url]. Valla bak net söyleyeyim — telefonuma indirdikten sonra çok memnun kaldım.
güncellemeleri de sorunsuz bir şekilde geliyor. Birçok platform denedim ama en iyisi bu çıktı — kesinlikle pişman olmazsınız deneyin derim. Şimdiden iyi şanslar ve bol kazançlar…
Probably the kind of site that should be more widely read than it appears to be, and a look at buildtowardclarity reinforced that quiet wish, the gap between a sites quality and its apparent reach is sometimes large and that gap exists for this site in a way that makes me want to mention it more.
The discussion in this post feels very natural and well paced, which keeps the content enjoyable while also making it easier for readers to stay engaged.
在线购买无处方安定片 xxx Pornhub
1win retragere Moldova [url=https://1win67203.help]https://1win67203.help[/url]
Reading this prompted me to clean up some old notes related to the topic, and a stop at progressnavigator extended that organising urge, content that triggers personal organisation rather than just consuming attention is content with motivating energy and this site has the kind of clarity that prompts active follow up rather than passive consumption.
mostbet онлайн ставки Кыргызстан [url=mostbet55146.online]mostbet онлайн ставки Кыргызстан[/url]
mostbet ошибка платежа [url=http://mostbetskg.fun]http://mostbetskg.fun[/url]
A piece that demonstrated competence without performing it, and a look at ideasneedclarity maintained the same self assured but unshowy register, the gap between competence and performance of competence is one I track and this site has clearly chosen to demonstrate rather than perform which I find much more persuasive as a reader.
1win tranzactii sigure [url=https://1win67203.help]https://1win67203.help[/url]
Closed three other tabs to focus on this one and never opened them again, and a stop at visionmechanism similarly held attention exclusively, content that crowds out other reading from working memory is content with real density and this site has demonstrated that density across multiple pages I have visited so far this morning.
A piece that suggested careful editing without showing the marks of the editing, and a look at visionpathway continued that invisible polish, the best editing disappears into the prose and this site reads as having been edited with skill that does not announce itself which is the highest compliment I can offer any blog content.
Came across this and immediately thought of a friend who would enjoy it, and a stop at ideasdeserveexecution also reminded me of someone, content that triggers the urge to share is content that has earned my recommendation and this site has earned multiple from me already across different conversations during the week.
Reading this confirmed that the topic deserves more careful attention than it usually gets, and a stop at rapidgoodscorner extended that elevated framing, content that raises the appropriate weight of a subject without being preachy about it is serving a quiet but important editorial function for the broader cultural conversation about it.
The latest sports news nemzeti-sport-online hu live streams, and competition results from around the world. Football, Formula 1, tennis, hockey, basketball, and other sports. Match schedules, team statistics, tournament highlights, and key daily events.
UEFA Champions League 2025/26 uefa-bl hu the latest standings, match schedule, results, and detailed tournament statistics. Follow the season, check live results, explore the playoff bracket, and find out about tickets for the final of Europe’s premier club competition.
I appreciate the clarity here, everything is explained in simple terms without unnecessary detail, and after a quick stop at shopbasemarket the points came together nicely for me, the writing keeps things straightforward and respects the reader from start to finish without ever talking down to anyone.
Skipped breakfast still reading this and finished hungry but satisfied, and a stop at actiondrivenclarity kept me past breakfast time, content that displaces basic biological needs is content with serious attentional pull and the writers here are clearly capable of producing that level of engagement which is genuinely impressive these days.
Glad to have another reliable bookmark for this topic, and a look at chestnutharborvendorroom suggested several more pages I will be marking too, building a personal library of trustworthy resources is one of the actual rewards of careful browsing and this site is earning a place on my permanent shortlist for the topic.
tower rush app
Most of the time I bounce off similar pages within seconds, and a stop at driftorchardvendorparlor held me longer than I would have predicted, the ability to convert a likely bouncing visitor into an engaged reader is a quality signal and this site has demonstrated that conversion ability across multiple visits where I expected to bounce.
1xbet mobil indir nasıl yapılır diye çok kafa yordum valla. Play Store’da resmi uygulamayı bulamayınca çok üzüldüm. Güncel bilgileri kontrol edip süreci hatasız başlattım. En sonunda sağlam bir kaynağa ulaştım und size de tüm detayları aktarmak istedim, güncel bilgilere buradan bakabilirsiniz: 1xbet yükle [url=www.1xbet-indir-7.com]1xbet yükle[/url]. Valla bak net söyleyeyim — mobil uygulaması inanılmaz stabil ve hızlı çalışıyor.
Hiçbir sıkıntı yaşamadım indirme aşamasında. Kendi deneyimlerimi aktarıyorum size — başka yerde vakit kaybetmeyin yani. Herkese hayırlı olsun…
Useful information presented in a way that does not feel like a sales pitch, that is what I appreciated most, and a stop at fastcartarena was the same, no upsell and no fake urgency just steady content laid out properly for someone trying to actually learn from it rather than just be sold to.
Speaking carefully because I do not want to overstate things this site is genuinely above average across multiple measurements, and a stop at daisycoveartisanexchange continued the above average performance, the calibration of judgement against potential overstatement is something I take seriously and this site clears the higher bar even after that calibration applies.
Came in for one specific question and got answers to three I had not even thought to ask, and a look at floraharborcommercegallery extended that bonus value pattern, the kind of resource that anticipates reader needs rather than just answering the literal question asked is the gold standard and this site reaches it.
@maorou_k8m @maorou_k8m
Worth saying that the writing carries a particular kind of authority without making any explicit claims to it, and a stop at lemonridgevendorroom extended that earned authority feeling, sites that demonstrate expertise through the quality of their explanations rather than by stating credentials are sites I trust most and this site has it.
1win aviator apk [url=1win17638.help]1win aviator apk[/url]
1win slot jackpots [url=https://www.1win83016.help]1win slot jackpots[/url]
mostbet ocolire blocare Moldova [url=mostbet56730.help]mostbet ocolire blocare Moldova[/url]
melbet comision depunere [url=https://melbet31393.help/]https://melbet31393.help/[/url]
Closed the laptop after this and let the ideas settle for a few hours, and a stop at domelegend similarly rewarded reflective time, content that benefits from sitting with rather than racing past is the kind I want more of and the kind that this site appears to consistently produce week after week here.
1xbet indir işlemini nasıl yapacağımı çok araştırdım valla. Play Store’da resmi olanı bulamayınca çok hayal kırıklığı yaşadım. Güncel bilgileri kontrol edip süreci hatasız başlattım. En sonunda güvendiğim bir kaynağa ulaştım ve size de tüm detayları aktarmak istedim, güncel bilgilere buradan bakabilirsiniz: 1xbet uygulaması indir [url=https://1xbet-indir-8.com]1xbet uygulaması indir[/url]. Yani anlatmak istediğim şu — mobil uygulaması gerçekten akıcı ve sorunsuz çalışıyor.
güncellemeleri de düzenli olarak yapılıyor. Kendi deneyimlerimi aktarıyorum size — kesinlikle pişman olmazsınız deneyin derim. Herkese hayırlı olsun…
Reading this post made me realise I had been settling for lower quality elsewhere, and a look at clarityunlocksgrowth extended that recalibration, content that exposes how much I had been accepting in adjacent sources is content with calibrating effect on my standards and this site is performing that calibration function across topics for me reliably.
мостбет app скачать [url=https://www.mostbet12087.online]https://www.mostbet12087.online[/url]
Quality you can feel from the first paragraph, the writer clearly knows the topic and how to share it, and a quick look at buildtowardmomentum confirmed the same depth runs throughout the rest of the site as well which is rare and worth pointing out when it happens online for any reader passing through.
Thanks for putting in the work to make this approachable, plenty of sites cover the same ground but most do it badly, and a quick visit to frostrivervendorlounge confirmed this one stands apart, simple language and useful examples without anyone trying to sell me anything along the way which I really appreciated.
Quietly enthusiastic about this site after the past few hours of reading, and a stop at progresswithfocus extended that enthusiasm, the calibration of enthusiasm to evidence is something I try to maintain and this site has earned a calibrated quiet enthusiasm rather than the loud excitement that usually fades within a day or two of finding something.
Held my interest from the opening line through to the closing thought, and a stop at strategyexecutionhub did the same, content that earns sustained attention in an environment full of distractions is doing something right and this site is clearly doing several things right rather than just one or two which I really appreciate.
Thanks for taking the time to write this, it is clear that some thought went into how each point would land, and after I went through clarityalignment I had a better grip on the topic, real value without the usual marketing noise people have to put up with online when searching for answers.
кыздарнет kyzdar net
Антирефлексное покрытие для очков (просветление) не только убирает блики, но и делает стекло более прозрачным – пропускание возрастает с 92% до 99,5% на линзу. Многослойное покрытие имеет слабый остаточный цвет (зелёный, фиолетовый), ProLens.ru
Honestly impressed by how much useful content sits in such a small post, and a stop at progressinitiator confirmed the rest of the site packs a similar punch, density without confusion is a hard balance to strike and this site has clearly cracked the code on it across many different topic areas covered.
Really appreciate that the writer did not stretch the post to hit some target word count, the points end when they are made, and a stop at ideamotionlab reflected the same discipline, brevity is generosity in disguise and this site has clearly figured that out far better than most blog operations have.
mostbet в Киргизии [url=http://mostbet12087.online]mostbet в Киргизии[/url]
Reading this gave me a small mental break from the heavier reading I had been doing, and a stop at growththroughdirection extended that lighter feel, content that provides relief without becoming trivial is harder to produce than people realise and this site has clearly figured out how to be light without being shallow at all.
Bookmark earned and shared the link with one specific person who would care, and a look at directionalvision got the same targeted share, sharing carefully rather than broadcasting is a discipline I try to maintain and this site is generating shares from me at a sustainable rate rather than the spam rate of viral content.
Just want to recognise that someone clearly cared about how this turned out, and a look at focusmovesideas confirmed that care extends across the broader site, you can feel the difference between content shipped to hit a deadline and content released because the writer was actually proud of the result for once.
Reading this in three sittings because the day was fragmented, and the piece survived the fragmentation, and a stop at growthoriented held up under similar reading conditions, content engineered for continuous attention is fragile in modern conditions and this site reads as durable across the realistic ways people consume content today.
https://espaciodca.fedace.org/content/metal-detectors-vs-gold-detectors-what%E2%80%99s-difference?page=6#comment-589105
My reading list is short and selective and this site is now on it, and a stop at explorefreshstrategicideas confirmed the placement, the short list of sites I read deliberately rather than encounter accidentally is something I curate carefully and adding to it is a real act of trust which this site has earned today.
A piece that left me thinking I had been undercaring about the topic, and a look at snowharbortradegallery reinforced that mild concern, content that raises the appropriate weight of a subject without being preachy about it is doing important work and this site is providing that gentle elevation of attention for me consistently.
1xbet nasıl indirilir diye çok kafa yordum valla. Play Store’da resmi olanı bulamayınca çok şaşırdım. Sonunda tüm teknik detayları inceleyip sistemi test ettim. En sonunda sağlam bir kaynağa ulaştım ve size de tüm detayları aktarmak istedim, güncel bilgilere buradan bakabilirsiniz: 1xbet mobil indir [url=www.1xbet-indir-4.com]1xbet mobil indir[/url]. Yani anlatmak istediğim şu — son sürümü bütün eksikleri kapatmış resmen.
kurulumu da oldukça kolaydı yani rahat olun. Birçok platform denedim ama en iyisi bu çıktı — kesinlikle pişman olmazsınız deneyin derim. Herkese hayırlı olsun…
мостбет aviator 2026 [url=https://mostbet55146.online]https://mostbet55146.online[/url]
Reading this slowly and letting each paragraph land before moving on, and a stop at fastgoodsarena earned the same patient approach, content that rewards slow reading rather than speed is content with real density and the writers here are clearly producing work that benefits from the careful eye rather than the rushed scan.
Taking the time to read carefully here has been worthwhile for the past hour, and a look at exploreideasdeeplynow extended the worthwhile reading, the calculation of return on reading time spent is something I do informally and this site has been producing positive returns across multiple sessions during the last week of regular visits and reads.
kyzdar net киздар
Now appreciating the way the post avoided the temptation to be longer than necessary, and a look at directionpowersgrowth continued that lean approach, content with the discipline to stop when finished rather than padding for length is content that respects both itself and its readers and this site has that disciplined editorial culture clearly throughout.
I came here looking for a quick answer and ended up reading the whole post because it was actually interesting, and after clovercrestmarkethouse I had a much fuller picture, no stress and no confusion just a clear walk through the topic that made everything fall into place without much effort.
Worth flagging that the writing rewarded a second read more than I expected, and a look at caramelharborcommercegallery produced the same second read benefit, content with hidden depths that emerge only on careful rereading is rare in the modern blog space and this site has clearly invested in that level of compositional density throughout.
Mobil bahis platformu arayışım epey uzun sürdü valla. Apk dosyasını nereden indireceğimi bulmak epey zaman aldı. Adımları doğru sırayla uyguladıktan sonra erişim sorunsuz açıldı. En sonunda güvendiğim bir kaynağa ulaştım ve size de tüm detayları aktarmak istedim, güncel bilgilere buradan bakabilirsiniz: 1xbet mobii [url=www.1xbet-indir-10.com]1xbet mobii[/url]. Yani anlatmak istediğim şu — mobil uygulaması gerçekten akıcı ve sorunsuz çalışıyor.
Hiçbir sıkıntı yaşamadım indirme esnasında. Birçok platform denedim ama en iyisi bu çıktı — en sağlam uygulama bu oldu artık. Umarım siz de memnun kalırsınız…
Worth bookmarking and sharing with anyone interested in the topic, that is my honest take, and a stop at domelounge reinforces that, the kind of generous resource that makes the open web feel worth defending against the constant pressure to retreat into walled gardens and curated feeds today everywhere I look across all my devices.
Reading this gave me a small framework I expect to use going forward, and a stop at bettershoppinghub extended that framework, content that produces transferable mental models rather than just specific facts is content with multiplicative value and this site is providing those models at a rate that justifies extra attention from me regularly.
Reading this on a long flight and finding it the best thing I read across hours of trying, and a stop at clarityfirstalways kept the streak going, when content beats long flight reading you know it has substance because flight reading is a hard test of a piece given the alternatives available everywhere.
Bookmark earned and shared the link with one specific person who would care, and a look at actionoveranalysis got the same targeted share, sharing carefully rather than broadcasting is a discipline I try to maintain and this site is generating shares from me at a sustainable rate rather than the spam rate of viral content.
A welcome contrast to the loud takes that have dominated my feed lately, and a look at growthalignment extended that calm voice, content that arrives without yelling has become unusual in the modern attention economy and this site is one of the few places I have found that consistently delivers without raising its voice.
Time spent here today felt productive in the way that good reading sessions sometimes do, and a stop at actiondesign extended that productive feeling across the rest of the morning, the difference between productive reading and merely passing time is real and this site is consistently on the productive side for me lately.
1xbet indir nasıl yapılır diye çok araştırdım valla. Herkes farklı bir şey tavsiye ediyordu kime güveneceğimi bilemedim. Adımları doğru sırayla uyguladıktan sonra erişim sorunsuz açıldı. En sonunda güvenilir bir kaynağa ulaştım ve size de tüm detayları aktarmak istedim, güncel bilgilere buradan bakabilirsiniz: 1xbet indirme [url=www.1xbet-indir-9.com]1xbet indirme[/url]. Valla bak net söyleyeyim — son sürümü tüm beklentileri karşılıyor resmen.
Hiçbir sorun yaşamadım indirme işleminde. Kendi deneyimlerimi aktarıyorum size — kesinlikle pişman olmazsınız deneyin derim. Şimdiden iyi şanslar ve bol kazançlar…
mostbet вывести деньги 2026 [url=http://mostbetskg.fun]http://mostbetskg.fun[/url]
1win Мбанк [url=https://1win17638.help]https://1win17638.help[/url]
1win inregistrare cu email [url=www.1win67203.help]www.1win67203.help[/url]
Looking for similar voices elsewhere has come up empty in my recent searches, and a stop at royaldealzone extended the search frustration, the rare site that does what no other does in quite the same way is precious and this one has clearly developed a particular approach that I have not been able to find duplicates of.
Took some notes for a project I am working on, and a stop at actioncreatesclarity added more raw material to those notes, content that contributes to my own creative work rather than just being interesting in the moment is the kind I value most and the kind I will keep coming back to repeatedly.
Honestly enjoyed not being sold anything for the entire duration of the post, and a look at clarityspark kept that pleasant absence going across more pages, content that exists for its own sake rather than as a funnel to a paid product is increasingly rare and worth supporting where I can find it.
Walked away with a clearer head than I had before reading this, and a quick visit to forwarddesign only sharpened that, the writing has a way of cutting through the noise that surrounds most topics online which is something I will definitely remember the next time I am searching for an answer to anything.
Appreciated that the writer trusted the reader to follow along without constant restating of earlier points, and a look at ideaacceleration continued that respect for the reader, treating an audience as capable adults rather than as people to be hand held through every paragraph is something I notice and value highly across the open internet today.
promo code 1win [url=https://1win83016.help/]https://1win83016.help/[/url]
melbet schimbare numar telefon [url=https://melbet31393.help/]https://melbet31393.help/[/url]
1вин фриспины [url=1win17638.help]1win17638.help[/url]
mostbet inregistrare pe site [url=http://mostbet56730.help]http://mostbet56730.help[/url]
Skimmed first and then went back to read carefully, and the careful read paid off in places I had missed, and a stop at shopcoremarket got the same treatment, the rare site whose content rewards a second pass is content I want more of in my regular rotation rather than disposable single read articles.
каменная крошка 5-10 мм галтованная купить [url=www.kamennaya-kroshka.ru]каменная крошка 5-10 мм галтованная купить[/url]
https://sites.google.com/view/codebonus1xbet200/home
Now sitting back and recognising that this was a small but real win in my reading day, and a stop at ideaprocessing extended that quiet win, the cumulative effect of small reading wins versus the cumulative effect of small reading losses is real over time and this site is contributing to the wins side of that ledger.
A piece that read as the work of someone who reads carefully themselves, and a look at visionalignment continued that informed feel, writers who are also serious readers produce work with a different quality and this site reads as the product of someone steeped in good writing rather than just generating content for an audience.
Bookmarked the page and the homepage too because clearly there is more to explore here, and a quick stop at actionmatrix only made that more obvious, this is the kind of place I want to dig through over a weekend rather than rushing through during a coffee break tomorrow morning before getting back to work.
Started reading expecting to disagree and ended mostly nodding along, and a look at learnandadvanceintentionally continued the pattern, content that wins agreement through evidence and reasoning rather than rhetorical force is the kind that actually shifts minds and this site clearly knows how to do that across what I have read so far.
Started this morning and finished at lunch with a small sense of having spent the time well, and a look at driftwillowmarketroom extended that satisfaction into the afternoon, content that fits naturally into the rhythm of a working day rather than demanding a dedicated reading block is increasingly the kind I prefer.
melbet jackpot slots [url=https://melbet31393.help/]https://melbet31393.help/[/url]
mostbet pacanele [url=http://mostbet56730.help]http://mostbet56730.help[/url]
1win wagering requirements [url=http://1win83016.help/]http://1win83016.help/[/url]
Worth saying this site reads better than most paid newsletters I have tried, and a stop at actionwithpurpose confirmed that comparison, the bar for free content is often lower than for paid but this site clears the paid bar consistently and that says something about the editorial approach behind the work being published here regularly.
Telefonuma son sürümü yüklemek istiyordum açıkçası. Play Store’da resmi olanı bulamayınca çok hayal kırıklığı yaşadım. Güncel bilgileri kontrol edip süreci hatasız başlattım. En sonunda güvendiğim bir kaynağa ulaştım ve size de tüm detayları aktarmak istedim, güncel bilgilere buradan bakabilirsiniz: 1xbet mobil uygulama indir [url=https://www.1xbet-indir-8.com]1xbet mobil uygulama indir[/url]. Valla bak net söyleyeyim — son sürümü tüm eksiklikleri gidermiş resmen.
kurulumu da oldukça kolay ve hızlıydı yani rahat olun. İşin doğrusunu söylemek gerekirse — başka yerde vakit kaybetmeyin yani. Şimdiden iyi şanslar ve bol kazançlar…
Now feeling confident enough in this site to use it as a reference point for evaluating others on the same topic, and a look at growthacceleration continued the comparison friendly quality, sites that serve as quality benchmarks for their topic are precious and this one has clearly become a benchmark for me on this particular subject area.
Generally I do not leave comments but this post merits a small note, and a stop at momentumflowlab extended that comment worthy quality, the urge to actively contribute to a sites community rather than passively consume from it is something specific content provokes and this site has provoked that engagement urge from me today.
Liked the way the post handled the final paragraph, no neat bow but no abrupt cutoff either, and a stop at opendealsmarket continued that thoughtful ending pattern, endings are hard and most blog writers either over engineer them or skip them entirely and this site has clearly figured out a sustainable middle approach.
Closed and reopened the tab three times before finally finishing, and a stop at clarityovernoise held my attention straight through, sometimes content fights for time against my own distraction and the times it wins say something positive about its quality and this post clearly won that fight today afternoon for me.
Decided to set a calendar reminder to revisit, and a stop at momentumvector extended that revisit list, calendar entries for content are a level of commitment I rarely make but when I do they signal a higher regard than a simple bookmark and this site has earned that calendar tier of relationship from me today.
Looking back on this reading session it stands as one of the better ones recently, and a look at buildpurposefullynow extended that ranking, the informal ranking of reading sessions against each other is something I do mentally and this session ranks high largely because of this site and a couple of related pages here.
Denemek isteyen arkadaşlara hep tavsiye ediyorum. Güvenilir bir platform bulmak gerçekten çok zaman aldı. Güncel bilgileri kontrol edip süreci hatasız başlattım. En sonunda doğru adrese ulaştım ve size de tüm detayları aktarmak istedim, güncel bilgilere buradan bakabilirsiniz: 1xbet üye ol [url=http://1xbet-80.com]1xbet üye ol[/url]. Yani anlatmak istediğim şu — casino sevenler için de ideal bir ortam var.
müşteri desteği de ilgili ve hızlı. Kendi deneyimlerimi aktarıyorum size — kesinlikle pişman olmazsınız deneyin derim. Şimdiden iyi şanslar ve bol kazançlar…
Denemek isteyen arkadaşlara hep soruyorum valla. Sürekli engelleme derdi bitmek bilmiyor artık. Güncel bilgileri kontrol edip süreci hatasız başlattım. En sonunda doğru adrese ulaştım ve size de tüm detayları aktarmak istedim, güncel bilgilere buradan bakabilirsiniz: 1 x bet [url=http://1xbet-79.com]1 x bet[/url]. Şimdi size kısaca özet geçeyim — casino oyunlarına meraklıysanız burası tam size göre.
para çekme işlemleri de hızlı yani rahat olun. Kendi deneyimlerimi aktarıyorum size — en güvendiğim yer burası oldu artık. Herkese hayırlı olsun…
мостбет актуальное зеркало [url=http://mostbet12087.online]http://mostbet12087.online[/url]
Açıkçası bu alanda çok fazla seçenek var ama doğrusunu bulmak zor. Herkes farklı bir şey söylüyor kafam karıştı. Adımları doğru sırayla uyguladıktan sonra erişim sorunsuz açıldı. En sonunda doğru adrese ulaştım ve size de tüm detayları aktarmak istedim, güncel bilgilere buradan bakabilirsiniz: 1xbet üye ol [url=https://1xbet-78.com]1xbet üye ol[/url]. Şimdi size kısaca özet geçeyim — casino oyunlarına meraklıysanız burası tam size göre.
müşteri hizmetleri bile ilgili ve hızlı. Birçok platform denedim ama en iyisi bu çıktı — kesinlikle pişman olmazsınız deneyin derim. Herkese hayırlı olsun…
Took a screenshot of one section to come back to later, and a stop at ideasrequireaction prompted another saved tab, the urge to capture and revisit specific pieces of content is something I rarely feel but when I do it tells me the work is worth more than the average passing read for sure.
Just want to say thank you for putting this together, posts like these make searching online actually worth it sometimes, and a quick look at forwardprogression kept that going, useful and easy to read without any of the tricks that ruin most blog comment sections lately on the wider open web.
Looking forward to seeing what gets published next month, and a look at domemarina extended that anticipation across the broader site, finding myself looking forward to a sites future content rather than just consuming its existing content is a stronger commitment level than I usually reach with new finds and this site triggered that.
Reading this in the gap between work projects was a small but meaningful break, and a stop at directioncrafting extended that gentle reset, content that provides genuine refreshment rather than just distraction during work breaks is content with a particular kind of utility and this site fits that role for me reliably during work days.
Worth saying this site reads better than most paid newsletters I have tried, and a stop at coastharbormerchantgallery confirmed that comparison, the bar for free content is often lower than for paid but this site clears the paid bar consistently and that says something about the editorial approach behind the work being published here regularly.
Saving this link for the next time someone asks me about this topic, and a look at growthvector expanded what I will be sharing with them, this is the kind of resource that makes a real difference when you are trying to point a friend to something useful and reliable rather than generic marketing pages.
Came away feeling slightly smarter than I was when I started, that is a real win, and a stop at startpurposefulgrowthpath added a bit more to that, the rare site that actually transfers some of its knowledge to the reader in a way that sticks rather than just creating an illusion of learning briefly.
Now appreciating that the post left me with enough to say in a follow up conversation, and a look at coppercovemarkethouse added more material for those follow ups, content that prepares me for related conversations rather than just informing me alone is content with social utility and this site provides that social armament reliably for me.
My usual pattern is to skim and bounce but this site has reset that pattern temporarily, and a stop at mintmeadowgoodsgallery maintained the slower reading mode, content that changes how I read is content with structural influence and this site has clearly nudged my reading behaviour toward something better at least for the duration of these visits.
Really appreciate that the writer did not assume I would read every other related post first, and a look at momentumarchitecture kept that self contained feel going where each piece can stand alone, accessibility for new readers is a sign of generous editorial thinking and this site has clearly invested in that approach.
A genuine compliment to the writer for keeping the post focused on what mattered, and a look at progresspathfinder continued that disciplined focus, focus is a editorial choice that compounds across many small decisions and this site has clearly made those small decisions consistently across what I have read so far this week here.
Working through this site has been a small antidote to the shallow content that fills most of my reading time, and a stop at growthnavigationhub extended that antidote function, sites that quietly improve the average quality of my reading by being themselves are sites worth supporting through return visits and recommendations consistently.
During my morning reading slot this fit perfectly into the routine, and a look at claritybeforegrowth extended that perfect fit into the rest of the routine, content that matches the rhythm of how I actually read rather than demanding accommodation from my schedule is content well calibrated to its likely audience and this site has it.
If I were grading sites on this topic this one would receive high marks, and a stop at actiondirection continued earning those high marks, the informal grading I do mentally for content sources is something I take seriously even though it is informal and this site has been receiving consistent high marks across multiple sessions today.
1вин промокод [url=http://1win17638.help]1вин промокод[/url]
melbet metode plata Moldova [url=melbet31393.help]melbet31393.help[/url]
Worth marking the moment when reading this clicked into something useful for my own work, and a look at trustedshoppinghub extended that practical click, content that connects to my actual life rather than just being interesting is content with the highest kind of value and this site is generating that connection at a high rate.
During a reading session that included several other sources this one stood out, and a look at royalgoodsarena continued the standout quality, the side by side comparison of sources during research is a useful exercise and this site has been winning those comparisons for me consistently across multiple research sessions during the last week.
Honestly slowed down to read this carefully which is not my default, and a look at clarityshapesoutcomes kept me in that careful reading mode, the kind of writing that demands attention by being worth attention is rare in a media environment full of content engineered to be skimmed not read with any real focus today.
Felt the post had been written without using a single buzzword, and a look at actiondrivensuccess continued that clean vocabulary, content free of jargon and trendy phrases reads better and ages better and this site has clearly committed to a vocabulary that will not feel dated in three years which is impressive editorially.
1xbet indir işlemini nasıl yapacağımı çok merak ediyordum. Herkes farklı bir adres söylüyordu kime güveneceğimi şaşırdım. Adımları doğru sırayla uyguladıktan sonra erişim sorunsuz açıldı. En sonunda güvendiğim bir kaynağa ulaştım ve size de tüm detayları aktarmak istedim, güncel bilgilere buradan bakabilirsiniz: 1xbet uygulaması indir [url=http://www.1xbet-indir-10.com]1xbet uygulaması indir[/url]. Şimdi size kısaca özet geçeyim — telefonuma indirdikten sonra çok memnun kaldım.
kurulumu da oldukça basit ve hızlıydı yani rahat olun. İşin doğrusunu söylemek gerekirse — en sağlam uygulama bu oldu artık. Umarım siz de memnun kalırsınız…
Honestly enjoyed not being sold anything for the entire duration of the post, and a look at strategicflow kept that pleasant absence going across more pages, content that exists for its own sake rather than as a funnel to a paid product is increasingly rare and worth supporting where I can find it.
Liked how the post handled an objection I was forming as I read, and a stop at discoverhiddenpaths similarly anticipated where my thinking was going next, the rare writer who can predict reader concerns and address them in advance is doing something most online content fails to do despite that being basic editorial work.
Skipped the related products section because there was none, and a stop at clarityorientation also lacked any aggressive monetisation, content that is not constantly trying to convert me into a customer or subscriber is content that has confidence in its own value and that confidence shows up as a different reading experience.
Now thinking I want more sites built on this kind of editorial foundation, and a stop at shopgatemarket extended that wish into a broader hope, sites built on substance and care rather than on metrics and growth are the kind of sites I want to see more of and this one is a small example worth supporting.
Really appreciate that the writer did not overstate the importance of the topic to make the post feel weightier, and a quick visit to directioncraft maintained the same modest framing, content that is honest about its own scope rather than inflating itself is the kind I trust and return to repeatedly over time.
Now sitting with the thoughts the post triggered rather than rushing on to the next thing, and a stop at growwithstructuredmomentum extended that reflective pause, content that earns time for thought after closing the tab is content of higher value than the merely interesting and this site has clearly produced that lasting effect today.
A piece that handled multiple complications without becoming confused, and a look at directionalfocus continued that organisational clarity, holding multiple threads in a single piece without losing any of them is a sign of skilled writing and this site has clearly developed the editorial discipline to manage complexity without sacrificing readability throughout.
1xbet indir nasıl yapılır diye çok araştırdım valla. Play Store’da resmi olanı bulamayınca çok şaşırdım. Sonunda tüm teknik detayları inceleyip sistemi test ettim. En sonunda güvenilir bir kaynağa ulaştım ve size de tüm detayları aktarmak istedim, güncel bilgilere buradan bakabilirsiniz: 1xbet indir [url=1xbet-indir-9.com]1xbet indir[/url]. Yani anlatmak istediğim şu — telefonuma indirdikten sonra çok memnun kaldım.
kurulumu da oldukça basit ve anlaşılırdı yani rahat olun. Kendi deneyimlerimi aktarıyorum size — en kullanışlı uygulama bu oldu artık. Umarım siz de memnun kalırsınız…
Now planning a longer reading session for the archives, and a stop at draftglade confirmed the archives are worth that longer commitment, sites with archives I want to read deliberately rather than just sample are rare and this one has clearly earned that level of interest based on the consistency of what I have already read.
Just enjoyed the experience without needing to think about why, and a look at dunecovemarkethouse kept that effortless feeling going, sometimes the best content is invisible in the sense that you forget you are reading until you reach the end and realise time has passed without you noticing it pass naturally.
1xbet indir işlemini nasıl yapacağımı çok merak ediyordum valla. Apk dosyasını nereden indireceğimi bulmak çok zaman aldı. Adımları doğru sırayla uyguladıktan sonra erişim sorunsuz açıldı. En sonunda güvenilir bir kaynağa ulaştım ve size de tüm detayları aktarmak istedim, güncel bilgilere buradan bakabilirsiniz: 1xbet mobile download [url=1xbet-indir-6.com]1xbet mobile download[/url]. Yani anlatmak istediğim şu — mobil uygulaması gerçekten akıcı ve hızlı çalışıyor.
kurulumu da çok basit ve anlaşılırdı yani rahat olun. Kendi deneyimlerimi aktarıyorum size — en kullanışlı uygulama bu oldu artık. Umarım siz de memnun kalırsınız…
A quiet kind of confidence runs through the writing, and a look at forwardthinkinggrowth carried that same understated assurance, confidence without bragging is the most attractive register for online writing and the writers here have clearly developed it through practice rather than affecting it through stylistic tricks that would feel hollow eventually.
Reading this fit naturally into my afternoon walk because I was reading on my phone, and a stop at visionexecutionhub continued well in that walking format, content that survives mobile reading without becoming awkward is content with format flexibility and this site has clearly thought about how it reads across different devices today.
mostbet site oglindă [url=http://mostbet56730.help]http://mostbet56730.help[/url]
1win crypto deposit pending [url=https://www.1win83016.help]https://www.1win83016.help[/url]
Just wanted to say this was useful and leave a small note of thanks, and a quick visit to momentumoperations earned a similar nod from me, the small acknowledgements add up over time and represent the real economy of trust that good content runs on across the open and increasingly fragmented modern internet.
Bahis siteleri arasında uzun süredir araştırma yapıyorum valla. Herkes farklı bir şey tavsiye ediyor kafam allak bullak oldu. Adımları doğru sırayla uyguladıktan sonra erişim sorunsuz açıldı. En sonunda doğru adrese ulaştım und size de tüm detayları aktarmak istedim, güncel bilgilere buradan bakabilirsiniz: 1xbet üyelik [url=http://1xbet-81.com]1xbet üyelik[/url]. Yani anlatmak istediğim şu — casino oyunlarına meraklıysanız burası tam size göre.
müşteri hizmetleri de ilgili ve yardımsever. İşin doğrusunu söylemek gerekirse — başka yerde vakit kaybetmeyin yani. Herkese hayırlı olsun…
Now appreciating that the post did not require me to agree with the writer to find it valuable, and a look at visionguidesaction maintained the same useful regardless of agreement quality, content that informs even when it does not convince is content with broader utility and this site reads as useful even when I disagree.
A clear case of writing that does not try to do too much in one post, and a look at progressignition maintained the same scoped discipline, posts that try to cover too much end up covering nothing well and this site has clearly chosen scope discipline as a core editorial principle which shows up clearly in what I read.
Started reading skeptically because the headline seemed overconfident, and the post earned the headline by the end, and a look at copperharborvendorroom continued that pattern of earning its claims, sites that can back up their headlines without overpromising are rare and this one has clearly developed editorial calibration on that front consistently.
Comfortable in tone and substantive in content, that is a hard combination to land, and a look at claritysequencehub kept that pairing alive across more material, this is what good editorial direction looks like in practice and the team here clearly has someone keeping a steady hand on the wheel across what they decide to publish.
Beyond the topic at hand this site reads as a small ongoing project of taking writing seriously, and a look at focuscreatesresults reinforced that project quality, sites that treat publishing as an ongoing serious practice rather than as content production for traffic are sites worth supporting and this one has clearly chosen the serious approach.
Denemek isteyen arkadaşlara hep tavsiye ediyorum. Sürekli yeni adres aramak yoruyor artık. Adımları doğru sırayla uyguladıktan sonra erişim sorunsuz açıldı. En sonunda doğru adrese ulaştım ve size de tüm detayları aktarmak istedim, güncel bilgilere buradan bakabilirsiniz: xbet [url=http://1xbet-80.com]xbet[/url]. Şimdi size kısaca özet geçeyim — spor bahislerinde uzman olanlar burayı bilir.
müşteri desteği de ilgili ve hızlı. Birçok platform denedim ama en iyisi bu çıktı — en güvendiğim adres burası oldu artık. Herkese hayırlı olsun…
Now noticing the careful balance the post struck between confidence and humility, and a stop at growthwithpurpose maintained the same balance, finding the line between asserting and admitting is hard and this site has clearly developed the calibration to walk that line consistently which produces a more persuasive reading experience for me.
Liked that the post landed without needing to manufacture controversy or take a contrarian stance for attention, and a stop at amberharbormerchantgallery continued that grounded approach, content that earns attention through quality rather than provocation is the kind that builds long term trust rather than burning it on quick wins.
Now saved this in a way that I will actually find again rather than the casual bookmark approach, and a stop at strategyguided earned the same careful saving, organising my reading bookmarks so that high quality sources rise to the top is something I should do more of and this site triggered that organisation today.
Açıkçası bu işe yeni başlayanlar için kafa karıştırıcı olabiliyor. Güvenilir bir platform bulmak gerçekten çok zordu. Adımları doğru sırayla uyguladıktan sonra erişim sorunsuz açıldı. En sonunda doğru adrese ulaştım ve size de tüm detayları aktarmak istedim, güncel bilgilere buradan bakabilirsiniz: 1 xbet [url=https://1xbet-79.com]1 xbet[/url]. Yani anlatmak istediğim şu — canlı bahis seçenekleri bile yeterli aslında.
müşteri hizmetleri bile ilgili ve yardımsever. Birçok platform denedim ama en iyisi bu çıktı — en güvendiğim yer burası oldu artık. Şimdiden iyi şanslar ve bol kazançlar…
1xbet indir işlemini nasıl yapacağımı çok araştırdım valla. Play Store’da resmi olanı bulamayınca çok hayal kırıklığı yaşadım. Adımları doğru sırayla uyguladıktan sonra erişim sorunsuz açıldı. En sonunda güvendiğim bir kaynağa ulaştım ve size de tüm detayları aktarmak istedim, güncel bilgilere buradan bakabilirsiniz: xbet indir [url=http://www.1xbet-indir-8.com]xbet indir[/url]. Valla bak net söyleyeyim — son sürümü tüm eksiklikleri gidermiş resmen.
kurulumu da oldukça kolay ve hızlıydı yani rahat olun. Birçok platform denedim ama en iyisi bu çıktı — en sağlam uygulama bu oldu artık. Şimdiden iyi şanslar ve bol kazançlar…
Recommended reading: שירותי ליווי בישראל
Liked that there was nothing performative about the writing, and a stop at strategyalignment continued that genuine quality, performative writing tries to be witnessed rather than read and the difference between performance and substance is huge for the careful reader and this site has clearly chosen substance every time clearly.
Just want to recognise that someone clearly cared about how this turned out, and a look at visionactivation confirmed that care extends across the broader site, you can feel the difference between content shipped to hit a deadline and content released because the writer was actually proud of the result for once.
Reading this in my last reading slot of the day was a good way to end, and a stop at strategyignition provided a satisfying close to the reading session, content that ends a day well rather than agitating it before sleep is the kind I value increasingly and this site fits that role for me consistently now.
A thoughtful piece that did not strain to be thoughtful, and a look at progressengineered continued that effortless quality, when thinking shows up in writing without the writer drawing attention to it you know you are reading something genuinely considered rather than something performing the appearance of consideration which is also common online.
[url=https://sip-kabel-1.ru]сип кабель[/url]
кабель сигнально блокировочный [url=https://kabel-signalno-blokirovochnyj-1.ru]https://kabel-signalno-blokirovochnyj-1.ru[/url]
Now appreciating that I did not feel exhausted after reading, and a stop at draftlake extended that energising quality, content that leaves me with more attention than it consumed is rare and the gap between draining and energising content is real over the course of a typical day spent reading widely online.
Time spent here today felt productive in the way that good reading sessions sometimes do, and a stop at clarityshapesgrowth extended that productive feeling across the rest of the morning, the difference between productive reading and merely passing time is real and this site is consistently on the productive side for me lately.
Came in expecting another generic take and got something with actual character instead, and a look at momentumstartswithclarity carried that personality forward, finding a distinct voice on a saturated topic is impressive and worth pointing out when it happens because most sites end up sounding identical to their nearest competitors quickly.
maorou_k8m pussy maorou_k8m onlyfans
https://ustanovka-otopleniya-02.kz/
Reading this with my morning coffee turned into reading the related posts with my morning coffee, and a stop at claritymomentum stretched the morning further, content that pulls breakfast into a reading session rather than just accompanying it is content that has earned a higher claim on my attention than the average article does.
Glad I gave this a chance instead of bouncing on the headline, and after strategydeployment I was certain I had made the right call, snap judgements based on titles miss a lot of good content and this is a reminder to slow down and check things out before scrolling past in a hurry.
Came away with a small but real shift in perspective on the topic, and a stop at trendycartspace pushed that shift a bit further, the kind of subtle reframing that good writing does to a reader without making a big deal of it is something I always appreciate when it happens which is sadly not that often.
https://jsmnqlb.com/промокод-в-1xbet-2026-1x200box-бонус-32500-рублей/
A genuine compliment to the writer for keeping the post focused on what mattered, and a look at clarityflow continued that disciplined focus, focus is a editorial choice that compounds across many small decisions and this site has clearly made those small decisions consistently across what I have read so far this week here.
Took a chance on the headline and was rewarded, and a stop at directionalclarity kept the rewards coming as I clicked through, the kind of place where every link leads somewhere worth the click is a small luxury on the modern web where so many sites are mostly empty calories disguised as content.
Liked the natural conversational tone throughout, never stiff and never overly casual either, and a stop at strategyfuelsgrowth kept that comfortable middle ground going, finding a tone that respects the reader without becoming distant or overly familiar is harder than it sounds and this site nails that balance consistently across many different pieces.
Pleasant surprise, the post delivered more than the headline promised, and a stop at birchharborcommercegallery continued that pattern of under promising and over delivering, the rarest combination on the modern web where most content does the opposite by promising the world and delivering thin recycled summaries instead each time you click on something interesting.
Denemek isteyen arkadaşlara hep soruyorum. Herkes farklı bir şey söylüyor kafam karıştı. Güncel bilgileri kontrol edip süreci hatasız başlattım. En sonunda doğru adrese ulaştım ve size de tüm detayları aktarmak istedim, güncel bilgilere buradan bakabilirsiniz: 1xbet turkey [url=https://www.1xbet-78.com]1xbet turkey[/url]. Yani anlatmak istediğim şu — canlı bahis seçenekleri bile yeterli aslında.
müşteri hizmetleri bile ilgili ve hızlı. Birçok platform denedim ama en iyisi bu çıktı — başka yerde vakit kaybetmeyin yani. Umarım siz de memnun kalırsınız…
Decided I would read the archives over the weekend, and a stop at mintorchardmarkethouse confirmed that the archives would be worth the time, very few sites have archives I would actively read through but this one has earned that level of interest based on the consistent quality across what I have sampled so far.
надежные капперы Ставки на футбол
Came here from a search and stayed for the side links because they were that interesting, and a stop at ideafocus took me even further into the site, the kind of organic exploration that good content invites is something most sites kill through aggressive interlinking and pushy navigation choices rather than relying on quality.
Took a chance on the headline and was rewarded, and a stop at momentumfocused kept the rewards coming as I clicked through, the kind of place where every link leads somewhere worth the click is a small luxury on the modern web where so many sites are mostly empty calories disguised as content.
Reading carefully here has reminded me what reading carefully feels like, and a look at shopneststore extended that reminder, the experience of careful reading versus skimming is different in ways I had partially forgotten and this site has clearly refreshed my memory of what attention feels like when content rewards it consistently.
Found this via a link from another piece I was reading and the click was worth it, and a stop at coralharbortradehall extended the value across more material, the open web still rewards clicking through citations when the underlying writers care about each other work and this site clearly belongs to that network.
Recommended to anyone working in or curious about this area, the depth and clarity combine well, and a look at dunemeadowvendorhall keeps that going across more pages, the kind of site that earns regular visits rather than chasing trends has my respect because it suggests genuine commitment to the topic itself rather than to chasing trends.
Felt the post had been quietly polished rather than aggressively styled, and a look at momentumstream confirmed the same understated polish, sites whose quality reveals itself slowly rather than announcing itself loudly are the kind I trust more deeply because the trust is not based on first impressions of marketing but actual substance.
Reading this in my last reading slot of the day was a good way to end, and a stop at claritystarter provided a satisfying close to the reading session, content that ends a day well rather than agitating it before sleep is the kind I value increasingly and this site fits that role for me consistently now.
Telefonuma güncel uygulamayı yüklemek istiyordum açıkçası. Herkes farklı bir adres söylüyordu kime güveneceğimi şaşırdım. Adımları doğru sırayla uyguladıktan sonra erişim sorunsuz açıldı. En sonunda güvendiğim bir kaynağa ulaştım ve size de tüm detayları aktarmak istedim, güncel bilgilere buradan bakabilirsiniz: 1xbet mobil indir [url=www.1xbet-indir-10.com]1xbet mobil indir[/url]. Şimdi size kısaca özet geçeyim — telefonuma indirdikten sonra çok memnun kaldım.
güncellemeleri de düzenli olarak yapılıyor. İşin doğrusunu söylemek gerekirse — en sağlam uygulama bu oldu artık. Herkese hayırlı olsun…
Quietly impressive in a way that does not announce itself, and a stop at createforwardthinking extended that quiet impressiveness, the kind of quality that emerges through sustained attention rather than first impressions is the kind I trust more deeply and this site has been earning that deeper trust across multiple sessions over time consistently.
Useful enough to recommend to several people I know who would appreciate it, and a stop at garnetharbortradehouse added more material I will pass along too, the kind of writing that earns word of mouth is the kind that actually delivers on its promises which is what this site does without any drama or fanfare attached.
Came across this looking for something else entirely and ended up reading it through twice, and a look at directionmattersmost pulled me deeper into the site than I planned, the writing has a way of holding attention without resorting to manipulative cliffhangers or vague promises that never get delivered later down the page.
Bahis siteleri arasında uzun süredir araştırma yapıyorum valla. Herkes farklı bir şey tavsiye ediyor kafam allak bullak oldu. Sonunda tüm teknik detayları inceleyip sistemi test ettim. En sonunda doğru adrese ulaştım und size de tüm detayları aktarmak istedim, güncel bilgilere buradan bakabilirsiniz: 1xbet üyelik [url=https://www.1xbet-81.com]1xbet üyelik[/url]. Yani anlatmak istediğim şu — spor bahislerinde iddialı olanlar burayı bilir.
Hiçbir sorun yaşamadım şu ana kadar. Kendi deneyimlerimi aktarıyorum size — kesinlikle pişman olmazsınız deneyin derim. Herkese hayırlı olsun…
Genuinely glad I clicked through to read this rather than skipping past, and a stop at focuspowersmomentum confirmed I should keep clicking through to more pages here, the kind of resource that justifies its place in my browser history rather than feeling like wasted time which is the highest compliment I offer any site online today.
Better than most of the writing I have come across on this topic recently, simpler and more direct, and a look at aspenfalcon continued in that same way, a real outlier in a crowded space full of repetitive content that says little while taking up a lot of reader time today which is unfortunate.
Reading this on the train into work was a better use of the commute than my usual choices, and a stop at bevelhamlet extended that commute reading well, content that improves transit time rather than just filling it is content with practical benefit and this site has earned its place in my morning commute reading rotation.
Telefonuma güncel versiyonu yüklemek istiyordum açıkçası. Play Store’da resmi olanı bulamayınca çok şaşırdım. Adımları doğru sırayla uyguladıktan sonra erişim sorunsuz açıldı. En sonunda güvenilir bir kaynağa ulaştım ve size de tüm detayları aktarmak istedim, güncel bilgilere buradan bakabilirsiniz: 1xbet uygulaması indir [url=https://1xbet-indir-6.com]1xbet uygulaması indir[/url]. Şimdi size kısaca özet geçeyim — telefonuma indirdikten sonra çok memnun kaldım.
Hiçbir sorun yaşamadım indirme işleminde. Kendi deneyimlerimi aktarıyorum size — başka yerde vakit kaybetmeyin yani. Şimdiden iyi şanslar ve bol kazançlar…
Solid quality, the kind of work that holds up to a careful read rather than a quick skim, and a quick look at draftlog kept that standard going strong, content that rewards attention rather than punishing it is something I appreciate more and more these days online across nearly every topic I follow.
Honest opinion is that this is the kind of post that builds long term trust with readers, and a look at directionalintelligence reinforced that perception, the slow accumulation of trust through consistent quality is the only sustainable way to build a real audience and this site is clearly playing that long game.
1xbet indir nasıl yapılır diye çok araştırdım valla. Play Store’da resmi olanı bulamayınca çok şaşırdım. Adımları doğru sırayla uyguladıktan sonra erişim sorunsuz açıldı. En sonunda güvenilir bir kaynağa ulaştım ve size de tüm detayları aktarmak istedim, güncel bilgilere buradan bakabilirsiniz: 1xbet son sürüm indir [url=www.1xbet-indir-9.com]1xbet son sürüm indir[/url]. Şimdi size kısaca özet geçeyim — son sürümü tüm beklentileri karşılıyor resmen.
kurulumu da oldukça basit ve anlaşılırdı yani rahat olun. Birçok platform denedim ama en iyisi bu çıktı — başka yerde vakit kaybetmeyin yani. Herkese hayırlı olsun…
Yesterday I was complaining about the state of online writing and today this site has temporarily fixed that complaint, and a look at ideasneedmovementnow extended that mood reversal, the short term mood improvement that comes from finding good content is real and this site has produced that improvement for me at a useful moment.
A relief to read something where I did not have to fact check every claim mentally, and a look at forwardmotiondesign continued that reliable feeling, sites where I can lower my guard and trust the content are rare and this one is earning that trust paragraph by paragraph through consistent careful work behind the scenes.
Açıkçası bu alanda en doğru adresi bulmak zor. Güvenilir bir platform bulmak gerçekten çok zaman aldı. Güncel bilgileri kontrol edip süreci hatasız başlattım. En sonunda doğru adrese ulaştım ve size de tüm detayları aktarmak istedim, güncel bilgilere buradan bakabilirsiniz: 1xbet turkey [url=https://1xbet-80.com]1xbet turkey[/url]. Şimdi size kısaca özet geçeyim — casino sevenler için de ideal bir ortam var.
işlemler hızlı ve güvenli yani rahat olun. Kendi deneyimlerimi aktarıyorum size — kesinlikle pişman olmazsınız deneyin derim. Umarım siz de memnun kalırsınız…
Liked everything about the experience, from the opening through to the closing notes, and a stop at atticcondor extended that into more pages, finding a site where the editorial vision shows through every choice rather than feeling random is an increasingly rare experience and one I am glad to have today during this particular reading session.
maorou_k8m nude maorou_k8m leak
Good clean post, no errors and no awkward phrasing that breaks the reading flow, and a stop at ideatraction kept the same standard, definitely the kind of editorial care that earns a return visit because it tells me the writer is paying attention to details that matter to readers rather than just rushing publication.
Will be coming back to this for sure, too much good content to absorb in one sitting, and a stop at momentumframework only added more pages I want to dig through, this site is going onto my regular rotation list because it consistently delivers something worth the visit lately rather than empty filler.
Solid value for anyone willing to read carefully, and a look at actionmomentum extends that value across the rest of the site, this is the kind of place that rewards return visits rather than offering everything in a single splashy post and then leaving readers nothing to come back for later which is unfortunately common.
Honest take is that I will probably forget most of what I read online today but this post is one I will remember, and a stop at claritystrategy kept that same memorable quality going, certain writing leaves a residue in the mind in a way most content simply does not manage.
Just nice to read something that does not feel like it was assembled from a content brief, and a stop at forwardthinkingclarity kept that handcrafted feel going, you can tell when a real human with real understanding is behind the words versus a templated piece churned out for an algorithm to find.
Now considering carefully how to share this site with the right audience rather than broadcasting widely, and a look at floraharborvendorparlor extended that careful sharing impulse, content worth sharing carefully rather than spamming is content that has earned a higher kind of recommendation and this site has earned that careful shareability throughout pieces.
Açıkçası bu işe yeni başlayanlar için kafa karıştırıcı olabiliyor. Herkes farklı bir adres söylüyor kafam allak bullak oldu. Sonunda tüm teknik detayları inceleyip sistemi test ettim. En sonunda doğru adrese ulaştım ve size de tüm detayları aktarmak istedim, güncel bilgilere buradan bakabilirsiniz: 1 xbet [url=http://1xbet-79.com]1 xbet[/url]. Şimdi size kısaca özet geçeyim — spor bahislerinde iddialı olanlar burayı bilir.
Hiçbir sorun yaşamadım şu ana kadar. İşin doğrusunu söylemek gerekirse — kesinlikle pişman olmazsınız deneyin derim. Şimdiden iyi şanslar ve bol kazançlar…
The formatting and overall presentation of this post are absolutely excellent, making it a breeze to read through and ensuring that the most critical pieces of information stand out clearly without feeling overly difficult to process.
kids sexual xxx porn onlyfans
Came here from a search and stayed for the side links because they were that interesting, and a stop at visionexecution took me even further into the site, the kind of organic exploration that good content invites is something most sites kill through aggressive interlinking and pushy navigation choices rather than relying on quality.
ставки в максе ставки лайв
Closed the post with a small satisfied sigh, and a stop at cloudcovemerchantgallery produced the same gentle exhale, content that ends well is content that respects the rhythm of reading and the writers here have clearly thought about how their pieces close rather than just trailing off when they run out of things to say.
During a reading session that included several other sources this one stood out, and a look at growthpath continued the standout quality, the side by side comparison of sources during research is a useful exercise and this site has been winning those comparisons for me consistently across multiple research sessions during the last week.
Came in for one specific question and got answers to three I had not even thought to ask, and a look at ideabuilder extended that bonus value pattern, the kind of resource that anticipates reader needs rather than just answering the literal question asked is the gold standard and this site reaches it.
Looking at the surface design and the substance together this site has both right, and a look at growthneedsstructure reinforced that integrated quality, sites where presentation and content reinforce each other rather than fighting are sites with full editorial coherence and this one has clearly invested in both layers in a balanced way.
mostbet Oʻzbekistonda [url=https://www.mostbet94259.help]https://www.mostbet94259.help[/url]
Reading this slowly to give it the attention it deserved, and a stop at atticboulder earned the same slow read, choosing to read slowly is a small act of respect for content quality and very few sites earn that respect from me but this one did so without any explicit ask which is the cleanest way.
Solid stuff, the kind of post that I will probably refer back to later this month when the topic comes up again, and a look at actionpathfinder only confirmed I should bookmark the site as a whole rather than just this single page for future reference and use across coming weeks.
melbet dépôt mtn ci [url=https://melbet79845.help/]https://melbet79845.help/[/url]
Reading carefully here has reminded me what reading carefully feels like, and a look at gladeridgemarkethouse extended that reminder, the experience of careful reading versus skimming is different in ways I had partially forgotten and this site has clearly refreshed my memory of what attention feels like when content rewards it consistently.
A nicely understated post that does not shout for attention, and a look at autumncovevendorroom maintained the same quiet quality, understatement is a stylistic choice that distinguishes serious writing from attention seeking writing and this site has clearly committed to the understated approach as a core editorial value rather than just a phase.
Reading this between two meetings turned out to be the highlight of the morning, and a stop at focuscreatestraction continued that highlight quality, content that outshines the structured parts of a working day is doing something well beyond ordinary and this site has produced multiple such highlights for me already this week alone.
Refreshing tone compared to the dry corporate posts on similar topics, and a stop at dunemeadowvendorparlor carried that personality through nicely, you can tell when a real person is behind the writing versus a content team chasing metrics and this site definitely falls into the former category clearly across what I have seen.
pinup ios app store bormi [url=https://www.pinup38399.help]pinup ios app store bormi[/url]
Picked up a couple of new ideas here that I can actually try out, and after my visit to visionactionloop I have even more notes saved, this is the kind of resource that pays you back for the time you spend on it which is rare to come across in this corner of the web.
If I had to defend the time I spend reading independent blogs this site would feature in the defence, and a look at forestcovevendorgallery reinforced that defensive utility, the ongoing case for non algorithmic reading is one I make to myself periodically and sites like this one provide the actual evidence that supports the case clearly.
Found a couple of useful angles in here I had not considered before reading carefully, and a quick stop at executionoverhesitation added more, this is one of those sites where the value compounds the more you read rather than peaking at one viral post and then offering nothing else of substance afterwards which is common.
Now noticing that the post never raised its voice even when making a strong point, and a look at ideasintoprogress continued that calm volume, content that can make important points without resorting to typographic emphasis or emotional appeal is content that trusts its substance to do the work and this site has that confidence consistently.
A piece that handled a controversial angle without becoming heated, and a look at mooncovevendorhall continued that calm engagement, content that can address contested topics without inflaming them is doing rare diplomatic work and this site has clearly developed the editorial maturity to handle sensitive material with the appropriate temperature of writing throughout.
Skipped the social share buttons but might come back to actually use one later, and a stop at focusprogression extended that share urge, content that triggers genuine sharing impulses rather than performative ones is content that has actually moved me and not many posts in a typical week do that for me actually.
Started reading skeptically because the headline seemed overconfident, and the post earned the headline by the end, and a look at directionalmap continued that pattern of earning its claims, sites that can back up their headlines without overpromising are rare and this one has clearly developed editorial calibration on that front consistently.
Honestly informative, the writer covers the ground without showing off, and a look at startsmartgrowth reflected the same humility, content that respects the reader rather than trying to dazzle them is something I always appreciate and rarely come across in this corner of the internet today across the topics I usually read.
Closed my email tab so I could read this without interruption, and a stop at rainharborcommercegallery earned the same protected attention, when content is good enough to defend against the usual digital distractions you know it deserves better than the half attention most online reading gets in a typical busy day.
военный беспилотник Гуманоидный робот способен имитировать человеческие движения, что делает его универсальным помощником в сложных средах. Такие системы разрабатываются для работы в условиях, где требуется гибкость и антропоморфная манипуляция предметами.
Thanks for keeping the writing direct without losing the warmth that makes content feel human, and a stop at echobrooktradehall carried both qualities forward, balancing professionalism and personality is a rare skill and the writers here have clearly figured out how to consistently land it across many posts which I notice.
стратегия продаж бизнес создать бизнес продажа бизнесов
надежные букмекерские конторы [url=http://svarog.forum24.ru/?1-0-0-00000860-000-0-0]надежные букмекерские конторы[/url]
Now noticing that the post avoided the temptation to be funny in places where humour would have undermined the substance, and a stop at ideasneedstructure maintained the same restraint, knowing when to be serious is a rare editorial virtue and this site has clearly developed it through what I assume is careful editorial practice over years.
mostbet бонус за регистрацию [url=www.tagilshops.forum24.ru/?1-4-0-00000309-000-0-0]mostbet бонус за регистрацию[/url]
Bahis siteleri arasında uzun süredir araştırma yapıyorum valla. Herkes farklı bir şey tavsiye ediyor kafam allak bullak oldu. Adımları doğru sırayla uyguladıktan sonra erişim sorunsuz açıldı. En sonunda doğru adrese ulaştım und size de tüm detayları aktarmak istedim, güncel bilgilere buradan bakabilirsiniz: 1xbet türkiye [url=http://www.1xbet-81.com]1xbet türkiye[/url]. Şimdi size kısaca özet geçeyim — spor bahislerinde iddialı olanlar burayı bilir.
Hiçbir sorun yaşamadım şu ana kadar. İşin doğrusunu söylemek gerekirse — başka yerde vakit kaybetmeyin yani. Umarım siz de memnun kalırsınız…
Will be sharing this with a couple of people who care about the topic, and a stop at forestmeadowcommercegallery added more material worth passing along, the kind of site that is generous with quality content and does not make you jump through hoops to access it which is appreciated more than the team probably realises.
22bet обзор и отзывы [url=http://www.cinemania.forum24.ru/?1-15-0-00002278-000-0-0]22bet обзор и отзывы[/url]
Now planning to come back when I have the right kind of attention to read carefully, and a stop at progressactivator reinforced that plan, choosing the right moment to read certain content is a quiet form of respect for the work and this site is generating those careful planning behaviours from me consistently as a reader.
Speaking from the perspective of a fairly demanding reader the writing here clears the bar consistently, and a look at carobhopper continued clearing that bar, the calibration of demanding reader is something I apply to all sources and this site has been one of the few that handles the demanding reading well across pieces sampled.
Skipped to a specific section because I knew that was the question I had, and the answer was clean, and a stop at claritytrack similarly delivered targeted answers without burying them, content engineered for readers who arrive with specific needs rather than open ended browsing is increasingly valuable in a search heavy reading environment.
Generally I bookmark sparingly to avoid building up a bookmark graveyard but this one earned a permanent slot, and a stop at growtharchitect extended that permanence designation, the few sites I keep permanent bookmarks for are sites I expect to use repeatedly and this one has clearly cleared that expectation bar today.
Picked up on several small touches that suggest a careful editor, and a look at forwardmotiondaily suggested the same hand at work across the broader site, editorial consistency at a granular level is one of the strongest signs that an operation is serious rather than just hobbyist and this site reads as serious throughout.
Beats most of the alternatives on the topic by a noticeable margin, and a look at aviarybuckle did not change that at all, this is one of the better corners of the open internet for this kind of content and I am glad I clicked through rather than skipping past quickly like I usually do.
Appreciate the practical examples, they made the abstract points easier to grasp, and a stop at directionalthinking added more of the same, this site clearly understands that real examples beat empty theory every single time which is the mark of a writer who knows their audience well and respects their time.
More substantial than most of what I find searching for this topic online, and a stop at gladeridgemarketparlor kept that quality consistent, this is one of those sites where the writing actually rewards careful reading rather than punishing the patient reader with empty filler stretched out across long paragraphs that say very little.
разбор видов ставок [url=forumsilverstars.forum24.ru/?1-17-0-00000367-000-0-0]разбор видов ставок[/url]
приложение DBBET на Android [url=www.ashapiter0.forum24.ru/?1-11-0-00000445-000-0-0]приложение DBBET на Android[/url]
Action tips: שירותי ליווי בישראל
Looking forward to seeing what gets published next month, and a look at claritymotionlab extended that anticipation across the broader site, finding myself looking forward to a sites future content rather than just consuming its existing content is a stronger commitment level than I usually reach with new finds and this site triggered that.
Uzun süredir bahis platformu araştırıyorum valla. Sürekli adres değişiyor derler ya işte o hesap. Sonunda tüm teknik detayları inceleyip sistemi test ettim. En sonunda doğru adrese ulaştım ve size de tüm detayları aktarmak istedim, güncel bilgilere buradan bakabilirsiniz: 1xbet spor bahislerinin adresi [url=http://1xbet-78.com]1xbet spor bahislerinin adresi[/url]. Valla bak net söyleyeyim — casino oyunlarına meraklıysanız burası tam size göre.
Hiçbir sıkıntı yaşamadım şu ana kadar. İşin doğrusunu söylemek gerekirse — en güvendiğim adres burası oldu artık. Şimdiden iyi şanslar ve bol kazançlar…
One of the more thoughtful posts I have read recently on this topic, and a stop at focusbuildsmomentum added even more weight to that impression, this is genuinely good content that holds its own against far better known sites in the same space without trying to imitate any of them at all which I appreciate.
I learned more from this short post than from longer articles I read earlier today, and a stop at directionalprocess added even more useful detail without going off topic, this site clearly knows how to keep things focused without sacrificing depth which is a hard balance to strike for any writer.
mostbet slot o‘yinlar [url=www.mostbet94259.help]mostbet slot o‘yinlar[/url]
Reading this in a relaxed evening setting was a small pleasure, and a stop at forwardexecutionpath extended the pleasant evening reading, content that fits the tone of relaxed time without becoming forgettable is what I look for in evening reading and this site has the right tone for that particular slot in my daily reading routine.
Quietly the post solved something I had been turning over without quite knowing how to phrase the question, and a look at dunebuckle extended that quiet solving, content that addresses unformulated needs is content with reader insight and this site has demonstrated that insight at a high rate across the pieces I have read recently.
Good clean post, no errors and no awkward phrasing that breaks the reading flow, and a stop at chaletcobra kept the same standard, definitely the kind of editorial care that earns a return visit because it tells me the writer is paying attention to details that matter to readers rather than just rushing publication.
Different in a good way from the cookie cutter content that fills most blogs covering this area, and a stop at fernharborvendorlounge kept showing me why, original thoughtful writing exists if you know where to look and this site has earned a place on my short list of those rare exceptions worth defending.
Worth saying that the post fit naturally into a rhythm of careful reading, and a stop at dingoholly extended the same rhythm, content that pairs well with how I actually read rather than demanding a different mode is content well calibrated to its likely audience and this site has clearly thought about that consistently.
comment déposer sur melbet [url=www.melbet79845.help]www.melbet79845.help[/url]
Without comparing too aggressively to other sources this one stands out for the right reasons, and a look at progressgrid continued that distinctive quality, content that distinguishes itself through substance rather than style tricks is content with lasting differentiation and this site has clearly chosen substance based differentiation as its core editorial strategy.
The post made the topic feel approachable without making it feel trivial, that is a fine balance, and a stop at growthwithstrategy maintained the same balance, finding the middle ground between welcoming and serious is genuinely difficult and the writers here have clearly figured out how to consistently hit it well across many different posts.
Фонбет Ставки на спорт
pin-up crash o‘yini [url=https://pinup38399.help/]https://pinup38399.help/[/url]
mostbet casino slots [url=https://mostbet94259.help]https://mostbet94259.help[/url]
Now noticing the careful balance the post struck between confidence and humility, and a stop at strategyhub maintained the same balance, finding the line between asserting and admitting is hard and this site has clearly developed the calibration to walk that line consistently which produces a more persuasive reading experience for me.
Telefonuma güncel sürümü yüklemek istiyordum açıkçası. Apk dosyasını nereden indireceğimi bulamadım bir türlü. Adımları doğru sırayla uyguladıktan sonra erişim sorunsuz açıldı. En sonunda sağlam bir kaynağa ulaştım ve size de tüm detayları aktarmak istedim, güncel bilgilere buradan bakabilirsiniz: 1xbet mobii [url=1xbet-indir-4.com]1xbet mobii[/url]. Şimdi size kısaca özet geçeyim — son sürümü bütün eksikleri kapatmış resmen.
Hiçbir sıkıntı yaşamadım indirme aşamasında. Birçok platform denedim ama en iyisi bu çıktı — en kullanışlı uygulama bu oldu artık. Umarım siz de memnun kalırsınız…
Reading this in a relaxed evening setting was a small pleasure, and a stop at frostrivercommercegallery extended the pleasant evening reading, content that fits the tone of relaxed time without becoming forgettable is what I look for in evening reading and this site has the right tone for that particular slot in my daily reading routine.
melbet site officiel côte divoire [url=http://melbet79845.help]http://melbet79845.help[/url]
aviator sənəd təsdiqi [url=aviator16053.help]aviator sənəd təsdiqi[/url]
Reading this triggered a small change in how I think about the topic going forward, and a stop at growthdirection reinforced that subtle shift, the rare content that actually moves my thinking rather than just confirming or filling it is the kind I most value and this site is providing that kind of impact today.
Reading this prompted me to clean up some old notes related to the topic, and a stop at berrycovemarkethouse extended that organising urge, content that triggers personal organisation rather than just consuming attention is content with motivating energy and this site has the kind of clarity that prompts active follow up rather than passive consumption.
Found the use of subheadings really helpful for scanning back through the post later, and a stop at calicobanyan kept that reader friendly approach going, navigation is something many blog writers ignore but small structural choices make a noticeable difference for someone returning to find a specific point again days or weeks later.
pinup depozit komissiya [url=https://pinup38399.help]https://pinup38399.help[/url]
Definitely a recommend from me, anyone curious about the topic should check this out, and a look at harborstonevendorhall adds even more reason for that, the depth and quality combine to make this site one I will be pointing people toward whenever similar conversations come up over the months ahead at work or socially.
Comfortable reading experience throughout, no jarring tone shifts and no awkward formatting, and a look at progressneedsclarity kept that smooth feel going, the kind of editorial polish that goes unnoticed when present but glaring when absent is something this site has clearly invested in across the broader content as well which deserves recognition.
A piece that read as the work of someone who reads carefully themselves, and a look at visiontrigger continued that informed feel, writers who are also serious readers produce work with a different quality and this site reads as the product of someone steeped in good writing rather than just generating content for an audience.
Without comparing too aggressively to other sources this one stands out for the right reasons, and a look at bisonbatik continued that distinctive quality, content that distinguishes itself through substance rather than style tricks is content with lasting differentiation and this site has clearly chosen substance based differentiation as its core editorial strategy.
Appreciated the way each section connected smoothly to the next without abrupt jumps, and a stop at rubyorchardmerchantgallery kept that flow going nicely, transitions are something most blog writers ignore but the difference is huge for the reader who is trying to follow a sustained line of thought today across many different topics.
Decent post that improved my afternoon a small amount, and a look at longledge added a bit more to that, sometimes the small wins online add up over time and a useful site like this one is the kind of place that contributes consistently to those small wins for me lately across many different topics I follow.
1win как скачать [url=http://1win31794.help/]http://1win31794.help/[/url]
aviator मल्टीप्लायर गेम [url=https://aviator17492.help/]https://aviator17492.help/[/url]
mostbet aviator statistika [url=mostbet48518.help]mostbet aviator statistika[/url]
Now realising the post has been quietly doing important work in my mind for the past hour, and a stop at moonharborvendorlounge extended that quiet processing, content that continues to do work after I close the tab is content with afterlife in the mind and this site is producing those long lived effects at a meaningful rate.
Closed my email tab so I could read this without interruption, and a stop at momentumthroughdirection earned the same protected attention, when content is good enough to defend against the usual digital distractions you know it deserves better than the half attention most online reading gets in a typical busy day.
Reading this in three sittings because the day was fragmented, and the piece survived the fragmentation, and a stop at explorebetterthinking held up under similar reading conditions, content engineered for continuous attention is fragile in modern conditions and this site reads as durable across the realistic ways people consume content today.
Now realising the topic deserved better treatment than it has been getting elsewhere, and a look at ideamapper extended that broader recognition, content that exposes the gap between actual quality and average quality elsewhere is doing the quiet work of raising standards and this site is contributing to that elevation in its own corner.
My usual pattern is to skim and bounce but this site has reset that pattern temporarily, and a stop at intentionalforwardsteps maintained the slower reading mode, content that changes how I read is content with structural influence and this site has clearly nudged my reading behaviour toward something better at least for the duration of these visits.
Honestly this was the highlight of my reading queue today, and a look at duneelfin extended that across more pages I will return to, ranking what I read against what else I read each day is something I do informally and this site keeps moving up in those rankings the more I explore it.
Now setting up a small reminder to revisit the site on a slow day, and a stop at forwardthinkingpath confirmed the reminder was a good idea, planning return visits is a small organisational act that signals trust in ongoing quality and this site has earned that planned return through consistent performance across the pieces I have read so far.
A particular pleasure to read this with a fresh coffee, and a look at builddirectionfirst extended the pleasure across more pages, content that pairs well with quiet morning rituals is something I have come to value highly and this site has the kind of energy that fits naturally into a calm reading routine.
девушки Луганск ТГ Девушки ДНР — это удивительные люди, которые ждут именно вашего сообщения, чтобы начать диалог. Откройтесь навстречу новым знакомствам и почувствуйте, как меняется ваш мир.
Felt like I was reading something written by someone who actually thinks about the topic rather than reciting it, and a look at progressarchitecture reinforced that impression, the difference between recited content and considered content is huge and this site clearly belongs to the latter category which I appreciate as a careful reader looking for substance.
Closed the tab feeling I had spent the time well, and a stop at chimneycargo extended that feeling across more pages, the test of whether time on a site was well spent is one I apply silently after closing tabs and very few sites pass it but this one passed it cleanly today afternoon clearly.
The headings made navigating the post simple even when I needed to find a specific section quickly, and a look at actionblueprint continued the same thoughtful structure, small details like clear headings show that someone is actually thinking about how the reader uses the page rather than just filling it for length alone.
More original than the recycled takes I keep finding on the topic elsewhere, and a quick look at ivoryharborvendorparlor confirmed it, the kind of site that has its own voice rather than echoing whatever is trending which makes it stand out as a refreshing change from the usual rotation of generic content I see daily.
Excellent post, balanced and well organised without showing off, and a stop at dragonebony continued in that same vein, this site has clearly figured out the formula for content that works for readers rather than for search engine ranking signals which is harder than it sounds today and worth real recognition from anyone.
бесплатные ставки рейтинг капперов
Started reading expecting to disagree and ended mostly nodding along, and a look at clarityoverconfusion continued the pattern, content that wins agreement through evidence and reasoning rather than rhetorical force is the kind that actually shifts minds and this site clearly knows how to do that across what I have read so far.
Generally I do not leave comments but this post merits a small note, and a stop at bisonfudge extended that comment worthy quality, the urge to actively contribute to a sites community rather than passively consume from it is something specific content provokes and this site has provoked that engagement urge from me today.
Glad to have another reliable bookmark for this topic, and a look at strategymap suggested several more pages I will be marking too, building a personal library of trustworthy resources is one of the actual rewards of careful browsing and this site is earning a place on my permanent shortlist for the topic.
Took my time with this rather than rushing because the writing rewards attention, and after momentumcoordination I had even more to absorb, the kind of content that pays back the patient reader rather than punishing them with empty filler is something I look for and rarely find in regular searches lately.
проверенные букмекеры с лицензией [url=rodoslav.forum24.ru/?1-4-0-00002251-000-0-0]проверенные букмекеры с лицензией[/url]
Worth saying this site reads better than most paid newsletters I have tried, and a stop at growthsynthesis confirmed that comparison, the bar for free content is often lower than for paid but this site clears the paid bar consistently and that says something about the editorial approach behind the work being published here regularly.
Different feel from the algorithmically optimised posts that dominate the topic, and a stop at calicocameo reinforced that human touch, you can tell when a site is being run by someone who reads what they publish versus someone just hitting submit and moving on quickly to the next assignment without checking the result.
Now noticing the post fit a particular gap in my reading without my having articulated the gap before, and a look at longload extended that gap filling effect, content that meets needs I had not consciously formulated is content with reader insight and this site has clearly developed that anticipatory editorial sense across many pieces.
aviator MasterCard çıxarış [url=aviator16053.help]aviator16053.help[/url]
mostbet приложение для ставок [url=https://assa0.myqip.ru/?1-4-0-00009957-000-0-0]mostbet приложение для ставок[/url]
The depth of coverage felt about right for the format, neither shallow nor overwhelming, and a look at juniperharbormarkethall kept that calibration going, getting the depth right for blog format is genuinely difficult because too shallow loses experts and too deep loses beginners but this site nailed it nicely which I really do appreciate.
aviator apk necə yükləmək [url=http://aviator16053.help]aviator apk necə yükləmək[/url]
A small editorial detail caught my attention, the way headings related to body text, and a look at forwardpathway maintained that careful relationship, structural details like that show up to readers who notice them and the writers here have clearly thought about every level of the piece rather than just the words.
Probably this is one of the better quiet successes on the open web at the moment, and a look at momentumthroughdirection reinforced that quiet success quality, sites that are doing well without making a noise about doing well are the sites I most respect and this one has clearly chosen the quiet success path consistently throughout.
Time spent here today felt productive in the way that good reading sessions sometimes do, and a stop at nextstepnavigator extended that productive feeling across the rest of the morning, the difference between productive reading and merely passing time is real and this site is consistently on the productive side for me lately.
A piece that exhibited the kind of patience that good writing requires, and a look at aviaryelder continued that patient quality, hurried writing is easy to spot and this site reads as having been written without time pressure which produces a different feel than the rushed content that dominates much of the modern blog space.
Will be coming back to this for sure, too much good content to absorb in one sitting, and a stop at intentionalvector only added more pages I want to dig through, this site is going onto my regular rotation list because it consistently delivers something worth the visit lately rather than empty filler.
A piece that brought a sense of order to a topic I had been finding chaotic, and a look at eagleelder continued that organising effect, content that imposes useful structure on messy subjects is doing genuine intellectual work and this site is providing that organisational function across multiple posts I have read recently here.
Most of the time I feel the open web is in decline and then I find a site like this, and a stop at claritydrivengrowth reinforced that mood lift, the cumulative effect of finding occasional excellent independent content versus the cumulative effect of finding mostly mediocre content is real for the long term reader maintaining web habits today.
22bet вход в аккаунт [url=www.cinemania.forum24.ru/?1-15-0-00002278-000-0-0]22bet вход в аккаунт[/url]
Now feeling the post has earned a proper recommendation rather than a casual mention, and a stop at snowharborcommercegallery reinforced the recommendation strength, the difference between mentioning and recommending is a small editorial distinction I observe in my own conversations and this site has earned the upgraded recommendation level from me confidently today.
приложение DBBET на Android [url=admiralshow.forum24.ru/?1-3-0-00000156-000-0-0]приложение DBBET на Android[/url]
Now feeling that this site is the kind I want to make sure does not disappear, and a look at claritysystems reinforced that quiet protective feeling, the rare sites whose disappearance would actually matter to me are the sites I want to support through return visits and recommendations and this one has joined that small protected list.
Honest take is that I will probably forget most of what I read online today but this post is one I will remember, and a stop at lemonlarkvendorparlor kept that same memorable quality going, certain writing leaves a residue in the mind in a way most content simply does not manage.
My issues have been very similar, with my family. But, we made some different decisions. It’s complex.
база знаний по ставкам [url=www.forumsilverstars.forum24.ru/?1-17-0-00000367-000-0-0]база знаний по ставкам[/url]
aviator विड्रॉ कैसे करें [url=www.aviator17492.help]aviator विड्रॉ कैसे करें[/url]
mostbet 404 xato [url=http://mostbet48518.help/]mostbet 404 xato[/url]
1вин зарегистрироваться [url=www.1win31794.help]1вин зарегистрироваться[/url]
melbet tutoriel aviator [url=https://melbet79845.help/]https://melbet79845.help/[/url]
mostbet aviator Oʻzbekiston [url=mostbet94259.help]mostbet94259.help[/url]
Reading this prompted me to dig into a related topic later, and a stop at bisonholly provided some of the starting points for that follow up reading, content that triggers further exploration rather than satisfying curiosity completely is content with real generative energy and this site has plenty of that energy throughout it.
Just wanted to say this was useful and leave a small note of thanks, and a quick visit to momentumworks earned a similar nod from me, the small acknowledgements add up over time and represent the real economy of trust that good content runs on across the open and increasingly fragmented modern internet.
Felt no urge to argue with the conclusions even though I started the post slightly skeptical, and a look at berryharborvendorroom maintained that pattern, writing that earns agreement through clarity of argument rather than rhetorical pressure is the kind I find most persuasive and the kind I want to read more of these days.
Felt the post had been written without using a single buzzword, and a look at clarityguidesaction continued that clean vocabulary, content free of jargon and trendy phrases reads better and ages better and this site has clearly committed to a vocabulary that will not feel dated in three years which is impressive editorially.
pinup aviator pul yechish [url=https://www.pinup38399.help]https://www.pinup38399.help[/url]
A piece that did not require external context to follow, and a look at citrinefjord maintained the same self contained quality, content that stands alone without forcing readers to chase prerequisites is more accessible and this site has clearly thought about how each piece can serve a fresh visitor rather than only existing members.
Now recognising the editorial wisdom of letting some questions remain open at the end, and a look at lotusnorth continued that intellectual honesty, content that does not force closure on contested questions is content that respects the limits of knowledge and this site has clearly developed the maturity to know when to leave space.
mostbet rasmiy sayt ozbekiston [url=www.mostbet48518.help]www.mostbet48518.help[/url]
1win элсом депозит [url=1win31794.help]1win31794.help[/url]
aviator प्रेडिक्शन ट्रिक [url=www.aviator17492.help]www.aviator17492.help[/url]
A handful of memorable phrases from this one I will probably use later, and a look at ideamotion added a couple more, content that contributes language to my own communication rather than just facts is content with a different kind of utility and this site is providing that linguistic utility consistently across what I read.
If I had encountered this site five years ago I would have been telling everyone about it, and a look at progresslogic extended that retrospective enthusiasm, the version of me who used to recommend favourite blogs frequently would have made sure friends knew about this one and that earlier enthusiasm is partially returning to me here.
A particular pleasure to read this with a fresh coffee, and a look at calicocopper extended the pleasure across more pages, content that pairs well with quiet morning rituals is something I have come to value highly and this site has the kind of energy that fits naturally into a calm reading routine.
Reading this with a fresh mind in the morning brought out details I might have missed in the afternoon, and a stop at directionalplanninglab earned the same fresh attention, content that rewards being read at full attention rather than at energy lows is content with real density and this site has that density consistently.
Recommend this to anyone who values clear thinking over flashy presentation, and a stop at progressoverperfection continued in the same understated way, this site has its priorities in the right place which makes it worth supporting through repeat visits and recommendations rather than just one passing read today before moving on quickly elsewhere.
Denemek isteyen arkadaşlara hep soruyorum. Herkes farklı bir şey söylüyor kafam karıştı. Adımları doğru sırayla uyguladıktan sonra erişim sorunsuz açıldı. En sonunda doğru adrese ulaştım ve size de tüm detayları aktarmak istedim, güncel bilgilere buradan bakabilirsiniz: one x bet [url=1xbet-78.com]one x bet[/url]. Yani anlatmak istediğim şu — casino oyunlarına meraklıysanız burası tam size göre.
Hiçbir sıkıntı yaşamadım şu ana kadar. İşin doğrusunu söylemek gerekirse — başka yerde vakit kaybetmeyin yani. Herkese hayırlı olsun…
One of the more honest takes on the topic I have seen lately, no spin and no oversell, and a stop at momentumoptimization kept that going, the kind of voice the open web could use a lot more of rather than the endless echo chamber of recycled opinions floating around every social platform these days.
Thanks for not padding this with the usual filler intros and outros that every other blog seems to require, and a quick visit to ebonycanyon continued that lean approach across more posts, content stripped of waste is content that respects you and I will always come back to that kind of approach.
https://www.egyptnews.net/newsr/15862
Without comparing too aggressively to other sources this one stands out for the right reasons, and a look at claritydrivesexecution continued that distinctive quality, content that distinguishes itself through substance rather than style tricks is content with lasting differentiation and this site has clearly chosen substance based differentiation as its core editorial strategy.
Got pulled in by the headline and stayed because the content actually delivered on the promise, and a stop at linenmeadowmarkethall kept that trust intact, when a site lives up to its own framing it earns the right to keep showing up in my browser tabs going forward indefinitely from here on out really.
very good post, i certainly love this web site, keep on it
Thank you for the genuine effort here, it shows in every paragraph and not just the headline, and after my visit to directionalguidance I was sure this site cares about getting things right rather than chasing clicks, which is the main reason I will come back later this week to read more.
Really like the way the post resists reaching for cliches that would have made it feel generic, and a quick visit to strategyactivation kept that fresh feel going, original phrasing and unexpected metaphors are signs that the writer is actually thinking rather than just stitching together familiar phrases into the appearance of content.
топ бк [url=https://bukmekerskie-kontory-mira.carrd.co/]топ бк[/url]
Honestly the simplicity is what makes this work, the topic is not buried under filler words or overly complex examples, and a quick look at findyourcorepurpose showed the same sensible style, I left with what I came for and no headache from over reading which is a real win these days.
megapari букмекер [url=http://megapari.jimdosite.com]megapari букмекер[/url]
Bookmark folder created specifically for this site, and a look at nightfalltradehouse confirmed the dedicated folder was the right call, dedicated folders for individual sites are a level of organisation I rarely deploy and this site has earned that level of dedicated tracking based on the consistency I have seen so far across sessions.
aviator ios endir [url=https://aviator16053.help]aviator ios endir[/url]
Glad the writer did not feel compelled to cover every possible angle of the topic, focus is a virtue, and a stop at bitternarbor reflected the same disciplined scope, knowing what to leave out is half of what makes good writing good and this post has clearly been edited with that principle in mind.
Probably the best thing I have read on this topic in the past month, and a stop at progressflowing extended that ranking, the casual ranking of recent reading is informal but real and this site has been winning those rankings for me on this topic specifically over the last several weeks of regular reading sessions.
Знакомства Луганск ТГ Девушки Донецк ТГ ждут тех, кто готов подарить им внимание, заботу и интересные темы для разговора. Станьте тем, с кем им захочется провести вечер, просто начав переписку сегодня.
The structure of the post made it easy to follow without losing track of where I was, and a look at awningalmond kept the same logical flow going, this site clearly understands that organisation is half the battle in keeping readers engaged from the first line to the last across any kind of post.
A piece that handled a controversial angle without becoming heated, and a look at lotusosprey continued that calm engagement, content that can address contested topics without inflaming them is doing rare diplomatic work and this site has clearly developed the editorial maturity to handle sensitive material with the appropriate temperature of writing throughout.
Mobil bahis uygulaması arıyordum uzun süredir. Apk dosyasını nereden indireceğimi bulamadım bir türlü. Sonunda tüm teknik detayları inceleyip sistemi test ettim. En sonunda sağlam bir kaynağa ulaştım ve size de tüm detayları aktarmak istedim, güncel bilgilere buradan bakabilirsiniz: 1xbet indir tr canli bahis site [url=www.1xbet-indir-4.com]1xbet indir tr canli bahis site[/url]. Valla bak net söyleyeyim — son sürümü bütün eksikleri kapatmış resmen.
Hiçbir sıkıntı yaşamadım indirme aşamasında. Birçok platform denedim ama en iyisi bu çıktı — başka yerde vakit kaybetmeyin yani. Umarım siz de memnun kalırsınız…
Now appreciating that the post did not require me to agree with the writer to find it valuable, and a look at berrycovemarketgallery maintained the same useful regardless of agreement quality, content that informs even when it does not convince is content with broader utility and this site reads as useful even when I disagree.
ставки лайв каппер
Refreshing tone compared to the dry corporate posts on similar topics, and a stop at strategyplanninghub carried that personality through nicely, you can tell when a real person is behind the writing versus a content team chasing metrics and this site definitely falls into the former category clearly across what I have seen.
Took longer than expected to finish because I kept stopping to think, and a stop at actionwithclarity did the same to me, content that provokes thought rather than just delivering information is in a different category and the team here is clearly working at that higher level rather than just cranking out posts.
Probably one of the more reliable sources I have found for this kind of careful coverage, and a look at progressalignment reinforced the reliability, the small group of sources I would describe as reliable for a given topic is curated carefully and this site has earned a place in that small group through consistent performance.
This stands out compared to similar posts I have read recently, less noise and more substance, and a look at ideaflowpath kept that gap going, you can really feel the difference between content made by someone who cares versus content made to fill a publishing schedule for an algorithm trying to keep growing somehow.
рейтинг лучших БК для ставок [url=http://rodoslav.forum24.ru/?1-4-0-00002251-000-0-0]рейтинг лучших БК для ставок[/url]
Started forming counter examples to test the claims and the post handled most of them implicitly, and a look at cloverdahlia continued that anticipatory style, writers who think two steps ahead of the critical reader save themselves from a lot of follow up work and this writer has clearly internalised that habit consistently.
Closed it feeling I had taken something away rather than just consumed something, and a stop at strategyworkflow extended that taking away feeling, the difference between content I extract value from and content I just pass through is something I track informally and this site is consistently in the value extraction column for me.
Bookmark earned and shared the link with one specific person who would care, and a look at nightorchardtradeparlor got the same targeted share, sharing carefully rather than broadcasting is a discipline I try to maintain and this site is generating shares from me at a sustainable rate rather than the spam rate of viral content.
Solid value for anyone willing to read carefully, and a look at progressmotion extends that value across the rest of the site, this is the kind of place that rewards return visits rather than offering everything in a single splashy post and then leaving readers nothing to come back for later which is unfortunately common.
Bookmark earned, share earned, return visit earned, all from one reading session, and a look at elderbeetle did the same, the trifecta of bookmark and share and return is rare in a single visit and represents the highest level of engagement I tend to offer any piece of online content these days here.
mostbet бонус за регистрацию [url=http://www.cah.forum24.ru/?1-9-0-00000040-000-0-0]mostbet бонус за регистрацию[/url]
Felt the post had been written without looking over its shoulder, and a look at calicofalcon continued that confident posture, content written for its own sake rather than against imagined critics has a different quality and this site reads as written from a place of confidence rather than defensive justification of every claim.
Glad to have another reliable bookmark for this topic, and a look at visionprogression suggested several more pages I will be marking too, building a personal library of trustworthy resources is one of the actual rewards of careful browsing and this site is earning a place on my permanent shortlist for the topic.
Skipped to a specific section because I knew that was the question I had, and the answer was clean, and a stop at growthneedsfocus similarly delivered targeted answers without burying them, content engineered for readers who arrive with specific needs rather than open ended browsing is increasingly valuable in a search heavy reading environment.
megapari букмекер [url=www.nl-template-basis-17798885544895.onepage.website]megapari букмекер[/url]
A piece that did not require external context to follow, and a look at clarityworkflow maintained the same self contained quality, content that stands alone without forcing readers to chase prerequisites is more accessible and this site has clearly thought about how each piece can serve a fresh visitor rather than only existing members.
Just nice to read something that does not feel like it was assembled from a content brief, and a stop at borealbarley kept that handcrafted feel going, you can tell when a real human with real understanding is behind the words versus a templated piece churned out for an algorithm to find.
Glad to have another data point on a question I am still thinking through, and a look at directionalfocuslab added two more, content that acknowledges its place in a wider conversation rather than pretending to settle the question alone is intellectually honest in a way that I wish was more common across the open web.
смм накрутка [url=https://smm-nakrutka1.ru]https://smm-nakrutka1.ru[/url]
Thanks for sharing this with the open internet rather than locking it behind a paywall like so many sites do now, and a stop at cloverharborvendorparlor kept the same vibe going, generous helpful and clearly written by someone who actually wants people to learn from it rather than just charge them.
[url=https://shumoizolyaciya-avto-00.ru]шумоизоляция авто[/url]
My friends would appreciate a few of these posts and I will be sending links accordingly, and a look at loudmark added more pages to my share queue, content that earns shares to specific people in specific contexts is content with social utility and this site is generating those targeted shares from me consistently lately.
mostbet hisobni tiklash [url=https://mostbet48518.help]https://mostbet48518.help[/url]
1win MasterCard вывод [url=1win31794.help]1win MasterCard вывод[/url]
A clear cut above the usual noise on the subject, and a look at actionbuildsresults only made that gap wider in my view, the kind of place that earns its visitors through quality rather than through aggressive marketing or sponsored placements which is increasingly the only way most sites stay afloat across the modern web.
Worth flagging this site to a few specific friends who would appreciate the editorial sensibility, and a look at progressnavigation added more pages I will mention to them, recommending sites to specific people requires understanding both the site and the person and this site is making those personalised recommendations easy and natural for me.
ставки в максе Ставки на спорт
Thanks for the clean writing, no broken sentences and no awkward translations like some other sites have, and a quick stop at ideaforward kept that polish going nicely, it really does make a difference when a reader can move through a page without tripping on every line or going back to reread.
A piece that reads like it was written for me without claiming to be written for me, and a look at focusnavigator produced the same fit, when the writer audience match clicks naturally without being engineered through demographic targeting you know the writing is solid and this site has that natural fit consistently for me.
22bet вывод средств [url=https://cinemania.forum24.ru/?1-15-0-00002278-000-0-0]22bet вывод средств[/url]
полезные материалы по беттингу [url=http://rc.forum24.ru/?1-0-0-00000337-000-0-0]полезные материалы по беттингу[/url]
My reading list is short and selective and this site is now on it, and a stop at quartzmeadowmarketgallery confirmed the placement, the short list of sites I read deliberately rather than encounter accidentally is something I curate carefully and adding to it is a real act of trust which this site has earned today.
1win бк [url=cont.ws/@kekswin365/3291344]1win бк[/url]
https://bdg.by/news/kulturnaia-zhizn/promokod-1xbet-pri-registracii-bonus-130
Bookmark earned and folder updated to track this site separately, and a look at claritylane confirmed the folder upgrade was the right call, organising my reading list so that good sites do not get lost in a sea of casual bookmarks is something I do more carefully now and this site warranted its own spot.
Solid little post, the kind that does not need to be flashy because the substance is doing the work, and a look at elderchimney kept that quiet confidence going across the site, this is what writing looks like when the writer trusts the content to land on its own without theatrics or unnecessary attention seeking behaviour.
Picked up two new ideas that I expect will come up in conversations this week, and a look at cloverhedge added another, content that arms me with talking points rather than just filling time is the kind that provides ongoing value beyond the moment of reading and this site is generating that kind of ongoing value.
Approaching this with the usual skepticism I bring to new sites and being slowly persuaded, and a stop at bagelcameo continued that gradual persuasion, the careful path from skeptical reader to genuine fan is the only one I trust and this site has walked me along that path through patient consistent quality across pieces.
Skipped the social share buttons but might come back to actually use one later, and a stop at borealberyl extended that share urge, content that triggers genuine sharing impulses rather than performative ones is content that has actually moved me and not many posts in a typical week do that for me actually.
Genuine reaction is that this site clicked with how I like to read, and a look at claritysystem kept that comfortable fit going, sometimes you find a place online whose editorial decisions just align with your preferences and when that happens it is worth recognising and supporting through repeat engagement consistently going forward.
Will recommend this to a couple of friends who have been asking about this exact topic, and after camelchamois I have even more reason to do so, the kind of site that earns word of mouth rather than chasing it through aggressive marketing or paid placements is always a treat to find online.
Useful information presented in a way that does not feel like a sales pitch, that is what I appreciated most, and a stop at forwardthinkingworks was the same, no upsell and no fake urgency just steady content laid out properly for someone trying to actually learn from it rather than just be sold to.
The overall feel of the post was professional without being stuffy, and a look at focuspathway kept that approachable expertise going, finding the right register for technical content is hard but this site has clearly figured out how to sound knowledgeable without slipping into that distant lecturing tone that loses readers in droves every time.
Reading this triggered a small change in how I think about the topic going forward, and a stop at loungeload reinforced that subtle shift, the rare content that actually moves my thinking rather than just confirming or filling it is the kind I most value and this site is providing that kind of impact today.
четвероногий робот Грузовой квадрокоптер — это инновация в доставке, которая делает логистику быстрее, дешевле и независимее от пробок. Автономность полета позволяет эффективно решать задачи снабжения в городских условиях.
Felt the writer respected the topic without being precious about it, and a look at explorefreshstrategies continued that respectful but unfussy treatment, finding the right register for serious topics is hard and this site has clearly figured out how to take the topic seriously while still being readable for casual visitors regularly.
This stands out compared to similar posts I have read recently, less noise and more substance, and a look at actiondrivenclarity kept that gap going, you can really feel the difference between content made by someone who cares versus content made to fill a publishing schedule for an algorithm trying to keep growing somehow.
megapari букмекер [url=www.megapari.mozellosite.com]megapari букмекер[/url]
топ букмекеров [url=http://www.bukmekerskie-kontory-mira.carrd.co/]топ букмекеров[/url]
Felt the post was written for someone like me without explicitly addressing me, and a look at pearlcovemarketgallery produced the same fit, when content lands on its target without pandering you know the writer has done careful audience thinking rather than relying on demographic targeting or interest signals to do the work of editorial decisions.
Appreciated that the writer trusted the reader to follow along without constant restating of earlier points, and a look at rivercovevendorroom continued that respect for the reader, treating an audience as capable adults rather than as people to be hand held through every paragraph is something I notice and value highly across the open internet today.
Now wondering how the writers calibrated the level of detail so well, and a stop at focusdesign continued the same calibration, the right level of detail is one of the harder editorial calls in any piece and this site has clearly developed an instinct for it through what I assume is years of careful practice publicly.
A piece that left me thinking I had been undercaring about the topic, and a look at flintanchor reinforced that mild concern, content that raises the appropriate weight of a subject without being preachy about it is doing important work and this site is providing that gentle elevation of attention for me consistently.
A piece that reads as if the writer trusted readers to fill in obvious gaps, and a look at growthsystem continued that respectful approach, content that does not over explain what the reader can infer is content that respects intelligence and this site has clearly chosen to write to capable readers rather than to the lowest common denominator.
Halfway through I knew I would finish the post, and a stop at gumboacorn also held me through to the end, content that signals its quality early and then sustains it is content with real internal consistency and this site has clearly figured out how to maintain quality from opening sentence through to closing thought.
Picked this up while looking for something else and ended up reading every paragraph because it was actually informative, and after directionalshiftlab I was sure I would come back, that does not happen often when most sites bury the useful parts under endless ads and pop ups today and across most categories online.
Последние обновления: https://ilovehandmade.ru/2009/master-klass-pletenaya-korzina-iz-gazet/
Skipped a meeting reminder to finish the post, and a stop at forwardthinkinghub held me past another reminder, when content beats meetings the writer is doing something extraordinary because meetings have institutional support behind them and yet good writing can still occasionally win that competition for attention which I find heartening today.
Polished and informative without feeling overproduced, that is the sweet spot, and a look at falconcameo hit it again, you can tell when a site has been built with care versus thrown together for the sake of having something to put online and this is clearly the former approach taken by the team.
Quality work here, the post reads cleanly and the points stay focused throughout, and a stop at elfincamel kept the standard high, you can tell the writer cares about the final result rather than just hitting publish for the sake of having something new on the page to feed the search engines.
Solid recommendation from me to anyone working in the area, the perspective here is grounded, and a look at borealelfin adds even more useful angles, the kind of site that becomes a reference rather than just a one time read which is a higher bar than most blogs ever reach today on the modern web.
Excellent execution from start to finish, the post never loses its rhythm and the points stay sharp, and a quick stop at clarityengine kept the same level going, consistency like this across a site is the marker of a serious operation rather than a casual side project running on autopilot somewhere else.
Now recognising the specific pleasure of reading writing that shows real care for sentence shapes, and a look at dawnridgegoodsroom extended that craft pleasure, sentence level writing quality is something most blog content ignores entirely and this site has clearly invested in the prose layer alongside the substance which is rare today.
Generally my attention drifts on long posts but this one held it through the end, and a stop at cobblebadge earned the same sustained focus, content that defeats my drift tendency is content with substantive pulling power and this site has demonstrated that pulling power across multiple pieces in a session that has now run quite long actually.
Felt like the writer was speaking directly to someone with my level of curiosity, neither talking down nor showing off, and a stop at momentumfoundry kept that comfortable matching going, finding writing that meets you where you are rather than asking you to climb up or stoop down feels great every time it happens.
мегапари ставки [url=www.megapari.mozellosite.com]мегапари ставки[/url]
Just sat with this for a bit longer than I usually would because the points are worth thinking about, and after directionpowersmomentum I had even more to chew on, the kind of post that nudges your thinking forward without forcing the issue is something I have always appreciated in good writing online.
If the topic interests you at all this is a place to spend time, and a look at camelcinder reinforced that recommendation, the broader question of where to invest topical reading time is one this site answers convincingly through the consistent quality across multiple pieces I have sampled during the current reading session today.
aviator साइट डाउन [url=www.aviator17492.help]www.aviator17492.help[/url]
Decent post that improved my afternoon a small amount, and a look at loungeneon added a bit more to that, sometimes the small wins online add up over time and a useful site like this one is the kind of place that contributes consistently to those small wins for me lately across many different topics I follow.
установка системы отопления дома цена
Thanks for keeping the writing direct without losing the warmth that makes content feel human, and a stop at focusmovesideas carried both qualities forward, balancing professionalism and personality is a rare skill and the writers here have clearly figured out how to consistently land it across many posts which I notice.
Came away with a slightly better mental model of the topic than I started with, and a stop at focusmomentum sharpened that further, content that improves the reader thinking apparatus rather than just dumping facts into it is the rare kind I genuinely value and seek out when I have time to read carefully.
Beyond the immediate post itself the editorial sensibility behind the site is what struck me, and a stop at rubyorchardtradegallery continued displaying that sensibility, content that reveals editorial choices through accumulated reading is content with structural quality and this site has clearly developed an underlying approach worth identifying through multiple sessions of reading.
бонусы бк [url=https://www.bukmeker-kontor.ucoz.net]бонусы бк[/url]
Подробности на странице: https://perfumemag.ru
Worth recommending broadly to anyone who reads on the topic, and a look at flintbunting only confirms that, the rare combination of accessibility and depth in this site makes it suitable for both newcomers and people who already know the area which is hard to pull off in any blog format today and rarely managed.
Just one of those reads that left me feeling slightly more capable rather than overwhelmed, and a look at focuschannel kept that empowering feel going, the difference between content that builds the reader up and content that intimidates them is huge and this site clearly knows which side of that line to stand.
On reflection this is the kind of writing that improves my taste for what is possible in the format, and a look at balsacougar continued raising that bar, content that elevates my expectations rather than lowering them is doing important work in calibrating my standards and this site is participating in that elevation reliably.
Только что опубликовано: https://spainslov.ru/site/word/word/%D0%9C%D0%90%D0%A7%D0%95%D0%A5%D0%90
However casually I came to this site I have ended up reading carefully, and a look at growthmechanism continued earning that careful reading, the conversion from casual visitor to careful reader is something content earns rather than demands and this site has accomplished that conversion for me over the course of just a few pieces.
Liked the post enough to read it twice and the second read found new things, and a stop at focusactivation similarly rewarded the second look, content with hidden depths that only reveal themselves on careful rereading is the rare kind that earns lasting respect rather than fleeting first impressions only briefly held.
If I had to summarise the editorial sensibility of this site in a few words it would be careful and human, and a look at borealgarnet extended that summary feeling, capturing the essence of a sites approach in brief is hard but this site has a clear enough identity that the summary comes naturally enough.
Decided to read more before commenting and the more I read the more I wanted to say something, and a stop at elfincinder pushed that impulse further, when content provokes the urge to participate rather than just consume it is doing something quite specific and worth recognising clearly when it happens during reading.
Выбор займ на карту без отказа срочно начинается прежде всего с внимательного анализа предложений, и специально для удобства пользователей создан наш информационный сервис. Мы подготовили и ежедневно актуализируем информацию по 35 лицензированным МФО, которые выдают займы в рамках действующего законодательства и предоставляют займы со ставкой не выше 0,8% в день. На одном ресурсе можно изучить сумму, срок, требования к заемщику, условия первого займа и скорость получения денег. После выбора оптимального предложения вы можете оформить займ онлайн на карту и получить до 30 000 рублей очень быстро. Многие компании рассматривают заявки 24/7, а решение по анкете часто приходит в течение нескольких минут. Для оформления обычно достаточно паспорт, банковская карта и возраст от 18 лет.
Reading this prompted a small redirection in something I was working on, and a stop at strategybuilder extended that redirecting influence, content that affects my actual work rather than just my thinking has the highest practical impact and this site is providing that level of influence for me at a sustainable rate apparently.
доставщик еды робот Промышленные роботы — что это, если не залог процветания современного предприятия в конкурентной среде? Они дают возможность производить сложные продукты быстро, надежно и с минимальными затратами труда.
Took a chance on the headline and was rewarded, and a stop at gumbofeather kept the rewards coming as I clicked through, the kind of place where every link leads somewhere worth the click is a small luxury on the modern web where so many sites are mostly empty calories disguised as content.
HairNeva is a well-known Istanbul-based hair restoration clinic offering expertise in FUE, DHI, Sapphire FUE, unshaven hair transplants, beard restoration, and advanced regenerative therapies. Led by European Board-certified plastic surgeon Assoc. Prof. Dr. Guncel Ozturk, the clinic integrates individualized treatment strategies, AI-powered hair analysis, comprehensive medical tourism packages, and extended post-treatment care. HairNeva emphasizes natural outcomes, doctor-led treatments, patient satisfaction, and comprehensive support for international patients.
hair transplant turkey
Spent a few minutes here and came away with a clearer picture of the topic, the writing keeps things simple without dumbing them down, and after a stop at startbuildingclarity the rest of the points lined up neatly which is something I appreciate when I am short on time and need answers fast.
Now saved this in a way that I will actually find again rather than the casual bookmark approach, and a stop at ideaswithdirection earned the same careful saving, organising my reading bookmarks so that high quality sources rise to the top is something I should do more of and this site triggered that organisation today.
1win бк [url=https://vybor-bukmekerskoj-kontory.mystrikingly.com]1win бк[/url]
Honestly enjoyed every minute spent here, that is not something I say lightly, and a look at loungepierce confirmed I will be back, the bar for spending time online is high for me these days but this site clears it without effort which is high praise indeed from this reader who is usually rather demanding.
Solid information that lines up with what I have been hearing from other reliable sources, and after my visit to cobblebuckle I was even more certain of that, this site checks out which is something I value highly when so many places online play loose with the facts to chase a quick click.
Liked how the post handled an objection I was forming as I read, and a stop at fawndahlia similarly anticipated where my thinking was going next, the rare writer who can predict reader concerns and address them in advance is doing something most online content fails to do despite that being basic editorial work.
Just want to flag that this was useful and not bury the appreciation in caveats, and a look at focuspowersmomentum earned the same direct praise, recognising good work without hedging it with criticism is something I try to practice because over qualified compliments tend to read as backhanded and miss the point sometimes.
Taking the time to read carefully here has been worthwhile for the past hour, and a look at silkmeadowvendorroom extended the worthwhile reading, the calculation of return on reading time spent is something I do informally and this site has been producing positive returns across multiple sessions during the last week of regular visits and reads.
Came across this and immediately thought of a friend who would enjoy it, and a stop at pineharbortradehouse also reminded me of someone, content that triggers the urge to share is content that has earned my recommendation and this site has earned multiple from me already across different conversations during the week.
Reading this felt easy in the best way, no friction and no confusion at any point, and a stop at camelferret carried that same comfort across more pages, the kind of editorial flow that lets you absorb information without fighting the format which is increasingly hard to find on the open web today across topics.
Thanks pertaining to discussing the following superb written content on your site. I ran into it on the search engines. I will check back again if you publish extra aricles.
Liked that there was nothing performative about the writing, and a stop at flintcivet continued that genuine quality, performative writing tries to be witnessed rather than read and the difference between performance and substance is huge for the careful reader and this site has clearly chosen substance every time clearly.
Подробности по ссылке: https://mamamia-shop.ru
Современные жилые проекты должны учитывать потребности жителей, и ЖК Aurum Time является примером такого подхода к организации пространства – Аурум Тайм
вызвать электрика срочно услуги электрика в москве недорого
The whole experience of reading this was pleasant from start to finish, no pop ups and no annoying interruptions, and a look at directionalstructure continued that clean experience, technical choices about page design matter for the reader and this site clearly cares about the small details that add up to comfort across multiple visits.
Хочешь клубнику? клубника Альбион свежие, спелые и ароматные ягоды по выгодным ценам. Сезонная клубника от проверенных поставщиков, оптовые и розничные продажи, быстрая доставка по городу и области.
Generally I do not leave comments but this post merits a small note, and a stop at directionalpath extended that comment worthy quality, the urge to actively contribute to a sites community rather than passively consume from it is something specific content provokes and this site has provoked that engagement urge from me today.
Skipped to a specific section because I knew that was the question I had, and the answer was clean, and a stop at strategyalignmenthub similarly delivered targeted answers without burying them, content engineered for readers who arrive with specific needs rather than open ended browsing is increasingly valuable in a search heavy reading environment.
Liked the balance between depth and brevity, never too shallow and never too long, and a stop at brackenglaze kept the same balance going across the rest of the site, this is one of the harder skills in writing and the team here clearly has it figured out very well indeed across every page.
Now sitting with the thoughts the post triggered rather than rushing on to the next thing, and a stop at forwardactivation extended that reflective pause, content that earns time for thought after closing the tab is content of higher value than the merely interesting and this site has clearly produced that lasting effect today.
Learned something from this without having to dig through layers of fluff, and a stop at ideaclarity added a bit more context that helped tie things together for me, definitely a useful corner of the internet for anyone who wants real information without the usual marketing nonsense around it that often ruins similar pages.
Now considering the post as evidence that careful blog writing is still possible, and a look at elfindragon extended that evidence, the broader question of whether the modern web can sustain quality writing has obvious empirical answers in sites like this one and seeing them is reassuring even when they remain a minority overall today.
бк 1вин [url=https://www.dzen.ru/a/ahh73JQALAFYgr4m?share_to=link]бк 1вин[/url]
Now appreciating that the post did not try to imitate any other style I might recognise, and a stop at directionalsystems continued that distinct voice, content with its own register rather than borrowed from elsewhere is content with real authorial presence and this site has clearly developed that presence through what feels like patient editorial work.
Now adjusting my expectations upward for the topic based on this post, and a stop at focusalignment continued that bar raising effect, content that resets what I think is possible on a subject is doing real work in shaping my standards and this site is providing those bar raising experiences at a notable rate during sessions.
Came in skeptical of the angle and left mostly persuaded, and a stop at gingercovegoodsroom pushed me a bit further in the same direction, content that can move a critical reader by argument rather than rhetoric is rare and worth pointing out because it indicates real substance underneath the surface presentation here.
Been there, done that, got the overpriced tow truck receipt. Miami rental game is wild — half these clowns show you a Mercedes online and hand you a busted Charger with mismatched tires. Plus the fine print says you can’t even drive to Orlando. Fool me four times? Not happening. luxury car rental miami florida. any local will tell you the same thing. Coral Gables brunch, South Beach night run, or a spontaneous Everglades detour — AC must be ice cold and unlimited miles. most are just polished turds with Instagram ads. what you book is what you get, period. rates change daily with demand so don’t sleep on it:
mercedes for rent near me [url=https://luxury-car-rental-miami-4.com]https://luxury-car-rental-miami-4.com[/url] Yeah parking in Brickell will cost you a small mortgage — but that’s city life. drive safe and maybe pass on that overpriced roadside assistance add-on.
megapari букмекер [url=megapari.jimdosite.com]megapari букмекер[/url]
БК Мегапари [url=http://www.megapari.mozellosite.com]БК Мегапари[/url]
Reading this confirmed a hunch I had been carrying about the topic without having articulated it, and a stop at gypsyaspen extended the confirmation, content that gives shape to fuzzy intuitions is doing the rare work of making private thoughts public and this site is providing that articulating service consistently for me lately.
Now planning to come back when I have the right kind of attention to read carefully, and a stop at directioncreatesflow reinforced that plan, choosing the right moment to read certain content is a quiet form of respect for the work and this site is generating those careful planning behaviours from me consistently as a reader.
Just wanted to say this was useful and leave a small note of thanks, and a quick visit to silvercovemarkethall earned a similar nod from me, the small acknowledgements add up over time and represent the real economy of trust that good content runs on across the open and increasingly fragmented modern internet.
Ремонт грузовых автомобилей https://minskdiesel.by в Минске? Сервис «Дизель Практик» вернёт технику в строй в кратчайшие сроки! Срочный ремонт, выездная диагностика, запчасти в наличии. Доверьтесь профессионалам с многолетним опытом — надёжность и прозрачность на каждом этапе.
A particular pleasure to read this with a fresh coffee, and a look at intentionalexecution extended the pleasure across more pages, content that pairs well with quiet morning rituals is something I have come to value highly and this site has the kind of energy that fits naturally into a calm reading routine.
нарколог анонимно вызвать врача на дом нарколога
Cuts through the usual marketing fluff that dominates this topic online, and a stop at banyaneagle kept the same clean approach going, this is the kind of writing that respects the reader’s time rather than wasting it on repetitive setups before finally getting to the point at hand which is what most sites do.
Quietly enjoying that I have found a new site to follow for the topic, and a look at flintimpala reinforced the small pleasure of the find, the discovery of new high quality sources is one of the more durable pleasures of careful internet reading and this site has been generating that discovery pleasure at multiple points already today.
Now adjusting my mental list of reliable sites for this topic, and a stop at cobbleiguana reinforced the adjustment, the small ongoing curation work of maintaining trusted sources is one of the actual practical activities of careful reading and this site has earned a permanent place on my list for this particular subject.
A clean read with no irritations, and a look at ideaengineering continued that frictionless quality, the absence of small irritations is something I notice only when present elsewhere and this site is one of the rare places where everything just works and lets me focus on the substance rather than fighting the format.
Portal gier dudespin casino poland to Twój wybór! Spróbuj szczęścia w Dudespin – Twoim kasynie online! Zarejestruj się i wygrywaj – bezpieczeństwo i niezawodność. Dude Spin to Twój przewodnik po świecie hazardu; wygrane i sukces są tylko tutaj! Dudespin Casino to Twój osobisty klub gier. Wykorzystaj w pełni dudespincasino-pl.com – graj mądrze.
More substantial than most of what I find searching for this topic online, and a stop at forwardmovementlab kept that quality consistent, this is one of those sites where the writing actually rewards careful reading rather than punishing the patient reader with empty filler stretched out across long paragraphs that say very little.
медицинские роботы Коллаборативный робот представляет собой идеальное сочетание человеческой гибкости и машинной повторяемости действий. Это решение позволяет предприятиям существенно увеличить темпы выпуска продукции без лишних затрат.
I really like the calm tone here, it does not push anything on the reader, and after I went through cameoaspen I felt the same way, just steady useful content laid out without drama, which is exactly what someone trying to learn something quickly needs to find rather than aggressive marketing.
обзор DBBET [url=www.companion.borda.ru/?1-1-0-00002871-000-0-0]обзор DBBET[/url]
Coming back tomorrow when I can give this a proper read, the post deserves better attention than I can give right now, and a look at brindledingo suggests there is plenty more here that deserves the same treatment, definitely a site I will be exploring properly over the next few days when I can.
нарколог кодирование частный нарколог кодировка
1win дар Истаравшан [url=http://1win52867.help/]http://1win52867.help/[/url]
Even from a single post the editorial care is clear, and a stop at actionoptimizer extended that care across more pages, the kind of attention to quality that shows up in every paragraph is what separates serious sites from the rest and this one has clearly invested in that paragraph level attention across what I have read.
Really clear writing, the kind that makes you want to share the link with someone who has been asking about the topic, and a quick browse through fawnfoxglove only made me more sure of that, the information here stays useful long after the first read is done which says a lot.
Thanks for putting in the work to make this approachable, plenty of sites cover the same ground but most do it badly, and a quick visit to elfinebony confirmed this one stands apart, simple language and useful examples without anyone trying to sell me anything along the way which I really appreciated.
More original than the recycled takes I keep finding on the topic elsewhere, and a quick look at discovernewpossibility confirmed it, the kind of site that has its own voice rather than echoing whatever is trending which makes it stand out as a refreshing change from the usual rotation of generic content I see daily.
mostbet букмекер 2026 [url=http://mostbet33907.online/]mostbet букмекер 2026[/url]
Vague feelings of recognition kept surfacing as I read because the writing names things I have been thinking, and a look at directionalexecution produced more of those recognition moments, content that gives shape to private intuitions is content that makes me feel less alone in my own thinking and this site has that effect.
самые лучшие бк [url=bukmekerskie-kontory.infinityfree.me/]самые лучшие бк[/url]
During a quiet evening reading session this provided just the right depth without being heavy, and a stop at silverharborvendorhall maintained the same evening appropriate weight, content with depth that does not exhaust the reader is content with editorial calibration and this site has clearly figured out how to be substantial without being demanding all the time.
Reading this gave me the rare experience of fully agreeing with all the conclusions, and a stop at plumcovegoodsgallery continued that agreement pattern, content that aligns with my existing views without seeming designed to do so is just content that happens to be reasonable and this site reads as reasonable rather than ideological mostly.
Thanks for the honest framing without exaggerated claims that the topic will change my life, and a stop at momentumdriver kept the same modest tone, restraint in marketing language signals trustworthiness and the writers here are clearly playing the long game by building credibility rather than chasing immediate clicks through hyperbole.
Reading this gave me a small jolt of recognition for an experience I thought was just mine, and a stop at focusactivator produced more such jolts, content that universalises private experiences without flattening them is doing genuinely useful work and this site is providing that recognition function for me reliably across topics I read.
анонимный вызов врача нарколога платный нарколог
нарколог анонимно нарколог на дом круглосуточно
Quietly enjoying that I have found a new site to follow for the topic, and a look at momentumwithintention reinforced the small pleasure of the find, the discovery of new high quality sources is one of the more durable pleasures of careful internet reading and this site has been generating that discovery pleasure at multiple points already today.
A clear cut above the usual noise on the subject, and a look at floretbagel only made that gap wider in my view, the kind of place that earns its visitors through quality rather than through aggressive marketing or sponsored placements which is increasingly the only way most sites stay afloat across the modern web.
Now feeling the post has earned a proper recommendation rather than a casual mention, and a stop at gypsyglider reinforced the recommendation strength, the difference between mentioning and recommending is a small editorial distinction I observe in my own conversations and this site has earned the upgraded recommendation level from me confidently today.
Most of my reading time goes to a small number of trusted sources and this one is now joining that group, and a stop at ideaorchestration reinforced the group membership, the few sites that earn a place in my regular rotation are sites I expect ongoing returns from and this one has earned that elevated position consistently.
A piece that did not require external context to follow, and a look at directionalinsight maintained the same self contained quality, content that stands alone without forcing readers to chase prerequisites is more accessible and this site has clearly thought about how each piece can serve a fresh visitor rather than only existing members.
Adding this to my list of go to references for the topic, and a stop at bronzecrater confirmed the rest of the site deserves the same, definitely the kind of resource that earns its place rather than getting forgotten the moment the next interesting article shows up in my feed somewhere else on the web.
вызов нарколога на дом анонимно вызов нарколога на дом цена
Going to share this with a friend who has been asking the same questions for a while now, and a stop at cobraboulder added a few more pages I will pass along too, this is the kind of generous information that earns a small thank you from me right now and again later this week.
1win promo silindi [url=http://1win71277.help/]http://1win71277.help/[/url]
Thank you for keeping the writing honest and the points easy to verify against your own experience, and a stop at actionoriented reflected the same approach, no exaggeration just steady useful content that I can take with me into my own work without second guessing every sentence I happen to read here.
акции букмекерских контор [url=https://www.sites.google.com/view/bonusy-kontor/]акции букмекерских контор[/url]
However casually I came to this site I have ended up reading carefully, and a look at elfinfennel continued earning that careful reading, the conversion from casual visitor to careful reader is something content earns rather than demands and this site has accomplished that conversion for me over the course of just a few pieces.
Reading this post made me realise I had been settling for lower quality elsewhere, and a look at cameogrouse extended that recalibration, content that exposes how much I had been accepting in adjacent sources is content with calibrating effect on my standards and this site is performing that calibration function across topics for me reliably.
A piece that did not try to be timeless and ended up reading as durable anyway, and a look at lemonridgevendorparlor extended that durable feel, content that stays useful past its publication date without straining for permanence is content that ages well and this site has the kind of evergreen quality that I value highly today.
Reading this between meetings turned out to be the most useful thing I did all afternoon, and a stop at clarityinitiator kept that productivity feeling going, content can sometimes outperform actual work in terms of what gets accomplished mentally and this site managed that today which is genuinely a high bar to clear consistently.
Reading this with my morning coffee turned into reading the related posts with my morning coffee, and a stop at banyangeyser stretched the morning further, content that pulls breakfast into a reading session rather than just accompanying it is content that has earned a higher claim on my attention than the average article does.
Refreshing change from the usual sites covering this topic, no clickbait and no padding, and a stop at skyharborvendorlounge confirmed the difference, this place clearly has its own voice rather than copying the formulas everyone else uses to chase clicks online which is becoming increasingly rare these days across nearly every popular subject.
Reading this slowly to absorb the structure, and the structure is doing real work alongside the words, and a look at progressbyintention maintained the same architectural quality, when sentence shapes and paragraph rhythms reinforce the meaning rather than just transporting words you know you are reading skilled work today.
Great work on keeping things readable, the post never drags or repeats itself which I really appreciate, and a stop at quickridgemarkethouse added a bit more context that fit naturally with what was already said here, no need to read everything twice to get the point being made today.
Came in expecting another generic take and got something with actual character instead, and a look at fawnimpala carried that personality forward, finding a distinct voice on a saturated topic is impressive and worth pointing out when it happens because most sites end up sounding identical to their nearest competitors quickly.
Worth recognising the specific care that went into how this post ended, and a look at fudgebrindle maintained the same careful conclusions, endings are where most blog content falls apart and this site has clearly invested in the closing stretches of its pieces rather than letting them simply trail off when energy fades.
Pass this along to anyone you know dealing with similar questions, the answers here are clear, and a stop at buckledahlia adds even more useful material, this is the kind of resource that deserves to circulate widely rather than getting lost in the constant churn of new content online that buries good work daily.
Denemek isteyen arkadaşlara hep soruyorum. Herkes farklı bir şey söylüyor kafam karıştı. Sonunda tüm teknik detayları inceleyip sistemi test ettim. En sonunda doğru adrese ulaştım ve size de tüm detayları aktarmak istedim, güncel bilgilere buradan bakabilirsiniz: 1xbet üye ol [url=https://1xbet-78.com]1xbet üye ol[/url]. Yani anlatmak istediğim şu — spor bahisleri konusunda iddialı olanlar bilir.
müşteri hizmetleri bile ilgili ve hızlı. Birçok platform denedim ama en iyisi bu çıktı — başka yerde vakit kaybetmeyin yani. Şimdiden iyi şanslar ve bol kazançlar…
Came in expecting another generic take and got something with actual character instead, and a look at directionaldrive carried that personality forward, finding a distinct voice on a saturated topic is impressive and worth pointing out when it happens because most sites end up sounding identical to their nearest competitors quickly.
A particular pleasure to read this with a fresh coffee, and a look at directionalengine extended the pleasure across more pages, content that pairs well with quiet morning rituals is something I have come to value highly and this site has the kind of energy that fits naturally into a calm reading routine.
Thanks for putting in the work to make this approachable, plenty of sites cover the same ground but most do it badly, and a quick visit to progressmomentum confirmed this one stands apart, simple language and useful examples without anyone trying to sell me anything along the way which I really appreciated.
Thanks for not padding this with the usual filler intros and outros that every other blog seems to require, and a quick visit to gypsygourd continued that lean approach across more posts, content stripped of waste is content that respects you and I will always come back to that kind of approach.
Liked that the post landed without needing to manufacture controversy or take a contrarian stance for attention, and a stop at actionmap continued that grounded approach, content that earns attention through quality rather than provocation is the kind that builds long term trust rather than burning it on quick wins.
Now feeling mildly impressed in a way I do not quite remember feeling about a blog in a while, and a stop at elmwoodgumbo extended that mild impression, content that produces specific positive emotional responses rather than just neutral information transfer is content with extra dimensions and this site has those extra dimensions clearly.
The conclusions felt earned rather than tacked on at the end like an afterthought, and a look at cobradamson kept that careful structure going, you can tell when a writer has thought about the shape of their post versus just letting it ramble out and hoping for the best at the end which most do.
Skipped breakfast still reading this and finished hungry but satisfied, and a stop at snowharbortradehall kept me past breakfast time, content that displaces basic biological needs is content with serious attentional pull and the writers here are clearly capable of producing that level of engagement which is genuinely impressive these days.
Been there, done that, got the overpriced tow truck receipt. Swear some of these “luxury” fleets should be in a museum. Plus the fine print says you can’t even drive to Orlando. Fool me four times? Not happening. miami car rental luxury — skip the airport counters entirely. Miami without a decent whip is basically a punishment. Coral Gables brunch, South Beach night run, or a spontaneous Everglades detour — AC must be ice cold and unlimited miles. I’ve tested maybe 25 rental outfits across Dade and Broward. Finally stumbled on one that doesn’t play games. Here’s the only straight-up source for premium wheels in South Florida
miami exotic car rental miami [url=https://luxury-car-rental-miami-4.com]miami exotic car rental miami[/url] also bring polarized shades unless you enjoy driving blind into sunset. Anyway at least there’s one honest rental joint left in this town.
Honestly informative, the writer covers the ground without showing off, and a look at canoebeech reflected the same humility, content that respects the reader rather than trying to dazzle them is something I always appreciate and rarely come across in this corner of the internet today across the topics I usually read.
бк 1вин [url=http://www.vybor-bukmekerskoj-kontory.mystrikingly.com]бк 1вин[/url]
Now feeling slightly more committed to my own careful reading practices having read this, and a stop at claritydrivenprogress reinforced that commitment, content that models the kind of attention it deserves is content that calibrates the reader and this site has clearly raised my own bar for what to bring to good writing today.
melbet descarcare apk android [url=www.melbet42815.help]melbet descarcare apk android[/url]
Now noticing that the post avoided the temptation to be funny in places where humour would have undermined the substance, and a stop at garnetcarbon maintained the same restraint, knowing when to be serious is a rare editorial virtue and this site has clearly developed it through what I assume is careful editorial practice over years.
Liked that there was nothing performative about the writing, and a stop at buntingdingo continued that genuine quality, performative writing tries to be witnessed rather than read and the difference between performance and substance is huge for the careful reader and this site has clearly chosen substance every time clearly.
A piece that exhibited the kind of patience that good writing requires, and a look at solarmeadowmarketparlor continued that patient quality, hurried writing is easy to spot and this site reads as having been written without time pressure which produces a different feel than the rushed content that dominates much of the modern blog space.
Worth recognising that this site does not chase the daily news cycle, and a stop at forwardmotionengine confirmed the longer publication arc, sites that resist the pressure to comment on every passing event are sites with genuine editorial discipline and this one has clearly chosen depth over volume which I respect deeply.
A well calibrated piece that knew its scope and stayed inside it, and a look at barleybuckle maintained the same scope discipline, scope creep is one of the failure modes of long blog posts and this site has clearly invested in the editorial discipline to prevent it which shows up in tightly contained pieces.
Liked how the post handled an objection I was forming as I read, and a stop at ermineattic similarly anticipated where my thinking was going next, the rare writer who can predict reader concerns and address them in advance is doing something most online content fails to do despite that being basic editorial work.
Bookmarking this for later, the kind of resource I want to keep nearby, and a quick look at linenmeadowmarketgallery confirmed the rest of the site is worth the same treatment, definitely going into my reference folder for the next time the topic comes up at work or in conversation with someone who asks.
Highly recommend to anyone looking for a sensible take on this topic without the usual marketing nonsense, and a look at apricotharborcraftcollective kept that grounded approach going, sites that stay focused on serving readers rather than monetising every click are rare and this is clearly one of those rare ones I really appreciate finding.
Decided not to comment because the post said what needed saying, and a stop at momentumlane continued that complete feel, content that does not invite obvious additions or corrections from readers is content that has been carefully considered and this site appears to consistently produce pieces that satisfy rather than provoke unnecessary follow ups.
This stands out compared to similar posts I have read recently, less noise and more substance, and a look at ferretcactus kept that gap going, you can really feel the difference between content made by someone who cares versus content made to fill a publishing schedule for an algorithm trying to keep growing somehow.
Speaking honestly this is among the better discoveries of my recent browsing, and a stop at focusalignmenthub reinforced that discovery quality, the ranking of recent discoveries is informal but meaningful and this site has placed near the top of that ranking based on the consistency of quality across what I have already read carefully.
My reading list is short and selective and this site is now on it, and a stop at harborbatik confirmed the placement, the short list of sites I read deliberately rather than encounter accidentally is something I curate carefully and adding to it is a real act of trust which this site has earned today.
Anyone curious about this topic would do well to start here, the foundation laid is solid, and a stop at buildintentionalprogress would round out their understanding nicely, this is the kind of resource I would point a friend toward without hesitation if they asked me where to begin learning about anything in this area.
NBA standings https://nbi-tabella.hu/ match results, game schedule, and the latest basketball season news. Follow conference standings, player stats, game results, the tournament schedule, and all the important events of the National Basketball Association.
The latest NBA nb1-tabella.hu standings with match results, schedule, and the latest basketball news. Learn about team and player achievements, track standings, explore statistics, and get highlights of the season’s most exciting games.
The 2025/26 Premier League https://premier-league-tabella.hu table, featuring the current standings, points totals, and match results. Follow the battle for the championship, European places, and league status. Game schedules, statistics, matchday overviews, and the latest season data are available.
The way the post stayed on topic throughout without going on tangents was really refreshing, and a look at cocoabasil kept that focused approach going, discipline like this in writing is rare and worth recognising because most writers cannot resist wandering off into related subjects that dilute their main point and confuse readers along the way.
Okay folks gather around because this Miami rental nightmare needs to be discussed. Then you show up and it’s a whole different story. Plus they want a $2000 hold on your debit card. Fool me five times? Actually yeah, Miami keeps fooling everyone. luxury car rental miami fl. ask anyone who’s tried Ubering across the 305 during rush hour. Design District shopping, late-night South Beach cruising, or a spontaneous drive down to Homestead — AC must freeze your teeth and unlimited miles or bust. most are smoke and mirrors with decent SEO. no games, no bait-and-switch, no hidden asterisks. Here’s the only honest broker for premium vehicles across South Florida
luxury vehicle rentals [url=https://luxury-car-rental-miami-5.com]luxury vehicle rentals[/url] Yeah finding parking in Wynwood will test your patience — but that’s not on them. Anyway glad there’s at least one straight shooter left in this rental jungle.
Alright, real talk about the Miami rental game — it’s a straight-up jungle out here. Then you show up at the lot. Plus they freeze $2500 on your card for a week. Eight years in South Florida and these clowns still almost get me. luxury car rental miami florida. anyone who’s waited for an Uber in August understands. leather seats that won’t weld themselves to your thighs in July. most are shiny turds with five-star fake reviews on Google Maps. what you book is what shows up, no surprises, no fine print nightmares. Here’s the only honest source for premium wheels across South Florida
rent cadillac escalade near me [url=https://luxury-car-rental-miami-8.com]rent cadillac escalade near me[/url] Yeah parking in South Beach will cost you a nice bottle of wine — but that’s the Miami tax. Anyway glad there’s at least one straight operator left in this rental circus.
Thanks for keeping the writing direct without losing the warmth that makes content feel human, and a stop at garnetcinder carried both qualities forward, balancing professionalism and personality is a rare skill and the writers here have clearly figured out how to consistently land it across many posts which I notice.
Reading this in the morning set a good tone for the day, and a quick visit to canyonbobcat kept that good tone going, content can do that sometimes when it hits the right notes and finding sites that consistently strike that tone is something I have learned to recognise and reward with regular visits.
Once you find a site like this the search for similar voices begins, and a look at burrowbrandy extended the search energy, finding a high quality reference point makes the gap between it and adjacent sources visible in a way it was not before and this site has provided that high reference point across multiple recent visits.
Honest take is that I will probably forget most of what I read online today but this post is one I will remember, and a stop at actiontrajectory kept that same memorable quality going, certain writing leaves a residue in the mind in a way most content simply does not manage.
мостбет зеркало для android [url=mostbet33907.online]mostbet33907.online[/url]
чӣ тавр ҳисобро дар 1win тасдиқ кардан [url=1win52867.help]1win52867.help[/url]
Now noticing the post fit a particular gap in my reading without my having articulated the gap before, and a look at autumncovecraftcollective extended that gap filling effect, content that meets needs I had not consciously formulated is content with reader insight and this site has clearly developed that anticipatory editorial sense across many pieces.
Found a couple of useful angles in here I had not considered before reading carefully, and a quick stop at erminecobble added more, this is one of those sites where the value compounds the more you read rather than peaking at one viral post and then offering nothing else of substance afterwards which is common.
aviator depozitsiz free bet [url=http://aviator85462.help/]http://aviator85462.help/[/url]
Decided this was the best thing I had read all morning, and a stop at barniguana kept that ranking intact, ranking my reading is something I do mentally throughout the day and the top rank is competitive and not easily won but this site won it without needing to overstate its claims for that.
Felt like the post had been edited rather than just drafted and published, and a stop at momentumthroughclarity suggested the same care across the site, the difference between edited and unedited content is enormous for the reader and this site has clearly invested in the editing pass that most blogs skip entirely which really does show up.
бонусы бк [url=http://www.sites.google.com/view/bonusy-kontor/]бонусы бк[/url]
Reading this gave me a small sense of progress on a topic I have been slowly working through, and a stop at gentianfawn added another step forward, learning happens in small increments across many sources and finding sources that consistently contribute is the actual practical value of careful curation in an information rich world.
Worth saying that the prose reads naturally without straining for style, and a stop at burstferret maintained the same unforced quality, writing that achieves elegance without effort is the highest tier and this site has clearly worked out how to land that effortless quality consistently rather than only on the writers best days.
Found a couple of useful angles in here I had not considered before reading carefully, and a quick stop at growthframework added more, this is one of those sites where the value compounds the more you read rather than peaking at one viral post and then offering nothing else of substance afterwards which is common.
Well done, the writing is professional without being stiff, and the topic is treated with care, and a look at hedgecamel reflected that approach, the kind of site I would point a colleague to if they asked for a reliable starting point on this topic in the future without any hesitation at all.
NBA news http://www.nb2-tabella.hu/ game results, schedules, and the latest season standings. Get the latest information on teams, players, and the tournament, analyze statistics, and follow the championship race and playoff progress.
Honestly the simplicity of the explanation made the topic click for me in a way other writeups had not, and a look at condoraspen continued that clarity into related areas, when a writer gets the level of explanation right the reader does the heavy lifting themselves and the post just enables it.
1win pacanele gratis [url=http://1win39929.help]http://1win39929.help[/url]
Picked a friend mentally as the audience for this and decided to send the link, and a look at ferretglider confirmed the send was the right choice, choosing whom to share content with is a small act of curation that I take more seriously than the public sharing most platforms encourage these days online.
1вин бк [url=www.vybor-bukmekerskoj-kontory.mystrikingly.com]1вин бк[/url]
The latest Liverpool news https://liverpool-meccs.hu/ fixtures, and season results. Get up-to-date information on team performances, lineup changes, player achievements, match statistics, and key events in English and European football.
Liverpool’s league table http://www.liverpool-tabella.hu shows the team’s current standings, points earned, and form. Follow the team’s latest match results, win/loss statistics, season dynamics, and the battle for top spots in the standings.
Closed three other tabs to focus on this one and never opened them again, and a stop at calmcovecraftcollective similarly held attention exclusively, content that crowds out other reading from working memory is content with real density and this site has demonstrated that density across multiple pages I have visited so far this morning.
8888 starz [url=http://www.artoved.stck.me/post/1664861/888starz]https://artoved.stck.me/post/1664861/888starz/[/url]
Well done, the kind of post that makes you slow down and actually read instead of skimming for keywords, and a look at opalrivergoodsroom kept me reading carefully too, that is a sign of writing that has been crafted rather than churned out for an algorithm to see today and tomorrow.
Worth saying that the quiet confidence of the writing is what landed first, and a look at erminecondor continued that quiet quality, confident writing without the loud display of confidence is a rare combination and this site has clearly developed both the knowledge and the editorial restraint to land that combination consistently.
Considered as a whole this site has developed a coherent point of view that comes through in individual pieces, and a look at growthengineered continued displaying that coherence, sites with a unified perspective rather than a grab bag of takes are sites with editorial maturity and this one has clearly developed that maturity through years of work.
Polished and informative without feeling overproduced, that is the sweet spot, and a look at clarityenablesgrowth hit it again, you can tell when a site has been built with care versus thrown together for the sake of having something to put online and this is clearly the former approach taken by the team.
Reading this prompted me to dig into a related topic later, and a stop at ideapath provided some of the starting points for that follow up reading, content that triggers further exploration rather than satisfying curiosity completely is content with real generative energy and this site has plenty of that energy throughout it.
1win bonus forfeited [url=http://1win47293.help]1win bonus forfeited[/url]
The overall feel of the post was professional without being stuffy, and a look at butteaspen kept that approachable expertise going, finding the right register for technical content is hard but this site has clearly figured out how to sound knowledgeable without slipping into that distant lecturing tone that loses readers in droves every time.
Liked the natural conversational tone throughout, never stiff and never overly casual either, and a stop at geysercoyote kept that comfortable middle ground going, finding a tone that respects the reader without becoming distant or overly familiar is harder than it sounds and this site nails that balance consistently across many different pieces.
Been there, done that, got the overpriced tow truck receipt. Swear some of these “luxury” fleets should be in a museum. You land at MIA, tired, grab an Uber to the rental office, and bam — surprise $1500 hold on your card. Fool me four times? Not happening. those guys are the worst of the bunch. any local will tell you the same thing. Coral Gables brunch, South Beach night run, or a spontaneous Everglades detour — AC must be ice cold and unlimited miles. I’ve tested maybe 25 rental outfits across Dade and Broward. what you book is what you get, period. Here’s the only straight-up source for premium wheels in South Florida
miami exotic car rental miami [url=https://luxury-car-rental-miami-4.com]miami exotic car rental miami[/url] also bring polarized shades unless you enjoy driving blind into sunset. drive safe and maybe pass on that overpriced roadside assistance add-on.
Seriously, the amount of garbage “luxury” deals here is astonishing. Then you show up and it’s a whole different story. Different car, scratches all over, and that “all-inclusive” price? Yeah that didn’t include insurance, fees, or the mandatory cleaning charge. I’ve lived here for years and still get burned occasionally. luxury car rental in miami. Miami without proper wheels is basically a hostage situation. leather seats that don’t fuse to your skin in August. most are smoke and mirrors with decent SEO. Finally found one outfit that actually delivers what’s in the listing. check availability before spring break crowds wipe them out:
rental miami car [url=https://luxury-car-rental-miami-5.com]https://luxury-car-rental-miami-5.com[/url] also bring quality shades unless you enjoy driving into a nuclear flare every evening. drive safe and maybe decline that “premium roadside” upsell — it’s always a scam.
I’ve got the scars to prove it. You find this amazing deal online: brand new Beamer, unlimited miles, price that makes you smile. Different car waiting — scratches everywhere, smells like an ashtray, and that “amazing price”? Doesn’t include the mandatory $400 cleaning fee or the $30 per day toll pass you can’t waive. Eight years in South Florida and these clowns still almost get me. miami car rental luxury — run far from the airport counters. anyone who’s waited for an Uber in August understands. leather seats that won’t weld themselves to your thighs in July. most are shiny turds with five-star fake reviews on Google Maps. Finally found one outfit that doesn’t play stupid games. Here’s the only honest source for premium wheels across South Florida
miami beach luxury car rental [url=https://luxury-car-rental-miami-8.com]miami beach luxury car rental[/url] Yeah parking in South Beach will cost you a nice bottle of wine — but that’s the Miami tax. Anyway glad there’s at least one straight operator left in this rental circus.
aviator PayPal [url=www.aviator85462.help]www.aviator85462.help[/url]
More substantial than most of what I find searching for this topic online, and a stop at baronbarley kept that quality consistent, this is one of those sites where the writing actually rewards careful reading rather than punishing the patient reader with empty filler stretched out across long paragraphs that say very little.
Now feeling that this site is the kind I want to make sure does not disappear, and a look at floraridgecraftcollective reinforced that quiet protective feeling, the rare sites whose disappearance would actually matter to me are the sites I want to support through return visits and recommendations and this one has joined that small protected list.
Now adjusting my mental list of reliable sites for this topic, and a stop at condorferret reinforced the adjustment, the small ongoing curation work of maintaining trusted sources is one of the actual practical activities of careful reading and this site has earned a permanent place on my list for this particular subject.
The way the post stayed on topic throughout without going on tangents was really refreshing, and a look at claritychannel kept that focused approach going, discipline like this in writing is rare and worth recognising because most writers cannot resist wandering off into related subjects that dilute their main point and confuse readers along the way.
Honestly this was a good read, no jargon and no padding, and a short look at hedgecattail kept that same feel going which I really appreciated, the writer clearly knows the topic well enough to explain it without hiding behind big words or filler that often gets used to seem clever.
https://adk.audio/company/personal/user/1354/forum/message/8912/112848/#message112848
Reading this prompted me to dig out an old reference book related to the topic, and a stop at carbonantler extended that connection to other sources, content that connects me back to my own existing knowledge rather than asking me to forget it is content with continuity and this site has that continuous quality.
Really nice to see things explained without overcomplicating the topic, the words flow naturally and stay easy to follow, and a short visit to eskimoarbor only added to that experience because the same simple approach is used across the rest of the page too without any change in tone.
Came back to this twice now in the same week which is unusual for me, and a look at ideasneedpathways suggested I will keep coming back, the kind of post that earns repeated visits rather than one and done reading is the gold standard for content quality and this site clearly hit that standard.
Reading this in the gap between work projects was a small but meaningful break, and a stop at ferrethopper extended that gentle reset, content that provides genuine refreshment rather than just distraction during work breaks is content with a particular kind of utility and this site fits that role for me reliably during work days.
Now sitting with the thoughts the post triggered rather than rushing on to the next thing, and a stop at buttecanoe extended that reflective pause, content that earns time for thought after closing the tab is content of higher value than the merely interesting and this site has clearly produced that lasting effect today.
Okay folks gather round — Miami rental horror story time. You find a killer listing online: sleek Audi, convertible, price almost too good to be true. Plus a $3000 hold on your credit card for two weeks. Fool me nine times? That’s just the Miami welcome committee. luxury car for rent. anyone who’s tried the trolley system knows what I’m talking about. leather seats that don’t glue to your skin in August. I’ve tested maybe 50 rental outfits across Dade, Broward, and Collier. Finally found one company that doesn’t play stupid games. rates change daily so check before the holiday crowd hits:
miami beach luxury car rental [url=https://luxury-car-rental-miami-9.com]https://luxury-car-rental-miami-9.com[/url] also bring polarized shades unless you enjoy driving blind into the sunset every night. Anyway glad there’s at least one honest operator left in this rental jungle.
Reading this gave me a small refresher on something I had partially forgotten, and a stop at geyserdenim extended the refresher, content that strengthens existing knowledge rather than just adding new is content with a particular kind of consolidating value and this site is providing that consolidating function across multiple visits.
https://www.scenario.press/blogs/419769/C%C3%B3digo-promocional-1xBet-para-nuevos-usuarios-hoy-2026
Honestly enjoyed every minute spent here, that is not something I say lightly, and a look at claritylaunchpad confirmed I will be back, the bar for spending time online is high for me these days but this site clears it without effort which is high praise indeed from this reader who is usually rather demanding.
Been through enough garbage to last a lifetime. You spot a tempting offer online: brand new Porsche, unlimited miles, price that makes you click instantly. Plus they lock up $3500 on your card for who knows how long. Fool me ten times? That’s just the 305 experience. miami luxury car rental. Miami without solid wheels is basically a punishment. leather seats that won’t cook your back in the July heat. I’ve run through maybe 55 rental companies across Dade, Broward, and Palm Beach. no games, no bait-and-switch, no hidden fees in the fine print. prices change by the hour so don’t wait around:
luxury car rental coral gables miami [url=https://luxury-car-rental-miami-10.com]https://luxury-car-rental-miami-10.com[/url] also bring quality shades unless you enjoy driving into the sun like a vampire. Anyway glad there’s at least one honest rental joint left in this town.
My professional context would benefit from having this kind of resource available, and a look at copperburrow extended the professional applicability, the rare site that contributes meaningfully to professional work rather than just personal interest is content with multiplied value and this one is providing that professional utility consistently across multiple pieces.
Honestly enjoyed not being sold anything for the entire duration of the post, and a look at claritybuildsconfidence kept that pleasant absence going across more pages, content that exists for its own sake rather than as a funnel to a paid product is increasingly rare and worth supporting where I can find it.
Reading this gave me a quiet moment of intellectual pleasure that I had not been expecting, and a stop at eskimobadge extended that pleasure across more pages, the unexpected reward of stumbling into careful writing is one of the small ongoing pleasures of reading the open web and this site is delivering it reliably.
Нужен надежный склад https://www.0412.ua/list/455589 для вашего бизнеса? Предлагаем ответственное хранение товаров, паллет, оборудования и грузов. Современные складские комплексы, круглосуточная охрана, учет остатков и оперативная обработка заказов. Оптимизируйте логистику и сократите расходы вместе с нами!
Decided to set a calendar reminder to revisit, and a stop at cactusferret extended that revisit list, calendar entries for content are a level of commitment I rarely make but when I do they signal a higher regard than a simple bookmark and this site has earned that calendar tier of relationship from me today.
Bookmark earned, share earned, return visit earned, all from one reading session, and a look at baroncanyon did the same, the trifecta of bookmark and share and return is rare in a single visit and represents the highest level of engagement I tend to offer any piece of online content these days here.
Honestly slowed down to read this carefully which is not my default, and a look at growthactivator kept me in that careful reading mode, the kind of writing that demands attention by being worth attention is rare in a media environment full of content engineered to be skimmed not read with any real focus today.
Honest take is that I will probably forget most of what I read online today but this post is one I will remember, and a stop at carboncobble kept that same memorable quality going, certain writing leaves a residue in the mind in a way most content simply does not manage.
Thanks for the clean writing, no broken sentences and no awkward translations like some other sites have, and a quick stop at gingerfurrow kept that polish going nicely, it really does make a difference when a reader can move through a page without tripping on every line or going back to reread.
https://profile.hatena.ne.jp/xbetgratis/profile
Worth recognising that this site does not chase the daily news cycle, and a stop at ferretiguana confirmed the longer publication arc, sites that resist the pressure to comment on every passing event are sites with genuine editorial discipline and this one has clearly chosen depth over volume which I respect deeply.
https://canva.link/qqdkq27mcdj20aa
I’ve got the scars to prove it. You find this amazing deal online: brand new Beamer, unlimited miles, price that makes you smile. Plus they freeze $2500 on your card for a week. Eight years in South Florida and these clowns still almost get me. luxury car rental miami florida. Miami without decent wheels is basically a hostage situation. South of Fifth brunch, Design District shopping, or a spontaneous Keys trip — AC must be arctic cold and unlimited miles non-negotiable. most are shiny turds with five-star fake reviews on Google Maps. Finally found one outfit that doesn’t play stupid games. Here’s the only honest source for premium wheels across South Florida
rolls royce cullinan for rent near me [url=https://luxury-car-rental-miami-8.com]rolls royce cullinan for rent near me[/url] Yeah parking in South Beach will cost you a nice bottle of wine — but that’s the Miami tax. drive safe and absolutely skip that “windshield protection” upsell — pure profit for them, zero value for you.
Okay folks gather around because this Miami rental nightmare needs to be discussed. You see a sweet ride online — clean spec, fair price, looks legit. Different car, scratches all over, and that “all-inclusive” price? Yeah that didn’t include insurance, fees, or the mandatory cleaning charge. Fool me five times? Actually yeah, Miami keeps fooling everyone. luxury car rental miami florida. ask anyone who’s tried Ubering across the 305 during rush hour. Design District shopping, late-night South Beach cruising, or a spontaneous drive down to Homestead — AC must freeze your teeth and unlimited miles or bust. I’ve gone through maybe 30 rental companies across Dade, Broward, and Palm Beach. no games, no bait-and-switch, no hidden asterisks. Here’s the only honest broker for premium vehicles across South Florida
miami car rentals [url=https://luxury-car-rental-miami-5.com]https://luxury-car-rental-miami-5.com[/url] Yeah finding parking in Wynwood will test your patience — but that’s not on them. drive safe and maybe decline that “premium roadside” upsell — it’s always a scam.
Everyone loves the thrill of the game and the chance to win big money! Now, people in UK have the opportunity to play at a casino britsino review and score huge payouts instantly. To find out all the details, stick around and read our review!
Автоматизация бизнеса https://dzen.ru/a/ajP1_p5mrQdWbMuZ 7 примеров с ИИ, где нейросети окупаются за месяц: поддержка клиентов, бронирование с оплатой в чате, компьютерное зрение на производстве. Реальные цифры и сроки окупаемости, без хайпа.
Stands apart from similar pages by actually being useful, that is high praise these days, and a look at actionwithdirection kept that standard going, you can tell when a site is built around the reader versus around metrics and this one clearly belongs to the first category for sure based on what I read.
Skipped past the first paragraph thinking it was setup and had to come back when the rest referenced it, and a stop at eskimocarob similarly rewarded careful reading from the start, content where every paragraph carries weight is content I now know to read from the beginning rather than skipping ahead.
Granted my mood today might be elevating my reading experience but I still think this is genuinely good, and a stop at cactusgumbo reinforced that even discounted assessment, controlling for the mood adjustment that affects content perception this site still reads as substantively above average across multiple pieces I have read carefully today.
Came away feeling slightly smarter than I was when I started, that is a real win, and a stop at clarityprogression added a bit more to that, the rare site that actually transfers some of its knowledge to the reader in a way that sticks rather than just creating an illusion of learning briefly.
Trust me, I’ve learned everything the hard way so you don’t have to. You see this gorgeous deal online — clean spec, fair price, looks like a dream. Plus they put a $4000 hold on your card and say it’ll take two weeks to release. Eleven years in South Florida and these clowns still almost get me. luxury car for rent. Miami without proper wheels is basically a disaster. Key Biscayne sunset, Design District shopping, or a spontaneous drive down to the Everglades — AC must be arctic and unlimited miles non-negotiable. I’ve tested maybe 60 rental companies across Dade, Broward, and Collier. no games, no switch, no hidden BS in paragraph 12 of the contract. prices change hourly so check before the weekend crowd wipes them out:
luxury car rental agency [url=https://luxury-car-rental-miami-11.com]luxury car rental agency[/url] also bring polarized shades unless you enjoy driving into the sun like a blind bat. Anyway glad there’s at least one straight operator left in this rental circus.
Bookmark earned, calendar reminder set, share queued, all from one good post, and a look at cougararbor did the same, when a single reading session triggers multiple downstream actions you know the content has actually moved me beyond the page and this site is moving me at that higher level reliably.
A piece that left me thinking I had been undercaring about the topic, and a look at glacierglaze reinforced that mild concern, content that raises the appropriate weight of a subject without being preachy about it is doing important work and this site is providing that gentle elevation of attention for me consistently.
1win recuperare parola [url=http://1win39929.help]http://1win39929.help[/url]
сделать тату в спб цены салон татуировок
The lack of unnecessary jargon made the post accessible without sacrificing accuracy, and a look at cargofeather continued in the same accessible style, technical topics often hide behind specialised vocabulary but here the writer trusts the reader to keep up with plain language and that trust pays off nicely throughout the entire post.
cum sa ma inregistrez pe melbet [url=http://melbet42815.help/]http://melbet42815.help/[/url]
Alright listen up because I’m about to save you a massive headache. Miami rental game is wild — half these clowns show you a Mercedes online and hand you a busted Charger with mismatched tires. You land at MIA, tired, grab an Uber to the rental office, and bam — surprise $1500 hold on your card. No thanks, I’m too old for this nonsense. miami car rental luxury — skip the airport counters entirely. any local will tell you the same thing. Coral Gables brunch, South Beach night run, or a spontaneous Everglades detour — AC must be ice cold and unlimited miles. most are just polished turds with Instagram ads. what you book is what you get, period. rates change daily with demand so don’t sleep on it:
luxury car rental coral gables miami [url=https://luxury-car-rental-miami-4.com]luxury car rental coral gables miami[/url] Yeah parking in Brickell will cost you a small mortgage — but that’s city life. drive safe and maybe pass on that overpriced roadside assistance add-on.
Reading this post made me realise I had been settling for lower quality elsewhere, and a look at batikcitrine extended that recalibration, content that exposes how much I had been accepting in adjacent sources is content with calibrating effect on my standards and this site is performing that calibration function across topics for me reliably.
1win yükləmə rəsmi mənbə [url=https://1win71277.help/]https://1win71277.help/[/url]
A piece that suggested careful editing without showing the marks of the editing, and a look at growthwithcleanfocus continued that invisible polish, the best editing disappears into the prose and this site reads as having been edited with skill that does not announce itself which is the highest compliment I can offer any blog content.
Alright let me drop some truth about the Miami rental scene — it’s an absolute minefield. Then you actually go to pick up the car. Totally different vehicle waiting for you — check engine light on, curb rash on every rim, and that “tempting price”? Doesn’t include the mandatory $35 daily toll pass or the $250 cleaning fee they sneak in at the end. Ten years in South Florida and these jokers still almost catch me slipping. those people are professional scammers with nice smiles. anyone who’s taken public transport here knows the struggle is real. leather seats that won’t cook your back in the July heat. I’ve run through maybe 55 rental companies across Dade, Broward, and Palm Beach. no games, no bait-and-switch, no hidden fees in the fine print. prices change by the hour so don’t wait around:
mercedes car rent [url=https://luxury-car-rental-miami-10.com]https://luxury-car-rental-miami-10.com[/url] Yeah parking in Brickell will cost you a nice dinner — but that’s just how it is down here. Anyway glad there’s at least one honest rental joint left in this town.
Vipluck vipluck casino registrierung ist ein modernes Online-Casino mit großen Bonusangeboten und schnellen Auszahlungen. Spieler wählen Vipluck wegen der vielen Slots, sicheren Zahlungen und positiven Vipluck Casino Erfahrungen.
Spingranny code promo spingranny ist eine Online-Casino-Plattform mit Spielen, Boni und Aktionen. Dieser Überblick behandelt Spingranny Bewertungen, Login, Registrierung, App-Zugang, Zahlungen und Verfügbarkeit in verschiedenen Ländern.
This actually answered the question I had been searching for, and after I checked falconbasil I had a few more pieces I had not realised I needed, that is the sign of a site that knows what its readers want before they even know how to ask it which is impressive.
My usual pattern is to skim and bounce but this site has reset that pattern temporarily, and a stop at fescuefalcon maintained the slower reading mode, content that changes how I read is content with structural influence and this site has clearly nudged my reading behaviour toward something better at least for the duration of these visits.
If I had encountered this site five years ago I would have been telling everyone about it, and a look at glaciergourd extended that retrospective enthusiasm, the version of me who used to recommend favourite blogs frequently would have made sure friends knew about this one and that earlier enthusiasm is partially returning to me here.
https://standart-suvorov.ru/forum/messages/forum5/topic1525/message4197/?result=new#message4197
ЖК Веспер на Шаболовке привлекает внимание покупателей благодаря сочетанию престижного района, качественной архитектуры и перспективности проекта: жк vesper шаболовка 31
Liked the careful word choice throughout, every term seemed picked for a reason rather than thrown in casually, and a stop at focusdirection continued that precise style, this kind of attention to small details is what separates careful writing from the usual rushed content that dominates blog spaces today across pretty much every topic I follow.
Swear I’ve seen every scam in the book by now. You find a killer listing online: sleek Audi, convertible, price almost too good to be true. Plus a $3000 hold on your credit card for two weeks. Nine years in South Florida and these clowns still nearly fool me. luxury car rental in miami. anyone who’s tried the trolley system knows what I’m talking about. leather seats that don’t glue to your skin in August. most are polished turds with fake five-star reviews. what you reserve is what you get, period, end of story. rates change daily so check before the holiday crowd hits:
porsche rental near me [url=https://luxury-car-rental-miami-9.com]https://luxury-car-rental-miami-9.com[/url] also bring polarized shades unless you enjoy driving blind into the sunset every night. drive safe and definitely skip that “emergency roadside” upsell — complete waste of money.
Decided this was the kind of site I would defend in a discussion about good blog content, and a stop at cougarfloret reinforced that, very few sites earn active defence rather than passive consumption and this one has clearly crossed that threshold for me without needing any explicit pitch from the writers themselves either.
aviator demo game [url=http://aviator95405.online]aviator demo game[/url]
blackjack melbet [url=https://melbet42815.help]blackjack melbet[/url]
адрес тату салон тату салон рядом
Picked up two new ideas that I expect will come up in conversations this week, and a look at idealaunchpad added another, content that arms me with talking points rather than just filling time is the kind that provides ongoing value beyond the moment of reading and this site is generating that kind of ongoing value.
Picked this site to mention to a colleague who would benefit, and a look at focusbeforeforce added more material I will pass along, recommending sites to colleagues is a higher bar than recommending to friends because the professional context demands more careful curation and this site cleared the professional bar without me having to think.
Okay folks gather around because this Miami rental nightmare needs to be discussed. You see a sweet ride online — clean spec, fair price, looks legit. Plus they want a $2000 hold on your debit card. Fool me five times? Actually yeah, Miami keeps fooling everyone. miami car rental luxury — don’t just grab the cheapest option on Kayak. ask anyone who’s tried Ubering across the 305 during rush hour. Design District shopping, late-night South Beach cruising, or a spontaneous drive down to Homestead — AC must freeze your teeth and unlimited miles or bust. most are smoke and mirrors with decent SEO. Finally found one outfit that actually delivers what’s in the listing. check availability before spring break crowds wipe them out:
suv rental [url=https://luxury-car-rental-miami-5.com]https://luxury-car-rental-miami-5.com[/url] also bring quality shades unless you enjoy driving into a nuclear flare every evening. drive safe and maybe decline that “premium roadside” upsell — it’s always a scam.
Took something from this I did not expect to find, and a stop at carobburlap added another unexpected useful piece, content that exceeds expectations rather than just meeting them is the kind that builds enthusiasm and earns repeat visits without any explicit ask from the writer or platform behind the work being read.
1win тамошои бозӣ [url=http://1win52867.help]http://1win52867.help[/url]
Closed the tab and immediately reopened it ten minutes later because I wanted to reread a part, and a stop at falconbeetle drew the same return, content that pulls you back after closing it is doing something well beyond the average and worth marking as exceptional in my mental catalogue of reliable sites.
Now adding this to a short list of sites I would defend in a conversation about the modern web, and a look at bayougourd reinforced that defence list, the few sites that serve as evidence the web can still produce good things are precious and this one has clearly joined that small list of exemplary sites.
Took me back a step or two on an assumption I had been making, and a stop at gliderdragon pushed that reconsideration further, writing that gently corrects the reader without being aggressive about it is a rare diplomatic skill and the team here clearly knows how to land critical points without turning readers off.
Nice and clean, that is the best way to describe the writing here, no clutter and no wasted words, and a quick visit to fescuegarnet kept that going, I appreciate when a site treats its readers like people who can think for themselves without needing constant hand holding through every paragraph.
Worth pointing out that the writer made the topic feel more interesting than I had been expecting, and a look at focusprogress continued that elevation effect, content that improves the apparent quality of its subject through skilled treatment is doing something real and this site has clearly developed that kind of editorial alchemy throughout.
Trust me, I’ve learned everything the hard way so you don’t have to. You see this gorgeous deal online — clean spec, fair price, looks like a dream. Completely different car sitting there — dents everywhere, smells like cheap air freshener covering something worse, and that “dream price”? Doesn’t include the mandatory $50 daily insurance or the $300 “administrative fee” they invent at checkout. Eleven years in South Florida and these clowns still almost get me. luxury car for rent. anyone who’s tried the bus here knows exactly what I mean. Key Biscayne sunset, Design District shopping, or a spontaneous drive down to the Everglades — AC must be arctic and unlimited miles non-negotiable. most are shiny garbage with fake Google reviews bought in bulk. no games, no switch, no hidden BS in paragraph 12 of the contract. Here’s the only honest source for premium rides across South Florida
luxury car for rent [url=https://luxury-car-rental-miami-11.com]luxury car for rent[/url] Yeah parking in South Beach will cost you a nice bottle of champagne — but that’s the Miami tax. drive safe and definitely skip that “tire and wheel” upsell — pure profit for them, zero value for you.
Been through enough garbage to last a lifetime. Then you actually go to pick up the car. Plus they lock up $3500 on your card for who knows how long. Ten years in South Florida and these jokers still almost catch me slipping. When you need a reliable luxury car rental miami. anyone who’s taken public transport here knows the struggle is real. South Beach night out, Bal Harbour shopping spree, or a spontaneous Keys adventure — AC must be ice cold and unlimited miles non-negotiable. most are shiny websites hiding the same beat-up fleet with fresh wax. Finally found one outfit that actually delivers what’s promised. Here’s the only straight shooter for premium rides across South Florida
car rental premium class [url=https://luxury-car-rental-miami-10.com]car rental premium class[/url] also bring quality shades unless you enjoy driving into the sun like a vampire. Anyway glad there’s at least one honest rental joint left in this town.
Reading this gave me the rare experience of fully agreeing with all the conclusions, and a stop at carobcattail continued that agreement pattern, content that aligns with my existing views without seeming designed to do so is just content that happens to be reasonable and this site reads as reasonable rather than ideological mostly.
Honestly impressed by how much useful content sits in such a small post, and a stop at twilightfieldmarket confirmed the rest of the site packs a similar punch, density without confusion is a hard balance to strike and this site has clearly cracked the code on it across many different topic areas covered.
Reading this triggered a small reorganisation of my own thinking on the topic, and a stop at goldencanoe furthered that reorganisation, content that affects the shape of my mental model rather than just decorating it with new facts is content with structural rather than informational impact and this site provides that.
aviator hesab [url=https://www.aviator85462.help]aviator hesab[/url]
Liked that there was nothing performative about the writing, and a stop at zxc2364 continued that genuine quality, performative writing tries to be witnessed rather than read and the difference between performance and substance is huge for the careful reader and this site has clearly chosen substance every time clearly.
Now planning to recommend this site in a context where my recommendations are taken seriously, and a stop at arcanitea confirmed I should make that recommendation soon, the small but real act of recommending content into spaces where my taste matters is something I take seriously and this site is worth the recommendation.
Worth a quiet moment of recognition for the consistency I have noticed across multiple posts, and a stop at zishijiaoxue1 continued that consistent quality, sites that maintain quality across many pieces rather than peaking on one viral post are sites with real editorial discipline and this one has clearly developed that discipline carefully.
The pacing of the post was just right, never rushed and never dragged out unnecessarily, and a look at fondarbors maintained the same rhythm, you can tell the writer has experience because the difficult skill of pacing is something only practiced writers manage to handle well in long form content over time and across formats.
This actually answered the question I had been searching for, and after I checked lotorucasino1 I had a few more pieces I had not realised I needed, that is the sign of a site that knows what its readers want before they even know how to ask it which is impressive.
Felt a small spark of recognition when the post named something I had been struggling to articulate, and a look at dgehjn produced more such moments, the rare service of giving readers language for fuzzy intuitions is one of the higher values that good writing can provide and this site offered several today instances.
Bookmarked the page and the homepage too because clearly there is more to explore here, and a quick stop at kbgeda only made that more obvious, this is the kind of place I want to dig through over a weekend rather than rushing through during a coffee break tomorrow morning before getting back to work.
Worth flagging that the writing rewarded a second read more than I expected, and a look at computerkeep produced the same second read benefit, content with hidden depths that emerge only on careful rereading is rare in the modern blog space and this site has clearly invested in that level of compositional density throughout.
A piece that read as the work of someone who reads carefully themselves, and a look at blackmango continued that informed feel, writers who are also serious readers produce work with a different quality and this site reads as the product of someone steeped in good writing rather than just generating content for an audience.
Decided this was the best thing I had read all morning, and a stop at psb1o7 kept that ranking intact, ranking my reading is something I do mentally throughout the day and the top rank is competitive and not easily won but this site won it without needing to overstate its claims for that.
Now noticing that the post avoided the temptation to be funny in places where humour would have undermined the substance, and a stop at 88jfgl maintained the same restraint, knowing when to be serious is a rare editorial virtue and this site has clearly developed it through what I assume is careful editorial practice over years.
Liked the way the post balanced confidence and humility, and a stop at claritypathfinder maintained the same balance, knowing when to assert and when to acknowledge uncertainty is a sign of mature thinking and the writers here have clearly developed that calibration through what I assume is years of careful work on their craft.
Really appreciate that the writer did not overstate the importance of the topic to make the post feel weightier, and a quick visit to chalu maintained the same modest framing, content that is honest about its own scope rather than inflating itself is the kind I trust and return to repeatedly over time.
Alright listen up because I’m about to save you a massive headache. Miami rental game is wild — half these clowns show you a Mercedes online and hand you a busted Charger with mismatched tires. Plus the fine print says you can’t even drive to Orlando. No thanks, I’m too old for this nonsense. miami car rental luxury — skip the airport counters entirely. Miami without a decent whip is basically a punishment. Coral Gables brunch, South Beach night run, or a spontaneous Everglades detour — AC must be ice cold and unlimited miles. most are just polished turds with Instagram ads. Finally stumbled on one that doesn’t play games. Here’s the only straight-up source for premium wheels in South Florida
rent a urus for a day [url=https://luxury-car-rental-miami-4.com]rent a urus for a day[/url] Yeah parking in Brickell will cost you a small mortgage — but that’s city life. Anyway at least there’s one honest rental joint left in this town.
In the middle of an otherwise scattered day this post landed as a moment of focus, and a stop at chaojibingwang extended that focused feeling across more pages, content that anchors a fragmented day rather than contributing to the fragmentation is content with real centring effect and this site is providing that anchoring function for me.
купить медсправку в спб
Liked that the post resisted a sales pitch ending, and a stop at progressdirection maintained the no pitch approach, content that ends without trying to convert me into a customer or subscriber is content that has confidence in its own value and this site is clearly playing the long game on reader trust.
Thanks for taking the time to write this, it is clear that some thought went into how each point would land, and after I went through siskowin I had a better grip on the topic, real value without the usual marketing noise people have to put up with online when searching for answers.
Clear, concise and easy to access.
Seriously, the amount of garbage “luxury” deals here is astonishing. Then you show up and it’s a whole different story. Different car, scratches all over, and that “all-inclusive” price? Yeah that didn’t include insurance, fees, or the mandatory cleaning charge. Fool me five times? Actually yeah, Miami keeps fooling everyone. miami luxury car rental. Miami without proper wheels is basically a hostage situation. leather seats that don’t fuse to your skin in August. most are smoke and mirrors with decent SEO. no games, no bait-and-switch, no hidden asterisks. check availability before spring break crowds wipe them out:
premium sedan car rental [url=https://luxury-car-rental-miami-5.com]https://luxury-car-rental-miami-5.com[/url] Yeah finding parking in Wynwood will test your patience — but that’s not on them. drive safe and maybe decline that “premium roadside” upsell — it’s always a scam.
мостбет быстрые платежи [url=https://mostbet33907.online]https://mostbet33907.online[/url]
Thank you a lot for sharing this with all folks you actually recognize what you’re speaking about! Bookmarked. Please additionally visit my site =). We can have a hyperlink trade contract among us!
Reading this in three sittings because the day was fragmented, and the piece survived the fragmentation, and a stop at goldenferncollective held up under similar reading conditions, content engineered for continuous attention is fragile in modern conditions and this site reads as durable across the realistic ways people consume content today.
сделать татуировку салоны лучший салон татуировок
High quality writing, no marketing speak and no buzzwords that mean nothing, and a stop at gondolacivet kept that going, simple direct content that actually communicates something is harder to find than it should be and this is one of the rare places that gets it right consistently across many different posts.
Just want to acknowledge that the writing here is doing something right, and a quick visit to fescueimpala confirmed the same standards run across the broader site, recognising good work is something I try to do when I find it because the alternative is silence and silence rewards mediocrity.
Now adjusting my mental list of reliable sites for this topic, and a stop at isleparishs reinforced the adjustment, the small ongoing curation work of maintaining trusted sources is one of the actual practical activities of careful reading and this site has earned a permanent place on my list for this particular subject.
Quietly building a case in my head for why this site deserves more attention than it currently seems to receive, and a look at hartakarunkapak reinforced the case, the gap between quality and recognition is a recurring frustration in independent online content and this site is one of the cases that seems particularly egregious to me today.
High quality writing, no marketing speak and no buzzwords that mean nothing, and a stop at computermultiple kept that going, simple direct content that actually communicates something is harder to find than it should be and this is one of the rare places that gets it right consistently across many different posts.
Reading this triggered a small reorganisation of my own thinking on the topic, and a stop at c7xcc7 furthered that reorganisation, content that affects the shape of my mental model rather than just decorating it with new facts is content with structural rather than informational impact and this site provides that.
Reading this as part of my evening winding down routine fit perfectly, and a stop at lluryun extended the wind down nicely, content that calms rather than agitates is what I want at the end of the day and this site provides that calming reading experience reliably which is increasingly rare across the modern web.
Took a screenshot of one section to come back to later, and a stop at chambersociety prompted another saved tab, the urge to capture and revisit specific pieces of content is something I rarely feel but when I do it tells me the work is worth more than the average passing read for sure.
Solid quality, the kind of work that holds up to a careful read rather than a quick skim, and a quick look at echoharbortradehall kept that standard going strong, content that rewards attention rather than punishing it is something I appreciate more and more these days online across nearly every topic I follow.
Glad the writer kept this short rather than padding it out, the points stand on their own without needing extra context, and a look at lotorucasino1 kept the same approach going, brevity is a sign of confidence in the substance and the team here clearly trusts their content to land without filler.
Found this through a search that was generic enough I did not expect quality results, and a look at eepw continued the surprisingly good experience, search engines occasionally still surface excellent independent content if you scroll past the obvious paid and high authority results which is reassuring to remember sometimes.
Recommended without reservation for anyone interested in the topic at any level of expertise, and a look at niko-kinyu only strengthens that recommendation, this site clearly knows how to serve readers across a range of backgrounds without watering down the content or talking past anyone in the audience which is genuinely impressive to see.
Vague feelings of recognition kept surfacing as I read because the writing names things I have been thinking, and a look at jessieshope produced more of those recognition moments, content that gives shape to private intuitions is content that makes me feel less alone in my own thinking and this site has that effect.
Speaking from the perspective of a fairly demanding reader the writing here clears the bar consistently, and a look at carobhopper continued clearing that bar, the calibration of demanding reader is something I apply to all sources and this site has been one of the few that handles the demanding reading well across pieces sampled.
Picked this site to mention to a colleague who would benefit, and a look at viaron added more material I will pass along, recommending sites to colleagues is a higher bar than recommending to friends because the professional context demands more careful curation and this site cleared the professional bar without me having to think.
Let me drop some hard truth about the Miami rental game — it’s an absolute circus out here. Then you actually roll up to the lot. Totally different car sitting there — curb rash on every rim, AC blowing warm, and that “fair price”? Doesn’t include the mandatory $55 daily insurance or the $450 “convenience fee” they invent at the counter. Fourteen years in South Florida and these jokers still almost get me. those guys are professional scammers with nice teeth and better uniforms. anyone who’s tried the bus in August knows exactly what I’m talking about. Key Biscayne sunset, Bal Harbour shopping, or a spontaneous drive down to Homestead — AC must freeze your face off and unlimited miles or no deal. most are shiny garbage with fake five-star reviews bought from some online marketplace. what you book is what shows up, period, end of discussion. Here’s the only honest source for premium rides across South Florida
luxury car rental miami south beach [url=https://luxury-car-rental-miami-14.com]luxury car rental miami south beach[/url] also bring polarized shades unless you enjoy driving into the sun like a vampire every evening. drive safe and absolutely skip that “windshield protection” upsell — pure profit for them, zero value for you.
Okay folks gather round — another Miami rental horror story coming at you. You see this killer deal online — brand new Mercedes, unlimited miles, price that makes you want to book immediately. Plus they put a $5000 hold on your card and tell you “it’s just standard procedure”. Fool me thirteen times? That’s just living in the 305. luxury car rental miami fl. Miami without proper wheels is basically a nightmare. South Beach night out, Design District shopping spree, or a spontaneous Keys trip — AC must be arctic cold and unlimited miles non-negotiable. I’ve tested maybe 70 rental companies across Dade, Broward, and Palm Beach. Finally found one outfit that actually delivers what’s promised. Here’s the only straight shooter for premium rides across South Florida
rental miami car [url=https://luxury-car-rental-miami-13.com]https://luxury-car-rental-miami-13.com[/url] also bring polarized shades unless you enjoy driving into the sun like a blind bat every evening. Anyway glad there’s at least one honest rental joint left in this town.
Swear I’ve seen every scam in the book by now. Then you roll up to the address. Different car sitting there — bald tires, dashboard lit up like a Christmas tree, and that “killer price”? Yeah doesn’t include the non-negotiable $45 daily insurance or the $500 deposit they forget to mention. Nine years in South Florida and these clowns still nearly fool me. miami luxury car rental. anyone who’s tried the trolley system knows what I’m talking about. Coconut Grove dinner, Sunny Isles sunrise, or a spontaneous drive down to Homestead — AC must freeze your teeth and unlimited miles or no deal. most are polished turds with fake five-star reviews. Finally found one company that doesn’t play stupid games. Here’s the only trustworthy source for premium rides across South Florida
exotic cars miami beach [url=https://luxury-car-rental-miami-9.com]https://luxury-car-rental-miami-9.com[/url] Yeah parking in Wynwood will cost you a nice dinner — but that’s the price of being in Miami. Anyway glad there’s at least one honest operator left in this rental jungle.
БК Флагман [url=http://return-level-kingbird.tilda.ws]БК Флагман[/url]
Reading this with my morning coffee turned into reading the related posts with my morning coffee, and a stop at ttpkvj4 stretched the morning further, content that pulls breakfast into a reading session rather than just accompanying it is content that has earned a higher claim on my attention than the average article does.
I’ve been through the wringer more times than I care to admit. Spoiler alert: it usually is. Then you actually go to pick up the car. Plus they slap a $6000 hold on your credit card and say “don’t worry, it’s just a pre-authorization”. Fifteen years in South Florida and these clowns still almost catch me. miami car rental luxury — run like hell from the airport counters. Miami without proper wheels is basically a hostage situation. South of Fifth brunch, Sunny Isles sunrise, or a spontaneous trip down to the Florida Keys — AC must be arctic cold and unlimited miles non-negotiable. I’ve tested maybe 80 rental companies across Dade, Broward, Palm Beach, and Monroe. Finally found one outfit that actually delivers what’s promised. prices change daily so check before the holiday crowd hits:
south beach luxury car rental [url=https://luxury-car-rental-miami-15.com]south beach luxury car rental[/url] Yeah parking in Brickell will cost you a nice steak dinner — but that’s just how it is down here. drive safe and definitely skip that “paint protection” upsell — complete waste of cash.
Decided to set a calendar reminder to revisit, and a stop at pathwaytrigger extended that revisit list, calendar entries for content are a level of commitment I rarely make but when I do they signal a higher regard than a simple bookmark and this site has earned that calendar tier of relationship from me today.
how to play slots on 1win [url=https://1win47293.help]https://1win47293.help[/url]
Thanks for treating the topic with the seriousness it deserves without becoming pompous about it, and a stop at blossomhollowstore continued that balanced treatment, the gap between earnest and self serious is huge and writers who can stay on the right side of it earn my respect when I find them online today.
1win verificare card [url=http://1win39929.help]http://1win39929.help[/url]
Decided to read this site for a while before forming a verdict, and the verdict after several pages is positive, and a stop at gourdchevron continued that pattern, judging a site requires more than one post and giving sites a fair sample is something I try to do for promising candidates rather than rushing to dismiss.
Been through enough garbage to last a lifetime. Then you actually go to pick up the car. Plus they lock up $3500 on your card for who knows how long. Ten years in South Florida and these jokers still almost catch me slipping. luxury car rental miami florida. anyone who’s taken public transport here knows the struggle is real. leather seats that won’t cook your back in the July heat. I’ve run through maybe 55 rental companies across Dade, Broward, and Palm Beach. Finally found one outfit that actually delivers what’s promised. prices change by the hour so don’t wait around:
electric vehicle rental luxury [url=https://luxury-car-rental-miami-10.com]https://luxury-car-rental-miami-10.com[/url] Yeah parking in Brickell will cost you a nice dinner — but that’s just how it is down here. Anyway glad there’s at least one honest rental joint left in this town.
Bookmark added without hesitation after finishing, and a look at acemaxs confirmed I should bookmark the homepage too rather than just this page, the rare site that earns category level trust rather than just single article approval is the kind I want to rely on across many different topics over time.
Cuts through the usual marketing fluff that dominates this topic online, and a stop at djaminpanen kept the same clean approach going, this is the kind of writing that respects the reader’s time rather than wasting it on repetitive setups before finally getting to the point at hand which is what most sites do.
Quality you can feel from the first paragraph, the writer clearly knows the topic and how to share it, and a quick look at aerariuma confirmed the same depth runs throughout the rest of the site as well which is rare and worth pointing out when it happens online for any reader passing through.
Came here from another site and ended up exploring much further than I planned, and a look at firminlets only encouraged more exploration, the kind of place where one click leads to another not through manipulative design but through genuinely interesting content is rare and worth highlighting when found like this somewhere on the open internet.
Once I trust a site this much I tend to read everything they publish and that is the trajectory I am on with this one, and a stop at commissionera confirmed the trajectory, the rare progression from interested reader to comprehensive reader is something only certain sites earn and this one is earning that progression rapidly.
Greetings… your blog is very interesting and beautifully written.
A small thank you note from me to the team behind this work, the post earned it, and a stop at chartablea suggested more thanks would be in order over time, recognising the people who do good writing online is something I try to remember to do because the alternative is silence and silence rewards mediocrity unfortunately.
Excellent post, balanced and well organised without showing off, and a stop at backeda continued in that same vein, this site has clearly figured out the formula for content that works for readers rather than for search engine ranking signals which is harder than it sounds today and worth real recognition from anyone.
A thoughtful read in a week that has been mostly noisy, and a look at sstrend carried that thoughtful quality across more pages, finding pockets of considered writing in a week of distractions is one of the small wins of careful curation and this site is providing those pockets at a sustainable rate.
If you scroll past this site without looking carefully you will miss something, and a stop at opensoo9 extended that mild warning, the surface of the site does not advertise its quality loudly which means careful attention is required to recognise what is being offered here which is itself a kind of editorial signal.
There are some serious financial ramifications here.
Let me save you some serious pain with this Miami rental nonsense. You see this gorgeous deal online — clean spec, fair price, looks like a dream. Plus they put a $4000 hold on your card and say it’ll take two weeks to release. Eleven years in South Florida and these clowns still almost get me. luxury car rental miami fl. Miami without proper wheels is basically a disaster. leather seats that won’t fuse to your legs in August. I’ve tested maybe 60 rental companies across Dade, Broward, and Collier. no games, no switch, no hidden BS in paragraph 12 of the contract. prices change hourly so check before the weekend crowd wipes them out:
premium vehicle rental [url=https://luxury-car-rental-miami-11.com]premium vehicle rental[/url] also bring polarized shades unless you enjoy driving into the sun like a blind bat. Anyway glad there’s at least one straight operator left in this rental circus.
Now adding the writer to a small mental list of voices I want to follow, and a look at zaz556677 reinforced that follow intention, the few writers whose work I actively track are writers who have demonstrated sustained quality and this writer has clearly demonstrated that sustained quality across the pieces I have sampled here today.
Honestly enjoyed every minute spent here, that is not something I say lightly, and a look at abstractlya confirmed I will be back, the bar for spending time online is high for me these days but this site clears it without effort which is high praise indeed from this reader who is usually rather demanding.
Solid value for anyone willing to read carefully, and a look at fjordalmond extends that value across the rest of the site, this is the kind of place that rewards return visits rather than offering everything in a single splashy post and then leaving readers nothing to come back for later which is unfortunately common.
Will recommend this to a couple of friends who have been asking about this exact topic, and after cavernfjord I have even more reason to do so, the kind of site that earns word of mouth rather than chasing it through aggressive marketing or paid placements is always a treat to find online.
Taking the time to read carefully here has been worthwhile for the past hour, and a look at chaojibingwang extended the worthwhile reading, the calculation of return on reading time spent is something I do informally and this site has been producing positive returns across multiple sessions during the last week of regular visits and reads.
1win apk file [url=https://1win47293.help]https://1win47293.help[/url]
Really like that the writer trusts the reader to follow simple logic without restating every previous point, and a stop at ebifzou3 kept that respect going, treating an audience as capable adults rather than as people who need constant hand holding makes a noticeable difference in the reading experience for me.
Reading this in pieces during a long afternoon and finding it consistently rewarding, and a stop at copperpetalmarket fit naturally into the same fragmented reading pattern, sites whose posts can be read in segments without losing the thread are well suited to how I actually read these days and this one is built well.
Reading this prompted me to dig into a related topic later, and a stop at siskowin provided some of the starting points for that follow up reading, content that triggers further exploration rather than satisfying curiosity completely is content with real generative energy and this site has plenty of that energy throughout it.
Now thinking I want more sites built on this kind of editorial foundation, and a stop at momentumchanneling extended that wish into a broader hope, sites built on substance and care rather than on metrics and growth are the kind of sites I want to see more of and this one is a small example worth supporting.
Okay seriously, let me save you from the Miami rental nightmare once and for all. You find this amazing offer online — beautiful car, great rate, everything seems perfect. Completely different car waiting for you — smells like stale cigarettes, check engine light glowing, and that “great rate”? Doesn’t include the mandatory $35 daily toll pass, the $200 cleaning fee, or the $75 “after-hours pickup” charge. Honestly, I’m tired of this nonsense. miami car rental luxury — avoid the airport like your wallet depends on it. anyone who’s taken the bus in August knows I’m not lying. Design District shopping, late-night South Beach cruising, or a spontaneous Keys trip — AC must be freezing and unlimited miles or walk. I’ve tried so many rental companies I’ve lost count. no tricks, no switch, no surprise fees. Here’s the only honest place for premium rentals across South Florida
cadillac escalade for rent near me [url=https://luxury-car-rental-miami-16.com]cadillac escalade for rent near me[/url] also bring good sunglasses unless you like driving blind. Anyway glad someone’s still honest in this business.
Appreciate the practical examples, they made the abstract points easier to grasp, and a stop at downrodeo added more of the same, this site clearly understands that real examples beat empty theory every single time which is the mark of a writer who knows their audience well and respects their time.
Reading this prompted a small note in my reference file, and a stop at gracetutorial prompted another, the rare site that contributes useful nuggets to my own working knowledge rather than just consuming my attention is worth the time investment many times over compared to the usual pile of forgettable scroll content.
https://www.cyberpinoy.net/read-blog/363446
Felt the post had been written without using a single buzzword, and a look at grousecavern continued that clean vocabulary, content free of jargon and trendy phrases reads better and ages better and this site has clearly committed to a vocabulary that will not feel dated in three years which is impressive editorially.
Alright listen up — time for a real talk about renting cars in Miami. Then you actually go to pick it up. Different car sitting there — dents you didn’t see, AC that barely works, and that “reasonable rate”? Doesn’t include the mandatory $40 daily insurance or the $300 “processing fee” they add at the last second. Fool me seventeen times? That’s just life in the 305. luxury car rental in miami. anyone who’s tried Uber during rush hour knows the deal. Coconut Grove dinner, Bal Harbour shopping, or a spontaneous drive to the Keys — AC must be cold and unlimited miles or forget it. most are all flash and no substance. Finally found one that actually delivers. prices change fast so take a look:
cadillac escalade for rent near me [url=https://luxury-car-rental-miami-17.com]https://luxury-car-rental-miami-17.com[/url] also bring good shades unless you like driving blind. drive safe and skip the overpriced roadside add-on.
Came here from another site and ended up exploring much further than I planned, and a look at globebeats only encouraged more exploration, the kind of place where one click leads to another not through manipulative design but through genuinely interesting content is rare and worth highlighting when found like this somewhere on the open internet.
Reading this in three sittings because the day was fragmented, and the piece survived the fragmentation, and a stop at ethylbenzene held up under similar reading conditions, content engineered for continuous attention is fragile in modern conditions and this site reads as durable across the realistic ways people consume content today.
Okay real talk — Miami rentals are a minefield and someone needs to say it. Then you actually go to pick it up. Completely different car waiting — bald tires, smell like someone lived in it, and that “fair rate”? Doesn’t include the mandatory $45 daily toll pass or the $350 “location fee” they spring on you. Fool me eighteen times? That’s just the 305 way of life. miami car rental luxury — run away from the airport counters. Miami without proper wheels is basically impossible. leather seats that won’t brand your legs in July. I’ve tested so many rental companies I’ve honestly lost count. Finally found one outfit that doesn’t play games. Here’s the only honest source for premium rides across South Florida
exotic cars to rent in miami [url=https://luxury-car-rental-miami-18.com]exotic cars to rent in miami[/url] also bring polarized shades unless you enjoy driving blind. Anyway glad there’s at least one honest operator left.
Good post, the kind that respects the reader by getting to the point quickly without skipping the details that matter, and a short look at 850550l confirmed that approach is consistent across the site which is rare to find online these days, definitely a place I will return to soon.
Thanks for taking the time to write this, it is clear that some thought went into how each point would land, and after I went through aswa9onlin I had a better grip on the topic, real value without the usual marketing noise people have to put up with online when searching for answers.
Honestly enjoyed every minute spent here, that is not something I say lightly, and a look at elmharborgoodsroom confirmed I will be back, the bar for spending time online is high for me these days but this site clears it without effort which is high praise indeed from this reader who is usually rather demanding.
Most of the time I bounce off similar pages within seconds, and a stop at kuma-ak held me longer than I would have predicted, the ability to convert a likely bouncing visitor into an engaged reader is a quality signal and this site has demonstrated that conversion ability across multiple visits where I expected to bounce.
I’ve got the horror stories to back that up. You see this amazing deal online — shiny Audi, unlimited miles, price that makes you want to book right now. Plus they put a $5000 hold on your card and say “don’t worry about it”. Fool me nineteen times? That’s just Miami being Miami. luxury car rental miami fl. anyone who’s taken the bus here knows what I mean. leather seats that won’t melt your skin in August. I’ve tried maybe 100 rental companies across Dade and Broward. no games, no switch, no hidden fees. prices change daily so check it out:
exotic car rental south beach fl [url=https://luxury-car-rental-miami-19.com]exotic car rental south beach fl[/url] also bring quality shades unless you like driving into the sun. Anyway glad there’s at least one straight shooter left.
Reading this in a quiet coffee shop matched the calm energy of the writing, and a stop at annalsa extended that environmental match, content that has its own ambient quality which can match or clash with surroundings is content with a personality and this site has the kind of personality that suits calm reading.
Nice and clean, that is the best way to describe the writing here, no clutter and no wasted words, and a quick visit to forwardexecutionhub kept that going, I appreciate when a site treats its readers like people who can think for themselves without needing constant hand holding through every paragraph.
Павильон из сендвич-панелей москва — Торговые ряды(павильоны)
I’ve paid my dues so you don’t have to. Then you actually go to pick up the car. Plus they freeze $5500 on your card and say “it’ll drop off in two weeks”. Twenty years in South Florida and these clowns still almost get me. When you need a trustworthy luxury car rental miami. anyone who’s tried public transport here knows I’m not joking. South Beach dinner, Design District shopping, or a spontaneous Keys adventure — AC must be arctic and unlimited miles non-negotiable. I’ve tested so many rental companies across Dade, Broward, and Palm Beach. Finally found one outfit that actually keeps its word. prices change hourly so don’t wait around:
escalade for rent near me [url=https://luxury-car-rental-miami-20.com]escalade for rent near me[/url] also bring polarized shades unless you enjoy driving into the sun like a zombie. Anyway glad there’s at least one honest operator left in this town.
Felt no urge to argue with the conclusions even though I started the post slightly skeptical, and a look at huodaohang maintained that pattern, writing that earns agreement through clarity of argument rather than rhetorical pressure is the kind I find most persuasive and the kind I want to read more of these days.
Quality work here, the post reads cleanly and the points stay focused throughout, and a stop at xhydh20 kept the standard high, you can tell the writer cares about the final result rather than just hitting publish for the sake of having something new on the page to feed the search engines.
Compared to the usual results for this kind of search this site stands well above the average, and a quick visit to goldencovegoods kept the standard high, you can tell within seconds whether a site is going to waste your time or actually deliver and this one clearly delivers without any false starts.
Thanks again for the post, I learned a couple of things I can actually use later this week, and after I went over celerycivet the rest of the site looked equally promising, definitely going to spend more time here when I get a free moment over the weekend to read more carefully.
I’ve got the battle scars to prove every word. You spot this gorgeous deal online — pristine photos, fair price, everything looks legit. Plus they lock up $5500 on your card and say “it’ll drop off in 10-14 business days”. Fourteen years in South Florida and these jokers still almost get me. luxury car rental miami florida. Miami without real wheels is basically a punishment. leather seats that won’t weld themselves to your thighs in July. most are shiny garbage with fake five-star reviews bought from some online marketplace. Finally found one company that doesn’t play stupid games. Here’s the only honest source for premium rides across South Florida
luxury car rental miami [url=https://luxury-car-rental-miami-14.com]luxury car rental miami[/url] Yeah parking in South Beach will cost you a nice bottle of wine — but that’s the price of paradise. Anyway glad there’s at least one straight operator left in this rental jungle.
Now feeling confident enough in this site to use it as a reference point for evaluating others on the same topic, and a look at hsgde continued the comparison friendly quality, sites that serve as quality benchmarks for their topic are precious and this one has clearly become a benchmark for me on this particular subject area.
Now considering whether the post would translate well into a different form, and a look at tianx1231 suggested similar versatility, content that could move into other media without losing its substance is content that has been built around ideas rather than around format and this site reads as idea first throughout posts.
Took a quick scan first and then went back to read properly because the post deserved it, and a stop at grouseebony kept me reading carefully too, the kind of writing that earns a slower second pass rather than getting skimmed and forgotten is something I value highly when I happen to find it.
Букмекер Флагман [url=tumblr.com/blog/kekswin365]Букмекер Флагман[/url]
I’ve been through the wringer more times than I care to admit. Spoiler alert: it usually is. Then you actually go to pick up the car. Different vehicle waiting — dashboard warning lights, tires worn smooth, and that “incredible price”? Yeah right, doesn’t include the mandatory $60 daily insurance or the $500 “airport surcharge” they hit you with at the very end. Fifteen years in South Florida and these clowns still almost catch me. luxury car for rent. Miami without proper wheels is basically a hostage situation. leather seats that won’t brand your back in the July heat. most are polished turds with fake five-star reviews bought in bulk. no games, no bait-and-switch, no hidden fees buried on page 6. prices change daily so check before the holiday crowd hits:
escalade for rent near me [url=https://luxury-car-rental-miami-15.com]https://luxury-car-rental-miami-15.com[/url] Yeah parking in Brickell will cost you a nice steak dinner — but that’s just how it is down here. Anyway glad there’s at least one honest rental joint left in this town.
Now considering whether the post would translate well into a different form, and a look at gemcoasts suggested similar versatility, content that could move into other media without losing its substance is content that has been built around ideas rather than around format and this site reads as idea first throughout posts.
Skipped past the first paragraph thinking it was setup and had to come back when the rest referenced it, and a stop at 595tz131 similarly rewarded careful reading from the start, content where every paragraph carries weight is content I now know to read from the beginning rather than skipping ahead.
Reading this in a relaxed evening setting was a small pleasure, and a stop at 5ysrzcf extended the pleasant evening reading, content that fits the tone of relaxed time without becoming forgettable is what I look for in evening reading and this site has the right tone for that particular slot in my daily reading routine.
Been through enough garbage to last a lifetime. You spot a tempting offer online: brand new Porsche, unlimited miles, price that makes you click instantly. Plus they lock up $3500 on your card for who knows how long. Ten years in South Florida and these jokers still almost catch me slipping. miami car rental luxury — run away from the airport counters. Miami without solid wheels is basically a punishment. South Beach night out, Bal Harbour shopping spree, or a spontaneous Keys adventure — AC must be ice cold and unlimited miles non-negotiable. I’ve run through maybe 55 rental companies across Dade, Broward, and Palm Beach. no games, no bait-and-switch, no hidden fees in the fine print. Here’s the only straight shooter for premium rides across South Florida
porsche car rental near me [url=https://luxury-car-rental-miami-10.com]https://luxury-car-rental-miami-10.com[/url] Yeah parking in Brickell will cost you a nice dinner — but that’s just how it is down here. Anyway glad there’s at least one honest rental joint left in this town.
Reading this confirmed a hunch I had been carrying about the topic without having articulated it, and a stop at fjordaster extended the confirmation, content that gives shape to fuzzy intuitions is doing the rare work of making private thoughts public and this site is providing that articulating service consistently for me lately.
Драгон Мани Официальный Сайт
1win android quraşmır [url=https://www.1win71277.help]1win android quraşmır[/url]
Now saved this in a way that I will actually find again rather than the casual bookmark approach, and a stop at dohanyzoasztal earned the same careful saving, organising my reading bookmarks so that high quality sources rise to the top is something I should do more of and this site triggered that organisation today.
Granted my mood today might be elevating my reading experience but I still think this is genuinely good, and a stop at 595tz184 reinforced that even discounted assessment, controlling for the mood adjustment that affects content perception this site still reads as substantively above average across multiple pieces I have read carefully today.
aviator kyc malawi [url=https://aviator95405.online]https://aviator95405.online[/url]
Swear this city never fails to surprise me with new ways to get ripped off. You see this killer deal online — brand new Mercedes, unlimited miles, price that makes you want to book immediately. Completely different car sitting there — scratches everywhere, smells like someone hotboxed it for a week, and that “killer price”? Doesn’t include the mandatory $45 daily insurance or the $400 “destination fee” they add at the very end. Thirteen years in South Florida and these clowns still almost get me. miami luxury car rental. Miami without proper wheels is basically a nightmare. South Beach night out, Design District shopping spree, or a spontaneous Keys trip — AC must be arctic cold and unlimited miles non-negotiable. I’ve tested maybe 70 rental companies across Dade, Broward, and Palm Beach. Finally found one outfit that actually delivers what’s promised. prices change by the hour so don’t sleep on it:
luxury car rental miami beach [url=https://luxury-car-rental-miami-13.com]https://luxury-car-rental-miami-13.com[/url] also bring polarized shades unless you enjoy driving into the sun like a blind bat every evening. Anyway glad there’s at least one honest rental joint left in this town.
Now thinking about whether the writer might publish a longer form work I would buy, and a look at ss6767 suggested the same depth would translate, content that makes me want to pay for related work in other formats is content that has earned commercial trust as well as attention trust and this site has both clearly.
Thanks for putting in the work to make this approachable, plenty of sites cover the same ground but most do it badly, and a quick visit to slkmlfds05 confirmed this one stands apart, simple language and useful examples without anyone trying to sell me anything along the way which I really appreciated.
Worth recognising the specific care that went into how this post ended, and a look at ktfgru3r maintained the same careful conclusions, endings are where most blog content falls apart and this site has clearly invested in the closing stretches of its pieces rather than letting them simply trail off when energy fades.
Новости России Все самые Главные новости, которые стоит прочитать сегодня, уже на нашем портале. Не тратьте время на поиски — всё необходимое здесь.
Swear I’ve seen every scam in the book by now. Then you roll up to the address. Different car sitting there — bald tires, dashboard lit up like a Christmas tree, and that “killer price”? Yeah doesn’t include the non-negotiable $45 daily insurance or the $500 deposit they forget to mention. Nine years in South Florida and these clowns still nearly fool me. luxury car rental in miami. anyone who’s tried the trolley system knows what I’m talking about. Coconut Grove dinner, Sunny Isles sunrise, or a spontaneous drive down to Homestead — AC must freeze your teeth and unlimited miles or no deal. I’ve tested maybe 50 rental outfits across Dade, Broward, and Collier. what you reserve is what you get, period, end of story. rates change daily so check before the holiday crowd hits:
suv rental near me [url=https://luxury-car-rental-miami-9.com]https://luxury-car-rental-miami-9.com[/url] Yeah parking in Wynwood will cost you a nice dinner — but that’s the price of being in Miami. Anyway glad there’s at least one honest operator left in this rental jungle.
https://vibroyaitso.ru/2026/06/18/Промокод-для-1хБет-2026-onex777-Бонус-32500/
Football is the most exciting sport, especially when the World Cup is on. But you’ll be even more excited to watch the match if you decide to bet on it! But how do you learn to bet on sports, and most importantly, where? You can find the answers to all these questions at football betting sites
If quality blog writing is dying as people sometimes claim then this site is one piece of evidence that it has not died yet, and a look at royalpescaria888 extended that evidence, the broader cultural question about online writing has empirical answers in specific sites and this one is contributing to a more optimistic answer overall.
Liked the balance between depth and brevity, never too shallow and never too long, and a stop at ambercrestmarket kept the same balance going across the rest of the site, this is one of the harder skills in writing and the team here clearly has it figured out very well indeed across every page.
Useful enough to recommend to several people I know who would appreciate it, and a stop at projectflag added more material I will pass along too, the kind of writing that earns word of mouth is the kind that actually delivers on its promises which is what this site does without any drama or fanfare attached.
Definitely a recommend from me, anyone curious about the topic should check this out, and a look at wtrewrdetqwfdvagc adds even more reason for that, the depth and quality combine to make this site one I will be pointing people toward whenever similar conversations come up over the months ahead at work or socially.
Thanks for the clean writing, no broken sentences and no awkward translations like some other sites have, and a quick stop at qi3 kept that polish going nicely, it really does make a difference when a reader can move through a page without tripping on every line or going back to reread.
Liked the balance between depth and brevity, never too shallow and never too long, and a stop at jyiw9 kept the same balance going across the rest of the site, this is one of the harder skills in writing and the team here clearly has it figured out very well indeed across every page.
https://www.weddingbee.com/members/haydentweddle/
Closed the laptop after this and let the ideas settle for a few hours, and a stop at goldmanors similarly rewarded reflective time, content that benefits from sitting with rather than racing past is the kind I want more of and the kind that this site appears to consistently produce week after week here.
Reading this confirmed that my time researching the topic in other places had not been wasted, and a stop at datasatinal extended the confirmation, when independent sources agree that is a useful signal and this site is one of the more reliable sources I have found for cross checking what I read elsewhere on similar subjects.
Now feeling something close to gratitude for the fact this site exists, and a look at opi4d extended that gratitude, the rare site that produces this kind of response is the rare site worth defending in conversations about whether the modern internet is still capable of producing genuinely valuable independent content for serious adults.
I’ve seen it all, and most of it isn’t pretty. Then you actually go to pick it up. Different car sitting there — dents you didn’t see, AC that barely works, and that “reasonable rate”? Doesn’t include the mandatory $40 daily insurance or the $300 “processing fee” they add at the last second. Fool me seventeen times? That’s just life in the 305. miami car rental luxury — stay far away from the airport booths. anyone who’s tried Uber during rush hour knows the deal. leather that won’t stick to you in the humidity. most are all flash and no substance. no games, no hidden fees, no nonsense. Here’s the only honest spot for premium rides across South Florida
miami luxury car rental [url=https://luxury-car-rental-miami-17.com]miami luxury car rental[/url] Yeah parking in South Beach will cost you — but that’s Miami for you. drive safe and skip the overpriced roadside add-on.
Let me save you some serious pain with this Miami rental nonsense. Then you actually show up to grab the keys. Completely different car sitting there — dents everywhere, smells like cheap air freshener covering something worse, and that “dream price”? Doesn’t include the mandatory $50 daily insurance or the $300 “administrative fee” they invent at checkout. Fool me eleven times? That’s just called living in Miami. miami car rental luxury — avoid the airport like the plague. anyone who’s tried the bus here knows exactly what I mean. leather seats that won’t fuse to your legs in August. I’ve tested maybe 60 rental companies across Dade, Broward, and Collier. Finally found one outfit that actually delivers what’s in the photos. prices change hourly so check before the weekend crowd wipes them out:
premium car rental [url=https://luxury-car-rental-miami-11.com]premium car rental[/url] Yeah parking in South Beach will cost you a nice bottle of champagne — but that’s the Miami tax. drive safe and definitely skip that “tire and wheel” upsell — pure profit for them, zero value for you.
Quality you can feel from the first paragraph, the writer clearly knows the topic and how to share it, and a quick look at actiondeployment confirmed the same depth runs throughout the rest of the site as well which is rare and worth pointing out when it happens online for any reader passing through.
Will be coming back to this for sure, too much good content to absorb in one sitting, and a stop at zibzi6 only added more pages I want to dig through, this site is going onto my regular rotation list because it consistently delivers something worth the visit lately rather than empty filler.
Now thinking I want more sites built on this kind of editorial foundation, and a stop at embermeadowmarketlounge extended that wish into a broader hope, sites built on substance and care rather than on metrics and growth are the kind of sites I want to see more of and this one is a small example worth supporting.
Started believing the writer knew the topic deeply by about the second paragraph, and a look at solitudehouse reinforced that confidence, the speed at which a writer establishes credibility through their writing is a useful quality signal and this writer establishes it quickly and quietly without resorting to credential dropping or self promotion.
I’ve been burned more times than a cheap steak at a tourist trap. Then you actually show up to get the keys. Completely different car waiting for you — smells like stale cigarettes, check engine light glowing, and that “great rate”? Doesn’t include the mandatory $35 daily toll pass, the $200 cleaning fee, or the $75 “after-hours pickup” charge. Sixteen years in Miami and these tricks still pop up like bad weeds. luxury car rental miami florida. Miami without real wheels is basically a slow death. Design District shopping, late-night South Beach cruising, or a spontaneous Keys trip — AC must be freezing and unlimited miles or walk. I’ve tried so many rental companies I’ve lost count. no tricks, no switch, no surprise fees. prices move fast so check them out:
rental cars near miami beach [url=https://luxury-car-rental-miami-16.com]rental cars near miami beach[/url] also bring good sunglasses unless you like driving blind. drive safe and skip the extra insurance upsell, it’s a joke.
However many similar pages I have read this one taught me something new, and a stop at intentionalmomentum added more new material, content that contributes genuinely fresh information rather than recycling what is already widely available is content with real informational value and this site is providing that informational freshness at a notable rate.
Okay real talk — Miami rentals are a minefield and someone needs to say it. You find this tempting offer online — gorgeous convertible, fair daily rate, looks like a steal. Plus they lock up $4500 on your card and say “10-14 business days”. Fool me eighteen times? That’s just the 305 way of life. those guys are professional scammers in nice uniforms. anyone who’s tried the trolley knows the struggle. South Beach night out, Design District shopping, or a spontaneous Keys trip — AC must be arctic and unlimited miles non-negotiable. most are polished turds with fake reviews. what you book is what shows up, period. Here’s the only honest source for premium rides across South Florida
car rental in miami florida [url=https://luxury-car-rental-miami-18.com]https://luxury-car-rental-miami-18.com[/url] also bring polarized shades unless you enjoy driving blind. Anyway glad there’s at least one honest operator left.
Solid information that lines up with what I have been hearing from other reliable sources, and after my visit to aeronauticsa I was even more certain of that, this site checks out which is something I value highly when so many places online play loose with the facts to chase a quick click.
Felt no urge to argue with the conclusions even though I started the post slightly skeptical, and a look at devilworld maintained that pattern, writing that earns agreement through clarity of argument rather than rhetorical pressure is the kind I find most persuasive and the kind I want to read more of these days.
Thank you for keeping the writing honest and the points easy to verify against your own experience, and a stop at fjordchimney reflected the same approach, no exaggeration just steady useful content that I can take with me into my own work without second guessing every sentence I happen to read here.
If you scroll past this site without looking carefully you will miss something, and a stop at goldencreststore extended that mild warning, the surface of the site does not advertise its quality loudly which means careful attention is required to recognise what is being offered here which is itself a kind of editorial signal.
Thanks for sharing this with the open internet rather than locking it behind a paywall like so many sites do now, and a stop at pin-up-kasino1 kept the same vibe going, generous helpful and clearly written by someone who actually wants people to learn from it rather than just charge them.
Reading this gave me the rare experience of fully agreeing with all the conclusions, and a stop at forexswiss continued that agreement pattern, content that aligns with my existing views without seeming designed to do so is just content that happens to be reasonable and this site reads as reasonable rather than ideological mostly.
Драгон Мани Официальный Сайт
My usual response to new bookmarks is to forget them but this one I have already returned to twice, and a look at dazzquays pulled me back a third time, the actual return rate to bookmarked sites is the real measure of value and this one is clearing that measure at a notable rate already.
ЖК 26 ПаркВью станет хорошим выбором для семей, которые хотят жить рядом с образовательными учреждениями, парками и объектами повседневной инфраструктуры – жк 26 парквью
Glad I clicked through from where I did because this turned out to be worth the time spent, and after kolcson I had a fuller picture, the kind of content that earns its visitors through delivering value rather than chasing them through aggressive advertising or constant pop ups appearing everywhere on the screen lately.
My usual pattern is to skim and bounce but this site has reset that pattern temporarily, and a stop at peqc maintained the slower reading mode, content that changes how I read is content with structural influence and this site has clearly nudged my reading behaviour toward something better at least for the duration of these visits.
Информационное агентство Все Главные новости дня теперь структурированы по рубрикам для вашего удобства. Это экономит время и позволяет сразу перейти к интересующей теме.
A particular pleasure to read this with a fresh coffee, and a look at accomplishmentsa extended the pleasure across more pages, content that pairs well with quiet morning rituals is something I have come to value highly and this site has the kind of energy that fits naturally into a calm reading routine.
Alright, last one I swear — but someone’s gotta warn people about this Miami rental mess. You spot this killer offer online — brand new Porsche, zero excess, price that screams “book me”. Plus they freeze $5500 on your card and say “it’ll drop off in two weeks”. Twenty years in South Florida and these clowns still almost get me. miami luxury car rental. anyone who’s tried public transport here knows I’m not joking. South Beach dinner, Design District shopping, or a spontaneous Keys adventure — AC must be arctic and unlimited miles non-negotiable. most are shiny garbage with fake five-star reviews from God knows where. no games, no bait-and-switch, no hidden fees on page 8. Here’s the only straight shooter for premium rides across South Florida
porsche rental miami [url=https://luxury-car-rental-miami-20.com]porsche rental miami[/url] also bring polarized shades unless you enjoy driving into the sun like a zombie. drive safe and absolutely skip that “windshield protection” upsell — pure profit for them, zero for you.
Really nice to see things explained without overcomplicating the topic, the words flow naturally and stay easy to follow, and a short visit to buydescriptiveessays only added to that experience because the same simple approach is used across the rest of the page too without any change in tone.
Felt a small spark of recognition when the post named something I had been struggling to articulate, and a look at jetsprint produced more such moments, the rare service of giving readers language for fuzzy intuitions is one of the higher values that good writing can provide and this site offered several today instances.
https://instrymentdar.ru/2026/06/18/Промокод-при-Регистрации-1хБет-2026-onex777/
БК Флагман [url=http://www.site-8.voog.com]БК Флагман[/url]
Alright folks, last warning about the Miami rental madness — learn from my mistakes. Spoiler alert: it usually is. Then you actually go to pick up the car. Plus they slap a $6000 hold on your credit card and say “don’t worry, it’s just a pre-authorization”. Fifteen years in South Florida and these clowns still almost catch me. miami car rental luxury — run like hell from the airport counters. Miami without proper wheels is basically a hostage situation. South of Fifth brunch, Sunny Isles sunrise, or a spontaneous trip down to the Florida Keys — AC must be arctic cold and unlimited miles non-negotiable. I’ve tested maybe 80 rental companies across Dade, Broward, Palm Beach, and Monroe. no games, no bait-and-switch, no hidden fees buried on page 6. Here’s the only straight shooter for premium rides across South Florida
exotic car rental miami florida [url=https://luxury-car-rental-miami-15.com]exotic car rental miami florida[/url] also bring quality shades unless you enjoy driving into the sun like a blind zombie. drive safe and definitely skip that “paint protection” upsell — complete waste of cash.
Found the use of subheadings really helpful for scanning back through the post later, and a stop at pokertracker4 kept that reader friendly approach going, navigation is something many blog writers ignore but small structural choices make a noticeable difference for someone returning to find a specific point again days or weeks later.
Generally I find the content on similar topics frustrating in specific ways and this post avoided all of them, and a look at growthplanner continued that frustration free experience, content that sidesteps the standard failure modes of its genre is content with editorial awareness and this site has clearly studied what fails elsewhere consistently.
Let me give it to you straight — renting a decent car in Miami is way harder than it should be. You see this amazing deal online — shiny Audi, unlimited miles, price that makes you want to book right now. Plus they put a $5000 hold on your card and say “don’t worry about it”. Nineteen years in South Florida and these tricks still surprise me. When you’re hunting for a legit luxury car rental miami. anyone who’s taken the bus here knows what I mean. Key Biscayne sunset, Bal Harbour shopping, or a spontaneous drive down to Homestead — AC must freeze your face off and unlimited miles or no deal. most are shiny garbage with fake five-star reviews. Finally found one outfit that actually delivers. Here’s the only honest source for premium rides across South Florida
south beach exotic rentals [url=https://luxury-car-rental-miami-19.com]south beach exotic rentals[/url] Yeah parking in Brickell will cost you — but that’s life here. Anyway glad there’s at least one straight shooter left.
Solid stuff, the kind of post that I will probably refer back to later this month when the topic comes up again, and a look at kasih123spin only confirmed I should bookmark the site as a whole rather than just this single page for future reference and use across coming weeks.
Now appreciating that I did not feel exhausted after reading, and a stop at twilightmeadowgoods extended that energising quality, content that leaves me with more attention than it consumed is rare and the gap between draining and energising content is real over the course of a typical day spent reading widely online.
However measured this site clears the bar I set for sites I take seriously, and a stop at bugbeara continued clearing that bar, the metrics I use for site quality are admittedly informal but they are consistent and this site has cleared them on multiple measurements across multiple visits which is meaningful for my evaluation.
Liked that there was nothing performative about the writing, and a stop at 1stshopping continued that genuine quality, performative writing tries to be witnessed rather than read and the difference between performance and substance is huge for the careful reader and this site has clearly chosen substance every time clearly.
Now realising this site has been quietly doing good work for longer than I knew, and a look at imprumutfaralocdemunca suggested an archive worth exploring, sites with deep archives of consistent quality represent a different kind of resource than sites with viral hits and this one looks like the durable kind based on what I see.
Let me drop some hard truth about the Miami rental game — it’s an absolute circus out here. Then you actually roll up to the lot. Totally different car sitting there — curb rash on every rim, AC blowing warm, and that “fair price”? Doesn’t include the mandatory $55 daily insurance or the $450 “convenience fee” they invent at the counter. Fool me fourteen times? That’s just the 305 experience at this point. luxury car rental in miami. anyone who’s tried the bus in August knows exactly what I’m talking about. leather seats that won’t weld themselves to your thighs in July. most are shiny garbage with fake five-star reviews bought from some online marketplace. what you book is what shows up, period, end of discussion. rates change hourly so check before the weekend crowd cleans them out:
exotic cars miami florida [url=https://luxury-car-rental-miami-14.com]exotic cars miami florida[/url] Yeah parking in South Beach will cost you a nice bottle of wine — but that’s the price of paradise. drive safe and absolutely skip that “windshield protection” upsell — pure profit for them, zero value for you.
https://www.web-bookmarks.win/promokod-1hbet-na-stavku-2026-rich888
Skipped a meeting reminder to finish the post, and a stop at bellyachinga held me past another reminder, when content beats meetings the writer is doing something extraordinary because meetings have institutional support behind them and yet good writing can still occasionally win that competition for attention which I find heartening today.
Better than most of the writing I have come across on this topic recently, simpler and more direct, and a look at etherfairs continued in that same way, a real outlier in a crowded space full of repetitive content that says little while taking up a lot of reader time today which is unfortunate.
Кстати, недавно наткнулся на обсуждение реальных кейсов. Сам уже не первый месяц ищу нормальный способ отправить деньги, без лишних проблем и комиссий. В общем, если вас тоже волнует эта тема — посмотрите тут. Реальные примеры и подводные камни по международным платежам: перевод средств за границу [url=https://mezhdunarodnye-platezhi-lor.ru]https://mezhdunarodnye-platezhi-lor.ru[/url] Короче, учтите, что без адекватных тарифов любые трансграничные переводы превращаются в головную боль. Ещё такой момент — лучше перепроверять несколько площадок, прежде чем платить.
Found the use of subheadings really helpful for scanning back through the post later, and a stop at burkinaa kept that reader friendly approach going, navigation is something many blog writers ignore but small structural choices make a noticeable difference for someone returning to find a specific point again days or weeks later.
Really appreciate that the writer did not stretch the post to hit some target word count, the points end when they are made, and a stop at ifollowers reflected the same discipline, brevity is generosity in disguise and this site has clearly figured that out far better than most blog operations have.
Alright listen up — time for a real talk about renting cars in Miami. Then you actually go to pick it up. Plus they freeze $4000 on your card and say “it’ll drop off eventually”. Seventeen years in South Florida and these scams still pop up. miami car rental luxury — stay far away from the airport booths. Miami without good wheels is basically a headache. leather that won’t stick to you in the humidity. I’ve tried so many rental places I’ve lost count. no games, no hidden fees, no nonsense. prices change fast so take a look:
premium car rental miami [url=https://luxury-car-rental-miami-17.com]https://luxury-car-rental-miami-17.com[/url] Yeah parking in South Beach will cost you — but that’s Miami for you. drive safe and skip the overpriced roadside add-on.
Reading this prompted me to clean up some old notes related to the topic, and a stop at billyboya extended that organising urge, content that triggers personal organisation rather than just consuming attention is content with motivating energy and this site has the kind of clarity that prompts active follow up rather than passive consumption.
Reading this brought back an idea I had set aside months ago, and a stop at flaxbeech added more substance to that idea, content that revives dormant projects in my own thinking is content with serious creative value and this site is contributing to my own work in ways I had not expected when first clicking through.
aviator big win Malawi [url=www.aviator95405.online]aviator big win Malawi[/url]
Honest assessment is that this is one of the better short reads I have had this week, and a look at paisprecaria reinforced that, the bar for short content is low because most of it sacrifices substance for brevity but this site manages both at once which is harder than it sounds for most writers attempting it.
Honestly informative, the writer covers the ground without showing off, and a look at cancelleda reflected the same humility, content that respects the reader rather than trying to dazzle them is something I always appreciate and rarely come across in this corner of the internet today across the topics I usually read.
Irwin Casino irwin casino online bietet eine moderne Plattform für Fans von Online-Casinospielen. Nutzer finden hier attraktive Bonusangebote, regelmäßige Aktionen und exklusive Vorteile für Neu- und Bestandskunden. Mit einem Promo Code Irwin Casino, einem Bonus Code Irwin Casino oder einem Irwin Casino Bonus Code können zusätzliche Boni und besondere Angebote freigeschaltet werden.
mostbet rəsmi giriş linki [url=https://mostbet02606.online/]mostbet rəsmi giriş linki[/url]
Reading this in three sittings because the day was fragmented, and the piece survived the fragmentation, and a stop at dfneroiqw held up under similar reading conditions, content engineered for continuous attention is fragile in modern conditions and this site reads as durable across the realistic ways people consume content today.
mostbet купон [url=http://mostbet70131.online/]mostbet купон[/url]
A piece that earned its conclusions through the body rather than asserting them at the end, and a look at coldhearta maintained the same earned quality, conclusions that follow from what came before are more persuasive than declarations and this site has clearly internalised that principle in how it constructs arguments throughout pieces.
Really appreciate this kind of writing, no shouting and no clickbait headlines just steady useful content, and a quick look at lunarfieldtraders kept that going, definitely a site I will be returning to whenever I need a sensible take on similar topics in the days ahead and also during slower work weeks.
Swear this city never fails to surprise me with new ways to get ripped off. Then you actually drive to the rental lot. Completely different car sitting there — scratches everywhere, smells like someone hotboxed it for a week, and that “killer price”? Doesn’t include the mandatory $45 daily insurance or the $400 “destination fee” they add at the very end. Thirteen years in South Florida and these clowns still almost get me. those people are professional con artists with nice uniforms. Miami without proper wheels is basically a nightmare. leather seats that won’t fuse to your skin in the August heat. I’ve tested maybe 70 rental companies across Dade, Broward, and Palm Beach. Finally found one outfit that actually delivers what’s promised. prices change by the hour so don’t sleep on it:
luxury car rental service [url=https://luxury-car-rental-miami-13.com]luxury car rental service[/url] Yeah parking in Wynwood will cost you a nice dinner — but that’s just the Miami tax. drive safe and definitely skip that “tire protection” upsell — pure robbery.
карточные игры melbet [url=melbet38319.online]карточные игры melbet[/url]
1win сменить почту [url=http://1win75197.online/]http://1win75197.online/[/url]
Thanks for not padding this with the usual filler intros and outros that every other blog seems to require, and a quick visit to apexhelms continued that lean approach across more posts, content stripped of waste is content that respects you and I will always come back to that kind of approach.
Now appreciating the small but real way this post improved my afternoon, and a stop at clarityactivator extended that small improvement effect, content that produces measurable positive impact on the texture of a reading day is content with real value and this site is producing those small positive impacts at a sustainable rate apparently.
Honestly the simplicity is what makes this work, the topic is not buried under filler words or overly complex examples, and a quick look at 5ys3so6dd showed the same sensible style, I left with what I came for and no headache from over reading which is a real win these days.
mostbet mirror [url=https://mostbet44364.online]mostbet mirror[/url]
мостбет суроғаи сайт [url=https://mostbet33044.online]https://mostbet33044.online[/url]
Okay seriously, let me save you from the Miami rental nightmare once and for all. You find this amazing offer online — beautiful car, great rate, everything seems perfect. Completely different car waiting for you — smells like stale cigarettes, check engine light glowing, and that “great rate”? Doesn’t include the mandatory $35 daily toll pass, the $200 cleaning fee, or the $75 “after-hours pickup” charge. Honestly, I’m tired of this nonsense. When you need a legit luxury car rental miami. anyone who’s taken the bus in August knows I’m not lying. leather seats that won’t stick to your back in the humidity. I’ve tried so many rental companies I’ve lost count. no tricks, no switch, no surprise fees. Here’s the only honest place for premium rentals across South Florida
mercedes g wagon rental near me [url=https://luxury-car-rental-miami-16.com]mercedes g wagon rental near me[/url] also bring good sunglasses unless you like driving blind. Anyway glad someone’s still honest in this business.
https://www.thaigolfer.com/forums/thread/279/
A clear case of writing that does not try to do too much in one post, and a look at zghuiy maintained the same scoped discipline, posts that try to cover too much end up covering nothing well and this site has clearly chosen scope discipline as a core editorial principle which shows up clearly in what I read.
Worth flagging that this approach to the topic is fresh without being contrarian, and a stop at mdkiwq5 extended the same fresh angle, finding original perspective on familiar subjects is rare and this site has clearly developed its own way of seeing rather than echoing the dominant takes from elsewhere consistently.
Thanks for putting this online without locking it behind email signups or paywalls, and a quick visit to intentionalpathway kept that open feel going, content that trusts the reader to come back rather than gating access is the kind of approach I will reward with regular return visits over time happily.
Okay folks gather round — Miami rental horror story time. You find a killer listing online: sleek Audi, convertible, price almost too good to be true. Plus a $3000 hold on your credit card for two weeks. Nine years in South Florida and these clowns still nearly fool me. miami car rental luxury — stay the hell away from the airport rental center. anyone who’s tried the trolley system knows what I’m talking about. Coconut Grove dinner, Sunny Isles sunrise, or a spontaneous drive down to Homestead — AC must freeze your teeth and unlimited miles or no deal. most are polished turds with fake five-star reviews. Finally found one company that doesn’t play stupid games. Here’s the only trustworthy source for premium rides across South Florida
premium car rental miami [url=https://luxury-car-rental-miami-9.com]https://luxury-car-rental-miami-9.com[/url] also bring polarized shades unless you enjoy driving blind into the sunset every night. drive safe and definitely skip that “emergency roadside” upsell — complete waste of money.
Reading this on a phone at a coffee shop and finding it perfectly suited to that context, and a stop at birouldecrediterauplatnicilista continued the comfortable mobile experience, content that works across reading conditions without compromising on substance is increasingly important and this site has clearly thought about the whole reader experience here.
melbet киргизия онлайн казино [url=melbet05281.online]melbet05281.online[/url]
Trust me, I’ve learned everything the hard way so you don’t have to. You see this gorgeous deal online — clean spec, fair price, looks like a dream. Plus they put a $4000 hold on your card and say it’ll take two weeks to release. Eleven years in South Florida and these clowns still almost get me. When you’re searching for a legit luxury car rental miami. Miami without proper wheels is basically a disaster. leather seats that won’t fuse to your legs in August. I’ve tested maybe 60 rental companies across Dade, Broward, and Collier. no games, no switch, no hidden BS in paragraph 12 of the contract. Here’s the only honest source for premium rides across South Florida
south beach luxury car rental [url=https://luxury-car-rental-miami-11.com]south beach luxury car rental[/url] Yeah parking in South Beach will cost you a nice bottle of champagne — but that’s the Miami tax. Anyway glad there’s at least one straight operator left in this rental circus.
I’ve stepped on enough landmines to write a guidebook. You find this tempting offer online — gorgeous convertible, fair daily rate, looks like a steal. Plus they lock up $4500 on your card and say “10-14 business days”. Eighteen years in South Florida and these clowns still almost get me. luxury car rental miami florida. Miami without proper wheels is basically impossible. leather seats that won’t brand your legs in July. I’ve tested so many rental companies I’ve honestly lost count. Finally found one outfit that doesn’t play games. Here’s the only honest source for premium rides across South Florida
renting luxury cars near me [url=https://luxury-car-rental-miami-18.com]https://luxury-car-rental-miami-18.com[/url] also bring polarized shades unless you enjoy driving blind. Anyway glad there’s at least one honest operator left.
Now feeling the post has earned a proper recommendation rather than a casual mention, and a stop at yujiejia reinforced the recommendation strength, the difference between mentioning and recommending is a small editorial distinction I observe in my own conversations and this site has earned the upgraded recommendation level from me confidently today.
Glad the writer did not feel the need to argue with imaginary critics in the post itself, and a stop at 29xx29 kept the same focused approach going, defensive writing wastes the reader time and confidence on positions that did not need defending and this post has clearly avoided that common failure.
Found the section structure particularly thoughtful, and a stop at aweeka suggested the same care across the broader site, structural choices guide the reader through the material in ways most people do not consciously notice but feel the absence of when those choices are made carelessly or not at all.
A genuine compliment to the writer for keeping the post focused on what mattered, and a look at hmpornvideos continued that disciplined focus, focus is a editorial choice that compounds across many small decisions and this site has clearly made those small decisions consistently across what I have read so far this week here.
Really appreciate that the writer did not overstate the importance of the topic to make the post feel weightier, and a quick visit to qg4rzm maintained the same modest framing, content that is honest about its own scope rather than inflating itself is the kind I trust and return to repeatedly over time.
https://t.me/s/dragonmoney_kazik
Новости России Наша Служба новостей работает в режиме 24/7, обеспечивая непрерывный поток достоверной информации для широкой аудитории. Мы гарантируем скорость и профессиональный подход в каждой статье.
Now considering carefully how to share this site with the right audience rather than broadcasting widely, and a look at arakea extended that careful sharing impulse, content worth sharing carefully rather than spamming is content that has earned a higher kind of recommendation and this site has earned that careful shareability throughout pieces.
Now appreciating that the post did not require me to agree with the writer to find it valuable, and a look at dp50rbzx maintained the same useful regardless of agreement quality, content that informs even when it does not convince is content with broader utility and this site reads as useful even when I disagree.
Thank you for keeping the writing honest and the points easy to verify against your own experience, and a stop at oakmeadowvendorroom reflected the same approach, no exaggeration just steady useful content that I can take with me into my own work without second guessing every sentence I happen to read here.
A thoughtful read in a week that has been mostly noisy, and a look at clippoises carried that thoughtful quality across more pages, finding pockets of considered writing in a week of distractions is one of the small wins of careful curation and this site is providing those pockets at a sustainable rate.
Thank you for not assuming the reader already knows everything, the explanations meet me where I am, and a look at awasa did the same, that consideration is what makes a site feel welcoming rather than gatekeepy which is sadly the default mood across the modern web today for most subjects covered.
WoW decent article. Can I hire you to guest write for my blog? If so send me an email!
A piece that read as if the writer was thinking carefully rather than just typing fluently, and a look at ideastomotion continued that considered quality, the difference between fluent typing and careful thinking shows up in writing and this site reads as the product of thought rather than just the product of language fluency apparently.
Started reading without much expectation and ended on a high note, and a look at flaxbuckle continued that arc, content that builds rather than peaks early is a sign of a writer who knows how to structure a piece for sustained reader engagement rather than relying on a strong hook to do all the work.
I have to say this post was certainly informative and contains useful content for enthusiastic visitors. I will definitely bookmark this website for future reference and further viewing. cheers a bunch for sharing this with us!
A genuine compliment to the writer for keeping the post focused on what mattered, and a look at brainwashinga continued that disciplined focus, focus is a editorial choice that compounds across many small decisions and this site has clearly made those small decisions consistently across what I have read so far this week here.
Alright, last one I swear — but someone’s gotta warn people about this Miami rental mess. You spot this killer offer online — brand new Porsche, zero excess, price that screams “book me”. Plus they freeze $5500 on your card and say “it’ll drop off in two weeks”. Twenty years in South Florida and these clowns still almost get me. luxury car rental in miami. Miami without real wheels is basically a disaster. leather seats that won’t weld to your legs in July. most are shiny garbage with fake five-star reviews from God knows where. Finally found one outfit that actually keeps its word. Here’s the only straight shooter for premium rides across South Florida
rent cadillac escalade near me [url=https://luxury-car-rental-miami-20.com]rent cadillac escalade near me[/url] Yeah parking in South Beach will cost you a nice bottle of wine — but that’s the Miami tax. Anyway glad there’s at least one honest operator left in this town.
Reading this prompted a brief but useful conversation with a colleague who happened to walk by, and a stop at premiumdownload extended that conversational seed, content that becomes a starting point for in person discussion rather than ending in solitary reading is content with social generative energy and this site has plenty of it apparently.
A piece that did exactly what it promised in the headline without overshooting or underdelivering, and a look at qkl100861 continued that calibration, alignment between promise and delivery is a basic editorial virtue that many sites fail at and this site has clearly mastered the matching of expectation and substance throughout pieces.
Started imagining how I would explain the topic to someone else after reading, and a look at 2b817774 gave me more material for that imagined explanation, content that improves my own ability to discuss a topic is content that has actually transferred knowledge rather than just decorating my screen for a few minutes.
Кстати, недавно наткнулся на обсуждение текущей ситуации с переводами. Сам уже давно ищу нормальный способ отправить деньги, без лишних проблем и комиссий. В общем, если вас тоже волнует эта тема — узнайте подробности тут. Детальный разбор ситуации по платежам за рубежом: перевод за рубеж [url=https://mezhdunarodnye-platezhi-lor.ru]https://mezhdunarodnye-platezhi-lor.ru[/url] И ещё момент обратите внимание, что без прозрачных комиссий любые операции с валютой превращаются в лотерею. Добавлю по опыту — всегда смотрите несколько вариантов, прежде чем отправлять.
The post made the topic feel approachable without making it feel trivial, that is a fine balance, and a stop at spjugt maintained the same balance, finding the middle ground between welcoming and serious is genuinely difficult and the writers here have clearly figured out how to consistently hit it well across many different posts.
Reading this in pieces over a coffee break and finding it consistently rewarding, and a stop at jjzb86e extended that into related material I will return to later, the kind of site that fits naturally into small reading windows without requiring a long uninterrupted block is genuinely useful for how I actually browse.
Reading this on a difficult day was a small bright spot, and a stop at usadisease extended that brightness, content that improves a hard day is content that has earned a particular kind of place in my reading habits and this site is occupying that uplifting role for me today which I appreciate clearly.
Reading this gave me a small jolt of recognition for an experience I thought was just mine, and a stop at detskazidleastul produced more such jolts, content that universalises private experiences without flattening them is doing genuinely useful work and this site is providing that recognition function for me reliably across topics I read.
Came here from another site and ended up exploring much further than I planned, and a look at flickaltars only encouraged more exploration, the kind of place where one click leads to another not through manipulative design but through genuinely interesting content is rare and worth highlighting when found like this somewhere on the open internet.
https://forum.blagfondveroniki.ru/viewtopic.php?t=351
Solid endorsement from me, the writing earns it, and a look at jaspermeadowtradehouse continues to earn it across the broader site too, the kind of operation that maintains quality across many pages rather than just one viral post is a sign of serious commitment and that is what I see here clearly across what I read.
Wer nach einem zuverlässigen Online-Casino sucht, findet bei Irwin Casino irwin casino registrierung eine große Auswahl an Spielen und attraktiven Promotionen. Regelmäßige Bonusaktionen, exklusive Angebote und spezielle Belohnungen sorgen für zusätzlichen Spielspaß. Mit einem Irwin Casino Promo Code oder einem aktuellen Bonus Code lassen sich weitere Vorteile und interessante Prämien sichern.
I’ve got the horror stories to back that up. You see this amazing deal online — shiny Audi, unlimited miles, price that makes you want to book right now. Totally different car waiting — scratches everywhere, AC blowing warm, and that “amazing price”? Doesn’t include the mandatory $50 daily insurance or the $400 “service fee” they add at the counter. Fool me nineteen times? That’s just Miami being Miami. luxury car rental miami florida. anyone who’s taken the bus here knows what I mean. leather seats that won’t melt your skin in August. most are shiny garbage with fake five-star reviews. no games, no switch, no hidden fees. Here’s the only honest source for premium rides across South Florida
luxury car rental miami fl [url=https://luxury-car-rental-miami-19.com]luxury car rental miami fl[/url] Yeah parking in Brickell will cost you — but that’s life here. Anyway glad there’s at least one straight shooter left.
The tone stayed consistent across the whole post which is harder than it looks for longer pieces, and a look at kaitori-st continued the same voice, this kind of editorial consistency is a sign of either a single careful writer or a tightly run team and either is impressive today across the broader media environment.
Now noticing the post fit a particular gap in my reading without my having articulated the gap before, and a look at zil2vem5 extended that gap filling effect, content that meets needs I had not consciously formulated is content with reader insight and this site has clearly developed that anticipatory editorial sense across many pieces.
A quiet piece that did not try to compete on volume, and a look at opencarnivore maintained that selective approach, sites that publish less but better are increasingly rare in an environment that rewards volume and this one has clearly chosen quality cadence over quantity which is a brave editorial decision in current conditions.
Reading this prompted me to send the link to two different people for two different reasons, and a stop at strategylogic provided ammunition for a third share, content that suits multiple audiences without being generic enough to be useless to any of them is genuinely valuable and this site has that multi audience quality clearly.
Служба новостей Our Russian News Agency focuses on providing a clear vision of the country’s development strategies and cultural events. We aim for excellence in every report we publish.
Reading this with a fresh mind in the morning brought out details I might have missed in the afternoon, and a stop at askoloznice earned the same fresh attention, content that rewards being read at full attention rather than at energy lows is content with real density and this site has that density consistently.
Probably worth setting aside a longer block to read more carefully than I can right now, and a stop at ratanovynabyteknaterasu confirmed the longer block plan, the impulse to schedule dedicated time for a sites archive is itself a measure of trust and this site has earned that scheduling impulse from me clearly today actually.
I discovered your weblog site on google and verify just a few of your early posts. Proceed to maintain up the very good operate. I simply further up your RSS feed to my MSN News Reader.
Worth saying that the writing carries a particular kind of authority without making any explicit claims to it, and a stop at wwrqeqesrdtdccgsc extended that earned authority feeling, sites that demonstrate expertise through the quality of their explanations rather than by stating credentials are sites I trust most and this site has it.
Dragon Money Официальный Сайт
Now considering carefully how to share this site with the right audience rather than broadcasting widely, and a look at hjshu extended that careful sharing impulse, content worth sharing carefully rather than spamming is content that has earned a higher kind of recommendation and this site has earned that careful shareability throughout pieces.
Now adding a small note in my reading log that this site is one to watch, and a look at berrybalsillie reinforced the watch status, the few sites I track deliberately rather than encounter accidentally are sites I expect ongoing returns from and this one has cleared the bar for that elevated tracking based on what I read.
crash mostbet [url=www.mostbet02606.online]www.mostbet02606.online[/url]
Appreciated how the post felt complete without overstaying its welcome, and a stop at beefsteaka confirmed that economical approach runs across the site, knowing when to stop is a skill many writers never develop but here the discipline is obvious and welcome from the perspective of a busy reader trying to learn things efficiently.
A piece that read smoothly because the writer understood how readers actually move through prose, and a look at galafactors maintained the same reader awareness, writers who think about the reading experience as much as the writing experience produce better work and this site has clearly made that shift in editorial approach.
Excellent execution from start to finish, the post never loses its rhythm and the points stay sharp, and a quick stop at flaxcargo kept the same level going, consistency like this across a site is the marker of a serious operation rather than a casual side project running on autopilot somewhere else.
Worth recognising that the post handled a familiar topic without reaching for any of the obvious hot takes, and a stop at canyonharborvendorhall continued that fresh treatment, sites that find new angles on subjects others have exhausted are sites worth following carefully and this one has clearly developed that exploratory instinct through patient practice.
Unquestionably believe that which you said. Your favorite reason seemed to be on the net the easiest thing to be aware of. I say to you, I certainly get annoyed while people consider worries that they plainly don’t know about. You managed to hit the nail on the head. Will probably be back to get more. Thanks
Looking through other posts here the consistency is what makes the site valuable rather than any single piece, and a stop at executionlane extended that consistency observation, sites whose value lies in the ongoing pattern rather than in standout posts are sites I trust more deeply and this one has clearly built that kind of trust.
Recommend this to anyone who values clear thinking over flashy presentation, and a stop at z78oxkon continued in the same understated way, this site has its priorities in the right place which makes it worth supporting through repeat visits and recommendations rather than just one passing read today before moving on quickly elsewhere.
The conclusions felt earned rather than tacked on at the end like an afterthought, and a look at chuzs2 kept that careful structure going, you can tell when a writer has thought about the shape of their post versus just letting it ramble out and hoping for the best at the end which most do.
Unquestionably believe that which you said. Your favorite reason seemed to be on the net the easiest thing to be aware of. I say to you, I certainly get annoyed while people consider worries that they plainly don’t know about. You managed to hit the nail on the head. Will probably be back to get more. Thanks
Worth saying this site reads better than most paid newsletters I have tried, and a stop at lenobeta confirmed that comparison, the bar for free content is often lower than for paid but this site clears the paid bar consistently and that says something about the editorial approach behind the work being published here regularly.
Вот уже несколько недель мучаюсь с этим вопросом — как найти адекватный способ международных платежей. Эксперты рекомендуют вот этот обзор: комиссия за международный перевод [url=https://mezhdunarodnye-platezhi-nar.ru]https://mezhdunarodnye-platezhi-nar.ru[/url] Суть в том, — курсы валют часто кусаются. Да и сами понимаете перевод за границу онлайн — это риск переплатить в два раза. И ещё момент, — прежде чем платить проверьте несколько вариантов. Иначе легко попасть на лишние траты. Резюмируя, — стоит разобраться заранее.
Долго откладывал, но созрел — какой вариант реально рабочий для международных транзакций. Порылся в интернете — обязательно гляньте этот источник: международные переводы [url=https://mezhdunarodnye-platezhi-tov.ru]международные переводы[/url] Если по делу, то — есть реальные подводные камни. Согласитесь любой подобный?? перевод — это всегда головная боль без нормальной инфы. Обратите внимание — перед финальным кликом проверьте актуальные отзывы. Без этого легко остаться в минусе. Как итог — лучше сначала изучить тему.
Долго не мог понять, в чем подвох — где условия адекватные, а не грабёж для платежей за рубежом. В одном обсуждении попался дельный совет: трансграничные платежи в условиях санкций [url=https://mezhdunarodnye-platezhi-kap.ru]трансграничные платежи в условиях санкций[/url] Короче, если по факту — банковские комиссии могут быть грабительскими. Согласитесь, абсурд любой подобный трансграничный платёж — это реальная финансовая лотерея. Вот ещё важный момент — перед финальным подтверждением проверьте все комиссии до копейки. Иначе легко остаться в минусе только на конвертации. Короче — лучше один раз изучить тему перед любой отправкой.
1win время вывода [url=http://1win75197.online]http://1win75197.online[/url]
mostbet app telepítése [url=https://mostbet44364.online/]https://mostbet44364.online/[/url]
mostbet verifikasiya gözləmədə [url=mostbet02606.online]mostbet02606.online[/url]
Nice to see a post that does not try to overcomplicate the basics for the sake of looking smart, and once I looked at growthpathway the same direct tone was there too, which honestly makes a difference when you are short on time and want answers without long pointless intros.
Well done, the kind of post that makes you slow down and actually read instead of skimming for keywords, and a look at qqqb kept me reading carefully too, that is a sign of writing that has been crafted rather than churned out for an algorithm to see today and tomorrow.
Refreshing to find writing that does not try to manipulate the reader into clicking onto the next page through cliffhangers and forced engagement, and a stop at xiaoxi02 continued in the same respectful way, this is what reader first design actually looks like in practice rather than just in marketing copy that sounds nice.
winmatch monopoly [url=monopolyy.live]https://monopolyy.live/[/url]
The pacing of the post was just right, never rushed and never dragged out unnecessarily, and a look at loansseptember maintained the same rhythm, you can tell the writer has experience because the difficult skill of pacing is something only practiced writers manage to handle well in long form content over time and across formats.
monopoly result [url=https://monopolyy.live/]https://monopolyy.live/[/url]
monopoly big baller win today india [url=http://monopolyy.live/]https://monopolyy.live/[/url]
live monopoly [url=https://monopolyy.live]https://monopolyy.live/[/url]
Quietly enjoying that I have found a new site to follow for the topic, and a look at depo50rbgcr reinforced the small pleasure of the find, the discovery of new high quality sources is one of the more durable pleasures of careful internet reading and this site has been generating that discovery pleasure at multiple points already today.
Thanks for the clean writing, no broken sentences and no awkward translations like some other sites have, and a quick stop at bleckblog kept that polish going nicely, it really does make a difference when a reader can move through a page without tripping on every line or going back to reread.
mostbet Revolut kifizetés [url=http://mostbet44364.online]mostbet Revolut kifizetés[/url]
промокод 1win [url=https://1win75197.online]https://1win75197.online[/url]
https://576school.ru/forum/messages/forum1/topic3309/message5627/?result=new#message5627
Solid quality, the kind of work that holds up to a careful read rather than a quick skim, and a quick look at sddy80 kept that standard going strong, content that rewards attention rather than punishing it is something I appreciate more and more these days online across nearly every topic I follow.
Now thinking the topic is more interesting than I had given it credit for, and a stop at pujckanarekonstrukci continued that elevated interest, content that revives my curiosity about subjects I had set aside is doing genuine work in the structure of my interests and this site is providing that revivifying effect today actually.
mostbet бурд дар aviator [url=www.mostbet33044.online]mostbet бурд дар aviator[/url]
Now feeling the small relief of finding writing that does not condescend, and a stop at linencovevendorroom extended that respect for readers, content that treats its audience as capable adults rather than as people to be managed produces a different reading experience and this site has clearly chosen the respectful approach across all pieces.
melbet sign up [url=melbet05281.online]melbet05281.online[/url]
Кстати, недавно наткнулся на обсуждение актуальной темы. Сам уже давно ищу нормальный способ провести транзакцию, без лишних проблем и комиссий. В общем, если вас тоже волнует эта тема — узнайте подробности тут. Вся необходимая информация по переводу за границу онлайн: международный платежный агент [url=https://mezhdunarodnye-platezhi-lor.ru]https://mezhdunarodnye-platezhi-lor.ru[/url] Кстати, имейте в виду, что без прозрачных комиссий любые международные платежи превращаются в головную боль. Ну и напоследок — лучше перепроверять несколько сервисов, прежде чем платить.
Even on a quick first read the substance of the post comes through, and a look at acquirementsa reinforced that immediate quality, content that does not require a slow careful read to demonstrate value but rewards one anyway is content with real depth and this site has produced work of that demanding depth class.
If I am being honest this is the kind of site I quietly hope my own work will someday resemble, and a stop at aquifera extended that aspirational feeling, finding work that models what I want to produce is part of why I read carefully and this site has been performing that modelling function for me lately consistently.
Solid endorsement from me, the writing earns it, and a look at biganki-ef continues to earn it across the broader site too, the kind of operation that maintains quality across many pages rather than just one viral post is a sign of serious commitment and that is what I see here clearly across what I read.
Worth observing that the post landed without needing a flashy headline to hook attention, and a stop at alitanwir did the same, content that earns engagement through substance rather than packaging is the kind I trust more deeply and this site has clearly chosen substance as the primary lever for reader engagement throughout.
Reading this prompted me to send the link to two different people for two different reasons, and a stop at focusignition provided ammunition for a third share, content that suits multiple audiences without being generic enough to be useless to any of them is genuinely valuable and this site has that multi audience quality clearly.
Worth saying that the writing carries a particular kind of authority without making any explicit claims to it, and a stop at flaxdune extended that earned authority feeling, sites that demonstrate expertise through the quality of their explanations rather than by stating credentials are sites I trust most and this site has it.
mostbet чат 24 7 [url=https://mostbet33044.online/]mostbet чат 24 7[/url]
melbet ставка без риска [url=melbet05281.online]melbet ставка без риска[/url]
Closed the post with a small satisfied sigh, and a stop at clubmana produced the same gentle exhale, content that ends well is content that respects the rhythm of reading and the writers here have clearly thought about how their pieces close rather than just trailing off when they run out of things to say.
Felt the post had been written without using a single buzzword, and a look at willielambert continued that clean vocabulary, content free of jargon and trendy phrases reads better and ages better and this site has clearly committed to a vocabulary that will not feel dated in three years which is impressive editorially.
Now thinking about how this post will age over the coming years, and a stop at webpic suggested the same durability, content built to age well rather than to capture the attention of the moment is content with a different kind of value and this site has clearly chosen the long horizon over the short one.
The depth of coverage felt about right for the format, neither shallow nor overwhelming, and a look at slkmlfds01 kept that calibration going, getting the depth right for blog format is genuinely difficult because too shallow loses experts and too deep loses beginners but this site nailed it nicely which I really do appreciate.
A satisfying piece in the way that good meals are satisfying rather than just filling, and a look at aspireclub extended that satisfaction, the metaphor between content and meals is one I find useful and this site reads as a satisfying meal rather than the empty calories that most content provides for casual readers.
Liked the post enough to read it twice and the second read found new things, and a stop at rubybrookmarketfoundry similarly rewarded the second look, content with hidden depths that only reveal themselves on careful rereading is the rare kind that earns lasting respect rather than fleeting first impressions only briefly held.
Новостное агентство Информационное агентство с безупречной репутацией продолжает предоставлять читателям эксклюзивные данные о текущих событиях. Доверяйте профессионалам, когда речь идет о правде.
Honest reaction is that this is the kind of writing I would defend in a conversation about good blog content, and a look at hanbo65 reinforced that, the rare site whose work I would actively recommend rather than just tolerate is the kind I want to support through return visits regularly.
However measured this site clears the bar I set for sites I take seriously, and a stop at evanshistorical continued clearing that bar, the metrics I use for site quality are admittedly informal but they are consistent and this site has cleared them on multiple measurements across multiple visits which is meaningful for my evaluation.
Took a chance on the headline and was rewarded, and a stop at zh-movies kept the rewards coming as I clicked through, the kind of place where every link leads somewhere worth the click is a small luxury on the modern web where so many sites are mostly empty calories disguised as content.
Dragon Money Официальный Сайт
Strong recommendation, anyone interested in this topic owes themselves a visit, and a stop at cp38l extends that recommendation across more of the site, this is the kind of resource that makes me more optimistic about the state of the open web than I usually am these days actually for once which is genuinely refreshing.
Now realising this site has been quietly doing good work for longer than I knew, and a look at sgeff0 suggested an archive worth exploring, sites with deep archives of consistent quality represent a different kind of resource than sites with viral hits and this one looks like the durable kind based on what I see.
I came here looking for a quick answer and ended up reading the whole post because it was actually interesting, and after visiontrajectory I had a much fuller picture, no stress and no confusion just a clear walk through the topic that made everything fall into place without much effort.
В общем, решил поделиться — как нормально отправлять деньги для международных транзакций. Пока сидел искал инфу — смотрите, тут годнота: комиссия за международный перевод [url=https://mezhdunarodnye-platezhi-tov.ru]комиссия за международный перевод[/url] Короче, суть такая — курс валют может убить любую выгоду. Согласитесь любой очередной международный перевод — это риск потерять на конвертации. И да, кстати — перед финальным кликом посчитайте итоговую сумму с комиссиями. В противном случае легко остаться в минусе. Как итог — не поленитесь проверить информацию перед отправкой.
Honest take is that I will probably forget most of what I read online today but this post is one I will remember, and a stop at pujckapropodnikatele kept that same memorable quality going, certain writing leaves a residue in the mind in a way most content simply does not manage.
Cuts through the usual marketing fluff that dominates this topic online, and a stop at becharma kept the same clean approach going, this is the kind of writing that respects the reader’s time rather than wasting it on repetitive setups before finally getting to the point at hand which is what most sites do.
A piece that brought a sense of order to a topic I had been finding chaotic, and a look at 34zhgtu-07-27 continued that organising effect, content that imposes useful structure on messy subjects is doing genuine intellectual work and this site is providing that organisational function across multiple posts I have read recently here.
Bookmark added without hesitation after finishing, and a look at 54815485 confirmed I should bookmark the homepage too rather than just this page, the rare site that earns category level trust rather than just single article approval is the kind I want to rely on across many different topics over time.
Now noticing that the post avoided the temptation to be funny in places where humour would have undermined the substance, and a stop at woodbrooktradingfoundry maintained the same restraint, knowing when to be serious is a rare editorial virtue and this site has clearly developed it through what I assume is careful editorial practice over years.
Reading this gave me a small refresher on something I had partially forgotten, and a stop at unibotz extended the refresher, content that strengthens existing knowledge rather than just adding new is content with a particular kind of consolidating value and this site is providing that consolidating function across multiple visits.
Вот уже несколько недель мучаюсь с этим вопросом — где лучше всего организовать перевода денег за границу онлайн. Эксперты рекомендуют вот этот обзор: онлайн перевод денег за границу [url=https://mezhdunarodnye-platezhi-nar.ru]https://mezhdunarodnye-platezhi-nar.ru[/url] Главное, что нужно понять — комиссии могут сильно отличаться. Согласитесь, перевод за границу онлайн — это риск переплатить в два раза. И ещё момент, — прежде чем платить почитайте свежие отзывы. Без этого легко попасть на лишние траты. Короче, — не поленитесь проверить информацию.
Reading this in a relaxed evening setting was a small pleasure, and a stop at chctw extended the pleasant evening reading, content that fits the tone of relaxed time without becoming forgettable is what I look for in evening reading and this site has the right tone for that particular slot in my daily reading routine.
A piece that brought a sense of order to a topic I had been finding chaotic, and a look at nebankovnipujckabezdolozeniprijmu continued that organising effect, content that imposes useful structure on messy subjects is doing genuine intellectual work and this site is providing that organisational function across multiple posts I have read recently here.
Новости в России Мы отбираем Главные новости из сотен источников, чтобы предложить вам самый качественный контент. Наш подход основан на принципах независимости и объективности.
Thanks again for the post, I learned a couple of things I can actually use later this week, and after I went over flaxermine the rest of the site looked equally promising, definitely going to spend more time here when I get a free moment over the weekend to read more carefully.
Долго не мог понять, в чем подвох — где условия адекватные, а не грабёж для международных переводов. Товарищ скинул ссылку на нормальный разбор: платежи за границу [url=https://mezhdunarodnye-platezhi-kap.ru]платежи за границу[/url] Короче, если по факту — скрытые платежи всплывают в последний момент. Ну сами подумайте любой подобный трансграничный платёж — это реальная финансовая лотерея. Вот ещё важный момент — до любой операции с валютой сравните эффективный курс. В противном случае легко остаться в минусе только на конвертации. Короче — не ленитесь проверять информацию перед любой отправкой.
Felt the writer was being honest with the reader which is rare enough that I want to acknowledge it, and a look at soukbio continued that honest feel, content built on actual knowledge rather than aggregated summaries is something I value highly and rarely come across in regular searches on the open internet these days.
Ça fait longtemps que je voulais tester cette plateforme. Je n’arrivais pas à trouver la bonne version sur le Play Store. Après avoir suivi les étapes dans le bon ordre, tout a fonctionné. J’ai finalement trouvé la bonne source et je voulais vous partager tous les détails, vous pouvez consulter les informations à jour ici: 1xbet cameroun apk [url=http://www.mameauto.com]1xbet cameroun apk[/url]. Voilà, pour être clair — après l’avoir installée sur mon téléphone, j’ai été agréablement surpris.
Je n’ai rencontré aucun problème lors du téléchargement. Je vous parle de mon expérience personnelle — croyez-moi, vous ne serez pas déçus, essayez-la. Je vous souhaite bonne chance et beaucoup de gains…
Liked how the post handled an objection I was forming as I read, and a stop at claritybuilderhub similarly anticipated where my thinking was going next, the rare writer who can predict reader concerns and address them in advance is doing something most online content fails to do despite that being basic editorial work.
Came back to this twice now in the same week which is unusual for me, and a look at boxcara suggested I will keep coming back, the kind of post that earns repeated visits rather than one and done reading is the gold standard for content quality and this site clearly hit that standard.
Dragon Money Зеркало
Honestly impressed by the consistency of voice across what I have read so far, and a quick visit to imprumutprovidentfaracartemunca continued that consistent feel, when a site reads like one careful person rather than a committee the experience is more rewarding for the reader who notices these subtle editorial details over time.
tower rush cash game
Started reading without much expectation and ended on a high note, and a look at polaks continued that arc, content that builds rather than peaks early is a sign of a writer who knows how to structure a piece for sustained reader engagement rather than relying on a strong hook to do all the work.
Granted I am giving this site more credit than I usually give new finds, and a look at s0021 continued earning that credit, the calibration of how much trust to extend after limited exposure is something I do carefully and this site has earned more trust on shorter exposure than most due to consistent quality across.
Reading this on the train into work was a better use of the commute than my usual choices, and a stop at hvyq extended that commute reading well, content that improves transit time rather than just filling it is content with practical benefit and this site has earned its place in my morning commute reading rotation.
Glad the writer did not feel the need to argue with imaginary critics in the post itself, and a stop at woodcovecommerceatelier kept the same focused approach going, defensive writing wastes the reader time and confidence on positions that did not need defending and this post has clearly avoided that common failure.
Нашёл интересный материал по этому вопросу — как правильно организовать процесс для платежей за рубежом. Нашёл подробный анализ ситуации: переводы денег за границу [url=https://mezhdunarodnye-platezhi-fra.ru]https://mezhdunarodnye-platezhi-fra.ru[/url] Основной вывод, который я сделал — банковские комиссии сильно различаются. Дело в том, что любой международный перевод — требует предварительного сравнения условий. И ещё один момент — до проведения операции стоит проверить итоговую сумму. Без этого можно получить менее выгодные условия. В итоге — необходимо проверять информацию перед любой отправкой средств.
Quietly building a case in my head for why this site deserves more attention than it currently seems to receive, and a look at daythi reinforced the case, the gap between quality and recognition is a recurring frustration in independent online content and this site is one of the cases that seems particularly egregious to me today.
Decided to read this site for a while before forming a verdict, and the verdict after several pages is positive, and a stop at nerodev continued that pattern, judging a site requires more than one post and giving sites a fair sample is something I try to do for promising candidates rather than rushing to dismiss.
Bookmark added with a small note about why, and a look at bowdena prompted another bookmark with another note, the bookmarks I annotate are the ones I expect to return to deliberately rather than stumble into and this site is generating annotated bookmarks at a higher rate than my usual content sources by some margin.
Beyond the topic at hand this site reads as a small ongoing project of taking writing seriously, and a look at christmastidea reinforced that project quality, sites that treat publishing as an ongoing serious practice rather than as content production for traffic are sites worth supporting and this one has clearly chosen the serious approach.
Felt no urge to argue with the conclusions even though I started the post slightly skeptical, and a look at xbt15h maintained that pattern, writing that earns agreement through clarity of argument rather than rhetorical pressure is the kind I find most persuasive and the kind I want to read more of these days.
Worth every minute of the time spent reading, and a stop at lologacor extends that value across more pages, in a media environment where most content is engineered to waste attention this site stands out by treating reader time as something valuable rather than something to be exploited and stretched as far as possible.
Useful information presented in a way that does not feel like a sales pitch, that is what I appreciated most, and a stop at beaconaster was the same, no upsell and no fake urgency just steady content laid out properly for someone trying to actually learn from it rather than just be sold to.
Honestly this was the highlight of my reading queue today, and a look at flaxgourd extended that across more pages I will return to, ranking what I read against what else I read each day is something I do informally and this site keeps moving up in those rankings the more I explore it.
Glad to have another data point on a question I am still thinking through, and a look at busan-massage3 added two more, content that acknowledges its place in a wider conversation rather than pretending to settle the question alone is intellectually honest in a way that I wish was more common across the open web.
Found the writing surprisingly fresh for what is by now a well covered topic, and a stop at oliveorchardgoodsroom kept that freshness going across the related pages, original perspective on familiar ground is hard to come by and this site has clearly earned its place in the conversation rather than just rehashing old ideas.
Reading this confirmed a small detail I had been uncertain about, and a stop at adverbsa provided the source for further checking, content that supports verification through citations or links rather than just asserting facts is more trustworthy and this site has clearly built its credibility through that kind of verifiable approach consistently.
В общем, решил поделиться — где брать адекватные тарифы для платежей за рубежом. Порылся в интернете — смотрите, тут годнота: оплата за границу [url=https://mezhdunarodnye-platezhi-tov.ru]оплата за границу[/url] Самое важное, что я понял — не все способы одинаково безопасны. Потому что любой перевод за границу онлайн — это риск потерять на конвертации. Вот ещё какой момент — перед финальным кликом обязательно сравните хотя бы пару вариантов. В противном случае легко переплатить в два раза. Как итог — стоит один раз разобраться.
Just sat with this for a bit longer than I usually would because the points are worth thinking about, and after claritybuilder I had even more to chew on, the kind of post that nudges your thinking forward without forcing the issue is something I have always appreciated in good writing online.
Now appreciating that the post did not require me to agree with the writer to find it valuable, and a look at jualpurehopeoil maintained the same useful regardless of agreement quality, content that informs even when it does not convince is content with broader utility and this site reads as useful even when I disagree.
Thanks for taking the time to write this, it is clear that some thought went into how each point would land, and after I went through loopconcepts I had a better grip on the topic, real value without the usual marketing noise people have to put up with online when searching for answers.
The post made the topic feel approachable without making it feel trivial, that is a fine balance, and a stop at 6rtpibisawin maintained the same balance, finding the middle ground between welcoming and serious is genuinely difficult and the writers here have clearly figured out how to consistently hit it well across many different posts.
Reading this gave me confidence to make a decision I had been putting off, and a stop at 2b808805 reinforced that confidence, content that translates into action in my own life rather than just informing it is content with the highest practical value and this site is generating that action level utility for me lately.
Reading this on a difficult day was a small bright spot, and a stop at sandbetgacor extended that brightness, content that improves a hard day is content that has earned a particular kind of place in my reading habits and this site is occupying that uplifting role for me today which I appreciate clearly.
франшиза бизпро
Новости России Следите за тем, какие Новости в РФ становятся наиболее популярными в социальных сетях и СМИ. Мы анализируем тренды и предлагаем вам лучшее.
Now setting aside time on my next free afternoon to read more from the archives, and a stop at minnesotarocks confirmed that time will be well spent, the rare site whose archive deserves a dedicated reading session rather than just casual sampling is the kind of resource worth scheduling around and this one qualifies clearly.
I have been surfing online more than three hours today, yet I never found anything that grabbed my interest as much as this piece.
On reflection this is the kind of writing that improves my taste for what is possible in the format, and a look at commentariesa continued raising that bar, content that elevates my expectations rather than lowering them is doing important work in calibrating my standards and this site is participating in that elevation reliably.
Felt the post had been written without using a single buzzword, and a look at antiromanticisma continued that clean vocabulary, content free of jargon and trendy phrases reads better and ages better and this site has clearly committed to a vocabulary that will not feel dated in three years which is impressive editorially.
Вот уже несколько недель мучаюсь с этим вопросом — где лучше всего организовать международных платежей. В одном блоге вычитал вот этот разбор: перевод за границу онлайн [url=https://mezhdunarodnye-platezhi-nar.ru]перевод за границу онлайн[/url] Главное, что нужно понять — курсы валют часто кусаются. Согласитесь, такая транзакция — это потеря времени без нормальной инфы. Обратите внимание — перед тем как отправлять почитайте свежие отзывы. Иначе легко остаться в минусе. Резюмируя, — лучше один раз изучить тему.
Glad to be one of several visitors on this awful internet site : D.
This is really interesting, You’re a very skilled blogger. I have joined your feed and look forward to seeking more of your fantastic post. Also, I have shared your website in my social networks!
Found the use of subheadings really helpful for scanning back through the post later, and a stop at a478884 kept that reader friendly approach going, navigation is something many blog writers ignore but small structural choices make a noticeable difference for someone returning to find a specific point again days or weeks later.
I really like the calm tone here, it does not push anything on the reader, and after I went through growthmovement I felt the same way, just steady useful content laid out without drama, which is exactly what someone trying to learn something quickly needs to find rather than aggressive marketing.
A piece that read as the work of someone who reads carefully themselves, and a look at laskarlucky continued that informed feel, writers who are also serious readers produce work with a different quality and this site reads as the product of someone steeped in good writing rather than just generating content for an audience.
Bookmark moved to my permanent reference folder rather than the casual maybe later folder, and a look at ikeakancelarskystul earned the same upgrade, the distinction between casual interest and lasting reference is something I track carefully and very few sites cross that threshold but this one did so without much effort apparently.
https://domishche.ru/user/voadilghfu
bonjour I love Your Blog can not say I come here often but im liking what i c so far….
Glad to find a site whose links lead somewhere worth going rather than back to itself for SEO juice, and a stop at shortwatches kept that generous outbound feel, citing other peoples work with real respect rather than just for ranking signals is a sign of an honest operation worth supporting going forward.
Top quality material, deserves more attention than it probably gets, and a look at beaconbevel reflected the same effort across the site, a hidden gem in the modern web where most attention goes to whoever shouts loudest rather than whoever actually delivers the best content for their readers without much marketing fanfare.
Reading this gave me material for a conversation I needed to have anyway, and a stop at pangfan added even more talking points, content that connects to upcoming social or professional needs rather than just being interesting in the abstract is the kind that earns priority placement in my attention these days routinely.
If I had to defend the time I spend reading independent blogs this site would feature in the defence, and a look at providentkolcson reinforced that defensive utility, the ongoing case for non algorithmic reading is one I make to myself periodically and sites like this one provide the actual evidence that supports the case clearly.
Took a screenshot of one section to come back to later, and a stop at 8499ng prompted another saved tab, the urge to capture and revisit specific pieces of content is something I rarely feel but when I do it tells me the work is worth more than the average passing read for sure.
Решил проблему только когда наткнулся — как выбрать реально работающий способ для международных платежей. Товарищ скинул ссылку на нормальный разбор: переводы за рубеж [url=https://mezhdunarodnye-platezhi-kap.ru]переводы за рубеж[/url] Самое главное, что я вынес — банковские комиссии могут быть грабительскими. Ну сами подумайте любой очередной международный перевод — это головная боль с отслеживанием статуса. Обратите внимание, многие не в курсе — перед финальным подтверждением обязательно сверьте итоговую сумму. В противном случае легко попасть на лишние траты. Короче — лучше один раз изучить тему перед любой отправкой.
Appreciated that the writer trusted the reader to follow along without constant restating of earlier points, and a look at zlg01 continued that respect for the reader, treating an audience as capable adults rather than as people to be hand held through every paragraph is something I notice and value highly across the open internet today.
Reading this on a slow Sunday and finding it perfectly suited to a slow Sunday read, and a quick stop at baiduyunpro kept the same gentle pace, content that fits the mood of the moment is something I notice and remember and this site has the kind of pace that suits relaxed reading sessions especially well.
I really like the calm tone here, it does not push anything on the reader, and after I went through bellboya I felt the same way, just steady useful content laid out without drama, which is exactly what someone trying to learn something quickly needs to find rather than aggressive marketing.
Came away with some new perspectives I had not considered before, and after antronasala those ideas felt more complete, the kind of content that stays with you a little while after reading rather than slipping out the moment you switch tabs and move on with your day to whatever comes next.
Now setting aside time on my next free afternoon to read more from the archives, and a stop at aphoriaa confirmed that time will be well spent, the rare site whose archive deserves a dedicated reading session rather than just casual sampling is the kind of resource worth scheduling around and this one qualifies clearly.
J’ai essayé plusieurs sites mais rien n’y faisait. Tout le monde donnait des adresses différentes, je ne savais plus qui croire. Finalement, j’ai pris le temps d’analyser tous les détails techniques. J’ai finalement trouvé la bonne source et je voulais vous partager tous les détails, vous pouvez consulter les informations à jour ici: 1xbet com apk [url=mameauto.com]mameauto.com[/url]. Bref, ce que je voulais dire — après l’avoir installée sur mon téléphone, j’ai été agréablement surpris.
Je n’ai rencontré aucun problème lors du téléchargement. J’ai testé plusieurs apps mais celle-ci est la meilleure — croyez-moi, vous ne serez pas déçus, essayez-la. Je vous souhaite bonne chance et beaucoup de gains…
Solid quality, the kind of work that holds up to a careful read rather than a quick skim, and a quick look at 5gdaohang kept that standard going strong, content that rewards attention rather than punishing it is something I appreciate more and more these days online across nearly every topic I follow.
Now feeling that this site is the kind I want to make sure does not disappear, and a look at dp50rbme reinforced that quiet protective feeling, the rare sites whose disappearance would actually matter to me are the sites I want to support through return visits and recommendations and this one has joined that small protected list.
Excellent post, balanced and well organised without showing off, and a stop at clarityroutehub continued in that same vein, this site has clearly figured out the formula for content that works for readers rather than for search engine ranking signals which is harder than it sounds today and worth real recognition from anyone.
A clear cut above the usual noise on the subject, and a look at businessfri only made that gap wider in my view, the kind of place that earns its visitors through quality rather than through aggressive marketing or sponsored placements which is increasingly the only way most sites stay afloat across the modern web.
Felt no urge to argue with the conclusions even though I started the post slightly skeptical, and a look at x3301 maintained that pattern, writing that earns agreement through clarity of argument rather than rhetorical pressure is the kind I find most persuasive and the kind I want to read more of these days.
Really nice to see things explained without overcomplicating the topic, the words flow naturally and stay easy to follow, and a short visit to zoyf only added to that experience because the same simple approach is used across the rest of the page too without any change in tone.
One of the more thoughtful posts I have read recently on this topic, and a stop at nqcty added even more weight to that impression, this is genuinely good content that holds its own against far better known sites in the same space without trying to imitate any of them at all which I appreciate.
whoah this weblog is wonderful i like reading your articles. Keep up the good paintings! You already know, many people are looking around for this information, you can help them greatly.
A relief to read something where I did not have to fact check every claim mentally, and a look at afifia continued that reliable feeling, sites where I can lower my guard and trust the content are rare and this one is earning that trust paragraph by paragraph through consistent careful work behind the scenes.
Awesome post. It’s so good to see someone taking the time to share this information
Top quality material, deserves more attention than it probably gets, and a look at shebra reflected the same effort across the site, a hidden gem in the modern web where most attention goes to whoever shouts loudest rather than whoever actually delivers the best content for their readers without much marketing fanfare.
Reading this slowly because the writing rewards a slower pace, and a stop at beaconcopper did the same, the pace at which I read content is something I now use as a quality signal and writing that earns a slower pace earns my attention as a reader looking for substance these days.
https://boitetransparente.com/modules/pgs/glossariy_po_dizaynu_standartnye_opredeleniya.html
Вот решил поделиться информацией — какой способ действительно работает для международных платежей. В одном обсуждении попался дельный обзор: перевод за рубеж [url=https://mezhdunarodnye-platezhi-fra.ru]https://mezhdunarodnye-platezhi-fra.ru[/url] Суть в следующем — банковские комиссии сильно различаются. Важно понимать любой перевод за границу онлайн — требует предварительного сравнения условий. И ещё один момент — прежде чем отправлять средства стоит проверить итоговую сумму. В противном случае можно столкнуться с неожиданными расходами. Резюмируя — стоит потратить время на анализ перед любой отправкой средств.
I loved your idea there, I tell you blogs are so exciting sometimes like looking into people’s private life’s and work. Every new remark wonderful in its own right.
https://aboutsnfjobs.com/author/xbetfree38/
Now placing this in the small category of sites whose updates I would actually want to know about, and a stop at kldjfb confirmed that placement, the difference between sites I want to follow and sites I just consume from is real and this one has crossed into the active follow category from the casual consumption side.
Most blog writing on this subject reaches for the same handful of arguments and this post avoided them, and a look at chabang continued the original treatment, content that finds its own path through territory other writers have flattened is content with real authorial energy and this site has plenty of that distinctive energy.
Felt like the post had been edited rather than just drafted and published, and a stop at baaga suggested the same care across the site, the difference between edited and unedited content is enormous for the reader and this site has clearly invested in the editing pass that most blogs skip entirely which really does show up.
Reading this brought back the satisfaction I used to get from blogs ten years ago, and a stop at livechatslotasiabet kept that nostalgic quality alive, sites that capture what was good about an earlier era of internet writing are increasingly precious and this one is doing that without feeling like a deliberate throwback at all.
mostbet смотреть матчи [url=http://mostbet70131.online/]mostbet смотреть матчи[/url]
aplicatia 1win [url=http://1win95031.help/]http://1win95031.help/[/url]
Quietly the writers approach to the topic differs from the dominant takes I have been encountering, and a stop at wqreqwrerdxadcxds extended that distinctive approach, content that maintains a different perspective without explicitly arguing against the dominant ones is content with confident editorial identity and this site has that confidence throughout pieces.
Will be coming back to this for sure, too much good content to absorb in one sitting, and a stop at claritymapping only added more pages I want to dig through, this site is going onto my regular rotation list because it consistently delivers something worth the visit lately rather than empty filler.
In the middle of an otherwise scattered day this post landed as a moment of focus, and a stop at dcvghn33 extended that focused feeling across more pages, content that anchors a fragmented day rather than contributing to the fragmentation is content with real centring effect and this site is providing that anchoring function for me.
сколько стоит имплант зуба в волгограде Выбирайте современные брекеты в Волгограде от лучших производителей для эффективной коррекции прикуса. Наши специалисты ведут вас на всех этапах лечения.
Thanks for putting in the work to make this approachable, plenty of sites cover the same ground but most do it badly, and a quick visit to kuaib101 confirmed this one stands apart, simple language and useful examples without anyone trying to sell me anything along the way which I really appreciated.
Now sitting with the thoughts the post triggered rather than rushing on to the next thing, and a stop at acorndamson extended that reflective pause, content that earns time for thought after closing the tab is content of higher value than the merely interesting and this site has clearly produced that lasting effect today.
Honestly enjoyed reading this more than I expected to when I first clicked through, and a stop at dmin-site kept that pleasant surprise going, sometimes you stumble onto a site that just clicks with how you like to read and this is one of those for me right now today which is great.
Glad the writer kept this short rather than padding it out, the points stand on their own without needing extra context, and a look at yordam kept the same approach going, brevity is a sign of confidence in the substance and the team here clearly trusts their content to land without filler.
Thanks for keeping the writing direct without losing the warmth that makes content feel human, and a stop at makura-smp carried both qualities forward, balancing professionalism and personality is a rare skill and the writers here have clearly figured out how to consistently land it across many posts which I notice.
My friends would appreciate a few of these posts and I will be sending links accordingly, and a look at howtobecomeaninsuranceagent added more pages to my share queue, content that earns shares to specific people in specific contexts is content with social utility and this site is generating those targeted shares from me consistently lately.
Picked up a couple of new ideas here that I can actually try out, and after my visit to onkm I have even more notes saved, this is the kind of resource that pays you back for the time you spend on it which is rare to come across in this corner of the web.
Reading this in the morning set a good tone for the day, and a quick visit to bedouina kept that good tone going, content can do that sometimes when it hits the right notes and finding sites that consistently strike that tone is something I have learned to recognise and reward with regular visits.
Reading this prompted a small note in my reference file, and a stop at momentumengine prompted another, the rare site that contributes useful nuggets to my own working knowledge rather than just consuming my attention is worth the time investment many times over compared to the usual pile of forgettable scroll content.
Generally I am cautious about recommending sites on first encounter but this one warrants the exception, and a look at cpduua reinforced the exception making, the rare site that justifies breaking my normal cautious approach is the rare site worth flagging early and this one has prompted exactly that early flagging response from me.
Ça fait longtemps que je voulais tester cette plateforme. Télécharger un fichier sûr était devenu un vrai casse-tête. Finalement, j’ai pris le temps d’analyser tous les détails techniques. J’ai finalement trouvé la bonne source et je voulais vous partager tous les détails, vous pouvez consulter les informations à jour ici: 1xbet app download apk [url=mameauto.com]1xbet app download apk[/url]. Bref, ce que je voulais dire — la dernière version est vraiment bien conçue.
les mises à jour se font automatiquement. J’ai testé plusieurs apps mais celle-ci est la meilleure — croyez-moi, vous ne serez pas déçus, essayez-la. Je vous souhaite bonne chance et beaucoup de gains…
Just want to say thank you for putting this together, posts like these make searching online actually worth it sometimes, and a quick look at ambitusa kept that going, useful and easy to read without any of the tricks that ruin most blog comment sections lately on the wider open web.
Came in for one specific question and got answers to three I had not even thought to ask, and a look at artsyhands extended that bonus value pattern, the kind of resource that anticipates reader needs rather than just answering the literal question asked is the gold standard and this site reaches it.
Picked this up while looking for something else and ended up reading every paragraph because it was actually informative, and after heronbobcat I was sure I would come back, that does not happen often when most sites bury the useful parts under endless ads and pop ups today and across most categories online.
Worth recognising that the post handled a familiar topic without reaching for any of the obvious hot takes, and a stop at bubblinga continued that fresh treatment, sites that find new angles on subjects others have exhausted are sites worth following carefully and this one has clearly developed that exploratory instinct through patient practice.
Genuinely well crafted writing, the kind that makes the topic look easier than it actually is, and a look at kaitori-gk added even more depth, you can feel the experience behind every line which is something only writers who have been at this for a while can pull off with this level of grace.
Reading this gave me a small jolt of recognition for an experience I thought was just mine, and a stop at minicreditosnuevos produced more such jolts, content that universalises private experiences without flattening them is doing genuinely useful work and this site is providing that recognition function for me reliably across topics I read.
A small thank you note from me to the team behind this work, the post earned it, and a stop at kaitori-hk suggested more thanks would be in order over time, recognising the people who do good writing online is something I try to remember to do because the alternative is silence and silence rewards mediocrity unfortunately.
Started reading expecting to disagree and ended mostly nodding along, and a look at 54xx54 continued the pattern, content that wins agreement through evidence and reasoning rather than rhetorical force is the kind that actually shifts minds and this site clearly knows how to do that across what I have read so far.
Clean writing, easy to read, and never tries too hard to impress, that combination is harder to find than people think, and after my time on 87tv I am sure this site treats its readers well, no flashy tricks just useful content done right which is honestly all I want online.
A piece that earned its conclusions through the body rather than asserting them at the end, and a look at adobebronze maintained the same earned quality, conclusions that follow from what came before are more persuasive than declarations and this site has clearly internalised that principle in how it constructs arguments throughout pieces.
Good quality through and through, no rough edges and no signs of being rushed, and a quick look at beetledune kept the same polish going, the kind of site that respects its own brand by maintaining consistency across pages which is something I always appreciate as a reader looking for trustworthy information online today.
However many similar pages I have read this one taught me something new, and a stop at ghewr added more new material, content that contributes genuinely fresh information rather than recycling what is already widely available is content with real informational value and this site is providing that informational freshness at a notable rate.
https://dreevoo.com/profile_info.php?pid=1936878
Speaking from the perspective of having read widely on the topic this site offers something distinct, and a look at adverba reinforced that distinctness, the rare site that contributes something genuinely original to a saturated topic is the rare site worth following carefully and this one has demonstrated that original contribution capability today.
hsk 4 standard course Уверенное владение материалом HSK 4 позволяет чувствовать себя свободно в Китае и общаться с носителями языка. Это важная ступень в изучении китайского языка.
Reading this on the train into work was a better use of the commute than my usual choices, and a stop at dgeg extended that commute reading well, content that improves transit time rather than just filling it is content with practical benefit and this site has earned its place in my morning commute reading rotation.
Felt energised after reading rather than drained, which is unusual for online content these days, and a look at ufobet88 continued that good feeling, content that leaves you better than it found you is rare and worth bookmarking when you stumble across it for the first time today or any other day really.
Reading this felt productive in a way most internet reading does not, and a look at americahtml continued that productive feeling, sometimes the open web feels like a waste of time but sites like this remind me why I still bother to look around rather than retreating to old reliable sources for everything I need.
1win suport Moldova [url=https://1win95031.help/]1win suport Moldova[/url]
Reading this in pieces over a coffee break and finding it consistently rewarding, and a stop at tzxc3342 extended that into related material I will return to later, the kind of site that fits naturally into small reading windows without requiring a long uninterrupted block is genuinely useful for how I actually browse.
Thanks for the honest framing without exaggerated claims that the topic will change my life, and a stop at collothuna kept the same modest tone, restraint in marketing language signals trustworthiness and the writers here are clearly playing the long game by building credibility rather than chasing immediate clicks through hyperbole.
A piece that left me thinking I had been undercaring about the topic, and a look at coyotederby reinforced that mild concern, content that raises the appropriate weight of a subject without being preachy about it is doing important work and this site is providing that gentle elevation of attention for me consistently.
http://www.stes.tyc.edu.tw/xoops/modules/profile/userinfo.php?uid=4004082 Занимаемся арендой авто в Краснодаре без залога и ограничения по пробегу с подачей в аэропорт и жд вокзал
Honestly impressed by how much useful content sits in such a small post, and a stop at airmailsa confirmed the rest of the site packs a similar punch, density without confusion is a hard balance to strike and this site has clearly cracked the code on it across many different topic areas covered.
Better signal to noise ratio than most places I check on this kind of topic, and a look at wbsaoabb kept that going, every paragraph here carries something worth reading rather than padding out the page to hit some arbitrary length target that search engines reward but readers ignore as soon as they notice it.
Now adjusting my mental list of reliable sites for this topic, and a stop at 2hays reinforced the adjustment, the small ongoing curation work of maintaining trusted sources is one of the actual practical activities of careful reading and this site has earned a permanent place on my list for this particular subject.
Ça faisait un moment que je voulais essayer cette appli. Je n’arrivais pas à trouver la version officielle sur le Play Store. Finalement, j’ai pris le temps d’analyser tous les détails techniques. J’ai finalement déniché la bonne source et je voulais vous partager tous les détails, vous pouvez consulter les informations à jour ici: 1xbet original [url=https://twittercal.com]1xbet original[/url]. Voilà, pour être clair avec vous — l’appli tourne parfaitement bien sur mon téléphone.
l’installation était rapide et simple, pas de tracas. Pour être honnête, c’est la plus stable que j’aie trouvée — croyez-moi, vous ne serez pas déçus, essayez-la sans hésiter. Bonne chance à tous…
Je cherchais une application mobile pour mes paris sportifs. Télécharger un fichier fiable devenait vraiment compliqué. J’ai vérifié les dernières mises à jour pour lancer le processus sans erreur. J’ai finalement déniché la bonne source et je voulais vous partager tous les détails, vous pouvez consulter les informations à jour ici: télécharger 1xbet original [url=countryontheriver.com]télécharger 1xbet original[/url]. Voilà, pour être clair — l’appli tourne parfaitement sur mon smartphone.
l’installation était rapide et sans complication. J’ai comparé plusieurs apps mais celle-ci est la meilleure — croyez-moi, vous ne serez pas déçus, essayez-la sans hésiter. Bonne chance à tous…
Столкнулся с ситуацией и начал разбираться — как правильно организовать процесс для международных переводов. Нашёл подробный анализ ситуации: прием оплаты из-за рубежа [url=https://mezhdunarodnye-platezhi-fra.ru]https://mezhdunarodnye-platezhi-fra.ru[/url] Суть в следующем — не все сервисы одинаково прозрачны. Стоит учитывать, что любой международный перевод — требует предварительного сравнения условий. И ещё один момент — прежде чем отправлять средства рекомендуется сравнить несколько вариантов. В противном случае можно переплатить из-за невыгодного курса. Резюмируя — лучше заранее разобраться в вопросе перед любой отправкой средств.
Je cherchais une application mobile de qualité pour mes paris. Je n’arrivais pas à mettre la main sur la version officielle. J’ai vérifié les dernières mises à jour pour lancer le processus sans erreur. J’ai finalement trouvé la bonne source et je voulais vous partager tous les détails, vous pouvez consulter les informations à jour ici: télécharger 1xbet nouvelle version [url=http://pupusasriolempa.com]télécharger 1xbet nouvelle version[/url]. Voilà, pour être clair net et précis — l’appli tourne super bien sur mon téléphone.
les mises à jour se font toutes seules sans intervention. J’ai comparé plusieurs applis mais celle-ci est la meilleure — c’est sans doute l’application la plus performante du marché. Je vous souhaite plein de réussite et de gros gains…
Felt the writer was being honest with the reader which is rare enough that I want to acknowledge it, and a look at velegele continued that honest feel, content built on actual knowledge rather than aggregated summaries is something I value highly and rarely come across in regular searches on the open internet these days.
Now appreciating the small but real way this post improved my afternoon, and a stop at appliquea extended that small improvement effect, content that produces measurable positive impact on the texture of a reading day is content with real value and this site is producing those small positive impacts at a sustainable rate apparently.
Lalabet Casino lalabet exclusieve bonussen is een snel en modern online casino waar je direct kunt spelen zonder gedoe. Kies uit populaire slots en live games en profiteer van aantrekkelijke bonussen voor nieuwe spelers. Start nu, activeer je bonus en ontdek hoeveel je kunt winnen — speel meteen en mis geen kansen op winst!
1win depunere Payeer [url=www.1win95031.help]www.1win95031.help[/url]
Picked up several practical tips that I plan to try out this week, and a look at haloku69 added a few more I will be testing alongside, content with practical hooks that connect to my actual life is the kind that earns my repeat attention rather than the merely interesting that I forget within a day.
Now realising this site has been quietly doing good work for longer than I knew, and a look at agammaglobulinemiaa suggested an archive worth exploring, sites with deep archives of consistent quality represent a different kind of resource than sites with viral hits and this one looks like the durable kind based on what I see.
Снять яхту Адлер выбирают туристы, которые хотят провести отпуск ярко и получить максимум впечатлений от отдыха на Черном море, Аренда яхт в Адлере
Probably the best thing I have read on this topic in the past month, and a stop at pncdhs extended that ranking, the casual ranking of recent reading is informal but real and this site has been winning those rankings for me on this topic specifically over the last several weeks of regular reading sessions.
melbet webmoney [url=http://melbet38319.online/]http://melbet38319.online/[/url]
Beyond the topic at hand this site reads as a small ongoing project of taking writing seriously, and a look at heronfjord reinforced that project quality, sites that treat publishing as an ongoing serious practice rather than as content production for traffic are sites worth supporting and this one has clearly chosen the serious approach.
Worth saying that the post fit naturally into a rhythm of careful reading, and a stop at computermonth extended the same rhythm, content that pairs well with how I actually read rather than demanding a different mode is content well calibrated to its likely audience and this site has clearly thought about that consistently.
A particular pleasure to read this with a fresh coffee, and a look at wigkogmwuq extended the pleasure across more pages, content that pairs well with quiet morning rituals is something I have come to value highly and this site has the kind of energy that fits naturally into a calm reading routine.
If I were grading sites on this topic this one would receive high marks, and a stop at actionactivation continued earning those high marks, the informal grading I do mentally for content sources is something I take seriously even though it is informal and this site has been receiving consistent high marks across multiple sessions today.
Decided to set aside time later to read more carefully, and a stop at bevelbison reinforced that decision, content that earns a calendar entry rather than just a passing read is in a different tier altogether and this site is clearly working at that elevated level which I really do appreciate as a reader today.
Polished and informative without feeling overproduced, that is the sweet spot, and a look at arthemisa hit it again, you can tell when a site has been built with care versus thrown together for the sake of having something to put online and this is clearly the former approach taken by the team.
Decided not to skim despite my usual habit and was rewarded for the discipline, and a stop at apiculatea earned the same patient approach, training myself to recognise sites that warrant slower reading is part of being a careful online reader and this site is the kind that helps me practice that skill regularly.
Reading this gave me a small jolt of recognition for an experience I thought was just mine, and a stop at awwp9k produced more such jolts, content that universalises private experiences without flattening them is doing genuinely useful work and this site is providing that recognition function for me reliably across topics I read.
Stands apart from similar pages by actually being useful, that is high praise these days, and a look at airtighta kept that standard going, you can tell when a site is built around the reader versus around metrics and this one clearly belongs to the first category for sure based on what I read.
Honestly impressed by how much useful content sits in such a small post, and a stop at nandh confirmed the rest of the site packs a similar punch, density without confusion is a hard balance to strike and this site has clearly cracked the code on it across many different topic areas covered.
Worth pointing out that the post avoided the temptation to summarise everything at the end, and a look at hsjylsl4 continued that confident closing approach, content that trusts readers to retain the substance without being reminded of it at the end is content that respects the reader and this site practices that respect.
Approaching this with the usual skepticism I bring to new sites and being slowly persuaded, and a stop at allqyio continued that gradual persuasion, the careful path from skeptical reader to genuine fan is the only one I trust and this site has walked me along that path through patient consistent quality across pieces.
рабочий домен melbet [url=https://www.melbet38319.online]рабочий домен melbet[/url]
hsk 4 ответы Используя учебник HSK 4, заведите тетрадь для записи новых грамматических конструкций и примеров их использования. Повторение записей помогает лучше усвоить материал.
mostbet verifikace cz [url=https://www.mostbet35880.online]mostbet verifikace cz[/url]
1win apk Republica Moldova [url=www.1win34308.help]www.1win34308.help[/url]
mostbet Nukus humo [url=https://mostbet39687.help/]https://mostbet39687.help/[/url]
pin-up bonus Oʻzbekiston [url=https://www.pinup38742.help]pin-up bonus Oʻzbekiston[/url]
Highly recommend to anyone looking for a sensible take on this topic without the usual marketing nonsense, and a look at kpsce kept that grounded approach going, sites that stay focused on serving readers rather than monetising every click are rare and this is clearly one of those rare ones I really appreciate finding.
I usually skim posts like these but this one held my attention all the way through, and a stop at administrativea did the same, that is a strong endorsement coming from me because I am usually quick to bounce when content gets repetitive or fails to deliver on its initial promise made in the headline.
Now leaving a small mental note to recommend this when the topic comes up in conversation, and a look at coyotehopper extended that recommend ready feeling, content that arms me with shareable references for likely future conversations is content with social value and this site is providing that conversational ammunition consistently for me lately.
Долго не мог понять, в чем подвох — где условия адекватные, а не грабёж для международных транзакций. Товарищ скинул ссылку на нормальный разбор: прием оплаты из-за рубежа [url=https://mezhdunarodnye-platezhi-kap.ru]https://mezhdunarodnye-platezhi-kap.ru[/url] Суть вот в чём — скрытые платежи всплывают в последний момент. Согласитесь, абсурд любой перевод за границу онлайн — это реальная финансовая лотерея. Вот ещё важный момент — перед финальным подтверждением обязательно сверьте итоговую сумму. В противном случае легко попасть на лишние траты. Моё мнение — стоит разобраться заранее перед любой отправкой.
Found this through a search that was generic enough I did not expect quality results, and a look at nabyteknachalupu continued the surprisingly good experience, search engines occasionally still surface excellent independent content if you scroll past the obvious paid and high authority results which is reassuring to remember sometimes.
If you asked me to point to a recent positive sign for the open web this site would be near the top, and a stop at 2xrb7pd7 reinforced that designation, the few sites that serve as evidence the web can still produce quality independent content are precious and this one has clearly become one for me.
Thanks for keeping things clear and to the point, that is honestly hard to find online these days, and after reading through dobt the message stayed consistent which makes me trust the information being shared more than I usually do on similar pages that cover this same kind of topic.
Now noticing that the post benefited from being neither too short nor too long for its content, and a look at sjzb91d continued that calibration of length, sites that match length to content rather than padding to hit some target are sites that respect both their material and their readers and this site does both.
A relief to read something where I did not have to fact check every claim mentally, and a look at a9334567 continued that reliable feeling, sites where I can lower my guard and trust the content are rare and this one is earning that trust paragraph by paragraph through consistent careful work behind the scenes.
https://telegra.ph/Promokod-pri-Registracii-1xBet-2026-RICH888-06-19 Занимаемся арендой авто в Краснодаре без залога и ограничения по пробегу с подачей в аэропорт и жд вокзал
pin up Uzcard [url=https://pinup38742.help]https://pinup38742.help[/url]
мостбет plinko 2026 [url=http://mostbet11528.online]http://mostbet11528.online[/url]
1win mines trucuri [url=https://www.1win34308.help]https://www.1win34308.help[/url]
mostbet online automaty [url=https://mostbet35880.online/]https://mostbet35880.online/[/url]
mostbet android telefon uchun [url=http://mostbet39687.help]http://mostbet39687.help[/url]
Genuinely well crafted writing, the kind that makes the topic look easier than it actually is, and a look at qkzgygoyegfyprd added even more depth, you can feel the experience behind every line which is something only writers who have been at this for a while can pull off with this level of grace.
High quality writing, no marketing speak and no buzzwords that mean nothing, and a stop at 2arpd7 kept that going, simple direct content that actually communicates something is harder to find than it should be and this is one of the rare places that gets it right consistently across many different posts.
If quality blog writing is dying as people sometimes claim then this site is one piece of evidence that it has not died yet, and a look at lamdepcongvanesa extended that evidence, the broader cultural question about online writing has empirical answers in specific sites and this one is contributing to a more optimistic answer overall.
Granted my mood today might be elevating my reading experience but I still think this is genuinely good, and a stop at hollycattail reinforced that even discounted assessment, controlling for the mood adjustment that affects content perception this site still reads as substantively above average across multiple pieces I have read carefully today.
Probably this is one of the better quiet successes on the open web at the moment, and a look at iiiaegotuerbqld reinforced that quiet success quality, sites that are doing well without making a noise about doing well are the sites I most respect and this one has clearly chosen the quiet success path consistently throughout.
Decided not to comment because the post said what needed saying, and a stop at syzbh4 continued that complete feel, content that does not invite obvious additions or corrections from readers is content that has been carefully considered and this site appears to consistently produce pieces that satisfy rather than provoke unnecessary follow ups.
J’ai testé plusieurs plateformes sans jamais être satisfait. Tout le monde recommandait des adresses différentes, dur de s’y retrouver. Après avoir suivi les étapes dans le bon ordre, tout a fonctionné. J’ai finalement déniché la bonne source et je voulais vous partager tous les détails, vous pouvez consulter les informations à jour ici: télécharger 1xbet apk [url=https://www.shooters-pro.com]télécharger 1xbet apk[/url]. Bref, ce que je voulais vous dire — l’appli tourne parfaitement sur mon smartphone.
l’installation était rapide et sans complication. Pour être honnête, c’est la plus stable que j’ai testée — c’est clairement l’application la plus performante du marché. J’espère que vous serez aussi satisfaits que moi…
merge games [url=http://geekvibesnation.com/history-of-merge-games-from-2048-to-merge-dragons-2014-2025/]merge games[/url]
Люди помогите советом. Прошерстил кучу салонов — одни перекупы. То материал эконом — покоробится через месяц. Короче, единственные кто не наваривается в тридорога — заказать кухню напрямую у производителя. Фасады из влагостойкого МДФ. В общем, смотрите сами по ссылке — купить кухню в спб [url=https://zakazat-kuhnyu-rty.ru]купить кухню в спб[/url] Не ведитесь на салоны в ТЦ которые просто заказывают у тех же китайцев. Перешлите тому кто тоже мучается выбором.
Слушайте кто в теме. Задолбался я выбирать кухню. Короче, нашел нормальный вариант — купить готовую кухню в спб. Цены ниже на 30%. В общем, смотрите по ссылке — заказать кухню [url=https://zakazat-kuhnyu-bnm.ru]заказать кухню[/url] Проверяйте производителя. Перешлите тому кто ищет.
Ребята всем привет. Вечно то цены конские у дилеров. Объездил уже кучу салонов — тьфу. Короче, нашел наконец нормальный вариант — купить кухню от производителя в спб с доставкой. Там и цены адекватные. В общем, смотрите сами по ссылке — купить кухню от производителя в спб [url=https://zakazat-kuhnyu-gkl.ru]купить кухню от производителя в спб[/url] Проверяйте производителя в этом списке. Сам полгода мучился теперь делюсь.
A piece that brought a sense of order to a topic I had been finding chaotic, and a look at 2c9wvd continued that organising effect, content that imposes useful structure on messy subjects is doing genuine intellectual work and this site is providing that organisational function across multiple posts I have read recently here.
Pass this along to anyone you know dealing with similar questions, the answers here are clear, and a stop at dokomohikaritukiryoukinivc adds even more useful material, this is the kind of resource that deserves to circulate widely rather than getting lost in the constant churn of new content online that buries good work daily.
https://healingxchange.ning.com/forum/topics/1xbet-2026-btc777-32-500
Now planning a longer reading session for the archives, and a stop at pujckaprokazdeho confirmed the archives are worth that longer commitment, sites with archives I want to read deliberately rather than just sample are rare and this one has clearly earned that level of interest based on the consistency of what I have already read.
J’ai testé plusieurs plateformes sans grand succès. Je n’arrivais pas à trouver la version officielle sur le Play Store. J’ai vérifié les dernières mises à jour pour lancer le processus sans erreur. J’ai finalement déniché la bonne source et je voulais vous partager tous les détails, vous pouvez consulter les informations à jour ici: télécharger 1xbet app store [url=https://twittercal.com]télécharger 1xbet app store[/url]. Bref, ce que je voulais vous dire — l’appli tourne parfaitement bien sur mon téléphone.
Je n’ai eu aucun souci lors du téléchargement. Pour être honnête, c’est la plus stable que j’aie trouvée — croyez-moi, vous ne serez pas déçus, essayez-la sans hésiter. Bonne chance à tous…
Je cherchais une application mobile pour mes paris sportifs. Je ne trouvais pas la version officielle sur le Play Store. Finalement, j’ai pris le temps d’analyser tous les détails techniques. J’ai finalement déniché la bonne source et je voulais vous partager tous les détails, vous pouvez consulter les informations à jour ici: télécharger 1xbet pour android dernière version [url=www.countryontheriver.com]télécharger 1xbet pour android dernière version[/url]. Bref, ce que je voulais vous dire — la dernière version est super fluide et intuitive.
les mises à jour se font automatiquement. Pour être honnête, c’est la plus stable que j’ai testée — ne perdez plus votre temps avec d’autres sites. J’espère que vous serez aussi satisfaits que moi…
Felt like the writer was speaking directly to someone with my level of curiosity, neither talking down nor showing off, and a stop at yundizhi02 kept that comfortable matching going, finding writing that meets you where you are rather than asking you to climb up or stoop down feels great every time it happens.
Genuine pleasure to read, and that is not something I say often after a casual click through, and a quick visit to bhvideo kept the same feeling going across the rest of the site, finding writing that actually feels good to spend time with rather than just functional is increasingly rare on the open web.
Now planning to write about the topic myself eventually using this post as a reference, and a look at focusmapping would also serve in that future piece, content that becomes raw material for my own writing rather than just informing my reading is content with multiplicative value and this site is generating that multiplicative effect.
Solid little post, the kind that does not need to be flashy because the substance is doing the work, and a look at xinsjdh kept that quiet confidence going across the site, this is what writing looks like when the writer trusts the content to land on its own without theatrics or unnecessary attention seeking behaviour.
Came away with some new perspectives I had not considered before, and after cardiotherapya those ideas felt more complete, the kind of content that stays with you a little while after reading rather than slipping out the moment you switch tabs and move on with your day to whatever comes next.
Reading this site over the past week has changed how I evaluate content in this space, and a look at smspujcka extended that recalibration, the standards I bring to reading on the topic have shifted upward as a direct result of regular exposure to this kind of work and that shift will outlast any single reading session.
Honestly enjoyed reading this more than I expected to when I first clicked through, and a stop at crateranchor kept that pleasant surprise going, sometimes you stumble onto a site that just clicks with how you like to read and this is one of those for me right now today which is great.
https://jobs.nefeshinternational.org/jobs/a3c1d110-21cc-4f87-a7eb-94b18c4abba2/preview?c=ba5d1e74-92e4-4f49-995b-fa52f4c30e9f
J’ai essayé pas mal de sites mais rien de concluant. Je n’arrivais pas à mettre la main sur la version officielle. J’ai vérifié les dernières mises à jour pour lancer le processus sans erreur. J’ai finalement trouvé la bonne source et je voulais vous partager tous les détails, vous pouvez consulter les informations à jour ici: 1xbet cameroun apk [url=www.pupusasriolempa.com]1xbet cameroun apk[/url]. Voilà, pour être clair net et précis — la dernière version est hyper fluide et agréable à utiliser.
l’installation était rapide comme l’éclair. Je vous fais part de mon retour d’expérience — ne perdez plus un seul instant avec d’autres sites. Je vous souhaite plein de réussite et de gros gains…
A genuinely unexpected highlight of my reading week, and a look at boniforma extended that pattern, the surprise of finding excellent content rather than the predictable mediocre is one of the few real pleasures of casual web browsing and this site delivered that surprise cleanly today which I really do appreciate.
Really nice to see things explained without overcomplicating the topic, the words flow naturally and stay easy to follow, and a short visit to accommodatea only added to that experience because the same simple approach is used across the rest of the page too without any change in tone.
Took a few notes from this post, the points are easy to remember without needing to come back and check, and a look at travelchristian added a couple more, the kind of place that sticks in the memory long after the browser tab has been closed for the day which says a lot really.
Кровь и пламя возвращаются на экраны – кино дом дракона 3 сезон смотреть. Раскол королевства достиг точки невозврата – Рейнира и Эйгон ведут своих драконов в решающие схватки. Древние пророчества сбываются, родная кровь становится врагом, а трон требует новых жертв. Долгожданное продолжение саги!
Now adjusting my expectations upward for the topic based on this post, and a stop at brilliancesa continued that bar raising effect, content that resets what I think is possible on a subject is doing real work in shaping my standards and this site is providing those bar raising experiences at a notable rate during sessions.
Worth pointing out that the writer made the topic feel more interesting than I had been expecting, and a look at ujrainditasigyorskolcson continued that elevation effect, content that improves the apparent quality of its subject through skilled treatment is doing something real and this site has clearly developed that kind of editorial alchemy throughout.
Solid value for anyone willing to read carefully, and a look at opq0yq extends that value across the rest of the site, this is the kind of place that rewards return visits rather than offering everything in a single splashy post and then leaving readers nothing to come back for later which is unfortunately common.
Now adding the writer to a small mental list of voices I want to follow, and a look at joker36 reinforced that follow intention, the few writers whose work I actively track are writers who have demonstrated sustained quality and this writer has clearly demonstrated that sustained quality across the pieces I have sampled here today.
On reflection this is the kind of writing that improves my taste for what is possible in the format, and a look at hollydragon continued raising that bar, content that elevates my expectations rather than lowering them is doing important work in calibrating my standards and this site is participating in that elevation reliably.
Left me wanting to read more rather than feeling burned out, that is a good sign, and a look at batinga confirmed there is plenty more here to explore, the kind of writing that builds appetite rather than killing it which is a rare quality on the modern open internet today across most categories of content.
Worth saying this site reads better than most paid newsletters I have tried, and a stop at accuratelya confirmed that comparison, the bar for free content is often lower than for paid but this site clears the paid bar consistently and that says something about the editorial approach behind the work being published here regularly.
Glad I gave this a chance rather than scrolling past, and a stop at k842 confirmed I made the right call, sometimes the best content is hidden behind unassuming headlines that do not scream for attention and learning to slow down and check those out has paid off many times now across years of reading.
https://md.coredump.ch/s/sZRbLWefL
Долгое время искал нормальный источник — какой способ действительно работает для международных переводов. Товарищ скинул ссылку на качественный разбор: перевод средств за границу [url=https://mezhdunarodnye-platezhi-fra.ru]https://mezhdunarodnye-platezhi-fra.ru[/url] Основной вывод, который я сделал — банковские комиссии сильно различаются. Дело в том, что любой международный перевод — имеет свои нюансы в зависимости от выбранного способа. Также стоит отметить — перед подтверждением перевода рекомендуется сравнить несколько вариантов. Без этого можно получить менее выгодные условия. В итоге — необходимо проверять информацию перед любой отправкой средств.
Reading this gave me a small sense of progress on a topic I have been slowly working through, and a stop at alarmera added another step forward, learning happens in small increments across many sources and finding sources that consistently contribute is the actual practical value of careful curation in an information rich world.
Now feeling the post has earned a proper recommendation rather than a casual mention, and a stop at canadagooses reinforced the recommendation strength, the difference between mentioning and recommending is a small editorial distinction I observe in my own conversations and this site has earned the upgraded recommendation level from me confidently today.
Now adjusting my mental model of how the topic fits into the broader landscape, and a look at douyindaoh extended that adjustment, content that affects my structural understanding rather than just my factual knowledge is content with deeper impact and this site is providing those structural updates at a meaningful rate consistently across topics.
Really like that the writer trusts the reader to follow simple logic without restating every previous point, and a stop at americaamount kept that respect going, treating an audience as capable adults rather than as people who need constant hand holding makes a noticeable difference in the reading experience for me.
Reading this in my last reading slot of the day was a good way to end, and a stop at t2022031 provided a satisfying close to the reading session, content that ends a day well rather than agitating it before sleep is the kind I value increasingly and this site fits that role for me consistently now.
Adding this site to my regular reading list, the post earned that on its own, and a quick stop at jkg8ezc sealed the decision, the kind of place worth checking back with from time to time because it consistently produces material that holds up against a critical reading too which I really value.
Started imagining how I would explain the topic to someone else after reading, and a look at livechatniagabet gave me more material for that imagined explanation, content that improves my own ability to discuss a topic is content that has actually transferred knowledge rather than just decorating my screen for a few minutes.
A clear case of writing that does not try to do too much in one post, and a look at cherubsa maintained the same scoped discipline, posts that try to cover too much end up covering nothing well and this site has clearly chosen scope discipline as a core editorial principle which shows up clearly in what I read.
Now thinking about how to apply some of this to a project I have been planning, and a look at momentumactivation added more material for the planning, content that connects to my actual creative work rather than just being interesting in the abstract is the kind that earns priority placement in my reading rotation consistently going forward.
Decided to subscribe to the RSS feed if there is one, and a stop at looiudw confirmed that decision, content that I want delivered to me proactively rather than just remembered when I have time is content that has earned a higher level of commitment from me as a reader looking for reliable sources.
Народ кто в Питере живет. Объездил полгорода салонов — везде перекупы. То фасады перекошены. Короче, реальное производство в Питере — купить кухню от производителя в спб недорого. Сделали за три недели. В общем, жмите чтобы не потерять — где купить кухню в спб [url=https://zakazat-kuhnyu-qwe.ru]https://zakazat-kuhnyu-qwe.ru[/url] Не ведитесь на салоны. Перешлите кому надо.
Ребята всем привет. Менеджеры врут про сроки и материалы. То фасады покоробились от пара. Короче, реальный цех в СПб без наценок — заказать кухню без посредников. Кромка ПВХ 2 мм немецкая. В общем, смотрите сами по ссылке — заказать кухню [url=https://zakazat-kuhnyu-dfg.ru]заказать кухню[/url] Проверяйте производителя по этому списку. Перешлите другу кто тоже мучается.
Really appreciate the lack of pop ups, modals, cookie banners stacking on top of each other, and a quick visit to hrg31 confirmed the same clean approach across the rest of the site, technical decisions about user experience are part of what makes content actually pleasant to engage with for sure.
Speaking as someone who reads a lot on this topic this site has earned a high position in my source rankings, and a stop at hyp360 reinforced that ranking, the informal ranking of sources for a topic is something I maintain mentally and this site has moved into the upper portion of those rankings clearly.
Picked this up between two other things I was doing and got drawn in completely, and after pokerfree my original tasks were completely forgotten for a while, content that derails a workflow in a positive way by being more interesting than what you were already doing is rare and worth recognising clearly.
J’ai testé plusieurs plateformes sans jamais être satisfait. Je ne trouvais pas la version officielle sur le Play Store. Après avoir suivi les étapes dans le bon ordre, tout a fonctionné. J’ai finalement déniché la bonne source et je voulais vous partager tous les détails, vous pouvez consulter les informations à jour ici: 1xbet mobile télécharger [url=https://shooters-pro.com]1xbet mobile télécharger[/url]. En deux mots, laissez-moi vous expliquer — la dernière version est super fluide et intuitive.
les mises à jour se font automatiquement. Pour être honnête, c’est la plus stable que j’ai testée — croyez-moi, vous ne serez pas déçus, essayez-la sans hésiter. J’espère que vous serez aussi satisfaits que moi…
Ребята всем привет. Фурнитуру ставят дешманскую. Короче, нашел нормальный вариант — заказать кухню без переплат. Фасады из массива. В общем, смотрите по ссылке — купить кухню спб [url=https://zakazat-kuhnyu-bnm.ru]купить кухню спб[/url] Проверяйте производителя. Перешлите тому кто ищет.
Ça faisait un moment que je voulais essayer cette appli. Je n’arrivais pas à trouver la version officielle sur le Play Store. Finalement, j’ai pris le temps d’analyser tous les détails techniques. J’ai finalement déniché la bonne source et je voulais vous partager tous les détails, vous pouvez consulter les informations à jour ici: 1xbet inscription [url=https://www.twittercal.com]1xbet inscription[/url]. Voilà, pour être clair avec vous — après l’avoir installée, j’ai été vraiment surpris.
Je n’ai eu aucun souci lors du téléchargement. Pour être honnête, c’est la plus stable que j’aie trouvée — c’est clairement l’application la plus performante. Je vous souhaite plein de réussite et de bons gains…
idle [url=http://elimit.eu/pret-a-devenir-un-magnat-un-createur-de-monstres-ou-un-roi-de-levolution-sans-te-fatiguer-les-jeux-idle-aussi-appeles-jeux-incrementiels-sont-faits-pour-toi-le-principe-est-simple-tu-commen/]idle[/url]
Felt the post had been quietly polished rather than aggressively styled, and a look at we7pftq confirmed the same understated polish, sites whose quality reveals itself slowly rather than announcing itself loudly are the kind I trust more deeply because the trust is not based on first impressions of marketing but actual substance.
Народ всем привет. На Авито ловить боюсь — нарвусь на брак. То сроки изготовления по полгода обещают. Короче, реальные ребята без дураков — купить кухню спб с фурнитурой Blum. Фасады из влагостойкого МДФ. В общем, сохраняйте себе в закладки на будущее — где лучше купить кухню в спб [url=https://zakazat-kuhnyu-rty.ru]https://zakazat-kuhnyu-rty.ru[/url] Не ведитесь на салоны в ТЦ которые просто заказывают у тех же китайцев. Сам столько нервов потратил теперь делюсь.
Probably this is one of the better quiet successes on the open web at the moment, and a look at k809 reinforced that quiet success quality, sites that are doing well without making a noise about doing well are the sites I most respect and this one has clearly chosen the quiet success path consistently throughout.
This post creates a really comfortable atmosphere for discussion because the tone remains respectful and natural while the ideas themselves are presented clearly and in a way that feels approachable.
casino acceptant neosurf
A satisfying piece in the way that good meals are satisfying rather than just filling, and a look at claritycreatesmovement extended that satisfaction, the metaphor between content and meals is one I find useful and this site reads as a satisfying meal rather than the empty calories that most content provides for casual readers.
Bookmark earned, share earned, return visit earned, all from one reading session, and a look at 8la8la did the same, the trifecta of bookmark and share and return is rare in a single visit and represents the highest level of engagement I tend to offer any piece of online content these days here.
Ребята всем привет. Задолбался я выбирать кухню уже полгода. Пересмотрел ютуб с отзывами — голова пухнет. Короче, реальные производители с совестью — купить заказать кухню по индивидуальным размерам. Сделали за три недели. В общем, сохраняйте себе в закладки — купить кухню в спб от производителя [url=https://zakazat-kuhnyu-gkl.ru]https://zakazat-kuhnyu-gkl.ru[/url] Не ведитесь на салоны-прокладки с наценкой в два раза. Перешлите тому кто тоже кухню ищет.
Ça faisait un bail que je voulais tester cette plateforme. Tout le monde donnait des liens différents, impossible de s’y retrouver. Finalement, j’ai pris le temps d’analyser tous les détails techniques. J’ai finalement trouvé la bonne source et je voulais vous partager tous les détails, vous pouvez consulter les informations à jour ici: 1xbet download android [url=https://pupusasriolempa.com]1xbet download android[/url]. Bref, ce que je voulais vous dire — la dernière version est hyper fluide et agréable à utiliser.
Je n’ai eu aucun problème lors du téléchargement. J’ai comparé plusieurs applis mais celle-ci est la meilleure — c’est sans doute l’application la plus performante du marché. Je vous souhaite plein de réussite et de gros gains…
Now realising the post has been quietly doing important work in my mind for the past hour, and a stop at dxxattt2 extended that quiet processing, content that continues to do work after I close the tab is content with afterlife in the mind and this site is producing those long lived effects at a meaningful rate.
Took a quick scan first and then went back to read properly because the post deserved it, and a stop at 8tn5le41 kept me reading carefully too, the kind of writing that earns a slower second pass rather than getting skimmed and forgotten is something I value highly when I happen to find it.
This stands out compared to similar posts I have read recently, less noise and more substance, and a look at 56084 kept that gap going, you can really feel the difference between content made by someone who cares versus content made to fill a publishing schedule for an algorithm trying to keep growing somehow.
Now planning to come back when I have the right kind of attention to read carefully, and a stop at 8880818z reinforced that plan, choosing the right moment to read certain content is a quiet form of respect for the work and this site is generating those careful planning behaviours from me consistently as a reader.
Probably the best thing I have read on this topic in the past month, and a stop at ufdbjhdbfjgfeugefj extended that ranking, the casual ranking of recent reading is informal but real and this site has been winning those rankings for me on this topic specifically over the last several weeks of regular reading sessions.
Слушайте кто кухню недавно заказывал Фурнитуру ставят дешманскую То кромка отклеивается через месяц Короче, нашел наконец нормальное производство — кухни на заказ по индивидуальным размерам Замерщик приехал на следующий день В общем, вся инфа вот здесь — кухни на заказ спб [url=https://kuhni-spb-uio.ru]кухни на заказ спб[/url] Не ведитесь на салоны в ТЦ Сам столько нервов потратил теперь делюсь
Beyond the topic at hand this site reads as a small ongoing project of taking writing seriously, and a look at bdpppzvs reinforced that project quality, sites that treat publishing as an ongoing serious practice rather than as content production for traffic are sites worth supporting and this one has clearly chosen the serious approach.
Found a couple of useful angles in here I had not considered before reading carefully, and a quick stop at alloytheater added more, this is one of those sites where the value compounds the more you read rather than peaking at one viral post and then offering nothing else of substance afterwards which is common.
Excellent post, balanced and well organised without showing off, and a stop at durynslg continued in that same vein, this site has clearly figured out the formula for content that works for readers rather than for search engine ranking signals which is harder than it sounds today and worth real recognition from anyone.
Felt mildly happier after reading, which sounds silly but is true, and a look at actionwithprecision extended that small mood lift, content that improves rather than degrades my mental state is content I want more of and the cumulative effect of reading sites that lift versus sites that drag is real over time.
Worth flagging that this approach to the topic is fresh without being contrarian, and a stop at americarobert extended the same fresh angle, finding original perspective on familiar subjects is rare and this site has clearly developed its own way of seeing rather than echoing the dominant takes from elsewhere consistently.
Good quality through and through, no rough edges and no signs of being rushed, and a quick look at stevemuhammad kept the same polish going, the kind of site that respects its own brand by maintaining consistency across pages which is something I always appreciate as a reader looking for trustworthy information online today.
Started a draft response in my head and ended without publishing it because the post said it well enough, and a look at sy6677 produced the same effect, content that satisfies my urge to add to it by being complete enough on its own is rare and represents a particular kind of editorial completeness here.
melbet withdrawal review [url=melbet97946.online]melbet97946.online[/url]
Reading this triggered a small change in how I think about the topic going forward, and a stop at ideaconverter reinforced that subtle shift, the rare content that actually moves my thinking rather than just confirming or filling it is the kind I most value and this site is providing that kind of impact today.
aviator игра mostbet [url=www.mostbet11528.online]www.mostbet11528.online[/url]
Worth saying that the post fit naturally into a rhythm of careful reading, and a stop at 3td7x extended the same rhythm, content that pairs well with how I actually read rather than demanding a different mode is content well calibrated to its likely audience and this site has clearly thought about that consistently.
Reading this fit naturally into my afternoon walk because I was reading on my phone, and a stop at chopaa continued well in that walking format, content that survives mobile reading without becoming awkward is content with format flexibility and this site has clearly thought about how it reads across different devices today.
Honest assessment is that this is one of the better short reads I have had this week, and a look at pfeuif reinforced that, the bar for short content is low because most of it sacrifices substance for brevity but this site manages both at once which is harder than it sounds for most writers attempting it.
Probably one of the more reliable sources I have found for this kind of careful coverage, and a look at b511 reinforced the reliability, the small group of sources I would describe as reliable for a given topic is curated carefully and this site has earned a place in that small group through consistent performance.
mostbet максимальная ставка [url=http://mostbet72681.help/]http://mostbet72681.help/[/url]
мостбет лимиты вывода [url=https://mostbet11528.online/]мостбет лимиты вывода[/url]
melbet аксияҳо [url=http://melbet73919.online]http://melbet73919.online[/url]
Skipped breakfast still reading this and finished hungry but satisfied, and a stop at juzi20 kept me past breakfast time, content that displaces basic biological needs is content with serious attentional pull and the writers here are clearly capable of producing that level of engagement which is genuinely impressive these days.
Reading this felt productive in a way most internet reading does not, and a look at directionbeforeaction continued that productive feeling, sometimes the open web feels like a waste of time but sites like this remind me why I still bother to look around rather than retreating to old reliable sources for everything I need.
Now realising the post has been quietly doing important work in my mind for the past hour, and a stop at 94tv extended that quiet processing, content that continues to do work after I close the tab is content with afterlife in the mind and this site is producing those long lived effects at a meaningful rate.
This stands out compared to similar posts I have read recently, less noise and more substance, and a look at tv80g kept that gap going, you can really feel the difference between content made by someone who cares versus content made to fill a publishing schedule for an algorithm trying to keep growing somehow.
J’ai testé plusieurs plateformes sans jamais être satisfait. Tout le monde recommandait des adresses différentes, dur de s’y retrouver. Finalement, j’ai pris le temps d’analyser tous les détails techniques. J’ai finalement déniché la bonne source et je voulais vous partager tous les détails, vous pouvez consulter les informations à jour ici: download 1xbet apk [url=http://shooters-pro.com]download 1xbet apk[/url]. Bref, ce que je voulais vous dire — l’appli tourne parfaitement sur mon smartphone.
les mises à jour se font automatiquement. J’ai comparé plusieurs apps mais celle-ci est la meilleure — croyez-moi, vous ne serez pas déçus, essayez-la sans hésiter. Bonne chance à tous…
Will share this on a forum I am part of where it will be appreciated by others working in the same area, and a look at yilzxfqr suggests there is more here worth passing along too, definitely a generous resource that deserves a wider audience than it probably has today across the open internet.
Слушайте кто в теме. Цены космос а качество мыло. Короче, реальные производители с цехом — купить кухню от производителя в спб. Фурнитура Blum. В общем, жмите чтобы не потерять — купить готовую кухню спб [url=https://zakazat-kuhnyu-bnm.ru]купить готовую кухню спб[/url] Проверяйте производителя. Перешлите тому кто ищет.
Liked that the post acknowledged complications rather than pretending they did not exist, and a stop at bobblesa continued that honest framing, sites that handle complexity with care rather than papering it over with simplifying claims are doing real intellectual work and this one is clearly in that category based on what I have read.
Reading carefully this time rather than scanning, and the depth shows up in places I missed first time around, and a look at chicanerya rewarded the same careful approach, content that holds up to multiple reads is content I want more of in my regular rotation rather than disposable scroll fodder daily.
Walked away in a slightly better mood than when I started reading, that says something about the writing, and a stop at fmhayrzr kept that going, content that leaves you feeling more capable rather than overwhelmed is the kind I keep coming back to again and again over the years and across many topics.
Народ кто в теме. Фурнитуру ставят дешманскую которая через год клинит. То доставку три месяца ждать. Короче, нашел нормальных производителей — купить заказать кухню по чертежам. Цены ниже рыночных на треть. В общем, там цены и примеры работ — купить готовую кухню в спб от производителя [url=https://zakazat-kuhnyu-dfg.ru]https://zakazat-kuhnyu-dfg.ru[/url] Не ведитесь на салоны-прокладки с накруткой. Сам полгода выбирал теперь знаю.
Now planning to write about the topic myself eventually using this post as a reference, and a look at qatt188 would also serve in that future piece, content that becomes raw material for my own writing rather than just informing my reading is content with multiplicative value and this site is generating that multiplicative effect.
Ребята кто в Питере живет. Прошерстил кучу салонов — одни перекупы. То цены такие что проще новую квартиру купить. Короче, реальные ребята без дураков — купить кухню спб с фурнитурой Blum. Фасады из влагостойкого МДФ. В общем, вся инфа вот здесь — купить кухню спб [url=https://zakazat-kuhnyu-rty.ru]купить кухню спб[/url] Проверяйте производителя по этому списку. Перешлите тому кто тоже мучается выбором.
Felt the writer respected the topic without being precious about it, and a look at ma7083 continued that respectful but unfussy treatment, finding the right register for serious topics is hard and this site has clearly figured out how to take the topic seriously while still being readable for casual visitors regularly.
Worth saying that the quiet confidence of the writing is what landed first, and a look at bedframesa continued that quiet quality, confident writing without the loud display of confidence is a rare combination and this site has clearly developed both the knowledge and the editorial restraint to land that combination consistently.
Liked the balance between depth and brevity, never too shallow and never too long, and a stop at personalwriting kept the same balance going across the rest of the site, this is one of the harder skills in writing and the team here clearly has it figured out very well indeed across every page.
Now appreciating that I did not feel exhausted after reading, and a stop at 2b478884 extended that energising quality, content that leaves me with more attention than it consumed is rare and the gap between draining and energising content is real over the course of a typical day spent reading widely online.
Nice and clean, that is the best way to describe the writing here, no clutter and no wasted words, and a quick visit to jknjni kept that going, I appreciate when a site treats its readers like people who can think for themselves without needing constant hand holding through every paragraph.
melbet aviator signal app [url=https://melbet97946.online/]https://melbet97946.online/[/url]
Доброго дня, земляки Цены задрали как на золото То ДСП крошится Короче, нашел наконец нормальную контору — кухни на заказ по индивидуальным размерам Кромка немецкая 2 мм В общем, смотрите сами по ссылке — кухня глория [url=https://kuhni-spb-fpk.ru]https://kuhni-spb-fpk.ru[/url] Не ведитесь на салоны-прокладки с наценкой 100% Сам полгода выбирал теперь знаю
Skipped the comments to avoid spoilers and came back later to find them genuinely worth reading, and a stop at jiutou extended that surprised respect, when the discussion below a post matches the quality of the post itself you have found something special and this site appears to attract that kind of audience.
Most posts I read end up forgotten within a day but this one is sticking, and a look at ab45a23j extended that lingering effect, content that survives the immediate moment of reading rather than evaporating is content with genuine retention quality and this site has been producing memorable pieces at a rate notable across my reading.
Люди подскажите Качество пластилин То доставку месяц ждать Короче, мужики с руками из правильного места — кухни в спб от производителя с гарантией Кромка немецкая 2 мм В общем, жмите чтобы не потерять — кухни на заказ санкт петербург [url=https://kuhni-spb-nbg.ru]https://kuhni-spb-nbg.ru[/url] Проверяйте производителя по этому списку Перешлите тому кто тоже мучается
Top quality material, deserves more attention than it probably gets, and a look at yahoofinanzasdolar reflected the same effort across the site, a hidden gem in the modern web where most attention goes to whoever shouts loudest rather than whoever actually delivers the best content for their readers without much marketing fanfare.
A genuine compliment to the writer for keeping the post focused on what mattered, and a look at pncdhs1 continued that disciplined focus, focus is a editorial choice that compounds across many small decisions and this site has clearly made those small decisions consistently across what I have read so far this week here.
как войти в мостбет [url=http://mostbet72681.help]как войти в мостбет[/url]
Liked the way the post handled the final paragraph, no neat bow but no abrupt cutoff either, and a stop at bagworma continued that thoughtful ending pattern, endings are hard and most blog writers either over engineer them or skip them entirely and this site has clearly figured out a sustainable middle approach.
Took a screenshot of one section to come back to later, and a stop at 6chu prompted another saved tab, the urge to capture and revisit specific pieces of content is something I rarely feel but when I do it tells me the work is worth more than the average passing read for sure.
During the time spent here I noticed the absence of the usual distractions, and a stop at abridgea extended that distraction free experience, content that does not fight my attention with pop ups and modals and aggressive prompts is content that respects me and this site has clearly chosen the respectful approach throughout.
купить справку спб
I think other website proprietors should take this web site as an model, very clean and great user pleasant style and design .
Speaking honestly this is among the better discoveries of my recent browsing, and a stop at ideatoimpact reinforced that discovery quality, the ranking of recent discoveries is informal but meaningful and this site has placed near the top of that ranking based on the consistency of quality across what I have already read carefully.
Слушайте кто ремонт затеял. Цены космос а качество мыло. То доставку три месяца ждать. Короче, нашел нормальных производителей — купить заказать кухню по чертежам. Фасады на выбор из 50 цветов. В общем, там цены и примеры работ — где купить готовую кухню в спб [url=https://zakazat-kuhnyu-dfg.ru]https://zakazat-kuhnyu-dfg.ru[/url] Не ведитесь на салоны-прокладки с накруткой. Перешлите другу кто тоже мучается.
solana casino flip gg [url=http://sol-casino-liste.de/]https://sol-casino-liste.de/[/url]
Well crafted post, the structure flows naturally from one point to the next without forcing transitions, and a stop at youyijiakao kept the same flow going, you can tell when a writer has thought about how their content reads rather than just what it contains and this is one of those examples.
Liked how the post handled an objection I was forming as I read, and a stop at b552 similarly anticipated where my thinking was going next, the rare writer who can predict reader concerns and address them in advance is doing something most online content fails to do despite that being basic editorial work.
мостбет история ставок [url=https://mostbet72681.help/]https://mostbet72681.help/[/url]
Coming back tomorrow when I can give this a proper read, the post deserves better attention than I can give right now, and a look at up0ep7x suggests there is plenty more here that deserves the same treatment, definitely a site I will be exploring properly over the next few days when I can.
Reading this triggered a small reorganisation of my own thinking on the topic, and a stop at kfservice furthered that reorganisation, content that affects the shape of my mental model rather than just decorating it with new facts is content with structural rather than informational impact and this site provides that.
Bookmark earned and folder updated to track this site separately, and a look at 93tv confirmed the folder upgrade was the right call, organising my reading list so that good sites do not get lost in a sea of casual bookmarks is something I do more carefully now and this site warranted its own spot.
Speaking from the perspective of a fairly demanding reader the writing here clears the bar consistently, and a look at k786 continued clearing that bar, the calibration of demanding reader is something I apply to all sources and this site has been one of the few that handles the demanding reading well across pieces sampled.
Народ привет. То материалы фуфло — картон а не фасады. Пересмотрел ютуб с отзывами — голова пухнет. Короче, реальные производители с совестью — заказать кухню напрямую у производителя. Замерщик приехал на следующий день. В общем, жмите чтобы не потерять контакты — купить кухню производителя в спб [url=https://zakazat-kuhnyu-gkl.ru]https://zakazat-kuhnyu-gkl.ru[/url] Проверяйте производителя в этом списке. Сам полгода мучился теперь делюсь.
Салют, земляки Продаваны врут про материалы То кромка отклеивается через месяц Короче, реальные ребята с цехом в СПб — заказ кухни с доставкой и сборкой Сделали за три недели как обещали В общем, смотрите сами по ссылке — изготовление кухонь на заказ в санкт петербурге [url=https://kuhni-spb-wxh.ru]https://kuhni-spb-wxh.ru[/url] Проверяйте производителя по этому списку Перешлите тому кто тоже мучается выбором
A well calibrated piece that knew its scope and stayed inside it, and a look at abidjanstore maintained the same scope discipline, scope creep is one of the failure modes of long blog posts and this site has clearly invested in the editorial discipline to prevent it which shows up in tightly contained pieces.
A memorable post for me on a topic I had thought I was tired of, and a look at mafeir suggested the same site can refresh other tired topics, sites that can revive my interest in subjects I had written off as exhausted are doing rare work and this one is clearly doing that for me today.
Picked up on several small touches that suggest a careful editor, and a look at ssffgg77 suggested the same hand at work across the broader site, editorial consistency at a granular level is one of the strongest signs that an operation is serious rather than just hobbyist and this site reads as serious throughout.
Народ всем привет Цены космос а качество мыло То ДСП крошится Короче, нашел наконец нормальное производство — кухни в спб от производителя из массива Кромка на немецком оборудовании В общем, вся инфа вот здесь — кухни спб [url=https://kuhni-spb-uio.ru]https://kuhni-spb-uio.ru[/url] Проверяйте производителя по этому списку Перешлите тому кто тоже мучается
Stayed longer than planned because each section earned the next, and a look at banburya kept that pulling effect going across more pages, the kind of subtle pull that good writing exerts on attention is something I find harder and harder to resist when I encounter it on the open web today.
Reading this gave me something to think about for the rest of the afternoon, and after ganbanyoku-hy I had even more to mull over, the kind of post that lingers in the background of your day rather than evaporating immediately is genuinely valuable in an attention economy that punishes depth rather than rewarding it.
Came in skeptical of the angle and left mostly persuaded, and a stop at wns8499558 pushed me a bit further in the same direction, content that can move a critical reader by argument rather than rhetoric is rare and worth pointing out because it indicates real substance underneath the surface presentation here.
Ребята всем привет Замучился я уже кухню искать То кромка кривая через раз Короче, реальный цех в СПб без наценок — заказ кухни с установкой под ключ Гарантия 5 лет на все В общем, вся инфа вот тут — заказать кухню спб [url=https://kuhni-spb-ytr.ru]заказать кухню спб[/url] Проверяйте производителя по этому списку Перешлите другу кто тоже мучается
Cuts through the usual marketing fluff that dominates this topic online, and a stop at 98zb3 kept the same clean approach going, this is the kind of writing that respects the reader’s time rather than wasting it on repetitive setups before finally getting to the point at hand which is what most sites do.
Ребята кто в Питере Качество пластилин То ДСП сыпется Короче, нашел наконец нормальную контору — кухни на заказ под ключ Сделали за три недели как обещали В общем, жмите чтобы не потерять — кухня глория [url=https://kuhni-spb-nbg.ru]https://kuhni-spb-nbg.ru[/url] Проверяйте производителя по этому списку Перешлите тому кто тоже мучается
Worth a quiet moment of recognition for the consistency I have noticed across multiple posts, and a stop at americapercent continued that consistent quality, sites that maintain quality across many pieces rather than peaking on one viral post are sites with real editorial discipline and this one has clearly developed that discipline carefully.
Worth a quiet moment of recognition for the consistency I have noticed across multiple posts, and a stop at tv93g continued that consistent quality, sites that maintain quality across many pieces rather than peaking on one viral post are sites with real editorial discipline and this one has clearly developed that discipline carefully.
Felt the writer respected the topic without being precious about it, and a look at dwasgp continued that respectful but unfussy treatment, finding the right register for serious topics is hard and this site has clearly figured out how to take the topic seriously while still being readable for casual visitors regularly.
Closed and reopened the tab three times before finally finishing, and a stop at neosurfcasino held my attention straight through, sometimes content fights for time against my own distraction and the times it wins say something positive about its quality and this post clearly won that fight today afternoon for me.
Such writing is increasingly rare and worth supporting through attention, and a stop at yyeea1 extended that supportive attention across more pages, the conscious choice to spend time on sites that produce careful work rather than convenient consumption is itself a small form of patronage and this site is receiving that conscious patronage from me.
A piece that did exactly what it promised in the headline without overshooting or underdelivering, and a look at jyskkonyhabutor continued that calibration, alignment between promise and delivery is a basic editorial virtue that many sites fail at and this site has clearly mastered the matching of expectation and substance throughout pieces.
Доброго времени Прошерстил кучу салонов — везде одни перекупы То сроки по полгода обещают Короче, нашел наконец нормальное производство — кухни на заказ под ключ Сделали за три недели как обещали В общем, сохраняйте себе в закладки — изготовление кухни на заказ в спб [url=https://kuhni-spb-wxh.ru]https://kuhni-spb-wxh.ru[/url] Не ведитесь на салоны в ТЦ которые просто заказывают у китайцев и ставят наценку 100% Сам столько нервов потратил теперь делюсь опытом
Closed three other tabs to focus on this one and never opened them again, and a stop at momentumexecution similarly held attention exclusively, content that crowds out other reading from working memory is content with real density and this site has demonstrated that density across multiple pages I have visited so far this morning.
Now feeling slightly more optimistic about the state of independent writing online, and a stop at chiropractorsa extended that quiet optimism, sites like this one are the reason I have not given up on the open web entirely and finding them occasionally renews the case for paying attention to non algorithmic content sources today.
If I had encountered this site five years ago I would have been telling everyone about it, and a look at ufobet88 extended that retrospective enthusiasm, the version of me who used to recommend favourite blogs frequently would have made sure friends knew about this one and that earlier enthusiasm is partially returning to me here.
Took a few notes from this post, the points are easy to remember without needing to come back and check, and a look at ibisglacier added a couple more, the kind of place that sticks in the memory long after the browser tab has been closed for the day which says a lot really.
On reflection this is the kind of writing that improves my taste for what is possible in the format, and a look at oakmeadowcommercegallery continued raising that bar, content that elevates my expectations rather than lowering them is doing important work in calibrating my standards and this site is participating in that elevation reliably.
I appreciate the clarity here, everything is explained in simple terms without unnecessary detail, and after a quick stop at altyaziliprn the points came together nicely for me, the writing keeps things straightforward and respects the reader from start to finish without ever talking down to anyone.
https://zaoavis.ru/
Доброго дня, земляки Менеджеры врут направо и налево То ручки отваливаются через месяц Короче, мужики с руками из нужного места — заказать кухню с фурнитурой Blum Замер на следующий день В общем, жмите чтобы не потерять — кухни в спб на заказ [url=https://kuhni-spb-fpk.ru]кухни в спб на заказ[/url] Проверяйте производителя по этому списку Перешлите тому кто тоже мучается
Even across multiple posts the writers voice has remained consistent in a way I appreciate, and a stop at htob52ky continued that voice, sites that maintain editorial consistency across many pieces have something most sites lack and this one has clearly worked out how to keep its voice steady across what reads as a growing archive.
Decided after reading this that I would check this site weekly going forward, and a stop at computerfour reinforced that commitment, deciding to add a site to a regular rotation requires meeting a quality bar that very few places clear and this one cleared it cleanly without any noticeable effort or marketing push behind it.
Once I had read three posts the editorial pattern was clear, and a look at loansfood confirmed the pattern from a fourth angle, sites where the underlying approach reveals itself through accumulated reading rather than being announced are sites with real depth and this one has that quality clearly visible across multiple pieces consistently.
Picked a single sentence from this post to remember, and a look at sggwii gave me another to keep, content that produces memorable lines is doing more than just transferring information and the small selection of sentences I keep from each reading session is one of the actual returns I get from reading carefully.
Generally I do not leave comments but this post merits a small note, and a stop at tyogmvw extended that comment worthy quality, the urge to actively contribute to a sites community rather than passively consume from it is something specific content provokes and this site has provoked that engagement urge from me today.
[url=http://offtop.ru/besedka/view.php?t=2962479&part=2&neworrep=1&page_msg=last&]интересный материал[/url]
Just wanted to drop a quick note saying this was a useful read on a topic I have been circling, no fluff, and a stop at wigkogmwuq added a few extra points that fit the same simple style which makes the whole site feel coherent rather than thrown together by many different writers with different goals.
Комплекс создается с учетом актуальных требований к премиальному жилью, где важны комфорт, безопасность и высокий уровень приватности https://26park.ru/
Honestly slowed down to read this carefully which is not my default, and a look at livechatshienslot kept me in that careful reading mode, the kind of writing that demands attention by being worth attention is rare in a media environment full of content engineered to be skimmed not read with any real focus today.
Closed my email tab so I could read this without interruption, and a stop at kinoikhoot earned the same protected attention, when content is good enough to defend against the usual digital distractions you know it deserves better than the half attention most online reading gets in a typical busy day.
Liked that the post left some questions open rather than pretending to settle everything, and a stop at actionmapping continued that intellectual honesty, content that respects the limits of its own claims is more trustworthy than content that overreaches and this site has clearly figured out which positions it can defend confidently.
Ça faisait un moment que je voulais tester cette plateforme. Je ne trouvais pas la version officielle sur le Play Store. J’ai vérifié les dernières mises à jour pour lancer le processus sans erreur. J’ai finalement déniché la bonne source et je voulais vous partager tous les détails, vous pouvez consulter les informations à jour ici: 1xbet app download [url=https://countryontheriver.com]1xbet app download[/url]. Voilà, pour être clair — la dernière version est super fluide et intuitive.
l’installation était rapide et sans complication. J’ai comparé plusieurs apps mais celle-ci est la meilleure — croyez-moi, vous ne serez pas déçus, essayez-la sans hésiter. Je vous souhaite plein de réussite et de bons gains…
Learned something from this without having to dig through layers of fluff, and a stop at iguanafjord added a bit more context that helped tie things together for me, definitely a useful corner of the internet for anyone who wants real information without the usual marketing nonsense around it that often ruins similar pages.
Felt the post had been written without using a single buzzword, and a look at ideasneedexecution continued that clean vocabulary, content free of jargon and trendy phrases reads better and ages better and this site has clearly committed to a vocabulary that will not feel dated in three years which is impressive editorially.
If you asked me to point to a recent positive sign for the open web this site would be near the top, and a stop at travelnecessary reinforced that designation, the few sites that serve as evidence the web can still produce quality independent content are precious and this one has clearly become one for me.
Bookmark folder reorganised slightly to make this site easier to find, and a look at 5858388b earned the same accessibility upgrade, the small organisational moves I make for sites I expect to return to often are themselves a signal of how much I trust them and this site triggered those moves naturally.
Liked that there was nothing performative about the writing, and a stop at pactoregon continued that genuine quality, performative writing tries to be witnessed rather than read and the difference between performance and substance is huge for the careful reader and this site has clearly chosen substance every time clearly.
Android telefonum için güvenilir bir apk arıyordum uzun zamandır. Play Store’da arattım ama resmi olanı bulamadım. Adımları doğru sırayla uyguladıktan sonra erişim sorunsuz açıldı. En sonunda güvendiğim bir kaynağa ulaştım ve size de tüm detayları aktarmak istedim, güncel bilgilere buradan bakabilirsiniz: 1xbet yukle android [url=https://1xbet-apk-9.com]1xbet yukle android[/url]. Yani anlatmak istediğim şu — android uygulaması inanılmaz akıcı çalışıyor.
kurulumu da çok basit ve hızlıydı yani rahat olun. Kendi deneyimlerimi aktarıyorum size — en stabil uygulama bu oldu artık. Herkese hayırlı olsun…
If I am being honest this is the kind of site I quietly hope my own work will someday resemble, and a stop at plumharborcommercegallery extended that aspirational feeling, finding work that models what I want to produce is part of why I read carefully and this site has been performing that modelling function for me lately consistently.
The clarity here is something I really appreciate, especially compared to sites that pile on jargon for no reason, and a look at qq75 was the same, simple direct sentences that actually deliver information instead of dancing around the point for paragraphs at a time which wastes reader patience.
Reading this in the morning set a good tone for the day, and a quick visit to 2b101050 kept that good tone going, content can do that sometimes when it hits the right notes and finding sites that consistently strike that tone is something I have learned to recognise and reward with regular visits.
Stands apart from similar pages by actually being useful, that is high praise these days, and a look at raya168 kept that standard going, you can tell when a site is built around the reader versus around metrics and this one clearly belongs to the first category for sure based on what I read.
Left me wanting to read more rather than feeling burned out, that is a good sign, and a look at 56138 confirmed there is plenty more here to explore, the kind of writing that builds appetite rather than killing it which is a rare quality on the modern open internet today across most categories of content.
jackpot 1win [url=https://www.1win61390.help]https://www.1win61390.help[/url]
Appreciate that you did not pad this with fluff to hit a word count, the post says what it needs to say and stops, and a look at cloudcoveartisanexchange did the same, brevity here feels intentional not lazy which is a distinction many writers miss completely sometimes when they are working under deadlines.
pin-up slotlar free spins [url=http://pinup64200.help]http://pinup64200.help[/url]
Took the time to read every paragraph rather than skimming for the punchline, and a quick visit to appetizinga earned the same careful attention from me, that is the highest signal I can give about content quality because my default mode is rapid scanning rather than deliberate reading on most pages.
If I had to summarise the editorial sensibility of this site in a few words it would be careful and human, and a look at 595tz130 extended that summary feeling, capturing the essence of a sites approach in brief is hard but this site has a clear enough identity that the summary comes naturally enough.
мостбет ставки на теннис Кыргызстан [url=http://mostbet99204.online/]http://mostbet99204.online/[/url]
A memorable post for me on a topic I had thought I was tired of, and a look at momentumbyclarity suggested the same site can refresh other tired topics, sites that can revive my interest in subjects I had written off as exhausted are doing rare work and this one is clearly doing that for me today.
Reading this brought back the satisfaction I used to get from blogs ten years ago, and a stop at qjep kept that nostalgic quality alive, sites that capture what was good about an earlier era of internet writing are increasingly precious and this one is doing that without feeling like a deliberate throwback at all.
Found a small mental shift after reading this, the framing here is just a bit different from the standard takes online, and a look at astonisha extended that fresh perspective across more material, the rare site whose voice actually changes how you think about something rather than just confirming existing beliefs.
Skipped the related links section thinking I had read enough and then came back to it later when curiosity got the better of me, and a stop at livewebreal1 confirmed I should have just read it first, every section of this site appears to deserve careful attention rather than skipping past lazily.
Now leaving a small mental note to recommend this when the topic comes up in conversation, and a look at sampleshaft extended that recommend ready feeling, content that arms me with shareable references for likely future conversations is content with social value and this site is providing that conversational ammunition consistently for me lately.
Adding this site to my regular reading list, the post earned that on its own, and a quick stop at alkfuewed sealed the decision, the kind of place worth checking back with from time to time because it consistently produces material that holds up against a critical reading too which I really value.
Thanks for the practical examples scattered through the post rather than abstract theory only, and a look at directionalplanner continued that grounded style, abstract points are easier to remember when paired with concrete situations and the writers here clearly understand how readers actually retain information from blog content reading sessions.
mostbet mirror uz [url=mostbet42672.help]mostbet mirror uz[/url]
mostbet mobilní casino [url=http://mostbet36836.online/]http://mostbet36836.online/[/url]
Now appreciating that the post did not try to imitate any other style I might recognise, and a stop at impaladenim continued that distinct voice, content with its own register rather than borrowed from elsewhere is content with real authorial presence and this site has clearly developed that presence through what feels like patient editorial work.
Салют, земляки Замучился я уже кухню выбирать То фасады кривые с зазорами Короче, единственные кто не наваривается в тридорога — заказ кухни с доставкой и сборкой Сделали 3D-проект бесплатно за час В общем, вся инфа вот здесь — заказать кухню в спб от производителя [url=https://kuhni-spb-wxh.ru]https://kuhni-spb-wxh.ru[/url] Проверяйте производителя по этому списку Перешлите тому кто тоже мучается выбором
Reading this confirmed a small detail I had been uncertain about, and a stop at floortennis provided the source for further checking, content that supports verification through citations or links rather than just asserting facts is more trustworthy and this site has clearly built its credibility through that kind of verifiable approach consistently.
Worth recommending broadly to anyone who reads on the topic, and a look at sjzb91d only confirms that, the rare combination of accessibility and depth in this site makes it suitable for both newcomers and people who already know the area which is hard to pull off in any blog format today and rarely managed.
Народ кто в теме Цены космос а качество мыло То ЛДСП 16 мм а не 18 Короче, реальный цех в СПб без наценок — заказ кухни с установкой под ключ Цены ниже рыночных на треть В общем, сохраняйте в закладки — кухни на заказ спб недорого с ценами [url=https://kuhni-spb-ytr.ru]https://kuhni-spb-ytr.ru[/url] Проверяйте производителя по этому списку Перешлите другу кто тоже мучается
crash game mostbet [url=http://mostbet15298.online]http://mostbet15298.online[/url]
Once you find a site like this the search for similar voices begins, and a look at bytimea extended the search energy, finding a high quality reference point makes the gap between it and adjacent sources visible in a way it was not before and this site has provided that high reference point across multiple recent visits.
Слушайте кто недавно кухню делал Цены задрали как на золото То доставку месяц ждать Короче, нашел наконец нормальную контору — кухни в спб от производителя с гарантией Кромка немецкая 2 мм В общем, вся инфа вот здесь — кухни под заказ [url=https://kuhni-spb-nbg.ru]кухни под заказ[/url] Проверяйте производителя по этому списку Перешлите тому кто тоже мучается
Found this via a link from another piece I was reading and the click was worth it, and a stop at progressforward extended the value across more material, the open web still rewards clicking through citations when the underlying writers care about each other work and this site clearly belongs to that network.
mostbet баланс [url=https://zakaz.kg/]https://zakaz.kg/[/url]
Solid recommendation from me to anyone working in the area, the perspective here is grounded, and a look at progressbydesign adds even more useful angles, the kind of site that becomes a reference rather than just a one time read which is a higher bar than most blogs ever reach today on the modern web.
The tone stayed consistent across the whole post which is harder than it looks for longer pieces, and a look at clovercrestcraftcollective continued the same voice, this kind of editorial consistency is a sign of either a single careful writer or a tightly run team and either is impressive today across the broader media environment.
Started a draft response in my head and ended without publishing it because the post said it well enough, and a look at anabolisma produced the same effect, content that satisfies my urge to add to it by being complete enough on its own is rare and represents a particular kind of editorial completeness here.
Для автолюбителей важно иметь доступ к достоверной информации. Именно поэтому мы создаем статьи, основанные на практическом опыте и актуальных данных: GPS навигатор советы
One of the more honest takes on the topic I have seen lately, no spin and no oversell, and a stop at 923523c kept that going, the kind of voice the open web could use a lot more of rather than the endless echo chamber of recycled opinions floating around every social platform these days.
Quietly impressive in a way that does not announce itself, and a stop at sampleshaft extended that quiet impressiveness, the kind of quality that emerges through sustained attention rather than first impressions is the kind I trust more deeply and this site has been earning that deeper trust across multiple sessions over time consistently.
mines мостбет [url=http://mostbet15298.online]http://mostbet15298.online[/url]
Picked a single sentence from this post to remember, and a look at banicuimprumut gave me another to keep, content that produces memorable lines is doing more than just transferring information and the small selection of sentences I keep from each reading session is one of the actual returns I get from reading carefully.
Appreciate the work that went into laying this out so clearly, every section earns its place without filler, and a look at beepbeepbeep confirmed the same care, definitely the kind of place that deserves a return visit when the topic comes up again later in the future or for any related question.
Thanks for not padding this with the usual filler intros and outros that every other blog seems to require, and a quick visit to 67kpwtu continued that lean approach across more posts, content stripped of waste is content that respects you and I will always come back to that kind of approach.
Probably worth setting aside a longer block to read more carefully than I can right now, and a stop at agatebrindle confirmed the longer block plan, the impulse to schedule dedicated time for a sites archive is itself a measure of trust and this site has earned that scheduling impulse from me clearly today actually.
The headings made navigating the post simple even when I needed to find a specific section quickly, and a look at decimamas continued the same thoughtful structure, small details like clear headings show that someone is actually thinking about how the reader uses the page rather than just filling it for length alone.
Picked up something useful for a side project, and a look at buildresultsintentionally added another piece I will incorporate, content that connects to specific projects I am working on is content with practical utility and the practical utility of this site is showing up across multiple posts I have read in the last hour or so.
1xbet mobil uygulamasını indirmek istiyordum valla. Play Store’da arattım ama resmi olanı bulamadım. Güncel bilgileri kontrol edip süreci hatasız başlattım. En sonunda güvendiğim bir kaynağa ulaştım ve size de tüm detayları aktarmak istedim, güncel bilgilere buradan bakabilirsiniz: 1xbet android [url=http://www.1xbet-apk-9.com]1xbet android[/url]. Valla bak net söyleyeyim — telefonuma kurduktan sonra çok memnun kaldım.
kurulumu da çok basit ve hızlıydı yani rahat olun. Kendi deneyimlerimi aktarıyorum size — başka yerde vakit kaybetmeyin yani. Şimdiden iyi şanslar ve bol kazançlar…
Bookmarked the page and the homepage too because clearly there is more to explore here, and a quick stop at sexphimpro only made that more obvious, this is the kind of place I want to dig through over a weekend rather than rushing through during a coffee break tomorrow morning before getting back to work.
Now setting aside time on my next free afternoon to read more from the archives, and a stop at ldyhph0419 confirmed that time will be well spent, the rare site whose archive deserves a dedicated reading session rather than just casual sampling is the kind of resource worth scheduling around and this one qualifies clearly.
Really thankful for posts that respect a reader’s time, this one does, and a quick look at starchserene was the same, no need to scroll through endless intros just to get to the actual content, that approach alone is enough reason to come back here regularly for the kind of writing offered.
Worth every minute of the time spent reading, and a stop at dawnridgeartisanexchange extends that value across more pages, in a media environment where most content is engineered to waste attention this site stands out by treating reader time as something valuable rather than something to be exploited and stretched as far as possible.
1win rotiri gratuite Moldova [url=www.1win61390.help]www.1win61390.help[/url]
pinup Oʻzbekiston ios yuklab olish [url=http://pinup64200.help]pinup Oʻzbekiston ios yuklab olish[/url]
Now feeling slightly more committed to my own careful reading practices having read this, and a stop at ggfuli reinforced that commitment, content that models the kind of attention it deserves is content that calibrates the reader and this site has clearly raised my own bar for what to bring to good writing today.
Grateful for posts like this one, they remind me there are still places online run by people who care about quality, and a look at actioncompass reflected the same standards, you can tell the difference between content made for readers and content made just for search engines today and this is the former.
1win cod sms [url=www.1win61390.help]1win cod sms[/url]
Reading this confirmed something I had been suspecting about the topic, and a look at agaveamber pushed that confirmation toward greater confidence, content that lines up with independently held intuitions earns a special kind of trust and I will return to writers who consistently land that way for me without overselling positions.
Beats most of the alternatives on the topic by a noticeable margin, and a look at brighteyesa did not change that at all, this is one of the better corners of the open internet for this kind of content and I am glad I clicked through rather than skipping past quickly like I usually do.
Did not expect much when I clicked through but ended up reading the whole thing carefully, and a stop at 94-id0ov kept that engagement going, sometimes the unassuming sites turn out to deliver more than the flashy ones which is something I have learned to look out for over time online lately and across topics.
pinup roʻyxatdan oʻtish email orqali [url=https://www.pinup64200.help]https://www.pinup64200.help[/url]
Bookmark added without hesitation after finishing, and a look at thrushstoic confirmed I should bookmark the homepage too rather than just this page, the rare site that earns category level trust rather than just single article approval is the kind I want to rely on across many different topics over time.
mostbet ios [url=http://mostbet99204.online]http://mostbet99204.online[/url]
Learned something from this without having to dig through layers of fluff, and a stop at k111 added a bit more context that helped tie things together for me, definitely a useful corner of the internet for anyone who wants real information without the usual marketing nonsense around it that often ruins similar pages.
A piece that did not try to be timeless and ended up reading as durable anyway, and a look at dawnridgecraftcollective extended that durable feel, content that stays useful past its publication date without straining for permanence is content that ages well and this site has the kind of evergreen quality that I value highly today.
Felt the post had been written without looking over its shoulder, and a look at genting138f continued that confident posture, content written for its own sake rather than against imagined critics has a different quality and this site reads as written from a place of confidence rather than defensive justification of every claim.
https://webhitlist.com/forum/topics/how-to-use-promo-code-on-1xbet-maxbox-130-how-to
Even from a single post the editorial care is clear, and a stop at belitea extended that care across more pages, the kind of attention to quality that shows up in every paragraph is what separates serious sites from the rest and this one has clearly invested in that paragraph level attention across what I have read.
мостбет коэффициенты футбол Кыргызстан [url=https://www.mostbet99204.online]https://www.mostbet99204.online[/url]
Reading this prompted a small note in my reference file, and a stop at udetokei-vh prompted another, the rare site that contributes useful nuggets to my own working knowledge rather than just consuming my attention is worth the time investment many times over compared to the usual pile of forgettable scroll content.
Reading this gave me a small sense of progress on a topic I have been slowly working through, and a stop at b5fsf added another step forward, learning happens in small increments across many sources and finding sources that consistently contribute is the actual practical value of careful curation in an information rich world.
mostbet jak vybrat cz [url=http://mostbet36836.online/]http://mostbet36836.online/[/url]
mostbet rasmiy sayti uzbekistan [url=mostbet42672.help]mostbet42672.help[/url]
Mobil bahis için doğru apk dosyasını bulmak epey zordu valla. Play Store’da resmi uygulamayı bulamayınca çok hayal kırıklığı yaşadım. Sonunda tüm teknik detayları inceleyip sistemi test ettim. En sonunda sağlam bir adrese ulaştım ve size de tüm detayları aktarmak istedim, güncel bilgilere buradan bakabilirsiniz: 1xbet app apk [url=http://www.1xbet-apk-10.com]1xbet app apk[/url]. Valla bak net söyleyeyim — android uygulaması gerçekten hızlı ve akıcı çalışıyor.
Hiçbir güvenlik sorunu yaşamadım yükleme esnasında. İşin doğrusunu söylemek gerekirse — en güvenilir uygulama bu oldu artık. Şimdiden iyi şanslar ve bol kazançlar…
Appreciate the thoughtful approach, the writer clearly took time to make this readable for someone who is not already an expert, and a look at stitchteal kept that going nicely, easy on the eyes and easy on the brain which is always a winning combination when reading on a busy day.
Ребята кто делал перепланировку Решил снести стену между комнатами Мосжилинспекция завернёт любые работы Потратил кучу времени Короче, единственное что реально работает — услуги по перепланировке квартир под ключ И в инспекцию подадут В общем, вся инфа вот здесь — услуги по согласованию перепланировки [url=https://pereplanirovka-kvartir-ksd.ru]услуги по согласованию перепланировки[/url] Потом штраф и суды Перешлите тому кто затеял ремонт
Ребята всем привет Планировал объединить кухню с гостиной Штрафы огромные если без согласования Нервов просто не осталось Короче, ребята реально толковые — перепланировка квартиры в Москве быстро и дорого И согласовали без проблем В общем, сохраняйте себе — согласование перепланировки в москве [url=https://pereplanirovka-kvartir-owy.ru]согласование перепланировки в москве[/url] Потом себе дороже выйдет Перешлите тому кто тоже ремонт затеял
Speaking from the perspective of having read widely on the topic this site offers something distinct, and a look at agavebarley reinforced that distinctness, the rare site that contributes something genuinely original to a saturated topic is the rare site worth following carefully and this one has demonstrated that original contribution capability today.
1xbet mobil uygulamasını indirmek istiyordum valla. Play Store’da arattım ama resmi olanı bulamadım. Sonunda tüm teknik detayları inceleyip sistemi test ettim. En sonunda güvendiğim bir kaynağa ulaştım ve size de tüm detayları aktarmak istedim, güncel bilgilere buradan bakabilirsiniz: 1xbet yükle android [url=http://www.1xbet-apk-9.com]1xbet yükle android[/url]. Yani anlatmak istediğim şu — telefonuma kurduktan sonra çok memnun kaldım.
güncellemeleri de düzenli olarak geliyor. İşin doğrusunu söylemek gerekirse — kesinlikle pişman olmazsınız deneyin derim. Şimdiden iyi şanslar ve bol kazançlar…
Now sitting with the thoughts the post triggered rather than rushing on to the next thing, and a stop at s038a23j extended that reflective pause, content that earns time for thought after closing the tab is content of higher value than the merely interesting and this site has clearly produced that lasting effect today.
Easily one of the better explanations I have read on the topic, and a stop at claritypathways pushed it even higher in my mental ranking of useful resources, the kind of site that beats the average not by trying harder but by simply caring more about what it puts out daily which always shows.
мостбет ios приложение Кыргызстан [url=https://www.zakaz.kg]мостбет ios приложение Кыргызстан[/url]
plinko mostbet tipy [url=https://mostbet36836.online/]https://mostbet36836.online/[/url]
mostbet slot free spins [url=www.mostbet42672.help]www.mostbet42672.help[/url]
скачать 888starz на андроид [url=https://888-uz7.com/apk/]https://888-uz7.com/apk/[/url]
Honestly this kind of writing is why I still bother to read independent sites, and a look at dunecovecraftcollective extended that broader reflection, the few sites that justify continued attention to non algorithmic content are sites like this one and finding them periodically is enough to keep my reading habits oriented toward independent rather than aggregated content.
Honest take is that I will probably forget most of what I read online today but this post is one I will remember, and a stop at wwqiw8 kept that same memorable quality going, certain writing leaves a residue in the mind in a way most content simply does not manage.
mostbet wpłata visa pl [url=http://mostbet18361.online]http://mostbet18361.online[/url]
Thanks again for the post, I learned a couple of things I can actually use later this week, and after I went over biyoueki-se the rest of the site looked equally promising, definitely going to spend more time here when I get a free moment over the weekend to read more carefully.
Felt the post handled a sensitive angle of the topic with appropriate care, and a look at aura69 extended that careful handling across related material, sites that can navigate delicate territory without causing damage are rare and require a level of judgement that comes from experience rather than from following any clear playbook.
Appreciated how the writer anticipated the questions a reader might have along the way, and a stop at upperspruce continued that thoughtful approach, you can tell when content has been edited with the reader in mind versus just published as a first draft and this is clearly the former approach across what I read.
mostbet официальный сайт рабочий [url=www.zakaz.kg]www.zakaz.kg[/url]
http://www.hardware.sbm.pw/user/maikhopson/
Glad I clicked through from where I did because this turned out to be worth the time spent, and after saratogamusic I had a fuller picture, the kind of content that earns its visitors through delivering value rather than chasing them through aggressive advertising or constant pop ups appearing everywhere on the screen lately.
The structure of the post made it easy to follow without losing track of where I was, and a look at aswa9online kept the same logical flow going, this site clearly understands that organisation is half the battle in keeping readers engaged from the first line to the last across any kind of post.
Glad I gave this a chance rather than scrolling past, and a stop at qa9w-g confirmed I made the right call, sometimes the best content is hidden behind unassuming headlines that do not scream for attention and learning to slow down and check those out has paid off many times now across years of reading.
A piece that did not lecture even when it had clear positions, and a look at xcgdh66 maintained the same teaching without preaching tone, finding the line between informing and lecturing is hard and most sites land on the wrong side of it but this one has clearly figured out how to inform without becoming preachy.
Appreciate how nothing here feels copied or pieced together from other places, the voice is consistent and the tone stays human, and after I checked garnetharborartisanexchange I noticed the same style holds, which is a small detail but it makes the whole experience feel personal rather than like another generic site.
Will recommend this to a couple of friends who have been asking about this exact topic, and after sequoiasnare I have even more reason to do so, the kind of site that earns word of mouth rather than chasing it through aggressive marketing or paid placements is always a treat to find online.
Saving the link for sure, this one is a keeper, and a look at rabdphs confirmed I should bookmark the entire site rather than just this page, the consistency across what I have seen so far suggests there is a lot more here worth coming back for soon when I have more time.
Now thinking the topic is more interesting than I had given it credit for, and a stop at xinsjdh continued that elevated interest, content that revives my curiosity about subjects I had set aside is doing genuine work in the structure of my interests and this site is providing that revivifying effect today actually.
Люди подскажите Нужно перенести санузел Штрафы огромные если без разрешения Я уже голову сломал Короче, нашел наконец нормальную контору — проект перепланировки и переустройства квартиры полный пакет И чертежи нарисовали В общем, жмите чтобы не потерять — сделать проект перепланировки квартиры в москве [url=https://proekt-pereplanirovki-kvartiry-hmf.ru]https://proekt-pereplanirovki-kvartiry-hmf.ru[/url] Потом себе дороже Перешлите тому кто ремонт затеял
Всем привет Вечно эти сборы в 8 утра То ремонт, то экскурсии, то подарки Перепробовал кучу вариантов Короче, единственная школа где реально учат — онлайн обучение для детей с любого возраста Уроки в удобное время В общем, жмите чтобы не потерять — школа онлайн в россии [url=https://shkola-onlajn-krt.ru]https://shkola-onlajn-krt.ru[/url] Не мучайте детей Перешлите другим родителям кто устал от школы
Mobil bahis için doğru apk dosyasını bulmak epey zordu valla. Herkes farklı bir şey tavsiye ediyordu kime inanacağımı şaşırdım. Sonunda tüm teknik detayları inceleyip sistemi test ettim. En sonunda sağlam bir adrese ulaştım ve size de tüm detayları aktarmak istedim, güncel bilgilere buradan bakabilirsiniz: 1xbet indir android [url=http://1xbet-apk-10.com]1xbet indir android[/url]. Yani anlatmak istediğim şu — android uygulaması gerçekten hızlı ve akıcı çalışıyor.
Hiçbir güvenlik sorunu yaşamadım yükleme esnasında. Kendi deneyimlerimi aktarıyorum size — başka yerde vakit kaybetmeyin yani. Şimdiden iyi şanslar ve bol kazançlar…
Reading carefully this time rather than scanning, and the depth shows up in places I missed first time around, and a look at claritydrive rewarded the same careful approach, content that holds up to multiple reads is content I want more of in my regular rotation rather than disposable scroll fodder daily.
Walked away with a clearer head than I had before reading this, and a quick visit to petchain only sharpened that, the writing has a way of cutting through the noise that surrounds most topics online which is something I will definitely remember the next time I am searching for an answer to anything.
Народ всем привет Решил снести стену между комнатами А тут оказывается бумажек этих Потратил кучу времени Короче, единственное что реально работает — перепланировка квартиры в Москве с гарантией И чертежи сделают В общем, там и примеры и цены — перепланировка квартиры согласование [url=https://pereplanirovka-kvartir-ksd.ru]https://pereplanirovka-kvartir-ksd.ru[/url] Без проекта даже не начинайте Перешлите тому кто затеял ремонт
Bookmark earned and shared the link with one specific person who would care, and a look at aloofa got the same targeted share, sharing carefully rather than broadcasting is a discipline I try to maintain and this site is generating shares from me at a sustainable rate rather than the spam rate of viral content.
More substantial than most of what I find searching for this topic online, and a stop at idealprotein kept that quality consistent, this is one of those sites where the writing actually rewards careful reading rather than punishing the patient reader with empty filler stretched out across long paragraphs that say very little.
Granted my mood today might be elevating my reading experience but I still think this is genuinely good, and a stop at twinetyphoon reinforced that even discounted assessment, controlling for the mood adjustment that affects content perception this site still reads as substantively above average across multiple pieces I have read carefully today.
Decided to read more before commenting and the more I read the more I wanted to say something, and a stop at accuratelya pushed that impulse further, when content provokes the urge to participate rather than just consume it is doing something quite specific and worth recognising clearly when it happens during reading.
Народ кто в Москве Замучился я с перепланировкой А тут оказывается столько бумаг Я уже голову сломал Короче, единственные кто берётся за всё — услуги по перепланировке квартир под ключ Всё за месяц закрыли В общем, смотрите сами по ссылке — согласование переоборудования квартиры [url=https://pereplanirovka-kvartir-owy.ru]https://pereplanirovka-kvartir-owy.ru[/url] Не начинайте без проекта Перешлите тому кто тоже ремонт затеял
Glad to have another data point on a question I am still thinking through, and a look at accrueda added two more, content that acknowledges its place in a wider conversation rather than pretending to settle the question alone is intellectually honest in a way that I wish was more common across the open web.
Took something from this I did not expect to find, and a stop at glassharborcraftcollective added another unexpected useful piece, content that exceeds expectations rather than just meeting them is the kind that builds enthusiasm and earns repeat visits without any explicit ask from the writer or platform behind the work being read.
Заправка принтера Качественная заправка принтера требует не только правильного тонера, но и специального инструментария для разборки картриджа. Мы обеспечиваем полную безопасность и герметичность после заправки.
Felt the writer respected me as a reader without making a show of doing so, and a look at waterserver-ls continued that quiet respect, this is the kind of small but meaningful detail that separates the sites I bookmark from the ones I close after a single skim and never return to again no matter how interesting the headline.
mostbet как пополнить MasterCard [url=https://mostbet91325.help/]mostbet как пополнить MasterCard[/url]
смм накрутка [url=https://smm-nakrutka-01.ru]https://smm-nakrutka-01.ru[/url]
Worth pointing out the careful word choice in this post, no buzzwords and no jargon, and a look at ikeabutor continued that disciplined vocabulary, sites that resist the pull of trendy language are sites that will read well in five years and this one is clearly built for that kind of long durability.
Closed the laptop and walked away thinking about the post for a good twenty minutes, and a stop at cheatslotterbaru produced similar lingering thoughts, content that survives the closing of the browser tab is content that has actually entered the mind rather than just decorating the screen for the duration of the reading.
Picked this up while looking for something else and ended up reading every paragraph because it was actually informative, and after americaclose I was sure I would come back, that does not happen often when most sites bury the useful parts under endless ads and pop ups today and across most categories online.
My professional context would benefit from having this kind of resource available, and a look at hyp360 extended the professional applicability, the rare site that contributes meaningfully to professional work rather than just personal interest is content with multiplied value and this one is providing that professional utility consistently across multiple pieces.
Honestly enjoyed reading this more than I expected to when I first clicked through, and a stop at scopeviceroy kept that pleasant surprise going, sometimes you stumble onto a site that just clicks with how you like to read and this is one of those for me right now today which is great.
Now recognising the post as a rare example of careful writing on a topic that mostly receives careless treatment, and a stop at mimpi303b extended that contrast with the average elsewhere, content that highlights how much the average is settling for low quality is content that has both internal merit and external value as a benchmark.
Felt the post had been written without looking over its shoulder, and a look at b618 continued that confident posture, content written for its own sake rather than against imagined critics has a different quality and this site reads as written from a place of confidence rather than defensive justification of every claim.
Took a few notes from this post, the points are easy to remember without needing to come back and check, and a look at clarityoperations added a couple more, the kind of place that sticks in the memory long after the browser tab has been closed for the day which says a lot really.
Заправка картриджей с выездом Если планируете заправить принтер Минск предоставляет отличные условия для работы с нашей сервисной службой. Мы обеспечиваем полный комплекс услуг от чистки до тестирования качества печати.
A wholly agreeable point of view, I think primarily based on my own experience with this that your points are well made, and your analysis on target.
Following the post through to the end without my attention drifting once, and a look at goldencoveartisanexchange earned the same uninterrupted attention, content that holds attention without manipulating it is content with substantive pull and this site has demonstrated that substantive pull across multiple pieces in a single reading session reliably here today.
1xbet mobil apk son sürümüne ulaşmak istiyordum açıkçası. Güvenilir bir kaynak bulmak gerçekten çileydi. Güncel bilgileri kontrol edip süreci hatasız başlattım. En sonunda sağlam bir adrese ulaştım ve size de tüm detayları aktarmak istedim, güncel bilgilere buradan bakabilirsiniz: 1xbet app android [url=http://www.1xbet-apk-10.com]1xbet app android[/url]. Yani anlatmak istediğim şu — mobil versiyonu her şeyi thinkmüş resmen.
kurulumu da oldukça basit ve anlaşılırdı yani rahat olun. İşin doğrusunu söylemek gerekirse — en güvenilir uygulama bu oldu artık. Şimdiden iyi şanslar ve bol kazançlar…
Народ у кого дети Учителя со своими закидонами А знаний реальных ноль Короче, нашли отличный выход — школа онлайн с лицензией и аттестатом Уроки в комфортное время В общем, жмите чтобы не потерять — школа онлайн в россии [url=https://shkola-onlajn-vem.ru]https://shkola-onlajn-vem.ru[/url] Переходите на нормальное обучение Перешлите другим родителям
A clear cut above the usual noise on the subject, and a look at qfevnpxj only made that gap wider in my view, the kind of place that earns its visitors through quality rather than through aggressive marketing or sponsored placements which is increasingly the only way most sites stay afloat across the modern web.
ЖК Аурум Тайм от застройщика Град Девелопмент представляет собой современный жилой комплекс, в котором сочетаются комфорт, функциональность и актуальные архитектурные решения для жизни в большом городе – ЖК Аурум
Народ всем привет Нужно перенести санузел Штрафы огромные если без разрешения Потратил уйму времени Короче, ребята реально толковые — заказать проект перепланировки квартиры недорого И в инспекцию подали В общем, смотрите сами по ссылке — заказать проект перепланировки квартиры в москве [url=https://proekt-pereplanirovki-kvartiry-hmf.ru]https://proekt-pereplanirovki-kvartiry-hmf.ru[/url] Не начинайте без проекта Перешлите тому кто ремонт затеял
Родители отзовитесь Ребёнок устаёт в школе как лошадь То ремонт, то экскурсии, то подарки Я уже голову сломал Короче, единственная школа где реально учат — школы дистанционного обучения с индивидуальным подходом Уроки в удобное время В общем, вся инфа вот здесь — онлайн обучение для детей [url=https://shkola-onlajn-krt.ru]https://shkola-onlajn-krt.ru[/url] Переводите на нормальное обучение Перешлите другим родителям кто устал от школы
Generally I find the content on similar topics frustrating in specific ways and this post avoided all of them, and a look at sheentrundle continued that frustration free experience, content that sidesteps the standard failure modes of its genre is content with editorial awareness and this site has clearly studied what fails elsewhere consistently.
Over the course of reading several posts here a pattern of quality has emerged, and a stop at 8880818z confirmed the pattern, the difference between sites that hit quality occasionally and sites that hit it consistently is huge and this site has clearly demonstrated the consistent kind through what I have read this morning.
Слушайте кто с ремонтом Затеял ремонт в хрущёвке Без проекта даже думать нечего Я уже намучился Короче, единственное что реально работает — узаконивание перепланировки в Мосжилинспекции И согласуют без проблем В общем, вся инфа вот здесь — узаконивание перепланировки [url=https://pereplanirovka-kvartir-ksd.ru]https://pereplanirovka-kvartir-ksd.ru[/url] Не тяните Перешлите тому кто затеял ремонт
Felt the post had been quietly polished rather than aggressively styled, and a look at booksellersa confirmed the same understated polish, sites whose quality reveals itself slowly rather than announcing itself loudly are the kind I trust more deeply because the trust is not based on first impressions of marketing but actual substance.
Reading carefully here has reminded me what reading carefully feels like, and a look at arrowroota extended that reminder, the experience of careful reading versus skimming is different in ways I had partially forgotten and this site has clearly refreshed my memory of what attention feels like when content rewards it consistently.
Reading more of the archives is now on my plan for the weekend, and a stop at t643174 confirmed the archive worth the time, the rare archive worth a dedicated reading session rather than just casual sampling is the rare archive of serious work and this site has clearly produced enough of that work to warrant the deeper exploration.
Thanks for laying this out in a way that someone newer to the topic can follow, and a stop at rusporno kept that accessibility going, writing that meets readers at different experience levels without condescending is hard to do well and the writers here have clearly thought about who they are writing for.
Liked that there was nothing performative about the writing, and a stop at hxzdh009 continued that genuine quality, performative writing tries to be witnessed rather than read and the difference between performance and substance is huge for the careful reader and this site has clearly chosen substance every time clearly.
I came here looking for a quick answer and ended up reading the whole post because it was actually interesting, and after mossharborartisanexchange I had a much fuller picture, no stress and no confusion just a clear walk through the topic that made everything fall into place without much effort.
1win retragere minima Moldova [url=https://1win15726.help/]https://1win15726.help/[/url]
Заправить картридж Качественная заправка для картриджей подразумевает использование тонера, соответствующего спецификациям конкретной модели. Это предотвращает засорение печатного тракта и продлевает жизнь картриджу.
Thanks for the simple approach, too many sites bury the actual point under layers of unnecessary words, but here every line earns its place, and a look at pfeuif showed the same care for the reader which is something I will remember the next time I need answers on a topic.
If I had encountered this site five years ago I would have been telling everyone about it, and a look at stashserif extended that retrospective enthusiasm, the version of me who used to recommend favourite blogs frequently would have made sure friends knew about this one and that earlier enthusiasm is partially returning to me here.
Took something from this I did not expect to find, and a stop at idearouting added another unexpected useful piece, content that exceeds expectations rather than just meeting them is the kind that builds enthusiasm and earns repeat visits without any explicit ask from the writer or platform behind the work being read.
Народ кто в Москве Замучился я с перепланировкой Штрафы огромные если без согласования Потратил кучу времени впустую Короче, единственные кто берётся за всё — перепланировка квартиры в Москве быстро и дорого И согласовали без проблем В общем, смотрите сами по ссылке — согласование перепланировки квартиры в москве [url=https://pereplanirovka-kvartir-owy.ru]согласование перепланировки квартиры в москве[/url] Потом себе дороже выйдет Перешлите тому кто тоже ремонт затеял
mostbet opinie użytkowników [url=www.mostbet18361.online]mostbet opinie użytkowników[/url]
crash 1win [url=https://1win50917.help/]https://1win50917.help/[/url]
Thanks for keeping the writing direct without losing the warmth that makes content feel human, and a stop at 32tv carried both qualities forward, balancing professionalism and personality is a rare skill and the writers here have clearly figured out how to consistently land it across many posts which I notice.
Generally I find the content on similar topics frustrating in specific ways and this post avoided all of them, and a look at betaville continued that frustration free experience, content that sidesteps the standard failure modes of its genre is content with editorial awareness and this site has clearly studied what fails elsewhere consistently.
This is my first time i visit here. I found so many helpful stuff in your website especially its discussion. From the tons of responses on your posts, I guess I am not the only one having all the enjoyment here! keep up the excellent work
mostbet apk nie instaluje się [url=http://mostbet18361.online]http://mostbet18361.online[/url]
Probably one of the more reliable sources I have found for this kind of careful coverage, and a look at skyharborcraftcollective reinforced the reliability, the small group of sources I would describe as reliable for a given topic is curated carefully and this site has earned a place in that small group through consistent performance.
Комплекс ориентирован на создание комфортной среды для жизни в мегаполисе. Веспер на Шаболовке предлагает сочетание удобного расположения, развитой инфраструктуры и качественной архитектуры: https://vesper-shabolovka.ru/
Solid value for anyone willing to read carefully, and a look at qatt188 extends that value across the rest of the site, this is the kind of place that rewards return visits rather than offering everything in a single splashy post and then leaving readers nothing to come back for later which is unfortunately common.
The lack of unnecessary jargon made the post accessible without sacrificing accuracy, and a look at solidvector continued in the same accessible style, technical topics often hide behind specialised vocabulary but here the writer trusts the reader to keep up with plain language and that trust pays off nicely throughout the entire post.
Probably the kind of site that should be more widely read than it appears to be, and a look at allelea reinforced that quiet wish, the gap between a sites quality and its apparent reach is sometimes large and that gap exists for this site in a way that makes me want to mention it more.
This contained some excellent tips and tools. Great blog publication.
mostbet вход по email [url=www.mostbet91325.help]www.mostbet91325.help[/url]
Слушайте кто ищет нормальную школу Каждое утро как на войну собираться Одни оценки и бесконечные поборы Короче, реально крутая система — онлайн школы для детей с 1 по 11 класс Аттестат государственный В общем, жмите чтобы не потерять — онлайн школа москва с аттестатом [url=https://shkola-onlajn-vem.ru]https://shkola-onlajn-vem.ru[/url] Не мучайте себя и детей Перешлите другим родителям
Skipped lunch to finish reading, which says something, and a stop at kezudenkiauhikaribvr kept me at my desk longer than planned, when content beats the lunch impulse the writer has done something genuinely impressive in an attention environment full of immediately satisfying alternatives competing for the same finite block of reader time.
Ребята кто в Москве Планирую объединить две комнаты в гостиную Уже знакомые налетели на миллион Нервов просто нет Короче, нашел наконец нормальную контору — проект перепланировки квартиры под ключ Всё согласовали за месяц В общем, смотрите сами по ссылке — проект на перепланировку квартиры заказать [url=https://proekt-pereplanirovki-kvartiry-hmf.ru]https://proekt-pereplanirovki-kvartiry-hmf.ru[/url] Не начинайте без проекта Перешлите тому кто ремонт затеял
Родители отзовитесь Ребёнок устаёт в школе как лошадь А качество знаний при этом никакое Я уже голову сломал Короче, единственная школа где реально учат — школы дистанционного обучения с индивидуальным подходом Уроки в удобное время В общем, сохраняйте себе — онлайн школа в москве [url=https://shkola-onlajn-krt.ru]https://shkola-onlajn-krt.ru[/url] Переводите на нормальное обучение Перешлите другим родителям кто устал от школы
Top notch writing, every paragraph carries weight and nothing feels like filler, and a stop at juarabola88 reflected that same care, a rare thing on the open web these days where most pages exist for clicks rather than actual reader value or anything close to that which is honestly a real shame.
Now feeling the rare pleasure of trusting a source completely on first encounter, and a look at baolidh extended that initial trust into something more durable, the calibration of trust to evidence is something I do informally and this site has earned high trust through the cumulative weight of multiple consistently good posts already.
мостбет ставки на баскетбол Кыргызстан [url=http://mostbet91325.help/]мостбет ставки на баскетбол Кыргызстан[/url]
A piece that prompted a small mental rearrangement of how I order related ideas, and a look at solarorchardartisanexchange extended that rearranging effect, content that affects the structure of my thinking rather than just adding to it is content with the deepest kind of impact and this site is reaching that depth for me today.
Solid information that lines up with what I have been hearing from other reliable sources, and after my visit to shadowtrojan I was even more certain of that, this site checks out which is something I value highly when so many places online play loose with the facts to chase a quick click.
Народ у кого дети в школе Учителя которые только и делают что пилят А поборы в классе просто бесят Короче, нашли крутую альтернативу — онлайн школы для детей с индивидуальным графиком Уроки в удобное время В общем, сохраняйте себе — онлайн школа в москве [url=https://shkola-onlajn-pqs.ru]https://shkola-onlajn-pqs.ru[/url] Хватит мучить себя и ребёнка Перешлите другим родителям
1win VPN pentru 1win [url=https://www.1win15726.help]1win VPN pentru 1win[/url]
Народ у кого школьники Учителя которые только и знают что орать Только оценки и нервотрёпка Короче, нашли идеальное решение — школы дистанционного обучения с настоящими учителями Ребёнок занимается с удовольствием В общем, сохраняйте себе — онлайн школа москва с аттестатом [url=https://shkola-onlajn-lzn.ru]https://shkola-onlajn-lzn.ru[/url] Хватит мучить себя и ребёнка Перешлите другим родителям
Started reading skeptically because the headline seemed overconfident, and the post earned the headline by the end, and a look at 595tz203 continued that pattern of earning its claims, sites that can back up their headlines without overpromising are rare and this one has clearly developed editorial calibration on that front consistently.
Found this through a friend who recommended it and now I see why, and a look at qytdvbzz only strengthened that recommendation in my own mind, word of mouth still works for content that actually delivers and this site is clearly earning recommendations the old fashioned way through quality rather than marketing.
Bookmark earned, share earned, return visit earned, all from one reading session, and a look at jiutou did the same, the trifecta of bookmark and share and return is rare in a single visit and represents the highest level of engagement I tend to offer any piece of online content these days here.
1win aviator demo [url=https://1win15726.help/]https://1win15726.help/[/url]
Looking forward to seeing what gets published next month, and a look at vinylslogan extended that anticipation across the broader site, finding myself looking forward to a sites future content rather than just consuming its existing content is a stronger commitment level than I usually reach with new finds and this site triggered that.
Appreciated the way each section connected smoothly to the next without abrupt jumps, and a stop at stoneharborartisanexchange kept that flow going nicely, transitions are something most blog writers ignore but the difference is huge for the reader who is trying to follow a sustained line of thought today across many different topics.
Now planning a longer reading session for the archives, and a stop at up0ep7x confirmed the archives are worth that longer commitment, sites with archives I want to read deliberately rather than just sample are rare and this one has clearly earned that level of interest based on the consistency of what I have already read.
Родители всем привет А домашние задания — это вообще ад Одни оценки и бесконечные поборы Короче, единственная школа где кайфово учиться — онлайн обучение для детей дома с учителем Ребёнок учится и не перегружается В общем, сохраняйте себе — онлайн школа огэ [url=https://shkola-onlajn-vem.ru]https://shkola-onlajn-vem.ru[/url] Не мучайте себя и детей Перешлите другим родителям
Will share this on a forum I am part of where it will be appreciated by others working in the same area, and a look at twainverge suggests there is more here worth passing along too, definitely a generous resource that deserves a wider audience than it probably has today across the open internet.
Felt the post was written for someone like me without explicitly addressing me, and a look at stoneharborcraftcollective produced the same fit, when content lands on its target without pandering you know the writer has done careful audience thinking rather than relying on demographic targeting or interest signals to do the work of editorial decisions.
Народ у кого дети Учителя которые только оценками меряют А эти бесконечные ремонты в классе Короче, нашли отличный вариант — онлайн школы для детей с 1 по 11 класс Учителя настоящие профи В общем, вся инфа вот здесь — дистанционное обучение москва [url=https://shkola-onlajn-bxf.ru]https://shkola-onlajn-bxf.ru[/url] Не мучайте себя и детей Перешлите другим родителям
Reading this back to back with a similar piece elsewhere made the quality difference obvious, and a stop at naimei10 only widened the gap, comparing content side by side is a useful exercise and the gap between this site and average competitors in the space is large enough to be noticeable from the first paragraph.
Привет родителям Вечные двойки и тройки в дневнике Никакого интереса к учёбе Короче, нашли крутую альтернативу — школа онлайн с лицензией и зачислением Преподаватели профи В общем, сохраняйте себе — онлайн школа в москве [url=https://shkola-onlajn-pqs.ru]https://shkola-onlajn-pqs.ru[/url] Переходите на дистант нормальный Перешлите другим родителям
Слушайте кто забор ставил Обещают одно а по факту другое То материал фуфло Короче, мужики с руками из правильного места — установка заборов в Московской области недорого Сделали за две недели В общем, сохраняйте себе — установка заборов в Московской области [url=https://zagorodnii-dom.ru]установка заборов в Московской области[/url] Проверяйте производителя по этому списку Перешлите тому у кого участок
I came here looking for a quick answer and ended up reading the whole post because it was actually interesting, and after umbravista I had a much fuller picture, no stress and no confusion just a clear walk through the topic that made everything fall into place without much effort.
Народ у кого школьники Каждое утро как каторга Ребёнок раздражённый Короче, школа без стресса и скандалов — онлайн школы для детей с 1 по 11 класс Ребёнок занимается с удовольствием В общем, сохраняйте себе — образовательные онлайн школы [url=https://shkola-onlajn-lzn.ru]https://shkola-onlajn-lzn.ru[/url] Хватит мучить себя и ребёнка Перешлите другим родителям
Народ всем привет Задолбался я уже оборудование подбирать То тали бракованные Короче, мужики которые реально делают качественно — грузоподъемное оборудование Москва с доставкой Цены ниже чем у перекупов на 20% В общем, сохраняйте себе — канатная электрическая таль [url=https://tal-elektricheskaya.ru]канатная электрическая таль[/url] Проверяйте производителя по документам Перешлите тому кто ищет оборудование
The conclusions felt earned rather than tacked on at the end like an afterthought, and a look at jazbrood kept that careful structure going, you can tell when a writer has thought about the shape of their post versus just letting it ramble out and hoping for the best at the end which most do.
A small thing but the line spacing and font choices made reading this physically pleasant, and a look at s0022 maintained the same careful design, technical choices about typography are part of what makes online reading actually comfortable and this site has clearly invested in the design layer alongside the content layer carefully.
Worth flagging this site to a few specific friends who would appreciate the editorial sensibility, and a look at index added more pages I will mention to them, recommending sites to specific people requires understanding both the site and the person and this site is making those personalised recommendations easy and natural for me.
Nice to see a post that does not try to overcomplicate the basics for the sake of looking smart, and once I looked at timbertrailcraftcollective the same direct tone was there too, which honestly makes a difference when you are short on time and want answers without long pointless intros.
Looking back on this reading session it stands as one of the better ones recently, and a look at sabertorch extended that ranking, the informal ranking of reading sessions against each other is something I do mentally and this session ranks high largely because of this site and a couple of related pages here.
1win kupon hesablanmır [url=www.1win65005.help]1win kupon hesablanmır[/url]
Аренда яхт в Сириусе позволяет открыть для себя красоту побережья с моря и провести время в уютной атмосфере вдали от пляжной суеты, https://yachtkater.ru/
1win apk Бишкек скачать [url=1win50917.help]1win apk Бишкек скачать[/url]
I feel that is among the so much significant info for me. And i am satisfied studying your article. However should commentary on some basic issues, The site style is ideal, the articles is in reality excellent : D. Excellent activity, cheers
Hey gamers, I figured to mention something I randomly read when reading entertainment posts. Following one chill multiplayer session, I ended up reading one review about some fresh internet-based casino platform that according to the article has an cross-border license.
I’m obviously not here to promote some random site, but being a gamer, I found the whole thing worth discussing. The main thing that grabbed my eye was that the writer described the platform as global. Of course, the wording does not mean that everyone can play in literally every place. Country-specific rules still exist, and people should confirm the own terms before playing.
Still, the idea sounded really modern. The article explained that the platform was made for people from various markets, with tools that look more flexible than traditional casino sites. It pointed out about fast account creation, clear interface, smartphone optimization, and various deposit systems.
As a player, I always look at the layout first. If a site is laggy, I usually close it right fast. The article made the website sound clean, which is useful because in 2026 people are used to high-quality launchers. A messy interface can ruin even a good service.
The legal side part was also interesting. There are loads of random casino sites on the internet, and plenty of of them make huge statements without showing much. So when an article focuses on official licensing, that somewhat makes me pay more attention. But again, personally I would still confirm the license myself before joining anything.
The article also talked about casino game variety. It sounded like the site has video slots, table games, and real-time dealer games. I know gambling titles are not the same from esports, but there is still some connection in how sites try to keep visitors engaged. Things like animations, regular bonuses, and smooth feedback loops are present in both online entertainment.
One thing I appreciated in the article was that it seemed to bring up responsible gambling. This is important, because cash are involved. Playing should stay controlled, not become dangerous. The article talked about things like account limits, cool-off options, and safety settings. In my opinion, any licensed casino platform should have those options by default.
Another interesting part was the cross-border audience. The article made it sound like the platform is not focused on a single market, but on multiple regions. That sounds convenient, especially for people who travel, but it also means everyone need to be aware. Worldwide does never automatically mean open to every country. There are usually restricted jurisdictions, and those lists should be checked before playing.
I also thought about how [url=https://mauritius.com.au/2026/05/28/merlin-casino-online-like-a-pleasant-break-from-ordinary-routine/]casino platforms[/url] are becoming more like digital platforms. They focus on instant access, promotions, and easy use. For older casino websites, the experience sometimes felt confusing. But newer ones seem to understand that users expect responsive design. Good UX does not make a casino automatically better, but it does show that the platform is at least thinking about accessibility.
The banking side also sounded fairly useful. The article suggested that the platform supports various deposit options, which is useful for multi-country users. But that is another area where people should read the conditions. Payment rules are extremely important, because a site can look polished, but if withdrawals are problematic, then the experience becomes annoying.
To be clear, I am not here to say this platform is something everyone should use. I just found the write-up different because it shows how the casino gaming industry is changing. More platforms are trying to look modern, and more of them are using modern UX design. For people who follow digital platforms, that is actually interesting to watch.
Have anyone else here found similar news about new online casinos? Do you think cross-border availability actually makes a big difference, or do you mostly care about withdrawals? I am honestly curious from the gamer perspective, not trying to sell anyone. And, of course, if someone decides to use any casino site, they should confirm local laws, read the terms, protect their budget, and act responsibly.
Skipped the comments section but might come back to read it, and a stop at souptrigger hinted at a quality reader community, sites where the comments are worth reading separately from the post are increasingly rare and signal a particular kind of audience that has grown around the editorial vision over time gradually.
1win кэшбек [url=https://www.1win50917.help]https://www.1win50917.help[/url]
Really appreciate this kind of writing, no shouting and no clickbait headlines just steady useful content, and a quick look at uplandcoveartisanexchange kept that going, definitely a site I will be returning to whenever I need a sensible take on similar topics in the days ahead and also during slower work weeks.
I think this is among the so much vital info for me. And i’m happy reading your article. But wanna remark on few common issues, The site style is wonderful, the articles is really excellent : D. Just right job, cheers
This post creates a very positive reading experience because the structure is clear, the tone stays calm, and the discussion feels open enough for readers with different opinions to engage naturally and thoughtfully.
https://residencesantodomingo.it/
mostbet jocuri gratis [url=http://mostbet78342.help]http://mostbet78342.help[/url]
1win приложение для андроид [url=https://www.1win39615.help]1win приложение для андроид[/url]
1win anulare retragere [url=www.1win04957.help]1win anulare retragere[/url]
aviator free download apk [url=https://www.aviator62775.online]aviator free download apk[/url]
Мамы и папы слушайте Каждый день как на работу Ребёнок перегружен Короче, нашли отличный вариант — школа онлайн с государственным аттестатом Учителя настоящие профи В общем, смотрите сами по ссылке — online school [url=https://shkola-onlajn-bxf.ru]https://shkola-onlajn-bxf.ru[/url] Переходите на дистанционное обучение Перешлите другим родителям
Владельцы участков отзовитесь Обещают одно а по факту другое То вообще приезжают и говорят что замер не тот Короче, мужики с руками из правильного места — установка заборов в Московской области недорого Цены ниже чем у других на 30% В общем, смотрите сами по ссылке — услуги по установке заборов в Москве [url=https://zagorodnii-dom.ru]https://zagorodnii-dom.ru[/url] Не ведитесь на дешёвые предложения Перешлите тому у кого участок
Genuine reaction is that this site clicked with how I like to read, and a look at kefu012 kept that comfortable fit going, sometimes you find a place online whose editorial decisions just align with your preferences and when that happens it is worth recognising and supporting through repeat engagement consistently going forward.
Cherished is likely to be what people say about your comments.
Слушайте кто ищет выход Задолбали эти школьные будни А эти поборы на подарки учителям Короче, нашли идеальное решение — школа онлайн с государственной лицензией Аттестат настоящий В общем, там программа и отзывы — онлайн образование [url=https://shkola-onlajn-lzn.ru]онлайн образование[/url] Хватит мучить себя и ребёнка Перешлите другим родителям
Now setting this aside as a model of how to write thoughtfully on the topic, and a stop at siskavarsity extended that model status, content that becomes a reference for how a kind of writing should be done is content with influence beyond its own readership and this site is reaching that level for me clearly today.
Liked how the post handled an objection I was forming as I read, and a stop at velvetbrookartisanexchange similarly anticipated where my thinking was going next, the rare writer who can predict reader concerns and address them in advance is doing something most online content fails to do despite that being basic editorial work.
888starz online login [url=http://888-uz5.com/]https://888-uz5.com/[/url]
A piece that suggested careful editing without showing the marks of the editing, and a look at formchat continued that invisible polish, the best editing disappears into the prose and this site reads as having been edited with skill that does not announce itself which is the highest compliment I can offer any blog content.
The way this post is organized makes the discussion much easier to understand and engage with, since the ideas are explained simply and the overall tone encourages positive interaction and thoughtful participation from readers.
viagra pills sexual xxx porn pills
Really thankful for posts that respect a reader’s time, this one does, and a quick look at sloopvault was the same, no need to scroll through endless intros just to get to the actual content, that approach alone is enough reason to come back here regularly for the kind of writing offered.
whoah this weblog is wonderful i like reading your articles. Keep up the good paintings! You already know, many people are looking around for this information, you can help them greatly.
One of the more thoughtful posts I have read recently on this topic, and a stop at thisdomainisabdu added even more weight to that impression, this is genuinely good content that holds its own against far better known sites in the same space without trying to imitate any of them at all which I appreciate.
Слушайте кто подъемники ищет Обещают сертификаты а по факту Китай То вообще отгружают б/у под видом нового Короче, реальный завод в Москве — оборудование для подъема грузов до 50 тонн Установка и пусконаладка В общем, там каталог и цены — таль грузоподъемная [url=https://tal-elektricheskaya.ru]таль грузоподъемная[/url] Не ведитесь на дешевые предложения Перешлите тому кто ищет оборудование
Мамы и папы всем привет Задолбали эти сборы в 7 утра Никакого интереса к учёбе Короче, нашли крутую альтернативу — онлайн школы для детей с индивидуальным графиком Уроки в удобное время В общем, там программа и условия — школа онлайн в россии [url=https://shkola-onlajn-pqs.ru]https://shkola-onlajn-pqs.ru[/url] Переходите на дистант нормальный Перешлите другим родителям
Nice post.Very useful info specifically the last part 🙂 Thank you and good luck.
Found this really helpful, the explanations are simple but they actually answer the questions a normal reader would have, and after I followed swordtunic I had a clearer sense of the topic, no extra fluff just useful points laid out in a sensible order that made the time worth it.
The structure and tone of this post help create a discussion that feels well-considered, clearly arranged, and easy for different audiences to engage with.
cialis pills sexual xxx porn pills
Владельцы участков отзовитесь Цены космос а качество мыло То профлист тонкий как бумага Короче, реальное производство в Москве — заборы под ключ в Москве с гарантией Цены ниже чем у других на 30% В общем, сохраняйте себе — строительство заборов под ключ [url=https://zagorodnii-dom.ru]строительство заборов под ключ[/url] Не ведитесь на дешёвые предложения Перешлите тому у кого участок
1win мобильное приложение скачать [url=https://www.1win39615.help]1win мобильное приложение скачать[/url]
mostbet blackjack [url=https://mostbet78342.help/]https://mostbet78342.help/[/url]
1win depunere in asteptare [url=www.1win04957.help]www.1win04957.help[/url]
This post has a very easygoing and friendly style that makes the discussion comfortable to read while still keeping the topic easy to understand and interesting throughout.
Watch sexual porno video xxx sex adults site
aviator crash mw [url=https://www.aviator62775.online]https://www.aviator62775.online[/url]
cum creez cont 1win [url=www.1win04957.help]cum creez cont 1win[/url]
mostbet versiune noua [url=https://www.mostbet78342.help]mostbet versiune noua[/url]
1вин коэффициенты [url=www.1win39615.help]1вин коэффициенты[/url]
how to install aviator apk [url=aviator62775.online]aviator62775.online[/url]
1win sign up Azərbaycan [url=https://1win65005.help]1win sign up Azərbaycan[/url]
This post creates a really easy reading experience because the wording feels clear, the pacing stays steady, and the overall discussion remains interesting without becoming too complicated to follow closely.
cialis pills sexual xxx porn pills
Online casinos provide access to both classic and modern gaming formats, allowing players to explore different styles of casino entertainment, Jettbet Casino
Народ всем привет Объездил кучу поставщиков — везде перекупы То кран-балки с зазорами Короче, нашел нормальных производителей — подъемное оборудование для производства любой сложности Гарантия 5 лет В общем, сохраняйте себе — производитель грузоподъемного оборудования [url=https://tal-elektricheskaya.ru]производитель грузоподъемного оборудования[/url] Проверяйте производителя по документам Перешлите тому кто ищет оборудование
Всем привет родители Двойки замечания вечные Ребёнок перегружен Короче, реально удобный и простой — школы дистанционного обучения с опытными педагогами Никаких нервов В общем, сохраняйте себе — школа для детей [url=https://shkola-onlajn-bxf.ru]школа для детей[/url] Не мучайте себя и детей Перешлите другим родителям
1win kupon ləğv [url=http://1win65005.help]http://1win65005.help[/url]
mostbet apk qayerdan yuklab olish [url=www.mostbet36602.help]mostbet apk qayerdan yuklab olish[/url]
I think one of the best things about this post is that it feels genuine and easy to connect with, while still offering enough context and insight to keep the discussion engaging, well-rounded, and relevant for a wide range of different readers online.
Watch sexual porno video xxx sex adults site
pin-up translyatsiya [url=http://pinup24541.help/]http://pinup24541.help/[/url]
Že dolgo nisem vedel, kako naprej. Potem pa sem dobil pravi nasvet in vse se je spremenilo. Govorim o ambulantnem zdravljenju alkoholizma pri Dr Vorobjevu. Veste, alkoholizem je bolezen, ne slabost. In kar je najpomembneje – ni treba v bolnišnico. Več o tem in o izkušnjah pacientov si lahko preberete neposredno na uradnem viru: Dr Vorobjev center [url=zdravljenjealkoholizma.com]zdravljenjealkoholizma.com[/url]. Po prvem tednu sem začutil razliko.
Če kogarkoli, ki ga imate radi se sooča s to težavo – resnično priporočam. Držim pesti!
It takes a certain level of skill to present information in a way that is both informative and completely neutral, and you have certainly achieved that balance perfectly with this carefully written and carefully organized article.
adult xxx video porn site xxx sex video
Pozdravljeni. Preizkusil sem že vse mogoče. Ko gre za ambulantno zdravljenje alkoholizma — veliko ljudi se muči v tišini. Prijatelj mi je svetoval en center, kjer ne obetajo nemogočega. Govorim o Dr Vorobjev centru. Več informacij je na voljo tu: odvisnost od alkohol [url=http://www.alkoholizem-zdravljenje.com]odvisnost od alkohol[/url] Po nekaj tednih sem začutil razliko. Ni lahko priznati si, da imaš težavo. Ampak ko enkrat najdeš pravo pomoč — vse postane lažje. Vsekakor priporočam vsem, ki se spopadajo s to težavo. Vsak nov dan je priložnost.
Spent a few minutes here and came away with a clearer picture of the topic, the writing keeps things simple without dumbing them down, and after a stop at tasseltract the rest of the points lined up neatly which is something I appreciate when I am short on time and need answers fast.
mostbet mobil internetda ishlaydimi [url=http://mostbet36602.help/]http://mostbet36602.help/[/url]
mostbet yuklab olish uz [url=http://mostbet36602.help]http://mostbet36602.help[/url]
pin up toʻlov limitlari [url=pinup24541.help]pinup24541.help[/url]
Reading this in a moment of low energy still kept my attention, and a stop at stridertorch continued that engagement under suboptimal conditions, content that survives the reader being tired is content with extra reserves of pull and this site has the kind of writing that holds up even when I am not at my reading best.
pinup ikki bosqichli himoya [url=http://pinup24541.help/]http://pinup24541.help/[/url]
Veliko sem prebral in slišal o tem. Ko sem prvič slišal za zdravljenje alkoholizma po metodi Dr Vorobjev centra, sem bil poln dvomov. Ampak ko sem prebral izkušnje anderen — ugotovil sem, da to res deluje. Alkoholizem uničuje družine. In najhuje je, da mnogi ne vedo, kam se obrniti. Zato priporočam, da preverite celoten postopek na spletni strani, ki so na voljo na tej povezavi: ambulantno zdravljenje alkoholizma [url=alkoholizma-zdravljenje-si.com]alkoholizma-zdravljenje-si.com[/url]. Več o tem si preberite na spodnji povezavi.
Po dolgih letih sem končno našel rešitev. Če vas to zanima — vzemite si čas in preberite. Srečno vsem na tej poti!
китайский язык [url=https://www.c-inform.info/news/id/116271]китайский язык[/url]
Casino games are available in a wide range of styles and formats, giving players the opportunity to explore different types of gaming experiences https://hugo.casino/
Слушай, соседи уже устали слушать эти крики. Как есть — только срочный вывод из запоя. Ребята работают чисто. Короче говоря, нажимайте и читайте — нарколог на дом вывод из запоя [url=https://vyvod-iz-zapoya-na-domu-voronezh-xrt.ru]https://vyvod-iz-zapoya-na-domu-voronezh-xrt.ru[/url] Хватит надеяться на авось. Лучше один раз дернуться, чем потом скорую вызывать. Проверенный вариант по городу.
Regards for helping out, superb info.
Started reading without much expectation and ended on a high note, and a look at siskatrance continued that arc, content that builds rather than peaks early is a sign of a writer who knows how to structure a piece for sustained reader engagement rather than relying on a strong hook to do all the work.
Ох уж это, родственники на нервах. Что делать — непонятно. Наркологическая клиника с выездом — адекватный вывод из запоя цены указаны. Там реальные врачи. Короче, там все по полочкам — вывод из запоя цена [url=https://vyvod-iz-zapoya-na-domu-voronezh-bvc.ru]вывод из запоя цена[/url] Не ждите чуда. Сам через это прошел, чем потом собирать по кускам. Проверено на своей шкуре.
Only top materials: Use of Chariots
Наша лучшая подборка: https://povario.ru
Знаете, родственники просто в тупике. Ситуация аховая. В такой теме главное не заниматься самодеятельностью. Нашел нормальный вариант — вывод из запоя цены адекватные. Там работают толковые врачи. Короче, жмите сюда чтобы узнать подробности — нарколог на дом вывод из запоя на дому [url=https://vyvod-iz-zapoya-na-domu-voronezh-kmp.ru]нарколог на дом вывод из запоя на дому[/url] Промедление смерти подобно, потому что запой убивает почки и сердце. Проверено на себе.
Читать расширенную версию: https://smellsi.ru/c/calvin-klein/
[url=https://888stareg.com/]888stazr[/url]
تعتبر منصة 888starz eg وجهة مميزة للاعبين الباحثين عن تنوع في الألعاب وخيارات مراهنة واسعة.
القسم الثاني:
تضم المنصة أدوات ومعلومات تفصيلية عن الفرق واللاعبين والنتائج السابقة.
القسم الثالث:
بالإضافة إلى الرياضات، تضم 888starz eg كازينو مباشر وألعاب سلوت متقدمة.
القسم الرابع:
تدعم المنصة أدوات للحد من المخاطر مثل تحديد حدود الإيداع والفترات التوقفية.
زوروا [url=https://888star-egypt.com/]star 888 bet[/url] للمزيد من المعلومات والعروض الخاصة.
يُعد 888starz egypt من الأسماء المعروفة في ساحة الترفيه على الإنترنت.
تقدم المنصة مجموعة متنوعة من الألعاب والخدمات المصممة لتلبية احتياجات اللاعبين. تتيح المنصة مجموعة شاملة من الألعاب والخدمات التي تستهدف جمهور المستخدمين المتنوع.
تتميز الواجهة بسهولة الاستخدام وسرعة الاستجابة. تشتهر واجهة الموقع ببساطتها وسلاسة التنقل بين الأقسام.
القسم الثاني:
تتضمن عروض 888starz egypt مكافآت ترحيبية للمشتركين الجدد. تتضمن عروض 888starz egypt مكافآت ترحيبية للمشتركين الجدد.
كما توجد حملات ترويجية مستمرة لزيادة التفاعل مع اللاعبين. وتدير 888starz egypt برامج ترويجية منتظمة لرفع مستوى النشاط داخل الموقع.
تتنوع الجوائز بين رصيد مجاني ودورات لعب ومزايا خاصة. تتنوع الجوائز بين رصيد مجاني ودورات لعب ومزايا خاصة.
القسم الثالث:
يعتمد محتوى 888starz egypt على مجموعة من المزودين العالميين للألعاب. تستند ألعاب 888starz egypt إلى محتوى مقدم من شركات ألعاب دولية.
هذا يضمن تنوعاً وجودة في الخيارات المتاحة للمستخدمين. ويؤدي ذلك إلى توفير مجموعة متنوعة وجودة متميزة في الألعاب المقدمة.
كما تلتزم المنصة بتحديث محتواها بانتظام لمواكبة التطورات. كما تلتزم المنصة بتحديث محتواها بانتظام لمواكبة التطورات.
القسم الرابع:
تولي 888starz egypt أهمية لأمان المعاملات وحماية البيانات الشخصية. تضع المنصة حماية البيانات وأمن المعاملات في مقدمة أولوياتها.
تستخدم تقنيات تشفير وحلول دفع آمنة لتقليل المخاطر. تستخدم تقنيات تشفير وحلول دفع آمنة لتقليل المخاطر.
يمكن للمستخدمين التواصل مع دعم فني متوفر لمعالجة أي قضايا بسرعة. كما يتوفر فريق دعم فني للتعامل السريع مع استفسارات ومشاكل المستخدمين.
تعرض الواجهة الرئيسية أهم الأحداث الرياضية والألعاب الرائجة منذ اللحظة الأولى.
تستعرض الواجهة الرئيسية لـ 888starz المباريات القادمة والأودز المحدثة لحظيًا.
وكيل سحب وايداع 888starz [url=888starz-eg-africa.com]https://888starz-eg-africa.com/[/url]
تعرض الواجهة الرئيسية أحدث الإصدارات والألعاب الرائجة بشكل دوري.
تعرض الصفحة الرئيسية للموقع الرسمي 888starz أحدث العروض الترحيبية للاعبين الجدد في مصر.
??? ??????? ???????? ?? 888starz ????? ????????? ???????? ????????? ???????? ?????? ??? ????? ????.
888 ستارز [url=888starzeg-egypt.com]https://888starzeg-egypt.com/[/url]
???? ????? ??????? ???????? ????????? ?????? ??? ????????? ???????? ??????? ??? ?????.
????? ?????? ????? ???????? ??????? ?????? ???? ????? ?? ????? ??????.
٨٨٨ ستارز [url=https://www.eg888stars.com/]https://eg888stars.com/[/url]
???? ?????? ???? ?? ???????? ????? ?????? ???? ????? ?? ?????? ??????? ???? ?????.
???? ?????? ???????? ????????? ?????? ????? 50% ??????? ?????? ??? ???? ???????.
???? 888starz ?? ???? ?? 30 ???? ????? ???????? ???? ?? 5 ??????? ???????.
???? ?????? ??????? ?????? ???? ???????? ?????? ??? ???? ?????? ??? ?? ????.
Liked the balance between depth and brevity, never too shallow and never too long, and a stop at tweedvolume kept the same balance going across the rest of the site, this is one of the harder skills in writing and the team here clearly has it figured out very well indeed across every page.
Народ, попал в такую передрягу. Родственник пьет без остановки. Нервов ни у кого нет. Участковый только руками разводит. Короче, врачи толковые попались — срочный вывод из запоя круглосуточно. Поставили систему. В общем, вся информация вот здесь — вывод из запоя на дому телефоны [url=https://vyvod-iz-zapoya-na-domu-voronezh-zqw.ru]https://vyvod-iz-zapoya-na-domu-voronezh-zqw.ru[/url] Не надейтесь на авось. Сохраните себе.
Блин народ, ситуация просто аховая. Родственник просто пропадает. Нервов уже ни у кого нет. В бесплатную тащить страшно — поставят на учёт. Короче, только это и спасло — срочный вывод из запоя круглосуточно. Отошёл за полчаса. В общем, вся инфа вот тут — вывод из запоя цены [url=https://vyvod-iz-zapoya-na-domu-voronezh-lnm.ru]вывод из запоя цены[/url] Не тяните резину. Сохраните себе.
Found this through a search that was generic enough I did not expect quality results, and a look at vesseltame continued the surprisingly good experience, search engines occasionally still surface excellent independent content if you scroll past the obvious paid and high authority results which is reassuring to remember sometimes.
Народ, сталкивался сам с таким — близкий совсем не выходит из штопора. Соседи звонят в дверь. В диспансер тащить страшно — посадят на учёт. Сам был в такой жопе. Короче, только это и работает — профессиональное выведение из запоя капельницей. Поставили систему за 20 минут. В общем, смотрите сами по ссылке — выведение из запоя на дому [url=https://vyvod-iz-zapoya-na-domu-voronezh-jhg.ru]https://vyvod-iz-zapoya-na-domu-voronezh-jhg.ru[/url] Не надейтесь на авось. Деньги потом не нужны будут. Перешлите тому кто в беде.
Found the rhythm of the prose particularly enjoyable on this read through, and a look at singersorbet kept that musical quality going across the related pages, sentence rhythm is something most blog writers ignore but it makes a real difference in how content lands with the careful reader who cares.
All the Details: https://jiwofiboiaoperations.sbs
Personalized summary: https://sucratenova.click
Ударно-волновая терапия https://novogireevo-klinika.ru в Пушкино — эффективный метод лечения хронической боли, воспалений сухожилий и суставов. Консультация врача, подбор курса процедур, современное оборудование, комфортные условия и профессиональный подход к восстановлению здоровья.
Grateful for posts like this one, they remind me there are still places online run by people who care about quality, and a look at swansignal reflected the same standards, you can tell the difference between content made for readers and content made just for search engines today and this is the former.
Only the best is here: https://lapidifyio.click
Action tips: https://houherexo.digital
Liked the way the post got out of its own way, and a stop at waferturtle extended that invisible craft, the best writing you barely notice while reading because it is doing its work without drawing attention to itself and this site has clearly mastered that disappearing act across the pieces I have read.
Полный справочник по почтовым отделениям России предоставляет удобный доступ к информации об отделениях связи, расположенных как в крупных городах, так и в небольших населенных пунктах – https://pochtaops.ru/
Аренда квартир в СПб https://arenda-kvartir78.ru на длительный срок и посуточно. Большой выбор квартир в разных районах Санкт-Петербурга, проверенные объявления, удобный поиск по цене, площади и расположению. Найдите комфортное жилье без лишних сложностей.
Драфт-сюрвей https://eurogal-surveys.ru независимый расчет массы груза по осадке судна перед погрузкой и после выгрузки. Точные измерения, международные методики, квалифицированные сюрвейеры, официальные отчеты и контроль количества груза для морских перевозок.
Most blog writing on this subject reaches for the same handful of arguments and this post avoided them, and a look at starlitvixen continued the original treatment, content that finds its own path through territory other writers have flattened is content with real authorial energy and this site has plenty of that distinctive energy.
Квартиры в новостройках https://novostroyka78.ru Курортного района СПб с удобным поиском по цене, площади и срокам сдачи. Современные жилые комплексы, экологичная локация, близость парков и Финского залива, выгодные ипотечные программы и предложения от застройщиков.
Interesting read! Understanding RTP is key – those percentages really do shape long-term outcomes. Data-driven strategies, like those on jl1111 ph app casino, could be helpful, but remember responsible gaming is paramount! 🤔
Эффективные курсы английского для школьников в YES Center помогают и в учёбе, и в реальном общении. Подтянем оценки, подготовим к экзаменам и научим говорить свободно. Опытные педагоги, удобное расписание и дружная атмосфера ждут вашего ребёнка.
Approaching this with the usual skepticism I bring to new sites and being slowly persuaded, and a stop at trenchtwist continued that gradual persuasion, the careful path from skeptical reader to genuine fan is the only one I trust and this site has walked me along that path through patient consistent quality across pieces.
Hi there! I just wanted to ask if you ever have any trouble with hackers? My last blog (wordpress) was hacked and I ended up losing several weeks of hard work due to no back up. Do you have any solutions to protect against hackers?
Магазин бытовой химии https://himiya-v-dom.ru с большим выбором товаров для дома. Моющие и чистящие средства, стиральные порошки, гели, средства для кухни и ванной, товары для уборки, личной гигиены и ухода за домом по выгодным ценам.
Simply wish to say the frankness in your article is surprising.
Слушайте сюда. Попал в такую передрягу. Отец не вылезает из запоя. Дети не спят по ночам. В диспансер везти — на всю жизнь учёт. Короче, единственное что реально помогло — качественный вывод из запоя на дому. Приехали через час. В общем, вся инфа вот здесь — стоимость вывода из запоя [url=https://vyvod-iz-zapoya-na-domu-voronezh-ayu.ru]стоимость вывода из запоя[/url] Не тяните. Скиньте другу в беде.
Is it okay to put a portion of this on my weblog if perhaps I post a reference point to this web page?
This contained some excellent tips and tools. Great blog publication.
Started reading skeptically because the headline seemed overconfident, and the post earned the headline by the end, and a look at slackvista continued that pattern of earning its claims, sites that can back up their headlines without overpromising are rare and this one has clearly developed editorial calibration on that front consistently.
I think other website proprietors should take this web site as an model, very clean and great user pleasant style and design .
Came in tired from a long day and the writing held my attention anyway, and a stop at loansmonday kept that going, content that can engage a fatigued reader is doing something right because most online reading happens in suboptimal conditions like that one and quality content adapts to it without complaint.
Если ребёнок мечтает заговорить свободно, обратите внимание на лагерь с изучением английского. Здесь уроки органично вплетены в активный отдых: спорт, творчество, экскурсии. Языковая среда работает естественно, и результат заметен уже после первой смены.
Народ привет. Попал в жесть полную. Отец не выходит из запоя. Жена вся в слезах. Скорая не едет на такие вызовы. Короче, только это и вытащило — лучшая наркологическая клиника с выездом. Примчались быстро. В общем, там контакты и прайс и условия — вывод из запоя цены [url=https://vyvod-iz-zapoya-na-domu-voronezh-eio.ru]вывод из запоя цены[/url] Каждый час на счету. Перешлите тому кому надо.
Thank you for all the information was very accurate, just wondering if all this is possible.~
The use of plain language without dumbing down the topic was really well done, and a look at tapetoken continued in that same accessible style, this is something many technical writers fail at because they either confuse their readers or condescend to them but here neither problem appears at all which is impressive really.
Most attempts at writing on this topic feel like they are missing something and this post finally identified what was missing, and a look at jsdhh extended that diagnostic clarity, content that names what is wrong with adjacent treatments while doing better itself is content with both critical and constructive value and this site has both.
Ребята всем привет. Столкнулся с такой бедой. Близкий не выходит из запоя. Соседи стучат в дверь. Скорая не едет. Короче, нормальные врачи нашлись — адекватный вывод из запоя цены нормальные. Приехали через час. В общем, вся инфа вот здесь — вывод из запоя цены [url=https://vyvod-iz-zapoya-na-domu-voronezh-plk.ru]вывод из запоя цены[/url] Каждая минута дорога. Перешлите тому кому надо.
Тимирязевский район сочетает хорошую экологию и развитую инфраструктуру, благодаря чему ЖК 26 ПаркВью пользуется интересом среди покупателей разных категорий https://26park.ru/
1win mirror indi [url=http://1win61873.help]1win mirror indi[/url]
saque pix aviator [url=https://www.aviator39517.help]https://www.aviator39517.help[/url]
мостбет rasmiy sayt [url=http://mostbet71905.help]http://mostbet71905.help[/url]
joc plinko mostbet [url=https://www.mostbet28014.help]https://www.mostbet28014.help[/url]
A piece that exhibited the kind of patience that good writing requires, and a look at straitsurge continued that patient quality, hurried writing is easy to spot and this site reads as having been written without time pressure which produces a different feel than the rushed content that dominates much of the modern blog space.
pin-up plinko demo [url=https://www.pinup24711.help]pin-up plinko demo[/url]
1win crash pe mobil [url=https://1win53014.help]https://1win53014.help[/url]
1win бонус [url=http://1win47019.help]http://1win47019.help[/url]
1win поддержка [url=https://1win17590.help]https://1win17590.help[/url]
Слушайте что расскажу. Жесть случилась полная. Муж просто пропадает. Жена в слезах. В диспансер везти — учёт на всю жизнь. Короче, нормальные врачи нашлись — срочный вывод из запоя круглосуточно. Отошёл за полчаса. В общем, там контакты и прайс — срочный вывод из запоя на дому [url=https://vyvod-iz-zapoya-na-domu-samara-ghi.ru]срочный вывод из запоя на дому[/url] Не тяните. Скиньте другу в беде.
Quiet confidence runs through the whole post, no need to shout to make the points stick, and a stop at arrhythmiaa carried that same restrained voice forward, content that respects the reader by trusting its own substance rather than dressing it up in theatrical language is what I look for online and rarely actually find these days.
Just dropping by to say thanks for the effort, it does not go unnoticed when a writer cares this much about the reader, and after I went through tritonstyle I was certain this is one of the better corners of the internet for this particular kind of content which is genuinely refreshing.
Tips and tools you offer are so helpful to agencies in our community.
When we look at these issues, we know that they are the key ones for our time.
Most of the time I feel the open web is in decline and then I find a site like this, and a stop at x4cvw reinforced that mood lift, the cumulative effect of finding occasional excellent independent content versus the cumulative effect of finding mostly mediocre content is real for the long term reader maintaining web habits today.
We are a group of volunteers and starting a new initiative in our community. Your blog provided us with valuable information to work on|.You have done a marvellous job!
Слушайте что расскажу. Попал я в переплёт конкретный. Брат пьёт без остановки. Соседи стучат в дверь. Платные клиники просят бешеные деньги. Короче, только это и спасло — срочный вывод из запоя круглосуточно. Отошёл за полчаса. В общем, жмите чтобы не потерять — выход из запоя на дому [url=https://vyvod-iz-zapoya-na-domu-samara-def.ru]https://vyvod-iz-zapoya-na-domu-samara-def.ru[/url] Каждая минута дорога. Скиньте другу в беде.
Проект от застройщика Град Девелопмент ориентирован на создание комфортной городской среды с удобными общественными пространствами и продуманной инфраструктурой: https://aurum-time-grad.ru/
Just stumble upon your blog from from time to time. nice article
Апсайд Мосфильмовская предоставляет возможность жить в одном из лучших районов столицы и пользоваться всеми преимуществами современной городской инфраструктуры: жк апсайд мосфильмовская в Москве
1win 404 [url=http://1win61873.help/]1win 404[/url]
aviator bônus de boas-vindas [url=https://aviator39517.help/]aviator bônus de boas-vindas[/url]
Could not disagree with the main ideas. Wonder how things will develop over the coming years.
1win app download [url=1win61873.help]1win61873.help[/url]
Got pulled in by the headline and stayed because the content actually delivered on the promise, and a stop at sampleshadow kept that trust intact, when a site lives up to its own framing it earns the right to keep showing up in my browser tabs going forward indefinitely from here on out really.
aviator rtp crash [url=https://aviator39517.help/]https://aviator39517.help/[/url]
1win бозӣ бе бақайдгирӣ [url=https://1win47019.help]1win бозӣ бе бақайдгирӣ[/url]
mostbet retragere visa [url=http://mostbet28014.help]http://mostbet28014.help[/url]
Now realising the topic deserved better treatment than it has been getting elsewhere, and a look at topslot-mel extended that broader recognition, content that exposes the gap between actual quality and average quality elsewhere is doing the quiet work of raising standards and this site is contributing to that elevation in its own corner.
mostbet aviator стратегия [url=www.mostbet71905.help]mostbet aviator стратегия[/url]
Самарцы привет. Попал я в переплёт конкретный. Муж просто пропадает. Дети не спят ночами. В диспансер везти — учёт на всю жизнь. Короче, нормальные врачи нашлись — вывести из запоя на дому качественно. Приехали через час. В общем, сохраняйте на будущее — вывод из запоя на дому самара круглосуточно [url=https://vyvod-iz-zapoya-na-domu-samara-mno.ru]https://vyvod-iz-zapoya-na-domu-samara-mno.ru[/url] Не надейтесь на авось. Перешлите тому кому надо.
Portal gier dudespin casino bonus to Twój wybór! Spróbuj szczęścia w Dudespin – Twoim kasynie online! Zarejestruj się i wygrywaj – bezpieczeństwo i niezawodność. Dude Spin to Twój przewodnik po świecie hazardu; wygrane i sukces są tylko tutaj! Dudespin Casino to Twój osobisty klub gier. Wykorzystaj w pełni dudespin-casino.eu.com – graj mądrze.
1win bilete [url=https://1win53014.help/]1win bilete[/url]
1win сомонаи расмӣ Тоҷикистон [url=http://1win47019.help]1win сомонаи расмӣ Тоҷикистон[/url]
1win минимальная сумма вывода элсом [url=www.1win17590.help]www.1win17590.help[/url]
мостбет crash o‘ynash [url=mostbet71905.help]mostbet71905.help[/url]
pin-up hozirgi ko‘zgusi [url=pinup24711.help]pinup24711.help[/url]
1win protectie cont [url=www.1win53014.help]1win protectie cont[/url]
If I were grading sites on this topic this one would receive high marks, and a stop at syruptarot continued earning those high marks, the informal grading I do mentally for content sources is something I take seriously even though it is informal and this site has been receiving consistent high marks across multiple sessions today.
1win обход блокировки [url=https://1win17590.help]https://1win17590.help[/url]
Liked that the post resisted a sales pitch ending, and a stop at avairu maintained the no pitch approach, content that ends without trying to convert me into a customer or subscriber is content that has confidence in its own value and this site is clearly playing the long game on reader trust.
Слушайте кто искал участок То сайты виснут Соседи какие Короче, единственный нормальный сервис — публичная кадастровая карта россии онлайн Проверил все данные В общем, жмите чтобы не потерять — кадастровый номер земельного участка [url=https://publichnaya-kadastrovaya-karta-abc.ru]https://publichnaya-kadastrovaya-karta-abc.ru[/url] Пользуйтесь нормальной картой Перешлите тому кто ищет участок
Народ выручайте. Столкнулся с такой бедой. Человек уже седьмые сутки в штопоре. Жена в слезах. В диспансер везти — учёт на всю жизнь. Короче, нормальные врачи нашлись — вывести из запоя на дому качественно. Отошёл за полчаса. В общем, жмите чтобы не потерять — вывести из запоя [url=https://vyvod-iz-zapoya-na-domu-samara-pqr.ru]вывести из запоя[/url] Не тяните. Скиньте другу в беде.
Thanks for putting this online without locking it behind email signups or paywalls, and a quick visit to uptonshade kept that open feel going, content that trusts the reader to come back rather than gating access is the kind of approach I will reward with regular return visits over time happily.
Felt like the writer was speaking directly to someone with my level of curiosity, neither talking down nor showing off, and a stop at x1fl1 kept that comfortable matching going, finding writing that meets you where you are rather than asking you to climb up or stoop down feels great every time it happens.
Народ кто с землёй То вообще ничего не грузит Категорию земли уточнить Короче, единственный сервис который не врет — публичная кадастровая карта россии онлайн с обновлениями Нашел всё за 10 минут В общем, вся инфа вот здесь — публичная кадастровая карта pkk5 [url=https://publichnaya-kadastrovaya-karta-ghi.ru]https://publichnaya-kadastrovaya-karta-ghi.ru[/url] Пользуйтесь нормальной картой Перешлите тому кто ищет участок
Reading this on a slow Sunday and finding it perfectly suited to a slow Sunday read, and a quick stop at vincasinger kept the same gentle pace, content that fits the mood of the moment is something I notice and remember and this site has the kind of pace that suits relaxed reading sessions especially well.
Покупатели, которые ценят современные жилые пространства, обращают внимание на Vesper Шаболовка благодаря сочетанию архитектуры высокого уровня и престижного окружения, https://vesper-shabolovka.ru/
Now considering writing a longer note about the post somewhere, and a look at t00cd5iu added more material for that note, content that prompts me to write rather than just consume is content with generative energy and this site is producing that generative effect for me at a higher rate than most sources.
Worth pointing out that the writing reads as confident without being defensive about it, and a look at catatonica extended that secure tone, content that does not pre emptively argue against imagined critics has a different quality from defensive writing and this site reads as written from a place of real ease.
Picked up something useful for a side project, and a look at singlevision added another piece I will incorporate, content that connects to specific projects I am working on is content with practical utility and the practical utility of this site is showing up across multiple posts I have read in the last hour or so.
Honestly this was the highlight of my reading queue today, and a look at cameranexus extended that across more pages I will return to, ranking what I read against what else I read each day is something I do informally and this site keeps moving up in those rankings the more I explore it.
Started forming counter examples to test the claims and the post handled most of them implicitly, and a look at writerharbor continued that anticipatory style, writers who think two steps ahead of the critical reader save themselves from a lot of follow up work and this writer has clearly internalised that habit consistently.
Reading more of the archives is now on my plan for the weekend, and a stop at streamnexushub confirmed the archive worth the time, the rare archive worth a dedicated reading session rather than just casual sampling is the rare archive of serious work and this site has clearly produced enough of that work to warrant the deeper exploration.
Came away with a slightly better mental model of the topic than I started with, and a stop at deliverynexus sharpened that further, content that improves the reader thinking apparatus rather than just dumping facts into it is the rare kind I genuinely value and seek out when I have time to read carefully.
1win скачать на ios app [url=http://1win67466.online]http://1win67466.online[/url]
Reading this gave me something to think about for the rest of the afternoon, and after slippersixth I had even more to mull over, the kind of post that lingers in the background of your day rather than evaporating immediately is genuinely valuable in an attention economy that punishes depth rather than rewarding it.
Worth saying that the post fit naturally into a rhythm of careful reading, and a stop at brightwinner extended the same rhythm, content that pairs well with how I actually read rather than demanding a different mode is content well calibrated to its likely audience and this site has clearly thought about that consistently.
Felt the post had been written without using a single buzzword, and a look at brightamigo continued that clean vocabulary, content free of jargon and trendy phrases reads better and ages better and this site has clearly committed to a vocabulary that will not feel dated in three years which is impressive editorially.
Liked the balance between depth and brevity, never too shallow and never too long, and a stop at orientnexus kept the same balance going across the rest of the site, this is one of the harder skills in writing and the team here clearly has it figured out very well indeed across every page.
Solid little post, the kind that does not need to be flashy because the substance is doing the work, and a look at unifiednexus kept that quiet confidence going across the site, this is what writing looks like when the writer trusts the content to land on its own without theatrics or unnecessary attention seeking behaviour.
Different feel from the algorithmically optimised posts that dominate the topic, and a stop at aromatherapista reinforced that human touch, you can tell when a site is being run by someone who reads what they publish versus someone just hitting submit and moving on quickly to the next assignment without checking the result.
Самарцы всем привет. Столкнулся с такой бедой. Брат пьёт без остановки. Жена в слезах. Платные клиники просят бешеные деньги. Короче, только это и спасло — вывести из запоя на дому качественно. Приехали через час. В общем, смотрите сами по ссылке — вывести из запоя на дому цена [url=https://vyvod-iz-zapoya-na-domu-samara-jkl.ru]https://vyvod-iz-zapoya-na-domu-samara-jkl.ru[/url] Не надейтесь на авось. Перешлите тому кому надо.
Worth saying that this is one of the better things I have read on the topic in months, and a stop at cameranexus reinforced that ranking, the topic is well covered by many sources but few do it with this level of care and the few that do deserve to be flagged so other readers can find them.
Really clear writing, the kind that makes you want to share the link with someone who has been asking about the topic, and a quick browse through singlevision only made me more sure of that, the information here stays useful long after the first read is done which says a lot.
Stayed longer than planned because each section earned the next, and a look at writerharbor kept that pulling effect going across more pages, the kind of subtle pull that good writing exerts on attention is something I find harder and harder to resist when I encounter it on the open web today.
However many similar pages I have read this one taught me something new, and a stop at gardenvertex added more new material, content that contributes genuinely fresh information rather than recycling what is already widely available is content with real informational value and this site is providing that informational freshness at a notable rate.
A piece that built up gradually rather than front loading its main points, and a look at streamnexushub maintained the same gradual structure, content that trusts the reader to reach conclusions through accumulating reasoning is more persuasive than content that announces conclusions and then defends them and this site uses the persuasive approach.
Solid value for anyone willing to read carefully, and a look at vectortimber extends that value across the rest of the site, this is the kind of place that rewards return visits rather than offering everything in a single splashy post and then leaving readers nothing to come back for later which is unfortunately common.
Spent a few minutes here and came away with a clearer picture of the topic, the writing keeps things simple without dumbing them down, and after a stop at brightwinner the rest of the points lined up neatly which is something I appreciate when I am short on time and need answers fast.
Thanks for keeping things clear and to the point, that is honestly hard to find online these days, and after reading through unifiednexus the message stayed consistent which makes me trust the information being shared more than I usually do on similar pages that cover this same kind of topic.
Слушайте кто участки ищет Вечно то данные старые Соседей проверить Короче, работает быстро и понятно — росреестр публичная кадастровая карта быстрый поиск Проверил обременения В общем, жмите чтобы не потерять — кадастровая карта [url=https://publichnaya-kadastrovaya-karta-mno.ru]https://publichnaya-kadastrovaya-karta-mno.ru[/url] Не парьтесь с росреестром Перешлите тому кто ищет участок
يخضع 888starz لمعايير صارمة تضمن شفافية اللعب وحماية المعلومات الشخصية.
online Slots [url=https://wiki.familie-rosche.de/index.php?title=user:tandypethard05]online Slots[/url].
يوفر الموقع طاولات مباشرة بموزعين حقيقيين تتيح أجواء كازينو واقعية.
يمكن للاعب المراهنة المباشرة خلال الأحداث مع متابعة فورية للأرقام.
يبرز 888starz أحدث البونصات والعروض في مكان سهل الوصول إليه.
يقدم التطبيق تجربة مستقرة وتصميمًا سهل الاستخدام على الأجهزة المحمولة.
mostbet как связаться с поддержкой [url=http://mostbet77382.online/]http://mostbet77382.online/[/url]
Now noticing that the post never raised its voice even when making a strong point, and a look at brightamigo continued that calm volume, content that can make important points without resorting to typographic emphasis or emotional appeal is content that trusts its substance to do the work and this site has that confidence consistently.
888starz تحميل [url=http://inkbunny.net/kevinthomas/]https://inkbunny.net/kevinthomas[/url]
???? ????? ??? apk ????? ???????? ?????? ??? ????? ??????? ?????? ?????.
??? ????? ????? ???? ????? ???? ??????? ?????? ????? ??????? ????????.
????? ????? ??????? ?? ????? 888starz ????? ?????? ?????? ???? ????????.
????? ????? apk ???????? ?? ????? ?????? ?????? ??????? ????????.
?? ????? ????? ??????? ??? ??????? ??? ????? ????? ??????.
Cuts through the usual marketing fluff that dominates this topic online, and a stop at orientnexus kept the same clean approach going, this is the kind of writing that respects the reader’s time rather than wasting it on repetitive setups before finally getting to the point at hand which is what most sites do.
Now considering writing a longer note about the post somewhere, and a look at primevertexhub added more material for that note, content that prompts me to write rather than just consume is content with generative energy and this site is producing that generative effect for me at a higher rate than most sources.
888starz rasmiy platformasi o’zbek foydalanuvchilari uchun kazino va sport stavkalarini xavfsiz tarzda birlashtiradi.
рабочее зеркало 888starz [url=https://www.888-uz9.com]https://888-uz9.com/[/url]
Mobil versiya barqaror ishlaydi va kichik ekranlar uchun optimallashtirilgan.
Sayt depozit va yechib olishlarni ishonchli shifrlash tizimi orqali himoyalaydi.
Rasmiy platforma litsenziyalangan tizim orqali shaffof va adolatli o’yinni kafolatlaydi.
Genuinely good work, the kind that holds up over multiple readings without losing its appeal, and a stop at urbanfamilia kept that going, definitely a site I will be returning to and probably mentioning to others who work in or care about this particular area of interest today and in coming weeks.
A particular kind of restraint shows up in the writing, and a look at rapidnexus maintained the same restraint across pages, knowing what not to say is just as important as knowing what to say and this site has clearly developed strong instincts on both sides of that editorial line throughout pieces I have read.
mostbet вывести без верификации [url=mostbet77382.online]mostbet77382.online[/url]
Rasmiy saytga kirish orqali foydalanuvchilar barcha o’yin va tikish bo’limlaridan foydalanishlari mumkin.
888starz rasmiy sayti slot, ruletka va blekjek kabi mingdan ortiq kazino o’yinini taklif etadi.
888starz rasmiy saytining sport bo’limi 50 dan ortiq sport turiga tikish imkonini beradi.
888starz rasmiy platformasi o’yin va tikishlar uchun himoyalangan muhit yaratadi.
starz888 [url=http://www.888starz-uzb1.com]https://888starz-uzb1.com/[/url]
Люди подскажите То вообще ничего не показывает Границы посмотреть Короче, работает быстро и понятно — росреестр публичная кадастровая карта быстрый поиск Скачал выписку за секунду В общем, вся инфа вот здесь — кадастровые участки [url=https://publichnaya-kadastrovaya-karta-def.ru]https://publichnaya-kadastrovaya-karta-def.ru[/url] Не парьтесь с росреестром Перешлите тому кто ищет участок
Люди помогите То карта тормозит Границы посмотреть Короче, нашел крутой инструмент — публичная кадастровая карта россии онлайн с обновлениями Скачал выписку за секунду В общем, вся инфа вот здесь — единая кадастровая карта россии [url=https://publichnaya-kadastrovaya-karta-jkl.ru]единая кадастровая карта россии[/url] Не парьтесь с росреестром Перешлите тому кто ищет участок
888. [url=https://888starz-uzb2.com/]https://888starz-uzb2.com/[/url]
Foydalanuvchilar rasmiy saytga kirgach mashhur o’yinlar va jonli tikishlarni darhol ko’radilar.
Rasmiy saytdagi kazino bo’limi mashhur ishlab chiqaruvchilardan minglab o’yinni o’z ichiga oladi.
Rasmiy sayt raqobatbardosh koeffitsiyentlar bilan jonli tikish rejimini taklif etadi.
Rasmiy platforma foydalanuvchilar ma’lumotlari va mablag’larini ishonchli himoya qiladi.
Granted I am giving this site more credit than I usually give new finds, and a look at wisdomvertex continued earning that credit, the calibration of how much trust to extend after limited exposure is something I do carefully and this site has earned more trust on shorter exposure than most due to consistent quality across.
One of the more honest takes on the topic I have seen lately, no spin and no oversell, and a stop at masteryvertex kept that going, the kind of voice the open web could use a lot more of rather than the endless echo chamber of recycled opinions floating around every social platform these days.
Generally I find the content on similar topics frustrating in specific ways and this post avoided all of them, and a look at trumpetsixth continued that frustration free experience, content that sidesteps the standard failure modes of its genre is content with editorial awareness and this site has clearly studied what fails elsewhere consistently.
Reading this felt easy in the best way, no friction and no confusion at any point, and a stop at growthvertexhub carried that same comfort across more pages, the kind of editorial flow that lets you absorb information without fighting the format which is increasingly hard to find on the open web today across topics.
Liked how the post handled an objection I was forming as I read, and a stop at moderncomfort similarly anticipated where my thinking was going next, the rare writer who can predict reader concerns and address them in advance is doing something most online content fails to do despite that being basic editorial work.
1win aviator как играть [url=http://1win67466.online/]1win aviator как играть[/url]
Thank you for being clear and direct, that simple approach saves so much frustration on the reader’s end, and a stop at craftbreweryhub only made me more sure of it, the rest of the content seems to follow the same pattern which is a great sign of consistent editorial care behind the scenes.
Reading this back to back with a similar piece elsewhere made the quality difference obvious, and a stop at growthcareer only widened the gap, comparing content side by side is a useful exercise and the gap between this site and average competitors in the space is large enough to be noticeable from the first paragraph.
Reading this gave me confidence to make a decision I had been putting off, and a stop at brightzenithhub reinforced that confidence, content that translates into action in my own life rather than just informing it is content with the highest practical value and this site is generating that action level utility for me lately.
Hey, find awesome [URL=https://hotchip.org.uk/]real dad and daughter porn[/URL] archive. This provides great clips. Experience them free!
1win сменить валюту [url=1win67466.online]1win67466.online[/url]
Really appreciate this kind of writing, no shouting and no clickbait headlines just steady useful content, and a quick look at oceanriders kept that going, definitely a site I will be returning to whenever I need a sensible take on similar topics in the days ahead and also during slower work weeks.
Reading this gave me a small refresher on something I had partially forgotten, and a stop at discountnexus extended the refresher, content that strengthens existing knowledge rather than just adding new is content with a particular kind of consolidating value and this site is providing that consolidating function across multiple visits.
Now feeling slightly more optimistic about the state of independent writing online, and a stop at royalmariner extended that quiet optimism, sites like this one are the reason I have not given up on the open web entirely and finding them occasionally renews the case for paying attention to non algorithmic content sources today.
My coder is trying to convince me to move to .net from PHP. I have always disliked the idea because of the expenses. But he’s tryiong none the less. I’ve been using WordPress on numerous websites for about a year and am nervous about switching to another platform. I have heard great things about blogengine.net. Is there a way I can import all my wordpress posts into it? Any help would be really appreciated!
Speaking carefully because I do not want to overstate things this site is genuinely above average across multiple measurements, and a stop at sweatertorso continued the above average performance, the calibration of judgement against potential overstatement is something I take seriously and this site clears the higher bar even after that calibration applies.
@nami_m0mmy leaked
Really grateful for content like this, it does not waste my time and it does not insult my intelligence either, and a quick look at purposehaven was the same, balanced respectful writing that makes a person feel welcome rather than rushed through pages of forced engagement just to keep clicking around.
Got something practical out of this that I can apply later this week, and a stop at topicnexus added more details to think about, this is exactly the kind of content I bookmark for future reference rather than the throwaway listicles that dominate most search results these days for almost any common topic.
This stands out compared to similar posts I have read recently, less noise and more substance, and a look at cozyhomestead kept that gap going, you can really feel the difference between content made by someone who cares versus content made to fill a publishing schedule for an algorithm trying to keep growing somehow.
Reading this brought back the satisfaction I used to get from blogs ten years ago, and a stop at radianttouch kept that nostalgic quality alive, sites that capture what was good about an earlier era of internet writing are increasingly precious and this one is doing that without feeling like a deliberate throwback at all.
Well done, the writing is professional without being stiff, and the topic is treated with care, and a look at trendoutlet reflected that approach, the kind of site I would point a colleague to if they asked for a reliable starting point on this topic in the future without any hesitation at all.
mostbet tətbiqini yüklə [url=https://mostbet80398.online]https://mostbet80398.online[/url]
mostbet instalacja z nieznanych źródeł [url=mostbet29665.online]mostbet29665.online[/url]
mostbet jak hrát automaty [url=https://mostbet52410.online/]https://mostbet52410.online/[/url]
мелбет mines стратегия [url=http://melbet72136.online/]http://melbet72136.online/[/url]
ставка дар Тоҷикистон мостбет [url=http://mostbet60008.online/]ставка дар Тоҷикистон мостбет[/url]
Worth saying that the post fit naturally into a rhythm of careful reading, and a stop at modernvertex extended the same rhythm, content that pairs well with how I actually read rather than demanding a different mode is content well calibrated to its likely audience and this site has clearly thought about that consistently.
Honestly enjoyed not being sold anything for the entire duration of the post, and a look at trillsaddle kept that pleasant absence going across more pages, content that exists for its own sake rather than as a funnel to a paid product is increasingly rare and worth supporting where I can find it.
Found this through a search that was generic enough I did not expect quality results, and a look at guidancehubpro continued the surprisingly good experience, search engines occasionally still surface excellent independent content if you scroll past the obvious paid and high authority results which is reassuring to remember sometimes.
My professional context would benefit from having this kind of resource available, and a look at digitalgrove extended the professional applicability, the rare site that contributes meaningfully to professional work rather than just personal interest is content with multiplied value and this one is providing that professional utility consistently across multiple pieces.
Reading this gave me a small jolt of recognition for an experience I thought was just mine, and a stop at artistnexus produced more such jolts, content that universalises private experiences without flattening them is doing genuinely useful work and this site is providing that recognition function for me reliably across topics I read.
Picked this site to mention to a colleague who would benefit, and a look at quietvoyage added more material I will pass along, recommending sites to colleagues is a higher bar than recommending to friends because the professional context demands more careful curation and this site cleared the professional bar without me having to think.
Liked that the post landed without needing to manufacture controversy or take a contrarian stance for attention, and a stop at socialflare continued that grounded approach, content that earns attention through quality rather than provocation is the kind that builds long term trust rather than burning it on quick wins.
This has to be one of my favorite posts! And on top of thats its also very helpful topic for newbies. thank a lot for the information!
cupoheaven leaked
Honestly impressed, did not expect to find this level of care on the topic, and a stop at unityharbor cemented the impression, you can tell within the first few paragraphs whether a site is going to be worth the time and this one delivered on that early promise nicely throughout the rest of what I read.
Started believing the writer knew the topic deeply by about the second paragraph, and a look at businessnova reinforced that confidence, the speed at which a writer establishes credibility through their writing is a useful quality signal and this writer establishes it quickly and quietly without resorting to credential dropping or self promotion.
Picked up something useful for a side project, and a look at supportnexus added another piece I will incorporate, content that connects to specific projects I am working on is content with practical utility and the practical utility of this site is showing up across multiple posts I have read in the last hour or so.
Howdy! I simply wish to give a huge thumbs up for the great information you have here on this post. I will be coming again to your weblog for extra soon.
Really like the way the post resists reaching for cliches that would have made it feel generic, and a quick visit to humorvertex kept that fresh feel going, original phrasing and unexpected metaphors are signs that the writer is actually thinking rather than just stitching together familiar phrases into the appearance of content.
Now planning to share the link with a small group of readers I trust, and a look at cocktailnexus suggested more material to share with the same group, recommending content into a curated circle requires confidence in the recommendation and this site is making me confident in those personal recommendations on multiple separate occasions now.
Reading this felt productive in a way most internet reading does not, and a look at silverpathhub continued that productive feeling, sometimes the open web feels like a waste of time but sites like this remind me why I still bother to look around rather than retreating to old reliable sources for everything I need.
Worth observing that the post landed without needing a flashy headline to hook attention, and a stop at modernlivinghub did the same, content that earns engagement through substance rather than packaging is the kind I trust more deeply and this site has clearly chosen substance as the primary lever for reader engagement throughout.
The pacing of the post was just right, never rushed and never dragged out unnecessarily, and a look at brightportal maintained the same rhythm, you can tell the writer has experience because the difficult skill of pacing is something only practiced writers manage to handle well in long form content over time and across formats.
Felt like the writer was speaking directly to someone with my level of curiosity, neither talking down nor showing off, and a stop at modernupdate kept that comfortable matching going, finding writing that meets you where you are rather than asking you to climb up or stoop down feels great every time it happens.
Honest take is that this was better than I expected when I clicked through, and a look at tattooharbor reinforced that, the bar for online content has dropped so much that finding something thoughtful and well constructed feels almost noteworthy now which says more about the average than about this site itself.
Took a few notes from this post, the points are easy to remember without needing to come back and check, and a look at connectnexus added a couple more, the kind of place that sticks in the memory long after the browser tab has been closed for the day which says a lot really.
mostbet kartdan karta depozit [url=www.mostbet80398.online]www.mostbet80398.online[/url]
Stayed longer than planned because each section earned the next, and a look at uniquevoyager kept that pulling effect going across more pages, the kind of subtle pull that good writing exerts on attention is something I find harder and harder to resist when I encounter it on the open web today.
A piece that earned its conclusions through the body rather than asserting them at the end, and a look at parcelvoyager maintained the same earned quality, conclusions that follow from what came before are more persuasive than declarations and this site has clearly internalised that principle in how it constructs arguments throughout pieces.
Polished and informative without feeling overproduced, that is the sweet spot, and a look at pixelharborhub hit it again, you can tell when a site has been built with care versus thrown together for the sake of having something to put online and this is clearly the former approach taken by the team.
Самарцы привет. Жесть случилась полная. Муж просто пропадает. Соседи стучат в дверь. Платные клиники просят бешеные деньги. Короче, только это и спасло — анонимный вывод из запоя без последствий. Отошёл за полчаса. В общем, сохраняйте на будущее — запой на дому [url=https://vyvod-iz-zapoya-na-domu-samara-stu.ru]https://vyvod-iz-zapoya-na-domu-samara-stu.ru[/url] Не надейтесь на авось. Скиньте другу в беде.
mostbet most bet az [url=https://mostbet80398.online]https://mostbet80398.online[/url]
Now adjusting my expectations upward for the topic based on this post, and a stop at urbanwellness continued that bar raising effect, content that resets what I think is possible on a subject is doing real work in shaping my standards and this site is providing those bar raising experiences at a notable rate during sessions.
pomoc mostbet [url=www.mostbet29665.online]pomoc mostbet[/url]
мелбет mines game [url=melbet72136.online]melbet72136.online[/url]
mostbet download барои ios [url=https://www.mostbet60008.online]https://www.mostbet60008.online[/url]
Looking at this objectively the editorial quality is hard to deny even setting aside personal taste, and a stop at masterynexus maintained the same objective quality, the gap between what I personally enjoy and what is objectively well crafted exists and this site clears both bars simultaneously which is rarer than it sounds.
Салон красоты «Планета Красоты» в Ульяновске (Новый Город) — это не только парикмахерская, но и студия маникюра и педикюра. Мы делаем женские и мужские стрижки, покраску, укладки, маникюр, педикюр. В Заволжье наши мастера славятся вниманием к деталям. Если вы ищете, где сделать стрижку, маникюр или покраску, мы — ваш выбор. «Планета Красоты» — это красота без компромиссов: BeautyPlanet73.RU
Now thinking about how this post will age over the coming years, and a stop at cosmicvertex suggested the same durability, content built to age well rather than to capture the attention of the moment is content with a different kind of value and this site has clearly chosen the long horizon over the short one.
Skipped the related products section because there was none, and a stop at glamourbrush also lacked any aggressive monetisation, content that is not constantly trying to convert me into a customer or subscriber is content that has confidence in its own value and that confidence shows up as a different reading experience.
как играть в mines mostbet [url=mostbet68204.help]mostbet68204.help[/url]
melbet casino live roulette [url=www.melbet56045.help]melbet casino live roulette[/url]
melbet aviator вывод [url=https://www.melbet72136.online]melbet aviator вывод[/url]
mostbet logowanie przez numer [url=http://mostbet29665.online/]http://mostbet29665.online/[/url]
мостбет бурд дар crash [url=http://mostbet60008.online]http://mostbet60008.online[/url]
Now feeling confident enough in this site to use it as a reference point for evaluating others on the same topic, and a look at joyfulnexus continued the comparison friendly quality, sites that serve as quality benchmarks for their topic are precious and this one has clearly become a benchmark for me on this particular subject area.
Quietly the writers approach to the topic differs from the dominant takes I have been encountering, and a stop at deliverynexus extended that distinctive approach, content that maintains a different perspective without explicitly arguing against the dominant ones is content with confident editorial identity and this site has that confidence throughout pieces.
Picked up on several small touches that suggest a careful editor, and a look at clarityleadsaction suggested the same hand at work across the broader site, editorial consistency at a granular level is one of the strongest signs that an operation is serious rather than just hobbyist and this site reads as serious throughout.
Felt mildly happier after reading, which sounds silly but is true, and a look at focusconstructor extended that small mood lift, content that improves rather than degrades my mental state is content I want more of and the cumulative effect of reading sites that lift versus sites that drag is real over time.
1win canlı kazino bonusu [url=http://1win46318.help]http://1win46318.help[/url]
Reading more of the archives is now on my plan for the weekend, and a stop at trendrocket confirmed the archive worth the time, the rare archive worth a dedicated reading session rather than just casual sampling is the rare archive of serious work and this site has clearly produced enough of that work to warrant the deeper exploration.
Approaching this site through a casual link click and being surprised by what I found, and a look at stellarpath extended the surprise, the rare experience of stumbling into excellent independent content rather than predictable mediocrity is one of the actual remaining pleasures of casual web browsing and this site provided it cleanly.
Now noticing that the post benefited from being neither too short nor too long for its content, and a look at buildgrowthsystems continued that calibration of length, sites that match length to content rather than padding to hit some target are sites that respect both their material and their readers and this site does both.
Took a quick scan first and then went back to read properly because the post deserved it, and a stop at nexusharbor kept me reading carefully too, the kind of writing that earns a slower second pass rather than getting skimmed and forgotten is something I value highly when I happen to find it.
During a reading session that included several other sources this one stood out, and a look at digitalnexushub continued the standout quality, the side by side comparison of sources during research is a useful exercise and this site has been winning those comparisons for me consistently across multiple research sessions during the last week.
Слушайте что расскажу. Жесть случилась полная. Брат пьёт без остановки. Дети не спят ночами. Скорая не едет. Короче, единственное что реально помогло — срочный вывод из запоя круглосуточно. Приехали через час. В общем, жмите чтобы не потерять — вывод из запоя с выездом на дом [url=https://vyvod-iz-zapoya-na-domu-samara-vwx.ru]вывод из запоя с выездом на дом[/url] Не тяните. Скиньте другу в беде.
Honestly this was the highlight of my reading queue today, and a look at progressmapping extended that across more pages I will return to, ranking what I read against what else I read each day is something I do informally and this site keeps moving up in those rankings the more I explore it.
A piece that built up gradually rather than front loading its main points, and a look at vibrantjourney maintained the same gradual structure, content that trusts the reader to reach conclusions through accumulating reasoning is more persuasive than content that announces conclusions and then defends them and this site uses the persuasive approach.
Самое полезное для вас: https://firstremont.ru
Took the time to read the comments on this post too and they were also worth reading, and a stop at progressmapping suggested the community quality matches the content quality, when the conversation around a piece is as good as the piece itself you know you have found a real corner of the internet.
Honestly this kind of writing is why I still bother to read independent sites, and a look at nexushorizon extended that broader reflection, the few sites that justify continued attention to non algorithmic content are sites like this one and finding them periodically is enough to keep my reading habits oriented toward independent rather than aggregated content.
Refreshing tone compared to the dry corporate posts on similar topics, and a stop at progresswithpurpose carried that personality through nicely, you can tell when a real person is behind the writing versus a content team chasing metrics and this site definitely falls into the former category clearly across what I have seen.
Adding this to my list of go to references for the topic, and a stop at forwardthinkingcore confirmed the rest of the site deserves the same, definitely the kind of resource that earns its place rather than getting forgotten the moment the next interesting article shows up in my feed somewhere else on the web.
Reading this prompted me to dig out an old reference book related to the topic, and a stop at timekeeperhub extended that connection to other sources, content that connects me back to my own existing knowledge rather than asking me to forget it is content with continuity and this site has that continuous quality.
Got pulled in by the headline and stayed because the content actually delivered on the promise, and a stop at ideaswithoutnoise kept that trust intact, when a site lives up to its own framing it earns the right to keep showing up in my browser tabs going forward indefinitely from here on out really.
Just dropping by to say thanks for the effort, it does not go unnoticed when a writer cares this much about the reader, and after I went through progresswithdiscipline I was certain this is one of the better corners of the internet for this particular kind of content which is genuinely refreshing.
A piece that did not require external context to follow, and a look at forwardthinkingnow maintained the same self contained quality, content that stands alone without forcing readers to chase prerequisites is more accessible and this site has clearly thought about how each piece can serve a fresh visitor rather than only existing members.
Halfway through I knew I would finish the post, and a stop at gardenvertex also held me through to the end, content that signals its quality early and then sustains it is content with real internal consistency and this site has clearly figured out how to maintain quality from opening sentence through to closing thought.
A handful of memorable phrases from this one I will probably use later, and a look at ideapathfinder added a couple more, content that contributes language to my own communication rather than just facts is content with a different kind of utility and this site is providing that linguistic utility consistently across what I read.
Honestly impressed by the consistency of voice across what I have read so far, and a quick visit to brightcanvas continued that consistent feel, when a site reads like one careful person rather than a committee the experience is more rewarding for the reader who notices these subtle editorial details over time.
Speaking as someone who used to recommend blogs frequently and got out of the habit this site is rekindling that impulse, and a look at legendseeker extended the rekindling, the recovery of an old habit triggered by encountering work that justifies it is itself a small kind of pleasure and this site is providing that recovery experience.
If I were grading sites on this topic this one would receive high marks, and a stop at luxuryseconds continued earning those high marks, the informal grading I do mentally for content sources is something I take seriously even though it is informal and this site has been receiving consistent high marks across multiple sessions today.
Felt no urge to argue with the conclusions even though I started the post slightly skeptical, and a look at executeprogress maintained that pattern, writing that earns agreement through clarity of argument rather than rhetorical pressure is the kind I find most persuasive and the kind I want to read more of these days.
Now thinking I want more sites built on this kind of editorial foundation, and a stop at herojourneyhub extended that wish into a broader hope, sites built on substance and care rather than on metrics and growth are the kind of sites I want to see more of and this one is a small example worth supporting.
Decided after reading this that I would check this site weekly going forward, and a stop at runnervertex reinforced that commitment, deciding to add a site to a regular rotation requires meeting a quality bar that very few places clear and this one cleared it cleanly without any noticeable effort or marketing push behind it.
Different in a good way from the cookie cutter content that fills most blogs covering this area, and a stop at moveforwardintentionally kept showing me why, original thoughtful writing exists if you know where to look and this site has earned a place on my short list of those rare exceptions worth defending.
Appreciated that the writer trusted the reader to follow along without constant restating of earlier points, and a look at nightlifehub continued that respect for the reader, treating an audience as capable adults rather than as people to be hand held through every paragraph is something I notice and value highly across the open internet today.
Honestly impressed by how much useful content sits in such a small post, and a stop at progresswithpurpose confirmed the rest of the site packs a similar punch, density without confusion is a hard balance to strike and this site has clearly cracked the code on it across many different topic areas covered.
Decided to write a short note to the author if there is contact info anywhere, and a stop at buildforwardlogic extended that intention, the urge to thank the writer directly is a strong signal of content quality and this site has triggered that urge in me today which is a fairly rare event for my reading.
melbet problème wave [url=https://melbet56045.help]melbet problème wave[/url]
Worth pointing out that the post avoided the temptation to summarise everything at the end, and a look at strategylaunchpad continued that confident closing approach, content that trusts readers to retain the substance without being reminded of it at the end is content that respects the reader and this site practices that respect.
Came in skeptical of the angle and left mostly persuaded, and a stop at wavevoyager pushed me a bit further in the same direction, content that can move a critical reader by argument rather than rhetoric is rare and worth pointing out because it indicates real substance underneath the surface presentation here.
Adding this site to my regular reading list, the post earned that on its own, and a quick stop at ideasneedvelocity sealed the decision, the kind of place worth checking back with from time to time because it consistently produces material that holds up against a critical reading too which I really value.
mostbet скачать apk [url=http://mostbet68204.help]http://mostbet68204.help[/url]
Quietly impressive in a way that does not announce itself, and a stop at strategyinplay extended that quiet impressiveness, the kind of quality that emerges through sustained attention rather than first impressions is the kind I trust more deeply and this site has been earning that deeper trust across multiple sessions over time consistently.
Glad to find a site whose links lead somewhere worth going rather than back to itself for SEO juice, and a stop at wisdomvertex kept that generous outbound feel, citing other peoples work with real respect rather than just for ranking signals is a sign of an honest operation worth supporting going forward.
melbet coupon [url=melbet56045.help]melbet56045.help[/url]
Reading this with my morning coffee turned into reading the related posts with my morning coffee, and a stop at claritylaunch stretched the morning further, content that pulls breakfast into a reading session rather than just accompanying it is content that has earned a higher claim on my attention than the average article does.
Appreciated the way each section connected smoothly to the next without abrupt jumps, and a stop at motorzenith kept that flow going nicely, transitions are something most blog writers ignore but the difference is huge for the reader who is trying to follow a sustained line of thought today across many different topics.
Now noticing the post fit a particular gap in my reading without my having articulated the gap before, and a look at profitnexus extended that gap filling effect, content that meets needs I had not consciously formulated is content with reader insight and this site has clearly developed that anticipatory editorial sense across many pieces.
Closed the laptop and walked away thinking about the post for a good twenty minutes, and a stop at marineharbor produced similar lingering thoughts, content that survives the closing of the browser tab is content that has actually entered the mind rather than just decorating the screen for the duration of the reading.
mostbet сайт регистрация [url=http://mostbet68204.help/]mostbet сайт регистрация[/url]
Found something new in here that I had not seen explained this way before, and a quick stop at laughingnova expanded the idea even further, the kind of writing that nudges your thinking forward a bit without forcing the issue is exactly what I look for online today and rarely actually find anywhere.
Beyond the topic at hand this site reads as a small ongoing project of taking writing seriously, and a look at modernhorizon reinforced that project quality, sites that treat publishing as an ongoing serious practice rather than as content production for traffic are sites worth supporting and this one has clearly chosen the serious approach.
Now thinking about how to apply some of this to a project I have been planning, and a look at glamourvista added more material for the planning, content that connects to my actual creative work rather than just being interesting in the abstract is the kind that earns priority placement in my reading rotation consistently going forward.
Now placing this in the small category of sites whose updates I would actually want to know about, and a stop at actionmapsuccess confirmed that placement, the difference between sites I want to follow and sites I just consume from is real and this one has crossed into the active follow category from the casual consumption side.
1win mərc hesablanmır [url=http://1win46318.help/]1win mərc hesablanmır[/url]
Picked something concrete from the post that I will use immediately, and a look at clarityfirstgrowth added another concrete piece, content that produces immediately useful output rather than just abstract appreciation is content that earns its place in my regular rotation without needing any further evaluation from me at this point honestly.
Honestly this was the highlight of my reading queue today, and a look at actionoverhesitation extended that across more pages I will return to, ranking what I read against what else I read each day is something I do informally and this site keeps moving up in those rankings the more I explore it.
My usual response to new bookmarks is to forget them but this one I have already returned to twice, and a look at progressmapping pulled me back a third time, the actual return rate to bookmarked sites is the real measure of value and this one is clearing that measure at a notable rate already.
Did not expect much when I clicked through but ended up reading the whole thing carefully, and a stop at buildwithmotion kept that engagement going, sometimes the unassuming sites turn out to deliver more than the flashy ones which is something I have learned to look out for over time online lately and across topics.
Reading this triggered a small but real correction in something I had assumed, and a stop at savingharbor extended that corrective effect, content that updates my beliefs through evidence rather than rhetoric is content with intellectual integrity and this site has earned that label consistently across the pieces I have read so far today.
Honestly enjoyed not being sold anything for the entire duration of the post, and a look at urbanbartender kept that pleasant absence going across more pages, content that exists for its own sake rather than as a funnel to a paid product is increasingly rare and worth supporting where I can find it.
More original than the recycled takes I keep finding on the topic elsewhere, and a quick look at actiondrivenoutcomes confirmed it, the kind of site that has its own voice rather than echoing whatever is trending which makes it stand out as a refreshing change from the usual rotation of generic content I see daily.
Bookmark added without hesitation after finishing, and a look at brightacademy confirmed I should bookmark the homepage too rather than just this page, the rare site that earns category level trust rather than just single article approval is the kind I want to rely on across many different topics over time.
Generally I do not leave comments but this post merits a small note, and a stop at discountnexus extended that comment worthy quality, the urge to actively contribute to a sites community rather than passively consume from it is something specific content provokes and this site has provoked that engagement urge from me today.
1win təhlükəsiz giriş [url=https://www.1win46318.help]https://www.1win46318.help[/url]
Useful read, especially because the writer did not assume too much background from the reader, and a quick look at clarityactivates continued in the same way, a thoughtful site that meets people where they are which is something the modern web could use a lot more of for both casual and serious readers.
Worth your time, that is the simplest endorsement I can give, and a stop at velvetorbit extends that endorsement across the rest of the site, this is one of those increasingly rare places that delivers on what it promises rather than over selling the content and under delivering on substance every time which I find frustrating elsewhere.
However measured this site clears the bar I set for sites I take seriously, and a stop at urbanmarket continued clearing that bar, the metrics I use for site quality are admittedly informal but they are consistent and this site has cleared them on multiple measurements across multiple visits which is meaningful for my evaluation.
registrace mostbet [url=https://www.mostbet52410.online]registrace mostbet[/url]
Felt the writer respected me as a reader without making a show of doing so, and a look at visiondirection continued that quiet respect, this is the kind of small but meaningful detail that separates the sites I bookmark from the ones I close after a single skim and never return to again no matter how interesting the headline.
Really like the way the post resists reaching for cliches that would have made it feel generic, and a quick visit to buildforwardtraction kept that fresh feel going, original phrasing and unexpected metaphors are signs that the writer is actually thinking rather than just stitching together familiar phrases into the appearance of content.
Probably the best thing I have read on this topic in the past month, and a stop at fitnessnexus extended that ranking, the casual ranking of recent reading is informal but real and this site has been winning those rankings for me on this topic specifically over the last several weeks of regular reading sessions.
Друзья ситуация. Жесть случилась полная. Человек уже четвёртые сутки в штопоре. Дети не спят ночами. Скорая не едет. Короче, нормальные врачи нашлись — срочный вывод из запоя круглосуточно. Отошёл за полчаса. В общем, жмите чтобы не потерять — доктор вывод из запоя [url=https://vyvod-iz-zapoya-na-domu-samara-yza.ru]https://vyvod-iz-zapoya-na-domu-samara-yza.ru[/url] Не тяните. Перешлите тому кому надо.
mostbet bonus hesablanmır [url=https://mostbet89142.online]https://mostbet89142.online[/url]
Слушайте что расскажу. Столкнулся с такой бедой. Человек уже пятые сутки в штопоре. Дети не спят ночами. Скорая не едет. Короче, только это и спасло — анонимный вывод из запоя без последствий. Поставили систему. В общем, сохраняйте на будущее — нарколог на дом вывод из запоя на дому [url=https://vyvod-iz-zapoya-na-domu-samara-bcd.ru]нарколог на дом вывод из запоя на дому[/url] Каждая минута дорога. Перешлите тому кому надо.
Now noticing that the post avoided the temptation to be funny in places where humour would have undermined the substance, and a stop at urbanlatino maintained the same restraint, knowing when to be serious is a rare editorial virtue and this site has clearly developed it through what I assume is careful editorial practice over years.
mostbet výběr na bankovní účet [url=http://mostbet52410.online/]mostbet výběr na bankovní účet[/url]
Now thinking about how this post will age over the coming years, and a stop at growthwithintent suggested the same durability, content built to age well rather than to capture the attention of the moment is content with a different kind of value and this site has clearly chosen the long horizon over the short one.
Felt the writer respected me as a reader without making a show of doing so, and a look at actionwithsignal continued that quiet respect, this is the kind of small but meaningful detail that separates the sites I bookmark from the ones I close after a single skim and never return to again no matter how interesting the headline.
Reading this in a relaxed evening setting was a small pleasure, and a stop at moveideaswithpurpose extended the pleasant evening reading, content that fits the tone of relaxed time without becoming forgettable is what I look for in evening reading and this site has the right tone for that particular slot in my daily reading routine.
Reading this confirmed a small detail I had been uncertain about, and a stop at pathwaytoaction provided the source for further checking, content that supports verification through citations or links rather than just asserting facts is more trustworthy and this site has clearly built its credibility through that kind of verifiable approach consistently.
If I am being honest this is the kind of site I quietly hope my own work will someday resemble, and a stop at pixelgallery extended that aspirational feeling, finding work that models what I want to produce is part of why I read carefully and this site has been performing that modelling function for me lately consistently.
Skipped the comments to avoid spoilers and came back later to find them genuinely worth reading, and a stop at modernvertex extended that surprised respect, when the discussion below a post matches the quality of the post itself you have found something special and this site appears to attract that kind of audience.
Reading this confirmed a small detail I had been uncertain about, and a stop at activehorizon provided the source for further checking, content that supports verification through citations or links rather than just asserting facts is more trustworthy and this site has clearly built its credibility through that kind of verifiable approach consistently.
Reading this prompted a brief but useful conversation with a colleague who happened to walk by, and a stop at socialcircle extended that conversational seed, content that becomes a starting point for in person discussion rather than ending in solitary reading is content with social generative energy and this site has plenty of it apparently.
Worth pointing out that the writing reads as confident without being defensive about it, and a look at darkvoyager extended that secure tone, content that does not pre emptively argue against imagined critics has a different quality from defensive writing and this site reads as written from a place of real ease.
On reflection this is the kind of writing that improves my taste for what is possible in the format, and a look at claritycreatesadvantage continued raising that bar, content that elevates my expectations rather than lowering them is doing important work in calibrating my standards and this site is participating in that elevation reliably.
Came away with a small but real shift in perspective on the topic, and a stop at motionwithmeaning pushed that shift a bit further, the kind of subtle reframing that good writing does to a reader without making a big deal of it is something I always appreciate when it happens which is sadly not that often.
Saving the link for sure, this one is a keeper, and a look at rapidcourier confirmed I should bookmark the entire site rather than just this page, the consistency across what I have seen so far suggests there is a lot more here worth coming back for soon when I have more time.
Looking back on this reading session it stands as one of the better ones recently, and a look at goldenbarrel extended that ranking, the informal ranking of reading sessions against each other is something I do mentally and this session ranks high largely because of this site and a couple of related pages here.
Really like the way the post resists reaching for cliches that would have made it feel generic, and a quick visit to executionpathway kept that fresh feel going, original phrasing and unexpected metaphors are signs that the writer is actually thinking rather than just stitching together familiar phrases into the appearance of content.
I favored your idea there, I tell you blogs are so helpful sometimes like looking into people’s private life’s and work.At times this world has too much information to grasp. Every new comment wonderful in its own right.
Nice blog. Could someone with little experience do it, and add updates without messing it up? Good information on here, very informative.
Have you always been concerned about these issues?
Worth marking this site as one to come back to deliberately rather than by accident, and a stop at digitaljournal reinforced that intention, the difference between sites I find again by chance and sites I return to on purpose is meaningful and this one has clearly moved into the deliberate return category for me.
Flying to Thessaloniki from the UK? Visit https://halkidiki-transfer.uk/ for competitively priced private transfers from Thessaloniki Airport (SKG) to every corner of Halkidiki—Kassandra, Sithonia, and Mount Athos—with a fixed price, an English-speaking driver, and no fees until you arrive. We offer free child seats and online booking. Learn more on our website.
Picked this site to mention to a colleague who would benefit, and a look at inkedvoyager added more material I will pass along, recommending sites to colleagues is a higher bar than recommending to friends because the professional context demands more careful curation and this site cleared the professional bar without me having to think.
aviator slot [url=http://aviator05248.help/]aviator slot[/url]
Покупатели, которые ценят современные жилые пространства, обращают внимание на Vesper Шаболовка благодаря сочетанию архитектуры высокого уровня и престижного окружения, Новостройки Москвы
A piece that built up gradually rather than front loading its main points, and a look at growwithprecision maintained the same gradual structure, content that trusts the reader to reach conclusions through accumulating reasoning is more persuasive than content that announces conclusions and then defends them and this site uses the persuasive approach.
A genuine compliment to the writer for keeping the post focused on what mattered, and a look at intentionalprogression continued that disciplined focus, focus is a editorial choice that compounds across many small decisions and this site has clearly made those small decisions consistently across what I have read so far this week here.
aviator फ्री बेट [url=https://aviator28045.help]https://aviator28045.help[/url]
aviator bet with bdt [url=https://aviator31708.help]https://aviator31708.help[/url]
Екатеринбург. Отец ушел в штопор четвертые сутки. Родня разрывает телефон. Участковый только руками разводит. Короче говоря, выручили только эти ребята — круглосуточный вывод из запоя на дом. Примчались за полчаса. В общем, там и цены и контакты — вывод из запоя [url=https://vyvod-iz-zapoya-na-domu-ekaterinburg-rfj.ru]вывод из запоя[/url] Не ждите чуда. Кто в беде — тому пригодится.
Worth recognising that the post handled a familiar topic without reaching for any of the obvious hot takes, and a stop at clarityshift continued that fresh treatment, sites that find new angles on subjects others have exhausted are sites worth following carefully and this one has clearly developed that exploratory instinct through patient practice.
A piece that did exactly what it promised in the headline without overshooting or underdelivering, and a look at focuscreatesleverage continued that calibration, alignment between promise and delivery is a basic editorial virtue that many sites fail at and this site has clearly mastered the matching of expectation and substance throughout pieces.
Most attempts at writing on this topic feel like they are missing something and this post finally identified what was missing, and a look at buildmomentumclean extended that diagnostic clarity, content that names what is wrong with adjacent treatments while doing better itself is content with both critical and constructive value and this site has both.
Came away with some new perspectives I had not considered before, and after strategylaunchpad those ideas felt more complete, the kind of content that stays with you a little while after reading rather than slipping out the moment you switch tabs and move on with your day to whatever comes next.
A piece that exhibited the kind of patience that good writing requires, and a look at mysticgiant continued that patient quality, hurried writing is easy to spot and this site reads as having been written without time pressure which produces a different feel than the rushed content that dominates much of the modern blog space.
Saving this link for the next time someone asks me about this topic, and a look at clarityturnskeys expanded what I will be sharing with them, this is the kind of resource that makes a real difference when you are trying to point a friend to something useful and reliable rather than generic marketing pages.
Проект от Град Девелопмент предлагает современное жилье с удобными планировками и благоустроенной территорией для отдыха и прогулок: жк Аурум Тайм Москва
Reading carefully this time rather than scanning, and the depth shows up in places I missed first time around, and a look at clarityguidesmotion rewarded the same careful approach, content that holds up to multiple reads is content I want more of in my regular rotation rather than disposable scroll fodder daily.
Closed the laptop and walked away thinking about the post for a good twenty minutes, and a stop at humorvertex produced similar lingering thoughts, content that survives the closing of the browser tab is content that has actually entered the mind rather than just decorating the screen for the duration of the reading.
Stands apart from similar pages by actually being useful, that is high praise these days, and a look at visualharbor kept that standard going, you can tell when a site is built around the reader versus around metrics and this one clearly belongs to the first category for sure based on what I read.
Now realising the topic deserved better treatment than it has been getting elsewhere, and a look at strategyforwardpath extended that broader recognition, content that exposes the gap between actual quality and average quality elsewhere is doing the quiet work of raising standards and this site is contributing to that elevation in its own corner.
Now recognising the post as a rare example of careful writing on a topic that mostly receives careless treatment, and a stop at forwardenergyactivated extended that contrast with the average elsewhere, content that highlights how much the average is settling for low quality is content that has both internal merit and external value as a benchmark.
A small editorial detail caught my attention, the way headings related to body text, and a look at primevoyager maintained that careful relationship, structural details like that show up to readers who notice them and the writers here have clearly thought about every level of the piece rather than just the words.
Will be back, that is the simplest way to say it, and a quick visit to clickvoyager reinforced the decision, this site has earned a spot in my regular rotation alongside a few other reliable places I check when I want something genuinely informative without all the usual modern web noise getting in the way.
If patience for careful reading is rare these days finding sites that reward it is rarer still, and a stop at claritycompass extended that rare reward, the diminishing returns on shallow content reading have made me more selective about where to spend reading time and this site is meeting the higher selectivity bar consistently.
A memorable post for me on a topic I had thought I was tired of, and a look at knowledgebaypro suggested the same site can refresh other tired topics, sites that can revive my interest in subjects I had written off as exhausted are doing rare work and this one is clearly doing that for me today.
Felt no urge to argue with the conclusions even though I started the post slightly skeptical, and a look at easternvista maintained that pattern, writing that earns agreement through clarity of argument rather than rhetorical pressure is the kind I find most persuasive and the kind I want to read more of these days.
Really clear writing, the kind that makes you want to share the link with someone who has been asking about the topic, and a quick browse through learnvertex only made me more sure of that, the information here stays useful long after the first read is done which says a lot.
Closed the laptop after this and let the ideas settle for a few hours, and a stop at ideasneedexecutionnow similarly rewarded reflective time, content that benefits from sitting with rather than racing past is the kind I want more of and the kind that this site appears to consistently produce week after week here.
[url=https://kabel-s-rezinovoj-izolyaciej-01.ru]кабель с резиновой изоляцией[/url]
кабель канал [url=https://kabel-kanal-01.ru]https://kabel-kanal-01.ru[/url]
Definitely a recommend from me, anyone curious about the topic should check this out, and a look at buildsmartmotion adds even more reason for that, the depth and quality combine to make this site one I will be pointing people toward whenever similar conversations come up over the months ahead at work or socially.
Adding this to my list of go to references for the topic, and a stop at progresswithdirectionalforce confirmed the rest of the site deserves the same, definitely the kind of resource that earns its place rather than getting forgotten the moment the next interesting article shows up in my feed somewhere else on the web.
Liked that the post left some questions open rather than pretending to settle everything, and a stop at growthnavigationpath continued that intellectual honesty, content that respects the limits of its own claims is more trustworthy than content that overreaches and this site has clearly figured out which positions it can defend confidently.
Thanks for laying this out in a way that someone newer to the topic can follow, and a stop at clarityactivatorhub kept that accessibility going, writing that meets readers at different experience levels without condescending is hard to do well and the writers here have clearly thought about who they are writing for.
Тимирязевский район привлекает покупателей недвижимости благодаря сочетанию развитой инфраструктуры и большого количества зеленых территорий. Именно поэтому ЖК 26 ПаркВью рассматривается как привлекательное место для проживания – купить квартиру в жк 26 парквью на тимирязевской
Took something from this I did not expect to find, and a stop at uniquevoyager added another unexpected useful piece, content that exceeds expectations rather than just meeting them is the kind that builds enthusiasm and earns repeat visits without any explicit ask from the writer or platform behind the work being read.
Glad I gave this fifteen minutes rather than the usual three minute skim, and a look at directionenergizesaction earned the same investment, time spent on quality content is rarely wasted but the reverse is also true and learning which sites deserve which kind of attention is part of being a careful online reader.
Honest take is that this was better than I expected when I clicked through, and a look at beautycanvas reinforced that, the bar for online content has dropped so much that finding something thoughtful and well constructed feels almost noteworthy now which says more about the average than about this site itself.
A clean piece that knew exactly what it wanted to say and said it, and a look at peacefulstay maintained the same clarity of intention, knowing the goal of a piece before writing is something most blog content lacks and the clarity of purpose here shows up in every paragraph for any careful reader to notice.
mostbet Şəki [url=https://mostbet89142.online]https://mostbet89142.online[/url]
Now feeling that this site is the kind I want to make sure does not disappear, and a look at focusforwardpath reinforced that quiet protective feeling, the rare sites whose disappearance would actually matter to me are the sites I want to support through return visits and recommendations and this one has joined that small protected list.
Thanks for taking the time to write this, it is clear that some thought went into how each point would land, and after I went through hoppyharbor I had a better grip on the topic, real value without the usual marketing noise people have to put up with online when searching for answers.
mostbet hesabim [url=http://mostbet80398.online/]mostbet hesabim[/url]
Народ выручайте. Попал я в переплёт конкретный. Муж просто пропадает. Жена в слезах. В диспансер везти — учёт на всю жизнь. Короче, только это и спасло — вывод из запоя недорого и качественно. Отошёл за полчаса. В общем, смотрите сами по ссылке — срочный вывод из запоя [url=https://vyvod-iz-zapoya-na-domu-ekaterinburg-xtz.ru]срочный вывод из запоя[/url] Не тяните. Перешлите тому кому надо.
Took me back a step or two on an assumption I had been making, and a stop at ideaprogression pushed that reconsideration further, writing that gently corrects the reader without being aggressive about it is a rare diplomatic skill and the team here clearly knows how to land critical points without turning readers off.
Thanks for keeping the writing direct without losing the warmth that makes content feel human, and a stop at modernhaven carried both qualities forward, balancing professionalism and personality is a rare skill and the writers here have clearly figured out how to consistently land it across many posts which I notice.
Worth a slow read rather than the fast scan I usually default to, and a look at activevoyage earned the same slower pace from me, content that resets my reading speed downward is content with substance worth absorbing and this site has produced that effect on me multiple times now over the last week here.
Worth saying that the writing carries a particular kind of authority without making any explicit claims to it, and a stop at actionpathway extended that earned authority feeling, sites that demonstrate expertise through the quality of their explanations rather than by stating credentials are sites I trust most and this site has it.
Liked the natural conversational tone throughout, never stiff and never overly casual either, and a stop at buildprogressdeliberately kept that comfortable middle ground going, finding a tone that respects the reader without becoming distant or overly familiar is harder than it sounds and this site nails that balance consistently across many different pieces.
most bet [url=http://mostbet89142.online]most bet[/url]
Genuine pleasure to read, and that is not something I say often after a casual click through, and a quick visit to clarityactivates kept the same feeling going across the rest of the site, finding writing that actually feels good to spend time with rather than just functional is increasingly rare on the open web.
1win краш [url=www.1win67262.online]1win краш[/url]
aviator depósito seguro [url=https://aviator05248.help]https://aviator05248.help[/url]
However casually I came to this site I have ended up reading carefully, and a look at focusunlockspath continued earning that careful reading, the conversion from casual visitor to careful reader is something content earns rather than demands and this site has accomplished that conversion for me over the course of just a few pieces.
Speaking from the perspective of having read widely on the topic this site offers something distinct, and a look at growthwithforwardmotion reinforced that distinctness, the rare site that contributes something genuinely original to a saturated topic is the rare site worth following carefully and this one has demonstrated that original contribution capability today.
Honest reaction is that I want to send this to a friend who would benefit from it, and a look at claritydrivesvelocity added more material I will pass along too, the impulse to share is the strongest signal I have for content quality and this site is generating that impulse cleanly across multiple posts.
aviator depósito rápido [url=http://aviator05248.help]http://aviator05248.help[/url]
Felt the post was written for someone like me without explicitly addressing me, and a look at quantumleafhub produced the same fit, when content lands on its target without pandering you know the writer has done careful audience thinking rather than relying on demographic targeting or interest signals to do the work of editorial decisions.
Now feeling that this site is the kind I want to make sure does not disappear, and a look at brightlivinghub reinforced that quiet protective feeling, the rare sites whose disappearance would actually matter to me are the sites I want to support through return visits and recommendations and this one has joined that small protected list.
Reading this confirmed that my time researching the topic in other places had not been wasted, and a stop at stellarpath extended the confirmation, when independent sources agree that is a useful signal and this site is one of the more reliable sources I have found for cross checking what I read elsewhere on similar subjects.
aviator विड्रॉ लिमिट [url=http://aviator28045.help]http://aviator28045.help[/url]
aviator slot games [url=https://aviator31708.help]https://aviator31708.help[/url]
Liked everything about the experience, from the opening through to the closing notes, and a stop at momentumworkflow extended that into more pages, finding a site where the editorial vision shows through every choice rather than feeling random is an increasingly rare experience and one I am glad to have today during this particular reading session.
My time on this site has now extended past what I had budgeted, and a stop at calmretreats keeps extending it further, content that overstays its budget in my schedule is content that has earned the extra time and this site has been earning extra time across multiple visits to the point where my schedule needs adjustment.
Now appreciating that I did not feel exhausted after reading, and a stop at facthorizon extended that energising quality, content that leaves me with more attention than it consumed is rare and the gap between draining and energising content is real over the course of a typical day spent reading widely online.
Felt like the post had been edited rather than just drafted and published, and a stop at forwardplanninglab suggested the same care across the site, the difference between edited and unedited content is enormous for the reader and this site has clearly invested in the editing pass that most blogs skip entirely which really does show up.
Skipped the social share buttons but might come back to actually use one later, and a stop at viralnexus extended that share urge, content that triggers genuine sharing impulses rather than performative ones is content that has actually moved me and not many posts in a typical week do that for me actually.
aviator हैक apk [url=http://aviator28045.help/]aviator हैक apk[/url]
aviator plinko betting Bangladesh [url=https://aviator31708.help]https://aviator31708.help[/url]
Closed several other tabs to focus on this one as I read, and a stop at growthfindsdirection held my undivided attention the same way, content that earns full focus in an attention environment full of competing pulls is content doing something genuinely well and the team behind it deserves recognition for that achievement consistently.
Speaking honestly this is among the better discoveries of my recent browsing, and a stop at buildtractionnow reinforced that discovery quality, the ranking of recent discoveries is informal but meaningful and this site has placed near the top of that ranking based on the consistency of quality across what I have already read carefully.
Felt the post had been quietly polished rather than aggressively styled, and a look at focusfirstapproach confirmed the same understated polish, sites whose quality reveals itself slowly rather than announcing itself loudly are the kind I trust more deeply because the trust is not based on first impressions of marketing but actual substance.
Compared to the usual results for this kind of search this site stands well above the average, and a quick visit to ideasintosystems kept the standard high, you can tell within seconds whether a site is going to waste your time or actually deliver and this one clearly delivers without any false starts.
The pacing of the post was just right, never rushed and never dragged out unnecessarily, and a look at actioncreatestraction maintained the same rhythm, you can tell the writer has experience because the difficult skill of pacing is something only practiced writers manage to handle well in long form content over time and across formats.
Took a few notes from this post, the points are easy to remember without needing to come back and check, and a look at signaldrivenaction added a couple more, the kind of place that sticks in the memory long after the browser tab has been closed for the day which says a lot really.
Coming back to this one, definitely, and a quick visit to vibrantdaily only made me more sure of that, the kind of writing that makes you want to set aside time later rather than rushing through it now while distracted by everything else competing for attention on the screen today across so many tabs.
Thanks for the breakdown, it gave me a clearer picture of something I had been confused about for a while now, and a stop at gentleparent closed the remaining gaps in my understanding nicely, no need to hunt around twenty other articles to put the pieces together which is a real time saver.
Honest assessment is that this is one of the better short reads I have had this week, and a look at velvetglowhub reinforced that, the bar for short content is low because most of it sacrifices substance for brevity but this site manages both at once which is harder than it sounds for most writers attempting it.
Reading this back to back with a similar piece elsewhere made the quality difference obvious, and a stop at growthpipeline only widened the gap, comparing content side by side is a useful exercise and the gap between this site and average competitors in the space is large enough to be noticeable from the first paragraph.
Reading this in a moment of low energy still kept my attention, and a stop at brightcanvas continued that engagement under suboptimal conditions, content that survives the reader being tired is content with extra reserves of pull and this site has the kind of writing that holds up even when I am not at my reading best.
mostbet azərbaycanca yardım [url=http://mostbet80398.online/]mostbet azərbaycanca yardım[/url]
БигПикча — один из самых популярных российских фотомедиа-порталов, где каждый день публикуются захватывающие новости в фотографиях, редкие исторические снимки и увлекательные лонгриды. На https://bigpicture.ru/ вы найдёте всё: от криминальных хроник и путевых заметок до неожиданных научных фактов и забавных подборок из мировых соцсетей — каждый материал написан живо и с душой, а визуальная подача делает чтение особенно увлекательным.
Полный справочник по почтовым отделениям России позволяет быстро проверить индекс дома, адрес отделения и доступные почтовые услуги перед отправкой корреспонденции: https://pochtaops.ru/
Добрый день. Брат снова в штопоре. Родные не знают, за что хвататься. Скорая даже не рассматривает такие вызовы. Короче, реально крутые врачи попались — профессиональный вывод из запоя недорого. Сняли алкогольную интоксикацию. В общем, сохраните в закладки обязательно — капельница от запоя недорого [url=https://vyvod-iz-zapoya-na-domu-ekaterinburg-hjm.ru]https://vyvod-iz-zapoya-na-domu-ekaterinburg-hjm.ru[/url] Звоните не раздумывая. Вдруг пригодится.
A particular kind of restraint shows up in the writing, and a look at growwithprecision maintained the same restraint across pages, knowing what not to say is just as important as knowing what to say and this site has clearly developed strong instincts on both sides of that editorial line throughout pieces I have read.
Better than most of the writing I have come across on this topic recently, simpler and more direct, and a look at trendgallery continued in that same way, a real outlier in a crowded space full of repetitive content that says little while taking up a lot of reader time today which is unfortunate.
mostbet oyun provayderi [url=http://mostbet80398.online]mostbet oyun provayderi[/url]
Just want to recognise that someone clearly cared about how this turned out, and a look at quantumharbor confirmed that care extends across the broader site, you can feel the difference between content shipped to hit a deadline and content released because the writer was actually proud of the result for once.
My professional context would benefit from having this kind of resource available, and a look at actionshapessuccess extended the professional applicability, the rare site that contributes meaningfully to professional work rather than just personal interest is content with multiplied value and this one is providing that professional utility consistently across multiple pieces.
Liked the way the post handled the final paragraph, no neat bow but no abrupt cutoff either, and a stop at progresswithsignal continued that thoughtful ending pattern, endings are hard and most blog writers either over engineer them or skip them entirely and this site has clearly figured out a sustainable middle approach.
Thanks for the practical examples scattered through the post rather than abstract theory only, and a look at digitalhaven continued that grounded style, abstract points are easier to remember when paired with concrete situations and the writers here clearly understand how readers actually retain information from blog content reading sessions.
I am lucky that I discovered this website , precisely the right info that I was searching for! .
Now planning to write about the topic myself eventually using this post as a reference, and a look at ideasneedalignment would also serve in that future piece, content that becomes raw material for my own writing rather than just informing my reading is content with multiplicative value and this site is generating that multiplicative effect.
Honest assessment after reading this twice is that it holds up under careful attention, and a look at intentionalforwardenergy extended that durability across more pages, content that survives a second read without revealing weak spots is rarer than the average reader probably realises and this site clearly cleared that bar.
Really like the way the post resists reaching for cliches that would have made it feel generic, and a quick visit to growththroughdesign kept that fresh feel going, original phrasing and unexpected metaphors are signs that the writer is actually thinking rather than just stitching together familiar phrases into the appearance of content.
Thank you for not assuming the reader already knows everything, the explanations meet me where I am, and a look at directionturnsideas did the same, that consideration is what makes a site feel welcoming rather than gatekeepy which is sadly the default mood across the modern web today for most subjects covered.
Saving the link for sure, this one is a keeper, and a look at buildclearoutcomes confirmed I should bookmark the entire site rather than just this page, the consistency across what I have seen so far suggests there is a lot more here worth coming back for soon when I have more time.
Useful information presented in a way that does not feel like a sales pitch, that is what I appreciated most, and a stop at comicnexus was the same, no upsell and no fake urgency just steady content laid out properly for someone trying to actually learn from it rather than just be sold to.
Reading this in segments because the day was busy, and the post survived the fragmented attention well, and a stop at latinovista held up similarly under interrupted reading, content that can withstand modern distracted reading patterns rather than requiring a perfect block of focused time is increasingly the kind I prefer.
1win бонус на депозит [url=https://1win67262.online]1win бонус на депозит[/url]
Доброго времени суток. Брат не вылезает из штопора. Дети всего боятся. В диспансер отвозить — стыдоба. В итоге, действительно профессиональная бригада — капельница от запоя на дому. Приехали за 40 минут. В общем, контакты и цены здесь — наркология вывод из запоя [url=https://vyvod-iz-zapoya-na-domu-ekaterinburg-pcl.ru]наркология вывод из запоя[/url] Звоните прямо сейчас. Кому-то это может спасти жизнь.
Strong recommendation from me, anyone curious about the topic should make time for this, and a look at profitnexus only sharpens that recommendation further, the kind of resource that holds up against careful scrutiny rather than crumbling at the first critical question is rare and worth pointing other people toward when the topic comes up.
Now feeling the quiet pleasure of finding writing that takes itself seriously without being self serious, and a stop at greenharvest extended that subtle pleasure, the gap between earnest and pretentious is fine and this site has clearly chosen to land on the earnest side without slipping over into pretentious which is impressive.
Beneficial Blog! I had been simply just debating that there are plenty of screwy results at this issue you now purely replaced my personal belief. Thank you an excellent write-up.
1win Apelsin вывод средств [url=https://1win67262.online]1win Apelsin вывод средств[/url]
جرب الحظ الآن على [url=https://888starsegypt.com]تسجيل دخول 888[/url] للفوز بجوائز مثيرة ومباشرة.
تتفرد المنصة بواجهة استخدام واضحة وسهلة التعامل.
الفقرة الثانية:
يوفر الفريق المختص دعمًا متواصلًا لمساعدة الأعضاء وحل المشاكل بكفاءة.
[url=https://888starzs7.com]888starz bet[/url]
تعرّف منصة 888starz على نفسها كموقع رائد في عالم الألعاب والترفيه عبر الإنترنت.
القسم الثاني:
تعتمد المنصة سياسات صارمة لضمان نزاهة النتائج وحماية المستخدمين.
القسم الثالث:
تقدم 888starz عروضًا ترحيبية وبونصات دورية لزيادة فرص الربح وتحفيز الاستخدام.
القسم الرابع:
تسعى المنصة للحفاظ على بيئة تشريعية سليمة عبر الالتزام بالمعايير المحلية والدولية.
Appreciated that the writer trusted the reader to follow along without constant restating of earlier points, and a look at growthfollowsfocus continued that respect for the reader, treating an audience as capable adults rather than as people to be hand held through every paragraph is something I notice and value highly across the open internet today.
Ищете, как совместить каникулы и учёбу? английский детский лагерь от YES Center — это безопасный отдых, насыщенная программа и ежедневная языковая практика. Профессиональные вожатые и преподаватели создают комфортную атмосферу для каждого ребёнка.
Ребята в Екбе. Отец не просыхает уже пятый день. Дети боятся. Скорая отказывается приезжать. В итоге, единственные кто не побоялся взяться — анонимный вывод из запоя без кодировки. Приехали быстро. В общем, все контакты по ссылке — вывод из запоя на дому в екатеринбурге [url=https://vyvod-iz-zapoya-na-domu-ekaterinburg-gkd.ru]вывод из запоя на дому в екатеринбурге[/url] Промедление дороже. Перешлите кому надо.
Для защиты данных и прозрачности процессов 888starz использует надёжные методы шифрования и проверенные провайдеры.
бк 888starz [url=https://888-uz10.com]https://888-uz10.com[/url]
A friend of mine advised me to review this site. And yes. it has some useful pieces of info and I enjoyed reading it.
Акции и бонусы на 888starz стимулируют интерес новых посетителей и вознаграждают постоянных игроков.
Пользователи отмечают удобный интерфейс и быстрый доступ к основным разделам сайта.
888starz review [url=https://www.888-uz1.com/]https://888-uz1.com[/url]
The whole experience of reading this was pleasant from start to finish, no pop ups and no annoying interruptions, and a look at nexoravision continued that clean experience, technical choices about page design matter for the reader and this site clearly cares about the small details that add up to comfort across multiple visits.
how to download plinko for android [url=http://plinko45619.help/]http://plinko45619.help/[/url]
Пользователи отмечают удобный интерфейс и быстрый доступ к любимым развлечениям.
888starz вход [url=http://www.888-uz2.com/]https://888-uz2.com[/url]
Quietly impressive in a way that does not announce itself, and a stop at buildclearprogress extended that quiet impressiveness, the kind of quality that emerges through sustained attention rather than first impressions is the kind I trust more deeply and this site has been earning that deeper trust across multiple sessions over time consistently.
Good clean post, no errors and no awkward phrasing that breaks the reading flow, and a stop at brightvertex kept the same standard, definitely the kind of editorial care that earns a return visit because it tells me the writer is paying attention to details that matter to readers rather than just rushing publication.
Looking at this from the perspective of someone tired of generic content the contrast is striking, and a look at digitalclicks maintained that distinctive feel, sites with strong editorial identity stand out against the bland background of algorithmic content and this one has clearly developed an identity worth recognising through careful attention.
Now setting aside time on my next free afternoon to read more from the archives, and a stop at momentumdesign confirmed that time will be well spent, the rare site whose archive deserves a dedicated reading session rather than just casual sampling is the kind of resource worth scheduling around and this one qualifies clearly.
Liked how the writer used real examples instead of theoretical ones to make the points stick, and a stop at growthpilothub added even more concrete examples, this is the kind of practical approach that respects readers who actually want to apply what they learn rather than just nodding along passively without doing anything useful.
ごけい キングダム, かんき, 魏火龍七師, キングダム 最新刊 ネタバレ, キングダム 呉慶 当サイト https://kingdom-kaitai.site/ をぜひご覧ください。情報は常に更新されていますので、最新のイベント情報を常に把握できます。当サイトはあらゆる情報が揃った総合情報源です!
Ребята в Екбе. У нас беда приключилась. Родственники места себе не находят. Платная клиника просто грабит. Короче, спасла только эта контора — выведение из запоя без документов и штампа. Капельницу поставили сразу. В общем, подробности и расценки тут — вывод из запоя на дому недорого [url=https://vyvod-iz-zapoya-na-domu-ekaterinburg-bqm.ru]вывод из запоя на дому недорого[/url] Звоните пока не поздно. Скиньте кому пригодится.
Now noticing that the post avoided the temptation to be funny in places where humour would have undermined the substance, and a stop at growthnavigationpath maintained the same restraint, knowing when to be serious is a rare editorial virtue and this site has clearly developed it through what I assume is careful editorial practice over years.
Reading this felt productive in a way most internet reading does not, and a look at progressengine continued that productive feeling, sometimes the open web feels like a waste of time but sites like this remind me why I still bother to look around rather than retreating to old reliable sources for everything I need.
Following the post through to the end without my attention drifting once, and a look at velvettress earned the same uninterrupted attention, content that holds attention without manipulating it is content with substantive pull and this site has demonstrated that substantive pull across multiple pieces in a single reading session reliably here today.
My friends would appreciate a few of these posts and I will be sending links accordingly, and a look at growthwithoutfriction added more pages to my share queue, content that earns shares to specific people in specific contexts is content with social utility and this site is generating those targeted shares from me consistently lately.
Solid recommendation from me to anyone working in the area, the perspective here is grounded, and a look at vibrantstage adds even more useful angles, the kind of site that becomes a reference rather than just a one time read which is a higher bar than most blogs ever reach today on the modern web.
Decided to set aside time later to read more carefully, and a stop at urbanmarket reinforced that decision, content that earns a calendar entry rather than just a passing read is in a different tier altogether and this site is clearly working at that elevated level which I really do appreciate as a reader today.
However many similar pages I have read this one taught me something new, and a stop at actionclaritylab added more new material, content that contributes genuinely fresh information rather than recycling what is already widely available is content with real informational value and this site is providing that informational freshness at a notable rate.
The tone stayed consistent across the whole post which is harder than it looks for longer pieces, and a look at claritybeforevelocity continued the same voice, this kind of editorial consistency is a sign of either a single careful writer or a tightly run team and either is impressive today across the broader media environment.
Well done, the kind of post that makes you slow down and actually read instead of skimming for keywords, and a look at intentionalvelocity kept me reading carefully too, that is a sign of writing that has been crafted rather than churned out for an algorithm to see today and tomorrow.
Most often since i look for a blog Document realize that the vast majority of blog pages happen to be amateurish. Not so,We can honestly claim for which you writen is definitely great and then your webpage rock solid.
Now sitting back and recognising that this was a small but real win in my reading day, and a stop at urbanriders extended that quiet win, the cumulative effect of small reading wins versus the cumulative effect of small reading losses is real over time and this site is contributing to the wins side of that ledger.
Clean writing, easy to read, and never tries too hard to impress, that combination is harder to find than people think, and after my time on forwardthinkingcore I am sure this site treats its readers well, no flashy tricks just useful content done right which is honestly all I want online.
A modest masterpiece in its own quiet way, and a look at actionfeedsprogress confirmed the same quiet quality across the rest of the site, calling something a masterpiece is usually overstating but for content this carefully crafted the word feels appropriate even if the writers themselves would probably resist the label honestly.
安迪阿瓦隆色情
Walked away in a slightly better mood than when I started reading, that says something about the writing, and a stop at glowharbor kept that going, content that leaves you feeling more capable rather than overwhelmed is the kind I keep coming back to again and again over the years and across many topics.
Started reading and ended an hour later without realising the time had passed, and a look at winterhaven produced the same time dilation effect, when content makes time feel different the writer has achieved something well beyond the average and this site is producing that experience for me reliably across multiple readings.
However casually I came to this site I have ended up reading carefully, and a look at expertvoyager continued earning that careful reading, the conversion from casual visitor to careful reader is something content earns rather than demands and this site has accomplished that conversion for me over the course of just a few pieces.
Нужна надёжная IT-поддержка бизнеса в Санкт-Петербурге? Организация выполняет абонентское обслуживание ПК, восстановление оборудования после неполадок и потерянных сведений. Ищете локальные компьютерные сети? Все вопросы решает закреплённый системный администратор на сайте help-spb.ru. Специалисты выполняют срочные и плановые выезды, настраивают сети и серверы, обеспечивают комплексную антивирусную защиту. Доверьте технику профессионалам и работайте без простоев.
Liked the natural conversational tone throughout, never stiff and never overly casual either, and a stop at growththroughmotion kept that comfortable middle ground going, finding a tone that respects the reader without becoming distant or overly familiar is harder than it sounds and this site nails that balance consistently across many different pieces.
Bookmark earned, calendar reminder set, share queued, all from one good post, and a look at progresswithclarity did the same, when a single reading session triggers multiple downstream actions you know the content has actually moved me beyond the page and this site is moving me at that higher level reliably.
My usual pattern is to skim and bounce but this site has reset that pattern temporarily, and a stop at ideasneedmotion maintained the slower reading mode, content that changes how I read is content with structural influence and this site has clearly nudged my reading behaviour toward something better at least for the duration of these visits.
Онлайн-магазин «Для шикарных женщин» создан для тех, кто выбирает элегантность и стиль. На http://smart-woman.ru/ собран широкий ассортимент модной одежды с доставкой по всей России. При регистрации каждая покупательница получает 300 рублей на первую покупку, при этом заказы от 2500 рублей доставляются Почтой России бесплатно. Постоянные скидки и выгодные предложения делают онлайн-шопинг по-настоящему доступным.
Now wishing I had found this site sooner, and a look at rapidcourier extended that mild regret, the calculation of how many years of good content I missed by not finding the right sources earlier is one I try not to make too often but it does come up sometimes when I find sites this good.
Здорова земляки. Случилась жесть. Родственники места себе не находят. Платная наркология запрашивает бешеные деньги. В итоге, выручила только эта бригада — вывод из запоя на дому круглосуточно. К утру человек пришёл в себя. В общем, контакты и расценки тут — капельница от запоя на дому [url=https://vyvod-iz-zapoya-na-domu-ekaterinburg-nws.ru]капельница от запоя на дому[/url] Каждый час усугубляет состояние. Может кому-то спасёт жизнь.
The tone stayed consistent across the whole post which is harder than it looks for longer pieces, and a look at actioncreatestraction continued the same voice, this kind of editorial consistency is a sign of either a single careful writer or a tightly run team and either is impressive today across the broader media environment.
Thanks for taking the time to write this, it is clear that some thought went into how each point would land, and after I went through clarityshift I had a better grip on the topic, real value without the usual marketing noise people have to put up with online when searching for answers.
Appreciate the work that went into laying this out so clearly, every section earns its place without filler, and a look at focusacceleration confirmed the same care, definitely the kind of place that deserves a return visit when the topic comes up again later in the future or for any related question.
Speaking honestly this is among the better discoveries of my recent browsing, and a stop at progressengineon reinforced that discovery quality, the ranking of recent discoveries is informal but meaningful and this site has placed near the top of that ranking based on the consistency of quality across what I have already read carefully.
Well done, the kind of post that makes you slow down and actually read instead of skimming for keywords, and a look at intentionalvelocity kept me reading carefully too, that is a sign of writing that has been crafted rather than churned out for an algorithm to see today and tomorrow.
A piece that reads as if the writer trusted readers to fill in obvious gaps, and a look at artistneedle continued that respectful approach, content that does not over explain what the reader can infer is content that respects intelligence and this site has clearly chosen to write to capable readers rather than to the lowest common denominator.
Liked everything about the experience, from the opening through to the closing notes, and a stop at momentumworkflow extended that into more pages, finding a site where the editorial vision shows through every choice rather than feeling random is an increasingly rare experience and one I am glad to have today during this particular reading session.
Ze dolgo casa nisem vedel, kako naprej. Potem pa sem po priporocilu nasel nekaj, kar je mi dalo novo upanje. Govorim o zdravljenju alkoholizma pri metodi, ki resnicno deluje. Veste, odvisnost od alkohola je zahrbtna. In veliko je slabih informacij. Zato svetujem, da si vzamete cas in preberete posodobljene podatke, ki so na voljo na tej povezavi: odvajanje od alkohola [url=http://www.alkoholizma-zdravljenje.com]odvajanje od alkohola[/url]. Na tej povezavi so odgovori na vsa vprasanja.
Meni je ta pristop pomagal. Pot je bila naporna, ampak vredno je bilo vsakega truda. Ce vi ali kdo od vasih bliznjih se sooca s to tezavo – najboljsa odlocitev je poklicati. Srecno na tej poti!
Pozdrav iz moje izkusnje. Moram povedati svojo zgodbo. Dolga leta sem se boril s to odvisnostjo. Potem pa sem po dolgem iskanju nasel zdravljenje alkoholizma pri Dr Vorobjevu. Nisem verjel, da bo delovalo. Ampak sem dal priloznost. In zdaj, po nekaj mesecih, lahko recem, da je bilo to resitev, ki sem jo iskal. Sam sem preucil celoten program in vsi kljucni podatki so na voljo na tej povezavi: Dr Vorobjev [url=https://alkoholizmazdravljenje.com]Dr Vorobjev[/url]. Ni lahko priznati, ampak se splaca.
Ce kdo v vasi okolici potrebuje pomoc — ne odlasajte s to odlocitvijo. Drzim pesti za vsakega, ki se bori
Reading the writers other posts after this one suggests the quality is consistent rather than peak, and a stop at signalcreatesmovement confirmed the consistent quality reading, sites that hold the same level across many pieces rather than peaking on a few are sites with sustainable editorial discipline and this one has clearly developed that.
Liked that the post left some questions open rather than pretending to settle everything, and a stop at stellarchoice continued that intellectual honesty, content that respects the limits of its own claims is more trustworthy than content that overreaches and this site has clearly figured out which positions it can defend confidently.
Came away with some new perspectives I had not considered before, and after festiveglow those ideas felt more complete, the kind of content that stays with you a little while after reading rather than slipping out the moment you switch tabs and move on with your day to whatever comes next.
A clean piece that knew exactly what it wanted to say and said it, and a look at radiantderma maintained the same clarity of intention, knowing the goal of a piece before writing is something most blog content lacks and the clarity of purpose here shows up in every paragraph for any careful reader to notice.
If I were to recommend a starting point for the topic this site would be near the top of my list, and a stop at clarityturnsideas reinforced that recommendation status, the small list of starting point recommendations I keep for friends asking about topics is short and this site is now firmly on it.
Picked something concrete from the post that I will use immediately, and a look at mysticvoyage added another concrete piece, content that produces immediately useful output rather than just abstract appreciation is content that earns its place in my regular rotation without needing any further evaluation from me at this point honestly.
plinko withdrawal Bangladesh [url=www.plinko45619.help]www.plinko45619.help[/url]
mostbet lucky jet strategiya [url=https://www.mostbet44945.help]https://www.mostbet44945.help[/url]
Took me back a step or two on an assumption I had been making, and a stop at facthorizon pushed that reconsideration further, writing that gently corrects the reader without being aggressive about it is a rare diplomatic skill and the team here clearly knows how to land critical points without turning readers off.
Now thinking I want more sites built on this kind of editorial foundation, and a stop at growthfindsclarity extended that wish into a broader hope, sites built on substance and care rather than on metrics and growth are the kind of sites I want to see more of and this one is a small example worth supporting.
Well done, the kind of post that makes you slow down and actually read instead of skimming for keywords, and a look at progresswithcontrol kept me reading carefully too, that is a sign of writing that has been crafted rather than churned out for an algorithm to see today and tomorrow.
Bookmarking this for later, the kind of resource I want to keep nearby, and a quick look at ideaprogression confirmed the rest of the site is worth the same treatment, definitely going into my reference folder for the next time the topic comes up at work or in conversation with someone who asks.
Современная электроника требует надежных комплектующих, и выбор поставщика становится критически важным для успеха любого проекта. Профессиональные инженеры и радиолюбители знают, что качество компонентов напрямую влияет на долговечность устройств и безопасность эксплуатации. На платформе https://components.ru/ собран широкий ассортимент электронных элементов — от микроконтроллеров и силовых транзисторов до пассивных компонентов и соединителей, что позволяет реализовать проекты любой сложности. Удобная навигация, техническая документация и оперативная доставка делают процесс закупки максимально эффективным, экономя время специалистов и обеспечивая бесперебойность производственных циклов в условиях современного рынка.
мостбет пополнить сомами [url=www.mostbet18868.online]мостбет пополнить сомами[/url]
Рекламное агентство «Транзит Медиа» специализируется на наружной рекламе в Крыму: брендировании транспорта плёнкой ORACAL, оклейке торговых точек и витрин, изготовлении баннеров и сеток с пропаем и люверсами. Компания располагает собственным производством https://transitmedia.ru/ — лазерная резка, термогибка акрила, ПЭТ и ПВХ. Все работы выполняются как в собственном боксе, так и на территории заказчика по Симферополю, Севастополю и Ялте.
Appreciate the thoughtful approach, the writer clearly took time to make this readable for someone who is not already an expert, and a look at signalthefuture kept that going nicely, easy on the eyes and easy on the brain which is always a winning combination when reading on a busy day.
мостбет логин [url=https://mostbet69815.online]мостбет логин[/url]
мостбет ios приложение Кыргызстан [url=mostbet06394.help]mostbet06394.help[/url]
Thank you for not assuming the reader already knows everything, the explanations meet me where I am, and a look at strategyfocus did the same, that consideration is what makes a site feel welcoming rather than gatekeepy which is sadly the default mood across the modern web today for most subjects covered.
Probably worth setting aside a longer block to read more carefully than I can right now, and a stop at ideasgainmotion confirmed the longer block plan, the impulse to schedule dedicated time for a sites archive is itself a measure of trust and this site has earned that scheduling impulse from me clearly today actually.
plinko betting [url=plinko45619.help]plinko betting[/url]
Reading this in a quiet coffee shop matched the calm energy of the writing, and a stop at actionplanner extended that environmental match, content that has its own ambient quality which can match or clash with surroundings is content with a personality and this site has the kind of personality that suits calm reading.
Now adjusting my expectations upward for the topic based on this post, and a stop at shadowbeast continued that bar raising effect, content that resets what I think is possible on a subject is doing real work in shaping my standards and this site is providing those bar raising experiences at a notable rate during sessions.
Now feeling that this site is the kind I want to make sure does not disappear, and a look at forwardthinkingcore reinforced that quiet protective feeling, the rare sites whose disappearance would actually matter to me are the sites I want to support through return visits and recommendations and this one has joined that small protected list.
Центр EnglishGroup проводит качественное обучение английскому языку для детей, подростков и взрослых. Профессиональные преподаватели помогут освоить язык с азов и сдать тесты TOEFL и IELTS. Записывайтесь на сайте https://englishgroup.by/ и получите бесплатное пробное занятие в идущей группе. Заметный результат и удобное расписание занятий гарантированы каждому студенту.
Glassway производит алюминиевые конструкции и интерьерные решения: потолки Hook On, Clip In, Грильято, кассетные и реечные системы, перегородки в том числе противопожарные, двери, остекление, смарт-стекло и светодиодные светильники — единый стандарт качества для каждого изделия. Ищете потолок грильято? На glassway.group представлен полный каталог с возможностью оформить заказ. Ассортимент охватывает потребности офисных, торговых и промышленных проектов любого масштаба.
The post made the topic feel approachable without making it feel trivial, that is a fine balance, and a stop at executeideasfast maintained the same balance, finding the middle ground between welcoming and serious is genuinely difficult and the writers here have clearly figured out how to consistently hit it well across many different posts.
Following a few of the internal links revealed more posts of similar quality, and a stop at clarityfuel added more to that growing pile, sites where internal links lead to more good content rather than to more of the same recycled material are sites with depth and this one has clearly built that depth carefully.
Чистая горная вода «Эльбрусинка» из Карачаево-Черкесии — идеальный выбор для всей семьи: добытая в экологически чистом регионе у подножия Эльбруса, она относится к детской воде высшей категории с мягким вкусом и нейтральным pH 7,5. На сайте https://voda-s-gor.ru/168 можно заказать удобную бутыль 19 литров всего за 450 рублей с доставкой на дом или в офис по Махачкале и Каспийску. Сбалансированный минеральный состав — кальций, магний и натрий — делает её безопасной даже для детей.
Reading this gave me a small jolt of recognition for an experience I thought was just mine, and a stop at actionremovesfriction produced more such jolts, content that universalises private experiences without flattening them is doing genuinely useful work and this site is providing that recognition function for me reliably across topics I read.
Thanks for the clean writing, no broken sentences and no awkward translations like some other sites have, and a quick stop at littlebloomhub kept that polish going nicely, it really does make a difference when a reader can move through a page without tripping on every line or going back to reread.
Closed the post with a small satisfied sigh, and a stop at actionshapessuccess produced the same gentle exhale, content that ends well is content that respects the rhythm of reading and the writers here have clearly thought about how their pieces close rather than just trailing off when they run out of things to say.
Probably the best thing I have read on this topic in the past month, and a stop at buildmomentumintelligently extended that ranking, the casual ranking of recent reading is informal but real and this site has been winning those rankings for me on this topic specifically over the last several weeks of regular reading sessions.
Coming to this with low expectations and being pleasantly surprised by the substance, and a stop at forwardtractionhub continued exceeding expectations, the recalibration of expectations upward across multiple positive readings is one of the actual rewards of careful browsing and this site is providing that recalibration at a steady rate apparently.
Picked up a couple of new ideas here that I can actually try out, and after my visit to urbanfashion I have even more notes saved, this is the kind of resource that pays you back for the time you spend on it which is rare to come across in this corner of the web.
Reading this confirmed a hunch I had been carrying about the topic without having articulated it, and a stop at oceanvoyagerhub extended the confirmation, content that gives shape to fuzzy intuitions is doing the rare work of making private thoughts public and this site is providing that articulating service consistently for me lately.
Picked up two new ideas that I expect will come up in conversations this week, and a look at quantumharbor added another, content that arms me with talking points rather than just filling time is the kind that provides ongoing value beyond the moment of reading and this site is generating that kind of ongoing value.
Decided not to skim despite my usual habit and was rewarded for the discipline, and a stop at growthpipeline earned the same patient approach, training myself to recognise sites that warrant slower reading is part of being a careful online reader and this site is the kind that helps me practice that skill regularly.
Skipped the social share buttons but might come back to actually use one later, and a stop at buildmomentumwisely extended that share urge, content that triggers genuine sharing impulses rather than performative ones is content that has actually moved me and not many posts in a typical week do that for me actually.
Solid value packed into a relatively short post, that takes skill, and a look at focusforwardpath continues the dense useful content across more pages, this site clearly understands that respecting reader time is itself a form of generosity which is something most blog operations seem to have forgotten lately across the wider open web.
Great work on keeping things readable, the post never drags or repeats itself which I really appreciate, and a stop at nexustower added a bit more context that fit naturally with what was already said here, no need to read everything twice to get the point being made today.
Now feeling that this site is the kind I want to make sure does not disappear, and a look at forwardthinkingcore reinforced that quiet protective feeling, the rare sites whose disappearance would actually matter to me are the sites I want to support through return visits and recommendations and this one has joined that small protected list.
Worth recognising that the post handled a familiar topic without reaching for any of the obvious hot takes, and a stop at focusunlockspotential continued that fresh treatment, sites that find new angles on subjects others have exhausted are sites worth following carefully and this one has clearly developed that exploratory instinct through patient practice.
Good post, the kind that respects the reader by getting to the point quickly without skipping the details that matter, and a short look at focusandexecute confirmed that approach is consistent across the site which is rare to find online these days, definitely a place I will return to soon.
mostbet sms kelmayapti [url=https://www.mostbet44945.help]mostbet sms kelmayapti[/url]
Just sat with this for a bit longer than I usually would because the points are worth thinking about, and after claritysimplifiesprogress I had even more to chew on, the kind of post that nudges your thinking forward without forcing the issue is something I have always appreciated in good writing online.
Probably worth setting aside a longer block to read more carefully than I can right now, and a stop at clarityoveractivity confirmed the longer block plan, the impulse to schedule dedicated time for a sites archive is itself a measure of trust and this site has earned that scheduling impulse from me clearly today actually.
Honestly enjoyed every minute spent here, that is not something I say lightly, and a look at silkstrandly confirmed I will be back, the bar for spending time online is high for me these days but this site clears it without effort which is high praise indeed from this reader who is usually rather demanding.
A genuine compliment to the writer for keeping the post focused on what mattered, and a look at claritydrivesmotion continued that disciplined focus, focus is a editorial choice that compounds across many small decisions and this site has clearly made those small decisions consistently across what I have read so far this week here.
mostbet internet talab [url=https://www.mostbet44945.help]https://www.mostbet44945.help[/url]
Worth pointing out that the writing reads as confident without being defensive about it, and a look at actiondrive extended that secure tone, content that does not pre emptively argue against imagined critics has a different quality from defensive writing and this site reads as written from a place of real ease.
Picked this up while looking for something else and ended up reading every paragraph because it was actually informative, and after momentumdesign I was sure I would come back, that does not happen often when most sites bury the useful parts under endless ads and pop ups today and across most categories online.
mostbet баланс [url=http://mostbet18868.online]mostbet баланс[/url]
Decided to set aside time later to read more carefully, and a stop at forwardenergyflow reinforced that decision, content that earns a calendar entry rather than just a passing read is in a different tier altogether and this site is clearly working at that elevated level which I really do appreciate as a reader today.
The depth of coverage felt about right for the format, neither shallow nor overwhelming, and a look at nexoravision kept that calibration going, getting the depth right for blog format is genuinely difficult because too shallow loses experts and too deep loses beginners but this site nailed it nicely which I really do appreciate.
Will be back, that is the simplest way to say it, and a quick visit to claritypowersresults reinforced the decision, this site has earned a spot in my regular rotation alongside a few other reliable places I check when I want something genuinely informative without all the usual modern web noise getting in the way.
ハイセンシとは シュラウド ヴァロラントの感覚 頂点の精神 ヴァロラントの感覚 これらはすべて当社の Web サイト https://gamersettings.net/ にあります – すべてのイベントの最新情報を入手できる最新情報をお見逃しなく
Came in skeptical of the angle and left mostly persuaded, and a stop at intentionalmovement pushed me a bit further in the same direction, content that can move a critical reader by argument rather than rhetoric is rare and worth pointing out because it indicates real substance underneath the surface presentation here.
Genuine pleasure to read, and that is not something I say often after a casual click through, and a quick visit to broadcastnova kept the same feeling going across the rest of the site, finding writing that actually feels good to spend time with rather than just functional is increasingly rare on the open web.
If quality blog writing is dying as people sometimes claim then this site is one piece of evidence that it has not died yet, and a look at focusfirstapproach extended that evidence, the broader cultural question about online writing has empirical answers in specific sites and this one is contributing to a more optimistic answer overall.
Got something practical out of this that I can apply later this week, and a stop at growthwithoutnoise added more details to think about, this is exactly the kind of content I bookmark for future reference rather than the throwaway listicles that dominate most search results these days for almost any common topic.
mostbet lucky jet [url=mostbet18868.online]mostbet18868.online[/url]
If you scroll past this site without looking carefully you will miss something, and a stop at progressengine extended that mild warning, the surface of the site does not advertise its quality loudly which means careful attention is required to recognise what is being offered here which is itself a kind of editorial signal.
mostbet почта поддержки [url=www.mostbet06394.help]www.mostbet06394.help[/url]
mostbet MasterCard [url=https://mostbet69815.online]https://mostbet69815.online[/url]
Really clear writing, the kind that makes you want to share the link with someone who has been asking about the topic, and a quick browse through signaldrivengrowth only made me more sure of that, the information here stays useful long after the first read is done which says a lot.
Thanks for taking the time to write this, it is clear that some thought went into how each point would land, and after I went through modernhavens I had a better grip on the topic, real value without the usual marketing noise people have to put up with online when searching for answers.
Skipped the comments to avoid spoilers and came back later to find them genuinely worth reading, and a stop at infonexushub extended that surprised respect, when the discussion below a post matches the quality of the post itself you have found something special and this site appears to attract that kind of audience.
Now appreciating that the post did not try to imitate any other style I might recognise, and a stop at progressneedsstructure continued that distinct voice, content with its own register rather than borrowed from elsewhere is content with real authorial presence and this site has clearly developed that presence through what feels like patient editorial work.
I came here looking for a quick answer and ended up reading the whole post because it was actually interesting, and after focuspowersmovement I had a much fuller picture, no stress and no confusion just a clear walk through the topic that made everything fall into place without much effort.
Approaching this site through a casual link click and being surprised by what I found, and a look at directionbeforeforce extended the surprise, the rare experience of stumbling into excellent independent content rather than predictable mediocrity is one of the actual remaining pleasures of casual web browsing and this site provided it cleanly.
Bookmark folder reorganised slightly to make this site easier to find, and a look at brightcapture earned the same accessibility upgrade, the small organisational moves I make for sites I expect to return to often are themselves a signal of how much I trust them and this site triggered those moves naturally.
мостбет чат поддержки [url=http://mostbet69815.online]мостбет чат поддержки[/url]
мостбет как пополнить с карты [url=http://mostbet06394.help]http://mostbet06394.help[/url]
Granted I am giving this site more credit than I usually give new finds, and a look at focusacceleration continued earning that credit, the calibration of how much trust to extend after limited exposure is something I do carefully and this site has earned more trust on shorter exposure than most due to consistent quality across.
Picked up a couple of new ideas here that I can actually try out, and after my visit to directionsharpensfocus I have even more notes saved, this is the kind of resource that pays you back for the time you spend on it which is rare to come across in this corner of the web.
A piece that was confident enough to leave some questions open rather than forcing closure, and a look at executeplansnow continued that intellectual honesty, content that admits the limits of its scope is more trustworthy than content that pretends to total understanding and this site has the right calibration on certainty consistently.
solo gay porn
Decided to read this site for a while before forming a verdict, and the verdict after several pages is positive, and a stop at urbanriders continued that pattern, judging a site requires more than one post and giving sites a fair sample is something I try to do for promising candidates rather than rushing to dismiss.
Comfortable read, finished it without realising how much time had passed, and a look at growththroughdesign pulled me into more pages the same way, the absence of friction in good content lets time disappear and that is one of the highest compliments I can pay any piece of writing I find online during a regular search session.
Доброго дня. Брат совсем потерял себя. Дети боятся заходить в комнату. В диспансер сдавать — ужас. Итог, только эти врачи смогли помочь — вывод из запоя цены ниже рынка. Купировали абстинентный синдром. В общем, вся информация по ссылке — выведение из запоя на дому [url=https://vyvod-iz-zapoya-na-domu-ekaterinburg-vqx.ru]выведение из запоя на дому[/url] Промедление может стоить здоровья. Вдруг это спасёт кого-то.
Now organising my browser bookmarks to give this site easier access, and a look at moveideasforwardclean earned the same organisational priority, the small acts of digital housekeeping I do for sites I expect to use often are themselves a measure of trust and this site has triggered the trust based housekeeping behaviour from me clearly.
Appreciate the thoughtful approach, the writer clearly took time to make this readable for someone who is not already an expert, and a look at focusoverforce kept that going nicely, easy on the eyes and easy on the brain which is always a winning combination when reading on a busy day.
Just enjoyed the experience without needing to think about why, and a look at growthneedsalignment kept that effortless feeling going, sometimes the best content is invisible in the sense that you forget you are reading until you reach the end and realise time has passed without you noticing it pass naturally.
A welcome reminder that thoughtful writing still happens online, and a look at claritymovesideas extended that reassurance, the modern web makes it easy to forget that careful writing exists and finding sites that practice it is a small antidote to the cynicism that builds up from too much exposure to algorithmic content.
Pass this along to anyone you know dealing with similar questions, the answers here are clear, and a stop at clarityroute adds even more useful material, this is the kind of resource that deserves to circulate widely rather than getting lost in the constant churn of new content online that buries good work daily.
Now recognising that this site has earned a place in the small group of resources I treat as authoritative, and a stop at growthsignalhub confirmed that placement, the difference between resources I trust and resources I just consume is real and this site has clearly moved into the trusted category through consistent quality over time.
Reading this site over the past week has changed how I evaluate content in this space, and a look at thinkingtomotion extended that recalibration, the standards I bring to reading on the topic have shifted upward as a direct result of regular exposure to this kind of work and that shift will outlast any single reading session.
Pleasant surprise, the post delivered more than the headline promised, and a stop at actionplanner continued that pattern of under promising and over delivering, the rarest combination on the modern web where most content does the opposite by promising the world and delivering thin recycled summaries instead each time you click on something interesting.
Going to share this with a friend who has been asking the same questions for a while now, and a stop at directionanchorsmotion added a few more pages I will pass along too, this is the kind of generous information that earns a small thank you from me right now and again later this week.
Really appreciate that the writer did not stretch the post to hit some target word count, the points end when they are made, and a stop at actioncreatestraction reflected the same discipline, brevity is generosity in disguise and this site has clearly figured that out far better than most blog operations have.
Solid post, the structure is easy to follow and the language stays simple even when the topic gets a bit more involved, and a look at visiontoexecution kept that same standard going, so I left feeling like the time spent here was actually worth something for once which is rare lately.
Zivjo vsem skupaj. Danes bi rad spregovoril o necem pomembnem. Alkohol je dolgo casa vodil moje zivljenje. Potem pa sem na spletu naletel na resitev. Govorim o zdravljenju alkoholizma pri Dr Vorobjevu. Mislil sem, da mi nic ne more pomagati. Ampak sem dal tej metodi priloznost in koncno sem spet jaz. Vse uradne informacije in podrobnosti sem preveril na spletni strani, posodobljene podatke pa si lahko ogledate tukaj: ambulantno zdravljenje alkoholizma [url=www.odvajanje-od-alkoho.com]ambulantno zdravljenje alkoholizma[/url] Alkoholizem je bolezen in se zdravi.
Ce vi sami se bori z alkoholom — vredno je poskusiti. Nikoli ni prepozno za nov zacetek.
Ended up here on a wandering afternoon and was glad I stayed for the read, and a stop at festiveglow extended the wandering into a proper exploration of the site, the kind of place that rewards aimless clicking with something genuinely interesting rather than the shallow content that mostly populates the modern open web.
Useful information presented in a way that does not feel like a sales pitch, that is what I appreciated most, and a stop at glossylocks was the same, no upsell and no fake urgency just steady content laid out properly for someone trying to actually learn from it rather than just be sold to.
Now planning to write about the topic myself eventually using this post as a reference, and a look at directioncreatesadvantage would also serve in that future piece, content that becomes raw material for my own writing rather than just informing my reading is content with multiplicative value and this site is generating that multiplicative effect.
melbet бк вход [url=https://www.melbet30147.online]https://www.melbet30147.online[/url]
melbet id verification [url=melbet64624.online]melbet64624.online[/url]
aviator mw casino [url=www.aviator07349.online]www.aviator07349.online[/url]
мостбет как играть в казино [url=www.mostbet05859.online]www.mostbet05859.online[/url]
Worth flagging that the post handled an angle of the topic I had not seen elsewhere, and a look at actioncreatespace extended that fresh treatment, content that finds underexplored corners of well covered subjects is genuinely valuable and this site has demonstrated that exploratory editorial approach across multiple pieces in my reading sessions today.
Yesterday I was complaining about the state of online writing and today this site has temporarily fixed that complaint, and a look at playfulorbit extended that mood reversal, the short term mood improvement that comes from finding good content is real and this site has produced that improvement for me at a useful moment.
Came across this through a roundabout path and now it is on my regular rotation, and a stop at focusbeatsfriction sealed that decision, the open web still produces serendipitous discoveries when you let the citations and references guide you rather than relying purely on algorithmic feeds for new content recommendations always.
Appreciate that you did not pad this with fluff to hit a word count, the post says what it needs to say and stops, and a look at dailyhorizonhub did the same, brevity here feels intentional not lazy which is a distinction many writers miss completely sometimes when they are working under deadlines.
Good clean post, no errors and no awkward phrasing that breaks the reading flow, and a stop at ideaswithimpact kept the same standard, definitely the kind of editorial care that earns a return visit because it tells me the writer is paying attention to details that matter to readers rather than just rushing publication.
Quality writing that respects the reader’s intelligence without overloading them, and a quick look at activateyourmomentum reflected that approach, a balanced thoughtful site that earns trust by being consistent rather than by shouting about how trustworthy it is which is the usual approach online sadly across most content categories.
Honest reaction is that this is the kind of writing I would defend in a conversation about good blog content, and a look at strongharbor reinforced that, the rare site whose work I would actively recommend rather than just tolerate is the kind I want to support through return visits regularly.
Thanks for putting this online without locking it behind email signups or paywalls, and a quick visit to clarityfirstaction kept that open feel going, content that trusts the reader to come back rather than gating access is the kind of approach I will reward with regular return visits over time happily.
A piece that respected the reader by not over explaining the obvious, and a look at actiondrive continued that calibrated approach, finding the right level of explanation is one of the harder editorial calls and this site has clearly thought carefully about what readers will already know versus what they need help with consistently.
Runico — авторитетный ресурс по рунам Старшего Футарка, представляющий полный разбор всех 24 символов древнескандинавского алфавита. Ресурс раскрывает символику рун и их применение в гадании, магии и психологии. https://runico.ru/runes/ собрал исчерпывающую базу знаний о рунах: значение каждого символа, мифологические корни и практические техники. Материалы написаны доступно и структурированно — для новичков и опытных практиков.
Definitely returning here, that is decided, and a look at surfnexora only made the case stronger, this is one of those rare websites that rewards regular visits rather than feeling stale after the first read which is something I cannot say about most of the places I bookmark today across all my topics.
A piece that respected the reader by not over explaining the obvious, and a look at directioncreateslift continued that calibrated approach, finding the right level of explanation is one of the harder editorial calls and this site has clearly thought carefully about what readers will already know versus what they need help with consistently.
Recommended to anyone working in or curious about this area, the depth and clarity combine well, and a look at motioncreatesresults keeps that going across more pages, the kind of site that earns regular visits rather than chasing trends has my respect because it suggests genuine commitment to the topic itself rather than to chasing trends.
Skipped a meeting reminder to finish the post, and a stop at directionsetsspeed held me past another reminder, when content beats meetings the writer is doing something extraordinary because meetings have institutional support behind them and yet good writing can still occasionally win that competition for attention which I find heartening today.
Held my interest from the opening line through to the closing thought, and a stop at actionledgrowth did the same, content that earns sustained attention in an environment full of distractions is doing something right and this site is clearly doing several things right rather than just one or two which I really appreciate.
Liked the natural conversational tone throughout, never stiff and never overly casual either, and a stop at shadowbeast kept that comfortable middle ground going, finding a tone that respects the reader without becoming distant or overly familiar is harder than it sounds and this site nails that balance consistently across many different pieces.
A piece that was confident enough to leave some questions open rather than forcing closure, and a look at forwardenergyhub continued that intellectual honesty, content that admits the limits of its scope is more trustworthy than content that pretends to total understanding and this site has the right calibration on certainty consistently.
Reading carefully here has reminded me what reading carefully feels like, and a look at clarityturnsideas extended that reminder, the experience of careful reading versus skimming is different in ways I had partially forgotten and this site has clearly refreshed my memory of what attention feels like when content rewards it consistently.
Will be back, that is the simplest way to say it, and a quick visit to progressframework reinforced the decision, this site has earned a spot in my regular rotation alongside a few other reliable places I check when I want something genuinely informative without all the usual modern web noise getting in the way.
Now noticing the careful balance the post struck between confidence and humility, and a stop at igniteforwardmotion maintained the same balance, finding the line between asserting and admitting is hard and this site has clearly developed the calibration to walk that line consistently which produces a more persuasive reading experience for me.
Solid recommendation from me to anyone working in the area, the perspective here is grounded, and a look at strategyfocus adds even more useful angles, the kind of site that becomes a reference rather than just a one time read which is a higher bar than most blogs ever reach today on the modern web.
Skipped the TLDR thinking I would read everything anyway, and ended up enjoying the path through the full post, and a stop at growtharchitected similarly rewarded the patient read, summaries are useful but the journey through good writing is part of what makes the destination feel earned rather than just delivered cleanly.
Decided to set a calendar reminder to revisit, and a stop at growthacceleratesforward extended that revisit list, calendar entries for content are a level of commitment I rarely make but when I do they signal a higher regard than a simple bookmark and this site has earned that calendar tier of relationship from me today.
Skipped the social share buttons but might come back to actually use one later, and a stop at ideasunlockmovement extended that share urge, content that triggers genuine sharing impulses rather than performative ones is content that has actually moved me and not many posts in a typical week do that for me actually.
Желаете овладеть популярной профессией и сразу работать с живыми клиентами? Школа-студия приглашает на курсы парикмахеров как начинающих, так и практикующих специалистов. Ищете курсы парикмахера колориста? К практике на клиентах вы приступаете уже после трёхдневной теории — обучают на сайте j-center.ru дипломированные специалисты. Курс включает мужские, женские и детские стрижки, свадебные укладки, плетение кос, химическую завивку и углублённую колористику с нуля.
Will recommend this to a couple of friends who have been asking about this exact topic, and after velvetcomplex I have even more reason to do so, the kind of site that earns word of mouth rather than chasing it through aggressive marketing or paid placements is always a treat to find online.
Once I trust a site this much I tend to read everything they publish and that is the trajectory I am on with this one, and a stop at clarityroute confirmed the trajectory, the rare progression from interested reader to comprehensive reader is something only certain sites earn and this one is earning that progression rapidly.
Reading this in a relaxed evening setting was a small pleasure, and a stop at factvoyager extended the pleasant evening reading, content that fits the tone of relaxed time without becoming forgettable is what I look for in evening reading and this site has the right tone for that particular slot in my daily reading routine.
antibiotic doxycycline and alcohol
Better than most of the writing I have come across on this topic recently, simpler and more direct, and a look at ideasneedmomentum continued in that same way, a real outlier in a crowded space full of repetitive content that says little while taking up a lot of reader time today which is unfortunate.
Just sat with this for a bit longer than I usually would because the points are worth thinking about, and after forwardmomentumcore I had even more to chew on, the kind of post that nudges your thinking forward without forcing the issue is something I have always appreciated in good writing online.
However selective I am about new bookmarks this one made it past my filter, and a look at globalvoyager confirmed the bookmark was worth the slot, the precious slots in my permanent bookmark folder are difficult to earn and this site earned one without making me think twice about whether the slot was justified by the quality.
Reading this confirmed a hunch I had been carrying about the topic without having articulated it, and a stop at progressengineon extended the confirmation, content that gives shape to fuzzy intuitions is doing the rare work of making private thoughts public and this site is providing that articulating service consistently for me lately.
Probably the best thing I have read on this topic in the past month, and a stop at learningpath extended that ranking, the casual ranking of recent reading is informal but real and this site has been winning those rankings for me on this topic specifically over the last several weeks of regular reading sessions.
ducky luck pokies bonus iwowbet.com low wagering casino bonuses australia
Loved the writing voice here, friendly without being fake and confident without being arrogant, and a stop at directionpowersresults carried the same tone forward, the kind of personality that makes a reader feel welcome rather than lectured at which is a balance plenty of writers struggle to find no matter how long they have been at it.
Came across this looking for something else entirely and ended up reading it through twice, and a look at momentumbychoice pulled me deeper into the site than I planned, the writing has a way of holding attention without resorting to manipulative cliffhangers or vague promises that never get delivered later down the page.
мостбет зеркало для Кыргызстана [url=http://mostbet44719.online/]http://mostbet44719.online/[/url]
High quality writing, no marketing speak and no buzzwords that mean nothing, and a stop at executeideasfast kept that going, simple direct content that actually communicates something is harder to find than it should be and this is one of the rare places that gets it right consistently across many different posts.
Reading this in pieces over a coffee break and finding it consistently rewarding, and a stop at buildvelocitycleanly extended that into related material I will return to later, the kind of site that fits naturally into small reading windows without requiring a long uninterrupted block is genuinely useful for how I actually browse.
Will be passing this along to a few people who would benefit from the perspective shared here, and a stop at nexustower only added to what I will be sharing, this kind of generous content deserves to circulate widely rather than getting buried in some search engine algorithm tweak that pushes it down the rankings.
Closed and reopened the tab three times before finally finishing, and a stop at quantumvista held my attention straight through, sometimes content fights for time against my own distraction and the times it wins say something positive about its quality and this post clearly won that fight today afternoon for me.
Took some notes for a project I am working on, and a stop at ideasintoflow added more raw material to those notes, content that contributes to my own creative work rather than just being interesting in the moment is the kind I value most and the kind I will keep coming back to repeatedly.
melbet aviator hack [url=http://melbet64624.online]http://melbet64624.online[/url]
мостбет бонус на первый депозит [url=https://www.mostbet05859.online]мостбет бонус на первый депозит[/url]
мостбет вывести [url=www.mostbet86491.online]www.mostbet86491.online[/url]
aviator scam sites [url=https://www.aviator07349.online]https://www.aviator07349.online[/url]
мелбет экспресс ставки [url=http://melbet30147.online]http://melbet30147.online[/url]
1win Узбекистан [url=https://www.1win54722.online]https://www.1win54722.online[/url]
melbet как вывести на элкарт [url=http://melbet13861.online/]http://melbet13861.online/[/url]
Reading this prompted me to send the link to two different people for two different reasons, and a stop at strategyactivator provided ammunition for a third share, content that suits multiple audiences without being generic enough to be useless to any of them is genuinely valuable and this site has that multi audience quality clearly.
Big thanks to whoever wrote this, you saved me a lot of time hunting for the same info on other sites, and a stop at clarityguidesexecution only added more useful detail without going off topic, that kind of focus is honestly hard to come across these days when most posts wander everywhere.
Liked that the post acknowledged complications rather than pretending they did not exist, and a stop at velvetcloset continued that honest framing, sites that handle complexity with care rather than papering it over with simplifying claims are doing real intellectual work and this one is clearly in that category based on what I have read.
Started forming counter examples to test the claims and the post handled most of them implicitly, and a look at directionsetsspeed continued that anticipatory style, writers who think two steps ahead of the critical reader save themselves from a lot of follow up work and this writer has clearly internalised that habit consistently.
Now setting aside time on my next free afternoon to read more from the archives, and a stop at victorysquad confirmed that time will be well spent, the rare site whose archive deserves a dedicated reading session rather than just casual sampling is the kind of resource worth scheduling around and this one qualifies clearly.
Now recognising the specific pleasure of reading writing that shows real care for sentence shapes, and a look at ideasunlockmovement extended that craft pleasure, sentence level writing quality is something most blog content ignores entirely and this site has clearly invested in the prose layer alongside the substance which is rare today.
A piece that did not try to be timeless and ended up reading as durable anyway, and a look at visionintoprocess extended that durable feel, content that stays useful past its publication date without straining for permanence is content that ages well and this site has the kind of evergreen quality that I value highly today.
Appreciated how the writer anticipated the questions a reader might have along the way, and a stop at forwardlogiclab continued that thoughtful approach, you can tell when content has been edited with the reader in mind versus just published as a first draft and this is clearly the former approach across what I read.
aviator telegram support [url=www.aviator07349.online]aviator telegram support[/url]
melbet lucky jet download [url=https://melbet64624.online/]https://melbet64624.online/[/url]
как вывести без комиссии mostbet [url=https://mostbet05859.online]https://mostbet05859.online[/url]
melbet способы оплаты киргизия [url=http://melbet30147.online]http://melbet30147.online[/url]
My time on this site has now extended past what I had budgeted, and a stop at ideasneedmomentum keeps extending it further, content that overstays its budget in my schedule is content that has earned the extra time and this site has been earning extra time across multiple visits to the point where my schedule needs adjustment.
Definitely a recommend from me, anyone curious about the topic should check this out, and a look at focuscreatesflow adds even more reason for that, the depth and quality combine to make this site one I will be pointing people toward whenever similar conversations come up over the months ahead at work or socially.
A piece that handled the topic with appropriate weight without becoming portentous, and a look at focusandexecute continued that calibrated seriousness, content that takes itself seriously without becoming pompous is something this site has clearly figured out and the balance shows up in every piece I have read across multiple sessions now.
Now noticing the careful balance the post struck between confidence and humility, and a stop at igniteforwardmotion maintained the same balance, finding the line between asserting and admitting is hard and this site has clearly developed the calibration to walk that line consistently which produces a more persuasive reading experience for me.
Quietly the post solved something I had been turning over without quite knowing how to phrase the question, and a look at progresswithcontrol extended that quiet solving, content that addresses unformulated needs is content with reader insight and this site has demonstrated that insight at a high rate across the pieces I have read recently.
A thoughtful piece that did not strain to be thoughtful, and a look at clarityleadsaction continued that effortless quality, when thinking shows up in writing without the writer drawing attention to it you know you are reading something genuinely considered rather than something performing the appearance of consideration which is also common online.
Bookmark earned, calendar reminder set, share queued, all from one good post, and a look at motionwithclarity did the same, when a single reading session triggers multiple downstream actions you know the content has actually moved me beyond the page and this site is moving me at that higher level reliably.
Casino websites often feature a broad selection of games designed to suit different interests, from traditional card games to modern digital experiences https://casinogoldenbet.co.uk/
Easy to recommend, the content speaks for itself without needing additional praise from me, and a stop at primequality only adds more reasons to send people this way, the kind of generous resource that benefits its readers without demanding anything in return is increasingly rare and worth recognising clearly today across the broader open internet.
услуги государственной охраны услуги охранного агентства
High quality writing, no marketing speak and no buzzwords that mean nothing, and a stop at ideasrequiremovement kept that going, simple direct content that actually communicates something is harder to find than it should be and this is one of the rare places that gets it right consistently across many different posts.
Honest reaction is that I want to send this to a friend who would benefit from it, and a look at broadcastnova added more material I will pass along too, the impulse to share is the strongest signal I have for content quality and this site is generating that impulse cleanly across multiple posts.
Reading this in a relaxed evening setting was a small pleasure, and a stop at wisdommentor extended the pleasant evening reading, content that fits the tone of relaxed time without becoming forgettable is what I look for in evening reading and this site has the right tone for that particular slot in my daily reading routine.
Felt the post had been written without looking over its shoulder, and a look at progresswithoutpressure continued that confident posture, content written for its own sake rather than against imagined critics has a different quality and this site reads as written from a place of confidence rather than defensive justification of every claim.
The use of plain language without dumbing down the topic was really well done, and a look at forwardlogiclab continued in that same accessible style, this is something many technical writers fail at because they either confuse their readers or condescend to them but here neither problem appears at all which is impressive really.
Genuinely well crafted writing, the kind that makes the topic look easier than it actually is, and a look at expertvertex added even more depth, you can feel the experience behind every line which is something only writers who have been at this for a while can pull off with this level of grace.
Got pulled in by the headline and stayed because the content actually delivered on the promise, and a stop at progressrequiresfocus kept that trust intact, when a site lives up to its own framing it earns the right to keep showing up in my browser tabs going forward indefinitely from here on out really.
Glad I stumbled across this post, the explanations actually make sense without needing background knowledge to follow along, and after a stop at momentumdesignlab the same was true there, no assumptions about the reader just clear writing that anyone can understand from the first line right through to the end.
Здорова, ребята. Мой брат окончательно ушёл в запой. Дети боятся оставаться дома. Государственные клиники — только учёт и очереди. В общем, выручила только эта клиника — наркологическая помощь на дому. Сняли острую интоксикацию. В общем, не потеряйте — наркологическая клиника недорого [url=https://narkologicheskaya-pomoshh-nizhnij-novgorod-ksc.ru]https://narkologicheskaya-pomoshh-nizhnij-novgorod-ksc.ru[/url] Каждый день усугубляет ситуацию. Перешлите тем, кто в отчаянии.
Took a chance on the headline and was rewarded, and a stop at forwardthinkingnow kept the rewards coming as I clicked through, the kind of place where every link leads somewhere worth the click is a small luxury on the modern web where so many sites are mostly empty calories disguised as content.
Came back to this an hour later to reread a specific section, and a quick visit to buildclearprogress also drew a second look, content that pulls you back rather than letting you move on permanently is the kind I want to fill my browser bookmarks with in 2026 and beyond as the open internet evolves.
Reading this gave me the rare experience of fully agreeing with all the conclusions, and a stop at growthmovesforward continued that agreement pattern, content that aligns with my existing views without seeming designed to do so is just content that happens to be reasonable and this site reads as reasonable rather than ideological mostly.
Honestly the simplicity is what makes this work, the topic is not buried under filler words or overly complex examples, and a quick look at focusunlockspotential showed the same sensible style, I left with what I came for and no headache from over reading which is a real win these days.
Useful information presented in a way that does not feel like a sales pitch, that is what I appreciated most, and a stop at forwardtractionhub was the same, no upsell and no fake urgency just steady content laid out properly for someone trying to actually learn from it rather than just be sold to.
يوفر 888starz واجهة عربية واضحة مخصصة لمستخدمي مصر وسهلة الاستخدام.
تظهر ماكينات السلوت الرائجة والإصدارات الجديدة بشكل بارز على الموقع الرسمي.
يمكن الرهان على بطولات كبرى من الدوري الإنجليزي إلى أهم البطولات في مصر.
888starz [url=https://bbhscanners.com]https://bbhscanners.com/[/url]
تشمل العروض المنتظمة استردادًا نقديًا بنسبة 50% وبونصات إضافية على مدار الأسبوع.
يدعم الموقع الرسمي 888starz طرق دفع متعددة تشمل البطاقات البنكية والمحافظ الإلكترونية مثل Skrill و Neteller.
мостбет KGS пополнение [url=mostbet44719.online]mostbet44719.online[/url]
Если вы ищете надёжный магазин для всего, что нужно ребёнку, «Резиденция детства» — именно то место, где удобный выбор сочетается с качеством: на https://childresidence.ru/ собраны игрушки, детская одежда, мебель и электроника для всей семьи. Магазин предлагает широкий ассортимент проверенных товаров, помогая родителям создавать уют и радость для своих детей без лишних хлопот. Менеджеры всегда готовы помочь с выбором.
Now adjusting my mental model of how the topic fits into the broader landscape, and a look at urbanhomestead extended that adjustment, content that affects my structural understanding rather than just my factual knowledge is content with deeper impact and this site is providing those structural updates at a meaningful rate consistently across topics.
Really like that the writer trusts the reader to follow simple logic without restating every previous point, and a stop at focuscreatespace kept that respect going, treating an audience as capable adults rather than as people who need constant hand holding makes a noticeable difference in the reading experience for me.
The use of plain language without dumbing down the topic was really well done, and a look at directionbuildsvelocity continued in that same accessible style, this is something many technical writers fail at because they either confuse their readers or condescend to them but here neither problem appears at all which is impressive really.
doxycycline in chinese
Reading this prompted me to subscribe to my first newsletter in months, and a stop at actiondrivenshift confirmed the subscribe was the right call, content that earns a newsletter signup is content that has cleared a higher trust bar than a casual visit and this site has clearly earned that level of commitment from me.
mostbet не загружается сайт [url=https://www.mostbet44719.online]https://www.mostbet44719.online[/url]
мелбет карта пополнение [url=https://www.melbet13861.online]мелбет карта пополнение[/url]
Closed the tab and immediately reopened it ten minutes later because I wanted to reread a part, and a stop at brightlifestyle drew the same return, content that pulls you back after closing it is doing something well beyond the average and worth marking as exceptional in my mental catalogue of reliable sites.
Bookmark added with a small mental note that this is a site to keep, and a look at directionbeforeforce reinforced the keep status, the verb keep rather than visit captures something about how I think about this kind of site and it is a higher tier of relationship than I have with most places online today.
Time spent here today felt productive in the way that good reading sessions sometimes do, and a stop at happycradle extended that productive feeling across the rest of the morning, the difference between productive reading and merely passing time is real and this site is consistently on the productive side for me lately.
I learned more from this short post than from longer articles I read earlier today, and a stop at ideasintomomentum added even more useful detail without going off topic, this site clearly knows how to keep things focused without sacrificing depth which is a hard balance to strike for any writer.
Now thinking about whether the writer might publish a longer form work I would buy, and a look at ideasguidedforward suggested the same depth would translate, content that makes me want to pay for related work in other formats is content that has earned commercial trust as well as attention trust and this site has both clearly.
Genuinely well crafted writing, the kind that makes the topic look easier than it actually is, and a look at actionfeedsmomentum added even more depth, you can feel the experience behind every line which is something only writers who have been at this for a while can pull off with this level of grace.
Considered as a whole this site has developed a coherent point of view that comes through in individual pieces, and a look at clarityfuelsmotion continued displaying that coherence, sites with a unified perspective rather than a grab bag of takes are sites with editorial maturity and this one has clearly developed that maturity through years of work.
melbet элкарт пополнение [url=https://melbet13861.online]https://melbet13861.online[/url]
Now placing this in the same category as a few other sites I have come to trust, and a look at strategyinplay continued the placement decision, the small category of fully trusted sites is one I extend rarely and only after multiple positive reading sessions and this site has earned the category placement methodically over time.
1win apk последняя версия скачать бесплатно [url=1win54722.online]1win54722.online[/url]
On reflection this is the kind of writing that improves my taste for what is possible in the format, and a look at planetnexus continued raising that bar, content that elevates my expectations rather than lowering them is doing important work in calibrating my standards and this site is participating in that elevation reliably.
Really grateful for content like this, it does not waste my time and it does not insult my intelligence either, and a quick look at actionfeedsprogress was the same, balanced respectful writing that makes a person feel welcome rather than rushed through pages of forced engagement just to keep clicking around.
Appreciated how the writer anticipated the questions a reader might have along the way, and a stop at progresswithintelligence continued that thoughtful approach, you can tell when content has been edited with the reader in mind versus just published as a first draft and this is clearly the former approach across what I read.
Bookmark moved to my permanent reference folder rather than the casual maybe later folder, and a look at claritydrivesmotion earned the same upgrade, the distinction between casual interest and lasting reference is something I track carefully and very few sites cross that threshold but this one did so without much effort apparently.
Well crafted post, the structure flows naturally from one point to the next without forcing transitions, and a stop at moveideascleanly kept the same flow going, you can tell when a writer has thought about how their content reads rather than just what it contains and this is one of those examples.
Now feeling confident that this site will continue producing work I will want to read, and a look at growthpathwaynow extended that confidence into the future, projecting forward from current quality to expected future quality is something I do for sites I genuinely follow and this one has earned that forward looking trust clearly today.
скачать 1win на android [url=http://1win54722.online]http://1win54722.online[/url]
Reading this felt easy in the best way, no friction and no confusion at any point, and a stop at actionwithstructure carried that same comfort across more pages, the kind of editorial flow that lets you absorb information without fighting the format which is increasingly hard to find on the open web today across topics.
This one is staying open in a tab for the rest of the day so I can come back and re read certain parts, and a look at buildcleartraction suggests I will be doing the same with a few more pages here too, this is going to be a deep dive over the coming hours.
A piece that respected the reader by not over explaining the obvious, and a look at brightcurrent continued that calibrated approach, finding the right level of explanation is one of the harder editorial calls and this site has clearly thought carefully about what readers will already know versus what they need help with consistently.
Platformadan brauzer orqali ham, Android va iOS uchun ilova orqali ham foydalanish mumkin.
888starz uz [url=https://oerknal.org/]888starz uz[/url].
888starz slotlari Rival, Spinmatic, Simple Play va Evoplay kabi yetakchi provayderlar tomonidan taqdim etiladi.
888starz eng muhim sport tadbirlariga raqobatbardosh liniyalar bilan tikishni ta’minlaydi.
888starz birinchi to’ldirish uchun 100% bonus taklif etadi, umumiy summa 1500 evrogacha va 150 FS bilan.
Rasmiy sayt sutkalik yordamni jonli chat va elektron pochta orqali ta’minlaydi.
888starz apk [url=https://1in11.org/]888starz apk[/url]
Platforma smartfonlarga to’liq moslashgan va alohida mobil ilovaga ega.
Aviator, Keno, Wheel va Bingo kabi tezkor o’yinlar alohida bo’limda to’plangan.
Foydalanuvchi o’yin davomida jonli stavka qo’yishi va statistikani kuzatishi mumkin.
To’liq bonusni olish uchun ro’yxatdan o’tishda 888UZ777 kodini kiritish kerak.
Saytda mahalliy va xalqaro to’lov vositalari past limitlar bilan mavjud.
Now adding the homepage to my regular check rotation rather than waiting for individual links to find me, and a stop at intentionalmovement confirmed the rotation upgrade, the move from passive discovery to active checking is a vote of confidence in a sites ongoing quality and this site has earned that active engagement clearly.
Platforma barcha qurilmalarda barqaror ishlaydi va rasmiy mobil ilovalarga ega.
Keno, Poker, Bingo va Aviator kabi formatlar doimo foydalanuvchi ixtiyorida.
888starz uz [url=https://freewriterai.com/]888starz uz[/url]
Bukmeker bo’limi futbol, tennis, basketbol, kriket, xokkey va kibersportni o’z ichiga oladi.
888UZ777 kodi to’liq xush kelibsiz paketini faollashtiradi.
Hisob ochish telefon yoki email orqali bir necha daqiqa ichida amalga oshadi.
Found the writing surprisingly fresh for what is by now a well covered topic, and a stop at actiondrivenoutcomes kept that freshness going across the related pages, original perspective on familiar ground is hard to come by and this site has clearly earned its place in the conversation rather than just rehashing old ideas.
Came in tired from a long day and the writing held my attention anyway, and a stop at momentumbeforeforce kept that going, content that can engage a fatigued reader is doing something right because most online reading happens in suboptimal conditions like that one and quality content adapts to it without complaint.
Всем привет. Просто ужас. Родственники на взводе. Скорая помощь просто разводит руками. Короче говоря, спасла только эта бригада — вывод из запоя на дому анонимно. К ночи человек пришёл в себя. В общем, не потеряйте, пригодится — вывод из запоя круглосуточно [url=https://vyvod-iz-zapoya-na-domu-ekaterinburg-mfk.ru]вывод из запоя круглосуточно[/url] Звоните прямо сейчас. Отправьте тем, кто рядом с бедой.
порно анджелина джоли
мостбет app скачать [url=https://www.mostbet86491.online]https://www.mostbet86491.online[/url]
A modest masterpiece in its own quiet way, and a look at brightdwelling confirmed the same quiet quality across the rest of the site, calling something a masterpiece is usually overstating but for content this carefully crafted the word feels appropriate even if the writers themselves would probably resist the label honestly.
Всем привет из НН. Отец снова сорвался в пьянку. Жена в отчаянии. В бесплатную наркологию — страшно идти. Короче, единственные, кто быстро приехал и поставил систему — поставить капельницу от запоя на дому цена адекватная. Сняли острую интоксикацию. В общем, цены и телефон тут — вывод из запоя капельница [url=https://kapelnica-ot-zapoya-nizhnij-novgorod-icy.ru]вывод из запоя капельница[/url] Звоните прямо сейчас. Киньте ссылку тем, кто в беде.
A piece that did not waste any of its substance on sales or promotion, and a look at oceanprestige continued that pure content focus, sites that resist the urge to monetise every paragraph are increasingly rare and this one has clearly made the editorial choice to keep the writing clean from commercial intrusion which I value highly.
Аренда жилья на Пхукете пользуется высоким спросом среди туристов, цифровых кочевников и семей. На острове представлен широкий выбор объектов — от уютных студий до роскошных вилл с панорамными видами – снять виллу на пхукете
Honestly impressed by the consistency of voice across what I have read so far, and a quick visit to progressneedsstructure continued that consistent feel, when a site reads like one careful person rather than a committee the experience is more rewarding for the reader who notices these subtle editorial details over time.
Just sat with this for a bit longer than I usually would because the points are worth thinking about, and after ideasneedpath I had even more to chew on, the kind of post that nudges your thinking forward without forcing the issue is something I have always appreciated in good writing online.
Looking at the surface design and the substance together this site has both right, and a look at visiontoexecution reinforced that integrated quality, sites where presentation and content reinforce each other rather than fighting are sites with full editorial coherence and this one has clearly invested in both layers in a balanced way.
A clean piece that knew exactly what it wanted to say and said it, and a look at focusconstructor maintained the same clarity of intention, knowing the goal of a piece before writing is something most blog content lacks and the clarity of purpose here shows up in every paragraph for any careful reader to notice.
Genuinely glad I clicked through to read this rather than skipping past, and a stop at builddirectionnow confirmed I should keep clicking through to more pages here, the kind of resource that justifies its place in my browser history rather than feeling like wasted time which is the highest compliment I offer any site online today.
More original than the recycled takes I keep finding on the topic elsewhere, and a quick look at visualvoyage confirmed it, the kind of site that has its own voice rather than echoing whatever is trending which makes it stand out as a refreshing change from the usual rotation of generic content I see daily.
мостбет игра lucky jet [url=http://mostbet86491.online/]http://mostbet86491.online/[/url]
A relief to read something where I did not have to fact check every claim mentally, and a look at directiondrivengrowth continued that reliable feeling, sites where I can lower my guard and trust the content are rare and this one is earning that trust paragraph by paragraph through consistent careful work behind the scenes.
Came in expecting another generic take and got something with actual character instead, and a look at futurevertex carried that personality forward, finding a distinct voice on a saturated topic is impressive and worth pointing out when it happens because most sites end up sounding identical to their nearest competitors quickly.
Just want to say thank you for putting this together, posts like these make searching online actually worth it sometimes, and a quick look at focusleadsaction kept that going, useful and easy to read without any of the tricks that ruin most blog comment sections lately on the wider open web.
Reading this site over the past week has changed how I evaluate content in this space, and a look at growthneedssignal extended that recalibration, the standards I bring to reading on the topic have shifted upward as a direct result of regular exposure to this kind of work and that shift will outlast any single reading session.
A well calibrated piece that knew its scope and stayed inside it, and a look at pathwaytoaction maintained the same scope discipline, scope creep is one of the failure modes of long blog posts and this site has clearly invested in the editorial discipline to prevent it which shows up in tightly contained pieces.
Thanks for taking the time to write this, it is clear that some thought went into how each point would land, and after I went through growthfollowsmovement I had a better grip on the topic, real value without the usual marketing noise people have to put up with online when searching for answers.
Decided after reading this that I would check this site weekly going forward, and a stop at forwardthinkingactivated reinforced that commitment, deciding to add a site to a regular rotation requires meeting a quality bar that very few places clear and this one cleared it cleanly without any noticeable effort or marketing push behind it.
Доброго времени. Случился ад. Соседи уже вызывали участкового. Платная наркология — как счёт за квартиру. Короче, единственные кто приехал без предоплаты — вывод из запоя цены фиксированные. Через час человек начал говорить. В общем, все контакты по ссылке — вызвать капельницу от запоя на дому [url=https://vyvod-iz-zapoya-na-domu-ekaterinburg-dyz.ru]https://vyvod-iz-zapoya-na-domu-ekaterinburg-dyz.ru[/url] Звоните прямо сейчас. Киньте ссылку нуждающимся.
Reading this in a quiet coffee shop matched the calm energy of the writing, and a stop at directionovereffort extended that environmental match, content that has its own ambient quality which can match or clash with surroundings is content with a personality and this site has the kind of personality that suits calm reading.
Now adjusting my mental list of reliable sites for this topic, and a stop at executeplansnow reinforced the adjustment, the small ongoing curation work of maintaining trusted sources is one of the actual practical activities of careful reading and this site has earned a permanent place on my list for this particular subject.
A welcome reminder that thoughtful writing still happens online, and a look at inkedcanvas extended that reassurance, the modern web makes it easy to forget that careful writing exists and finding sites that practice it is a small antidote to the cynicism that builds up from too much exposure to algorithmic content.
A piece that read smoothly because the writer understood how readers actually move through prose, and a look at claritymovesideas maintained the same reader awareness, writers who think about the reading experience as much as the writing experience produce better work and this site has clearly made that shift in editorial approach.
Ikigai Auto — компания полного цикла по доставке автомобилей из-за рубежа в Россию. Профессионалы компании занимаются всем: подбором, выкупом, экспортной документацией, доставкой и таможенным оформлением. Стоимость услуг — от 70 000 рублей, схема оплаты поэтапная: инвойс клиент вносит самостоятельно через банк, таможенные платежи — напрямую по реквизитам таможенной службы. Оставьте заявку на https://ikigaiauto.ru/ — менеджеры подберут лучшие варианты под ваш бюджет и параметры.
Доброго дня. Мой отец уже четвёртый день в запое. Жена на грани срыва. В диспансер тащить — клеймо на всю жизнь. Короче, выручила эта служба — анонимное выведение из запоя с капельницей. Через пару часов человек задышал ровно. В общем, вся инфа и контакты по ссылке — капельница от запоя на дому недорого [url=https://vyvod-iz-zapoya-na-domu-nizhnij-novgorod-pwj.ru]https://vyvod-iz-zapoya-na-domu-nizhnij-novgorod-pwj.ru[/url] Звоните прямо сейчас. Киньте ссылку нуждающимся.
Generally I do not leave comments but this post merits a small note, and a stop at ideapathfinder extended that comment worthy quality, the urge to actively contribute to a sites community rather than passively consume from it is something specific content provokes and this site has provoked that engagement urge from me today.
Saving this link for the next time someone asks me about this topic, and a look at intentionalprogresspath expanded what I will be sharing with them, this is the kind of resource that makes a real difference when you are trying to point a friend to something useful and reliable rather than generic marketing pages.
Glad the writer did not feel compelled to cover every possible angle of the topic, focus is a virtue, and a stop at modernchrono reflected the same disciplined scope, knowing what to leave out is half of what makes good writing good and this post has clearly been edited with that principle in mind.
Glad I stumbled across this post, the explanations actually make sense without needing background knowledge to follow along, and after a stop at nexoraquest the same was true there, no assumptions about the reader just clear writing that anyone can understand from the first line right through to the end.
viagra name
Worth recommending broadly to anyone who reads on the topic, and a look at momentumunlocked only confirms that, the rare combination of accessibility and depth in this site makes it suitable for both newcomers and people who already know the area which is hard to pull off in any blog format today and rarely managed.
melbet problème apk android [url=www.melbet83310.help]www.melbet83310.help[/url]
Reading this gave me material for a conversation I needed to have anyway, and a stop at claritybeforecomplexity added even more talking points, content that connects to upcoming social or professional needs rather than just being interesting in the abstract is the kind that earns priority placement in my attention these days routinely.
mostbet ставки на теннис Кыргызстан [url=http://mostbet26814.help/]mostbet ставки на теннис Кыргызстан[/url]
pin-up pasport bilan tasdiqlash [url=www.pinup51879.help]www.pinup51879.help[/url]
cum primesc cashback melbet [url=http://melbet90383.help/]cum primesc cashback melbet[/url]
mostbet evolution [url=https://www.mostbet06693.help]https://www.mostbet06693.help[/url]
Компания «МАСТЕРВУД-СТАНКИ» предлагает полный спектр оборудования для деревообработки и производства мебели от ведущих заводов HBW, Blue Elephant, Fravol, Maggi и V-hold. В каталоге — форматно-раскроечные, кромкооблицовочные, сверлильно-присадочные, четырёхсторонние и фрезерные станки с ЧПУ, а также сушильные камеры, покрасочные линии и инструмент. Опытные менеджеры подберут оборудование за 10 минут, а специалисты обеспечат доставку, пуско-наладку, обучение и сервис. Подробнее — на сайте https://mwstanki.ru/. Доступен лизинг, запчасти и демонстрационный зал в Химках. Надёжное решение для вашего производства.
Now noticing how rare it is to find a site that does not feel rushed, and a look at igniteforwardmotion extended that calm pace, content produced without time pressure has a different quality than content shipped to meet a deadline and this site reads as written without urgency which produces a different and better experience for readers.
A modest masterpiece in its own quiet way, and a look at luxuryvoyage confirmed the same quiet quality across the rest of the site, calling something a masterpiece is usually overstating but for content this carefully crafted the word feels appropriate even if the writers themselves would probably resist the label honestly.
Glad to find a site whose links lead somewhere worth going rather than back to itself for SEO juice, and a stop at actioncreatesmomentum kept that generous outbound feel, citing other peoples work with real respect rather than just for ranking signals is a sign of an honest operation worth supporting going forward.
Took a quick scan first and then went back to read properly because the post deserved it, and a stop at thinkingtomotion kept me reading carefully too, the kind of writing that earns a slower second pass rather than getting skimmed and forgotten is something I value highly when I happen to find it.
Will share this on a forum I am part of where it will be appreciated by others working in the same area, and a look at clarityfuelsaction suggests there is more here worth passing along too, definitely a generous resource that deserves a wider audience than it probably has today across the open internet.
Now realising the topic deserved better treatment than it has been getting elsewhere, and a look at actionledgrowth extended that broader recognition, content that exposes the gap between actual quality and average quality elsewhere is doing the quiet work of raising standards and this site is contributing to that elevation in its own corner.
Хотите найти место, где можно посмотреть взрослый анимационный ситком Гриффины? Заходите на сайт https://www.griffinfan.ru/ – там вы найдете все сезоны, которые можно смотреть онлайн в отличном качестве без регистрации. Тем же, кто уже знаком с сериалом – это отличная возможность снова насладиться забавными похождениями безумной американской семьи, которые гарантированно поднимут вам настроение!
Speaking carefully because I do not want to overstate things this site is genuinely above average across multiple measurements, and a stop at activateyourmomentum continued the above average performance, the calibration of judgement against potential overstatement is something I take seriously and this site clears the higher bar even after that calibration applies.
Comfortable read, finished it without realising how much time had passed, and a look at rapidvoyager pulled me into more pages the same way, the absence of friction in good content lets time disappear and that is one of the highest compliments I can pay any piece of writing I find online during a regular search session.
Looking for a transfer from Thessaloniki Airport? Visit https://thessaloniki-transfer.de/ for reliable, punctual, and convenient airport transfers to Chalkidiki, Sani Resort, and all of Greece. We offer fixed prices and no hidden costs, 24/7 customer support, and new, air-conditioned vehicles. Explore our other benefits on our website.
Considered against the flood of similar content this one stands apart in important ways, and a stop at progressmovesintentionally extended that distinctive feel, sites that find their own corner of a crowded topic and stay there are sites worth following and this one has clearly carved out its own space and committed to defending it carefully.
Thanks for the practical examples scattered through the post rather than abstract theory only, and a look at directionenablesmomentum continued that grounded style, abstract points are easier to remember when paired with concrete situations and the writers here clearly understand how readers actually retain information from blog content reading sessions.
Thanks for the honest framing without exaggerated claims that the topic will change my life, and a stop at momentumfactory kept the same modest tone, restraint in marketing language signals trustworthiness and the writers here are clearly playing the long game by building credibility rather than chasing immediate clicks through hyperbole.
Solid quality, the kind of work that holds up to a careful read rather than a quick skim, and a quick look at directionguidesgrowth kept that standard going strong, content that rewards attention rather than punishing it is something I appreciate more and more these days online across nearly every topic I follow.
Reading this gave me a small jolt of recognition for an experience I thought was just mine, and a stop at actioncreatesalignment produced more such jolts, content that universalises private experiences without flattening them is doing genuinely useful work and this site is providing that recognition function for me reliably across topics I read.
Натуральные соки и квас «СУЛАК» от https://voda-s-gor.ru/soki-kvas/ — это настоящая альтернатива магазинным напиткам с искусственными добавками: абрикос, персик, слива, гранат, яблоко и миксы выжаты из отборного горного сырья без консервантов и красителей. Компактный формат 0,25 л удобен в дороге и для детского питания, а упаковки от 15 штук делают покупку выгодной для семьи или офиса. Попробуйте вкус настоящих фруктов — без компромиссов.
Will share this on a forum I am part of where it will be appreciated by others working in the same area, and a look at motionbeatsmotionless suggests there is more here worth passing along too, definitely a generous resource that deserves a wider audience than it probably has today across the open internet.
Now setting up a small reminder to revisit the site on a slow day, and a stop at signaloverdistraction confirmed the reminder was a good idea, planning return visits is a small organisational act that signals trust in ongoing quality and this site has earned that planned return through consistent performance across the pieces I have read so far.
Now appreciating the way the post avoided the temptation to be longer than necessary, and a look at studyharbor continued that lean approach, content with the discipline to stop when finished rather than padding for length is content that respects both itself and its readers and this site has that disciplined editorial culture clearly throughout.
Many players are interested in learning more about casino games, industry trends, and the technologies that drive modern gaming platforms: Hugo Casino
Liked how the post handled an objection I was forming as I read, and a stop at clarityfuelsmotion similarly anticipated where my thinking was going next, the rare writer who can predict reader concerns and address them in advance is doing something most online content fails to do despite that being basic editorial work.
Reading this on a slow Sunday and finding it perfectly suited to a slow Sunday read, and a quick stop at ideaswithimpact kept the same gentle pace, content that fits the mood of the moment is something I notice and remember and this site has the kind of pace that suits relaxed reading sessions especially well.
Good quality through and through, no rough edges and no signs of being rushed, and a quick look at claritylaunch kept the same polish going, the kind of site that respects its own brand by maintaining consistency across pages which is something I always appreciate as a reader looking for trustworthy information online today.
Moulin Blanc — престижное агентство с безукоризненной репутацией, открывающее доступ к избранным VIP-компаньонкам Лондона, Парижа и ведущих мировых городов. https://moulin-blanc.com/ открывает двери в мир абсолютной конфиденциальности и утончённого сервиса высочайшего класса. Каждая компаньонка агентства воплощает стандарты изысканности, естественного обаяния и высокого профессионализма — для короткого свидания или продолжительного путешествия в любую точку планеты.
Now thinking about this site as a small example of what good independent writing looks like, and a stop at ideasintoflow continued that exemplary status, the few sites that serve as good examples are sites worth holding up in conversations about quality and this one has earned that exemplary placement through patient consistent effort over time.
Everything for Minecraft https://topminecraftworldseeds.com in one place: mods, skins, maps, texture packs, and the best seeds for survival, creativity, and adventure. Collections of popular add-ons, installation instructions, updates, and secure downloads for different versions of the game.
Откройте для себя rodnik-clean.ru: Родник Чистоты — это клининг под ключ, включающий ежедневную уборку, химчистку мебели и профессиональную уборку после ремонта в квартирах, офисах и на производстве. Узнайте больше о наших возможностях, посетив официальный сайт компании. Фиксированная стоимость в договоре и гарантия. За плечами нашей команды — свыше 12 лет успешной работы в сфере клининга!
Доброго вечера. Отец окончательно ушёл в штопор. Нужно серьёзное наблюдение специалистов. Государственная наркология — страшно и стыдно. Короче, спасло только это — анонимный вывод из запоя в стационаре. Выписали без симптомов ломки. В общем, жмите, чтобы сохранить — круглосуточный стационар вывод из запоя [url=https://vyvod-iz-zapoya-v-staczionare-nizhnij-novgorod-knd.ru]https://vyvod-iz-zapoya-v-staczionare-nizhnij-novgorod-knd.ru[/url] Не надейтесь, что само пройдёт. Перешлите тем, кто в отчаянии.
Walked away with a clearer head than I had before reading this, and a quick visit to progresswithintent only sharpened that, the writing has a way of cutting through the noise that surrounds most topics online which is something I will definitely remember the next time I am searching for an answer to anything.
Closed it feeling slightly more competent in the topic than I started, and a stop at focusdrivenresults reinforced that competence boost, real learning is rare in casual online reading but it does happen sometimes and this site managed to make it happen for me today which is genuinely worth pausing to acknowledge.
melbet compte bonus bloqué [url=http://melbet83310.help]http://melbet83310.help[/url]
Pass this along to colleagues if the topic comes up, the framing here is sensible, and a stop at signalbasedgrowth adds more useful angles to share, the kind of content that improves conversations rather than just feeding them is what makes a resource genuinely valuable in professional contexts going forward over time and across project boundaries too.
Genuine reaction is that this site clicked with how I like to read, and a look at progressstarter kept that comfortable fit going, sometimes you find a place online whose editorial decisions just align with your preferences and when that happens it is worth recognising and supporting through repeat engagement consistently going forward.
мостбет пополнить сомами [url=www.mostbet26814.help]www.mostbet26814.help[/url]
pin-up app so‘nggi versiya [url=pinup51879.help]pinup51879.help[/url]
Reading this prompted a brief but useful conversation with a colleague who happened to walk by, and a stop at actionwithclarityfirst extended that conversational seed, content that becomes a starting point for in person discussion rather than ending in solitary reading is content with social generative energy and this site has plenty of it apparently.
Now setting up a small reminder to revisit the site on a slow day, and a stop at strategyactivator confirmed the reminder was a good idea, planning return visits is a small organisational act that signals trust in ongoing quality and this site has earned that planned return through consistent performance across the pieces I have read so far.
Glad I stumbled across this post, the explanations actually make sense without needing background knowledge to follow along, and after a stop at actioncreatesflowstate the same was true there, no assumptions about the reader just clear writing that anyone can understand from the first line right through to the end.
melbet niveaux vip [url=http://melbet83310.help]http://melbet83310.help[/url]
Came in for one specific question and got answers to three I had not even thought to ask, and a look at progresswithdiscipline extended that bonus value pattern, the kind of resource that anticipates reader needs rather than just answering the literal question asked is the gold standard and this site reaches it.
Everything for Minecraft https://topminecraftworldseeds.com/ in one place: mods, skins, maps, texture packs, and the best seeds for survival, creativity, and adventure. Collections of popular add-ons, installation instructions, updates, and secure downloads for different versions of the game.
мостбет регистрация без паспорта [url=https://mostbet26814.help/]https://mostbet26814.help/[/url]
pin-up statistika [url=https://pinup51879.help]pin-up statistika[/url]
Now appreciating the way the post avoided the temptation to be longer than necessary, and a look at growthneedssignal continued that lean approach, content with the discipline to stop when finished rather than padding for length is content that respects both itself and its readers and this site has that disciplined editorial culture clearly throughout.
Everything for Minecraft http://www.topminecraftworldseeds.com in one place: mods, skins, maps, texture packs, and the best seeds for survival, creativity, and adventure. Collections of popular add-ons, installation instructions, updates, and secure downloads for different versions of the game.
A memorable post for me on a topic I had thought I was tired of, and a look at executevisionnow suggested the same site can refresh other tired topics, sites that can revive my interest in subjects I had written off as exhausted are doing rare work and this one is clearly doing that for me today.
Appreciate the practical examples, they made the abstract points easier to grasp, and a stop at growtharchitected added more of the same, this site clearly understands that real examples beat empty theory every single time which is the mark of a writer who knows their audience well and respects their time.
Now feeling that this site is the kind I want to make sure does not disappear, and a look at contentnexus reinforced that quiet protective feeling, the rare sites whose disappearance would actually matter to me are the sites I want to support through return visits and recommendations and this one has joined that small protected list.
Started reading expecting to disagree and ended mostly nodding along, and a look at visiondirection continued the pattern, content that wins agreement through evidence and reasoning rather than rhetorical force is the kind that actually shifts minds and this site clearly knows how to do that across what I have read so far.
A clear cut above the usual noise on the subject, and a look at directionbuildsvelocity only made that gap wider in my view, the kind of place that earns its visitors through quality rather than through aggressive marketing or sponsored placements which is increasingly the only way most sites stay afloat across the modern web.
mostbet mines qoidalari [url=http://mostbet06693.help]http://mostbet06693.help[/url]
Thanks for not padding this with the usual filler intros and outros that every other blog seems to require, and a quick visit to thinklessmovebetter continued that lean approach across more posts, content stripped of waste is content that respects you and I will always come back to that kind of approach.
After several visits I am now confident this site is one to follow seriously, and a stop at orbitnexora reinforced that confidence, the gradual building of trust through repeated quality exposures is the only sustainable way to develop reader loyalty and this site is building that loyalty in me through patient consistent work consistently.
mostbet mines yutish [url=https://mostbet06693.help/]https://mostbet06693.help/[/url]
Капельница от запоя назначается врачом только после осмотра пациента и определения показаний. Такой подход позволяет соблюдать требования безопасности и учитывать индивидуальные особенности организма: https://osteoz.ru/lechenie/kak-bezopasno-vyvesti-cheloveka-iz-zapoya-prakticheskoe-rukovodstvo-bez-paniki.html
Glad the writer did not feel the need to argue with imaginary critics in the post itself, and a stop at focusgeneratespower kept the same focused approach going, defensive writing wastes the reader time and confidence on positions that did not need defending and this post has clearly avoided that common failure.
Useful reading material, the kind I can hand off to someone newer to the topic without worrying about confusing them, and a quick look at focuscreatesvelocity confirmed the same beginner friendly tone runs throughout the site which is great for sharing with people just starting their learning journey on this particular topic.
Everything for Minecraft https://topminecraftworldseeds.com in one place: mods, skins, maps, texture packs, and the best seeds for survival, creativity, and adventure. Collections of popular add-ons, installation instructions, updates, and secure downloads for different versions of the game.
Reading this post made me realise I had been settling for lower quality elsewhere, and a look at intentionalmovementlab extended that recalibration, content that exposes how much I had been accepting in adjacent sources is content with calibrating effect on my standards and this site is performing that calibration function across topics for me reliably.
Refreshing tone compared to the dry corporate posts on similar topics, and a stop at strategyandclarity carried that personality through nicely, you can tell when a real person is behind the writing versus a content team chasing metrics and this site definitely falls into the former category clearly across what I have seen.
Now thinking about whether the writer might publish a longer form work I would buy, and a look at actioncreatesalignment suggested the same depth would translate, content that makes me want to pay for related work in other formats is content that has earned commercial trust as well as attention trust and this site has both clearly.
Thank you pertaining to sharing the following great subject matter on your website. I ran into it on google. I am going to check to come back after you publish additional aricles.
Worth recommending broadly to anyone who reads on the topic, and a look at builddirectionnow only confirms that, the rare combination of accessibility and depth in this site makes it suitable for both newcomers and people who already know the area which is hard to pull off in any blog format today and rarely managed.
A piece that reads as if the writer trusted readers to fill in obvious gaps, and a look at executionpathway continued that respectful approach, content that does not over explain what the reader can infer is content that respects intelligence and this site has clearly chosen to write to capable readers rather than to the lowest common denominator.
If I had to summarise the editorial sensibility of this site in a few words it would be careful and human, and a look at directionpowersresults extended that summary feeling, capturing the essence of a sites approach in brief is hard but this site has a clear enough identity that the summary comes naturally enough.
Всем привет с Невы. Брат не выходит из штопора. Дети боятся отца. Скорая не приедет на такой вызов. Короче, спасла только эта бригада — недорогой вывод из запоя в Санкт-Петербурге. Приехали через 35 минут. В общем, контакты и цены тут — вывод из запоя на дому спб цены [url=https://vyvod-iz-zapoya-na-domu-sankt-peterburg-zqe.ru]https://vyvod-iz-zapoya-na-domu-sankt-peterburg-zqe.ru[/url] Звоните прямо сейчас. Вдруг это спасёт чью-то жизнь.
Thanks for the honest framing without exaggerated claims that the topic will change my life, and a stop at clarityfuelsaction kept the same modest tone, restraint in marketing language signals trustworthiness and the writers here are clearly playing the long game by building credibility rather than chasing immediate clicks through hyperbole.
Everything for Minecraft https://topminecraftworldseeds.com in one place: mods, skins, maps, texture packs, and the best seeds for survival, creativity, and adventure. Collections of popular add-ons, installation instructions, updates, and secure downloads for different versions of the game.
Coming back tomorrow when I can give this a proper read, the post deserves better attention than I can give right now, and a look at visionguidesmotion suggests there is plenty more here that deserves the same treatment, definitely a site I will be exploring properly over the next few days when I can.
Now setting this aside as a model of how to write thoughtfully on the topic, and a stop at momentumdesignlab extended that model status, content that becomes a reference for how a kind of writing should be done is content with influence beyond its own readership and this site is reaching that level for me clearly today.
Привет из Нижнего. Отец снова ушёл в штопор. Соседи уже стучат в стену. Платная клиника — огромные счета. Итог, реально профессиональные врачи — анонимная наркологическая частная клиника. Врач осмотрел и поставил капельницу. В общем, жмите, чтобы сохранить — наркологическая клиника анонимная помощь нарколога [url=https://narkologicheskaya-pomoshh-nizhnij-novgorod-fql.ru]наркологическая клиника анонимная помощь нарколога[/url] Каждый час усугубляет ситуацию. Отправьте тем, кто рядом с бедой.
Great work on keeping things readable, the post never drags or repeats itself which I really appreciate, and a stop at personalvista added a bit more context that fit naturally with what was already said here, no need to read everything twice to get the point being made today.
A piece that built up gradually rather than front loading its main points, and a look at progressbuilder maintained the same gradual structure, content that trusts the reader to reach conclusions through accumulating reasoning is more persuasive than content that announces conclusions and then defends them and this site uses the persuasive approach.
melbet download [url=https://melbet90383.help/]melbet download[/url]
A welcome contrast to the loud takes that have dominated my feed lately, and a look at buildmotiondaily extended that calm voice, content that arrives without yelling has become unusual in the modern attention economy and this site is one of the few places I have found that consistently delivers without raising its voice.
Reading this slowly and letting each paragraph land before moving on, and a stop at creativeinkwell earned the same patient approach, content that rewards slow reading rather than speed is content with real density and the writers here are clearly producing work that benefits from the careful eye rather than the rushed scan.
Bookmark added with a small mental note that this is a site to keep, and a look at growthmoveswithfocus reinforced the keep status, the verb keep rather than visit captures something about how I think about this kind of site and it is a higher tier of relationship than I have with most places online today.
Reading this triggered a small reorganisation of my own thinking on the topic, and a stop at strategyintoenergy furthered that reorganisation, content that affects the shape of my mental model rather than just decorating it with new facts is content with structural rather than informational impact and this site provides that.
A piece that built up gradually rather than front loading its main points, and a look at directionenablesmomentum maintained the same gradual structure, content that trusts the reader to reach conclusions through accumulating reasoning is more persuasive than content that announces conclusions and then defends them and this site uses the persuasive approach.
Left me wanting to read more rather than feeling burned out, that is a good sign, and a look at signalguidesmotion confirmed there is plenty more here to explore, the kind of writing that builds appetite rather than killing it which is a rare quality on the modern open internet today across most categories of content.
Everything for Minecraft https://www.topminecraftworldseeds.com in one place: mods, skins, maps, texture packs, and the best seeds for survival, creativity, and adventure. Collections of popular add-ons, installation instructions, updates, and secure downloads for different versions of the game.
Now feeling slightly more committed to my own careful reading practices having read this, and a stop at claritycompass reinforced that commitment, content that models the kind of attention it deserves is content that calibrates the reader and this site has clearly raised my own bar for what to bring to good writing today.
mostbet фора [url=http://mostbet88517.online]mostbet фора[/url]
1win uz下载 [url=https://1win98802.online/]1win uz下载[/url]
1win поддержка кыргызча [url=http://1win28076.help/]http://1win28076.help/[/url]
metode de plata melbet [url=https://www.melbet90383.help]https://www.melbet90383.help[/url]
Приветствую земляков. Близкий человек снова сорвался. Дети боятся заходить в комнату. В государственную наркологию — страшно и стыдно. Короче, реально профессиональные врачи — вывод из запоя цены фиксированные. Приехали через 30 минут. В общем, не потеряйте — вывод из запоя [url=https://vyvod-iz-zapoya-na-domu-sankt-peterburg-abc.ru]вывод из запоя[/url] Каждый час ухудшает состояние. Это может спасти чью-то жизнь.
Здорова, народ. Отец не выходит из штопора. Дети боятся заходить в квартиру. Платная клиника — грабёж. Короче, выручила эта служба — капельница на дому от запоя. Примчались за 25 минут. В общем, цены и телефон тут — капельница от алкоголя на дому спб [url=https://vyvod-iz-zapoya-na-domu-sankt-peterburg-mnq.ru]https://vyvod-iz-zapoya-na-domu-sankt-peterburg-mnq.ru[/url] Промедление убивает. Вдруг это спасёт чью-то семью.
Приветствую народ. Близкий человек уже пятые сутки в запое. Дети боятся оставаться с отцом. В диспансер везти — позор на район. Короче, спасла только эта бригада — вывод из запоя на дому круглосуточно. К утру человек пришёл в себя. В общем, жмите, чтобы сохранить — вывод из запоя недорого [url=https://vyvod-iz-zapoya-na-domu-sankt-peterburg-jfw.ru]вывод из запоя недорого[/url] Не ждите чуда. Перешлите тем, кто рядом с бедой.
Everything for Minecraft topminecraftworldseeds.com in one place: mods, skins, maps, texture packs, and the best seeds for survival, creativity, and adventure. Collections of popular add-ons, installation instructions, updates, and secure downloads for different versions of the game.
Well structured and easy to read, that combination is rarer than people think, and a stop at signalbasedgrowth confirmed the same standard runs across the rest of the site, definitely the kind of place I will be coming back to when this topic comes up in conversation later again over the weeks ahead.
mostbet kg [url=https://mostbet73296.online/]https://mostbet73296.online/[/url]
Now feeling the rare pleasure of trusting a source completely on first encounter, and a look at progressoveractivity extended that initial trust into something more durable, the calibration of trust to evidence is something I do informally and this site has earned high trust through the cumulative weight of multiple consistently good posts already.
Felt energised after reading rather than drained, which is unusual for online content these days, and a look at clarityactivatesmotion continued that good feeling, content that leaves you better than it found you is rare and worth bookmarking when you stumble across it for the first time today or any other day really.
Speaking from the perspective of having read widely on the topic this site offers something distinct, and a look at movementwithmeaning reinforced that distinctness, the rare site that contributes something genuinely original to a saturated topic is the rare site worth following carefully and this one has demonstrated that original contribution capability today.
Appreciate how nothing here feels copied or pieced together from other places, the voice is consistent and the tone stays human, and after I checked modernpixels I noticed the same style holds, which is a small detail but it makes the whole experience feel personal rather than like another generic site.
A particular kind of restraint shows up in the writing, and a look at growthpathwaynow maintained the same restraint across pages, knowing what not to say is just as important as knowing what to say and this site has clearly developed strong instincts on both sides of that editorial line throughout pieces I have read.
Picked up several practical tips that I plan to try out this week, and a look at focuspowersgrowth added a few more I will be testing alongside, content with practical hooks that connect to my actual life is the kind that earns my repeat attention rather than the merely interesting that I forget within a day.
Most of the time I bounce off similar pages within seconds, and a stop at actionpathway held me longer than I would have predicted, the ability to convert a likely bouncing visitor into an engaged reader is a quality signal and this site has demonstrated that conversion ability across multiple visits where I expected to bounce.
Great content! Keep up the good work!
Honestly enjoyed every minute spent here, that is not something I say lightly, and a look at claritydrivenpath confirmed I will be back, the bar for spending time online is high for me these days but this site clears it without effort which is high praise indeed from this reader who is usually rather demanding.
Thanks for the honest framing without exaggerated claims that the topic will change my life, and a stop at ideasneedactivation kept the same modest tone, restraint in marketing language signals trustworthiness and the writers here are clearly playing the long game by building credibility rather than chasing immediate clicks through hyperbole.
Honestly this kind of writing is why I still bother to read independent sites, and a look at forwardmovementengine extended that broader reflection, the few sites that justify continued attention to non algorithmic content are sites like this one and finding them periodically is enough to keep my reading habits oriented toward independent rather than aggregated content.
При обращении за выводом из запоя важно подробно сообщить врачу о состоянии пациента и имеющихся хронических заболеваниях. Эта информация помогает специалисту принять наиболее обоснованное медицинское решение https://prodiabet24.ru/kapelnica-ot-alkogolja-kak-ona-rabotaet-komu-pomogaet-i-chego-ozhidat
Vague feelings of recognition kept surfacing as I read because the writing names things I have been thinking, and a look at brightfusion produced more of those recognition moments, content that gives shape to private intuitions is content that makes me feel less alone in my own thinking and this site has that effect.
Everything for Minecraft https://topminecraftworldseeds.com/ in one place: mods, skins, maps, texture packs, and the best seeds for survival, creativity, and adventure. Collections of popular add-ons, installation instructions, updates, and secure downloads for different versions of the game.
Started smiling at one paragraph because the writing was just nice, and a look at directionanchorsgrowth produced a couple more such moments, prose that produces small spontaneous reactions in the reader is doing more than just transferring information and the writers here are clearly hitting that level fairly consistently throughout pieces.
mostbet bonus şərt dövriyyə [url=http://mostbet10542.help]http://mostbet10542.help[/url]
мостбет mines стратегия [url=https://mostbet01460.online]https://mostbet01460.online[/url]
Liked that there was nothing performative about the writing, and a stop at actionclarifiesdirection continued that genuine quality, performative writing tries to be witnessed rather than read and the difference between performance and substance is huge for the careful reader and this site has clearly chosen substance every time clearly.
Got something practical out of this that I can apply later this week, and a stop at directionstartsclarity added more details to think about, this is exactly the kind of content I bookmark for future reference rather than the throwaway listicles that dominate most search results these days for almost any common topic.
Yo players, I recently thought to post a quick find I randomly discovered when scrolling online gaming blogs. Following a late gaming match streak, I checked one write-up about some modern digital casino platform that apparently has some kind of cross-border operating license.
I’m not posting this to advertise anything, but from the perspective of a person who spends too much time online, I found the whole thing kind of unusual. The main thing that got my eye was that the review described the site as available for many regions. Of course, that does obviously not mean that every single person can play from every place. Country-specific laws still apply, and every player should confirm their local rules before depositing.
Still, the positioning sounded really interesting. The article said that the platform was made for users from various countries, with tools that appear more flexible than older casino sites. It wrote about easy sign-up, smooth interface, smartphone optimization, and several deposit methods.
As a online player, I always notice the interface first. If a site is clunky, I usually lose interest almost fast. The article made the platform sound responsive, which is useful because in 2026 users are used to well-made games. A outdated interface can damage even a good site.
The regulation part was also worth noting. There are tons of unknown casino sites online, and some of them throw around big promises without explaining much. So when an article points to regulated licensing, that somewhat makes me look closer. But again, honestly I would still confirm the license myself before recommending anything.
The article also talked about entertainment variety. It sounded like the site has video slots, card games, and dealer-based casino games. I know casino games are different from MMOs, but there is still some overlap in how sites try to keep users engaged. Things like animations, regular offers, and quick feedback loops are present in both digital platforms.
One thing I respected in the article was that it did bring up responsible gambling. That is essential, because real money are involved. Entertainment should stay reasonable, not become a problem. The article talked about things like spending limits, cool-off options, and player protection. In my opinion, any modern casino platform should include those features by default.
Another important part was the global audience. The article made it sound like the platform is not only focused on one market, but on several player groups. That sounds convenient, especially for people who travel, but it also means people need to be responsible. Cross-border does not automatically mean available everywhere. There are usually blocked locations, and those lists should be checked before depositing.
I also thought about how [url=https://cloud4log.de/forums/users/evetill27298]gambling sites[/url] are becoming more like gaming apps. They focus on instant access, personalization, and simple use. For older casino websites, the experience sometimes felt messy. But newer ones seem to understand that players expect responsive design. Good UX does not make a casino automatically good, but it does indicate that the brand is at least thinking about convenience.
The banking side also sounded fairly important. The article mentioned that the platform supports different payment options, which can be important for cross-border users. But that is another area where people should check the terms. Withdrawal rules are very important, because a site can look nice, but if withdrawals are problematic, then the experience becomes bad.
To be clear, I am not trying to say this platform is the best. I just found the write-up different because it shows how the digital gambling industry is changing. More platforms are trying to look trustworthy, and more of them are using gaming-style design. For people who follow gaming, that is pretty interesting to watch.
Has anyone else here seen similar news about new online casinos? Do you think international licensing actually makes a meaningful difference, or do you mostly care about reputation? I am mostly curious from the gamer perspective, not trying to convince anyone. And, of course, whenever someone decides to join any casino site, they should verify local laws, read the terms, protect their budget, and act responsibly.
Liked that the post acknowledged complications rather than pretending they did not exist, and a stop at visionguidesmotion continued that honest framing, sites that handle complexity with care rather than papering it over with simplifying claims are doing real intellectual work and this one is clearly in that category based on what I have read.
мостбет хоккей ставки [url=http://mostbet88517.online]http://mostbet88517.online[/url]
Reading this gave me a small refresher on something I had partially forgotten, and a stop at actionclaritylab extended the refresher, content that strengthens existing knowledge rather than just adding new is content with a particular kind of consolidating value and this site is providing that consolidating function across multiple visits.
Everything for Minecraft topminecraftworldseeds.com in one place: mods, skins, maps, texture packs, and the best seeds for survival, creativity, and adventure. Collections of popular add-ons, installation instructions, updates, and secure downloads for different versions of the game.
Looking through the archives suggests this site has been doing this for a while at this level, and a look at asianvoyager confirmed the long term consistency, sites that have maintained quality across years rather than just a recent stretch are sites with serious editorial discipline and this one has clearly been at it for a while.
мостбет бонус на первый депозит [url=mostbet88517.online]мостбет бонус на первый депозит[/url]
1win O! Деньги [url=http://1win28076.help/]http://1win28076.help/[/url]
Приветствую народ. Мой брат уже шестой день в запое. Дети боятся оставаться дома. В бесплатный диспансер — стыд на всю жизнь. Итог, спасла только эта бригада — недорогой вывод из запоя в Санкт-Петербурге. Прибыли через 40 минут. В общем, все контакты по ссылке — вывод из запоя цена [url=https://vyvod-iz-zapoya-na-domu-sankt-peterburg-xyt.ru]вывод из запоя цена[/url] Не тяните время. Вдруг это спасёт чью-то жизнь.
Came away feeling slightly smarter than I was when I started, that is a real win, and a stop at progressoriented added a bit more to that, the rare site that actually transfers some of its knowledge to the reader in a way that sticks rather than just creating an illusion of learning briefly.
mostbet рабочий сайт Кыргызстан [url=mostbet73296.online]mostbet73296.online[/url]
Decided I would read the archives over the weekend, and a stop at focusenablesvelocity confirmed that the archives would be worth the time, very few sites have archives I would actively read through but this one has earned that level of interest based on the consistent quality across what I have sampled so far.
Stands apart from similar pages by actually being useful, that is high praise these days, and a look at buildforwardenergy kept that standard going, you can tell when a site is built around the reader versus around metrics and this one clearly belongs to the first category for sure based on what I read.
Everything for Minecraft https://www.topminecraftworldseeds.com in one place: mods, skins, maps, texture packs, and the best seeds for survival, creativity, and adventure. Collections of popular add-ons, installation instructions, updates, and secure downloads for different versions of the game.
A piece that left me thinking I had been undercaring about the topic, and a look at signalcreatesmovement reinforced that mild concern, content that raises the appropriate weight of a subject without being preachy about it is doing important work and this site is providing that gentle elevation of attention for me consistently.
Adding to the bookmarks now before I forget, that is how good this is, and a look at actiondrivenvelocity confirmed the rest of the site is worth saving too, this is one of those rare finds that justifies the time spent searching the web for once which is a relief in the current environment.
1win бесплатная ставка [url=https://1win98802.online]https://1win98802.online[/url]
1вин официальный [url=http://1win28076.help/]1вин официальный[/url]
mostbet apk последняя версия скачать [url=https://www.mostbet73296.online]mostbet apk последняя версия скачать[/url]
The conclusions felt earned rather than tacked on at the end like an afterthought, and a look at progresswithsignalpath kept that careful structure going, you can tell when a writer has thought about the shape of their post versus just letting it ramble out and hoping for the best at the end which most do.
Thanks for the clean writing, no broken sentences and no awkward translations like some other sites have, and a quick stop at actionclarifiespath kept that polish going nicely, it really does make a difference when a reader can move through a page without tripping on every line or going back to reread.
Thanks for taking the time to write this, it is clear that some thought went into how each point would land, and after I went through clarityshift I had a better grip on the topic, real value without the usual marketing noise people have to put up with online when searching for answers.
Honest reaction is that this is the kind of writing I would defend in a conversation about good blog content, and a look at progresswithpurpose reinforced that, the rare site whose work I would actively recommend rather than just tolerate is the kind I want to support through return visits regularly.
Took the time to read every paragraph rather than skimming for the punchline, and a quick visit to happyfamilia earned the same careful attention from me, that is the highest signal I can give about content quality because my default mode is rapid scanning rather than deliberate reading on most pages.
mostbet azərbaycanca tətbiq [url=http://mostbet84891.online]http://mostbet84891.online[/url]
1вин ios [url=http://1win98802.online/]http://1win98802.online/[/url]
Now thinking about how to apply some of this to a project I have been planning, and a look at focuspowersgrowth added more material for the planning, content that connects to my actual creative work rather than just being interesting in the abstract is the kind that earns priority placement in my reading rotation consistently going forward.
Everything for Minecraft https://topminecraftworldseeds.com/ in one place: mods, skins, maps, texture packs, and the best seeds for survival, creativity, and adventure. Collections of popular add-ons, installation instructions, updates, and secure downloads for different versions of the game.
Всем привет из Питера. Отец не выходит из штопора. Дети боятся оставаться с отцом. В бесплатный диспансер — страшно. Короче, спасла эта служба — вывод из запоя на дому срочно. Приехали через 40 минут. В общем, вся информация по ссылке — вывод из запоя цена [url=https://vyvod-iz-zapoya-na-domu-sankt-peterburg-hnd.ru]вывод из запоя цена[/url] Каждый час ухудшает состояние. Перешлите тем, кто рядом с бедой.
Well done, the kind of post that makes you slow down and actually read instead of skimming for keywords, and a look at intentionalvelocity kept me reading carefully too, that is a sign of writing that has been crafted rather than churned out for an algorithm to see today and tomorrow.
Reading this in the gap between work projects was a small but meaningful break, and a stop at ideasgainmotion extended that gentle reset, content that provides genuine refreshment rather than just distraction during work breaks is content with a particular kind of utility and this site fits that role for me reliably during work days.
Honestly the simplicity is what makes this work, the topic is not buried under filler words or overly complex examples, and a quick look at progresswithoutdistraction showed the same sensible style, I left with what I came for and no headache from over reading which is a real win these days.
mostbet azərbaycanda android yüklə [url=https://www.mostbet10542.help]https://www.mostbet10542.help[/url]
mostbet покер [url=http://mostbet01460.online]http://mostbet01460.online[/url]
Reading this on a long flight and finding it the best thing I read across hours of trying, and a stop at ideasintoalignment kept the streak going, when content beats long flight reading you know it has substance because flight reading is a hard test of a piece given the alternatives available everywhere.
Reading this in pieces over a coffee break and finding it consistently rewarding, and a stop at momentumunlocked extended that into related material I will return to later, the kind of site that fits naturally into small reading windows without requiring a long uninterrupted block is genuinely useful for how I actually browse.
Liked the way the post balanced confidence and humility, and a stop at ideaprogression maintained the same balance, knowing when to assert and when to acknowledge uncertainty is a sign of mature thinking and the writers here have clearly developed that calibration through what I assume is years of careful work on their craft.
Reading this brought back the satisfaction I used to get from blogs ten years ago, and a stop at progressstarter kept that nostalgic quality alive, sites that capture what was good about an earlier era of internet writing are increasingly precious and this one is doing that without feeling like a deliberate throwback at all.
Decided to set aside time later to read more carefully, and a stop at growththroughsimplicity reinforced that decision, content that earns a calendar entry rather than just a passing read is in a different tier altogether and this site is clearly working at that elevated level which I really do appreciate as a reader today.
Now noticing that the post avoided the temptation to be funny in places where humour would have undermined the substance, and a stop at brightdebate maintained the same restraint, knowing when to be serious is a rare editorial virtue and this site has clearly developed it through what I assume is careful editorial practice over years.
Probably the kind of site that should be more widely read than it appears to be, and a look at buildmomentumwithclarity reinforced that quiet wish, the gap between a sites quality and its apparent reach is sometimes large and that gap exists for this site in a way that makes me want to mention it more.
If I were to recommend a starting point for the topic this site would be near the top of my list, and a stop at directionisleverage reinforced that recommendation status, the small list of starting point recommendations I keep for friends asking about topics is short and this site is now firmly on it.
мостбет фора [url=www.mostbet01460.online]www.mostbet01460.online[/url]
mostbet verifikasiya olmadan depozit [url=http://mostbet10542.help/]http://mostbet10542.help/[/url]
Всем привет из культурной столицы. Близкий человек снова сорвался в пьянку. Родственники просто в шоке. Платная наркология — грабёж. Короче, единственные, кто взялся за дело — срочный вывод из запоя с капельницей. Врач поставил систему сразу. В общем, цены и телефон тут — вывод из запоя [url=https://vyvod-iz-zapoya-na-domu-sankt-peterburg-vkx.ru]вывод из запоя[/url] Не ждите. Перешлите тем, кто рядом с бедой.
Нужна надёжная IT-поддержка бизнеса в Санкт-Петербурге? Фирма обеспечивает абонентское сопровождение компьютеров, ремонт техники после сбоев и возврат утраченных данных. Ищете системный администратор? Все вопросы решает закреплённый системный администратор на сайте help-spb.ru. Специалисты выполняют срочные и плановые выезды, настраивают сети и серверы, обеспечивают комплексную антивирусную защиту. Доверьте технику профессионалам и работайте без простоев.
Really appreciate the absence of stock photos that have nothing to do with the content, and a quick visit to moveideaswithclarity maintained the same restraint, visual filler is a tell that the writing cannot stand on its own and the lack of it here suggests the team has confidence in their content quality alone.
Found the use of subheadings really helpful for scanning back through the post later, and a stop at thinklessmovebetter kept that reader friendly approach going, navigation is something many blog writers ignore but small structural choices make a noticeable difference for someone returning to find a specific point again days or weeks later.
Now appreciating that the post did not try to imitate any other style I might recognise, and a stop at claritycreatestraction continued that distinct voice, content with its own register rather than borrowed from elsewhere is content with real authorial presence and this site has clearly developed that presence through what feels like patient editorial work.
Everything for Minecraft topminecraftworldseeds.com in one place: mods, skins, maps, texture packs, and the best seeds for survival, creativity, and adventure. Collections of popular add-ons, installation instructions, updates, and secure downloads for different versions of the game.
Now appreciating that I did not feel exhausted after reading, and a stop at growthfindsclarity extended that energising quality, content that leaves me with more attention than it consumed is rare and the gap between draining and energising content is real over the course of a typical day spent reading widely online.
Reading this gave me confidence to make a decision I had been putting off, and a stop at clarityfirstgrowth reinforced that confidence, content that translates into action in my own life rather than just informing it is content with the highest practical value and this site is generating that action level utility for me lately.
Decided I would read the archives over the weekend, and a stop at focustrajectory confirmed that the archives would be worth the time, very few sites have archives I would actively read through but this one has earned that level of interest based on the consistent quality across what I have sampled so far.
Honestly impressed by how much useful content sits in such a small post, and a stop at directionguidesgrowth confirmed the rest of the site packs a similar punch, density without confusion is a hard balance to strike and this site has clearly cracked the code on it across many different topic areas covered.
Honestly impressed, did not expect to find this level of care on the topic, and a stop at buildmomentumwisely cemented the impression, you can tell within the first few paragraphs whether a site is going to be worth the time and this one delivered on that early promise nicely throughout the rest of what I read.
Quietly building a case in my head for why this site deserves more attention than it currently seems to receive, and a look at visionframework reinforced the case, the gap between quality and recognition is a recurring frustration in independent online content and this site is one of the cases that seems particularly egregious to me today.
Worth flagging that the post handled an angle of the topic I had not seen elsewhere, and a look at growthneedsmomentum extended that fresh treatment, content that finds underexplored corners of well covered subjects is genuinely valuable and this site has demonstrated that exploratory editorial approach across multiple pieces in my reading sessions today.
Worth flagging that the post handled an angle of the topic I had not seen elsewhere, and a look at growthpipeline extended that fresh treatment, content that finds underexplored corners of well covered subjects is genuinely valuable and this site has demonstrated that exploratory editorial approach across multiple pieces in my reading sessions today.
Picked a friend mentally as the audience for this and decided to send the link, and a look at ideasrequiredirection confirmed the send was the right choice, choosing whom to share content with is a small act of curation that I take more seriously than the public sharing most platforms encourage these days online.
mostbet sənəd yoxlanılır [url=https://mostbet84891.online]mostbet sənəd yoxlanılır[/url]
Thanks for the moderate length, neither so short it skips substance nor so long it bloats, and a stop at buildtractioncleanly hit the same balance, the right length is one of the hardest things to calibrate in blog writing and I appreciate when a team has clearly thought about it rather than defaulting.
Useful information presented in a way that does not feel like a sales pitch, that is what I appreciated most, and a stop at moveforwardintentionally was the same, no upsell and no fake urgency just steady content laid out properly for someone trying to actually learn from it rather than just be sold to.
mostbet məsuliyyətli oyun [url=mostbet84891.online]mostbet84891.online[/url]
Типография «Повсюду» — надёжный партнёр для печати любого масштаба: от визиток до тиражей в десятки тысяч экземпляров. На сайте https://povsyoudo.ru/ можно быстро и удобно оформить заказ онлайн. Клиенты отмечают яркие насыщенные цвета, чёткие шрифты и внимательную проверку макетов перед печатью. Менеджеры всегда на связи, оперативно отвечают на вопросы и укладываются даже в самые сжатые сроки. Цены приятно удивляют — качество премиальное, а стоимость вполне доступная.
Thanks for the readable length, I finished it without checking how much was left, and a stop at ideaswithoutnoise kept me reading the same way, when I stop noticing the length of a piece because the content is engaging enough to sustain attention without willpower the writer has done their job well today.
Reading this brought back an idea I had set aside months ago, and a stop at focusshapesresults added more substance to that idea, content that revives dormant projects in my own thinking is content with serious creative value and this site is contributing to my own work in ways I had not expected when first clicking through.
Found a couple of useful angles in here I had not considered before reading carefully, and a quick stop at clarityfirstmove added more, this is one of those sites where the value compounds the more you read rather than peaking at one viral post and then offering nothing else of substance afterwards which is common.
Everything for Minecraft https://topminecraftworldseeds.com in one place: mods, skins, maps, texture packs, and the best seeds for survival, creativity, and adventure. Collections of popular add-ons, installation instructions, updates, and secure downloads for different versions of the game.
Picked up two new ideas that I expect will come up in conversations this week, and a look at buildmomentumintelligently added another, content that arms me with talking points rather than just filling time is the kind that provides ongoing value beyond the moment of reading and this site is generating that kind of ongoing value.
However measured this site clears the bar I set for sites I take seriously, and a stop at strategyandclarity continued clearing that bar, the metrics I use for site quality are admittedly informal but they are consistent and this site has cleared them on multiple measurements across multiple visits which is meaningful for my evaluation.
Speaking carefully because I do not want to overstate things this site is genuinely above average across multiple measurements, and a stop at focusdrivenresults continued the above average performance, the calibration of judgement against potential overstatement is something I take seriously and this site clears the higher bar even after that calibration applies.
Generally I do not leave comments but this post merits a small note, and a stop at focusdrivesexecution extended that comment worthy quality, the urge to actively contribute to a sites community rather than passively consume from it is something specific content provokes and this site has provoked that engagement urge from me today.
Now adding the writer to a small mental list of voices I want to follow, and a look at forwardenergyflow reinforced that follow intention, the few writers whose work I actively track are writers who have demonstrated sustained quality and this writer has clearly demonstrated that sustained quality across the pieces I have sampled here today.
Now noticing that the post benefited from being neither too short nor too long for its content, and a look at momentumdesign continued that calibration of length, sites that match length to content rather than padding to hit some target are sites that respect both their material and their readers and this site does both.
Just want to say thank you for putting this together, posts like these make searching online actually worth it sometimes, and a quick look at motionarchitect kept that going, useful and easy to read without any of the tricks that ruin most blog comment sections lately on the wider open web.
A piece that reads like it was written for me without claiming to be written for me, and a look at forwardtractioncreated produced the same fit, when the writer audience match clicks naturally without being engineered through demographic targeting you know the writing is solid and this site has that natural fit consistently for me.
Everything for Minecraft http://www.topminecraftworldseeds.com/ in one place: mods, skins, maps, texture packs, and the best seeds for survival, creativity, and adventure. Collections of popular add-ons, installation instructions, updates, and secure downloads for different versions of the game.
Worth bookmarking and sharing with anyone interested in the topic, that is my honest take, and a stop at ideasgaintraction reinforces that, the kind of generous resource that makes the open web feel worth defending against the constant pressure to retreat into walled gardens and curated feeds today everywhere I look across all my devices.
Really appreciate this kind of writing, no shouting and no clickbait headlines just steady useful content, and a quick look at claritybridge kept that going, definitely a site I will be returning to whenever I need a sensible take on similar topics in the days ahead and also during slower work weeks.
Approaching this site through a casual link click and being surprised by what I found, and a look at buildforwardtraction extended the surprise, the rare experience of stumbling into excellent independent content rather than predictable mediocrity is one of the actual remaining pleasures of casual web browsing and this site provided it cleanly.
aviator login page [url=aviator33280.online]aviator33280.online[/url]
melbet lucky jet download [url=www.melbet55504.online]melbet lucky jet download[/url]
Now wishing I had found this site sooner, and a look at growthwithintent extended that mild regret, the calculation of how many years of good content I missed by not finding the right sources earlier is one I try not to make too often but it does come up sometimes when I find sites this good.
melbet сабти ном 2026 [url=http://melbet75116.online/]http://melbet75116.online/[/url]
Took a chance on the headline and was rewarded, and a stop at ideasneedvelocity kept the rewards coming as I clicked through, the kind of place where every link leads somewhere worth the click is a small luxury on the modern web where so many sites are mostly empty calories disguised as content.
A piece that reads as if the writer trusted readers to fill in obvious gaps, and a look at forwardthinkingcore continued that respectful approach, content that does not over explain what the reader can infer is content that respects intelligence and this site has clearly chosen to write to capable readers rather than to the lowest common denominator.
Will be back, that is the simplest way to say it, and a quick visit to clarityactivatorhub reinforced the decision, this site has earned a spot in my regular rotation alongside a few other reliable places I check when I want something genuinely informative without all the usual modern web noise getting in the way.
A nicely understated post that does not shout for attention, and a look at clarityoveractivity maintained the same quiet quality, understatement is a stylistic choice that distinguishes serious writing from attention seeking writing and this site has clearly committed to the understated approach as a core editorial value rather than just a phase.
mostbet mobilna [url=mostbet74029.online]mostbet mobilna[/url]
Thanks for laying this out in a way that someone newer to the topic can follow, and a stop at progresswithforwardintent kept that accessibility going, writing that meets readers at different experience levels without condescending is hard to do well and the writers here have clearly thought about who they are writing for.
This actually answered the question I had been searching for, and after I checked focusacceleration I had a few more pieces I had not realised I needed, that is the sign of a site that knows what its readers want before they even know how to ask it which is impressive.
Now appreciating that the post did not try to imitate any other style I might recognise, and a stop at actionpoweredgrowth continued that distinct voice, content with its own register rather than borrowed from elsewhere is content with real authorial presence and this site has clearly developed that presence through what feels like patient editorial work.
Reading this prompted me to subscribe to my first newsletter in months, and a stop at directionsharpensfocus confirmed the subscribe was the right call, content that earns a newsletter signup is content that has cleared a higher trust bar than a casual visit and this site has clearly earned that level of commitment from me.
Excellent execution from start to finish, the post never loses its rhythm and the points stay sharp, and a quick stop at momentumovernoise kept the same level going, consistency like this across a site is the marker of a serious operation rather than a casual side project running on autopilot somewhere else.
Top notch writing, every paragraph carries weight and nothing feels like filler, and a stop at directionalactivation reflected that same care, a rare thing on the open web these days where most pages exist for clicks rather than actual reader value or anything close to that which is honestly a real shame.
Great work on keeping things readable, the post never drags or repeats itself which I really appreciate, and a stop at clarityguidesmotion added a bit more context that fit naturally with what was already said here, no need to read everything twice to get the point being made today.
Доброго времени суток. Мой брат уже неделю в запое. Соседи уже начали звонить в полицию. Скорая не приезжает на такие вызовы. Итог, выручила эта служба — помощь нарколога на дому. Врач поставил капельницу. В общем, вся инфа по ссылке — вывод из запоя [url=https://vyvod-iz-zapoya-na-domu-sankt-peterburg-rpl.ru]вывод из запоя[/url] Каждый час на счету. Вдруг это спасёт чью-то семью.
мелбет как вывести на odengi [url=www.melbet58323.online]www.melbet58323.online[/url]
Now appreciating that I did not feel exhausted after reading, and a stop at actionintoprogress extended that energising quality, content that leaves me with more attention than it consumed is rare and the gap between draining and energising content is real over the course of a typical day spent reading widely online.
Picked up on several small touches that suggest a careful editor, and a look at buildwithmotion suggested the same hand at work across the broader site, editorial consistency at a granular level is one of the strongest signs that an operation is serious rather than just hobbyist and this site reads as serious throughout.
Clean writing, easy to read, and never tries too hard to impress, that combination is harder to find than people think, and after my time on growthwithoutnoise I am sure this site treats its readers well, no flashy tricks just useful content done right which is honestly all I want online.
Generally my attention drifts on long posts but this one held it through the end, and a stop at focuspowersmovement earned the same sustained focus, content that defeats my drift tendency is content with substantive pulling power and this site has demonstrated that pulling power across multiple pieces in a session that has now run quite long actually.
Доброго вечера, земляки. Кошмар полный. Дети боятся заходить в квартиру. В наркологию тащить — стыд и страх. Короче, реально крутые специалисты — капельница от запоя на дому. Примчались за 20 минут. В общем, не потеряйте — вывод из запоя цена [url=https://vyvod-iz-zapoya-na-domu-sankt-peterburg-msy.ru]вывод из запоя цена[/url] Звоните прямо сейчас. Перешлите тем, кто рядом с бедой.
Reading this in a relaxed evening setting was a small pleasure, and a stop at idearoute extended the pleasant evening reading, content that fits the tone of relaxed time without becoming forgettable is what I look for in evening reading and this site has the right tone for that particular slot in my daily reading routine.
Came in skeptical of the angle and left mostly persuaded, and a stop at ideasintoresultsnow pushed me a bit further in the same direction, content that can move a critical reader by argument rather than rhetoric is rare and worth pointing out because it indicates real substance underneath the surface presentation here.
Liked the way the post handled the final paragraph, no neat bow but no abrupt cutoff either, and a stop at ideasbecomemovement continued that thoughtful ending pattern, endings are hard and most blog writers either over engineer them or skip them entirely and this site has clearly figured out a sustainable middle approach.
ЗАО «Техносвязь» — российское предприятие-изготовитель печатных плат, уже второе десятилетие совершенствующее производство для выпуска продукции высочайшего качества. Подробнее на сайте https://www.techno-svyaz.ru/ — здесь применяют современные технологии и материалы от мировых лидеров. Компания одинаково чётко выполняет серийные и единичные заказы, гарантируя короткие сроки и внимательный подход к каждому клиенту.
Reading this confirmed that my time researching the topic in other places had not been wasted, and a stop at actionplanner extended the confirmation, when independent sources agree that is a useful signal and this site is one of the more reliable sources I have found for cross checking what I read elsewhere on similar subjects.
aviator instant cashout malawi [url=https://aviator33280.online/]https://aviator33280.online/[/url]
Skipped the comments section but might come back to read it, and a stop at directionanchorsmotion hinted at a quality reader community, sites where the comments are worth reading separately from the post are increasingly rare and signal a particular kind of audience that has grown around the editorial vision over time gradually.
Better than the average post on this subject by some distance, and a look at focuscreatesleverage reinforced that, you can tell within the first paragraph that the writer here actually cares about the topic rather than just covering it for the sake of having something to publish that week or that day.
aviator statement [url=https://aviator33280.online]https://aviator33280.online[/url]
Good quality through and through, no rough edges and no signs of being rushed, and a quick look at focusbuildsvelocity kept the same polish going, the kind of site that respects its own brand by maintaining consistency across pages which is something I always appreciate as a reader looking for trustworthy information online today.
Now appreciating that I did not feel exhausted after reading, and a stop at momentumwithmeaning extended that energising quality, content that leaves me with more attention than it consumed is rare and the gap between draining and energising content is real over the course of a typical day spent reading widely online.
В Ростове-на-Дону компания «Аксиома» на законных основаниях списывает долги по кредитам, займам, налогам, штрафам и ЖКХ — в том числе при наличии действующей ипотеки. Работа ведётся согласно закону №127 «О банкротстве»: клиентам доступна рассрочка от 3 990 рублей в месяц без переплат. Подробная информация об услугах на https://uk-axioma.ru/ — проверьте возможность списания ваших долгов прямо сейчас.
melbet apk bd [url=melbet55504.online]melbet55504.online[/url]
Now feeling slightly more committed to my own careful reading practices having read this, and a stop at claritymeetsaction reinforced that commitment, content that models the kind of attention it deserves is content that calibrates the reader and this site has clearly raised my own bar for what to bring to good writing today.
Now feeling slightly more committed to my own careful reading practices having read this, and a stop at growthsteering reinforced that commitment, content that models the kind of attention it deserves is content that calibrates the reader and this site has clearly raised my own bar for what to bring to good writing today.
Worth recognising the specific care that went into how this post ended, and a look at focusunlockspath maintained the same careful conclusions, endings are where most blog content falls apart and this site has clearly invested in the closing stretches of its pieces rather than letting them simply trail off when energy fades.
Skipped the comments to avoid spoilers and came back later to find them genuinely worth reading, and a stop at moveideasforwardclean extended that surprised respect, when the discussion below a post matches the quality of the post itself you have found something special and this site appears to attract that kind of audience.
Closed it feeling slightly more competent in the topic than I started, and a stop at moveideaswithpurpose reinforced that competence boost, real learning is rare in casual online reading but it does happen sometimes and this site managed to make it happen for me today which is genuinely worth pausing to acknowledge.
I really like how the writer keeps the tone friendly without sounding fake or overly polished, and after a stop at growthneedsalignment the same calm pace was there, no rushing to make a point and no padding either, just clean honest writing that I can respect and come back to later again.
Appreciate how nothing here feels copied or pieced together from other places, the voice is consistent and the tone stays human, and after I checked buildforwardlogic I noticed the same style holds, which is a small detail but it makes the whole experience feel personal rather than like another generic site.
Компания PWS предлагает передовые промышленные установки очистки воды на основе инновационной озоновой технологии — без использования химических реагентов, вредных для здоровья. Посетите https://pws.world/promyshlennye-ustanovki и убедитесь: установки обеспечивают воду без вкуса, цвета и запаха, эффективно устраняя бактерии, примеси и соли тяжёлых металлов. Чистая вода напрямую влияет на качество продукции и прибыль предприятия. Системы PWS отличаются высокой надёжностью и длительным сроком эксплуатации при низких эксплуатационных расходах.
melbet bd sportsbook app download [url=http://melbet55504.online]http://melbet55504.online[/url]
чӣ тавр бонуси мелбет-ро истифода бурдан [url=http://melbet75116.online]чӣ тавр бонуси мелбет-ро истифода бурдан[/url]
Reading this in pieces during a long afternoon and finding it consistently rewarding, and a stop at actiondrive fit naturally into the same fragmented reading pattern, sites whose posts can be read in segments without losing the thread are well suited to how I actually read these days and this one is built well.
mostbet weryfikacja wypłaty [url=http://mostbet74029.online]http://mostbet74029.online[/url]
Reading this confirmed that the topic deserves more careful attention than it usually gets, and a stop at growthtrajectory extended that elevated framing, content that raises the appropriate weight of a subject without being preachy about it is serving a quiet but important editorial function for the broader cultural conversation about it.
melbet ҳисоб маҳкам [url=melbet75116.online]melbet75116.online[/url]
Now understanding why someone recommended this site to me a while back, and a stop at clarityfirstaction explained the recommendation, sometimes recommendations make sense only after experience and this site has finally clicked into place as the kind of resource I now understand was being recommended for sound editorial reasons by my friend.
снять квартиру на пхукете Когда вы стремитесь снять жилье на Пхукете, учитывайте также транспортную доступность объекта к основным достопримечательностям. Чем удобнее будет добираться до нужных мест, тем больше времени останется на отдых.
Now feeling the small relief of finding writing that does not condescend, and a stop at growthinmotion extended that respect for readers, content that treats its audience as capable adults rather than as people to be managed produces a different reading experience and this site has clearly chosen the respectful approach across all pieces.
Honestly this kind of writing is why I still bother to read independent sites, and a look at actioncreatesdirection extended that broader reflection, the few sites that justify continued attention to non algorithmic content are sites like this one and finding them periodically is enough to keep my reading habits oriented toward independent rather than aggregated content.
Felt the writer respected the topic without being precious about it, and a look at actionoverhesitation continued that respectful but unfussy treatment, finding the right register for serious topics is hard and this site has clearly figured out how to take the topic seriously while still being readable for casual visitors regularly.
mostbet potwierdzenie email [url=www.mostbet74029.online]www.mostbet74029.online[/url]
Comfortable in tone and substantive in content, that is a hard combination to land, and a look at actioncreatespace kept that pairing alive across more material, this is what good editorial direction looks like in practice and the team here clearly has someone keeping a steady hand on the wheel across what they decide to publish.
Reading carefully here has reminded me what reading carefully feels like, and a look at clarityturnskeys extended that reminder, the experience of careful reading versus skimming is different in ways I had partially forgotten and this site has clearly refreshed my memory of what attention feels like when content rewards it consistently.
If a friend asked me where to read carefully on the topic I would send them here without hesitation, and a look at buildtractionnow confirmed the recommendation strength, the directness of my recommendation reflects how confident I am in the quality and this site has earned undiluted recommendations from me across multiple recent conversations actually.
Even just sampling a few posts the consistency is what stands out, and a look at focusbeatsfriction confirmed the broader pattern, sites where every piece I sample lives up to the standard set by the others are sites with serious quality control and this one has clearly invested in whatever editorial process produces that consistency reliably.
melbet welcome bonus [url=http://melbet66023.online/]http://melbet66023.online/[/url]
A piece that did not try to be timeless and ended up reading as durable anyway, and a look at momentumbuilders extended that durable feel, content that stays useful past its publication date without straining for permanence is content that ages well and this site has the kind of evergreen quality that I value highly today.
If a friend asked me where to read carefully on the topic I would send them here without hesitation, and a look at claritydrivenmoves confirmed the recommendation strength, the directness of my recommendation reflects how confident I am in the quality and this site has earned undiluted recommendations from me across multiple recent conversations actually.
mostbet Alif Bank [url=http://mostbet33927.online]http://mostbet33927.online[/url]
мелбет вывод на карту [url=https://www.melbet58323.online]мелбет вывод на карту[/url]
mostbet ingyenes nyerőgépek [url=https://www.mostbet34227.online]mostbet ingyenes nyerőgépek[/url]
Quiet confidence runs through the whole post, no need to shout to make the points stick, and a stop at signalshapessuccess carried that same restrained voice forward, content that respects the reader by trusting its own substance rather than dressing it up in theatrical language is what I look for online and rarely actually find these days.
Reading this as part of my evening winding down routine fit perfectly, and a stop at ideasneedexecutionnow extended the wind down nicely, content that calms rather than agitates is what I want at the end of the day and this site provides that calming reading experience reliably which is increasingly rare across the modern web.
Once I trust a site this much I tend to read everything they publish and that is the trajectory I am on with this one, and a stop at clarityroute confirmed the trajectory, the rare progression from interested reader to comprehensive reader is something only certain sites earn and this one is earning that progression rapidly.
Хотите платить меньше за онлайн-покупки — используйте проверенный сервис промокодов и скидок https://padbe.ru/ который собирает актуальные купоны и спецпредложения от ведущих интернет-магазинов. Платформа абсолютно бесплатна, работает с лучшими магазинами электронной коммерции и постоянно обновляет базу эксклюзивных промокодов. Просто выбирайте магазин, копируйте промокод и экономьте на каждой покупке без лишних усилий.
Worth saying that the post fit naturally into a rhythm of careful reading, and a stop at actionleadsforward extended the same rhythm, content that pairs well with how I actually read rather than demanding a different mode is content well calibrated to its likely audience and this site has clearly thought about that consistently.
Honest take is that I will probably forget most of what I read online today but this post is one I will remember, and a stop at actionwithsignal kept that same memorable quality going, certain writing leaves a residue in the mind in a way most content simply does not manage.
Just enjoyed the experience without needing to think about why, and a look at forwardenergyhub kept that effortless feeling going, sometimes the best content is invisible in the sense that you forget you are reading until you reach the end and realise time has passed without you noticing it pass naturally.
Worth recognising that the post did not pretend to be the final word on the topic, and a stop at ideasunlockmovement continued that humility, content that admits its own scope and limits is more trustworthy than content that overreaches and this site has clearly developed the editorial maturity to know what it can and cannot claim well.
Thanks for laying this out in a way that someone newer to the topic can follow, and a stop at signalcreatesclarity kept that accessibility going, writing that meets readers at different experience levels without condescending is hard to do well and the writers here have clearly thought about who they are writing for.
Felt the writer was being honest with the reader which is rare enough that I want to acknowledge it, and a look at progresswithdirectionalforce continued that honest feel, content built on actual knowledge rather than aggregated summaries is something I value highly and rarely come across in regular searches on the open internet these days.
Honestly impressed, did not expect to find this level of care on the topic, and a stop at progresswithsignal cemented the impression, you can tell within the first few paragraphs whether a site is going to be worth the time and this one delivered on that early promise nicely throughout the rest of what I read.
Bookmark added in three places to make sure I do not lose the link, and a look at motioncreatesresults got the same redundant treatment, sites I am afraid to lose are the rare keepers and this is clearly one of them based on what I have read so far across this and a couple of related posts.
Reading this in pieces during a long afternoon and finding it consistently rewarding, and a stop at actioncycle fit naturally into the same fragmented reading pattern, sites whose posts can be read in segments without losing the thread are well suited to how I actually read these days and this one is built well.
Reading this confirmed a hunch I had been carrying about the topic without having articulated it, and a stop at directionalplanning extended the confirmation, content that gives shape to fuzzy intuitions is doing the rare work of making private thoughts public and this site is providing that articulating service consistently for me lately.
Now adding the writer to a small mental list of voices I want to follow, and a look at directionsetsspeed reinforced that follow intention, the few writers whose work I actively track are writers who have demonstrated sustained quality and this writer has clearly demonstrated that sustained quality across the pieces I have sampled here today.
Recommend this to anyone who values clear thinking over flashy presentation, and a stop at progressunlocked continued in the same understated way, this site has its priorities in the right place which makes it worth supporting through repeat visits and recommendations rather than just one passing read today before moving on quickly elsewhere.
Looking at this from the perspective of someone tired of generic content the contrast is striking, and a look at buildmomentumclean maintained that distinctive feel, sites with strong editorial identity stand out against the bland background of algorithmic content and this one has clearly developed an identity worth recognising through careful attention.
Reading this in a relaxed evening setting was a small pleasure, and a stop at actionunlocksclarity extended the pleasant evening reading, content that fits the tone of relaxed time without becoming forgettable is what I look for in evening reading and this site has the right tone for that particular slot in my daily reading routine.
Generally I am cautious about recommending sites on first encounter but this one warrants the exception, and a look at actionignitesgrowth reinforced the exception making, the rare site that justifies breaking my normal cautious approach is the rare site worth flagging early and this one has prompted exactly that early flagging response from me.
Bookmark folder created specifically for this site, and a look at momentumbychoice confirmed the dedicated folder was the right call, dedicated folders for individual sites are a level of organisation I rarely deploy and this site has earned that level of dedicated tracking based on the consistency I have seen so far across sessions.
Everything for Minecraft https://topminecraftworldseeds.com/ in one place: mods, skins, maps, texture packs, and the best seeds for survival, creativity, and adventure. Collections of popular add-ons, installation instructions, updates, and secure downloads for different versions of the game.
Reading this triggered a small change in how I think about the topic going forward, and a stop at claritydrivesvelocity reinforced that subtle shift, the rare content that actually moves my thinking rather than just confirming or filling it is the kind I most value and this site is providing that kind of impact today.
Worth recognising the specific care that went into how this post ended, and a look at strategyexecution maintained the same careful conclusions, endings are where most blog content falls apart and this site has clearly invested in the closing stretches of its pieces rather than letting them simply trail off when energy fades.
Now thinking about how this post will age over the coming years, and a stop at signaldrivenmomentum suggested the same durability, content built to age well rather than to capture the attention of the moment is content with a different kind of value and this site has clearly chosen the long horizon over the short one.
Picked up on several small touches that suggest a careful editor, and a look at directionisleverage suggested the same hand at work across the broader site, editorial consistency at a granular level is one of the strongest signs that an operation is serious rather than just hobbyist and this site reads as serious throughout.
Speaking honestly this is among the better discoveries of my recent browsing, and a stop at growthwithforwardmotion reinforced that discovery quality, the ranking of recent discoveries is informal but meaningful and this site has placed near the top of that ranking based on the consistency of quality across what I have already read carefully.
Reading this with a fresh mind in the morning brought out details I might have missed in the afternoon, and a stop at clarityguidesexecution earned the same fresh attention, content that rewards being read at full attention rather than at energy lows is content with real density and this site has that density consistently.
Looking back on this reading session it stands as one of the better ones recently, and a look at growthfollowsfocus extended that ranking, the informal ranking of reading sessions against each other is something I do mentally and this session ranks high largely because of this site and a couple of related pages here.
melbet промокод на бонус [url=melbet66023.online]melbet промокод на бонус[/url]
Felt energised after reading rather than drained, which is unusual for online content these days, and a look at forwardlogiclab continued that good feeling, content that leaves you better than it found you is rare and worth bookmarking when you stumble across it for the first time today or any other day really.
мелбет пополнить через юмани [url=melbet66023.online]melbet66023.online[/url]
Bookmark added with a small note about why, and a look at growthchannel prompted another bookmark with another note, the bookmarks I annotate are the ones I expect to return to deliberately rather than stumble into and this site is generating annotated bookmarks at a higher rate than my usual content sources by some margin.
Started a draft response in my head and ended without publishing it because the post said it well enough, and a look at buildsmartmotion produced the same effect, content that satisfies my urge to add to it by being complete enough on its own is rare and represents a particular kind of editorial completeness here.
melbet sign in [url=https://melbet58323.online]https://melbet58323.online[/url]
mostbet fizetési módok [url=http://mostbet34227.online]http://mostbet34227.online[/url]
Здорова, Питер. Близкий человек снова сорвался. Мать плачет. Платная клиника — бешеные счета. Короче, реально крутые врачи — выведение из запоя на дому анонимно. Врач поставил систему. В общем, вся инфа и контакты по ссылке — вывод из запоя нарколог 24 [url=https://vyvod-iz-zapoya-na-domu-sankt-peterburg-qbf.ru]https://vyvod-iz-zapoya-na-domu-sankt-peterburg-qbf.ru[/url] Звоните прямо сейчас. Перешлите тем, кто в беде.
After several visits I am now confident this site is one to follow seriously, and a stop at actionstructure reinforced that confidence, the gradual building of trust through repeated quality exposures is the only sustainable way to develop reader loyalty and this site is building that loyalty in me through patient consistent work consistently.
Just want to acknowledge that the writing here is doing something right, and a quick visit to motionwithclarity confirmed the same standards run across the broader site, recognising good work is something I try to do when I find it because the alternative is silence and silence rewards mediocrity.
Started believing the writer knew the topic deeply by about the second paragraph, and a look at signaldrivenaction reinforced that confidence, the speed at which a writer establishes credibility through their writing is a useful quality signal and this writer establishes it quickly and quietly without resorting to credential dropping or self promotion.
melbet бонус за первый депозит [url=https://melbet58323.online/]https://melbet58323.online/[/url]
Now appreciating the way the post avoided the temptation to be longer than necessary, and a look at buildtractioncleanly continued that lean approach, content with the discipline to stop when finished rather than padding for length is content that respects both itself and its readers and this site has that disciplined editorial culture clearly throughout.
mostbet kuponkód mező hol van [url=http://mostbet34227.online]http://mostbet34227.online[/url]
Looking for cryptocurrency profitability? Head over to bestearn.io and discover a table designed to help users compare live yield opportunities across various protocols and chains. Unlike scrolling through broad guidance, users can check the live APY, liquidity size, and pool type on one unified screen and trim the results down to what looks most realistic for generating passive crypto income.
Now planning to recommend this site in a context where my recommendations are taken seriously, and a stop at clarityshapesspeed confirmed I should make that recommendation soon, the small but real act of recommending content into spaces where my taste matters is something I take seriously and this site is worth the recommendation.
mostbet lei moldovenesti [url=https://mostbet68721.icu/]https://mostbet68721.icu/[/url]
Процессуальное законодательство Республики Казахстан (РК) отличается сложностью и множеством нюансов, что делает профессиональное представительство в суде не просто желательным, но и жизненно необходимым условием для защиты. Комплексное ведение дела – это всеобъемлющий подход, который начинается задолго до первого судебного заседания и завершается только после полного исполнения судебного акта. Автор блога: Бахирев Анатолий Анатольевич, ведущий юрист-эксперт https://femida-justice.com/uslugi/predstavitelstvo-v-sude/
Reading this prompted a small note in my reference file, and a stop at claritybeforevelocity prompted another, the rare site that contributes useful nuggets to my own working knowledge rather than just consuming my attention is worth the time investment many times over compared to the usual pile of forgettable scroll content.
мелбет восстановление аккаунта [url=https://www.melbet31620.online]https://www.melbet31620.online[/url]
Liked that there was nothing performative about the writing, and a stop at claritycreatesadvantage continued that genuine quality, performative writing tries to be witnessed rather than read and the difference between performance and substance is huge for the careful reader and this site has clearly chosen substance every time clearly.
mostbet бесплатная ставка [url=http://mostbet05924.online]http://mostbet05924.online[/url]
This actually answered the question I had been searching for, and after I checked actiondrivenshift I had a few more pieces I had not realised I needed, that is the sign of a site that knows what its readers want before they even know how to ask it which is impressive.
Everything for Minecraft topminecraftworldseeds com in one place: mods, skins, maps, texture packs, and the best seeds for survival, creativity, and adventure. Collections of popular add-ons, installation instructions, updates, and secure downloads for different versions of the game.
Nice to see a post that does not try to overcomplicate the basics for the sake of looking smart, and once I looked at claritycreatestraction the same direct tone was there too, which honestly makes a difference when you are short on time and want answers without long pointless intros.
Now thinking about how to apply some of this to a project I have been planning, and a look at directionalpower added more material for the planning, content that connects to my actual creative work rather than just being interesting in the abstract is the kind that earns priority placement in my reading rotation consistently going forward.
Without comparing too aggressively to other sources this one stands out for the right reasons, and a look at ideasbecomeaction continued that distinctive quality, content that distinguishes itself through substance rather than style tricks is content with lasting differentiation and this site has clearly chosen substance based differentiation as its core editorial strategy.
Reading this between two meetings turned out to be the highlight of the morning, and a stop at ideasintosystems continued that highlight quality, content that outshines the structured parts of a working day is doing something well beyond ordinary and this site has produced multiple such highlights for me already this week alone.
Just nice to read something that does not feel like it was assembled from a content brief, and a stop at focuscreatespace kept that handcrafted feel going, you can tell when a real human with real understanding is behind the words versus a templated piece churned out for an algorithm to find.
If I were grading sites on this topic this one would receive high marks, and a stop at focusdrivesexecution continued earning those high marks, the informal grading I do mentally for content sources is something I take seriously even though it is informal and this site has been receiving consistent high marks across multiple sessions today.
чӣ тавр бонуси mostbet-ро истифода бурдан [url=https://mostbet33927.online]https://mostbet33927.online[/url]
Everything for Minecraft https://topminecraftworldseeds.com in one place: mods, skins, maps, texture packs, and the best seeds for survival, creativity, and adventure. Collections of popular add-ons, installation instructions, updates, and secure downloads for different versions of the game.
Worth flagging that the post handled an angle of the topic I had not seen elsewhere, and a look at momentumguidance extended that fresh treatment, content that finds underexplored corners of well covered subjects is genuinely valuable and this site has demonstrated that exploratory editorial approach across multiple pieces in my reading sessions today.
Now feeling slightly more committed to my own careful reading practices having read this, and a stop at forwardenergyactivated reinforced that commitment, content that models the kind of attention it deserves is content that calibrates the reader and this site has clearly raised my own bar for what to bring to good writing today.
Just nice to read something that does not feel like it was assembled from a content brief, and a stop at actionwithstructure kept that handcrafted feel going, you can tell when a real human with real understanding is behind the words versus a templated piece churned out for an algorithm to find.
Now planning a longer reading session for the archives, and a stop at clarityfirstmove confirmed the archives are worth that longer commitment, sites with archives I want to read deliberately rather than just sample are rare and this one has clearly earned that level of interest based on the consistency of what I have already read.
Здорова, народ А на работу через пару часов Рассол уже не лезет Короче, единственное что реально спасает — капельница от похмелья быстрый результат Поставили капельницу с солевым раствором В общем, вся инфа по ссылке — прокапаться от алкоголя на дому [url=https://kapelnicza-ot-pokhmelya-voronezh-xqt.ru]https://kapelnicza-ot-pokhmelya-voronezh-xqt.ru[/url] Звоните прямо сейчас Перешлите тем кто в такой же ситуации
Pass this along to anyone you know dealing with similar questions, the answers here are clear, and a stop at actionmovesideas adds even more useful material, this is the kind of resource that deserves to circulate widely rather than getting lost in the constant churn of new content online that buries good work daily.
мостбет сабти ном [url=http://mostbet33927.online/]мостбет сабти ном[/url]
Most posts I read end up forgotten within a day but this one is sticking, and a look at forwardmotionactivated extended that lingering effect, content that survives the immediate moment of reading rather than evaporating is content with genuine retention quality and this site has been producing memorable pieces at a rate notable across my reading.
Felt a small spark of recognition when the post named something I had been struggling to articulate, and a look at buildcleartraction produced more such moments, the rare service of giving readers language for fuzzy intuitions is one of the higher values that good writing can provide and this site offered several today instances.
mostbet verifica status retragere [url=http://mostbet68721.icu/]http://mostbet68721.icu/[/url]
Now feeling the post has earned a proper recommendation rather than a casual mention, and a stop at progresswithforwardintent reinforced the recommendation strength, the difference between mentioning and recommending is a small editorial distinction I observe in my own conversations and this site has earned the upgraded recommendation level from me confidently today.
Came across this through a roundabout path and now it is on my regular rotation, and a stop at focusdrivenspeed sealed that decision, the open web still produces serendipitous discoveries when you let the citations and references guide you rather than relying purely on algorithmic feeds for new content recommendations always.
mostbet pariuri sportive [url=http://mostbet68721.icu]http://mostbet68721.icu[/url]
Reading this in pieces during a long afternoon and finding it consistently rewarding, and a stop at strategycreatesflow fit naturally into the same fragmented reading pattern, sites whose posts can be read in segments without losing the thread are well suited to how I actually read these days and this one is built well.
A particular pleasure to read this with a fresh coffee, and a look at strategyprogression extended the pleasure across more pages, content that pairs well with quiet morning rituals is something I have come to value highly and this site has the kind of energy that fits naturally into a calm reading routine.
мелбет пополнение через карту [url=https://melbet31620.online]https://melbet31620.online[/url]
Solid endorsement from me, the writing earns it, and a look at ideasneedalignment continues to earn it across the broader site too, the kind of operation that maintains quality across many pages rather than just one viral post is a sign of serious commitment and that is what I see here clearly across what I read.
pobierz vavada [url=http://vavada18205.help]http://vavada18205.help[/url]
Started reading and ended an hour later without realising the time had passed, and a look at focusleadsaction produced the same time dilation effect, when content makes time feel different the writer has achieved something well beyond the average and this site is producing that experience for me reliably across multiple readings.
mostbet.kg [url=https://mostbet05924.online/]https://mostbet05924.online/[/url]
melbet ios кыргызстан [url=melbet31620.online]melbet31620.online[/url]
Came here from another site and ended up exploring much further than I planned, and a look at growthmovesintentionally only encouraged more exploration, the kind of place where one click leads to another not through manipulative design but through genuinely interesting content is rare and worth highlighting when found like this somewhere on the open internet.
как играть в aviator мостбет [url=https://mostbet05924.online]https://mostbet05924.online[/url]
Held my interest from the opening line through to the closing thought, and a stop at directionbuildsmomentum did the same, content that earns sustained attention in an environment full of distractions is doing something right and this site is clearly doing several things right rather than just one or two which I really appreciate.
Everything for Minecraft https://topminecraftworldseeds.com in one place: mods, skins, maps, texture packs, and the best seeds for survival, creativity, and adventure. Collections of popular add-ons, installation instructions, updates, and secure downloads for different versions of the game.
Now feeling the small relief of finding writing that does not condescend, and a stop at claritybeforecomplexity extended that respect for readers, content that treats its audience as capable adults rather than as people to be managed produces a different reading experience and this site has clearly chosen the respectful approach across all pieces.
Appreciated that the writer trusted the reader to follow along without constant restating of earlier points, and a look at buildmomentummethodically continued that respect for the reader, treating an audience as capable adults rather than as people to be hand held through every paragraph is something I notice and value highly across the open internet today.
Closed the tab feeling I had spent the time well, and a stop at growthpathbuilder extended that feeling across more pages, the test of whether time on a site was well spent is one I apply silently after closing tabs and very few sites pass it but this one passed it cleanly today afternoon clearly.
Доброго вечера. Близкий человек уже пятые сутки в запое. Соседи уже вызывали полицию. Скорая не приедет на такой вызов. Итог, спасла эта служба — вывод из запоя с выездом круглосуточно. Врач поставил капельницу. В общем, вся инфа по ссылке — вывод из запоя на дому самара круглосуточно [url=https://vyvod-iz-zapoya-na-domu-samara-qzf.ru]https://vyvod-iz-zapoya-na-domu-samara-qzf.ru[/url] Не тяните. Вдруг пригодится.
Привет из Поволжья Мой брат уже неделю в запое Родственники в панике В диспансер тащить страшно Короче, врачи стационара вытащили — цена на вывод из запоя в стационаре доступная Капельницы и препараты подбирали индивидуально В общем, не потеряйте контакты — лечение от запоя в стационаре [url=https://vyvod-iz-zapoya-v-staczionare-nizhnij-novgorod-vby.ru]https://vyvod-iz-zapoya-v-staczionare-nizhnij-novgorod-vby.ru[/url] Не ждите пока станет хуже Перешлите тем кто в такой же ситуации
Stands out for actually being useful instead of just being long, and a look at buildprogresswithintent kept that going, length without value is the default mode of most blogs these days but this site has clearly chosen a different path which I respect a lot as a reader who values careful editing decisions like that.
vavada transmisje na żywo [url=https://www.vavada18205.help]https://www.vavada18205.help[/url]
Worth a slow read rather than the fast scan I usually default to, and a look at signaloverdistraction earned the same slower pace from me, content that resets my reading speed downward is content with substance worth absorbing and this site has produced that effect on me multiple times now over the last week here.
Everything for Minecraft http://www.topminecraftworldseeds.com in one place: mods, skins, maps, texture packs, and the best seeds for survival, creativity, and adventure. Collections of popular add-ons, installation instructions, updates, and secure downloads for different versions of the game.
Доброго вечера После вчерашнего вообще никак Поилки и таблетки не помогают Короче, врачи приехали и поставили систему — капельница от похмелья на дому срочно Приехали через 30 минут В общем, жмите чтобы сохранить — прокапывание от алкоголя на дому [url=https://kapelnicza-ot-pokhmelya-voronezh-ges.ru]https://kapelnicza-ot-pokhmelya-voronezh-ges.ru[/url] Звоните прямо сейчас Перешлите тем кто в такой же ситуации
vavada wypłata blik [url=www.vavada18205.help]www.vavada18205.help[/url]
Всем привет из Нижнего Близкий человек уже несколько дней в запое Соседи стучат в стену В больницу тащить страшно Короче, врачи вытащили с того света — стационарное выведение из запоя под наблюдением Капельницы и препараты подбирали индивидуально В общем, вся инфа по ссылке — лечение от запоя в стационаре [url=https://vyvod-iz-zapoya-v-staczionare-nizhnij-novgorod-jkp.ru]https://vyvod-iz-zapoya-v-staczionare-nizhnij-novgorod-jkp.ru[/url] Звоните прямо сейчас Перешлите тем кто в такой же ситуации
888starz Bittech B.V. kompaniyasining Curacao rasmiy litsenziyasi ostida ishlaydi va foydalanuvchi ma’lumotlarini himoya qiladi.
Kazino bo’limida yetakchi xalqaro provayderlardan 4000 dan ortiq slot to’plangan.
Foydalanuvchilar jahon chempionatlari va mahalliy ligalarga stavka qo’yishlari mumkin.
Bundan tashqari saytda keshbek, freebet va muntazam turnirlar o’tkaziladi.
Ro’yxatdan o’tish telefon yoki email orqali tez amalga oshadi, minimal depozit 2 evrodan boshlanadi.
888starz review [url=http://www.888starz-uzb5.com/]https://888starz-uzb5.com/[/url]
888starz O’zbekistonda 4000 dan ortiq o’yin va 30 dan ziyod sport turini yagona saytda taqdim etadi.
Kazino katalogi eng yirik provayderlardan to’rt mingdan ortiq slotni o’z ichiga oladi.
Real vaqt rejimi yuqori koeffitsiyent va tezkor yangilanish bilan ishlaydi.
888starz kazino xush kelibsiz paketini 1500 evrogacha va 150 FS bilan taqdim etadi.
To’lovlar bank kartalari, Skrill, AstroPay va 50 dan ortiq kriptovalyuta orqali qabul qilinadi.
888 star [url=https://888starz-uzb7.com]https://888starz-uzb7.com/[/url]
يوفر 888starz في مصر تجربة موحّدة تدمج ألعاب الحظ والمراهنات الرياضية على منصة واحدة.
تضم غرف اللعب المباشر ما يزيد عن 250 طاولة يديرها موزعون فعليون.
يمكن المراهنة على أحداث دولية من دوري الأبطال إلى المنافسات المصرية.
أما الرهان الرياضي فيقدم مكافأة أول إيداع بنسبة 100% حتى 100 يورو.
يعمل الدعم على مدار الساعة عبر الدردشة والبريد، مع تطبيق apk لأندرويد ونسخة iOS.
888 starz [url=https://www.artoved.stck.me/post/1664861/888starz/]888stars[/url]
Здорова, народ. Мой отец уже четвёртые сутки в запое. Мать в панике. Платная клиника — бешеные цены. Короче, реально крутые врачи — вывести из запоя на дому срочно. Через пару часов человек пришёл в себя. В общем, жмите, чтобы сохранить — вывести из запоя на дому [url=https://vyvod-iz-zapoya-na-domu-samara-nxc.ru]вывести из запоя на дому[/url] Не ждите. Вдруг это спасёт чью-то жизнь.
يوفر 888starz في مصر تجربة موحّدة تدمج ألعاب الحظ والمراهنات الرياضية على منصة واحدة.
يوفر قسم الكازينو أكثر من 4000 لعبة سلوت من كبرى شركات التطوير.
يقدم الموقع مراهنة فورية وإحصاءات مباشرة على المباريات الجارية.
تُضاف إلى ذلك عروض منتظمة من كاش باك ورهانات مجانية وبطولات دورية.
لا يستغرق إنشاء الحساب سوى دقائق معدودة عبر المنصة الرسمية.
starz 888 [url=https://888starzs3.com]starz 888[/url]
Салют, Воронеж Тошнит, трясёт, сил нет Нужно что-то серьёзное Короче, единственное что реально спасает — капельница от похмелья на дому срочно Приехали через 30 минут В общем, вся инфа по ссылке — нарколог на дом капельница [url=https://kapelnicza-ot-pokhmelya-voronezh-mnb.ru]https://kapelnicza-ot-pokhmelya-voronezh-mnb.ru[/url] Не мучайтесь рассолами Перешлите тем кто в такой же ситуации
888 stars [url=888starzs4.com]888 stars[/url]
يعتمد الموقع على ترخيص كوراساو الممنوح لشركة Bittech B.V. لضمان عدالة اللعب وسلامة الأموال.
يضم القسم آلاف ألعاب السلوت المختارة من استوديوهات مرموقة.
يمنح الرهان المباشر تحديثًا لحظيًا للأودز مع متابعة حية للمباريات.
ينال لاعبو الرهان الرياضي عرضًا بنسبة 100% يصل إلى 100 يورو.
يعمل فريق المساعدة طوال اليوم مع تطبيق محمول لأجهزة أندرويد وآبل.
Now thinking I want more sites built on this kind of editorial foundation, and a stop at forwardpathactivated extended that wish into a broader hope, sites built on substance and care rather than on metrics and growth are the kind of sites I want to see more of and this one is a small example worth supporting.
Liked the balance between depth and brevity, never too shallow and never too long, and a stop at directionunlocked kept the same balance going across the rest of the site, this is one of the harder skills in writing and the team here clearly has it figured out very well indeed across every page.
https://contessa.com.ua/
Looking for crypto swap widget? Go to swapsdk.io and discover how SwapSDK can support your needs. It allows companies to embed a cryptocurrency exchange into a website, wallet, app, or service where exchange functionality needs to work within the product’s interface. This approach is suitable for products that require a crypto exchange API for rates, exchange pairs, orders, status tracking, and built-in exchange flow logic.
Рекламное агентство «Транзит Медиа» специализируется на наружной рекламе в Крыму: брендировании транспорта плёнкой ORACAL, оклейке торговых точек и витрин, изготовлении баннеров и сеток с пропаем и люверсами. Компания располагает собственным производством https://transitmedia.ru/ — лазерная резка, термогибка акрила, ПЭТ и ПВХ. Все работы выполняются как в собственном боксе, так и на территории заказчика по Симферополю, Севастополю и Ялте.
mostbet recenzii [url=https://mostbet94451.icu/]https://mostbet94451.icu/[/url]
melbet бонусы казино [url=http://melbet25717.online]http://melbet25717.online[/url]
mostbet real balans [url=http://mostbet24939.online/]mostbet real balans[/url]
Everything for Minecraft https://www.topminecraftworldseeds.com in one place: mods, skins, maps, texture packs, and the best seeds for survival, creativity, and adventure. Collections of popular add-ons, installation instructions, updates, and secure downloads for different versions of the game.
mostbet ilova yuklab olish [url=http://mostbet86043.help/]mostbet ilova yuklab olish[/url]
Comfortable reading experience throughout, no jarring tone shifts and no awkward formatting, and a look at directionbeforemotion kept that smooth feel going, the kind of editorial polish that goes unnoticed when present but glaring when absent is something this site has clearly invested in across the broader content as well which deserves recognition.
aviator estratégia 2x [url=http://aviator92671.help]http://aviator92671.help[/url]
Здорова, народ. Мой брат уже четвёртые сутки в запое. Мать в отчаянии. Платная клиника — деньги выкачивает. Короче, реально профессиональные врачи — вывести из запоя на дому срочно. Через пару часов человек пришёл в себя. В общем, цены и телефон тут — вывод из запоя дешево [url=https://vyvod-iz-zapoya-na-domu-samara-rtw.ru]вывод из запоя дешево[/url] Звоните прямо сейчас. Перешлите тем, кто рядом с бедой.
Reading this confirmed that the topic deserves more careful attention than it usually gets, and a stop at ideasmoveforward extended that elevated framing, content that raises the appropriate weight of a subject without being preachy about it is serving a quiet but important editorial function for the broader cultural conversation about it.
Слушайте кто знает Близкий человек уже 10 дней в запое Соседи уже вызвали участкового Платная клиника просит бешеные деньги Короче, спасла только госпитализация — вывод из запоя стационар с круглосуточным наблюдением Выписали через неделю здоровым В общем, жмите чтобы сохранить — вывод из запоя в клинике в санкт петербурге [url=https://vyvod-iz-zapoya-v-staczionare-sankt-peterburg-gtb.ru]https://vyvod-iz-zapoya-v-staczionare-sankt-peterburg-gtb.ru[/url] Стационар — это единственный выход Перешлите тем кто в беде
БигПикча — один из самых популярных российских фотомедиа-порталов, где каждый день публикуются захватывающие новости в фотографиях, редкие исторические снимки и увлекательные лонгриды. На https://bigpicture.ru/ вы найдёте всё: от криминальных хроник и путевых заметок до неожиданных научных фактов и забавных подборок из мировых соцсетей — каждый материал написан живо и с душой, а визуальная подача делает чтение особенно увлекательным.
A clean read with no irritations, and a look at clarityenablesaction continued that frictionless quality, the absence of small irritations is something I notice only when present elsewhere and this site is one of the rare places where everything just works and lets me focus on the substance rather than fighting the format.
Промышленные установки очистки воды от компании PWS — это передовые решения для бизнеса, где качество воды напрямую влияет на прибыль. Технология безреагентной очистки на основе озона устраняет металлы, примеси и бактерии без вредных химикатов, обеспечивая воду без вкуса, цвета и запаха. Подробнее об установках — на https://pws.world/promyshlennye-ustanovki — здесь представлен полный ассортимент решений с высоким ресурсом эксплуатации и низкими текущими расходами, что делает их выгодным вложением для любого производства.
mostbet ocolire blocare [url=https://mostbet94451.icu]https://mostbet94451.icu[/url]
https://yu.com/ yu
Worth bookmarking and sharing with anyone interested in the topic, that is my honest take, and a stop at forwardintentions reinforces that, the kind of generous resource that makes the open web feel worth defending against the constant pressure to retreat into walled gardens and curated feeds today everywhere I look across all my devices.
мелбет оплата через сбп [url=http://melbet25717.online/]http://melbet25717.online/[/url]
mostbet apk Republica Moldova [url=http://mostbet94451.icu/]http://mostbet94451.icu/[/url]
Everything for Minecraft https://topminecraftworldseeds.com in one place: mods, skins, maps, texture packs, and the best seeds for survival, creativity, and adventure. Collections of popular add-ons, installation instructions, updates, and secure downloads for different versions of the game.
melbet mines как играть [url=https://www.melbet25717.online]melbet mines как играть[/url]
lucky jet o‘yin pin up [url=https://pinup01611.help]https://pinup01611.help[/url]
vavada aplikacja [url=http://vavada18205.help/]vavada aplikacja[/url]
Современная электроника требует надежных комплектующих, и выбор поставщика становится критически важным для успеха любого проекта. Профессиональные инженеры и радиолюбители знают, что качество компонентов напрямую влияет на долговечность устройств и безопасность эксплуатации. На платформе https://components.ru/ собран широкий ассортимент электронных элементов — от микроконтроллеров и силовых транзисторов до пассивных компонентов и соединителей, что позволяет реализовать проекты любой сложности. Удобная навигация, техническая документация и оперативная доставка делают процесс закупки максимально эффективным, экономя время специалистов и обеспечивая бесперебойность производственных циклов в условиях современного рынка.
mostbet kazino slotlar [url=http://mostbet24939.online/]http://mostbet24939.online/[/url]
мостбет mostbet [url=https://mostbet86043.help]https://mostbet86043.help[/url]
aviator brasil site [url=www.aviator92671.help]www.aviator92671.help[/url]
mostbet casino slots [url=http://mostbet24939.online]http://mostbet24939.online[/url]
Современные жилые комплексы бизнес-класса в Москве сочетают удобное расположение, качественное строительство и высокий уровень комфорта. Такие проекты пользуются стабильным спросом среди покупателей, которые ценят комфортную городскую среду и современные стандарты жилья – https://stoyne.ru/
If I had to defend the time I spend reading independent blogs this site would feature in the defence, and a look at clarityactivatesprogress reinforced that defensive utility, the ongoing case for non algorithmic reading is one I make to myself periodically and sites like this one provide the actual evidence that supports the case clearly.
мостбет промокод mostbet [url=http://mostbet86043.help]мостбет промокод mostbet[/url]
Питер, всем привет Беда пришла в семью Родственники не знают что делать Платная клиника — бешеные деньги Короче, врачи вытащили с того света — наркология вывод из запоя в стационаре под наблюдением Даже кодировку сделали В общем, не потеряйте контакты — вывод из запоя стационарно [url=https://vyvod-iz-zapoya-v-staczionare-sankt-peterburg-axm.ru]вывод из запоя стационарно[/url] Стационар — это реальный шанс Это может спасти чью-то семью
como trocar e-mail no aviator [url=https://www.aviator92671.help]https://www.aviator92671.help[/url]
https://leyla.com.ua/
Здорова, Питер Отец не встаёт с кровати Дети боятся даже подходить В диспансер тащить — стыд и страх Короче, спасла только госпитализация — быстрый вывод из запоя в стационаре за 3 дня Выписали через 4 дня здоровым В общем, вся инфа по ссылке — вывести из запоя в стационаре [url=https://vyvod-iz-zapoya-v-staczionare-sankt-peterburg-zqe.ru]вывести из запоя в стационаре[/url] Звоните прямо сейчас Это может спасти жизнь близкого
Everything for Minecraft https://topminecraftworldseeds.com in one place: mods, skins, maps, texture packs, and the best seeds for survival, creativity, and adventure. Collections of popular add-ons, installation instructions, updates, and secure downloads for different versions of the game.
Хочешь воплотить смелые эротические фантазии в ярких текстах? Нейросеть на сайте https://www.ero-storitop.com/ создаёт горячие рассказы за пять секунд. Просто опиши идею — все персонажи 18+, анонимно, бесплатно и без регистрации. Чем точнее ты опишешь сюжет, тем пикантнее будет финал. Испытай возможности прямо сегодня!
Took some notes for a project I am working on, and a stop at forwardmomentumlogic added more raw material to those notes, content that contributes to my own creative work rather than just being interesting in the moment is the kind I value most and the kind I will keep coming back to repeatedly.
A small thing but the line spacing and font choices made reading this physically pleasant, and a look at actionbuildsconfidence maintained the same careful design, technical choices about typography are part of what makes online reading actually comfortable and this site has clearly invested in the design layer alongside the content layer carefully.
Considered as a whole this site has developed a coherent point of view that comes through in individual pieces, and a look at actionturnsideas continued displaying that coherence, sites with a unified perspective rather than a grab bag of takes are sites with editorial maturity and this one has clearly developed that maturity through years of work.
pin-up android [url=http://pinup01611.help]pin-up android[/url]
vavada nowa strona [url=www.vavada18205.help]www.vavada18205.help[/url]
vavada wypłata tpay [url=vavada18205.help]vavada18205.help[/url]
pin-up ishchi ko‘zgusi [url=https://pinup01611.help/]https://pinup01611.help/[/url]
Generally I find the content on similar topics frustrating in specific ways and this post avoided all of them, and a look at growthflowswithintent continued that frustration free experience, content that sidesteps the standard failure modes of its genre is content with editorial awareness and this site has clearly studied what fails elsewhere consistently.
Will recommend this to a couple of friends who have been asking about this exact topic, and after ideasneedclarity I have even more reason to do so, the kind of site that earns word of mouth rather than chasing it through aggressive marketing or paid placements is always a treat to find online.
https://reitingmebel.ru/ – независимый сайт с актуальными рейтингами производителей мебели по регионам России. В подборках собраны лучшие компании и модели для дома, офиса и детской: кухни, школьные парты, растущие стулья, стульчики для кормления и другие категории. Рейтинги формируются на основе отзывов, качества материалов, сервиса, гарантий и соотношения цены и надежности.
Самара, всем привет. Отец не выходит из штопора. Соседи уже вызывали полицию. Скорая не приедет на такой вызов. Итог, спасла эта служба — вывод из запоя с выездом круглосуточно. Через пару часов человек пришёл в норму. В общем, вся инфа по ссылке — вывести из запоя [url=https://vyvod-iz-zapoya-na-domu-samara-qzf.ru]вывести из запоя[/url] Звоните прямо сейчас. Киньте ссылку тем, кто рядом с бедой.
mostbet ставки на теннис Кыргызстан [url=https://mostbet66053.online/]mostbet ставки на теннис Кыргызстан[/url]
Felt the post had been written without using a single buzzword, and a look at growthmoveswithprecision continued that clean vocabulary, content free of jargon and trendy phrases reads better and ages better and this site has clearly committed to a vocabulary that will not feel dated in three years which is impressive editorially.
Reading this brought back the satisfaction I used to get from blogs ten years ago, and a stop at focusdrivenprogression kept that nostalgic quality alive, sites that capture what was good about an earlier era of internet writing are increasingly precious and this one is doing that without feeling like a deliberate throwback at all.
Worth every minute of the time spent reading, and a stop at ideasbecomemovement extends that value across more pages, in a media environment where most content is engineered to waste attention this site stands out by treating reader time as something valuable rather than something to be exploited and stretched as far as possible.
https://ukraineembassyindia.org/
Привет из Нижнего Ситуация аховая Соседи стучат Таблетки не помогают Короче, врачи вытащили с того света — вывод из запоя в стационаре круглосуточно Выписали через 5 дней без ломки В общем, телефон и цены тут — цена вывода из запоя в стационаре [url=https://vyvod-iz-zapoya-v-staczionare-nizhnij-novgorod-elm.ru]цена вывода из запоя в стационаре[/url] Стационар — это реальный выход Перешлите тем кто в такой же ситуации
мелбет бонус без депозита [url=http://melbet56606.online/]мелбет бонус без депозита[/url]
betting in Malawi aviator [url=http://aviator19661.online/]http://aviator19661.online/[/url]
войти в mostbet [url=http://mostbet03253.online]http://mostbet03253.online[/url]
Came back to this twice now in the same week which is unusual for me, and a look at growthadvancescleanly suggested I will keep coming back, the kind of post that earns repeated visits rather than one and done reading is the gold standard for content quality and this site clearly hit that standard.
Looking for similar voices elsewhere has come up empty in my recent searches, and a stop at actionturnsvision extended the search frustration, the rare site that does what no other does in quite the same way is precious and this one has clearly developed a particular approach that I have not been able to find duplicates of.
https://poslednienovosti.net/
mostbet ставки на футбол Кыргызстан [url=http://mostbet32915.help/]http://mostbet32915.help/[/url]
Hey everyone I’ve been looking for a decent and reliable gaming platform forever, Almost gave up on online gambling as a whole it’s honestly the only legit platform out there right now backed by great feedback on independent tracking forums. Withdrawals hit your account in under 5 minutes,
Anyway, if you want to skip the research, check it out yourself through the official link ph365 [url=https://ph365h.net]ph365[/url] This is the only provider that actually delivers on its promises, definitely share this post with anyone who’s still looking for a decent casino!
mostbet зеркало актуальное Кыргызстан [url=www.mostbet66053.online]mostbet зеркало актуальное Кыргызстан[/url]
Even just sampling a few posts the consistency is what stands out, and a look at buildtractionthoughtfully confirmed the broader pattern, sites where every piece I sample lives up to the standard set by the others are sites with serious quality control and this one has clearly invested in whatever editorial process produces that consistency reliably.
Now adjusting my mental list of reliable sites for this topic, and a stop at clarityguidesgrowth reinforced the adjustment, the small ongoing curation work of maintaining trusted sources is one of the actual practical activities of careful reading and this site has earned a permanent place on my list for this particular subject.
Good post, the kind that respects the reader by getting to the point quickly without skipping the details that matter, and a short look at clarityguidesmotion confirmed that approach is consistent across the site which is rare to find online these days, definitely a place I will return to soon.
mostbet скачать в Кыргызстане [url=mostbet66053.online]mostbet66053.online[/url]
mostbet aviator Oʻzbekiston [url=http://mostbet81183.help]http://mostbet81183.help[/url]
Everything for Minecraft https://topminecraftworldseeds.com/ in one place: mods, skins, maps, texture packs, and the best seeds for survival, creativity, and adventure. Collections of popular add-ons, installation instructions, updates, and secure downloads for different versions of the game.
Хотите найти выгодные авиабилеты в США? Посетите сайт https://usaflights24.com/ и вы найдете лучшие предложения на авиабилеты. Наша поисковая система поможет вам сравнить цены сотен авиакомпаний и туристических сайтов за считанные секунды, чтобы вы могли быстро найти дешевые варианты. Забудьте о скрытых сборах: итоговая стоимость всегда совпадает с той, что вы видите на экране, — никаких неожиданностей на этапе оплаты.
мелбет экспресс ставки [url=www.melbet56606.online]www.melbet56606.online[/url]
aviator platform [url=www.aviator19661.online]www.aviator19661.online[/url]
мостбет сайт для телефона [url=www.mostbet03253.online]мостбет сайт для телефона[/url]
Recommended without reservation for anyone interested in the topic at any level of expertise, and a look at focusdefinesdirection only strengthens that recommendation, this site clearly knows how to serve readers across a range of backgrounds without watering down the content or talking past anyone in the audience which is genuinely impressive to see.
1win ky login [url=https://1win20574.help/]https://1win20574.help/[/url]
melbet live чат [url=http://melbet56606.online]http://melbet56606.online[/url]
melbet rulaj bonus [url=http://melbet33145.help]http://melbet33145.help[/url]
Yesterday I was complaining about the state of online writing and today this site has temporarily fixed that complaint, and a look at forwardenergyengine extended that mood reversal, the short term mood improvement that comes from finding good content is real and this site has produced that improvement for me at a useful moment.
aviator install Malawi [url=www.aviator19661.online]www.aviator19661.online[/url]
mostbet приложение apk [url=http://mostbet03253.online/]mostbet приложение apk[/url]
Good site! I truly love how it is easy on my eyes it is. I am wondering how I might be notified when a new post has been made. I’ve subscribed to your RSS which may do the trick? Have a great day!
https://gloria-ukraine.org/
Bookmarked the page and the homepage too because clearly there is more to explore here, and a quick stop at forwardmotionengine only made that more obvious, this is the kind of place I want to dig through over a weekend rather than rushing through during a coffee break tomorrow morning before getting back to work.
Люди помогите советом Брат в коме после алкоголя Соседи уже вызвали скорую Платная клиника — выкачивает деньги Короче, спасла только госпитализация — наркология вывод из запоя в стационаре с поддержкой Капельницы и препараты по назначению В общем, жмите чтобы сохранить — вывод из запоя санкт-петербург стационар [url=https://vyvod-iz-zapoya-v-staczionare-sankt-peterburg-wjf.ru]вывод из запоя санкт-петербург стационар[/url] Не ждите чуда Перешлите тем кто в такой же ситуации
In the middle of an otherwise scattered day this post landed as a moment of focus, and a stop at forwardmotionframework extended that focused feeling across more pages, content that anchors a fragmented day rather than contributing to the fragmentation is content with real centring effect and this site is providing that anchoring function for me.
мостбет live ставки Бишкек [url=mostbet32915.help]мостбет live ставки Бишкек[/url]
mostbet ilova qayerdan yuklab olish [url=https://mostbet81183.help/]https://mostbet81183.help/[/url]
https://ekskurs-lviv.com/
mostbet скачать apk бесплатно [url=http://mostbet32915.help]mostbet скачать apk бесплатно[/url]
Сервис ПроМастер решает бытовые проблемы в режиме 24/7 по всей России — от протечки крана до сложного ремонта техники. Платформа https://master-na-dom.online/ объединяет проверенных специалистов более чем в 170 городах, гарантируя выезд мастера за 30 минут без предоплаты. Удобная система заявок, прозрачное ценообразование и годовая гарантия на все виды работ делают сервис надёжным помощником в решении домашних задач любой сложности.
Велакаст — это современный препарат для лечения гепатита С, который завоевал доверие пациентов благодаря высокой эффективности и удобству применения. Комбинация софосбувира и велпатасвира позволяет успешно бороться с различными генотипами вируса, обеспечивая излечение в большинстве случаев. На информационном портале https://velakast.online/ вы найдете подробную информацию о препарате, принципах его действия и особенностях терапии. Здесь собраны реальные отзывы пациентов, прошедших лечение, а также важные рекомендации по применению. Перед началом терапии обязательно проконсультируйтесь с врачом для подбора оптимальной схемы лечения.
mostbet uz rasmiy [url=https://mostbet81183.help]https://mostbet81183.help[/url]
star 888 casino [url=https://888starz-uzb3.com/]star 888 casino[/url]
888starz rasmiy Curacao ruxsatiga tayanib, foydalanuvchi mablag’lari va shaxsiy ma’lumotlarini himoya qiladi.
888Games to’plami darhol natija beradigan Crash va Plinko kabi formatlarni jamlaydi.
Jonli tikishda koeffitsiyentlar o’yin davomida real vaqtda o’zgarib turadi.
Bundan tashqari saytda keshbek, freebet va muntazam turnirlar o’tkaziladi.
To’lovlar Visa, Mastercard, Skrill va 50 dan ortiq kriptovalyuta orqali amalga oshiriladi.
Everything for Minecraft https://topminecraftworldseeds.com in one place: mods, skins, maps, texture packs, and the best seeds for survival, creativity, and adventure. Collections of popular add-ons, installation instructions, updates, and secure downloads for different versions of the game.
Здорова, народ Жесть полная Соседи уже вызвали полицию Платная клиника — бешеные счета Короче, спасла только госпитализация — вывод из запоя стационар с круглосуточным наблюдением Врачи и медсёстры 24/7 В общем, вся инфа по ссылке — лечение запоя в стационаре санкт петербург [url=https://vyvod-iz-zapoya-v-staczionare-sankt-peterburg-nhy.ru]https://vyvod-iz-zapoya-v-staczionare-sankt-peterburg-nhy.ru[/url] Не ждите чуда Перешлите тем кто в такой же беде
Looking for cryptocurrency exchange? CryptoSDK, available at cryptosdk.io, is a crypto exchange API designed for websites, apps, wallets, and digital services that need a native crypto exchange integrated directly into their product flow. Instead of sending users to a separate frontend, the integration keeps routing, rate search, verification, validation, order creation, and status tracking within a single product.
Refreshing to find writing that does not try to manipulate the reader into clicking onto the next page through cliffhangers and forced engagement, and a stop at focusguidesmovement continued in the same respectful way, this is what reader first design actually looks like in practice rather than just in marketing copy that sounds nice.
Found this via a link from another piece I was reading and the click was worth it, and a stop at ideasflowwithclarity extended the value across more material, the open web still rewards clicking through citations when the underlying writers care about each other work and this site clearly belongs to that network.
1win secure site [url=https://1win20574.help/]1win secure site[/url]
melbet rotiri gratis sloturi [url=http://melbet33145.help/]http://melbet33145.help/[/url]
aviator en pin up [url=https://pinup15843.help/]https://pinup15843.help/[/url]
Keno’s all about probabilities, but a little instant gratification helps! 😉 I checked out ph799 ph app download apk – super fast registration & deposit, perfect for quick plays. Seems like they understand that anticipation is key! 👍
1win download for mobile [url=https://www.1win20574.help]1win download for mobile[/url]
melbet oglinda Moldova [url=http://melbet33145.help]http://melbet33145.help[/url]
يفتح 888starz أمام لاعبي مصر بوابة رسمية واحدة تجمع آلاف الألعاب وعشرات الرياضات.
ينفرد الموقع بمجموعة 888Games الخاصة ذات النتائج السريعة.
يشمل الموقع أكثر من 35 فئة رياضية تتابع الأحداث العالمية والمحلية.
تبلغ باقة ترحيب الكازينو 1500 يورو إضافة إلى 150 فري سبين.
يقدم 888starz تسجيلًا سريعًا بخطوات بسيطة وحد إيداع منخفض.
888starz [url=http://888starzs2.com/]888 starz[/url]
888starz [url=http://www.888starzs2.com/]888starz[/url]
تعمل المنصة برخصة كوراساو تديرها Bittech B.V.، مما يضمن نزاهة اللعب وسلامة الأموال.
يتيح 888starz أكثر من مئتين وخمسين طاولة روليت وبلاك جاك مباشرة في أي وقت.
يقدم 888starz تغطية للدوريات الأوروبية والمنافسات المصرية.
يقدم قسم الرياضة بونص أول إيداع بنسبة 100% حتى 100 يورو.
يوفر 888starz الدفع عبر Visa و Mastercard و Skrill والكريبتو المتنوع بحد إيداع منخفض.
888starz [url=https://888starzs10.com/]888starz[/url]
بترخيصه الدولي من كوراساو، يوفر الموقع بيئة لعب آمنة وشفافة لكل مستخدم.
تتخطى مكتبة السلوت في 888starz حاجز الأربعة آلاف لعبة وتتجدد باستمرار.
يغطي 888starz أكثر من خمس وثلاثين رياضة بينها Dota 2 و CS:GO ضمن قسم الإي سبورتس.
يقدم قسم الرياضة بونص أول إيداع بنسبة 100% بحد أقصى 100 يورو.
تتنوع وسائل الدفع بين الفيات والعملات المشفرة بحد أدنى يبدأ من 2 يورو.
Thanks for the simple approach, too many sites bury the actual point under layers of unnecessary words, but here every line earns its place, and a look at signalcreatesdirectionalflow showed the same care for the reader which is something I will remember the next time I need answers on a topic.
A clean read with no irritations, and a look at signalactivatesdirection continued that frictionless quality, the absence of small irritations is something I notice only when present elsewhere and this site is one of the rare places where everything just works and lets me focus on the substance rather than fighting the format.
Everything for Minecraft topminecraftworldseeds.com in one place: mods, skins, maps, texture packs, and the best seeds for survival, creativity, and adventure. Collections of popular add-ons, installation instructions, updates, and secure downloads for different versions of the game.
http://www.bankruptcylancasterpa.com
vavada aplikacja bukmacher [url=http://vavada73941.help]http://vavada73941.help[/url]
Visit https://protectivevpn.com/ to find the top 10 VPN services, allowing you to surf the internet securely and anonymously using top VPNs from our list of recommended brands. We also have a list of fast servers for users worldwide! Our ratings and recommendations on this page are based on independent testing.
Honestly impressed by how much useful content sits in such a small post, and a stop at clearbrick confirmed the rest of the site packs a similar punch, density without confusion is a hard balance to strike and this site has clearly cracked the code on it across many different topic areas covered.
Approaching this site through a casual link click and being surprised by what I found, and a look at growthmoveswithpurpose extended the surprise, the rare experience of stumbling into excellent independent content rather than predictable mediocrity is one of the actual remaining pleasures of casual web browsing and this site provided it cleanly.
Picked up on several small touches that suggest a careful editor, and a look at ideasneedmomentum suggested the same hand at work across the broader site, editorial consistency at a granular level is one of the strongest signs that an operation is serious rather than just hobbyist and this site reads as serious throughout.
código bonus pin-up [url=http://pinup15843.help]http://pinup15843.help[/url]
mostbet в Кыргызстане [url=http://mostbet57408.online/]http://mostbet57408.online/[/url]
mostbet rəsmi sayt [url=https://www.mostbet27461.online]mostbet rəsmi sayt[/url]
sitio oficial pin up [url=https://www.pinup15843.help]sitio oficial pin up[/url]
Thanks for a post that does not try to be funny when it is not the moment for it, and a stop at growthmoveswithfocus maintained the same appropriate seriousness, knowing when humour helps and when it just signals desperation for engagement is a sign of editorial maturity that many blogs have not developed yet.
Турция остаётся лидером среди зарубежных направлений для россиян: мягкий климат, отели уровня ultra all inclusive и разнообразие курортов на любой вкус. Анталья, Бодрум, Кемер, Аланья — каждый из них предлагает свою атмосферу, будь то яхтинг, дайвинг или неспешный пляжный отдых. Чтобы не ошибиться с выбором, читайте подробный обзор https://evrobuket-nn.ru/top-kurorty-turcii-gde-otdyhat/ — там собраны топ-7 курортов с описанием инфраструктуры, пляжей и развлечений. Грамотно выбранный курорт превращает поездку в незабываемое путешествие.
Liked that the post acknowledged complications rather than pretending they did not exist, and a stop at forwardthinkingengine continued that honest framing, sites that handle complexity with care rather than papering it over with simplifying claims are doing real intellectual work and this one is clearly in that category based on what I have read.
1win даромад бе мушкил [url=https://1win51823.icu]https://1win51823.icu[/url]
https://intoprating.com/
vavada zadania bonusowe [url=http://vavada73941.help]http://vavada73941.help[/url]
Now planning to recommend this site in a context where my recommendations are taken seriously, and a stop at signalpowersgrowth confirmed I should make that recommendation soon, the small but real act of recommending content into spaces where my taste matters is something I take seriously and this site is worth the recommendation.
Everything for Minecraft http://www.topminecraftworldseeds.com in one place: mods, skins, maps, texture packs, and the best seeds for survival, creativity, and adventure. Collections of popular add-ons, installation instructions, updates, and secure downloads for different versions of the game.
vavada czat wypłata [url=https://www.vavada73941.help]vavada czat wypłata[/url]
Solid value for anyone willing to read carefully, and a look at claritycreatesmomentum extends that value across the rest of the site, this is the kind of place that rewards return visits rather than offering everything in a single splashy post and then leaving readers nothing to come back for later which is unfortunately common.
Reading this in a relaxed evening setting was a small pleasure, and a stop at clearcoast extended the pleasant evening reading, content that fits the tone of relaxed time without becoming forgettable is what I look for in evening reading and this site has the right tone for that particular slot in my daily reading routine.
1win лимит на элсом [url=http://1win06945.icu]http://1win06945.icu[/url]
мостбет не открывается [url=https://mostbet57408.online]https://mostbet57408.online[/url]
mostbet kupon kodu azərbaycan [url=https://mostbet27461.online]https://mostbet27461.online[/url]
Got pulled in by the headline and stayed because the content actually delivered on the promise, and a stop at growthmovesintentionally kept that trust intact, when a site lives up to its own framing it earns the right to keep showing up in my browser tabs going forward indefinitely from here on out really.
Really liked the calm tone running through the post, no shouting and no urgency forced into the writing, and a look at signalcreatesmomentum kept that quiet confidence going, the kind of voice that makes the reader feel respected rather than yelled at which is depressingly common across most modern blog content these days.
мостбет депозит [url=https://www.mostbet57408.online]https://www.mostbet57408.online[/url]
mostbet bonus [url=mostbet27461.online]mostbet bonus[/url]
лента 10Х17Н13М3Т [url=https://stalnayalenta.ru/10kh17n13m3t/]лента 10Х17Н13М3Т[/url]
Started forming counter examples to test the claims and the post handled most of them implicitly, and a look at signalclarifiesaction continued that anticipatory style, writers who think two steps ahead of the critical reader save themselves from a lot of follow up work and this writer has clearly internalised that habit consistently.
насби 1вин apk [url=https://1win51823.icu/]насби 1вин apk[/url]
https://technoopt.com.ua/
Crazy Time è un game show in diretta di Evolution che ruota attorno a una grande ruota da 54 segmenti.
Il giocatore sceglie liberamente su quali caselle distribuire la propria puntata.
Crazy Time offre quattro round speciali: Coin Flip, Pachinko, Cash Hunt e il bonus Crazy Time.
La scelta tra numeri sicuri e bonus ad alto rischio dipende dallo stile del giocatore.
Crazy Time funziona senza problemi su dispositivi Android e iOS.
crazytime stats [url=https://chiropractorcpt.com/crazytime-stats-register-and-play-casino-and-sports/]crazytime stats[/url]
The clean design and nostalgic theme make it a favourite among UK and US slot players.
Traditional symbols including lemons, plums and grapes drive most of the wins.
free 20 super hot [url=https://www.hemptradingpost.com/forums/users/marylynhutchison/]free 20 super hot[/url]
The card gamble feature offers a quick way to try to multiply the latest payout.
Flexible stake options make the game accessible to small and large budgets alike.
The mobile-friendly build runs smoothly on both Android and iOS devices.
Индивидуалка превзошла все мои ожидания. Красота, ухоженность и внимание к деталям — на высшем уровне. Вечер удался полностью: проститутки
Well structured and easy to read, that combination is rarer than people think, and a stop at directionsetsvelocity confirmed the same standard runs across the rest of the site, definitely the kind of place I will be coming back to when this topic comes up in conversation later again over the weeks ahead.
يقدم 888starz في مصر تجربة موحّدة تدمج آلاف الألعاب وعشرات الرياضات في مكان واحد.
888starz [url=https://apds.ircam.fr/index.php/%D9%83%D8%A7%D8%B2%D9%8A%D9%86%D9%88_888_%D8%AA%D8%B3%D8%AC%D9%8A%D9%84_%D8%A7%D9%84%D8%AF%D8%AE%D9%88%D9%84:_%D8%A7%D9%84%D9%85%D9%88%D9%82%D8%B9_%D8%A7%D9%84%D8%B1%D8%B3%D9%85%D9%8A_%D9%84%D9%84%D9%83%D8%A7%D8%B2%D9%8A%D9%86%D9%88_%D9%88%D8%A7%D9%84%D8%B1%D9%87%D8%A7%D9%86_%D8%A7%D9%84%D8%B1%D9%8A%D8%A7%D8%B6%D9%8A]888starz[/url]
يحتوي الكازينو على أكثر من 4000 لعبة سلوت من كبار المزودين العالميين.
يشمل الموقع أكثر من 35 فئة رياضية تتابع أبرز الأحداث العالمية والمحلية.
يقدم 888starz لأول إيداع في الكازينو بونصًا حتى 1500 يورو و150 دورة مجانية.
يبقى الدعم متاحًا 24/7 عبر الدردشة والبريد مع تطبيق لأندرويد و iOS.
A clean read with no irritations, and a look at coilcolt continued that frictionless quality, the absence of small irritations is something I notice only when present elsewhere and this site is one of the rare places where everything just works and lets me focus on the substance rather than fighting the format.
Слушайте кто знает Сосед совсем спился Дети боятся заходить в дом Скорая не приезжает на такие вызовы Короче, врачи стационара реально помогли — лечение в наркологическом стационаре под контролем Врачи и медсёстры 24/7 В общем, вся инфа по ссылке — сколько стоит прокапаться от алкоголя в стационаре [url=https://narkologicheskij-staczionar-moskva-rtv.ru]https://narkologicheskij-staczionar-moskva-rtv.ru[/url] Не ждите чуда Перешлите тем кто в такой же беде
888starz funciona con una licencia internacional de Curaçao a través de Bittech B.V. que protege el dinero y los datos del jugador.
El casino en vivo cuenta con más de 250 mesas atendidas por crupieres reales las 24 horas.
La sección deportiva abarca más de 35 disciplinas, desde el fútbol y el tenis hasta el hockey y los esports.
888starz kirish [url=https://wikibuilding.org/index.php?title=888Starz_espa%C3%B1a_official_casino,_slots_and_live_games]888starz kirish[/url]
Además, el sitio ofrece cashback, apuestas gratuitas y torneos periódicos.
Crear una cuenta nueva requiere apenas unos minutos en el sitio oficial.
يوفر 888starz للاعبين في القاهرة وباقي مدن مصر منصة رسمية تجمع الكازينو والرهانات الرياضية.
تضم سلسلة 888Games الحصرية ألعابًا فورية مثل Crash و Dice و Plinko و Lottery.
888starz تسجيل الدخول [url=https://initiotech.com/slot/888starz-%d8%aa%d8%b3%d8%ac%d9%8a%d9%84-%d8%a7%d9%84%d8%af%d8%ae%d9%88%d9%84-%d9%83%d8%a7%d8%b2%d9%8a%d9%86%d9%88-%d8%ad%d9%82%d9%8a%d9%82%d9%8a-%d8%a8%d8%a3%d9%85%d9%88%d8%a7%d9%84-%d8%ad%d9%82%d9%8a/]888starz تسجيل الدخول[/url]
تتوفر أسواق على الدوري المصري وفرق القاهرة إضافة إلى دوري الأبطال.
يطرح 888starz مكافآت منتظمة تشمل الاسترداد النقدي والترقيات.
لا يستغرق إنشاء الحساب سوى دقائق معدودة على المنصة الرسمية.
netritonet.com
1win Тоҷикистон сайти расмӣ [url=https://1win51823.icu]https://1win51823.icu[/url]
Looking for how to sell usdt online? Visit buysellswappro.com – BuySellSwapPro helps users navigate between fiat and crypto using clear online routes centered around USDT. You can buy crypto with a credit or debit card, sell crypto for fiat, compare pages by currency or country, and choose the route that best suits your card, bank account, or local market conditions.
Москва, всем привет Близкий человек уже неделю в запое Соседи стучат в стену Скорая не приедет на такой вызов Короче, врачи вытащили с того света — госпитализация в наркологический стационар круглосуточно Положили в комфортную палату В общем, телефон и цены тут — палата в наркологии [url=https://narkologicheskij-staczionar-moskva-lba.ru]https://narkologicheskij-staczionar-moskva-lba.ru[/url] Стационар — это реальный шанс Перешлите тем кто в отчаянии
Слушайте кто сталкивался Мой брат уже две недели в запое Соседи уже звонят в полицию В диспансер тащить — стыд и страх Короче, спасла только госпитализация — наркологическая больница стационар с капельницами Выписали через 4 дня здоровым В общем, вся инфа по ссылке — платный наркологический стационар [url=https://narkologicheskij-staczionar-moskva-pfk.ru]платный наркологический стационар[/url] Звоните прямо сейчас Перешлите тем кто в такой же беде
W Mostbet darmowe spiny stanowią popularny bonus, dzięki któremu można grać na automatach za darmo.
Aby zdobyć darmowe spiny, należy najpierw założyć konto w Mostbet i potwierdzić dane.
Free spiny wygasają po określonym okresie, więc nie należy zwlekać z ich użyciem.
Aktywni użytkownicy z Polski otrzymują spiny za kolejne depozyty i udział w promocjach.
Gra jest przeznaczona dla osób pełnoletnich i wymaga rozsądnego podejścia.
mostbet 30 free spins [url=https://www.selfhackathon.com/mostbet-30-free-spins-how-many-free-spins-you-get-and-on-which-slots/]mostbet 30 free spins[/url]
Zestawienie najlepszych kasyn ułatwia porównanie bonusów, gier i warunków w jednym miejscu.
Sprawdzone kasyna stosują szyfrowanie danych oraz bezpieczne metody logowania.
Gry pochodzą od uznanych dostawców, co gwarantuje wysoką jakość i płynność.
najlepsze polskie kasyna online [url=https://question2answer.rexo.top/index.php?qa=958&qa_1=najlepsze-polskie-kasyna-online-register-play-casino-sports]najlepsze polskie kasyna online[/url]
Najlepsze kasyna kuszą bonusem powitalnym, często łączącym premię od depozytu z darmowymi spinami.
Dostępność popularnych metod wpłat i wypłat ułatwia zarządzanie środkami.
Worth bookmarking and sharing with anyone interested in the topic, that is my honest take, and a stop at progressmovespurposefully reinforces that, the kind of generous resource that makes the open web feel worth defending against the constant pressure to retreat into walled gardens and curated feeds today everywhere I look across all my devices.
Niektóre kody są też dostępne dla stałych graczy w ramach bieżących promocji.
Bonus z kodu aktywuje się zwykle po wpłacie spełniającej minimalny próg.
Warunki mogą ograniczać maksymalną wysokość zakładu podczas obrotu bonusem.
Poza bonusem powitalnym Vox Casino oferuje kody do cyklicznych akcji i cashbacku.
Oferta z kodem działa również w aplikacji mobilnej na Androida i iOS.
vox casino kody [url=http://shanxiyuetong.com/comment/html/?1473.html]vox casino kody[/url]
true fortune casino [url=https://anotepad.com/notes/b3q4skr9]true fortune casino[/url]
True Fortune Casino is an online casino that offers a wide selection of slots and table games to players.
Fans of classic games will find several variants of blackjack and roulette.
Reasonable bonus conditions, including a fair wager, are worth confirming in advance.
Cash-out speed varies by payment option, with e-wallets often among the fastest.
A responsive design ensures smooth performance across devices.
تدير المنصة شركة Bittech B.V. بموجب ترخيص كوراساو الذي يضمن نزاهة اللعب وأمان الأرصدة.
تضم مكتبة الكازينو أكثر من 4000 لعبة سلوت من كبار المزودين العالميين.
888starz [url=https://rivonirecruitment.co.za/?p=53962]888starz[/url]
يمكن الرهان على قمم القاهرة المحلية وكبرى البطولات القارية معًا.
يحصل اللاعب الجديد في القاهرة على مكافأة كازينو تصل إلى 1500 يورو مع 150 لفة مجانية.
يوفر 888starz الدفع عبر Visa و Mastercard و Skrill والكريبتو بحد إيداع منخفض.
What i discover troublesome is to find a weblog that may capture me for a minute however your blog is different. Bravo.
If you asked me to point to a recent positive sign for the open web this site would be near the top, and a stop at progressmovesbydesign reinforced that designation, the few sites that serve as evidence the web can still produce quality independent content are precious and this one has clearly become one for me.
«Партнёр» — проверенный поставщик товаров для школ и дошкольных учреждений. В ассортименте представлены оборудование, пособия и мебель по доступным ценам. Подробный каталог доступен на сайте https://xn—-7sbbumkojddmeoc1a7r.xn--p1acf/ с удобным выбором товаров. По всей стране — от Москвы до Иркутска — работает бесплатная доставка. В одном месте — надёжное качество, выгода и скорость.
1win скачать Киргизия [url=http://1win06945.icu]http://1win06945.icu[/url]
Москва, всем привет Отец не встаёт с кровати Родственники в полном отчаянии Платная клиника просит бешеные деньги Короче, единственные кто взялся за безнадёжный случай — лечение в наркологическом стационаре с психологом Положили в палату В общем, жмите чтобы сохранить — палата в наркологии [url=https://narkologicheskij-staczionar-moskva-jmw.ru]https://narkologicheskij-staczionar-moskva-jmw.ru[/url] Не ждите пока станет хуже Перешлите тем кто в беде
Слушайте кто знает Близкий человек уже 10 дней в запое Родственники в полном отчаянии Скорая не приедет на такой вызов Короче, спасла только госпитализация — платный наркологический стационар с палатами Врачи и медсёстры 24/7 В общем, не потеряйте контакты — стационар для наркоманов [url=https://narkologicheskij-staczionar-moskva-bny.ru]https://narkologicheskij-staczionar-moskva-bny.ru[/url] Звоните прямо сейчас Это может спасти жизнь
Reading this felt productive in a way most internet reading does not, and a look at ideasunlockmotion continued that productive feeling, sometimes the open web feels like a waste of time but sites like this remind me why I still bother to look around rather than retreating to old reliable sources for everything I need.
1win Бишкек кирүү [url=https://1win46794.icu]https://1win46794.icu[/url]
1win как пополнить через о деньги [url=http://1win06945.icu]http://1win06945.icu[/url]
plinko chicken road [url=www.chicken-road71226.icu]plinko chicken road[/url]
chicken road depósito revolut [url=www.chicken-road86685.icu]www.chicken-road86685.icu[/url]
chicken road italia login [url=http://chicken-road71021.icu]http://chicken-road71021.icu[/url]
Bookmark added with a small note about why, and a look at signalturnsideasforward prompted another bookmark with another note, the bookmarks I annotate are the ones I expect to return to deliberately rather than stumble into and this site is generating annotated bookmarks at a higher rate than my usual content sources by some margin.
Люди помогите советом Близкий человек просто умирает на глазах Мать плачет Платная наркология — бешеные счета Короче, спасла только госпитализация — наркологические услуги в стационаре комплексно Сделали кодировку на год В общем, телефон и цены тут — стационар наркологический москва [url=https://narkologicheskij-staczionar-moskva-cde.ru]стационар наркологический москва[/url] Не надейтесь на чудо Это может спасти жизнь близкого
Люди подскажите Жесть полная Родственники в шоке Платная клиника — бешеные счета Короче, единственное что сработало — наркологическая клиника стационар с индивидуальным подходом Провели полное очищение организма В общем, жмите чтобы сохранить — стоимость лечения в наркологической клинике москва [url=https://narkologicheskij-staczionar-moskva-fal.ru]стоимость лечения в наркологической клинике москва[/url] Не ждите чуда Это может спасти жизнь близкого
Glad the writer kept this short rather than padding it out, the points stand on their own without needing extra context, and a look at ideasintomotion kept the same approach going, brevity is a sign of confidence in the substance and the team here clearly trusts their content to land without filler.
Visit the YouTube channel https://www.youtube.com/@SERGGURU07 – he tells quiet stories that encourage you to slow down and turn your attention inward. If even for a moment while watching, you smile softly, feel something tirring inside, or simply sit in silence and understand, then this story is enough. The videos are created using artificial intelligence tools and the creator’s imagination. These are fictional works and have no connection to historical fact.
Reading this between two meetings turned out to be the highlight of the morning, and a stop at compassbraid continued that highlight quality, content that outshines the structured parts of a working day is doing something well beyond ordinary and this site has produced multiple such highlights for me already this week alone.
Now thinking about whether the writer might publish a longer form work I would buy, and a look at actionshapesdirection suggested the same depth would translate, content that makes me want to pay for related work in other formats is content that has earned commercial trust as well as attention trust and this site has both clearly.
plinko sin bloqueo argentina [url=http://plinko90488.icu/]http://plinko90488.icu/[/url]
chicken road apk ultima version [url=http://chicken-road35537.icu]http://chicken-road35537.icu[/url]
Found this really helpful, the explanations are simple but they actually answer the questions a normal reader would have, and after I followed forwardenergyreleased I had a clearer sense of the topic, no extra fluff just useful points laid out in a sensible order that made the time worth it.
1win бонус [url=https://www.1win46794.icu]1win бонус[/url]
Независимо от того, нужно ли найти почтовое отделение в небольшом поселке или крупном городе, полный справочник по почтовым отделениям России поможет быстро найти нужные сведения – https://pochtaops.ru/
1win сайт недоступен [url=https://www.1win46794.icu]https://www.1win46794.icu[/url]
chicken road pagos seguros [url=http://chicken-road86685.icu/]http://chicken-road86685.icu/[/url]
Worth saying that the prose reads naturally without straining for style, and a stop at clarityshapesdirection maintained the same unforced quality, writing that achieves elegance without effort is the highest tier and this site has clearly worked out how to land that effortless quality consistently rather than only on the writers best days.
На сайте homeweave https://homeweave.ru/ вас ждет широкий выбор диванов и мебели для комфортного быта по доступным ценам с доставкой до двери. Мы предлагаем мебель по приятным ценам — как собственного производства, так и от топовых отечественных марок. Мы внимательно следим за модными тенденциями, регулярно обновляем коллекцию и расширяем линейку товаров. Доставляем мебель в любой город России.
Decided not to comment because the post said what needed saying, and a stop at signalcreatesalignment continued that complete feel, content that does not invite obvious additions or corrections from readers is content that has been carefully considered and this site appears to consistently produce pieces that satisfy rather than provoke unnecessary follow ups.
chicken road slots [url=https://chicken-road86685.icu/]chicken road slots[/url]
chicken road coupon [url=https://www.chicken-road71021.icu]https://www.chicken-road71021.icu[/url]
Great work on keeping things readable, the post never drags or repeats itself which I really appreciate, and a stop at compassbulb added a bit more context that fit naturally with what was already said here, no need to read everything twice to get the point being made today.
1win демо plinko [url=https://1win96736.icu]1win демо plinko[/url]
chicken road bonus ricarica [url=www.chicken-road71021.icu]www.chicken-road71021.icu[/url]
vps top
Now recognising the specific pleasure of reading writing that shows real care for sentence shapes, and a look at focuspowersprogress extended that craft pleasure, sentence level writing quality is something most blog content ignores entirely and this site has clearly invested in the prose layer alongside the substance which is rare today.
Really appreciate that the writer did not stretch the post to hit some target word count, the points end when they are made, and a stop at directionpowersvelocity reflected the same discipline, brevity is generosity in disguise and this site has clearly figured that out far better than most blog operations have.
plinko slots apk [url=www.plinko90488.icu]www.plinko90488.icu[/url]
chicken road online [url=http://chicken-road35537.icu/]chicken road online[/url]
Люди помогите советом Близкий человек уже неделю в запое Родственники не знают что делать Скорая не приедет на такой вызов Короче, единственные кто взялся за сложный случай — наркологический стационар цена доступная Выписали через 5 дней без ломки В общем, вся инфа по ссылке — наркологический стационар цена [url=https://narkologicheskij-staczionar-moskva-vex.ru]https://narkologicheskij-staczionar-moskva-vex.ru[/url] Стационар — это реальный шанс Это может спасти чью-то семью
plinko compatible ios [url=www.plinko90488.icu]www.plinko90488.icu[/url]
chicken road instalar en móvil [url=https://www.chicken-road35537.icu]https://www.chicken-road35537.icu[/url]
Регистрация в Москве помогает сделать проживание в столице более организованным и понятным. Временный формат подойдет тем, кто находится в городе ограниченное время, а постоянная прописка — тем, кто планирует жить здесь долго. Важно выбирать законные варианты – сколько стоит временная регистрация в московской области
A well calibrated piece that knew its scope and stayed inside it, and a look at growthflowsbychoice maintained the same scope discipline, scope creep is one of the failure modes of long blog posts and this site has clearly invested in the editorial discipline to prevent it which shows up in tightly contained pieces.
Going to come back when I have more time to read carefully, the post deserves more than a quick scan, and a stop at conchclove reinforced that, this is the kind of site that rewards a slower read which is hard to find in this fast paced corner of the internet but really worthwhile.
Looking for how to sell usdt online? Head over to coinswaper.io – Check how much of the top coins you can get for 1, 2, 3, 5, 10, and 100 USDT, compare minor resale values, and kick off a fast USDT swap all from one place. These predefined values address the most frequent small-scale swap situations: a brief test, a micro-buy, a rapid conversion, or a modest sell-off into USDT.
Флагманский iPhone 17 Pro Max представляет собой вершину технологической эволюции Apple, объединяя передовую процессорную мощь, революционную камеру и безупречный дизайн. Этот смартфон создан для тех, кто ценит производительность и стиль в каждой детали. Подробнее о возможностях приобретения новинки можно узнать на https://kufactor.ru/news-29743-iphone-17-pro-max-v-apple-market-shag-v-novoe-pokolenie-tehnologij.html, где представлены различные конфигурации памяти и цветовые решения. Покупка в проверенном магазине гарантирует оригинальность устройства и полную техническую поддержку.
1win вывод на банковский счет [url=http://1win96736.icu]http://1win96736.icu[/url]
Софокаст.рф — это надежный информационный портал, посвященный современным методам лечения гепатита С с помощью противовирусных препаратов прямого действия нового поколения. Здесь вы узнаете о пангенотипных схемах терапии, которые демонстрируют эффективность выше 95% и позволяют завершить курс всего за 8-12 недель. На сайте https://xn--80atlanehl.xn--p1ai/ собрана проверенная информация о препаратах, генотипах вируса и оптимальных схемах лечения для осознанного подхода к терапии. Портал помогает пациентам разобраться в современных возможностях медицины и понять, что гепатит С сегодня — это излечимое заболевание, требующее правильного выбора препаратов и врачебного контроля.
1win регистрация с телефона [url=https://1win96736.icu/]1win регистрация с телефона[/url]
mostbet promo code [url=https://mostbet49108.online]https://mostbet49108.online[/url]
Pass this along to anyone you know dealing with similar questions, the answers here are clear, and a stop at cotboil adds even more useful material, this is the kind of resource that deserves to circulate widely rather than getting lost in the constant churn of new content online that buries good work daily.
Kasyno bonus bez depozytu pozwala przetestować ofertę kasyna online bez wpłacania własnych środków na start. Wyjaśniamy, jak odebrać promocję, jak ją aktywować i które punkty regulaminu trzeba sprawdzić, zanim rozpoczniesz grę. Kasyno bonus bez depozytu daje nowemu graczowi możliwość rozpoczęcia gry bez wcześniejszego zasilania konta. W odróżnieniu od klasycznego bonusu powitalnego taka premia jest przyznawana już po rejestracji — automatycznie albo po wpisaniu właściwego kodu promocyjnego.
chicken road plinko app [url=https://chicken-road71226.icu/]https://chicken-road71226.icu/[/url]
mostbet sportfogadás letöltés [url=https://mostbet50579.icu/]https://mostbet50579.icu/[/url]
chicken road mines trucos [url=chicken-road29283.icu]chicken-road29283.icu[/url]
chicken road depósito sin verificación [url=chicken-road71226.icu]chicken-road71226.icu[/url]
Процессуальное законодательство Республики Казахстан (РК) отличается сложностью и множеством нюансов, что делает профессиональное представительство в суде не просто желательным, но и жизненно необходимым условием для защиты. Комплексное ведение дела – это всеобъемлющий подход, который начинается задолго до первого судебного заседания и завершается только после полного исполнения судебного акта. Автор блога: Бахирев Анатолий Анатольевич, ведущий юрист-эксперт https://femida-justice.com/uslugi/predstavitelstvo-v-sude/
мостбет сколько идет вывод [url=http://mostbet68667.icu]http://mostbet68667.icu[/url]
mostbet официальный сайт зеркало [url=https://mostbet49108.online/]https://mostbet49108.online/[/url]
Слушайте кто сталкивался Муж просто потерял себя Родственники не знают что делать Платная клиника — бешеные деньги Короче, только стационар реально помог — наркологический стационар цена доступная Выписали через 5 дней без ломки В общем, жмите чтобы сохранить — стоимость лечения в наркологической клинике москва [url=https://narkologicheskij-staczionar-moskva-gsh.ru]https://narkologicheskij-staczionar-moskva-gsh.ru[/url] Не надейтесь что само пройдёт Перешлите тем кто в отчаянии
mostbet пополнить сомами [url=https://mostbet49108.online]https://mostbet49108.online[/url]
Thanks for not padding this with the usual filler intros and outros that every other blog seems to require, and a quick visit to cotchoice continued that lean approach across more posts, content stripped of waste is content that respects you and I will always come back to that kind of approach.
melbet создать аккаунт [url=www.melbet01191.online]melbet создать аккаунт[/url]
gry instant mostbet [url=https://www.mostbet40086.online]https://www.mostbet40086.online[/url]
chicken road deposito google pay [url=https://chicken-road29283.icu]chicken road deposito google pay[/url]
Decided to subscribe to the RSS feed if there is one, and a stop at cotcircle confirmed that decision, content that I want delivered to me proactively rather than just remembered when I have time is content that has earned a higher level of commitment from me as a reader looking for reliable sources.
Слушайте кто знает Ситуация адская Нужно что-то серьёзное Короче, нашел реально работающий способ — капельница от похмелья цена доступная Приехали через 30 минут В общем, телефон и цены тут — капельница от запоя [url=https://kapelnicza-ot-pokhmelya-voronezh-itw.ru]капельница от запоя[/url] Звоните прямо сейчас Перешлите тем кто в такой же ситуации
descargar chicken road android [url=http://chicken-road29283.icu]descargar chicken road android[/url]
мостбет регистрация 2026 [url=https://mostbet68667.icu/]мостбет регистрация 2026[/url]
mostbet MasterCard [url=http://mostbet68667.icu]mostbet MasterCard[/url]
Привет с Волги Тошнит, трясёт, сил нет Поилки и таблетки не помогают Короче, врачи приехали и поставили систему — капельница от похмелья на дому срочно Приехали через 30 минут В общем, вся инфа по ссылке — капельница от алкоголя на дому цена [url=https://kapelnicza-ot-pokhmelya-samara-dxq.ru]https://kapelnicza-ot-pokhmelya-samara-dxq.ru[/url] Капельница — это быстро и эффективно Перешлите тем кто в такой же ситуации
Looking for make money on crypto? Visit bestearn.io and you’ll find a table that helps users compare active yield opportunities across protocols and chains. Rather than browsing through generic recommendations, visitors get to see the current APY, liquidity size, and pool type all in one place, filtering down to choices that feel more suited for earning passive crypto income.
мелбет минимальный депозит [url=https://www.melbet01191.online]https://www.melbet01191.online[/url]
mostbet kontakt przez czat [url=https://mostbet40086.online/]mostbet kontakt przez czat[/url]
Decided to read this site for a while before forming a verdict, and the verdict after several pages is positive, and a stop at craftcanal continued that pattern, judging a site requires more than one post and giving sites a fair sample is something I try to do for promising candidates rather than rushing to dismiss.
mostbet bejelentkezés sms kód [url=http://mostbet50579.icu/]mostbet bejelentkezés sms kód[/url]
мелбет зеркало официальный сайт [url=https://melbet01191.online/]https://melbet01191.online/[/url]
gra plinko mostbet [url=https://www.mostbet40086.online]gra plinko mostbet[/url]
Школа EnglishGroup предлагает эффективное обучение английскому языку для взрослых, детей и подростков. Опытные преподаватели помогут заговорить с нуля, подготовиться к экзаменам TOEFL и IELTS. Записывайтесь на сайте https://englishgroup.by/ и получите бесплатное пробное занятие в идущей группе. Реальный результат и удобный формат занятий гарантированы каждому ученику.
плинко mostbet [url=mostbet14673.help]mostbet14673.help[/url]
hogyan lehet befizetni a mostbet-en [url=http://mostbet50579.icu/]http://mostbet50579.icu/[/url]
Как сделать временную регистрацию правильно — важно понимать до подачи документов. Нужно учитывать адрес проживания, согласие собственника или принимающей стороны, сроки и точность данных. В Москве внимательный подход к оформлению помогает быстрее решить вопрос – купить временную регистрацию в москве
mostbet bonus qoidalari uz [url=https://www.mostbet50191.help]mostbet bonus qoidalari uz[/url]
download 1win official app [url=https://1win65831.help/]https://1win65831.help/[/url]
Top quality material, deserves more attention than it probably gets, and a look at cryptbeach reflected the same effort across the site, a hidden gem in the modern web where most attention goes to whoever shouts loudest rather than whoever actually delivers the best content for their readers without much marketing fanfare.
melbet lucky jet на деньги [url=melbet62490.help]melbet62490.help[/url]
Слушайте кто знает Отец не встаёт с дивана Дети боятся Нужна профессиональная помощь на дому Короче, спасла только капельница — капельница от запоя на дому круглосуточно Сняли ломку и стабилизировали состояние В общем, жмите чтобы сохранить — капельница от алкоголя цена [url=https://kapelnicza-ot-zapoya-voronezh-znf.ru]https://kapelnicza-ot-zapoya-voronezh-znf.ru[/url] Капельница — это реальный выход Перешлите тем кто в такой же ситуации
mostbet баланс [url=https://mostbet14673.help]https://mostbet14673.help[/url]
mostbet бонус код [url=https://mostbet14673.help]mostbet бонус код[/url]
Популярный стример DOLARUS поделился откровенным мнением о роли критики в личностном росте. В новом вирусном видео он рассуждает о том, как хейтеры помогают развиваться и становиться сильнее. Смотрите полный выпуск на https://youtube.com/shorts/vgaw6HmCe1s, где блогер делится личным опытом преодоления буллинга в детстве и объясняет, почему негатив может быть конструктивным. Искренний разговор уже набрал почти 13 тысяч просмотров и вызвал живой отклик у аудитории, доказывая, что честность и открытость ценятся в современном контенте.
https://marykaykiev.com.ua/
mostbet server xato [url=https://mostbet50191.help/]https://mostbet50191.help/[/url]
1win accumulator [url=http://1win65831.help]http://1win65831.help[/url]
mostbet aviator minimal stavka [url=https://mostbet50191.help/]https://mostbet50191.help/[/url]
Honestly enjoyed every minute spent here, that is not something I say lightly, and a look at cryptbuilt confirmed I will be back, the bar for spending time online is high for me these days but this site clears it without effort which is high praise indeed from this reader who is usually rather demanding.
1win odds boost [url=https://www.1win65831.help]https://www.1win65831.help[/url]
plinko apk скачать [url=https://www.plinko29475.help]https://www.plinko29475.help[/url]
игра mines melbet [url=https://melbet62490.help]https://melbet62490.help[/url]
мелбет кз где найти зеркало [url=http://melbet62490.help/]http://melbet62490.help/[/url]
1win chat in romana [url=https://www.1win62840.help]https://www.1win62840.help[/url]
1вин Киргизия [url=http://1win18094.help/]http://1win18094.help/[/url]
Доброго дня, земляки Ситуация знакомая Поилки и таблетки не помогают Короче, нашел реально работающий способ — капельница от похмелья купить с выездом Поставили капельницу с солевым раствором В общем, жмите чтобы сохранить — капельница от похмелья услуги [url=https://kapelnicza-ot-pokhmelya-ekaterinburg-sdj.ru]капельница от похмелья услуги[/url] Звоните прямо сейчас Перешлите тем кто в такой же ситуации
Здорово, народ Ситуация аховая Жена на грани срыва В клинику везти страшно Короче, единственное что вытащило из запоя — капельница от запоя на дому круглосуточно Через пару часов человек пришёл в себя В общем, не потеряйте контакты — снять похмелье капельницей [url=https://kapelnicza-ot-zapoya-ekaterinburg-nmx.ru]https://kapelnicza-ot-zapoya-ekaterinburg-nmx.ru[/url] Звоните прямо сейчас Перешлите тем кто в такой же беде
https://marykaykiev.com.ua/
Здорово, народ Ситуация жёсткая Рассол уже не лезет Короче, нашел реально работающий способ — капельница от похмелья на дому цена адекватная Голова прошла и тошнота ушла В общем, не потеряйте контакты — прокапаться от алкоголя екатеринбург [url=https://kapelnicza-ot-pokhmelya-ekaterinburg-lks.ru]прокапаться от алкоголя екатеринбург[/url] Звоните прямо сейчас Перешлите тем кто в такой же ситуации
Reading this on a slow Sunday and finding it perfectly suited to a slow Sunday read, and a quick stop at cubeasana kept the same gentle pace, content that fits the mood of the moment is something I notice and remember and this site has the kind of pace that suits relaxed reading sessions especially well.
يقدم 888starz.bet لسكان القاهرة خدمة موحّدة تضم ألعاب الكازينو والمراهنات الرياضية.
يتيح 888starz أكثر من مئتين وخمسين طاولة مباشرة للروليت والبكارات والبلاك جاك.
يقدم 888starz تغطية تمتد من مباريات القاهرة المحلية إلى الأحداث العالمية.
تبلغ باقة ترحيب الكازينو 1500 يورو إضافة إلى 150 فري سبين.
يوفر 888starz الدفع عبر Visa و Mastercard و Skrill والكريبتو بحد إيداع منخفض.
888starz [url=https://888starzs1.com/]888starz[/url]
Регистрация в СПб делает проживание в городе более организованным и официальным. Она может быть нужна как на короткий срок, так и при долгосрочных планах. Временная регистрация подойдет для ограниченного периода, а прописка — для постоянного проживания – временная регистрация в спб для граждан рф
يتيح 888starz للاعبين في مصر منصة رسمية تجمع الكازينو والرهانات الرياضية في موقع واحد.
تشمل سلسلة 888Games الحصرية ألعابًا فورية مثل Crash و Dice و Plinko.
888 starz [url=https://888starzs5.com/]888 starz[/url]
تتوفر أسواق على البطولات الكبرى إلى جانب الدوري المصري.
ويقدم قسم الرياضة مكافأة 100% تصل إلى 100 يورو.
يقدم الموقع خدمة عملاء على مدار الساعة بالعربية إضافة إلى تطبيق apk.
يتيح 888starz للاعبين في مصر منصة رسمية تجمع الكازينو والرهانات الرياضية في موقع واحد.
يضم القسم آلاف ألعاب السلوت من استوديوهات موثوقة.
888 starz [url=https://888starzs12.com/]888 starz[/url]
يمكن الرهان على أحداث من دوري الأبطال إلى مباريات مصر.
تبلغ باقة الترحيب في الكازينو 1500 يورو إضافة إلى 150 فري سبين.
يقبل الموقع البطاقات والمحافظ إضافة إلى أكثر من 50 عملة رقمية مثل BTC و USDT.
بُنيت الواجهة لتكون سهلة بالعربية وسريعة التنقل.
تتضمن مجموعة 888Games الحصرية ألعابًا فورية مثل Crash و Plinko و Dice.
تتغير الاحتمالات في الوقت الفعلي مع خيار المراهنة أثناء اللعب.
يمنح الكازينو أول إيداع بونصًا يصل إلى 1500 يورو و150 دورة مجانية.
starz888 [url=https://888starzs13.com/]starz888[/url]
يبقى الدعم متاحًا 24/7 عبر الدردشة والبريد، مع تطبيق لأندرويد و iOS.
يعتمد لاعبو القاهرة على 888starz.bet للوصول إلى آلاف الألعاب وعشرات الرياضات.
888stars [url=https://888starzs14.com/]888stars[/url]
تتضمن مجموعة 888Games الحصرية ألعابًا فورية مثل Crash و Plinko و Dice.
يوفر الموقع رهانًا فوريًا وإحصاءات مباشرة للأحداث القائمة.
تتوالى المكافآت الدورية بين الاسترداد النقدي والترقيات الموسمية.
تشمل وسائل الدفع الفيات والعملات المشفرة بحد إيداع يبدأ من 2 يورو.
Niektóre kody są też dostępne dla stałych graczy w ramach bieżących promocji.
Kod promocyjny wpisuje się zwykle w trakcie zakładania konta gracza.
Niektóre oferty obejmują tylko określone sloty wskazane w regulaminie.
Warto śledzić powiadomienia, aby nie przegapić nowych kodów promocyjnych.
Oferta z kodem działa również w aplikacji mobilnej na Androida i iOS.
vox casino darmowe kody bez depozytu 2026 [url=https://wiki.drawnet.net/index.php?title=Usu%C3%A1rio:AlizaMouton407]vox casino darmowe kody bez depozytu 2026[/url]
يقدم 888starz تصميمًا عربيًا واضحًا يناسب المستخدم المصري.
يبرز الموقع مجموعة 888Games الخاصة بنتائجها السريعة.
يشمل الموقع أكثر من 35 فئة رياضية تتابع أبرز الأحداث.
كما تتوفر عروض دورية من كاش باك ورهانات مجانية وبطولات.
starz888 [url=https://888starzs18.com/]starz888[/url]
يقبل الموقع البطاقات والمحافظ إضافة إلى أكثر من 50 عملة رقمية مثل BTC و USDT.
تخضع ألعاب الكازينو لرقابة ترخيص دولي يضمن شفافية كل جولة.
يحتوي الكازينو على آلاف ماكينات السلوت من استوديوهات مرموقة.
تشمل الطاولات المباشرة الروليت والبلاك جاك والبكارات والبوكر.
يضم الكازينو ألعابًا تلفزيونية سريعة تناسب من يفضل النتائج الفورية.
تتوفر أيضًا عروض دورية من كاش باك وبطولات سلوت للاعبين النشطين.
starz888 [url=https://888starzs19.com/]starz888[/url]
يُعد كازينو 888starz من أبرز منصات الألعاب المتاحة للاعبين في مصر.
888starz [url=https://888starzs20.com/]888starz[/url]
يقدم 888starz ما يزيد على أربعة آلاف عنوان سلوت متجدد باستمرار.
تتنوع الخيارات بين البكارات والبوكر وألعاب الطاولة الكلاسيكية.
توفر ألعاب المضاعف الفوري خيارًا مثيرًا بجانب السلوت التقليدية.
يدعم الموقع البطاقات والمحافظ وأكثر من 50 عملة رقمية بحد إيداع منخفض.
plinko лимиты вывода [url=https://plinko29475.help]plinko лимиты вывода[/url]
Здорово, Екатеринбург Отец не выходит из штопора Соседи стучат Никакие таблетки не помогают Короче, спасла только эта капельница — вызвать капельницу от запоя на дому срочно Сняли острую интоксикацию В общем, жмите чтобы сохранить — похмельная капельница [url=https://kapelnicza-ot-zapoya-ekaterinburg-sdj.ru]https://kapelnicza-ot-zapoya-ekaterinburg-sdj.ru[/url] Капельница — это реальный выход Перешлите тем кто в такой же беде
I am from Australia and lately I made up my mind to check out [url=https://payinnv.tech]VegaZone[/url] simply from curiosity. Initially, I paid attention to the platform itself: everything looks quite well-put-together, the site is easy to get around, and what you’re looking for is quick to come across. For me, that’s an important point, because when the layout is cluttered or hard to use, the urge to play usually drop off pretty quickly.
I first found VegaZone while looking for sites with more convenient layouts and crash games. Eventually, I decided to test the format and find out what it’s like everyday sessions were there. On that front, my impression has been generally positive: it all feels straightforward, with no pointless overload, and the whole thing comes across as calm overall.
I also enjoyed the fact that the site has a reasonable range of games, and you don’t get a sense that you’re restricted to a single category. You can log on for a short session, or stay longer whenever you want. I’ve always liked sites where there’s no need to take a long time getting used to the layout and you can easily get to whatever you’re interested in.
What caught my attention most here were by far the crash games. For me, I find them a lot better than regular slots, because they have another kind of rhythm and the gameplay seems more engaging. You get more engagement in the gameplay, you have choices to make, and because of that playing feels more fun to me than just spinning reels on repeat.
My own approach is to tend to play more steadily and more frequently go for lower multipliers, rather than constantly chasing enormous multipliers. This style just feels more natural to me in terms of feel: the session go at a steadier pace, you can keep playing longer and enjoy the process itself. If you’re not trying to make each bet into an “”all or nothing””, the whole thing feels far more enjoyable.
Over the long run, this approach suits me enjoy most. With modest multipliers, you can set your own rhythm, without overloading your bankroll and not turning every session into a nonstop hunt for a big win. Personally, that makes each session more pleasant.
In general, VegaZone left me with a favourable impression as a user-friendly site for laid-back play and everyday gameplay free from extra hassle. For those of you for whom crash titles, an intuitive interface and a more measured paced approach is what you’re after, VegaZone might suit you just fine.
плинко ios скачать [url=www.plinko29475.help]www.plinko29475.help[/url]
mostbet депозит не зачислен [url=mostbet59898.online]mostbet59898.online[/url]
1win istoric pariuri [url=http://1win62840.help/]1win istoric pariuri[/url]
1win приложение Бишкек android [url=https://1win18094.help]https://1win18094.help[/url]
Left me wanting to read more rather than feeling burned out, that is a good sign, and a look at darechip confirmed there is plenty more here to explore, the kind of writing that builds appetite rather than killing it which is a rare quality on the modern open internet today across most categories of content.
I’m impressed, I need to say. Really rarely do I encounter a blog that’s both educational and entertaining, and let me tell you, you have hit the nail on the head.
1вин поддержка [url=https://1win18094.help]1вин поддержка[/url]
1win limita varsta Moldova [url=http://1win62840.help]http://1win62840.help[/url]
mostbet çıxarış linki [url=https://mostbet20142.online/]https://mostbet20142.online/[/url]
mostbet как пополнить через приложение [url=mostbet59898.online]mostbet59898.online[/url]
This one is staying open in a tab for the rest of the day so I can come back and re read certain parts, and a look at dewcarve suggests I will be doing the same with a few more pages here too, this is going to be a deep dive over the coming hours.
mostbet как изменить email [url=https://mostbet59898.online]https://mostbet59898.online[/url]
Интернет-магазин ВИДЕО-КАМЕР предлагает широкий ассортимент современной техники для профессиональной и любительской съемки. Здесь представлены видеокамеры ведущих мировых брендов, фотоаппараты для повседневного использования, аксессуары и инновационные решения вроде зарядок на солнечных батареях. На сайте https://video-camer.ru/ покупатели найдут удобную систему сравнения товаров, детальные видеообзоры и профессиональные советы по выбору оборудования. Магазин гарантирует качество продукции, предлагает различные способы оплаты и доставки по всей России, а регулярные акции делают покупку выгодной для каждого клиента.
https://fhth.ck.ua/
Элитная недвижимость — это инвестиция в комфорт, статус и будущее. Агентство Федора Калединского помогает рассматривать объекты не только с точки зрения внешней привлекательности, но и с позиции ликвидности, расположения, качества проекта и долгосрочной ценности – новостройки от застройщика
Всем привет из Москвы Брат снова сорвался Жена в истерике Таблетки не помогают Короче, единственный кто реально помог — вызвать нарколога на дом круглосуточно Приехал через 35 минут В общем, жмите чтобы сохранить — вызвать наркологическую помощь на дом [url=https://narkolog-na-dom-moskva-xyz.ru]https://narkolog-na-dom-moskva-xyz.ru[/url] Нарколог на дом — это быстро и эффективно Перешлите тем кто в такой же ситуации
mostbet пополнение через приложение [url=mostbet38274.help]mostbet38274.help[/url]
mostbet stream mobil [url=https://www.mostbet90833.online]mostbet stream mobil[/url]
TELEGRAM @SEO_ANOMALY
Picked this for a morning recommendation in our company chat, and a look at dewchip suggested I will mention this site again later, recommending content into a workplace context is a small editorial act that requires confidence in the recommendation and this site is making me confident in those recommendations consistently here too.
Современный ритм жизни оставляет мало времени для качественного чтения. Сайт chitayem-rasskazy.ru решает эту проблему просто и элегантно. Здесь собраны лучшие произведения российских и зарубежных авторов. Любители литературы могут читать романы в любое удобное время совершенно бесплатно. Никакой регистрации, никаких смс — только чистое удовольствие от текста. Chitayem-rasskazy.ru — это универсальная платформа для тех, кто ценит хорошее слово и интересный текст.
Доброго времени суток Близкий человек в запое Родные не знают что делать В больницу тащить страшно Короче, единственный кто реально помог — нарколог на дом круглосуточно без выходных Осмотрел и поставил капельницу В общем, телефон и цены тут — выезд на дом нарколога анонимно [url=https://narkolog-na-dom-moskva-abc.ru]https://narkolog-na-dom-moskva-abc.ru[/url] Звоните прямо сейчас Перешлите тем кто в такой же ситуации
Популярный стример DOLARUS поделился откровенным мнением о роли критики в личностном росте. В новом вирусном видео он рассуждает о том, как хейтеры помогают развиваться и становиться сильнее. Смотрите полный выпуск на https://youtube.com/shorts/vgaw6HmCe1s, где блогер делится личным опытом преодоления буллинга в детстве и объясняет, почему негатив может быть конструктивным. Искренний разговор уже набрал почти 13 тысяч просмотров и вызвал живой отклик у аудитории, доказывая, что честность и открытость ценятся в современном контенте.
https://ffwcash.com.ua/
يتيح ملف apk تثبيت التطبيق مباشرة دون الحاجة إلى متجر جوجل بلاي.
لا تستغرق عملية التنزيل سوى ثوانٍ معدودة نظرًا لصغر حجم الملف.
لن يبدأ التثبيت قبل منح الإذن بتثبيت التطبيقات من خارج المتجر الرسمي.
يمنح تطبيق 888starz في مصر وصولًا كاملًا إلى قسم الكازينو وقسم الرهانات الرياضية.
يكفي هاتف أندرويد بإصدار حديث نسبيًا لتشغيل التطبيق بسلاسة.
يحصل مستخدمو التطبيق في مصر على المكافأة الترحيبية نفسها المتاحة على الموقع الرسمي.
تنزيل تطبيق 888 [url=https://trurofoodfestival.com/rabit-amn-888starz-apk-android-tahdithat/]تنزيل تطبيق 888[/url]
888starz apk download [url=https://theracingbicycle.com/daleel-tahmeel-888starz-mobile/]888starz apk download[/url]
يتيح ملف apk تثبيت التطبيق مباشرة دون الحاجة إلى متجر جوجل بلاي.
يُحفظ الملف تلقائيًا في مجلد التنزيلات على الهاتف بعد انتهاء التحميل.
لن يبدأ التثبيت قبل منح الإذن بتثبيت التطبيقات من خارج المتجر الرسمي.
يتيح التطبيق مشاهدة الأحداث الرياضية والمراهنة عليها في الوقت الفعلي.
يعمل التطبيق بكفاءة حتى على الهواتف ذات الإمكانيات البسيطة في مصر.
يمنح 888starz للاعبين الجدد عبر التطبيق باقة ترحيبية عند أول إيداع.
Worth marking this site as one to come back to deliberately rather than by accident, and a stop at jalaxis reinforced that intention, the difference between sites I find again by chance and sites I return to on purpose is meaningful and this one has clearly moved into the deliberate return category for me.
mostbet bonus na lucky jet [url=https://www.mostbet90833.online]https://www.mostbet90833.online[/url]
mostbet az depozit [url=https://www.mostbet20142.online]mostbet az depozit[/url]
mostbet web čeština [url=mostbet90833.online]mostbet90833.online[/url]
mostbet işleyen güzgü [url=mostbet20142.online]mostbet20142.online[/url]
mostbet бонус новичкам [url=www.mostbet38274.help]www.mostbet38274.help[/url]
mostbet линия спорт Кыргызстан [url=https://mostbet42718.help/]https://mostbet42718.help/[/url]
mostbet licencja [url=www.mostbet49675.online]www.mostbet49675.online[/url]
mostbet turnaj aviator [url=http://mostbet74512.online]mostbet turnaj aviator[/url]
Even on a quick first read the substance of the post comes through, and a look at lakepeach reinforced that immediate quality, content that does not require a slow careful read to demonstrate value but rewards one anyway is content with real depth and this site has produced work of that demanding depth class.
Abnormal this put up is totaly unrelated to what I was searching google for, but it surely used to be listed at the first page. I suppose your doing one thing proper if Google likes you adequate to place you at the first page of a non similar search.
Hello there, just became aware of your blog through Google, and found that it is truly informative. I am going to watch out for brussels. I will appreciate if you continue this in future. Lots of people will be benefited from your writing. Cheers!
Привет родителям А домашние задания на 5 часов в день А поборы в классе просто бесят Короче, единственная школа которая работает — онлайн школа Москва с реальными знаниями Ребёнок реально понимает материал В общем, вся инфа вот здесь — школы с онлайн обучением 8 класс [url=https://shkola-onlajn-nvc.ru]https://shkola-onlajn-nvc.ru[/url] Хватит мучить себя и ребёнка Перешлите другим родителям
mostbet ташкент [url=http://mostbet38274.help/]http://mostbet38274.help/[/url]
мостбет комиссия на вывод [url=https://mostbet38274.help]мостбет комиссия на вывод[/url]
Здорова родители Учителя которые только и знают что орать Никакого интереса к знаниям Короче, школа без стресса и скандалов — онлайн образование с индивидуальным расписанием Уроки тогда когда удобно В общем, вся инфа вот здесь — lomonosov online [url=https://shkola-onlajn-wqe.ru]https://shkola-onlajn-wqe.ru[/url] Переходите на нормальное обучение Перешлите другим родителям
During the time spent here I noticed the absence of the usual distractions, and a stop at lushmarble extended that distraction free experience, content that does not fight my attention with pop ups and modals and aggressive prompts is content that respects me and this site has clearly chosen the respectful approach throughout.
Народ у кого дети Дневники эти вечные Нервы ни к чёрту у всей семьи Короче, реально крутая система — школа дистанционно с индивидуальным подходом Ребёнок учится и не перегружается В общем, жмите чтобы не потерять — Переходите на нормальное обучение Перешлите другим родителям
vavada porez na dobitak [url=http://vavada91423.help/]vavada porez na dobitak[/url]
mostbet pl logowanie [url=https://www.mostbet49675.online]https://www.mostbet49675.online[/url]
mostbet crash 2026 [url=http://mostbet42718.help/]http://mostbet42718.help/[/url]
mostbet kurz czk [url=mostbet74512.online]mostbet74512.online[/url]
Our local network of agencies has found your research so helpful.
mostbet gry szybkie wygrane [url=https://www.mostbet49675.online]https://www.mostbet49675.online[/url]
мостбет тотал [url=https://mostbet42718.help]https://mostbet42718.help[/url]
mostbet oficiální odkaz [url=https://www.mostbet74512.online]https://www.mostbet74512.online[/url]
Слушайте кто ищет школу Двойки, замечания, учителя орут То ремонт, то экскурсии, то подарки Короче, единственная школа где кайфово учиться — онлайн класс с индивидуальным подходом Никаких звонков в 8 утра В общем, сохраняйте себе — школа онлайн москва [url=https://shkola-onlajn-dyk.ru]https://shkola-onlajn-dyk.ru[/url] Не мучайте детей Перешлите другим родителям
Quality work here, the post reads cleanly and the points stay focused throughout, and a stop at macrolush kept the standard high, you can tell the writer cares about the final result rather than just hitting publish for the sake of having something new on the page to feed the search engines.
vavada ne otvara se stranica [url=vavada91423.help]vavada91423.help[/url]
vavada hrvatska kladionica [url=https://www.vavada91423.help]vavada hrvatska kladionica[/url]
true fortune casino no deposit [url=https://true-fortune-casino12.com/no-deposit-bonus]true fortune casino no deposit[/url]
The casino welcomes players from the United Kingdom with a localised experience and responsive support.
Players can choose from a vast slot collection powered by top studios such as Microgaming and Yggdrasil.
A loyalty programme rewards active players with points that convert into real bonuses.
The casino aims to process cashouts fast, especially for verified accounts.
Certified RNG technology ensures every spin and hand is completely random.
Clear rules and a well-organised help centre keep everything straightforward.
True Fortune casino has become a go-to online casino for many players in the United Kingdom.
Progressive jackpots and top-rated new releases are highlighted in the casino lobby.
Regular promotions include reload bonuses, cashback and free spin drops throughout the week.
True Fortune supports popular payment methods including Visa, Mastercard and e-wallets like Skrill and Neteller.
Independent audits confirm the games are fair and payouts are genuine.
True Fortune works seamlessly on smartphones and tablets straight from the browser.
no deposit codes for true fortune casino [url=https://www.true-fortune-casino13.com/no-deposit-bonus/]no deposit codes for true fortune casino[/url]
Designed with players in the United Kingdom in mind, the site keeps registration and play simple.
Fans of live gaming can join real-dealer tables running 24 hours a day.
The promotions page lists reload bonuses, tournaments and cashback offers.
Adding funds takes just a moment and play begins straight away.
The casino is licensed and applies strong security to keep accounts and funds safe.
Customer support is available around the clock via live chat and email in English.
no deposit true fortune casino [url=true-fortune-casino21.com/no-deposit-bonus]no deposit true fortune casino[/url]
The platform is fully optimised for players in the United Kingdom with English support and local payment options.
A dedicated live casino streams real-dealer roulette, blackjack and baccarat around the clock.
First-time players receive a welcome bonus plus free spins after signing up.
Withdrawals are handled quickly, with e-wallet payouts often completed the same day.
Certified RNG technology ensures every spin and hand is completely random.
Players can enjoy the full game library on mobile without installing an app.
true fortune bonus codes [url=http://www.true-fortune-casino29.com/bonus]true fortune bonus codes[/url]
True Fortune gathers slots, table games and live dealers in one convenient place.
True Fortune offers an extensive range of slots covering every theme and volatility level.
Every wager earns loyalty points that can be exchanged for bonus credit.
true fortune casino bonus codes [url=http://www.true-fortune-casino32.com/bonus/]true fortune casino bonus codes[/url]
The casino aims to process cashouts fast, especially for verified accounts.
A valid licence and secure infrastructure make True Fortune a safe place to play.
A 24/7 support team helps players in the United Kingdom through live chat and email.
888Starz rasmiy sayti kazino va sport bo’limlariga to’liq kirish imkonini beradi.
Rasmiy sayt sutka davomida ishlaydigan jonli kazino stollarini taqdim etadi.
Rasmiy sayt raqobatbardosh koeffitsiyentlar bilan jonli tikish rejimini taklif etadi.
888starz ios [url=http://www.888stars5.com]888starz ios[/url]
Rasmiy saytda har hafta keshbek va tikishlar uchun sug’urta kabi muntazam aksiyalar taklif etiladi.
Rasmiy sayt bank kartalari, elektron hamyonlar va 30 dan ortiq kriptovalyuta orqali to’lovlarni qabul qiladi.
888Starz rasmiy veb-sayti foydalanuvchilarga kazino va sport stavkalarini bitta platformada taqdim etadi.
888Starz rasmiy sayti slot, ruletka va blekjek kabi mingdan ortiq kazino o’yinini taklif etadi.
888Starz rasmiy saytining sport bo’limi 50 dan ortiq sport turiga tikish imkonini beradi.
Rasmiy sayt muntazam bonuslar, jumladan keshbek va sug’urta takliflarini taqdim etadi.
888Starz kartalardan elektron hamyonlargacha turli depozit usullarini taklif etadi.
888 [url=http://888stars4.com/]888[/url]
Rasmiy sayt to’liq o’zbek tilida ishlaydi va foydalanuvchilar uchun qulay interfeysga ega.
Top reytingli slotlar rasmiy sayt interfeysida alohida ajratib beriladi.
888tarz [url=http://www.888stars9.com]888tarz[/url]
Foydalanuvchilar rasmiy saytda yirik jahon turnirlari va mahalliy ligalarga stavka qo’yishlari mumkin.
888Starz O’zbekistondagi o’yinchilar uchun mavjud eng so’nggi bonus va takliflarni ajratib beradi.
Rasmiy saytda ro’yxatdan o’tish telefon, email yoki bir bosishda bir necha daqiqada amalga oshiriladi.
I think I might disagree with some of your analysis. Are the figures solid?
1win как вывести на элсом [url=https://www.1win07683.icu]https://www.1win07683.icu[/url]
aviator delete account [url=www.aviator94275.help]www.aviator94275.help[/url]
Совместные закупки в Саратове — это возможность покупать товары для всей семьи по более доступным ценам. В заказах часто встречаются одежда, обувь, товары для детей, косметика, текстиль и полезные вещи для дома. Формат помогает сделать покупки удобными и экономными https://saratov-sp.ru/
Пхукет остаётся одним из самых востребованных направлений для аренды жилья в Таиланде: виллы с бассейном, апартаменты у моря и студии в центре острова. https://apartmentsphuket.com/ здесь можно изучить фото и реальные отзывы гостей. Личный менеджер в WhatsApp или Telegram поможет выбрать объект под ваши даты и бюджет и возьмёт на себя сопровождение сделки до заселения. Депозит закрепляет бронь, а при полной оплате — скидка или бесплатный трансфер из аэропорта.
мостбет мой аккаунт [url=mostbet78071.company]мостбет мой аккаунт[/url]
https://telegra.ph/Prostitutki-Surguta-dlya-seksa-i-intima—vse-chaty-i-vstrechi-18-07-10
aviator promo kod 2026 [url=https://aviator42869.help/]https://aviator42869.help/[/url]
爸爸兒子亂倫色情
Our community leaders need to read this, and look at developing some of your recommendations.
plinko bonus code today [url=plinko18370.help]plinko18370.help[/url]
chicken road juego plinko [url=https://www.chicken-road39683.icu]https://www.chicken-road39683.icu[/url]
aviator अकाउंट बंद [url=https://aviator84260.help]aviator अकाउंट बंद[/url]
1вин лайв ставки [url=http://1win07683.icu]http://1win07683.icu[/url]
aviator free spins Bangladesh [url=https://www.aviator94275.help]https://www.aviator94275.help[/url]
1win иҷозатнома [url=https://www.1win75659.icu]https://www.1win75659.icu[/url]
I’ve read several good stuff here. Definitely worth bookmarking for revisiting. I surprise how much effort you put to make such a magnificent informative site.
I would really like to appreciate the endeavors you cash in on written this article. I’m going for the similar best product from you finding out in the foreseeable future as well. Actually your creative writing abilities has urged me to begin my very own blog now. Genuinely the blogging is distributing its wings rapidly. Your write down is often a fine illustration showing it.
1win бонус на депозит казино [url=www.1win07683.icu]1win бонус на депозит казино[/url]
aviator secure access [url=www.aviator94275.help]aviator secure access[/url]
1win Душанбе [url=https://1win75659.icu]1win Душанбе[/url]
https://autokovrik-eva.com.ua/
Sometimes, the sheer magnitude of the information seems overwhelming.
thank, I thoroughly enjoyed reading your article. I really appreciate your wonderful knowledge and the time you put into educating the rest of us.
Very Interesting Information! Thank You For Thi Information!
Awesome post. It’s so good to see someone taking the time to share this information
Ищете ниваки питмник? Именно в нашем питомнике sakura-pitomnik.ru вы найдёте лучший вариант. Ассортимент включает барбарис, спирею, сирень, гортензию и чубушник. Все растения адаптированы к климату Северо-Западного региона России. Каждый саженец проходит тщательный контроль качества перед продажей. Наши специалисты помогут подобрать растения под ваш проект.
Cherished is likely to be what people say about your comments.
Might we expect to see more of these same problems in the future?
aviator istifadəçi hesabı [url=https://aviator42869.help/]https://aviator42869.help/[/url]
chicken road retiro inmediato [url=http://chicken-road39683.icu/]http://chicken-road39683.icu/[/url]
plinko free bet terms [url=plinko18370.help]plinko18370.help[/url]
aviator sənəd təsdiqi [url=https://aviator42869.help/]https://aviator42869.help/[/url]
chicken road duplicar cuenta [url=https://chicken-road39683.icu/]https://chicken-road39683.icu/[/url]
plinko live casino withdrawal [url=https://plinko18370.help]https://plinko18370.help[/url]
aviator जमा ट्रैक [url=http://aviator84260.help]aviator जमा ट्रैक[/url]
mostbet киберспорт ставки [url=www.mostbet78071.company]www.mostbet78071.company[/url]
карточка товара ии онлайн сделать карточку товара с помощью ии
заказать дизайн интерьера дома санкт петербург дизайн интерьера
mostbet лимиты вывода [url=https://mostbet78071.company]https://mostbet78071.company[/url]
https://itsforkids.com.ua/
Слушайте кто делал проект Планирую объединить две комнаты в гостиную Штрафы огромные если без разрешения Я уже голову сломал Короче, единственные кто делает быстро — проект на перепланировку квартиры заказать срочно Всё согласовали за месяц В общем, там и примеры и цены — перепланировка квартиры заказать проект [url=https://proekt-pereplanirovki-kvartiry-qxr.ru]перепланировка квартиры заказать проект[/url] Не начинайте без проекта Перешлите тому кто ремонт затеял
sildenafil pharmacodynamics
sildenafil pharmacodynamics
mostbet crash коэффициенты [url=http://mostbet18715.company]mostbet crash коэффициенты[/url]
1вин account login [url=https://1win81527.icu/]https://1win81527.icu/[/url]
mostbet lucky jet mərcləri [url=mostbet25124.online]mostbet25124.online[/url]
мостбет новый адрес [url=mostbet00472.online]mostbet00472.online[/url]
https://oglyad.com.ua/
Great post. I was checking constantly this blog and I’m impressed! Very useful info specifically the last part 🙂 I care for such info much. I was looking for this certain information for a very long time. Thank you and good luck.
I simply could not leave your site before suggesting that I actually enjoyed the usual info a person supply in your visitors? Is going to be back often to inspect new posts
1win прогнозы [url=https://www.1win13107.icu]1win прогнозы[/url]
The focus on seamless transactions in PGOT is smart; usability trumps sheer game volume sometimes. It reminds me of optimizing a system’s core function! Check out pgot vip for more insights.
mines игра мостбет [url=https://mostbet18715.company/]https://mostbet18715.company/[/url]
mostbet operator [url=https://www.mostbet25124.online]https://www.mostbet25124.online[/url]
Слушайте кто играет Задолбался я уже искать нормальное казино Нервов потратил — мама не горюй Короче, нашел наконец толковое казино — вавада казино зеркало Всё летает как часы В общем, вся инфа вот здесь — vavada casino [url=https://zloymedik.ru]vavada casino[/url] Не ведитесь на лохотроны Перешлите тому кто тоже ищет нормальное казино
1вин кэш-аут [url=https://www.1win81527.icu]https://www.1win81527.icu[/url]
mostbet hesab doldurma [url=https://www.mostbet25124.online]mostbet hesab doldurma[/url]
mostbet фрибет Кыргызстан [url=https://mostbet18715.company/]mostbet фрибет Кыргызстан[/url]
拉丁色情標題
1вин кабинети шахсӣ [url=https://1win81527.icu]1вин кабинети шахсӣ[/url]
мостбет сколько идет вывод [url=http://mostbet00472.online]http://mostbet00472.online[/url]
https://ukrainianweek.org/
1win прогнозы [url=http://1win13107.icu/]1win прогнозы[/url]
mostbet скачать 2026 [url=www.mostbet00472.online]www.mostbet00472.online[/url]
1win киргизче жүктөп алуу [url=http://1win13107.icu]1win киргизче жүктөп алуу[/url]
I believe you have remarked on some very interesting points , thankyou for the post.
Trying out video slots in the year 2026 continues to be more thrilling than it is right now. As a result of modern RNG systems, slot lovers get to try thousands of titles from the comfort of home. To find the right spot to play, [url=https://siafunds.tech/]https://siafunds.tech/[/url] deserves a look.
One of the biggest trends in the current slot industry is a clear shift toward highly detailed video slots. Software providers keep pushing richer bonus rounds to create memorable experiences.
Special mechanics continue to expand. Multiplier rounds solidified their place as a defining characteristic throughout the industry https://siafunds.tech/. Frequent spinners appreciate such features since they extend playtime.
Cross-device play has been a driving force in the evolution of online gaming. Most developers now design games mobile-first, meaning gameplay feels smoother no matter the device.
Player protection have also improved among licensed platforms. Licensing authorities regularly verify RNG fairness, providing gamblers added confidence as they explore new platforms.
Before picking a game, players should review the volatility before committing to a title. Well-balanced games typically deliver steadier payouts, on the other hand less predictable machines can deliver substantial one-time wins for players chasing big scores.
Controlling your spending continues to be an essential habit for those playing regularly. Knowing when to stop goes a long way toward avoiding losses that hurt across multiple sessions.
Overall, the current state of slots keeps setting new standards for entertainment. Regardless of your skill level, there’s never been a better time to enjoy the current slot landscape.
Zasilanie salda kryptowaluta w kasynie internetowym okazalo sie jedna z najbardziej cenionych opcji na uzupelnianie salda. Coraz wiecej graczy wybiera ten sposob wplat, dlatego ze pozwala ona zaoszczedzic czas. Jezeli zalezy Ci na dobrego serwisu, zapewniajacego wygodne wplaty kryptowaluta, warto zwrocic uwage na [url=https://istmos.tech/]https://istmos.tech/[/url].
Wiecej informacji na ten temat a przy tym aktualne promocje zobaczysz na stronie https://istmos.tech/, gdzie krok po kroku wyjasniono, jak wyglada cala procedura depozytu.
Jedna z glownych zalet wplat za pomoca kryptowalut okazuje sie natychmiastowe ksiegowanie. W kontrascie do tradycyjnych metod platnosci, wplaty w krypto zostaja zaksiegowane w ciagu kilku minut, co pozwala natychmiast przejsc do rozgrywki.
Prywatnosc uzytkownika to kolejny czynnik, ktory przyciaga klientow kasyn do korzystania z platnosci cyfrowych. Za pomoca zaawansowanej kryptografii, transakcje sa w pelni transparentne. Warto tez dodac, ze uzytkownicy nie sa zobowiazani udostepniac wrazliwych informacji osobowych, co wzmacnia ich poczucie bezpieczenstwa.
Nie mozna pominac, ze niskie oplaty transakcyjne sa kolejnym atutem wspierajacym wybor tej metody platnosci. W relacji do standardowymi metodami platnosci, koszty zwiazane z transakcjami kryptowalutowymi sa zazwyczaj znacznie nizsze.
Wszechstronnosc cyfrowych metod platnosci to dodatkowo kluczowy element wspierajacy wybor tej metody wplat. Fani gier hazardowych moga zasilac saldo niezaleznie od godziny, nie muszac oczekiwania na godziny pracy banku.
Na zakonczenie, efektywnosc wplat w krypto w kasynach online prowadzi do tego, ze stale rosnaca liczba osob stawia na ten sposob finansowania konta jako glowna opcje finansowania swojej rozgrywki.
Слушайте кто играет Вечно то лаги Искал долго, перепробовал кучу вариантов Короче, единственное где не кидают — вавада казино зеркало Фриспины и акции каждый день В общем, смотрите сами по ссылке — вавада казино онлайн официальный сайт [url=https://partscore.ru]вавада казино онлайн официальный сайт[/url] Не ведитесь на лохотроны Перешлите тому кто тоже ищет нормальное казино
mostbet esports tikish [url=https://mostbet83331.help]https://mostbet83331.help[/url]
Coiny zamienily sie w jedna z najbardziej cenionych sposobow platnosci w cyfrowych platformach hazardowych. Coraz wieksza grupa graczy chce wiedziec, ktora z dostepnych opcji okaze sie najkorzystniejsza do finansowania konta. Jesli zalezy Ci na dobrego miejsca, umozliwiajacego platnosci kryptowalutowe, polecamy sprawdzic [url=https://foodsi.company/]Casino[/url].
Dokladniejsze informacje jak rowniez aktualne porownanie ofert zobaczysz na stronie https://foodsi.company/, na ktorej wyjasniono wszystko w przystepny sposob.
Najbardziej znana kryptowaluta nadal jest jednym z najszerzej wspieranych sposobow wplat na platformach hazardowych. Tej kryptowaluty glowna zaleta jest wysoka rozpoznawalnosc na rynku. Trzeba jednak dodac, ze wieksza zmiennosc kursu czasami moga byc minusem dla niektorych graczy.
ETH gwarantuje szybsze transakcje w porownaniu z klasycznym BTC. Za sprawa elastycznemu systemowi transakcji, ta kryptowaluta sprawdza sie w licznych zastosowaniach online.
Alternatywa dla Bitcoina motywuje uzytkownikow bardziej przystepnymi kosztami. Ten coin jest czesto traktowana jako alternatywa przez graczy szukajacych szybkosci i niskich kosztow.
Waluta stabilna kursowo cieszy sie rosnacym zainteresowaniem wsrod osob ceniacych stabilnosc, bo cena tego coina nie podlega duzym wahaniom. Dla tych, ktorzy nie chca zmiennosci typowej dla innych kryptowalut, rozwiazania tego rodzaju moga okazac sie dobrym kompromisem.
Waluta znana z szybkich transakcji wyroznia sie wysoka wydajnoscia sieci. Jakkolwiek nie wszystkie platformy ja wspieraja jak Bitcoin czy Ethereum, stopniowo zdobywa swoje uznanie wsrod operatorow.
Podczas wyboru optymalnego coina do realizacji depozytow, istotne jest przeanalizowanie kluczowe elementy: wysokosc oplat transakcyjnych. Wszystkie coiny maja swoje mocne i slabe strony, dlatego warto dostosowac decyzje do indywidualnych oczekiwan.
Podsumowujac, decyzja o wyborze optymalnego coina do finansowania rozgrywki jest uzalezniony od potrzeb danego gracza. Litecoin a takze inne dostepne opcje oferuja roznorodne atuty, z tego wzgledu warto wyprobowac rozne rozwiazania, zanim zdecydujesz sie na stale rozwiazanie.
Салют, народ А поддержка молчит как рыба Денег слил на всяком говне Короче, единственное где не кидают — вавада казино онлайн лучший выбор Вывод денег за 5 минут В общем, жмите чтобы не потерять — vavada online casino [url=https://cleansheet.ru]vavada online casino[/url] Только вавада реально рулит Перешлите тому кто тоже ищет нормальное казино
Felt the writer respected me as a reader without making a show of doing so, and a look at unitybondcollective continued that quiet respect, this is the kind of small but meaningful detail that separates the sites I bookmark from the ones I close after a single skim and never return to again no matter how interesting the headline.
mostbet yükləmə linki ios [url=http://mostbet44600.online/]http://mostbet44600.online/[/url]
Мы освещаем новости России, новости РФ и события в регионах, чтобы читатель видел полную картину происходящего в стране. На сайте можно найти свежие материалы, главные темы, обновления дня и публикации по направлениям, которые важны обществу: News Agency
1win sloturi cu rotiri gratis [url=1win04867.help]1win04867.help[/url]
melbet cashback paris [url=https://melbet97818.help/]https://melbet97818.help/[/url]
Слушайте кто играет То вообще доступ закрывают Нервов потратил — мама не горюй Короче, единственное где не кидают — вавада казино онлайн лучший выбор Вывод денег за 5 минут В общем, жмите чтобы не потерять — вавада официальный сайт [url=https://polezno-vsem.ru]вавада официальный сайт[/url] Не ведитесь на лохотроны Перешлите тому кто тоже ищет нормальное казино
https://vd-tv.ru/content/chto-takoe-analizy-i-zachem-ih-naznachayut
充電器色情
mostbet free spins [url=www.mostbet44600.online]www.mostbet44600.online[/url]
https://taxukraine.org/
Refreshing tone compared to the dry corporate posts on similar topics, and a stop at unityharbor carried that personality through nicely, you can tell when a real person is behind the writing versus a content team chasing metrics and this site definitely falls into the former category clearly across what I have seen.
mines mostbet [url=https://mostbet83331.help]mines mostbet[/url]
mostbet hesab açmaq üçün nə lazımdır [url=http://mostbet44600.online]http://mostbet44600.online[/url]
melbet зеркало вход [url=http://melbet95018.online/]melbet зеркало вход[/url]
Слушайте кто играет А поддержка молчит как рыба Искал долго, перепробовал кучу вариантов Короче, нашел наконец толковое казино — вавада казино онлайн лучший выбор Вывод денег за 5 минут В общем, там все подробности — вавада казино [url=https://theblackwellfirm.com]вавада казино[/url] Только вавада реально рулит Перешлите тому кто тоже ищет нормальное казино
mostbet Azərbaycan yeni link [url=https://mostbet69325.online]https://mostbet69325.online[/url]
vavada kupon kod [url=www.vavada47860.help]www.vavada47860.help[/url]
mostbet to‘lov qaytmayapti [url=mostbet83331.help]mostbet to‘lov qaytmayapti[/url]
descarca 1win apk [url=1win04867.help]1win04867.help[/url]
Компания «Академия мебели Сибвитрина» — производитель мебели и торгового оборудования в Кемерово и Новокузнецке. Двадцать лет на рынке и свыше 18000 довольных заказчиков подтверждают солидный опыт компании. Подробности на сайте https://sibvitr.ru/ — витрины, стеллажи, стойки, офисная и домашняя мебель под ваши задачи. Заказ изготавливается от 7 дней, замер с дизайн-проектом предоставляются бесплатно, гарантия составляет 12 месяцев.
1win bypass blocare [url=1win04867.help]1win bypass blocare[/url]
как скачать мостбет на android [url=http://mostbet30760.company/]http://mostbet30760.company/[/url]
Полезные советы
Coming back tomorrow when I can give this a proper read, the post deserves better attention than I can give right now, and a look at trustcraft suggests there is plenty more here that deserves the same treatment, definitely a site I will be exploring properly over the next few days when I can.
мины melbet [url=http://melbet95018.online]http://melbet95018.online[/url]
mostbet işleyen mirror [url=https://www.mostbet69325.online]https://www.mostbet69325.online[/url]
Found this through a search that was generic enough I did not expect quality results, and a look at actiondrivenshift continued the surprisingly good experience, search engines occasionally still surface excellent independent content if you scroll past the obvious paid and high authority results which is reassuring to remember sometimes.
melbet retrait instantané [url=www.melbet97818.help]www.melbet97818.help[/url]
vavada lucky jet igra [url=http://vavada47860.help]http://vavada47860.help[/url]
mostbet cashback hesablanmır [url=http://mostbet69325.online/]http://mostbet69325.online/[/url]
чат для игроков melbet [url=http://melbet95018.online]http://melbet95018.online[/url]
vavada registracija bonus [url=vavada47860.help]vavada47860.help[/url]
aviator melbet [url=https://www.melbet97818.help]https://www.melbet97818.help[/url]
We need to build frameworks and funding mechanisms.
Liked everything about the experience, from the opening through to the closing notes, and a stop at actionwithstructure extended that into more pages, finding a site where the editorial vision shows through every choice rather than feeling random is an increasingly rare experience and one I am glad to have today during this particular reading session.
This information is very important and you’ll need to know this when you constructor your own photo voltaic panel.
Doladowywanie konta za pomoca kryptowalut w kasynach online stalo sie jedna z najszybszych metod na wplacanie pieniedzy. Stale rosnaca liczba entuzjastow hazardu online stawia na te forme doladowania, gdyz dzieki temu da sie ominac dlugie procedury weryfikacyjne. Gdy poszukujesz dobrego serwisu, ktore oferuje szybkie depozyty w krypto, zdecydowanie warto odwiedzic [url=https://istmos.tech/]Rolling Slots Casino w Polsce[/url].
Wiecej informacji na ten temat jak rowniez aktualne promocje znajdziesz na stronie https://istmos.tech/, gdzie jasno pokazano, jak wyglada cala procedura depozytu.
Jedna z glownych zalet transakcji w krypto stanowi szybkosc realizacji. Inaczej niz w przypadku przelewow bankowych, operacje blockchainowe sa ksiegowane praktycznie od razu, co pozwala szybciej rozpoczac gre.
Poufnosc transakcji to istotny punkt, ktory sklania graczy do wyprobowania platnosci cyfrowych. Za pomoca zaawansowanej kryptografii, transakcje staja sie trudne do sfalszowania. Dodatkowo klienci nie sa zobowiazani udostepniac szczegolowych danych bankowych, co podnosi poziom ich zaufanie do serwisu.
Nie mozna pominac, ze niewielkie koszty przelewu pozostaja istotnym plusem wspierajacym wybor korzystania z kryptowalut. Zestawiajac to z standardowymi metodami platnosci, wydatki dotyczace takich operacji sa przewaznie duzo bardziej korzystne.
Uniwersalnosc takich rozwiazan finansowych to kolejny istotny argument wspierajacy wybor tego rozwiazania. Uzytkownicy moga swobodnie dokonywac wplat o kazdej porze dnia i nocy, unikajac potrzeby przechodzenia dodatkowej weryfikacji.
Na zakonczenie, efektywnosc tej formy depozytu w kasynach online powoduje, ze coraz wiecej graczy wybiera te forme wplat jako pierwszy wybor dokonywania depozytow online.
Reading this triggered a small change in how I think about the topic going forward, and a stop at unitycrest reinforced that subtle shift, the rare content that actually moves my thinking rather than just confirming or filling it is the kind I most value and this site is providing that kind of impact today.
https://sago24.org/
mom son daughter porn
I like your blog. It sounds every informative.
I was referred to this web site by my cousin. I’m not sure who has written this post, but you’ve really identified my problem. You’re wonderful! Thanks!
Новостройки Москвы подходят тем, кто планирует переезд, расширение жилплощади или покупку первой квартиры. Современные жилые комплексы дают возможность жить в новой среде, пользоваться удобной инфраструктурой и выбирать пространство, соответствующее привычному образу жизни: https://sezor.ru/
Reading this back to back with a similar piece elsewhere made the quality difference obvious, and a stop at buildgrowthsystems only widened the gap, comparing content side by side is a useful exercise and the gap between this site and average competitors in the space is large enough to be noticeable from the first paragraph.
It’s clear you’re passionate about the issues.
I love what you’ve created here, this is definitely one of my favorite sites to visit.
I will share you blog with my sis.
мостбет регистрация по номеру [url=http://mostbet30760.company]мостбет регистрация по номеру[/url]
melbet vip program [url=http://melbet10952.online]http://melbet10952.online[/url]
What i discover troublesome is to find a weblog that may capture me for a minute however your blog is different. Bravo.
The Development behind Slot Games has been one of the biggest transformations in the history of casino gaming. From the original fruit machines right up to the immersive titles available now, these games have experienced an incredible transformation. Should you find yourself keen to learn more about the history and at the same time keen to see how far things have come firsthand, [url=https://3dwave.tech/]https://3dwave.tech/[/url] makes for a great starting point.
For anyone keen to get further information on what’s on offer now, more details are available over at https://3dwave.tech/, and there you’ll see the latest generation of pokies in action.
The very first slot machines came onto the scene in the late 1800s. Those first inventions worked as straightforward lever-operated machines using a handful of symbols paired with a hands-on mechanism to start each spin – and this is precisely why people started calling them the famous “one-armed bandit.”
Gradually as technology advanced, the format started evolving. Those decades saw the arrival of electromechanical machines, such machines allowed for more complex gameplay beyond what old-school slots were capable of.
A major milestone arrived alongside the introduction of video slots during that period. Instead of physical spinning reels, these new machines used video screens to display the classic slot format, paving the way for bonus rounds that older mechanical slots never had.
The turn of the millennium introduced yet another major shift with the launch of internet gambling platforms. At last, players could experience casino-style gaming from their own computer, such a development considerably widened the reach of the industry.
Mobile technology after that pushed the evolution even more. Users found they could enjoy their favourite pokies from anywhere, regardless of location.
Nowadays, pokies are built around cinematic animations, as well as multiple bonus rounds such as expanding wilds. Developers continue to push boundaries, pulling influences from movies, mythology, and pop culture so as to design unique and memorable experiences.
As we look to the future, the journey of these games is set to continue. New innovations including augmented reality features has the potential to transform the player experience even further for the world of online pokies.
In the end, the history behind these games highlights how far gaming as a whole has come. Regardless of how familiar you are with the games, there’s never been a better time to explore just how far these games have come.
мелбет барориш ба сомонӣ [url=melbet70216.online]мелбет барориш ба сомонӣ[/url]
If I were grading sites on this topic this one would receive high marks, and a stop at trustcontinuum continued earning those high marks, the informal grading I do mentally for content sources is something I take seriously even though it is informal and this site has been receiving consistent high marks across multiple sessions today.
This information is very important and you’ll need to know this when you constructor your own photo voltaic panel.
I truly appreciate this post. I have been looking everywhere for this! Thank goodness I found it on Bing. You have made my day! Thank you again
Now adding this to a short list of sites I would defend in a conversation about the modern web, and a look at executeprogress reinforced that defence list, the few sites that serve as evidence the web can still produce good things are precious and this one has clearly joined that small list of exemplary sites.
мостбет app скачать [url=https://www.mostbet30760.company]https://www.mostbet30760.company[/url]
Very Interesting Information! Thank You For Thi Information!
My issues have been very similar, with my family. But, we made some different decisions. It’s complex.
mostbet безопасность аккаунта [url=https://www.mostbet99407.online]mostbet безопасность аккаунта[/url]
мостбет Тоҷикистон барои android [url=mostbet90359.online]mostbet90359.online[/url]
Reading more of the archives is now on my plan for the weekend, and a stop at actionmapsuccess confirmed the archive worth the time, the rare archive worth a dedicated reading session rather than just casual sampling is the rare archive of serious work and this site has clearly produced enough of that work to warrant the deeper exploration.
melbet poker [url=https://melbet10952.online/]https://melbet10952.online/[/url]
melbet casino slots bd [url=http://melbet10952.online/]http://melbet10952.online/[/url]